Showing 493 items
matching metal blade
-
 Flagstaff Hill Maritime Museum and Village
Domestic object - Plate, Alfred Meakin
The Process of Making Pottery Decorating, Firing, Glazing, Making, Technical There is a rhythm and flow to clay. It can’t be done all at once! Even the making process! It can take weeks to get everything done, especially if you can only work on your pottery once a week! Even though we have three hour classes, it’s often just not enough time! Here is an overview of some of the processes so you have a bit more grasp on some of the technical stuff! Step One – Design There are SO many ideas out there for making stuff in clay! From delicate porcelain jewellery, through to heavy sculptural work and everything in between. Deciding your direction is sometimes not that easy – when you first start, try everything, you will naturally gravitate to the style that you enjoy! The options and variations are endless and can get a wee bit overwhelming too! Check in with me before you start to ensure your ideas will work, what order you might do things, how you could achieve the look you are seeking and any other technical data required! Step Two – Making Clay is thixotropic. This means that as you work with it, the clay first gets sloppier and wetter, before is begins to dry in the atmosphere. For most things, you simply can’t do all parts of the project at once. An example of work order might look like: Get last weeks work out from the shelves Prepare clay for today’s work – roll your clay, prepare balls for throwing, make the first stage of a pinch pot) Clean up last week’s work and put it on the shelf for bisque firing Check that you have any glazing to do – and do enough of it that you will have time to finish your main project Do the next step of your next project – there might be a further step that can’t be complete immediately, in that case, wrap your work well and put onto the shelves. Letting your work rest for a while can really help keep your work clean and professional looking. Many things require bagging under plastic to keep it ready for work the next week – put your name on the outside of the bag so you can find your work easily. We have stickers and markers. Consider how you want to decorate your work – coloured slip can be applied at a fairly wet stage (remembering that it will make your work even wetter!). Trying to apply slip to dry clay won’t work! If you want to do sgraffito – you will need to keep the work leather hard (a state of dryness where you can still work the clay with a little effort and a little water and care). Step Three – Drying Most of the time your work can go into the rack uncovered to let it dry out for the following week. If you want to continue forming or shaping you will need to double bag your work – put your work on a suitable sized bat and put the bat in a bag so the base of the bag is under the bat, then put another bag over the top of the work and tuck the top of the bag under the bat. If you want to trim (or turn) your thrown work the following week, it should also be double bagged. If your work is large, delicate, or of uneven thicknesses, you should lightly cover your work for drying. When considering the drying process, bare in mind the weather, humidity and wind! The hotter and dryer, the faster things dry and work can dry unevenly in the shelves – this can lead to cracking – another time to lightly cover your work for drying. Step Four – Trimming and Cleaning Up Your work is dry! It is called greenware now and it is at it’s most fragile! Handle everything with two hands. I often refer to soft hands – keep everything gentle and with your fingers spread as much as possible. Try to not pick up things like plates too much, and always with both hands! Before your work can be bisque fired it should be “cleaned up”. You work won’t go into the kiln if it has sharp edges – when glazed, sharp edges turn into razor blades! Use a piece of fly wire to rub the work all over – this will scratch a little so be light handed. Use a knife or metal kidney to scrape any areas that require a bit more dynamic treatment than the fly wire offers! Finally, a very light wipe over with a slightly damp sponge can help soften and soothe all of your edges and dags! Trimming thrown work: If you are planning to trim (or turn) your thrown work (and you should be), make sure you bag it well – your work should be leather hard to almost dry for easiest trimming. Use this step to finish the work completely – use a metal kidney to polish the surface, or a slightly damp sponge to give a freshly thrown look. Wipe the sponge around the rim after trimming, and check the inside of the pot for dags! Trimming slip cast work: Usually I will trim the rims of your work on the wheel the following day to make that stage easier, however you will still need to check your work for lumps and bumps. Last but not least – check that your name is still clearly on the bottom of your work. Step Five – Bisque Firing When the work is completely dry it can go into the bisque kiln. The bisque kiln is fired to 1000°C. This process burns off the water in the clay as well as some of the chemically bound water. The structure of the clay is not altered that much at this temperature. Inside the bisque kiln, the work is stacked a little, small bowl inside a larger bowl and onto a heavy plate. Smaller items like decorations or drink coasters might get stacked several high. Consideration is paid to the weight of the stack and shape of the work. A bisque kiln can fire about one and a half times the amount of work that the glaze kiln can fire. The firing takes about 10 hours to complete the cycle and about two days to cool down. Once it has been emptied the work is placed in the glaze room ready for you to decorate! Step Six – Glazing Decorating your work with colour can be a lot of fun – and time consuming! There are three main options for surface treatment at this stage: Oxide Washes Underglazes Glazes Washes and underglazes do not “glaze” the work – It will still need a layer of glaze to fully seal the clay (washes don’t need glaze on surfaces not designed for food or liquid as they can gloss up a little on their own). Underglazes are stable colourants that turn out pretty much how they look in the jar. They can be mixed with each other to form other colours and can be used like water colours to paint onto your work. Mostly they should have a clear glaze on top to seal them. Oxides are a different species – the pink oxide (cobalt) wash turns out bright blue for instance. They don’t always need a glaze on top, and some glazes can change the colour of the wash! The glazes need no other “glaze” on top! Be careful of unknown glaze interactions – you can put any combination of glaze in a bowl or on a plate, but only a single glaze on the outside of any vertical surface! Glazes are a chemical reaction under heat. We don’t know the exact chemicals in the Mayco glazes we use. I can guess by the way they interact with each other, however, on the whole, you need to test every idea you have, and not run the test on a vertical surface! Simply put, glaze is a layer of glass like substance that bonds with the clay underneath. Clay is made of silica, alumina and water. Glaze is made of mostly silica. Silica has a melting point of 1700°C and we fire to 1240°C. The silica requires a “flux” to help it melt at the lower temperature. Fluxes can be all sorts of chemicals – a common one is calcium – calcium has a melting point of 2500°C, however, together they both melt at a much lower temperature! Colourants are metal oxides like cobalt (blue), chrome (green through black), copper (green, blue, even red!), manganese (black, purple and pink) iron (red brown), etc. Different chemicals in the glaze can have dramatic effects. for example, barium carbonate (which we don’t use) turns manganese bright pink! Other elements can turn manganese dioxide brown, blue, purple and reddish brown. Manganese dioxide is a flux in and of itself as well. So, glazes that get their black and purple colours, often interact with other glazes and RUN! Our mirror black is a good example – it mixes really well with many glazes because it fluxes them – causes them to melt faster. It will also bring out many beautiful colours in the glazes because it’s black colouring most definitely comes from manganese dioxide! Glaze chemistry is a whole subject on it’s own! We use commercial Mayco glazes on purpose – for their huge range of colour possibilities, stability, cool interactions, artistic freedom with the ability to easily brush the glazes on and ease of use. We currently have almost 50 glazes on hand! A major project is to test the interactions of all glazes with each other. That is 2,500 test tiles!!!! I’m going to make the wall behind the wheels the feature wall of pretty colours! Step Seven – Glaze (Gloss or sometimes called “Glost”) Firing Most of the time this is the final stage of making your creation (but not always!) The glaze kiln goes to 1240°C. This is called cone 6, or midrange. It is the low end of stoneware temperatures. Stoneware clays and glazes are typically fired at cone 8 – 10, that is 1260 – 1290°C. The energy requirement to go from 1240°C to 1280°C is almost a 30% more! Our clay is formulated to vitrify (mature, turn “glass-like”) at 1240°, as are our glazes. A glaze kiln take around 12 hours to reach temperature and two to three days to cool down. Sometimes a third firing process is required – this is for decoration that is added to work after the glaze firing. For example – adding precious metals and lustres. this firing temperature is usually around 600 – 800°C depending upon the techniques being used. There are many students interested in gold and silver trims – we will be doing this third type of firing soon! After firing your work will be in the student finished work shelves. Remember to pay for it before you head out the door! There is a small extra charge for using porcelain clay (it’s more than twice the price of regular clay), and for any third firing process! Once your work has been fired it can not turn back into clay for millennia – so don’t fire it if you don’t like it! Put it in the bucket for recycling. https://firebirdstudios.com.au/the-process-of-making-pottery/Ceramics have evolved over thousands of years.Earthenware dessert plate, cream colour. Made by Alfred Meakin, England. Backstamped ‘Alfred Meakin England’. flagstaff hill, warrnambool, shipwrecked-coast, flagstaff-hill, flagstaff-hill-maritime-museum, maritime-museum, shipwreck-coast, flagstaff-hill-maritime-village, alfred meakin, ceramics, earthenware, kitchenware -
 Flagstaff Hill Maritime Museum and Village
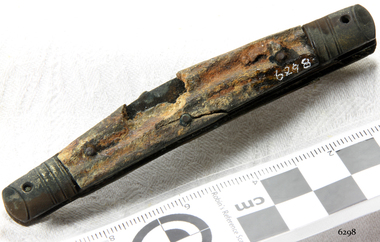
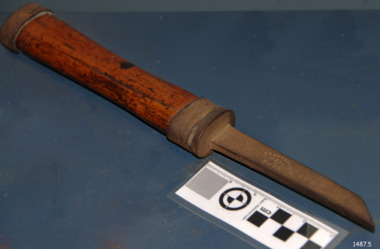
Pocket Knife
When the ship Schomberg was launched in 1855, she was considered the most perfect clipper ship ever to be built. James Blaine’s Black Ball Line had commissioned her to be built for their fleet of passenger liners. At a cost of £43,103, the Aberdeen builders designed her to sail faster than the quick clippers designed by North American Donald McKay. She was a three masted wooden clipper ship, built with diagonal planking of British oat with layers of Scottish larch. This luxury vessel was designed to transport emigrants to Melbourne in superior comfort. She had ventilation ducts to provide air to the lower decks and a dining saloon, smoking room, library and bathrooms for the first class passengers. At the launch of Schomberg’s maiden voyage, her master Captain ‘Bully’ Forbes, drunkenly predicted that he would make the journey between Liverpool and Melbourne in 60 days. Schomberg departed Liverpool on 6 October 1855 with 430 passengers and 3000 tons cargo including iron rails and equipment intended the build the Geelong Railway and a bridge over the Yarra from Melbourne to Hawthorn. The winds were poor as Schomberg sailed across the equator, slowing her journey considerably. She was 78 days out of Liverpool when she ran aground on a sand-spit near Peterborough, Victoria, on 27 December; the sand spit and the currents were not marked on Forbes’s map. Overnight, the crew launched a lifeboat to find a safe place to land the ship’s passengers. The scouting party returned to Schomberg and advised Forbes that it was best to wait until morning because the rough seas could easily overturn the small lifeboats. The ship’s Chief Officer spotted SS Queen at dawn and signalled the steamer. The master of the SS Queen approached the stranded vessel and all of Schomberg’s passengers were able to disembark safely. The Black Ball Line’s Melbourne agent sent a steamer to retrieve the passengers’ baggage from the Schomberg. Other steamers helped unload her cargo until the weather changed and prevented the salvage teams from accessing the ship. Local merchants Manifold & Bostock bought the wreck and cargo, but did not attempt to salvage the cargo still on board the ship. They eventually sold it on to a Melbourne businessman and two seafarers. After two of the men drowned when they tried to reach Schomberg, salvage efforts were abandoned.32 In 1975, divers from Flagstaff Hill, including Peter Ronald, found an ornate communion set at the wreck. The set comprised a jug, two chalices, a plate and a lid. The lid did not fit any of the other objects and in 1978 a piece of the lid broke off, revealing a glint of gold. As museum staff carefully examined the lid and removed marine growth, they found a diamond ring, which is currently on display in the Great Circle Gallery.33 Flagstaff Hill also holds ship fittings and equipment, personal effects, a lithograph, tickets and photograph from the Schomberg. Most of the artefacts were salvaged from the wreck by Peter Ronald, former director of Flagstaff Hill. The Schomberg, which is on the Victorian Heritage Register (VHR S612), has great historical significance as a rare example of a large, fast clipper ship on the England to Australia run, carrying emigrants at the time of the Victorian gold rush. She represents the technical advances made to break sailing records between Europe and Australia. Flagstaff Hill’s collection of artefacts from the Schomberg is significant for its association with the shipwreck. The collection is primarily significant because of the relationship between the objects, as together they have a high potential to interpret the story of the Schomberg. It is archaeologically significant as the remains of an international passenger Ship. It is historically significant for representing aspects of Victoria’s shipping history and for its association with the shipwreck and the ship, which was designed to be fastest and most luxurious of its day Part of a Pocket knife handle, wooden handle with metal inlay on one side, blade missing. Recovered from the wreck of the Schomberg. warrnambool, shipwrecked-coast, flagstaff-hill, flagstaff-hill-maritime-museum, maritime-museum, shipwreck-coast, flagstaff-hill-maritime-village, schomberg, shipwrecked-artefact, clipper ship, black ball line, 1855 shipwreck, aberdeen clipper ship, captain forbes, peterborough shipwreck, ss queen, pocket knife -
 Flagstaff Hill Maritime Museum and Village
Domestic object - Jug
The Process of Making Pottery Decorating, Firing, Glazing, Making, Technical There is a rhythm and flow to clay. It can’t be done all at once! Even the making process! It can take weeks to get everything done, especially if you can only work on your pottery once a week! Even though we have three hour classes, it’s often just not enough time! Here is an overview of some of the processes so you have a bit more grasp on some of the technical stuff! Step One – Design There are SO many ideas out there for making stuff in clay! From delicate porcelain jewellery, through to heavy sculptural work and everything in between. Deciding your direction is sometimes not that easy – when you first start, try everything, you will naturally gravitate to the style that you enjoy! The options and variations are endless and can get a wee bit overwhelming too! Check in with me before you start to ensure your ideas will work, what order you might do things, how you could achieve the look you are seeking and any other technical data required! Step Two – Making Clay is thixotropic. This means that as you work with it, the clay first gets sloppier and wetter, before is begins to dry in the atmosphere. For most things, you simply can’t do all parts of the project at once. An example of work order might look like: Get last weeks work out from the shelves Prepare clay for today’s work – roll your clay, prepare balls for throwing, make the first stage of a pinch pot) Clean up last week’s work and put it on the shelf for bisque firing Check that you have any glazing to do – and do enough of it that you will have time to finish your main project Do the next step of your next project – there might be a further step that can’t be complete immediately, in that case, wrap your work well and put onto the shelves. Letting your work rest for a while can really help keep your work clean and professional looking. Many things require bagging under plastic to keep it ready for work the next week – put your name on the outside of the bag so you can find your work easily. We have stickers and markers. Consider how you want to decorate your work – coloured slip can be applied at a fairly wet stage (remembering that it will make your work even wetter!). Trying to apply slip to dry clay won’t work! If you want to do sgraffito – you will need to keep the work leather hard (a state of dryness where you can still work the clay with a little effort and a little water and care). Step Three – Drying Most of the time your work can go into the rack uncovered to let it dry out for the following week. If you want to continue forming or shaping you will need to double bag your work – put your work on a suitable sized bat and put the bat in a bag so the base of the bag is under the bat, then put another bag over the top of the work and tuck the top of the bag under the bat. If you want to trim (or turn) your thrown work the following week, it should also be double bagged. If your work is large, delicate, or of uneven thicknesses, you should lightly cover your work for drying. When considering the drying process, bare in mind the weather, humidity and wind! The hotter and dryer, the faster things dry and work can dry unevenly in the shelves – this can lead to cracking – another time to lightly cover your work for drying. Step Four – Trimming and Cleaning Up Your work is dry! It is called greenware now and it is at it’s most fragile! Handle everything with two hands. I often refer to soft hands – keep everything gentle and with your fingers spread as much as possible. Try to not pick up things like plates too much, and always with both hands! Before your work can be bisque fired it should be “cleaned up”. You work won’t go into the kiln if it has sharp edges – when glazed, sharp edges turn into razor blades! Use a piece of fly wire to rub the work all over – this will scratch a little so be light handed. Use a knife or metal kidney to scrape any areas that require a bit more dynamic treatment than the fly wire offers! Finally, a very light wipe over with a slightly damp sponge can help soften and soothe all of your edges and dags! Trimming thrown work: If you are planning to trim (or turn) your thrown work (and you should be), make sure you bag it well – your work should be leather hard to almost dry for easiest trimming. Use this step to finish the work completely – use a metal kidney to polish the surface, or a slightly damp sponge to give a freshly thrown look. Wipe the sponge around the rim after trimming, and check the inside of the pot for dags! Trimming slip cast work: Usually I will trim the rims of your work on the wheel the following day to make that stage easier, however you will still need to check your work for lumps and bumps. Last but not least – check that your name is still clearly on the bottom of your work. Step Five – Bisque Firing When the work is completely dry it can go into the bisque kiln. The bisque kiln is fired to 1000°C. This process burns off the water in the clay as well as some of the chemically bound water. The structure of the clay is not altered that much at this temperature. Inside the bisque kiln, the work is stacked a little, small bowl inside a larger bowl and onto a heavy plate. Smaller items like decorations or drink coasters might get stacked several high. Consideration is paid to the weight of the stack and shape of the work. A bisque kiln can fire about one and a half times the amount of work that the glaze kiln can fire. The firing takes about 10 hours to complete the cycle and about two days to cool down. Once it has been emptied the work is placed in the glaze room ready for you to decorate! Step Six – Glazing Decorating your work with colour can be a lot of fun – and time consuming! There are three main options for surface treatment at this stage: Oxide Washes Underglazes Glazes Washes and underglazes do not “glaze” the work – It will still need a layer of glaze to fully seal the clay (washes don’t need glaze on surfaces not designed for food or liquid as they can gloss up a little on their own). Underglazes are stable colourants that turn out pretty much how they look in the jar. They can be mixed with each other to form other colours and can be used like water colours to paint onto your work. Mostly they should have a clear glaze on top to seal them. Oxides are a different species – the pink oxide (cobalt) wash turns out bright blue for instance. They don’t always need a glaze on top, and some glazes can change the colour of the wash! The glazes need no other “glaze” on top! Be careful of unknown glaze interactions – you can put any combination of glaze in a bowl or on a plate, but only a single glaze on the outside of any vertical surface! Glazes are a chemical reaction under heat. We don’t know the exact chemicals in the Mayco glazes we use. I can guess by the way they interact with each other, however, on the whole, you need to test every idea you have, and not run the test on a vertical surface! Simply put, glaze is a layer of glass like substance that bonds with the clay underneath. Clay is made of silica, alumina and water. Glaze is made of mostly silica. Silica has a melting point of 1700°C and we fire to 1240°C. The silica requires a “flux” to help it melt at the lower temperature. Fluxes can be all sorts of chemicals – a common one is calcium – calcium has a melting point of 2500°C, however, together they both melt at a much lower temperature! Colourants are metal oxides like cobalt (blue), chrome (green through black), copper (green, blue, even red!), manganese (black, purple and pink) iron (red brown), etc. Different chemicals in the glaze can have dramatic effects. for example, barium carbonate (which we don’t use) turns manganese bright pink! Other elements can turn manganese dioxide brown, blue, purple and reddish brown. Manganese dioxide is a flux in and of itself as well. So, glazes that get their black and purple colours, often interact with other glazes and RUN! Our mirror black is a good example – it mixes really well with many glazes because it fluxes them – causes them to melt faster. It will also bring out many beautiful colours in the glazes because it’s black colouring most definitely comes from manganese dioxide! Glaze chemistry is a whole subject on it’s own! We use commercial Mayco glazes on purpose – for their huge range of colour possibilities, stability, cool interactions, artistic freedom with the ability to easily brush the glazes on and ease of use. We currently have almost 50 glazes on hand! A major project is to test the interactions of all glazes with each other. That is 2,500 test tiles!!!! I’m going to make the wall behind the wheels the feature wall of pretty colours! Step Seven – Glaze (Gloss or sometimes called “Glost”) Firing Most of the time this is the final stage of making your creation (but not always!) The glaze kiln goes to 1240°C. This is called cone 6, or midrange. It is the low end of stoneware temperatures. Stoneware clays and glazes are typically fired at cone 8 – 10, that is 1260 – 1290°C. The energy requirement to go from 1240°C to 1280°C is almost a 30% more! Our clay is formulated to vitrify (mature, turn “glass-like”) at 1240°, as are our glazes. A glaze kiln take around 12 hours to reach temperature and two to three days to cool down. Sometimes a third firing process is required – this is for decoration that is added to work after the glaze firing. For example – adding precious metals and lustres. this firing temperature is usually around 600 – 800°C depending upon the techniques being used. There are many students interested in gold and silver trims – we will be doing this third type of firing soon! After firing your work will be in the student finished work shelves. Remember to pay for it before you head out the door! There is a small extra charge for using porcelain clay (it’s more than twice the price of regular clay), and for any third firing process! Once your work has been fired it can not turn back into clay for millennia – so don’t fire it if you don’t like it! Put it in the bucket for recycling. https://firebirdstudios.com.au/the-process-of-making-pottery/The form of the jug has been in use for many centuries.Stoneware jug. Two tone brown glaze with pierced lip behind spout. Spout chipped.None.flagstaff hill, warrnambool, shipwrecked-coast, flagstaff-hill, flagstaff-hill-maritime-museum, maritime-museum, shipwreck-coast, flagstaff-hill-maritime-village, jug, ceramic jug -
 Flagstaff Hill Maritime Museum and Village
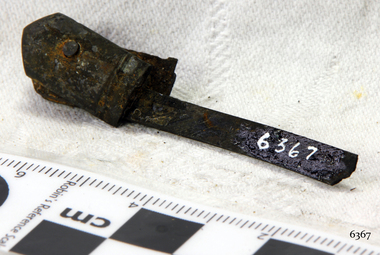
Tool - Pocket Knife, ca 1855
When the ship Schomberg was launched in 1855, she was considered the most perfect clipper ship ever to be built. James Blaine’s Black Ball Line had commissioned her to be built for their fleet of passenger liners. At a cost of £43,103, the Aberdeen builders designed her to sail faster than the quick clippers designed by North American Donald McKay. She was a three masted wooden clipper ship, built with diagonal planking of British oat with layers of Scottish larch. This luxury vessel was designed to transport emigrants to Melbourne in superior comfort. She had ventilation ducts to provide air to the lower decks and a dining saloon, smoking room, library and bathrooms for the first class passengers. At the launch of Schomberg’s maiden voyage, her master Captain ‘Bully’ Forbes, drunkenly predicted that he would make the journey between Liverpool and Melbourne in 60 days. Schomberg departed Liverpool on 6 October 1855 with 430 passengers and 3000 tons cargo including iron rails and equipment intended the build the Geelong Railway and a bridge over the Yarra from Melbourne to Hawthorn. The winds were poor as Schomberg sailed across the equator, slowing her journey considerably. She was 78 days out of Liverpool when she ran aground on a sand-spit near Peterborough, Victoria, on 27 December; the sand spit and the currents were not marked on Forbes’s map. Overnight, the crew launched a lifeboat to find a safe place to land the ship’s passengers. The scouting party returned to Schomberg and advised Forbes that it was best to wait until morning because the rough seas could easily overturn the small lifeboats. The ship’s Chief Officer spotted SS Queen at dawn and signalled the steamer. The master of the SS Queen approached the stranded vessel and all of Schomberg’s passengers were able to disembark safely. The Black Ball Line’s Melbourne agent sent a steamer to retrieve the passengers’ baggage from the Schomberg. Other steamers helped unload her cargo until the weather changed and prevented the salvage teams from accessing the ship. Local merchants Manifold & Bostock bought the wreck and cargo, but did not attempt to salvage the cargo still on board the ship. They eventually sold it on to a Melbourne businessman and two seafarers. After two of the men drowned when they tried to reach Schomberg, salvage efforts were abandoned.32 In 1975, divers from Flagstaff Hill, including Peter Ronald, found an ornate communion set at the wreck. The set comprised a jug, two chalices, a plate and a lid. The lid did not fit any of the other objects and in 1978 a piece of the lid broke off, revealing a glint of gold. As museum staff carefully examined the lid and removed marine growth, they found a diamond ring, which is currently on display in the Great Circle Gallery.33 Flagstaff Hill also holds ship fittings and equipment, personal effects, a lithograph, tickets and photograph from the Schomberg. Most of the artefacts were salvaged from the wreck by Peter Ronald, former director of Flagstaff Hill. The Schomberg, which is on the Victorian Heritage Register (VHR S612), has great historical significance as a rare example of a large, fast clipper ship on the England to Australia run, carrying emigrants at the time of the Victorian gold rush. She represents the technical advances made to break sailing records between Europe and Australia. Flagstaff Hill’s collection of artefacts from the Schomberg is significant for its association with the shipwreck. The collection is primarily significant because of the relationship between the objects, as together they have a high potential to interpret the story of the Schomberg. It is archaeologically significant as the remains of an international passenger Ship. It is historically significant for representing aspects of Victoria’s shipping history and for its association with the shipwreck and the ship, which was designed to be fastest and most luxurious of its day Piece of metal pocket knife, with an end section and blade with broken end. Recovered from the wreck of the Schomberg. warrnambool, shipwrecked-coast, flagstaff-hill, flagstaff-hill-maritime-museum, maritime-museum, shipwreck-coast, flagstaff-hill-maritime-village, schomberg, shipwrecked-artefact, clipper ship, black ball line, 1855 shipwreck, aberdeen clipper ship, captain forbes, peterborough shipwreck, ss queen, pocket knife -
 City of Moorabbin Historical Society (Operating the Box Cottage Museum)
Kitchen Equipment, cutlery butter knife, c1930
Rodd's was established by George & Ernest Rodd in Melbourne in 1919.They were manufacturers and wholesalers of precious metal jewellery. Later they began to manufacture high quality silver plated cutlery under the brand name “Rodd”. They then expanded into holloware when they took over Platers Pty. Ltd. who produced a very high quality range of silver plated Sheffield Reproduction Silverware, under the brand name “Hecworth”. Rodd’s established a large factory at 150 Barkly St., St. Kilda, Melbourne. During WW2 with a staff some 200, the factory produced ordnance components to help with the war effort. Rodd’s established sales offices in the main city centres of all States. The company prospered. In December, 1960, Rodd [Australia] Ltd. was merged with Mytton’s Ltd., Melbourne, and became part of the newly formed company Mytton Rodd [Australia] Ltd. Mytton’s were also producers of silver plated cutlery under the brand name “Grosvenor” and were strong competitors to the Rodd brand of cutlery Australia wide. It was a friendly take over and the Directors of Rodd [Aust.] Ltd. were appointed to the board of Mytton Rodd [Aust.] Ltd., and some to the Holding Company Mytton’s Ltd. Mytton’s were heavy manufacturing engineers producing a large range of stainless steel products including: kitchen sinks of various design, beer barrels [9 and 18 gallon kegs] for the breweries, milk vats for cooling and storing milk on dairy farms, a large range of dairy and industrial vessels, road transport tanks, LPG tanks, low pressure pre-mix vessels for the soft drink industry. They also produced a range of domestic bathes, steel railway sleepers, using their 3000 ton hydraulic presses. Mytton’s also had their own non ferrous foundry and rolling mill which produced nickel silver sheet used in the manufacturer of their silver plated cutlery. They also produced copper sheet for their own and industrial use. Mytton’s had factories in York St., South Melbourne and Port Melbourne. Rodd [Aust.] Ltd. set up a manufacturing, distribution plant in Auckland, New Zealand, circa 1960. This company began producing precious metal jewellery in a rented space in the premises of Matthey Garret Ltd., Bullion Merchants, in Drake St., Auckland. Later they moved into their own building in Sale St., Auckland. The company prospered and purchased land and built a factory at 121 Apirana Ave. Glen Innes, Auckland, circa 1964. ( B. McCulloch Rodd Pty Ltd)A butter knife with stainless steel blade and bone handle c1930on blade; RODD / STAINLESScutlery, stainless steel, cheltenham, moorabbin, bentleigh, early settlers, rodd aust ltd, mytton rodd pty ltd, aukland, port melbourne -
 City of Moorabbin Historical Society (Operating the Box Cottage Museum)
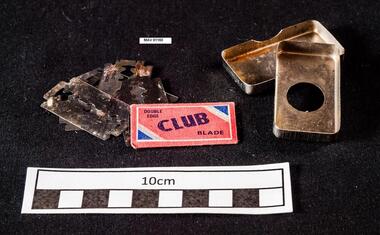
Manufactured Object, stainless steel razor blade holder, c1950
... razor blade holder Metal manufacturer ...King Camp Gillette observed in 1902 that as existing, relatively expensive, razor blades dulled quickly and needed continuous sharpening, a razor whose blade could be thrown away when it dulled would meet a real need and likely be profitable. Gillette's innovation was the thin, inexpensive, disposable blade of stamped steel. Safety razors had been developed in the mid-19th century, but still used a forged blade that dulled and rusted.. Gillette's safety razor was expensive but lasted many years and the convenience of inexpensive disposable sharp blades was very profitable for Gillette.Throughout the 20thC most men used a safety razor with disposable stainless steel razor blades to shave their beards prior to the introduction of affordable electric razors in 1960's.A two piece stainless steel razor blade holder. The base has a round hole to safely push blade with fingertip and the lid has side finger grooves to aid opening. Contains unused 'CLUB' razor blade in paper packet, 2 used Wilkinson Sword razor blades and 2 Gillette Blades on razor blade 'CLUB', WILKINSON SWORD ; GILLETTEshaving equipment, safety razors, gillette king, proctor & gamble, club razor blades pty ltd melbourne, wilkinson sword pty ltd england, moorabbin, bentleigh, cheltenham, -
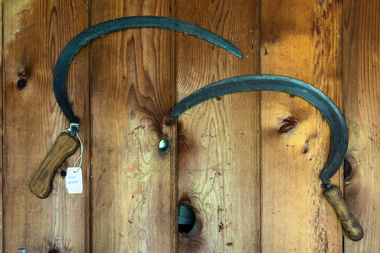 City of Moorabbin Historical Society (Operating the Box Cottage Museum)
Tools, metal scythe, c1880
A scythe is an agricultural hand tool for mowing grass or reaping crops. It was largely replaced by horse-drawn and then tractor machinery. A scythe consists of a wooden shaft and a long, curved blade is mounted at the lower end, perpendicular. Scythes always have the blade projecting from the left side when in use. Mowing is done by holding the handle , with the arms straight, the blade parallel to the ground and very close to it, and the body twisted to the right. The body is then twisted steadily to the left, moving the scythe blade along its length in a long arc from right to left, ending in front of the mower, thus depositing the cut grass to the left. Mowing proceeds with a steady rhythm, stopping at frequent intervals to sharpen the blade. The correct technique has a slicing action on the grass, cutting a narrow strip with each stroke Mowing grass is easier when it is damp, and so hay-making traditionally began at dawn and often stopped early, the heat of the day being spent raking and carting the hay cut on previous daysEarly settlers and market gardeners used these scythes as they established their farms in Moorabbin Shire c1880A large metal scythe with a wooden handle x 2early settlers, pioneers, market gardeners, moorabbin, bentleigh, brighton, cheltenham, tools, blacksmiths -
 City of Moorabbin Historical Society (Operating the Box Cottage Museum)
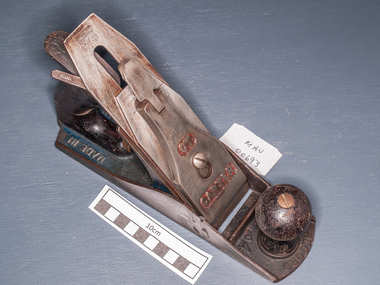
Tools, 'Carter' wood plane, c1900
Richard Carter Ltd is still making edge tools in Honley, near Huddersfield. Established in 1740 by Jeremiah Carter in High Burton: the 1834 Piggots directory list three edge tool CARTER - makers at Kirk Burton: Henry Carter, John Carter and Robert Carter. By 1870 the company was known by its current name. The Stanley Rule and Level Company was founded in 1857 by Henry Stanley in New Britain, Connecticut. In 1920, this company merged with the separate but related Stanley Works, founded by Henry Stanley's cousin Frederick Trent Stanley, and continued operating as its hand tools division.. 2010 merger of The Stanley Works with Black & Decker Subsequent reports by visitors to Vic. Collections are noted Geoff Thomas 2019, Mitchell 2019 , Bob Burgess 2022 The early settlers were resourceful and self sufficient so they made and repaired their tools as required.Early settlers were self sufficient and resourceful making and mending their tools, farm and household equipment.c1900 A 'Carter' hand wood plane, made of metal with an adjustable screw for blade thickness.early settlers, pioneers, market gardeners, moorabbin, bentleigh, brighton, cheltenham, tools -
 City of Moorabbin Historical Society (Operating the Box Cottage Museum)
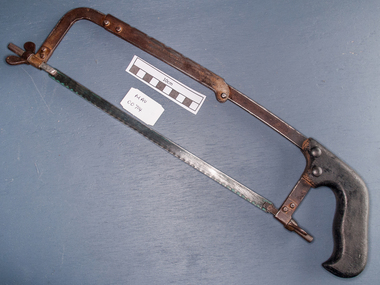
Tools, steel hacksaw 'Marples', 20thC
A hacksaw is a fine-toothed saw, originally and principally for cutting metal. They can also cut various other materials, such as plastic and wood; for example, plumbers and electricians often cut plastic pipe and plastic conduit with them. On hacksaws, as with most frame saws, the blade can be mounted with the teeth facing toward or away from the handle, resulting in cutting action on either the push or pull stroke. In normal use, cutting vertically downwards with work held in a bench vice, hacksaw blades should be set to be facing forwards. Joseph Marples & Son Pty Ltd Traditional Craftsmans Hand Tools made in Sheffield. The finest quality hand made tools, backed by over 170 years of manufacturing heritage. .In the 1840’s Joseph Marples was one of several ‘Marples’ (most of which were related) in Sheffield manufacturing joiners tools, such as brass inlaid rosewood & ebony braces, boxwood spokeshaves, beech planes, gauges and squares. The business has remained within the family to this date, and has been based in Sheffield since those early days. Although modern technology has been used in some instances, many of the traditions of manufacturing fine hand tools has remained the same using selected materials and hand finishing, indeed the same threads are used in the gauges as were used over 100 years ago. A steel hacksaw. 'Marples' with bladeMARPLEStools, woodwork, metalwork, carpentry, pioneers, market gardeners, early settlers, moorabbin, cheltenham, bentleigh, ormond, joseph marples & son pty ltd, sheffield , england, -
 City of Moorabbin Historical Society (Operating the Box Cottage Museum)
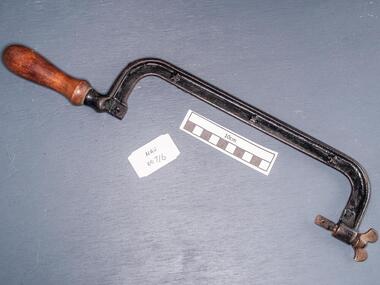
Tools, steel hacksaw with wooden handle, c1900
A hacksaw is a fine-toothed saw, originally and principally for cutting metal. They can also cut various other materials, such as plastic and wood; for example, plumbers and electricians often cut plastic pipe and plastic conduit with them. On hacksaws, as with most frame saws, the blade can be mounted with the teeth facing toward or away from the handle, resulting in cutting action on either the push or pull stroke. In normal use, cutting vertically downwards with work held in a bench vice, hacksaw blades should be set to be facing forwards. A steel hacksaw with a wooden handle but without blade -
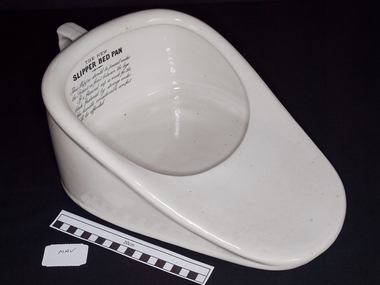 City of Moorabbin Historical Society (Operating the Box Cottage Museum)
Functional object - Medical Equipment, china bed-pan, c1910-1940
A bedpan is a receptacle used for the toileting of a bedridden patient in the home or in a hospital and are usually made of a metal, glass, or plastic . A bed pan can be used for both urinary and faecal discharge. This porcelain 'New Slipper' bed pan was used early 20thC.A white china bed-pan with handle at centre back 'The New Slipper'Inside back 'The New Slipper bed pan should be passed under the patient in front between the legs. If a flannel cap is made for the blade, fastened by string to the handle, considerable comfort will be affected." on base 'F Large"toilets, invalids, cummerford family, moorabbin, bentleigh, cheltenham, early settlers, market gardeners -
 Flagstaff Hill Maritime Museum and Village
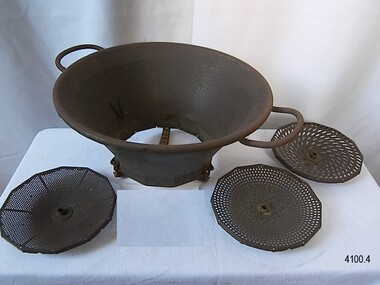
Domestic object - Food Mill, 1950s+
The Moulin Legumes No. 3 food mill is a useful manual kitchen utensil for milling, sieving, grating and pureeing various food types (legumes, vegetables, fruit and herbs). The food is placed in the chamber and the handle is turned to push the food through the holes in the blades and into a bowl placed below it. The various blades allow choice of consistency as they have different sized holes. It was in use before electric food processors were invented and is still used in modern times. The vegetable mill was invented by the French inventor and industrialist, Jean Mantelet, in 1932. Inspired by his wife, he invented the mill, which simply and quickly made cooked food into puree or mash. He said "My greatest pride is to rid women of a daily chore." The business started using the brand Moulinex in 1956 and today is it a household name linked to useful and good quality kitchen utensils and aids. The name comes from combining the words Moulin Express, which was an electric coffee mill. The embossed text "BREVETE S G D G" was a type of French patent without a government guarantee. It stopped being used in 1968. This Moulin is an example of a kitchen utensil used before electric food processors were invented, and had gained popularity to process foods such as vegetable's, fruit, nuts and herbs in a domestic or commercial kitchen. The first model of the Moulin Legunes was invented in 1932 by French industrialist Jean Mantelet to meet the reduce labour for housewives in the kitchen. Millions of this labour saving device have since been sold. Food mill, metal, for manually processing food. Conical-shaped food chamber, two U-shaped handles on opposite sides, two clips inside. Three interchangeable twelve-sided cutting blades, each with different sized holes. Made in France. Model is Moulin Legumes No. 3. Impressed into the side, within a circle "MADE IN FRANCE - BREVETE S G D C -" and in centre "2" (Brevete is French word for Patent)flagstaff hill, warrnambool, flagstaff hill maritime museum, maritime museum, shipwreck coast, flagstaff hill maritime village, great ocean road, made in france, french kitchen utensils, moulin, food preparation, kitchen utensil, food mill, food processor, sieve, moule, mouli, grater, puree, hand operated, moulin legumes no. 3, vingage, kitchen gadget, moulineux, jean mantelet -
 Flagstaff Hill Maritime Museum and Village
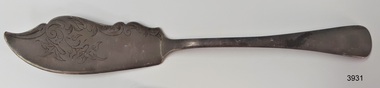
Domestic object - Butter Knife, Barker Brothers, Ca. 1885-1895
This butter or cheese knife is a decorative example of electroplated cutlery that had become an affordable alternative to more expensive silver cutlery in the late 1800s to early 1900s. The knife has stamp marks in the back of its handle that are a combination of letters and symbols used by British silversmiths to identify their workmanship. The design and type of this knife was not normally used by everyday people but rather those of a higher social class with time and money to have a particular decorative knife to serve butter or cheese. The marks on the handle tell that it was made of nickel silver, and electroplated with superior quality Stirling silver. The Barker Brothers of Birmingham made the knife between 1885 and 1907, but most likely before 1895. It was made for the British, or British colonial, people, connected with a government department such as the navy or defence. This story may be slightly inaccurate, as some silversmiths added extra ‘pseudo marks’ to their wares to disguise the quality. THE MARKS and their meaning – - ‘A1’ The silver used in electroplating this knife was the highest level, ‘superior quality’, measured in grams of silver per table spoon or table fork, with ‘A1’ being 2 2/3 grams, and ‘D’ being 0 1/2 grams of silver. - ‘BB’ The Baker Brothers used these initials from 1885 to 1907. - ‘[crown symbol]’ – This symbol is used for Sterling silver but this knife is a metal alloy. The crown is also the town mark of Sheffield (appointed by the Sheffield Assay Office) but this knife was made in Birmingham, which has the town mark of an anchor. The Barker Brothers may have added the crown mark to this electroplated silverware as a ‘pseudo hallmark’, leading the buyer to think that it was actual Sterling silver. The use of pseudo hallmarks by electroplaters of the Victorian era was common practice but it was illegal. In 1895 the unlawful practice was seen as imitating the Sheffield Silver Mark and the law was firmly applied to eradicate the deception, so items with this mark probably date before 1895. - [EPNS] Electro Plated Nickel Silver, called nickel silver or German silver, is a metal alloy that usually combines copper, nickel and zinc (60 percent copper, 20 percent nickel, 20 percent zinc). It has a silver-white appearance and is sometimes referred to as ‘white ware’. It does not contain any silver but is often used as a base for electroplating, when the item is covered with a thin layer of silver to give it the polished appearance of pure silver. It became popular in the late 19th and early 20th century as an affordable substitute for sterling silver. - Broad Arrow - an official stamp that indicates it was once the property of Britain government, either in Britain or one of its colonies, and used in the defence force. In Great Britain, from an 1875 government act, it was, and still, is a crime to forge or wrongfully use, the broad arrow symbol. The BARKER BROTHERS of Birmingham - Barker Brothers were one of the earlies firms of Birmingham silversmiths, established in 1801 by Mary Barker. They became Barker & Creed, then William and Matthias Barker, then from 1885 they were the Barker Brothers. They were operating in Paradise Street in 1871 until in 1903 they moved to Unity Works, Constitution Hill, in Birmingham. The firm also had a showroom at 292 High Holborn, London, from the early 1900s to the 1980s. In 1907 the firm became Barker Brothers Silversmiths Ltd, then in the 1960s they merged with Ellis & Co, becoming Barker Ellis Silver Co. Ltd. In 1979 they were registered in USA as Ellis & Co., Barker Ellis, and Ellis Barker. The business went into administration in 1992, after almost 200 years of production. The firm advertised as specialists in electroplating, and used the trademarks BRITANOID, UNITY PLATE and THE HYGENIA.This knife is historically significant, dated from 1885 to 1907 but most likely pre-1895, and made by the longstanding Birmingham silversmiths, the Barker Brothers, established in 1801. The knife is an example of decorative flatware used by people of ’class’. It also has the broad arrow stamp, connecting it to the British government, in particular the ordinance department. The stamp also connects it to other items in our collection with that stamp. It may have been connected to pre-Federation government organisations and officials such as the army Garrison, government naval vessel, police, lighthouse keepers, harbour masters. The knife is the only example of its kind in our collection, being a decorative silver butter or cheese knife, made by the Barker Brothers of Birmingham. Butter knife, or cheese knife, electroplated nickel silver (EPNS). Upper blade edge has decorative shape and engraved motifs, lower blade edge is bevelled to a cutting edge, and narrow plain handle flares out to a wide, rounded end. Maker’s marks are stamped on the reverse. Made by Barker Brothers of Birmingham in the late-19th century. Stamps: “flagstaff hill, warrnambool, maritime village, maritime museum, flagstaff hill maritime museum & village, shipwreck coast, great ocean road, butter knife, cheese knife, electroplate, electro plate, nickel silver, nickel alloy, alloy composition, copper nickel zinc, german silver, epns, barker brothers, birmingham, london, silversmiths, victorian era, 19th century, a1, bb, crown inside square, broad arrow, flatware, tableware, cutlery, cutler, dining utensils, eating utensils, superior quality, pseudo hallmark, stirling silver, silver-white metal, mary barker, barker & creed, william barker, matthias barker, barker brothers silversmiths, barker ellis silver co, ellis & co, barker ellis, ellis barker, britanoid, unity plate, the hygenia, british, colonial, government use, defence department use, naval use, knife, serving knife -
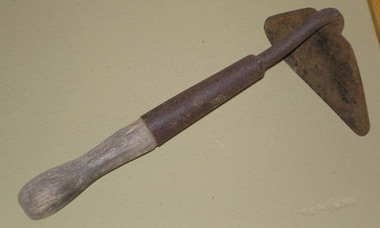
 Flagstaff Hill Maritime Museum and Village
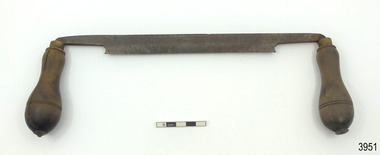
Tool - Draw knife, C Johnson (Christopher Johnson), 1855-1879
... include tight handles, a blade with plenty of metal... draw knife include tight handles, a blade with plenty of metal ...A draw knife is a hand tool that has a long straight blade between two handles. As implied by its name. it is drawn like a knife across the wood. It is used to prepare the timber for the next step of the process, removing loose wood and bark and giving a start to making the wood into a round or cylindrical shape. Then a finer smoother finish is given with a spokeshave, which has a shorter, curved blade. A draw knife could be used for the wooden spokes for cart, wagon and carriage wheels as well as for ladder staves and ship wheels. Features of a good draw knife include tight handles, a blade with plenty of metal to it and a blade length of 20 to 24 centimetres. This draw knife was likely made at least 150 years ago by C Johnson of Sheffield, who used the Trade Mark “C.J.” within a flag. Christopher Johnson began work as a cutler, making knives, pocket knives and tableware in his works at Howard Street in Sheffield. In the book ‘Hand-Saw Makers of Britain by Schaeffer and McConnel, Johnson is listed in 1855 as a saw maker. A later reference has the business name of Johnson & Company, Sheffield in 1879-1882. Australia was one of the company’s markets. The company continued until its closure in 1955.This draw knife is significant for being made in Sheffield, a location famous for steel and silver manufacturers. It is significant because of its age, being made no later than 1879, which is the time period of our maritime Village. It is a tool most suitable for the blacksmith's or a ship' smith's workshop for making spokes for the wheels of wagons and carts, and for making ship's wheels.. It is also significant for being made by C Johnson, who was well known for his good workmanship. Draw knife; flat cast steel fixed blade with rotating wooden handles each end. Round bulbous handles have two parallel scored lines around the end furthest from the blade and a brass collar between the handle and blade. A logo and inscription are cast into the centre front of the blade. Made by C Johnson. of Sheffield.Cast into steel blade: Sideways Image “C.J.” within {flag}, “JOHNSON / CAST STEEL”flagstaff hill, warrnambool, maritime village, maritime museum, shipwreck coast, great ocean road, spokes, wagon maker, blacksmith, cart maker, cart wheel maker, blacksmith tool, wagon wheel, c johnson, sheffield, wheelright, craftsman, woodwork, carriage wheel, ship wheels, shipwright, wooden spokes, ladder staves, draw knife -
 Flagstaff Hill Maritime Museum and Village
Tool - Caulking iron, Mid-to-late 20th century
Caulking is the use of cork or other substances to seal the seams and joints of the vessel to make them watertight. Caulking lasts for quite some time but eventually dries out and needs to be replaced. A hammer is often used with a caulking iron to drive it along the seams. The caulking iron’s blade is tapered to be narrower at the tip to make it easier to remove it from the joint. The shipwright’s tools on display in the Great Circle Gallery are connected to the maritime history of Victoria through their past owner, user and donor, Laurie Dilks. Laurie began his career as a shipwright in the mid-1900s, following in the wake of the skilled carpenters who have over many centuries used their craft to build and maintain marine vessels and their fittings. You can see Laurie’s inscription on the tool called a ‘bevel’. Laurie worked for Ports and Harbours, Melbourne, for over 50 years, beginning in the early 1960s. He and a fellow shipwright inscribed their names on a wheelhouse they built in 1965; the inscription was discovered many decades later during a repair of the plumbing. Many decades later Laurie worked on the Yarra moving barges up and down the river and was fondly given the title ‘Riverboat Man’ His interest in maritime history led him to volunteer with the Maritime Trust of Australia’s project to restore and preserve the historic WWII 1942 Corvette, the minesweeper HMAS Castlemaine, which is a sister ship to the HMAS Warrnambool J202. Laurie Dilks donated two handmade displays of some of his tools in the late 1970s to early-1980s. The varnished timber boards displayed the tools below together with brass plaques. During the upgrade of the Great Circle Gallery Laurie’s tools were transferred to the new display you see there today. He also donated tools to Queenscliffe Maritime Museum and Clunes Museum.The shipwright’s tools on display in the Great Circle Gallery are connected to the maritime history of Victoria through their past owner, user and donor, Laurie Dilks. Laurie began his career as a shipwright at Ports and Harbours in Melbourne in the mid-1900s, following in the wake of the skilled carpenters who have over many centuries used their craft to build and maintain marine vessels and their fittings.Caulking iron, or broad chisel, wooden handle with reinforcing on the ends, metal shaft that tapers down from the handle to the end of the blade. It has an inscription. It once belonged to shipwright Laurie Dinks.Stamped into metal " - - WARD /(image of crossed swords) WEFT / WARRANTED"flagstaff hill, warrnambool, great ocean road, shipwreck coast, maritime museum, maritime village, shipwright, carpenter, shipbuilding, ship repairs, hand tool, equipment, ship maintenance, cooper, tool, marine technology, caulking iron, jerry iron, broad chisel, caulking, sealing, laurie dilks, l dilks, port and harbours melbourne -
 Flagstaff Hill Maritime Museum and Village
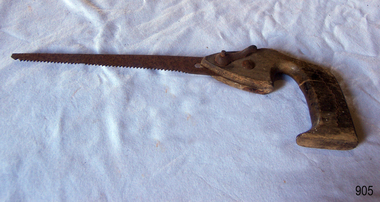
Tool - Saw, Mid 20th Century
A saw is a tool consisting of a tough blade, wire, or chain with a hard-toothed edge. It is used to cut through material, very often wood, though sometimes metal or stone. The cut is made by placing the toothed edge against the material and moving it forcefully forth and less vigorously back or continuously forward. This force may be applied by hand, or powered by steam, water, electricity or other power sources. An abrasive saw has a powered circular blade designed to cut through metal or ceramic. In ancient Egypt, open (unframed) saws made of copper are documented as early as the Early Dynastic Period, circa 3,100–2,686 BC. Many copper saws were found in tombs dating to the 31st century BC. Models of saws have been found in many contexts throughout Egyptian history. As the saw developed, teeth were raked to cut only on the pull stroke and set with the teeth projecting only on one side, rather than in the modern fashion with an alternating set. Saws were also made of bronze and later iron. In the Iron Age, frame saws were developed holding the thin blades in tension. The earliest known sawmill is the Roman Hierapolis sawmill from the third century AD used for cutting stone.The subject item is believed to date from around the mid to late 20th century and is regarded as a modern item. The maker is unknown but the pattern or design and type of wood used indicate it is a tool of modern manufacture. Compass saw blade with wooden with open handle blade attached with wingnut lever at side to adjust long narrow blade Noneflagstaff hill, warrnambool, flagstaff-hill, flagstaff-hill-maritime-museum, maritime-museum, shipwreck-coast, flagstaff-hill-maritime-village, wood cutting, wood saw, cross cut saw, cabinet makers tools, wood working tools, tool -
 Coal Creek Community Park & Museum
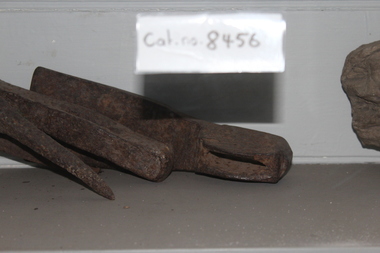
Adze head
8456.1 - Metal head od adze; wide, flat blade, with ovoid ring for where the handle would be secured, the opening oriented perpendicular to the blade. -
 Coal Creek Community Park & Museum
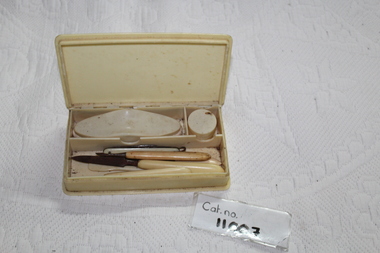
Nail Kit
Cream colour case box. 11007.1 - cream box with 3 sections varying sizes. 11007.2 - nail buffer cream white with two bumps on top. 11007.3 - cream container - empty. 11007.4 - sharp object with carvings - cream colour. 11007.5 - cream stick with two flat sides, one carved, on pointy. 11007.6 - cream handle with hook - metal 11007.7 - nail file with cream/yellow handle - file is rusted with sharp point on top. 11007.8 - long handle cream with curved and flat/straight surface. 11007.9 - same as above, but handle is a darker cream. 11007.10 - pocket knife - two blades - cream - has loop on top - DOES NOT OPEN.11007.3 - says England on bottom -
 Royal Australian and New Zealand College of Obstetricians & Gynaecologists (RANZCOG)
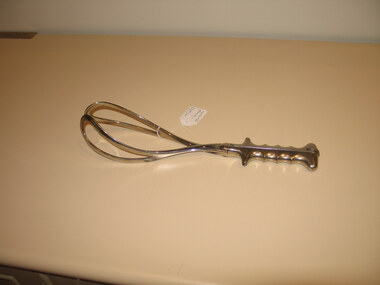
Elliot-type obstetrical forceps used by Colin Noel de Garis
These forceps belonged to the late Colin Noel de Garis. Also donated was a foetal scalpel electrode applicator- see donation form. There is a note that former honorary curator Peter Renou collected the donation. Peter Renou does not recall being involved in the donation.( Source: Grainne Murphy 15 November 2010.) This design of obstetrical forceps, with a screw in the handle, was introduced by George Thomson Elliot (1827-1871), a New York obstetrician. (Source: National Museum of American History, 'Obstetrical forceps') The 'sliding pivot' on the forceps was designed to prevent the compression of the baby's head. (Source: Elliot, GT, 'Description of a new midwifery forceps : having a sliding pivot to prevent compression of the foetal head, with cases', c.1860)"The Elliot forceps and its modifications (Elliot, Tucker-McLane, Tucker-Luikart) have shorter blades and an accentuated cephalic curve that is more suitable for a rounded fetal head that has not undergone extensive molding. In addition, Elliot instruments, because of their overlapping shanks, do not distend the perineum in the same way as the separated shanks of the Simpson-type forceps." (Source: Sakornbut, EL, 'Chapter 18 - Intrapartum Procedures', in Ratcliffe SD et al (eds.), 'Family Medicine Obstetrics', 3rd ed., 2008) Obstetric forceps, Elliot's. Consists of long shanks, made of forged chrome plated metal with metal handle, four finger grips, and distinctive screw and pin at the end of the handles. This screw functioned as a means of regulating the lateral pressure of the handles when in use. obstetric delivery -
 Royal Australian and New Zealand College of Obstetricians & Gynaecologists (RANZCOG)
Godson modification of Zwanke's stem pessary associated with Dr Frank Forster, Arnold & Sons, early 20th century
Godson modified the Zwanke pessary by adding a spring catch to the metal stem.Black vulcanite pessary with metal stem and hinged wings. This design is similar to a Zwanke's pessary. There are three small hinges in the middle of the wings and a metal stud. On the back of the left wing is the number "3 registered no. 5798". Maker's name 'Arnold and Sons' is inscribed on the flattened section of the flat blade.intrauterine device, pessary -
 Royal Australian and New Zealand College of Obstetricians & Gynaecologists (RANZCOG)
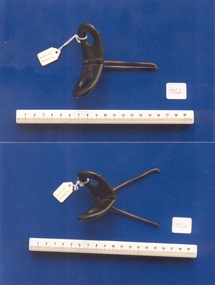
Simpson's cranioclast used by Dr Mitchell Henry O'Sullivan
Prior to the 1900s, complicated births, particularly where there was a disproportion between the size of the woman’s pelvis and the foetus’ head, often meant the death of the baby and the mother. Instruments for removing a dead or ailing foetus from within the mother were used to attempt to save the mother’s life. The cranioclast, first invented by Dr. James Simpson in the mid-19th century and later redesigned by others, was used for fetal destruction and removal. Fundamentally a strong pair of forceps, the cranioclast was used to crush the skull, decreasing its diameter. In some cases, this would allow normal uterine contractions to expel the foetus; in others, the physicians would use an obstetrical hook to pull the body out of the mother. Doctors disagreed as to the pelvic diameter that would necessitate this drastic intervention, but generally found that 3 to 3.5 inches was the smallest size through which a living infant could pass. Equally of debate was the pelvic size through which the dead fetus could be extracted. When vaginal extraction was deemed unadvisable, Caesarian section would be performed. As caesarean section became safer and more common with the advent of anaesthetics and antiseptic techniques, the use of cranioclasts and obstetrical hooks diminished. (Museum of Health Care, Kingston) Dr Mitchell Henry O'Sullivan worked in the Victorian country town of Casterton as a general practitioner from 1919 until his death in 1977. He also practiced obstetrics. His son, Dr David More O'Sullivan donated his obstetric bag and its contents to the College in 1999. The bag and contents are a unique time capsule of the type of instruments and pharmaceuticals used in the inter-war period.Hinged metal tool with bakelite handles at one end and serrated teeth at other end. The instrument is in two sections. The right or upper blade has a black bakelite handle. There are two screws on the inside of the handle, 5.5cm apart. In the centre of the blade is a screw notch in the shape of a small horseshoe. On the inner side of the blade is a depression extending most of the length. The left, or lower, blade also has a black bakelite handle. There are two screws on the inside of the handle approximately 6cm apart. Mobile metal clasps in the shape of an 'S' , with three serrations, is attached to the distal end of the handle, which enables the blades to be opened or closed. destructive instruments -
 Royal Australian and New Zealand College of Obstetricians & Gynaecologists (RANZCOG)
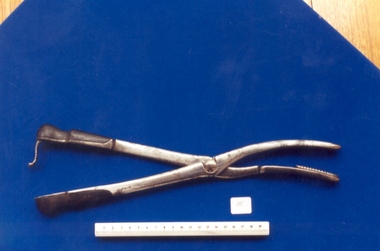
Tool - Barnes-Neville axis traction obstetrical forceps used by Dr Mitchell Henry O'Sullivan, Allen & Hanburys, England
Neville Barnes Obstetric Forceps have a cephalic and pelvic curve and are used for delivery of babies presenting as occipitoanterior. When used, the left blade is put on first followed by the right blade – the baby is then pulled down until the occiput is under the symphysis, then pulled around. (RACGP)Dr Mitchell Henry O'Sullivan worked in the Victorian country town of Casterton as a general practitioner from 1919 until his death in 1977. He also practiced obstetrics. His son, Dr David More O'Sullivan donated his obstetric bag and its contents to the College in 1999. The bag and contents are a unique time capsule of the type of instruments and pharmaceuticals used in the inter-war period.Set of metal forceps. Consists of two blades [204.1,.2] and detachable traction axis [204.3]. Inner aspect of right hand blade is inscribed ' Allen and Hanbury's - London'. '3' inscribed on axis traction handle.'Allen & Hanburys - London', '3'obstetric delivery -
 Royal Australian and New Zealand College of Obstetricians & Gynaecologists (RANZCOG)
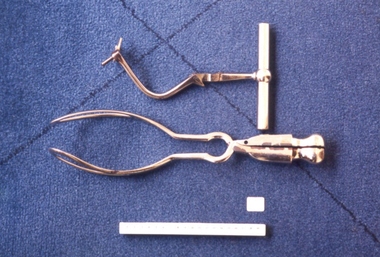
Simpson-type obstetrical forceps used by Dr Mitchell Henry O'Sullivan, Skidmore, 1851- 1898, approximate date of manufacture
These are long obstetrical forceps following the design of Sir James Young Simpson (1811-1870). They are longer and heavier than Simpson's type of short forceps and were used to deliver babies from higher up the birth canal. Simpson's long and short forceps were adapted in many later designs. (Science Museum Group)Dr Mitchell Henry O'Sullivan worked in the Victorian country town of Casterton as a general practitioner from 1919 until his death in 1977. He also practiced obstetrics. His son, Dr David More O'Sullivan donated his obstetric bag and its contents to the College in 1999. The bag and contents are a unique time capsule of the type of instruments and pharmaceuticals used in the inter-war period.Metal forceps, consisting of two blades with detachable traction axis.obstetric delivery -
 Royal Australian and New Zealand College of Obstetricians & Gynaecologists (RANZCOG)
Tool - Tongue depressor with anaesthetic tube attachment used by Dr Lorna Lloyd-Green
Metal tongue depressor with anaesthetic tube attachment. Consists of proximal and distal blades, and a blade shaft. "4" marking on the upper distal end of the blade. There is a short metal tube alongside the proximal flange, attached to the upper section of the flange, which is turned inwards and down with a small bulb on the end. Plastic or rubber tubing can be attached to this bulb. There is a smaller rounded flange at the distal end of the shaft. -
 Royal Australian and New Zealand College of Obstetricians & Gynaecologists (RANZCOG)
Tongue depressor with anaesthetic tube attachment used by Dr Lorna Lloyd-Green
This particular type of tongue blade comes in sizes 2,4,6, and 8 and can be easily fitted to the Boyle Davis mouth gag.Metal tongue depressor, metal with a metal tube and nozzle attachment. Consists of a shaft and two metal sections at right angles to the shaft. Distal section is turned inwards to act as a lever. Proximal section is shaped as a flange with multiple serrations on the underside. There is a small metal tube attached along the entire length of the flange. The tube is turned downwards at the junction of the flange and the shaft, with a small bulb at the end. A small piece of tubing can be attached to this bulb. -
 Royal Australian and New Zealand College of Obstetricians & Gynaecologists (RANZCOG)
Ferguson's bone cutter used by Dr Lorna Lloyd-Green
In the 1950s and 60s, Ferguson's bone cutters were used by obstetricians to remove the foreskin during circumcisions. The scoring on the handles is to prevent the tool slipping in the user's grip when in use.Metal bone cutter, with hand grip scoring on outer arms. Similar in appearance to pliers, with short cutting blades.circumcision -
 Maffra Sugarbeet Museum
Beet Hoe
These hoes were the standard thinning tool for sugarbeet, and allowed a standard space between seedlings. Thinning was back-breaking work, usually carried out by a transient work force.These hoes are probably still commonly in the possession of old gardeners. They are important as the only tool required of a large, transient workforce that worked under extremely difficult conditions.A metal thinning hoe of four piece construction, with a turned wooden handle attached to the tool by a nail. The blade is welded onto a bent holder, which is in turn welded to the metal extension of the handle. There is cloth inside the ferrule.sugarbeet -
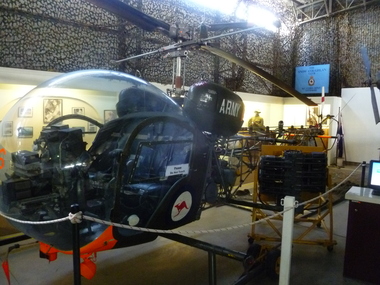 National Vietnam Veterans Museum (NVVM)
Vehicle - Helicopter, Sioux, Bell 47G - 3 BI, About 1953
The Bell Sioux was used as one of the primary equipment of the 161 Reconnaissance flight. Every major Australian unit in Vietnam would have utilised their services. The helicopter on display did not serve in Vietnam.The Bell 47 is a two-bladed, single engine light observation helicopter made by Bell Helicopters. It has a bubblt cockpit for two crew and the tail is open metal framework.This helicopter bears a full set of Australian Army insignia and carries the A.A. Serial No. A1-406.military equipment, helicopters, sioux -
 Bendigo Historical Society Inc.
Tool - PITTOCK COLLECTION: THREE WOOD SPOKEHAVES
Pittock collection: three wood spokeshaves, metal construction * one straight spokeshave, marked 64, 230 mm L x 40 mm W * one rounded spokeshave, marked B, 250 mm L x 60 mm W * one specialised marking/shaping tool, wide guide, marked Stanley No. 66 Pat'd Feb 9.86, 300 mm L x 50 mm W x 55 mm D * variety of shaping tool blades for Stanley tool, 60 mm x 15 mm blades. Stored in Havelock Flake Cut Pure Virginia Tobacco tin, 80 mm L x 55 mm W x 15 mm D Items stored in Pittock coach builder's box, reference 13000.1. -
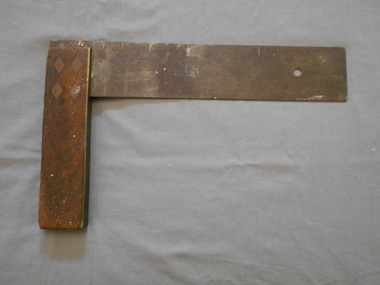 Bendigo Historical Society Inc.
Tool - PITTOCK COLLECTION: METAL & TIMBER LARGE SET SQUARE
Solid timber & metal Set Square Dark timber and brass short leg, and steeel wide larger leg Marked "A. Pittock"and "P"one side; with five impressions of "P" on opposite side Steel blade slightly sustedsnil