Showing 2210 items matching " bendigo trams"
-
 Ballarat Tramway Museum
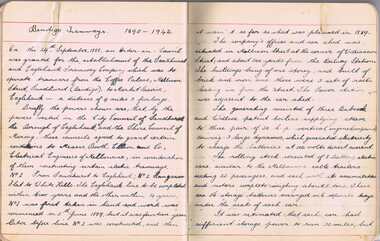
Document - Handwritten Notes, Wal Jack, "Bendigo Tramways 1890 - 1942", 1930-1940's
... operations in Bendigo and the tramcars. Trams tramways Bendigo ...Covers the development of the battery tramway, depot, battery tramcar operations, steam locomotives, horse trams, steam trams, track, managers of the private company, ESCo purchase, electric trams, trams from Melbourne, SEC, description and extension to North Bendigo. May have been copied from another source.Yields information about the history of tramway operations in Bendigo and the tramcars.Handwritten copy of an article or an original article, titled "Bendigo Tramways 1890 - 1942" Eleven pages. Contained within Reg Item 5485 - Service Exercise Book, black covers, with label, red binding titled "No. 2 - Ballarat Tramways & S.E.C. Systems". trams, tramways, bendigo, battery trams, steam trams, sec, esco -
 Ballarat Tramway Museum
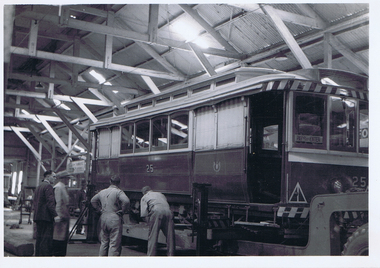
Photograph - Digital image, Wal Jack, 6/10/1960 12:00:00 AM
... the loading and departure of Ballarat No. 25 to Bendigo in 1960. Trams ...Yields information about the loading and departure of Ballarat No. 25 to Bendigo in 1960.Digital image from the Wal Jack Ballarat Album of a photograph of No.25 being loaded onto the Yellow Express Low Loader within the depot - 6-10-1960. Has Les Denmead standing alongside. See image i2 for rear of photograph. See image i3 for hi res scan of print. See image i4 for hi res scan of negative. See Reg Items 1478, 5241, 5242, 7759 and 7766 for a series of 5 photos of this event.On rear of photograph in ink "SEC, Ballarat Loading No. 25 for Bendigo onto Yellow Express Loader - Wendouree Depot Ballarat 6-10-1960." and in top Right hand corner Wal Jack stamp with "T255" written in.trams, tramways, transporting trams, yellow express, bendigo, moving trams, tram 25 -
 Ballarat Tramway Museum
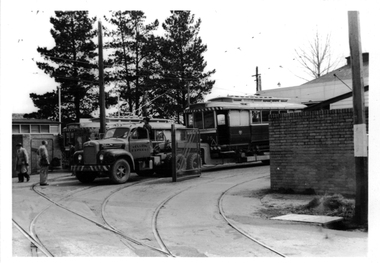
Photograph - Digital image, Wal Jack, 6/10/1960 12:00:00 AM
... the loading and departure of Ballarat No. 25 to Bendigo in 1960. Trams ...Yields information about the loading and departure of Ballarat No. 25 to Bendigo in 1960.Digital image from the Wal Jack Ballarat Album of a photograph of No.25 loaded onto the Yellow Express Low Loader outside the depot - 6-10-1960. See image i2 for rear of photograph. See image i3 for hi res scan of print. See image i4 for hi res scan of negative See Reg Items 1478, 5241, 5242, 7759 and 7766 for a series of 5 photos of this event.On rear of photograph in ink "SEC, Ballarat Loading No. 25 on Loader for Bendigo in depot yards Wendouree 6-10-1960." and in top Right hand corner Wal Jack stamp with "T256" written in.trams, tramways, transporting trams, yellow express, bendigo, moving trams, tram 25 -
 Ballarat Tramway Museum
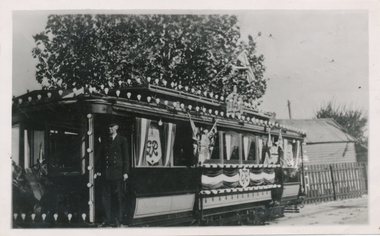
Photograph - Black & White Photograph/s, May. 1937
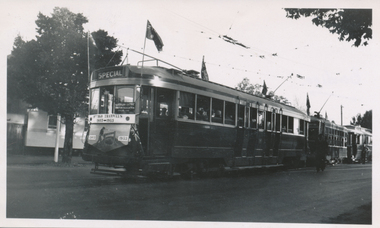
... Parade Ballarat Ballarat goldfields Trams tramways Bendigo ...Black and White print contained within the Wal Jack Bendigo and Geelong Album, see Reg Item 5003 for more details. Photograph of Bendigo 21 decorated for the coronation of George VI, May 1937 on the depot access track. Source unknown. Wal's album notes provides details of the photograph, the note on the back is incorrect. On the rear in ink "Bendigo Decorated car, decorated for centenary there".trams, tramways, bendigo, decorated trams, coronation, george vi, tram 21 -
 Ballarat Tramway Museum
Photograph - Black & White Photograph/s - set of 2, Keith Kings, 11/04/1953 12:00:00 AM
... Parade Ballarat Ballarat goldfields Trams tramways Bendigo ...Black and White prints contained within the Wal Jack Bendigo and Geelong Album, see Reg Item 5003 for more details. Set of two photographs of the AETA Special trams Golden Jubilee Anniversary Saturday 11-4-1953, by Keith Kings. .1 - Bogie 23 and Birney 29 and service car 20 at Golden Square. .2 - Birney 29, Bogie 23 at Quarry Hill. On the rear in blue ink .1 - "Bendigo, AETA specials Bogie 23 & Birney 29 (also service car 20), at Golden Square, Saturday 11/4/53. /Golden Jubilee Celebrations. (Two flags broken off drop centre roof by centre pole notices!!!!)" .2 - "Bendigo, AETA specials Bogie 23 & Birney 29, at Quarry Hill, Saturday 11/4/53. /Golden Jubilee Celebrations." Both have the K. S. Kings copyright stamp in the top right hand corner, and the numbers H(f)(iii) and H(e)(ii) written in respectively.trams, tramways, bendigo, decorated trams, gold tram, quarry hill, golden square, aeta -
 Ballarat Tramway Museum
Photograph - Black & White Photograph/s, Keith Kings, 29/12/1947 12:00:00 AM
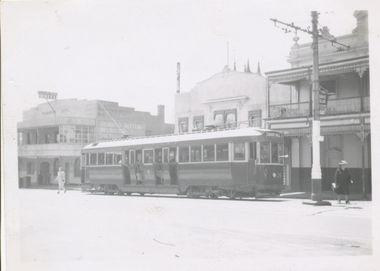
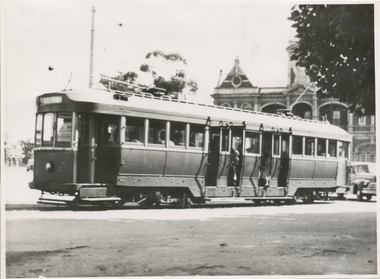
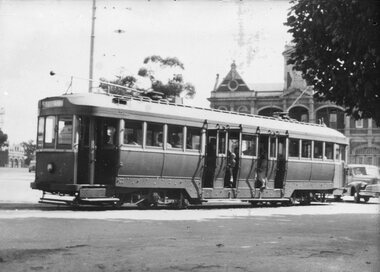
... Parade Ballarat Ballarat goldfields Trams tramways Bendigo Bogie ...Black and White print contained within the Wal Jack Bendigo and Geelong Album, see Reg Item 5003 for more details. Photograph of No. 26 in Mitchell St Bendigo, outbound to Quarry Hill with the Terminus Hotel in the background. Wal's album notes date the photo as 29-12-1947. Photo by Leon Marshall Wood. In ink on rear "SEC of Victoria, Bendigo, Bogie drop centre car No.26 acquired from M&MTB 1947, ex MMTB "C" class, owned originally by Hawthorn Tramways Trust". In pencil, different hand writing "ex 135" and in bottom left hand corner, Leon Marshall Wood photo number "SEC 22" written in.trams, tramways, bendigo, bogie trams, quarry hill, mitchell st, tram 26 -
 Ballarat Tramway Museum
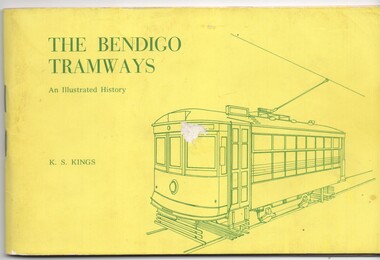
Book, Keith Kings, "The Bendigo Tramways", Feb. 1972
... Parade Ballarat Ballarat goldfields Trams tramways Bendigo ...Book, 80 pages, gloss art paper, in black ink with a yellow card cover in green ink, centre stapled, titled "The Bendigo Tramways" Details history of Bendigo tramways, its tramcars and the involvement of the various operators. Has maps and photographs. Written by Keith Kings and published by the Victorian Division of the Australian Railway Historical Society and others at the time of the closure of the Bendigo system. Has details of the various organisations that published the book on the rear cover. Cover, index page, maps and rollingstock lists have been scanned see jpg images i1 to i7 For book itself see pdf images i1 to i4 326.1 - ditto - purchased by W.A. Doubleday for BTM ex Scottsbluff, NE, USA 8/2003. Added 27/09/03. See Reg Item 4242 for other copies of this book which has pencil annotations.trams, tramways, bendigo, battery trams, steam trams, history -
 Ballarat Tramway Museum
Photograph - Bendigo tram 26 Eaglehawk, Keith Kings, 8/04/1950
... Bendigo tram 26 Eaglehawk... tramways Bendigo Bogie Trams tram 26 In ink on rear "SEC Victoria ...Photograph of No. 26 the Eaglehawk terminus, 8-4-1950, photo by Keith Kings. Has the Eaglehawk Town Hall in the background. See item 9463 for a glass plate negative.Yields information about tram 26 and the Eaglehawk Destination.Black and White print contained within the Wal Jack Bendigo and Geelong Album, see Reg Item 5003 for more details.In ink on rear "SEC Victoria, Bendigo, Bogie car No.26 at Eaglehawk". Date "8/4/1950" in bottom right hand corner. Keith Kings copyright stamp in top left hand corner with "D(k)(vi)" and "enlargement" written in.trams, tramways, bendigo, bogie trams, tram 26 -
 Ballarat Tramway Museum
Photograph - Glass plate - Bendigo tram 26 Eaglehawk, Keith Kings, 8/04/1950
... Glass plate - Bendigo tram 26 Eaglehawk... and the Eaglehawk Destination. Trams tramways Bendigo Bogie Trams tram 26 ...Photograph of No. 26 the Eaglehawk terminus, 8-4-1950, photo by Keith Kings. Has the Eaglehawk Town Hall in the background. Same as item 5783.Yields information about tram 26 and the Eaglehawk Destination.Glass plate negative.trams, tramways, bendigo, bogie trams, tram 26 -
 Melbourne Tram Museum
Book, Keith Kings, "The Bendigo Tramways", Feb. 1972
... Trams tramways Bendigo Battery Trams Steam Trams History Book ...Book, 80 pages, gloss art paper, in black ink with a yellow card cover in green ink, centre stapled, titled "The Bendigo Tramways" Details history of Bendigo tramways, its tramcars and the involvement of the various operators. Has maps and photographs. Written by Keith Kings and published by the Victorian Division of the Australian Railway Historical Society and others at the time of the closure of the Bendigo system. Has details of the various organisations that published the book on the rear cover.trams, tramways, bendigo, battery trams, steam trams, history -
 Melbourne Tram Museum
Photograph - Colour Photograph/s, Keith Kings, 2/10/1988 12:00:00 AM
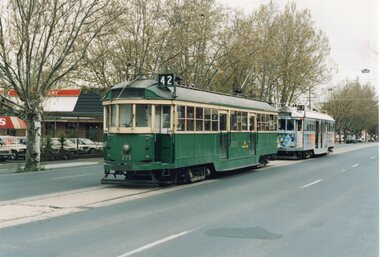
... Trams tramways W2 class SW2 class Bendigo Decorated Trams 150th ...Colour print of W2 275, marked as 1275, followed by W2 441 in High St Bendigo, near Myrtle St on a test run 2/10/1988. Photo by J. Bounds. W2 441 - decorated in 1983 for the 150th anniversary of Victoria.Details in ink on rear. In an accompanying envelope - not retained - "ex Jeff Bounds 28/7/89 - (Exchanged)."trams, tramways, w2 class, sw2 class, bendigo, decorated trams, 150th anniversary victoria, tram 275, tram 1275, tram 441 -
 Ballarat Tramway Museum
Administrative record - Agreement, Bendigo Tramway Co, "City Council of Bendigo et al and the Bendigo Tramway Co.", 1891
... Agreement between the "The City Council of Bendigo, the Borough ...Document or administrative record set outs a Modified Agreement between the "The City Council of Bendigo, the Borough Council of Eaglehawk, and the Shire of Council of Marong and the Bendigo Tramway Company", dated 3/9/1891. Notes at the time the Sandhurst and Eaglehawk Electric Tramway Co. Ltd (the battery tram operator) was being liquidated. Refers to previous agreements, agreement with Charles Frederick Kennedy, agreement conditions, modifications to the previous agreements and sealing clauses.Yields information about the formation and agreements with the Bendigo Tramway Co. and the relevant councils.Document - 3 printed sheets stapled within a light green set of covers.tramways, bendigo, steam trams, agreements, battery trams -
 Ballarat Tramway Museum
Photograph - Black & White Photograph/s, early 1960's
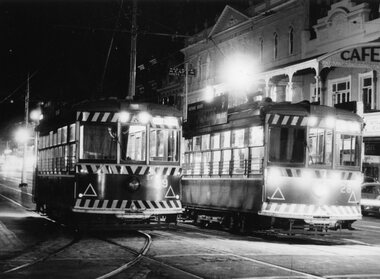
... Black and White print of Bendigo SECV Bendigo trams 29... Bendigo Charing Cross tram 28 tram 29 Black and White print ...Black and White print of Bendigo SECV Bendigo trams 29 and 28 (Birney's) at night at the Charing Cross terminus for the Golden Square - North Bendigo route. Trams have dash canopy lights, but no large white strip under the drivers windows. Photo not dated but appears to be at during early 1960's. Has the Beehive Stores building, "Dad and Dave Cafe" and "W.I. Jones Chemist" store in the background. Tram 28 has a SECV briquette ad on the roof.trams, tramways, pall mall, bendigo, charing cross, tram 28, tram 29 -
 Bendigo Historical Society Inc.
Document - BASIL MILLER COLLECTION: TRAMS - MR FRED WOODS
... . Nine (9) pages.Brief history of Bendigo Trams during the time...Bendigo Historical Society Inc. Bendigo Historical Society ...Cover sheet and notes of a talk given by Mr Fred Woods. Nine (9) pages.Brief history of Bendigo Trams during the time Steam Trams were in use, by Mr Fred Woods of Carpenter Street Quarry Hill. Inscription: Railway Historical Society. 10 special Trams, Oct, 1962.person, individual, basil miller -
 Ballarat Tramway Museum
Photograph, Tramway Museum Society of Victoria (TMSV), Bendigo Birney 28 - bridgework, 1965
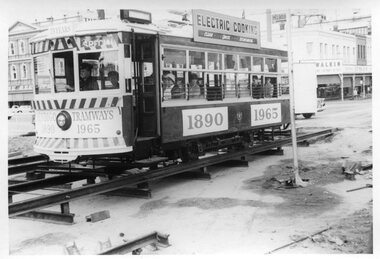
... of Bendigo trams (1890 to 1965) crossing temporary track at Charing... decorated for the 75th anniversary of Bendigo trams (1890 to 1965 ...Photo shows Bendigo 28 decorated for the 75th anniversary of Bendigo trams (1890 to 1965) crossing temporary track at Charing Cross during the reconstruction of the Bendigo Creek bridge during early 1965 - see Electric Traction Vol. 20, No. 6, June 1965. The front cover has a photo by H R Clark of the decorated car. The photo shows the method of supporting the rails during the work prior to completion of concreting. Yields inforamation about bridge reconstruction in Bendigo and their 75th anniversary.Black and white photograph printTMSV Shop stamptrams, tramways, bendigo, birney, tram 28, bridgeworks, charing cross, 75th anniversary -
 Ballarat Tramway Museum
Photograph - Bendigo - Adelaide 302 in Melbourne, 25/1/1982
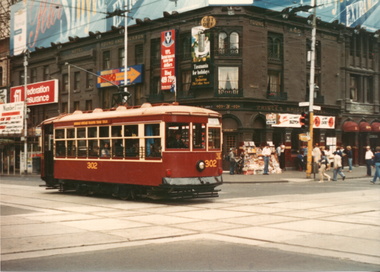
... (former Bendigo tram 29) in Melbourne for the 1982 Australia Day... (former Bendigo tram 29) in Melbourne for the 1982 Australia Day ...Set of two colour prints of ex Adelaide Birney No. 302 (former Bendigo tram 29) in Melbourne for the 1982 Australia Day Transport Pagent. The first photo is at Swanston and Flinders St with Young and Jackson Hotel in the background and the second at Flinders and Market Streets with a Hitachi Silver train on the railway viaduct. Not known who took the photographs. See Feb. 1982 issue of Electric Traction for a note regarding this tram in Melbourne for the Pagent.Yields information about Bendigo No. 29 as Adelaide 302 in Melbourne Set of two Colour prints - on plain papertramcars, tram 29, bendigo, birney tramcars, flinders st, swanston st, pageant -
 Melbourne Tram Museum
Photograph - Series of 4 - VR tramcar 20, Lloyd Rogers, 1992, 1993 and 2005
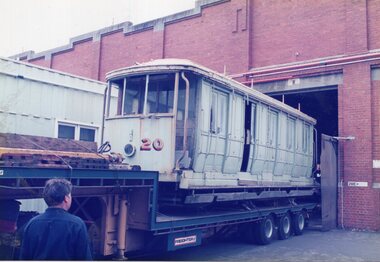
... 20 is being reassembled at Bendigo tram depot 1-2-2005.... is being reassembled at Bendigo tram depot 1-2-2005. Yields ...Series of four photographs by Lloyd Rogers of Victorian Railways tramcar No. 20 1 - arriving at Preston Workshops - 2/12/1992 2 - The body of VR Tram 20 on stands at Preston Workshops - 1993 3 - the 21E truck from the tram at the Preston Workshops with Lloyd Rogers standing alongside 1993 4 - The 21E truck from VR 20 is being reassembled at Bendigo tram depot 1-2-2005.Yields information about former VR tramcar No. 20 after its recovery.Series of four photograph printed on Kodak paper.Two have details on rear including photo numbervr trams, tram 20, tramcars, preston workshops, bendigo -
 Ballarat Tramway Museum
Slide - 35mm slide/s - set of 3, Noel Simons, 22/11/1962 12:00:00 AM
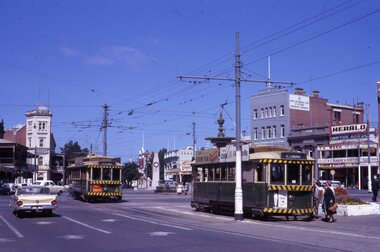
... with Electricity". Passengers are boarding the tram. 1190.2 - Bendigo... Parade Ballarat Ballarat goldfields Tramways trams Bendigo ...Set of 3 transparencies taken on 22/11/1962 on Kodak mounts. 1190.1 - No. 7 (bound for North Bendigo) at the Charing Cross stop with No. 19 just left for Quarry Hill. Has the buildings on the south side of High St. in the background, including RACV building. No. 7 has front dash panel ad for Streets ice cream, and roof ads for Ilford Film and an SEC "Cook with Electricity". Passengers are boarding the tram. 1190.2 - Bendigo No. 2 at Charing Cross with fountain in the background and other buildings on the south side of High St. Tram has two SEC roof ads - good side on view - "Electric Cooking - Matchless" and "Switch to Electric Cooking". 1190.3 - Nos. 19, 2 and 7 at Charing cross with a Austin ? motor car. Has buildings on the south side of High St. in the background, along with SEC and Ilford film roof ads.Information written on in black ink and date stamped on purple ink. 1190.1 - "Nos. 19 and 7 at Alexandra Fountain, Charing Cross, Bendigo" 1190.2 - "No. 2 at Alexandra Fountain, Charing Cross, Bendigo" 1190.3 - "Nos. 19, 2 and 7 at Alexandra Fountain, Charing Cross, Bendigo" tramways, trams, bendigo, charing cross, alexandra fountain, tram 2, tram 7, tram 19 -
 Bendigo Historical Society Inc.
Photograph - HARRY BIGGS COLLECTION: EAGLEHAWK
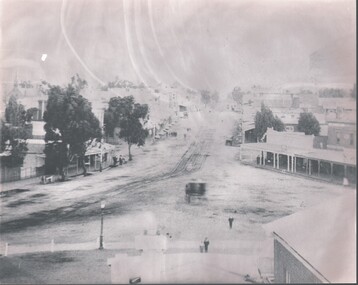
... of Eaglehawk Road from the Town Hall looking towards Bendigo. Tram... of Eaglehawk Road from the Town Hall looking towards Bendigo. Tram ...Photograph. Harry Biggs Collection. 1 black & white photo of Eaglehawk Road from the Town Hall looking towards Bendigo. Tram tracks link the two settlements. Three children are in the foreground. A horse & coach are in the foreground also. A line of shops are on either side of the road with many people standing around.photograph, streetscape, eaglehawk, harry biggs collection, eaglehawk -
 Ballarat Tramway Museum
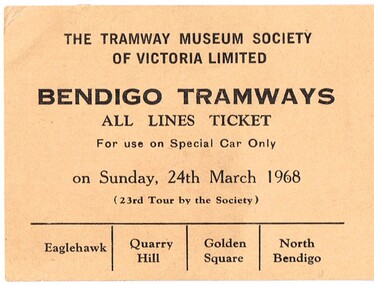
Ephemera - Ticket, Tramway Museum Society of Victoria (TMSV), TMSV Bendigo Tour, Mar. 1968
... of Victoria tour to Bendigo trams on Sat. 24 March 1968. Printed... Society of Victoria tour to Bendigo trams on Sat. 24 March 1968 ...Ticket used for passengers on the Tramway Museum Society of Victoria tour to Bendigo trams on Sat. 24 March 1968. Printed on light brown card with the name the name of the TMSV, date, ticket punch positions for the four Bendigo routes. Ticket printed in landscape format with black ink. See image for details.trams, tramways, tickets, tmsv, bendigo, tours -
 Ballarat Tramway Museum
Photograph - Colour Photograph/s, 1960's
... Colour postcard size print of an SEC Bendigo trams 24... Parade Ballarat Ballarat goldfields Bendigo Depot tram 24 tram 20 ...Colour postcard size print of an SEC Bendigo trams 24 and 20 parked on the Bendigo depot access track. Tram 24 on bridge showing destination "SPECIAL" with 20 in background. Tram 24 has two roof ads, do not appear to be SEC ads. Depot buildings in background. Both trams fitted with dash canopy lighting and large white strip under cabin. Printed on AGFA paper.bendigo, depot, tram 24, tram 20 -
 Bendigo Historical Society Inc.
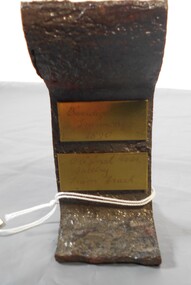
Ephemera - Cross section of tram track Bendigo 1890
... Cross section of tram track Bendigo 1890...Original No. 29 Battery Tram Track, Bendigo Tramways 1890... Collection historic Bendigo tram track profile 1890 from original ...BHS Collectionhistoric Bendigo tram track profile 1890 from original Tram depot in Mollison StreetOriginal No. 29 Battery Tram Track, Bendigo Tramways 1890. Dug up from Mollison Street, Bendigo, where the Tram Depot used to be sited. Brass tags note Bendigo Tramways 1890 and Original No. 29 Battery Tram Tracktramways bendigo, tram track profile 1890 -
 Ballarat Tramway Museum
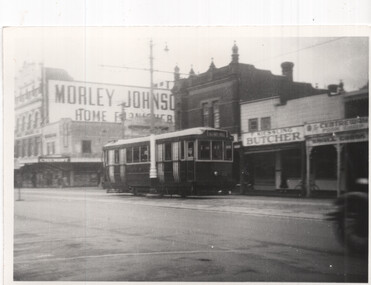
photograph - Set of 5 Black & White - Bendigo tramways, Peter Duckett, early 1950s
... Set of five photographs of Bendigo trams photographed... of Bendigo trams photographed by Peter Duckett, early 1950s 1 ...Set of five photographs of Bendigo trams photographed by Peter Duckett, early 1950s 1 - Bendigo 22 in Mitchell Street. Tram has the destination of Quarry Hill. In the background is the Morley Johnson Home furnisher and F. Kessling Butcher 2 - Tram No. 3 at the depot. 3 - Tram 7 on a Quarry Hill service. 4 - Bogie tram 24 at the depot 5 - Track cleaner - scrubber and another ex Melbourne single trucker at the depot.Yields information about Bendigo trams early 1950sSet of five black and white photographs by Peter Duckett.Details the image on the rear of the print in ink.bendigo, tramcars, bendigo tramways, quarry hill, charing cross, mitchell st, tram 22, tram 3, tram 7, tram 24, scrubber tram -
 Ballarat Tramway Museum
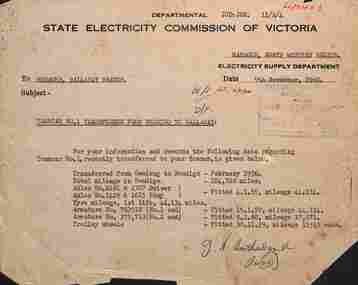
Letter, State Electricity Commission of Victoria (SECV), "Tramcar No. 1 transferred from Bendigo to Ballarat", 9/11/1960
... Manager North Western Region (Bendigo) giving details of Bendigo... 1960 tramways Ballarat reports SECV tram 1 tram 37 Bendigo ...Memo dated 9/11/1960 to the Manager of Ballarat Branch from Manager North Western Region (Bendigo) giving details of Bendigo tram No. 1 transferred to Ballarat. Gives history, mileages, axle numbers, tyre mileage, armatures, and trolley wheels, including fitting date. The tram became Ballarat 37 (the second one) and is now at the Sydney Tramway Museum. Signed by Mr Sutherland. See item 5549 for dates of transfer.Yields information about Bendigo No. 1 when it was transferred to Ballarat during October 1960Memo on SECV letterhead, typed with handwritten signatures and receipt stamp.tramways, ballarat, reports, secv, tram 1, tram 37, bendigo, tramcars -
 Bendigo Historical Society Inc.
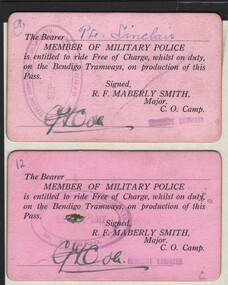
Document - BASIL MILLER COLLECTION: TRAMS - TRAMWAYS PASS
... Two (2) pink cards, Bendigo Tramways passes dated September... for free travel on Bendigo Trams. No.9 issued in the name ...Two (2) pink cards, Bendigo Tramways passes dated September 14 1917, issued to Military Police for free travel on Bendigo Trams. No.9 issued in the name of Pete.Sinclair and signed by the 'Resident Engineer', No.12 does not have bearer name, but, is signed by the 'Resident Engineer'. A Photocopy of the No. 9 card is also enclosed.person, individual, basil miller -
 Ballarat Tramway Museum
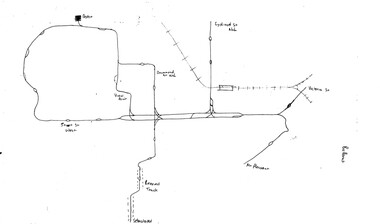
Map, Ballarat and Bendigo tram systems, 1960's or 1970's
... Ballarat and Bendigo tram systems...Set of two hand drawn maps of the Ballarat and Bendigo tram... of the Ballarat and Bendigo tram systems, showing loops, terminus, depots ...Yields information about the extent of the Ballarat and Bendigo tramway systems and possibly has a strong association with the work of Tom Murray.Set of two hand drawn maps of the Ballarat and Bendigo tram systems, showing loops, terminus, depots and rail lines, including out of use loops and reserved track. Possibly made during the 1960's or early 1970's. Drawn on lined foolscap paper - have been torn from a pad.trams, tramways, map, drawings, ballarat, bendigo -
 Ballarat Tramway Museum
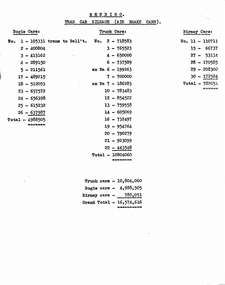
Document - Report, State Electricity Commission of Victoria (SECV), "Bendigo Tram car Mileage (Air Brake cars)", c1972
... "Bendigo Tram car Mileage (Air Brake cars)"...Report - typed quarto sheet, titled "Bendigo Tram car... be at the completion. Trams tramways Bendigo Tramcars Mileage Birney Report ...Yields timetable information about the Bendigo tramcar mileages, though no date provided. May be at the completion.Report - typed quarto sheet, titled "Bendigo Tram car Mileage (Air Brake cars)", giving a mileage figure for each tramcar, broken down into Bogie, Truck cars (4 wheels) and Birney cars. Undated. Based on the knowledge of the compilation of the Ballarat figures towards closure this should be considered an estimate, not an accurate figure. trams, tramways, bendigo, tramcars, mileage, birney -
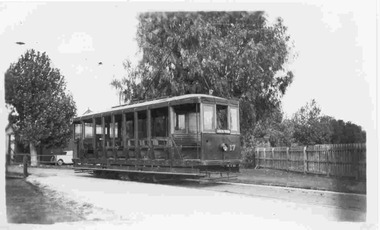 Ballarat Tramway Museum
Photograph - Black & White Photograph/s, Keith Kings, Apr. 1949
... of SEC Bendigo tram 17 on the depot lead, Easter Monday (?) April... Parade Ballarat Ballarat goldfields trams tramways Bendigo Open ...Black and White photograph contained with Reg. Item 1902 - Photo Album from Keith Kings to Les Denmead 1970. Photograph of SEC Bendigo tram 17 on the depot lead, Easter Monday (?) April 1949. Keith Kings No. C(a)(1) Scanning: i - image file, p - presentation file, b - back of photograph.Stamp in top left hand corner and handwritten number with "K.S. Kings No. C(a)(1) Copyright reserved". In blue ink "Bendigo / No.17 / Open bench car / Depot / 4/49".trams, tramways, bendigo, open bench tramcars, depot, tram 17 -
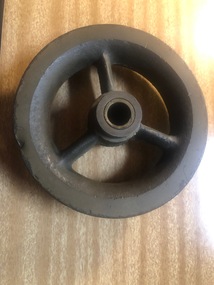 Melbourne Tram Museum
Functional object - Trolley Wheel, Melbourne & Metropolitan Tramways Board (MMTB), 1950's?
... and Bendigo trams.... and Bendigo trams. Trolley Wheel Functional object Trolley Wheel ...Trolley Wheel - cast brass, fitted with a cylindrical bush in the centre. Used on Melbourne trams until the late 1950's when changed for trolley skids to bring the power from the overhead into the tram. Fitted to the end of a trolley pole with another cast item known as a hasp. Has been used. Used by Ballarat and Bendigo trams.trams, tramways, tramcar component, overhead, trolley wheels, trolley poles -
 Ballarat Tramway Museum
Slide - 35mm slide/s - set of 17, Noel Simons, 20/11/1962 12:00:00 AM
... outbound for North Bendigo. Photo taken after tram has passed... Parade Ballarat Ballarat goldfields Tramways trams Bendigo Quarry ...Set of 17 transparencies taken on 20/11/1962 on Kodak mounts. 1187.1 - Bendigo No. 2 at the Quarry Hill terminus, showing destination of Quarry Hill. Has Cohns Drinks and Streets Ice Cream ads on dash panel, a SEC 'electric cooking' roof ad and another roof ad. Shows the Y terminus at this location, but tram standing just before it. Overhead in position. 1187.2 - as above, but closer up. 1187.3 - as above, but from the north side, showing cemetery in the background. 1187.4 - Bendigo No.3 at Eaglehawk terminus. Tram showing destination of Quarry Hill. Has the various buildings at Eaglehawk in the background including the Foodland store. Has Streets Ice cream and White Horse Whiskey ads on the dash panel. 1187.5 - Bendigo No. 18 at Garden Gully crossing loop, in bound, with destination of Eaglehawk. Passengers waiting for an Eaglehawk tram at the stop. Has a white horse whiskey ad on dash panel and SEC roof ads. Conductor standing in doorway looking out. 1187.6 - Bendigo No. 7 inbound in Nolan St. at cnr of McCrae St. showing destination of Golden Square. Has Streets Ice cream ad on dash panel and a Castrol Roof ad. 1187.7 - Bendigo No. 19 at the North Bendigo terminus with railway level crossing in background. Tram has a Cohns Drinks ad and an SEC 'Electric Cooking' roof ad. 1187.8 - Bendigo No. 2 at the Quarry Hill terminus, looking back into Bendigo, showing destination of Eaglehawk. 1187.9 - Bendigo No. 21 in McCrae St, near Nolan St outbound for North Bendigo. Photo taken after tram has passed photographer. 1187.10 - Bendigo Nos. 4 and 26 at Charing Cross in View St. with fountain alongside and the Beehive, Ezywalkin Buildings in the background. No. 26 has a Sandhurst Milk and SEC 'Electric Cooking' roof ad. 1187.11 - close up of 22E maximum traction truck and folded footstep. 1187.12 - Bendigo No. 19 at Charing Cross terminus, after tram has passed photographer, showing destination of North Bendigo, with the Beehive building in the background and passengers boarding tram. 1187.13 - Bendigo No. 11, turning from View St. into Pall Mall, showing Special with the conductor holding point bar. Has the Beehive and Ezywalkin Buildings in the background. 1187.14 - No. 7 at Charing Cross terminus, in Pall Mall, bound for Golden Square. Has the Beehive and Ezywalkin buildings in the background and passengers waiting at the tram stop. 1187.15 - No. 18 at the Charing Cross terminus, bound for Eaglehawk. Has the Beehive and Ezywalkin buildings in the background and passengers waiting at the tram stop. Also has the 'Safety Zone' sign in the photograph. 1187.16 - No. 2 at Quarry Hill terminus, night or dusk photo. Tram showing destination of Depot. 1187.17 - No. 26 at Charing Cross, night photo. Tram has destination of Quarry Hill, but is on the line for Eaglehawk. Photo looks along Mitchell St. Also shows Safety Zone sign. Information written on in black ink and date stamped on purple ink. 1187.1 - "No. 2 at Quarry Hill terminus Bendigo" 1187.2 - "No. 2 at Quarry Hill terminus Bendigo" 1187.3 - "No. 2 at Quarry Hill terminus Bendigo" 1187.4 - "No. 3 at Eaglehawk terminus" 1187.5 - "No. 18 in Mt Korong Road, Long Gully at cnr of Havilah Road (Eaglehawk Route)" 1187.6 - "No. 7 in Nolan St. Bendigo, at Cnr of McCrae St., near lake Weeroona, (North Bendigo Route)' 1187.7 - "No. 19 at North Bendigo terminus" 1187.8 - "No. 2 at Quarry Hill terminus" 1187.9 - "No. 21 in McCrae St. Bendigo, near Nolan St. (North Bendigo Route) 1187.10 - "4 and 26 at Alexandra Fountain, Charing Cross Bendigo" 1187.11 - "Truck of Bogie Car, Bendigo Tramways" 1187.12 - "No. 19 in Pall Mall at Charing Cross, Bendigo" 1187.13 - "Birney car No. 11 entering Pall Mall from View St. at Charing Cross Bendigo" 1187.14 - "No. 7 in Pall Mall at Charing Cross, Bendigo" 1187.15 - "No. 18 at Alexandra Fountain, Charing Cross, Bendigo" 1187.16 - "No. 2 at Quarry Hill terminus, Bendigo" 1187.17 - "No. 26 at Alexandra Fountain, Charing Cross, Bendigo" tramways, trams, bendigo, quarry hill, eaglehawk, north bendigo, maximum traction, night photo, tram 2, tram 3, tram 4, tram 7, tram 11, tram 18, tram 19, tram 21, tram 26