Showing 743 items
matching gardens loop
-
 Ballarat Tramway Museum
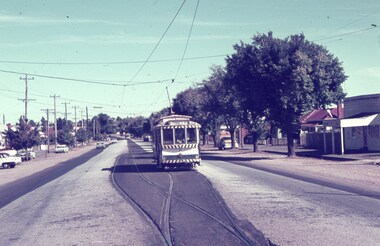
Slide - 35mm slide/s, Robert Thomson, 27/04/1965 12:00:00 AM
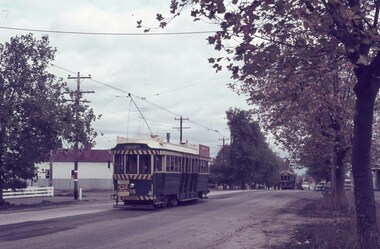
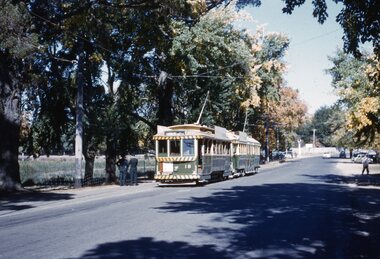
Yields information about Ballarat's trams during crossing at the Gregory St loop during 1965.Agfa blue/white mount, colour slide of trams 35 southbound to Sebastopol and 35 northbound in Lydiard St North, crossing at the Gregory St loop, 27-4-1965. No. 35 has a dash canopy advert for Dancing at the Civic Centre."27-4-65" in ink.tramways, trams, lydiard st north, gregory st, tram 35, tram 37 -
 Ballarat Tramway Museum
Slide - 35mm slide/s, Robert Thomson, May. 1968
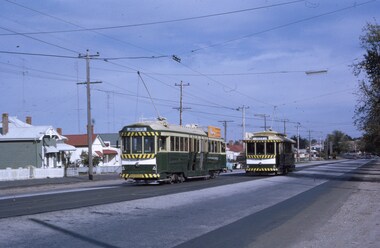
Yields information about Ballarat's trams in Skipton St at the Bell St loop.Kodak Kodachrome cardboard mount, colour slide of trams 37 (Southbound to Sebastopol) and 26 (northbound to City), crossing at the Bell St loop in Skipton St. May 1968."5/68" in ink.tramways, trams, skipton st, bell st, sebastopol, tram 37, tram 26 -
 Ballarat Tramway Museum
Slide - 35mm slide/s, Robert Thomson, May. 1968
Yields information about Ballarat's trams in Drummond St North and the Mill St loop.Kodak Kodachrome cardboard mount, colour slide of trams 41 (northbound to the Gardens), in Drummond St North May 1968. The driver has the controller in the full parallel position. In the background is the Mill St loop."5/68" in ink.tramways, trams, drummond st nth, mill st loop, tram 41 -
 Ballarat Tramway Museum
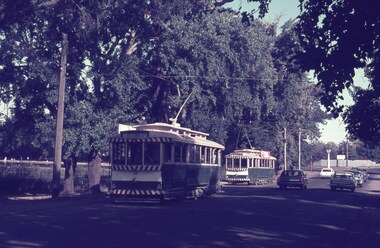
Slide - 35mm slide/s, Robert Thomson, 5/04/1969 12:00:00 AM
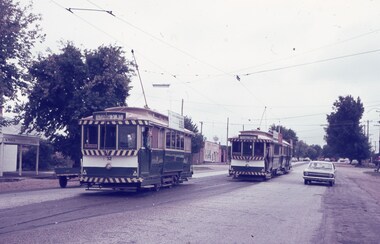
Yields information about Ballarat's trams crossing at the Bell St loop.Agfa blue/white mount, colour slide of three trams crossing at the Bell St loop, with the Atlantic Hotel in the background. Tram 32 northbound to Lydiard St North, crossing No. 28 southbound to Sebastopol A bogie tram is following. No. 32 has a roof advert for the ANA friendly society. A shop with the name of W. Parkin is visible. See also Reg Item 7496 of this shop / Milk Bar. In between the two trams is the Atlantic Hotel."5-4-69" in ink.tramways, trams, sebastopol, bell st, skipton st, tram 32, tram 28 -
 Ballarat Tramway Museum
Slide - 35mm slide/s, Robert Thomson, 11/04/1971 12:00:00 AM
Yields information about Ballarat's trams at the Sebastopol terminus and the tram operations at the Bell St loop.Agfa blue/white mount, colour slide of tram 21 at the Bell St loop, taken from the rear cab of a preceding tram. In the distance is another tram, most likely going to Sebastopol Tram 21 has the destination of Lydiard St North. On the right hand side of the photograph is the W. Parkin Milk Bar with a Peters Ice cream cone sign. See Reg Item 7490 for another photo of this shop."11-4-71" in ink.tramways, trams, bell st, skipton st, tram 21 -
 Ballarat Tramway Museum
Slide - 35mm slide/s, Robert Thomson, May. 1968
Yields information about trams in the lower section of Sturt St at Grenville St and the buildings during 1968.Kodak Kodachrome cardboard mount, colour slide of tram 20 passing the Grenville St shelter in Sturt St, about to enter Bridge St, with the destination of Mt Pleasant. There is a tram in the City Loop. Taken 5/68. In the photo are signs for T&G, Patersons, Thomas Jewellers, Bill Valpied and a Susan Day cakes truck. In the photo are the Ballarat Mechanics Institute building, the Ballarat Gas Company and Town Hall."5/68" in ink.tramways, trams, mt pleasant, grenville st, sturt st, city loop, tram 20 -
 Ballarat Tramway Museum
Slide - 35mm slide/s, Robert Thomson, 11/04/1971 12:00:00 AM
Yields information about trams in Wendouree Parade and the use of the Carlton St loop.Agfa blue/white mount, colour slide of trams 33 and another crossing at the Carlton St Loop. Tram 33 has the destination of Victoria St, while the other Mt Pleasant. The Lake is in the background."11-4-71" in ink.tramways, trams, victoria st, mt pleasant, carlton st, wendouree parade, lake wendouree, tram 33 -
 Ballarat Tramway Museum
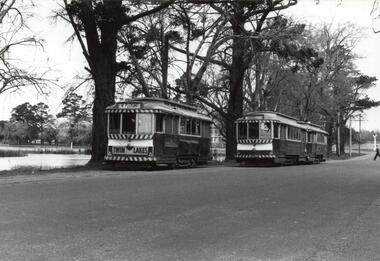
Photograph - Black & White Photograph/s - set of 2, Richard Gilbert, c August 1971
Yields information about the use of the Carlton St crossing loop prior to the closure of the tramway. Series of 2 Black and white photographs of trams using the Carlton St, Wendouree Parade crossing loop. .1 - tram 11 (with a Twin Lakes sign, Mt Pleasant) crossing tram 21 (Gardens via Sturt St West) and another single trucker. Has the signal and the Olympics Monument in the background. .2 - tram 27 and a bogie tram crossing. Tram 27 has the destination of Victoria St and a Twin Lakes sign. trams, tramways, carlton st, wendouree parade, tram 27, tram 11, tram 21 -
 Ballarat Tramway Museum
Photograph - Black & White Photograph/s - set of 5 - tram operations on the Victoria St, Richard Gilbert, c August 1971
... St loop. .4 - No. 31 (to Gardens crossing No. 39) at the King... the King St loop. .3 - No. 13, (Gardens via Sturt St West ...Yields information about the appearance of the Victoria St line shortly before the closure of the Victoria St line. Series of 5 Black and white photographs of tram operations on the Victoria St line prior to its closure in August 1971. .1 - View of the Victoria St terminus as you arrive in Ballarat from Melbourne, with the divided highway and a tram warning sign. Has a tram at the terminus. .2 - Tram 39, running a special tour with St Alipius church in the background. A new bus stop sing has been positioned. Another tram has departed the King St loop. .3 - No. 13, (Gardens via Sturt St West and a Twin Lakes sign) entering the King St loop. .4 - No. 31 (to Gardens crossing No. 39) at the King St loop. .5 - No. 31 leaving Stones Corner for Victoria St with Stones Corner building in the background along with the Caltex service station and Viscount Ambassador caravans.trams, tramways, victoria st, king st, stones corner, tram 39, tram 13, tram 31 -
 Ballarat Tramway Museum
Photograph - Black & White Photograph/s - set of 2, Richard Gilbert, c August 1971
Yields information about tramway operations in Sturt St west. Series of 2 Black and white photographs of trams using the Hospital corner curves. .1 - No. 12 east bound in Sturt St West with the destination of Mt Pleasant. Has a Twin Lakes sign. Near the intersection with Russell or Morrison Streets at the Victoria Park loop. .2 - West bound (NO. 11?) about to enter the Victoria Park Loop trams, tramways, sturt st west, russell st, victoria park, tram 12, tram 11? -
 Ballarat Tramway Museum
Photograph - Black & White Photograph/s - set of 4, Richard Gilbert, c August 1971
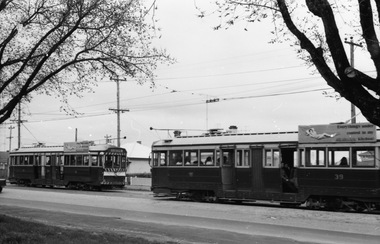
Yields information about tram operations in the vicinity of the SEC depot prior to closure. Series of 4 Black and white photographs of tram operations in Wendouree Parade near the depot prior to its closure in August 1971. .1 - Tram No. 30, running into the depot from Wendouree Parade. .2 - Tram 21 approaching the depot junction. .3 - Trams 13 and 21 crossing at the depot loop. .4 - trams 32 and 39 ditto. 32 has an ANA health fund roof advert.trams, tramways, wendouree parade, depot, depot loop, tram 30, tram 21, tram 13, tram 32, tram 39 -
 Ballarat Tramway Museum
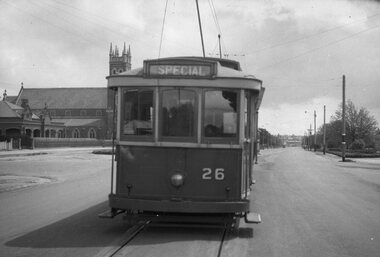
Photograph - Black & White Photograph/s, Richard Gilbert, c August 1971
Yields information about tram operations in the Drummond St North at the time of the closure of the first of Ballarat's lines in August 1971.Black and white photograph of four trams (last tram No. 14 showing Special) crossing a single tram at the Mill St loop in Drummond St Nth, possibly on the final day of Victoria St operations, the trams running special to meet the ARHS / TMSV train at the railway station. trams, tramways, closure, mill st loop, drummond st nth, tram 14 -
 Ballarat Tramway Museum
Negative, Wal Jack, mid 1940's
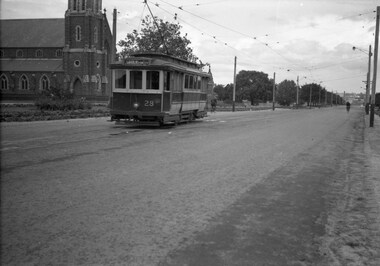
Yields information about Ballarat 's 33 in use at the Barkly St loop on the Mt Pleasant line.Negative and Digital image of the Wal Jack Ballarat Negative file of No. 33 inbound in Barkly St Mt Pleasant at the Grant St loop. The tram has the destination of Gardens via Drummond North on a wet day mid 1940's. Could be the same date as 5156 - another wet day 1-1-1945.trams, tramways, mt pleasant, barkly st, tram 33 -
 Ballarat Tramway Museum
Negative, Wal Jack, late 1930's
Yields information about Ballarat 's tram operations and the King St loop in Victoria St.Negative and Digital image of the Wal Jack Ballarat Negative file of No. 28 inbound to the city entering the King St Loop with the St Alipius church in the background. There a two bicycles and one motor car in the far distance. The tram has the destination of Gardens via Sturt St West. trams, tramways, victoria st, king st, tram 28 -
 Ballarat Tramway Museum
Photograph - B&W print of donated negative - set of 5, Graham Parry, 1971
Yields information about the City Loop and tram operations in Sturt St, 1971Set of five black and white prints and associated negatives of trams in Ballarat during 1971 prior to closure of the system by Graham Parry. All images from the scanned negative. .1 - No. 43 and possibly 31 in the City Loop. Has various buildings in the background. .2 - No. 34 at the Sturt and Lydiard Sts tram stop. Has the National Mutual Building in the background, which has a CML (Colonial Mutual Life) sign on it. .3 - No.35 at the north side tram stop. Has a Briquettes roof advert. Tram has the destination of Lydiard St North. .4 - View looking from the top of the hill at the City Loop with 43 and other cars in the loop. Has the Dickens Food Store and Patersons in the view along with other buildings. .5 - as for .4, but from the south side footpath with trams 43, 31, 26 and another in the loop. All have SEC roof adverts.tramways, trams, sturt st, city loop, lydiard st nth, tram 43, tram 31, tram 34, tram 35, tram 26 -
 Ballarat Tramway Museum
Photograph - B&W print of donated negative - set of 2, Graham Parry, 1971
Set of two black and white prints and associated negatives of trams in Ballarat during 1971 prior to closure of the system by Graham Parry. All images from the scanned negative. All taken at the Grey St crossing loop. .1 - Nos 39 and 34 crossing. .2 - ditto. No. 39 to Lydiard St North, No. 34 to Sebastopol. Both have SEC Roof adverts.tramways, trams, sebastopol, grey st, albert st tram 39 -
 Ballarat Tramway Museum
Photograph - Digital image, John Ward, 27/02/1971 12:00:00 AM
Yields information about the use of City Loop for storing trams at night.Digital image of trams 26 and 20 at night in the City Loop. Has the Big W store in the background. Photo by John Ward 27 Feb. 1971. Slide title "04410 270269 6926-D SECV Single truck trams 26 & 20 at night time on layover in Sturt St Ballarat Vic"trams, tramways, sturt st, city loop, night photo, tram 26, tram 20 -
 Ballarat Tramway Museum
Photograph - Digital image, John Ward, 1/01/1972 12:00:00 AM
Digital image of the Bendigo 28 crossing No. 2 at Pinders Loop in Carpenter Loop on the Quarry Hill line. No. 28 has the destination of Quarry Hill, while No. 2 Eaglehawk. Photo by John Ward 01 - 01- 1972 Slide title "04751 010172 7207-H SECV Birney tram 28 passing bogie tram 2 in Carpenter St on Quarry Hill line Bendigo Vic"trams, tramways, bendigo, carpenter st, pinders loop, quarry hill, tram 28, tram 2 -
 Ballarat Tramway Museum
Photograph - Black & White Photograph/s - set of 3, Andrew Howlett, c1971
Yields information about the appearance of the city loop area and associated tramcar operations.Series of three Black and White photograph print of Four bogie trams parked in City Loop. .1 - four bogie trams parked in the loop - numbers unable to be read. .2 - ditto .3 - dittotrams, tramways, city loop, sturt st -
 Ballarat Tramway Museum
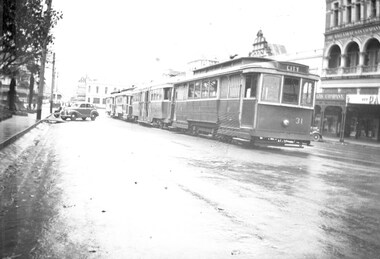
Negative, Wal Jack, Late 1930's to mid 1940's
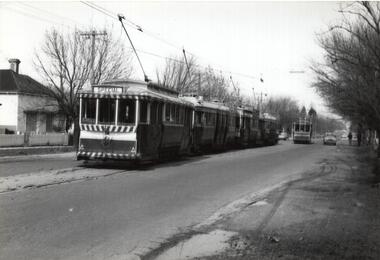
Yields information about the use of the City Loop during the late 1940s.Negative and Digital image of the Wal Jack Ballarat Negative file of a group of trams (3 single truckers and one bogie car) in City Loop late 1940's or early 1950s. Tram 31 (City) is at the head of the line up on a wet day. In the background is the Ballarat Gas Company building.trams, tramways, city loop, sturt st, tram 31 -
 Ballarat Tramway Museum
Negative, Wal Jack, 16/12/1945 12:00:00 AM
Yields information about the use of the bogie cars when first introduced to Ballarat.Negative and Digital image of the Wal Jack Ballarat Negative file of a new bogie tram at the City stop in Sturt and Lydiard Sts, with the destination of Victoria St. The Town Hall is in the background. Most likely No. 22, based on Reg Item 5273 - 16/12/1945trams, tramways, city loop, sturt st, tram 22 -
 Ballarat Tramway Museum
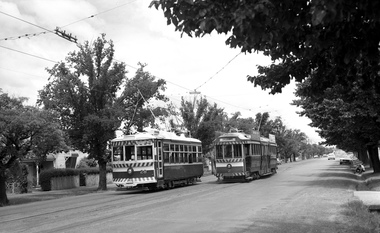
Slide - 35mm slide/s, Robert Thomson, 21/04/1962 12:00:00 AM
Yields information about Ballarat's trams during 1964 and the Carlton St loop.Kodachrome cardboard mount, colour slide of No. 18 and most likely 37 at the Carlton St Loop. 18 has the destination of Gardens via Sturt St West. The crews are chatting alongside 18. In the background is the Olympic rings."AETA Convention 21-4-62" in ink.tramways, trams, carlton st loop, tram 18 -
 Ballarat Tramway Museum
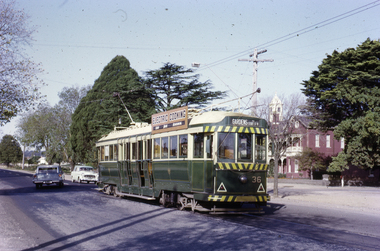
Slide - 35mm slide/s, Robert Thomson?, 27/03/1964 12:00:00 AM
Yields information about Ballarat's trams during 1964 and the Victoria St terminus. Has the Orphanage in the background.Ilford cardboard mount, colour slide of No. 36 at the Victoria St terminus, 27.3.1964 with the original orphanage building in the background. Tram has the destination of Gardens via Sturt St west and an electric cooking roof advert."Bogie 36. Victoria St ter. No. 38, 27.3.64" in ink."tramways, trams, carlton st loop, tram 36 -
 Ballarat Tramway Museum
Slide - 35mm slide/s, Robert Thomson, May. 1968
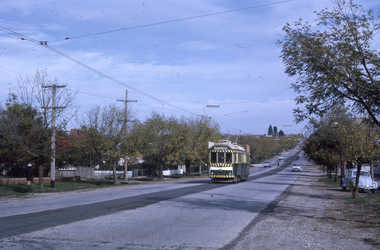
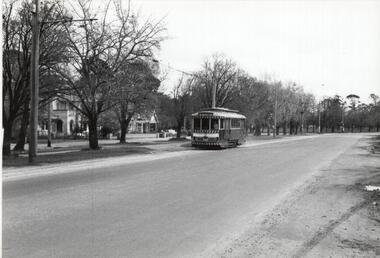
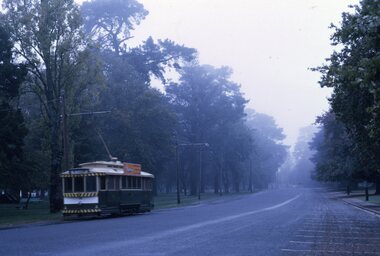
Yields information about Ballarat's trams during 1968 and Wendouree Parade.Kodachrome cardboard mount, colour slide of No. 30 south bound near the old loop in Wendouree Parade. Tram has the destination of Mt Pleasant. Taken on a foggy morning. fog"5/68" in ink.tramways, trams, wendouree parade, gardens, tram 30 -
 Ballarat Tramway Museum
Slide - 35mm slide/s - set of 3, Robert Thomson, 5/04/1969 12:00:00 AM
Yields information about Ballarat's trams during 1969, the Trambulance and the Victoria St line.Set of three AGFA blue / white plastic mount, colour slides of No. 21 as the 1969 "Trambulance" raising funds for the Ballarat Base Hospital in Victoria St Ballarat. No. 21 running a special service .1 - with St Alipius church in the background. .2 - ditto crossing tram 34 to Victoria St at the King St loop. .3 - ditto"5.4.69" in ink on all slidestramways, trams, victoria st, king st, tram 21, tram 34 -
 Ballarat Tramway Museum
Negative, Wal Jack, late 1940's?
Yields information about the Victoria St terminus and the trams used.Negative and Digital image of the Wal Jack Ballarat Negative file of No. 26 west bound (showing Special) nearing the King St Loop in Victoria St. There is another tram in front of 26 and another tram in the loop. Has the St Alipius church in background. See Reg Item 7645 - likely to have been taken at the same time.trams, tramways, victoria st, king st, tram 26 -
 Ballarat Tramway Museum
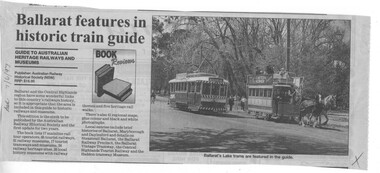
Newspaper, The Courier Ballarat, "Ballarat features in historic train guide", 7/06/1997 12:00:00 AM
Newspaper cutting from The Courier, Ballarat, Saturday 7/6/1997 in the Book Review section of the "Guide to Heritage Railways and Museums" published by the ARHS (NSW), RRP $16.95. Includes a photo of the horse tram and tram No. 14 at the crossing loop, which is featured in the guide. Gives details of the coverage of the district rail based museums, publication details and general details of the book.On left hand edge of the cutting, "Sat. 7/6/1997" in blue ink. Also a blue ink cross in the bottom right hand corner.trams, tramways, btm, horse trams, tour guide, rail museum guide -
 Ballarat Tramway Museum
Slide - 35mm slide/s - set of 14, Noel Simons, 23/11/1962 12:00:00 AM
Set of 14 Kodachrome transparencies taken on 23/11/1962. 1162.1 - tram 38 turning into Lydiard St. North from Sturt St. with tram 20 in background. Many motor vehicles in photo. 1162.2 - as above, but a minute of so later. Has Mutual Life building in background as well as Town Hall. 1162.3 - No. 40 entering Albert St. from Skipton St. outbound to Sebastopol. 1162.4 - No. 40 near start of side of the road running in Albert St. heading to Sebastopol. 1162.5 - No. 40 at the City terminus, on the South side of Sturt St. Has Town Hall and other buildings along the south side of Sturt St. in the background. 1162.6 - No. 40 at Sebastopol terminus - shows arrangement of the signs at the terminus. 1162.7 - No. 40 and No. 38 crossing at loop between Sayle and Grey St. No. 40 inbound. 1162.8 - No. 40 turning from Drummond St. South to Sturt St. at Hospital Corner with Southern Cross Hotel in background. 1162.9 - No. 18 in Wendouree Parade near Forest St. heading east with destination of "Victoria St." 1162.10 - Nos 41 and 39 at Depot Junction. Both trams have SEC ads. 1162.11 - No. 39 turning into the depot from Wendouree Parade - showing destination of "Gardens via Drummond Nth" 1162.12- No. 17 at Lydiard St. North terminus, showing destination of "Grey St. Sebas". Has a Twin Lakes sign 1162.13 - ditto, but with trolley pole turned around. Has SEC Briquettes roof ad and Whitehorse whiskey ad on rear dash panel. 1162.14 - No. 40 outbound to Sebastopol crossing Albert St. 1162.1 -"Nos. 38 and 20 in Sturt St. Ballarat at corner of Lydiard St." 1162.2 - "No. 38 turns into Lydiard St. as No. 20 waits at stop in Sturt St. Ballarat" 1162.3 - "No. 40 entering Albert St. from Skipton St. Redan on Sebastopol route." 1162.4 - "No 40 at beginning of reserved track on Sebastopol route, Albert St. Redan." 1162.5 - "No. 40 in Sturt St. Ballarat near cnr. of Armstrong St." 1162.6 - "No. 40 at Sebastopol terminus" 1162.7 - "No. 38 and 40 crossing at Sayle St. Loop on Albert St. reserved track, Sebastopol route" 1162.8 - "No. 40 turning into Sturt St. from Drummond St." 1162.9 - "No. 18 in Wendouree Pde. Ballarat near tramway depot" 1162.10 - "No. 41 and 39 outside Ballarat tramway depot, Lake Wendouree in background" 1162.11 - "No. 39 entering tramway depot from Wendouree Parade, Ballarat" 1162.12 - "No 17 at Lydiard St. North terminus, Ballarat North" 1162.13 - "No 17 at Lydiard St. North terminus, Ballarat North" 1162.14 - "No. 40 crossing Albert St. Sebastopol as reserved track switches from left to right of road" All have date stamp of "23 Nov. 1962" in purple ink. All black ink unless otherwise noted.tramways, trams, ballarat, albert st., sturt st., sebastopol, grey st., hospital corner, wendouree parade, depot junction, lydiard st. north, tram 17, tram 18, tram 20, tram 38, tram 39, tram 40, tram 41 -
 Ballarat Tramway Museum
Slide - 35mm slide/s, Noel Simons, 1/01/1968 12:00:00 AM
Kodachrome transparency slide of Ballarat No. 13 parked in the City loop, with a young boy leaning from one of the doors. Has Thomas Jewellers Store in background, Edments and Hartleys and Dickins Supermarket in Grenville St. Slide has date of 1/68 written on, and has been stamped by Kodak as being processed Jul 68. It appears to be a hot day, during January as sun is quite high. Tram has large white strip under the dash canopy lighting. In red ink under number 15 "Ballarat 1/68" and on base in blue ink "City Loop"tramways, trams, sturt st., city loop, tram 13 -
 Ballarat Tramway Museum
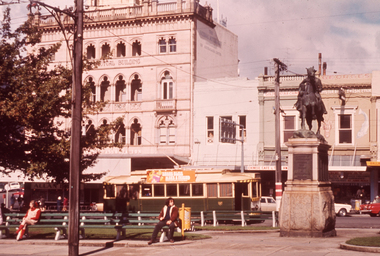
Slide - 35mm slide/s - set of 13, Noel Simons, 28/04/1971 12:00:00 AM
Set of 13 transparencies taken on 28/4/1971 on PAKON mounts. 1168.1 - No. 21 at City terminus - taken from North side of street. Has Boer War statue on right side and National Mutual building in the background. 1168.2 - No. 34 with destination "Sebastopol" in Sturt St., outside Town Hall, with National Mutual building in background. 1168.3 - No. 18 at corner of Sturt and Lydiard Sts with National Mutual building and Craigs Hotel in background. 1168.4 - 18 at intersection of Sturt and Dawson St. 1168.5 - No. 30 at intersection of Armstrong St and Sturt St. with Fletcher Jones building in background. 1168.6 - No. 14 at City Terminus, showing destination of "Victoria St." with Town Hall in the background. 1168.7 - No. 11 bound for Mt Pleasant, opposite Titanic Bandstand in Sturt St. Has a Twin Lakes advertisement on the front dash panel and an unknown roof advertisement. 1168.8 - No. 21 at bottom of Sturt St. approaching the Grenville St. junction, with Dickins Food Store and the Spot Cafe in the background. Tram has destination of "Victoria St". and a roof advertisement for a cigarette? company. 1168.9 - No. 26 and three other trams in City Loop, looking west along Sturt St., just after a heavy hail storm. 1168.10 - No. 21 at the intersection of Sturt St and Dawson St. with Golden City Hotel and the Ritzy Cafe in the background. Can see the Dawson St. crossover track, just after a heavy hail storm. 1168.11 - No. 21 and three other trams at City Loop looking east along the south side of Sturt St. See also image 1168i1a - cleaned up and edited by Peter Waugh April 2024 - used in the April 2024 issue of Fares Please. 1168.12 - No. 14 entering the South side of Sturt St. from Bridge St. with Dickins Store in the background and the Grenville St. shelter alongside the tram. 1168.13 - No. 37 at Sturt and Dawson St., eastbound, showing "Lydiard St. Nth" Has SEC roof advertisement on the side of the tram.1168.1 -"Sturt & Lydiard Sts" 1168.2 - "Town Hall" 1168.3 - "Sturt St & Dawson Sts" 1168.4 - "Sturt and Lydiard Sts" 1168.5 - "Sturt St." 1168.6 - "Sturt and Lydiard Sts" 1168.7 - "Sturt St." 1168.8 - "Bridge St." 1168.9 - "City Loop" 1168.10 -"Dawson & Sturt Sts." 1168.11 - "City Loop" 1168.12 - "Bridge St." All have date stamp of "28 Apr 1971" in purple ink on base. All blue ink unless otherwise noted.tramways, trams, town hall, sturt st., dawson st, armstrong st., grenville st, bridge st., titanic bandstand, tram 11, tram 14, tram 18, tram 21, tram 26, tram 30, tram 34, tram 37