Showing 483 items matching "dash"
-
 Ballarat Tramway Museum
Photograph - Black & White Photograph/s, pre 1920
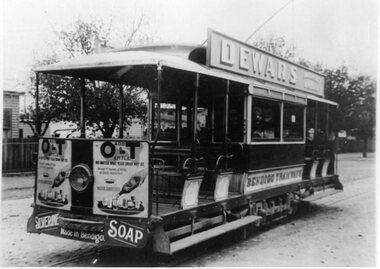
Black and white photograph of a Bendigo Single Truck straight sill tramcar (were numbers 1 to 12) prior to fitting windscreens (Destination Eaglehawk page 30 - says this occurred in 1920). Tram has "Dewar's imperial whisky" roof advertisement, "Bendigo Tramways" on the letterboard, on the front dash, advertisements for "O-T+ drink additive on either side of the headlight and "Silverline Soap" on the panel either side of the bumper bar. See Reg Item 1712 for side on view of this tram. Photograph appears to be a photo of another print, with black ink "18" in the bottom left hand corner on the newer print on copy 1 of the item only. Two copies held. See page 30 of Destination Eaglehawk trams, tramways, bendigo, esco -
 Ballarat Tramway Museum
Photograph - Colour Photograph/s, Austin Brehaut, 15/03/2003 12:00:00 AM
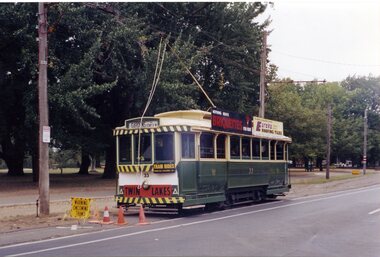
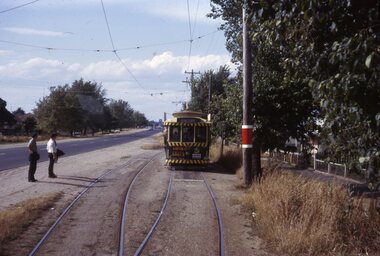
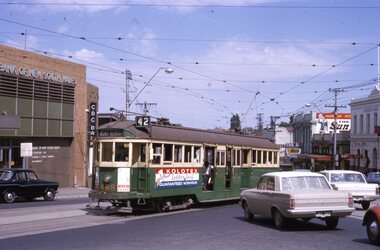
Colour photograph of tram 33 terminating at the north end of Gardens Loop, Wendouree Parade, the first service tram to do so on Sat. 15 March 2003. The service was terminated at this point for some 6 weeks while Wendouree Parade was resurfaced and other track work done. Shows the temporary terminal arrangements, and the earth cable installed to protect the work site on the section insulator and earth stake alongside the pole. Tram 33 has the Eureka roofing tiles and SEC Briquettes roof advertisements and Twin Lakes sign on the drivers dash panel. The destination shown is Gardens via Sturt St. West. Photo taken by Austin Brehaut and printed on Kodak paper.In black ink on the rear of the photo "1st car to use short-working during track and road repairs 15.3.03 / APB"btm, road works, gardens loop, wendouree parade, tram 33 -
 Ballarat Tramway Museum
Photograph - Black & White Photograph/s, Doug Colquhoun, 15/05/1971 12:00:00 AM
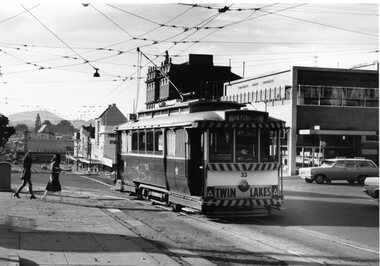
Yields information about Ballarat's trams in the early 1970's and the Drummond St streetscape near the Mill St loop, Yields information about Ballarat's trams in the early 1970's and the Drummond St streetscape near the Mill St loopBlack and white print of Ballarat 33, in turning from Lydiard St Nth into Sturt St, with the Commonwealth Bank and buildings on the south side of Sturt St.. Two copies. Photo by Doug Colquhoun, 15/5/1971. Trams has the destination of Sebastopol and has a "Twin Lakes" sign on the dash panel. In the photograph is signage for Dickins, Neptune, Commonwealth Bank and Patersons. Has two young ladies walking across the street and the ESCo electrical cabinet. Photo print courtesy of Port Dock Railway Museum, now the National Railway Museum. See worksheet 4311 for letter and details of prints sent to Bill Scott, 19/10/2001. Any photo credit to mention NRM Collection.On rear of copy 1 "SEC Ballarat / 33 / 15/5/71 4164 / Lydiard St @ Sturt St / D.A. Colquhoun" . Copy 2 "DAC" in ink, bottom right hand corner.trams, tramways, sturt st, fashions, lydiard st nth, tram 33 -
 Ballarat Tramway Museum
Slide - 35mm slide/s, Noel Simons, 21/11/1962 12:00:00 AM
Set of 17 transparencies taken on 21/11/1962 on Kodak mounts. 1188.1 - Bendigo No. 11 at Depot Junction McCrae and Arnold St. with driver/conductor changing points. 1188.2 - Bendigo No. 4 at Charing Cross, side on photo, with City Club Hotel and Alexandra Fountain in the background. Tram has Castrol and SEC 'Electric Cooking' ads. 1188.3 - Bendigo No. 4 climbing View St. after tram has passed photographer. Tram has Streets Ice Cream and Cohns Soft Drinks ad on rear dash panel. In the background are the buildings in View St., including the Princess Theatre. Tram has destination of Eaglehawk. 1188.4 - Trams 2 and 4 crossing at the California Gully or Thorpe St Loop. 1188.5 - Bendigo 4 in Mt Korong Road. Tram inbound with destination of Quarry Hill, just leaving Garden Gully Loop. 1188.6 - Bendigo 4 and 17 crossing at the Hayes St. or Iron Bark Gully Loop. No. 17 bound for Eaglehawk, No. 4, Quarry Hill. 17 has two SEC roof ads and a white horse whiskey ad. 1188.7 - No. 17 bound for Eaglehawk, soon after leaving California Gully. Has large mullock heap in background. 1188.8 - Bendigo 2 and 17 crossing at the Thorpe St. or California Gully Loop. Has butchers shop in background. 1188.9 - Bendigo 17 at the Eaglehawk terminus. Has destination of Quarry Hill. In background is the hotel and shops at the terminus, showing ads for "Melbourne Bitter". Tram has two SEC 'Electric Cooking' ads. Driver and conductor about to assist two lady passengers with a pram and baby. 1188.10 - No. 17 at Eaglehawk terminus, awaiting departure. Has Eaglehawk Town Hall and Post Office in background. Tram has a Whitehorse Whiskey ad on the front dash panel. 1188.11 - No. 3 in High St. Eaglehawk, with destination of Eaglehawk. Has the shops on the south side of High St. in the background, including the Eaglehawk fish shop. Tram has two roof ads, one an SEC roof ad, and Cohns Drinks and Streets Ice cream ads on front dash panel. 1188.12 - as above, but after tram has passed photographer. Note the centre of the road poles. 1188.13 - No. 2 outbound for Eaglehawk at the intersection of Mt. Korong Road and the Calder Highway. Photo taken after the tram has passed the photographer. Has an Ampol service station in the background. 1188.14 - No. 11 leaving the Bendigo depot, crossing the bridge, with the Scrubber car in the background. 1188.15 - No. 21 at the North Bendigo terminus. Tram has destination of Golden Square and Cohns drink ad on front dash and two roof ads on side. 1188.16 - No. 11 on Golden Square route, in High St. at intersection with Old High St. 1188.17 - No. 11 at the Golden Square terminus, conductor turning the pole. Hotel on the left side of the photo. Note the road works barrier and red flag behind the tram. Slide has an end of roll mark on the right hand side of the image.Information written on in black ink and date stamped on purple ink. 1188.1 - "Birney car No. 11 in McCrae St. at Cnr of Arnold about to run into depot, Bendigo" 1188.2 - "No. 4 at Alexandra Fountain, Charing Cross Bendigo" 1188.3 - "No. 4 climbing the View St. Hill from Charing Cross, Bendigo (Eaglehawk Route)" 1188.4 - "No. 4 and 2 at Thorpe St. Loop, California Gully" 1188.5 - "No. 4 in Mt Korong Rd., Long Gully, Near Havilah Rd. (Bendigo) (Eaglehawk Route)" 1188.6 - "Nos. 17 and 4 crossing on Hayes St. Loop, Ironbark, Bendigo" 1188.7 - "No. 17 soon after leaving California Gully (Eaglehawk Route)" 1188.8 - "No.2 and 17 crossing on Thorpe St. Loop, California Gully (Eaglehawk Route)" 1188.9 - "No. 17 at Eaglehawk terminus" 1188.10 - "No. 17 at Eaglehawk terminus" 1188.11 - "No. 3 in High St. Eaglehawk" 1188.12 - "No. 3 nearing Eaglehawk terminus" 1188.13 - "No. 2 in Mt. Korong Rd., Ironbark. Calder highway on left (Eaglehawk route) 1188.14 - "Birney car No. 11 leaving Bendigo depot. Scrubber car at rear" 1188.15 - "No. 21 at North Bendigo Terminus" 1188.16 - "Birney car No. 11 in High St. Bendigo at intersection with Old High Street (Golden Square Route)" 1188.17 - "Birney Car No. 11 at Golden Square terminus, High St., Bendigo". tramways, trams, bendigo, depot junction, charing cross, view st., eaglehawk, north bendigo, golden square, tram 2, tram 3, tram 4, tram 11, tram 17, tram 21, tram scrubber -
 Ballarat Tramway Museum
Photograph - Black & White Photograph/s, 1905
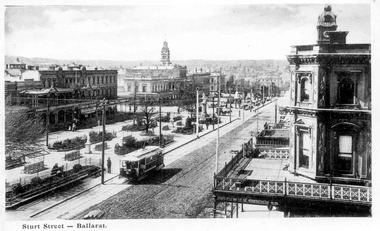
Black and white photograph mounted onto heavy cardboard. Image is an ESCo tram near the intersection of Doveton St. and Sturt St. travelling west along the south side of Sturt Street. Photo appears to be taken soon after opening of the electric trams, as the tramway is well paved compared to the rest of the street which shows vehicle tracks etc. Small horse drawn vehicle crossing in front of the photograph. Shows buildings along the north side of Sturt St. and the building at the SE corner of Doveton St. ESCo tram has destination board on the front dash of the tram. Has title printed on photograph of "Sturt St. Ballarat". See Reg. No. 834 and btm834i for image scanned from postcard for this photograph.trams, tramways, esco, sturt st, doveton st -
 Ballarat Tramway Museum
Slide - 35mm slide/s, Peter Moses, Dec. 1963
Photo of Ballarat tram 27, southbound at Grey St. loop waiting to cross a City bound tram car. Has one male passenger waiting to board the inbound tram and a conductor (in SEC hat) waiting to board the tram and act as the conductor back into the City. Trams between Bell St. and Sebastopol during the day, were driver only. Conductors changed trams at Bell St. or wherever they crossed one another on the single track. Tram has destination of "Sebastopol", and advertisements for "Twin Lakes" and Whitehorse whiskey. Note long grass on the left hand side of the photo. Tram has tiger stripes but not the white dash under the lights. Kodak cardboard mount slide, taken by Peter Moses December 1963.On back of slide in blue ink "1963 Dec. Tram Ballarat" and bottom right hand corner "P. Moses"tramways, trams, grey st, sebastopol, conductors, tram 27 -
 Ballarat Tramway Museum
Photograph - Black & White Photograph/s, Dave Macartney, 25/07/1961 12:00:00 AM
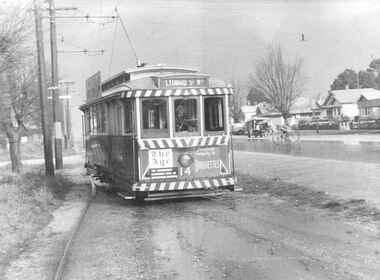
Yields information about the Grey St. loop and the street scene on a wet day with a milk car and bicycle in the view.Black and white photograph of No. 14 entering the Grey / Gray St. Loop, Albert St, Sebastopol. Taken during a rainy day with a horse drawn milk cart in the background and a cyclist crossing the road. The tram has the destination of Lydiard St. North, is running one man, the motorman / driver has a conductors bag around his neck. The tram also has dash canopy advertisements for "The Age" and Briquettes. Photo taken 25/7/1961 by Dave Macartney. Printed on stipple paper. Two copies held - 2nd in poor order - for temporary display only. Copy 3 - in good condition - added 26/7/2007, ex Alan Bradley 5/2007 - 203H x 252W.tramways, trams, sebastopol, albert st, grey st loop, horse drawn vehicle, milk cart, tram 14 -
 Ballarat Tramway Museum
Slide - 35mm slide/s - set of 3, Eldon Hogan, early 1960's
Set of three Kodak cardboard mounted slides - have handwritten captions and slide numbers - no date, post dash canopy lights but with the largely green front - early 1960's. From the Eldon Hogan collection. Scanned on the Canon scanner at the depot 15/12/1971 at the time of the installation of the scanner. .1 - No. 16 and a bogie car at Charing Cross, early 1960's with the City Club Hotel in the background. .2 - No. 18 at Charing Cross with the destination of Quarry Hill and with the City Club Hotel in the background .3 - No. 25 at the Eaglehawk terminus with two crewmen standing in front of the tram. Tram has the destination of Eaglehawk. The Town Hall in the background has a money raising thermometer for the Olympic Swimming Pool fund..1 - "Trams at Bendigo" .2 - "Trams at Fountain at Bendigo" .3 - "Tram at Eaglehawk" all in penciltramways, trams, bendigo, eaglehawk, charing cross, tram 16, tram 18, tram 25 -
 Ballarat Tramway Museum
Negative, Wal Jack, 6/10/1960 12:00:00 AM
Yields information about Ballarat No. 25 leaving the depot for Bendigo Oct. 1960.Negative and Digital images of the Wal Jack Ballarat Negative file of trams 25 leaving for Bendigo. Shows Yellow Express Mack prime mover GPU 328 with Ballarat Tram No. 25 loaded and leaving the depot. Tram has destination box removed. Also the process of fitting the dash canopy lighting had commenced, with the small white stripe painted under the windows. Also would appear trolley pole base has been removed. Taken 6/10/1960. See also Reg Item 1478 - this is a different image and 7763i for Bendigo 1 in the depot and 7766 for the truck leaving. See Reg Items 1478, 5241, 5242, 7759 and 7766 for a series of 5 photos of this event.trams, tramways, yellow express, transporting trams, moving trams, bendigo, tram 25 -
 Ballarat Tramway Museum
Newspaper - Newspaper Clipping from Black and white photograph, The Courier Ballarat, Mt. Pleasant tram transferred to preservation site, 16/07/1972 12:00:00 AM
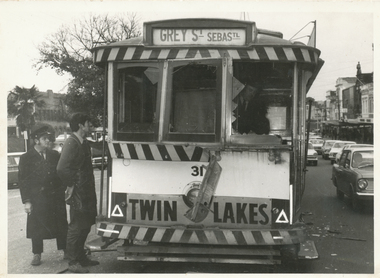
Black and White newspaper photograph taken by The Courier of Transferring No. 27 to the BTPS depot, while parked at depot junction. Has the destination of "Mt Pleasant" and a "Twin Lakes" front dash panel advertisement. Photo taken 16/7/1972, published 18/7/1972. See Reg. Item 1790 for the photo used in the newspaper clipping. Collected by Alan Bradley from the Ballarat Courier early 1980's. See Excel file "Record of Ballarat Courier Photos BTM era" (Archive Documents) for source of details. .1 - actual cutting from The Courier, with the caption "A tram in Ballarat is an unusual sight these days. This tram, which ran to Mt Pleasant is being transferred to the trams preservation site."tramways, trams, btps, moving trams, depot junction, tram 27 -
 Eltham District Historical Society Inc
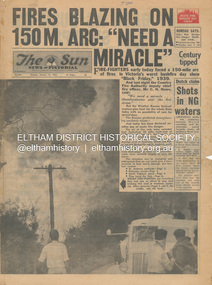
Newspaper - Newspaper articles, Sun News-Pictorial, Fires Blazing on 150M. Arc: "Need a Miracle", The Sun News-Pictorial, Tuesday, January 16, p1, 1962
Various news articles pertaining to the January 1962 Victorian bushfires in the Dandenong and Healesville districts which by second day had spread on to a 150 mile front fromDaylesford and Kinglake through to the Dandenongs. Specific Eltham Shire districts mentioned include Ninka Road, St. Andrews, Kinglake, Hurstbridge on page 2 • Fires Blazing on 150M. Arc: "Need a Miracle", p1 (Illust.) – Victoria’s worst bushfire day since “Black Friday,” 1939 • Night dash as bushfire sweeps by, p2 (Illust.) • Kalorama Saved: Fire 100 Ft. Away, p2 • Stay away, says police chief, p2 • The Tragedy of the Fires, p3 (Illust.) • Good save by firemen, p4 (Illust.) • S.E.C. Firemen Saved N. Yallourn, p4 • Cherry river of flame, p4 • From the fire front: Fire-fighters are bitten by snakes, p4 • They faced the fury, p6 (Illust.) • The ’39 Blaze, p6 • They fought and failed, p6 • Hills Aflame: 2nd Day, pp16-17 (Illust.) • Respite at Olinda HQ, p16 (Illust.) • Here is Ruin, p17 (Illust.) • This fireman had to work among piled up furniture … p32 (Illust.) tom fielding collection, victorian bushfires - 1962, victorian bushfires – 1962, black friday, victorian bushfires – 1939, c.h. howe, daylesford, country fire authority, dandenongs, yallourn, central gippsland, montrose, olinda, kalorama, healesville, st. andrews, hurstbridge, ninka road, kinglake, yarra glen, a.l. mccutcheon, st. andrews postmaster, eltham shire secretary, max watson, police commissioner porter, observatory road, mt. dandenong, whittlesea, one tree hill, sassafras, the basin, steel’s creek, ruby ryan, the basin progress hall, yaallourn, yallourn north, stet electricity commission (s.e.c.), hernes oak, mcdonalds track, florence milkins, lieutenant-colonel k. leggett, bonza view road, ringwood police station, michael o’connor, volunteers, fire damage - buildings -
 Ballarat Tramway Museum
Postcard - copy, "Sturt St, Ballarat", c2000
Yields information about the appearance of Sturt St following the introduction of electric trams in 1905 and has a strong association with the work of Sovereign Hill and Rose Stereograph Co.Postcard reproduction - sepia coloured - of an ESCo tram near the intersection of Doveton St. and Sturt St. travelling west along the south side of Sturt Street. Photo appears to be taken soon after opening of the electric trams, as the tramway is well paved compared to the rest of the street which shows vehicle tracks etc. Small horse drawn vehicle crossing in front of the photograph. Shows buildings along the north side of Sturt St. and the building at the SE corner of Doveton St. ESCo tram has destination board on the front dash of the tram. See Reg Item 834 for a black and white view. Card reproduced for Sovereign Hill Gold Mining Township by Rose Stereograph Co. of Glen Waverley c2000. Divided back type with caption, production and the Rose Co. symbol on the rear.trams, tramways, sturt st, ballarat, esco, rose postcards -
 Ballarat Tramway Museum
Newspaper, The Courier Ballarat, "In Retrospect", 20/09/1994 12:00:00 AM
Newspaper cutting from The Courier, Ballarat, Tuesday 20/9/1994 of the reproduction of a postcard photograph showing an ESCo tram soon after opening running west bound in Sturt St with the Town Hall in the background. Shows the development of the Gardens at the time and buildings on either side of Sturt St. and type of poles etc. The tram is fitted with a destination board on the front dash - the type used soon after opening in 1905. Caption of the photo says "Trams run up Sturt St and people relax in this postcard sent in December 1907. Ballarat's Town Hall is pictured at right." Also has an item in the "In Retrospect" section of the newspaper, about the construction of a new road to avoid two level crossings between Talbot and Clunes. Item compiled by Lorrie BrownIn bottom right hand corner, in blue ink "Tues 20/9/94".trams, tramways, sturt st, esco, town hall -
 Ballarat Tramway Museum
Postcard, John Phillips, Sturt St. Ballarat
B&W print and scanned images of a coloured postcard lent to the BTM by Mr. Norm DePomeroy, Dec. 1997. Image is an ESCo tram near the intersection of Doveton St. and Sturt St. travelling west along the south side of Sturt Street. Photo appears to be taken soon after opening of the electric trams, as the tramway is well paved compared to the rest of the street which shows vehicle tracks etc. Small horse drawn vehicle crossing in front of the photograph. Shows buildings along the north side of Sturt St. and the building at the SE corner of Doveton St. ESCo tram has destination board on the front dash of the tram. See Reg. Item 2151 for a colour version of this postcard - overprinted "Christmas Greetings" See Reg Item 7381 for a colour version produced by Sovereign Hill. See 834i3. In top of image are the words "Sturt Street, Ballarat"trams, tramways, esco, sturt st, postcards, doveton st, tram 4 -
 Ballarat Tramway Museum
Postcard, John Phillips, Doveton St. and Sturt St
B&W print and scanned images of a coloured postcard lent to the BTM by Mr. Norm DePomeroy, Dec. 1997. Image is an ESCo tram near the intersection of Doveton St. and Sturt St. travelling west along the south side of Sturt. Steet. Photo taken soon after opening of the electric trams. Shows buildings along the north side of Sturt St. and the building at the SE corner of Doveton St. ESCo tram has destination board on the front dash of the tram. Note very similar to item 834, but shadows are different, road surface different and trees have leaves. 1 copy held at 8/98. Postcard posted 25/7/1907. See Reg item 4004 for another postcard using this image within a map of Australia. See 838i3. In top of image are the words "Sturt Street, Ballarat"trams, tramways, esco, sturt st, postcards, doveton st -
 Ballarat Tramway Museum
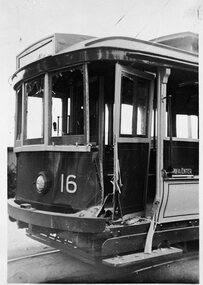
Photograph - B&W print of donated negative - set of 3, State Electricity Commission of Victoria (SECV), late 1930's
Yields information about an accident or collision between a tramcar and a vehicle late 1930's. Gives information about the damage to the tramcar and details of the liverySet of three Black and white photo prints from collected negative of Ballarat (SEC) No. 16 photographed in the depot yard following a collision with vehicle. Thought to be late 1930's. 1364.1 - photo of front dash panel cabin showing damage end panel, doorway and slight damage to bumper bar. 1364.2 - as above, but more side on. 1364.3 - close up of the damage to the tram. Copy 2 - of all above photos - large format prints (253H x 203W) - added 30/7/2007, ex Alan Bradley holding of prints, received 5/2007. See also Reg Item 3904 for a mounted set of these photographs along with that of Reg Item. 580, 1019 and 1365. .Negatives rescanned 17/5/2020 and image updated.tramways, trams, accidents, collision, damage, tram 16 -
 Ballarat Tramway Museum
Photograph - Black & White Photograph/s, The Courier Ballarat, 2/09/1971 12:00:00 AM
Black and white photograph of SEC No. 31 at the intersection of Sturt and Lydiard St after having an accident. Photo is on the front only of the tram, one cab window smashed, dash canopy lighting cover partly torn off. Crew members - one inside tram, one on outside. Another person standing by the doorway wearing a leather apron. Trams has destination of Grey St. Sebastl" Person looking into tram wearing the leather apron is probably the driver of the Fruit truck that collided with the tram. Published in the Courier on 3/9/1971. 2nd copy added 29/5/05 - in good condition. Hi Res version added 16-12-2015. See Reg item 7132 for a poor copy of the original Newspaper which identifies both people as Nicholas Marios and D. Powell.On rear of photo "Copyright Ballarat Courier Proprietary Limited" stamp in ink - very faint.trams, tramways, accidents, ballarat, sturt st, tram 31 -
 Ballarat Tramway Museum
Slide - 35mm slide/s, early 1960's
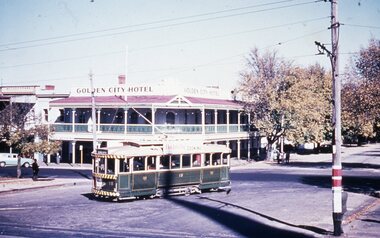
Agfa plastic mount (blue base, white cover) of a photograph of No. 18 using the Dawson St Crossover, the wrong way, to its normal expected use. Appears to be on a tour special with passengers in the tramcar. Has the Golden City Hotel in the background. Photo taken early 1960's. Tramcar has an SEC "Use Electricity for Cooking" roof advertisement and an Age newspaper advertisement on back dash panel. Note the lining of No. 18, using the wide gold lining. The slide appears to be a copy slide, given the nature of the colour and the additional number WP413. Photographer could be Bill Pearce (WP). Slide rescanned at 3200 dpi 25-10-2020, jpg replaced, tiff file retained. This file was scanned in 2003 and may show colour changes."BAS 54 in penciltramways, trams, dawson st, tours, sturt st, tram 18 -
 Ballarat Tramway Museum
Negative - Black and white print from negative, Travis Jeffrey, 12/12/1958?
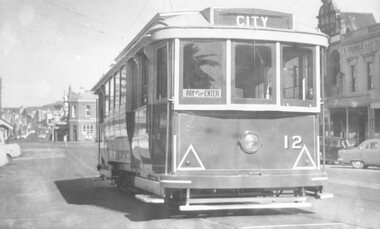
Negative No. N375 and black and white print made by a laser printer (stored in folder) of Ballarat No. 12 in City or Grenville St Loop with Grenville St and Bridge St. in the background. Date thought to be 12/12/1958. Tram has destination of City. Can see the Bucks Head Hotel in the background and the full length of Bridge St., with Victoria St. hill as well. W. Gribble & Co. building on the right hand side of the photograph. Although folder dated 23/2/62, the photo is taken before 12/1960, as tram has not been fitted with dash canopy lights, so date taken as for photograph BA1, Reg. No. 2381 - note angle of shadow. hi res scan made and image updated 23/5/2020. Paper folder that contained the negative had "NR64A" in red ink, "BA2" in pencil, date stamp of "23 Sep 62" on front, and on rear date stamps "26 Sep 1962" and "6 Oct 1962".trams, tramways, city loop, grenville st, bridge st, sturt st, tram 12 -
 Melbourne Tram Museum
Photograph - Set of 3 Black & White Photograph/s, c1920
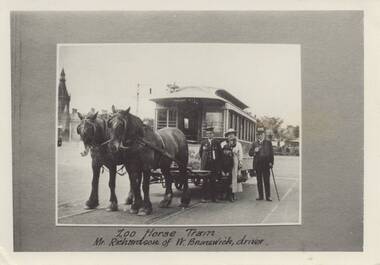
Set of three black and white photographs of the Melbourne Zoo Horse tram. .1 - view of tram with horses, a conductor, and a well dressed family in front of the tram. Photo taken at the Sydney road terminus. Has the note under the photo "Zoo Horse Tram Mr Richardson of W. Brunswick, driver." .2 - Side of view of the horse tram - No. 42 with "Royal Park" on the side. .3 - View of the zoo terminus, from the rear of the tram with "Zoological Gardens" on the rear dash panel of the tram. The conductor appears to be applying the hand brake. Note the signage on the right side of the photo. Photos c1900 to 1910. 2nd copy of .2 and .3 added from the Keith Kings collection - 14-8-2021 - see also Reg Item 5993 for another copy.On the rear of .3 -"M. G. R? collection" On rear of 2nd copy of .2 is the MMTB Stamp.trams, tramways, horse trams, royal park, zoo tram, tram 42 -
 Ballarat Tramway Museum
Slide - 35mm slide/s - set of 7, Noel Simons, 23/10/1965 12:00:00 AM
Set of 7 Kodachrome transparencies taken on 23/10/1965 in Melbourne. 1179.1 - W2 488 (route 42, Mont Albert) at the corner of High St. and Cotham Road Kew. Taken from Kew Post Office, has Bank of New South Wales in the background, CBC bank and the Greyhound Hotel. Tram has ads for Kolotex stockings and Ryco oil filters. 1179.2 - SW2 436, in bound (route 45, City) leaving Cotham Road, about to join High St, Kew. Buildings on the south side of Cotham Road in photo. Tram has an ad along with others for Vincent's powders. 1179.3 - W2 545 (route 48, North Balwyn) in High St. Kew. Has Commercial bank in background along with other shops. 1179.4 - W2 648 (route 42, Mont Albert) turning from High St. South into High St at Kew Junction, with Clifton Hotel in background. Tram has an ad for Kenric clothes. Note an MFBB street fire alarm by the tram stop. 1179.5 - W2 566 (inbound route 42, City) at same location as 1179.5. Tram has a Jex and a Remy Martin Brandy ads. on front dash panel. 1179.6 - W2 572 entering Victoria Parade from Brunswick St. Fitzroy. Tram has a Jex and a Remy Martin Brandy ads. on front dash panel. Eastern Hill Fire Station and ICI building in background. 1179.7 - W2 378 (inbound, route 45, City) and W2 572, inbound, in Victoria Parade between Brunswick St and Gismo St. East Melbourne. Otherwise as for 1179.6.All have date stamp of "23 Oct 1965" in purple ink. All black ink unless otherwise noted. 1179.1 - "W2 488 Entering Cotham Rd. from High St. Kew" 1179.2 - "SW2 436 in Cotham Rd., Kew, about to enter High St." 1179.3 - "W2 545 in High Street Kew, nearly opposite Cotham Road" 1179.4 - "W2 648 entering High Street from High Street South, Kew". 1179.5 - "W2 566 entering High St. South from High St. Kew" 1179.6 - "W2 572 entering Victoria Pde from Brunswick St. East Melbourne" 1179.7 - "W2 378 and 572 in Victoria Pde between Brunswick and Gisborne Sts. East Melbourne."tramways, trams, kew, high st kew, cotham road, victoria parade, melbourne, tram 545, tram 488, tram 436, tram 648, tram 566, tram 572, tram 378 -
 Melbourne Tram Museum
Photograph - set of 9 Black & White Photograph/s, Melbourne & Metropolitan Tramways Board (MMTB), 1966
Series of 9 black and white photographs of the traffic congestion in the CBD during 1951. .1 - view looking south along Spencer St from Collins St showing the VR Head office, and the railway viaduct with a Berger Paint advertisement, Has one wide body tram with dash canopy lighting and three W2's. Also one small bus. Has "G3" in pencil on rear. .2 - similar view but with a different vehicle mix - W2 317 (Richmond Route 28), an SW6 route 27 and another W2 (route 41). Includes one large truck carrying Land Rover boxes. Typed on rear "Enlargement of No. 72 - Sheet No. 26 (Report P25/1/8) and in ink initials and "For Testing Engs 1/11/51". .3 - View looking north along Swanston St Princes Bridge with a route 6 tram and Princes Bridge Station and St Pauls Cathedral. On rear in pencil "11/2" .4 - Spencer St - trams crossing Spencer St bridge - W5 781 (Route 10) and a W2 649, route 9, South Melbourne Beach. .5 - Queensbridge under bridge - showing many cars jammed and the railway viaduct. .6 - ?? - Collins St - National Mutual and Shaw Savill Line offices - has a Safety Zone stand. .7 - Collins St looking east from Market St - with many trams in the view and many cars. .8 - Collins at Market St with a SW6 with dash canopy lighting - route 45, followed by a route 9A .9 - same location - total chaos. See also Reg 4520 for another 7 photos of the same series.trams, tramways, traffic control, congestion, spencer st, route 27, route 28, route 41, route 6, princes bridge, swanston st, w2 class, sw6 class, route 10, route 9, spencer st bridge, market st, collins st, route 45, route 9a, tram 317, tram 781, tram 649 -
 Ballarat Tramway Museum
Slide - 35mm slide/s - set of 3, Noel Simons, 22/11/1962 12:00:00 AM
Set of 3 transparencies taken on 22/11/1962 on Kodak mounts. 1190.1 - No. 7 (bound for North Bendigo) at the Charing Cross stop with No. 19 just left for Quarry Hill. Has the buildings on the south side of High St. in the background, including RACV building. No. 7 has front dash panel ad for Streets ice cream, and roof ads for Ilford Film and an SEC "Cook with Electricity". Passengers are boarding the tram. 1190.2 - Bendigo No. 2 at Charing Cross with fountain in the background and other buildings on the south side of High St. Tram has two SEC roof ads - good side on view - "Electric Cooking - Matchless" and "Switch to Electric Cooking". 1190.3 - Nos. 19, 2 and 7 at Charing cross with a Austin ? motor car. Has buildings on the south side of High St. in the background, along with SEC and Ilford film roof ads.Information written on in black ink and date stamped on purple ink. 1190.1 - "Nos. 19 and 7 at Alexandra Fountain, Charing Cross, Bendigo" 1190.2 - "No. 2 at Alexandra Fountain, Charing Cross, Bendigo" 1190.3 - "Nos. 19, 2 and 7 at Alexandra Fountain, Charing Cross, Bendigo" tramways, trams, bendigo, charing cross, alexandra fountain, tram 2, tram 7, tram 19 -
 Ballarat Tramway Museum
Photograph - B&W print of donated negative, Ron E. Fluck, 23/06/1962 12:00:00 AM
Black and white print of a donated negative. Print made 8/1998. Photo of SEC tram no. 31 in Main St, Ballarat East, with destination of "Gardens via Drummond St." Tram has been fitted with dash canopy lighting, but not the large white strip under the lighting. Has small triangles on the panels. Also has a small ad for White Horse whisky. Shows buildings on either side of Main St. and the Caltex service station in the background on Main Road and Bridge St. Photo taken 23-6-1962. Copy made Oct. 2001 for the "gold, Gold GOLD" temporary exhibition - colour laser print onto card, with Velcro dots on rear. Stored in box D1 (Display Box) 02/2003. High Res scan of negative added 17/1/2019.tramways, trams, main st, 31, ballarat, tram 31 -
 Ballarat Tramway Museum
Photograph - Black & White Photograph/s - set of 3', Keith Kings, 26/03/1956 12:00:00 AM
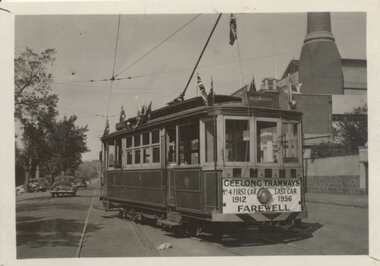
Black and White print contained within the Wal Jack Bendigo and Geelong Album, see Reg Item 5003 for more details. Set of three black and white photographs from Keith Kings of the staged closures of the Geelong tramways. .1 - Geelong No. 4 - decorated as the Last tram, has a dash sign "Geelong Tramways No. 4 first car 1912, Last car 1956 Farewell", with the destination of Belmont. Photographed with power station in the background in Corio Terrace. 26/3/1956, KSK Photo (T)(e)(8). Printed on Ilford Paper. See also Reg Item 2667 and 4388 for a colour slide version of the same photograph. .2 - ditto - about to leave the depot - KSK Photo - T(g)(3) .3 - ditto - back at the depot - KSK Photo - T(g)(8)On the rear in ink and with the Keith Kings Copyright stamp: .1 - "Geelong - 4 - decorated as Official "Last" tram -26/3/56" - (T)(e)(8). .2 - "Geelong - 4 - illuminated as last tram Sun 26/3/56" - (T)(g)(3). .3 - "Geelong - 4 - last tram, back at Depot, Sun 26/3/56" - (T)(g)(8). trams, tramways, geelong, closure, depot, last tram, tram 4 -
 Ballarat Tramway Museum
Photograph - Black and White photocopy, Travis Jeffrey, 1961
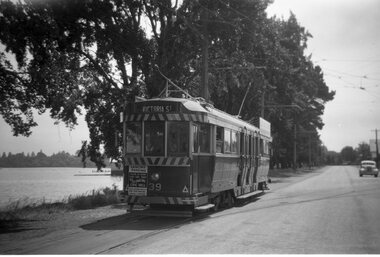
Negative No. N387 and black and white print made by a laser printer (stored in folder) of Ballarat No. 39 passing depot junction, in 1961. Tram fitted with lights and small white stripe. Small triangles in corners of front dash. Ad for 60/40 dancing at Civil hall on front of tram. Showing Victoria Street destination. Lake in background, no other vehicles. Photo by Travis Jeffrey, who advised could be Dave Kellett driving. Date of photo on folder 5/9/1960. Date of photo could be incorrect, due to fitting of lights taking place late 1960. Large print of this photo made for display 1995c. Item updated when negative added to collection - 1/6/2003. Original negative rescanned 24/5/2020 and image file updated. Paper print of original photo in folder 73.Paper folder that contained the negative had "NR40A" in red ink, "BA14" in pencil, date stamp of "5 Sep 1960" on front, and on rear date stamps "26 Sep 1962" and "6 Oct 1962".trams, tramways, ballarat, wendouree parade, tram 39 -
 Ballarat Tramway Museum
Photograph - Black & White Photograph/s - set of 8, Bob Lilburn, late 1950's to early 1960
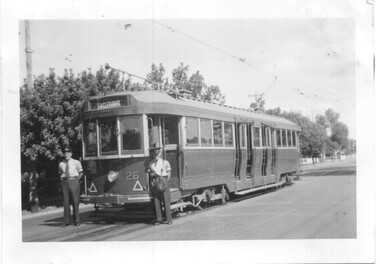
Set of eight Black and White photograph of Bendigo trams late 1950's to 1960 prior to the installation of dash canopy lighting. .1 - No. 26 at Quarry Hill with the crew standing either side of the tram - grey album remnants on the rear .2 -18 at Eaglehawk, showing Depot as the destination .3 - 5 in Arnold Street, 4/1960, showing Special. Note the white bumpers. .4 - 18 at Quarry Hill .5 - 14 at Quarry Hill - has remnants of album mounting on the rear and "Ex 86 PMTT" in pencil - not in Bob's hand writing. Has crews standing by the front of the tram. .6 - 10 at Charing cross, with a large "Plume" sign in the background with The Beehive building, chemist and cafe. .7 - 30 at Bendigo Depot .8 - 10 at Charing Cross, with the destination of Quarry Hill. Photograph from the Bob Lilburn Collection. Inscription in Bob's handwriting.On rear in ink are details of the location and tram number and some dates.trams, tramways, bendigo, quarry hill, crews, eaglehawk, birney, charing cross, arnold st, tram 26, tram 18, tram 5, tram 8, tram 18, tram 14, tram 10, tram 30 -
Moorabbin Air Museum
Photograph (item) - John Wells Collection - see Description for details of photo collection
-
 Ringwood and District Historical Society
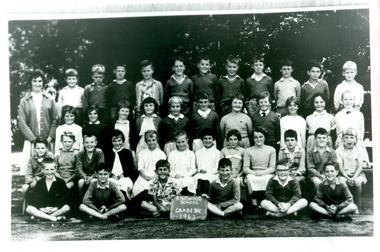
Photograph, Ringwood State School - Grade 4C, 1962
Black and white photograph - Grade 4C, 1962"Attached to photograph" Back Row- L to R: ?, Mark Dash, ?, ?, Roger Harris, ?, Ian McCall, Graeme Haglan, ?, John Grayling, Bruce Barber. 2nd Row- L to R: Ann Logan, Debbie Sylvie, Christine Smith, Linda Chegwielan, Leanne Thorpe, Ann Downey, ?, Meg Flowers, Julie Hogarth, Robyn Westhorp, Robyn Morris. 3rd Row- L to R: Dale Ryan, Grant Nichol, Tony Martin, Linda Willis, ?, Christine (?), Jenny Buchanan, Elvina Crawford, Grace King, Allan McLaine, Terry Bacon. Front Row- L to R: ?, Chris McDonald, Ron Saines, Howard Archer, ?. Teacher: -
 Ringwood and District Historical Society
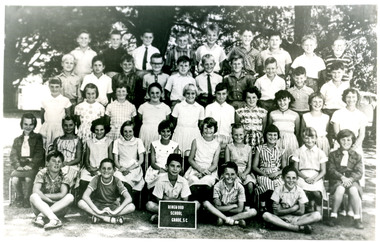
Photograph, Ringwood State School - Grade 5C, 1963
Black and white photograph - Grade 5C, 1963."Attached to photograph" Back Row- L to R: Ron Saines, ?, ?, Ian Carrington, Ian McCall, Roger Harris, ?, Grant Nichol, Howard Archer. 2nd Row- L to R: Bruce Barber, David Kimberley, ?, Mark Wells, Tony Martin, Makus Dash, Wayne Walton, ?, ?, ?. 3rd Row- L to R: Ann Downey, Christie Schrum, Meg Flowers, Robyn Westthorpe, ?, Whilema Coenders, Grace King, Rosemary Weaver, Ann Hagar. Front Row- L to R: Lynda Wilis, Linda (?), Debbie Sylvie, Elvena Crawford, Christine Smith, ?, Jenny Buchanan, ?, Annette Smeaton, Ann Logan. On Ground: Terry Bacon, ?, John Grayling, Dale Ryan. Teacher: Miss Enterkin.