Showing 455 items matching "station sign"
-
 Melbourne Tram Museum
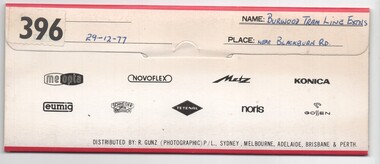
Negative, Bruce Herbert, "Burwood Tram Line Extns - near Blackburn Road", 29/12/1977 12:00:00 AM
Negative folder - made by SAGA Japan, containing 6 no. 120 film negatives 60mm x 90mm of the works on the extension to East Burwood, Burwood Highway, near Blackburn Road, 29-12-1977. Folder stamped 396 .1 - Burwood highway - out of focus - showing end of slab. .2 - ditto - looking west? - shows cross section of slab. .3 - Blackburn road with poles positioned - with BP service station in background. .4 - ditto .5 - sign showing tramway works in progress .6 - from the kerbside showing the track.trams, tramways, burwood highway, tramway construction, construction, east burwood -
 Melbourne Tram Museum
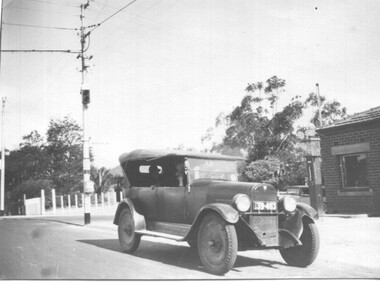
Photograph - 1926 Hudson Super 6 - Riversdale and Warragul Roads, Ray Pearson, 1930s
Photograph of a 1926 Hudson Super 6 parked at the tea room/kiosk on the intersection of Riversdale Road and Warragul Road. Distinguishing features of the car include the triangular badge on the radiator and the unusual disc wheels. The 1926 Hudson also had horizontal radiator shutters. On this vehicle, a finer mesh has been attached in front of the shutters. This is normal practice when insects such as locusts are in plague. At the time, Warragul Road was known as East Boundary Road. Behind the car on the tramway pole is a colour light tramway signal for the single-line section between Warragul Road and the terminus. On 1 July 1928, the Wattle Park line was extended from Boundary Road via Riversdale Road to Elgar Road. It was built as a single track with a passing loop about halfway along, plus a passing loop at the former Boundary Road terminus. The tramway pole has a stop sign and a telephone box as well. In a box of negatives received is an envelope noting the car was owned by Ray Pearson and photo taken during the 1930s. Inside the motor car are two people, the driver, and a lady. In the background is part of the tea rooms located at this corner with a Shell gravity-fed petrol bowser. At the time, petrol was not sold at Service Stations on a Sunday - Sunday trading laws, but they allowed Tea Rooms or kiosks to be open.Yields information the intersection of Warragul and Riversdale Road and MMTB single line signals.Black and white photograph on Velox paper.On rear in pencil "Colour light signal Wattle Park Route, down end loop line, corner of Riversdale and East Boundary Roads".trams, tramways, riversdale road, wattle park, warragul road, motor cars, hudson super 6, shell fuel, signalling, single line, ray pearson -
 Melbourne Tram Museum
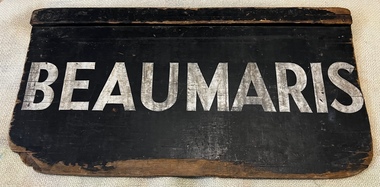
Sign - Auxiliary Destination Board - Black Rock - Beaumaris, Victorian Railways (VR)
Used as a destination or auxiliary board on Sandringham trams and buses that operated from the Sandringham railway station tram/bus depot. Tram and bus services were operated by the Victorian Railways. Has been lettered on one side for Black Rock and the other Beaumaris.Demonstrates destination signs used by the Victorian Railways on their Sandringham services.Sign - plywood - 3 ply with a rebated timber section at the top of the sign, painted black with white letters. Two copies held.sandringham, vr trams, vr buses, signs, buses -
 Melbourne Tram Museum
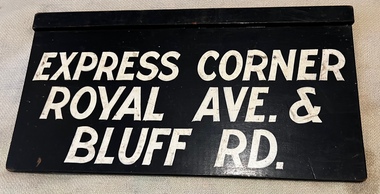
Sign - Auxiliary Destination Board - Sandringham - Royal Ave - Bluff Road, Victorian Railways (VR)
Used as a destination or auxiliary board on Sandringham trams and buses that operated from the Sandringham railway station tram/bus depot. Tram and bus services were operated by the Victorian Railways. Has been lettered on one side for "Express Corner Royal Ave & Bluff Road" and the other "Sandringham"Demonstrates destination signs used by the Victorian Railways on their Sandringham services.Sign - plywood - 3 ply with a rebated timber section at the top of the sign, painted black with white letters. Two copies held.sandringham, vr trams, vr buses, signs, buses -
 Melbourne Tram Museum
Document - Radio Transcript, Melbourne & Metropolitan Tramways Board (MMTB), Wireless talk - "inside information regarding tramcars", Jul. 1926
Radio transcript - 12 foolscap sheets, typed. Although not named, appears to have been prepared for or by Mr. Strickland describing "inside information regarding tramcars". Notes cable trams, conversion, sale of trailers and dummies or grip cars, the variety taken over from the trusts, design of new cars (180 in service at the time of the report), open cars vs closed cars, seating and standing capacity, speed, braking system, step heights, destination signs, lifeguards. Gives a description of Preston Workshops, finishing soon, description of the tramcar construction, roofing, painting, sourcing of materials, timbers, cost per tram of 3250 pounds, depots, breakdowns, overhauls, workshops, collision repairs in 1925, construction of 10 safety cars. Vicsig.net gives that X1 461 entered service in Sept. 1926. Pinned to the file by Robert on the rear of TMSV Raffle ticket is a note "Electrical Engineer 15/7/26 p35 "C. H. Wickham gave recent address broadcast on 3LO"In blue pencil in top left hand corner appears to be "Wickham"trams, tramways, tramcars, preston workshops, new trams, sale of trams, cable trams, destination roll, tram brakes, tramcar equipment, x1 class, w class, depots, radio stations -
 Melbourne Tram Museum
Photograph - Set of 7 Black & White Photograph/s, Melbourne & Metropolitan Tramways Board (MMTB), 1966
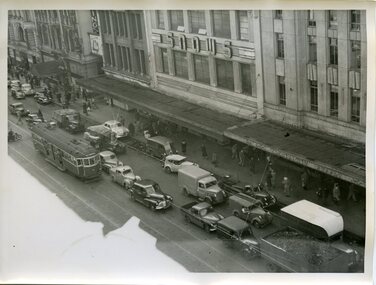
Series of 7 black and white photographs of the traffic congestion in the CBD during 1951. .1 - Flinders St from Flinders St Station office looking northwest with a W2 317 Richmond route 28 and many cars. Has "32" on rear in pencil. Has Snows and the SEC building in the view. .2 - Spencer St bridge, looking north with Fish Market/Cool Stores and the VR Head Office in the view. Has Taylor and ? General Carriers and Nestle's truck in the view. .3 - William St? with passengers waiting at a safety zone - has the Dennys Lascelles building in the background. .4 - Flinders St looking north east with Snows, the SEC, a Hotel and Hearnes sign showing. Has a W2 436? route 27 Hawthorn eastbound. Typed on rear "Enlargement of No. 76, Sheet No. 28 (report P25/1/8), "Spare" written in pencil and "For Testing Engrs 1/11/51" in ink. .5 - looking north with a horse drawn cart and a SW6 (East Kew) with dash canopy lighting. .6 - looking north - with Hearnes Provisions, Olympia Inn and Coffee Lounge and Young & Jacksons Hotel. Has a W2 partly in the photo about to enter the Safety Zone. ..7 - similar to .1 - with Snows, W2 route 48 North Balwyn and a Pattons Dry Cleaning van. See also Reg 4519 for another 7 photos of the same series.trams, tramways, traffic control, congestion, flinders st, spencer st, route 27, route 28, east kew, richmond, route 48, william st, safety zone, hawthorn, tram 317, tram 436 -
 Melbourne Tram Museum
Photograph - Set of 3 Colour Negatives, Phil A'Vard, 10/02/1962 12:00:00 AM
Set of 3 photographs taken on the AETA tour Sat. 10/2/1962 - Closure of the Local Tram Routes at Footscray. .1 - X2 677 inbound at the corner of Gannon and Charles Sts Footscray with a BP service station in the distance. .2 - X2 677 and two X1 class cars at the Williamstown Road terminus in Somerville Road. .3 - ditto, with X1 467 at the rear of the 3 trams. Has the tram sign on the left hand side of the photograph, with a Craven A and Nugget boot polish signs in the view. Taken on Perutz film - see 3997 for the AETA Tour circular.trams, tramways, footscray, aeta, williamstown rd, charles st, gannon st, x1 class, x2 class, tram 677, tram 467 -
 Melbourne Tram Museum
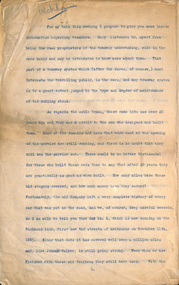
Document - Notice, Tramway Board, "Tramway Board War Loan 5% Bonds, Repayable in 1927", Mar. 1918
Set of 9 notices and other documents concerned with the issuing of "Tramway Board War Loan 5% Bonds, Repayable in 1927". by the Commonwealth Government. Signed W. O Strangward Secretary. .1 - Notice - setting out the conditions, the need, payments - dated 26/2/1918 - 2 copies held. .2 - Notice - application notice - dated 6/3/1918 giving conditions - 2 copies held. .3 - Memo dated 11/4/1918 - on half foolscap, carbon copy, address to all stations regarding extension of the closing date. .4 - Gestetner printed notice dated 27/2/18, forwarding copies of the notices and conditions of the loan and documents. .5 - Quarto printed sheet - Memorandum of Agreement for the employee to signed, giving conditions and signature lines. .6 - Sheet, headed "Tramway Board Melbourne Commonwealth 5% War Bonds" - for each car or power house, listing the names, number of bonds, applicants signature and the amount paid. Double sided, Nos. 104 and 105 .7 - Poster or notice - printed foolscap sheet - advertising the Bonds, and conditions and asking employees to consider. .8 - Memorandum to the Officer in Charge of a particular location, dated 19/9/18, advising of the war loans and associated paperwork. Two copies held. .9 - Form to record payments for the war loans for a particular person, three copies, numbered 496, 497 and 500. Pink cloth back recording the location, name and application number - form No. 530. See also Reg Item 3924 for other documents.trams, tramways, tramway board, world war 1, finances, bonds -
 Melbourne Tram Museum
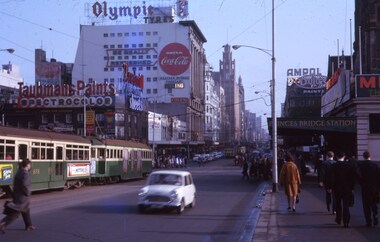
Slide, Peter Moses, 1963
Photograph looking northwards along Swanston St just before Flinders St Station. Has SW6 878 and a W2 (route 64) waiting at the traffic light as people commence to cross. In the view are Princes Bridge Station and Young & Jackson. There is a myriad of signs - Taubmans Paints, Olympic tyres, Bradmill Sheets, Coca Cola, Coles, Ampol, Dulux. Tram 878 has signs for Metters and Sobrtol ?? Soap. Kodak cardboard mount slide, taken by Peter Moses, slide mount dated Feb. Taken during 1963In ink on slide " Melbourne 1963 Barbara Photo"trams, tramways, swanston st, flinders st, trams, sw6 class, w2 class, tram 878 -
 Melbourne Tram Museum
Slide - Set of 3, David Verrier, 19/10/1974 12:00:00 AM
Set of three Agfa colour slide, white blue plastic mount. Photograph by David Verrier. .1 - SW6 846 Flinders St near Batman Ave, Destination Glen Iris with a multistorey apartment building behind - now Southbank apartment? Has had three additional stories added. Tram has adverts for Ampol and Otto Worth Bacon. Large sign for Craven cigarettes. .2 - W5 811 ditto, adverts for Park Drive, Yellow Pages and Crest Lager. .3 - View looking north along Swanston at Batman Ave. with adverts for CBC Bank, Olympic Tyres, Coca Cola, Peter Stuyvesant. Photos taken 19/10/74In ink: "Sat 19/10/74 tram 846 Princes Bridge St Kilda Rd."trams, tramways, swanston st, sw6 class, glen iris, route 6, w5 class, east malvern, flinders st station, tram 846, tram 811 -
 Melbourne Tram Museum
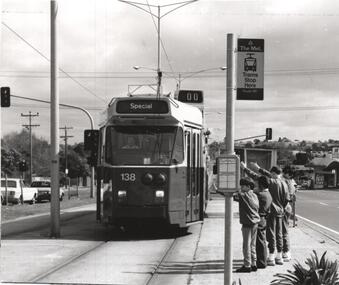
Photograph - Black & White Photograph/s, The Met, mid 1980's
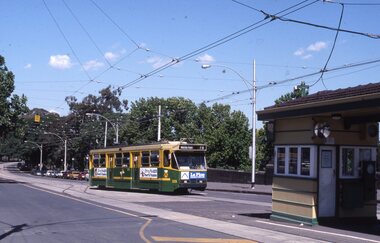
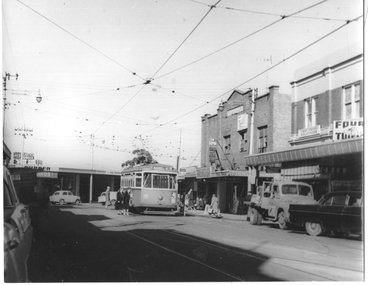
Black and white photograph - Z3 138 running a Special on the East Burwood line mid 1980's at Station Street. Official looking photo, possibly soon after the new stop signage by The Met. Has a tram stop with The Met sign and timetable board. Route number not shown. Has a number of school boys with hands outstretch - hailing the tram?trams, tramways, east burwood, burwood highway, z3 class, station st, tram 138 -
 Melbourne Tram Museum
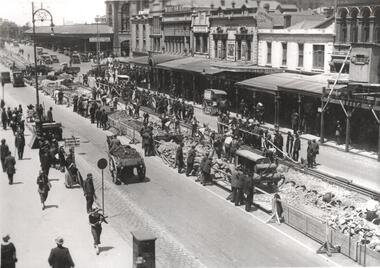
Photograph - Black & White Photograph/s, Melbourne & Metropolitan Tramways Board (MMTB), Dec 1925 or Jan 1926
Black and white photograph of the conversion of the Flinders St end of Swanston Street from cable trams to electric trams. Note the signs advising passengers to go to Princes Bridge for buses, horse drawn vehicles with excavated spoil, air compressor, the cable tram slot rail supporting yokes. In the background is the Flinders St Station. Photo from the Collection of the Department of Infrastructure now with the Public Records Office - image number H101. Note: this photo is now out of copyright and was not an original VR photograph, but one copied from another source and collected as their Heritage series.Has Department of Infrastructure copy right stamp on rear and number "H243" in ink on rear and "2-4"trams, tramways, swanston st, cable trams, trackwork, new tramway, flinders st, conversion -
 Melbourne Tram Museum
Slide - Set of 3, Colin Rough, 29/04/2003 12:00:00 AM
Set of 3, 35mm Tecnodia white plastic mount slides of trams in Swanston St at Flinders St Station 29/4/2003. Trams in M>Tram livery. .1 - Z3 209 in all over advertising for Mentos mouth fresheners. Has Young & Jacksons Hotel behind with a large sign for Optus. Also the Dangerfield building. .2 - D1 3509, Malvern Rd via Dandenong Rd and as above re background. .3 - Z3 117 inbound, with destination of Melbourne University.On front written on a label "M>Tram, Flinders St station, Melbourne 29/4/03" and the tram number.trams, tramways, swanston st, flinders st, flinders st station, z3 class, tram 209, tram 3509, tram 117, m>tram, d1 class -
 Melbourne Tram Museum
Negative, Wal Jack, post 6/1955
Black and white negative, by Wal Jack, of the conductress - conductor walking back to the tram, W7 1006 at the Bourke St terminus post 6/1955. Tram has the destination of Northcote - Dundas St, route 90 In the background is the Carloyn's Hotel. and the Spencer St Station buildings. On the side of the hotel is a sign asking for support to Prince Henry's Hospital. See Reg Item 5097 for another photo of the tram at Bourke St. Photo Wal Jack.trams, tramways, w7 class, bourke st, spencer st, route 90, conductors, conductresses, tram 1006 -
 Melbourne Tram Museum
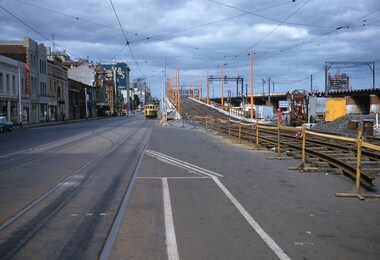
Slide - Set of 5, Keith Kings, 15/11/1959 12:00:00 AM
Set of five Colour slides, Kodak, white cardboard mount of track laying and the construction of the Flinders Street overpass during November 1959. .1 - Photo showing the tram line in the pre location position with the new track over the first stage of the overpass read to be cut in. 15/11/1959. Tram running a route 46. Keith notes - 317 to Spencer St terminus in Flinders St from Cnr of Spencer with temporary track ready for trams on the overpass. .2 - track being tested on 21/11/1959 - has the Flinders St station and signal gantry in the background. On the bridge is a sign for Coffey Ford. Keith notes - 903 stranded on temporary track as test car for Kings St bridge overpass Flinders St between William and Market Sts. .3 - tram 903 testing the track, has a number of workers in the view - 22/11/1959 Keith's notes - 903 first tram (on its second use) testing Flinders St overpass track and approach curves on east side. .4 - trams 939 (route 46) and 350 (route 27, Spencer St) at the east end of the new bridge with people watching. Note the "cars stop here" on the orange pole near the bottom of the ramp. 22/11/1959 Keith's notes - 939 - first passenger tram over Flinders St overpass on return journey and 350 second passenger tram. .5 - tram 939 first passenger car over the bridge at the western end of the new bridge with many workers in the background. Also Markillies Hotel. Also shows the reinforcing in the side of the bridge for the next section of the bridge to be built following this stage. 22/11/1959 Keith's notes - 939 first passenger tram over Flinders St overpass over King St. Slide Number K(l)(287), K(m)(275), K(m)(278), K(m)(287), K(m)(282) respectively.Extensive handwriting on rear in ink giving the photographic details of exposure.trams, tramways, flinders st, track equipment, track construction, trackwork, route 46, testing, king st, tram 371, tram 903, tram 939, tram 350 -
 Melbourne Tram Museum
Slide - Set of 9, Keith Caldwell, 17/03/1966 12:00:00 AM
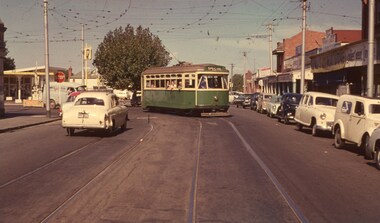
Set of 8 Agfa colour blue white plastic mount slides, photo by Keith Caldwell of trams on the Royal Park line in the vicinity of the Royal Park railway line. .1 - W2 328 (West Coburg Bell St route 55) passing under the railway bridge, with another W2 (362 or 382?) behind. Tram 328 has adverts for Remy Martin and Kleenex tissues. .2 - W2 521, route 55, passing a tram stop. Note the overhead light. .3 -W2 456, route 55 West Coburg via William St, passing under the railway bridge. .4 - not used, .5 - W2 355 with railway bridge in background, Domain Road, Route 56. .6 - W2 506 climbing the hill, Domain Road, route 55. Tram has adverts for White Crow tomato sauce. .7 - W5 812, arriving at stop (Section sign), to Carnegie, route 4. The tram stop has the fares to the city (15d and 7d). In the background is a Perway box. .8 - W2 227 (Domain Road route 56) with the railway station and two other trams in the background. .9 - SW6 (Route 55) outbound with the zoo walls in the background. Tram has advert for Coffey Ford. 17/3/1966In ink "17 iii 66"trams, tramways, royal park, route 55, west coburg, w2 class, domain rd, route 56, w5 class, sw6 class, tram 328, tram 521, tram 456, tram 355, tram 506, tram 812, tram 227, tram 913 -
 Melbourne Tram Museum
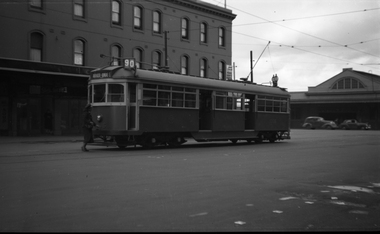
Negative, Wal Jack, c1943-44
Black and white negative, by Wal Jack, of S class 166 (showing Russell St), in Barkly St Footscray. Based on the photograph, the tram is inbound to Footscray Station, as the buildings match the current (12/2020) Google Earth view at 185 Barkly St and Albert St. In the background is - Brown's Dry cleaner, a Millinery shop at 185, W. Adler Tailor, J. Paarons PA (Radio) on the clockface and H E M Burrow? store sign. A horse drawn van is alongside the tram. Photo undated, c1943-44trams, tramways, barkly st, footscray, russell st, s class, tram 166, mmtb -
 Melbourne Tram Museum
Postcard, Carinya, Elizabeth St looking south from Collins St, c1980
Colour postcard Carinya Postcards, of Elizabeth St looking south from Collins St to Flinders St Station building. Has a Z and another tram in the view. Has signs for ANA Health, a Friendly Society and Light House.trams, tramways, z class, elizabeth st, flinders st station -
 Melbourne Tram Museum
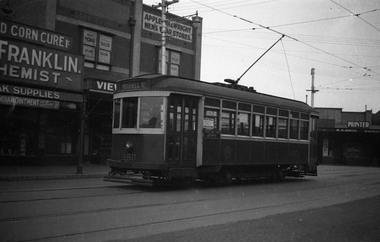
Negative, Wal Jack, late 1930's?
Black and white negative, by Wal Jack, of X1 460, at the Footscray Railway Station terminus in Leeds St. Has the destination of Russell St. Tram has a Pay as You leave sign. In the background is the Franklin Chemist, Appleton and Wright Menswear, Roy Thomas Tailor, and R. S. Smith Printer. Either late 1930's, 1940 or post 1945 no white stripe on tram.trams, tramways, footscray, leeds st, x1 class, tram 460 -
 Melbourne Tram Museum
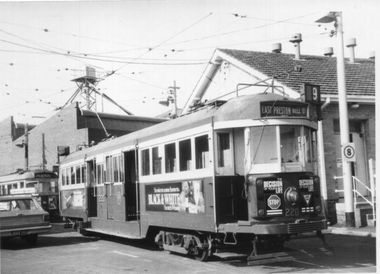
Photograph, David Menzies, W2 220 North Fitzroy Depot, 1975
Black and white print of W2 220 parked on the depot access tracks at North Fitzroy depot. It has the destination of East Preston Bell St. The tram has adverts for Black and White scotch whiskey and road safety messages re stop and give way signs. In the background is the sub-station at this location. It was unusual to see a W2 class at this location. Has a print date of 8/1975 on the rear.Yields information about W2 220, the second W class tram built.Black and White photographs - printed on plain paper with photographers stamp and notes on rear.Has stamp of David Menzies on rear. and in ink details of photo.tramways, trams, mmtb, w2 class, tram 220, north fitzroy depot -
 Melbourne Tram Museum
Album - Robert Thomson Slide Collection - box 16
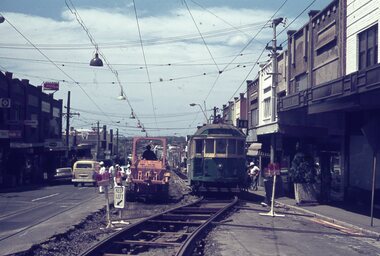
Photo - see pdf file for further information. Number Date Brief Description Box 16 RT372 23-1-1980 W2 271, High St Kew reconstruction trackwork – route 48 RT373 23-1-1980 W2 504 Burwood Road RT374 23-1-1980 Z7 East Burwood terminus RT375 23-1-1980 Z26 Burwood Highway, route 75 RT376 23-1-1980 W2 255 North Balwyn terminus, route 48 RT377 24-1-1980 W5 at North Coburg terminus – route 19 RT378 24-1-1980 Z37 (route 19) and a W route 20 at North Coburg terminus RT379 24-1-1980 W2 378? Park St St Kilda terminus, route 12 RT380 24-1-1980 Z121 route 88 at Bourke St terminus with Spencer St station in background RT381 25-1-1980 Z1 118 and another Z81? At East Preston terminus – both route 88 RT382 26-1-1980 SW5 812 route 67 at Carnegie terminus RT383 28-1-1980 MMTB Austerity bus No. 301 RT384 26-1-1980 SW5 818? And SW6 965 at Carnegie Glen Huntly Road at start of the single line Truganini Road – note the single track signs. Both route 67. RT385 26-1-1980 W2 504 at East Malvern Darling Road – route 3 RT386 26-1-1980 SW5 787 route 52, Mathews Ave. RT387 26-1-1980 SW5 684? Airport West terminus, route 52, RT388 26-1-1980 High St Kew track reconstruction, W6 986, route 48 RT389 26-1-1980 SW6 965 route 67, Glen Huntly Road level crossing RT390 27-1-1980 SW6 962 Collins St route 42 Spencer St terminus RT391 27-1-1980 Z3 121, route 88 Bourke St Mal with parked cars. RT392 27-1-1980 Z3 188? Bourke St route 96 RT393 27-1-1980 3MP tram Camberwell Route 72 at Gardiner level crossing RT394 28-1-1980 MMTB Bus 370, Leyland OPS1 on display RT395 28-1-1980 MAN Bus 103, on display showing Doncaster Depot Demonstrates the work of Robert Thomson in photography, collection and/or production of slidesAssembled album in a black presentation folder of 24 colour slides, collected or produced by Robert Thomson. A list of all photographs with details has been compiled. All rights reserved for all photos., melbourne, tramways, trams, tram 271, high st kew, trackworks, route 48, tram 504, tram 7, east burwood, tram 26, tram 255, north coburg, route 19, tram 37, park st st kilda, tram 121, bourke st, spencer st, tram 118, east preston, route 88, route 12, route 67, carnegie, tram 812, tram 67, buses, tram 965, truganini road, route 3, route 52, tram 787, tram 986, level crossings, glen huntly rd, matthews ave, tram 962, collins st, route 42, tram 188, route 72, gardiner -
 Melbourne Tram Museum
Album - Robert Thomson Slide Collection - box 17
Photo - see pdf file for further information. Number Date Brief Description Box 17 RT396 Nov. 99 A 239 arriving Batman Ave Route 70 RT397 Nov 99 W7 1012 running Special, Clarendon St RT398 Nov 99 A 300, Port Melbourne, Mont Albert route 109 RT399 Nov 99 A 286 Port Melbourne line, route 109 RT400 Nov 99 Z3 223 Carlisle St St Kilda, route 69 – with destination set for return Kew Cotham Road RT401 Nov 99 W7 1005 Swanston St route 8 with Christmas decorations – route 8 RT402 Nov 99 Z3 140 Swanston St route 8 with Christmas decorations – route 11 RT403 Nov 99 Z3 144 Swanston and Bourke with “Give way to passengers ”sign – route 1 RT404 Nov 99 Z3s 144 and 196 Swanston St – with sign “Tram stop ahead” RT405 Nov 99 W6 977 Swanston St – route 8 and Z1 72 RT406 Nov 99 11W and City Circle SW5 723 – Spencer and Collins Sts RT407 Nov 99 SW6 960 University terminus, route 16 RT408 Nov 99 SW6 960 University terminus with Z2 108 and other trams RT409 Nov. 99 A 234 Wattle Park terminus, route 70 RT410 Nov 99 New track docklands with old shipping shed in the view. RT411 Nov 99 Flinders St extension Docklands new track RT412 Nov 99 A 255 route 109 Port Melbourne terminus with former station building RT413 Nov 99 SW6 954 Route 16, Ackland St terminus with a Z3 behind. RT414 Nov 99 Restraurant tram 442, Esplanade. RT 415 Nov 2000 Z27 and Z1 Balaclava Junction RT416 Nov 2000 A 278 route 109 Port Melbourne terminus with former station building RT417 Nov 2001 B2 2010 in Yarra livery, Bourke St at Spencer St RT418 Nov 2001 B2 2108 turning from Bourke into Spencer St (route 96) followed by another B2 2048? RT 419 Nov 2001 Z 80 and another two Zs in Swanston St RT420 Nov 2001 Z137 and other Z’s in Swanston St RT421 Nov 2001 Z82 Swanston st RT422 Nov 2001 Z3 169 Wests Road, West Maribyrnong terminus with another Z arriving. Route 57 RT423 Nov 2001 West Maribyrnong terminus board with Swanston Trams signage RT424 Nov 2001 Z3 172 route 82, Wests Road RT425 Nov 2001 A class Flinders St extension route 48 in Yarra Trams livery RT426 Nov 2001 11W Bourke St with MTOCco building in the background. Demonstrates the work of Robert Thomson in photography, collection and/or production of slidesAssembled album in a black presentation folder of 31 colour slides, collected or produced by Robert Thomson. A list of all photographs with details has been compiled. All rights reserved for all photos., melbourne, tramways, trams, tram 239, route 70, batman ave, tram 1012, clarendon st, tram 300, port melbourne, route 109, tram 223, tram 69, tram 1005, route 8, swanston st, tram 140, tram 144, tram 196, tram 977, tram 72, tram 11w, tram 723, city circle, tram 960, tram 108, tram 234, wattle park, docklands, trackwork, flinders st, tram 255, tram 954, tram 442, tram 27, tram 1, tram 278, tram 2010, tram 2108, tram 80, tram 137, tram 82, tram 169, wests road, west maribyrnong, swanston trams, tram 172, route 82, route 48, bourke st, mtoco -
 Melbourne Tram Museum
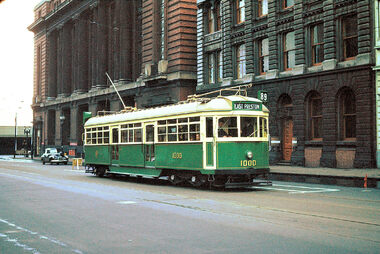
Photograph - Digital Image, W6 1000 on the opening day of the service in Bourke St, 26/06/1955 12:00:00 AM
Set of 4 digital images of W6 1000 on the opening day of the service in Bourke St via High St Northcote to East Preston on 26/6/1955. .1 - 1000 (East Preston route 89) at Spencer St, note the sign behind the tram and the newly painted safety zone. Has the Mail Exchange in the background. .2 - ditto at Spencer St with Carlyon's Hotel and the Spencer St Railway station in the background. .3 - tram arriving at the East Preston depot leads - has adverts for Milo, Kiwi boot polish and Pleshur's shoes. .4 - ditto with a Book Repairs Shop, R. P Evans, Goweville Hotel advertising Fosters Lager, and the Melody Picture theatre, In the background is Bell St with a set of clock traffic lights and two tower wagons and a Pura Milk truck just behind the tram.trams, tramways, w6 class, opening, route 89, bourke st, east preston, high st, northcote, tower trucks, traffic lights, bell st, tram 1000 -
 Melbourne Tram Museum
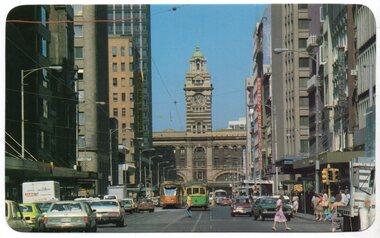
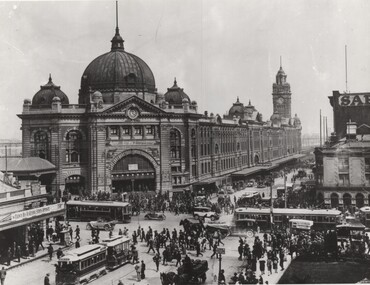
Photograph - Black and White photograph, Flinders St station cable and electric trams, c1926
... cream, and numerous signs on the railway station. See Reg Item..., and numerous signs on the railway station. See Reg Item 5272 ...Photograph of the intersection of Flinders and Swanston Sts featuring the Flinders St Station building - c1926?? features a very busy intersection cable trams (No. 17 west bound in Flinders St), tram 160 north bound in Swanston, two W class trams, other cable trams, many motor cars, horse drawn vehicles, cyclist and pedestrians. Note the standing zone in Flinders St. In photo are Young and Jacksons Hotel, Bacchus Marsh Concentrated Milk table cream, and numerous signs on the railway station. See Reg Item 5272 for the photo on a Greetings Card and 103 for a framed photographic print.Yields information about the intersection of Flinders and Swanston St c1926 - after the conversion of Swanston St.Black and white photograph with notes on the rear. Two copies held.Has "1926 Brimson VicRail" in ink along lower edge on rear and "H4505" in the middle of the print back.trams, tramways, flinders st, swanston st, cable trams, flinders st station -
 Melbourne Tram Museum
Photograph - Black and White photographs and digital images, Victorian Railways, c1926
.1 - Black and White photo of W 324 passing under the rail over bridge in Racecourse Road Newmarket between July 1925 and Nov. 1929. Tram was converted to a W2 in November 1929. The Doutta Galla Hotel in the background. On the left of the bridge is Newmarket Station and on the right of the photo is the fence of the stockyards. The bridge has an advert for Wolfes Schnapps and Blue? Label Tea. On the embankment is a sign for Life Guard Life Insurance? A lady is waiting at the tram stop. The photo is part of the VR Advertising series, made to show advertisers where signs could go. image i2 - cropped image showing the tramcar by itself. .2 and .3 - Z3 class 209 in about the same position, with a large KIA motor vehicle advertisement. The yellow crash beams and truck parking bay are a result of too many large trucks hitting the bridge. Photo by Warren Doubleday 26/4/2021On rear in ink "ADV 202"trams, tramways, newmarket, racecourse road, flemington, w class, tram stops, advertisements, z3 class, tram 324, tram 203 -
 Melbourne Tram Museum
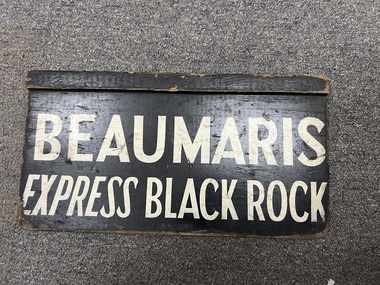
Sign - Form - Receipt docket, Victorian Railways (VR), Auxiliary Destination Board - Express - Beaumaris
Used as a destination or auxiliary board on Sandringham trams and buses that operated from the Sandringham railway station tram/bus depot. Tram and bus services were operated by the Victorian Railways. Have been letter Beaumaris Express and Beaumaris Express Black Rock which indicate more bus rather than trams.Demonstrates destination signs used by the Victorian Railways on their Sandringham services. Sign - plywood - 3 ply with a rebated timber section at the top of the sign, painted black with white letters. tramways, vr, sandringham, vr buses, buses, signs -
 Melbourne Tram Museum
Photograph - X2 676 Leeds St Footscray, Jim Seletto, c1960
The photograph shows X2 class tram No. 676 with the destination of Russell St in Leeds St Footscray. Has the station buildings in the background as well as signs for Four & Twenty Pies, Ace Plastic & Rubber and a shore repair shop Photo by Jim Seletto c1960.Yields information about MMTB X2 676 and the Footscray Station terminus.Black and white photograph, with photographer's notes on the rear."Footscray Station, JSE6" and Jim Seletto stamp.trams, leeds st, footscray, x2 class, tram 676 -
 Melbourne Tram Museum
Postcard, Rose Stereograph Co, "Flinders St Melbourne", late 1930s
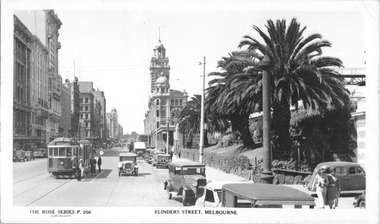
Rose Series postcard No. P 206, titled "Flinders St Melbourne" with W2 class tram 412 (Spencer St, route 40) westbound in Flinders St with Flinders Street Railway Station in the background. A group of ladies has alighted from the tram at the Safety Zone near Queen St. Note the "Do not park here" sign placed behind the pole on the right side of the photograph.Yields information about Flinders St late 1930sPostcard - printed real photograph with Rose Stereograph Co. name on the rear. Two copies held.tramways, w2 class, flinders st, tram 412, safety zone, trams, route 40 -
 Melbourne Tram Museum
Photograph - Black & White Photograph/s, c1926
Black and white photograph of Flinders St Station looking from St Paul's Cathedral with many people, motor cars and horse drawn vehicles. Has a W class tram in Swanston St and a bus by the kerb. Tram may be W 224. c1926 Numerous signs are visible as well.On the rear in ink, "Neg - Bob Lilburn Collection Prob 224"trams, tramways, flinders st station, swanston st, w class, tram 224 -
 Melbourne Tram Museum
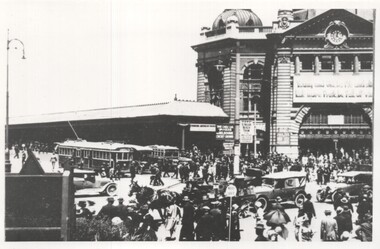
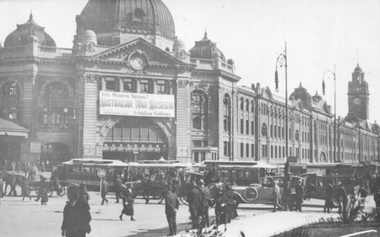
Photograph - Flinders St Station - Australian War Museum, 1922
... vehicles, and pedestrians. The sign above the station entrance..., and pedestrians. The sign above the station entrance is advertising ...The photograph shows the busy intersection of Flinders and Swanston St with Flinders St station, along with cable trams, motor vehicles, and pedestrians. The sign above the station entrance is advertising the "Australian War Museum" at the Exhibition Buildings. The reference dates its opening as ANZAC day 1922 and moving to Sydney in 1925. The photo was probably taken soon after it opened as the sign above the station entrance was regularly changed. Note the Safety Zone sign on the eastern side of the intersection for eastbound trams. At the time, trams stopped on either side of the intersection for passengers.Yields information the intersection of Flinders and Swanston St and the War Museum exhibition in the early 1920s.Black and White photograph - printed on plain paper.On the rear has pencil number "KM-M-008", and Ken Magor stamp.cable trams, flinders st station, war museum, flinders st, tramways, safety zone, swanston st