Showing 9453 items
matching 4th/19th
-
 8th/13th Victorian Mounted Rifles Regimental Collection
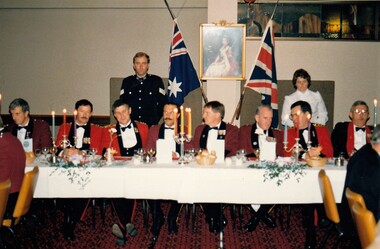
Photograph
This dinner commemorated the 40th Anniversary of the raising of 8th/13th Victorian Mounted Rifles Regiment which linked 8th, 13th, and 20th Light Horse Regiments.Two colour photographs of group of officers in mess uniform seated at table at a formal dinner at Commercial Club Albury 30 April 1988..“At rear: Sergeant R Ellison, Corporal Carr. From left: Major J Gay, Colonel C Brewer Area Commander AWMA, Brigadier D Perry Commander 4th Task Force, Major R Morrison Officer Commanding ‘A’ Squadron 8/13 Victorian Mounted Rifles, Colonel Howard Director Royal Australian Armoured Corps, Colonel John Neale Honorary Colonel 8/13 Victorian Mounted Rifles, Colonel G Garde, Colonel P Tremaine” military, officers, mess, uniform, dinner -
 Bendigo Historical Society Inc.
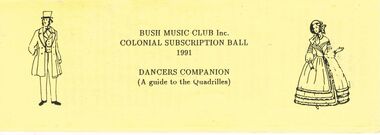
Document - PETER ELLIS COLLECTION: BUSH MUSIC CLUB COLONIAL BALL, 1991
Small yellow booklet outline of a man on left of title and woman on right. Bush Music Club Inc. Colonial Subscription Ball 1991 Dancers Companion (A guide to the Quadrilles) The Quadrille Figure 1 (Le Pantelon) (2x32) 8 Top couples R and L through. (without giving hands). 8 Set & turn Partners 8 Top ladies chain. 4 Top couples promenade across set. 4 Half R and L to place. 32 Side couples repeat Figure 2 (Le 'Ete) (4x24) 4 Top couples advance & retire. 4 Cross over (without changing places with partner). 8 Repeat back to place. 8 Set & turn partners. 24 Sides repeat. 48 Top and Sides repeat. Figure 3 (La Poule) (4x32) 4 Lady 1, Man 2 adv, tough RH, retire to opposite place. 4 Lady 1, Man 2 adv, join LH give RH to partner 4 Line of 4 balance fwd & back twice. 4 Men lead partners to opp. Place. 4 Lady 1, Man 2 adv. & ret. 4 Lady 1, Man 2 adv, honour & ret. 4 Top couples, advance & retire. 4 Half R & L to place. 32 Repeat with Lady 2, Man !. 32 Repeat with Lady 3, Man 4. 32 Repeat with Lady 4, Man 3. The Quadrille Figure 4. (La Pastourelle) (4x32) 4 1st couple advance & retire. 4 1st couple adv, lady join 2nd couple. 4 Line of 3 adv. & ret, 1st man retire. 4 Line of 3 adv. Ladies cross to 1st man. 4 Line of 3 adv. & ret, 2nd man retire. 4 Re-advance, form circle with 2nd man. 4 Circle L half way round. 4 Half R & L to place. 32 Repeat with 2nd couple leading. 32 Repeat with 3rd couple leading. 32 Repeat with 4th couple leading. Figure 5 (La Finale) (4 x 32 + 8) 4 All advance & retire. 4 Turn partners. 4 Ladies adv, curtsey & retire. 4 Men advance, bow & retire. 8 All set & turn corners. 8 Promenade with corner. (men to original place with corner) 96 Repeat 3 times to return to partner. 4 All advance & retire. Turn Partners. Notes: 1 Couples numbered 1 4 2 3 2 Set & turn is a 'balance' set and open hand turn. The Lancers Quadrille Figure 1 (4x24) 4 1st lady, 2nd man advance & retire, 4 Adv, turn two hands, return to place. 4 1st couple lead through across set 4 2nd couple lead through back 8 all set & turn corners. 24 Repeat, 2nd lady, 1st man leading 24 Repeat 3rd lady, 4th man leading 24 Repeat, 4th lady, 3rd man leading Figure 2 (4x24) 4 1st couple advance & retire. 2 1st lady adv to centre, turn to face partner 2 1st couple honour each other. 8 1st couple set and turn then sides form top & bottom lines 4 Lines advance & retire, 4 Advance and turn partners to place. 24 Repeat with 2nd couple leading 24 Repeat with 3rd couple leading 24 Repeat with 4th couple leading Figure 3. (2x32) 4 Ladies advance, curtsey & retire. 4 Men adv, bow, turn by left, bow to partners, then join RH in centre, (ladies RH on partners left elbow). 8 Promenade round set to place. 4 Ladies adv, curtsey & retire again. 4 Men adv, bow, turn by right, bow to partners, join LH in centre, right arm behind partner. 8 Promenade round to set in place. 32 Repeat. The Lancers Quadrille. Figure 4. (4x24) 8 Top couples visit R then L 4 Right Hands around with LH couple 4 then left hands around. 8 Circle left with that couple. 24 Repeat with side couples leading. 24 repeat, top couples visit L then R. 24 Repeat, side couples visit L then R. Figure 5. (4x48 +24) 8 All grand chain 1/2 way round and honour partners. 8 Continue grand chain to place and honour partners. 8 1st couple visit, return to place, facing out with sides in behind. 2 Change places with partner, 2 All rock fwd and back 2 change places again 2 All rock fwd and back 8 Cast out reform in lines 4 Lines advance & retire 4 Advance & turn partners to place 48 Repeat with 2nd couple leading 48 Repeat with 3rd couple leading 48 Repeat with 4th couple leading. 8 Grand chain 1/2 way round and honour partners. 8 continue grand chain to place and honour partners 8 swing partners (R arm round partner, LH in air) Note: All figures walked. Set & Turn is a 'balance' set and open two hand turn. The Prince Imperial's Quadrille Figure 1. (4x24) 4 Top couples visit right, honour sides. 4 Top men retire with partner & side lady to opposite place, (ladies facing each other). 8 Ladies grand chain to places 8 All set and turn partners 24 Top couples repeat back to place. 48 Repeat with side couples. Figure 2 (4 x 24) 4 1st Lady, 2nd man adv & turn in centre finish facing 2nd lady. 2 2nd lady pass through to 1st man. 2 Both couples turn out to place. 4 top couples advance & retire. 4 Ladies chain back to place. (Nariel) 8 Chasse-croise. (4 steps past partner RH turn corner 4 steps back, LH turn with partner.) 24 Repeat with 2nd lady, 1st man leading 24 Repeat with 3rd lady, 4th man leading 24 Repeat wth 4th lady, 3rd man leading. Figure 3 (4x32) 4 1st lady to centre, curtsey to partner. (RH in RH, ACW turn in to centre) 4 2nd lady to centre, curtsey to partner. 4 3rd lady to centre, curtsey to partner.4 4th lady to centre, curtsey to partner. 8 ladies join hands, circle R, small steps after circle R, Men join circle, (giving RH to partner). 4 Balance for 4 (step lift x 4) 4 Turn partners to place, bow & curtsey. 32 Repeat, Lady 2, 1, 4 & 3 to centre 32 Repeat Lady 3, 4, 2 & 1 to centre 32 Repeat, Lady 4, 3, 1 & 2 to centre The Prince Imperial's Quadrille Figure 4 (4x32) 4 Top couples advance & retire. 4 Top couples adv, ladies move to R, as men retire to place. 8 Line of 3 adv & ret twice. 4 Single men adv, bow and retire. 4 Re-advance and turn to face partner. 4 Circle L half way round (with partner & side couple). 4 Half R & L to place. 32 Repeat with side couples leading. 32 Repeat with top couples leading (men moving to left as ladies retire) 32 Repeat with Side couple leading. (Men moving to left as ladies retire) Figure 5 (4x32 +32) 16 Ladies to the right, (RH turn with corner man then continue round to the right turning each man) 4 1st Lady, 2nd man advance & retire 4 re-advance & turn RH (finish facing partners) 8 set & turn partners (finishing in place) 32 Repeat with 2nd Lady, 1st man leading 32 repeat with 3rd lady, 4th man leading 32 Repeat with 4th Lady, 3rd man leading 16 Ladies to the right again. 4 Men turn partners to centre. 4 All bow and curtsey. 8 Promenade set ( hall) Note: Set & turn is a 'balance' set and open hand turn. The Parisienne Quadrille Figure 1 (1x32) 8 Couples R and L through. (without giving hands) 8 set & turn partners 8 Ladies chain. 4 Couples promenade across set. 4 Half R and L to place. Figure 2 (2x24) 4 Couples advance & retire. 4 Cross over (without changing places with partners) 8 Repeat back to place. 8 Set & turn partners. 24 Repeat. Figure 3 (2x32) 4 Lady 1, Man 2 adv, touch RH, retire to opposite place. 4 Lady 1, Man 2 adv, join LH, give RH to partner. 4 Line of 4 balance fwd & back twice 4 Men lead partners to opp. Place 4 Lady 1, Man 2 adv & retire 4 Lady 1, Man 2 adv, honour & ret. 4 Couples, advance & retire. 4 Half R & L to place. 32 Repeat with Lady 2, Man 1. The Parisienne Quadrille Figure 4. (2x32) 4 1st couple advance & retire. 4 1st couple adv, lady join 2nd couple. 4 Line of 3 adv. & ret, 1st man retire. 4 Line of 3 adv. Ladies cross to 1st man. 4 Line of 3 adv. & ret, 2nd man retire. 4 Re-advance, form circle with 2nd man. 4 Circle L half way round. 4 Half R & L to place. 32 Repeat with 2nd couple leading. Figure 5 (2x32) 4 Couples advance & retire 4 Cross over 8 Repeat back to place. 8 Ladies chain across & back.8 Set & turn partners. 32 Repeat Notes: 1 This 'quadrille' is similar to the first set (1st 4 figures) and is danced as two couple sets. 2 Set & turn is a 'balance' set and open hand turn. Wellington Waltz 8 Honour Partner, honour corner 8 Circle L 7 steps, then tap, tap 8 Circle R 7 steps, then tap, tap 4 Top couples, 2 side-steps to centre and back with lady turning under man's left arm. 4 Waltz across to opposite side 8 Side couples repeat. 8 Top ladies chain across. (pause in centre, turn twice with opp. Man) 8 Side ladies chain across. 8 Grand Chain half way round set. 8 Waltz to man's place. 64 Repeat with side couples leading. Waltz Cotillon 8 Honour Partner, honour corner 16 1st couple waltz the set. 8 Top ladies cross over.8 Side ladies cross over. 8 Top men cross over. 8 Side men cross over. 16 All waltz back to place. Form top & bottom lines, 8 Adv. & ret, cross over. 8 Adv. & ret, cross back. 16 Waltz chain to meet partner. 16 All waltz back to place. Form top & bottom lines, 8 Adv. & ret, cross over. 8 Adv. & ret, cross back. 16 Waltz chain to meet partner. 16 All waltz back to place. 112 Repeat with 2nd couple leading. 112 Repeat with 3rd couple leading. Side lines adv. & ret. 112 Repeat with 4th couple leading. Side lines adv. & ret. Galopade Quadrille 8 Honour Partner, honour corner 8 All galop round set. (Galop half way round set, on opp. Side change places with partner, continue galop to place.) 8 Top couples R & L through. 8 Side couples R & L through. 8 All set & swing partners. 8 All galop round set. 8 Top ladies chain. 8 Side ladies chain. 8 All set & swing partners. 8 All galop round set. 8 1st couple lead through, 2nd on return 8 3rd couple lead through, 4th on return 8 All set & swing partners. 8 All galop round set. 4 1st lady & 2nd man adv. & ret. 4 2nd lady & 1st man adv. & ret. 4 3rd lady & 4th man adv. & ret. 4 4th lady & 3rd man adv. & ret. 8 All set & swing partners. 8 All galop round set. 4 Ladies advance & retire. 4 Men advance & retire. 8 Double ladies chain. 8 All set & swing partners. 8 All galop round set. 8 Top couples waltz the set 8 Side couples waltz the set 8 All set & swing partners. 32 Waltz the hall. The Caledonians Quadrille Figure 1. (2x32) 4 Top couples R.H. across, move CW (Ladies hands joined over Mens). 4 then L.H. across, move ACW. 8 Set & swing Partners 8 Top ladies chain. 4 Top couples promenade across set. 4 Half R and L to place. 32 Side couples repeat. Figure 2. (4x24) 8 1st Man advance & retire twice. 8 Set & swing corners. 8 Promenade with corners (to men's position.) 24 2nd man repeat. 48 3rd and 4th man repeat. Figure 3. (4x32) 4 Lady 1, Man 2 advance & retire. 4 Re-advance, 2 hand turn to place. 8 1st & 2nd couples lead through and back. (1st lead through across, 2nd back) 8 Set & swing corners. 4 All advance & retire. 4 Swing partners. 32 Repeat wth Lady 2, Man 1. 32 Repeat with Lady 3, Man 4. 32 Repeat with Lady 4, Man 3. The Caledonians Quadrille Figure 4. (4x24) 2 Lady 1, Man 2 advance and stop. 2 Lady 2, Man 1 advance and stop. 4 Turn partners back to place. 2 All ladies to the right 4 steps. 2 All men to the left 4 steps. 2 All ladies to the right 4 steps. 2 All men to the left 4 steps. 4 Promenade to place. 4 Swing partners. 24 Repeat wth Lady 2, Man 1 leading. 24 Repeat wth Lady 3, Man 4 leading. 24 Repeat wth Lady 4, Man 3 leading. Figure 5. (4x48 + 16) 8 1st couple visit. 4 Ladies advance, curtsey & retire. 4 Men advance, bow & retire. 8 All set & swing partners. 8 Grand chain 1/2 way round and honour partners. 4 Promenade to place 4 and swing partners. 8 Chasse-croise, (4 steps past partner, RH to corner balance fwd & back, then 4 steps back, LH to partner balance fwd & back). 48 Repeat with 2nd couple leading. 48 Repeat wth 3rd couple leading. 48 Repeat wth 4th couple leading. 8 All promenade set. 8 Swing partners. Note: Set & swing is 'normal' set and cross hand swing. The Lancers Quadrille (BMC version) Figure 1. (4x32) 8 1st Lady, 2nd man advance & swing in centre (with ballroom hold). 4 Partners move 1/2 way across, Centres keep swinging. 4 Promenade partner to opp. Place. 8 1st couple lead through to place. 8 All swing corners. 32 Repeat with 2nd lady, 1st man. 32 Repeat with 3rd lady, 4th man. 32 Repeat with 4th lady, 3rd man. Figure 2. (4x32) 8 1st couple lead up (to 2nd) & retire. 8 1st couple swing in place Form top & bottom lines. 8 Lines adv & retire twice. 8 Swing partners. 32 Repeat with 2nd couple leading. 32 Repeat with 3rd couple leading. (Forming side lines instead) 32 Repeat with 4th couple leading. (Forming side lines instead) Figure 3. (2x32) 4 Introduction - Ladies to the centre and men form a circle around them. 8 Men circle left. 8 Men circle right. Men form a grand cross (LH) Right arm behind partners. 16 Promenade round set. Ladies return to the centre. 32 Repeat - Circle L & R, & Grand Cross. The Lancers Quadrille (BMC version) Figure 4. (2x48) 8 Top couples visit. 4 Tops RH star. 4 then LH star. 8 Tops basket Left. 8 Tops basket Right. 8 Tops circle Left. Tops circle Right. 48 Repeat with side couples leading. Figure 5. ((4x 16+32) + 24) 8 All grand chain 1/2 way round and honour partners. 8 Promenade with partners to place. 8 1st couple lead up, turn and lead out with side falling in behind. 8 Cast out, reform top & bottom lines. 4 Lines advance & retire. 4 Advance & swing partners to place. 8 Swing partners in place. 48 Repeat with 2nd couple leading. 48 Repeat with 3rd couple leading (forming side lines) 48 Repeat with 4th couple leading. (forming side lines) 8 All grand chain 1/2 way round and honour partners. 8 Promenade with partners to place. 8 Swing partners in place. Note: Normal swing here is with hands crossed. 1. The Quadrille 2.The Lancers Quadrille 3. The Prince Imperials 4. The Parisienne Quadrille 5. The Wellington Waltz 6. The Waltz Cotillon 7. The Galopade Quadrille 8. The Caledonians Quadrille 9. The Lancers Quadrille (BMC)person, individual, peter ellis oam -
 Warrnambool and District Historical Society Inc.
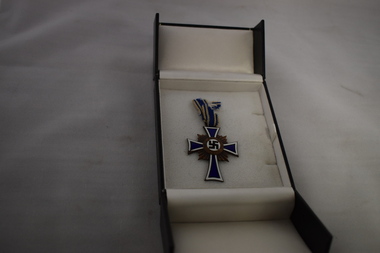
Medal, German Mothers Cross, Late 1930s
This item is a bronze German MotherCross. The MotherCross was given to German mothers of pure Aryan heritage before and during World War Two. Adolf Hitler wanted to encourage population growth and keep the German mother at home. Mothers were awarded these crosses according to the number of children they had – gold crosses for eight or more children, silver for six or seven children and bronze for four or five children. The crosses were presented to mothers on 4th August, the birthday of Hitler’s mother and also on Mother’s Day. They could only be worn on special occasions around the neck on a blue cord with two white stripes. This German MotherCross is a bronze one and has on one side ‘Der Deutschen Mutter’ and on the other side ‘16 Dezember 1938’ and Adolf Hitler’s signature. The date indicates when the award was first instituted. There were at least 8 million recipients of the medal.The recipient and donor of this medal are not known but it is a very interesting and unusual memento of World War Two.This is a metal medal in the shape of a cross with a bronze ridged background in the shape of a rectangle. The cross is enamelled in blue and white and has a round bronze disc in the centre and lettering with a blue swastika on a white background. There is lettering on the back of the cross. A metal catch is attached to the top of the cross and remnants of a blue and white cloth cord are looped over the catch. One small fragment of the cord is detached. The medal is in a box which is not the original container. ‘Der Deutschen Mutter’ ‘16 Dezember 1938’ plus Adolf Hitler’s signature world war two, german mothercross -
 Bendigo Military Museum
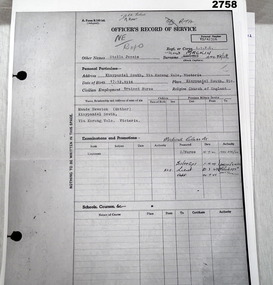
Administrative record - SERVICE RECORDS WW2, post WW2
Stella Jessie Mackin (Hewston) enlisted in the Australian Army Nursing Service No VX42596 on 4.6.1940 age 25 years 6 months. Served with 7th AGH and 4th AGH. Embarked for the Middle East 3.2.1941 and served with the 1st and 7th AGH. Hospital 27.5.1942 with Scabies, rejoin unit 29.5.1941, hospital 30.1.1942 with Gastro Enteritis, rejoin unit 1.2 1942. Embark for Australia 31.1.1943, serves with 115th AGH and 2/9th AGH. Appointed Lieutenant 23.3.1943. Embark for New Guinea 21.9.1943 and serves with 2/7th AGH, appointed Capt 24.9.1943. Hospital 2.6.1944 with Dengue Fever, rejoin unit 8.6.1944. Embark for Australia 25.1.1945, serves with 102nd AGH and 2/2nd AGH, discharged from the AIF on 25.3.1946. Refer 2993 re Stella. AGH, Australian General Hospital. Part of the Hewston collection WW1 & WW2.10 Photocopied pages of service records relating to Stella Jessie (Noelle) Mackin nee Hewston VX42596.documents-records, military history-service records, nursing -
 Bendigo Military Museum
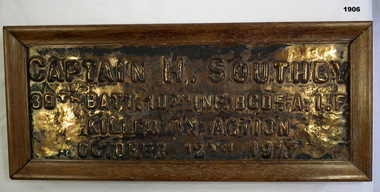
Plaque, Post 1918 (estimated)
Henry Southby pre WW1 served 5 years in the Militia and 22 years on the Permanent staff. He is listed as No 2240 serving in the 4th Batt Aust Commonwealth Horse during the Boer War from March to September 1902. By the time he enlisted in the AIF he was 41 years 2 months of age on 22.3.16 with the rank of Lieut in the 39th Batt. Embarked for England 27.5.16, embark for France 23.11.16, promoted Captain 23.4.17, WIA 7.6.17 shell wound to back, return to France 30.7.17, KIA 12.10.17 at Passchendaele. It is believed he was W.I.A and while being carried out by Stretcher Bearers a shell burst killing them all. No known grave. The plaque was one of many that were placed on trees in Condon St. Bendigo as a memorial to those who lost their lives. Refer 1903.2, 1905P.Bronze plaque set in a wood frame re; H.SOUTHBY. Frame is brown, the plaque lettering is raised."CAPTAIN H. SOUTHBY 39th BATT. 10th INF. BGD. A.I.F KILLED IN ACTION OCTOBER 12th 1917"civic mementoes - plaques, metalcraft - bronze, handcrafts - woodwork, military history -
 Bendigo Military Museum
Postcard - POSTCARDS WW1, c.1914
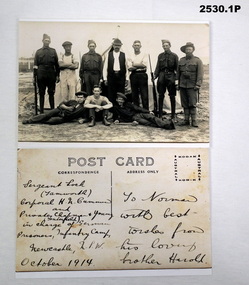
.1) H.N.Cummin. Harold Nesbit Cummin had prior Military service (unclear) to joining the AIF. No 1239 he enlisted on 17.8.1915 in the 6th reinforcements to the 11th Light Horse Regt age 20 years. Embark for Egypt 27.10.1915, hospital 3.1.1916 with Bronvhitis, rejoin unit 15.1.1916, over some 7 months from 4.4.1916 he transfers 4 times until 2.11.1916 and listed as 4th Australian Camel Regt, by 16.2.1917 he is classed as being with 11th Coy 3rd Anzac Batt 1st Camel Brigade, WIA 1.12.1917 GSW’s, DOW’s at 2nd L.H.Brigade Field Ambulance 1.12.1917 in Jaffa. Refer 2535P re his brother Alexander Norman. The photo obviously refers to his previous service as the photo is dated “Oct 1914”. The Germans are possibly people interned after outbreak of the war. .1) Photo of 4 armed Australian Soldiers with 6 civilians, verso postcard has hand written description. .2) Generic postcard from Egypt to a brother, verso letter from Harold to Norman. .3) Photo of 2 WWI German Servicemen with no headgear, verso addressed to a German lady - see Inscriptions & Markings. .1) SGT LOCK (Tamworth), CPL H N CUMMIN & PTES CHAPMAN & YOUNG (Tenterfield) in charge of German prisoners, Infantry Camp, Newcastle, NSW, October 1914. Address: To Norman with best wishes from his loving brother Harold. .2) Dated 5.10.1917 Dear Norman, .... 17 lines .... Your loving brother Harold. .3) To Frau A Muxfeldt Niendorf (Kr Tinneberg) Gaustedterueg No 19, Gesebrieben d 18 Juli 1918. Absender Hugu Muxfeldt No 252 15 Prisoner of War Coy France C/o GPO London Englandpostcards, photographs, 38th -
 Flagstaff Hill Maritime Museum and Village
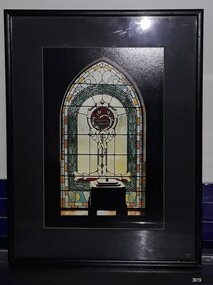
Card - Commemorative, Julian Aird, 'Illumination', Early 21st Century
The photograph was created by Geelong artist Julian Aird and framed by a business in Geelong. The window in the photograph is of the 1928 stained glass window and the baptism fold in the St Nicholas' Seamen's Chapel at Flagstaff Hill Maritime Village, which were installed at Flagstaff Hill's for the Chapel's opening in 1981. About the Window - The window in this photograph, once known as the Dr Connell Memorial Window, was a feature of an external wall adjacent to the Women’s and Children’s Wards of Warrnambool Hospital. Honorary Doctors had played a significant role in the operation of the hospital between the years 1900 to 1939. One of these doctors was Dr. Connell, who passed away in 1928. The green glass memorial nameplate has an inscription that dedicates the window to Dr. Connell. The inscription reads: "A tribute to Egbert John Connell M.B.B.S. who for 30 years rendered devoted and valuable service to this institution. Obiit April 4th 1928, A.D." The photograph's significance lies in the subject of the stained glass window, and its connection with the history of the local Warrnambool Base Hospital, dating to Dr Connell's work there in the early 20th century.This photograph captures the light shining through an arched, stained glass window behind a baptismal font. Rectangular framed photograph, portrait view, behind glass, with black frame and matt. A cord for hanging it is attached at the black, and there is a black, round felt pad on each lower rear corner. The photograph by Julian Aird is titled 'Illumination' and was framed in Geelong. Details of title, and photographer are handwritten on the back and and printed label gives the contact details of the framer. Written by hand in black pen " 'ILLUMINATION' / MARITIME MUSEUM WARRNAMBOOL", "JULIAN AIRD / TEL/FAX. 03 52890457" " Printed on adhesive label "EASTERN VIEW / PICTURE FRAMERS" "Proprietors Steven & Annemarie Hocking / 162 Malop Street, Geelong, Vic, 3220 / Ph. (03) 5229 5935" Logo on label in centre of oval with text [2 tall water birds facing each other with a water fountain between them]flagstaff hill maritime museum & village, maritime museum, maritime village, great ocean road, shipwreck coast, ulian aird, illumination, photograph, dr. connell, stained glass window, baptism font, gbert john connell, st nicholas seamen's church, warrnambool hospital, dr connell memorial window, eastern view picture framers, steven & annemarie hocking -
 Greensborough Historical Society
Postage Stamps, Von Mueller collection 3, 1885o
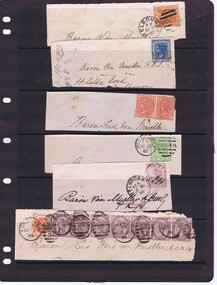
Envelope fronts with stamps, addressed to Baron Ferdinand von Mueller. Upper image, 1 x 1penny yellow/brown Victoria Stamp Duty, postmarked at Melbourne on April 27, 1892. 2nd image, 1 x 2 pence blue, New South Wales Postage stamp; postmark illegible. 3rd image, 2 x 2 pence red, New South Wales Postage stamp; postmark illegible. 4th image, 1 x 1 penny green Victoria, postmarked at Melbourne on December 8, 1882. 5th image, 1 x 2 pence mauve Victoria, postmarked at Melbourne on October 15, 1898. Lower image, 7 x 1d mauve Great Britain Postage and Inland Revenue stamps, 1 x ½ penny Great Britain orange Postage and Revenue stamp. Postmarked at London on December 2, 1891. Baron Ferdinand von Mueller (1825-1896) was born in Germany and migrated to Australia in 1847.He was the Victorian Government Botanist (from 1853) and Director of the Botanical Gardens (1857-1873). These envelopes and stamps are from correspondence addressed to him.Front of 6 envelopes with address and postage stamps, enclosed in black stamp folder.ferdinand von mueller, postage stamps -
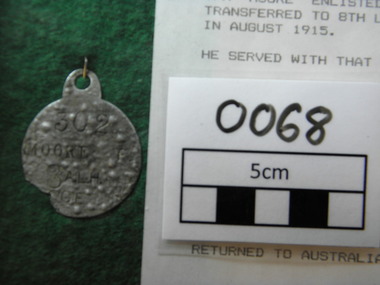 4th/19th Prince of Wales's Light Horse Regiment Unit History Room
Identity Disk, c.1914
Identity disk of 302 Frank Moore. Served 1st AIF 1914-1918. Enlisted B Squadron 4th Australian Light Horse Regiment 19/8/1914. 1/11/1915 transferred to 8th Australian Light Horse Regiment as batman to CO, Lt Col L Maygar VC. 25/1/1917-14/3/1917 to No 3 School of Military Aeronautics, Abbassia. 1/11/1917 Commissioned 2 Lt. 1/12/17 Wounded in Action - Bomb wound, right ankle. 15/6/1918 - Appointment terminated. 21/1/1917 - Awarded Distinguished Conduct Medal for action at MAGHDABA on 23/12/1916 18/2/1917 - Awarded Mentioned in Dispatches. 15/2/1918 RTA "Ulysses" ex Suez. Disc found in a Melbourne garden, address not known Metal identity disk. Mounted in glass fronted frame 270 x 215mm302 2 Lt MOORE F 8ALH CEworld war one, ww1, gallipoli, identity disc, palestine, 4th light horse, 8th light horse, frank moore, royal flying corps -
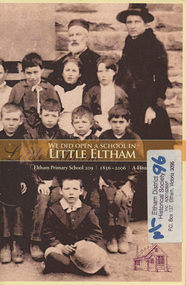 Eltham District Historical Society Inc
Book, Ian Anderson et al, We did open a school in Little Eltham : Eltham Primary School 209, 1856-2006, a history/ Ian Anderson, Barry Carozzi and Tarja Fellowes, 2006
The 150th celebrations of Eltham Primary School included the launch of this book to commemorate the event, titled "We Did Open a School in Little Eltham". The title is taken from a line in a letter from first head teacher David Clark who opened his first private school in a bark hut. This publication of some 262 pages far exceeds the standard of most school commemorative histories, both in content and presentation. The three joint writers are all parents of students at the school. Ian Anderson, Barry Carozzi and Tarja Fellowes have spent many months researching and writing. In the book they acknowledge the contribution of EDHS President Harry Gilham and of Peter Cuffley, great grandson of Eltham pioneer Thomas Sweeney, Many of the photographs were from the collection of EDHS. Cover includes the 3rd and 4th Class, with assistant teacher Catherine Clarke, c.1886Paperback; 1vISBN 0975179632 [written on flyleaf] Donated to the 2006 Committee by & from the School Councileltham state school, eltham, eltham primary school, social customs, schools, catherine clark -
 Victoria Police Museum
Record of Conduct and Service (Charles Lester Gordon Trewin)
When the First World War broke out, Australian men from all backgrounds and professions were called to serve their country. Members of the Victorian Police force were some of the first to answer the call with twenty men joining the first convoy of soldiers who left Australian shores in October 1914. Over the course of four long years, one hundred and thirty-eight Victorian Police enlisted from stations across the state. Of these, twenty-seven lost their lives. Whilst the fate of each man was different, a deep commitment to protecting and serving the public was common to all. Victoria Police service: Joined 10/04/1911; Discharged 3/09/1914 WW1 service: Enlisted: 5 September 1914; Highest rank: Captain; Regiment: 4th Australian Light Horse Regiment; Fate: Returned to Australia 15th January 1919.Official documentworld war 1, 1914-1918; victoria police; trewin, charles lester gordon 5640 -
 Federation University Historical Collection
Postcard, 'United We Stand' World War One Souvenir Postcard, c1916
Postcard sent from the French theatre of war during World War One by Harry Holmes. HENRY SMERDON (Harry) HOLMES was born in 1897 at the family property, ’Sauchieburn’, 17 km north of Ballarat, in the Ascot district. He was the youngest of four children. After finishing his education at St Patrick’s College, Ballarat, Henry joined the Holmes family farming interests. At the age of 18 he enlisted and served with AIF in Egypt, France and Belgium 1915-1918. Henry served at the famous battlegrounds of Ypes and Somme in the Australian Army 8th Battalion. He was a Driver with the 4th D.A.C. The postcard is of "The Ascot" boys. Includes [Samuel] Gordon Spittle, Henry [Harry] Holmes's first cousin, and other Ascot lads and district connections: neighbours, Ascot State School classmates and football mates from Clunes / Creswick districts. (Research by Jane Dyer) White postcard with embroidery on white silk. The embroidery includes 5 flags (England, France, Italy, Belgium, Russia), a blue horseshoe, a green sprig rosemary and the words 'United We Stand".Verso: With best love from Harry 13/5/16chatham, chatham family collection, holmes, harry holmes, henry holmes, world war, world war 1, world war i, world war one. -
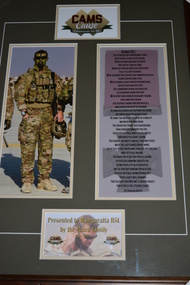 Wangaratta RSL Sub Branch
Framed Photograph, CAMS Cause
Cameron Stewart Baird, VC, MG was a soldier in the Australian Army who was posthumously awarded the Victoria Cross for Australia, the highest award in the Australian honours system. Cameron enlisted on 4/1/2000 and was posted to the 4th Battalion (Commando) RAR now known as the 2nd Commando Regiment. He was deployed on 7 operations including Operation TANAGER - Timor Leste in 2001 Operation BASTILLE and FALCONER - Iraq in 2003. Cameron resigned from the ADF in 2004 re enlisting in 2006 and again posted to 2nd Commando Regiment. In 2007 he was promoted to Lance Corporal and deployed on Operation SLIPPER - Afghanistan. He was awarded the Medal for Gallantry. In 2008 he was promoted to Corporal and deployed again on Operation SLIPPER in 2009 2011 and 2013. He was killed in action on 22 June 2013 and was posthumously awarded the VC for his actions in the Khod Valley Uruzgan province AfghanistanCorporal Baird is the 100th Australian to receive a VC since the award was first created by Queen Victoria in 1856. Brown timber frame and dark green mount containing photograph of soldier alongside poem with image of Victoria Cross medal in backgroundCAMS Cause - Commando for Lifecameron baird, victoria cross, medal for gallantry -
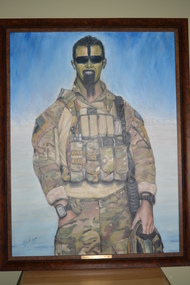 Wangaratta RSL Sub Branch
Framed Painting, Corporal Cameron Baird, VC ,MG
Cameron Stewart Baird, VC, MG was a soldier in the Australian Army who was posthumously awarded the Victoria Cross for his actions in Afghanistan. Cameron enlisted on 4/1/2000 and was posted to the 4th Battalion (Commando) RAR now known as the 2nd Commando Regiment. He was deployed on 7 operations including Operation TANAGER - Timor Leste in 2001 Operation BASTILLE and FALCONER - Iraq in 2003. Cameron resigned from the ADF in 2004 re enlisting in 2006 and again posted to 2nd Commando Regiment. In 2007 he was promoted to Lance Corporal and deployed on Operation SLIPPER - Afghanistan. He was awarded the Medal for Gallantry. In 2008 he was promoted to Corporal and deployed again on Operation SLIPPER in 2009 2011 and 2013. He was killed in action on 22 June 2013 and was posthumously awarded the VC for his actions in the Khod Valley Uruzgan province AfghanistanBrown timber look plastic frame containing watercolour painting in the image of a commando soldier. signature left bottom corner Henk Artplaque - Corporal Cameron Baird, VC ,MG cameron baird, victoria cross -
 Stawell Historical Society Inc
Photograph, Stawell Secondary College Staff 1990
Yearly Staff Photograph Wonga Campus Staff 4th Row L-R Marlene Mornane, Peter Grace, Steve Mullin, Ian Burke, Paul Gower, Jim Sawer, Murray Hart. 3rd Row L-R Gaynor Radovic, Sue Aubrey, Noelene Mintern-Lane, Col Phillips, Rudy Schrama, Philip Searle, Paul Kirsch, Rod Greer, Carol Hill 2nd Row L-R Margaret Nicholson, Leisha Scantleton, Jenny Greenberger, Ann Clarke, Sharon Eppingstall, Christina Franklin-Kolb, Val McCann, Karen Green, John Malloy, Jacinta Crabb, John Ma Front Row L-R Ken Salmon, John Harrington, Chris Peters, Mal Marquardt, Peter Martin, Yvonne Watson, Pat Pickering, Beth Anselmi, Gary Hill.Group portrait of staff in four rows. Named.Stawell Secondary College Staff 1990education -
 8th/13th Victorian Mounted Rifles Regimental Collection
Photograph - man and horse wwi, 1918 circa
The 8th Light Horse Regiment AIF was raised at Broadmeadows Victoria in September 1914 under the command of Lieutenant Colonel Alexander White and formed part of the 3rd Light Horse Brigade. The regiment served at Gallipoli where in a courageous but ill-fated charge at the Nek on 7 August 1915 it suffered horrendous casualties including Lieutenant Colonel White. Rebuilt in Egypt under the command of Lieutenant Colonel Leslie Maygar VC the regiment went on the serve throughout the Middle East Campaign. Colonel Maygar died of wounds at Beersheba when the regiment was attacked by enemy aircraft while waiting to follow up the successful charge of the 4th LH Brigade on 30 October 1917. The 8th Light Horse AIF was disbanded in 1919, but soon after re-raised as the 8th (Indi) Light Horse in the Citizen Military Forces, superseding 16th (Indi) Light Horse.Part of a rare collection of photographs of the 8th Light Horse Regiment AIF during WWI (1914-1918).Black and white photograph of a trooper of the 8th Light Horse AIF holding the reins of his horse with another trooper and 2 horses in the background. Photo glued to plastic backing.Horse lineslight horse, wwi, world war one, military, horse, uniform, 8th -
 8th/13th Victorian Mounted Rifles Regimental Collection
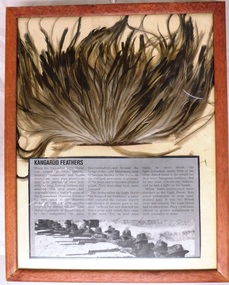
Uniform - Framed plumes
The practice of wearing emu plumes in hats began with the Queensland Mounted Infantry. It is thought to have begun when the unit was engaged in suppression of the Shearers’ Strike of 1891. It remained a Queensland tradition till 1915 when other AIF units of the Light Horse began to do the same. After some dispute and discussion, the practice was approved provided the soldiers paid for their own plumes. Some regiments did not take up plumes: 6th and 7th LH continued to wear wallaby fur puggarees; 4th LH refused plumes because of the association with anti-unionism. The post-war militia adopted plumes and today all Royal Australian Armoured Corps (RAAC) regiments wear emu plumes in slouch hats. In the 1950s 8/13 Victorian Mounted Rifles and some other RAAC regiments wore an emu plume tuft behind the regimental badge on black berets. Framed Emu feathers with the use of, with news item on history of the Light HorseKangaroo feathersmilitary, light horse, queensland, plumes, emu, wwi, world war one, hat -
 8th/13th Victorian Mounted Rifles Regimental Collection
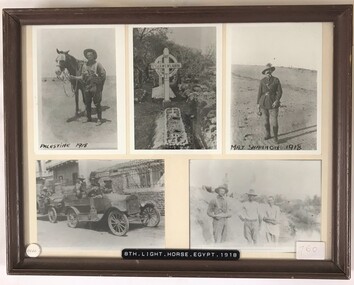
Photograph - 8th ALH Egypt 1918
The 8th Light Horse Regiment AIF was raised at Broadmeadows Victoria in September 1914 under the command of Lieutenant Colonel Alexander White and formed part of the 3rd Light Horse Brigade. The regiment served at Gallipoli where in a courageous but ill-fated charge at the Nek on 7 August 1915 it suffered horrendous casualties including Lieutenant Colonel White. Rebuilt in Egypt under the command of Lieutenant Colonel Leslie Maygar VC the regiment went on the serve throughout the Middle East Campaign. Colonel Maygar died of wounds at Beersheba when the regiment was attacked by enemy aircraft while waiting to follow up the successful charge of the 4th LH Brigade on 30 October 1917. The 8th Light Horse AIF was disbanded in 1919, but soon after re-raised as the 8th (Indi) Light Horse in the Citizen Military Forces, superseding 16th (Indi) Light Horse.Framed compilation of five black and white photographs of members of 8th Australian Light Horse in Egypt in 1918.8th, light horse, egypt, world war one, wwi, shannon, mclaurin -
 8th/13th Victorian Mounted Rifles Regimental Collection
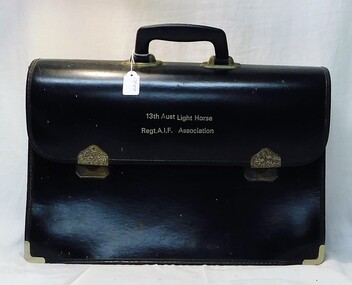
Functional object - Brief Case 13 ALH
This brief case was used by the secretary of the Association till its closure in 1980s, when it was passed to the 8/13 Victorian Mounted Rifles Heritage Collection with other regimental memorabilia. The 13th Australian Light Horse Regiment (AIF) was raised at Broadmeadows Victoria in March 1915. Following service at Gallipoli the regiment was broken up with squadrons going to France as Divisional Cavalry Squadrons of 2nd, 4th and 5th Divisions. The regiment was reformed as firstly 1st Anzac Corps Mounted Troops and later Australian Corps Mounted Troops. The regiment was raised as 13th Light Horse (Gippsland), a Citizen Forces unit. following WWI, and trained as a cavalry regiment till August 1940, when it converted from horse to mechanised initially as 13th Motor Regiment then 13th Armoured Regiment. It trained in Victoria and, as the Japanese threat to the mainland declined, was disbanded in October 1943 with men going to other units. Black leather brief case with two locks and with title embossed on side of flap13th Aust light Horse Regt Association13th, light horse, wwi, wwii, world war one, world war two -
 8th/13th Victorian Mounted Rifles Regimental Collection
Book, Into the saddles again
Transcription of diaries and notebooks of Trooper Harry Turner, 8th Australian Light Horse 1915-18 give a vivid account of a light horseman participating in the battles on the desert campaign 1916-1918.non-fictionTranscription of diaries and notebooks of Trooper Harry Turner, 8th Australian Light Horse 1915-18 give a vivid account of a light horseman participating in the battles on the desert campaign 1916-1918.world war one, wwi, egypt, palestine, light horse, turner -
 8th/13th Victorian Mounted Rifles Regimental Collection
Photograph - 8LH at Broadmeadows 1914
The 8th Light Horse Regiment AIF was raised at Broadmeadows Victoria in September 1914 under the command of Lieutenant Colonel Alexander White and formed part of the 3rd Light Horse Brigade. The regiment served at Gallipoli where in a courageous but ill-fated charge at the Nek on 7 August 1915 it suffered horrendous casualties including Lieutenant Colonel White. Rebuilt in Egypt under the command of Lieutenant Colonel Leslie Maygar VC the regiment went on the serve throughout the Middle East Campaign. Colonel Maygar died of wounds at Beersheba when the regiment was attacked by enemy aircraft while waiting to follow up the successful charge of the 4th LH Brigade on 30 October 1917. The 8th Light Horse AIF was disbanded in 1919, but soon after re-raised as the 8th (Indi) Light Horse in the Citizen Military Forces, superseding 16th (Indi) Light Horse. Black and white photograph glued to fluted plastic backing showing large group of soldiers at railway station.8th LH B Squadron / halted at North / Williamspown Station / Are we thirsty? NO!8th, light horse, williamstown, world war one, wwi, aif -
 8th/13th Victorian Mounted Rifles Regimental Collection
Photograph - 8th LH in desert
The 8th Light Horse Regiment AIF was raised at Broadmeadows Victoria in September 1914 under the command of Lieutenant Colonel Alexander White and formed part of the 3rd Light Horse Brigade. The regiment served at Gallipoli where in a courageous but ill-fated charge at the Nek on 7 August 1915 it suffered horrendous casualties including Lieutenant Colonel White. Rebuilt in Egypt under the command of Lieutenant Colonel Leslie Maygar VC the regiment went on the serve throughout the Middle East Campaign. Colonel Maygar died of wounds at Beersheba when the regiment was attacked by enemy aircraft while waiting to follow up the successful charge of the 4th LH Brigade on 30 October 1917. The 8th Light Horse AIF was disbanded in 1919, but soon after re-raised as the 8th (Indi) Light Horse in the Citizen Military Forces, superseding 16th (Indi) Light Horse. Aerial black and white photograph of light horse regiment in desert. Thought to be 8th Australian Light Horse (AIF) c.1917.8th, light horse, world war one, wwi, middle east -
 8th/13th Victorian Mounted Rifles Regimental Collection
Photograph - 8th LH in desert
The 8th Light Horse Regiment AIF was raised at Broadmeadows Victoria in September 1914 under the command of Lieutenant Colonel Alexander White and formed part of the 3rd Light Horse Brigade. The regiment served at Gallipoli where in a courageous but ill-fated charge at the Nek on 7 August 1915 it suffered horrendous casualties including Lieutenant Colonel White. Rebuilt in Egypt under the command of Lieutenant Colonel Leslie Maygar VC the regiment went on the serve throughout the Middle East Campaign. Colonel Maygar died of wounds at Beersheba when the regiment was attacked by enemy aircraft while waiting to follow up the successful charge of the 4th LH Brigade on 30 October 1917. The 8th Light Horse AIF was disbanded in 1919, but soon after re-raised as the 8th (Indi) Light Horse in the Citizen Military Forces, superseding 16th (Indi) Light Horse. Black and white photograph of light horsemen of 8th Australian Light Horse with horses fully load with campaign kit; in desert setting c.1917.world war one, wwi, aif, light horse, 8th -
 8th/13th Victorian Mounted Rifles Regimental Collection
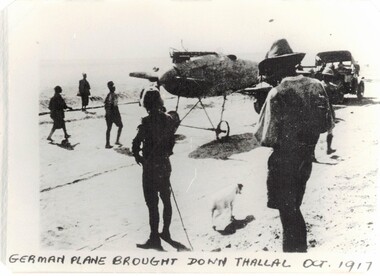
Photograph - WWI aircraft in desert
The 8th Light Horse Regiment AIF was raised at Broadmeadows Victoria in September 1914 under the command of Lieutenant Colonel Alexander White and formed part of the 3rd Light Horse Brigade. The regiment served at Gallipoli where in a courageous but ill-fated charge at the Nek on 7 August 1915 it suffered horrendous casualties including Lieutenant Colonel White. Rebuilt in Egypt under the command of Lieutenant Colonel Leslie Maygar VC the regiment went on the serve throughout the Middle East Campaign. Colonel Maygar died of wounds at Beersheba when the regiment was attacked by enemy aircraft while waiting to follow up the successful charge of the 4th LH Brigade on 30 October 1917. The 8th Light Horse AIF was disbanded in 1919, but soon after re-raised as the 8th (Indi) Light Horse in the Citizen Military Forces, superseding 16th (Indi) Light Horse. Black and white photograph of spectators round a downed German aircraft October 1917.German plane brought down Thallal Oct 1917world war one, wwi, aircraft, plane, thallal -
 8th/13th Victorian Mounted Rifles Regimental Collection
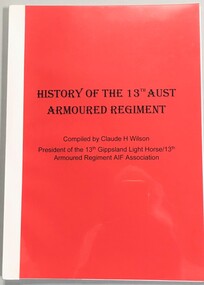
Document - 13th LH History
The 10th Light Horse was raised in 1903 from Victorian Mounted Rifles companies in Gippsland. In 1912 the regiment was renumbered 13th Light Horse. In 1920 the regiment had the territorial title Gippsland Light Horse added. The regiment was raised as 13th Light Horse (Gippsland), a Citizen Forces unit. In 1940 the regiment converted from horse to mechanised, initially as 13th Motor Regiment then 13th Armoured Regiment. It trained in Victoria and Queensland but as the Japanese threat to the mainland declined, was disbanded in October 1943 with men going to other units. The 13th Light Horse Regiment (AIF) was raised at Broadmeadows Victoria in March 1915. Following service at Gallipoli the regiment was broken up with squadrons going to France as Divisional Cavalry Squadrons of 2nd, 4th and 5th Divisions. The regiment was reformed as firstly 1st Anzac Corps Mounted Troops and later Australian Corps Mounted Troops.History of 13th Armoured Regiment and its preceding regiments 10th Light Horse (VMR), 13th Light Horse (VMR), 13th Light Horse (AIF) and 13th Light Horse (Gippsland Light Horse) compiled by the President of the regimental association, Claude H Wilson c.1970. The text is handwritten and includes the World War diary of lieutenant Vernon C Walker, who was a member of the AIF regiment. A4 format, thermal bound 27 pages with 6 page addendum.history, light horse, armour, 13th, gippsland, wilson, walker -
 8th/13th Victorian Mounted Rifles Regimental Collection
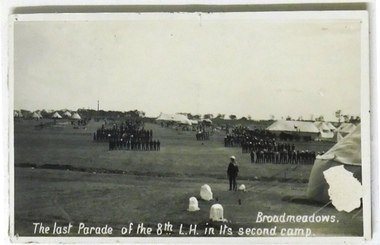
Photograph - Photograph 8th ALH Broadmeadows, 1914
The 8th Light Horse Regiment AIF was raised at Broadmeadows Victoria in September 1914 under the command of Lieutenant Colonel Alexander White and formed part of the 3rd Light Horse Brigade. The regiment served at Gallipoli where in a courageous but ill-fated charge at the Nek on 7 August 1915 it suffered horrendous casualties including Lieutenant Colonel White. Rebuilt in Egypt under the command of Lieutenant Colonel Leslie Maygar VC the regiment went on the serve throughout the Middle East Campaign. Colonel Maygar died of wounds at Beersheba when the regiment was attacked by enemy aircraft while waiting to follow up the successful charge of the 4th LH Brigade on 30 October 1917. The 8th Light Horse AIF was disbanded in 1919, but soon after re-raised as the 8th (Indi) Light Horse in the Citizen Military Forces, superseding 16th (Indi) Light Horse.Pert of a rare collection of photographs showing 8th Light Horse (AIF) during WWI (1914-1918)Black and white photograph of men of 8th Light Horse Regiment on parade ground at Broadmeadows Victoria with tents and marquees in background. Photo glued to fluted card backing."The Last Parade of the 8th Light Horse in its second camp, Broadmeadows"8th light horse regiment, broadmeadows -
 8th/13th Victorian Mounted Rifles Regimental Collection
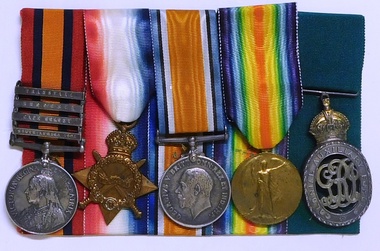
Medal - Nichol medal group
James Alexander Nicholl was born 1878 at Ballarat Victoria. He served four years with the 3rd Regiment Victorian Colonial Forces, receiving his commission as an officer after two years. On 1 May 1900, as a 22 year old lieutenant, he sailed with the 4th Victorian Imperial Regiment to South Africa serving there under Colonel NW Kelly for fifteen months. Upon his return to Australia he resumed service with the now, Australian Light Horse. He was adjutant of the 16th (Indi) Light Horse located in northeast Victoria when WWI began. He volunteered for the AIF and was appointed to ‘C’ Squadron 13th Light Horse with the rank of Captain. Nicholl served at Gallipoli, France and UK, returning to Australia in 1919. Again he resumed his service with the CMF, this time with the 20th Light Horse.Rare group of medals awarded to citizen soldier from Victoria with service in Boer War and WWI (1914-1918) and peacetime service with pre-Federation Colonial Forces and post-Federation Citizen Military Forces both before and the war.Swing mounted medal group awarded to Major JA Nicholl being: Queens South African Medal with four clasps - Transvaal, Rhodesia, Cape Colony and South Africa 1901; 1914-15 Star; British War Medal; Victory Medal and Colonial Auxiliary Forces Officer's Decoration (VD). On rim QSA "Lieut J.A. Nicholl Victorian MR"; on reverse 14-15 Star "Captain J.A. Nicholl 13/LH Rgt AIF"; on rim BWM and Victory "Major J.A. Nicholl AIF"; on reverse VD "Major J.A. Nicholl 20th LH"nichol, medal, boer war, wwi, vd, colonial, light horse, 13th, world war one -
 8th/13th Victorian Mounted Rifles Regimental Collection
Photograph - 'C' Sqn 8LH 1915, 1914 circa
The 8th Light Horse Regiment AIF was raised at Broadmeadows Victoria in September 1914 under the command of Lieutenant Colonel Alexander White and formed part of the 3rd Light Horse Brigade. The regiment served at Gallipoli where in a courageous, but ill-fated charge at the Nek on 7 August 1915, it suffered horrendous casualties including Lieutenant Colonel White. Rebuilt in Egypt under the command of Lieutenant Colonel Leslie Maygar VC the regiment went on the serve throughout the Middle East Campaign. Lieutenant Colonel Maygar died of wounds at Beersheba when the regiment was attacked by enemy aircraft while waiting to follow up the successful charge of the 4th LH Brigade on 30 October 1917. Returning to Australia after the war, the 8th Light Horse AIF was disbanded in 1921, but soon after re-raised as the 8th (Indi) Light Horse in the Citizen Military Forces.Rare professional photograph of a light horse squadron prior to their departure for overseas in 1914.Black and white photograph of 6 ranks of soldiers arranged in tiers being " C " Squadron 8th Light Horse, shortly before departure to the Middle East. Photograph is mounted on card.Soldiers are wearing bandoliers and peaked caps.On face of image - " 'C' Squad 8th Light Horse" and " Darge Copyright". On rear of mounting card " No.378/2nd Regx? 3rd Top"8th light horse regiment, world war one (1914-1918) -
 8th/13th Victorian Mounted Rifles Regimental Collection
Photograph - WWI LH resting, November 1917
The 8th Light Horse Regiment AIF was raised at Broadmeadows Victoria in September 1914 under the command of Lieutenant Colonel Alexander White and formed part of the 3rd Light Horse Brigade. The regiment served at Gallipoli where in a courageous but ill-fated charge at the Nek on 7 August 1915 it suffered horrendous casualties including Lieutenant Colonel White. Rebuilt in Egypt under the command of Lieutenant Colonel Leslie Maygar VC the regiment went on the serve throughout the Middle East Campaign. Colonel Maygar died of wounds at Beersheba when the regiment was attacked by enemy aircraft while waiting to follow up the successful charge of the 4th LH Brigade on 30 October 1917. The 8th Light Horse AIF was disbanded in 1919, but soon after re-raised as the 8th (Indi) Light Horse in the Citizen Military Forces, superseding 16th (Indi) Light Horse.Comparatively rare collection of photographs of 8th Light Horse (AIF) on operations in Egypt and Sinai 1916-1918.Black and White photograph of column of horsemen, dismounted, in desert landscape. Two figures reclining at left foreground. Part of a collection of photographs of 8th Light Horse (AIF) on operations in Egypt and Sinai 1916-1918."Resting in Wadi Ghuzzie outside Beershaba (slopes of Tel el Saba top right)"beersheba, light horse, wwi, world war one, egypt, wadi ghuzie -
 8th/13th Victorian Mounted Rifles Regimental Collection
Photograph - 8th LH camped by lake, 1918 circa
The 8th Light Horse Regiment AIF was raised at Broadmeadows Victoria in September 1914 under the command of Lieutenant Colonel Alexander White and formed part of the 3rd Light Horse Brigade. The regiment served at Gallipoli where in a courageous but ill-fated charge at the Nek on 7 August 1915 it suffered horrendous casualties including Lieutenant Colonel White. Rebuilt in Egypt under the command of Lieutenant Colonel Leslie Maygar VC the regiment went on the serve throughout the Middle East Campaign. Colonel Maygar died of wounds at Beersheba when the regiment was attacked by enemy aircraft while waiting to follow up the successful charge of the 4th LH Brigade on 30 October 1917. The 8th Light Horse AIF was disbanded in 1919, but soon after re-raised as the 8th (Indi) Light Horse in the Citizen Military Forces, superseding 16th (Indi) Light Horse.Comparatively rare collection of photographs of 8th Light Horse (AIF) on operations in Egypt and Palestine 1916-1918.Black and White photograph of bivouac beside river. Several soldiers of the 8th Light Horse Regiment AIF, two horses, pontoon bridge, and washing drying on line beside bivouac."Crossing the River Jordan"8th, light horse, wwi, world war one, aif, middle east, jordan