Showing 1298 items matching "clay"
-
 Federation University Art Collection
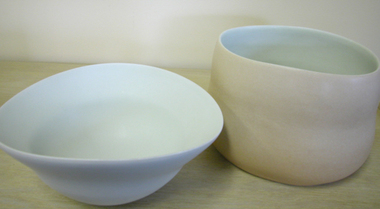
Ceramic, 'Helmet Bowl & Vessel' by Neville French, 2003
... During his time as a student at Ballarat Neville Bunning would collect clay from the Enfield clay pit. He described following white tyre tracks to find the location. ...During his time as a student at Ballarat Neville Bunning would collect clay from the Enfield clay pit. He described following white tyre tracks to find the location. ...Neville FRENCH (1955- ) Born Maryborough, Victoria In 1977 Neville French graduated from Ballarat College of Advanced Education after studying a Diploma in Fine Art (Ceramics) between 1974 and 1976, and was a tutor there for six months in 1978. He holds a Master of Arts, Research (Ceramics) from RMIT Universiy, and was awarded the Vitrify Alcorso National Ceramics Award in 2012. Neville has an international reputation as a ceramics artists and educator. From 1982 to 2012 Neville French was teach and coordinator of the Ceramics department at the Ballarat School of Mines and University of Ballarat (now Federation University). From 1982 to 2012 Neville French taught Ceramics at the Ballarat School of Mines TAFE, which later merged with the University of Ballarat (now Federation University Australia). He completed a Graduate Diploma of Education at Hawthorn State College in 1980, a Certificate of Stoneware Glazes from Brisbane College of Advanced Education in 1983 and a Master of Arts Fine Art (Ceramics) at RMIT University in 2000. Between 2010 and 2012 Neville French taught post graduate honours and masters Ceramics students. During his time as a student at Ballarat Neville Bunning would collect clay from the Enfield clay pit. He described following white tyre tracks to find the location. He described the clay as silky smooth and and fired to a beautiful grey colour at stoneware tempreture. When blended with terracotta clay from Nerrina or fireclay from Bacchus Marsh a wide range of different bodies could be created. This item is part of the Federation University Art Collection. The Art Collection features over 2000 works and was listed as a 'Ballarat Treasure' in 2007.Two vessels made as a sculptural pair. Statement: "My work involves an exploration of elemental vessels - extending porcelain to develop taut contours and spatial dynamics. I seek to distill an essence of purity to evoke notions of quietude and transendence through the expressive use of glaze and its relationship to form, tactility, weight and light. Forms are wheel-thrown, altered and slowly scraped to develip a soft line and solidity. Coloured matt glazes are layered and fused to the porcelain body through multiple firings to give expression and luminosity to the surface,. The iodosyncratice nature of glaze stimulates the imagination. It evokes associations with the natural environement and alludes to a meditative infinity."Signed on base 'f.'art, artwork, neville french, french, ceramics, porcelain, wheelthrown, thrown and altered, alumni -
 The Beechworth Burke Museum
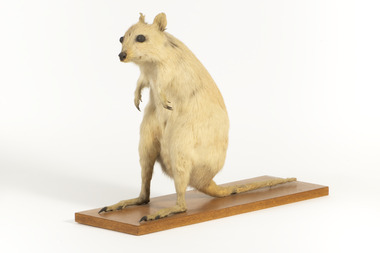
Animal specimen - Rufous Bettong, Trustees of the Australian Museum, 1860–1880
... The head is small with a short muzzle and two small rounded ears, and features two round dark brown eyes made from clay....The head is small with a short muzzle and two small rounded ears, and features two round dark brown eyes made from clay. Animal specimen Rufous Bettong Trustees of the Australian Museum Burke Museum Committee ...A rufous bettong is about the size of a rabbit, with body length ranging from 30cm to 38cm among species. All bettongs have long tails, roughly equal to body length. Body weight ranges from 1.2 kg in the smallest species (Northern Bettong) to 2.8kg in the Rufous Bettong, the largest of the group. Males tend to be slightly larger than females. Bettongs have furry coats, ranging in colour from grey to ginger and brown. The bettong is endemic to Australia, and is an important part of Australia's Indigenous biodiversity. There are five living species of bettong; Eastern Bettong, Burrowing Bettong, Brush-tailed Bettong, Northern Bettong, Rufous Bettong. The bettong is a member of the Potoroidae family along with the endangered Potoroos, and the extinct Desert Rat-Kangaroos. This specimen is part of a collection of almost 200 animal specimens that were originally acquired as skins from either the Trustees of the Australian Museum or from the amateur anthropologist Reynell Eveleigh Johns between 1860-1880 and mounted by members of the Burke Museum Committee around the same time. When all Taxidermy mounts were completed, they were quickly put-on display in the formal space of the Museum’s original exhibition hall where they continue to be on display. This display of taxidermy mounts initially served to instruct visitors to the Burke Museum of the natural world around them, today it serves as an insight into the collecting habits of the 19th century.This specimen is part of a significant and rare taxidermy mount collection in the Burke Museum. This collection is scientifically and culturally important for reminding us of how science continues to shape our understanding of the modern world. They demonstrate a capacity to hold evidence of how Australia’s fauna history existed in the past and are potentially important for future environmental research. This collection continues to be on display in the Museum and has become a key part to interpreting the collecting habits of the 19th century.Average sized rufous bettong with large clawed hind legs, small clawed fore legs, and a long tail that is roughly the length of its body and covered lightly in fur. The pelage of the bettong is fine and soft with the body fur cream and pale ochre in colouring with specks of brown while the underbelly is a solid cream colour. The head is small with a short muzzle and two small rounded ears, and features two round dark brown eyes made from clay.On mounting board: BMM5893/burke museum, taxidermy, taxidermy mount, bettong, rat kangaroo, bettongia, fauna, animal, animalia, potoroidae, reynell eveleigh johns, rufous bettong, rufous rat-kangaroo -
 Bendigo Historical Society Inc.
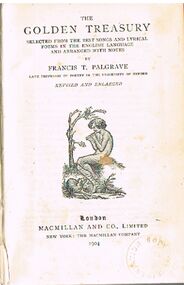
Book - ALEC H CHISHOLM COLLECTION: BOOK ''GOLDEN TREASURY OF SONGS AND LYRICS''
... Published in 1904 by MacMillan & Co., London and printed by Richard Clay & Sons, Suffolk. Catalogue sticker ''2099 PAL'' on spine. ...Published in 1904 by MacMillan & Co., London and printed by Richard Clay & Sons, Suffolk. Catalogue sticker ''2099 PAL'' on spine. ...Book. ALEC H CHISHOLM COLLECTION. 387 page hardcover collection of songs and lyrical poems arranged by Francis T. Palgrave with notes. Published in 1904 by MacMillan & Co., London and printed by Richard Clay & Sons, Suffolk. Catalogue sticker ''2099 PAL'' on spine. Handwritten in ink inside front cover ''A. H. Chisholm, Brisbane Oct. 1915'' Handwritten in ink on page after title page ''R. Spencer Browne Brisbane 4/10 04''Francis T. Palgravebooks, collections, poetry, alec h chisholm collection, francis t palgrave, songs, lyrics, poetry -
 Port Melbourne Historical & Preservation Society
Photograph - Bay Street shops, Charles Nettleton, Charles Nettleton, 1890s
... Bay Street shops, 1875:- original Charles NETTLETON print showing west side of Bay Street: Collings & Son, Butcher; Cranston, Paperhanger; Mrs T CLAY; Johnny ALLSORT's Pawn Office; H. DAVENPORT, Clothing; G. ...Built Environment - Commercial Charles NETTLETON Theresa CLAY Collings & Son Cranston H DAVENPORT G RANSOM Alexander Ebling AITKEN Mrs A BROWN John PARRY John BARRY E & M RICE F C FORSTER Johnny Allsorts Pawnbroker Bay Street shops, 1875:- original Charles NETTLETON print showing west side of Bay Street: Collings & Son, Butcher; Cranston, Paperhanger; Mrs T CLAY; Johnny ALLSORT's Pawn Office; H. ...This photograph was taken by Charles NETTLETON (1826-1902), a prominent Melbourne photographer who recorded the city’s rapid growth from a small town into a metropolis. He was the special photographer for the government and the Melbourne Corporation, and documented of the built environment and major public works throughout Melbourne from when he arrived to Victoria in 1854. Nettleton is credited for having photographed the first Australian steam train, the Melbourne-Sandridge (Port Melbourne) line, which opened in 12 September 1854; the first cricket team to come to Australia on the ss Great Britain in 1861; and Ned KELLY while Nettleton worked as a police photographer.Bay Street shops, 1875:- original Charles NETTLETON print showing west side of Bay Street: Collings & Son, Butcher; Cranston, Paperhanger; Mrs T CLAY; Johnny ALLSORT's Pawn Office; H. DAVENPORT, Clothing; G. RANSOM, Hardware; A.E. AITKEN, Auctioneer; Mrs A. BROWN, Haberdashery; F.C. FORSTER; Marshal, Printer; John PARRY (or BARRY), General Store; E & M RICE. The house is on the site of the 1912 Post Officebuilt environment - commercial, charles nettleton, theresa clay, collings & son, cranston, h davenport, g ransom, alexander ebling aitken, mrs a brown, john parry, john barry, e & m rice, f c forster, johnny allsorts pawnbroker -
 Eltham District Historical Society Inc
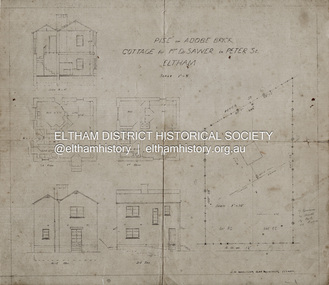
Document - Building Plan, J.M. Harcourt, 22 Peter Street, Eltham, c.1946
... Sawer in Peter St., Eltham Design and drawings by J.M. Harcourt, Clay Nuneham, Eltham. The cottage at present day 22 Peter Street was built circa 1946. ...Sawer in Peter St., Eltham Design and drawings by J.M. Harcourt, Clay Nuneham, Eltham. The cottage at present day 22 Peter Street was built circa 1946. ...Pise or Adobe Brick Cottage for Mr D. Sawer in Peter St., Eltham Design and drawings by J.M. Harcourt, Clay Nuneham, Eltham. The cottage at present day 22 Peter Street was built circa 1946. Also Drawing of planned carport and future extension for 22 Peter Street, Eltham22 peter street, building plans, clay nuneham, d. sawer, eltham, j.m. harcourt design, adobe house, j.m. harcourt designc.1946, pise house -
 Sunshine and District Historical Society Incorporated
Photograph - Porcelain Products, Melchior Bajada
... The insulators have been made at either the Sunshine Pottery Works or the Maribyrnong Permacite & Clay Pottery Works....The insulators have been made at either the Sunshine Pottery Works or the Maribyrnong Permacite & Clay Pottery Works. Sunshine Potteries Maribyrnong Potteries 5810.01 - Porcelain Products - Electric Jug.jpg 5810.02 - Porcelain Products - Electric Jug.jpg 5810.03 - Porcelain Products - Electric Jug.jpg 5810.04 - Porcelain Products - Electric Jug.jpg 5810.05 - Porcelain Products - Electric Jug.jpg 5810.06 - Porcelain Products - Electric Jug.jpg 5810.07 - Porcelain Products - Electric Jug.jpg 5810.08 - Porcelain Products - Electric Jug.jpg 5810.09 - Porcelain Products - Electric Jug.jpg 5810.10 - Porcelain Products - Electric Jug.jpg 5810.11 - Porcelain Products - Electric Jug.jpg 5810.12 - Porcelain Products - Electric Jug.jpg 5810.13 - Porcelain Products - Electric Jug.jpg 5810.14 - Porcelain Products - Electric Jug.jpg 5810.15 - Porcelain Products - Electric Jug.jpg 5810.16 - Porcelain Products - Electric Jug.jpg 5810.17 - Porcelain Products - Electric Jug.jpg 5810.18 - Porcelain Products - Electric Jug.jpg 5810.19 - Porcelain Products - Insulator.jpg 5810.20 - Porcelain Products - Insulator.jpg 5810.21 - Porcelain Products - Insulator.jpg 5810.22 - Porcelain Products - Insulator.jpg 5810.23 - Porcelain Products - Insulator.jpg 5810.24 - Porcelain Products - Insulator.jpg 5810.25 - Porcelain Products - Insulator.jpg 5810.26 - Porcelain Products - Insulator.jpg 5810.27 - Porcelain Products - Insulator.jpg 5810.28 - Porcelain Products - Insulator.jpg Collection of color photographs Photograph Porcelain Products Melchior Bajada ...These photographs are of various porcelain objects held in the Sunshine and District Historical Society Collection. The actual objects have been catalogued separately. The electric jugs were made at the Sunshine Pottery Works. The insulators have been made at either the Sunshine Pottery Works or the Maribyrnong Permacite & Clay Pottery Works.5810.01 - Porcelain Products - Electric Jug.jpg 5810.02 - Porcelain Products - Electric Jug.jpg 5810.03 - Porcelain Products - Electric Jug.jpg 5810.04 - Porcelain Products - Electric Jug.jpg 5810.05 - Porcelain Products - Electric Jug.jpg 5810.06 - Porcelain Products - Electric Jug.jpg 5810.07 - Porcelain Products - Electric Jug.jpg 5810.08 - Porcelain Products - Electric Jug.jpg 5810.09 - Porcelain Products - Electric Jug.jpg 5810.10 - Porcelain Products - Electric Jug.jpg 5810.11 - Porcelain Products - Electric Jug.jpg 5810.12 - Porcelain Products - Electric Jug.jpg 5810.13 - Porcelain Products - Electric Jug.jpg 5810.14 - Porcelain Products - Electric Jug.jpg 5810.15 - Porcelain Products - Electric Jug.jpg 5810.16 - Porcelain Products - Electric Jug.jpg 5810.17 - Porcelain Products - Electric Jug.jpg 5810.18 - Porcelain Products - Electric Jug.jpg 5810.19 - Porcelain Products - Insulator.jpg 5810.20 - Porcelain Products - Insulator.jpg 5810.21 - Porcelain Products - Insulator.jpg 5810.22 - Porcelain Products - Insulator.jpg 5810.23 - Porcelain Products - Insulator.jpg 5810.24 - Porcelain Products - Insulator.jpg 5810.25 - Porcelain Products - Insulator.jpg 5810.26 - Porcelain Products - Insulator.jpg 5810.27 - Porcelain Products - Insulator.jpg 5810.28 - Porcelain Products - Insulator.jpg sunshine potteries, maribyrnong potteries -
 Surrey Hills Historical Society Collection
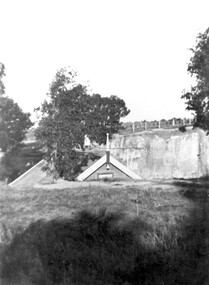
Photograph, The Surrey Dive, 1910, 1910
... The Dive, in Elgar Road Park was formed when water seeped into the hole from which clay had been quarried for brick-making. In 1905 the Surrey Swimming Club was formed and carnivals were held regularly. ...Surrey Hills Historical Society Collection 190A Canterbury Road Canterbury melbourne The Dive, in Elgar Road Park was formed when water seeped into the hole from which clay had been quarried for brick-making. In 1905 the Surrey Swimming Club was formed and carnivals were held regularly. ...The Dive, in Elgar Road Park was formed when water seeped into the hole from which clay had been quarried for brick-making. In 1905 the Surrey Swimming Club was formed and carnivals were held regularly. This was the venue for training Olympic swimmers prior to the Council constructing an Olympic sized pool.Black and white photo with a grassy foreground beyond which the apex of the roof only of the clubhouse is visible. Beyond this the far bank of the Surrey Dive can be seen with fencing along its perimeter.surrey dive, swimming, sports and recreation, quarries, box hill brick works, elgar road park, surrey swimming club -
Ballarat Heritage Services
Ceramic, Platters by Bern Emmerichs
... Bern EMMERICHS (1961 - ) Bern Emmerichs is a trained painter who has adopted clay surface as her canvas. She completed a Diploma of Fine Art at Phillip Institute of Technology, Melbourne in 1982. ...She became interested in clay as a medium while renovating her house and now paints on tiles, vessels and platters, as well as working in mosaic. ...Bern EMMERICHS (1961 - ) Bern Emmerichs is a trained painter who has adopted clay surface as her canvas. She completed a Diploma of Fine Art at Phillip Institute of Technology, Melbourne in 1982. She became interested in clay as a medium while renovating her house and now paints on tiles, vessels and platters, as well as working in mosaic. A founding member of 'Whitehall Enterprises', a group of about six artists who together rented an old factory in Whitehall Street, Footscray from 1987 to 1990. In 2000-2002, Bern spent two-years travelling, working and exhibiting in Europe, based for most of the time in Kamp-Lintfort, Germany. Recently she has been exploring imagery related to Australian colonial history. Her works are signed with a painted 'Bern Emmerichs'. Two platters decorated by Bern Emmerichsbern emmerichs -
 Great Stupa of Universal Compassion
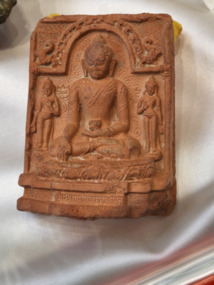
Sculpture - Tsatsa of Shakyamuni Buddha
... Traditionally made of clay using moulds, tsatsas are dried, decorated, and blessed with mantras....Traditionally made of clay using moulds, tsatsas are dried, decorated, and blessed with mantras. ...Tsatsas are small votive tablets shaped like deities, stupas, or sacred symbols. Buddhists may vow to create 100,000 tsatsas for purification and merit. These can be placed as an offering in holy sites, home altars, or gau boxes. Traditionally made of clay using moulds, tsatsas are dried, decorated, and blessed with mantras.Portable nature of tsatsas allows them to accompany practitioners on journeys, providing spiritual protection and serving as a focus for prayer and meditation. Due to their inexpensive production and portability, tsatsas made a great contribution to the spread of Buddhism in Tibet. This tsatsa is of the Buddha in a sitting position, accompanied by two standing figures. The Buddha is richly adorned with delicate carvings around it. The tsatsa features inscriptions in an ancient script.buddhist art, tibetan buddhism, holy objects -
 Flagstaff Hill Maritime Museum and Village
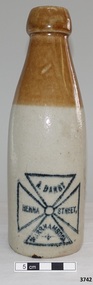
Bottle, circa 1899
... This clay soft drink bottle was made by Bendigo Pottery circa 1899. ...Angus Collection. Glazed clay, 'champ' shape, two-toned colour; caramel from mouth to shoulder, beige on lower section. ...Flagstaff Hill Maritime Museum and Village 89 Merri Street Warrnambool great-ocean-road This clay soft drink bottle was made by Bendigo Pottery circa 1899. ...This clay soft drink bottle was made by Bendigo Pottery circa 1899. It was badged for and sold by A. [Alfred] Darby of Henna Street Warrnambool, (between Raglan Pde and Lava St). The internal screw thread in the neck of this bottle allows for an applied ‘blob’ top stopper to be added. The company A. Darby bottled soda water, cordial, lemonade, ginger ale and ginger beer. Darby’s also made cider, lime juice, raspberry vinegar and other specialties. There was a branch of Darby’s cordial factory in Shepparton Victoria. The building has the year 1910 on it and is now the council office. The bottle’s manufacturer, Bendigo Pottery, was established in the 1858 during the gold rush era. The bottle is part of the “W.R. Angus Collection” that includes historical medical equipment, surgical instruments and material once belonging to Dr Edward Ryan and Dr Thomas Francis Ryan, (both of Nhill, Victoria) as well as Dr Angus’ own belongings. The Collection’s history spans the medical practices of the two Doctors Ryan, from 1885-1926 plus that of Dr Angus, up until 1969. ABOUT THE “W.R.ANGUS COLLECTION” Doctor William Roy Angus M.B., B.S., Adel., 1923, F.R.C.S. Edin.,1928 (also known as Dr Roy Angus) was born in Murrumbeena, Victoria in 1901 and lived until 1970. He qualified as a doctor in 1923 at University of Adelaide, was Resident Medical Officer at the Royal Adelaide Hospital in 1924 and for a period was house surgeon to Sir (then Mr.) Henry Simpson Newland. Dr Angus was briefly an Assistant to Dr Riddell of Kapunda, then commenced private practice at Curramulka, Yorke Peninsula, SA, where he was physician, surgeon and chemist. In 1926, he was appointed as new Medical Assistant to Dr Thomas Francis Ryan (T.F. Ryan, or Tom), in Nhill, Victoria, where his experiences included radiology and pharmacy. In 1927 he was Acting House Surgeon in Dr Tom Ryan’s absence. Dr Angus had become engaged to Gladys Forsyth and they decided he further his studies overseas in the UK in 1927. He studied at London University College Hospital and at Edinburgh Royal Infirmary and in 1928, was awarded FRCS (Fellow from the Royal College of Surgeons), Edinburgh. He worked his passage back to Australia as a Ship’s Surgeon on the on the Australian Commonwealth Line’s T.S.S. Largs Bay. Dr Angus married Gladys in 1929, in Ballarat. (They went on to have one son (Graham 1932, born in SA) and two daughters (Helen (died 12/07/1996) and Berenice (Berry), both born at Mira, Nhill According to Berry, her mother Gladys made a lot of their clothes. She was very talented and did some lovely embroidery including lingerie for her trousseau and beautifully handmade baby clothes. Dr Angus was a ‘flying doctor’ for the A.I.M. (Australian Inland Ministry) Aerial Medical Service in 1928. Its first station was in the remote town of Oodnadatta, where Dr Angus was stationed. He was locum tenens there on North-South Railway at 21 Mile Camp. He took up this ‘flying doctor’ position in response to a call from Dr John Flynn; the organisation was later known as the Flying Doctor Service, then the Royal Flying Doctor Service. A lot of his work during this time involved dental surgery also. Between 1928-1932 he was surgeon at the Curramulka Hospital, Yorke Peninsula, South Australia. In 1933 Dr Angus returned to Nhill and purchased a share of the Nelson Street practice and Mira hospital (a 2 bed ward at the Nelson Street Practice) from Dr Les Middleton one of the Middleton Brothers, the current owners of what previously once Dr Tom Ryan’s practice. Dr Tom and his brother had worked as surgeons included eye surgery. Dr Tom Ryan performed many of his operations in the Mira private hospital on his premises. He had been House Surgeon at the Nhill Hospital 1902-1926. Dr Tom Ryan had one of the only two pieces of radiology equipment in Victoria during his practicing years – The Royal Melbourne Hospital had the other one. Over the years Dr Tom Ryan had gradually set up what was effectively a training school for country general-practitioner-surgeons. Each patient was carefully examined, including using the X-ray machine, and any surgery was discussed and planned with Dr Ryan’s assistants several days in advance. Dr Angus gained experience in using the X-ray machine there during his time as assistant to Dr Ryan. When Dr Angus bought into the Nelson Street premises in Nhill he was also appointed as the Nhill Hospital’s Honorary House Surgeon 1933-1938. His practitioner’s plate from his Nhill surgery is now mounted on the doorway to the Port Medical Office at Flagstaff Hill Maritime Village, Warrnambool. When Dr Angus took up practice in the Dr Edward and Dr Tom Ryan’s old premises he obtained their extensive collection of historical medical equipment and materials spanning 1884-1926. A large part of this collection is now on display at the Port Medical Office at Flagstaff Hill Maritime Village in Warrnambool. In 1939 Dr Angus and his family moved to Warrnambool where he purchased “Birchwood,” the 1852 home and medical practice of Dr John Hunter Henderson, at 214 Koroit Street. (This property was sold in1965 to the State Government and is now the site of the Warrnambool Police Station and an ALDI sore is on the land that was once their tennis court). The Angus family was able to afford gardeners, cooks and maids; their home was a popular place for visiting dignitaries to stay whilst visiting Warrnambool. Dr Angus had his own silk worm farm at home in a Mulberry tree. His young daughter used his centrifuge for spinning the silk. Dr Angus was appointed on a part-time basis as Port Medical Officer (Health Officer) in Warrnambool and held this position until the 1940’s when the government no longer required the service of a Port Medical Officer in Warrnambool; he was thus Warrnambool’s last serving Port Medical Officer. (Masters of immigrant ships arriving in port reported incidents of diseases, illness and death and the Port Medical Officer made a decision on whether the ship required Quarantine and for how long, in this way preventing contagious illness from spreading from new immigrants to the residents already in the colony.) Dr Angus was a member of the Australian Medical Association, for 35 years and surgeon at the Warrnambool Base Hospital 1939-1942, He served with the Australian Department of Defence as a Surgeon Captain during WWII 1942-45, in Ballarat, Victoria, and in Bonegilla, N.S.W., completing his service just before the end of the war due to suffering from a heart attack. During his convalescence he carved an intricate and ‘most artistic’ chess set from the material that dentures were made from. He then studied ophthalmology at the Royal Melbourne Eye and Ear Hospital and created cosmetically superior artificial eyes by pioneering using the intrascleral cartilage. Angus received accolades from the Ophthalmological Society of Australasia for this work. He returned to Warrnambool to commence practice as an ophthalmologist, pioneering in artificial eye improvements. He was Honorary Consultant Ophthalmologist to Warrnambool Base Hospital for 31 years. He made monthly visits to Portland as a visiting surgeon, to perform eye surgery. He represented the Victorian South-West subdivision of the Australian Medical Association as its secretary between 1949 and 1956 and as chairman from 1956 to 1958. In 1968 Dr Angus was elected member of Spain’s Barraquer Institute of Barcelona after his research work in Intrasclearal cartilage grafting, becoming one of the few Australian ophthalmologists to receive this honour, and in the following year presented his final paper on Living Intrasclearal Cartilage Implants at the Inaugural Meeting of the Australian College of Ophthalmologists in Melbourne In his personal life Dr Angus was a Presbyterian and treated Sunday as a Sabbath, a day of rest. He would visit 3 or 4 country patients on a Sunday, taking his children along ‘for the ride’ and to visit with him. Sunday evenings he would play the pianola and sing Scottish songs to his family. One of Dr Angus’ patients was Margaret MacKenzie, author of a book on local shipwrecks that she’d seen as an eye witness from the late 1880’s in Peterborough, Victoria. In the early 1950’s Dr Angus, painted a picture of a shipwreck for the cover jacket of Margaret’s book, Shipwrecks and More Shipwrecks. She was blind in later life and her daughter wrote the actual book for her. Dr Angus and his wife Gladys were very involved in Warrnambool’s society with a strong interest in civic affairs. He had an interest in people and the community. They were both involved in the creation of Flagstaff Hill, including the layout of the gardens. After his death (28th March 1970) his family requested his practitioner’s plate, medical instruments and some personal belongings be displayed in the Port Medical Office surgery at Flagstaff Hill Maritime Village, and be called the “W. R. Angus Collection”. This glazed clay bottle represents early Warrnambool industry. It is also a good example of soft drink containers used in the late 19th and early 20th century and of Australian made products. Bendigo Pottery is Australia’s oldest working pottery. The kilns at Bendigo Pottery are now on the Victorian Heritage Register. The W.R. Angus Collection is significant for still being located at the site it is connected with, Doctor Angus being the last Port Medical Officer in Warrnambool. The collection of medical instruments and other equipment is culturally significant, being an historical example of medicine, administration, household equipment and clothing from late 19th to mid-20th century. Dr Angus assisted Dr Tom Ryan, a pioneer in the use of X-rays and in ocular surgery. Earthenware soft drink bottle, part of the W.R. Angus Collection. Glazed clay, 'champ' shape, two-toned colour; caramel from mouth to shoulder, beige on lower section. Inside of neck has an internal thread that could have been sealed with an applied internal ‘blob’ top stopper. Black stamped Maltese cross design emblem on front with each quarter containing text, black oval stamp on back with maker’s details. Bottle was made by Bendigo Pottery of Victoria circa 1899 and sold by A Darby of Henna Street Warrnambool.Maltese cross design, each quarter has text "A. DARBY", "HENNA", 'STREET,", WARRNAMBOOL" Oval stamp” - - - - - -RE BENDIGO POTTERY [EPSO] M - - - - - O” flagstaff hill, warrnambool, shipwrecked coast, flagstaff hill maritime museum, maritime museum, shipwreck coast, flagstaff hill maritime village, great ocean road, dr w r angus, dr ryan, nhill base hospital, mira hospital, flying doctor, department of defence australia, australian army, army uniform, bottle, earthernware soft drink bottle, earthernware bottle, a. darby, henna street warrnambool, soft drink industry warrnambool, bendigo pottery, 1899 soft drink bottle, champ shape soft drink bottle, ginger beer bottle, cordial bottle, blob top, blob stopper, internal stopper -
 Federation University Historical Collection
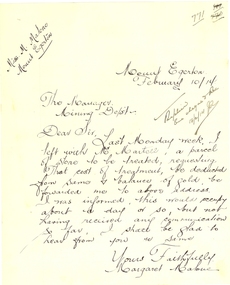
Letter - Correspondence, Margaret Malone, Letter regarding gold assay from Mount Egerton Mine, 10/02/2014
... By chewing a small piece of the clay he firmly believes that he "cured himself of heart burn." ...By chewing a small piece of the clay he firmly believes that he "cured himself of heart burn." ...Margaret Malone was associated with a kaolin mine at Mount Egerton. WOMAN WHO MANAGES A MINE Works With A Vision (By a Special Corespondent) BALLARAT, August 22.—Like a Heroine in a Bret Harte story of the Soaring: Forties Miss Margaret Malone, the only woman mine manager in Australia, has lived most of her life in an atmosphere where hope springs eternal in the gold-seeking breast. Forty years ago her father gave up farming to seek the elusive mineral near Ballarat. "One day my mother went for a walk along the Gordon-Egerton road and picked up a pebble with a few specks of gold in it," she told an interviewer yesterday, recounting the early history of the nine she now runs at Egerton. "Dad said, There must be more where that came from,' and hopefully sank a shaft. Our hopes were dashed, however, when he found only white clay. No one realised then the value of the disappointing looking white stuff which was all that Dad could find from every shaft he sank. At last be gave up the search, and the kaolin remained untouched." Later an Englishman from a pottery town in the old country urged Mr. Malone to try and sell his clay, and he sent some to the Bendigo potteries, but nothing came of it, and it was left to Miss Malone, after her father's death, to start on her unusual career by finding purchasers in Sydney and Melbourne for her clay, and herself working the mine. Strenuous Work "Mine managing is strenuous work in more ways than one," she admitted. "I have, to go down my mine daily, ad sometimes have to descend perpendicular ladders for about 150 ft. to reach areas being worked. I have to be my own manager, she explained, "because it is necessary to teach the men I employ the methods of grading clays." A New Cure She is convinced that a number of uses for kaolin, apart from pottery, soap and drugs, are yet to be discovered. "One of my employees has already found a new use for it," she said, "although scarcely one to be generally recommended, perhaps. By chewing a small piece of the clay he firmly believes that he "cured himself of heart burn." "All That Glistens" There is more in Miss Malone's mining than meets the eye, however. The actual working of the field and the substantial profit she makes on it do not fill her days. Always before her - dangles the compelling vision that caused her father, in his day, to give up farming to seek for gold. "All the time I am getting my clay dug," she confessed, "1 am watching for the colour of gold. One of these days I may strike it." WOMAN WHO MANAGES A MINE Works With A Vision (By a Special Corespondent) BALLARAT, August 22.—Like a Heroine in a Bret Harte story of the Soaring: Forties Miss Margaret Malone, the only woman mine manager in Australia, has lived most of her life in an atmosphere where hope springs eternal in the gold-seeking breast. Forty years ago her father gave up farming to seek the elusive mineral near Ballarat. "One day my mother went for a walk along the Gordon-Egerton road and picked up a pebble with a few specks of gold in it," she told an interviewer yesterday, recounting the early history of the nine she now runs at Egerton. "Dad said, There must be more where that came from,' and hopefully sank a shaft. Our hopes were dashed, however, when he found only white clay. No one realised then the value of the disappointing looking white stuff which was all that Dad could find from every shaft he sank. At last be gave up the search, and the kaolin remained untouched." Later an Englishman from a pottery town in the old country urged Mr. Malone to try and sell his clay, and he sent some to the Bendigo potteries, but nothing came of it, and it was left to Miss Malone, after her father's death, to start on her unusual career by finding purchasers in Sydney and Melbourne for her clay, and herself working the mine. Strenuous Work "Mine managing is strenuous work in more ways than one," she admitted. "I have, to go down my mine daily, ad sometimes have to descend perpendicular ladders for about 150 ft. to reach areas being worked. I have to be my own manager, she explained, "because it is necessary to teach the men I employ the methods of grading clays." A New Cure She is convinced that a number of uses for kaolin, apart from pottery, soap and drugs, are yet to be discovered. "One of my employees has already found a new use for it," she said, "although scarcely one to be generally recommended, perhaps. By chewing a small piece of the clay he firmly believes that he "cured himself of heart burn." "All That Glistens" There is more in Miss Malone's mining than meets the eye, however. The actual working of the field and the substantial profit she makes on it do not fill her days. Always before her - dangles the compelling vision that caused her father, in his day, to give up farming to seek for gold. "All the time I am getting my clay dug," she confessed, "1 am watching for the colour of gold. One of these days I may strike it." (WOMAN WHO MANAGES A MINE Works With A Vision (By a Special Corespondent) BALLARAT, August 22.—Like a Heroine in a Bret Harte story of the Soaring: Forties Miss Margaret Malone, the only woman mine manager in Australia, has lived most of her life in an atmosphere where hope springs eternal in the gold-seeking breast. Forty years ago her father gave up farming to seek the elusive mineral near Ballarat. "One day my mother went for a walk along the Gordon-Egerton road and picked up a pebble with a few specks of gold in it," she told an interviewer yesterday, recounting the early history of the nine she now runs at Egerton. "Dad said, There must be more where that came from,' and hopefully sank a shaft. Our hopes were dashed, however, when he found only white clay. No one realised then the value of the disappointing looking white stuff which was all that Dad could find from every shaft he sank. At last be gave up the search, and the kaolin remained untouched." Later an Englishman from a pottery town in the old country urged Mr. Malone to try and sell his clay, and he sent some to the Bendigo potteries, but nothing came of it, and it was left to Miss Malone, after her father's death, to start on her unusual career by finding purchasers in Sydney and Melbourne for her clay, and herself working the mine. Strenuous Work "Mine managing is strenuous work in more ways than one," she admitted. "I have, to go down my mine daily, ad sometimes have to descend perpendicular ladders for about 150 ft. to reach areas being worked. I have to be my own manager, she explained, "because it is necessary to teach the men I employ the methods of grading clays." A New Cure She is convinced that a number of uses for kaolin, apart from pottery, soap and drugs, are yet to be discovered. "One of my employees has already found a new use for it," she said, "although scarcely one to be generally recommended, perhaps. By chewing a small piece of the clay he firmly believes that he "cured himself of heart burn." "All That Glistens" There is more in Miss Malone's mining than meets the eye, however. The actual working of the field and the substantial profit she makes on it do not fill her days. Always before her - dangles the compelling vision that caused her father, in his day, to give up farming to seek for gold. "All the time I am getting my clay dug," she confessed, "1 am watching for the colour of gold. One of these days I may strike it." (Adelaide Observer, 31 August 1929.)Hand written letter from Margaret Malone of the Mount Egerton Mine.Mount Egerton Mine February 10/14 The Manager Mining Dept Dear Sir, Last Monday week, I left with Mr Martell, a parcel of stone to be treated, requesting that cost of treatment, be deducted from some and balance of gold be forwarded me to above address. I was informed, this would occupy about a day or so, but not having received any communication so far, I shall be glad to hear from you are same. Yours faithfully Margaret Malonemargaret malone, female mine manager, kaolin, mount egerton, women -
Port Melbourne Historical & Preservation Society
Photograph - Bay Street shops, Charles Nettleton, 1890s
... Bay Street shops, 1875:- original Charles NETTLETON print showing west side of Bay Street: Collings & Son, Butcher; CRANSTON, Paperhanger; Mrs T CLAY; Johnny ALLSORT's Pawn Office; H. DAVENPORT, Clothing; G. ...Port Melbourne Historical & Preservation Society Port Melbourne Town Hall 333 Bay Street Port Melbourne melbourne Built Environment - Commercial Charles NETTLETON Theresa CLAY Collings & Son Cranston H DAVENPORT G RANSOM Alexander Ebling AITKEN Mrs A BROWN John PARRY John BARRY E & M RICE F C FORSTER Johnny Allsorts Pawnbroker Bay Street shops, 1875:- original Charles NETTLETON print showing west side of Bay Street: Collings & Son, Butcher; CRANSTON, Paperhanger; Mrs T CLAY; Johnny ALLSORT's Pawn Office; H. ...Bay Street shops, 1875:- original Charles NETTLETON print showing west side of Bay Street: Collings & Son, Butcher; CRANSTON, Paperhanger; Mrs T CLAY; Johnny ALLSORT's Pawn Office; H. DAVENPORT, Clothing; G. RANSOM, Hardware; A.E. AITKEN, Auctioneer; Mrs A. BROWN, Haberdashery; F.C. FORSTER; Marshal, Printer; John PARRY (or BARRY), General Store; E & M RIVE. The house is on the site of the 1912 Post Office. This is a copy of the larger original at B.11.09built environment - commercial, charles nettleton, theresa clay, collings & son, cranston, h davenport, g ransom, alexander ebling aitken, mrs a brown, john parry, john barry, e & m rice, f c forster, johnny allsorts pawnbroker -
 Flagstaff Hill Maritime Museum and Village
Photograph - Historical, Flagstaff Hill, The Lighthouse Keeper’s Cottage showing re-roofing carried out by Council, 1970s
... It shows the a new iron roof that had been installed by the Warrnambool City Council, and the condition of the bluestone,walls. There are clay chimney pots on the two chimneys. A set of steps are at the entry on the right hand side. ...It shows the a new iron roof that had been installed by the Warrnambool City Council, and the condition of the bluestone,walls. There are clay chimney pots on the two chimneys. A set of steps are at the entry on the right hand side. ...The coloured photograph shows the Lighthouse Keepers' Quarters at Flagstaff Hill, Warrnambool. The building was erected in the 1850s on Middle Island, Lady Bay. It was relocated to its current location in the late 1870s along with the two lighthouses, the chart room and the privy. The Warrnambool City Council replaced the iron roof on the cottage in the 1970s and further work has since been carried out. The picture shows the poor condition of the stonework on the right hand side of the cottage. After the cottage ceased to be used by lighthouse keepers, it was rented out by various organisations and later became disused. The Historical Society requested the re-connection of power. The right hand side of the cottage was repurposed for use by Flagstaff Hill Maritime Museum and Village. in the 2020s it was restored and fitted out as the Alexander Farncombe room, which is used for temporary exhibitions. This photograph, a print, is one of a set of five that show the site of Flagstaff Hill. It is presumed to have been taken by John Lindsay, Founding Director of Flagstaff Hill Maritime Museum and Village. One of the photographs in the set has the pencil inscription "Photo J Lindsay". It was taken in the early 1970s during the initial stages of the development of Flagstaff Hill as a Museum and Maritime Village. The photographs belonged to the donor's grandparents, who lived in the Warrnambool district of Allansford/Naringal. The photograph is a record of the Lighthouse Keepers' Quarters at Flagstaff Hill Maritime Museum and Village before its development and opening in 1975. It shows the condition of the building at the time and some of the recent re-roofing. The photograph is significant for recording the condition of the original heritage listed building at that point in time.Coloured photograph, glassy print, one of a set of five. Photograph shows the Lighthouse Keepers' Quarters, focused on the Assistant's Quarters on the right. It shows the a new iron roof that had been installed by the Warrnambool City Council, and the condition of the bluestone,walls. There are clay chimney pots on the two chimneys. A set of steps are at the entry on the right hand side. The flagstaff is on the left of the photograph. The photograph's paper has the printer's watermark on the back. The early 1970s picture is presumed to have been photographed by John Lindsay, Warrnambool.Label on the back: "THE BLUESTONE COTTAGE SHOWING RE-ROOFING CARRIED OUT BY COUNCIL. The Historical Society has requested Council to have S.E.C. power re-connected"flagstaff hill maritime museum and village, warrnambool, maritime museum, shipwreck coast, 1970s, photograph, lady bay, flagstaff hill site, john lindsay, cannon emplacement, middle island, flagstaff, lighthouse keepers' quarters, lighthouse keepers' residence, alexander farncombe, re-roofing, s.e.c. connection -
 Flagstaff Hill Maritime Museum and Village
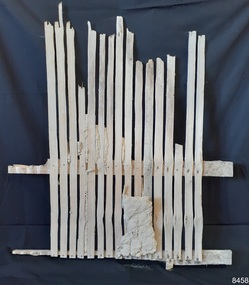
Functional object - Wall section, late 1800s
... There are remnants of a sand and clay-like mortar between and in front of the slats. ...There are remnants of a sand and clay-like mortar between and in front of the slats. ...This wall section was part of the original Warrnambool Lighthouse Keeper's Assistant's Quarters built in the late 1800s. The frame was found in 2023, when the non-heritage cabinets built in the 1970s were removed as part of conservation works.The wall section is significant for being part of the original Warrnambool lighthouse keeper's quarters on the western wall. It is an example of the building materials and methods used in the late 19th and early 20 centuries.Wall frame section; a sample of the original inner western wall frame from the Warrnambool Lighthouse Keeper's Residence, Assistant's Quarters. Vertical timber slates of uneven size are fixed with short flat head metal nails to more substantial upper and lower horizontal rails. There are remnants of a sand and clay-like mortar between and in front of the slats. There are two spacers n the rear of one of the rails, made of timber and fixed with thick square handmade nails; the timber of one is rotting.flagstaff hill maritime museum and village, warrnambool, great ocean road, shipwreck coast, warrnambool lighthouse keeper's quarters, 1800s wall lining -
Glenelg Shire Council Cultural Collection
Pamphlet - Pamphlets - Portland and surrounds, Victoria, n.d
... Collection of pamphlets, information and maps for seven tourist tours of Portland and district. a. green Tour No. 1 Town of Portland b. pale yellow Tour No.2 Portland Harbour c. blue Tour No. 3 Scenic Drive d. gold Tour No. 4 Cobboboonee Forest e. yellow Tour No.5 Nelson, Glenelg River and caves f. pink Tour No. 6 Bridgewater Bay, Lakes, Blowholes g. orange Tour No. 7 Yambuk Lakes, Mt. Clay...Glenelg Shire Council Cultural Collection History House Cliff Street Portland great-ocean-road Front: 'VIVIAN' -handwritten, blue biro, top right Collection of pamphlets, information and maps for seven tourist tours of Portland and district. a. green Tour No. 1 Town of Portland b. pale yellow Tour No.2 Portland Harbour c. blue Tour No. 3 Scenic Drive d. gold Tour No. 4 Cobboboonee Forest e. yellow Tour No.5 Nelson, Glenelg River and caves f. pink Tour No. 6 Bridgewater Bay, Lakes, Blowholes g. orange Tour No. 7 Yambuk Lakes, Mt. Clay Pamphlet Pamphlets - Portland and surrounds, Victoria ...Collection of pamphlets, information and maps for seven tourist tours of Portland and district. a. green Tour No. 1 Town of Portland b. pale yellow Tour No.2 Portland Harbour c. blue Tour No. 3 Scenic Drive d. gold Tour No. 4 Cobboboonee Forest e. yellow Tour No.5 Nelson, Glenelg River and caves f. pink Tour No. 6 Bridgewater Bay, Lakes, Blowholes g. orange Tour No. 7 Yambuk Lakes, Mt. ClayFront: 'VIVIAN' -handwritten, blue biro, top right -
 Dandenong & District Historical Society
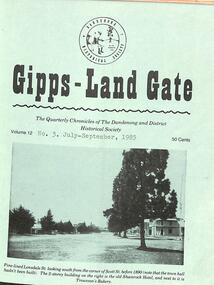
Journal, Dandenong & District Historical Society, Gipps-Land Gate Vol.12 No.2, 1985
... Keeping Posted Delving Into Dandenong Market History Topics Ahead Another Old Landmark Disappears Snippets Ordish Nearly Had a Fire-Clay Rival Across Stud Road Harking Back 75 Years Ago Keysborough-Dandenong Reminiscences Alex Scott - A Strong Personality Personalities Behind The Headstones The Sport Of Kings - And Pioneers - Was Tough In The Early Days Lively Elections! ...Keeping Posted Delving Into Dandenong Market History Topics Ahead Another Old Landmark Disappears Snippets Ordish Nearly Had a Fire-Clay Rival Across Stud Road Harking Back 75 Years Ago Keysborough-Dandenong Reminiscences Alex Scott - A Strong Personality Personalities Behind The Headstones The Sport Of Kings - And Pioneers - Was Tough In The Early Days Lively Elections! ...An interesting group of Early Dandenong Personalities, Places and EventsA5 size publication of the Gipps-Land Gate, July - September, 1985 featuring an old picture of Dandenong on the cover. Keeping Posted Delving Into Dandenong Market History Topics Ahead Another Old Landmark Disappears Snippets Ordish Nearly Had a Fire-Clay Rival Across Stud Road Harking Back 75 Years Ago Keysborough-Dandenong Reminiscences Alex Scott - A Strong Personality Personalities Behind The Headstones The Sport Of Kings - And Pioneers - Was Tough In The Early Days Lively Elections! An interesting group of Early Dandenong Personalities, Places and Eventshotel history, early education in dandenong, interesting milestones, family histories -
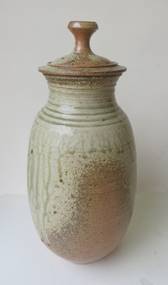
![Ceramic, Popplewell, Marion, [Blue Bowl] by Marion Popplewell](/media/collectors/530576742162ef0fa09a2288/items/534748169821f420f8c03860/item-media/5d00a29a21ea6b0e64759bf0/item-fit-380x285.jpg?cb=6) Federation University Art Collection
Federation University Art CollectionCeramic, Popplewell, Marion, [Blue Bowl] by Marion Popplewell
... Vessel has many small divots, suggesting the clay may have been reclaimed, or collected from nature, and not thoroughly prepared before throwing. ...Vessel has many small divots, suggesting the clay may have been reclaimed, or collected from nature, and not thoroughly prepared before throwing. ...Marion POPPLEWELL (1912-1998) Born Yorkshire Marion Popplewell visited relatives in Ballarat in the early 1940s. She loved Ballarat so much she decided to stay. She worked at a bank in Lydiard Street, opposite the Art Gallery of Ballarat, and lived in rooms above the Lydiard Street Shops. Marion enrolled in some evening classes at the Ballarat Technical Art School (a predecessor institution of Federation University Australia) conducted by Neville Bunning. He was nor overly happy with her small colourful jugs and vases, wanting her to handbuild pots, rather than wheel throw them. Marion Popplewell continued making her small wheel thrown pots with fine handles, and made glazes herself from materials imported from England. Attending classes in Ceramics up until the mid 1970s, she also took some classes in Woodwork and Needlework. Her 'Pink Glazed Jug' 1945 won a prize at the Royal Melbourne Show in the late 1940s. She died in Melbourne on 26 September 1998. This item is part of the Federation University Art Collection. The Art Collection features over 2000 works and was listed as a 'Ballarat Treasure' in 2007.Wheel thrown vessel with three slight bulges and turned foot. Deep blue glaze with rim banded in a second glaze, causing a eutectic reaction, causing the spontaneous syrupy runs down the outside of the vessel. Vessel has many small divots, suggesting the clay may have been reclaimed, or collected from nature, and not thoroughly prepared before throwing. Vessel has one small chip (13mm x 5mm) on inside of rim, but is not a threat to its overall integrity. Inscription on base: "MP 59" Sticker: "85"art, artwork, marion popplewell, ceramics, ceramics available, alumni -
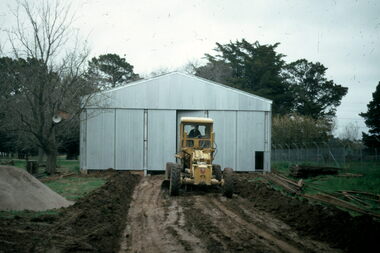 Ballarat Tramway Museum
Slide - BTPS Depot grading two road - set of 3, Warren Doubleday, 9/9/1972
... The second slide shows the soft nature of the clay after a winter of mud mining. The 3rd slide shows the area after the gravel base has been spread....The second slide shows the soft nature of the clay after a winter of mud mining. The 3rd slide shows the area after the gravel base has been spread. ...Set of two photographs of the BTPS depot grading for No. 2 road track construction using a P Kennedy Pty Ltd grader on 9/9/1972. The second slide shows the soft nature of the clay after a winter of mud mining. The 3rd slide shows the area after the gravel base has been spread.Yields information about the development of the BTPS depot and access track 9/1972Colour Slide - Kodak cardboard mounts - set of 3Have the photographer's slide number written on them. "19/72/21 & 22"tramways, btps, trackwork, depot -
 Federation University Art Collection
Ceramic - Artwork - Ceramics, Woodfired Lidded Jar by Stewart Scambler, c1986
... Stewart SCAMBLER Stewart Scrambler is also a woodfirer, making ceramic forms inspired by the Western Australian landscape from local clays and glazes and a mix of native timbers from his York property. ...Federation University Art Collection Artworks are displayed at Federation University Australia campuses at Ballarat, Gippsland (Churchill), Stawell and Horsham. goldfields Stewart SCAMBLER Stewart Scrambler is also a woodfirer, making ceramic forms inspired by the Western Australian landscape from local clays and glazes and a mix of native timbers from his York property. ...Stewart SCAMBLER Stewart Scrambler is also a woodfirer, making ceramic forms inspired by the Western Australian landscape from local clays and glazes and a mix of native timbers from his York property. He used an incised or impressed 'Stewart' for his mark on early works but later started incising his full name.Wheelthrown and woodfired lidded jar. stewart scrambler, ceramics, jan feder memorial ceramics collection, gippsland campus, woodfire 86, bohemian ceramics, australian studio pottery -
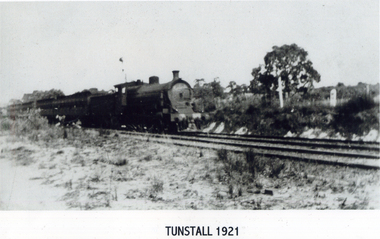 Whitehorse Historical Society Inc.
Photograph, Tunstall 1921
... Tunstall was named after a town in England of the same name because of the similarity of the clay. In 1945 Cr. Knox moved 'that the name of the district known as Tunstall be altered to Nunawading and the council requests that the Post Master General's Department, the Victorian Railway Commissioners and any other department concerned , give affect to such change'. ...Whitehorse Historical Society Inc. 2-10 Deep Creek Road Mitcham melbourne Tunstall was named after a town in England of the same name because of the similarity of the clay. In 1945 Cr. Knox moved 'that the name of the district known as Tunstall be altered to Nunawading and the council requests that the Post Master General's Department, the Victorian Railway Commissioners and any other department concerned , give affect to such change'. ...Tunstall was named after a town in England of the same name because of the similarity of the clay. In 1945 Cr. Knox moved 'that the name of the district known as Tunstall be altered to Nunawading and the council requests that the Post Master General's Department, the Victorian Railway Commissioners and any other department concerned , give affect to such change'. This was seconded by Cr. Savage and carried unanimously.Black and white photograph of a train on lines near Tunstall. No buildings.tunstall 1921, railways -
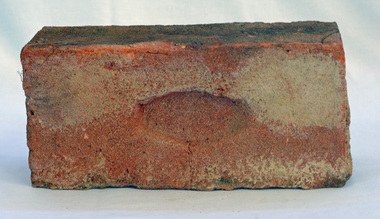 Orbost & District Historical Society
brick
... There is a slight ridge ridge along the side where the wet clay has been pushed up between the bricks as they have been stacked. ...Orbost & District Historical Society Ruskin Street Orbost gippsland There is a slight ridge ridge along the side where the wet clay has been pushed up between the bricks as they have been stacked. ...There is a slight ridge ridge along the side where the wet clay has been pushed up between the bricks as they have been stacked. Wooden press moulds were used to form the brick and lead shaped markers were used to brand a frog in the brick. The frog is the hollow in the centre of the face of the brick. This centre helps the bricks to adhere in construction.A hand-made brick. There is a slight ridge along the top side where it has been pushed up between the bricks as they dried. The frog (hollow in the centre) is an unusual elliptical shape. brick building construction -
 Bendigo Historical Society Inc.
Slide - DIGGERS & MINING: THE DIGGINGS - THE DIGGERS
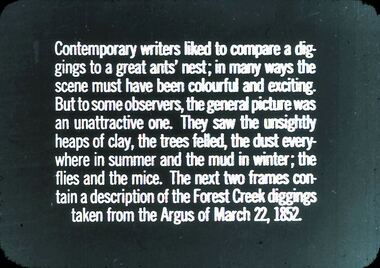
... They saw the unsightly heaps of clay, the trees felled, the dust everywhere in summer and the mud in winter; the flies and the mice. ...They saw the unsightly heaps of clay, the trees felled, the dust everywhere in summer and the mud in winter; the flies and the mice. ...Diggers & Mining: The Digging - The Diggers. Slide reads: Contemporary writers liked to compare a diggings to a great ants' nest; in many ways the scene must have been colourful and exciting. But to some observers, the general picture was an unattractive one. They saw the unsightly heaps of clay, the trees felled, the dust everywhere in summer and the mud in winter; the flies and the mice. The next two frames contain a description of the Forest Creek diggings taken from the Argus of March 22, 1852. Markings: 24 994.LIF:6. Used as a teaching aid.hanimounteducation, tertiary, goldfields -
 Federation University Historical Collection
poster, J. Kemp, Education Department Victoria Technical School Timetable for Examinations, 1910, 1910
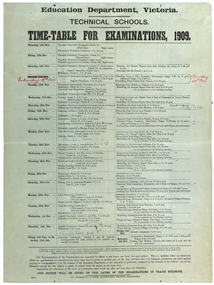
... Subjects included Chemistry, Geology, Asssaying, Hydraulics, Agriculture, Engineering , Mine Surveying, Algebra, Mineralogy, petrology, Botany, Trigonometry, Euclid, Land Surveying, Steam and gas Engines, Applied Mechanics, Drawing, painting, engineering drawing, building construction, architecture, drapery, modelled design, casting clay models, composition of form and colour, Lettering, Wood Carving, historic ornament, Wood Carving. .1) Trade Subjects .2) Other subjects, including art...Barker Library (top floor) Mount Helen goldfields examinations technical schools trades art technical art school timetable clay modelling ceramics Large printed timetable for Technical School examinations in 1901. ...Large printed timetable for Technical School examinations in 1901. Subjects included Chemistry, Geology, Asssaying, Hydraulics, Agriculture, Engineering , Mine Surveying, Algebra, Mineralogy, petrology, Botany, Trigonometry, Euclid, Land Surveying, Steam and gas Engines, Applied Mechanics, Drawing, painting, engineering drawing, building construction, architecture, drapery, modelled design, casting clay models, composition of form and colour, Lettering, Wood Carving, historic ornament, Wood Carving. .1) Trade Subjects .2) Other subjects, including artexaminations, technical schools, trades, art, technical art school, timetable, clay modelling, ceramics -
 Narre Warren and District Family History Group
Photograph, Tooradin State School Pupils & Teacher Prep to Grade 2, c1958
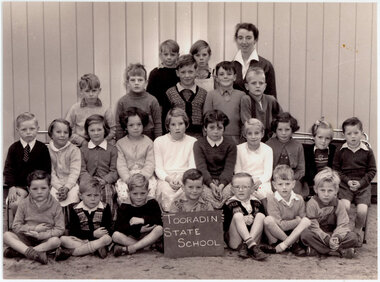
... Carter,-----, Geoffrey Wheatley, David Dawsom, Gary Dunstan, -----, Ronnie Clay....Carter,-----, Geoffrey Wheatley, David Dawsom, Gary Dunstan, -----, Ronnie Clay. Tooradin State School Pupils & Teacher Prep to Grade 2 Photograph ...Tooradin State School officially opened on April 12, 1875, with Mrs. Adelaide Dredge as the first teacher at 50 Tooradin Station Road. In 1975 the school relocated to Bayview Road. The former school site is recognised for its historical significance, although the buildings are gone, some of the trees remain. Black and White photograph of school children and teacher from Tooradin State School c1958. Prep to Grade 2. Back Row: Robert Wheatley, -----, Isabel Bradshaw, Teacher. Third row: ? Van Wyck, Gert Schepers, Colin East, -----, Adrian Schepers, Second row: Ashely Bould, Diane Dawson, Rosemary Coventry, Sharna Coram, Dulcie Mynard, Janette Coram, Christine Mynard, I Carter, Anne Adams,-----. Front Row: ? Carter,-----, Geoffrey Wheatley, David Dawsom, Gary Dunstan, -----, Ronnie Clay.tooradin state school, tooradin (vic.) -
 Narre Warren and District Family History Group
Photograph, Tooradin State School 1956. Grade 3 to Grade 6
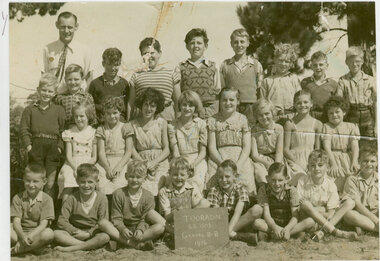
... Centre row: Dale Adams, Shirley Dean, Possie Popple, Merle Clay, Maria Mierziva, Jennifer Wright, Myrah Dean, Lyn Dawson. ...Centre row: Dale Adams, Shirley Dean, Possie Popple, Merle Clay, Maria Mierziva, Jennifer Wright, Myrah Dean, Lyn Dawson. ...Tooradin State School officially opened on April 12, 1875, with Mrs. Adelaide Dredge as the first teacher at 50 Tooradin Station Road. In 1975 the school relocated to Bayview Road. The former school site is recognised for its historical significance, although the buildings are gone, some of the trees remain.Photograph of Tooradin State School pupils and teacher grades 3 to 4 1956. Teacher Mr Bicknell Top Row: -------, Terry Hewson, Don Smith, Graeme Bell, Tony Jenner, Brian Codner, Johnnie Popple,-----,-----. Centre row: Dale Adams, Shirley Dean, Possie Popple, Merle Clay, Maria Mierziva, Jennifer Wright, Myrah Dean, Lyn Dawson. Bottom Row: Jury Radion, John Carter, Geoff Carter, Gary Codner, ? Wright, ? Wright, Francis Evans, Jim Dawson. tooradin state school, tooradin (vic.) -
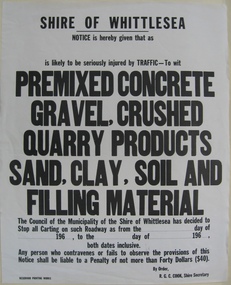 City of Whittlesea
Sign (item) - Shire of Whittlesea Notice, Reservoir Printing Works, Notice given to stop carting on roadway
... Shire of Whittlesea / Notice is hereby given that as / is likely to be seriously injured by traffic - to wit / soil, clay, sand or stone carting / The Council of the Municipality of the Shire of Whittlesea has decided to / stop all carting on such roadway as from the - day of / - 196 - , to the - day of - 196 - , / both dates inclusive / Any person who contravenes or fails to observe the provisions of this / notice shall be liable to a penalty of not more than forty dollars ($40) / By order / R G C Cook, Shire Secretary / Reservoir Printing Works...City of Whittlesea 25 Ferres Boulevard South Morang melbourne public notices Shire of Whittlesea / Notice is hereby given that as / is likely to be seriously injured by traffic - to wit / soil, clay, sand or stone carting / The Council of the Municipality of the Shire of Whittlesea has decided to / stop all carting on such roadway as from the - day of / - 196 - , to the - day of - 196 - , / both dates inclusive / Any person who contravenes or fails to observe the provisions of this / notice shall be liable to a penalty of not more than forty dollars ($40) / By order / R G C Cook, Shire Secretary / Reservoir Printing Works Linen with black print Notice given to stop carting on roadway Sign Shire of Whittlesea Notice Reservoir Printing Works ...Shire of Whittlesea / Notice is hereby given that as / is likely to be seriously injured by traffic - to wit / soil, clay, sand or stone carting / The Council of the Municipality of the Shire of Whittlesea has decided to / stop all carting on such roadway as from the - day of / - 196 - , to the - day of - 196 - , / both dates inclusive / Any person who contravenes or fails to observe the provisions of this / notice shall be liable to a penalty of not more than forty dollars ($40) / By order / R G C Cook, Shire Secretary / Reservoir Printing Workspublic notices -
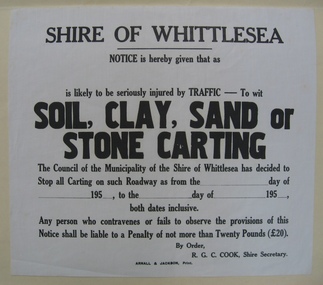 City of Whittlesea
Sign (item) - Shire of Whittlesea Notice, Notice given to stop carting on roadway - sand
... Shire of Whittlesea / Notice is hereby given that as / is likely to be seriously injured by traffic - to wit / soil, clay, sand or stone carting / The Council of the Municipality of the Shire of Whittlesea has decided to / stop all carting on such roadway as from the - day of / - 195 - , to the - day of - 195 - , / both dates inclusive / Any person who contravenes or fails to observe the provisions of this / notice shall be liable to a penalty of not more than twenty pounds (20) / By order / R G C Cook, Shire Secretary / Arnall & Jackson, Print...City of Whittlesea 25 Ferres Boulevard South Morang melbourne public notices Shire of Whittlesea / Notice is hereby given that as / is likely to be seriously injured by traffic - to wit / soil, clay, sand or stone carting / The Council of the Municipality of the Shire of Whittlesea has decided to / stop all carting on such roadway as from the - day of / - 195 - , to the - day of - 195 - , / both dates inclusive / Any person who contravenes or fails to observe the provisions of this / notice shall be liable to a penalty of not more than twenty pounds (20) / By order / R G C Cook, Shire Secretary / Arnall & Jackson, Print Notice printed on drafting linen, black text. ...Shire of Whittlesea / Notice is hereby given that as / is likely to be seriously injured by traffic - to wit / soil, clay, sand or stone carting / The Council of the Municipality of the Shire of Whittlesea has decided to / stop all carting on such roadway as from the - day of / - 195 - , to the - day of - 195 - , / both dates inclusive / Any person who contravenes or fails to observe the provisions of this / notice shall be liable to a penalty of not more than twenty pounds (20) / By order / R G C Cook, Shire Secretary / Arnall & Jackson, Printpublic notices -
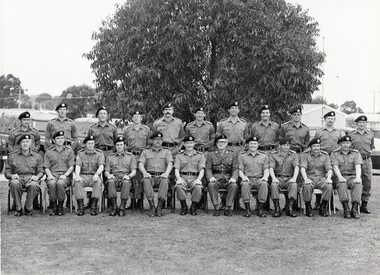 8th/13th Victorian Mounted Rifles Regimental Collection
photograph
... Back Row l to r: Lieuts J Clay, L Trapnell, T Ireland, Goodson,S. whitehead, R Griffiths, J boyce, Mentliskowsky,Wallman, K Courtis, J Mclean; Front Row: Major N whitehead MC, LieutsL Shefford, I Docking, Capt B Rowley, Major D Short, Lt Col J Neale, Colonel LG coleman ( Honrary Colonel ), Capt G Cole Lieuts J baines, L Jackel, J Horsley....Back Row l to r: Lieuts J Clay, L Trapnell, T Ireland, Goodson,S. whitehead, R Griffiths, J boyce, Mentliskowsky,Wallman, K Courtis, J Mclean; Front Row: Major N whitehead MC, LieutsL Shefford, I Docking, Capt B Rowley, Major D Short, Lt Col J Neale, Colonel LG coleman ( Honrary Colonel ), Capt G Cole Lieuts J baines, L Jackel, J Horsley. ...The 8th/13th Victorian Mounted Rifles was raised as a regiment of the Royal Australian Armoured Corps on 1 May 1948 with Headquarters in Melbourne and squadrons in Sale, Benalla/Wangaratta and Albury. In 1955 Regimental Headquarters moved to Wangaratta and a second squadron was located at Albury. The Sale squadron transferred to 4th/19th Prince of Wales’s Light Horse. In 1977 8/13 VMR Regiment was reduced to an independent squadron A Squadron 8th/13th Victorian Mounted Rifles and in 1991 was linked with 4th/19th Prince of Wales’s Light Horse forming the VMR Squadron of that regiment.Black and white photograph of officers of 8/13 Victorian Mounted Rifles at Annual camp Puckapunyal 1974.Back Row l to r: Lieuts J Clay, L Trapnell, T Ireland, Goodson,S. whitehead, R Griffiths, J boyce, Mentliskowsky,Wallman, K Courtis, J Mclean; Front Row: Major N whitehead MC, LieutsL Shefford, I Docking, Capt B Rowley, Major D Short, Lt Col J Neale, Colonel LG coleman ( Honrary Colonel ), Capt G Cole Lieuts J baines, L Jackel, J Horsley. -
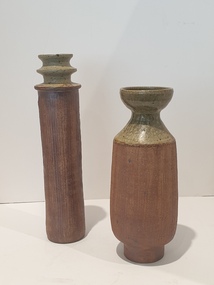 Federation University Art Collection
Ceramic, Two Pottery Vases by Mark Reid
... Mark REID
Mark Reid began working in clay in the early 1980. He was working for a time at Kairi Pottery in North Queensland. ...Federation University Art Collection Artworks are displayed at Federation University Australia campuses at Ballarat, Gippsland (Churchill), Stawell and Horsham. goldfields Mark REID
Mark Reid began working in clay in the early 1980. He was working for a time at Kairi Pottery in North Queensland. ...Mark REID Mark Reid began working in clay in the early 1980. He was working for a time at Kairi Pottery in North Queensland. In 1985, Mark and Robyn Reid established Torvil Pottery at Buninyong, Victoria. In 1991 he relocated to a 10 acre property in nearby Magpie and set up the Ballarat Clayfire Gallery. In 2005, Clayfire Gallery relocated to Daylesford. Two pottery vases by Mark Reid. He signs his work with an incised 'Mark Reid' or 'MR'.ceramics, mark reid, torvil pottery, clayfire gallery -
 Orbost & District Historical Society
pipe, 19th Century
... Meerschaum became a premium substitute for the clay pipes of the day and remains prized to this day, though briar pipes have become the most common pipes starting in the mid-1800s....Meerschaum became a premium substitute for the clay pipes of the day and remains prized to this day, though briar pipes have become the most common pipes starting in the mid-1800s. pipe smoking tobacco A pipe made in the shape of a ram's head, coloured white or bone. ...The first recorded use of meerschaum for making pipes was around 1723 and quickly became prized as the perfect material for providing a cool, dry, flavorful smoke. The porous nature of meerschaum draws moisture and tobacco tar into the stone. Meerschaum became a premium substitute for the clay pipes of the day and remains prized to this day, though briar pipes have become the most common pipes starting in the mid-1800s.A pipe made in the shape of a ram's head, coloured white or bone. It fits snugly into a shaped leather case which is hinged and closes to protect the pipe.pipe smoking tobacco