Showing 689 items matching "effect"
-
 Ballarat Heritage Services
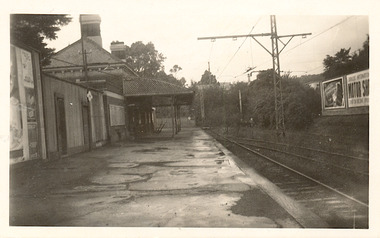
Photograph, Nucolorvue, Panorama from the Pioneed Memorial Tower, Daylesford, 1957
Daylesford is a tourist town in Central Victorian, known for its mineral water springs.Central Springs DaylesfordDaylesford, Victoria, Australia This famous holiday resort is famous for its up-to-date facilities, as well as for its natural attractions. The mineral Springs are renowned for their high medicinal elements. The visitor finds ample to amuse, in excellent fishing, boating, Boating, Swimming, golfing, hiking and riding. The district provides a wide range of typical Australian bush scenery, and the altitude of 2,000 feet above sea level as a tonic effect on all. Daylesford has modern hotels, guest houses, shops and places of amusement, also many other places of interest within short travelling distance. Bendigo, 50 miles, Ballara 30 miles, and Melbourne 75 miles, bring Daylesford within easy reach of many parts of Victoria. daylesford, wombat gardens, wombat hill gardens, daylesford pioneer memorial tower, landscape -
 Ballarat Heritage Services
Photograph, Nucolorvue, First Fairway of Golf Course, Hepburn, 1957
Daylesford is a tourist town in Central Victorian, known for its mineral water springs.The first course at the Hepburn Golf Club.Daylesford, Victoria, Australia This famous holiday resort is famous for its up-to-date facilities, as well as for its natural attractions. The mineral Springs are renowned for their high medicinal elements. The visitor finds ample to amuse, in excellent fishing, boating, Boating, Swimming, golfing, hiking and riding. The district provides a wide range of typical Australian bush scenery, and the altitude of 2,000 feet above sea level as a tonic effect on all. Daylesford has modern hotels, guest houses, shops and places of amusement, also many other places of interest within short travelling distance. Bendigo, 50 miles, Ballara 30 miles, and Melbourne 75 miles, bring Daylesford within easy reach of many parts of Victoria. daylesford, fairway, hepburn golf course -
 Ballarat Heritage Services
Photograph, Nucolorvue, Swimming Pool and Jetty, Lake Daylesford, 1957
Daylesford is a tourist town in Central Victorian, known for its mineral water springs.Swimming Pool and Jetty, Lake DaylesfordDaylesford, Victoria, Australia This famous holiday resort is famous for its up-to-date facilities, as well as for its natural attractions. The mineral Springs are renowned for their high medicinal elements. The visitor finds ample to amuse, in excellent fishing, boating, Boating, Swimming, golfing, hiking and riding. The district provides a wide range of typical Australian bush scenery, and the altitude of 2,000 feet above sea level as a tonic effect on all. Daylesford has modern hotels, guest houses, shops and places of amusement, also many other places of interest within short travelling distance. Bendigo, 50 miles, Ballara 30 miles, and Melbourne 75 miles, bring Daylesford within easy reach of many parts of Victoria. daylesford, swimming pool and jetty, lake daylesford, swimming -
 Ballarat Heritage Services
Photograph, Nucolorvue, A Section of Lake Daylesford, 1957
Daylesford is a tourist town in Central Victorian, known for its mineral water springs.A Section of Lake DaylesfordDaylesford, Victoria, Australia This famous holiday resort is famous for its up-to-date facilities, as well as for its natural attractions. The mineral Springs are renowned for their high medicinal elements. The visitor finds ample to amuse, in excellent fishing, boating, Boating, Swimming, golfing, hiking and riding. The district provides a wide range of typical Australian bush scenery, and the altitude of 2,000 feet above sea level as a tonic effect on all. Daylesford has modern hotels, guest houses, shops and places of amusement, also many other places of interest within short travelling distance. Bendigo, 50 miles, Ballara 30 miles, and Melbourne 75 miles, bring Daylesford within easy reach of many parts of Victoria. daylesford, swimming, lake daylesford -
 Ballarat Heritage Services
Photograph, Nucolorvue, Caravans in Victoria Park Camping Ground, Daylesford, 1957
Daylesford is a tourist town in Central Victorian, known for its mineral water springs.Caravans in Victoria Park Camping Ground, DaylesfordDaylesford, Victoria, Australia This famous holiday resort is famous for its up-to-date facilities, as well as for its natural attractions. The mineral Springs are renowned for their high medicinal elements. The visitor finds ample to amuse, in excellent fishing, boating, Boating, Swimming, golfing, hiking and riding. The district provides a wide range of typical Australian bush scenery, and the altitude of 2,000 feet above sea level as a tonic effect on all. Daylesford has modern hotels, guest houses, shops and places of amusement, also many other places of interest within short travelling distance. Bendigo, 50 miles, Ballara 30 miles, and Melbourne 75 miles, bring Daylesford within easy reach of many parts of Victoria. daylesford, victoria park caravan park, camping, victoria park, caravan park -
 Ballarat Heritage Services
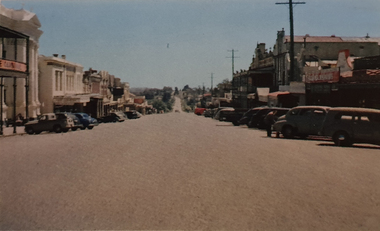
Photograph, Nucolorvue, Vincent Street Daylesford Looking Towards Hepburn Springs, 1957
Daylesford is a tourist town in Central Victorian, known for its mineral water springs.Vincent Street Daylesford Looking Towards Hepburn SpringsDaylesford, Victoria, Australia This famous holiday resort is famous for its up-to-date facilities, as well as for its natural attractions. The mineral Springs are renowned for their high medicinal elements. The visitor finds ample to amuse, in excellent fishing, boating, Boating, Swimming, golfing, hiking and riding. The district provides a wide range of typical Australian bush scenery, and the altitude of 2,000 feet above sea level as a tonic effect on all. Daylesford has modern hotels, guest houses, shops and places of amusement, also many other places of interest within short travelling distance. Bendigo, 50 miles, Ballara 30 miles, and Melbourne 75 miles, bring Daylesford within easy reach of many parts of Victoria. daylesford, vincent street, streetscape -
 The Beechworth Burke Museum
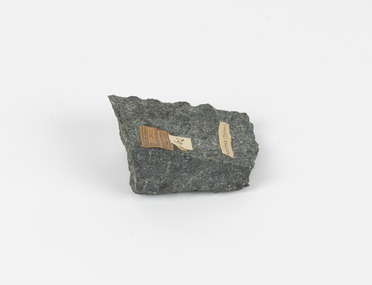
Geological specimen - Greenstone / Gabbro, Unknown
This specimen was recovered from Ceres West of Geelong, Victoria. Greenstone is the name for any metamorphosed basic igneous rock (in the case of this specimen, Gabbro) that gains its greenish colour to the presence of the minerals chlorite, actinolite, or epidote, hence the term 'green' and 'stone'. Greenstone is often formed through metamorphsis along a convergent plate boundary. In the rock cycle (the series of processes that creates the various types of rocks) there are identified three different types of rocks, which are the sedimentary, the igneous and the metamorphic. Metamorphic rocks started out as sedimentary, igneous or earlier metamorphic rocks but changed from their original condition under the effect of high heat, high pressure or hot, mineral-rich fluid. However, if pressure or heat is too high, then the rock will melt, resulting in the formation of an igneous rock. The name used to describe these types of rocks reflects this specific inherent trait of change, since the word “metamorphic” derives from the Greek word “metamorphosis”, meaning “change of form or structure”. Metamorphic rocks form in the Earth`s crust but can be also found on the surface, due to elevation of the Earth`s surface. They are divided into two categories: the foliated metamorphic and the non-foliated metamorphic rocks. Gabbro is a highly useful mineral that is often polished to create cemetery markers and kitchen benches. It is notable for its qualities of durability, being able to withstand extreme elements and wear. Whilst not rare, Gabbro is of great utility and has been highly desirable for its qualities. This specimen is part of a larger collection of geological and mineral specimens collected from around Australia (and some parts of the world) and donated to the Burke Museum between 1868-1880. A large percentage of these specimens were collected in Victoria as part of the Geological Survey of Victoria that begun in 1852 (in response to the Gold Rush) to study and map the geology of Victoria. Collecting geological specimens was an important part of mapping and understanding the scientific makeup of the earth. Many of these specimens were sent to research and collecting organisations across Australia, including the Burke Museum, to educate and encourage further study.Greenstone is a solid hand-sized metamorphic mineral of a green colour. Greenstone is the name for any metamorphosed basic igneous rock (in the case of this specimen, Gabbro) that gains its greenish colour to the presence of the minerals chlorite, actinolite, or epidote, hence the term 'green' and 'stone'. Gabbro is a medium to coarse grained rocks that consist primarily of plagioclase feldspar and pyroxene. Greenstone is often formed through metamorphsis along a convergent plate boundary. Gabbro forms due to cooling and crystallization of magma underneath Earth's surface. Greenstone/Gabbro/from Ceres west/of Geelong. Has old Geological Survey label/and probably collected by/Richard Daintree in 1861/C.Willam 15/4/21/ Other label: 62 /greenstone, metamorphosed, igneous rock, gabbro, chlorite, actinolite, epidote, metamorphsis, rock cycle, various types of rocks, sedimentary, high heat, high pressure, mineral-rich fluid, metamorphosis, foliated metamorphic, non-foliated metamorphic, convergent plate boundary, greenish colour, minerals -
 Clunes Museum
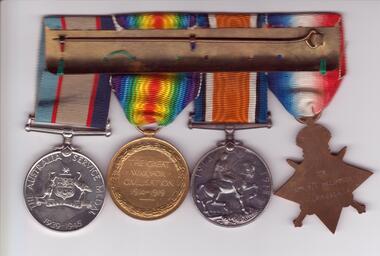
Medal - MEDALS
Milton Arthur Williamson was born in Clunes, Victoria and enlisted at 22 years and 5 months on 29/3/1915. He embarked for Alexandria on 30/8/1915. He was injured during duty and had continual problems with his knee. He was returned to Australia on 10/9/1917 following several appearances before the Medical Board of the Australian Military Offices of London and Kent in the United Kingdom. The termination of his appointment was effected on 4/3/1918 and he was medically discharged from the AIF. L-R .4 The Australia Service Medal 1939-1945 was instituted in 1949 to recognise the service of members of the Australian Armed Forces and the Australian Mercantile Marine during World War II. .3 The Victory Medal was awarded to prescribed classes of persons who entered a theatre of war on duty between 5 August 1914 and 11 November 1918. .2 The British War Medal instituted by King George V in 1919 to mark the end of World War I and record the service given. *PTE SS WILLIAMSON 1 The 1914–15 Star was authorised in 1918 and was awarded for service in specified theatres of war between 5 August 1914 and 31 December 1915.4 MEDALS : L-R WITH RIBBONS .1 BRONZE : STAR SHAPED MEDAL 1914-1915 ON BANNER. BACK 1112 SPR M A WILLIAMSON 2/ DIV SIG COY AIF .2 PEWTER - ROUND MEDAL FACE OF GEORGE V 0 BACK 1914-1918 NUDE MAN ON HORSE WITH 2 FEET OFF GROUND. RIM : 636 PTE SS WILLIAMSON 8 BN AIF .3 ROUND MEDAL ANGEL IS HOLDING A PALM BRANCH. BACK : ENCIRCLED BY WREATH - THE GREAT WAR FOR CIVILISATION 1914-1919 .4 ROUND SILVER MEDAL PROFILE OF GEORGE VI. BACK : AUSTRALIAN COAT OF ARMS ENCIRCLED BY THE AUSTRALIAN SERVICE MEDAL 1939-1945 RIM : W 71800 A M WILLIAMSON RIBBON NAVY, RED, BEIGE, SKY BLUElocal history, numismatics, medals, military -
 Bendigo Historical Society Inc.
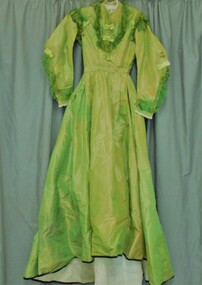
Clothing - VICTORIAN FULL LENGTH DRESS, WITH TRAIN, 1860's - 1870's
Green and gold shot silk dress. Hemline is edged with a binding of black velvet - one cm wide. Bodice lined with cream linen, sleeves lined with cream cotton, skirt lined with cream linen(?) or cotton(?). Long sleeves are shaped in a ""semi-circular'' shape at the elbow, and taper in at the wrist. Sleeves are trimmed with green fringing, and a flat green satin bow. Wrist is trimmed a 2cm wide band of cream cotton lace. Top of sleeve at shoulder is also trimmed with green and fringing encircling the sleeve top.High round neck is faced with a 1cm band, and a row of the cotton lace. Two bands of fringing give a rectangular "style'' effect on the front bodice, which is fastened at centre front with ten metal hooks, and nine hand stitched ''holes'' to fasten, and one hand stitched loop at the neckline. Fringing continues over the shoulder, into a 5-sided shape across the shoulder blades. Skirt has two pleats on RHS front and two on left hand side of back and a 7cm centre panel of tight pleating. Skirt extends into a train at back. An inside pocket is accessed from under a pleat in the RHS skirt.costume, female, victorian full length dress with train -
 Bendigo Historical Society Inc.
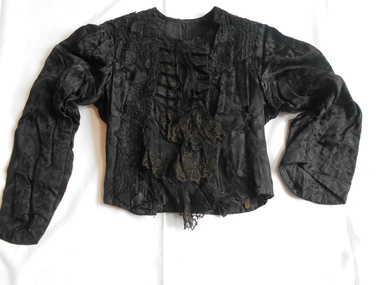
Clothing - WOMAN'S BLACK SILK BROCADE BODICE, 1880-1900
Clothing. Woman's black silk brocade bodice. High round neckline with full length front opening fastened with 13 metal hooks and eyes. Bodice fully lined with black cotton fabric and shaped in at waistline. Seven casings for boning - two on each side of front, one on each side seam and one at centre back (18cm X 1.3 cm). Casings reinforced with bright yellow cotton stitching. Cotton tape casing at hemline at waist. Long straight set in sleeves extending to a rounded shape over the back of the hand.Cross over front outer layer fastened with three hooks and eyes at the top and one at the waist. Panels of black lace run from shoulders to waist on either side of a centre insert panel (12 cm X 15cm) with five horizontal strips of velvet ribbon. Below the insert are three 7-9cm wide black lace ruffles with khaki green embroidery (Jabot effect). The back has a deep V shaped insert of vertical pin tucks and black lace, from across the shoulders to centre back. Pin tucks also on either side of front neckline.costume, female, woman's black silk brocade bodice -
 Ballarat Tramway Museum
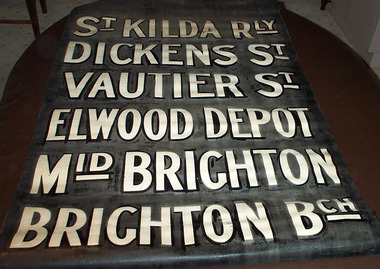
Functional object - Destination Roll, Victorian Railways (VR), "St Kilda - Brighton", 1950?
Destination roll - white lettering on black background for the St Kilda - Brighton tramway, operated by the Victorian Railways until November 1956. Letters are 125 high, with painted black linen (glossy black), leaving the letters white, but with edge to give a shadow effect - see images. Roll quite stiff when rolled out. Roll 790 wide, with a top section (no destinations) 225 long, the destination roll section, 995 long and a bottom 240 long. Destinations in order are: ST KILDA RLY; DICKENS ST; VAUTIER ST; ELWOOD DEPOT; MID BRIGHTON; BRIGHTON BCH. Rolled in direction with destinations on the outside of the roll. Image information: btm1745i1 - photo of roll showing front of destinations btm 1745i2 - close up of part of St Kilda, when held up to light - no flash btm 1745i3 - close up of part of St. Kilda from rear or primary painted side btm 1745i4 - close up of part of St. Kilda from front showing painting method. See Destination City - 5th edition Not to be used in a tramcar destination box - original to be kept in archives.tram, trams, vr trams, destination roll, st kilda - brighton -
 Bendigo Historical Society Inc.
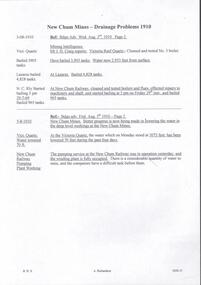
Document - DRAINAGE PROBLEMS - DRAINAGE PROBLEMS 1910
Handwritten notes from Bendigo Advertiser reports. (1) Mr J. H. Craig reports- Victoria Reef Quartz - Cleaned and tested No 3 boiler. Have bailed 3,905 tanks. Water now 2.953 feet from surface. At Lazarus - Bailed 4,828 tanks. At New Chum Railway - Cleaned and tested boilers and flues, effected repairs to machinery and shaft, and started bailing at 3 pm on Friday 29th inst, and bailed 965 tanks. Bendig Advertiser 3/8/1910 Page 2 Mining Intelligence. (2) New Chum Mines - Better progress is now being made in lowering the water in the deep level workings at the New Chum Mines. At the Victoria Quartz, the water which on Monday stood at 3073feet, has been lowered 70 feet during the past four days. The pumping service at the New Chum Railway was in operation yesterday, and the winding plant is fully occupied. There is a considerable quantity of water toraise, and the companies have a difficult task before them. Bendigo Advertiser 5/8/1910 Page 2. Document from Albert Richardson Collection of mining history.gold, drainage problems, new chum drainage association, new chum mines drainage problems 1910, bendigo advertiser 3/8/1910 page 2, mr j h craig, victoria reef quartz, lazarus, new chum railway, bendigo advertiser 5/8/1910 page 2, albert richardson -
 Melbourne Tram Museum
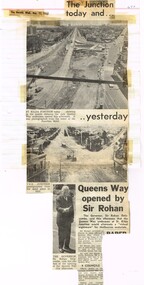
Newspaper, The Sun, The Herald, "The Junction today and Yesterday", "The Street that died" "Fare Rises attacked, Dec. 1968
Newspaper Clipping - set of four clippings adhered to two sides of two sheets of ruled quarto paper with punched holes on the left hand side - from newspaper about the St Kilda Junction tram and road works. 1 - "The Junction today and Yesterday", with photos of the St Kilda junction on 11/12/1968 and 1920, following the opening of Queens Way (road under the tram tracks_ by The Governor Sir Rohan Delacombe - from the Herald 11/12/1968. 2 - Keith Dunstan's a Place in The Sun about his visit to Brisbane and the closure of the Brisbane Tramway System - The Sun 11/12/1968 3 - "The Street that died" - the Sun 19/12/1968 - about the about the closure and removal of the tram tracks in Wellington St and its effect on the businesses. Has a photo of Frances Robinson of the St Kilda Post Office walking across demolished track tracks and wooden blocks. 4 - Trams - 20/12/1968 - about trams shunting at Malvern Depot 5 - two newspaper cuttings - "Fare Rises Attacked" - Monday 20-12-1968 - about proposed Fare Rises - quotes the Minister Mr Wilcox.trams, tramways, st kilda junction, opening, brisbane, road works, construction, malvern depot, wellington st, fares -
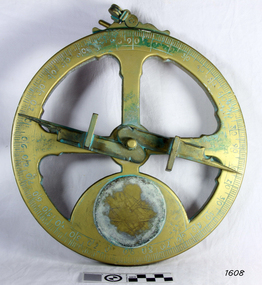 Flagstaff Hill Maritime Museum and Village
Instrument - Mariner's astrolabe
This representative example demonstrates a mariner’s astrolabe. Historical examples are rare. There are less than one hundred known to exist and most of these have been recovered from shipwrecks, many from Spanish and Portuguese vessels. An astrolabe is a measuring device once used to navigate the seas by observing the sun and stars to measure their altitude. The measurement of altitude could then be used to calculate the ship’s latitude but at that time in history there was no means of measuring longitude. The body of the navigational astrolabe was cast brass and much heavier, and less complicated than the variety used on land. The heavier weight and cut-away shape reduced the effect of the wind and waves when trying to use it at sea. A mariner’s astrolabe or ‘star finder’ is a simplified version than that used by Arabic astronomers to find the altitude of the sun and stars above the horizon, and time of the sunrise and sunset. It is a forerunner to the quadrant, octant and sextant and was popular for about 200 years over the 1500s and 1600s to find the latitude of a ship at sea. The user held the astrolabe at eye level and, usually with assistance, aligned the stars through the two small sights (pinnules), then read the altitude indicated by the pointer on the arm. It could also be used to sight the sun by holding it lower down, aiming it at the sun, and adjusting it until the sun shone through both pinnules. This astrolabe is an example used to demonstrate the mariner’s astrolabe, which was navigational tool of the 1500s and 1600s, in the time before longitude was able to be determined. It is a forerunner to modern navigation technology. Mariner’s astrolabe – a representative example. A gold painted, disc shaped object with cut outs and revolving arm in centre. The arm has two sights attached at right angles. The top has a ring attached. Measurements are marked in degrees in a circular scale around outer edge.flagstaff hill, warrnambool, maritime village, maritime museum, flagstaff hill maritime museum & village, shipwreck coast, great ocean road, navigation instrument, navigation tool, navigation, astrolabe, mariner’s astrolabe, measure latitude, measure altitude, arabic navigation, measuring device, star finder, astronomy, marine tool, marine instrument -
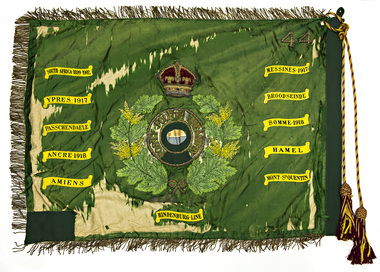 Australian Army Museum of Western Australia
Regimental Colour - 44th Battalion (The West Australian Rifles)
Presented by Lieutenant-General Sir JJ Talbot Hobbs, KCB, KCMG, VD, LLD at a parade held on the Esplanade, Perth, 22 October 1927. With the re-activation of the Citizen Military Forces (CMF) following the Second World War, the 11th/44th Infantry Battalion (The City of Perth Regiment) was raised as a linked battalion in 1948 to carry on the identity and traditions of the pre-war 11th and 44th Battalions respectively. The King's and Regimental Colours formerly held by these two battalions were passed on to the new battalion who paraded them in rotation on ceremonial occasions. Under major reorganisation of the CMF in 1960, all individual infantry battalions that existed at the time within each State were amalgamated to form State regiments, taking effect from 1 July 1960. Thus from that date the 11/44th, 16th and 28th Infantry Battalions were amalgamated to form The Royal Western Australia Regiment. In September 1960, at a ceremonial parade held at Northam Camp, the Colours carried by all former battalions were handed over for safe keeping by the new regiment. These former colours were subsequently laid up in the undercroft at the State War Memorial, King's Park on 29 November 1964. These were transferred to the Army Museum of WA in 1988 as part of the Bicentenary Colours Project. Dark green with gold fringes. In the centre the battalion colour patch of a white over blue oval within a circle inscribed "FORTY FOURTH INFANTRY", the whole within a wreath of Australian wattle and surmounted by the Imperial Crown. In the upper canton the Arabic numeral "44". The following battle honours are emblazoned on the Colour: SOUTH AFRICA 1899-1902, MESSINES 1917, YPRES 1917, BROODSEINDE, PASSCHENDAELE, SOMME 1918, ANCRE 1918, HAMEL, AMIENS, MONT ST QUENTIN, HINDENBURG LINE -
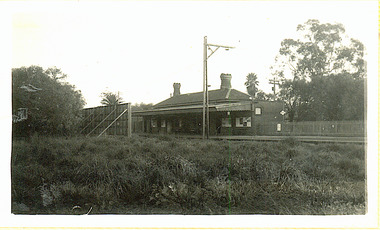 Kew Historical Society Inc
Photograph - The last train at Barker Station, 1952
The Kew railway was opened in 1887, and diverged from the main (Box Hill–Lilydale) line about half-way between Hawthorn and Glenferrie. From the point of divergence the line was slightly less than one mile long, and it had only one intermediate station — Barker. There were four road over-bridges and two level crossings, including one over the busy Barkers Road. The line supported a passenger and goods service, and was electrified in December 1922, at the same time as the main line to Box Hill. There were a number of peak hour services which ran from Flinders Street station (Melbourne) to Kew, but in 1938 all but one of these were diverted to the Ashburton line, where traffic was growing. This had an adverse effect on Kew traffic, as passengers from Kew needed to cross over a footbridge at Hawthorn to change trains, and the main line trains were usually already crowded by the time they reached Hawthorn. At about the same time the off-peak trains were replaced by road buses. In 1952 all passenger trains were withdrawn, but the road bus service continued for many years. Goods trains were finally withdrawn in 1957, and the railway was dismantled in 1958-59. (Source: Frank Stamford, 'The Hawthorn - Kew Railway')Small black and white snapshot of the last passenger train at Barker Railway Station in 1952. The photograph, one of 12, is part of a larger album of newspaper clippings, timetables, tickets and photos relating to the Kew Railway Line, taken and compiled by Lachlan Richardson, while a resident of Kew. The album dates from the 1950s. The album is part of a larger subject file on the Kew Line, compiled over time by members of the Kew Historical Society."Last train at Barker Station / 1 August 1952"kew railway line, transport -- railways -- kew (vic.), barker railway station, kew branch line -
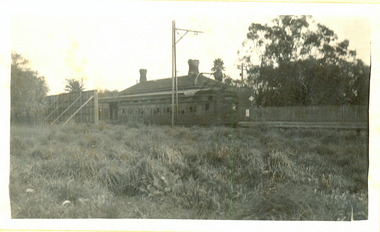 Kew Historical Society Inc
Photograph - Barker Station, August 1952
The Kew railway was opened in 1887, and diverged from the main (Box Hill–Lilydale) line about half-way between Hawthorn and Glenferrie. From the point of divergence the line was slightly less than one mile long, and it had only one intermediate station — Barker. There were four road over-bridges and two level crossings, including one over the busy Barkers Road. The line supported a passenger and goods service, and was electrified in December 1922, at the same time as the main line to Box Hill. There were a number of peak hour services which ran from Flinders Street station (Melbourne) to Kew, but in 1938 all but one of these were diverted to the Ashburton line, where traffic was growing. This had an adverse effect on Kew traffic, as passengers from Kew needed to cross over a footbridge at Hawthorn to change trains, and the main line trains were usually already crowded by the time they reached Hawthorn. At about the same time the off-peak trains were replaced by road buses. In 1952 all passenger trains were withdrawn, but the road bus service continued for many years. Goods trains were finally withdrawn in 1957, and the railway was dismantled in 1958-59. (Source: Frank Stamford, 'The Hawthorn - Kew Railway')Small black and white snapshot of the last passenger train at Barker Railway Station in 1952. The photograph, one of 12, is part of a larger album of newspaper clippings, timetables, tickets and photos relating to the Kew Railway Line, taken and compiled by Lachlan Richardson, while a resident of Kew. The album dates from the 1950s. The album is part of a larger subject file on the Kew Line, compiled over time by members of the Kew Historical Society."Barker Station / August 1952"kew railway line, transport -- railways -- kew (vic.), barker railway station, kew branch line -
 Kew Historical Society Inc
Photograph - Kew Railway Station: Denmark Street entrance, 1952
The Kew railway was opened in 1887, and diverged from the main (Box Hill–Lilydale) line about half-way between Hawthorn and Glenferrie. From the point of divergence the line was slightly less than one mile long, and it had only one intermediate station — Barker. There were four road over-bridges and two level crossings, including one over the busy Barkers Road. The line supported a passenger and goods service, and was electrified in December 1922, at the same time as the main line to Box Hill. There were a number of peak hour services which ran from Flinders Street station (Melbourne) to Kew, but in 1938 all but one of these were diverted to the Ashburton line, where traffic was growing. This had an adverse effect on Kew traffic, as passengers from Kew needed to cross over a footbridge at Hawthorn to change trains, and the main line trains were usually already crowded by the time they reached Hawthorn. At about the same time the off-peak trains were replaced by road buses. In 1952 all passenger trains were withdrawn, but the road bus service continued for many years. Goods trains were finally withdrawn in 1957, and the railway was dismantled in 1958-59. (Source: Frank Stamford, 'The Hawthorn - Kew Railway')Small black and white snapshot of the entrance to Kew Station from Denmark Street in 1952. The photograph, one of 12, is part of a larger album of newspaper clippings, timetables, tickets and photos relating to the Kew Railway Line, taken and compiled by Lachlan Richardson, while a resident of Kew. The album dates from the 1950s. The album is part of a larger subject file on the Kew Line, compiled over time by members of the Kew Historical Society.kew railway line, transport -- railways -- kew (vic.), kew branch line, kew railway station -
 Kew Historical Society Inc
Photograph - Kew Station 22/4/51, F3
The Kew railway was opened in 1887, and diverged from the main (Box Hill–Lilydale) line about half-way between Hawthorn and Glenferrie. From the point of divergence the line was slightly less than one mile long, and it had only one intermediate station — Barker. There were four road over-bridges and two level crossings, including one over the busy Barkers Road. The line supported a passenger and goods service, and was electrified in December 1922, at the same time as the main line to Box Hill. There were a number of peak hour services which ran from Flinders Street station (Melbourne) to Kew, but in 1938 all but one of these were diverted to the Ashburton line, where traffic was growing. This had an adverse effect on Kew traffic, as passengers from Kew needed to cross over a footbridge at Hawthorn to change trains, and the main line trains were usually already crowded by the time they reached Hawthorn. At about the same time the off-peak trains were replaced by road buses. In 1952 all passenger trains were withdrawn, but the road bus service continued for many years. Goods trains were finally withdrawn in 1957, and the railway was dismantled in 1958-59. (Source: Frank Stamford, 'The Hawthorn - Kew Railway')Small black and white snapshot of Kew Railway Station, looking south to Barker Station. The photograph, one of 12, is part of a larger album of newspaper clippings, timetables, tickets and photos relating to the Kew Railway Line, taken and compiled by Lachlan Richardson, while a resident of Kew. The album dates from the 1950s. The album is part of a larger subject file on the Kew Line, compiled over time by members of the Kew Historical Society.kew railway line, transport -- railways -- kew (vic.), kew branch line, kew railway station -
 Kew Historical Society Inc
Photograph - Kew Branch Line : The Hawthorn Grove crossing, August 1952
The Kew railway was opened in 1887, and diverged from the main (Box Hill–Lilydale) line about half-way between Hawthorn and Glenferrie. From the point of divergence the line was slightly less than one mile long, and it had only one intermediate station — Barker. There were four road over-bridges and two level crossings, including one over the busy Barkers Road. The line supported a passenger and goods service, and was electrified in December 1922, at the same time as the main line to Box Hill. There were a number of peak hour services which ran from Flinders Street station (Melbourne) to Kew, but in 1938 all but one of these were diverted to the Ashburton line, where traffic was growing. This had an adverse effect on Kew traffic, as passengers from Kew needed to cross over a footbridge at Hawthorn to change trains, and the main line trains were usually already crowded by the time they reached Hawthorn. At about the same time the off-peak trains were replaced by road buses. In 1952 all passenger trains were withdrawn, but the road bus service continued for many years. Goods trains were finally withdrawn in 1957, and the railway was dismantled in 1958-59. (Source: Frank Stamford, 'The Hawthorn - Kew Railway')Small black and white snapshot of the Hawthorn Grove crossing, August 1952. The photograph, one of 12, is part of a larger album of newspaper clippings, timetables, tickets and photos relating to the Kew Railway Line, taken and compiled by Lachlan Richardson, while a resident of Kew. The album dates from the 1950s. The album is part of a larger subject file on the Kew Line, compiled over time by members of the Kew Historical Society.kew railway line, transport -- railways -- kew (vic.), kew branch line, hawthorn grove -- hawthorn (vic.), railway crossings -
 Kew Historical Society Inc
Photograph - Seven Carriage Train at Barker Station
The Kew railway was opened in 1887, and diverged from the main (Box Hill–Lilydale) line about half-way between Hawthorn and Glenferrie. From the point of divergence the line was slightly less than one mile long, and it had only one intermediate station — Barker. There were four road over-bridges and two level crossings, including one over the busy Barkers Road. The line supported a passenger and goods service, and was electrified in December 1922, at the same time as the main line to Box Hill. There were a number of peak hour services which ran from Flinders Street station (Melbourne) to Kew, but in 1938 all but one of these were diverted to the Ashburton line, where traffic was growing. This had an adverse effect on Kew traffic, as passengers from Kew needed to cross over a footbridge at Hawthorn to change trains, and the main line trains were usually already crowded by the time they reached Hawthorn. At about the same time the off-peak trains were replaced by road buses. In 1952 all passenger trains were withdrawn, but the road bus service continued for many years. Goods trains were finally withdrawn in 1957, and the railway was dismantled in 1958-59. (Source: Frank Stamford, 'The Hawthorn - Kew Railway')Small black and white snapshot of a seven carriage train approaching Barker Railway Station. The photograph, one of 12, is part of a larger album of newspaper clippings, timetables, tickets and photos relating to the Kew Railway Line, taken and compiled by Lachlan Richardson, while a resident of Kew. The album dates from the 1950s. The album is part of a larger subject file on the Kew Line, compiled over time by members of the Kew Historical Society."Seven Carriage Train at Barker Station"kew railway line, transport -- railways -- kew (vic.), barker railway station, kew branch line -
 Kew Historical Society Inc
Photograph - Farewell to 'Our Lady of Fatima'. Xavier College 22/4/51
The Kew railway was opened in 1887, and diverged from the main (Box Hill–Lilydale) line about half-way between Hawthorn and Glenferrie. From the point of divergence the line was slightly less than one mile long, and it had only one intermediate station — Barker. There were four road over-bridges and two level crossings, including one over the busy Barkers Road. The line supported a passenger and goods service, and was electrified in December 1922, at the same time as the main line to Box Hill. There were a number of peak hour services which ran from Flinders Street station (Melbourne) to Kew, but in 1938 all but one of these were diverted to the Ashburton line, where traffic was growing. This had an adverse effect on Kew traffic, as passengers from Kew needed to cross over a footbridge at Hawthorn to change trains, and the main line trains were usually already crowded by the time they reached Hawthorn. At about the same time the off-peak trains were replaced by road buses. In 1952 all passenger trains were withdrawn, but the road bus service continued for many years. Goods trains were finally withdrawn in 1957, and the railway was dismantled in 1958-59. (Source: Frank Stamford, 'The Hawthorn - Kew Railway')Small black and white snapshot of a train leaving Kew Station with the Xavier Chapel on the hill in the background, hence the ironic title provided by the photographer. The photograph, one of 12, is part of a larger album of newspaper clippings, timetables, tickets and photos relating to the Kew Railway Line, taken and compiled by Lachlan Richardson, while a resident of Kew. The album dates from the 1950s. The album is part of a larger subject file on the Kew Line, compiled over time by members of the Kew Historical Society."Farewell to 'Our Lady of Fatima'. Xavier College 22/4/51"kew railway line, transport -- railways -- kew (vic.), kew branch line, xavier college, kew railway station -
 Kew Historical Society Inc
Photograph - Kew Branch Line: Looking along cutting towards Barker Station 22/4/51
The Kew railway was opened in 1887, and diverged from the main (Box Hill–Lilydale) line about half-way between Hawthorn and Glenferrie. From the point of divergence the line was slightly less than one mile long, and it had only one intermediate station — Barker. There were four road over-bridges and two level crossings, including one over the busy Barkers Road. The line supported a passenger and goods service, and was electrified in December 1922, at the same time as the main line to Box Hill. There were a number of peak hour services which ran from Flinders Street station (Melbourne) to Kew, but in 1938 all but one of these were diverted to the Ashburton line, where traffic was growing. This had an adverse effect on Kew traffic, as passengers from Kew needed to cross over a footbridge at Hawthorn to change trains, and the main line trains were usually already crowded by the time they reached Hawthorn. At about the same time the off-peak trains were replaced by road buses. In 1952 all passenger trains were withdrawn, but the road bus service continued for many years. Goods trains were finally withdrawn in 1957, and the railway was dismantled in 1958-59. (Source: Frank Stamford, 'The Hawthorn - Kew Railway')Small black and white snapshot looking along cutting towards Barker Station 22/4/51. The photograph, one of 12, is part of a larger album of newspaper clippings, timetables, tickets and photos relating to the Kew Railway Line, taken and compiled by Lachlan Richardson, while a resident of Kew. The album dates from the 1950s. The album is part of a larger subject file on the Kew Line, compiled over time by members of the Kew Historical Society."Looking along cutting towards Barker Station 22/4/51"kew railway line, transport -- railways -- kew (vic.), barker railway station, kew branch line -
 Kew Historical Society Inc
Photograph - The last train at Kew Station, August 1952
The Kew railway was opened in 1887, and diverged from the main (Box Hill–Lilydale) line about half-way between Hawthorn and Glenferrie. From the point of divergence the line was slightly less than one mile long, and it had only one intermediate station — Barker. There were four road over-bridges and two level crossings, including one over the busy Barkers Road. The line supported a passenger and goods service, and was electrified in December 1922, at the same time as the main line to Box Hill. There were a number of peak hour services which ran from Flinders Street station (Melbourne) to Kew, but in 1938 all but one of these were diverted to the Ashburton line, where traffic was growing. This had an adverse effect on Kew traffic, as passengers from Kew needed to cross over a footbridge at Hawthorn to change trains, and the main line trains were usually already crowded by the time they reached Hawthorn. At about the same time the off-peak trains were replaced by road buses. In 1952 all passenger trains were withdrawn, but the road bus service continued for many years. Goods trains were finally withdrawn in 1957, and the railway was dismantled in 1958-59. (Source: Frank Stamford, 'The Hawthorn - Kew Railway')Small black and white snapshot of the last passenger train at Kew Railway Station in 1952. The photograph, one of 12, is part of a larger album of newspaper clippings, timetables, tickets and photos relating to the Kew Railway Line, taken and compiled by Lachlan Richardson, while a resident of Kew. The album dates from the 1950s. The album is part of a larger subject file on the Kew Line, compiled over time by members of the Kew Historical Society."The last train at Kew Station, August 1952"kew railway line, transport -- railways -- kew (vic.), kew branch line, kew railway station -
 Kew Historical Society Inc
Photograph - Kew Branch Line: Weeds at Kew Station 14/51
The Kew railway was opened in 1887, and diverged from the main (Box Hill–Lilydale) line about half-way between Hawthorn and Glenferrie. From the point of divergence the line was slightly less than one mile long, and it had only one intermediate station — Barker. There were four road over-bridges and two level crossings, including one over the busy Barkers Road. The line supported a passenger and goods service, and was electrified in December 1922, at the same time as the main line to Box Hill. There were a number of peak hour services which ran from Flinders Street station (Melbourne) to Kew, but in 1938 all but one of these were diverted to the Ashburton line, where traffic was growing. This had an adverse effect on Kew traffic, as passengers from Kew needed to cross over a footbridge at Hawthorn to change trains, and the main line trains were usually already crowded by the time they reached Hawthorn. At about the same time the off-peak trains were replaced by road buses. In 1952 all passenger trains were withdrawn, but the road bus service continued for many years. Goods trains were finally withdrawn in 1957, and the railway was dismantled in 1958-59. (Source: Frank Stamford, 'The Hawthorn - Kew Railway')Small black and white snapshot of how the Kew Branch Line was allowed to run down. The photograph, one of 12, is part of a larger album of newspaper clippings, timetables, tickets and photos relating to the Kew Railway Line, taken and compiled by Lachlan Richardson, while a resident of Kew. The album dates from the 1950s. The album is part of a larger subject file on the Kew Line, compiled over time by members of the Kew Historical Society.kew railway line, transport -- railways -- kew (vic.), barker railway station, kew branch line -
 Kew Historical Society Inc
Photograph - Kew Railway Station, May 1950
The Kew railway was opened in 1887, and diverged from the main (Box Hill–Lilydale) line about half-way between Hawthorn and Glenferrie. From the point of divergence the line was slightly less than one mile long, and it had only one intermediate station — Barker. There were four road over-bridges and two level crossings, including one over the busy Barkers Road. The line supported a passenger and goods service, and was electrified in December 1922, at the same time as the main line to Box Hill. There were a number of peak hour services which ran from Flinders Street station (Melbourne) to Kew, but in 1938 all but one of these were diverted to the Ashburton line, where traffic was growing. This had an adverse effect on Kew traffic, as passengers from Kew needed to cross over a footbridge at Hawthorn to change trains, and the main line trains were usually already crowded by the time they reached Hawthorn. At about the same time the off-peak trains were replaced by road buses. In 1952 all passenger trains were withdrawn, but the road bus service continued for many years. Goods trains were finally withdrawn in 1957, and the railway was dismantled in 1958-59. (Source: Frank Stamford, 'The Hawthorn - Kew Railway')Small black and white snapshot of Kew Railway Station inMay 1950. The photograph, one of 12, is part of a larger album of newspaper clippings, timetables, tickets and photos relating to the Kew Railway Line, taken and compiled by Lachlan Richardson, while a resident of Kew. The album dates from the 1950s. The album is part of a larger subject file on the Kew Line, compiled over time by members of the Kew Historical Society."Kew Railway Station, May 1950"kew railway line, transport -- railways -- kew (vic.), kew branch line, kew railway station -
 Kew Historical Society Inc
Photograph - Kew Railway Station, 1951
The Kew railway was opened in 1887, and diverged from the main (Box Hill–Lilydale) line about half-way between Hawthorn and Glenferrie. From the point of divergence the line was slightly less than one mile long, and it had only one intermediate station — Barker. There were four road over-bridges and two level crossings, including one over the busy Barkers Road. The line supported a passenger and goods service, and was electrified in December 1922, at the same time as the main line to Box Hill. There were a number of peak hour services which ran from Flinders Street station (Melbourne) to Kew, but in 1938 all but one of these were diverted to the Ashburton line, where traffic was growing. This had an adverse effect on Kew traffic, as passengers from Kew needed to cross over a footbridge at Hawthorn to change trains, and the main line trains were usually already crowded by the time they reached Hawthorn. At about the same time the off-peak trains were replaced by road buses. In 1952 all passenger trains were withdrawn, but the road bus service continued for many years. Goods trains were finally withdrawn in 1957, and the railway was dismantled in 1958-59. (Source: Frank Stamford, 'The Hawthorn - Kew Railway')Small black and white snapshot of Kew Railway Station in 1950. The photograph, one of 12, is part of a larger album of newspaper clippings, timetables, tickets and photos relating to the Kew Railway Line, taken and compiled by Lachlan Richardson, while a resident of Kew. The album dates from the 1950s. The album is part of a larger subject file on the Kew Line, compiled over time by members of the Kew Historical Society."Kew Station / 14/51 / 22/4/51 F5"kew railway line, transport -- railways -- kew (vic.), kew branch line, kew railway station -
 Vision Australia
Administrative record - Text, Royal Blind Society of NSW Council meeting minutes: 28/7/1997 - 18/12/2001, 1997-2001
These minutes contain information on attendees, meeting chairs, apologies, matters arising out of minutes, correspondence, subscriptions, donations and general business. Reports are also included from Reports for Honorary Treasurer, Chief Executive Officer (CEO), Council Committee, Information Services, Corporate Services, Accommodation Services, Rehabilitation, Marketing, Administration Support and Personnel. 25/8/1997 The President read a letter from the CEO, Mr. J. M. Isaacs formally advising of his resignation to take into effect from 31 December 1997. 24/11/1997 The President reported that Mr. John Landau was to be appointed to the position of CEO. 8/7/1997 The CEO advised the telephone based daily new service using interactive voice response technology developed by RBS was launched. 10/8/1997 it was reported the Queensland Talking Book Service (QTBS) was launched. 21/3/2000 The CEO reported that Ms. Jane Evans had been appointed as General Manager of the National Information Library Service (NILS). 18/4/2000 The CEO reported that one of the reasons for the creation of NILS was to combine the resources of RVIB and RBS to ensure an economical and smooth transition of both collections. 12/11/2001 The CEO reported that a meeting was held to discuss the merger of NILS and Vision Australia Foundation. 1 volume of sheets glued to pagesroyal blind society of nsw, national information library service -
 Bacchus Marsh & District Historical Society
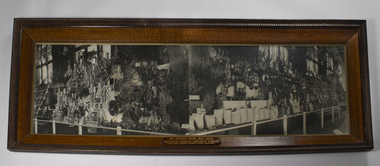
Photograph, The Prince's Show May 1920 Bacchus Marsh District Exhibit
During May through to July 1920 Prince Edward, later to become King Edward VIII of England toured Australia to thank the country for its support during World War One and to strengthen ties between Australia and the United Kingdom. He arrived in Victoria on the 26 May 1920 and on the 29 May attended a special agricultural show at the Royal Agricultural Showgrounds at Flemington. Bacchus Marsh district was invited to contribute to a display of agricultural produce and products which was displayed in the Government Pavilion at the Showgrounds. The display according to a newspaper report in the Bacchus Marsh Express on 5 June 1920 included 33 trays of fresh fruit, preserved fruit, pickles, sauces, bacon and other small goods, vegetables, hay grasses, grain, turned wood, wines and other drinks', &c., aided by pot plants, flags, draping of maroon and gold (official Exhibit colors) made up a color scheme and general effect worthy of the occasion. The Prince inspected the exhibit and expressed his admiration of it, his only regret was that he could not give more time to its examination. There was also 'an improvised "pheasant" nestling in one corner, and what "amazing" eyes it had!'. The organiser of the display was F. C. Minns, and the decorator was T. Stewart. This photograph is notable for its size and high quality framing. This signifies the importance the local community placed upon being chosen to participate in a major royal event and the desire to record this in a grand and elaborate way for posterity. Very large framed photograph of the agricultural produce and products from the Bacchus Marsh district displayed as part of a special exhibition for Prince Edward, the heir to the British throne when he visited Melbourne in May 1920. The display comprised a wide variety of produce such as fresh and preserved fruit, meats, vegetables, hay, grasses, grain, turned wood, wines and other drinks. The image is divided in the middle into two different angles of the display.A caption in gold lettering at the foot of the image reads 'The Prince's Show May 1920 Bacchus Marsh District Exhibit Royal Agricultural Society Showgrounds'royal visits, shows and exhibitions -
 Department of Energy, Environment and Climate Action
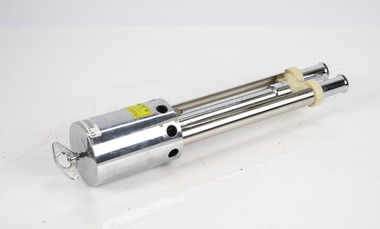
Relative Humidity Meter
Bushfire behaviour is influenced by many factors including temperature, relative humidity (RH), forest type, fuel quantity and fuel dryness, topography and even slope. Wind has a dominant effect on the Rate of Spread (ROS), as well as fire size, shape and direction. Temperature and relative humidity have major impacts on fuel dryness and therefore upon the availability of fuel for combustion. The amount of fine fuel available can increase rapidly from nearly zero when fuel moisture content is more than 16% after rain or a heavy morning dew, to many tonnes per hectare as fuel dries out later in the day and the moisture content drops below 9%. This explosive escalation in the amount of available fuel can happen over a few hours on hot and windy days. This device is used for determining air temperature and relative humidity. It contains two thermometers, one of which is covered with a wick saturated with ambient temperature liquid water. These two thermometers are called dry bulb and wet bulb. Once the thermometers to reach equilibrium temperatures the two thermometers are quickly read. The figures are then used to convert the dry bulb temperature TDB and the wet bulb temperature TWB into humidity information. The wet bulb temperature is approximately equal to the adiabatic saturation temperature. Relative humidity meter in wooden box two stainless steel tubes contain wet and dry thermometers A small clock drives a fan motor in the base to circulate airforests commission victoria (fcv), weather, bushfire