Showing 699 items matching "no 19 set"
-
 8th/13th Victorian Mounted Rifles Regimental Collection
Ceremonial object - Side drum
Side drum painted in colours indication it is part of a set related to the base drum marked as 8/13 Victorian Mounted Rifles.military, music, band, regimental, vmr -
 8th/13th Victorian Mounted Rifles Regimental Collection
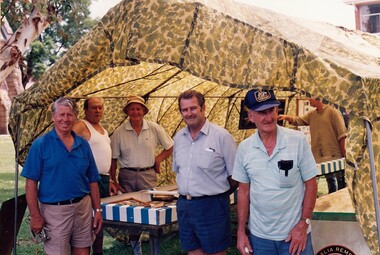
Photograph - Colour photograph of 5 men outside a display booth formed by a camoflaged parachute over a metal frame. Tables are set up displaying objects relating to Albury in WW11
Colour photograph of five men outside a display booth formed by a camouflaged parachute over a metal frame. Tables are set up displaying objects relating to Albury in WW1Lou Madjeric, Bill Woolford, Maurie Miles, Don Campbell, John Nealevmr, display, camouflage, buna barracks, albury -
 8th/13th Victorian Mounted Rifles Regimental Collection
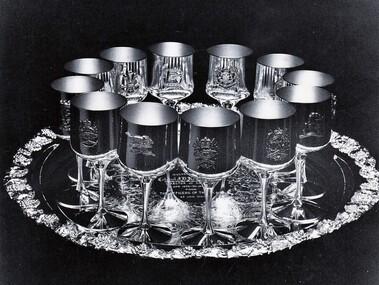
Photograph
Colonel J D ( Blue ) Keldie had a distinguished career in RAAC including service in Vietnam where he was awarded the Military Cross.Black and white photograph of a silver tray with set of twelve silver goblets each with the badge of an Armoured Corps regiment including 8/13 Victorian Mounted Rifles." Gift to Col. J.D. Keldie MC by the combined units of the RAAC on 22/1/81 on his farewell. He was Director during 179 - 80. -
 8th/13th Victorian Mounted Rifles Regimental Collection
Photograph
Colour photograph of two soldiers of A Squadron 8/13 VMR during Exercise ' Northern Explorer ' Trooper Pratt and Lance Corporal Van De Velde demonstrate how the F2 Radio set could be carried. In addition the men would have webbing, pack and rifle to carry. -
 8th/13th Victorian Mounted Rifles Regimental Collection
Document, May 1987
This document sets out the plan for a years training by an Army Reserve Unit.Typed document setting out the training directive for ' A ' Squadron 8/13 Victorian Mounted Rifles for the training year 1987 - 1988. Eight pages, dated May 1987 and signed by Officer Commanding Major J. Gay. -
 8th/13th Victorian Mounted Rifles Regimental Collection
Photograph
Members of the Women’s Royal Australian Army Corps (WRAAC) were posted to Army Reserve units in the 1980s and 1990s. They were rarely posted to Armoured Fighting Vehicles (AFVs) but were invaluable in the A1 Echelon driving fuel, ammunition, ration and water supply vehicles. Colour photograph of two WRAAC soldiers of 'A' Squadron 8/13 Victorian Mounted Rifles serving a meal from a BBQ set up on back of truck in A1 Echelon during field training. Private L. Cameron at left ; Private T. Roche, right. -
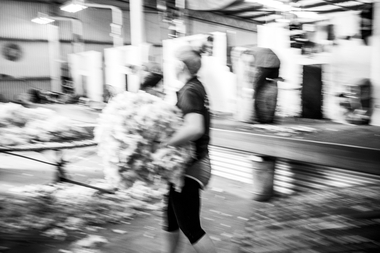
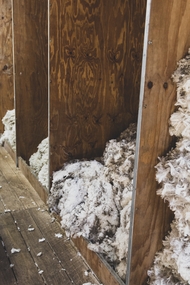 National Wool Museum
Photograph - 02 Wilkin, Nicole Marie, Women In Wool - Photographic Collection, 2018
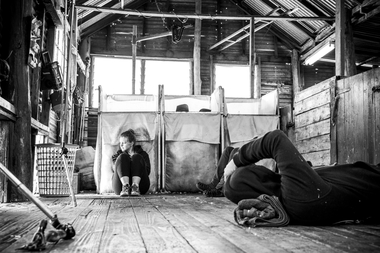
National Wool Museum exhibition in form of a series of portraits and a slideshow showcasing the women of Australia’s wool industry. Exhibition was launched on International Women’s Day 2019, featuring images by photographer Nicole Marie. Women In Wool The Australian wool industry would not be what it is today without the significant contribution of women. Often their role has been forgotten or underrepresented. Since colonial times, women have left their mark on the industry, such names as Eliza Forlonge, Elizabeth Macarthur and Anne Drysdale are examples of pioneering Australian women of wool. Traditionally woolsheds were claimed as the domain of men. In the past men would utter the phrase “ducks on the pond” as a cryptic warning to other male shearers that there were women in the sheds and they should watch their language and clean themselves up. But this segregation has changed. In recent years the role of women has increased dramatically across all aspects of the wool industry, but most significantly in woolsheds. Over the last decade the number of women in shearing sheds has almost doubled and it is set to increase further in the coming years. Today, in many sheds across Australia, sometimes women outnumber men when it comes around to shearing time. Women are active and important contributors to the prosperity of the industry. The portraits on show here are a celebration of the significant role of women in the industry. They are a diverse selection, including both young female shearers and experienced workers, ranging in age from 19 to 96. Many of the up-and-coming shearers started as rouseabouts and have stepped up to becoming shearers - one sitter for the project had just returned to the sheds after having a child only three-months before. Also on show are women who devoted decades of their lives to the industry and are only now becoming recognised for their vital role in Australian wool. Foreward by National Wool Museum Senior Curator - Dr. Luke Keoghvirtual imageswool, women in wool, nicole marie -
 National Wool Museum
Photograph - 03 Wendy, Nicole Marie, Women In Wool - Photographic Collection
National Wool Museum exhibition in form of a series of portraits and a slideshow showcasing the women of Australia’s wool industry. Exhibition was launched on International Women’s Day 2019, featuring images by photographer Nicole Marie. Women In Wool The Australian wool industry would not be what it is today without the significant contribution of women. Often their role has been forgotten or underrepresented. Since colonial times, women have left their mark on the industry, such names as Eliza Forlonge, Elizabeth Macarthur and Anne Drysdale are examples of pioneering Australian women of wool. Traditionally woolsheds were claimed as the domain of men. In the past men would utter the phrase “ducks on the pond” as a cryptic warning to other male shearers that there were women in the sheds and they should watch their language and clean themselves up. But this segregation has changed. In recent years the role of women has increased dramatically across all aspects of the wool industry, but most significantly in woolsheds. Over the last decade the number of women in shearing sheds has almost doubled and it is set to increase further in the coming years. Today, in many sheds across Australia, sometimes women outnumber men when it comes around to shearing time. Women are active and important contributors to the prosperity of the industry. The portraits on show here are a celebration of the significant role of women in the industry. They are a diverse selection, including both young female shearers and experienced workers, ranging in age from 19 to 96. Many of the up-and-coming shearers started as rouseabouts and have stepped up to becoming shearers - one sitter for the project had just returned to the sheds after having a child only three-months before. Also on show are women who devoted decades of their lives to the industry and are only now becoming recognised for their vital role in Australian wool. Foreward by National Wool Museum Senior Curator - Dr. Luke Keoghvirtual imageswool, women in wool, nicole marie -
 National Wool Museum
Photograph - 04 Katelynn, Nicole Marie, Women In Wool - Photographic Collection, 2018
National Wool Museum exhibition in form of a series of portraits and a slideshow showcasing the women of Australia’s wool industry. Exhibition was launched on International Women’s Day 2019, featuring images by photographer Nicole Marie. Women In Wool The Australian wool industry would not be what it is today without the significant contribution of women. Often their role has been forgotten or underrepresented. Since colonial times, women have left their mark on the industry, such names as Eliza Forlonge, Elizabeth Macarthur and Anne Drysdale are examples of pioneering Australian women of wool. Traditionally woolsheds were claimed as the domain of men. In the past men would utter the phrase “ducks on the pond” as a cryptic warning to other male shearers that there were women in the sheds and they should watch their language and clean themselves up. But this segregation has changed. In recent years the role of women has increased dramatically across all aspects of the wool industry, but most significantly in woolsheds. Over the last decade the number of women in shearing sheds has almost doubled and it is set to increase further in the coming years. Today, in many sheds across Australia, sometimes women outnumber men when it comes around to shearing time. Women are active and important contributors to the prosperity of the industry. The portraits on show here are a celebration of the significant role of women in the industry. They are a diverse selection, including both young female shearers and experienced workers, ranging in age from 19 to 96. Many of the up-and-coming shearers started as rouseabouts and have stepped up to becoming shearers - one sitter for the project had just returned to the sheds after having a child only three-months before. Also on show are women who devoted decades of their lives to the industry and are only now becoming recognised for their vital role in Australian wool. Foreward by National Wool Museum Senior Curator - Dr. Luke KeoghVirtual Imageswool, women in wool, nicole marie -
 National Wool Museum
Photograph - 05 Chloe, Women In Wool - Photographic Collection, 2018
National Wool Museum exhibition in form of a series of portraits and a slideshow showcasing the women of Australia’s wool industry. Exhibition was launched on International Women’s Day 2019, featuring images by photographer Nicole Marie. Women In Wool The Australian wool industry would not be what it is today without the significant contribution of women. Often their role has been forgotten or underrepresented. Since colonial times, women have left their mark on the industry, such names as Eliza Forlonge, Elizabeth Macarthur and Anne Drysdale are examples of pioneering Australian women of wool. Traditionally woolsheds were claimed as the domain of men. In the past men would utter the phrase “ducks on the pond” as a cryptic warning to other male shearers that there were women in the sheds and they should watch their language and clean themselves up. But this segregation has changed. In recent years the role of women has increased dramatically across all aspects of the wool industry, but most significantly in woolsheds. Over the last decade the number of women in shearing sheds has almost doubled and it is set to increase further in the coming years. Today, in many sheds across Australia, sometimes women outnumber men when it comes around to shearing time. Women are active and important contributors to the prosperity of the industry. The portraits on show here are a celebration of the significant role of women in the industry. They are a diverse selection, including both young female shearers and experienced workers, ranging in age from 19 to 96. Many of the up-and-coming shearers started as rouseabouts and have stepped up to becoming shearers - one sitter for the project had just returned to the sheds after having a child only three-months before. Also on show are women who devoted decades of their lives to the industry and are only now becoming recognised for their vital role in Australian wool. Foreward by National Wool Museum Senior Curator - Dr. Luke Keoghvirtual imageswool, women in wool, nicole marie -
 National Wool Museum
Photograph - 06 Tilly, Nicole Marie, Women In Wool - Photographic Collection, 2018
National Wool Museum exhibition in form of a series of portraits and a slideshow showcasing the women of Australia’s wool industry. Exhibition was launched on International Women’s Day 2019, featuring images by photographer Nicole Marie. Women In Wool The Australian wool industry would not be what it is today without the significant contribution of women. Often their role has been forgotten or underrepresented. Since colonial times, women have left their mark on the industry, such names as Eliza Forlonge, Elizabeth Macarthur and Anne Drysdale are examples of pioneering Australian women of wool. Traditionally woolsheds were claimed as the domain of men. In the past men would utter the phrase “ducks on the pond” as a cryptic warning to other male shearers that there were women in the sheds and they should watch their language and clean themselves up. But this segregation has changed. In recent years the role of women has increased dramatically across all aspects of the wool industry, but most significantly in woolsheds. Over the last decade the number of women in shearing sheds has almost doubled and it is set to increase further in the coming years. Today, in many sheds across Australia, sometimes women outnumber men when it comes around to shearing time. Women are active and important contributors to the prosperity of the industry. The portraits on show here are a celebration of the significant role of women in the industry. They are a diverse selection, including both young female shearers and experienced workers, ranging in age from 19 to 96. Many of the up-and-coming shearers started as rouseabouts and have stepped up to becoming shearers - one sitter for the project had just returned to the sheds after having a child only three-months before. Also on show are women who devoted decades of their lives to the industry and are only now becoming recognised for their vital role in Australian wool. Foreward by National Wool Museum Senior Curator - Dr. Luke Keoghvirtual imageswool, women in wool, nicole marie -
 National Wool Museum
Photograph - 07 Panels, Nicole Marie, Women In Wool - Photographic Collection, 2018
National Wool Museum exhibition in form of a series of portraits and a slideshow showcasing the women of Australia’s wool industry. Exhibition was launched on International Women’s Day 2019, featuring images by photographer Nicole Marie. Women In Wool The Australian wool industry would not be what it is today without the significant contribution of women. Often their role has been forgotten or underrepresented. Since colonial times, women have left their mark on the industry, such names as Eliza Forlonge, Elizabeth Macarthur and Anne Drysdale are examples of pioneering Australian women of wool. Traditionally woolsheds were claimed as the domain of men. In the past men would utter the phrase “ducks on the pond” as a cryptic warning to other male shearers that there were women in the sheds and they should watch their language and clean themselves up. But this segregation has changed. In recent years the role of women has increased dramatically across all aspects of the wool industry, but most significantly in woolsheds. Over the last decade the number of women in shearing sheds has almost doubled and it is set to increase further in the coming years. Today, in many sheds across Australia, sometimes women outnumber men when it comes around to shearing time. Women are active and important contributors to the prosperity of the industry. The portraits on show here are a celebration of the significant role of women in the industry. They are a diverse selection, including both young female shearers and experienced workers, ranging in age from 19 to 96. Many of the up-and-coming shearers started as rouseabouts and have stepped up to becoming shearers - one sitter for the project had just returned to the sheds after having a child only three-months before. Also on show are women who devoted decades of their lives to the industry and are only now becoming recognised for their vital role in Australian wool. Foreward by National Wool Museum Senior Curator - Dr. Luke Keoghvirtual imageswool, women in wool, nicole marie -
 National Wool Museum
Photograph - 08 Pinhole, Women In Wool - Photographic Collection, 2018
National Wool Museum exhibition in form of a series of portraits and a slideshow showcasing the women of Australia’s wool industry. Exhibition was launched on International Women’s Day 2019, featuring images by photographer Nicole Marie. Women In Wool The Australian wool industry would not be what it is today without the significant contribution of women. Often their role has been forgotten or underrepresented. Since colonial times, women have left their mark on the industry, such names as Eliza Forlonge, Elizabeth Macarthur and Anne Drysdale are examples of pioneering Australian women of wool. Traditionally woolsheds were claimed as the domain of men. In the past men would utter the phrase “ducks on the pond” as a cryptic warning to other male shearers that there were women in the sheds and they should watch their language and clean themselves up. But this segregation has changed. In recent years the role of women has increased dramatically across all aspects of the wool industry, but most significantly in woolsheds. Over the last decade the number of women in shearing sheds has almost doubled and it is set to increase further in the coming years. Today, in many sheds across Australia, sometimes women outnumber men when it comes around to shearing time. Women are active and important contributors to the prosperity of the industry. The portraits on show here are a celebration of the significant role of women in the industry. They are a diverse selection, including both young female shearers and experienced workers, ranging in age from 19 to 96. Many of the up-and-coming shearers started as rouseabouts and have stepped up to becoming shearers - one sitter for the project had just returned to the sheds after having a child only three-months before. Also on show are women who devoted decades of their lives to the industry and are only now becoming recognised for their vital role in Australian wool. Foreward by National Wool Museum Senior Curator - Dr. Luke Keoghvirtual imageswool, women in wool, nicole marie -
 Vision Australia
Photograph - Image, W.H. Paterson - Blind Cricketers of Australia, 1957
When the Victorian Blind Cricket Association approached Mr Paterson for assistance in gaining access to a permanent cricket pitch upon which games could be played, it set in chain a series of events that remain in place today. Mr Paterson had been heavily involved in the formation of the Association for the Blind and saw this as a problem to be solved. Raising money through public donation and door knocking, Mr Paterson arranged the purchase of land on the banks of Gardiner's Creek, and adjacent to the tram and train lines. The land was raised, to avoid flooding, and a surface prepared. The sportsground was adjacent to the AAB, however due to the interest of Malvern Council in the land and knowing that the AAB at that time was in financial difficulties, a Trust was set up to handle the management with Mr Paterson, Mr Gould the Malvern Council Town Clerk and George Maxwell as trustees. A clubhouse was also needed to allow players to take shelter during matches and once again, Mr Paterson came to the rescue. Using their personal funds, Mr and Mrs Paterson loaned the Trust the monies required for the building. This plaque recognises the dedication and support that Mr Paterson gave to help establish the first blind cricket playing ground in Australia.Digital image of metal plaqueErected to the Memory of W.H. Paterson, M.B.E. Obit. Feb. 19 1957 By his personal efforts and sacrifice these playing fields were obtained and this clubhouse erected The first for blind cricket in Australia Erected by the Blind Cricketers of Victoria October 22nd 1957william paterson, victorian blind cricket association -
 Lilydale RSL Sub Branch
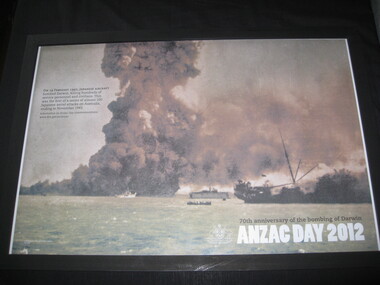
Poster - Anzac Day Poster 2012 #9, Anzac day 2012 - 70th Anniversary of Bombing of Darwin
Print of bombing of Darwin 19 February 1942 by Japanese aircraft. Shows several vessels loaded with ammunition, having been hit and set on fire in the harbour. Image from AWM collection AWM13495, issued by DVA 2012. -
Tarnagulla History Archive
Set of Maps (Mining & Local Area), various
David Gordon Collection. A set of mining documents, maps and plans: 1. Dunolly Deep Leads - showing location and names of deep lead gold deposits in region around Dunolly including at Tarnagulla and Newbridge. Geological Survey of Victoria, Department of Minerals and Energy. Bulletin No. 62, Map No. 4 Dunolly (770 x 485 mm). 2. Poseidon Lead (Facsimile) 3. Nick O Time Lead (Facsimile) 4. Happy Go Lucky Mine prospectus and plan (colour copy) 5. Jones Creek GM Co. (Raven & Gourlay's) Waanyarra - Prospectus (colour copy) 6. Poseidon Area Plan (colour copy) and Poseidon Area map (B&W copy). 7. Cross-section diagram of Spread Eagle Reef 8. New Birthday Gold Mine - area map (colour copy) and mine cross-section ( (colour copy). 9. Cross section of Poverty Reef, by Department of Mines (B&W copy, 2 parts on A2 paper) 10. Time-Lease Graph for Watts Reef, Specimen Reef, Stony Reef, Poverty Reef (second page in detail), created by Eric WIlkinson for Ref Mining NL, 1995 11. 1859 Plan of the Gold Workings & Township of Sandy Creek, Shewing the Mining Leases, Extended Claims & Machinery by R.J. McMillan, Mining Surveyor (B&W copy) 12. Longitundinal and Transverse Vertical Sections of Poverty Reef, Sandy Creek 1859, by R.J. McMillan, Mining Surveyor (B&W copy) 13. Tarnagulla Locality Plan (B&W copy) 14. Universal Grid Reference Map (Topographic) for Laanecoorie North (2 copies) 15. Universal Grid Reference Map (Topographic) for Inglewood South 16. Poverty Reef, Plan showing shafts and early tenements, created by Eric WIlkinson for Ref Mining NL, 1995 17. Locality Map of mining leases in Tarnagulla 18. Plan and Elevation of part of Poverty Reef, Sandy Creek, showing the claims and positions of the shaft. by R.J. McMillan, Mining Surveyor (Facsimile, composed of taped together components) 19.Plan and Elevation of part of Poverty Reef, Sandy Creek, showing the claims and positions of the shaft. by R.J. McMillan, Mining Surveyor (Facsimile, composed of taped together components) -
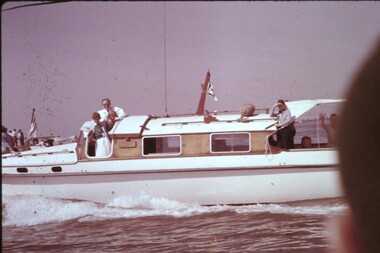 Melbourne Legacy
Slide, Operation Float 1961, 1961
A colour slide of children on a motor boat for Operation Float. Operation Float was an event run by Melbourne Legacy to take Junior legatees on an outing. It could have been to naval boats such as HMAS Cerberus or to a Yacht club. It gave the junior legatees the opportunity to see a naval boat in action, spend time on the water or try sailing. Part of a set of slides that are printed on Ektachrome and discoloured to a pink tinge. The year is possibly 1961 as one slide has the date on it. Was with many other slides taken in the 1950s and 1960s. The slides have been photographed to make digital images and moved to archive quality sleeves. In many cases the original images were not well focussed and the digital image the best available.A record of outings being organised for children.Colour slide of children on a motor boat in Kodak Ektachrome cardboard mount with yellow and blue print.Printed on front 'Made in USA' in blue ink. Embossed with slide number '19' in one corner. Printed on reverse "Kodak Ektachrome Transparency / Processed by Kodak" in blue ink.operation float, junior legatee outings -
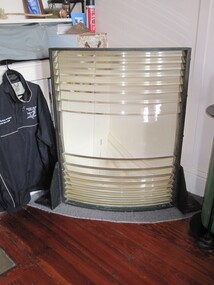 Parks Victoria - Gabo Island Lightstation
Lens section
Detached sector panel from upper lantern. The lens segment is one of a pair of freestanding panels that formerly stood on a platform in the upper lantern room on either side of a small fixed light. The platform rested above the 1860/62 Chance Bros. first order, fixed lens and could be accessed by a ladder. The two sector lens panels were each set in a bronze frame and comprised a curved wider (belt) piece in the centre with nine curved, slim line pieces above and below it (19 pieces in total). The belt aligned with the light source to provide optimal focus and range. The panels, the light and the platform were installed in 1934 to upgrade the original optical system with red warning lights. Fitting them above the lantern was a convenient and inexpensive way to do this, with each lens panel set up behind a red glass panel to project a red sector to the seaward over to Cape Howe and the Western Shore. The two sectors are likely to be Chance Bros. by manufacture although they do not appear to bear the maker’s name. This is probably because Chance Bros. typically fixed metal plaques to their apparatus and tended not to stamp smaller components such as their lens frames. It could possibly indicate that the two sectors are former components of a larger system, i.e. another lens. This can easily be confirmed by closely inspecting the bronze frames. A series of holes on the frame would indicate that ‘they would have bolted to other panels to make a larger lens assembly’. The absence of holes would confirm that ‘they were made specifically to stand alone’. The sector panels were removed from the Gabo lantern in February 1992. At some point after their removal, they were found in boxes marked with ‘Ince Pt.’, however it is thought that Ince Point lighthouse ‘never had … stand alone sectors’. The panel in the Gabo Island collection is one of two segments discovered at the Eden Killer Whale Museum in about 2007. One section was repatriated to Gabo Island and the other was to go to Smoky Cape Lighthouse in northern NSW. The Gabo lens segment has first level contributory significance for its historic value and provenance to the lantern room. It is recommended that Parks Victoria/AMSA seek to return the Smoky Cape segment to Gabo Island and reunite the sector panels.The Gabo lens segment has first level contributory significance for its historic value and provenance to the lantern room.Section of a lens from a lighting apparatus , rectangular louvers of glass enclosed in a metal frame. -
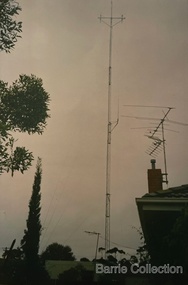 Melton City Libraries
Photograph, Antenna for Mount Cotterill Fire Brigades Group, Unknown
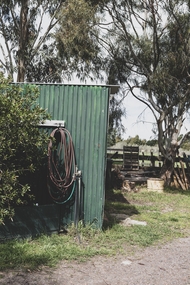
Erected 1974, dismantled 2000s. The Headquarters was operated from the family home at Ferris road at its inception, and in 1974 to the Barrie home at First Avenue Melton South. A storage office and Radio Tower was erected in the yard. A connection phone line was linked to the home of Wayne and Lynn Sullivan who lived at the rear in Kurrajong Cr later became LY remote. Wayne later became Communications Officer and the Headquarters moved location to the Melton Fire Station. The Mount Cotterill Group encompassed the Rural Fire Brigades of Melton, Rockbank, Sydenham, Toolern Vale, Truganina, and Werribee and later Diggers Rest. In the stage of transition from H.F.( High Frequency) to Very High Frequency some radio sets were non CFA Tankers when the group was established. Antenna was at 19 First Avenue, Melton.emergency services -
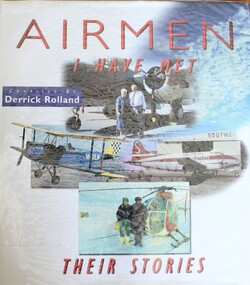 Wodonga & District Historical Society Inc
Book - Airmen I have Met - Their Stories, Derrick Rolland, 1999
... at the age of 19, Mr. Drage set about buying vintage aircraft that he ...This book includes biographies of 16 different airmen with whom the compiler has come in contact. They have had their own uniques experiences in aviation. 12 of them served in the Royal Australian Air Force (RAAF). One of the aviators featured in this publication is Joe Drage, Born on 10 July 1931 in Walwa, Joseph Gordon (Joe) Drage operated a timber mill and earthmoving business, but his great passion was aviation. After obtaining his pilot’s licence at the age of 19, Mr. Drage set about buying vintage aircraft that he feared would be sold overseas. He bought his first aircraft, a Tiger Moth in 1965. In 1972 he established Drage Historical Aircraft Museum on about 60 ha of land in Wodonga, with 5 planes. Over time this grew to 21 planes which Joe maintained so that they were all in flying order. His museum was the location for several air shows which included fly-ins by members of the Antique Aeroplane Association. The land occupied by the Museum was compulsorily acquired by the Albury-Wodonga Development Corporation and Wangaratta council bought the aircraft collection for about $2 million. They opened Drage Airworld in 1984. The cost of maintaining the collection became too much for the council which closed it down in 2002. Joe Drage died on 9 August 2017.This publication has a hard cover with a dust jacket. It consists of 191 pages, including 85 black and white and 12 coloured images.This book includes biographies of 16 different airmen with whom the compiler has come in contact. They have had their own uniques experiences in aviation. 12 of them served in the Royal Australian Air Force (RAAF). One of the aviators featured in this publication is Joe Drage, Born on 10 July 1931 in Walwa, Joseph Gordon (Joe) Drage operated a timber mill and earthmoving business, but his great passion was aviation. After obtaining his pilot’s licence at the age of 19, Mr. Drage set about buying vintage aircraft that he feared would be sold overseas. He bought his first aircraft, a Tiger Moth in 1965. In 1972 he established Drage Historical Aircraft Museum on about 60 ha of land in Wodonga, with 5 planes. Over time this grew to 21 planes which Joe maintained so that they were all in flying order. His museum was the location for several air shows which included fly-ins by members of the Antique Aeroplane Association. The land occupied by the Museum was compulsorily acquired by the Albury-Wodonga Development Corporation and Wangaratta council bought the aircraft collection for about $2 million. They opened Drage Airworld in 1984. The cost of maintaining the collection became too much for the council which closed it down in 2002. Joe Drage died on 9 August 2017.air pilots australia, aviation history, joe drage, joe drage airworld -
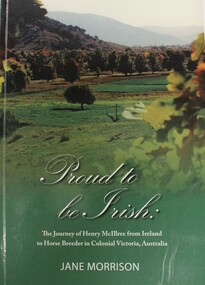 Wodonga & District Historical Society Inc
Book - Proud to be Irish: The Journey of Henry McIllree from Ireland to Horse Breeder in Colonial Victoria, Australia, Jane Morrison, 2019
Born in Belturbet, County Cavan, Ireland in 1824, McIllree was the youngest son of a large family. He achieved much after running away from home, aged just 14, to escape being sent into penury as a clergyman. By the time of his untimely death at Wodonga in 1882, McIllree had packed a lot into his life. He had sailed the high seas as an Able Seaman, toiled as a miner, run the Wodonga pound for 19 years, bought town blocks, set up a farm, a vineyard and a short- lived butchery business, served on local boards, appeared in court, leased and bought Upper Murray grazing lands, established a horse and cattle breeding enterprise at Biggara, taken horses to India for sale, and visited Aotearoa/ New Zealand’s Rotorua spas for a heart disease cure. Perhaps the most important even in his life was marrying a young Irish girl, Isabella Johnston from Belfast, at Wodonga in 1855. Their marriage produced 11 children, seven of whom have descendants living in Australia, Europe, Indonesia, Kiribati, the Philippines, and the United States of America.non-fictionBorn in Belturbet, County Cavan, Ireland in 1824, McIllree was the youngest son of a large family. He achieved much after running away from home, aged just 14, to escape being sent into penury as a clergyman. By the time of his untimely death at Wodonga in 1882, McIllree had packed a lot into his life. He had sailed the high seas as an Able Seaman, toiled as a miner, run the Wodonga pound for 19 years, bought town blocks, set up a farm, a vineyard and a short- lived butchery business, served on local boards, appeared in court, leased and bought Upper Murray grazing lands, established a horse and cattle breeding enterprise at Biggara, taken horses to India for sale, and visited Aotearoa/ New Zealand’s Rotorua spas for a heart disease cure. Perhaps the most important even in his life was marrying a young Irish girl, Isabella Johnston from Belfast, at Wodonga in 1855. Their marriage produced 11 children, seven of whom have descendants living in Australia, Europe, Indonesia, Kiribati, the Philippines, and the United States of America.henry mcillree, irish immigration, mcillree genealogy, wodonga pioneers -
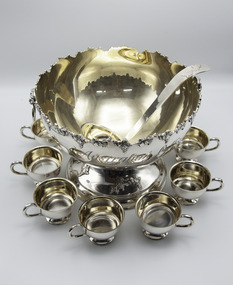 Victorian Harness Racing Heritage Collection at Lord's Raceway Bendigo
Memorabilia - Gold, Silver trophy, Mother Courage, 1999 Australian Oaks
Mother Courage (Stoneridge Scooter Imp P 1.50.8 - Talk To Me Vic P 1.59.6 (What's Next)) Bay Mare. Foaled 1995 (3rd Foal) Breeder/Owner: Castle Family Pty Ltd. Trainer B Morgan. Mother Courage raced from 1998 (2yo) through to 2003 (7yo). Career: 30 wins 19 seconds 9 thirds 81 starts $462,520 1.56.9 Winning Drivers: JJ Caldow (27) BR Gath (3). Won on 8 Tracks: Moonee Valley (14) Ballarat (6) Bendigo (2) Horsham (2) Maryborough (2) Kilmore (2) Hamilton (1) Mildura (1)Mother Courage won the 1999 Australian Oaks at Moonee Valley over 2060m at a mile rate of 1.58.6. Driven by JJ Caldow. Defeating Frosty Lady 2nd and Ok Rock NZ 3rd.Punch Bowl Set TrophyAustralian Oaks / Moonee Valley / Saturday 7 August 1999 / "Mother Courage"trophy, harness horse, mother courage, australian oaks, 1999, moonee valley, jj caldow, john caldow, bruce morgan, b morgan -
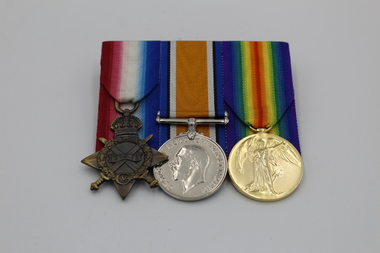 Charlton RSL Sub Branch
Medal - Set of 3 WW1 medals, Victory Medal 1914-19
... with ribbons Victory Medal 1914-19 Medal Set of 3 WW1 medals ...Three medals with ribbons1914-18 War Medal -
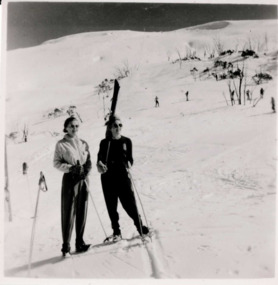 Falls Creek Historical Society
Photograph - Bogong, 1953
This photo is part of the Fred Griffith Photographic Collection documenting his time with the Australian Alpine Club and the formation of the Albury Ski Club. Frederick Charles “Fred” Griffith was born in Albury, NSW on 2 March 1910. Educated in Albury and Geelong Grammar. Beginning in 1927 he spent many years working first as a jackeroo and on a range of prominent pastoral and merino stud properties in NSW and Queensland. In 1935 he repurchased his former family property “Toonallook", Bowna, NSW and developed it to be the largest Romney Marsh stud in the world, exporting rams to Argentina. He introduced many innovative practices on his property including rabbit control measures and aerial crop dusting. He was an active member of the Albury Show Society and in 1949 established the Albury Sheep Show. Fred was also the Albury representative on the Graziers’ Association Council for over 30 years. He became a life member of both the Albury and Commercial Clubs. Fred’s greatest hobby was snow skiing. His first visit to the snow was to Kosciusko in 1919. The Albury Ski Club was formed in 1935 and Fred was an inaugural member. In 1949 they were granted a site at Falls Creek to build their own lodge. Fred guaranteed the Club for finance from the Bank of NSW. The first portion of the prefabricated building was constructed in Albury. It was transported to Falls Creek on the back of Fred’s truck and erected in one day. This was the bathroom section and the rest was completed in 1950. The original lodge was burned down in 1952 and a new one built the following year. In 1955, Fred also built the Bowna Lodge for his family in partnership with David Fairbairn. He became head of the North Eastern District Skiing Association (N.E.D.S.A.) and successfully applied to run the Australian Ski Championships. Fred also inaugurated children’s races at Falls Creek and ran them for about 20 years. He also formed the company “Falls Creek Ski Tows”. In 1956 Fred along with a group of key people selected the site for Thredbo Village. Fred and his brother sold Toonallook in sections between 1951 and 1974. He moved to Albury and set up as a landscape gardener and fencing contractor. After a serious work accident, Fred retired in 1985 and moved to Rosebud, Victoria where he died on 19 August 1992. This image is from the Fred Griffith collection which documents the early development of Falls Creek.Black and white square photograph of two people wearing snow gear in the snow. The person on the left is in a lighter coloured suit and holding a ski pole and the person on the right is in a dark suit and holding skis and ski pole. There are skiers in the background, where there is mostly snow-covered hill and small amount of sky above. Stamped - SUPER / G & D . SERVICE Pencil - 61bogong, falls creek, snow, snowfields, albury ski club, skiing, snow sports, fred griffith, australian alpine club, albury -
 Falls Creek Historical Society
Photograph - Bogong 12 July 1953
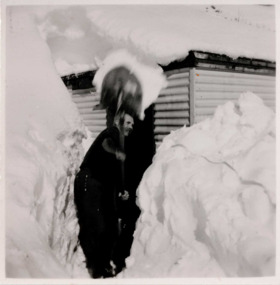
This photo is part of the Fred Griffith Photographic Collection documenting his time with the Australian Alpine Club and the formation of the Albury Ski Club. Frederick Charles “Fred” Griffith was born in Albury, NSW on 2 March 1910. Educated in Albury and Geelong Grammar. Beginning in 1927 he spent many years working first as a jackeroo and on a range of prominent pastoral and merino stud properties in NSW and Queensland. In 1935 he repurchased his former family property “Toonallook", Bowna, NSW and developed it to be the largest Romney Marsh stud in the world, exporting rams to Argentina. He introduced many innovative practices on his property including rabbit control measures and aerial crop dusting. He was an active member of the Albury Show Society and in 1949 established the Albury Sheep Show. Fred was also the Albury representative on the Graziers’ Association Council for over 30 years. He became a life member of both the Albury and Commercial Clubs. Fred’s greatest hobby was snow skiing. His first visit to the snow was to Kosciusko in 1919. The Albury Ski Club was formed in 1935 and Fred was an inaugural member. In 1949 they were granted a site at Falls Creek to build their own lodge. Fred guaranteed the Club for finance from the Bank of NSW. The first portion of the prefabricated building was constructed in Albury. It was transported to Falls Creek on the back of Fred’s truck and erected in one day. This was the bathroom section and the rest was completed in 1950. The original lodge was burned down in 1952 and a new one built the following year. In 1955, Fred also built the Bowna Lodge for his family in partnership with David Fairbairn. He became head of the North Eastern District Skiing Association (N.E.D.S.A.) and successfully applied to run the Australian Ski Championships. Fred also inaugurated children’s races at Falls Creek and ran them for about 20 years. He also formed the company “Falls Creek Ski Tows”. In 1956 Fred along with a group of key people selected the site for Thredbo Village. Fred and his brother sold Toonallook in sections between 1951 and 1974. He moved to Albury and set up as a landscape gardener and fencing contractor. After a serious work accident, Fred retired in 1985 and moved to Rosebud, Victoria where he died on 19 August 1992. This image is from the Fred Griffith collection which documents the early development of Falls Creek.Black and white square photograph of man shovelling snow in front of himself. There are high levels of snow either side of man and building in the background. Snow is on top of building. Stamped - SUPER / G & D . SERVICE Pencil - 61bogong, falls creek, snow, snowfields -
 Falls Creek Historical Society
Photograph - Bogong, 1953
This photo is part of the Fred Griffith Photographic Collection documenting his time with the Australian Alpine Club and the formation of the Albury Ski Club. Frederick Charles “Fred” Griffith was born in Albury, NSW on 2 March 1910. Educated in Albury and Geelong Grammar. Beginning in 1927 he spent many years working first as a jackeroo and on a range of prominent pastoral and merino stud properties in NSW and Queensland. In 1935 he repurchased his former family property “Toonallook", Bowna, NSW and developed it to be the largest Romney Marsh stud in the world, exporting rams to Argentina. He introduced many innovative practices on his property including rabbit control measures and aerial crop dusting. He was an active member of the Albury Show Society and in 1949 established the Albury Sheep Show. Fred was also the Albury representative on the Graziers’ Association Council for over 30 years. He became a life member of both the Albury and Commercial Clubs. Fred’s greatest hobby was snow skiing. His first visit to the snow was to Kosciusko in 1919. The Albury Ski Club was formed in 1935 and Fred was an inaugural member. In 1949 they were granted a site at Falls Creek to build their own lodge. Fred guaranteed the Club for finance from the Bank of NSW. The first portion of the prefabricated building was constructed in Albury. It was transported to Falls Creek on the back of Fred’s truck and erected in one day. This was the bathroom section and the rest was completed in 1950. The original lodge was burned down in 1952 and a new one built the following year. In 1955, Fred also built the Bowna Lodge for his family in partnership with David Fairbairn. He became head of the North Eastern District Skiing Association (N.E.D.S.A.) and successfully applied to run the Australian Ski Championships. Fred also inaugurated children’s races at Falls Creek and ran them for about 20 years. He also formed the company “Falls Creek Ski Tows”. In 1956 Fred along with a group of key people selected the site for Thredbo Village. Fred and his brother sold Toonallook in sections between 1951 and 1974. He moved to Albury and set up as a landscape gardener and fencing contractor. After a serious work accident, Fred retired in 1985 and moved to Rosebud, Victoria where he died on 19 August 1992. This image is from the Fred Griffith collection which documents the early development of Falls Creek.Black and white square photograph of two people wearing snow gear in front of a hut in deep snow, one person is sunken in the snow with back to camera and the person on the right is standing higher up on snow. Skis and ski poles are next to the people. Snowy hill with some greenery is in the background with sky. Stamped - SUPER / G & D . SERVICE Pencil - 61bogong, falls creek, snow, snowfields -
 Falls Creek Historical Society
Photograph - Bogong, 1953
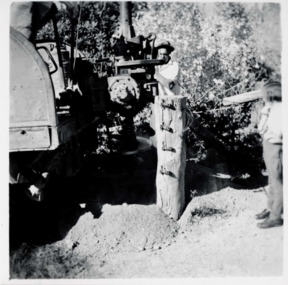
This photo is part of the Fred Griffith Photographic Collection documenting his time with the Australian Alpine Club and the formation of the Albury Ski Club. Frederick Charles “Fred” Griffith was born in Albury, NSW on 2 March 1910. Educated in Albury and Geelong Grammar. Beginning in 1927 he spent many years working first as a jackeroo and on a range of prominent pastoral and merino stud properties in NSW and Queensland. In 1935 he repurchased his former family property “Toonallook, Bowna, NSW and developed it to be the largest Romney Marsh stud in the world, exporting rams to Argentina. He introduced many innovative practices on his property including rabbit control measures and aerial crop dusting. He was an active member of the Albury Show Society and in 1949 established the Albury Sheep Show. Fred was also the Albury representative on the Graziers’ Association Council for over 30 years. He became a life member of both the Albury and Commercial Clubs. Fred’s greatest hobby was snow skiing. His first visit to the snow was to Kosciusko in 1919. The Albury Ski Club was formed in 1935 and Fred was an inaugural member. In 1949 they were granted a site at Falls Creek to build their own lodge. Fred guaranteed the Club for finance from the Bank of NSW. The first portion of the prefabricated building was constructed in Albury. It was transported to Falls Creek on the back of Fred’s truck and erected in one day. This was the bathroom section and the rest was completed in 1950. The original lodge was burned down in 1952 and a new one built the following year. In 1955, Fred also built the Bowna Lodge for his family in partnership with David Fairbairn. He became head of the North Eastern District Skiing Association (N.E.D.S.A.) and successfully applied to run the Australian Ski Championships. Fred also inaugurated children’s races at Falls Creek and ran them for about 20 years. He also formed the company “Falls Creek Ski Tows”. In 1956 Fred along with a group of key people selected the site for Thredbo Village. Fred and his brother sold Toonallook in sections between 1951 and 1974. He moved to Albury and set up as a landscape gardener and fencing contractor. After a serious work accident, Fred retired in 1985 and moved to Rosebud, Victoria where he died on 19 August 1992. This image is from the Fred Griffith collection which documents the early development of Falls Creek.Black and white square photograph of heavy machinery outside, a man wearing a hat is behind the machinery and operating it. A fence post is front right with a child standing (slightly blurred) to the right. Trees in the background. Stamped - SUPER / G & D . SERVICE Pencil - 61bogong, falls creek, snow, snowfields -
 Falls Creek Historical Society
Photograph - Bogong, 1953
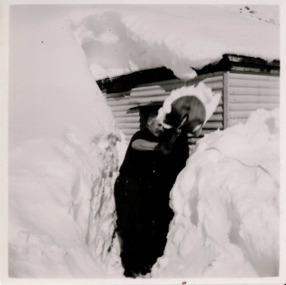
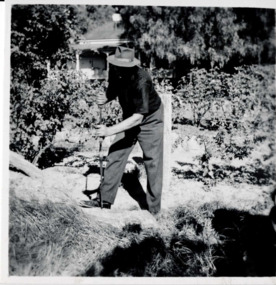
This photo is part of the Fred Griffith Photographic Collection documenting his time with the Australian Alpine Club and the formation of the Albury Ski Club. Frederick Charles “Fred” Griffith was born in Albury, NSW on 2 March 1910. Educated in Albury and Geelong Grammar. Beginning in 1927 he spent many years working first as a jackeroo and on a range of prominent pastoral and merino stud properties in NSW and Queensland. In 1935 he repurchased his former family property “Toonallook", Bowna, NSW and developed it to be the largest Romney Marsh stud in the world, exporting rams to Argentina. He introduced many innovative practices on his property including rabbit control measures and aerial crop dusting. He was an active member of the Albury Show Society and in 1949 established the Albury Sheep Show. Fred was also the Albury representative on the Graziers’ Association Council for over 30 years. He became a life member of both the Albury and Commercial Clubs. Fred’s greatest hobby was snow skiing. His first visit to the snow was to Kosciusko in 1919. The Albury Ski Club was formed in 1935 and Fred was an inaugural member. In 1949 they were granted a site at Falls Creek to build their own lodge. Fred guaranteed the Club for finance from the Bank of NSW. The first portion of the prefabricated building was constructed in Albury. It was transported to Falls Creek on the back of Fred’s truck and erected in one day. This was the bathroom section and the rest was completed in 1950. The original lodge was burned down in 1952 and a new one built the following year. In 1955, Fred also built the Bowna Lodge for his family in partnership with David Fairbairn. He became head of the North Eastern District Skiing Association (N.E.D.S.A.) and successfully applied to run the Australian Ski Championships. Fred also inaugurated children’s races at Falls Creek and ran them for about 20 years. He also formed the company “Falls Creek Ski Tows”. In 1956 Fred along with a group of key people selected the site for Thredbo Village. Fred and his brother sold Toonallook in sections between 1951 and 1974. He moved to Albury and set up as a landscape gardener and fencing contractor. After a serious work accident, Fred retired in 1985 and moved to Rosebud, Victoria where he died on 19 August 1992.Black and white square photograph of man shovelling snow with high levels of snow either side of him and a hut behind. There is snow on the roof of the hut. Stamped - SUPER / G & D . SERVICE Pencil - 61bogong, falls creek, snow, snowfields -
 Falls Creek Historical Society
Photograph - Bogong 12 July 1953
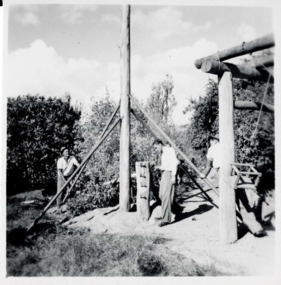
This photo is part of the Fred Griffith Photographic Collection documenting his time with the Australian Alpine Club and the formation of the Albury Ski Club. Frederick Charles “Fred” Griffith was born in Albury, NSW on 2 March 1910. Educated in Albury and Geelong Grammar. Beginning in 1927 he spent many years working first as a jackeroo and on a range of prominent pastoral and merino stud properties in NSW and Queensland. In 1935 he repurchased his former family property “Toonallook", Bowna, NSW and developed it to be the largest Romney Marsh stud in the world, exporting rams to Argentina. He introduced many innovative practices on his property including rabbit control measures and aerial crop dusting. He was an active member of the Albury Show Society and in 1949 established the Albury Sheep Show. Fred was also the Albury representative on the Graziers’ Association Council for over 30 years. He became a life member of both the Albury and Commercial Clubs. Fred’s greatest hobby was snow skiing. His first visit to the snow was to Kosciusko in 1919. The Albury Ski Club was formed in 1935 and Fred was an inaugural member. In 1949 they were granted a site at Falls Creek to build their own lodge. Fred guaranteed the Club for finance from the Bank of NSW. The first portion of the prefabricated building was constructed in Albury. It was transported to Falls Creek on the back of Fred’s truck and erected in one day. This was the bathroom section and the rest was completed in 1950. The original lodge was burned down in 1952 and a new one built the following year. In 1955, Fred also built the Bowna Lodge for his family in partnership with David Fairbairn. He became head of the North Eastern District Skiing Association (N.E.D.S.A.) and successfully applied to run the Australian Ski Championships. Fred also inaugurated children’s races at Falls Creek and ran them for about 20 years. He also formed the company “Falls Creek Ski Tows”. In 1956 Fred along with a group of key people selected the site for Thredbo Village. Fred and his brother sold Toonallook in sections between 1951 and 1974. He moved to Albury and set up as a landscape gardener and fencing contractor. After a serious work accident, Fred retired in 1985 and moved to Rosebud, Victoria where he died on 19 August 1992. This image is from the Fred Griffith Collection which documents early development of Falls Creek.Black and white square photograph of three men working on a tall wooden structure with a central tall pole. Trees and sky in the background, with grass in front and a wooden building structure at right of image. Stamped - SUPER / G & D . SERVICE Pencil - 61bogong, falls creek, snow, snowfields -
 Falls Creek Historical Society
Photograph - Bogong, 12 July 1953
This photo is part of the Fred Griffith Photographic Collection documenting his time with the Australian Alpine Club and the formation of the Albury Ski Club. Frederick Charles “Fred” Griffith was born in Albury, NSW on 2 March 1910. Educated in Albury and Geelong Grammar. Beginning in 1927 he spent many years working first as a jackeroo and on a range of prominent pastoral and merino stud properties in NSW and Queensland. In 1935 he repurchased his former family property “Toonallook", Bowna, NSW and developed it to be the largest Romney Marsh stud in the world, exporting rams to Argentina. He introduced many innovative practices on his property including rabbit control measures and aerial crop dusting. He was an active member of the Albury Show Society and in 1949 established the Albury Sheep Show. Fred was also the Albury representative on the Graziers’ Association Council for over 30 years. He became a life member of both the Albury and Commercial Clubs. Fred’s greatest hobby was snow skiing. His first visit to the snow was to Kosciusko in 1919. The Albury Ski Club was formed in 1935 and Fred was an inaugural member. In 1949 they were granted a site at Falls Creek to build their own lodge. Fred guaranteed the Club for finance from the Bank of NSW. The first portion of the prefabricated building was constructed in Albury. It was transported to Falls Creek on the back of Fred’s truck and erected in one day. This was the bathroom section and the rest was completed in 1950. The original lodge was burned down in 1952 and a new one built the following year. In 1955, Fred also built the Bowna Lodge for his family in partnership with David Fairbairn. He became head of the North Eastern District Skiing Association (N.E.D.S.A.) and successfully applied to run the Australian Ski Championships. Fred also inaugurated children’s races at Falls Creek and ran them for about 20 years. He also formed the company “Falls Creek Ski Tows”. In 1956 Fred along with a group of key people selected the site for Thredbo Village. Fred and his brother sold Toonallook in sections between 1951 and 1974. He moved to Albury and set up as a landscape gardener and fencing contractor. After a serious work accident, Fred retired in 1985 and moved to Rosebud, Victoria where he died on 19 August 1992.This image is from the Fred Griffith Collection which documents Falls Creek from the late 1940s to mid 1960sBlack and white square photograph of man outside holding a long tool into the ground, he is wearing a hat and his face is in the shadow. Trees and a house are in the background. Inscription on the reverse "Toonallook" was the name of Fred Griffith's property at Bowna, NSW.Stamped - SUPER / G & D . SERVICE Pen - Toonallookbogong, falls creek, snow, snowfields