Showing 940 items matching "used cars"
-
 Ballarat Tramway Museum
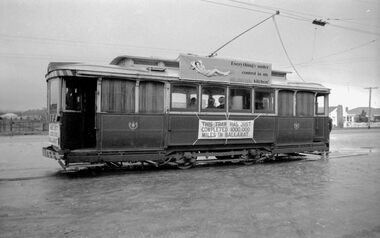
Photograph - Digital image, Mal Rowe, 29/06/1968 12:00:00 AM
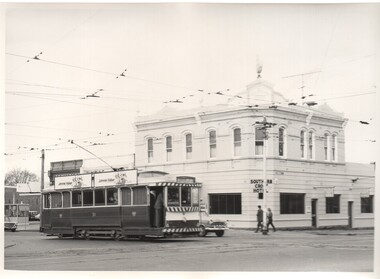
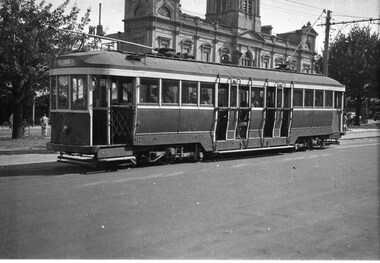
Yields information about the purported achievement of tram 27 reaching 1,000,000 miles and the TMSV Tour and the Sebastopol terminus.Digital image of a Black and white photograph of Tram 27 at Sebastopol terminus during the celebrations of the tram completing its "millionth" mile in Ballarat on Saturday 29 June 1968. Note the undeveloped land on the opposite side of Albert St and the overhead pan used to help centre the pole at night. Tram showing "Special", has banner "This tram has just completed 1,000,000 (million) miles in Ballarat" on the front of the tram during the TMSV Celebratory tour. See also Reg Items 1878 and 7990 to 7995 for other photos of the day by Mal Rowe. Note: A review of the tram car mileages by Dave Macartney, showed that it was actually 900,000, due to a carryover error.trams, tramways, tmsv, million miles, albert st, sebastopol, tram 27 -
 Ballarat Tramway Museum
Document - Report, Electric Supply Co. of Vic (ESCo), "Miles Run", c1921
Yields information about the passenger traffic in Ballarat, Bendigo during the mid 1920's? , Insurance, population and the use Fare Boxes.Report - typed, carbon copies, foolscap or quarto sheets, "Miles Run" listing , for both Ballarat and Bendigo, passengers tickets by Fare Box, Conductor, passenger per car mile, average fare, average speed, length of double and single track, passengers carried total, and population, and the public risk premium since fare boxes introduced. Use of Fare Boxes commenced in 1913, on this basis of 7 further years as noted in the sheet, c1921 6 copies held, all pinned together by paper type.trams, tramways, reports, passengers, ballarat, fare boxes, insurance, esco -
 Ballarat Tramway Museum
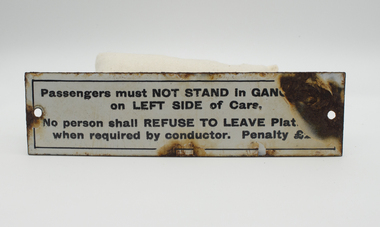
Sign - Warning Sign - Passengers must not stand, "Passengers must not stand..."
Sign advising passengers that they must not stand in gangways on the left side of cars and a penalty if refused to leave by the Conductor. The penalty appears to start with a 2. May not be relevant to SEC tramcars.Demonstrates signs used on tramcars to advise passengers of their behaviour.Enamel sign - black letters on a white base with screw holes at either end.signs, passengers, tramways, tramcars, btm, ballarat tramways -
 Ballarat Tramway Museum
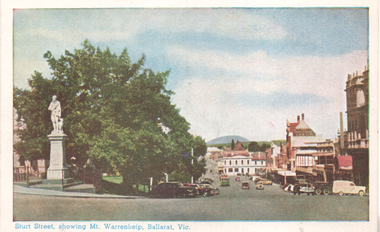
Postcard, Valentine & Sons Publishing Co, "Sturt Street showing Mt Warrenheip, Ballarat, Vic.", c1950
Coloured Postcard looking east along Sturt St south side from Lydiard St, with Mt Warrenheip in the view. A tram is parked in the loop. The Robbie Burns statue, Ballarat Gas Co and the Buckshead Hotel are in the view. Based on the cars, c1950. Published by Valentine Publishing Co. Demonstrates a coloured postcard produced by Valentine.Postcard - coloured - divided back, not used.sturt street, ballarat, mt warrenehip -
 Ballarat Tramway Museum
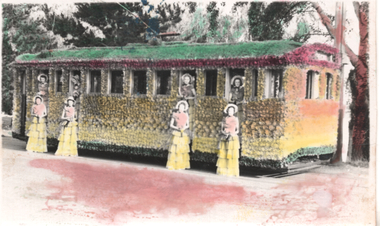
Postcard - 1939 Floral Tram, No. 29, Taylor & Taylor, March 1939
Photo features the 1939 Floral Tram, No. 29, photographed in Wendouree Parade, rendered in colour. March 1939. Has four ladies dressed in matching clothes standing outside the tram and four inside the doorways. See Item 7000 for a hand coloured image. with the ladies standing in the tram and 5188 for a digital image of the card. On the rear in pencil is "Ballarat No. 29, ex MMTB G class 152 former Fitzroy, Northcote and Preston Trust car. Car with waxed paper flowers and ran during the florale week March 1939. Car outside depot in Wendouree Parade. Colors are nearly approx to the real thing. Taylor & Taylor photo, Neg destroyed". Note written by Wal Jack and card sent to Ken Magor of Newcastle.Yields information about Ballarat 's 29 decorated for the 1939 Ballarat Floral Festival and its appearance and its use and publicity and demonstrates its colours of the flowers used.Postcard coloured, divided back, with a handwritten note on rear.See image 2 and notes for details of the handwritten note. tramways, trams, floral tram, tram 29, decorated trams -
 Ballarat Tramway Museum
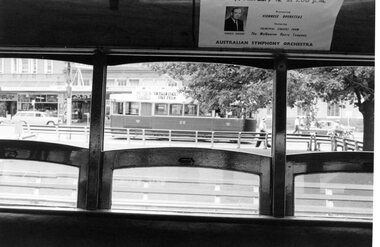
Photograph - Digital image Set of 6, George Coop, 1968 - 1970
Yields information about the interior views of the Ballarat tramcars and the driver's compartment.Six (6) Digital images taken by George Coop during the period 1968 - 1970, of the interior of trams. .1 - looking out of the open windows of a the saloon of a single trucker to the tram 28, at the City terminus. There is an Australian Symphony Orchestra interior advert. .2 - Looking through the open passenger door, with No. 17 behind. .3 - Looking from the saloon towards to the open end, no car number apparent. .4 - Looking at the driver's bulkhead with the used ticket box and a hand on the controller. .5 - View of the driver's compartment - T1F Controller, PV brake valve and "Pay as you enter" reversed. .6 - Close up of the Westinghouse T1F controller. trams, tramways, interiors, controllers, brake valves, signs, westinghouse, tram 17, tram 28 -
 Ballarat Tramway Museum
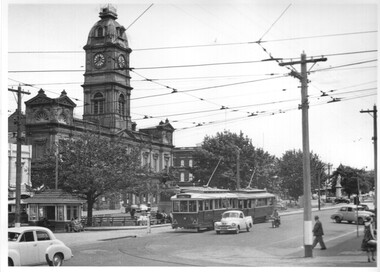
Photograph - Black & White Photograph/s, Charles Craig, 1950's
Yields information about the use of the appearance of City terminus and vehicles during the late 1950's.Black and white photograph of Ballarat tram 11 and another single trucker at the City tram stop, Sturt St, with the Town Hall in the background. Tram 11 has the destination of Mt Pleasant. In the view is the City Shelter and a number of Holden motor cars. Photo by Charles Craig possibly late 1950's. trams, tramways, sturt st, town hall, city, shelters, tram 11 -
 Ballarat Tramway Museum
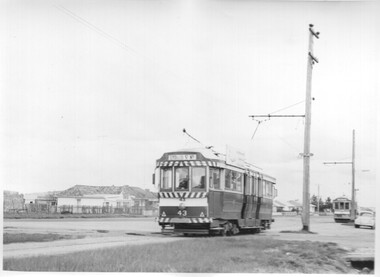
Photograph - Black & White Photograph/s, Charles Craig, early 1970's
Yields information about the use of the use of the Sebastopol line and the terminus during the last days of the SEC operated system when a number of Special trams were operated.Black and White photograph of two bogie cars at the Sebastopol terminus - No. 43 is on the way to Lydiard St North and the tram at the terminus, possibly No. 41 (see previous Reg item 6778) is waiting. The style of the houses at the terminus is in the background. Photo by Charles Craig possibly early 1970's. trams, tramways, albert st, sebastopol, tram 41, tram 43 -
 Ballarat Tramway Museum
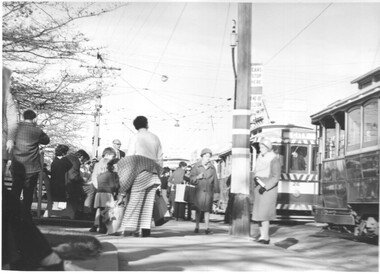
Photograph - Black & White Photograph/s set of 2, Charles Craig, early 1970's
Yields information about the use of the use of the City tram stop on the South side of Sturt St, during the last days of the SEC operated system.Set of two Black and White photographs of trams at the City terminus in Sturt St, south side, evening peak with many passengers boarding or leaving the tramcars. Shows the tram stop signage. .1 - tram 26 along with three other cars at the stop. No. 26 has the destination of City. .2 - tram 43 with the destination of Gardens via Sturt St west and the Commonwealth Bank in the background. Photo by Charles Craig possibly early 1970's. trams, tramways, sturt st, city, passengers, tram 17, tram 43 -
 Ballarat Tramway Museum
Photograph - Black & White Photograph/s - set of 5, Charles Craig, 1971
Yields information about the intersection of Sturt St and Drummond St and its use by trams in the period before the closure of the SEC system. Shows the Southern Cross Hotel.Set of five Black and White photographs of trams near the intersection of Sturt St and Drummond St South, Hospital Corner. All have the Southern Cross Hotel in the background .1 - No. 31 crosses Drummond St, Gardens via Sturt St West, with two Johnnie Walker Roof adverts. .2 - No. 40 turns from Drummond St South en route to Lydiard St North, while another bogie car waits. Both trams have an electric cooking roof advert. .3 - No. 17 crosses Sturt St with two bogie trams in the view - appears to have been taken before .2. Note the passengers getting off the tram on the south side. .4 - No. 21 turning into Drummond St south, with destination of Sebastopol. Tram has an electric cooking roof advert. .5 - No. 33 crosses Sturt St from Sebastopol while another tram waits at the Sturt St stop. Photo by Charles Craig - during 1971. trams, tramways, sturt st, hospital corner, drummond st sth, tram 31, tram 40, tram 17, tram 21, tram 33 -
 Ballarat Tramway Museum
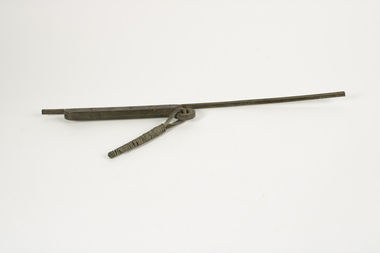
Functional Object - Trolley Wire Sample
Demonstrates the type of equipment used in overhead electrical collection parts and has a strong association with Ballarat trams..2 - Photocopy of the record cards "Car History", 10 sheets cut to size, giving dates, repairs, accidents, notes and maintenance of the tramcar.trolley wire, overhead, electrical equipment -
 Ballarat Tramway Museum
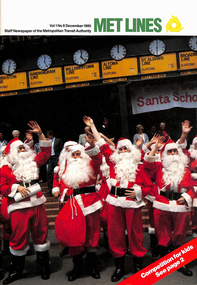
Magazine, Metropolitan Transit Authority (MTA), "MetLines - Vol 1, No. 9 December 1985", Dec. 1985
... No. 11. Gives a background to the cars, when they are used... 8, "Keeping tram lines clean" and "Scrubber Cars ...Magazine - 20 A4 pages centre stapled - titled "MetLines - Vol 1, No. 9 December 1985", staff newspaper of the Metropolitan Transit Authority. Has a number of "Santa Claus" on the front cover. Contains an article on page 8, "Keeping tram lines clean" and "Scrubber Cars" - featuring Frank Reale-Key posing in front of Scrubber 8W. Also has a photo of scrubber No. 11. Gives a background to the cars, when they are used, operated by Civil Branch. Gives hours of use and crews. On page 3 is a follow up to a question on a MTOC conductor with the large safety pins of the era.trams, tramways, scrubber tram, the met, conductors, track, mto co -
 Ballarat Tramway Museum
Negative, Wal Jack, Late 1930's to mid 1940's
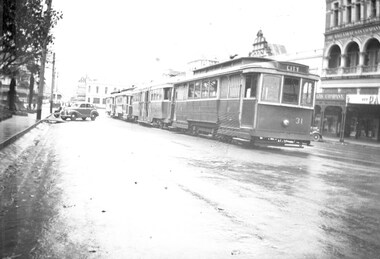
Yields information about the use of the City Loop during the late 1940s.Negative and Digital image of the Wal Jack Ballarat Negative file of a group of trams (3 single truckers and one bogie car) in City Loop late 1940's or early 1950s. Tram 31 (City) is at the head of the line up on a wet day. In the background is the Ballarat Gas Company building.trams, tramways, city loop, sturt st, tram 31 -
 Ballarat Tramway Museum
Negative, Wal Jack, 16/12/1945 12:00:00 AM
... the use of the bogie cars when first introduced to Ballarat. Trams ...Yields information about the use of the bogie cars when first introduced to Ballarat.Negative and Digital image of the Wal Jack Ballarat Negative file of a new bogie tram at the City stop in Sturt and Lydiard Sts, with the destination of Victoria St. The Town Hall is in the background. Most likely No. 22, based on Reg Item 5273 - 16/12/1945trams, tramways, city loop, sturt st, tram 22 -
 Ballarat Tramway Museum
Negative, Wal Jack, 14/03/1949 12:00:00 AM
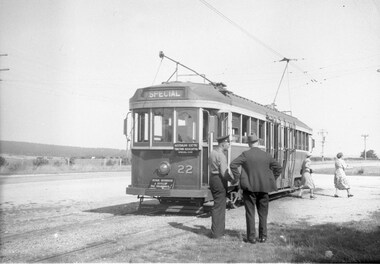
... the use of the bogie cars on a tour for the AETA ...Yields information about the use of the bogie cars on a tour for the AETA and the appearance of the Sebastopol terminus.Negative and Digital image of the Wal Jack Ballarat Negative file of No. 22 at the Sebastopol terminus running an AETA special, mid to late 1940's. Note the lack of housing behind the tram. Dated by G.Cleak - 14.3.1949 - Labour Day. Reg item 6764 has a photo of No. 22 at the depot.trams, tramways, aeta, tours, sebastopol, tram 22 -
 Ballarat Tramway Museum
Photograph - Colour Photograph/s, Darren Hutchesson, 8/01/1999 12:00:00 AM
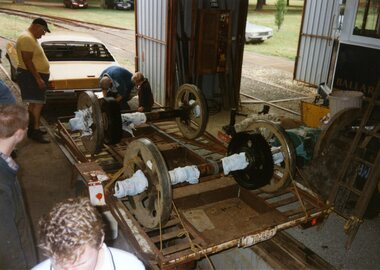
Colour photograph of BTM tram 28 wheels loaded onto a John Clowes supplied trailer for transport to AETM Adelaide on 8/1/1999 for reprofiling. In photo are John Clowes (standing by car), Stephen Butler, Simon Jenkins and Alastair Reither and two other people. Trailer positioned over pit in 5 road. Used in Feb. 1999 issue of Trolley Wire, page 41. Note spelling of John Clowes name in caption is "Clowes". Photo by Darren Hutchesson. Photo on AGFA Prestige paper.On rear of photo in blue ink "8/1/99 / Car 28, wheels/axles being loaded onto John Clowes' trailer for transport to out friends at AETM St Kilda - for reprofiling. / Photo: Darren Hutchesson"wheels, 28, aetm, btm, john clowes, tram 28 -
 Ballarat Tramway Museum
Slide - 35mm slide/s, Noel Simons, Sep. 1971
One slide on a Kodak Ready Mount made from the Association of Railway Enthusiast Provincial Tramways film strip, during September 1971 with a group of three trams at Charing Cross at dusk. Taken from an elevated position (the tower in the City Family Hotel) over looking the Alexandra fountain and looking towards the North on a wet evening. Two single truckers (1 possibly No. 6) and one bogie car waiting to proceed."Rainy evening at Charing Cross" in blue ink and "Sept 1971" in purple ink using a hand stamp.tramways, trams, charing cross, bendigo, tram 6 -
 Ballarat Tramway Museum
Slide - 35mm slide/s - set of 32, Noel Simons, 25/02/1971 12:00:00 AM
Set of 31 transparencies taken on 25/2/1972 on Kodak mounts. 1201.1 - Bendigo No. 26 in Bond St. just after leaving Long Gully en route for Quarry Hill. Has Norris Supermarket in background. Has two SEC roof ads. 1201.2 - No. 26 climbing View St. from Charing Cross en route to Eaglehawk. Has ANZ bank and AMOCO service station in background. 1201.3 - as for 1201.3, but after tram has passed photographer. Has buildings west of Mackenzie St. in photograph. 1201.4 - Tram stop and centre of the road pole with two "CARS STOP BY REQUEST" signs mounted on pole at the corner of Mackenzie St. 1201.5 - same position as for 1201.3, but with No. 5 descending the street. 1201.6 - same position as for 1201.2, but with No. 5 descending the street. Photo taken after tram has passed photographer. 1201.7 - No. 7 in Nolan St. from across the park at Lake Weeroona. 1201.8 - No. 7 entering McCrae St from Nolan St. - distant view. Note "TRAM "sign on left hand side under tree and overhead in McCrae St. from former track that once was in this street. 1201.9 - No. 7 in High St. with Cathedral in background. Tram en route to North Bendigo. Note scaffolding around Cathedral main spire area. 1201.10 - No. 7 crossing Bendigo Creek bridge in High St. near Golden Square. Has a Caltex Service station in the background. 1201.11 - No. 7 at Golden Square terminus with Sunburst Fruit Juices and a Peters Ice cream delivery vans alongside. 1201.12 - as for 1201.11 but photo taken from behind tram, with the end of the rails in the photograph. 1201.13 - No. 7 and 21 in Pall Mall at Charing Cross with No. 5 in the background. Taken some distance away from the location. 1201.14 - No. 7 at Golden Square terminus, taken a short distance from the tram terminus. Shows Milk Bar on right hand side and the hotel on the left hand side. Taken from the south side of the roadway. 1201.15 - as from 1201.14 but taken from the north side of the roadway. 1201.16 - No 5 waiting at California Gully loop. Distant photo showing surrounds 1201.17 - No. 5 en route for Quarry Hill crossing No. 26 at California Gully. 1201.18 - No. 26 at Eaglehawk terminus with Eaglehawk Town Hall and Post Office in background. 1201.19 - No. 21 arriving at Charing Cross en route to North Bendigo. Has Alexandra Fountain in the background, ANZ bank RACV building, and other buildings on the north side of Pall Mall or Nolan St. 1201.20 - No. 26 en route for Quarry Hill at Charing Cross, with crew standing by front door. Has Colonial Mutual life building, Armstrong Tyre Service (Firestone) and a sign for Cohns Drinks in the background. 1201.21 - as for 1201.20 but with No. 5 en route to Eaglehawk now in photograph. 1201.22 - No. 26 at Quarry Hill terminus. 1201.23 - No. 26 at Quarry Hill terminus, view of front portion of tram only from a gate at the Bendigo cemetery. 1201.24 - Track at the end of the Quarry Hill line showing the point blades of the former "Y" terminus and the overhead for this. 1201.25 - No. 2 at the Quarry Hill terminus, looking along the former Trackwork. 1201.26 - as for 1201.25 1201.27 - number not used. 1201.28 - Golden Square terminus from some distance from the actual terminus, showing the Warning sign "TRAM" for motorists from the south. No. 7 at the terminus. 1201.29 - No. 7 passing through the Golden Square shopping centre. Numerous cars and pedestrians. Tram en route for North Bendigo. 1201.30 - No. 7 in High St. Golden Square, en route for North Bendigo. Photo taken after tram has passed photographer. 1201.31 - No. 7 in High St. just past Wattle St. with the Cathedral in the background. Tram has two SEC roof ads good side on photo, 'Everything's fine in my all electric kitchen' and 'Electrical cooking - clean, quick, economical'. 1201.32 - No. 7 in High St. nearing Wattle St. Has Cathedral in the background. Photo taken after tram has passed photographer.Information written on in black ink and date stamped on purple ink. 1201.1 - "No. 26 in Bond St just after leaving Long Gully" 1201.2 - "No. 26 climbing View St. from Charing Cross" 1201.3 - "No. 26 ascending View St. from Charing Cross (At Mackenzie St.)" 1201.4 - "View St. & Mackenzie St." 1201.5 - "No. 5 in View St. near Mackenzie St." 1201.6 - "No. 5 in View St. nearing Charing Cross." 1201.7 - "No. 7 in Nolan St. seen from Lake Weeroona Park." 1201.8 - "No. 7 entering McRae St. from Nolan St. Note "TRAM" warning sign on left. 1201.9 - "No. 7 in High St. passing Short St." 1201.10 - "No. 7 crossing Bendigo Creek bridge in High St. near Golden Square." 1201.11 - "No. 7 at Golden Square terminus" 1201.12 - "No. 7 at Golden Square terminus" 1201.13 - "No 7, 21 and 5 at Charing Cross" 1201.14 - "No. 7 at Golden Square terminus" 1201.15 - "No. 7 at Golden Square terminus" 1201.16 - "No 5 waiting at California Gully loop." 1201.17 - "Nos. 5 and 26 crossing at California Gully loop" 1201.18 - "No. 26 at Eaglehawk terminus" 1201.19 - "No. 21 arriving at Charing Cross from Golden Square" 1201.20 - "No. 26 at Charing Cross" 1201.21 - "Nos. 5 and 26 at Charing Cross." 1201.22 - "No. 26 at Quarry Hill terminus" 1201.23 - "No. 26 at Quarry Hill terminus seen through the gates of the Bendigo Cemetery." 1201.24 - "Quarry Hill terminus showing remains for former double track layout abandoned before 1964." 1201.25 - "No. 2 at Quarry Hill terminus" 1201.26 - "No. 2 at Quarry Hill terminus" 1201.28 - "The Southern approach to Golden Square with No. 7 standing at the terminus, "TRAM" warning sign on the left. 1201.29 - "No. 7 passing through Golden Square Shopping Centre" 1201.30 - "No. 7 in High St. Golden Square" 1201.31 - "No. 7 in High St. passing Wattle St." 1201.32 - "No. 7 in High St. nearing Wattle St."tramways, trams, bendigo, bond st., view st., nolan st., high st., eaglehawk, california gully, charing cross, quarry hill, trackwork, tram 2, tram 5, tram 7, tram 21, tram 26 -
 Ballarat Tramway Museum
Slide - 35mm slide/s - set of 23, Noel Simons, 26/02/1972 12:00:00 AM
Set of 23 transparencies taken on 26/2/1972 on Kodak mounts. 1205.1 - Bendigo No. 25 on a special tour at Fire Station Loop, en route to Golden Square. 1205.2 - No. 21 and 25 crossing at Fire Station Loop, note photographers on the ground. No. 21 bound for North Bendigo. 1205.3 - as for 1205.3, but with trams departing loop and fire station in the background. 1205.4 - No. 25 at Golden Square Hotel with 'Rodda's Golden Square Hotel' in the background. Tram on a special tour, but showing destination of North Bendigo. 1205.5 - as for 1205.4 - but showing special. Has the end of the track in the photograph. 1205.6 - Nos. 7 and 25 (on a special tour) crossing at Myrtle St. Loop. 1205.7 - No. 7 leaving Myrtle St. loop with the mine poppet head in the background. Photo taken after tram has passed photographer. (Print made of this slide 10/2001 for use in the Gold Gold Gold exhibition of 10/2001 - See Reg. item 1979. 1205.8 - No. 25 entering depot. Tram showing 'special'. Tennis court on right has players. Photo taken after tram has passed photographer. 1205.9 - No. 24 (showing 'special') and No. 20 (showing 'Long Gully') at Bendigo Depot. 1205.10 - No. 24 on a special charter, leaving Bendigo depot. Tram has two 'Johnnie Walker' roof ads. 1205.11 - Bendigo depot with 29, 25 and a bogie car inside the depot doors. 1205.12 - As for 1205.11, but with 28 and 29. 1205.13 - No. 24 standing at front entrance of Bendigo depot with No. 20 in the background. 1205.14 - No. 24 running out into McCrae St showing special, with conductor on front step. 1205.15 - No. 24 in Caledonia St. at corner of Thunder St with the Gasworks in the background. 1205.16 - No. 5 en route for Quarry Hill at Charing cross with No. 26 (en route for Eaglehawk) about to arrive. Has former crossover at this location in the foreground. Has the Ezywalkin building in the background. 1205.17 - No. 5 and 26 at Charing Cross, with the Alexandra Fountain in the foreground and the Beehive and Ezywalkin buildings in the background. No.26 has two SEC roof ads. 1205.18 - Charing Cross looking along Pall Mall with trams 7 and 21 and 26 in the picture. 1205.19 - Charing Cross, with 21 departing for Golden Square and No. 5 heading for Quarry Hill. Has the Ezywalkin and the Beehive buildings in the background. 1205.20 - as for 1205.19, but a few moments later. Adjacent pole has a "NO ROAD" letter in reflectors vertically. 1205.21 - Charing Cross with Nos. 25, 21, 26 and 7, looking south from Pall Mall end. 1205.22 - No. 24 crossing Mitchell St. en route for Golden Square, showing 'special' with the Beehive and Ezywalkin buildings in the background. 1205.23 - Charing Cross with Nos. 24, 21 and 7 in the photo and Fountain Plaza in the background. Print of 1205.7 - stored in box D1.Information written on in blue ink and date stamped on purple ink. 1205.1 - "No. 25 at Fire Station Loop High Street, Golden Square." 1205.2 - "Nos. 25 and 21 crossing at Fire Station Loop, near Golden Square." 1205.3 - "Nos. 25 and 21 crossing at Fire Station Loop, near Golden Square." 1205.4 - "No. 25 at Golden Square terminus." 1205.5 - "No. 25 at Golden Square terminus." 1205.6 - "Nos. 7 and 25 crossing at Myrtle St. Loop." 1205.7 - "No. 7 leaving Myrtle St. Loop." 1205.8 - "No 25, entering Bendigo Depot." 1205.9 - "Nos. 20 and 24 at Bendigo Depot." 1205.10 - "No. 24 at Bendigo Depot." 1205.11 - "Nos. 25 and 29 at Bendigo Depot." 1205.12 - "Birney cars 29 and 28 at Bendigo Depot." 1205.13 - "No. 24 (with 20 beyond) at Bendigo Depot." 1205.14 - "No. 24 entering McCrae St. from Arnold St." 1204.15 - "No. 24 in Caledonia St. at cnr of Thunder St." 1204.16 - "No. 5 waits at Charing Cross as No. 26 arrives from Quarry Hill. Note remains of crossover abandoned on relocation in 1965." 1204.17 - "Nos. 5 and 26 at Charing Cross." 1204.18 - "Nos. 26, 7 and 21 at Charing Cross (No. 5 just visible behind No. 26)." 1204.19 - "No. 21 leaves Charing Cross for Golden Square as No. 5 starts off for Quarry Hill." 1204.20 - "No. 21 swings onto the single track Golden Square line as No. 5 heads into Mitchell St. towards Quarry Hill." 1204.21 - "Nos. 25, 21 and 26 watch No. 7 arrive at Charing Cross from Golden Square." 1204.22 - "No. 24 at Charing Cross crossing Mitchell St." 1204.23 - "Nos. 24, 21 and 7 at Charing Cross."tramways, trams, bendigo, golden square, myrtle st., fire station, depot, charing cross, tram 5, tram 7, tram 20, tram 21, tram 24, tram 25, tram 28, tram 29 -
 Ballarat Tramway Museum
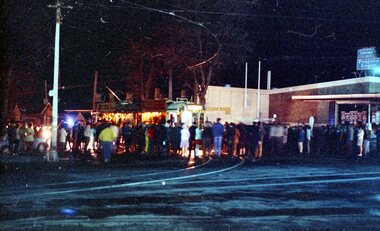
Photograph - Colour Photograph/s set of 2, David Endacott, 19/09/1971 12:00:00 AM
Two colour prints (Copies 1 and 2) of the scene at the Hospital Corner, Drummond St. Sth and Sturt St. after the running of the last tram from Sebastopol prior to running into the depot on 19 Sept. 1971. Shows one bogie tram No. 40 (from the advertising boards) with many people at the corner, a few cars and a police car leading the tram through the people standing around. Has the liquor store on the south west corner of the intersection in the background. Tram is heavily loaded with passengers. Copy 1 on Fujicolour Crystal Archive Paper is the better exposed and larger print and has been used in the scanned image.. Copy 2 another print off the same negative but with a smaller photograph area. Original film image scanned at 3200dpi 12/5/2020 and record revised. Image i2 - shows the crowd before the tram departed with a police escort. Image i3 - shows the scene as the tram departed with a police escort.On copy 2 - "The Last Tram at Drummond and Sturt Sts." in black ink.sebastopol, last tram, closure, hospital corner, tram 40 -
 Ballarat Tramway Museum
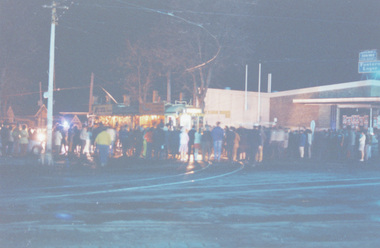
Photograph - Colour Photograph/s, David Endacott, 19/09/1971 12:00:00 AM
Two colour prints (Copies 1 and 2) of the scene at the Hospital Corner, Drummond St. Sth and Sturt St. after the running of the last tram from Sebastopol prior to running into the depot on 19 Sept. 1971. Shows one bogie tram No. 40 (from the advertising boards) with many people at the corner. Possibly taken after the police car has moved on, prior to the tram leaving for the depot after a few minutes. Has the liquor store on the south west corner of the intersection in the background. Tram is heavily loaded with passengers. Copy 1on Fujicolour Crystal Archive Paper is the better exposed and larger print and has been used in the scanned image.. Copy 2 another print off the same negative but with a smaller photograph area. Original film image scanned at 3200dpi 12/5/2020.On copy 2 - "Last tram to run in Ballaarat at Cnr Drummond & Sturt Sts on way to depot." in black ink.sebastopol, last tram, closure, hospital corner, tram 40 -
 Ballarat Tramway Museum
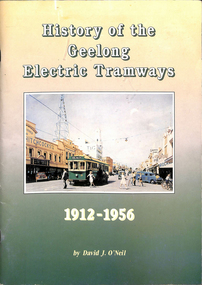
Book, David J. O'Neil, "History of the Geelong Electric Tramways", Jul. 1994
Eighty page book with heavy card covers A4 size. Colour covers with colour photo of No. 31 at Moorabool and Little Malop Streets, 1950. Contains index, notes on early Geelong Transport, Tramways, opening, decorated trams, Football and trams, People of the tramways, Conductresses, Tramway's staff, Yarns and Truthful (?) stories, The Tramway's Union, Closure, Tram car fleet disposal. Contains many black and white photos, stories and one map and plan of depot. Written by David (Dave) J. O'Neil On rear cover has a "Highton Newsagency" label with price of $24.95. Item scanned 28/4/2019 - btm1293i1.pdf to btm1293i3.pdf - three sections - text searchable when opened using a pdf editor.trams, tramways, geelong, provincial tramways, conductresses -
 Ballarat Tramway Museum
Book, Campbell Duncan, "Ballarat's Tramway Preservation Project", 1978?
Sixteen page book or booklet printed on A4 white paper, folded to A5 with saddle bound staples, titled "Ballarat's Tramway Preservation Project". Written by Campbell Duncan for the BTPS c1978, giving details of the history of Ballarat's tramways, and a brief history of Geelong and Bendigo, the formation and operations of the BTPS and the tramcar fleet. Has 10 photographs, 1 sketch of the front of a maximum traction tramcar and a map of the BTPS location on the rear. Map drawn by G. Inglis 2.73. Note no credits for photographs. See image files for photos used in book. Second edition - notes tram 28 has been repaired by the BTPS and this did not occur until 1978 - only gives 6 tramcars in list - we had others stored off site at the time. second copy added 1/1/12trams, tramways, btps, museum directory, car fleet, map -
 Ballarat Tramway Museum
Document - Photocopies, Alan Bradley, "One Man Farebox cars, tokens and statistics of the Ballarat Tramways", 18/07/2001 12:00:00 AM
Photocopies of an article written by Bob Prentice made by Alan Bradley in relation to the use of Fare Tokens by the Electric Supply Co. of Victoria - See Reg. Item 1794. Photocopies made 18.07.2001. Photocopy of the article from his collection. Comprises three sheets stapled together in top left hand corner. Article contains details of the use of tokens, colours of discs or lights used on trams while running on the various routes, fares, sections, fare box operation, and when and where tokens were issued. Includes a photograph of Barkly St. looking South from the fire station tower. Also gives details of tokens in use, cost of manufacture from other materials (Haxite and Crystalate) and the number in circulation. Has copy of an advertisement for the Southern Cross Hotel, S.A. Brabner, Proprietor, notes that all trams STOP. See Reg. Item 2514 for H.P. James notes on the token system.Parts of letter have been highlighted by Alan re tokens and other interesting points.trams, tramways, tokens, fares, tickets, esco, southern cross hotel, costs -
 Ballarat Tramway Museum
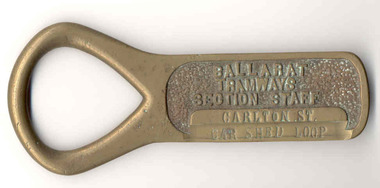
Functional Object - Section Staff, Electric Supply Co. of Vic (ESCo), "Carlton St - Car Shed Loop"
Demonstrates aspects of Safeworking on the Ballarat Tramway system from 1960 to c1936 when replaced by electric signs. Yields Information about the operation of Ballarat's trams and safeworking procedures.Cast brass item with a flat part recessed section with the words "BALLARAT TRAMWAYS SECTION STAFF" cast into the surface and a flat section underneath, flush with the outside edges in which the words "CARLTON ST. CAR SHED LOOP." stamped in. Has an open rounded end which forms a handle or a point where it could be hung on a peg. The part with the words "CAR SHED LOOP" appears to have been ground down and a previous location name taken out and replaced. Used a means of authorising a tramcar to have sole use of the track between the named points to avoid head on collisions. Safeworking object - known as a section staff. Not known when made, but in use until the introduction of the electric signalling in the mid 1930's by the SEC. See also Reg Items 934 and 988 for details of use and other examples are at 1851, to 53, 2473 and 4444 to 4448, , 4996 and 4497 and Reg item 934 and 988 for articles on the safeworking systems.trams, tramways, staff, safeworking, tramway staffs, sec, signals -
 Ballarat Tramway Museum
Photograph - Black & White Photograph/s, 14/01/1952 12:00:00 AM
Black and white photograph of Geelong Tramways, Scrubber or track cleaning tram in Ryrie St, at Moorabool St.. Taken by Keith Kings 14/1/1952. Note the 'Safety Zone' signs and arrangements. Stamp on rear, purple ink 'K.S. Kings No. F(k)(14) Copyright Reserved', with number hand written in using blue ink. Also written on back of photograph "Geelong / Track cleaning car. / Ryrie St. at Moorabool St., City / 14/1/52."trams, tramways, scrubber tram, track cleaner, geelong, safety zone, tram scrubber -
 Ballarat Tramway Museum
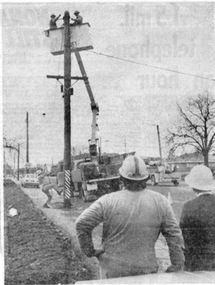
Newspaper, The Courier Ballarat, "Tram change uneventful", 24/08/1971 12:00:00 AM
Newspaper clipping pasted onto a single sheet of paper with two Punch holes on the left hand side with one hole through the photograph within the cutting. Clipping from The Courier, Ballarat, 24/8/1971, about the first stage of Ballarat's changeover from trams to buses passes uneventfully yesterday with only minor difficulties being reported. Quotes Transport Regulation Boards Regional Office, Mr. A. Stott, a few parking problems with cars in bus bays, demand for timetables. Also has a quote from the director of Davis Bus Lines, about minor problems - passengers asking questions. Has a photograph of the SEC linesman dismantling overhead in Victoria St., as a trail. A gang from Melbourne will come to Ballarat early in September to pull down all the lines. Newspaper cutting published on the Tuesday. 2nd copy added 14/11/2002In red ink in upper right hand corner, "24/8/71" On sheet of paper, various pencil markings - with date Dec. 1963. Possibly paper used by Donor at his job with the former machinery makers, Ronaldson and Tippet.trams, tramways, closure, bus changeover, overhead, dismantling -
 Ballarat Tramway Museum
Poster, Ballarat Tramway Preservation Society (BTPS), Ballarat Vintage tramway sales poster, c1980
Ballarat Vintage Tramway sales poster for use in trams, roof ad., laminated fawn coloured sheet, single sided, advertising sales items and display cases - backed onto heavy cardboard which was part of a former or older sales poster, in particular post cards, button badges, and car sticker. Old poster was orange colour - has been cut on one side. Post card of tram 26, and 27/38, most ripped off. Half car sticker and overlays of price changes. Has holes where button badges were placed. Images added 20-12-2016.trams, tramways, btps, posters, roof ads, sales -
 Ballarat Tramway Museum
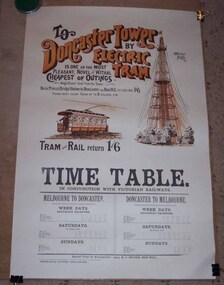
Poster, City of Box Hill, Box Hill Tramway, 1989
Reproduction of a wall poster used by the Box Hill - Doncaster Tramway, includes sketch of Doncaster Tower, one of the tram cars and timetable. Printed in two colours on heavy cartridge paper. Printed for centenary of tram by the City of Box Hill? Was Australia's first electric tramway. See also reference for further information on the tramway itself. Copy 2 - ex the ARHS Vic. Division June 2000. Hi Res scan made for MoV July 2012. See Item 351, "Know Your City - Box Hill - Doncaster Tram" 1974, by the City of Box Hill. trams, tramways, box hill, posters, timetables, doncaster -
 Ballarat Tramway Museum
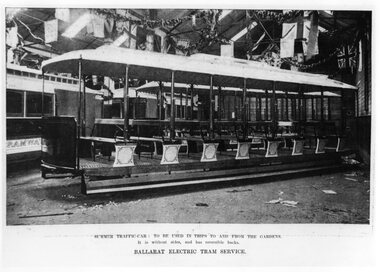
Photograph - Black & White Photograph/s - set of 2, 1905
... in caps) "Summer Traffic Car: to be used in trips to and from... Traffic Car: to be used in trips to and from the Gardens ...Black & White Photograph of one of the ESCo Toastracks being assembled in the Exhibition Buildings in Grenville St., north of the Alfred Hall in 1905. The other open Toastrack or Summer tramcar is behind this tram, with other California Combination cars on the sides. The trams have yet to be fitted with wheels or equipment, including headlights. Note the front dash panel has been painted, but no headlight opening or cut out. The print for this photograph made from a copy negative of page 454 of the Australasian, August 19, 1905 in 1993. Print includes caption (all in caps) "Summer Traffic Car: to be used in trips to and from the Gardens. It is without sides, and has reversible backs. Ballarat Electric Tram Service". See Reg. Item No. 763. Copy 1 made for No. 12 display 3/99. 754.1 - added 6/12/2004. Same print with details of source written on the rear. ARHS Vic. Div. Photo Number 771/24, ex Latrobe Library. Not as good as print as above. See Alan Bradley, draft Chapter 3, of the history of Ballarat Tramways.trams, tramways, esco, tramcar construction, exhibition buildings, ballarat, toastrack tram , tram 19 or 20