Showing 1639 items
matching australia square
-
 Lara RSL Sub Branch
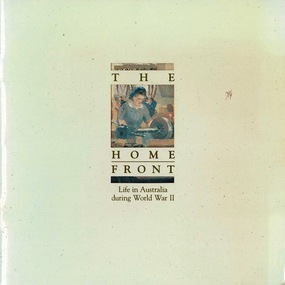
Book, The Home Front, 1991
This book 'The Home Front' Life in Australia during WW11, is a collection of stories from those remaing in Australia during WW11.This book is an original, it was produced by Australia Post and deplict's the life of Australians during WW11.A square book, light brown heavy cardboard cover, 36 heavy paper pages, two oblongs and one square cut out on the font cover.Australia Post 1991, Produced by Sprintpak Pty Ltd.the home front, life in australia during ww11, book, australia post -
 Bendigo Military Museum
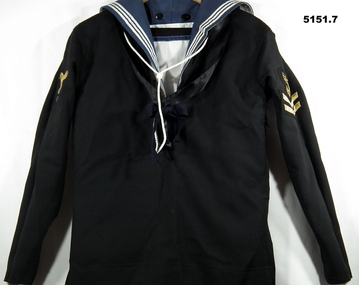
Uniform - UNIFORM, RAN - Winter Ceremonial, RED ANCHOR TAILORING CO
Royal Australian Navy Uniform belonging to E Rayner. Sailor cap/lid belonged to LS MTP Ross.1. Jumper/Barathea - Long sleeve, black wool/polyester fabric. Insignia - left sleeve depicting rank - right sleeve - depicting category. 2. Trousers - bell bottom, black wool/polyester fabric. 3. Shirt - white polyester/cotton fabric, short sleeve, navy blue trim to square neckline. Insignia on left sleeve. 4. Collar - Navy blue with three white stripes, cotton fabric - lined. 5. Silk - black polyester fabric. 6. Bow - Navy blue cotton tape. 7. Lanyard - white cotton cord. 8. Lid - Sailor's cap - white plastic with black band with Navy blue chin strap.1 & 2. Maker's label - Red and white print. Hand embroidered red cotton "E. RAYNER". 3. Handwritten blue ink "44" on back of neckline. 4. stamped in black ink " E.W. RAYNER", makers label. 8. Handwritten, black ink "LS MTP ROSS" inside on crown. Tally band embroidered gold thread "H.M.A.S. CERBERUS' on black band.uniform, ran -
 Bendigo Military Museum
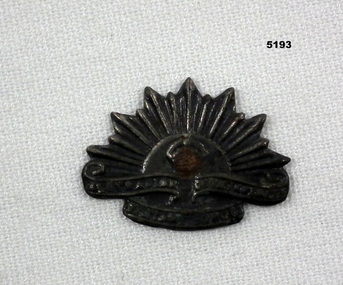
Uniform - BADGE, RISING SUN
See Cat 5192This appears to be a small, pressed tin badge. The pattern is that of the Rising Sun with a crown. There are two banners at the bottom with the words: - " Australian Commonwealth Military Forces". There is a small patch of corrosion on the crown. There is no sign of mounts on the badge on the rear, only a square piece of solder.badge, rising sun, australian army -
 Bendigo Military Museum
Souvenir - WALL HANGING, EMBROIDED SILK, 1919
Square silk embroidered wall hanging with light and dark blue triangles. In multi colours with cream cotton lace borders on all sides."Australian Commonwealth 1919 Military Forces, Souvenir of Egypt, 4th L.H. " To my Dear Wife From Your Loving Husband Dick" souvenir, textile, silk, lace -
 Bendigo Military Museum
Photograph - PHOTOGRAPH, BCOF, c 1944 - 1956
These relate to the WW2 and Post War service of VX112283 "Keith Charles Buckley" - Major1. Photo of an Australian Major of RA Sigs - in BCOF signing a document. Beside him is an Australian soldier and an Asian Gentleman. Behind them are cups and saucers. On the table is a round stamp or blotter. The Major is wearing Campaign medals. 2. Photo of the same conference from a different angle. 2 Australians, 5 Asian gentlemen. The Major and the mature Asian Gentleman are signing documents. The Australians are in winter dress. The civilians are in suits with ties, The table is a large square one with turned wooden legs.photos, ww2, signing of documents -
 Bendigo Military Museum
Accessory - BAG, LIGHT HORSEMAN, LEATHER, C1914-1919
1.) Leather bag cylindrical shape with fixed ends and opening flap on side. There are two straps that hold the bag close. 2 brass rings on the rear side of the bag. Function- to be used to carry spare horse shoes. .2). Iron nails- these appea to be handmade,square shafted nails.australian light horse, leather bag, horse shoe nails -
 Bendigo Military Museum
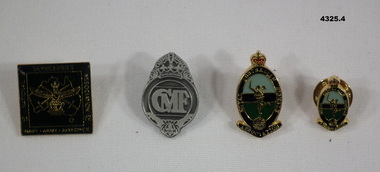
Badge - BADGES, VARIOUS, post 1956 onwards
Items in the collection re MAX Jolliffee, refer Cat No 4322.3 for service details..1) Badge metal square shape blue with gold trim and text, one pin on rear. .2) Badge metal silver colour black background crown at top, centre has the letters "CMF". .3) Badge metal centre oval shape, colours gold, black, two blues, crown at top, centre figure boomerang at bottom, one pin on rear. .4) Badge, miniature of .3).1) "National Servicemens Association 51 - 72 Navy Army Airforce". .3) .4) Royal Australian Signals Association".badges, association, cmf -
 Bendigo Military Museum
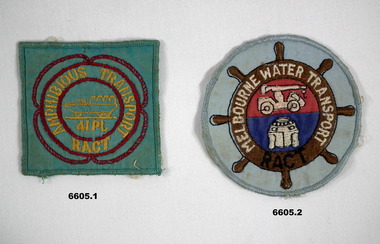
Badge - UNIT BADGES, RACT
Badges used to identify units within the RACT (Royal Australian Corp of Transport).1. Square material blue patch with red round borders and yellow writing and picture of a vehicle. Other side, white felt. 2. Round light blue patch with brown spoked boat wheel. White writing and inside wheel picture of white crane vehicle on red background and white machine on blue background.1. Embroidered "Amphibious Transport RACT"and "41 PL". 2. Embroidered "Melbourne Water Transport RACT".passchendaele barracks trust collection., ract, cloth badges -
 Bendigo Military Museum
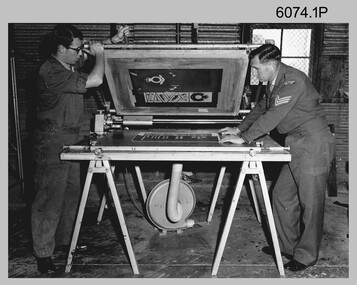
Photograph - Lithographic Technicians Screen Printing at the Army Survey Regiment, c1970s
These two photographs were most likely taken in the 1970s at the Army Survey Regiment’s Drill Hall Golden Square, Bendigo. The photos are annotated with the name of the technicians written on the back. In these photos the technicians are performing screen printing tasks.This is a set of photographs of lithographic technicians using screen printing equipment at the Army Survey Regiment, Bendigo from c1960s to c1980s. The photographs were printed on photographic paper and are part of the Army Survey Regiment’s Collection. The photographs were scanned at 300 dpi. .1) - Photo, black & white, c1970s, L to R: Bruce Appleford, SGT Evan Giri, Lithographic Squadron .2) - Photo, black & white, c1970s, Ian ‘Lofty’ Turner, Lithographic Squadron.1 to .2 – personnel names (less rank) annotated on back. royal australian survey corps, rasvy, army survey regiment, army svy regt, fortuna, asr, litho, printing -
 Bendigo Military Museum
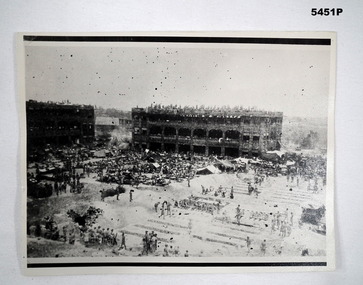
Photograph - PHOTOGRAPH, SELARANG BARRACKS, BRITISH AND AUSTRALIAN ARMY, Original 1942 copy ?
REF CAT 5445.2 FOR DETAILS Photograph- Black and white. It is very spotty, shows old building, tents and lots of allied POWS messing about in the sun. Long trenches have been dug in the square next to the tents.Rear of photograph- “SELARANG BARRACKS 42303. ALL TROOPS WERE PUT HERE FOR REFUSING TO SIGN NO ESCAPE FORMS.”ww2, pow, singapore -
 Bendigo Military Museum
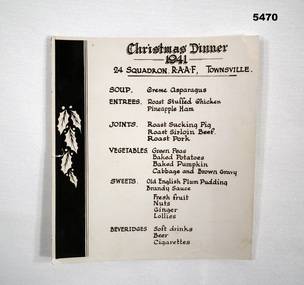
Programme - MENU, 1941 CHRISTMAS DINNER, Royal Australia Air Forces, 1941
Programme- has been done in the form of square photograph. Black and white. On the left is black stripe within which is a white symbolic bunch of holly leaves.Rear- 26 signatures mostly written in ink. At least six signatures show officers rank.ww2, r.a.a.f, christmas 1941, 24 sqn -
 Bendigo Military Museum
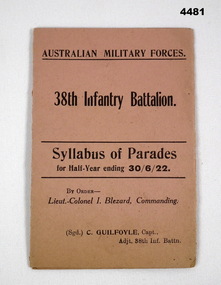
Pamphlet - 38th BN TRAINING SYLLABUS 1922, Australian Military forces, C. 1922
The 38th Battalion was classed as “Bendigo’s own”. The contents cover the Coy’s of the Battalion being; A Coy, HQ, Band, MG Pl, B Coy Golden Square, C Coy Eaglehawk, D Coy, Echuca, Deniliquin, Rochester, Kerang and Swanhill for the parade times half year ending 3.6.1922.Pamphlet, folds out to 3, pink colour, all pages are in black print, front has name of Battalion, Training date ending plus Officer Commanding details, adjutants details, inside has details of “Company” training times and dates, rear page has some.On front, “Lieut Colonel I.Blezard Commanding”. “C. Guilfoyle Capt Adjutant 38th INF Battn”38th inf battn, training syllabus, parades -
 Bendigo Military Museum
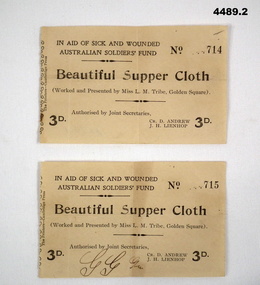
Flyer - RAFFLE TICKET, Beautiful Supper Cloth Raffle, c.1914 - 18
These tickets are believed to be WW1 era..1) Raffle tickets in Aid of Sick/Wounded Australian Soldiers Fund, yellowed colour, all type in black print, donated prize by Miss L.M. Tribe of Golden Square (Bendigo) price 3 pence. .1) ticket No 714, .2) ticket No 715..2) on front in black pen, "GG Gu"supper cloth, flyer, raffles -
 Bendigo Military Museum
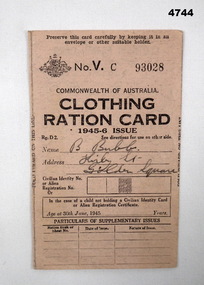
Accessory - CARD, CLOTHING RATION, Commonwealth of Australia, C.1945
Item relates to Cat No 4743.4Clothing Ration card pinkish colour rectangular shape all printing in black, Issue No.V.C 93028 1945 - 46, hand writing in black pencil, rear has directions for use. The actual tear off section of the card is missingIn pencil,” B Bubb Kirby St Golden Square”clothing ration, accessory -
 Lara RSL Sub Branch
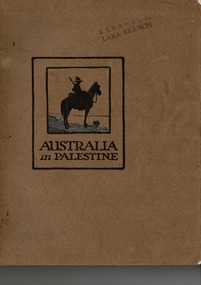
Book, Australia in Palestine, 1919
A soldier's book produced almost entirely by soldiers in the field under active service conditions to send to their friends in Australia and abroad. Australian Lighthorse men is a type peculiar his own and has no counterpart in h is NZ brother. His fearlessness, initiative and endurance, and his adaptability to almost any task, are due to the adventurous life he leads in his own country where he has been accustomed to long hours in the saddle, day and night, and to facing danger of all sorts from his earliest youth.Brown front and back hardcover with dark brown text 'Australia in Palestine' with a light horseman framed in centre of front cover. The spine is green with text Australia in Palestine, Angus and Robertson bottom of spine. Evidence of water on front cover. Silverfish have eaten top right hand corner of first two pages. Farm scene in four boxes with AR in the lower corner of each square. Inside front and back covers are illustrations of a camel train and came corps in the desert with the rising sun in the background with a mountain. There is a grave and white cross in their foreground right lower corner Illustrations, photographs, poems, short stories, Centre foldout of the Battle for Richon Le Zion and Battle of Beersheba and after the Battle of Bir El Abed To the memory of fallen comrades. Pen mark inside W. Mathews Larabattle of beersheba, battle of richon ze zion, battle of bir er abd, camel corps, lighthorse, slush light, sir h.g. chauvel, mounted division at kantara, medical services, signal engineers, katia oasis, new zealand mounted troops, sir edmund h allenby, walers story, 5th lighthorse, romani, ww1, world war 1, australian army -
 Shepparton RSL Sub Branch
Uniform, Great Coat
Coat worn by Sister Danson (VFX151507) during the British presence in Japan following the end of the Second World War. About 16,000 Australians served in the British Commonwealth Occupation Forces, including 130 from the Australian General Hospital with whom Sister Danson presumably served. Sister Danson was born in Numurkah and served as Leiutentant with the Heidelberg Military Hospital before embarking for Japan in 1947.This coat is part of a complete uniform set held by the Shepparton RSL. The uniform has representative and historic significance as an example of the style of uniform worn by nursing staff of the Australian General Hospital during the 1940s and into the 1950s. The uniform set has social significance to the Shepparton area, being owned and worn by a serving community member who was born in Numurkah, enlisted in Shepparton and returned to the community in later life.Shin length grey woollen double breasted coat fastened with three buttons on front centre. Interior bakelite or plastic button fastens panels on interior. Two hip-height pockets with folded flap on exterior. Grey fabric belt fastened with a metal buckle; belt is held in place with two fabric loops on either side of the waist. "AUSTRALIA" shoulder flashes on both left and right shoulders; on left arm a blue and brown rectangular colour patch and on the right arm, a blue square patch with embroidered crown and the words "BRITISH COMMONWEALTH FORCES." Epaulettes on either shoulder carry two metal badges signifying a senior Sister and fastened with a metal button. A pin is missing from the base of the epaulette. Interior lined with purple-grey lining; pocket on interior left chest and manufacturer's label at base of neck underneath loop.Shoulder flashes read "AUSTRALIA" and "BRITISH COMMONWEALTH FORCES". Label reads "TAILORS & HABIT/MAKERS/J. RAVENSDALE/& SON/NICHOLAS BLDG./SWANSTON ST MELBOURNE/SISTER DANSON". Buttons read "AUSTRALIAN MILITARY FORCES"second world war, world war ii, medical, wwii, nurse, women -
 Shepparton RSL Sub Branch
Uniform, Dress Jacket, 1943
This jacket belonged to Dorothy May Mortlock (VF518245) who was part of the Australian Womens Army Service (AWAS). Dorothy Mortlock was born in Swan Hill and enlisted with the 3rd AUST AWS REC DEPOT.Khaki-coloured woollen jacket which fastens along the centre via four metal buttons. Two hip-height pockets with external flap; two chest pockets with pleat in centre fastened via a metal button. Fabric belt around waist held in place by two fabric loops on back and fastened through metal buckle and loop. Collar carries two metal rising sun badges on the left and right side. Two epaulettes on either shoulder are held in place by a button and carries a badge reading "AWAS". Colour patch on both left and right side is square, half green and half black. Interior label on base of neck.Label reads "V 579/1943/SIZE/MADE IN/AUSTRALIA/D. MORTLOCK/VF518245". Rising sun badge reads "AUSTRALIAN COMMONWEALTH/MILITARY FORCES." Buttons read "AUSTRALIAN MILITARY FORCES."world war ii, second world war, wwii, women, australian women's army service -
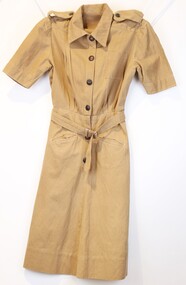 Shepparton RSL Sub Branch
Uniform, Dress, C. 1940s
This dress belonged to Dorothy May Mortlock (VF518245), who served as a Sapper with the Australian Women’s Army Service from 27 July 1945 to 1 August 1946.Light brown coloured woven cotton dress with button-up front secured by 6 metal buttons. Dress constructed of a skirt element attached to a short sleeve shirt-style torso section, a hook and eye sits on interior of two sections to fasten left and right sides together. One square topstitched pocket on the left chest and two angled hip pockets on front. Fabric belt with metal buckle held in place by fabric loops on both left and right side. Fabric epaulette passes through loop on both left and right side and secured with metal button. Two loops on interior left and right shoulders, left loop with inscription; woven label stitched to interior left side underneath which is a stamped motif.Ink inscription on interior loop difficult to read, “VF518245” and 5-6 indiscernible characters. Button reads “AUSTRALIAN MILITARY FORCES” below an embossed image of Australia with the King George V crown on top. Stamped motif reads “[broad arrow]/S.D.”women, wwii, world war two, second world war, australian womens army service, awas -
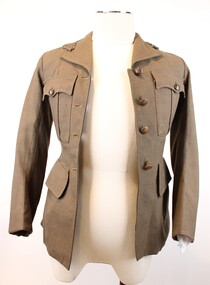
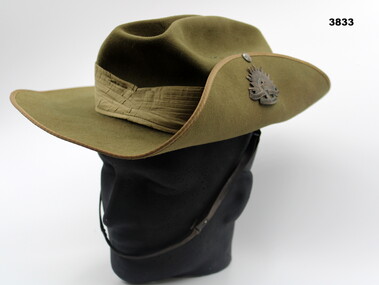 Bendigo Military Museum
Headwear - HAT, SLOUCH, Approx 1953
Slouch Hat made 1953 with King’s Crown blackened “Rising Sun” Badge (King George 6th) Square Bash Style. Worn during Korean War EraAustralian slouch hat with right hand side brim turned up and clipped to the body of the hat. Has Blackened Brass Rising Sun badge attached with inscription. Has attached Chin Strap & Hat BandBlackened Brass Badge has an inscription “Commonwealth Military Forces”hat, slouch, passchendaele barracks trust -
 Bendigo Military Museum
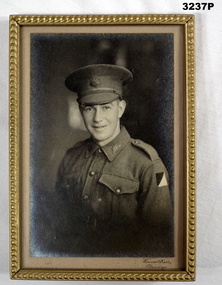
Photograph - PHOTOGRAPH WW2, FRAMED, Vincent Kelly, C.1940 onwards
Item relates to R T PHILLIPS VX113093 early in the CMF, refer Cat No 3239P for his service details.Small black & white portrait of an Australian Soldier wearing peaked cap, no rank evident. Rising Sun on his lapels & hat. The colour patch on his left shoulder is a square with a dividing line top right to bottom left. Dark on left, light on right. Photo is held in a simple tin frame painted gold.Small print at bottom: Photographic company name "Vincent Kelly - Bendigo"photograpy - photographs-frame accessories, military history-army -
 Bendigo Military Museum
Legal record - CERTIFICATES, FRAMED
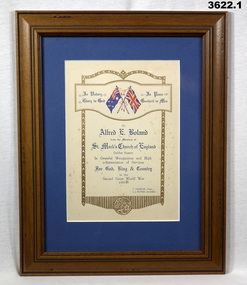
Certificates presented to Alfred Edward BOLAND between 1942 - 1946. Refer Cat No 2473 for his service details.Re Alfred Edward BOLAND. .1) Coloured certificate on blue background under glass in a wooden frame. .2) Cream background with black print, green surround, glass covered in a wooden frame. .3) Cream background with black print, green surround, glass covered in a wooden frame..1) Service Recognized by St Marks Church of England, Golden Square. .2) Certificate of Service of an Officer. .3) Australian Military Forces Warrant Issued 20.2.1942.promotion, service, recognition -
 Federation University Historical Collection
Booklet, Community Connections - 30 years Gold Museum
The Gold museum has links to miners that attended the School of Mines which is a predecessor of Federation UniversityMustard coloured flyer with brown squares and images and gold writing gold museum, community connections, tim sullivan, roger trudgeon, sovereign hill -
Federation University Historical Collection
Map, Central Ballarat Retail and Business Guide, 2003, 07/2003
Map of Central Ballarat Streets, Central Square, Bridge Mall Shopping Centre and Creswick Plaza, with a legend of businesses and locations. scarsdale, grenville, krause, browns and scarsdale, mopianimum, watershed, yarrowee, woady yalloak, timber reserve, department of mines, plans, cgt, crown lands, ferdinand krause -
 Federation University Historical Collection
Document, Cyclopedia of Victoria: Ballarat , 1904, 1904
Digital images of the Ballarat section of the Cyclopedia of Victoria, 1904cyclopedia of victoria, ballarat, ballarat benevolent asylum, john adam, gold discovery, lake wendouree, boat house, sailing, eureka stockade, ballarat botanical gardens, statuary, statues, ballarat school of mines, ballarat town hall, sturt street, shoppee square ballarat, ballarat mecahanics' institute, ballarat hospital, henry cuthbert, charles collett shoppee, john murray, richard greenwood middleton, john m. kline, john ritchie, thomas stoddart, william little, john robson, hugh v. mckay, h.v. mckay, n. clark, a. h. powell, r.j. powell, edward shaw, charles j. reid, frederick g. haymes, james thomas mitchell, robert scott, frane longden, robert d. pinnock, thomas a. wilson, sydney b. fisher, david bartholomew, t.r. treloar, s-ray, w. cornell, alexander greenfield, andrew callow, victorian mounted rifles, s.g. valentine, andrew scott, thomas robertson, john gordon robertspm, w.t. rowe, thomas a. oddie, william morris, jospeh walshe, william acheson, joseph dill, william mason, llanberis no 1, anthony jenkin, james carey, wlliam emery, percy kent, henry bath, j. rowe, john couttie, william sansom, francis coote, john mckenna, robert ditchburn, thomas mitchell, john daniel, george williams, william treloar, r.b. squire, jonah ward, robert smyth, william bell, thomas couper, w. joseph, william wallace, benjamin dowling, robert crawford, alexander aikens, c. dennison, w.f. coltman, federal timber yard, george hotel, williaim dones, j. dreaden, richard's and co, j.a. gear, r.w. fleming, l.e. cutter, l.s. cutter, a.e. cutter, c.f. cutter, george anderson, w.e. longhurst, christopher howlett, david mcgrath, james wishart, f.g. reeve, eureka iron works, j.e. cowley, albert foundry, john robert harrison, j.b. cameron, p.b. sutherland, george richards, ballarat brass foundry, m.b. john, morgan john, m.w.b. john, james smith, w.p. davies, j.t. vercoe, james kelly, williaim osbourne, alexander mcdonald, alexander e. mcdonald, henry john symons, bridge street flood -
Federation University Historical Collection
Tool, Handmade tools
Square hand made nails, possibly horse shoe nails/ Cut floor brad for use on tongue and groove floors.nails, tools -
 Federation University Historical Collection
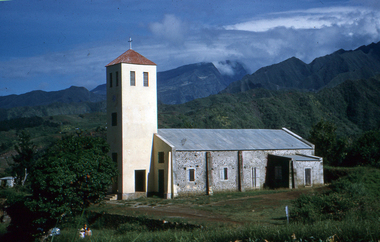
Slide, Eglise du Bras de Pontho (Church of the Holy Angels of Bras de Pontho), c1970
A small wooden chapel was built on this site but was destroyed by a cyclone in 1948. It was immediately replaced by the present church, which has simple architecture and interior ornaments. The concrete building is a large rectangle to which is added a square tower supporting a small bell tower. From the church site you can view the Bras de la Plaine valley Photograph of a church Handwritten "Eglise du Bras de Pontho" Stamped "R. Ueberschlag"eglise du bras de pontho, church of the holy angels of bras de pontho, church, bras de la plaine valley -
 Bendigo Military Museum
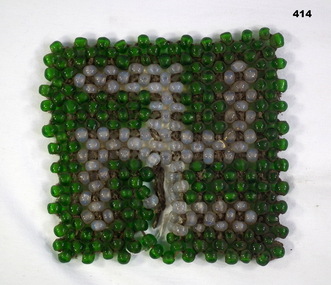
Functional object - TRIVET, C. 1939 - 45
Trivet - on which hot items could be placed. Brought back to Australia by an AIF officerSquare trivet featuring swastika. Made from green and purple beads joined with brown cord. Swastika is in purple beading.domestic items - cooking, metal craft? -
Bendigo Military Museum
Uniform - UNIFORM, NURSES WW2, 1939 - 1946
The uniform belonged to CAPT GLADYS MOLE VFX17199 AAMC 2nd AIF. Refer 1901.4 for Service History. Items were all numbered 215.01 from a previous institution. See also Reg No 1899 & 1900.2P.WRANC .1) Jacket. Grey, fine wool tailored jacket & skirt. Jacket has full belt fastened with press studs. Front fastened with military buttons, also pocket flaps & 2 buttons on each sleeve. Shoulder epaulettes of dark brown felt with a button 'Australia' badge & 3 captain's pips. Colour patch on each sleeve - brown square on light grey square with central angled blue bar. Service ribbons on right breast. Upper back section & fronts lined with rayon. Hanging tab centre back neck. .2) Shirt. Long sleeved cream cotton shirt with tail, epaulette tabs on shoulders fastened with a button. Front button fastening semi stiff collar. .3) Skirt. Fastens at side with hooks & eyes & 1 button on waist band. .4) Tie. Made of dark brown crepe with silver Rising Sun badge pinned to it. .5) Hat. Grey/green felt velour with band of brown edged both sides with narrow stripes of pale grey & red. Unlined with petersham sweat band & black hat elastic double chin strap. Signs of wear at inner front. .6) & .7) Gloves. Pair, dark brown leather with stitching detail in 3 decorative lines on backs. Previous number 215.01 has been inked inside. .8) & .9) Shoes. Pair, brown leather lace up with stitched soles by Duncan. .2) Self coloured label: V109 MADE IN AUSTRALIA 1942 Inside back neck in ink: G? HOLLOW .5) On label in black: V558 Made in 1943 Australia Size 6-3/4"uniforms, costumes - female uniform, essential services - hospital, nurses -
 Bendigo Military Museum
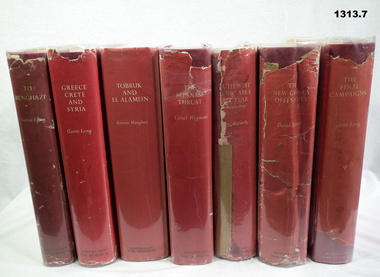
Book - BOOKS, 1), .2) & .7) Gavin Long et al, Australians in the War of 1939-1945 . Series One. Army, 1) 1952; .2) 1953; .3) 1966; .4) 1957; .5) 1963; .6) 1961; .7) 1963
.3) A Lee, 27 Alamein Court, Golden Square, Bendigo.Red buckram covers with loose paper & plastic covers. White text on loose covers. Black & white photos & illustrations. .1) Vol I The Benghazi, 336 pages .2) Vol II Greece, Crete and Syria, 587 pages .3) Vol III Tobruk and El Alamein, 854 pages .4) Vol IV The Japanese Thrust, 715 pages .5) Vol V South-West Pacific Area - First Year, 655 pages .6) Vol VI The New Guinea Offensives, 851 pages .7) Vol VII The Final Campaigns, 667 pagesbooks, military history -
 Bendigo Military Museum
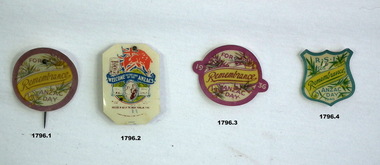
Memorabilia - BADGES
Belonged to Fanny Isabella Nicol Staff Nurse AIF. Refer 1795P for service history, 2317.6, 2591.4 paper & circular tin ANZAC day badges (not individually marked) .1) round paper badge "Remembrance " wattle flowers .2) square badge union jack flag and Navy flag (red) .3) round badge "remembrance." ANZAC day (1936) mauve .4) R.S.L remembrance ANZAC day (1940) yellow paper badge. .5) round metal badge ANZAC day purple / yellow .6) round badge metal ANZAC day (1939) purple/ green .7) round badge (metal) ANZAC day (1938) blue/ green with a laurel wreath + bow .8) round metal badge twentieth anniversary (1935) green/ blue .9) round metal badge "Lest we forget." brown /white) soldier with open. badges, remembrance, australian