Showing 875 items
matching water colour
-
 Eltham District Historical Society Inc
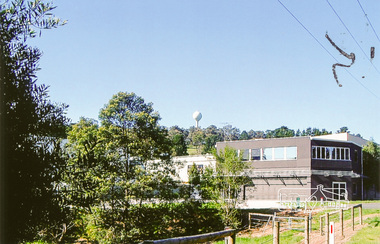
Photograph, View of water tower and industrial area, Candlebark Court, Research
... melbourne candlebark court research (vic.) water tower Colour ...Colour photographcandlebark court, research (vic.), water tower -
 Eltham District Historical Society Inc
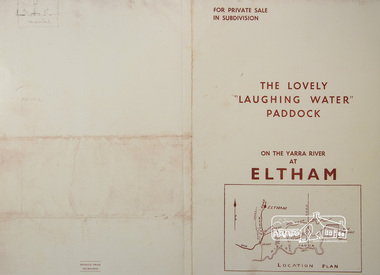
Photograph, For Private Sale in Subdivisions; The Lovely "Laughing Water" Paddock on the Yarra River at Eltham
Private sale of the "Laughing Water" paddock in subdivision; 5 river frontages with weatherboard villa on Lot 8; 6 woodland blocks of 5 and 6 acres. Sole Agent: Edward Haughton, 379 Collins Street, Melbourne Location plan and subdivision mapA3 colour photographic print from digital image of sales brochure and A4 reproduction of price listlaughing waters, edward haughton, real estate agent, eltham -
 Eltham District Historical Society Inc
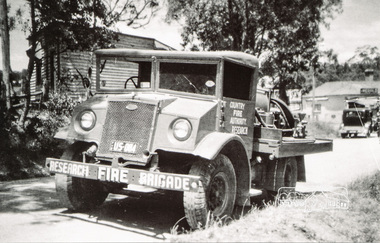
Photograph, Neil Ploog, Ford Blitz water tanker, Research Fire Brigade, Ingrams Road, Research, 1954, 1954
... digital colour variant Ford Blitz water tanker, Research Fire ...Early 1954 near present day site of Eltham Little TheatreThe Reynolds family were early settlers in Research.Black and white photograph mounted in an album, the Reynolds/Prior Photograph Collection, this being one of 53 reproduced black and white images of early Eltham. Also available digital colour variantThe Reynolds/Prior Photograph Collection, Presented to the Eltham District Historical Society, 14 June 2006 by Ross McDonald. A second copy was also presented to the Andrew Ross Museum, Kangaroo Groundreynolds prior collection, research (vic.), research fire brigade, fire brigades -
 Kiewa Valley Historical Society
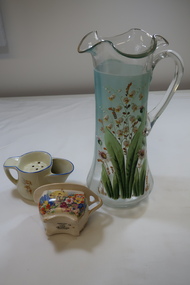
Jugs x 3 - water, milk and shaving
Ron White owned these jugs during his lifetime. Popular circa 1940s.Ron White owned these jugs. See KVHS 12821. Water Jug - tall glass jug with thin pale green 'plastic?' 'coating' wrapped around it. The cover has painted in colour -flowers and leaves. The lip is wavy with a clear plastic cover pulled over it. The handle is attached to the top half in the shape of an ear.The base is wider than the the top.Handblown. 2. Milk Jug - Unusual shaped small rectangular cream coloured jug with a handle at one end and a pouring lip at the opposite end. It sits on a four legged base and is decorated with coloured flowers and a cottage on each side. 3. Shaving Jug - Solid ceramic cream coloured jug with 7 holes in main area with a handle on one side and a pouring lip on the other. The jug is decorated with 3 small pictures of the countryside. The lip of the jug is defined in blue.1. Nil 2. At the base: "Hampton/ Ivory/ Swinnertons / England" 3. At the base: "Empire / Ivory ware/ England" and embossed also at the base "261 / England / 12?"ron white, ceramic and glass jugs, kitchenware, bathroomware -
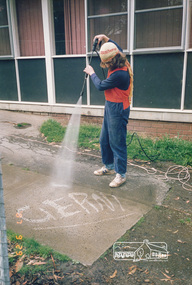 Eltham District Historical Society Inc
Photograph, Gerni High Pressure Water Cleaner - Engineering Design
One of a set of display images thought to be produced by the Shire of Eltham c.1979-1987Illustrative of services provided by former Shire of ElthamColour photograph 20 x 29 cm mounted on green-painted chipboard 28 x 35.5 cm (string on back for hanging)Title printed on label adhered to board below photograph (replaced June 2017)cleaning, maintenance -
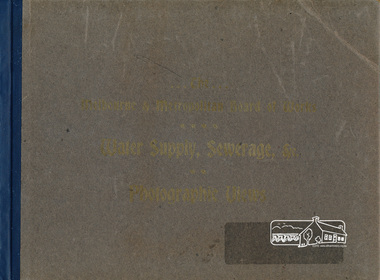 Eltham District Historical Society Inc
Book, The Melbourne & Metropolitan Board of Works Water Supply, Sewerage, etc. Photographic Views, 1908
In 1908 the Melbourne & Metropolitan board of Works published this book to illustrate its many constructions to provide Melbourne with its reticulated water and sewerage systems.This is now is a rare copy.Photographic images, landscape dimensions, hardboard cover, grey green colour Nilmmbw, weirs, dams & pumping stations, reservoirs, aqueducts -
 Eltham District Historical Society Inc
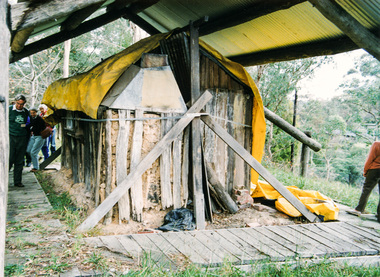
Photograph, Blacksmith's Bellows, Hand water Pump and Steam Time Whistle used at Briar Hill Timber Mill, Heritage Week, 1990, 1990
Three colour photographs of Blacksmith's Bellows, Handwater Pump and Steam Time Whistle used at Briar Hill Timber Mill, Heritage Week, 1990heritage week, eltham, courthouse, blacksmith bellows, hand water pump, steam whistle, briar hill, timber mill, activities -
 Eltham District Historical Society Inc
Photograph, Fitting of Time Capsule, Eltham, 1987, 1987
In November 1985 a monument was installed near the corner of Main Road and Pitt Street in Eltham, within the gardens at the front of what is now the Eltham Community and Reception Centre. This monument commemorates Victoria's 150th anniversary and the former location of the Eltham Town Centre, which existed along this section of Main Road, then known as Maria Street. Beneath the site is a time capsule to be opened in the year 2035. A plaque was also erected at this site in October 1987 to commemorate the Shire of Eltham Historical Society's 20th anniversary. The main feature of this monument is a ?tyring disc?, a blacksmith?s implement that was found on this site. This consists of a large iron disc that was used as a platform for fitting iron tyres (like the one shown on top of the platform) to wooden spoked cart wheels. The local blacksmith and wheelwright worked together to assemble the wheel, which was clamped to the platform placed close to the fire. The red hot iron hoop, previously forged to the correct size was lifted with tongs by the blacksmith over the outside of the rim, then hammered down amid flames from the scorching timber. The wheelwright drenched the tyre with cold water as soon as it was in position. A clamp placed on the naff (hub) and screwed down tightly kept the spokes at a constant angle as the tyre cooled. An even pressure from the contracting tyre tightened the joints at each end of the spokes and formed a vice-like grip, which would last for the life of the wheel.Four colour photographs (laser printed on paper); two showing the fitting of the time capsule into the monument and two showing Joh Ebeli during the dedication presentation.eltham, joh ebeli, time capsule -
 Eltham District Historical Society Inc
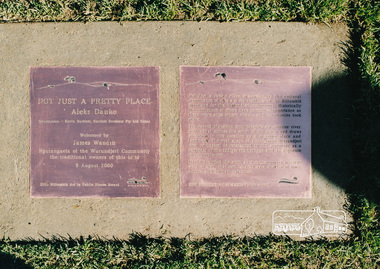
Photograph, Not Just a Pretty Place, Aleks Danko (2000), Lennister Farm, Eltham South, 2000c
Not Just a Pretty Place acknowledges the cultural significance of this site for the residents of Nillumbik Shire and for the Wurrundjeri community. Historically the confluence of rivers have particular importance as these were sites where rituals and ceremonies took place. The carved bluestone form presents an oversize river pebble that echoes the spirit of the water and draws attention to this location as a meeting place an landmark. Awarded the 2000 Nillumbik Art in Public Places Award and situated behind Lennister Farm near Yarra ParkColour photograph printaleks danko, eltham, lennister farm, yarra park -
 Eltham District Historical Society Inc
Photograph, Council water tanker
... colour photographs of Shire of Eltham truck-mounted water tanker ...Three colour photographs of Shire of Eltham truck-mounted water tankereltham shire council, equipment, water tanker, trucks -
 Eltham District Historical Society Inc
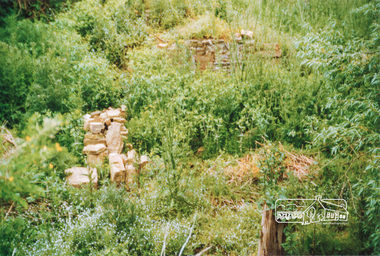
Photograph, Ruins of Coulstocks Mill, Janefield, South Morang
Mill Park Farm at Janefield on the Plenty River was established around 1840 by George Coulstock where he grew wheat. His flour mill was one of the first in Victoria, under construction as early as 1841. After bushfires and Coulstock's early death in 1842, the farm and its mill were taken over by local landowners Henry Miller and John Brock. Peter Hurlestone took charge of the mill. With water diverted from the Plenty River to fill the newly built Yan Yean Reservoir which opened in 1857, the Hurlestone family quit and that was the demise of the mill.Four colour photographs showing the ruins of Coulstocks Flour Mill (Janefield Mill), Janefield. 1. Stone wall 2. Old mill 3. Stone remains of old mill 4. Tree near old mill sitemills, flour mills, coulstock, janefield, plenty river, ruins, stone walls, plenty gorge, bundoora -
 Eltham District Historical Society Inc
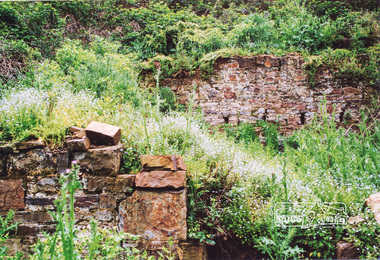
Photograph, Ruins of Coulstocks Mill, Janefield, South Morang
Mill Park Farm at Janefield on the Plenty River was established around 1840 by George Coulstock where he grew wheat. His flour mill was one of the first in Victoria, under construction as early as 1841. After bushfires and Coulstock's early death in 1842, the farm and its mill were taken over by local landowners Henry Miller and John Brock. Peter Hurlestone took charge of the mill. With water diverted from the Plenty River to fill the newly built Yan Yean Reservoir which opened in 1857, the Hurlestone family quit and that was the demise of the mill.Five colour photographs of ruins of Coulstocks Mill, Janefield (Mill Park - Bundoora)mills, flour mills, coulstock, janefield, plenty river, ruins, stone walls, bundoora, plenty gorge -
 Eltham District Historical Society Inc
Photograph, Slab hut, Warrandyte, Warrandyte Mystery Tour, 29 May 1994, 29/05/1994
[article by Bettina Woodburn in EDHS Newsletter No. 97, July 1994:] THE WARRANDYTE MYSTERY TOUR MAY 29TH 1994 - Members of the Eltham Historical Society met at the Old Post Office, now converted into the Warrandyte Historical Museum, for a picnic lunch on the sunny back verandah overlooking the shimmering Yarra River. Interesting photographs and artefacts filled various rooms outlining the history of this area, and told tales of Aboriginal and more recent neighbours of the Eltham Shire. The weather was calm, cloudy mostly with only occasional sunny patches, but it wasn't cold, although the autumnal leaf colours had changed to wintry brown. "All Aboard" and we set off in the Warrandyte Community Bus (with the School Bus sign displayed at the rear) to learn about local places of "Pride and Joy” from Bruce our guide and Tom the driver. Almost directly opposite we entered Whipstick Gully to explore the first of the district's hidden treasures - the Victory, one of the largest of the six or so major mines, past the old quarry now used for abseiling practice. By torchlight we entered the rocky hillside and saw the seams of quartz the miners had followed in their search for gold. Stamping batteries, and there was one in this gully, converted discarded rock into 'road metal'. Warrandyte is proud to be the first declared Goldfield in 1851, and one of the longest surviving, into the 1920s. A pleasant drive across the Bridge and along Bradley's Lane to Norman's Reserve brought us to see another Tunnel at Pound Bend through which the Yarra was diverted to allow about three miles of river-bed to be used for prospecting for alluvial gold. Still on this side of the river we visited the Old Slab Hut in Castles Road. This remnant of miners' housing is preserved because it had been incorporated into a weatherboard house, and saved from the bulldozers - a last minute reprieve, for preservation, by the National Trust. Devastating bush fires have destroyed other old cottages built of wattle and daub, with bark roofs and stone fire-places. The Cairn commemorating the disclosure of Gold Discovery at Warrandyte on June 30th 1851 beside Anderson's Creek Road was our next point of historical interest. We drove on to South Warrandyte and circled back to above the ford on Anderson's Creek to the entrance of the 4th Hill Mine. Again we crept along with our torches, careful of the low roof-rock, and side shafts. At a junction in a large cavity we were able to stand, look up a long air-vent which some 'cavers' climb down, and marvel at, and experience an aspect of a miner's life. Outside we heard the same bird songs, the trills and bell-pealing, saw the same straggly eucalypts, and a silver leafed wattle in flower, native grasses and ferns, and the neat present day houses, often of Warrandyte stone, perhaps veneered only. The day ended pleasantly, seeing more of the Yarra from Everard Drive, and the water rushing out of the Tunnel at Pound Bend, before returning to afternoon tea or coffee at the Museum. A great day for all concerned - many thanks to the Organisers.Colour photographslab hut, warrandyte, "warrandyte miner's cottage" -
 Eltham District Historical Society Inc
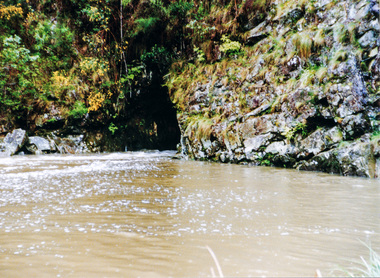
Photograph, Pound Bend tunnel, Warrandyte, Warrandyte Mystery Tour, 29 May 1994, 29/05/1994
[article by Bettina Woodburn in EDHS Newsletter No. 97, July 1994:] THE WARRANDYTE MYSTERY TOUR MAY 29TH 1994 - Members of the Eltham Historical Society met at the Old Post Office, now converted into the Warrandyte Historical Museum, for a picnic lunch on the sunny back verandah overlooking the shimmering Yarra River. Interesting photographs and artefacts filled various rooms outlining the history of this area, and told tales of Aboriginal and more recent neighbours of the Eltham Shire. The weather was calm, cloudy mostly with only occasional sunny patches, but it wasn't cold, although the autumnal leaf colours had changed to wintry brown. "All Aboard" and we set off in the Warrandyte Community Bus (with the School Bus sign displayed at the rear) to learn about local places of "Pride and Joy” from Bruce our guide and Tom the driver. Almost directly opposite we entered Whipstick Gully to explore the first of the district's hidden treasures - the Victory, one of the largest of the six or so major mines, past the old quarry now used for abseiling practice. By torchlight we entered the rocky hillside and saw the seams of quartz the miners had followed in their search for gold. Stamping batteries, and there was one in this gully, converted discarded rock into 'road metal'. Warrandyte is proud to be the first declared Goldfield in 1851, and one of the longest surviving, into the 1920s. A pleasant drive across the Bridge and along Bradley's Lane to Norman's Reserve brought us to see another Tunnel at Pound Bend through which the Yarra was diverted to allow about three miles of river-bed to be used for prospecting for alluvial gold. Still on this side of the river we visited the Old Slab Hut in Castles Road. This remnant of miners' housing is preserved because it had been incorporated into a weatherboard house, and saved from the bulldozers - a last minute reprieve, for preservation, by the National Trust. Devastating bush fires have destroyed other old cottages built of wattle and daub, with bark roofs and stone fire-places. The Cairn commemorating the disclosure of Gold Discovery at Warrandyte on June 30th 1851 beside Anderson's Creek Road was our next point of historical interest. We drove on to South Warrandyte and circled back to above the ford on Anderson's Creek to the entrance of the 4th Hill Mine. Again we crept along with our torches, careful of the low roof-rock, and side shafts. At a junction in a large cavity we were able to stand, look up a long air-vent which some 'cavers' climb down, and marvel at, and experience an aspect of a miner's life. Outside we heard the same bird songs, the trills and bell-pealing, saw the same straggly eucalypts, and a silver leafed wattle in flower, native grasses and ferns, and the neat present day houses, often of Warrandyte stone, perhaps veneered only. The day ended pleasantly, seeing more of the Yarra from Everard Drive, and the water rushing out of the Tunnel at Pound Bend, before returning to afternoon tea or coffee at the Museum. A great day for all concerned - many thanks to the Organisers.Two colour photographswarrandyte, activities, pound bend -
 Eltham District Historical Society Inc
Photograph, Spring Excursion, Exploring the Upper Yarra, 22 October 1995, 22/10/1995
[article by Bettina Woodburn in EDHS Newsletter No. 105, November 1995:] EXPLORING THE UPPER YARRA - We enjoyed the Spring Excursion, this year "Exploring the Upper Yarra" - in spite of the constant rain and the countryside under the cloud cover, especially in the valleys, being mainly shiny shades of green. The occasional fields of buttercups, clumps of arum lilies and splendid rhododendron and other flowering bushes became very special. The Cobb and Co coach was warm and a cosy retreat as we zig-zagged on the highways and byways to glimpse the Yarra River, upstream and down, its secret places, and particularly the many bridges. Russell excelled as 'Poet Laureate', reading from Dacre Smyth's book. This 1979 publication includes paintings of all the bridges along the river with poems and brief descriptions of each one. Some of the bridges are in out-of-the-way places and are not very well known. We looked forward to hearing the poetry as much as seeing the 'constructions'… Big Pat (was he short or tall, lean or fat? - he did win the £200 reward for discovering gold and had the creek named after him), about the 'Eddies'?, and the disliked 'meccano' bridge in Warburton, etc. etc. The hot roast lunch in the old Reefton Hotel was also most welcome. It was easy to imagine it peopled by miners and early settlers. Starting by crossing the new (1974) concrete bridge at Warrandyte we headed through Wonga Park with views to the Christmas Hills and to the escarpment of the Yering Gorge, which causes flood waters to back up through the Yarra Glen plain, so avoiding disasters downstream. At the end of a long driveway we found the wooden, privately owned Henley Bridge (1935 after the 1934 floods). This facilitates access to different parts of Henley Farm and to Lilydale. Everard Park, named after Blanche Shallard's father, a State Member for 17 years, below the Highway Yarra crossing was in need of care. It is 10 miles from Yarra Glen by road but, as "Yarra Marra” canoeists well know, 32 winding miles down by water. After more delightful countryside scenes we joined the Warburton Highway at Woori Yallock. From the old Railway Station at Launching Place the Centennial Trail for walkers, cyclists and horse riders has replaced the rails. The line from Lilydale was opened in 1901, and the last diesel freight train ran to Warburton in 1965. It continued to rain as we had morning tea in Warburton in a shelter between footbridges. From here we continued upstream past the Bridge to O'Shannassy Lodge and Reservoir, Starvation Creek, and the Peninsular tunnel (miners dug it as at Pound Bend) which we visited (scrambling down those steps!) on our return after lunch. Our furthermost point was the Upper Yarra Dam Reserve (and vast catchment area). Finished in 1957 after ten years' work and 100 years after Yan Yean, it supplies much of Melbourne's water. After crossing the 30m Launching Place Bridge to the Eltham side of the Yarra and Healesville, we saw in the distance the Yarra Glen Timber Trestle Bridge over the river flats "the longest for years in the land it was said!" Harry's dream of "better weather over the Divide" unfortunately didn't come true, but I'm sure we 36 members will retain happy memories of a day that was wet and green and filled with Bridges.Two colour photographsactivities, upper yarra, upper yarra dam -
 Eltham District Historical Society Inc
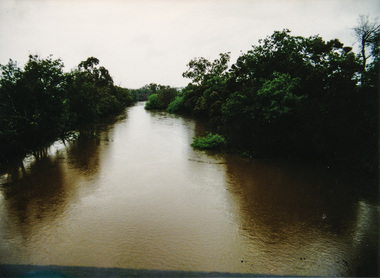
Photograph, Yarra River from Henley Bridge, Kangaroo Ground, Spring Excursion, Exploring the Upper Yarra, 22 October 1995, 22/10/1995
[article by Bettina Woodburn in EDHS Newsletter No. 105, November 1995:] EXPLORING THE UPPER YARRA - We enjoyed the Spring Excursion, this year "Exploring the Upper Yarra" - in spite of the constant rain and the countryside under the cloud cover, especially in the valleys, being mainly shiny shades of green. The occasional fields of buttercups, clumps of arum lilies and splendid rhododendron and other flowering bushes became very special. The Cobb and Co coach was warm and a cosy retreat as we zig-zagged on the highways and byways to glimpse the Yarra River, upstream and down, its secret places, and particularly the many bridges. Russell excelled as 'Poet Laureate', reading from Dacre Smyth's book. This 1979 publication includes paintings of all the bridges along the river with poems and brief descriptions of each one. Some of the bridges are in out-of-the-way places and are not very well known. We looked forward to hearing the poetry as much as seeing the 'constructions'… Big Pat (was he short or tall, lean or fat? - he did win the £200 reward for discovering gold and had the creek named after him), about the 'Eddies'?, and the disliked 'meccano' bridge in Warburton, etc. etc. The hot roast lunch in the old Reefton Hotel was also most welcome. It was easy to imagine it peopled by miners and early settlers. Starting by crossing the new (1974) concrete bridge at Warrandyte we headed through Wonga Park with views to the Christmas Hills and to the escarpment of the Yering Gorge, which causes flood waters to back up through the Yarra Glen plain, so avoiding disasters downstream. At the end of a long driveway we found the wooden, privately owned Henley Bridge (1935 after the 1934 floods). This facilitates access to different parts of Henley Farm and to Lilydale. Everard Park, named after Blanche Shallard's father, a State Member for 17 years, below the Highway Yarra crossing was in need of care. It is 10 miles from Yarra Glen by road but, as "Yarra Marra” canoeists well know, 32 winding miles down by water. After more delightful countryside scenes we joined the Warburton Highway at Woori Yallock. From the old Railway Station at Launching Place the Centennial Trail for walkers, cyclists and horse riders has replaced the rails. The line from Lilydale was opened in 1901, and the last diesel freight train ran to Warburton in 1965. It continued to rain as we had morning tea in Warburton in a shelter between footbridges. From here we continued upstream past the Bridge to O'Shannassy Lodge and Reservoir, Starvation Creek, and the Peninsular tunnel (miners dug it as at Pound Bend) which we visited (scrambling down those steps!) on our return after lunch. Our furthermost point was the Upper Yarra Dam Reserve (and vast catchment area). Finished in 1957 after ten years' work and 100 years after Yan Yean, it supplies much of Melbourne's water. After crossing the 30m Launching Place Bridge to the Eltham side of the Yarra and Healesville, we saw in the distance the Yarra Glen Timber Trestle Bridge over the river flats "the longest for years in the land it was said!" Harry's dream of "better weather over the Divide" unfortunately didn't come true, but I'm sure we 36 members will retain happy memories of a day that was wet and green and filled with Bridges.Colour photographactivities, upper yarra, henley bridge -
 Eltham District Historical Society Inc
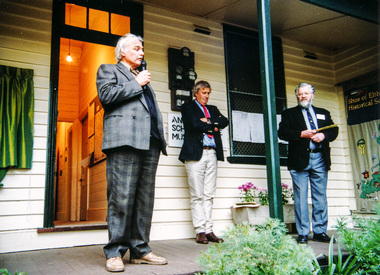
Photograph, Furphy Festival, Kangaroo Ground, 19 May 1996
The Andrew Ross Museum organised Kangaroo Ground’s 1851 – 1996 Furphy week-end which was held Friday May 17th to Sunday 19th May 1996. In commemoration of the district's links with the Furphy family, a plaque was unveiled at the front entry of the Andrew Ross Museum by Roger Furphy of the Furphy Foundary, Shepparton. The event was preceded by an address by author, Dr John Barnes of La Trobe University, the country’s leading authority on the novelist, Joseph Furphy. The date was seen as significant since it marked the 145th anniversary of the death of Judith, the young sister of John and Joseph Furphy, who died soon after commencing school in Kangaroo Ground 1851. Andrew Ross chronicled the event in his reminiscences. The most distinctive product to carry the Furphy brand would certainly be the water cart. The presence of the cart in military camps in Australia and overseas during the First World War led to the name of Furphy becoming an indelible part of our language and idiom. It was used extensively in Europe and the Middle East to carry water to the troops and the drivers of the carts were notorious sources of information and gossip for the men as they moved from camp to camp. As could be expected, not all their news was reliable and so it was that the word Furphy rapidly became a synonym for suspect information or rumour. Source: Kangaroo Ground Chronicle, Vol 1 No 2 Autumn 1996 Note the Shire of Eltham Historical Society Community Banner on display.Five colour photographsandrew ross museum, furphy festival, kangaroo ground -
 Eltham District Historical Society Inc
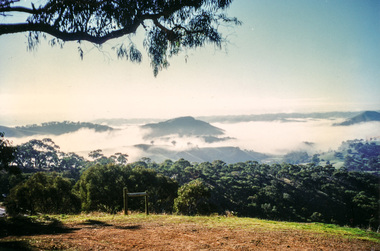
Photograph, Murchison Gap, Autumn Excursion, Hume and Hovell's 1824 expedition, 26 May 1996, 26/05/1996
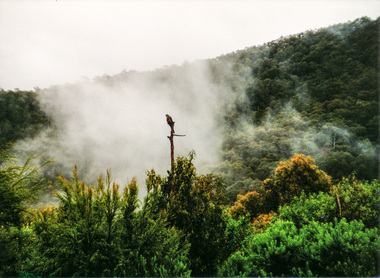
[article by Bettina Woodburn in EDHS Newsletter No. 109, July 1996:] ON THE TRAIL OF HUME AND HOVELL - REPORT ON THE AUTUMN EXCURSION - On a green and fresh morning (Sunday 26th May 1996) the Cobb and Co coach (driven by the most obliging Peter Tampion) set off in a north easterly direction from Eltham to connect with Hume and Hovell's route on their 1824 explorations of central Victoria. The Society would follow a series of monuments erected for the 1924 centenary of the expedition from King Parrot Creek (Tuesday 7th December 1824), through Strath Creek, over Sunday Creek (Sunday 12th December 1824) at Broadford, Tullamarine, St Albans, Deer Park, through Werribee, skirting east of the You Yangs to Lara and Avalon Beach. Because their distance-measuring wheel had broken and a one degree mistake was made in calculations, the two leaders of the original group of six convict-companions arrived at Corio Bay, instead of the expected Western Port, discovered earlier by Flinders. From below Mt. Disappointment (Hume and Hovell's difficulties in "scrambling over brush and rock", "leeches in forest, as well as no water", "cutting grass 4-5 ft. high", dreadful scrub", "devil flies") we took an easier route, saw the Strath Creek memorial in ground fog and a wonderful "field of dreams", the Hume-Hovell privately owned cricket ground with its white picket boundary fence. Now, after a steep climb, in sunshine under gums we stretched and viewed magnificent rolling hills and fog-filled valleys - not "smoke from Aborigines' bush fires". After morning tea at Broadford we followed the Sunday Creek valley beside the Hume Freeway, passed the Wallan Wallan Rest Area (more appropriately Hume and Hovell Rest Area) to tum right at Beveridge. In Gellibrand Hill Park, near the headwaters of the Moonee Ponds Creek, we experienced the landscape the first European settlers saw - huge river red gums and rolling pastures. The gardens and sheltered courtyard of the 1840s, timber, brought from .....[?] prefabricated Woodlands Homestead, provided a pleasant lunch stop. We enjoyed a private tour, panoramic views over Melbourne and surroundings and the excitement of arriving and departing aircraft. Our next river crossing was at Werribee, "in a vast treeless plain", then we drove on by-ways no coach had previously travelled, to find "an immense sheet of water" salty Corio Bay, off-course to the west. In late afternoon of a super, calm, late autumn day we headed homewards. Back at Eltham we were rather surprised to find that we had travelled a total of 347 km. Thanks again to Russell Yeoman for his research and organization. What a wonderful day! Three colour photographsactivities, murchison gap, murchison valley -
 Eltham District Historical Society Inc
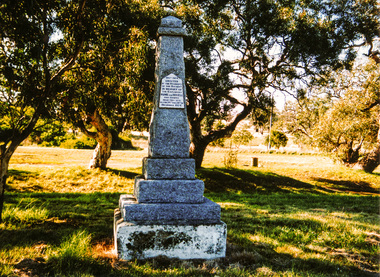
Photograph, Hume and Hovell Monument, Broadford, Autumn Excursion, Hume and Hovell's 1824 expedition, 26 May 1996, 26/05/1996
[article by Bettina Woodburn in EDHS Newsletter No. 109, July 1996:] ON THE TRAIL OF HUME AND HOVELL - REPORT ON THE AUTUMN EXCURSION - On a green and fresh morning (Sunday 26th May 1996) the Cobb and Co coach (driven by the most obliging Peter Tampion) set off in a north easterly direction from Eltham to connect with Hume and Hovell's route on their 1824 explorations of central Victoria. The Society would follow a series of monuments erected for the 1924 centenary of the expedition from King Parrot Creek (Tuesday 7th December 1824), through Strath Creek, over Sunday Creek (Sunday 12th December 1824) at Broadford, Tullamarine, St Albans, Deer Park, through Werribee, skirting east of the You Yangs to Lara and Avalon Beach. Because their distance-measuring wheel had broken and a one degree mistake was made in calculations, the two leaders of the original group of six convict-companions arrived at Corio Bay, instead of the expected Western Port, discovered earlier by Flinders. From below Mt. Disappointment (Hume and Hovell's difficulties in "scrambling over brush and rock", "leeches in forest, as well as no water", "cutting grass 4-5 ft. high", dreadful scrub", "devil flies") we took an easier route, saw the Strath Creek memorial in ground fog and a wonderful "field of dreams", the Hume-Hovell privately owned cricket ground with its white picket boundary fence. Now, after a steep climb, in sunshine under gums we stretched and viewed magnificent rolling hills and fog-filled valleys - not "smoke from Aborigines' bush fires". After morning tea at Broadford we followed the Sunday Creek valley beside the Hume Freeway, passed the Wallan Wallan Rest Area (more appropriately Hume and Hovell Rest Area) to tum right at Beveridge. In Gellibrand Hill Park, near the headwaters of the Moonee Ponds Creek, we experienced the landscape the first European settlers saw - huge river red gums and rolling pastures. The gardens and sheltered courtyard of the 1840s, timber, brought from .....[?] prefabricated Woodlands Homestead, provided a pleasant lunch stop. We enjoyed a private tour, panoramic views over Melbourne and surroundings and the excitement of arriving and departing aircraft. Our next river crossing was at Werribee, "in a vast treeless plain", then we drove on by-ways no coach had previously travelled, to find "an immense sheet of water" salty Corio Bay, off-course to the west. In late afternoon of a super, calm, late autumn day we headed homewards. Back at Eltham we were rather surprised to find that we had travelled a total of 347 km. Thanks again to Russell Yeoman for his research and organization. What a wonderful day! Colour photographactivities, broadford, hume and hovell, monument -
 Eltham District Historical Society Inc
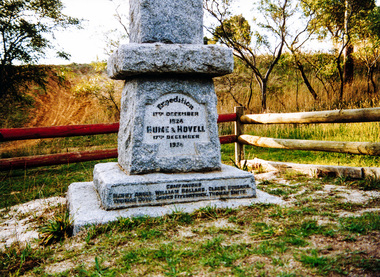
Photograph, Hume and Hovell Monument, Autumn Excursion, Hume and Hovell's 1824 expedition, 26 May 1996, 26/05/1996
[article by Bettina Woodburn in EDHS Newsletter No. 109, July 1996:] ON THE TRAIL OF HUME AND HOVELL - REPORT ON THE AUTUMN EXCURSION - On a green and fresh morning (Sunday 26th May 1996) the Cobb and Co coach (driven by the most obliging Peter Tampion) set off in a north easterly direction from Eltham to connect with Hume and Hovell's route on their 1824 explorations of central Victoria. The Society would follow a series of monuments erected for the 1924 centenary of the expedition from King Parrot Creek (Tuesday 7th December 1824), through Strath Creek, over Sunday Creek (Sunday 12th December 1824) at Broadford, Tullamarine, St Albans, Deer Park, through Werribee, skirting east of the You Yangs to Lara and Avalon Beach. Because their distance-measuring wheel had broken and a one degree mistake was made in calculations, the two leaders of the original group of six convict-companions arrived at Corio Bay, instead of the expected Western Port, discovered earlier by Flinders. From below Mt. Disappointment (Hume and Hovell's difficulties in "scrambling over brush and rock", "leeches in forest, as well as no water", "cutting grass 4-5 ft. high", dreadful scrub", "devil flies") we took an easier route, saw the Strath Creek memorial in ground fog and a wonderful "field of dreams", the Hume-Hovell privately owned cricket ground with its white picket boundary fence. Now, after a steep climb, in sunshine under gums we stretched and viewed magnificent rolling hills and fog-filled valleys - not "smoke from Aborigines' bush fires". After morning tea at Broadford we followed the Sunday Creek valley beside the Hume Freeway, passed the Wallan Wallan Rest Area (more appropriately Hume and Hovell Rest Area) to tum right at Beveridge. In Gellibrand Hill Park, near the headwaters of the Moonee Ponds Creek, we experienced the landscape the first European settlers saw - huge river red gums and rolling pastures. The gardens and sheltered courtyard of the 1840s, timber, brought from .....[?] prefabricated Woodlands Homestead, provided a pleasant lunch stop. We enjoyed a private tour, panoramic views over Melbourne and surroundings and the excitement of arriving and departing aircraft. Our next river crossing was at Werribee, "in a vast treeless plain", then we drove on by-ways no coach had previously travelled, to find "an immense sheet of water" salty Corio Bay, off-course to the west. In late afternoon of a super, calm, late autumn day we headed homewards. Back at Eltham we were rather surprised to find that we had travelled a total of 347 km. Thanks again to Russell Yeoman for his research and organization. What a wonderful day! Two colour photographsactivities, hume and hovell, monument -
 Australian National Surfing Museum
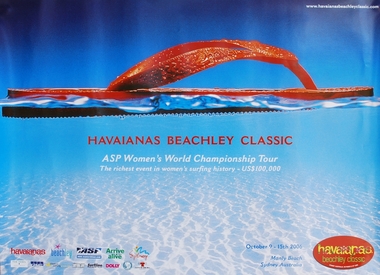
Poster, 2006 Havaianas Beachley Classic, Circa 2006
This poster was produced to promote the richest women's surfing event in the world, the Havaianas Beachley Classic held at Manly Beach, Sydney in October 2006. The contest is unique in that it is organised by 7 times world surfing champion Layne Beachley from Sydney Australia.The 2006 Havaianas Beachley Classic was the only surfing event on the World Championship Tour organised by a professional surfer still competing. Layne Beachley was defeated in the final by young Australian female surfer Stephanie Gilmore. Stephanie Gilmore set a number of records winning this event including the amount of prizemoney she took home and the fact she is the only individual to win 2 ASP World tour events competing as a wild card entrant.Surf Contest, full colour, A2 poster promoting the 2006 Havaianas Beachley Classic at Manly Beach, Sydney, Australia from October 9-15th. The poster festures a red Havaianas thong floating in the water.Sponsors logos - Havaiana, Beachley Foundation, ASP, Sydneylayne beachley, stephanie gilmore, havaianas, manly beach, havaianas beachley classic -
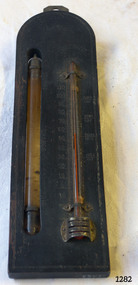 Flagstaff Hill Maritime Museum and Village
Thermometer, Early 20th Century
A Storm Glass and Thermometer such as this one would be used in predicting or forecasting the weather. Farmers used predictions they read from their Storm Glass to prepare for stormy weather or for choosing a good time for planting or harvesting their crops. This could mean to them the difference between a good year and a year without income. This design has been in use since the early 1800’s. According to Admiral Fitzroy (who studied the storm glass and wrote instructions on its use) the liquid in the glass changes composition and appearance according to the direction of the air moving around it. He advised the user to disturb the contents once or twice a year by tipping it upside down and shaking it gently. Item is a good example of a barometer/thermometer that would have been in most homes and farms from the late 19th century and early 20th century. This item would have been massed produced at the time therefore easily available and quite cheap to purchase making this particular item not very significant as not associated with a historic person or property or with a known manufacturer or date.Storm Glass and Thermometer, commonly called a 'Cottage Barometer', mounted on a rectangular dark rectangle of wood, top corners rounded. The Storm Glass (or weather glass, or chemical weather glass) is suspended in a long oval shaped hole in the wood on left side, held in place at top and at bottom with 2 metal bands secured by nails. The glass of this gauge is hand blown, sealed at the top with another layer of glass. The watery fluid in the storm glass is opaque brownish colour with dark particles floating in it. (Storm glasses were usually filled with a variation of a mix of camphor, distilled water, ethyl alcohol and silver nitrate.) The alcohol thermometer is mounted on the right side of the wood, bulb resting in a hollow, attached at top and near base by 2 thin metal strips, with clover-leaf shaped ends, nailed into place. Over the bulb is nailed a metal guard with 3 ventilation slits cut into it. On left of thermometer is a scale, stamped into wood, 30 below zero to 130 above zero, in 2 degree intervals. A border of 2 thin parallel lines, with remnants of light coloured paint, is around the block of wood. On the reverse side, a metal plate is nailed to the top with a mounting hole in it. Impressed sideways along edge of barometer is "STORMY" "CHANGE" "FAIR". Across the top of the thermometer is a fleur de leis in the wood, and above this it is stamped "FAHRENHEIT". On right of the thermometer, stamped into the wood, is "BLOOD/HEAT", "SUMR/HEAT", "TEMPE/RATE", "FREEZ/ING". On the back of the wood, at the base, are remnants of a white sticker with "...111.73". Carved into the wood is "HOLLAND / AV". flagstaff hill, warrnambool, shipwrecked coast, flagstaff hill maritime museum, maritime museum, shipwreck coast, flagstaff hill maritime village, great ocean road, barometer, cottage barometer, storm glass, thermometer, chemical weather glass -
 Flagstaff Hill Maritime Museum and Village
Domestic object - Bowl, Late 19th or early 20th Century
The Process of Making Pottery Decorating, Firing, Glazing, Making, Technical There is a rhythm and flow to clay. It can’t be done all at once! Even the making process! It can take weeks to get everything done, especially if you can only work on your pottery once a week! Even though we have three hour classes, it’s often just not enough time! Here is an overview of some of the processes so you have a bit more grasp on some of the technical stuff! Step One – Design There are SO many ideas out there for making stuff in clay! From delicate porcelain jewellery, through to heavy sculptural work and everything in between. Deciding your direction is sometimes not that easy – when you first start, try everything, you will naturally gravitate to the style that you enjoy! The options and variations are endless and can get a wee bit overwhelming too! Check in with me before you start to ensure your ideas will work, what order you might do things, how you could achieve the look you are seeking and any other technical data required! Step Two – Making Clay is thixotropic. This means that as you work with it, the clay first gets sloppier and wetter, before is begins to dry in the atmosphere. For most things, you simply can’t do all parts of the project at once. An example of work order might look like: Get last weeks work out from the shelves Prepare clay for today’s work – roll your clay, prepare balls for throwing, make the first stage of a pinch pot) Clean up last week’s work and put it on the shelf for bisque firing Check that you have any glazing to do – and do enough of it that you will have time to finish your main project Do the next step of your next project – there might be a further step that can’t be complete immediately, in that case, wrap your work well and put onto the shelves. Letting your work rest for a while can really help keep your work clean and professional looking. Many things require bagging under plastic to keep it ready for work the next week – put your name on the outside of the bag so you can find your work easily. We have stickers and markers. Consider how you want to decorate your work – coloured slip can be applied at a fairly wet stage (remembering that it will make your work even wetter!). Trying to apply slip to dry clay won’t work! If you want to do sgraffito – you will need to keep the work leather hard (a state of dryness where you can still work the clay with a little effort and a little water and care). Step Three – Drying Most of the time your work can go into the rack uncovered to let it dry out for the following week. If you want to continue forming or shaping you will need to double bag your work – put your work on a suitable sized bat and put the bat in a bag so the base of the bag is under the bat, then put another bag over the top of the work and tuck the top of the bag under the bat. If you want to trim (or turn) your thrown work the following week, it should also be double bagged. If your work is large, delicate, or of uneven thicknesses, you should lightly cover your work for drying. When considering the drying process, bare in mind the weather, humidity and wind! The hotter and dryer, the faster things dry and work can dry unevenly in the shelves – this can lead to cracking – another time to lightly cover your work for drying. Step Four – Trimming and Cleaning Up Your work is dry! It is called greenware now and it is at it’s most fragile! Handle everything with two hands. I often refer to soft hands – keep everything gentle and with your fingers spread as much as possible. Try to not pick up things like plates too much, and always with both hands! Before your work can be bisque fired it should be “cleaned up”. You work won’t go into the kiln if it has sharp edges – when glazed, sharp edges turn into razor blades! Use a piece of fly wire to rub the work all over – this will scratch a little so be light handed. Use a knife or metal kidney to scrape any areas that require a bit more dynamic treatment than the fly wire offers! Finally, a very light wipe over with a slightly damp sponge can help soften and soothe all of your edges and dags! Trimming thrown work: If you are planning to trim (or turn) your thrown work (and you should be), make sure you bag it well – your work should be leather hard to almost dry for easiest trimming. Use this step to finish the work completely – use a metal kidney to polish the surface, or a slightly damp sponge to give a freshly thrown look. Wipe the sponge around the rim after trimming, and check the inside of the pot for dags! Trimming slip cast work: Usually I will trim the rims of your work on the wheel the following day to make that stage easier, however you will still need to check your work for lumps and bumps. Last but not least – check that your name is still clearly on the bottom of your work. Step Five – Bisque Firing When the work is completely dry it can go into the bisque kiln. The bisque kiln is fired to 1000°C. This process burns off the water in the clay as well as some of the chemically bound water. The structure of the clay is not altered that much at this temperature. Inside the bisque kiln, the work is stacked a little, small bowl inside a larger bowl and onto a heavy plate. Smaller items like decorations or drink coasters might get stacked several high. Consideration is paid to the weight of the stack and shape of the work. A bisque kiln can fire about one and a half times the amount of work that the glaze kiln can fire. The firing takes about 10 hours to complete the cycle and about two days to cool down. Once it has been emptied the work is placed in the glaze room ready for you to decorate! Step Six – Glazing Decorating your work with colour can be a lot of fun – and time consuming! There are three main options for surface treatment at this stage: Oxide Washes Underglazes Glazes Washes and underglazes do not “glaze” the work – It will still need a layer of glaze to fully seal the clay (washes don’t need glaze on surfaces not designed for food or liquid as they can gloss up a little on their own). Underglazes are stable colourants that turn out pretty much how they look in the jar. They can be mixed with each other to form other colours and can be used like water colours to paint onto your work. Mostly they should have a clear glaze on top to seal them. Oxides are a different species – the pink oxide (cobalt) wash turns out bright blue for instance. They don’t always need a glaze on top, and some glazes can change the colour of the wash! The glazes need no other “glaze” on top! Be careful of unknown glaze interactions – you can put any combination of glaze in a bowl or on a plate, but only a single glaze on the outside of any vertical surface! Glazes are a chemical reaction under heat. We don’t know the exact chemicals in the Mayco glazes we use. I can guess by the way they interact with each other, however, on the whole, you need to test every idea you have, and not run the test on a vertical surface! Simply put, glaze is a layer of glass like substance that bonds with the clay underneath. Clay is made of silica, alumina and water. Glaze is made of mostly silica. Silica has a melting point of 1700°C and we fire to 1240°C. The silica requires a “flux” to help it melt at the lower temperature. Fluxes can be all sorts of chemicals – a common one is calcium – calcium has a melting point of 2500°C, however, together they both melt at a much lower temperature! Colourants are metal oxides like cobalt (blue), chrome (green through black), copper (green, blue, even red!), manganese (black, purple and pink) iron (red brown), etc. Different chemicals in the glaze can have dramatic effects. for example, barium carbonate (which we don’t use) turns manganese bright pink! Other elements can turn manganese dioxide brown, blue, purple and reddish brown. Manganese dioxide is a flux in and of itself as well. So, glazes that get their black and purple colours, often interact with other glazes and RUN! Our mirror black is a good example – it mixes really well with many glazes because it fluxes them – causes them to melt faster. It will also bring out many beautiful colours in the glazes because it’s black colouring most definitely comes from manganese dioxide! Glaze chemistry is a whole subject on it’s own! We use commercial Mayco glazes on purpose – for their huge range of colour possibilities, stability, cool interactions, artistic freedom with the ability to easily brush the glazes on and ease of use. We currently have almost 50 glazes on hand! A major project is to test the interactions of all glazes with each other. That is 2,500 test tiles!!!! I’m going to make the wall behind the wheels the feature wall of pretty colours! Step Seven – Glaze (Gloss or sometimes called “Glost”) Firing Most of the time this is the final stage of making your creation (but not always!) The glaze kiln goes to 1240°C. This is called cone 6, or midrange. It is the low end of stoneware temperatures. Stoneware clays and glazes are typically fired at cone 8 – 10, that is 1260 – 1290°C. The energy requirement to go from 1240°C to 1280°C is almost a 30% more! Our clay is formulated to vitrify (mature, turn “glass-like”) at 1240°, as are our glazes. A glaze kiln take around 12 hours to reach temperature and two to three days to cool down. Sometimes a third firing process is required – this is for decoration that is added to work after the glaze firing. For example – adding precious metals and lustres. this firing temperature is usually around 600 – 800°C depending upon the techniques being used. There are many students interested in gold and silver trims – we will be doing this third type of firing soon! After firing your work will be in the student finished work shelves. Remember to pay for it before you head out the door! There is a small extra charge for using porcelain clay (it’s more than twice the price of regular clay), and for any third firing process! Once your work has been fired it can not turn back into clay for millennia – so don’t fire it if you don’t like it! Put it in the bucket for recycling. https://firebirdstudios.com.au/the-process-of-making-pottery/ The bowl is an example of kitchenware used in the 19th century and still in use today.Bowl white ceramic. Crack on side. Badly stained.Backstamp very faint and unable to be read.flagstaff hill, warrnambool, shipwrecked-coast, flagstaff-hill, flagstaff-hill-maritime-museum, maritime-museum, shipwreck-coast, flagstaff-hill-maritime-village, mixing bowl, food preparation, kitchen equipment, ceramic -
 Flagstaff Hill Maritime Museum and Village
Domestic object - Bowl
The Process of Making Pottery Decorating, Firing, Glazing, Making, Technical There is a rhythm and flow to clay. It can’t be done all at once! Even the making process! It can take weeks to get everything done, especially if you can only work on your pottery once a week! Even though we have three hour classes, it’s often just not enough time! Here is an overview of some of the processes so you have a bit more grasp on some of the technical stuff! Step One – Design There are SO many ideas out there for making stuff in clay! From delicate porcelain jewellery, through to heavy sculptural work and everything in between. Deciding your direction is sometimes not that easy – when you first start, try everything, you will naturally gravitate to the style that you enjoy! The options and variations are endless and can get a wee bit overwhelming too! Check in with me before you start to ensure your ideas will work, what order you might do things, how you could achieve the look you are seeking and any other technical data required! Step Two – Making Clay is thixotropic. This means that as you work with it, the clay first gets sloppier and wetter, before is begins to dry in the atmosphere. For most things, you simply can’t do all parts of the project at once. An example of work order might look like: Get last weeks work out from the shelves Prepare clay for today’s work – roll your clay, prepare balls for throwing, make the first stage of a pinch pot) Clean up last week’s work and put it on the shelf for bisque firing Check that you have any glazing to do – and do enough of it that you will have time to finish your main project Do the next step of your next project – there might be a further step that can’t be complete immediately, in that case, wrap your work well and put onto the shelves. Letting your work rest for a while can really help keep your work clean and professional looking. Many things require bagging under plastic to keep it ready for work the next week – put your name on the outside of the bag so you can find your work easily. We have stickers and markers. Consider how you want to decorate your work – coloured slip can be applied at a fairly wet stage (remembering that it will make your work even wetter!). Trying to apply slip to dry clay won’t work! If you want to do sgraffito – you will need to keep the work leather hard (a state of dryness where you can still work the clay with a little effort and a little water and care). Step Three – Drying Most of the time your work can go into the rack uncovered to let it dry out for the following week. If you want to continue forming or shaping you will need to double bag your work – put your work on a suitable sized bat and put the bat in a bag so the base of the bag is under the bat, then put another bag over the top of the work and tuck the top of the bag under the bat. If you want to trim (or turn) your thrown work the following week, it should also be double bagged. If your work is large, delicate, or of uneven thicknesses, you should lightly cover your work for drying. When considering the drying process, bare in mind the weather, humidity and wind! The hotter and dryer, the faster things dry and work can dry unevenly in the shelves – this can lead to cracking – another time to lightly cover your work for drying. Step Four – Trimming and Cleaning Up Your work is dry! It is called greenware now and it is at it’s most fragile! Handle everything with two hands. I often refer to soft hands – keep everything gentle and with your fingers spread as much as possible. Try to not pick up things like plates too much, and always with both hands! Before your work can be bisque fired it should be “cleaned up”. You work won’t go into the kiln if it has sharp edges – when glazed, sharp edges turn into razor blades! Use a piece of fly wire to rub the work all over – this will scratch a little so be light handed. Use a knife or metal kidney to scrape any areas that require a bit more dynamic treatment than the fly wire offers! Finally, a very light wipe over with a slightly damp sponge can help soften and soothe all of your edges and dags! Trimming thrown work: If you are planning to trim (or turn) your thrown work (and you should be), make sure you bag it well – your work should be leather hard to almost dry for easiest trimming. Use this step to finish the work completely – use a metal kidney to polish the surface, or a slightly damp sponge to give a freshly thrown look. Wipe the sponge around the rim after trimming, and check the inside of the pot for dags! Trimming slip cast work: Usually I will trim the rims of your work on the wheel the following day to make that stage easier, however you will still need to check your work for lumps and bumps. Last but not least – check that your name is still clearly on the bottom of your work. Step Five – Bisque Firing When the work is completely dry it can go into the bisque kiln. The bisque kiln is fired to 1000°C. This process burns off the water in the clay as well as some of the chemically bound water. The structure of the clay is not altered that much at this temperature. Inside the bisque kiln, the work is stacked a little, small bowl inside a larger bowl and onto a heavy plate. Smaller items like decorations or drink coasters might get stacked several high. Consideration is paid to the weight of the stack and shape of the work. A bisque kiln can fire about one and a half times the amount of work that the glaze kiln can fire. The firing takes about 10 hours to complete the cycle and about two days to cool down. Once it has been emptied the work is placed in the glaze room ready for you to decorate! Step Six – Glazing Decorating your work with colour can be a lot of fun – and time consuming! There are three main options for surface treatment at this stage: Oxide Washes Underglazes Glazes Washes and underglazes do not “glaze” the work – It will still need a layer of glaze to fully seal the clay (washes don’t need glaze on surfaces not designed for food or liquid as they can gloss up a little on their own). Underglazes are stable colourants that turn out pretty much how they look in the jar. They can be mixed with each other to form other colours and can be used like water colours to paint onto your work. Mostly they should have a clear glaze on top to seal them. Oxides are a different species – the pink oxide (cobalt) wash turns out bright blue for instance. They don’t always need a glaze on top, and some glazes can change the colour of the wash! The glazes need no other “glaze” on top! Be careful of unknown glaze interactions – you can put any combination of glaze in a bowl or on a plate, but only a single glaze on the outside of any vertical surface! Glazes are a chemical reaction under heat. We don’t know the exact chemicals in the Mayco glazes we use. I can guess by the way they interact with each other, however, on the whole, you need to test every idea you have, and not run the test on a vertical surface! Simply put, glaze is a layer of glass like substance that bonds with the clay underneath. Clay is made of silica, alumina and water. Glaze is made of mostly silica. Silica has a melting point of 1700°C and we fire to 1240°C. The silica requires a “flux” to help it melt at the lower temperature. Fluxes can be all sorts of chemicals – a common one is calcium – calcium has a melting point of 2500°C, however, together they both melt at a much lower temperature! Colourants are metal oxides like cobalt (blue), chrome (green through black), copper (green, blue, even red!), manganese (black, purple and pink) iron (red brown), etc. Different chemicals in the glaze can have dramatic effects. for example, barium carbonate (which we don’t use) turns manganese bright pink! Other elements can turn manganese dioxide brown, blue, purple and reddish brown. Manganese dioxide is a flux in and of itself as well. So, glazes that get their black and purple colours, often interact with other glazes and RUN! Our mirror black is a good example – it mixes really well with many glazes because it fluxes them – causes them to melt faster. It will also bring out many beautiful colours in the glazes because it’s black colouring most definitely comes from manganese dioxide! Glaze chemistry is a whole subject on it’s own! We use commercial Mayco glazes on purpose – for their huge range of colour possibilities, stability, cool interactions, artistic freedom with the ability to easily brush the glazes on and ease of use. We currently have almost 50 glazes on hand! A major project is to test the interactions of all glazes with each other. That is 2,500 test tiles!!!! I’m going to make the wall behind the wheels the feature wall of pretty colours! Step Seven – Glaze (Gloss or sometimes called “Glost”) Firing Most of the time this is the final stage of making your creation (but not always!) The glaze kiln goes to 1240°C. This is called cone 6, or midrange. It is the low end of stoneware temperatures. Stoneware clays and glazes are typically fired at cone 8 – 10, that is 1260 – 1290°C. The energy requirement to go from 1240°C to 1280°C is almost a 30% more! Our clay is formulated to vitrify (mature, turn “glass-like”) at 1240°, as are our glazes. A glaze kiln take around 12 hours to reach temperature and two to three days to cool down. Sometimes a third firing process is required – this is for decoration that is added to work after the glaze firing. For example – adding precious metals and lustres. this firing temperature is usually around 600 – 800°C depending upon the techniques being used. There are many students interested in gold and silver trims – we will be doing this third type of firing soon! After firing your work will be in the student finished work shelves. Remember to pay for it before you head out the door! There is a small extra charge for using porcelain clay (it’s more than twice the price of regular clay), and for any third firing process! Once your work has been fired it can not turn back into clay for millennia – so don’t fire it if you don’t like it! Put it in the bucket for recycling. https://firebirdstudios.com.au/the-process-of-making-pottery/ This bowl is an example of kitchenware used in the 19th century and still in use today.Bowl white ceramic plain that has two sets of edging around lip. Inside bowl has plaster designed to look like cooking mixture.flagstaff hill, warrnambool, shipwrecked-coast, flagstaff-hill, flagstaff-hill-maritime-museum, maritime-museum, shipwreck-coast, flagstaff-hill-maritime-village, kitchen equipment, ceramic -
 Flagstaff Hill Maritime Museum and Village
Domestic object - Bowl, J & G Meakin, Late 19th or early 20th Century
The Process of Making Pottery Decorating, Firing, Glazing, Making, Technical There is a rhythm and flow to clay. It can’t be done all at once! Even the making process! It can take weeks to get everything done, especially if you can only work on your pottery once a week! Even though we have three hour classes, it’s often just not enough time! Here is an overview of some of the processes so you have a bit more grasp on some of the technical stuff! Step One – Design There are SO many ideas out there for making stuff in clay! From delicate porcelain jewellery, through to heavy sculptural work and everything in between. Deciding your direction is sometimes not that easy – when you first start, try everything, you will naturally gravitate to the style that you enjoy! The options and variations are endless and can get a wee bit overwhelming too! Check in with me before you start to ensure your ideas will work, what order you might do things, how you could achieve the look you are seeking and any other technical data required! Step Two – Making Clay is thixotropic. This means that as you work with it, the clay first gets sloppier and wetter, before is begins to dry in the atmosphere. For most things, you simply can’t do all parts of the project at once. An example of work order might look like: Get last weeks work out from the shelves Prepare clay for today’s work – roll your clay, prepare balls for throwing, make the first stage of a pinch pot) Clean up last week’s work and put it on the shelf for bisque firing Check that you have any glazing to do – and do enough of it that you will have time to finish your main project Do the next step of your next project – there might be a further step that can’t be complete immediately, in that case, wrap your work well and put onto the shelves. Letting your work rest for a while can really help keep your work clean and professional looking. Many things require bagging under plastic to keep it ready for work the next week – put your name on the outside of the bag so you can find your work easily. We have stickers and markers. Consider how you want to decorate your work – coloured slip can be applied at a fairly wet stage (remembering that it will make your work even wetter!). Trying to apply slip to dry clay won’t work! If you want to do sgraffito – you will need to keep the work leather hard (a state of dryness where you can still work the clay with a little effort and a little water and care). Step Three – Drying Most of the time your work can go into the rack uncovered to let it dry out for the following week. If you want to continue forming or shaping you will need to double bag your work – put your work on a suitable sized bat and put the bat in a bag so the base of the bag is under the bat, then put another bag over the top of the work and tuck the top of the bag under the bat. If you want to trim (or turn) your thrown work the following week, it should also be double bagged. If your work is large, delicate, or of uneven thicknesses, you should lightly cover your work for drying. When considering the drying process, bare in mind the weather, humidity and wind! The hotter and dryer, the faster things dry and work can dry unevenly in the shelves – this can lead to cracking – another time to lightly cover your work for drying. Step Four – Trimming and Cleaning Up Your work is dry! It is called greenware now and it is at it’s most fragile! Handle everything with two hands. I often refer to soft hands – keep everything gentle and with your fingers spread as much as possible. Try to not pick up things like plates too much, and always with both hands! Before your work can be bisque fired it should be “cleaned up”. You work won’t go into the kiln if it has sharp edges – when glazed, sharp edges turn into razor blades! Use a piece of fly wire to rub the work all over – this will scratch a little so be light handed. Use a knife or metal kidney to scrape any areas that require a bit more dynamic treatment than the fly wire offers! Finally, a very light wipe over with a slightly damp sponge can help soften and soothe all of your edges and dags! Trimming thrown work: If you are planning to trim (or turn) your thrown work (and you should be), make sure you bag it well – your work should be leather hard to almost dry for easiest trimming. Use this step to finish the work completely – use a metal kidney to polish the surface, or a slightly damp sponge to give a freshly thrown look. Wipe the sponge around the rim after trimming, and check the inside of the pot for dags! Trimming slip cast work: Usually I will trim the rims of your work on the wheel the following day to make that stage easier, however you will still need to check your work for lumps and bumps. Last but not least – check that your name is still clearly on the bottom of your work. Step Five – Bisque Firing When the work is completely dry it can go into the bisque kiln. The bisque kiln is fired to 1000°C. This process burns off the water in the clay as well as some of the chemically bound water. The structure of the clay is not altered that much at this temperature. Inside the bisque kiln, the work is stacked a little, small bowl inside a larger bowl and onto a heavy plate. Smaller items like decorations or drink coasters might get stacked several high. Consideration is paid to the weight of the stack and shape of the work. A bisque kiln can fire about one and a half times the amount of work that the glaze kiln can fire. The firing takes about 10 hours to complete the cycle and about two days to cool down. Once it has been emptied the work is placed in the glaze room ready for you to decorate! Step Six – Glazing Decorating your work with colour can be a lot of fun – and time consuming! There are three main options for surface treatment at this stage: Oxide Washes Underglazes Glazes Washes and underglazes do not “glaze” the work – It will still need a layer of glaze to fully seal the clay (washes don’t need glaze on surfaces not designed for food or liquid as they can gloss up a little on their own). Underglazes are stable colourants that turn out pretty much how they look in the jar. They can be mixed with each other to form other colours and can be used like water colours to paint onto your work. Mostly they should have a clear glaze on top to seal them. Oxides are a different species – the pink oxide (cobalt) wash turns out bright blue for instance. They don’t always need a glaze on top, and some glazes can change the colour of the wash! The glazes need no other “glaze” on top! Be careful of unknown glaze interactions – you can put any combination of glaze in a bowl or on a plate, but only a single glaze on the outside of any vertical surface! Glazes are a chemical reaction under heat. We don’t know the exact chemicals in the Mayco glazes we use. I can guess by the way they interact with each other, however, on the whole, you need to test every idea you have, and not run the test on a vertical surface! Simply put, glaze is a layer of glass like substance that bonds with the clay underneath. Clay is made of silica, alumina and water. Glaze is made of mostly silica. Silica has a melting point of 1700°C and we fire to 1240°C. The silica requires a “flux” to help it melt at the lower temperature. Fluxes can be all sorts of chemicals – a common one is calcium – calcium has a melting point of 2500°C, however, together they both melt at a much lower temperature! Colourants are metal oxides like cobalt (blue), chrome (green through black), copper (green, blue, even red!), manganese (black, purple and pink) iron (red brown), etc. Different chemicals in the glaze can have dramatic effects. for example, barium carbonate (which we don’t use) turns manganese bright pink! Other elements can turn manganese dioxide brown, blue, purple and reddish brown. Manganese dioxide is a flux in and of itself as well. So, glazes that get their black and purple colours, often interact with other glazes and RUN! Our mirror black is a good example – it mixes really well with many glazes because it fluxes them – causes them to melt faster. It will also bring out many beautiful colours in the glazes because it’s black colouring most definitely comes from manganese dioxide! Glaze chemistry is a whole subject on it’s own! We use commercial Mayco glazes on purpose – for their huge range of colour possibilities, stability, cool interactions, artistic freedom with the ability to easily brush the glazes on and ease of use. We currently have almost 50 glazes on hand! A major project is to test the interactions of all glazes with each other. That is 2,500 test tiles!!!! I’m going to make the wall behind the wheels the feature wall of pretty colours! Step Seven – Glaze (Gloss or sometimes called “Glost”) Firing Most of the time this is the final stage of making your creation (but not always!) The glaze kiln goes to 1240°C. This is called cone 6, or midrange. It is the low end of stoneware temperatures. Stoneware clays and glazes are typically fired at cone 8 – 10, that is 1260 – 1290°C. The energy requirement to go from 1240°C to 1280°C is almost a 30% more! Our clay is formulated to vitrify (mature, turn “glass-like”) at 1240°, as are our glazes. A glaze kiln take around 12 hours to reach temperature and two to three days to cool down. Sometimes a third firing process is required – this is for decoration that is added to work after the glaze firing. For example – adding precious metals and lustres. this firing temperature is usually around 600 – 800°C depending upon the techniques being used. There are many students interested in gold and silver trims – we will be doing this third type of firing soon! After firing your work will be in the student finished work shelves. Remember to pay for it before you head out the door! There is a small extra charge for using porcelain clay (it’s more than twice the price of regular clay), and for any third firing process! Once your work has been fired it can not turn back into clay for millennia – so don’t fire it if you don’t like it! Put it in the bucket for recycling. https://firebirdstudios.com.au/the-process-of-making-pottery/This bowl was made by renowned pottery company J & G Meakin of England. The firm was established in the mid-1800's. The bowl is an example of kitchenware used in the 19th century and still in use today.Bowl; white ceramic, round and tapering inwards towards base. Made by J and G Meakin England.On base, 'Ironstone China Reg SOL 391413' with symbolflagstaff hill, flagstaff hill maritime museum and village, warrnambool, maritime museum, maritime village, great ocean road, shipwreck coast, mixing bowl, food preparation, j & g meakin, pottery, stoke-on-trent, kitchen equipment, ceramic -
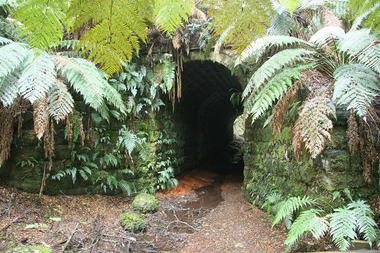 Marysville & District Historical Society
Photograph (Item) - Colour photograph, 20-09-2008
A colour photograph of the entrance to The Big Culvert.A colour photograph of the entrance to The Big Culvert. The Big Culvert is a historic granite and bluestone arch along the Yarra Track, a major route to Melbourne through the 1800s. Built in 1870 and a major piece of infrastructure for its time, the heritage listed culvert allowed water to flow under often-flooded the road. The Yarra Track is the former name of the gold fields road from Healesville to the Woods Point and Jordan Goldfields, in Victoria, Australia. A direct route via the Yarra River and the Great Divide was discovered by Rieck in September 1862 and became known as the Yarra Track. Early in 1863, the Victorian Government decided to construct a 193-kilometre (120 mile) road along the route. Its original width varied between 4 and 6 metres (12 and 20 feet), and was designed to accommodate horse-drawn vehicles. The Track involved the climbing of the Black Spur, descent into the Acheron Valley, and then through Marysville to the Cumberland where it followed the existing route.the big culvert, yarra track, victoria, healesville, wood's point goldfields, jordan goldfields, black spur, acheron valley, cumberland valley -
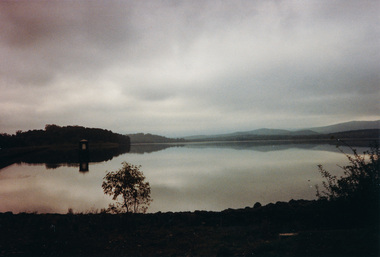 Eltham District Historical Society Inc
Photograph, Sugarloaf Reservoir from Skyline Drive, 1989, 1989
Originally contained in a 'magnetic' photo album believed to have been donated by Mr Eric Stephenson, Jingalong, 110 Ryans Road, Eltham, Vic. 3095; relocated to archival safe storage. Sugarloaf Reservoir is situated on former farmland. This large water storage was completed in 1982 and serves Melbourne's northern suburbs. Within the visitor areas are two picnic grounds and other recreational facilities. Below its massive rock embankment is located the Winnecke Treatment Plan designed to purify its water before being piped into Melbourne. The dam partly inundated the old firing ranges of the former Christmas Hills Rifle Club. Source: Christmas Hills Now and then: Yarra Glen & District Historical Society, 2004. Two colour photographsskyline drive, sugarloaf reservoir -
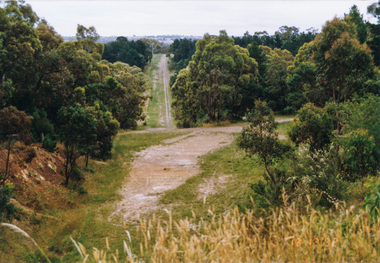
 Eltham District Historical Society Inc
Photograph, Metropolitan Water pipe track east from Afton Street, Research, 19 December 1992, 19/12/1992
... research (vic.) Colour photograph Metropolitan Water pipe track ...The Eltham Horse Trail: Research and Warrandyte to Kinglake: Survey of proposed route, December 1992: (4) Connecting trail to ElthamColour photographeltham horse trail (1992 survey), afton street, research (vic.) -
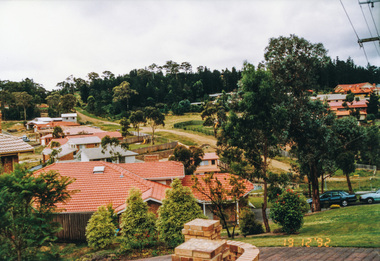
 Eltham District Historical Society Inc
Photograph, Metropolitan Water pipe track west from Afton Street, Research, 19 December 1992, 19/12/1992
... research (vic.) Colour photograph Metropolitan Water pipe track ...The Eltham Horse Trail: Research and Warrandyte to Kinglake: Survey of proposed route, December 1992: (4) Connecting trail to ElthamColour photographeltham horse trail (1992 survey), afton street, research (vic.) -
 Eltham District Historical Society Inc
Photograph, Metropolitan Water pipe track west from Maroong Drive, Research, 19 December 1992, 19/12/1992
... .) Maroong Drive Colour photograph Metropolitan Water pipe track west ...The Eltham Horse Trail: Research and Warrandyte to Kinglake: Survey of proposed route, December 1992: (4) Connecting trail to ElthamColour photographeltham horse trail (1992 survey), research (vic.), maroong drive