Showing 829 items
matching slide sets
-
 Ballarat Tramway Museum
Photograph - Digital image Set of 10, Tony Smith, 1971
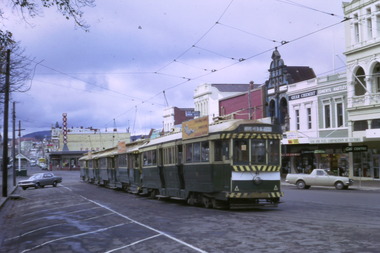
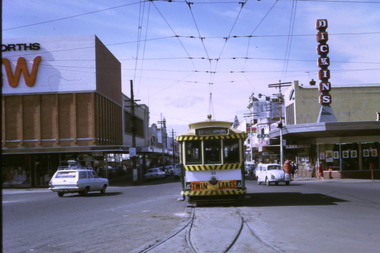
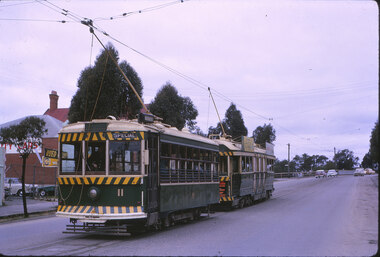
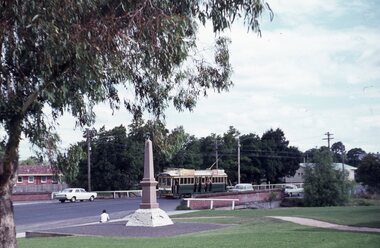
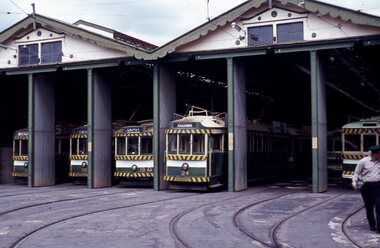
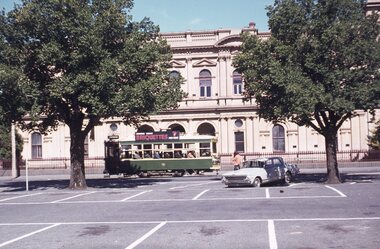
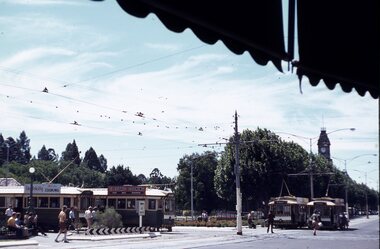
Yields information about Ballarat Tramways and trams prior to the closure of the tramway system.Set of 10 digital images of Ballarat trams prior to closure, scanned from original slides by Tony Smith, 1971 prior to closure of the system. .1 - 41 and four other single truckers in the City Loop - Sturt St - has Dickins, Gear Chemist, Egments - Hartleys in the background. .2 - 33 northbound in Drummond St North with a large semi trailer behind it. .3 - Scrubber tram on 0 road at the depot. .4 - 43 in Lydiard St North .5 - 37? at Sebastopol terminus with the Royal Hotel in the Background. .6 - 37, Albert St, south of Ophir St crossover, northbound - photo not in focus. .7 - 37 at the Grey St loop, northbound. .8 - 37 and 34? - Urquhart St loop? - not in focus. .9 - 11 - Sturt St, showing Victoria St destination. .10 - 37 - climbing the Lydiard St hill, tram showing Sebastopol.trams, tramways, city loop, sturt st, lydiard st north, drummond st nth, depot, grey st loop, albert st, urquhart st, tram 41, tram 33, tram scrubber, tram 43, tram 37, tram 34, tram 11 -
 Ballarat Tramway Museum
Photograph - Digital image Set of 10, Tony Smith, 1971
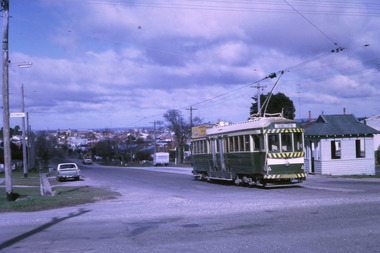
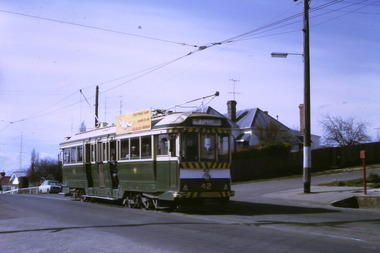
Yields information about Ballarat Tramways and trams prior to the closure of the tramway system.Set of 10 digital images of Ballarat trams prior to closure, scanned from original slides by Tony Smith, 1971 prior to closure of the system. .1 - 37 at the Lydiard St North terminus, with the shelter in the background. .2 - 33 at the Mount Pleasant terminus, has the corner store with a "The Sun" advertisement and the general store on the right side of the road in the background. Has signs for Streets Ice Cream and Coca Cola. Also has the tram stop signs - painted pole and enamel sign. .3 -33 arriving at the Mt Pleasant terminus with the conductor stepping off the back step, a lady walking across to the tram. Tram has a Twin Lakes sign. .4 - 11 at Victoria St terminus, with conductor turning the pole. Tram has a Twin Lakes sign. IN the background is the rail bridge over the Eureka line and a shelter. .5 - 11 in bound from Victoria St, shows the bleakness of the street at the time. Tram has Twin Lakes and a SEC Briquettes signs. .6 - 12 outbound to Mt Pleasant in Main St and the corner with Humffray St. Tram has a Twin Lakes sign. .7 - 11 in bound from Victoria St, in Bridge St, with junction in background. Tram has Twin Lakes and a SEC Briquettes signs. In the background are Rodda's, C.W. Pennant wall papers and Gill and O'Keffe footwear stores. .8 - 21 in Wendouree Parade, in bound to Victoria St, with the Lake in the background, near Macarthur St. .9 - 21 ditto, nearing the Macarthur St junction. Has the shelter and tram stop signage for View Point in the background. .10 - 34 sitting on the depot fan, 2 road, ready to run out. Has Mt Pleasant as the destination.trams, tramways, lydiard st north, mount pleasant terminus, victoria st, main st, bridge st, wendouree parade, macarthur st, view point, depot, tram 37, tram 33, tram 11, tram 12, tram 21, tram 34 -
 Ballarat Tramway Museum
Photograph - Digital image Set of 10, Tony Smith, 1971
Yields information about Ballarat Tramways and trams prior to the closure of the tramway system.Set of 10 digital images of Ballarat trams prior to closure, scanned from original slides by Tony Smith, 1971 prior to closure of the system. .1 - 11 arriving at Gardens Loop, tram has destination of Mt Pleasant, advert for Twin Lakes and SEC Briquettes. In the background is the Gardens Kiosk building. .2 - 11 at Gardens Loop .3 - 11 in Victoria St, crossing the Eureka line rail bridge. .4 - 43 and another bogie tram sitting on 1 road at the depot. .5 - 27 derailed at the depot, in Wendouree Parade - derailed all wheels. .6 - ditto .7 - 33 coupled up to 27, to pull it back onto the track. Driver adjusting the pole. Tram has an Eureka and SEC roof advertisement. .8 - 27 in Wendouree Parade, showing depot, just to the east of the depot. .9 - 33 in bound in Drummond St North at the Mill St Loop. .10 - 33 in bound in Victoria St, has Gardens via Drummond St Nth destination.trams, tramways, wendouree parade, gardens loop, victoria st, depot, derailments, drummond st nth, mill st loop, tram 11, tram 43, tram 27, tram 33 -
 Ballarat Tramway Museum
Photograph - Digital image Set of 10, Tony Smith, 1971
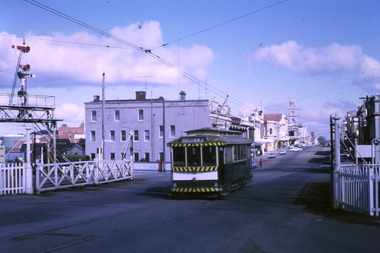
Yields information about Ballarat Tramways and trams prior to the closure of the tramway system.Set of 10 digital images of Ballarat trams prior to closure, scanned from original slides by Tony Smith, 1971 prior to closure of the system. .1 - 27 crossing Lydiard St North level crossing, with Reids Coffee Palace in the background. .2 - 11 and 26? crossing at the Bell St loop - 11 has destination of Lydiard St North, Twin Lakes sign and a SEC Briquette advert. 26 - enroute to Lydiard St North. .3 - 13 in Bridge St, at Stones Corner. Tram has a Twin Lakes advertisement. Has the Bank of NSW, ? Hotel, with a JP Howard sign on the building. .4 - 26 and 27 crossing at Bell St loop. 26 has a Briquettes roof advert. .5 - 13 and 12? crossing at the Parker St loop. 13 has a Twin Lakes advert. .6 - 13 at Carlton St loop, Wendouree Parade. Has the Olympic rings in the background. .7 - 17 in Wendouree Parade, with destination of Gardens via Drummond St North, near the depot. Tram has a Twin Lakes advert. .8 - 31 turning from Wendouree Parade into Macarthur St at View point, with a shelter in the background. Tram is showing Special. .9 - 31 in Macarthur St at View Point - has destination of Victoria St. .10 - 21 enroute to Victoria St, about to cross Grenville St. Tram has the destination of Victoria St. Has the signal control box on the adjacent pole.trams, tramways, level crossings, lydiard st gates, lydiard st nth, drummond st sth, bridge st, stones corner, bell st, parker st loop, wendouree parade, carlton st, view point, macarthur st, grenville st, sturt st, tram 27, tram 11, tram 26, tram 13, tram 21, tram 31, tram 12, tram 17 -
 Ballarat Tramway Museum
Photograph - Digital image Set of 10, Tony Smith, 1971
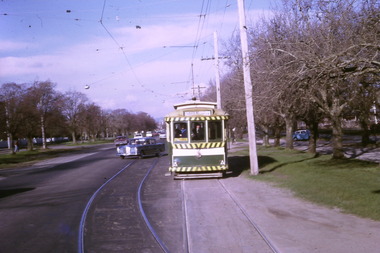
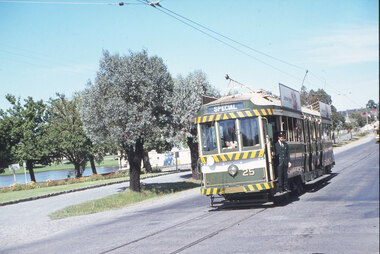
Yields information about Ballarat Tramways and trams prior to the closure of the tramway system.Set of 10 digital images of Ballarat trams prior to closure, scanned from original slides by Tony Smith, 1971 prior to closure of the system. .1 - 33 leaving Bridge St at Grenville St. Tram has destination of Gardens via Sturt St West and a Twin Lakes advert. Has Dickins and Woolworths in the background. .2 - 31 and another single trucker at the Victoria St terminus. Has the widened highway beyond the terminus in the background and Meagher's Hotel. .3 - 21 on the Dawson St cross over (has the destination of Mt Pleasant) with 37 in Sturt St, enroute to Lydiard St Nth. Has St Patrick's Cathedral in the background. .4 - 21 on crossover. .5 - 21 on crossover, waiting for 34 to pass by. .6 - 21 at Stones Corner, Bridge St., has Gear Chemist in the background, along with Bank of NSW. Tram has the destination of Mt Pleasant. .7 - 27 descending the Victoria St hill to Stones Corner, Main St junction. Tram has the destination of Gardens via Drummond St Nth. Has the Viscount ambassador Caravans site in the background. .8 - 21 outbound to Mt Pleasant at the Grant St loop in Barkly St. .9 - 21 and 34 at Grant St loop in Barkly St. .10 - 21 at Mt Pleasant terminus, showing Special. Has a person standing alongside the tram. On the adjacent shop is a "The Sun" sign.trams, tramways, grenville st, sturt st, victoria st, sturt st, dawson st, bridge st, stones corner, mt pleasant, grant st, barkly st, tram 33, tram 31, tram 21, tram 37, tram 34 -
 Ballarat Tramway Museum
Photograph - Digital image Set of 10, Tony Smith, 1971
Yields information about Ballarat Tramways and trams prior to the closure of the tramway system.Set of 10 digital images of Ballarat trams prior to closure, scanned from original slides by Tony Smith, 1971 prior to closure of the system. .1 - 42 in Barkly St - at top of hill, outbound to Mt Pleasant. Note the fire alarm on the right hand side of the photo. .2 - 42 and 21 crossing at Grant St Loop, Barkly St, Mt Pleasant. 42 outbound, 21 inbound. .3 - 34 and 21 crossing at Parker St Loop, with Ballarat College in the background. 42 in bound to City and Mt Pleasant, 21 showing Sturt St. West. .4 - 21, Wendouree Parade at the south end of the old parking loop. .5 - 42 and 21 crossing at Gardens Loop. 42 showing Mt Pleasant, 21 Gardens via Sturt St West. .6 - ditto .7 - 41 showing Special at intersection of Ripon St and Sturt St with a single trucker tram ex View Point waiting to turn into Sturt St. 41 has two Johnnie Walker Whiskey roof advertisements. .8 - Two single truckers - not well focused - 21? and 13? crossing at Mill St loop, has the hospital in the background. Conductor leaning out of the door on the outbound tram. .9 - 42, bogie tram and a single trucker at the City terminus (Sturt and Lydiard Sts). Has a group of SEC trammies standing alongside the tram. Has Racey's store and the SEC offices in the background. 42 has a briquettes roof advert. .10 - 34 in Sturt St, at the City terminus, with passengers getting onto the tram. Has the Town Hall, Myers store, Gemmola's Pharmacy in the background. Tram has the destination of Gardens via Drummond St. Nth. Has two trammies (crews) standing alongside the tram stop sign.trams, tramways, sturt st west, barkly st, grant st, parker st loop, sturt st, view point, ripon st, mill st loop, crews, town hall, tram 42, tram 21, tram 34, tram 41, tram 42 -
 Ballarat Tramway Museum
Photograph - Digital image Set of 10, Tony Smith, 1971
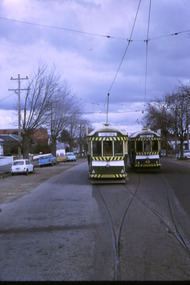
Yields information about Ballarat Tramways and trams prior to the closure of the tramway system.Set of 10 digital images of Ballarat trams prior to closure, scanned from original slides by Tony Smith, 1971 prior to closure of the system. .1 - 35 and 43 crossing at Urquhart St, Drummond St Sth. 35 outbound to Sebastopol, 43 to Lydiard St Nth. .2 - 35 in Lydiard St North, about to turn into Sturt St, with the Commonwealth Bank and National Mutual, Craig's Hotel in the background. Note the tram stop signs on the pole nearest to the Post Office. Tram has destination of Sebastopol. .3 - 39 and 41 at Grey St Loop, on a wet day. 39 showing Lydiard St Nth, 41 Special. .4 - two bogie trams (35?) and 41? Albert St, south of Grey St Loop. .5 - two bogies trams (41 and 35?) and a single trucker at the Sebastopol terminus. 41 showing Special. .6 - two bogies trams (41, 35?) and single trucker at the Grey St Loop, waiting for another bogie tram to arrive. Has a "Bounds" running alongside the tram. On a wet muddy day. .7 - two single truckers crossing at Gregory St loop, Lydiard St. Nth. - photo out of focus. .8 - 35 and single trucker crossing at ditto. .9 - 39 and another bogie tram waiting for two other trams to meet at Gregory St. loop. .10 - two single truckers crossing at the King St loop, Victoria St - out of focus and over exposed.trams, tramways, urquhart st, drummond st sth, lydiard st nth, sturt st, albert st, sebastopol, grey st loop, gregory st, king st, tram 35, tram 43, tram 39, tram 41 -
 Ballarat Tramway Museum
Photograph - Digital image Set of 10, Tony Smith, 1971
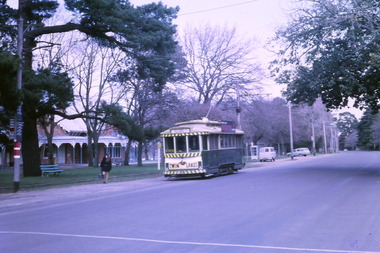
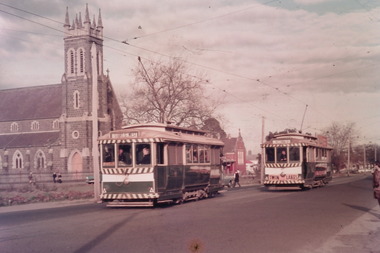
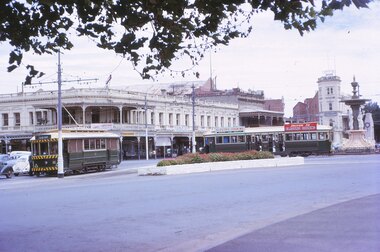
Yields information about Ballarat Tramways and trams prior to the closure of the tramway system.Set of 10 digital images of Ballarat trams prior to closure, scanned from original slides by Tony Smith, 1971 prior to closure of the system. The following photos have suffered colour change and showing some deterioration - fungal growth. .1 - 13 (Sturt St West) and 27 (Victoria St with Twin Lakes sign) crossing at King St loop with St Alipius church in the background. .2 - 13 (Sturt St West) and 17? (Mt Pleasant) crossing at Parker St loop, with the Ballarat College in the background. .3 - Single trucker, inbound, approaching the Parker St Loop, showing Mt Pleasant. .4 - 30 in Sturt St, descending the hill to Grenville St, with other trams in the background, including Woolworths Big W and the Dickins Store. Also has the 8 hour monument. 30 showing City. .5 - 37 running Special, no passengers, crossing Lydiard St Nth, heading for Grenville St. Has the Titanic bandstand, Mechanics Institute in the background. .6 - 33 and three other single truckers in the City Loop - has the Ballarat Gas Co and other buildings in the background. .7 - 37 showing Special passing 33 and other trams parked in the City Loop. Has Dickins, Ballarat Gas Co, Edmonds, Patersons store in the background. .8 - 17 crossing Lydiard St Nth in Sturt St. 17 has destination of Gardens via Drummond Nth, and a Twin Lakes sign. Includes the T&G sign in the background. .9 - 31, a single trucker and bogie tram crossing at Depot loop, Wendouree Parade - 31 showing Victoria St. .10 - 17 waiting in Gardens Loop, showing Mt Pleasant.trams, tramways, king st, victoria st, sturt st west, sturt st, grenville st, city loop, gardens loop, wendouree parade, tram 13, tram 27, tram 30, tram 37, tram 33, tram 17, tram 31 -
 Ballarat Tramway Museum
Photograph - Digital image Set of 10, Tony Smith, 1971
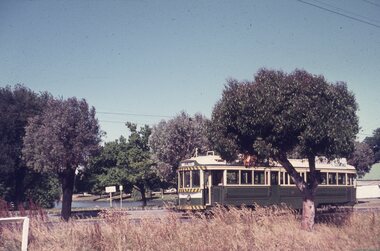
Yields information about Ballarat Tramways and trams prior to the closure of the tramway system.Set of 10 digital images of Ballarat trams prior to closure, scanned from original slides by Tony Smith, 1971 prior to closure of the system. The following photos have suffered colour change and showing some deterioration - fungal growth. .1 - 35 (Sebastopol), with the Town Hall and Gemmola's chemist in the background. Tram waiting at the tram stop. .2 - 27 at Victoria St loop, showing Gardens via Drummond St Nth. .3 - 35 at Armstrong St inbound showing Lydiard St Nth. Has the Commonwealth bank in the background. .4 - 32 westbound in Sturt St between Dawson and Lyon Streets, tram has the destination of Gardens via Drummond Nth. Has the Town Hall and other buildings in the background. .5 - 17 inbound at Dawson St. Tram has destination of Mt Pleasant. .6 - 39 picking up passengers at the tram stop on the west side of Dawson St. Has the Ritzy cafe and the Golden City hotel in the background. Tram appears to be well loaded with lady passengers and has a "Everything under my control in my all electric kitchen" SEC roof ad. .7 - 37 using the Dawson St crossover - has St Patricks Cathedral in the background. .8 - 21 entering the depot with Lake Wendouree in the background. .9 - 11 sitting in 0 road at the depot. .10 - 41 at the depot on 2 road. Tram has two Johnny Walker Whiskey roof adverts.trams, tramways, sturt st, victoria st, dawson st, lake wendouree, wendouree parade, depot, tram 35, tram 27, tram 32, tram 17, tram 39, tram 37, tram 21, tram 11, tram 41 -
 Ballarat Tramway Museum
Photograph - Digital image Set of 10, Tony Smith, 1971
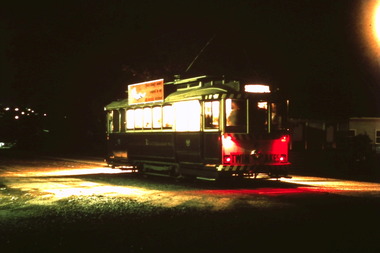
Yields information about Ballarat Tramways and trams prior to the closure of the tramway system.Set of 10 digital images of Ballarat trams prior to closure, scanned from original slides by Tony Smith, 1971 prior to closure of the system. .1 - 21 - night photo - at Sebastopol terminus .2 - 13 at Victoria St terminus .3 - 13 arriving at the Sturt St stop at Lydiard St, from Grenville St. Tram has the destination of Gardens via Sturt St West. Has the Commonwealth Bank and Mechanics institute in the background. .4 - 21 at Mill St loop, Drummond St Nth, enroute to Gardens via Drummond Nth. .5 - 26? about to turn from Drummond St Nth into Macarthur St with passengers boarding and leaving the tram. .6 - 21 northbound in Drummond St north at Mair St with an old hotel in the background. .7 - 33 at Lydiard St Nth, with many passengers boarding. Has the cemetery gates in the background. .8 - 26 waiting in the Martin Ave loop. Tram has the destination of Gardens via Drummond St Nth. .9 - 31 crossing 26 at the Martin Ave Loop. .10 - 26 at Gardens Loop with passengers getting off the tram. Tram has the destination of Mt Pleasant. The stop signage is visible to the right of the tram.trams, tramways, night photo, sebastopol, victoria st, sturt st, drummond st nth, mill st loop, macarthur st, mair st, lydiard st nth, martin ave, wendouree parade, tram 21, tram 13, tram 26, tram 31 -
 Ballarat Tramway Museum
Photograph - Digital image Set of 10, Tony Smith, 1971
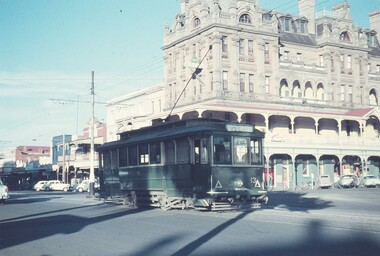
Yields information about Ballarat Tramways and trams prior to the closure of the tramway system.Set of 10 digital images of Ballarat trams prior to closure, scanned from original slides by Tony Smith, 1971 prior to closure of the system. .1 - 13 at the Parker St loop, Sturt St west waiting for another tram to arrive - Mercedes Benz car pull out around the stationary tramcar. .2 - 13 and another single trucker at the City terminus, north side of Sturt St. Note the conductor in the distance with a point bar about to hop onto the tram turning into Lydiard St North. Has the Post Office in the background. .3 - 26 arriving at the City stop, with the Mechanics Institute and Cooks Provide Hotel in the background. Tram has destination of Gardens via Drummond St North. .4 - 33 and 12 in Lydiard St Nth at Sturt St. 33 (Lydiard St Nth), 12 (Sebastopol). Has the post office and other buildings in the background .5 - 12 and 26 at city stop, south side with Town Hall and Myers in the background. 12 has destination of Sebastopol. .6 - 12 at intersection of Drummond St and Sturt St with Mobil petrol station in background and ad for Marshall batteries. Has the tram stop sign on the left hand side. Tram has destination of Sebastopol and a Twin Lakes sign. .7 - 30 northbound in Drummond St south at Sturt St about to turn into Sturt St. Has destination of Lydiard St Nth. Has the Southern Cross hotel in the background. .8 - 31 turning from Drummond St North into Sturt St, en route to Victoria St with the Shell service station in the background. Hospital Corner. Tram has roof advertisements for Johnnie Walker whisky. .9 - 30 and 31 (from above photos) in Sturt St. .10 - Tony Smith standing on the doorstep of 26 at Mt Pleasant terminus. Has the store in the background with The Sun and Robur tea adverts. trams, tramways, parker st loop, sturt st west, sturt st, conductors, drummond st, hospital corner, mt pleasant, tram 13, tram 26, tram 12, tram 30, tram 33 -
 Ballarat Tramway Museum
Slide - 35mm slide/s - set of 20, Eldon Hogan, 22/05/1971 12:00:00 AM
... 35mm slide/s - set of 20... - No. 29 at Quarry Hill Slide 35mm slide/s - set of 20 Eldon Hogan ...Set of 20 35mm Agfa colour blue and white plastic mount slide - featuring photos taken during an Association of Railway Enthusiasts Tour by Eldon Hogan. Folder had the date "22/5/1971" on it. Scanned on the Canon scanner at the depot 15/12/2005 at the time of the installation of the scanner. .1 - No. 25 in Nolan St with Lake Weeroona in the background. .2 - Three Birneys at the Depot junction, 30 and 29 with Conoles Hotel, McCrae St in the background. .3 - No. 5 in front of the Shamrock Hotel, Pall Mall .4 - No. 29 in front of the Shamrock Hotel with Stonemasons sign in the background. .5 - No. 18 ditto .6 - No. 30 and another Birney at the Quarry Hill terminus .7 - No. 24 southbound High St at the Violet St intersection with a "Mine Open" sign in the foreground and the Cathedral in the background. .8 - No. 19 at the Golden Square terminus, with the Golden Square Hotel in the background. .9 - No. 29 - side on view, North Bendigo line? Thunder St? .10 - No. 30 crossing the railway overbridge, inbound from Eaglehawk with a number of photographers in the foreground. .11 - No. 29? ditto .12 - No. 5 outbound - side on view, Thunder St, North Bendigo line? .13 - No. 29 and 30 at the intersection of High St and Brazier St with Church or School hall in the background. .14 - ditto .15 - ditto .16 - No. 25 and the two Birneys at the Eaglehawk terminus. .17 - No. 29 and two other trams at ditto .18 - No. 30 and 19 adjacent to the Lake View Hotel, McCrae St .19 - No. 5 and 25 crossing on the Eaglehawk Line, Ironbark? .20 - No. 29 at Quarry Hilltramways, trams, bendigo, lake weeroona, pall mall, golden square, eaglehawk, quarry hill, tram 25, tram 30, tram 29, tram 5, tram 18, tram 19, tram 24, tram 25 -
 Ballarat Tramway Museum
Slide - 35mm slide/s - set of 5, Eldon Hogan, 1/78 or late 1977
... 35mm slide/s - set of 5... in the background. Slide 35mm slide/s - set of 5 Eldon Hogan ...Set of five Kodak cardboard mounted slides - featuring photos taken during a visit to Bendigo Tour by Eldon Hogan. Slides have slide number (10 to 14) and date "Jan 78" stamped onto them. Scanned on the Canon scanner at the depot 15/12/1971 at the time of the installation of the scanner. .1 - No. 17 Nolan St .2 - No. 25 with Myer Roof Advertisement and No. 28 at Depot. .3 - No. 25 at Central Deborah Mine terminus .4 - No. 17 at North Bendigo terminus .5 - No. 17, Pall Mall at City terminus with the Beehive Building in the background.tramways, trams, bendigo, bendigo trust, nolan st, depot, central deborah, north bendigo, pall mall, tram 17, tram 25, tram 28 -
 Ballarat Tramway Museum
Slide - 35mm slide/s - set of 7, Eldon Hogan, Aug. 1964
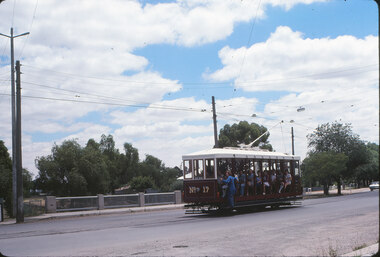
... 35mm slide/s - set of 7... Eaglehawk. Slide 35mm slide/s - set of 7 Eldon Hogan ...Set of seven Kodak cardboard mounted slides - featuring photos taken during a visit to Bendigo by Eldon Hogan. Slides have slide number (26 to 32) and date "Aug 64" stamped onto them. Possibly a Xavier College Cadets tour - Eldon was involved with them at the time, given slide No. 27. Scanned on the Canon scanner at the depot 15/12/1971 at the time of the installation of the scanner. .1 - No 11 and a bogie car at the Railway Station .2 - ditto - note uniformed person boarding (Xavier College Cadet?) .3 - No. 11 at Charing Cross, showing "special" .4 - No. 11 bound for Eaglehawk at a Crossing loop .5 - No. 20 in bound for Quarry Hill - at the above crossing loop? .6 - No. 11 crossing the Eaglehawk / Swan Hill railway line at the overbridge. .7 - No. 11, High St Eaglehawk.tramways, trams, bendigo, railway station, eaglehawk, charing cross, birney, tram 11, tram 20 -
 Ballarat Tramway Museum
Slide - 35mm slide/s - set of 2, Eldon Hogan?, late 1950's
... 35mm slide/s - set of 2..., with the Destination of Quarry Hill. Slide 35mm slide/s - set of 2 Eldon Hogan? ...Set of two Agfacolor cardboard mounted slides - have handwritten captions and two numbers - no date, pre dash canopy stripes and additional lights, late 1950's? Scanned on the Canon scanner at the depot 15/12/1971 at the time of the installation of the scanner. .1 - Bendigo 13, outbound in Pall Mall with the Shamrock Hotel in the background. .2 - Bendigo 2, in bound from Eaglehawk in a very rural situation, unsealed road sides, with the Destination of Quarry Hill..1 - "Tram No. 13 in Pall Mall Bendigo / 24)" in red ink. .2 - "Tram No. 2 approaching Bendigo / 25)" in red ink.tramways, trams, bendigo, eaglehawk, pall mall, tram 13, tram 2 -
 Ballarat Tramway Museum
Slide - 35mm slide/s - set of 3, Eldon Hogan, early 1960's
... 35mm slide/s - set of 3... at Eaglehawk" all in pencil Set of three Kodak cardboard mounted slides ...Set of three Kodak cardboard mounted slides - have handwritten captions and slide numbers - no date, post dash canopy lights but with the largely green front - early 1960's. From the Eldon Hogan collection. Scanned on the Canon scanner at the depot 15/12/1971 at the time of the installation of the scanner. .1 - No. 16 and a bogie car at Charing Cross, early 1960's with the City Club Hotel in the background. .2 - No. 18 at Charing Cross with the destination of Quarry Hill and with the City Club Hotel in the background .3 - No. 25 at the Eaglehawk terminus with two crewmen standing in front of the tram. Tram has the destination of Eaglehawk. The Town Hall in the background has a money raising thermometer for the Olympic Swimming Pool fund..1 - "Trams at Bendigo" .2 - "Trams at Fountain at Bendigo" .3 - "Tram at Eaglehawk" all in penciltramways, trams, bendigo, eaglehawk, charing cross, tram 16, tram 18, tram 25 -
 Ballarat Tramway Museum
Slide - 35mm slide/s - set of 11, Eldon Hogan, mid 1960's to early 1970's
... 35mm slide/s - set of 11... - with the single trucker leaving. Slide 35mm slide/s - set of 11 Eldon ...Set of 11 Agfa Plastic mounted slides - from the Eldon Hogan collection - possibly on an ARE Bendigo tours late 1960's or early 1970's with No. 18 Scanned on the Canon scanner at the depot 15/12/1971 at the time of the installation of the scanner. .1 - No 18 at Golden Square terminus with Billy Rodda's Golden Square Hotel in the background. .2 - ditto and the Victoria Bitter fence alongside the hotel. .3 - ditto and another single trucker. .4 - No. 18 at the Fire Station Loop, Golden Square line, with destination of Railway Station. .5 - No. 18 passing the Central Deborah mine, Violet St. Tram has a Briquette advertisement on the roof - the flaming briquettes. .6 - Another bogie tram at ditto. .7 - No. 18 and No. 6 crossing McCrae St loop near the depot junction? .8 - ditto .9 - No. 18 and a single trucker at the North Bendigo terminus. .10 - ditto .11 - with the single trucker leaving.tramways, trams, bendigo, golden square, central deborah, north bendigo, mccrae st, tram 18, tram 6 -
 Ballarat Tramway Museum
Slide - 35mm slide/s - set of 11, Eldon Hogan, mid 1960's to early 1970's
... 35mm slide/s - set of 11.... Slide 35mm slide/s - set of 11 Eldon Hogan ...Set of 11 Agfa Plastic mounted slides - from the Eldon Hogan collection - possibly on an ARE Bendigo tours - mid 1960's (black destination rolls) and late 1960's or early 1970's. Scanned on the Canon scanner at the depot 15/12/1971 at the time of the installation of the scanner. .1 - No 18 with Lake Weeroona in the background - possibly at the same time as the tour with No. 18, though showing destination of Charing Cross. .2 - ditto .3 - No. 25 and two following trams on a special tour, note the white disc - Quarry Hill line? .4 - No. 29 on the Eaglehawk line at the Mt. Korong Road and the Calder Highway, with the Ampol Service station in the background. .5 - No. 29 passing Lake Weeroona with Destination of Nth Bendigo - has a Briquettes Roof Advertisement., .6 - No. 26 ditto - with two SEC Roof Advertisements. .7 - No. 24 leaving Charing Cross for Golden Square with The Beehive building, Ezywalkin, Coca Cola and the Fountain Shopping Centre in the background. .8 - No. 29 and a bogie tram at the Golden Square terminus with Golden Square Hotel and Victoria Bitter fence in the background. No. 29 has a SEC Briquettes roof advertisement. .9 - No. 29, with the Cathedral in background. Tram has a SEC Briquettes roof advertisement and destination of Golden Square. .10 - side view of a bogie tram on the Eaglehawk line? Tram has a Electric cooking roof advertisement. Photo has been over exposed. .11 - Single trucker, Violet St with the Central Deborah mine head in the background. Tram has two SEC Electric Cooking roof advertisements. tramways, trams, bendigo, lake weeroona, eaglehawk, golden square, charing cross, central deborah, tram 18, tram 25, tram 29, tram 24 -
 Ballarat Tramway Museum
Slide - 35mm slide/s - set of 10, Eldon Hogan, mid 1960's to early 1970's
... 35mm slide/s - set of 10... 18 tram 24 tram 26 tram 21 tram 29 Set of 10 Agfa Plastic ...Set of 10 Agfa Plastic mounted slides - from the Eldon Hogan collection - possibly on an ARE Bendigo tours - mid 1960's (black destination rolls) and late 1960's or early 1970's. Scanned on the Canon scanner at the depot 15/12/1971 at the time of the installation of the scanner. .1 - No. 24 in bound along High St Bendigo with the discovery of gold monument in the foreground, Golden Sq route. .2 - ditto .3 - No. 26 outbound at the above location. .4 - No. 24 at the corner of Short St and High St, with the Technical college building? in the background. .5 - No. 26 at ditto, outbound for Golden Square. .6 - No. 24, High St Bendigo, with the Cathedral in the background. Tram has two Johnnie Walker Whiskey roof advertisements. .7 - Three trams, Pall Mall, Charing Cross, with the Beehive building in the background. Trams have SEC roof advertisement. .8 - ditto with Coca Cola ad on the Beehive building, turning around. .9 - No. 29 and a bogie tram at the Golden Square terminus with Billy Rodda's Golden Square Hotel in the background. Just past the tram is a large truck carrying boxes. .10 - Nos, 18, a bogie tram, 21 and 29 at the Quarry Hill terminus. tramways, trams, bendigo, tram 18, tram 24, tram 26, tram 21, tram 29 -
 Ballarat Tramway Museum
Slide - 35mm slide/s - set of 11, Eldon Hogan, mid 1960's to early 1970's
... 35mm slide/s - set of 11... to the discovery of Gold Monument. .11 - ditto. Slide 35mm slide/s - set ...Set of 11 Agfa Plastic mounted slides - from the Eldon Hogan collection - possibly on an ARE Bendigo tours - mid 1960's (black destination rolls) and late 1960's or early 1970's. Scanned on the Canon scanner at the depot 15/12/1971 at the time of the installation of the scanner. .1 - front of depot -26, 19, 24, 29 and 28 amongst those present. .2 - ditto .3 - 24 departing depot .4 - 26 at Eaglehawk .5 - No. 5 turning from Pall Mall into Mitchell St with town hall in background. .6 - No. 5 using crossover in Mitchell St - with Maples, CBA Bank, Astor, Homecrafts, Roger David shops or signs in the background. .7 - ditto .8 - bogie car at Charing Cross with the Fountain Plaza shopping centre in the background. .9 - Charing Cross, with the fountain in the foreground, The Beehive and three trams in the view. .10 - No. 24 outbound, Golden Square line crossing the bridge over the creek, adjacent to the discovery of Gold Monument. .11 - ditto. tramways, trams, bendigo, eaglehawk, depot, charing cross, golden square, tram 26, tram 19, tram 24, tram 29, tram 28, tram 26, tram 5 -
 Ballarat Tramway Museum
Slide - 35mm slide/s - set of 11, Eldon Hogan, mid 1960's to early 1970's
... 35mm slide/s - set of 11... roof advertisements. Slide 35mm slide/s - set of 11 Eldon Hogan ...Set of 11 Agfa Plastic mounted slides - from the Eldon Hogan collection - featuring an ARE tour with Nos. 21, 29 and 25 to Bendigo, mid 1960's. Scanned on the Canon scanner at the depot 15/12/1971 at the time of the installation of the scanner. .1 - No. 29 passing the Institute of Technology building, McCrae St. .2 - ditto .3 - Nos. 21 and 29 Lake Weeroona .4 - Nos. 29, 21 and 25 at the Golden Square Terminus with the Golden Square Hotel, Victoria Bitter fence in the background. .5 - ditto with a service car? .6 - ditto .7 - No. 21 with the Central Deborah mine poppet head in the background, Violet St. .8 - ditto with 21 and 29 .9 - ditto with 29 .10 - ditto with 21 and 29 .11 - 21, 29 and 25? at depot junction. Trams have SEC roof advertisements. tramways, trams, bendigo, lake weeroona, golden square, central deborah, tram 21, tram 29, tram 25 -
 Ballarat Tramway Museum
Slide - 35mm slide/s - set of 11, Eldon Hogan, mid 1960's to early 1970's
... 35mm slide/s - set of 11... 19 Set of 11 Agfa Plastic mounted slides - from the Eldon ...Set of 11 Agfa Plastic mounted slides - from the Eldon Hogan collection - featuring an ARE tour with Nos. 21, 29 and 25 to Bendigo, mid 1960's. Scanned on the Canon scanner at the depot 15/12/1971 at the time of the installation of the scanner. .1 - four trams at Charing Cross - includes 19 and 25. .2 - 21 and 25 at the depot junction. .3 - 21 and 29 Quarry Hill route? .4 - 29 ditto .5 - 24 at Golden Square terminus - photo taken from the city side - note all the little shops and buildings on the left hand side of the photograph. .6 - 29, 21 and 25 at Eaglehawk .7 - 29 - side on view - Eaglehawk line? .8 - ditto with 21 .9 - 29 - North Bendigo line? - side on view .10 - 29 and 21 - vacant paddocks - Eaglehawk line .11 - 29 crossing the railway overbridge, Eaglehawk line, in bound. Trams have SEC roof advertisements. tramways, trams, bendigo, eaglehawk, charing cross, golden square, tram 21, tram 29, tram 25, tram 19 -
 Ballarat Tramway Museum
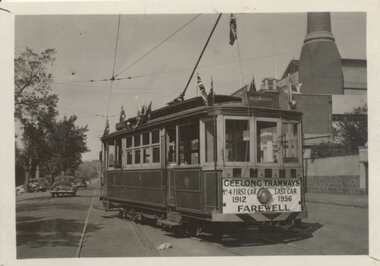
Photograph - Black & White Photograph/s - set of 3', Keith Kings, 26/03/1956 12:00:00 AM
Black and White print contained within the Wal Jack Bendigo and Geelong Album, see Reg Item 5003 for more details. Set of three black and white photographs from Keith Kings of the staged closures of the Geelong tramways. .1 - Geelong No. 4 - decorated as the Last tram, has a dash sign "Geelong Tramways No. 4 first car 1912, Last car 1956 Farewell", with the destination of Belmont. Photographed with power station in the background in Corio Terrace. 26/3/1956, KSK Photo (T)(e)(8). Printed on Ilford Paper. See also Reg Item 2667 and 4388 for a colour slide version of the same photograph. .2 - ditto - about to leave the depot - KSK Photo - T(g)(3) .3 - ditto - back at the depot - KSK Photo - T(g)(8)On the rear in ink and with the Keith Kings Copyright stamp: .1 - "Geelong - 4 - decorated as Official "Last" tram -26/3/56" - (T)(e)(8). .2 - "Geelong - 4 - illuminated as last tram Sun 26/3/56" - (T)(g)(3). .3 - "Geelong - 4 - last tram, back at Depot, Sun 26/3/56" - (T)(g)(8). trams, tramways, geelong, closure, depot, last tram, tram 4 -
 Bendigo Historical Society Inc.
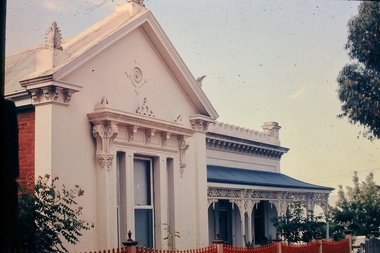
Slide - No 10 Valentine Street Bendigo
Situated walking distance from the city centre just off View Street is this superbly restored Victorian Residence displaying ornate treatment & style given to the house in 1880 by Bendigos famous architect William C. Vahland. Set amongst a private garden on a corner allotment of approx. 827m2, the residence includes entrance hall, ornate formal Lounge Room, spacious renovated kitchen and family room, 4 Bedrooms plus a music room or office, Bathroom plus provision for 2nd bathroom or ensuite off the main Bedroom. Large laundry, 2 toilets, downstairs includes large workshop, cellar and storage. Superb front & rear verandahs and private paved rear garden with double carport. The home is in excellent condition with loads of taste, style quality and charm. No 10 Valentine Street Bendigo - Slidehistory, bendigo, national trust collection bendigo, 10 valentine street -
 Bendigo Historical Society Inc.
Slide - Images by Arthur Pulfer, 1957-1970
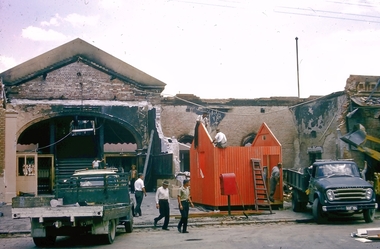
1965 fire at the Bendigo Railway Station A dull explosion in the refreshment room about 1:30 p.m. touched off the blaze, which quickly spread and burnt out the station in less than an hour. Just before the explosion a train carrying more than 200 Melbourne-bound holiday makers pulled out of the station. Scores of railways employees in other parts of the station did not realise the refreshment room was on fire until a signal box attendant gave the alarm. Early estimates place damage at more than £100,000. Quick work by station staff saved many thousands of pounds worth of equipment before flames engulfed the building from end to end. At the height of the blaze, a Bendigo fire brigade Station Officer, Vin Lapsley, fell 18 feet – and miraculously landed on his feet – after being overcome by smoke while directing a hose from a ladder on to the roof. Mr. Lapsley was later treated for a broken bone in his right leg.Many images from by Arthur Pulfer copied to slides. Nineteen Slides of Bendigo images: Bendigo Railway Station after fire 1965 New Bendigo Railway Station after the fire Bendigo Town Hall and Bull Street Bendigo Law Courts and Police Station from the conservatory gardens Gold Panners Monument with the Bendigo Technical school in the background Bendigo Cenotaph - set up for an event - Charing Cross - 1957 New Bendigo Chinese Dragon 'Loong' 1970 Easter Procession 1957 Golden Square High School September 1965 Hattam Street Bendigo Opening of Golden Oaks retirement village September 1965 - Hattam Street Bendigo High Street Golden Square, Bendigo - monument to the founding of gold in the area Bendigo Showgrounds with the Benevolent Home and the Base Hospital in the background Old Base Hospital Lucan Street Bendigo Arnold Street former shop Bendigo Alexandra Fountain Charing Cross Bendigo Banner - Bendigo Training Centre Bendigo House - address unknownhistory, bendigo, james lerk collection, bendigo conservatory, conservatory gardens bendigo, bendigo town hall, bull street bendigo, bendigo railway station fire, golden square high school, golden oaks village bendigo, dragon loong, bendigo cenotaph, alexandra fountain bendigo, bendigo base hospital, bendigo benevolent home, bendigo easter procession -
 Bendigo Historical Society Inc.
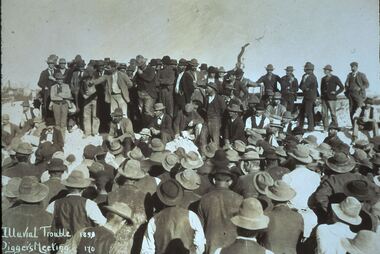
Slide - DIGGERS & MINING: THE DIGGERS, c1800s
Diggers & Mining: The Diggers. Illuvial Trouble 1858. Diggers meeting 170. Markings: VISAR COPYRIGHT SET - THE DIGGERS, 23. Used as a teaching aid.Visaireducation, tertiary, war -
 Bendigo Historical Society Inc.
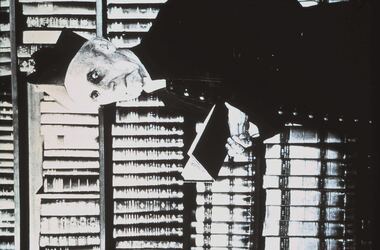
Slide - DIGGERS & MINING: THE DIGGERS, c1900
Diggers & Mining: The Diggers. Clergyman in front of shelves of books. Markings: VISAR COPYRIGHT SET - THE DIGGERS, 22. Used as a teaching aid.Visaireducation, tertiary, war -
 Bendigo Historical Society Inc.
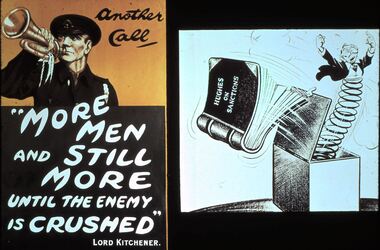
Slide - DIGGERS & MINING: THE DIGGERS, c1900s
Diggers & Mining: The Diggers. 2 IMAGES. 1st soldier on bugle, caption: Another Call, 'More Men and Still More until The Enemy is Crushed. Lord Kitchener. 2nd image: Jack in a box with book titled Hughes on Sanctions. Markings: VISAR COPYRIGHT SET - THE DIGGERS, 14. Used as a teaching aid.Visaireducation, tertiary, war -
 Bendigo Historical Society Inc.
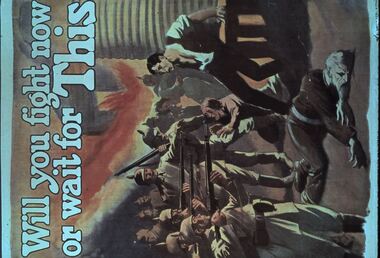
Slide - DIGGERS & MINING: THE DIGGERS, c1900s
Diggers & Mining: The Diggers. Geman army taking over, caption: Will you fight now or wait for This. Markings: VISAR COPYRIGHT SET - THE DIGGERS, 14. Used as a teaching aid.Visaireducation, tertiary, war -
 Bendigo Historical Society Inc.
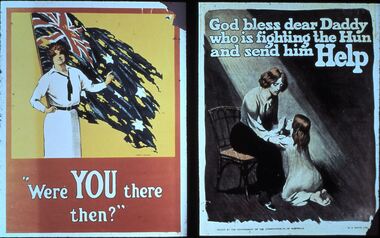
Slide - DIGGERS & MINING: THE DIGGERS, c1900
Diggers & Mining: The Diggers. 2 images on one slide. 1st image: woman in uniform in front of Auastralian flage, caption: 'Were YOU there then?' 2nd Image woman with her daughter, caption: God bless dear Daddy who is fighting the Hun and send him help. Markings: VISAR COPYRIGHT SET - THE DIGGERS, 20. Used as a teaching aid.Visaireducation, tertiary, war