Showing 673 items
matching street bars
-
 Ballarat Tramway Museum
Photograph - Black & White Photograph/s, Charles Craig, mid 1950's
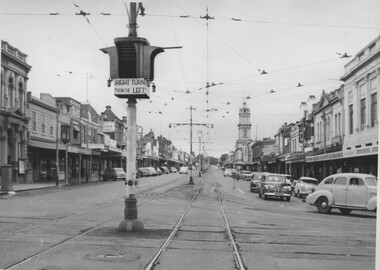
Photograph of the intersection of Ryrie and Moorabool Streets Geelong looking West along Ryrie St, showing the bar type traffic lights and that right hand turns were done from the left lane. Note the Safety zone sign. Two prints held - one large and one small in a vertical form with the traffic lights featured.. trams, tramways, geelong, ryrie st, moorabool st, traffic lights, safety zone -
 Ballarat Tramway Museum
Photograph - Black & White Photograph/s, Charles Craig, mid 1950's
Photograph of the intersection of Ryrie and Moorabool Streets Geelong looking south along Moorabool St, showing the bar type traffic lights and two bogie trams in Ryrie St, one with safety or hazard stripes. Has the Bank of NSW in the view. trams, tramways, geelong, ryrie st, moorabool st, traffic lights -
 Moorabbin Air Museum
Booklet (Item) - Ansett Notes On Automatic Bar Machines
Ministry Of Munitions Commonwealth Of Australia -
 Ballarat Tramway Museum
Slide - 35mm slide/s - set of 24, Noel Simons, 20/05/1971 12:00:00 AM
Set of 24 transparencies taken on 20/5/1971 on Kodak mounts. 1195.1 - Bendigo 19 arriving at Charing Cross en route to North Bendigo with Fountain Plaza and the City Family Hotel in the background. No. 19 has two roof ads for the SEC. -'Electricity better for cooking' and 'Everything's under control in my all electric kitchen' 1195.2 - as above, but standing at the Charing cross stop, with the Beehive Stores and other buildings along the east side of Pall Mall in the background. 1195.3 - No 21 ex Golden Square crossing View St. trackwork in front of No. 25 waiting to depart for Quarry Hill. No.21 has two roof ads (as for No.19 in 1195.1) and No.25 has one SEC roof ad and another. Ezywalkin sign in the background, and Fountain Plaza. 1195.4 - as for 1195.3, but after 21 has arrived and 25 left for Quarry Hill. Has Ezywalkin store and the Beehive store in the background. 1195.5 - No. 5 at the Eaglehawk terminus. Photo taken with a cannon in foreground looking along High St. Eaglehawk. Has shops on the west side of High St. in the background. 1195.6 - No. 5 at the Eaglehawk terminus, close up of the rear of the tram - note tow bar arrangement. Has destination of Quarry Hill. 1195.7-Nos.25 and 5 crossing at the Thorpe St. Loop, California Gully. No. 25 bound for Eaglehawk (has SEC Briquette and electric cooking roof ads) and 5 en route for Quarry Hill with a SEC and Cinzano roof ad. 1195.8 - as for 1195.7, but after trams have passed each other. Has Borough Auto Service building in the background. 1195.9 - No. 5 in Mt Korong Road, towards Bamard Street, photo taken after tram has passed photographer. 1195.10 - No. 30 at the Golden Square terminus with the Milk Bar on the right hand side of the photograph. 1195.11 - No. 30 inbound at Fire Station Loop, High St. Golden Square. Has old fire station in the background. Passengers are boarding the tramcar. 1195.12 - No. 30 in High St, bound for North Bendigo between Vine and Wattle Streets. 1195.13 - No. 5 bound for Eaglehawk waits at Iron Bark Gully Loop, at Hayes St. 1195.14 - No. 5 and No. 2 crossing at Iron Bark Gully Loop. 1195.15 - No. 5 bound for Eaglehawk leaving the Manchester Loop, Long gully. 1195.16 - No. 5 passing William Street, Long Gully en route to Eaglehawk. 1195.17 - No. 5 just before the California Gully Crossing Loop. 1195.18 - Nos. 5 and 26 crossing at California Gully crossing Loop. No. 5 heading to Eaglehawk, 26, Quarry Hill. 1195.19 - No. 5 in High St. Eaglehawk with Bob Moyle's Victoria Hotel and the TAB in the background. 1195.20 - No. 5 in High St. Eaglehawk approaching the terminus. Photo taken after the tram has passed the photographer. Has Foodland store and J. Best Fruit supply in the background, along with Eaglehawk Town Hall. 1195.21 - No. 5 at the Eaglehawk terminus, photo taken along seldom used track along High St. 1195.22 - as for 1195.22 - but at the very end of the track. 1195.23 - No. 5 en route for Quarry Hill climbs High St. Eaglehawk with the Victoria Hotel and Eaglehawk Town Hall in the background. 1195.24 - No. 5 and 25 crossing at Jobs Gully Loop. Note 25 has a black on white destination roll, while No. 5 has a white on black destination roll. Information written on in black ink and date stamped on purple ink. 1195.1 - "No. 19 arrives at Charing Cross Bendigo from Golden Square" 1195.2 - "No. 19 about to leave Charing Cross for North Bendigo" 1195.3 - "No. 25 awaiting departure for Quarry Hill, watches No. 21 arrive at Charring Cross from Golden Square" 1195.4 - "No. 21 on North Bendigo service and No. 25 on Quarry Hill run await departure at Charing Cross" 1195.5 - "No. 5 at Eaglehawk terminus" 1195.6 - "No. 5 at Eaglehawk terminus" 1195.7 - "Nos. 5 and 25 crossing at Thorpe St. Loop, California". 1195.8 - "Nos. 25 and 5 crossing Thorpe St. Loop, California Gully". 1195.9 - "No. 5 descending Mt Korong Rd. towards Bamard St." 1195.10 - "Birney car No. 30 at Golden Square terminus" 1195.11 - "Birney car No. 30 in High Street near Thistle Street (Fire Station Loop)" 1195.12 - "No. 30 in High St. between vine and Wattle Streets" 1195.13 - "No. 25 at Hayes Street Loop Iron Bark". 1195.14 - "Nos. 2 and 5 crossing at Hayes Street Loop Iron Bark" 1195.15 - "No. 5 at Manchester Loop opposite Havilah Road, Long Gully" 1195.16 - "No. 5 passing William Street, Long Gully". 1195.17 - "No. 5 at California Gully" 1195,18 - "Nos. 26 and 5 at Thorpe St. Loop, California Gully". 1195.19 - "No. 5 in High St. Eaglehawk". 1195.20 - "No. 5 approaching Eaglehawk terminus" 1195.21 - "No. 5 at Eaglehawk terminus" 1195.22 - "No. 5 at Eaglehawk terminus" 1195.23 - "No. 5 in High St. Eaglehawk" tramways, trams, bendigo, charing cross, eaglehawk, california gully, golden square, iron bark gully, jobs gully, tram 2, tram 5, tram 19, tram 21, tram 25, tram 26, tram 30 -
 Ballarat Tramway Museum
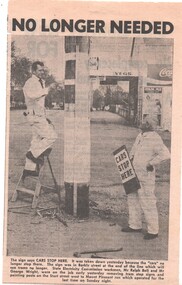
Newspaper, The Courier Ballarat, "No longer needed", 7/09/1971 12:00:00 AM
Yields information about the closure of the system and how the various small tasks, eg removal of tram stop signs were undertaken. The newspaper item details the name of the people.Newspaper clipping from The Courier, 7/9/1971 titled ""No longer needed" with a photo of two SEC workmen removing tram stop signs and painting poles on the Mt Pleasant route in Barkly St. Photo taken the previous day, following the closure of the route on Sunday. Has a photo of Mr. Ralph Bell and Mr George Wright. At corner with Cobden St. Has a Milk Bar in the background, advertising Streets Ice creek, Coca Cola, Briquettes and Vincent's Cold and Flu tablets. See Reg Item 3771 for a copy of the original photograph and a larger view of the scene. Second copy added 27/10/05. trams, tramways, mt pleasant, closure, tram stops, barkly st. -
Moorabbin Air Museum
Drawing (Item) - Lever Tow Bar RAAF Oxygen Recgharging Trolley W11141/20
-
 Ballarat Tramway Museum
Photograph - B&W print of donated negative, John Webster, 11/4/1953
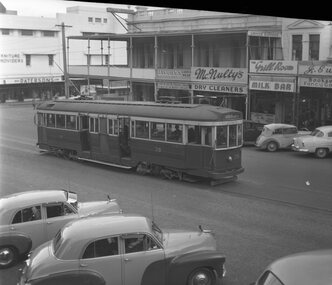
Yields information about Ballarat No. 39 and the street scene at the corner of Sturt and Lydiard St in 1953 and Holden Motor carsBlack and white digital print from a scan of a donated negative bogie tram No. 39 in Sturt St with the intersection of Grenville Street behind. In the rear are the buildings on the south west corner of the corner - featuring Mc Nultys Dry cleaning, a milk bar and grill room next door and Paterson's in the background. Note the Holden's (FJ's ?) parked with the rear into the kerbs. Black and White print made from scan of negative. Original Negative stored with Negatives. Image rescanned from copy neg and updated 31/5/2020. See On this basis, the envelope and marking matches that of Reg Item 4158, photo of No. 40, by John Webster and assumed taken on the same day as Item 4157, 4158, 4168, 4178 - 11/4/1953. Contained within Envelope No. 31.On left hand side of the negative in ink is "EI 36".tramways, trams, sturt st, grenville st, tram 39 -
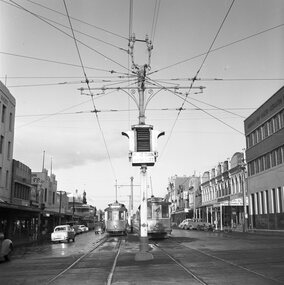 Ballarat Tramway Museum
Photograph - B&W print of donated negative, John Webster, 21/08/1955 12:00:00 AM
Yields information about the appearance of the appearance of the Bar Traffic light at the corner of Ryrie and Moorabool Streets and two trams in the backgroundBlack and white digital print from scan of a donated negative showing trams 17 and 10 in Ryrie St at the corner with Moorabool Street. Has the National Mutual Life Association and Geelong Gas Co. buildings and the ANZ Bank in the background and a number of cars in the street. Shows in detail the traffic bar lights and overhead pole and bracket arm details at the intersection. Assumed photo taken on the same day as the others - 21-8-1955. Black and White prints made from scan of negative. Original Negative stored with Negatives. Negative scanned at hi res 4/6/2020 and image updated.On left hand side of the negatives in ink is "EI 13"tramways, trams, geelong, tram stops, ryrie st, traffic lights, overhead, tram 17, tram 10 -
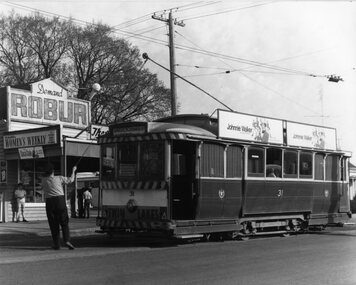 Ballarat Tramway Museum
Photograph - Black & White Photograph/s, Chris Wurr, 1971
Yields information about the streetscape at the terminus of the Mount Pleasant route with the milk bar in the background, people and the trolley pole being turned.Black and White photograph of a trammie commencing to swing the pole at the Mt Pleasant terminus of No. 31, with the Milk Bar at the terminus in the background along with other people. The tram has two roof advertisements for Johnnie Walker Whiskey and a front dash panel advertisement for "Twin Lakes". The Milk bar has advertisements for Robur Tea, Peters Ice Cream, Women's Weekly, Coca Cola and The Sun Newspaper (obscured). Stamped on rear in black ink "Donated to BTPS by and Photo By" / "Chris Wurr 12 Truscott Street, Ararat 3377 (053) 52 3403.tramways, trams, mt pleasant, milk bar, trolley poles, tram 31 -
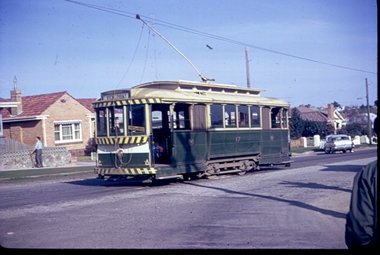
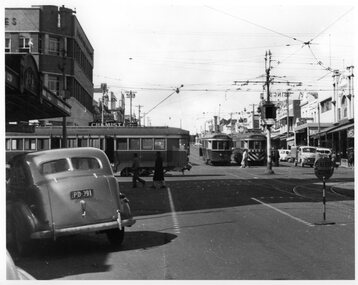 Ballarat Tramway Museum
Photograph - Black & White Photograph/s, 1955 or 1956
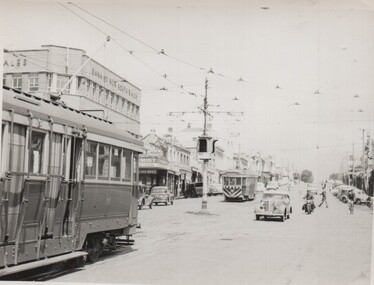
Black and white photograph of three Geelong bogie trams at the intersection of Moorabool and Ryrie Streets. Tram No. 33 in Moorabool St. has the destination of Belmont, while the adjacent tram has the destination of North. The third tram is eastbound in Ryrie St. Note Safety zone signs, the bar traffic lights. See also Reg. item 2799 for a subsequent photograph. In the background is the Bank of New South Wales building. Two copies held.tramways, trams, geelong, moorabool st, ryrie st, traffic lights, safety zone, tram 33 -
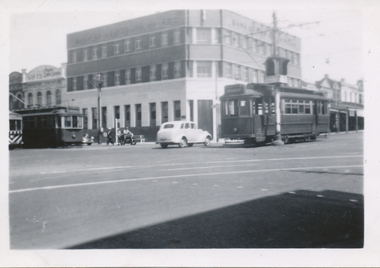
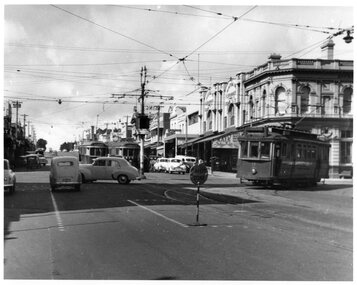 Ballarat Tramway Museum
Photograph - Black & White Photograph/s, 1955 or 1956
Black and white photograph of two Geelong bogie trams at the intersection of Moorabool and Ryrie Streets and Pengelly tram No. 17 turning into Moorabool St. See Reg. Item 2798 for a photograph just taken prior to this one. Tram No. 33 in Moorabool St. has the destination of Belmont, while the adjacent tram has the destination of North. The third tram is eastbound in Ryrie St. Note Safety zone signs, the bar traffic lights. In the background is Kays bakery. tramways, trams, geelong, moorabool st, ryrie st, traffic lights, safety zone, tram 33, tram 17 -
 Ballarat Tramway Museum
Photograph - Digital image, Joy Waller, 19/09/1971 12:00:00 AM
Copy of a colour slide showing Tram 17 in Lydiard Street North, at the terminus. This photo is taken from further north than 6013. From the direction of the trolley pole it is preparing to head back into the city, however the destination board is reading View Point.. One of the crew can be seen standing near a fence in the background, with a point bar in his hand. Several homes and motor cars can be seen. The photographer says this was taken on the last day of trams in Lydiard Street in 1971. There are shadows of other photographers at the location.trams, tramways, ballarat trams, crews, houses, last day, lydiard st nth, secv tramways, street scene, terminus, tramway closure, tram 17 -
 Ballarat Tramway Museum
Photograph - Digital image, Wal Jack, 1/01/1945 12:00:00 AM
Yields information the appearance of the SEC tramcar No. 21, and the south east corner of Sturt and Lydiard Streets in 1958 and an AETA tour.Digital image from the Wal Jack Ballarat Album of No. 32 at the Barkly St terminus, Mt Pleasant, 1-1-1945. Has the corner of the milk bar in the photograph. Note the clock in the photograph on the left hand side of the print. See image i2 for rear of photograph. See image i3 for hi res scan of print. See image i4 for hi res scan of negativeon rear of photo in ink, "Ballarat, No. 32. Mt Pleasant terminus. 11.20am, 1/1/45. Note plate on trolley wire". In the top right hand corner is the W. Jack stamp and has the negative number T68.trams, tramways, mt pleasant, barkly st, tram 32 -
 Ballarat Tramway Museum
Photograph - Digital image, Alwyn Marshall, 1960
Yields information about the appearance of No. 32, Lydiard St North and Macarthur St intersection in 1960.Digital image from the Wal Jack Ballarat Album of a photograph of No 32 southbound in Lydiard St at the intersection with Macarthur St. Has a Milk Bar - shop on the right hand side and the photograph shows the cutting wall on the east side of the street after the intersection. Photo by Alwyn Marshall. Possibly printed by Wal Jack as it has his handwriting on the rear. See image i2 for rear of photograph.On rear of photograph in ink "SEC, Ballarat No. 32 to Sebastopol in Lydiard St Nth at Macarthur St 1960 A. Marshal Photo."trams, tramways, lydiard st nth, macarthur st, tram 32 -
 Ballarat Tramway Museum
Photograph - Digital image, Ken Magor, 28/12/1950 12:00:00 AM
Yields information about the early use of Ballarat's bogie trams and the curve from Main Rd into Barkly St on the Mt Pleasant route.Digital image from the Wal Jack Ballarat Album of Ballarat 35 turning from Barkly St Mount Pleasant route into Main Road, 28-12-1950. Photo by Ken Magor. Shows the shops behind the tram - Milk bar - diary - advertising ice cream, Robur tea, fruits and confectionery. See image i2 for rear of photograph.On rear in ink "No. 35 from Mount Pleasant turning out of Barkly St into Main Street 28-12-50" and Ken Magor stamp with Neg No. "1901" written in.trams, tramways, mt pleasant, barkly st, main road, tram 35 -
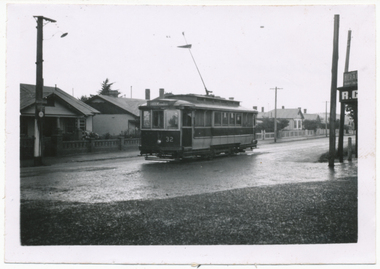
 Ballarat Tramway Museum
Photograph - Black & White Photograph/s, 8/01/1956 12:00:00 AM
Black and White print contained within the Wal Jack Bendigo and Geelong Album, see Reg Item 5003 for more details. Photo of No. 17 to Belmont (right) and No 18 to West at the intersection of Moorabool and Ryrie Streets 8-1-1956. Photographer unknown. In the background is the Bank of New South Wales Building and a gifts building. The pole in the centre has a bar traffic light. Has written in ink on the rear "Intersection Ryrie and Moorabool Sts 8/1/56, Geelong"trams, tramways, geelong, ryrie st, moorabool st, tram 17, tram 18 -
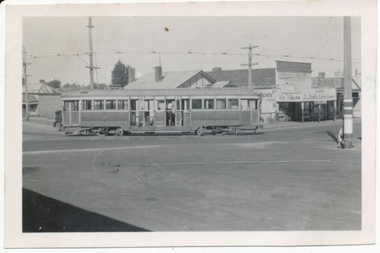
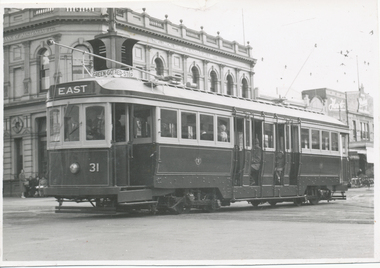 Ballarat Tramway Museum
Photograph - Black & White Photograph/s, 13/05/1947 12:00:00 AM
Black and White print contained within the Wal Jack Bendigo and Geelong Album, see Reg Item 5003 for more details. Photo of Car No. 31, crossing Ryrie and Moorabool Streets, first bogie to run in Geelong. Photo taken 13-5-1947. The tram has the destination of East. In the background is "The Union Bank of Australia. Limited". Above the front of the tram is a set of "Bar" traffic lights with signage "Green - Go - Red - Stop" No details on photographer. Has the Union Bank of Australia. Limited building in the background.trams, tramways, geelong, ryrie st, moorabool st, bogie trams, traffic lights, tram 31 -
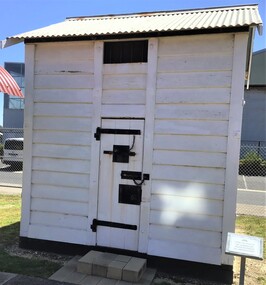 Queenscliffe Maritime Museum
Functional object - Building, Queenscliff Timber lock-up
Lock up originally located at rear of police station in Gellibrand Street QueenscliffFrequent occupants of the gaol were fishermen and sailors for being intoxicatedTimber lock-up building with tin roof painted white with small well secured door in the middle. A window with bars is high above the door. Door has black hinges, double locks and viewing window.gaol, lock up, queenscliff historic buildings -
 Colac RSL Sub Branch
Badge - Wounded on Active Service Bar, Wounded on Active Service Bar presented to William John Baird Service No: 5994
Brass stripe or bar awarded to Australian Service personnel while on Active ServiceSignificantThin brass barFront: Service wounded stripe. ss. Ltd-8 No 4 Prov Pat -
 Bendigo Historical Society Inc.
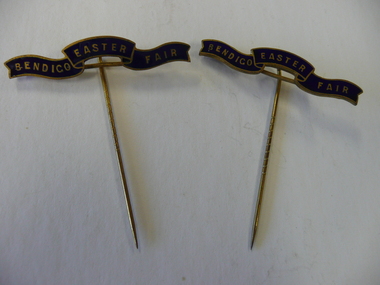
Souvenir - BENDIGO EASTER FAIR PINS
2 Bendigo Easter Fair stick pins, dark blue enamelled banner with gold lettering Bendigo Easter Fair, attached to back is a 5cm stick pin plus a bar for attaching ribbon.event, easter fair, bendigo easter fair -
 Bendigo Historical Society Inc.
Medal - BENDIGO EASTER FAIR MEDAL 1924, 1924
Bendigo Easter Fair medal 1924, blue enamelled circle worded Bendigo Easter Fair around gold Bendigo coat of arms on red enamel topped with gold wings and a red enamelled Maltese cross, suspended from a blue pin bar reading Bendigo 1924.Stokes & Sons Melbevent, easter fair, bendigo easter fair -
 Bendigo Historical Society Inc.
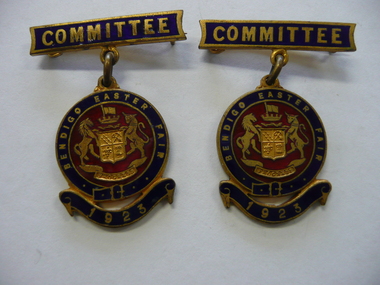
Medal - BENDIGO EASTER FAIR MEDALS 1923, 1923
2 Bendigo Easter Fair medals 1923, Bendigo coat of arms in gold on red enamel encircled by blue enamel ring in shape of belt with wording Bendigo Easter Fair above a blue banner dated 1923, suspended by a ring from a pin bar in blue enamel and gold lettering reading Committee.Stokes & Sons Melbevent, easter fair, bendigo easter fair -
 Bendigo Historical Society Inc.
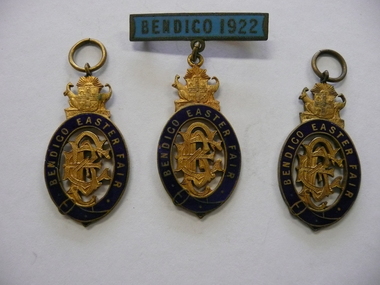
Medal - BENDIGO EASTER FAIR MEDALS 1922, 1922
3 Bendigo Easter Fair medals 1922, oval shaped blue enamelled ring with wording Bendigo Easter Fair around letters BEF in gold topped with Australian coat of arms, suspended from a blue enamelled pin bar with Bendigo 1922 on front.Stokes & Sons Melbevent, easter fair, bendigo easter fair -
 Bendigo Historical Society Inc.
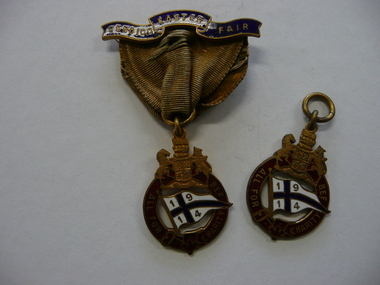
Medal - BENDIGO EASTER FAIR MEDALS 1914, 1914
2 Bendigo Easter Fair medals 1914, a circle of red enamel with wording B.E.F Charity For All with a white flag with blue cross in centre with date 1914, topped with Bendigo coat of arms, suspended from a green ribbon attached to a Navy blue enamelled bar with pin and wording Bendigo Easter Fair.Stokes & Sons Melbevent, easter fair, bendigo easter fair -
 Bendigo Historical Society Inc.
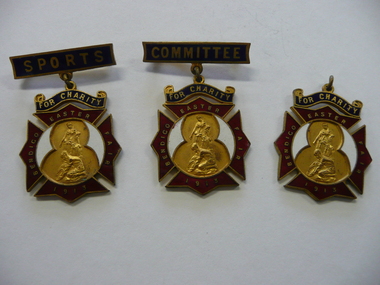
Medal - BENDIGO EASTER FAIR MEDALS 1913, 1913
3 Bendigo Easter Fair medals 1913 in the shape of a cross in red enamel with wording Bendigo Easter Fair 1913 depicted in centre in gold a man and woman panning for gold, topped with a blue enamel banner reading For Charity, suspended from a pinned bar one reading Sports , one Committee and one missing its bar.Stokes & Sons Melbevent, easter fair, bendigo easter fair -
 Bendigo Historical Society Inc.
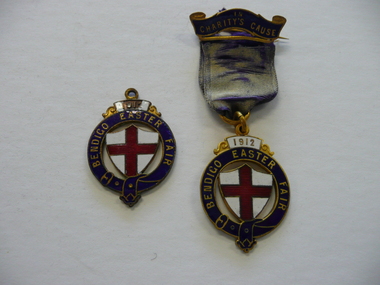
Medal - BENDIGO EASTER FAIR MEDAL 1912, 1912
2 Bendigo Easter Fair medals 1912, blue enamelled circle around a white enamelled shield with red cross, wording reads Bendigo Easter Fair 1912, suspended by a purple ribbon from a pinned bar with blue enamel and wording In Charitys Cause.Newmanevent, easter fair, bendigo easter fair -
 Bendigo Historical Society Inc.
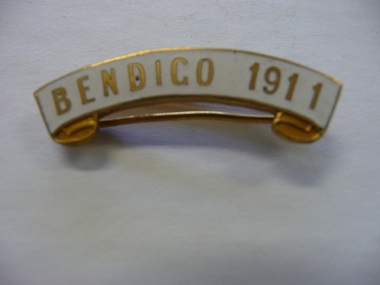
Souvenir - BENDIGO EASTER FAIR 1911, 1911
Pin bar for Bendigo Easter Fair medal 1911, gold with white enamel and reading Bendigo 1911, no ribbon or medal.Stokes & Sons Melbevent, easter fair, bendigo easter fair -
 Bendigo Historical Society Inc.
Medal - BENDIGO EASTER FAIR MEDAL 1910, 1910
3 Bendigo Easter Fair medals 1910, gold coloured with enamelled sections in navy blue, white and red, red cross in centre & wording Bendigo Easter Fair 1910, one is attached to a pinned bar (ribbon missing) with blue enamel and reads In Charitys Cause. One has letters AE scratched on back.Stokes & Sons Melbevent, easter fair, bendigo easter fair -
 Bendigo Historical Society Inc.
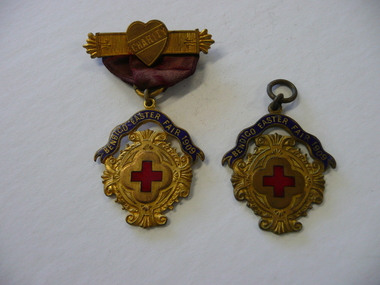
Medal - BENDIGO EASTER FAIR MEDAL 1909, 1909
2 Bendigo Easter Fair medals 1909, gold coloured with red cross in centre topped with a Navy blue ribbon worded Bendigo Easter Fair 1909, suspended by a burgundy ribbon from a pinned bar with heart shape with word Charity.event, easter fair, bendigo easter fair -
 Bendigo Historical Society Inc.
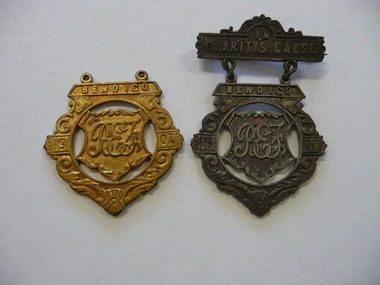
Medal - BENDIGO EASTER FAIR MEDAL 1907, 1907
2 Bendigo Easter Fair medals 1907, 1 gold coloured, 1 stg silver, letters BEF on central shield flanked by date 1907 & Bendigo on top, silver one suspended on a pinned bar with words In Charitys Cause & marked on back Stg Silver Stokes & Sons.Stokes & Sonsevent, easter fair, bendigo easter fair