Showing 1731 items
matching street making
-
 Flagstaff Hill Maritime Museum and Village
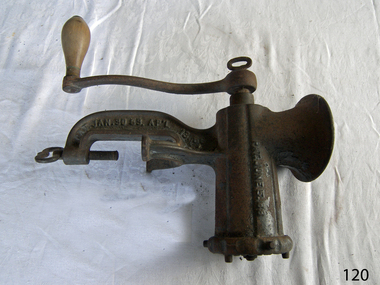
Domestic object - Food Mincer, Enterprise Manufacturing Company, circa 1911
This particular food mincer was manufactured by Enterprise Manufacturing Company. Located in Philadelphia, this company specialized in making hardware products. The company was especially known for its cherry pitters, apple peelers, and coffee mills. The company was founded in 1864 and was located on the corner of Dauphin, 3rd, and American Streets. Enterprise Manufacturing Co. remained in business until 1956 when it was bought by Silex Co.A mass produced early domestic item made for home food preparation this item's first patent design was approved in 1897. Manufactured by a well known company in the USA the "Enterprise Manufacturing Company” up until 1956. They specialised in making kitchen appliances of various types for domestic use and for export. Food mincers of the subject items design are still being produced today under the brand name of "Universal" made by Universal Trading Inc USA.Food mincer, metal, clamp on bench style, with rotating wooden handle. Inscriptions stamped on metal.Marked "Enterprise tinned Meat Chopper" "No. 10" "Enterprise MF'G Co. PHILA. USA" "PAT. JAN.30.83" flagstaff hill, warrnambool, flagstaff hill maritime museum, flagstaff hill maritime village, great ocean road, mincer, food mincer, meat mincer, food preparation, kitchen utensil, domestic object, enterprise manufacturing company, kitchen appliance -
 Flagstaff Hill Maritime Museum and Village
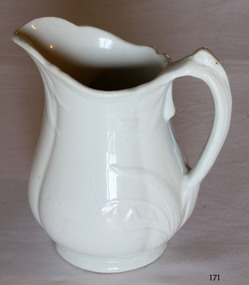
Ceramic - Jug, Baker & Co, 1891 to 1893
W Baker and Co-produced many different types of pottery at their Fenton Potteries, Stoke-on-Trent, Staffordshire England. The company was established in 1790 by Ralph Bourne and William Baker the company was working at capacity by the end of the century. By the late 1820's Bourne and Baker, in partnership with John Bourne, had acquired additional works opposite the first in 1833. With the deaths of John Bourne and William Baker, the partnership was dissolved, and then for a short time, the business was carried on by Ralph Bourne and William Baker junior and John Baker. By the early 1840s, William Baker was running it alone and was then using 'machinery for the potteries manufacturing operations in addition to the mill that was producing the raw clay. The business was subsequently carried on by William Baker and Company that were known for the making of printed, sponged, and pearl-white granite ware for export in the early 1880s at the Fenton works between Manor and Fountain Streets. The original works on the south side of City Road were by then an en-caustic tile works, apparently still in the hands of the Baker family. The pottery works flourished under William Baker’s management and by the middle of the nineteenth century with almost 500 employees was the biggest firm in Fenton. An early piece of ironstone Staffordshire pottery now a collector's item showing the types of domestic items that were exported from England to its colonies towards the end of the nineteenth century and into the beginning of the twentieth.Water pitcher ironstone ceramic white with raised embossed Lilly of the valley decoration around handle and lip sections. Marked on bottom, "Royal stone china, Baker and Co, England" with emblem of lion, crown and unicornflagstaff hill, warrnambool, shipwrecked coast, flagstaff hill maritime museum, maritime museum, shipwreck coast, flagstaff hill maritime village, great ocean road, jug, kitchen utensil, kitchen ware, water pitcher -
 Flagstaff Hill Maritime Museum and Village
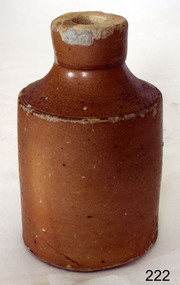
Ceramic - Stoneware Bottle, Doulton Lambeth, Circa 1870 - 1890
The Royal Doulton company began as a partnership between John Doulton, Martha Jones, and John Wattis an English ceramic and home accessories manufacturer founded in 1815. Operating originally in Vauxhall, London, later moving to Lambeth, in 1882 it opened a factory in Burslem, Stoke-on-Trent, in the centre of English pottery. The business was specialised in making salt-glazed stoneware articles, including utilitarian or decorative bottles, jugs and jars, much of it intended for inns and pubs. The backbone of the business was a wide range of utilitarian wares, mostly stone wares, including storage jars, tankards and the like, and later extending to pipes for drains, lavatories and other bathroom ceramics. From 1853 to 1902 its wares were marked Doulton & Co., then from 1902, when a royal warrant was given, Royal Doulton. The company always made some more decorative items, initially still mostly stoneware, and from the 1860s the firm made considerable efforts to get a reputation for design, in which it was largely successful, as one of the first British makers of art pottery. Initially, this was done through artistic stoneware's made in Lambeth, but in 1882 the firm bought a Burslem factory, which was mainly intended for making bone china table wares and decorative items. An early utilitarian stoneware item made by a well-known company that specialised in making salt-glazed items that later earned a reputation for making stoneware art objects.Ink bottle, brown salt glazed stoneware with narrow mouth tamped Doulton Lambeth cork missing. Stamp impressed into clay on edge "(2)32 / Doulton / Lambeth" flagstaff hill, warrnambool, shipwrecked coast, flagstaff hill maritime museum, flagstaff hill maritime village, great ocean road, stoneware, stoneware jar, doulton lambeth, kitchen ware, salt glazed -
 Flagstaff Hill Maritime Museum and Village
Functional object - Weight, Jabez & John Whitehouse Phoenix Foundry, Mid 19th to early 20th century
This cast iron weight was made in England by Jabez and John Whitehouse ironfounders of Tipton and who founded the company in 1848. J. Whitehouse owned and operated the Phoenix Foundry, in Castle Street, Tipton, Staffordshire, England. The Whitehouse family at the Phoenix Foundry produced cast-iron goods including this weight from the mid 1800s until the early 1900s. John Whitehouse died in 1893.An item made by one of the many ironfounders that operated foundries in the West Midlands of England giving a snapshot into the history of making cast iron objects at a time before plastics and other modern materials when most utilitarian items were made of cast iron by ironfounders.Weight, metal, 14 pound or 1 stone weight with a lifting handle. Three round indentations underneath."Whitehouse" inscribed at one end, "14" at the other flagstaff hill, warrnambool, shipwrecked coast, flagstaff hill maritime museum, maritime museum, flagstaff hill maritime village, great ocean road, weight, stone weight, weights and measures, j & j whitehouse, phoenix foundry, tipton uk, cast iron weight -
 Flagstaff Hill Maritime Museum and Village
Domestic object - Bowl, Late 19th or early 20th Century
The Process of Making Pottery Decorating, Firing, Glazing, Making, Technical There is a rhythm and flow to clay. It can’t be done all at once! Even the making process! It can take weeks to get everything done, especially if you can only work on your pottery once a week! Even though we have three hour classes, it’s often just not enough time! Here is an overview of some of the processes so you have a bit more grasp on some of the technical stuff! Step One – Design There are SO many ideas out there for making stuff in clay! From delicate porcelain jewellery, through to heavy sculptural work and everything in between. Deciding your direction is sometimes not that easy – when you first start, try everything, you will naturally gravitate to the style that you enjoy! The options and variations are endless and can get a wee bit overwhelming too! Check in with me before you start to ensure your ideas will work, what order you might do things, how you could achieve the look you are seeking and any other technical data required! Step Two – Making Clay is thixotropic. This means that as you work with it, the clay first gets sloppier and wetter, before is begins to dry in the atmosphere. For most things, you simply can’t do all parts of the project at once. An example of work order might look like: Get last weeks work out from the shelves Prepare clay for today’s work – roll your clay, prepare balls for throwing, make the first stage of a pinch pot) Clean up last week’s work and put it on the shelf for bisque firing Check that you have any glazing to do – and do enough of it that you will have time to finish your main project Do the next step of your next project – there might be a further step that can’t be complete immediately, in that case, wrap your work well and put onto the shelves. Letting your work rest for a while can really help keep your work clean and professional looking. Many things require bagging under plastic to keep it ready for work the next week – put your name on the outside of the bag so you can find your work easily. We have stickers and markers. Consider how you want to decorate your work – coloured slip can be applied at a fairly wet stage (remembering that it will make your work even wetter!). Trying to apply slip to dry clay won’t work! If you want to do sgraffito – you will need to keep the work leather hard (a state of dryness where you can still work the clay with a little effort and a little water and care). Step Three – Drying Most of the time your work can go into the rack uncovered to let it dry out for the following week. If you want to continue forming or shaping you will need to double bag your work – put your work on a suitable sized bat and put the bat in a bag so the base of the bag is under the bat, then put another bag over the top of the work and tuck the top of the bag under the bat. If you want to trim (or turn) your thrown work the following week, it should also be double bagged. If your work is large, delicate, or of uneven thicknesses, you should lightly cover your work for drying. When considering the drying process, bare in mind the weather, humidity and wind! The hotter and dryer, the faster things dry and work can dry unevenly in the shelves – this can lead to cracking – another time to lightly cover your work for drying. Step Four – Trimming and Cleaning Up Your work is dry! It is called greenware now and it is at it’s most fragile! Handle everything with two hands. I often refer to soft hands – keep everything gentle and with your fingers spread as much as possible. Try to not pick up things like plates too much, and always with both hands! Before your work can be bisque fired it should be “cleaned up”. You work won’t go into the kiln if it has sharp edges – when glazed, sharp edges turn into razor blades! Use a piece of fly wire to rub the work all over – this will scratch a little so be light handed. Use a knife or metal kidney to scrape any areas that require a bit more dynamic treatment than the fly wire offers! Finally, a very light wipe over with a slightly damp sponge can help soften and soothe all of your edges and dags! Trimming thrown work: If you are planning to trim (or turn) your thrown work (and you should be), make sure you bag it well – your work should be leather hard to almost dry for easiest trimming. Use this step to finish the work completely – use a metal kidney to polish the surface, or a slightly damp sponge to give a freshly thrown look. Wipe the sponge around the rim after trimming, and check the inside of the pot for dags! Trimming slip cast work: Usually I will trim the rims of your work on the wheel the following day to make that stage easier, however you will still need to check your work for lumps and bumps. Last but not least – check that your name is still clearly on the bottom of your work. Step Five – Bisque Firing When the work is completely dry it can go into the bisque kiln. The bisque kiln is fired to 1000°C. This process burns off the water in the clay as well as some of the chemically bound water. The structure of the clay is not altered that much at this temperature. Inside the bisque kiln, the work is stacked a little, small bowl inside a larger bowl and onto a heavy plate. Smaller items like decorations or drink coasters might get stacked several high. Consideration is paid to the weight of the stack and shape of the work. A bisque kiln can fire about one and a half times the amount of work that the glaze kiln can fire. The firing takes about 10 hours to complete the cycle and about two days to cool down. Once it has been emptied the work is placed in the glaze room ready for you to decorate! Step Six – Glazing Decorating your work with colour can be a lot of fun – and time consuming! There are three main options for surface treatment at this stage: Oxide Washes Underglazes Glazes Washes and underglazes do not “glaze” the work – It will still need a layer of glaze to fully seal the clay (washes don’t need glaze on surfaces not designed for food or liquid as they can gloss up a little on their own). Underglazes are stable colourants that turn out pretty much how they look in the jar. They can be mixed with each other to form other colours and can be used like water colours to paint onto your work. Mostly they should have a clear glaze on top to seal them. Oxides are a different species – the pink oxide (cobalt) wash turns out bright blue for instance. They don’t always need a glaze on top, and some glazes can change the colour of the wash! The glazes need no other “glaze” on top! Be careful of unknown glaze interactions – you can put any combination of glaze in a bowl or on a plate, but only a single glaze on the outside of any vertical surface! Glazes are a chemical reaction under heat. We don’t know the exact chemicals in the Mayco glazes we use. I can guess by the way they interact with each other, however, on the whole, you need to test every idea you have, and not run the test on a vertical surface! Simply put, glaze is a layer of glass like substance that bonds with the clay underneath. Clay is made of silica, alumina and water. Glaze is made of mostly silica. Silica has a melting point of 1700°C and we fire to 1240°C. The silica requires a “flux” to help it melt at the lower temperature. Fluxes can be all sorts of chemicals – a common one is calcium – calcium has a melting point of 2500°C, however, together they both melt at a much lower temperature! Colourants are metal oxides like cobalt (blue), chrome (green through black), copper (green, blue, even red!), manganese (black, purple and pink) iron (red brown), etc. Different chemicals in the glaze can have dramatic effects. for example, barium carbonate (which we don’t use) turns manganese bright pink! Other elements can turn manganese dioxide brown, blue, purple and reddish brown. Manganese dioxide is a flux in and of itself as well. So, glazes that get their black and purple colours, often interact with other glazes and RUN! Our mirror black is a good example – it mixes really well with many glazes because it fluxes them – causes them to melt faster. It will also bring out many beautiful colours in the glazes because it’s black colouring most definitely comes from manganese dioxide! Glaze chemistry is a whole subject on it’s own! We use commercial Mayco glazes on purpose – for their huge range of colour possibilities, stability, cool interactions, artistic freedom with the ability to easily brush the glazes on and ease of use. We currently have almost 50 glazes on hand! A major project is to test the interactions of all glazes with each other. That is 2,500 test tiles!!!! I’m going to make the wall behind the wheels the feature wall of pretty colours! Step Seven – Glaze (Gloss or sometimes called “Glost”) Firing Most of the time this is the final stage of making your creation (but not always!) The glaze kiln goes to 1240°C. This is called cone 6, or midrange. It is the low end of stoneware temperatures. Stoneware clays and glazes are typically fired at cone 8 – 10, that is 1260 – 1290°C. The energy requirement to go from 1240°C to 1280°C is almost a 30% more! Our clay is formulated to vitrify (mature, turn “glass-like”) at 1240°, as are our glazes. A glaze kiln take around 12 hours to reach temperature and two to three days to cool down. Sometimes a third firing process is required – this is for decoration that is added to work after the glaze firing. For example – adding precious metals and lustres. this firing temperature is usually around 600 – 800°C depending upon the techniques being used. There are many students interested in gold and silver trims – we will be doing this third type of firing soon! After firing your work will be in the student finished work shelves. Remember to pay for it before you head out the door! There is a small extra charge for using porcelain clay (it’s more than twice the price of regular clay), and for any third firing process! Once your work has been fired it can not turn back into clay for millennia – so don’t fire it if you don’t like it! Put it in the bucket for recycling. https://firebirdstudios.com.au/the-process-of-making-pottery/ The bowl is an example of kitchenware used in the 19th century and still in use today.Bowl white ceramic. Crack on side. Badly stained.Backstamp very faint and unable to be read.flagstaff hill, warrnambool, shipwrecked-coast, flagstaff-hill, flagstaff-hill-maritime-museum, maritime-museum, shipwreck-coast, flagstaff-hill-maritime-village, mixing bowl, food preparation, kitchen equipment, ceramic -
 Flagstaff Hill Maritime Museum and Village
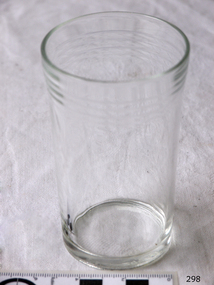
Domestic object - Glass
The art of making glass can be traced back to 2600 BC in Mesopotamia. Egyptians practised making glass around 2500 BC. Artificial glass first appeared in the Egyptian or the Mesopotamian civilization, whereas they used tools made out of volcanic glass obsidian in the Stone Age. Ancient China, however, discovered how to make glass a little later. Glass beads are known to be one of the earliest products made out of glass. Their creation is thought to be primarily accidental. In the later Bronze Age, glassmaking came to a halt. Glass was a luxury material back then. Archaeological excavations suggest the use of glass in England during the middle ages. In the 10th century, stained glass found a place in cathedrals and windows of palaces. After the Renaissance, architectural methods changed substantially, leading to a decrease in stained glass as a building material. Domestic use of glass increased following the industrial revolution. Vessels, glass windows, and glass beads gained popularity in Europe during this period. During the 19th century, many people preferred glass windows and doors as a decorative option. In the late 19th century, some designers brought back stained glass in decorative windows. It was during this period that Mr Tiffany discovered several methods to make domed glass handicrafts. People discovered the true versatility of using glass as a building material only in the 20th century. With glassmaking technology receiving an industrial boom, you could produce several different types of glass. Toughened glass, laminated glass, bulletproof glass, and smart glass all boosted the use of glass in buildings. Today, several skyscrapers, small and big homes, and offices use glass in almost all aspects of construction and design. https://www.aisglass.com/glass-made-step-step-process/The invention and development of glass, both as domestic items and in building, has been nothing short of revolutionary. Prior to the use of glass for windows, the interior of buildings were extremely dark, even during sunny days. The use of glass domestic objects, that could be easily washed, led to improved hygiene.Cylindrical drinking glass with stepped relief around lipNoneflagstaff hill, warrnambool, shipwrecked-coast, flagstaff-hill, flagstaff-hill-maritime-museum, maritime-museum, shipwreck-coast, flagstaff-hill-maritime-village, glass -
 Flagstaff Hill Maritime Museum and Village
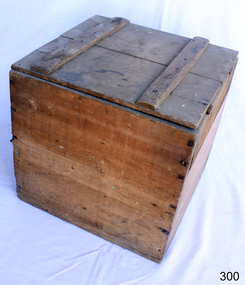
Container - Box
From the earliest days, humans have furnished their dwellings with the items they needed to survive and over the centuries the wooden chest, storage boxes and trunks have become the most common piece of furniture found in the home. Over time the simple storage chest has evolved into different styles and been modified for different uses: wooden boxes, storage chests, tool chests, treasure chests, blanket boxes and steamer trunks. Wooden chests and trunks have became the most useful, and most versatile piece in furniture’s history. https://www.vineyarddetails.com/blogs/february-2019/history-of-box-makingThe use of the wooden box for storage.Wooden square handmade box with hinged lid. Made from rough pine boards.None.flagstaff hill, warrnambool, shipwrecked-coast, flagstaff-hill, flagstaff-hill-maritime-museum, maritime-museum, shipwreck-coast, flagstaff-hill-maritime-village, wooden box, furniture, storage -
 Flagstaff Hill Maritime Museum and Village
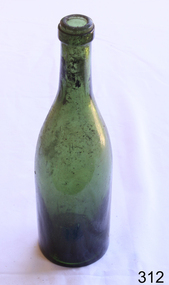
Container - Bottle, Late 19th century or early 20th century
Glass manufacturing has evolved over thousands of years. Glass making has been traced back to 3500 BC in Mesopotamia. The earliest known glass objects were beads, perhaps made by accident while working with metal. In the late Bronze Age, several civilizations discovered how to make vessels and glass bottles by wrapping threads of melted glass around cores of sand or clay. Later, moulds were used to form dishes and table wares. Around the 1st century BC, glassblowing was discovered. This made glass containers less expensive than pottery. Mould-blown glass, the process of blowing a piece of molten glass into a wooden or metal mould, was invented during the 1st century AD. This technique was faster with more consistent results. It paved the way for mass production. It wasn’t until the late 1800s that the production process to become more efficient. In 1887, a company in England created a semi-automatic process that could produce up to 200 bottles an hour. This process has been refined to the point where modern machines can yield more than 600 containers per minute. Blown vs. Manufactured Glass Bottles Nowadays, glass bottles, jars, and cups are usually manufactured on a bigger scale than is found in individual glassblowing studios. If we still depended on hand-blown glass for all of our glass containers, we would see some major differences in the process of creating bottles and jars. First, there's the time. Hand blowing glass takes a significant amount of time, even for one simple container. In contrast, hundreds of jars per minute can be made using modern technology. This leads to the second advantage: price. Because of the automated and streamlined process, the price for manufactured containers is much lower than that of hand-blown glass. Third, manufactured bottles will be much more consistently uniform than bottles blown by hand. Automated glass manufacturing produces nearly identical batches of jars. Glass blowing is awesome for unique, beautiful pieces of art. But for lots of lower priced and uniformly shaped containers, automatic manufacturing is the preferred method to create glass bottles and jars. https://www.containerandpackaging.com/resources/glass-bottles-brief-history The invention and development of glass for domestic items including bottles, has been nothing short of revolutionary. The use of glass bottles, that could be easily washed, led to improved hygiene, and mass manufacturing of drinks of all types, including milk, cordial and alcoholic beverages.Green Glass Bottle Possibly a ginger beer bottle.Concave indentation at the base. Also on base are two raised lumps. flagstaff hill, warrnambool, shipwrecked-coast, flagstaff-hill, flagstaff-hill-maritime-museum, maritime-museum, shipwreck-coast, flagstaff-hill-maritime-village, glass -
 Flagstaff Hill Maritime Museum and Village
Domestic object - Bowl
The Process of Making Pottery Decorating, Firing, Glazing, Making, Technical There is a rhythm and flow to clay. It can’t be done all at once! Even the making process! It can take weeks to get everything done, especially if you can only work on your pottery once a week! Even though we have three hour classes, it’s often just not enough time! Here is an overview of some of the processes so you have a bit more grasp on some of the technical stuff! Step One – Design There are SO many ideas out there for making stuff in clay! From delicate porcelain jewellery, through to heavy sculptural work and everything in between. Deciding your direction is sometimes not that easy – when you first start, try everything, you will naturally gravitate to the style that you enjoy! The options and variations are endless and can get a wee bit overwhelming too! Check in with me before you start to ensure your ideas will work, what order you might do things, how you could achieve the look you are seeking and any other technical data required! Step Two – Making Clay is thixotropic. This means that as you work with it, the clay first gets sloppier and wetter, before is begins to dry in the atmosphere. For most things, you simply can’t do all parts of the project at once. An example of work order might look like: Get last weeks work out from the shelves Prepare clay for today’s work – roll your clay, prepare balls for throwing, make the first stage of a pinch pot) Clean up last week’s work and put it on the shelf for bisque firing Check that you have any glazing to do – and do enough of it that you will have time to finish your main project Do the next step of your next project – there might be a further step that can’t be complete immediately, in that case, wrap your work well and put onto the shelves. Letting your work rest for a while can really help keep your work clean and professional looking. Many things require bagging under plastic to keep it ready for work the next week – put your name on the outside of the bag so you can find your work easily. We have stickers and markers. Consider how you want to decorate your work – coloured slip can be applied at a fairly wet stage (remembering that it will make your work even wetter!). Trying to apply slip to dry clay won’t work! If you want to do sgraffito – you will need to keep the work leather hard (a state of dryness where you can still work the clay with a little effort and a little water and care). Step Three – Drying Most of the time your work can go into the rack uncovered to let it dry out for the following week. If you want to continue forming or shaping you will need to double bag your work – put your work on a suitable sized bat and put the bat in a bag so the base of the bag is under the bat, then put another bag over the top of the work and tuck the top of the bag under the bat. If you want to trim (or turn) your thrown work the following week, it should also be double bagged. If your work is large, delicate, or of uneven thicknesses, you should lightly cover your work for drying. When considering the drying process, bare in mind the weather, humidity and wind! The hotter and dryer, the faster things dry and work can dry unevenly in the shelves – this can lead to cracking – another time to lightly cover your work for drying. Step Four – Trimming and Cleaning Up Your work is dry! It is called greenware now and it is at it’s most fragile! Handle everything with two hands. I often refer to soft hands – keep everything gentle and with your fingers spread as much as possible. Try to not pick up things like plates too much, and always with both hands! Before your work can be bisque fired it should be “cleaned up”. You work won’t go into the kiln if it has sharp edges – when glazed, sharp edges turn into razor blades! Use a piece of fly wire to rub the work all over – this will scratch a little so be light handed. Use a knife or metal kidney to scrape any areas that require a bit more dynamic treatment than the fly wire offers! Finally, a very light wipe over with a slightly damp sponge can help soften and soothe all of your edges and dags! Trimming thrown work: If you are planning to trim (or turn) your thrown work (and you should be), make sure you bag it well – your work should be leather hard to almost dry for easiest trimming. Use this step to finish the work completely – use a metal kidney to polish the surface, or a slightly damp sponge to give a freshly thrown look. Wipe the sponge around the rim after trimming, and check the inside of the pot for dags! Trimming slip cast work: Usually I will trim the rims of your work on the wheel the following day to make that stage easier, however you will still need to check your work for lumps and bumps. Last but not least – check that your name is still clearly on the bottom of your work. Step Five – Bisque Firing When the work is completely dry it can go into the bisque kiln. The bisque kiln is fired to 1000°C. This process burns off the water in the clay as well as some of the chemically bound water. The structure of the clay is not altered that much at this temperature. Inside the bisque kiln, the work is stacked a little, small bowl inside a larger bowl and onto a heavy plate. Smaller items like decorations or drink coasters might get stacked several high. Consideration is paid to the weight of the stack and shape of the work. A bisque kiln can fire about one and a half times the amount of work that the glaze kiln can fire. The firing takes about 10 hours to complete the cycle and about two days to cool down. Once it has been emptied the work is placed in the glaze room ready for you to decorate! Step Six – Glazing Decorating your work with colour can be a lot of fun – and time consuming! There are three main options for surface treatment at this stage: Oxide Washes Underglazes Glazes Washes and underglazes do not “glaze” the work – It will still need a layer of glaze to fully seal the clay (washes don’t need glaze on surfaces not designed for food or liquid as they can gloss up a little on their own). Underglazes are stable colourants that turn out pretty much how they look in the jar. They can be mixed with each other to form other colours and can be used like water colours to paint onto your work. Mostly they should have a clear glaze on top to seal them. Oxides are a different species – the pink oxide (cobalt) wash turns out bright blue for instance. They don’t always need a glaze on top, and some glazes can change the colour of the wash! The glazes need no other “glaze” on top! Be careful of unknown glaze interactions – you can put any combination of glaze in a bowl or on a plate, but only a single glaze on the outside of any vertical surface! Glazes are a chemical reaction under heat. We don’t know the exact chemicals in the Mayco glazes we use. I can guess by the way they interact with each other, however, on the whole, you need to test every idea you have, and not run the test on a vertical surface! Simply put, glaze is a layer of glass like substance that bonds with the clay underneath. Clay is made of silica, alumina and water. Glaze is made of mostly silica. Silica has a melting point of 1700°C and we fire to 1240°C. The silica requires a “flux” to help it melt at the lower temperature. Fluxes can be all sorts of chemicals – a common one is calcium – calcium has a melting point of 2500°C, however, together they both melt at a much lower temperature! Colourants are metal oxides like cobalt (blue), chrome (green through black), copper (green, blue, even red!), manganese (black, purple and pink) iron (red brown), etc. Different chemicals in the glaze can have dramatic effects. for example, barium carbonate (which we don’t use) turns manganese bright pink! Other elements can turn manganese dioxide brown, blue, purple and reddish brown. Manganese dioxide is a flux in and of itself as well. So, glazes that get their black and purple colours, often interact with other glazes and RUN! Our mirror black is a good example – it mixes really well with many glazes because it fluxes them – causes them to melt faster. It will also bring out many beautiful colours in the glazes because it’s black colouring most definitely comes from manganese dioxide! Glaze chemistry is a whole subject on it’s own! We use commercial Mayco glazes on purpose – for their huge range of colour possibilities, stability, cool interactions, artistic freedom with the ability to easily brush the glazes on and ease of use. We currently have almost 50 glazes on hand! A major project is to test the interactions of all glazes with each other. That is 2,500 test tiles!!!! I’m going to make the wall behind the wheels the feature wall of pretty colours! Step Seven – Glaze (Gloss or sometimes called “Glost”) Firing Most of the time this is the final stage of making your creation (but not always!) The glaze kiln goes to 1240°C. This is called cone 6, or midrange. It is the low end of stoneware temperatures. Stoneware clays and glazes are typically fired at cone 8 – 10, that is 1260 – 1290°C. The energy requirement to go from 1240°C to 1280°C is almost a 30% more! Our clay is formulated to vitrify (mature, turn “glass-like”) at 1240°, as are our glazes. A glaze kiln take around 12 hours to reach temperature and two to three days to cool down. Sometimes a third firing process is required – this is for decoration that is added to work after the glaze firing. For example – adding precious metals and lustres. this firing temperature is usually around 600 – 800°C depending upon the techniques being used. There are many students interested in gold and silver trims – we will be doing this third type of firing soon! After firing your work will be in the student finished work shelves. Remember to pay for it before you head out the door! There is a small extra charge for using porcelain clay (it’s more than twice the price of regular clay), and for any third firing process! Once your work has been fired it can not turn back into clay for millennia – so don’t fire it if you don’t like it! Put it in the bucket for recycling. https://firebirdstudios.com.au/the-process-of-making-pottery/ This bowl is an example of kitchenware used in the 19th century and still in use today.Bowl white ceramic plain that has two sets of edging around lip. Inside bowl has plaster designed to look like cooking mixture.flagstaff hill, warrnambool, shipwrecked-coast, flagstaff-hill, flagstaff-hill-maritime-museum, maritime-museum, shipwreck-coast, flagstaff-hill-maritime-village, kitchen equipment, ceramic -
 Flagstaff Hill Maritime Museum and Village
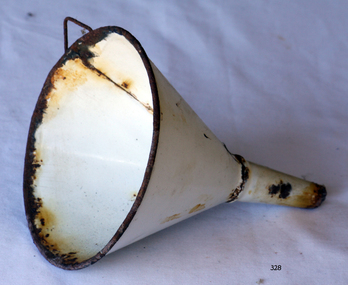
Domestic object - Funnel, Late 19th or early 20th Century
A funnel such as this is used to assist in pouring liquids into a narrow container such as a bottle or jar. An item like this could be commonly used in households for food preparation, cooking and soap making. It could also be used for pouring fuel, and medicinal purposes. Enamelware dates back to 1760 in Germany.This object is significant as an example of a type of item in common use in the 19th Century and that is still in use today.Funnel, white enamel with dark rusty metal rim. It has a triangular shaped hook on the top lip for hanging. The metal has been joined down one side.None.flagstaff hill, flagstaff hill maritime museum and village, warrnambool, maritime museum, maritime village, great ocean road, shipwreck coast, funnel, food preparation, beverage, laundry, fuel, food preservation, medicinal preparation, decanting, pouring -
 Flagstaff Hill Maritime Museum and Village
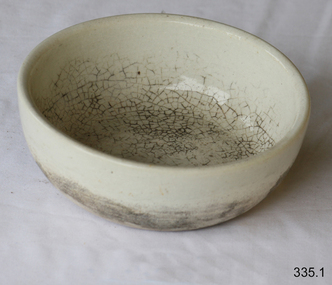
Container - Bowl, Late 19th or early 20th Century
Human beings appear to have been making their own ceramics for at least 26,000 years, subjecting clay and silica to intense heat to fuse and form ceramic materials. The earliest found so far were in southern central Europe and were sculpted figures, not dishes. The earliest known pottery was made by mixing animal products with clay and baked in kilns at up to 800°C. While actual pottery fragments have been found up to 19,000 years old, it was not until about ten thousand years later that regular pottery became common. An early people that spread across much of Europe is named after its use of pottery, the Corded Ware culture. These early Indo-European peoples decorated their pottery by wrapping it with rope, while still wet. When the ceramics were fired, the rope burned off but left a decorative pattern of complex grooves on the surface. The invention of the wheel eventually led to the production of smoother, more even pottery using the wheel-forming technique, like the pottery wheel. Early ceramics were porous, absorbing water easily. It became useful for more items with the discovery of glazing techniques, coating pottery with silicon, bone ash, or other materials that could melt and reform into a glassy surface, making a vessel less pervious to water. https://en.wikipedia.org/wiki/CeramicThe discovery and development of ceramics in numerous shapes, form and materials, revolutionised the world.Plain cream ceramic bowl with flat bottom inside. Shiny glaze fades to flat texture towards base. Possibly hand thrown pottery. No backstamp. Bad crazing and staining.None.flagstaff hill, warrnambool, shipwrecked-coast, flagstaff-hill, flagstaff-hill-maritime-museum, maritime-museum, shipwreck-coast, flagstaff-hill-maritime-village, ceramics -
 Flagstaff Hill Maritime Museum and Village
Domestic object - Bowl, J & G Meakin, Late 19th or early 20th Century
The Process of Making Pottery Decorating, Firing, Glazing, Making, Technical There is a rhythm and flow to clay. It can’t be done all at once! Even the making process! It can take weeks to get everything done, especially if you can only work on your pottery once a week! Even though we have three hour classes, it’s often just not enough time! Here is an overview of some of the processes so you have a bit more grasp on some of the technical stuff! Step One – Design There are SO many ideas out there for making stuff in clay! From delicate porcelain jewellery, through to heavy sculptural work and everything in between. Deciding your direction is sometimes not that easy – when you first start, try everything, you will naturally gravitate to the style that you enjoy! The options and variations are endless and can get a wee bit overwhelming too! Check in with me before you start to ensure your ideas will work, what order you might do things, how you could achieve the look you are seeking and any other technical data required! Step Two – Making Clay is thixotropic. This means that as you work with it, the clay first gets sloppier and wetter, before is begins to dry in the atmosphere. For most things, you simply can’t do all parts of the project at once. An example of work order might look like: Get last weeks work out from the shelves Prepare clay for today’s work – roll your clay, prepare balls for throwing, make the first stage of a pinch pot) Clean up last week’s work and put it on the shelf for bisque firing Check that you have any glazing to do – and do enough of it that you will have time to finish your main project Do the next step of your next project – there might be a further step that can’t be complete immediately, in that case, wrap your work well and put onto the shelves. Letting your work rest for a while can really help keep your work clean and professional looking. Many things require bagging under plastic to keep it ready for work the next week – put your name on the outside of the bag so you can find your work easily. We have stickers and markers. Consider how you want to decorate your work – coloured slip can be applied at a fairly wet stage (remembering that it will make your work even wetter!). Trying to apply slip to dry clay won’t work! If you want to do sgraffito – you will need to keep the work leather hard (a state of dryness where you can still work the clay with a little effort and a little water and care). Step Three – Drying Most of the time your work can go into the rack uncovered to let it dry out for the following week. If you want to continue forming or shaping you will need to double bag your work – put your work on a suitable sized bat and put the bat in a bag so the base of the bag is under the bat, then put another bag over the top of the work and tuck the top of the bag under the bat. If you want to trim (or turn) your thrown work the following week, it should also be double bagged. If your work is large, delicate, or of uneven thicknesses, you should lightly cover your work for drying. When considering the drying process, bare in mind the weather, humidity and wind! The hotter and dryer, the faster things dry and work can dry unevenly in the shelves – this can lead to cracking – another time to lightly cover your work for drying. Step Four – Trimming and Cleaning Up Your work is dry! It is called greenware now and it is at it’s most fragile! Handle everything with two hands. I often refer to soft hands – keep everything gentle and with your fingers spread as much as possible. Try to not pick up things like plates too much, and always with both hands! Before your work can be bisque fired it should be “cleaned up”. You work won’t go into the kiln if it has sharp edges – when glazed, sharp edges turn into razor blades! Use a piece of fly wire to rub the work all over – this will scratch a little so be light handed. Use a knife or metal kidney to scrape any areas that require a bit more dynamic treatment than the fly wire offers! Finally, a very light wipe over with a slightly damp sponge can help soften and soothe all of your edges and dags! Trimming thrown work: If you are planning to trim (or turn) your thrown work (and you should be), make sure you bag it well – your work should be leather hard to almost dry for easiest trimming. Use this step to finish the work completely – use a metal kidney to polish the surface, or a slightly damp sponge to give a freshly thrown look. Wipe the sponge around the rim after trimming, and check the inside of the pot for dags! Trimming slip cast work: Usually I will trim the rims of your work on the wheel the following day to make that stage easier, however you will still need to check your work for lumps and bumps. Last but not least – check that your name is still clearly on the bottom of your work. Step Five – Bisque Firing When the work is completely dry it can go into the bisque kiln. The bisque kiln is fired to 1000°C. This process burns off the water in the clay as well as some of the chemically bound water. The structure of the clay is not altered that much at this temperature. Inside the bisque kiln, the work is stacked a little, small bowl inside a larger bowl and onto a heavy plate. Smaller items like decorations or drink coasters might get stacked several high. Consideration is paid to the weight of the stack and shape of the work. A bisque kiln can fire about one and a half times the amount of work that the glaze kiln can fire. The firing takes about 10 hours to complete the cycle and about two days to cool down. Once it has been emptied the work is placed in the glaze room ready for you to decorate! Step Six – Glazing Decorating your work with colour can be a lot of fun – and time consuming! There are three main options for surface treatment at this stage: Oxide Washes Underglazes Glazes Washes and underglazes do not “glaze” the work – It will still need a layer of glaze to fully seal the clay (washes don’t need glaze on surfaces not designed for food or liquid as they can gloss up a little on their own). Underglazes are stable colourants that turn out pretty much how they look in the jar. They can be mixed with each other to form other colours and can be used like water colours to paint onto your work. Mostly they should have a clear glaze on top to seal them. Oxides are a different species – the pink oxide (cobalt) wash turns out bright blue for instance. They don’t always need a glaze on top, and some glazes can change the colour of the wash! The glazes need no other “glaze” on top! Be careful of unknown glaze interactions – you can put any combination of glaze in a bowl or on a plate, but only a single glaze on the outside of any vertical surface! Glazes are a chemical reaction under heat. We don’t know the exact chemicals in the Mayco glazes we use. I can guess by the way they interact with each other, however, on the whole, you need to test every idea you have, and not run the test on a vertical surface! Simply put, glaze is a layer of glass like substance that bonds with the clay underneath. Clay is made of silica, alumina and water. Glaze is made of mostly silica. Silica has a melting point of 1700°C and we fire to 1240°C. The silica requires a “flux” to help it melt at the lower temperature. Fluxes can be all sorts of chemicals – a common one is calcium – calcium has a melting point of 2500°C, however, together they both melt at a much lower temperature! Colourants are metal oxides like cobalt (blue), chrome (green through black), copper (green, blue, even red!), manganese (black, purple and pink) iron (red brown), etc. Different chemicals in the glaze can have dramatic effects. for example, barium carbonate (which we don’t use) turns manganese bright pink! Other elements can turn manganese dioxide brown, blue, purple and reddish brown. Manganese dioxide is a flux in and of itself as well. So, glazes that get their black and purple colours, often interact with other glazes and RUN! Our mirror black is a good example – it mixes really well with many glazes because it fluxes them – causes them to melt faster. It will also bring out many beautiful colours in the glazes because it’s black colouring most definitely comes from manganese dioxide! Glaze chemistry is a whole subject on it’s own! We use commercial Mayco glazes on purpose – for their huge range of colour possibilities, stability, cool interactions, artistic freedom with the ability to easily brush the glazes on and ease of use. We currently have almost 50 glazes on hand! A major project is to test the interactions of all glazes with each other. That is 2,500 test tiles!!!! I’m going to make the wall behind the wheels the feature wall of pretty colours! Step Seven – Glaze (Gloss or sometimes called “Glost”) Firing Most of the time this is the final stage of making your creation (but not always!) The glaze kiln goes to 1240°C. This is called cone 6, or midrange. It is the low end of stoneware temperatures. Stoneware clays and glazes are typically fired at cone 8 – 10, that is 1260 – 1290°C. The energy requirement to go from 1240°C to 1280°C is almost a 30% more! Our clay is formulated to vitrify (mature, turn “glass-like”) at 1240°, as are our glazes. A glaze kiln take around 12 hours to reach temperature and two to three days to cool down. Sometimes a third firing process is required – this is for decoration that is added to work after the glaze firing. For example – adding precious metals and lustres. this firing temperature is usually around 600 – 800°C depending upon the techniques being used. There are many students interested in gold and silver trims – we will be doing this third type of firing soon! After firing your work will be in the student finished work shelves. Remember to pay for it before you head out the door! There is a small extra charge for using porcelain clay (it’s more than twice the price of regular clay), and for any third firing process! Once your work has been fired it can not turn back into clay for millennia – so don’t fire it if you don’t like it! Put it in the bucket for recycling. https://firebirdstudios.com.au/the-process-of-making-pottery/This bowl was made by renowned pottery company J & G Meakin of England. The firm was established in the mid-1800's. The bowl is an example of kitchenware used in the 19th century and still in use today.Bowl; white ceramic, round and tapering inwards towards base. Made by J and G Meakin England.On base, 'Ironstone China Reg SOL 391413' with symbolflagstaff hill, flagstaff hill maritime museum and village, warrnambool, maritime museum, maritime village, great ocean road, shipwreck coast, mixing bowl, food preparation, j & g meakin, pottery, stoke-on-trent, kitchen equipment, ceramic -
 Flagstaff Hill Maritime Museum and Village
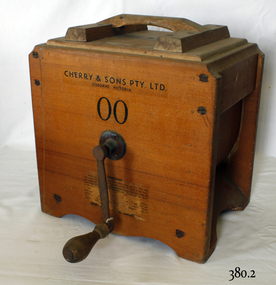
Domestic object - Butter Churn, Cherry and Sons, Circa 1890-1920
The subject item is a good example of a large, hand-operated Bentwood box butter churn used to make up to 14 pounds of butter. It was made in Gisborne, Victoria, by the famous manufacturer, E. Cherry, and is known as an Improved Patent No.2 model probably dating from the late 1800s. The Cherry works specialised in making all types of butter churns and equipment for both domestic use on farms and small butter factories during the late nineteenth and early to mid. twentieth centuries. Milk was "separated" to retrieve the cream which was then beaten to make butter. E Cherry began making various models of Cherry butter churns in 1858, Edward Cherry migrated from Herefordshire England to Australia in 1855 with his wife Ann Appleby, nee Davis, and established a joinery workshop at Gisborne, Victoria. He began by making butter churns in his spare time and his product soon became popular allowing him to establish a viable business. A factory was established in 1875 and he started to make churns of all sizes including up to industrial scale. He exported his products to many countries around the world, Edward Cherry died in 1909 and the business was then run by his son George until he died in 1917. E Cherry's other son Thomas (1861-1945) was also involved in the firm maintaining an interest for several years. He had been born in Gisborne and became a senior house medical surgeon at the Melbourne Hospital in 1890. He continued his studies at Kings College London, eventually becoming a renowned bacteriologist and agricultural scientist. A significant giving an snapshot into how early rural and industrial manufacturing became established in Australia.Rectangular butter churn, a footed wooden box containing an X-shaped wooden interior rack, which is joined to an exterior metal hand crank with turned wood handle, through a hole in the box. Beneath the hand crank is a hole from the interior lined with metal. The lid has a carry handle affixed to the lid on two cross pieces attached to the lid by brass screws.Lettering in black on a transfer "CHERRY & SONS PTY LTD. GISBORNE VICTORIA". Model 00warrnambool, shipwrecked-coast, flagstaff-hill, flagstaff-hill-maritime-museum, flagstaff-hill-maritime-village, butter churn, gisborne, edward cherry, george cherry, thomas cherry, ann appleby, dairy equipment -
 Flagstaff Hill Maritime Museum and Village
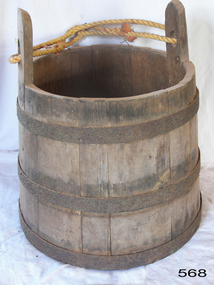
Domestic object - Coopered Bucket, 1960 to 1980
This bucket was made from vertical planks of wood with bands of metal around it for strength. Buckets such as this were made by coopers, who had expertise in making wooden barrels. Wood or animal skin was used to make buckets in colonial times when other materials were unavailable. Buckets had many uses in domestic and agricultural life including carrying, measuring and storing. Cooper tradesmen used carpentry and blacksmithing skills to make a wide range of wooden containers and other objects. They sometimes used water or steam to bend and mould the timber.The bucket is an example of a product made from wood and iron by an experienced Cooper. In early colonial timeswhen ready-made products were scarce so the trades of coopers, blacksmiths, metal smiths, carpenters, builders and others were necessary for domestic, commercial and industrial establishment.Wooden coopered bucket; three metal bands around vertical wooden planks that form the body of the bucket. Two lugs extend higher than the planks and have a rope joined between them.warrnambool, shipwreck coast, flagstaff hill, flagstaff hill maritime museum, flagstaff hill maritime village, bucket, wooden bucket, container, domestic bucket, cooper, cooper trade, coopered bucket -
 Flagstaff Hill Maritime Museum and Village
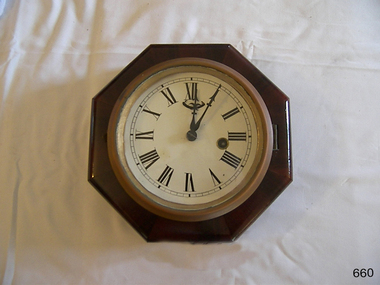
Clock, 1867-1870
Chauncey Jerome (1793–1868) was an American clock maker in the early to mid 19th century. He made a fortune selling his clocks, and his business grew quickly. Jerome was born in Canaan USA in 1793 son of a blacksmith and nail-maker. He began his career in Plymouth, making dials for long-case clocks where he learned all he could about clocks, particularly clock cases, and then went to New Jersey to make seven-foot cases for clocks mechanisms. In 1816 he went to work for Eli Terry making "Patent Shelf Clocks," learning how to make previously handmade cases using machinery. Deciding to go into business for himself, Jerome began to make cases, trading them to Terry for wooden movements. In 1822 Jerome moved his business to Bristol New Haven, opening a small shop with his brother Noble and began to produce a 30-hour and eight-day wooden clocks. By 1837 Jerome's company was selling more clocks than any of his competitors. A one-day wood-cased clock, which sold for six dollars had helped put the company on the map. A year later his company was selling that same clock for four dollars. The company also sold one line of clocks at a wholesale price of 75 cents and by 1841 the company was showing an annual profit of a whopping $35,000, primarily from the sale of its brass movements. In 1842 Jerome moved his clock-case manufacturing operation to St. John Street in New Haven. Three years later, following a fire that destroyed the Bristol plant, Jerome relocated the entire operation to Elm City factory. Enlarging the plant, the company soon became the largest industrial employer in the city, producing 150,000 clocks annually. In 1850 Jerome formed the Jerome Manufacturing Co. as a joint-stock company with Benedict & Burnham, brass manufacturers of Waterbury. In 1853 the company then became known as the New Haven Clock Co, producing 444,000 clocks and timepieces annually, then the largest clock maker in the world. Jerome's future should have been secure but in 1855 he bought out a failed Bridgeport clock company controlled by P.T. Barnum, which wiped him out financially, leaving the Jerome Manufacturing Co. bankrupt. Jerome never recovered from the loss. By his admission, he was a better inventor than a businessman. When Jerome went bankrupt in 1856 the New Haven Clock Company purchased the company. One of the primary benefits of Jerome purchasing New Haven in the first place was the good reputation of the Jerome brand and the network of companies that remained interested in selling its clocks. In England, Jerome & Co. Ltd. sold Jerome clocks for the New Haven company until 1904, when New Haven purchased the English firm outright. After his involvement with the New Haven Company in 1856, Jerome traveled from town to town, taking jobs where he could, often working for clock companies that had learned the business of clock making using Jerome's inventions. On returning to New Haven near the end of his life, he died, penniless, in 1868 at the age of 74. The company struggled on after Jerome's bankruptcy until after World War II, when the company endeavored to continue through disruptions caused by a takeover along with poor sales, finally having to fold its operations in 1960 a little more than 100 years after it had been founded. The item is significant as it is associated with Chauncey Jerome who had made a historic contribution to the clock making industry during the 19th century when he began to substitute brass mechanisms for wooden mechanisms in his clocks. This was said to be the greatest and most far-reaching contribution to the clock industry. Because of his discovery of stamping out clockwork gears rather than using castings, Jerome was producing the lowest-priced clocks in the world. That can only add to his significance as the major clock manufacture of the 19th century. Jerome may have made and lost, a fortune selling his clocks but was perhaps the most influential and creative person associated with the American clock business during the mid-19th century. Also, he had served his community as a legislator in 1834, a Presidential elector in 1852 and mayor of New Haven, Connecticut from 1854 to 1855.Eight day movement wall clock with Roman numerals, octagonal shaped rosewood veneered casing, hinged face with locking clip. Wound from front. Face has adjustment for Fast-to-Slow.Part paper label on back of case can just make out "Jerome" and "ight and One" probable meaning is "Eight and One Day" describing the movements operational time between winding the mechanism.flagstaff hill, warrnambool, shipwrecked-coast, flagstaff-hill, flagstaff-hill-maritime-museum, maritime-museum, shipwreck-coast, flagstaff-hill-maritime-village, clock maker, jerome & co, new haven, chauncey jerome, canaan -
 Flagstaff Hill Maritime Museum and Village
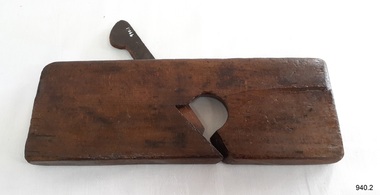
Tool - Rabbet Plane, Mathieson and Son, Late 19th to early 20th Century
In 1792 John Manners had set up a workshop making woodworking planes at 14 Saracens Lane Glasgow. He also had employed an apprentice Alexander Mathieson (1773-1851). But in the following year at Saracen's Lane, the 1841 census describes Alexander Mathieson as a master plane-maker now at 38 Saracen Lane with his son Thomas Adam working with him as a journeyman plane-maker. Presumably, Alexander must have taken over the premises and business of John Manners. Now that the business had Thomas Adam Mathieson working with his father it gradually grew and became more diversified, and it is recorded at the time by the Post-Office Glasgow Annual Directory that by 1847-1848 Alexander Mathieson was a “plane, brace, bit, auger & edge tool maker” In 1849 the firm of James & William Stewart at 65 Nicolson Street, Edinburgh was taken over and Thomas was put in charge of the business, trading under the name Thomas A. Mathieson & Co. as plane and edge-tool makers. Thomas's company went on to acquire the Edinburgh edge-tool makers “Charles & Hugh McPherson” and took over their premises in Gilmore Street. In the Edinburgh directory of 1856/7, the business is recorded as being Alexander Mathieson & Son, plane and edge-tool makers at 48 Nicolson Street and Paul's Work, Gilmore Street Edinburgh. The 1851 census Alexander is recorded as working as a tool and plane-maker employing eight men. Later that year Alexander died and his son Thomas took over the business. Under the heading of an edge-tool maker in the 1852/3 Post-Office Glasgow Annual Directory the firm is now listed as Alexander Mathieson & Son, with further entries as "turning-lathe and vice manufacturers". By the early 1850s, the business had moved to 24 Saracen Lane. The directory for 1857/8 records that the firm had moved again only a few years later to East Campbell Street, off the Gallowgate area, and that through further diversification was also manufacturing coopers' and tinmen's tools. The ten-yearly censuses report the firm's growth in 1861 stating that Thomas was a tool manufacturer employing 95 men and 30 boys; in 1871 he had 200 men working for him and in 1881 300 men. By 1899 the firm had been incorporated as Alexander Mathieson & Sons Ltd, even though only Alexander's son Thomas appears ever to have joined the firm so the company was still in his fathers' name. In September 1868 Thomas Mathieson put a notice in the newspapers of the Sheffield & Rotherham Independent and the Sheffield Daily Telegraph stating that his firm had used the trade-mark of a crescent and star "for some time" and that "using or imitating the Mark would be proceeded against for infringement". The firm had acquired its interest in the crescent-and-star mark from the heirs of Charles Pickslay, the Sheffield cutler who had registered it with the Cutlers' Company in 1833 and had died in 1852. The year 1868 seems also to be the one in which the name Saracen Tool Works was first adopted; not only does it figure at the foot of the notice in the Sheffield press, it also makes its first appearance in the firm's entry in the Post-Office Glasgow Annual Directory in the 1868/9 edition. As Thomas Mathieson's business grew, so too did his involvement in local public life and philanthropy. One of the representatives of the third ward on the town council of Glasgow, he became a river bailie in 1868, a magistrate in 1870 and a preceptor of Hutcheson's Hospital in 1878. He had a passion for books and was an "ardent Ruskinian". He served on the committee handling the bequest for the setting up of the Mitchell Library in Glasgow. When he died at Coulter Maynes near Biggar in 1899, he left an estate worth £142,764. Company's later years: Both Thomas's sons, James Harper and Thomas Ogilvie were involved in the continuing life of the firm. James followed in his father's footsteps in becoming a local public figure. He was appointed Deputy Lieutenant of the County of the City of Glasgow and was made a deacon of the Incorporation of the Hammermen of Glasgow in 1919. His brother Thomas Ogilvie was recorded as tool manufacturer and employer in the 1911 census. Thomas Ogilvie's son Thomas Alastair Sutherland Ogilvie Mathieson was born in 1908 took a rather different approach to engineering, however, by becoming a racing driver. In 1947 he wed the French film actress Mila Parély. The firm had won many awards at world fairs for their goods. At the Great Exhibition, London, 1851. Prize medal for joiners' tools in the class of Cutlery & Edge Tools, Great London Exposition, 1862. Prize medal honoris causa. International Exhibition, Melbourne, 1880. Gold medal International Exhibition of Industry, Science and Art, Edinburgh, 1886. Prize medalThe firm of Alexander Mathieson & Son was one of the leading makers of hand tools in Scotland. Its success went hand in hand with the growth of the shipbuilding industries on the Firth of Clyde in the nineteenth century and the emergence of Glasgow as the "second city of the Empire". It also reflected the firm's skill in responding to an unprecedented demand for quality tools by shipyards, cooperages and other industries, both locally and far and wide.Rabbet plane with a flat base. The blade wedge is inserted but without a blade. Made by A Mathieson and Son.Inscription "Alex Mathieson and Son" no longer visibleflagstaff hill, warrnambool, flagstaff-hill, flagstaff-hill-maritime-museum, maritime-museum, shipwreck-coast, flagstaff-hill-maritime-village, cabinet makers tools, carpenders tools, wood planes, rabbeting plane, window making, tools, wood working, hand tool -
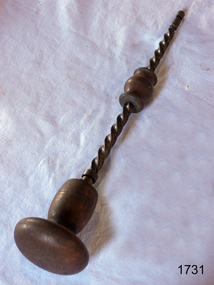 Flagstaff Hill Maritime Museum and Village
Tool - Archimedean drill, Late 19th Century
The Archimedes drill, also known as a fretwork drill, is an old type of drill which works on the Archimedian principle; the drill rotates quickly as the barrel on the stem is worked up and down. This tool provides a quick and easy way to bore holes through ordinary fret wood and other substances, smaller versions are used in jewellery making where precision drilling is required. There were numerous different sized Archimedes drills made from various materials, usually a combination of wood and steel, some being all steel and some including brass parts. The fancier versions of these drills included parts made from Rosewood, Ebony, Ivory and decorative brass parts. Some of the later Archimedes drills had technological improvements such as a ratchet device and the inclusion of fly-weights. The ratchet device allows the drill to revolve continuously in the cutting direction. The fly-weights give momentum to maintain the speed of the drill during the upward stroke of the hand. Most old examples such as the subject item have no makers names.A vintage drilling tool that gives a snapshot into how holes were drilled by hand into small or delicate objects during the Victorian era. Tools from this time are today regarded as collectable items eagerly sought by collectors of antique tools. Archimedean drill with Rosewood hand, brass bearings, steel twist and wooden grip. Noneflagstaff hill, warrnambool, flagstaff-hill, flagstaff-hill-maritime-museum, maritime-museum, shipwreck-coast, flagstaff-hill-maritime-village, archimedean drill, archimedean drill with wooden hand, drilling tool -
 Flagstaff Hill Maritime Museum and Village
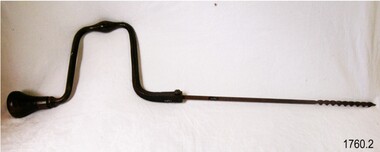
Tool - Drill Brace, 1800s
The subject item is an early Victorian Scotch Brace with a 10-inch sweep. They were also known as a six penny or "gentleman's" brace and were designed to accept tapered square shank bits, early designs have a thumb screw to help secure the bit. Later designs had a catch to secure drilling bits. This type of brace was used in wagon making for boring & drilling holes into the wood for a variety of purposes, including driving screws. The subject item is unmarked but could have been made in Glasgow Scotland by John Fray in the 1800s, early drill braces of this type were often unmarked by their makers. A significant early example of a drill brace made in the UK during the 1800s demonstrates the evolution of this type of tool from this time that today is a rare and collectable example of woodworking tools.Brace metal with wooden handle. Has a screw in the holding socket item also has an auger bit. Noneflagstaff hill, warrnambool, flagstaff-hill, flagstaff-hill-maritime-museum, maritime-museum, shipwreck-coast, flagstaff-hill-maritime-village, brace, carpenders wheel brace, cabinet makers tools, drilling tool, wagon makers drill -
 Flagstaff Hill Maritime Museum and Village
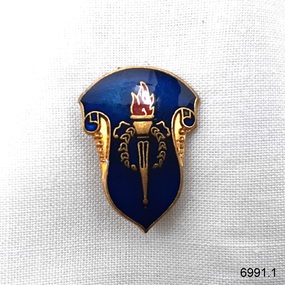
Badge - Legacy donor's badge, A.J. Parkes, Mid-1900s
This Legacy donor's badge is one of a set of badges collected by Dr W R Angus from the organisations in which he was involved. The badge was made by A.J. Parkes, an Australia-wide firm that has been making badges for over a century. The $10', embossed on the back dates the badge after February 1966, when Australian money changed to decimal currency. A donation of $10 would be recognised by the gift of this badge. The set of badges is now part of Flagstaff Hill’s comprehensive W.R. Angus Collection, donated by the family of Dr W R Angus, surgeon and oculist. The W.R. Angus Collection: - The W.R. Angus Collection includes historical medical equipment, surgical instruments and material belonging to Dr Edward Ryan and Dr Thomas Francis Ryan, (both of Nhill, Victoria) and Dr Angus’ own belongings. The Collection’s history spans the medical practices of the two Doctors Ryan, from 1885-1926 plus that of Dr Angus, up until 1969. It includes historical medical and surgical equipment and instruments from the doctors Edward and Thomas Ryan of Nhill, Victoria. Dr Angus married Gladys in 1927 at Ballarat, the nearest big city to Nhill where he began as a Medical Assistant. He was also Acting House surgeon at the Nhill hospital where their two daughters were born. During World War II He served as a Military Doctor in the Australian Defence Forces. Dr Angus and his family moved to Warrnambool in 1939, where Dr Angus operated his own medical practice. He later added the part-time Port Medical Officer responsibility and was the last person appointed to that position. Both Dr Angus and his wife were very involved in the local community, including the planning stages of the new Flagstaff Hill and the layout of the gardens there. Dr Angus passed away in March 1970.This badge is significant for connecting Doctor Angus with organisations that he supported. The W.R. Angus Collection is significant for still being located at the site it is connected with, Doctor Angus being the last Port Medical Officer in Warrnambool. The Collection includes historical medical objects that date back to the late 1800s.Legacy appeal badge; a rectangular, shield-shaped metal and enamel badge, blue enamel on gold, with the Legacy symbol of a flaming torch in the centre. It has a vertical stick pin and inscriptions on the back. Made by A.J. Parks, Australia. The badge was given to donors of $10. This badge is part of a set of badges collected by Dr W R Angus. the set represents organisations that he was involved in, and is part of the W.R. Angus Collection.Embossed:“$10”and “A.J. PARKES” “AUST. WIDE” flagstaff hill, warrnambool, maritime village, maritime museum, shipwreck coast, great ocean road, badge, legacy badge, organisation badge, a.j. parkes, $10, ten dollars, donor's badge, legacy appeal, w.r. angus collection -
 Flagstaff Hill Maritime Museum and Village
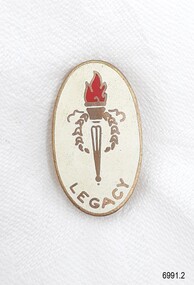
Badge - Legacy Appeal badge, A.J. Parkes, 1966
This Legacy badge is one of a set of badges collected by Dr W R Angus from the organisations in which he was involved. The badge was made by A.J. Parkes of Brisbane, an Australia-wide firm that has been making badges for over a century. The $2' and "£1" (one pound) embossed on the back dates the badge dates the badge to the year 1966 when Australian money was in the process of converting from pounds and pence to decimal currency's dollars and cents. It is interesting to note that the dollar sign "$2" has two vertical lines through the 'S', but the Australian currency sign for a dollar has only one vertical line. The badge may have been produced before the date of decimal conversion, which began on February 14th, 1966. A J Parkes may have ordered the badges before the published use of the dollar symbol. The set of badges is now part of Flagstaff Hill’s comprehensive W.R. Angus Collection, donated by the family of Dr W R Angus, surgeon and oculist. The W.R. Angus Collection: - The W.R. Angus Collection includes historical medical equipment, surgical instruments and material belonging to Dr Edward Ryan and Dr Thomas Francis Ryan, (both of Nhill, Victoria) and Dr Angus’ own belongings. The Collection’s history spans the medical practices of the two Doctors Ryan, from 1885-1926 plus that of Dr Angus, up until 1969. It includes historical medical and surgical equipment and instruments from the doctors Edward and Thomas Ryan of Nhill, Victoria. Dr Angus married Gladys in 1927 at Ballarat, the nearest big city to Nhill where he began as a Medical Assistant. He was also Acting House surgeon at the Nhill hospital where their two daughters were born. During World War II He served as a Military Doctor in the Australian Defence Forces. Dr Angus and his family moved to Warrnambool in 1939, where Dr Angus operated his own medical practice. He later added the part-time Port Medical Officer responsibility and was the last person appointed to that position. Both Dr Angus and his wife were very involved in the local community, including the planning stages of the new Flagstaff Hill and the layout of the gardens there. Dr Angus passed away in March 1970.This badge is significant for connecting Doctor Angus to organisations that he supported. It is also historically significant for representing Australia's conversion to decimal currency. The W.R. Angus Collection is significant for still being located at the site it is connected with, Doctor Angus being the last Port Medical Officer in Warrnambool. The Collection includes historical medical objects that date back to the late 1800s.Legacy Appeal badge; an oval-shaped metal and enamel badge, white enamel on gold, with the Legacy symbol of a flaming torch in the centre. It has a vertical stick pin and inscriptions on the back. It was made by A.J. Parks, Brisbane. The badge was given to a donor of $2 (£1 or one pound) to Legacy. This badge is part of a set of badges collected by Dr W R Angus. the set represents organisations that he was involved in, and is part of the W.R. Angus Collection.Embossed: "PARIVETTE 77-“ "A J PARKES" "BRISBANE" "£1" (one pound) "$2” (2 dollars) flagstaff hill, warrnambool, maritime village, maritime museum, shipwreck coast, great ocean road, badge, legacy badge, organisation badge, a.j. parkes, donor's badge, £1 badge, $2 badge, 14th february 1966, australian decimal conversion, brisbane, legacy appeal, w.r. angus collection -
 Flagstaff Hill Maritime Museum and Village
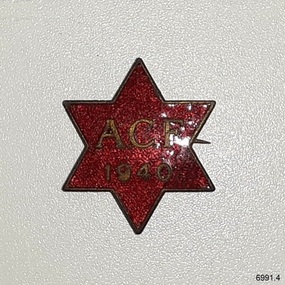
Badge - ACF Australian Comforts Fund badge, P J King Pty Ltd, 1940
This Australian Comforts Fund badge is part of a set of eleven badges collected from the 1920s to the 1940s by Dr W. R. Angus. The badge was sold by the ACF in 1940 to raise funds for gifts to send to the Australian troops serving overseas. The badge is one of a set of badges that represents various organisations that he had interests in. The Australian Comforts Fund was a mostly female, volunteer-run organisation officially recognised by the Government. It began in 1916 as an amalgamation of groups of people who wanted to support the Australian troops abroad with Items of comfort to supplement the essential items provided by the Australian Military Forces. The ACF raised funds to purchase goods, pack them and send them overseas. One of their fund-raising activities was 'button days' where buttons such as this one were given to those who gave donations. The ACF closed down after World War I but was re-formed at the start of World War II. Items that the ACF sent to the troops included personal toiletry items such as toothbrushes and toothpaste, magazines, pyjamas, singlets and socks. They also provided sporting equipment, recreational music, writing materials and postcards. Special hampers were sent to the troops at Christmas time. The maker, P J King, (Percy John King), originally established his engraving and ie casting business in Russell Street, Melbourne in 1893 in partnership with Charles Walder Bridgland, continuing on his own from 1899. Percy and his son John Howard King set up a new business P J King Pty Ltd in 1928 making uniform buttons. In the late 1980s, it merged with two other companies that then became J J Cash, now known as Cash's Australia. The set of badges was donated to Flagstaff Hill Maritime Village by the family of Doctor Angus, Surgeon and Oculist. It is part of the “W.R. Angus Collection” which includes historical medical equipment, surgical instruments and material belonging to Dr Edward Ryan and Dr Thomas Francis Ryan, (both of Nhill, Victoria) and Dr Angus’ own belongings. The Collection’s history spans the medical practices of the two Doctors Ryan, from 1885-1926 plus that of Dr Angus, up until 1969. The W.R. Angus Collection: - The W.R. Angus Collection includes historical medical equipment, surgical instruments and material belonging to Dr Edward Ryan and Dr Thomas Francis Ryan, (both of Nhill, Victoria) and Dr Angus’ own belongings. The Collection’s history spans the medical practices of the two Doctors Ryan, from 1885-1926 plus that of Dr Angus, up until 1969. It includes historical medical and surgical equipment and instruments from the doctors Edward and Thomas Ryan of Nhill, Victoria. Dr Angus married Gladys in 1927 at Ballarat, the nearest big city to Nhill where he began as a Medical Assistant. He was also Acting House surgeon at the Nhill hospital where their two daughters were born. During World War II He served as a Military Doctor in the Australian Defence Force. Dr Angus and his family moved to Warrnambool in 1939, where Dr Angus operated his own medical practice. He later added the part-time Port Medical Officer responsibility and was the last person appointed to that position. Dr Angus and his wife were very involved in the local community, including the planning stages of the new Flagstaff Hill and the layout of the gardens there. Dr Angus passed away in March 1970.This badge represents the efforts of the women volunteers in Australia to support the Australian troops overseas in WWI and WWII. This badge is one of a set of significant badges that connects Doctor Angus with Australian organisations of the early-to-mid 20th century, including those relating to military service support. The W.R. Angus Collection is significant for still being located at the site it is connected with, Doctor Angus being the last Port Medical Officer in Warrnambool. The Collection includes historical medical objects that date back to the late 1800s.The ACF Badge is a star-shaped, gold, glittered red enamel and metal badge. The star has six points. The enamel surface is textured. The border and front inscription of the badge is gold. It is the badge of the Australian Comfort Fund, made by P.J. King and dated 1940. This badge is part of a set of badges collected by Dr W R Angus. the set represents organisations that he was involved in, and is part of the W.R. Angus Collection.Front: “ACF / 1940” Reverse embossed “P.J. KING”flagstaff hill, warrnambool, maritime museum, maritime village, great ocean road, shipwreck coast, metal badges, enamel badges, organisation badges, acf, presbyterian brotherhood, oikumene, w.r. angus, flagstaff hill maritime museum and village, australian comforts fund, button day, volunteer, australian military forces, christmas hamper, 1940 acf badge, fund-raising, p j king pty ltd, percy john king, donor's badge, world war ii, 1939-1945, australians at war, voluntary work, volunteers, home front, w.r. angus collection -
 Flagstaff Hill Maritime Museum and Village
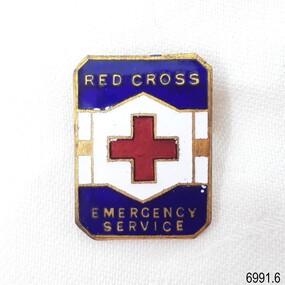
badge - Red Cross Society badge, K.G. Luke Pty. Ltd, Emergency Service, 1935-1945
The badge represents the Emergency Services section of the Red Cross Society. The Australian Red Cross was formed on 21st August 1914 at the outbreak of the First World War. The badge was made by K.G. Luke Pty. Ltd. in Melbourne. Kenneth George Luke, began work as an apprentice in 1910 at Stokes & Sons Pty. Ltd. in Melbourne and stayed with the company for eleven years. He then became a partner in a metalworking business, wholly owning this successful Carlton business in 1925. From 1935-1945 his products included silverware and supplies for military needs. The firm was K.G. Luke Pty. Ltd. by 1936, making buttons, badges, brooches, and heated food trolleys at his office and factory in North Fitzroy, and selling from his showroom in Elizabeth Street Melbourne. His customers included the Australian Red Cross, Victoria Police, TAA Airline, and the military forces of Australia and the United States. Seventeen years later the company was K.G. Luke (A/Asia) Ltd, then twenty-three years on it was Luke Ltd. until in 1983 it was taken over by National Consolidated Ltd. Sir Kenneth George Luke was also a V.F.L. football administrator. This badge is one of a set of badges collected by Dr W R Angus from the organisations in which he was involved. The set of badges is now part of Flagstaff Hill’s comprehensive W.R. Angus Collection, donated by the family of Dr W R Angus, surgeon and oculist. The W.R. Angus Collection: - The W.R. Angus Collection includes historical medical equipment, surgical instruments and material belonging to Dr Edward Ryan and Dr Thomas Francis Ryan, (both of Nhill, Victoria) and Dr Angus’ own belongings. The Collection’s history spans the medical practices of the two Doctors Ryan, from 1885-1926 plus that of Dr Angus, up until 1969. It includes historical medical and surgical equipment and instruments from the doctors Edward and Thomas Ryan of Nhill, Victoria. Dr Angus married Gladys in 1927 at Ballarat, the nearest big city to Nhill where he began as a Medical Assistant. He was also Acting House surgeon at the Nhill hospital where their two daughters were born. During World War II He served as a Military Doctor in the Australian Defence Forces. Dr Angus and his family moved to Warrnambool in 1939, where Dr Angus operated his own medical practice. He later added the part-time Port Medical Officer responsibility and was the last person appointed to that position. Both Dr Angus and his wife were very involved in the local community, including the planning stages of the new Flagstaff Hill and the layout of the gardens there. Dr Angus passed away in March 1970.This badge is significant for connecting Doctor Angus with organisations that he supported. The W.R. Angus Collection is significant for still being located at the site it is connected with, Doctor Angus being the last Port Medical Officer in Warrnambool. The Collection includes historical medical objects that date back to the late 1800s.Badge, rectangular metal and enamel badge, with a blue band across the top and bottom, and a white and gold band in the middle similar to a belt with the buckle of a red cross. The badge has a horizontal pin on the back. Inscriptions on top and bottom bands and on the reverse. It is the badge of the Red Cross Emergency Service, made by K.G. Luke of Melbourne.This badge is part of a set of badges collected by Dr W R Angus. the set represents organisations that he was involved in, and is part of the W.R. Angus Collection.Printed on front; “RED CROSS” above “EMERGENCY / SERVICE”. Embossed on back “8029” “K.G. LUKE / MELB” flagstaff hill, warrnambool, maritime village, maritime museum, shipwreck coast, great ocean road, w.r. angus, badge, organisation badge, flagstaff hill maritime museum and village, australian red cross, charity, volunteer organisation, red cross, k.g. luke pty. ltd., kenneth george luke, north fitzroy, stokes & sons, w.r. angus collection -
 Flagstaff Hill Maritime Museum and Village
Equipment - Foot Grip, Frank McDowell, Early 20th century
This foot grip was made and owned by Frederick William McDowell (Fred) (1880 to 15-6-1967). It would be been joined to the stafe or frame of a jinker and used to step up from the ground and onto the seat. He was a wheelwright by trade. He made and repaired vehicles such gigs, buggies, jinkers, sulkeys, spring carts and farm wagons. His workshop was on the corner of Cramer Street and Raglan Parade in Warrnambool., previously the site of Fotheringhams, and after McDowell's, and still in 2023, occupied by Reece Plumbing Fred's workplace prior to retiring was at Bryant & Waterson's in Kepler Street, opposite the Criterian Hotel, making rubber tyred horse-driven farm wagons.This jinker's foot grip id part of a jinker or two-wheeled carriage. It is a rare item, made by a local wheelwright Frank McDowell who operated his buggy making and repair business in Warrnambool's CBD in the early twentieth century. It is an example of the equipment used on horse-drawn vehicles for safety and convenience.Foot grip, iron with silver plate finish. Rectangular metal plate with textured crossed over diagonal lines on the top surface and inset rectangles with impressed text. the curved and shaped ends have a drilled round hole. the length of the plate is an inverted 'v' shape towards the base. Made by F. McDowell, Warrnambool."F McDOWELL" "WARRNAMBOOL"flagstaff hill, warrnambool, flagstaff hill maritime museum, maritime museum, shipwreck coast, flagstaff hill maritime village, great ocean road, fred mcdowell, frederick mcdowell, wheelwright, gig, buggy, jinker, sulkey, spring cart, farm wagon, 2-wheeled cart, horse cart, horse cart parts, jinker buggy, transport, vehicle, horse drawn, horse jinker, bryant & waterson, jinker part, jinker foot grip, step, foot plate, horse cart part, stafe, 2-wheeled carriage -
 Marysville & District Historical Society
Book - Hardcover book, Peter Evans, Wooden Rails & Green Gold-A century of timber and transport along the Yarra Track, 2022
A history of the timber mills along the Yarra Track from Narbethong to Matlock.Hardcover. Shows Mick Taylor making last-minute adjustments to the rigging of a large log about to commence its journey down the incline to the Marysville Timber and Seasoning Company No.1 mill. Back cover has a photograph of a rail tractor towing a timber trolley along a timber tramway.non-fictionA history of the timber mills along the Yarra Track from Narbethong to Matlock.timber, timber mills, yarra track, narbethong, matlock, marysville, wood's point, wilks creek, great divide, cathedral range, cumberland, foresters, sawmillers, peter evans -
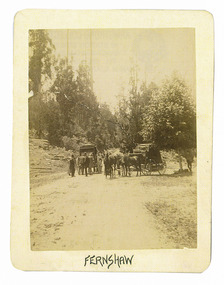 Marysville & District Historical Society
Photograph (Item) - Black and white photograph, Fernshaw, c1900
An early black and white photograph taken at Fernshaw.An early black and white photograph taken at Fernshaw. Fernshaw was a rural township 63 km north-east of Melbourne and 10 km north-east of Healesville. Situated on the Watts River, near where a log had fallen making a convenient crossing, Fernshaw was settled in the 1860s. It provided good country for orchards and berry growing. The location was at the foot of Blacks Spur, with Mounts Juliet and Mondah rising on either side, providing spectacular scenery. There were nearby fern gullies giving rise to the name – ‘shaw’ is old English for thicket or wood. By 1875 Fernshaw had a post office (1865), two hotels, a school (1871) and stores. It was famed for its beauty, attracting tourists. In 1886 the Melbourne and Metropolitan Board of Works began work on the Watts River water catchment scheme – later to become Maroondah – and the Board obtained approval for the catchment country to be reserved and kept free of settlement. This required the removal of the Fernshaw township, which was completed by about 1890. The area was described in the 1903 Australian handbook:ARMSTRONG COLLECTION 42 STATION STREET/ SANDRINGHAM 3191/ TEL. (03) 9521 5442/ IAN M.L. ARMSTRONG OAMfernshaw, healesville, watts river, orchard, berry orchard, blacks spur, black spur, mount juliet, mount mondah, maroondah dam, victoria -
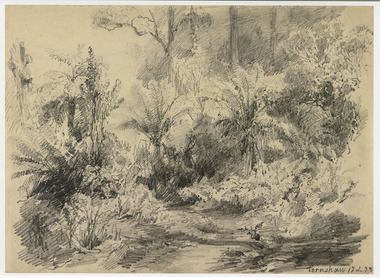 Marysville & District Historical Society
Artwork, other (Item) - Pencil Sketch, Louis Buvelot, Fernshaw 17.2.83, 1883
A copy of an early pencil sketch of Fernshaw in Victoria.A copy of an early pencil sketch of Fernshaw in Victoria by Louis Buvelot. Louis Buvelot ( 1814–1888), born Abram-Louis Buvelot, was a Swiss landscape painter who lived 17 years in Brazil and following 5 years back in Switzerland stayed 23 years in Australia, where he influenced the Heidelberg School of painters. Arriving in Melbourne in February 1865, after leaving the cold of Switzerland, which was impacting on his health, for the warmth of Australia, Buvelot was in business as a photographer in Bourke Street for a year but soon resumed his painting. He lived in Melbourne for a number of years before moving to Fitzroy. The National Gallery of Victoria purchased two of his paintings and he continued painting until his death in 1888. He was buried at the Boroondara Cemetery, where a large monument was erected in his memory. Fernshaw was a rural township 63 km northeast of Melbourne and 10 km northeast of Healesville. Situated on the Watts River, near where a log had fallen making a convenient crossing, Fernshaw was settled in the 1860s. It provided good country for orchards and berry growing. The location was at the foot of Blacks Spur, with Mounts Juliet and Mondah rising on either side, providing spectacular scenery. There were nearby fern gullies giving rise to the name – ‘shaw’ is old English for thicket or wood. By 1875 Fernshaw had a post office (1865), two hotels, a school (1871), and stores. It was famed for its beauty, attracting tourists. In 1886 the Melbourne and Metropolitan Board of Works began work on the Watts River water catchment scheme – later to become Maroondah – and the Board obtained approval for the catchment country to be reserved and kept free of settlement. This required the removal of the Fernshaw township, which was completed by about 1890.Fernshaw 17.2.83louis buvelot, fernshaw, victoria, national gallery of victoria, switzerland, boroondara cemetery, kew cemetery, artist -
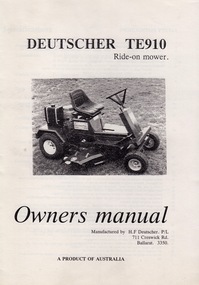 Federation University Historical Collection
Manual - Manual - Deutscher Mower, ZILLES COLLECTION: Owner's Manual for Duetscher TE910 Ride-On Mower
Zilles Printers was begun by Lewis Zilles in the early 1930s. It was in McKenzie Street Ballarat. His son Jeffrey also became a printer - letterpress, offset and screen printer. The business became Zilles Printers/Graphics and was in Armstrong Street and later Bell Street Ballarat. H F Deutscher Pty Ltd were the manufacturers of lawn mowers. They were at 711 Creswick Road, Ballarat but now are at 731 Creswick Road Wendouree. They have been making petrol mowers since the 1950s. Their history began when a golf club asked them to build a mower that was able to cut long grass. Since then they have produced many different models of hand and ride-on mowers.A4 booklet - 10 pages. Photographs of sections referred to. Draft copies and original photographszilles printers, deutscher, ballarat, petrol mowers, ride-on mowers, lawn mower -
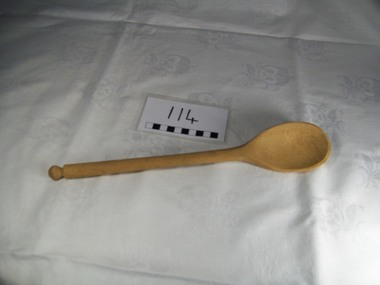 Blacksmith's Cottage and Forge
Wooden Spoon
Used for stirring a multitude of kitchen produced food, especially jam, scones, cakes, and soup. Also used by the mother as a threat to naughty children. The word spoon derives from an ancient word meaning a chip of wood or horn carved from a larger piece.[1] Wooden spoons were easy to carve and thus inexpensive, making them common throughout history. Wooden spoons have been made in virtually every nation on earth and (compared to silver or pewter or gold spoons) represent the ordinary artisan and reflect the life of ordinary folk: this is their "folk art". Source: www.wikipedia.org An essential item found in the kitchen. One piece wooden spoon. Turned marble-shaped decoration at end of handle.kitchen, food, spoon, wooden, stirring, mixing, jam, cakes, batter -
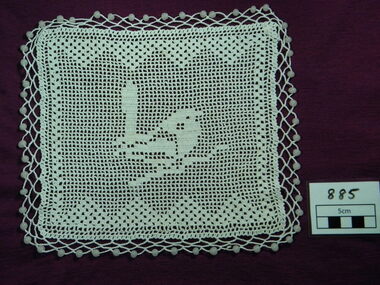 Blacksmith's Cottage and Forge
Jug cover, Early to mid 20th century
Covers were used to place over a jug to keep insects out of the liquid (usually milk). This sort of item was used in days before refrigeration. It also demonstrated womens ability to make items for the home.Part of Ellen Brown collection. Ellen Brown lived her whole life in Bacchus Marsh - she died aged 103 in 2009. She never married and excelled at home duties, eg., needlework, cooking. She won prizes at local shows for cakes, jam making, and preserves. She was a well known identity in the town.Square white beaded jug cover in ecru colored cotton. Crocheted central bird pattern with triangular pattern top and bottom. White beads attached on perimeter.lace, ellen brown, milk, crochet, jug cover, home duties, blue wren, beads