Showing 4839 items matching " road signs"
-
 Melbourne Tram Museum
Document - Instructions, Tramway Board, "Rules and Instructions for Gripmen and Conductors re Electric Lighting of cars and dummies", "Edison Car lighting system - rules for the guidance of employees", 1/03/1919 12:00:00 AM
Set of two instructions, duplicated foolscap sheets. Both signed by H. A Wilcox, General Manager. .1 - "Rules and Instructions for Gripmen and Conductors re Electric Lighting of cars and dummies", notes care for lamps, battery leads, failure, electric shock (7 volts) and cautions. Two sheets, Two copies held. Dated 1/3/19. .2 - "Edison Car lighting system - rules for the guidance of employees" - 4 sheets with brass pin in top left hand corner, giving details of connecting the batteries for charging, charging, battery car, methodology of using the rheostat, cleaning, jumper cables, reports, faults and contact electrical foreman Mr. T Dawe. Not dated.trams, tramways, lights, cable trams, batterymen, equipment -
 Melbourne Tram Museum
Document - Report, Tramway Board, "Confidential - The Chairman, Conference of Victorian Tramways Undertakings", 5/02/1919 12:00:00 AM
Report, 14 foolscap, duplicated sheets, titled "Confidential - The Chairman, Conference of Victorian Tramways Undertakings", dated 5/2/1919 and signed by W. Strangward as Secretary to the Committee reporting on the conference between Mr. Wilcox (Tramway Board), Mr Dix (PMTT), Mr. Murdoch (Essendon), Mr Pringle (Ballarat and Bendigo - ESCo) considering the claims of the Union, "Log of Wages and Working conditions served upon most Tramway Undertakings" through the Commonwealth. Goes through each demand and makes a recommendation.trams, tramways, unions, pmtt, tramway board, wages, nmetl, esco -
 Melbourne Tram Museum
Slide, Keith Caldwell, Mar. 1968
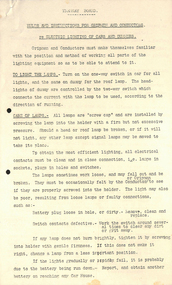
Agfa colour slide, blue / white plastic mount, photo by Keith Caldwell of L103 south bound in Swanston St crossing Flinders St, showing Hanna St Depot. Tram has an advert for Renault cars. In the background is the Young and Jackson's Hotel, the Classic Restaurant coffee lounge and cafe, Portmans, a sign for Visit Tasmania and HMV radios. 3/1968In ink "L 3/68"trams, tramways, l class, hanna st, hanna st depot, flinders st, swanston st, tram 103 -
 Melbourne Tram Museum
Slide - Set of 9, Keith Caldwell, 17/03/1966 12:00:00 AM
Set of 8 Agfa colour blue white plastic mount slides, photo by Keith Caldwell of trams on the Royal Park line in the vicinity of the Royal Park railway line. .1 - W2 328 (West Coburg Bell St route 55) passing under the railway bridge, with another W2 (362 or 382?) behind. Tram 328 has adverts for Remy Martin and Kleenex tissues. .2 - W2 521, route 55, passing a tram stop. Note the overhead light. .3 -W2 456, route 55 West Coburg via William St, passing under the railway bridge. .4 - not used, .5 - W2 355 with railway bridge in background, Domain Road, Route 56. .6 - W2 506 climbing the hill, Domain Road, route 55. Tram has adverts for White Crow tomato sauce. .7 - W5 812, arriving at stop (Section sign), to Carnegie, route 4. The tram stop has the fares to the city (15d and 7d). In the background is a Perway box. .8 - W2 227 (Domain Road route 56) with the railway station and two other trams in the background. .9 - SW6 (Route 55) outbound with the zoo walls in the background. Tram has advert for Coffey Ford. 17/3/1966In ink "17 iii 66"trams, tramways, royal park, route 55, west coburg, w2 class, domain rd, route 56, w5 class, sw6 class, tram 328, tram 521, tram 456, tram 355, tram 506, tram 812, tram 227, tram 913 -
 Melbourne Tram Museum
Slide, Keith Caldwell, March 1968?
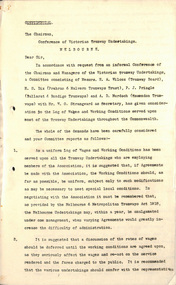
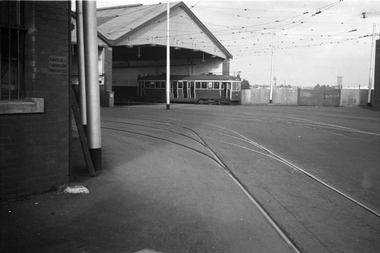
Agfa colour blue white plastic mount slide, photo by Keith Caldwell of scrubber tram No. 10 passing the entrance to A passenger tram on the other track has an ANA Hospital Benefits sign fitted to it. The traffic light to the depot is visible between the two trams. Slide undated - c1968?trams, tramways, scrubber tram, work trams, tram 10 -
 Melbourne Tram Museum
Slide, John Webster, 28/05/1960 12:00:00 AM
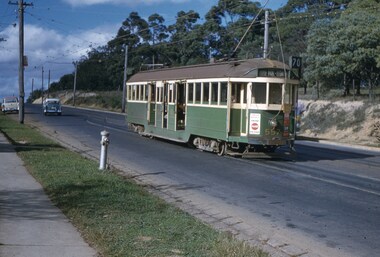
Colour slide, Kodak, white cardboard of Tram 557 waiting on passing loop, Riversdale Road, Wattle Park, outbound to Wattle Park, Elgar Road, route 70/ Has adverts for Coca Cola, 3AW. Also has an Auxiliary board - Football? There is a fire hydrant in the view and the tram stop sign. Slide dated 28-5-1960.Hand writing on rear in ink "28-5-60- Track - Tram 557 waiting on passing loop, Riversdale Road, Wattle Park, Melbourne Vic"trams, tramways, w2 class, wattle park, riversdale rd, route 70, tram 557 -
 Melbourne Tram Museum
Slide - Set of 2, John Webster, 21/07/1959 12:00:00 AM
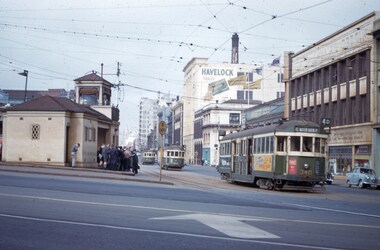
Set of two Colour slides, Kodak, white cardboard of trams of trams at the Victoria St / Swanston St shunt. 21-7-59. .1 - W2 340 showing East Malvern Darling road opposite the signal box followed by W2 showing route 4. Has a large number of men and school boys at the stop. In the view is a "No Entry" sign. In the background is the Ansett ANA building and a building advertising Havelock Tobacco. The tram has a Pimms No. 1 advert. .2 - W2's 550 (with a Castrol sign), 340 - as above and 358 (route 8, Toorak - Glenferrie Road) in the Victoria St shunting area. Has the Army hall behind the trams.Hand writing on rear in ink; "21-7-59 - KFB2 - TRACK - KEV - Swanston St near Victoria St Melbourne" "21-7-59 - KFB3 - TRACK - KEV - Trams in Victoria St Melbourne" Both slides have the speed and the f reading on the left hand side.trams, tramways, victoria st, swanston st, signal box, route 4, route 8, route 4d, east malvern, tram 550, tram 358, tram 340 -
 Melbourne Tram Museum
Document - Report, Melbourne & Metropolitan Tramways Board (MMTB), 24/01/1922 12:00:00 AM
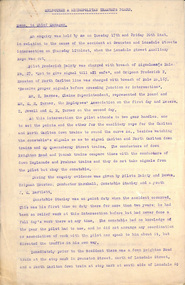
Report - original typed 3 foolscap pages, dated 24/1/1922 signed by the Manager Cable System (Mr. Roberts), to the Chief Manager, concerning an accident at the corner of Swanston and Lonsdale St where the auxiliary cable was cut due to a error by the policeman on duty directing tramcars, the pilot (pointsman/signaller) and one Gripman. Reports on the disciplinary hearing and makes recommendations as to the change of equipment and discussions with the Police department. Makes reference to somnolent market gardeners and general congestion on market days. Has names of Mr Barnes (claims Superintendent), Pilot Frederick Dainty, Gripman Frederick Houston, C. H. Turner and T Jewell representing the Union. Also has Mr. Strickland name in pencil. Also Constable Stanley, Youth J.C. Bartlett, Inspector Byers Notes issues with the intersection..1 - has stamp "Copy to Engineer" in top left hand corner.trams, tramways, cable trams, reports, services, accidents, police, lonsdale st, swanston st, signals -
 Melbourne Tram Museum
Letter, Premier of Victoria, "Tram Depot Commutative Plate and Glass", 22/07/2010 12:00:00 AM
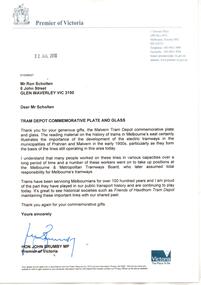
Letter - A4 sheet which has been laminated, address to Ron Scholten, from the Premier of Victoria, titled "Tram Depot Commutative Plate and Glass", thanking Ron for the item that celebrated the centenary of the Malvern Tram Depot in 2010. Signed by John Brumby as Premier.trams, tramways, pmtt, centenary, malvern depot, victorian government -
 Melbourne Tram Museum
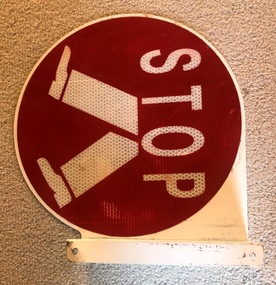
Sign, Yarra Trams, Stop sign fitted to tramcars, mid to late 2000's
Sign - galvanised folded steel sheet with a baked white enamel paint finish and overlaid with a reflective white and red "Stop" and two walking legs to warn motorists that a pedestrian or passenger was about to leave or board a tramcar. See Reg Item 1439 for another example.trams, tramways, tramcars, signs, passengers, safety -
 Melbourne Tram Museum
Sign - Adhesive label, 3M, mid 1980's
Adhesive Label - The Met - the first logo format, Green background with yellow symbol and letters - with instructions - produced by 3M on Controltac film.trams, tramways, logos, the met, marketing -
 Melbourne Tram Museum
Photograph - Black and White photograph, Jan. 1937
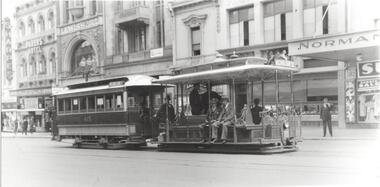
Black and white photograph of a lightly loaded cable car set, trailer 415, eastbound in Bourke St, nearing Russell St. Set has destination of Nicholson St. The Conductor and Gripman are both on the grip car - "gossiping". In the background are signs for Sharpe's store, Parers Hotel, Lewis's and Normans. On the underside of the photograph written in black ink "Cable Tram in Bourke St Jan 1937" Noelle Jones - 24/5/2021 It is no later than 1946, as Maples purchased the Love & Lewis business (194-6 Bourke St) in that year (the business was being sold by the executors of the owner). Note also that Parer's (not Parkers) Hotel, at 200 Bourke Street, was established in the 1880s by the Parer Brothers, originally from Spain. The most famous member of the family was Damien Parer, the WWII photographer. The building was demolished in 1960, and is the site of the Midcity Arcade. Sharpes bought the property on the left (202-4 Bourke St) in 1954, after being tenants for 20 years. Normans Corner Stores opened in 1932.trams, tramways, bourke st, nicholson st, cable trams, crews, tram 415 -
 Melbourne Tram Museum
Photograph - Black and White photograph, c1900
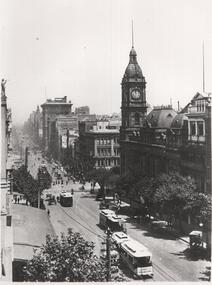
Black and white photograph of Collins St looking at the intersection with Swanston St. A number of cable trams in the view, including one with a Port Melbourne destination. Has the Town Hall and many other buildings in the view. In the photo are signs for Baker & Rouse Pty Ltd, Kodak and Coles Book Arcade.Has "1900" on the rear in ink.trams, tramways, cable trams, swanston st, collins st -
 Melbourne Tram Museum
Negative, Wal Jack, Sep. 1941
Black and white negative by Wal Jack of S160, fitted with a head light mask at the St Georges Road terminus of the Holden St line in Barkly St North Fitzroy. Note the tram stop signs on the adjacent pole. Photo dated, 1/9/1941 in the Wal Jack album.trams, tramways, s class, barkly st, holden st, st georges road, headlight mask, tram 160 -
 Melbourne Tram Museum
Negative, Wal Jack collection, 24/11/1941 12:00:00 AM
Black and white negative by Wal Jack of Maximum Traction N 123 at the Coburg Tram Depot. Note the sign on the wall "Hawking Canvassing Prohibited" Photo dated, 24/11/1941 in the Wal Jack album. See also Reg Item 5329 to 5332 for other photos featuring this tram.trams, tramways, n class, coburg depot, coburg, tram 123 -
 Melbourne Tram Museum
Negative, Wal Jack, 24/11/1941 12:00:00 AM
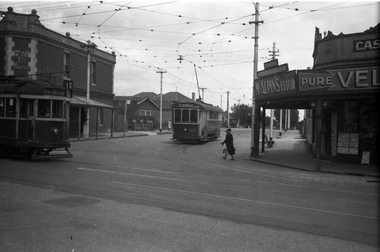
Black and white negative, by Wal Jack, of S 160 (St Georges Road) and W2 455 (West Preston 10) at the intersection of Barkly St and St Georges Road, North Fitzroy. The Trolley Pole is turned on S 160 for the car to return to Lygon St along Holden St. On a wall above the W2 is written "Gone to Berlin" On the corner is a Cash Grocer, advertising McAlpin's Flour, Velvet Soap. In the background is a bus stop sign and housing that has been built since the demolition and sale of the former Cable Tram depot. Photo dated 1-9-1941, in the Wal Jack album.trams, tramways, s class, w2 class, holden st, st georges road, barkly st, route 10, tram 160, tram 455 -
 Melbourne Tram Museum
Negative, Wal Jack, 1/09/1941 12:00:00 AM
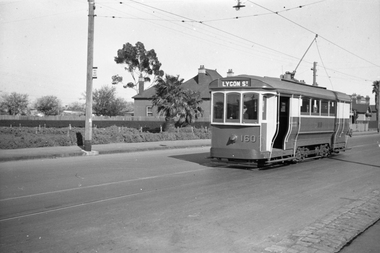
Black and white negative, by Wal Jack, of S160, east bound in Holden St passing the Holden St Reserve on the corner of Byrne St. The Lygon St destination is shown, which is not correct. Note the bus stop sign on the adjacent pole. Tram is fitted with a headlight mask. It is thought that one end of the tram generally would show St Georges Road and the other Lygon St. Possibly mixed up. Also see other photos of the tram on the same date. Photo dated 1-9-1941 in the Wal Jack album along with details of the location.trams, tramways, holden st, s class, headlight mask, tram 160 -
 Melbourne Tram Museum
Letter, The Met, "Classification of W class Trams", 17/12/1990 12:00:00 AM
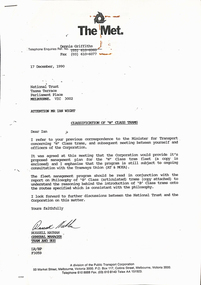
Photocopy of a letter and report (13 pages, stapled in the top left hand corner) signed by Russell Nathan of The Met, to the National Trust 17/12/1990, titled "Classification of W class Trams" enclosing the management plan for the Philosophy of the B class trams including use of W class trams. Includes notes on the implementation, general fleet distribution, composition. Report prepared by Dennis Griffithstrams, tramways, national trust, b class, w class, new trams, depots, depot allocation -
 Melbourne Tram Museum
Document - Instruction, Public Transport Corporation (PTC), "Code of Acceptable Behaviour", 8/01/1993 12:00:00 AM
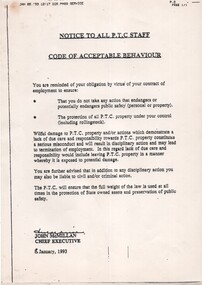
Instruction - single A4 Photocopied sheet, titled "Code of Acceptable Behaviour", signed John McMillan CEO of PTC, reminding personal of their contractual obligations regarding public safety, equipment and disciplinary action. Dated 8/1/1993. Was faxed.trams, tramways, ptc, behaviour, staff, unions, personnel -
 Melbourne Tram Museum
Negative, Wal Jack, 24/07/1944 12:00:00 AM
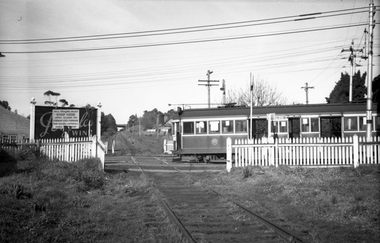
Black and white negative, by Wal Jack, of W2 365 in Whitehorse Road, crossing the outer circle railway. The tram has the destination of Balwyn. Note the sign on the level crossing requiring all trains to stop before proceeding. In the background is a Penfolds Wine billboard. Photo dated 24-7-1944 in the Wal Jack album along with details of the location and the tramcar.trams, tramways, balwyn, whitehorse road, level crossings, outer circle railway, w2 class, tram 365 -
 Melbourne Tram Museum
Negative, Wal Jack, 5/08/1943 12:00:00 AM
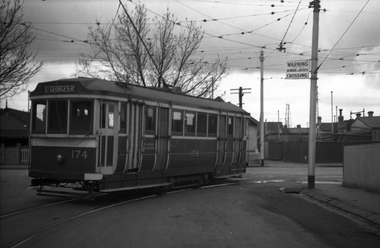
Black and white negative, by Wal Jack, of S174 turning from Pilkington St into Barkly St with the destination of St Georges Road. Shows the nature of the corner after the removal of the second track and the warning sign. Photo dated 5-8-1943 in the Wal Jack album along with details of the location and the tramcars.trams, tramways, holden st, barkly st, st georges road, pilkington st, s class, tram 174 -
 Melbourne Tram Museum
Negative, Wal Jack, c1943-44
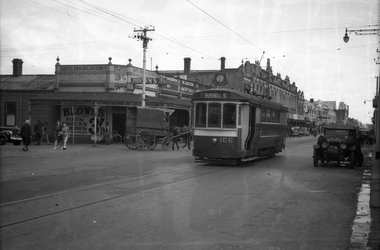
Black and white negative, by Wal Jack, of S class 166 (showing Russell St), in Barkly St Footscray. Based on the photograph, the tram is inbound to Footscray Station, as the buildings match the current (12/2020) Google Earth view at 185 Barkly St and Albert St. In the background is - Brown's Dry cleaner, a Millinery shop at 185, W. Adler Tailor, J. Paarons PA (Radio) on the clockface and H E M Burrow? store sign. A horse drawn van is alongside the tram. Photo undated, c1943-44trams, tramways, barkly st, footscray, russell st, s class, tram 166, mmtb -
 Melbourne Tram Museum
Negative, Wal Jack, 15/03/1945 12:00:00 AM
.1 - Black and white negative, by Wal Jack, of scrubber 5 at the Maribyrnong River terminus. The cross over is in front of the tram. In the background is a shop advertising Robur Tea. Also reversing is W5 804 (City via North Melbourne Route 54). Note the tram stop sign by the house and the bus stop sign on the other side of the road, along with "end of section" signs. Photo dated 15-3-1945 in the Wal Jack album along with details of the location and the tramcar.trams, tramways, maribyrnong rd, scrubber tram, work trams, w5 class, tram stops, tram 5, tram 804 -
 Melbourne Tram Museum
Sign, Public Transport Victoria (PTV), "Public Transport Victoria", 2014
Sign - with an adhesive backing, titled "Public Transport Victoria", PTV logos, Myki - with grey background. 2 copies.trams, tramways, ptv, tickets, signs, myki -
 Melbourne Tram Museum
Postcard, Carinya, Elizabeth St looking south from Collins St, c1980
Colour postcard Carinya Postcards, of Elizabeth St looking south from Collins St to Flinders St Station building. Has a Z and another tram in the view. Has signs for ANA Health, a Friendly Society and Light House.trams, tramways, z class, elizabeth st, flinders st station -
 Melbourne Tram Museum
Postcard, Biscay Greetings, Bourke St from Queen St at dusk, mid 1980's
Colour postcard divided back, vertical format, - Biscay Greetings, looking east along Bourke St from Queen St at dusk. Card has title "Bourke St Mall at Twilight". Has in the view a number of Z class trams in green, including an A class tram. C1984? Also has signs for Myer, Hoyts and Parliament House. Back has space for name and address, stamp and a message and details of the postcard. Produced by Biscay Greetings, possibly mid 1980's. Card No. BG355. Two copies held.trams, tramways, bourke st, mall, z class, a class, parliament -
 Melbourne Tram Museum
Postcard, Nu-color-Vue, Bourke St Mall from Queen St, late 1980's
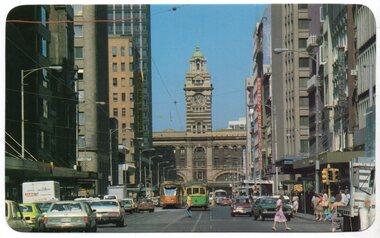
Colour postcard divided back, white border, - Nu-Color-Vue, The Classic Collection of Bourke St Mall from Queen St looking east, with a number of trams in the view, including Parliament house. Has Myer, Midtown Plaza and a sign for Qantas. Back has space for name and address, stamp and a message and details of the postcard. Produced by Nu-Color-Vue, number 140 078 NCV 7027 Has "Melbourne Australia" along the bottom edge.trams, tramways, bourke st, parliament, mall, z class -
 Melbourne Tram Museum
Negative, Wal Jack, c1955
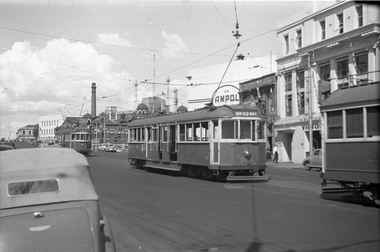
Black and white negative, by Wal Jack, of W5 808 (South Melbourne Beach) and W2 575 (Route 8 Toorak) at the Victoria St terminus, c1955. with the City Baths, D24, Emily McPherson college. Alongside the tram is an Ampol sign.trams, tramways, victoria st, route 8, route 1, w5 class, w2 class, tram 808, tram 575 -
 Melbourne Tram Museum
Negative, Wal Jack, 21/04/1945 12:00:00 AM
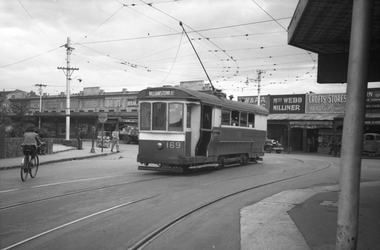
Black and white negative, by Wal Jack, of S 169, Williamstown Road turning from Irving St into Nicholson St over the railway line. In the background are Malvern Cycles, a frock shop, Footscray Fish Shop, Bancroft's Dry cleaners, Moran and Cato, Miss Webb Milliner, Crofts Grocery, A I Brown delivery truck, tram stop sign, fire alarm and a road "Major Stop Road".trams, tramways, footscray, nicholson st, irving st, williamstown road, s class, tram 169 -
 Melbourne Tram Museum
Negative, Wal Jack, late 1930's?
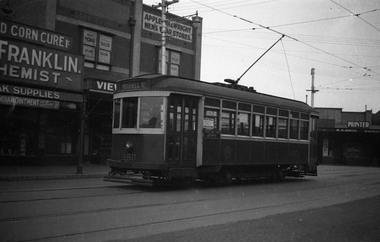
Black and white negative, by Wal Jack, of X1 460, at the Footscray Railway Station terminus in Leeds St. Has the destination of Russell St. Tram has a Pay as You leave sign. In the background is the Franklin Chemist, Appleton and Wright Menswear, Roy Thomas Tailor, and R. S. Smith Printer. Either late 1930's, 1940 or post 1945 no white stripe on tram.trams, tramways, footscray, leeds st, x1 class, tram 460