Showing 744 items
matching timetables
-
 Ballarat Tramway Museum
Document - Table Cards (Sheets), State Electricity Commission of Victoria (SECV), Sunday tables or runs for the SEC Ballarat trams, Aug. 1971
... Timetables ...Set of 2 sheets, photocopied on heat sensitive paper, demi-quarto (double quarto) size graph paper sheets giving the Sunday tables or runs for the SEC Ballarat trams on the Sebastopol - Lydiard St. Nth service following the closure of the Victoria St. - Gardens via Drummond St Nth and Mt Pleasant - Gardens via Sturt St. West services. Gives details of 5 tables or runs, numbered from 1 Run to 5 Run. Each sheet headed "Sebastopol - Lyd St Nth" and "Sunday". Each run details where the driver/conductor would sign on, time, the trips, meal breaks, finish time and the total time of the shift. Stored with these sheets are a photocopies of each sheet reduced to A4 size and full size copies made on A3 paper.trams, tramways, timetables, sec, ballarat, crews -
 Ballarat Tramway Museum
Document - Table Cards (Sheets), State Electricity Commission of Victoria (SECV), Weekdays, Saturdays and Sunday tables, Aug. 1971
... Timetables ...Copy of sheet, photocopied on heat sensitive paper, demi-quarto (double quarto) size graph paper sheets giving the summary of the hours worked for each run or table for Weekdays, Saturdays and Sunday tables or runs for the SEC Ballarat trams on the Sebastopol - Lydiard St. Nth service following the closure of the Victoria St. - Gardens via Drummond St Nth and Mt Pleasant - Gardens via Sturt St. West services. Gives ON - OFF times for meal breaks. Each sheet has "LJD/71" in the top left hand corner. Stored separately with these sheets are a photocopies of each sheet reduced to A4 size.In top left hand corner in ink "B.T.P.S. No. 813".trams, tramways, timetables, secv, ballarat, crews -
 Ballarat Tramway Museum
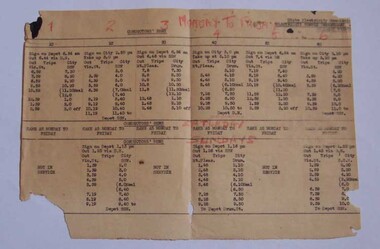
Document - Table Cards (Sheets), State Electricity Commission of Victoria (SECV), Conductors' Runs, for Mount Pleasant and Victoria St, Aug. 1971
... Timetables ...Set of two (2) sheets, typed on thin paper, detailing Conductors' Runs, for Mount Pleasant and Victoria St routes for Mondays to Fridays, Saturdays and Sundays. Not dated. Gives run details for 12 Conductor runs Monday to Saturday and 6 on Sunday. Gives a 20min service on lines on Sundays and 20 min service at the end of the day. See Reg. Item 2993 for Sebastopol line runs. Each run details where the driver/conductor would sign on, time, the trips, meal breaks, finish time and the total time of the shift. Stored separately with these sheets are a photocopies of each sheet reduced to A4 size and full size copies made on A3 paper. Do not remove sheets from enclosures - very delicate.trams, tramways, timetables, sec, ballarat, crews -
 Ballarat Tramway Museum
Document - Table Cards (Sheets), State Electricity Commission of Victoria (SECV), Conductors' Runs, for Sebastopol - Lydiard St, Aug. 1971
... Timetables ...Set of one sheet, typed on thin paper, detailing Conductors' Runs, for Sebastopol - Lydiard St routes for Mondays to Fridays, Saturdays and Sundays. Not dated. Gives run details for 6 Conductor runs Monday to Saturday and 4 on Sunday. Gives a 20min service on lines on Sundays and 20 min service at the end of the day. See Reg. Item 2992 for Mt Pleasant and Victoria St. runs. Each run details where the driver/conductor would sign on, time, the trips, meal breaks, finish time and the total time of the shift. Stored separately with these sheets are a photocopies of each sheet reduced to A4 size and full size copies made on A3 paper. Handle original with care. Stored within corrugated card sheets with item 2776.trams, tramways, timetables, sec, ballarat, crews -
 Ballarat Tramway Museum
Document - Table Cards (Sheets), State Electricity Commission of Victoria (SECV), Ballarat Tramways c1945, c1945
... Timetables ...Demonstrates aspects of the Ballarat Tramways at the end of the 2nd world war - when the tramway traffic was still high. Gives details of working hours, rosters for the week for crews. Shows the additional trams to the basic service on Weekdays and hours of one man operation.Set of two copies of Table or Run sheets for the Ballarat Tramways c1945. Each set comprises 45 small typed sheets held together by a brass clip for Weekdays and Saturdays. Numbered Runs 1 to 33. Some Runs comprise two sheets. Each run details where the driver/conductor would sign on, time, the trips, meal breaks, finish time. Some hand alterations made on a few of the sheets. Some have a large purple pencil mark giving the run table number. Shows the tram operations with many short workings. Full scan of document added as a pdf file 5/6/2019.On front of folder in black ink " BTPS Cat No 806"trams, tramways, timetables, sec, ballarat, crews -
 Ballarat Tramway Museum
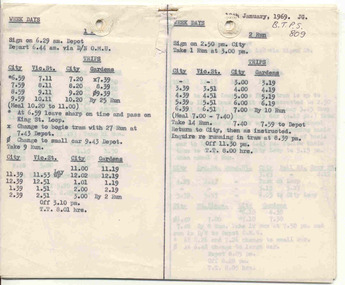
Document - Table Cards (Sheets), State Electricity Commission of Victoria (SECV), Weekdays - Motorman and Conductors, 1969, 1970
... Timetables ...Each sheet or run details where the driver/conductor would sign on, time, the trips, meal breaks, finish time. Shows the tram operations with many short workings with some very detailed instructions, including running specials to schools.Demonstrates aspects of the Ballarat Tramways at the end of the operations prior to closure. Gives details of working hours, rosters for the week for crews. Shows the additional trams to the basic service on Weekdays and special instructions for picking up school children etc.Set of Table or Run sheets for the Ballarat Tramways. Two tables per sheet, punch along top edge, with ring protectors on top sheet. Groups of sheets have been stapled centrally along the top edge. See Reg Item 3424.1, 3424.2 for Saturday and Sunday. 3423.1 - Weekdays (Monday to Fridays), Motorman - dated 19th January. 1969. Has runs 1 to 28. 3423.2 - Weekdays - Conductors - dated 13th January 1970. Has runs 1C to 17C. Full scan of document added as a pdf file 5/6/2019. On front of folder in black ink " BTPS Cat No 809" (3423.1) and "810" on 3423.2.trams, tramways, timetables, sec, ballarat, crews -
 Ballarat Tramway Museum
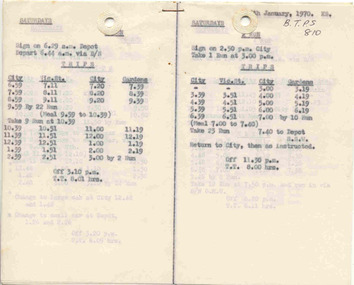
Document - Table Cards (Sheets), State Electricity Commission of Victoria (SECV), Saturdays and Sundays Motorman and Conductors, Jan. 1970
... Timetables ...Each sheet or run details where the driver/conductor would sign on, time, the trips, meal breaks, finish time. Shows the tram operations with many short workings with some very detailed instructions.Demonstrates SEC crew timetables or sheets for tram operations.Set of Table or Run sheets for the Ballarat Tramways. Two tables per sheet, punch along top edge, with ring protectors on top sheet. Groups of sheets have been stapled centrally along the top edge. See Reg Item 3423.1, 3423.2 for Weekdays Motorman and Conductors. Both items dated January 1970. Ring protector hides actual day. 3424.1 - Saturdays - Runs 1 to 16, some carbon copies, mostly typed originals. 3424.2 - Sundays, Runs 1 to 20 (even numbers only) and run 21. All carbon copies. No matching conductor sheets. Full scan of document added as a pdf file 5/6/2019. On front of folder in black ink " BTPS 810" (3424.1).trams, tramways, timetables, sec, ballarat, crews -
 Ballarat Tramway Museum
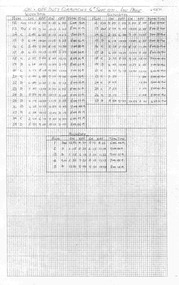
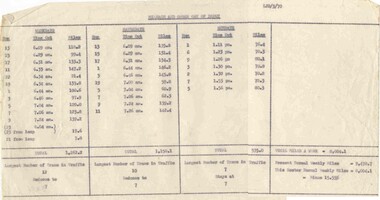
Document - Roster, State Electricity Commission of Victoria (SECV), "Mileage and Order out of Depot", Mar. 1970
... Timetables ...Gives information on the rostering of the tramcars themselves, how many miles per day , the number of trams required and the total week operation and a comparison to previous services.Typed sheet, carbon copy, titled "Mileage and Order out of Depot", dated 3-1970. Gives the run number order of the tramcars out of the depot, the time out and the number of miles for the day (would have other runs within it), for Weekdays, Saturday and Sundays. Also gives the total miles, the largest number of trams in traffic for each day and a comparison of the number of miles in the previous roster and the one of March 1970 - a 15.55% reduction. 2nd copy added 29/07/2012.trams, tramways, timetables, sec, ballarat, tramcars -
 Ballarat Tramway Museum
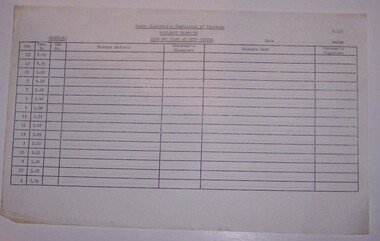
Document - Roster, State Electricity Commission of Victoria (SECV), "Sign off cars at City Centre", Mar. 1970
... Timetables ...Form used to provide information to the depot about defective trams when motormen signed off at the city centre office. Thought to be used in final months of the tramway system.Duplicated typed form, S.118, titled "Sign off cars at City Centre", for signing off defects in trams that Motorman signed off when signing off at the City Office in Sturt St. Form made out for weekdays, has date in top right hand corner. Has Run Number and Time in pre-printed, then space for car number, defects, motorman's signature, repairs made and Foreman's Signature. Some runs detailed twice. Runs line up with Reg. item 3426, possibly the form used after 3-1970.trams, tramways, timetables, sec, ballarat, tramcars -
 Ballarat Tramway Museum
Document - Form/s, State Electricity Commission of Victoria (SECV), "Sign off cars at Depot - Week Days", Mar. 1970
... Timetables ...Form used to provide information to the depot about defective trams when motormen signed off at the depot. Thought to be used in final months of the tramway system. Also used by Ray Hall as a sheet of paper to write out the details of No. 9 run for Sundays as a reference document.Duplicated typed form, S.163, titled "Sign off cars at Depot - Weekdays", for signing off defects in trams that Motorman signed off when signing off at the Depot in Wendouree Parade. Form made out for weekdays, has date/time in top right hand corner. Has Run Number and Time in pre-printed, then space for car number, defects, motorman's signature, repairs made and Foreman's Signature. Some runs detailed twice. On rear, Ray Hall has used the sheet to write out Sunday No. 9 run details, Mount Pleasant and Victoria St trips - gives sign on, meal and sign off times and notes that the trams pass at Pleasant St.trams, tramways, timetables, sec, ballarat, tramcars -
 Ballarat Tramway Museum
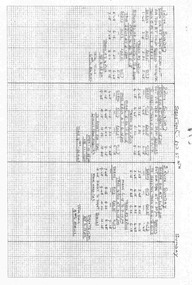
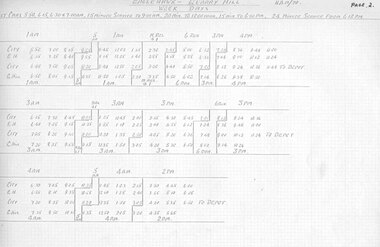
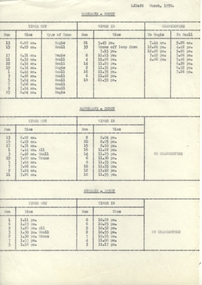
Document - Roster, State Electricity Commission of Victoria (SECV), Rosters for Bendigo, 1970
... Timetables ...Significant in being a almost complete set of rosters for Bendigo prior to closure - appear to be have been copied for a discussion or information document for management at Ballarat. Need to ascertain whether they line up with the actual last timetable. No Sunday tables given - probably did not change them.Set of photocopies of Rosters for Bendigo. Not sure whether these were actually used or were at the stage of a discussion document - see sheet 30. Photocopied onto foolscap size heat sensitive paper and some loosing information. Sheets have been numbered. Generally dated "HAM/70" Page 1 not location 2 - Eaglehawk - Quarry Hill Weekdays 3 - ditto - continued 4 - Golden Square - North Bendigo Weekdays - two different rosters given on two separate sheets. 5 - Eaglehawk - Quarry Hill Saturdays 6 - ditto continued 7 - Golden Square - North Bendigo - Saturdays 8 - Tables - 1AM, 2AM, 3AM 9 - Tables - 4AM, 5AM, 9AM - second sheet gives slightly different arrangements for 5AM 10 - Tables - 10AM, 11AM, 9Assist - second sheet gives slightly different arrangements for 10 & 11AM 11 - Tables - 2PM, 3PM, 4PM 12 - Tables - 6 run, Meal relief & 1, 11 Assist 13 - Tables - 9PM, 10PM, 16 Assist 14 - Tables - 1AM, 2AM, 3AM Conductors 15 - Tables - 4AM, 5AM, 6 run Conductors 16 - Tables - 2PM, 3PM, 4PM Conductors 17 - Tables - 12 Assist Motorman and 13 Assist Conductor - 2 sheets, can't see a difference. 18 - Tables - Saturday, 1AM, 2AM, 3AM 19 - Tables - Saturday, 4AM, 5AM, 9AM 20 - Tables - Saturday, 10AM, 11AM, 1st relief motorman 21 - Tables - Saturday, 9 Assist, 10 Assist, 14 Assist, 15 Assist 22 - Tables - Saturday, 1PM, 2PM, 3PM 23 - Tables - Saturday, 9PM, 10PM, Gol. Sq. relief Motorman 24 - Tables - Saturday, 1AM, 2AM, 3AM conductors 25 - Tables - Saturday, 4AM, 5AM, 1st Meal relief conductor 26 - Tables - Saturday, 1PM, 2PM, 3PM, conductors 27 - Tables - Saturday, 11 Assist, 12 Assist, 13 Assist - conductor 28 - Standby chart - Weekdays and Saturdays 29 - Rotation Roster for Motorman and Conductors - dated 12/5/1970 30 - Comparisons of Present Roster and proposed roster - includes cost impact analysis - 2 copies held. 31 - folded sheet - Weekday Instructions - poor order photocopied - 2nd copy - minor changes 32 - folded sheet - Saturday Instructions - poor order photocopied 33 - Daily hours of Motorman conductors - Weekdays and Saturday 33A - Hours of Motorman and Conductors - Sunday 34 - Weekly Hours - for motorman and conductors - poor order photocopied and data filled in on photocopy. 39 - Tramways - Motorman and Conductors Rotation Roster - dated 5-3-1970trams, tramways, rosters, timetables, sec, bendigo -
 Ballarat Tramway Museum
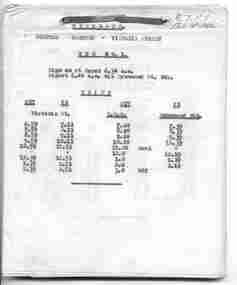
Document - Table Cards (Sheets), State Electricity Commission of Victoria (SECV), Run No. 25, Monday to Friday - includes Grey St, 1950's
... Timetables ...Demonstrates aspects of the Ballarat Tramways notices for tables or rosters provided to crews - could have been copied by the crew from the sheet.Was contained within Reg Item 3519 in which located in the filing cabinet 8/2006. Typed carbon copy sheet giving details for Run No. 25, Monday to Friday - includes Grey St. Run details where the driver/conductor would sign on, time, the trips, meal breaks, finish time. Date unknown - would have to compare with other documents - could be 1950's. trams, tramways, timetables, sec, ballarat, crews -
 Ballarat Tramway Museum
Document - Instruction, State Electricity Commission of Victoria (SECV), Ballarat tramcar type roster, Mar. 1970
... Timetables ...Yields information about the type of trams provided during the later part of SEC operations in Ballarat, times out and times in for specific runs.Typed, carbon copy, Foolscap sheet giving the run number, times out and the type of tram, times in and changeovers between bogie and small trams for Weekdays, Saturdays and Sundays. Has initials LJD: JG and date of March 1970 in top right hand corner. 2nd copy added 3/1/2020trams, tramways, timetables, sec, ballarat, tramcars -
 Ballarat Tramway Museum
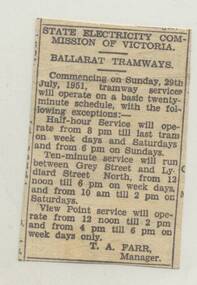
Newspaper, The Courier Ballarat, Altered Services, 29/07/1951 12:00:00 AM
... Timetables ...Yields information about Ballarat tramway services in July 1951.Newspaper clipping of July 1951, advertising altered tramway services, commencing Sun 28/7/1951 - details service frequency and View Point Services. exact date of cutting unknown - would appear to be a paid advertisement. Record updated and images added 21/8/2013.trams, tramways, ballarat tramways, timetables, services, sec -
 Melbourne Tram Museum
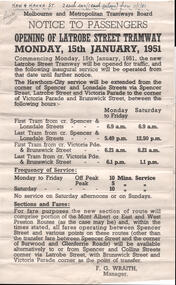
Document, Melbourne & Metropolitan Tramways Board (MMTB), "Opening of LaTrobe Street Tramway", Jan 1951
... timetables ...Notices to Passengers about the LaTrobe St tram line opening in Jan. 1951 and the withdrawal of Saturday services in 1955. The first details the services, times and fares and is signed by the F G Wraith Manager and the second is signed by C E Hall as Acting Traffic Manager. The last Saturday was 25/6/1955.Yields information about the LaTrobe services during the 1950sNotice - printed on foolscap paper with a handwritten note on the top edge and one small sheet."Haw & Hanna St - 2 each car (1 each saloon) from 11/1/51" in ink and "Book". Small sheet has the name of Mr "Rigaldi" in pencil on the top edge.latrobe st, new tramways, timetables, fares, saturday services, notices -
 Melbourne Tram Museum
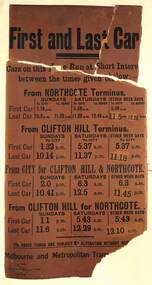
Document - Timetable, Melbourne & Metropolitan Tramways Board (MMTB), First and Last cars - Clifton Hill and Northcote cable trams, Nov 1931
... timetables ...Provides information on the times of the first and last trams on the Clifton Hill and Northcote lines. These lines operated in Bourke Street. Note the time of the first trams on Sundays - no trams operated on Sunday mornings throughout Melbourne.Demonstrates the provision of timetable information on cable tram services to passengers.First and Last cars - Clifton Hill and Northcote cable trams printed on heavy brown coloured card. Alterations have been made by pasting on small slips of paper with the revised times.cable trams, tramways, timetables, northcote, clifton hill, bourke street -
 Melbourne Tram Museum
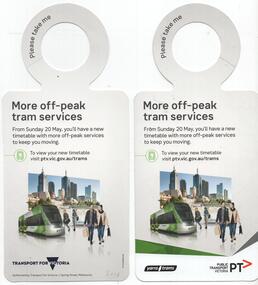
Pamphlet, Public Transport Victoria (PTV), "More off-peak tram services", May. 2018
... Timetables ...Pamphlet cut for use on a hanging rail inside a tram titled "More off-peak tram services", applicable from 20 May 2018. Has the Yarra Trams, PTV and "Transport for Victoria" logos on it.trams, tramways, public transport, timetables, yarra trams, ptv -
 Melbourne Tram Museum
Document - Personal Papers, Charles Craig, "Town cars along Flinders St from Approx 5.20 pm, c1960
... Timetables ...Handwritten in pencil notes titled "Town cars along Flinders St from Approx 5.20 pm" - no date. Gives run number, time ex Lonsdale St, Spencer and Flinders St and Market St. Not dated. Gives schedule times and destination. C1960, shows Hawthorn Depot as a terminus. Second sheet appears to be draft sheet. Prepared on ruled foolscap sheet with four punch holes on the right hand side.trams, tramways, flinders st, schedules, timetables, hawthorn depot -
 Melbourne Tram Museum
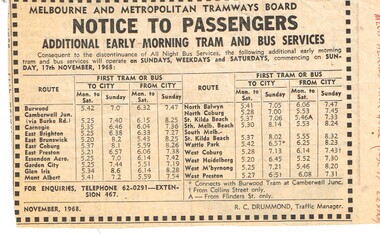
Newspaper, The Herald, "Notice to Passengers Additional Early Morning Tram and Bus Services", Nov. 1978
... Timetables ...Newspaper cutting from the Melbourne Herald Thurs 14/11/1968 (page 17 Late Extra), titled "Notice to Passengers Additional Early Morning Tram and Bus Services" giving details for 21 different routes to and from the city. Gives details of the first trams Monday to Saturday, Sunday, to and from the City. Has a telephone number. Dated November 1968, signed R. C. Drummond Traffic Manager. On the rear is a part of a page giving stock market companies and prices.In red ink on the right hand side "Melbourne Herald Thurs 14/11/1968 (page 17 L. Extra),"trams, tramways, mmtb, tram routes, timetables, notices and information -
 Melbourne Tram Museum
Document - Memorandum, Melbourne & Metropolitan Tramways Board (MMTB), "Memo 567", 9/9/1968
... Timetables ...Memo 567 from EG Blachford, South Melbourne, relating to introduction of new Sunday tables on 8 Sept 1968 requiring alterations to be made to weekday and Saturday tables.trams, tramways, rosters, instructions, south melbourne, timetables -
 Melbourne Tram Museum
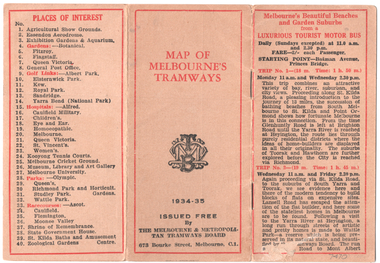
Map, Melbourne & Metropolitan Tramways Board (MMTB), "Map of Melbourne Tramways", 1934
... timetables ...Map booklet consists of three pages of bus and tram round trips, 3 center pages for a map of electric and cable trams, route numbers, and points of interest. Has 4 pages giving an index to routes and first and last trams to and from the City. Shows points where suburban routes are intersected by City routes. One page of places of interest. Dated 1934/35.Demonstrates methods of giving information to visitors to Melbourne and yields information about tram services at the time in Melbourne.Map - 2 octavo cards stapled and folded into 12 pages. All printing is in black with red headings and highlights except for the map which is in four colours.tramways, trams, mmtb, map, timetables, tourist trips -
 Melbourne Tram Museum
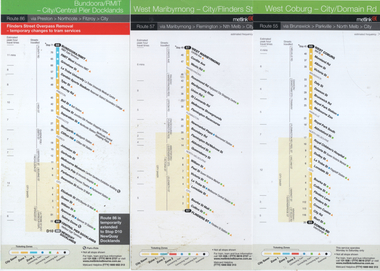
Ephemera - Tram Route Guide, Metlink, 2005
... timetables ...Route guides for route 55 (West Coburg - Domain Road), route 47 (West Maribyrnong) and route 86 (Bundoora - Central Pier) which has a note about the Flinders St overpass removal in 2005. See item 1253 for details and associated route guides. Has the logos of Yarra Trams, Metlink and Metcard.Demonstrates Metlink / Yarra trams route guides.Set of 3 DL pamphlets - full colourtramways, timetables, maps, route 57, route 55, route 86 -
 Melbourne Tram Museum
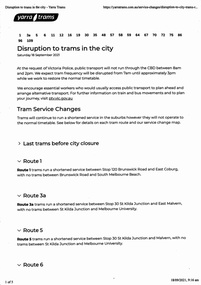
Ephemera - Timetable, Public Transport Victoria (PTV), "Disruption to trams in the City", 17/09/2021 12:00:00 AM
... Timetables ...Set of four documents associated with a planned major Demonstration over COVID-19 lockdowns planned to be held in the city on Saturday 18/9/2021. The actual event took place outside Richmond Town Hall and then in Barkers Road Hawthorn. News stories of the night did show some trams were caught up in the event. .1 - set of 5 pages printed from the Yarra Trams website showing changes route by route and a map. .2 - set of 6 sheets from the PTV website including Metro Trains and regional services. Note many VLine crews were impacted by a COVID outbreak and were isolating. .3 - Yarra Trams Employee Notice Y21653 - digital image copy only .4 - Map of the event - digital image.trams, tramways, covid-19, timetables, tram services, events -
 Melbourne Tram Museum
Document - Form/s, Yarra Trams, "Tram Service Changes", Sep. 2013
... Timetables ...Form A4 - white paper, printed with a yellow back and black stripped borders with a "!" sign, titled "Tram Service Changes". Has Yarra Trams contact call numbers at the base. Has date of 04.12 on right hand side. Has been used for the advice to service changes for the AFL Grand File Parade - 27/9/2013. Advised on trams affected by the closure of Swanston St and Collins St for the parade. Base sheet - see Reg Item 769trams, tramways, yarra trams, timetables, melbourne, information -
 Melbourne Tram Museum
Sign - Adhesive label, Yarra Trams, "Press for Information", c2012
... Timetables ...Adhesive label or sign for use on the press for information button and speakers and CBD tram stops - has the letter I within a circle and the words "Press for Information" underneath. On the base has Yarra Trams contact call numbers. Two copies held.trams, tramways, yarra trams, timetables, melbourne, information -
 Ballarat Tramway Museum
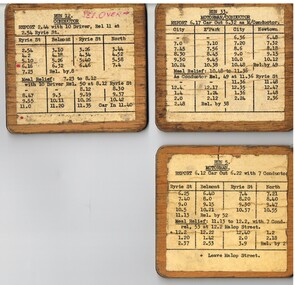
Document - Table Cards (Sheets), State Electricity Commission of Victoria (SECV), Geelong Trams Runs, 1950's
... Timetables ...Table cards gives details for the Motorman and Conductor, starting times, meal times, relief and taken by details. Not known when made - 1950's? .1 - Run 5- Ryrie St - Belmont and North .2 - Run 12 - Ryrie St - Belmont and North with further details on rear. .3 - Run 33 - City - Eastern Park and Newtown for Motorman and Conductor See also Reg Item 3155, 8134 and 9690 for other examples and 8135 for a Bendigo example.Set of three Typed table card or run card, for Geelong Trams Runs glued and varnished onto a sheet of three ply timber - plywood boards. trams, tramways, secv, forms, timetables, geelong -
 Ballarat Tramway Museum
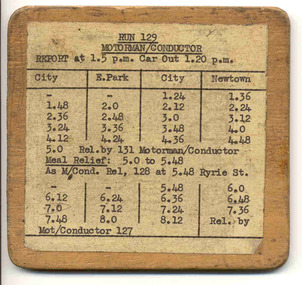
Document - Table Cards (Sheets), State Electricity Commission of Victoria (SECV), Geelong Trams Run 129, 1950's
... Timetables ...Table card gives details for the Motorman and Conductor, starting at 125, working Eastern Park and Newtown. Gives meal times, relief and taken by details. Not known when made - 1950's? See also Reg Item 6270, 8134 and 9690 for other examples and 8135 for a Bendigo example.Typed table card or run card, for Geelong Trams Run 129 glued and varnished onto a sheet of three ply timber - plywood. trams, tramways, secv, forms, timetables, geelong -
 Ballarat Tramway Museum
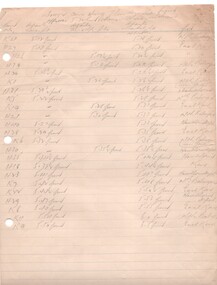
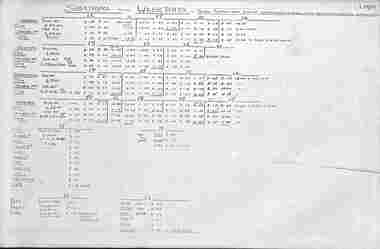
Document - Roster, State Electricity Commission of Victoria (SECV), Ballarat all routes, 1969
... timetables ...Shows the arrangement of the Weekdays Rosters, Saturdays, and Sundays for all Ballarat routes - for the drivers or motormen. Gives the various run numbers, sign-on location, trip take times, sign off times, i. Shows the full or basic 20-minute service during the day and 30 mins at night. Show how the various run or crew tables were arranged to provide overall service. Dated 1969, prepared by LJD - Les Denmead. Demonstrates aspects of the Ballarat Tramways management system of Motorman's' rosters interfacing during 1969. Shows the services and how the various run or crew tables were arranged in relation to the overall timetable.Photo copy of a five-sheet handwritten document on graph paper.secv, tramways, timetables, rosters, ballarat, crews -
 Bendigo Historical Society Inc.
Document - NEWSPAPER PAGES (BENDIGO ADVERTISER, 1971), 1971
a. Bendigo Tramways Amended Timetable (to operate from 27/9/1971). Advertiser 27/9/71 b. As for a. but Advertiser 25/9/71 c. Lake Eppalock page - maps and information. Advertiser 10/4/71 d. Classified Ad cutting 25/9/1971 - reference to Bendigo Historical Society Museum ( & Shakespeare Society) 23/01/2020 Item missing AVdocument, newspaper, bendigo theme -
 Ballarat Tramway Museum
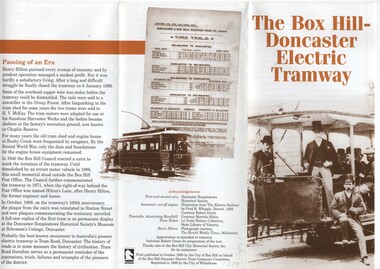
Pamphlet, City of Whitehorse, "The Box Hill - Doncaster Tram", 1998
Two colour pamphlet describing the history of the Australia's first electric tram service - Box Hill to Doncaster in 1889. Pamphlet folded into 6, with 9 photos and copy of timetable. Includes notes on sources, brochure preparation and edition details. Printed on white paper, with a reddish brown colour for headings and sepia toned photo backgrounds. On rear noted as reprint in 1998 of a 1989 brochure. Two copies held.trams, tramways, box hill, city of box hill, doncaster