Showing 798 items
matching corner hotel
-
 Ballarat Tramway Museum
Book, Ballarat Litho & Printing Co, "The Picturesque Folio of Ballarat - 'The Modern Athens", 1904
Forty two page book with red covers, titled "The Picturesque Folio of Ballarat - 'The Modern Athens". Sheets have been individually printed both sides, stapled and then glued to the covers. Cover - gives title and printer details First sheet - with a greetings sheet for Good wishes and seasons greetings. Has a printed date of 1905. See Inscriptions. Dated 22/11/1904. Pages 3 - 10 - a historical sketch of Ballarat, compiled by Lieut-Colonel R. W. Williams V.D. Pages 12 - 41 - photos of Ballarat and district - such as: Sturt St The Lakes Post Office - note the trams clock board - taken at corner of Lydiard and Sturt Streets, looking east. The Gardens Queen Victoria Square Lydiard and Sturt St with a horse tram in the photo Victoria Park Eureka Monument The Statues Botanical Gardens Benevolent Asylum Hospital The City Oval - Richards & Co Photograph Fairy Land - the Lake Railway Station with a D class loco waiting for a signal, 3 post home before the level crossing. Has Irwin's Provincial hotel in view. Gong Gong Lake School of Mines and Methodist Church Lake Fountain A Ballarat view - 1853 - 54. View Point Gong Gong reservoir embankment South Star Mine Lal Lal Falls Band & Loch Mine On last page has the logo for the printers - Ballarat Litho & Printing Co, successors to F. W. Niven & Co. 56 and 58 Lydiard St. Ballarat. PDF scan of book added 21/9/2019 as btm3326i.pdfOn first page in black ink " to Chorus? Dodds, from Robert Dodds, and dated 22 Nov 1904.trams, tramways, ballarat, horse trams, sturt st, gardens, railway station, hospital -
 Ballarat Tramway Museum
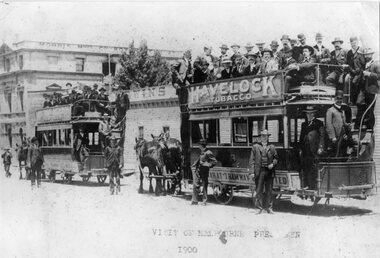
Photograph - Black & White Photograph/s - set of 2, 1900
Yields information about the nature of a visit to Ballarat by Melbourne pressmen and the buildings in the background at the time. Also shows the dress of the visitors at the time. Various sources - ex photo held by the Ballarat Historical Society. Also shows the condition of the trams at the time.Black and white print of a photograph of two crowded horse trams in Lydiard St North. Ballarat, titled "Visit of Melbourne Pressmen 1900". Has Morris Manufacturing Company building in the background. Both horse trams, No.9 nearest to camera, have "Havelock" Tobacco roof advertisements. Behind the trams is Irwin's Provincial Hotel, when it was a timber structure. Print made from a copy negative held in the Ballarat Historical Society collection???? 2nd copy added 8/11/2005 from BTM collection of photos in mess room. 2785.1 - as above, but photographed from an album - shows the full length of horse tram No. 9 and has number TR4 in bottom right hand corner. 2785.2 - as above but cropped on sides - cropped out rear of horse tram 9. 2785.1 & .2 added 12/7/2009, ex William F Scott. See Email from Max Harris 12/8/042785.1 - top on rear in ink - "Ballarat Visit of Press men , 1900 Sydney Harvey photo". 2785.2 - in ink on rear "18a)", "Visit from Melbourne Press 1900, opposite Ballarat Railway Station". In bottom right hand corner "Sydney Harvey" and "William F Scott" address label.tramways, trams, horse trams, melbourne pressmen, ballarat, tram 9 -
 Ballarat Tramway Museum
Slide - 35mm slide/s, Ben Parle, 5/04/1958 12:00:00 AM
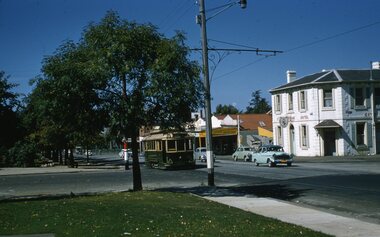
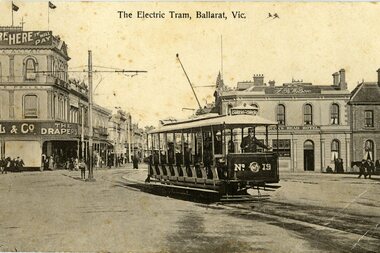
Kodachrome Transparency - 35mm slide - cardboard mount, with one side with red border and words "Kodachrome Transparency / Processed by Kodak" top and bottom. Photo taken by Ben Parle 5/4/1958. Has slide No. "3" stamped in red in top corner and date stamped on slide. Photo of No. 19 westbound in Sturt St. at the intersection of Raglan St, with the City Brigade Hotel in the background. "Sturt St" "-5 APR 1958"tramways, trams, sturt st, raglan st, city brigade hotel, tram 19 -
 Ballarat Tramway Museum
Slide - 35mm slide/s, Ben Parle, 5/04/1958 12:00:00 AM
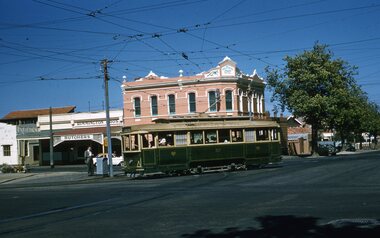
Kodachrome Transparency - 35mm slide - cardboard mount, with one side with red border and words "Kodachrome Transparency / Processed by Kodak" top and bottom. Photo taken by Ben Parle 5/4/1958. Has slide No. "4" stamped in red in top corner and date stamped on slide. Photo of No. 32 turning from Drummond St. South into Sturt St, with the Southern Cross Hotel and Rimmington Bros. Butchers buildings in the background. Note the ESCo electrical termination box just in front of the tram on the central median strip. For high resolution scan see btm2834h.tif"Sturt St" "-5 APR 1958"tramways, trams, sturt st, drummond st, southern cross hotel, esco, tram 32 -
 Ballarat Tramway Museum
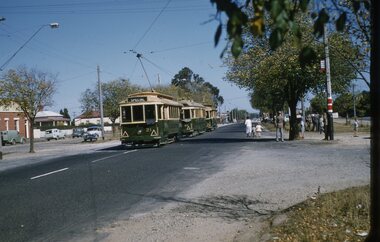
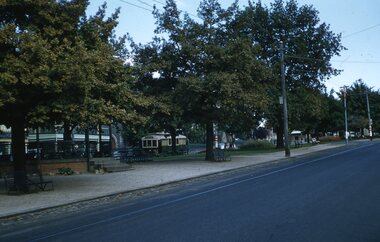
Slide - 35mm slide/s, Ben Parle, 5/04/1958 12:00:00 AM
Kodachrome Transparency - 35mm slide - cardboard mount, with one side with red border and words "Kodachrome Transparency / Processed by Kodak" top and bottom. Photo taken by Ben Parle 5/4/1958. Has slide No. "16" stamped in red in top corner. Photo of the No. 41 and 21 at the Victoria St terminus, with another single truck tram behind. No. 21 has destination of Special. Both trams are carrying the AETA special car auxiliary signs. Passengers are walking across to the service car - note the level of traffic on the main highway to Melbourne. Group of AETA travellers standing on the right hand side of the photo. Meagher's Hotel can be seen on the left hand side. Note the tram stop signage at the terminus. For high resolution scan see btm2849h.tif"Victoria St line" "5-4-58"tramways, trams, victoria st, aeta, tram 21, tram 41 -
 Ballarat Tramway Museum
Slide - 35mm slide/s, Ben Parle, 8/04/1958 12:00:00 AM
Kodachrome Transparency - 35mm slide - cardboard mount, with one side with red border and words "Kodachrome Transparency / Processed by Kodak" top and bottom. Photo taken by Ben Parle 8/4/1958. Has slide No. "17" stamped in red in top corner. Photo of Ballarat No. 13, outbound in Sturt St at Dawson St, with the Alexandra Bandstand in the foreground and the Golden City Hotel and St Patricks Cathedral in the background. "Sturt St Ballarat 8-4-58"tramways, trams, sturt st, dawson st, alexandra bandstand, tram 13 -
 Ballarat Tramway Museum
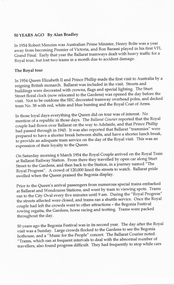
Document - Report, Alan Bradley, "50 Years Ago ", Apr. 2004
Four page printed document or report titled "50 Years Ago" written for BTM magazine Fares Please!, in April 2004. Should be "60 Years Ago". The document or report written by Alan Bradley looks at the 1954 Royal Tour, accidents in 1954, featuring No. 37 and 24 when it ran into the Bucks Head Hotel. Mentions in article, Frank Callahan, Dave Kellett, Les Edwards, Hodgson, Herb Knight. Four sheets of A4 paper stapled in top left hand corner. Images added 28/11/2016.trams, tramways, ballarat, royal visit, accidents, bucks head hotel -
 Ballarat Tramway Museum
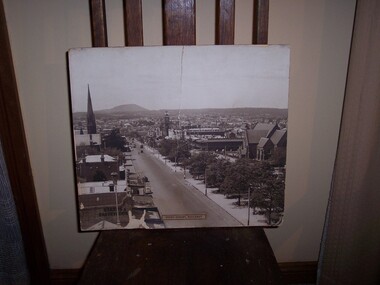
Photograph - Black and White photograph/s - mounted, Victorian Railways (VR), 1938?
Black and White photograph mounted onto heavy cardboard, original Victorian Railways Print, of Sturt St, looking east from the Ballarat City Fire Station tower, late 1930's, 1938? Photo has two trams east bound in the photo, along with a few motor vehicles. In the photo are a street side Garage, a bakery, Golden City Hotel, Town Hall, St. Patricks Church and Harry Davies & Co. Drapers and importers. Has title "Sturt Street, Ballarat" printed onto a label and fixed to the print. Victorian Railways Photograph - now held by State Library. Original photo will have copyright provisions. On rear of photograph, notes print ex ARHS, ex carriage 30AV, and in top right hand corner date 1938. On rear of photograph in top right hand corner "1938", central area of photo "725" in pencil, and lower central portion of the photo (in Warren Doubleday hand writing), "From A.R.H.S ex 30 AV".trams, tramways, sturt st, gold city hotel, st patricks, victorian railways -
 Ballarat Tramway Museum
Memorabilia - Event Materials, Menu, Richard Gilbert and Neil Lardner, "40th Anniversary", 31/05/2011 12:00:00 AM
Has a strong association with Richard Gilbert and Neil Lardner and the BTM's 40th anniversary celebrations and some of the paperwork used at the dinner..4974.1 - Booking form for the BTM's 40th Anniversary dinner at the Brewery Tap Hotel, printed on manilla coloured paper - A4 size. (two copies) 4974.2 - table seating plans and menu for the 40th Anniversary dinner, printed on yellow colour light weight card, with large Texta pen table number in top right hand corner - 3 copies - tables 2, 4 and 5., printed on A4 size paper. See also Reg item 4999 for other associated papers."numbers" in top right hand corner.trams, tramways, 40th anniversary, btm, btps, celebrations -
 Ballarat Tramway Museum
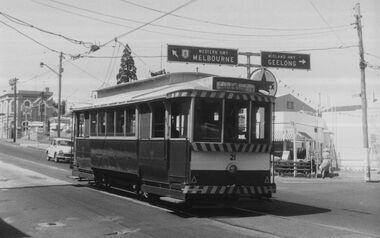
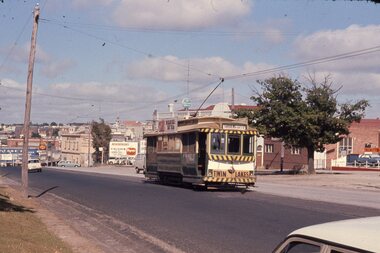
Photograph - Digital image, c1971
Yields information about Ballarat streetscape and its trams in the closing days of the SEC tramway system.Digital image from a black and white print of tram 21 at the intersection of Bridge, Victoria Streets and Main Road, inbound to the Gardens via Sturt St West. Has the Caltex service station, the Munster Arms Hotel in the background. CRB Road signage for Melbourne and Geelong over the tram. At Stones Corner. Photo by Marc Dahlstrom c1971. On rear is the Marc Dahlstrom stamp.trams, tramways, bridge st, victoria st, main st, stones corner, tram 21 -
 Ballarat Tramway Museum
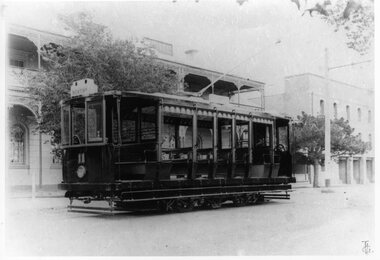
Photograph - Black & White Photograph/s - set of 2, c1912
Yields information about the form and style of the early Geelong trams.Black and white photograph, printed onto card (inkjet printer?) of Geelong Cross bench tram No. 11 in Corio Tce, now Brougham St outside Marks Hotel. Tram has the destination of Newtown. Two copies held. 4316.2 - same photograph printed on photographic paper - supplied by Peter Duckett - two copies held. Photograph used in Destination City, page 46.4316.1 Copy 1 - " Corio Tce, now Brougham St, outside Mark's Hotel, car travelling toward the Depot nearby - Geelong Hist Soc / W F S Collection." Copy 2 on rear "William F. Scott Collection / Geelong Hist Soc / W F S Collection" 4316.2 Copy 1 - On rear, stamped in black ink "Photo supplied from P.W. Duckett Collection, All Rights Reserved, 69 Howitt Rd. Nth Caulfield 3161." Copy 2 - On rear, stamped in black ink "Photo supplied from P.W. Duckett Collection, All Rights Reserved, 69 Howitt Rd. Nth Caulfield 3161." In the bottom right hand corner, a "William F Scott" address label in the bottom left hand corner.trams, tramways, geelong, depot, brougham st, tram 11 -
 Ballarat Tramway Museum
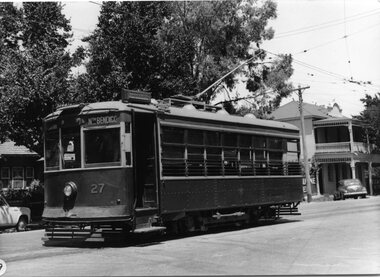
Photograph - Black & White Photograph/s, Keith Kings, 30/01/2956 12:00:00 AM
Black and White Photograph of SEC Bendigo Birney 27 in McCrae St and Arnold St, 30/1/1956. Has destination of North Bendigo, and the hotel in the background. Photo Keith Kings, number R(q)(8) Stamp in top right hand corner and handwritten number with "K.S. Kings No. R(q)(8) Copyright reserved". In black ink "Bendigo / Birney 27 in McCrae St and Arnold St, (Now Tramways Avenue) 30/1/1956. On front of photograph in bottom left hand corner, white dot with number "19"trams, tramways, bendigo, birney, mccrae st, tram 27 -
 Ballarat Tramway Museum
Photograph - Black & White Photograph/s - set of 2, late 1920's, early 1930's
Yields information about the appearance of Geelong's Birney trams during the 1940's.Black and White Photograph of Geelong No. 10, Malop St, travelling north west to the railway station, during the late 1920s, between Gheringhap and Moorabool St. Tram has the destination of "Station", with the National Mutual, Moran's Hotel Orient in the background. Melbourne Bitter advertisement on the hotel. A number of soft top cars parked in the street. Photo probably from a postcard, has the words "T. Geelong. No. 8" along part of the bottom edge. Photo from the Peter Duckett Collection. For a close up of the tram itself see Reg Item 5822. 4335.1 - Black and White print contained within the Wal Jack Bendigo and Geelong Album, see Reg Item 5003 for more details. Added 7/8/2013. This item is the larger image of the two.On rear, stamped in black ink "Photo supplied from P.W. Duckett Collection, All Rights Reserved, 69 Howitt Rd. Nth Caulfield 3161." In hand writing on the rear "47)" in top left hand corner. In the body of the photograph "Malop St travelling NW to Station, between Gheringhap and Moorabool Sts." 4335.1 - in ink on rear. "Geelong No. 10 Original Condition, photo about 1930" and "Please Return"trams, tramways, geelong, malop st, mesco, tram 10 -
 Ballarat Tramway Museum
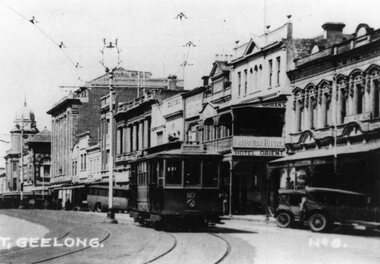
Postcard, V.S.M. Melbourne, ESCo crossbench car No. 19, c1906
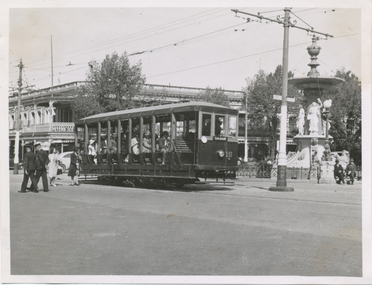
Demonstrates the early days of the Electric Supply Co of Victoria tram's in Ballarat, the use of cross bench or toast rack trams and the intersection of Grenville, Bridge and Sturt Sts Ballarat.Sepia toned photograph of ESCo crossbench car No. 19, at Sturt and Grenville Sts. with the Bucks Head Hotel in the background and Cowdell Tonner and Ellis drapers store on the corner of Bridge and Grenville St. The tram has the destination of Convent/Gardens. See Reg item 3885 for a photo of the store and a Toastrack tram. On the rear, divided areas for a message and address, place for a stamp and two 1d Australian postage stamps in the bottom right hand corner. In the stamp area, has the words "printed in Prussia" in very small type. On rear of card in top left hand corner "28)", along top edge "9383H $25" and in bottom right hand corner a "William F Scott" address label and "WFS Collection"trams, tramways, esco, toastrack tram, grenville st, bridge st, sturt st, tram 470 -
 Ballarat Tramway Museum
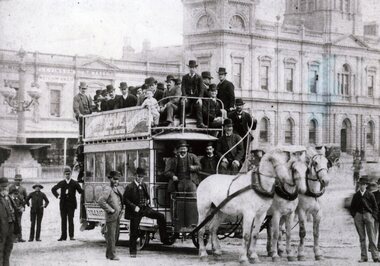
Photograph - Black & White Photograph/s, 1890's
Yields information about Ballarat's electric tramcars at the time of the opening of the service, uniforms and crews.Black and White photograph of Ballarat Horse tram with three white horses on it and many male passengers at the intersection of Sturt and Lydiard St with the Town Hall and other buildings in the background. Has the Vine Hotel modesty board advertisement. Also shows the horse harnesses and the dress of the men at the time. On rear in ink, "18)" in top left hand corner, "Ballarat horse tramways / pic copied from Max Harris collection." and in the bottom right hand corner a "William F Scott label"trams, tramways, horse trams, sturt st, lydiard st -
 Ballarat Tramway Museum
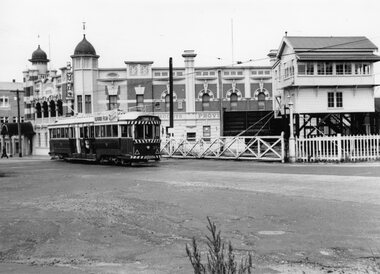
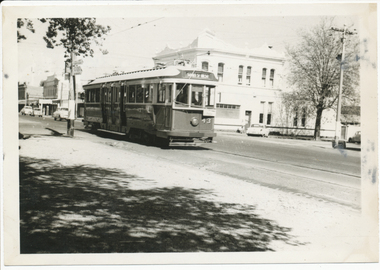
Photograph - Black & White Photograph/s, Wal Jack, 18/11/1961 12:00:00 AM
Yields information about Ballarat's trams in the late 1960'ss and the street scape in Victoria St?, Yields information about Ballarat's trams in the late 1960'ss and the street scape in Victoria St?Black and white print of Ballarat 35, northbound to Lydiard St North, crossing the Railway level crossing with Moodys Provincial Hotel and the Ballarat "B" signal box in the background. The tram has a roof advertisement for Ilford film. Note the entry canopy to the hotel. Two copies. Photo by Wal jack, 18/11/1961. Photo print courtesy of Port Dock Railway Museum, now the National Railway Museum. See worksheet 4311 for letter and details of prints sent to Bill Scott, 19/10/2001. Any photo credit to mention NRM Collection.On rear of copy 1 "SEC Ballarat / 35 / Lydiard St North / 18/11/61 2920 / Wal Jack " Copy 2 "DAC" in ink, bottom right hand corner.trams, tramways, lydiard st, ballarat railway station, level crossings, tram 35 -
 Ballarat Tramway Museum
Photograph - Black & White Photograph/s, Doug Colquhoun, 16/05/1971 12:00:00 AM
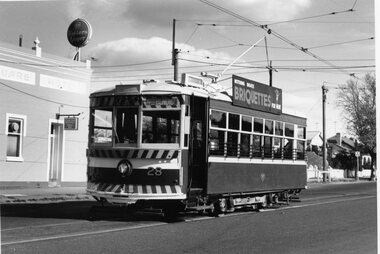
Yields information about Bendigo's trams in the early 1970's and the Eaglehawk terminus.Black and white print of Bendigo 28 at the Golden Square terminus. Two copies. Photo by Doug Colquhoun, 16/5/1971. Trams has the destination of Nth Bendigo and roof advertisements for Briquettes. Also has the Golden Square hotel in the background. Photo print courtesy of Port Dock Railway Museum, now the National Railway Museum. See worksheet 4311 for letter and details of prints sent to Bill Scott, 19/10/2001. Any photo credit to mention NRM Collection.On rear of copy 1 "SEC Bendigo / 28 /Golden Square / 16/5/71 4187 / D.A. Colquhoun" . Copy 2 "DAC" in ink, bottom right hand corner.trams, tramways, golden square, tram 28 -
 Ballarat Tramway Museum
Photograph - Black & White Photograph/s, Doug Colquhoun, 23/03/1959 12:00:00 AM
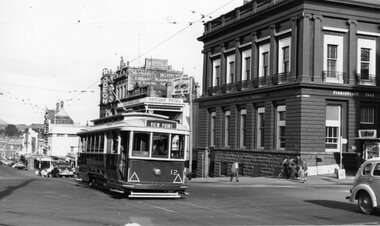
Yields information about the Eaglehawk terminus, tram 18 and the tram liveries in 1963.Black and white print of Ballarat 12, crossing Lydiard St, in Sturt St with the destination of Gardens via View Point. Has the Commonwealth Bank, Odeon theatre, Mechanics Institute, Ballarat Gas Co, Unicorn Hotel, and Colonial Mutual Life buildings in the background. A group of children with bicycles are on the corner and the newspaper seller stand. Photo Doug Colquhoun 23/3/1959. Photo print courtesy of Port Dock Railway Museum, now the National Railway Museum. See worksheet 4311 for letter and details of prints sent to Bill Scott, 19/10/2001. Any photo credit to mention NRM Collection.On rear of copy In top left hand corner "72) No . 71 withdrawn" a yellow label with "24" crossed out over a sticker "Photo No. Reduced to 82% 145x80 see photocopy for masking" and "22" crossed out in the top right hand corner. In the lower left hand corner "SEC Ballarat #12 / Sturt St @ Lydiard / 23/3/59 / Douglas A Colquhoun"trams, tramways, sturt st, lydiard st, tram 12 -
 Ballarat Tramway Museum
Photograph - Black & White Photograph/s, Wal Jack, Easter 1941, Saturday
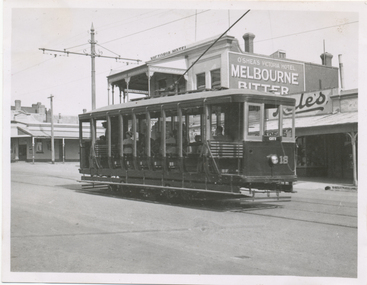
Black and White print contained within the Wal Jack Bendigo and Geelong Album, see Reg Item 5003 for more details. Photo of No. 18 at Charing Cross, Easter 1941. Tram has the destination of Eaglehawk and is carrying a white disk. Has the City Club Hotel in the background, with a Peters Ice Cream sign on it. i1 - scan of print in the album i2 - rear of image i3 - scan of negative at 3200dpi added 6/6/2020. On rear in ink "T187, Bendigo Tramways, No. 18 Summer Car at Charing Cross, Easter Saturday" and in bottom right hand corner "Photo by W. Jack"trams, tramways, bendigo, easter fair, charing cross, tram 18 -
 Ballarat Tramway Museum
Photograph - Black & White Photograph/s, Wal Jack, Easter 1941
Black and White print contained within the Wal Jack Bendigo and Geelong Album, see Reg Item 5003 for more details. Photo of No. 18 in High St Eaglehawk with O'Shea's Victoria Hotel in the background.. Tram has the destination of City on the rear window. i1 - scan of print in the album i2 - rear of image i3 - scan of negative at 3200dpi added 7/6/2020. On rear in ink "T192, Bendigo Tramways, No. 18 High St. Eaglehawk, Easter 1941" and in bottom right hand corner "Photo W. Jack".trams, tramways, bendigo, eaglehawk, high st, tram 18 -
 Ballarat Tramway Museum
Photograph - Black & White Photograph/s, Wal Jack, 4/08/1943 12:00:00 AM
Black and White print contained within the Wal Jack Bendigo and Geelong Album, see Reg Item 5003 for more details. Photo of No. 7 at Eaglehawk terminus with a conductress completing the turning of the trolley pole. The F. Esposito's Town Hall hotel in the background along with advertisements for Velvet soap. Photo taken 4-8-1943 by Wal Jack. The tram has the destination of Quarry Hill, has white bumpers and white steps. i1 - scan of print in the album i2 - rear of image i3 - scan of negative at 3200dpi added 6/6/2020. On rear in ink "SEC Bendigo, 2nd No. 7, (ex PMTT), Eaglehawk (heavy snow storms) 4-8-43" with the Wal Jack copyright stamp in the top right hand corner and the number "T208" written in.trams, tramways, eaglehawk, world war i, conductresses, tram 7 -
 Ballarat Tramway Museum
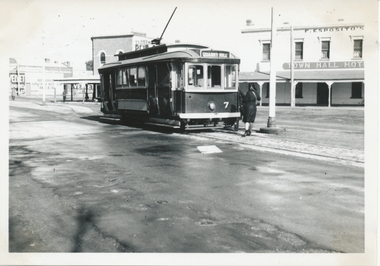
Photograph - Digital image, Wal Jack, 26/03/1951 12:00:00 AM
Yields information about Ballarat 's No. 23 and its use during its the celebrations.Digital image from the Wal Jack Ballarat Album of No. 23 crossing Sturt St from Sebastopol on its way to Lydiard St North, 26-3-1951, Photo Wal Jack. Has the Southern Cross Hotel and E. Daly Cash butcher in the background. See image i2 for rear of photograph.Written on rear in ink "SEC Ballarat, No.23 ex Adelaide 69, painted gold for gold centenary, Tram ex Sebastopol, Sturt and Drummond St 26-3-51" and the Wal Jack stamp in the top right hand corner, with "T725" written in.trams, tramways, gold tram, sturt st, drummond st, hospital corner, tram 23 -
 Ballarat Tramway Museum
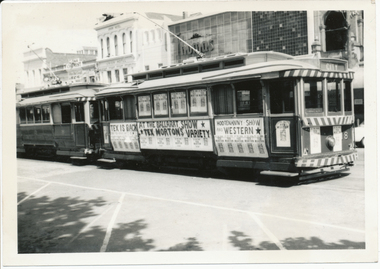
Photograph - Digital image, Wal Jack, 9/11/1963 12:00:00 AM
Yields information about a posters applied to a tram to advertise a Tex Morton variety show in Ballarat in 1963.Digital image from the Wal Jack Ballarat Album of Ballarat 18 dressed in extensive advertising posters and panels including the windows advertising the Tex Morton Variety Show, photographed in the parking loop, Sturt St by Wal Jack 9-11-1963. Has Thomas Jewellers shop, Gear chemist and the Union Hotel in the background. Tram No. 12 is parked behind No. 18. See image i2 for rear of photograph. See image i3 for hi res scan of print. See image i4 for hi res scan of negative Tex Morton died in 1983 and was a well known Country and Western performer. See Wikipedia and similar websites for more details.On rear in ink "SEC Ballarat No.18 decorated with Tex Morten's Variety Show posters - Sturt St, Parking Loop 9-11-63". In top right hand corner is Wal Jack stamp with negative number "T1275" written in.trams, tramways, sturt st, decorated trams, text morton, tram 18, tram 12 -
 Ballarat Tramway Museum
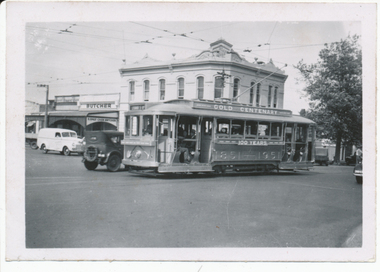
Photograph - Digital image, Wal Jack, 25/12/1945 12:00:00 AM
Yields information about a bogie tram use when they first came to Ballarat in 1945 and the Bridge St streetscape.Digital image from the Wal Jack Ballarat Album of Ballarat 22 outbound in Bridge St for Victoria St, Christmas Day, 25-12-1945, photo Wal Jack. Has Herbert Adams, Reed Chemist and CTA Hotel in the background, note no other vehicles in the photograph. Also an ad for Ballarat Bitter. See image i2 for rear of photograph. See image i3 for hi res scan of print. See image i4 for hi res scan of negative Tex Morton died in 1983 and was a well known Country and Western performer. See Wikipedia and similar websites for more details.On rear in ink "SEC Ballarat #22 in Bridge St, Ballarat 25-12-1945". In top right hand corner is Wal Jack stamp with negative number "T88" written in.trams, tramways, bridge st, bogie trams, tram 22 -
 Ballarat Tramway Museum
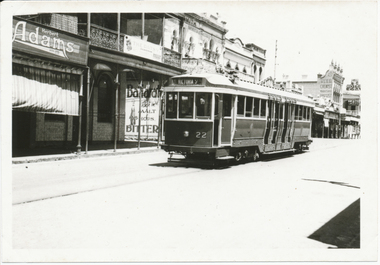
Photograph - Digital image, Wal Jack, 24/11/1956 12:00:00 AM
Yields information about the appearance of Sturt St in the mid 1950's and No. 43.Digital image from the Wal Jack Ballarat Album of photographs of No. 43 with destination of Sturt St West at Drummond St. Note auxiliary destination board and the Olympic rings sign on the pole behind the tram. Southern Cross Hotel in the background. Photo by Wal Jack 24-11-1956, while running an Olympic Games service. See image i2 for rear of photograph. See image i3 for hi res scan of print. See image i4 for hi res scan of negative on rear in black in "SEC Ballarat No. 43 in Sturt St 24-11-56" with Wal Jack stamp in top right hand corner with number "T241" written in.trams, tramways, sturt st, drummond st, olympics, hospital corner, tram 43 -
 Ballarat Tramway Museum
Photograph - Digital image Set of 10, Tony Smith, 1971
Yields information about Ballarat Tramways and trams prior to the closure of the tramway system.Set of 10 digital images of Ballarat trams prior to closure, scanned from original slides by Tony Smith, 1971 prior to closure of the system. .1 - 27 crossing Lydiard St North level crossing, with Reids Coffee Palace in the background. .2 - 11 and 26? crossing at the Bell St loop - 11 has destination of Lydiard St North, Twin Lakes sign and a SEC Briquette advert. 26 - enroute to Lydiard St North. .3 - 13 in Bridge St, at Stones Corner. Tram has a Twin Lakes advertisement. Has the Bank of NSW, ? Hotel, with a JP Howard sign on the building. .4 - 26 and 27 crossing at Bell St loop. 26 has a Briquettes roof advert. .5 - 13 and 12? crossing at the Parker St loop. 13 has a Twin Lakes advert. .6 - 13 at Carlton St loop, Wendouree Parade. Has the Olympic rings in the background. .7 - 17 in Wendouree Parade, with destination of Gardens via Drummond St North, near the depot. Tram has a Twin Lakes advert. .8 - 31 turning from Wendouree Parade into Macarthur St at View point, with a shelter in the background. Tram is showing Special. .9 - 31 in Macarthur St at View Point - has destination of Victoria St. .10 - 21 enroute to Victoria St, about to cross Grenville St. Tram has the destination of Victoria St. Has the signal control box on the adjacent pole.trams, tramways, level crossings, lydiard st gates, lydiard st nth, drummond st sth, bridge st, stones corner, bell st, parker st loop, wendouree parade, carlton st, view point, macarthur st, grenville st, sturt st, tram 27, tram 11, tram 26, tram 13, tram 21, tram 31, tram 12, tram 17 -
 Ballarat Tramway Museum
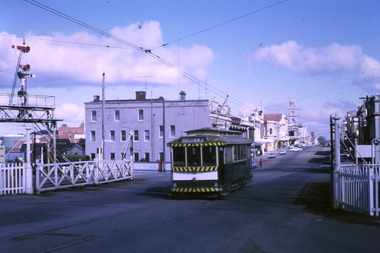
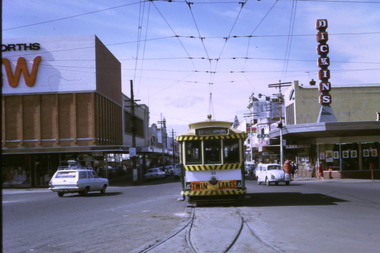
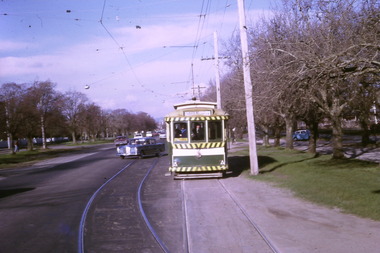
Photograph - Digital image Set of 10, Tony Smith, 1971
Yields information about Ballarat Tramways and trams prior to the closure of the tramway system.Set of 10 digital images of Ballarat trams prior to closure, scanned from original slides by Tony Smith, 1971 prior to closure of the system. .1 - 33 leaving Bridge St at Grenville St. Tram has destination of Gardens via Sturt St West and a Twin Lakes advert. Has Dickins and Woolworths in the background. .2 - 31 and another single trucker at the Victoria St terminus. Has the widened highway beyond the terminus in the background and Meagher's Hotel. .3 - 21 on the Dawson St cross over (has the destination of Mt Pleasant) with 37 in Sturt St, enroute to Lydiard St Nth. Has St Patrick's Cathedral in the background. .4 - 21 on crossover. .5 - 21 on crossover, waiting for 34 to pass by. .6 - 21 at Stones Corner, Bridge St., has Gear Chemist in the background, along with Bank of NSW. Tram has the destination of Mt Pleasant. .7 - 27 descending the Victoria St hill to Stones Corner, Main St junction. Tram has the destination of Gardens via Drummond St Nth. Has the Viscount ambassador Caravans site in the background. .8 - 21 outbound to Mt Pleasant at the Grant St loop in Barkly St. .9 - 21 and 34 at Grant St loop in Barkly St. .10 - 21 at Mt Pleasant terminus, showing Special. Has a person standing alongside the tram. On the adjacent shop is a "The Sun" sign.trams, tramways, grenville st, sturt st, victoria st, sturt st, dawson st, bridge st, stones corner, mt pleasant, grant st, barkly st, tram 33, tram 31, tram 21, tram 37, tram 34 -
 Ballarat Tramway Museum
Photograph - Digital image Set of 10, Tony Smith, 1971
Yields information about Ballarat Tramways and trams prior to the closure of the tramway system.Set of 10 digital images of Ballarat trams prior to closure, scanned from original slides by Tony Smith, 1971 prior to closure of the system. .1 - 13 at the Parker St loop, Sturt St west waiting for another tram to arrive - Mercedes Benz car pull out around the stationary tramcar. .2 - 13 and another single trucker at the City terminus, north side of Sturt St. Note the conductor in the distance with a point bar about to hop onto the tram turning into Lydiard St North. Has the Post Office in the background. .3 - 26 arriving at the City stop, with the Mechanics Institute and Cooks Provide Hotel in the background. Tram has destination of Gardens via Drummond St North. .4 - 33 and 12 in Lydiard St Nth at Sturt St. 33 (Lydiard St Nth), 12 (Sebastopol). Has the post office and other buildings in the background .5 - 12 and 26 at city stop, south side with Town Hall and Myers in the background. 12 has destination of Sebastopol. .6 - 12 at intersection of Drummond St and Sturt St with Mobil petrol station in background and ad for Marshall batteries. Has the tram stop sign on the left hand side. Tram has destination of Sebastopol and a Twin Lakes sign. .7 - 30 northbound in Drummond St south at Sturt St about to turn into Sturt St. Has destination of Lydiard St Nth. Has the Southern Cross hotel in the background. .8 - 31 turning from Drummond St North into Sturt St, en route to Victoria St with the Shell service station in the background. Hospital Corner. Tram has roof advertisements for Johnnie Walker whisky. .9 - 30 and 31 (from above photos) in Sturt St. .10 - Tony Smith standing on the doorstep of 26 at Mt Pleasant terminus. Has the store in the background with The Sun and Robur tea adverts. trams, tramways, parker st loop, sturt st west, sturt st, conductors, drummond st, hospital corner, mt pleasant, tram 13, tram 26, tram 12, tram 30, tram 33 -
 Ballarat Tramway Museum
Slide - 35mm slide/s, Chas Bevan, 19/12/1970 12:00:00 AM
Yields information about the Bakery Hill / Victoria St hill area.Colour slide - 35mm - of Ballarat single trucker 31, about to descend the Bakery Hill in Victoria St, inbound. Tram has the destination of Gardens via Sturt St West. Has the Stones Corner building in the background, Mack Hotel and an advertisement for Beaurepaires tyres. Tram 31 has an a Twin Lakes advertisement and Bliss Bombs (To read pack: Tilt Tram) roof advertisement. Photo taken by Chas Bevan on Saturday 19-12-1970. Note the change since the roundabout for Humffray St was built."Ballarat trams ? Highway. East 19-12-70 - Myers Xmas"tramways, trams, victoria st, bakery hill, stones corner, humffray st, tram 14, tram 17 -
 Ballarat Tramway Museum
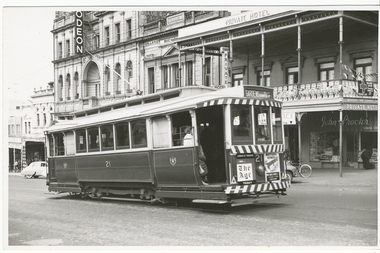
Photograph - Black & White Photograph/s, Lloyd Rogers, 21/03/1962 12:00:00 AM
Yields information about the appearance of tram No. 21 and the Mechanics Institute in the early 1960's.Black and white photograph of Ballarat tram No. 21 climbing the Sturt St hill. Has the destination of Gardens via Drummond Nth. Dated 21/3/1962. Printed on Agfa Gevaert paper in a postcard format. The tram has an Mutual Home and The Age advertisements on the front dash panel. In the background is the Ballarat Mechanics Institute building with The Odeon sign on the front of the building and Cooks Private Hotel. Photo by Lloyd Rogers.In ink "Car 21, Sturt St, Ballarat 21/3/1962. and the number "3/25". In the top left hand corner "ex A'alide 10?"trams, tramways, sturt st, tram 21