Showing 633 items
matching destination city
-
 Ballarat Tramway Museum
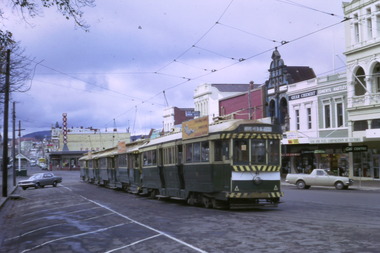
Photograph - Digital image Set of 10, Tony Smith, 1971
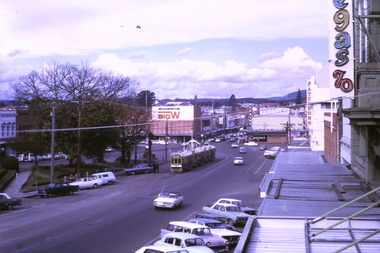
Yields information about Ballarat Tramways and trams prior to the closure of the tramway system.Set of 10 digital images of Ballarat trams prior to closure, scanned from original slides by Tony Smith, 1971 prior to closure of the system. .1 - 41 and four other single truckers in the City Loop - Sturt St - has Dickins, Gear Chemist, Egments - Hartleys in the background. .2 - 33 northbound in Drummond St North with a large semi trailer behind it. .3 - Scrubber tram on 0 road at the depot. .4 - 43 in Lydiard St North .5 - 37? at Sebastopol terminus with the Royal Hotel in the Background. .6 - 37, Albert St, south of Ophir St crossover, northbound - photo not in focus. .7 - 37 at the Grey St loop, northbound. .8 - 37 and 34? - Urquhart St loop? - not in focus. .9 - 11 - Sturt St, showing Victoria St destination. .10 - 37 - climbing the Lydiard St hill, tram showing Sebastopol.trams, tramways, city loop, sturt st, lydiard st north, drummond st nth, depot, grey st loop, albert st, urquhart st, tram 41, tram 33, tram scrubber, tram 43, tram 37, tram 34, tram 11 -
 Ballarat Tramway Museum
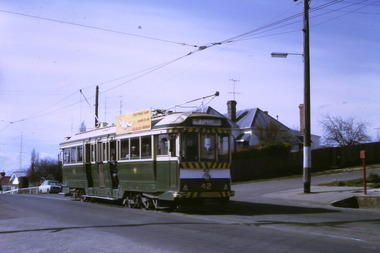
Photograph - Digital image Set of 10, Tony Smith, 1971
Yields information about Ballarat Tramways and trams prior to the closure of the tramway system.Set of 10 digital images of Ballarat trams prior to closure, scanned from original slides by Tony Smith, 1971 prior to closure of the system. .1 - 42 in Barkly St - at top of hill, outbound to Mt Pleasant. Note the fire alarm on the right hand side of the photo. .2 - 42 and 21 crossing at Grant St Loop, Barkly St, Mt Pleasant. 42 outbound, 21 inbound. .3 - 34 and 21 crossing at Parker St Loop, with Ballarat College in the background. 42 in bound to City and Mt Pleasant, 21 showing Sturt St. West. .4 - 21, Wendouree Parade at the south end of the old parking loop. .5 - 42 and 21 crossing at Gardens Loop. 42 showing Mt Pleasant, 21 Gardens via Sturt St West. .6 - ditto .7 - 41 showing Special at intersection of Ripon St and Sturt St with a single trucker tram ex View Point waiting to turn into Sturt St. 41 has two Johnnie Walker Whiskey roof advertisements. .8 - Two single truckers - not well focused - 21? and 13? crossing at Mill St loop, has the hospital in the background. Conductor leaning out of the door on the outbound tram. .9 - 42, bogie tram and a single trucker at the City terminus (Sturt and Lydiard Sts). Has a group of SEC trammies standing alongside the tram. Has Racey's store and the SEC offices in the background. 42 has a briquettes roof advert. .10 - 34 in Sturt St, at the City terminus, with passengers getting onto the tram. Has the Town Hall, Myers store, Gemmola's Pharmacy in the background. Tram has the destination of Gardens via Drummond St. Nth. Has two trammies (crews) standing alongside the tram stop sign.trams, tramways, sturt st west, barkly st, grant st, parker st loop, sturt st, view point, ripon st, mill st loop, crews, town hall, tram 42, tram 21, tram 34, tram 41, tram 42 -
 Ballarat Tramway Museum
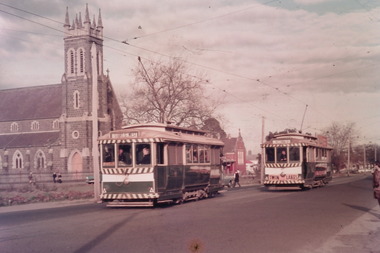
Photograph - Digital image Set of 10, Tony Smith, 1971
Yields information about Ballarat Tramways and trams prior to the closure of the tramway system.Set of 10 digital images of Ballarat trams prior to closure, scanned from original slides by Tony Smith, 1971 prior to closure of the system. The following photos have suffered colour change and showing some deterioration - fungal growth. .1 - 13 (Sturt St West) and 27 (Victoria St with Twin Lakes sign) crossing at King St loop with St Alipius church in the background. .2 - 13 (Sturt St West) and 17? (Mt Pleasant) crossing at Parker St loop, with the Ballarat College in the background. .3 - Single trucker, inbound, approaching the Parker St Loop, showing Mt Pleasant. .4 - 30 in Sturt St, descending the hill to Grenville St, with other trams in the background, including Woolworths Big W and the Dickins Store. Also has the 8 hour monument. 30 showing City. .5 - 37 running Special, no passengers, crossing Lydiard St Nth, heading for Grenville St. Has the Titanic bandstand, Mechanics Institute in the background. .6 - 33 and three other single truckers in the City Loop - has the Ballarat Gas Co and other buildings in the background. .7 - 37 showing Special passing 33 and other trams parked in the City Loop. Has Dickins, Ballarat Gas Co, Edmonds, Patersons store in the background. .8 - 17 crossing Lydiard St Nth in Sturt St. 17 has destination of Gardens via Drummond Nth, and a Twin Lakes sign. Includes the T&G sign in the background. .9 - 31, a single trucker and bogie tram crossing at Depot loop, Wendouree Parade - 31 showing Victoria St. .10 - 17 waiting in Gardens Loop, showing Mt Pleasant.trams, tramways, king st, victoria st, sturt st west, sturt st, grenville st, city loop, gardens loop, wendouree parade, tram 13, tram 27, tram 30, tram 37, tram 33, tram 17, tram 31 -
 Ballarat Tramway Museum
Photograph - Digital image Set of 10, Tony Smith, 1971
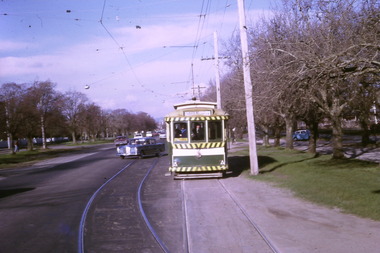
Yields information about Ballarat Tramways and trams prior to the closure of the tramway system.Set of 10 digital images of Ballarat trams prior to closure, scanned from original slides by Tony Smith, 1971 prior to closure of the system. The following photos have suffered colour change and showing some deterioration - fungal growth. .1 - 35 (Sebastopol), with the Town Hall and Gemmola's chemist in the background. Tram waiting at the tram stop. .2 - 27 at Victoria St loop, showing Gardens via Drummond St Nth. .3 - 35 at Armstrong St inbound showing Lydiard St Nth. Has the Commonwealth bank in the background. .4 - 32 westbound in Sturt St between Dawson and Lyon Streets, tram has the destination of Gardens via Drummond Nth. Has the Town Hall and other buildings in the background. .5 - 17 inbound at Dawson St. Tram has destination of Mt Pleasant. .6 - 39 picking up passengers at the tram stop on the west side of Dawson St. Has the Ritzy cafe and the Golden City hotel in the background. Tram appears to be well loaded with lady passengers and has a "Everything under my control in my all electric kitchen" SEC roof ad. .7 - 37 using the Dawson St crossover - has St Patricks Cathedral in the background. .8 - 21 entering the depot with Lake Wendouree in the background. .9 - 11 sitting in 0 road at the depot. .10 - 41 at the depot on 2 road. Tram has two Johnny Walker Whiskey roof adverts.trams, tramways, sturt st, victoria st, dawson st, lake wendouree, wendouree parade, depot, tram 35, tram 27, tram 32, tram 17, tram 39, tram 37, tram 21, tram 11, tram 41 -
 Ballarat Tramway Museum
Photograph - Digital image Set of 10, Tony Smith, 1971
Yields information about Ballarat Tramways and trams prior to the closure of the tramway system.Set of 10 digital images of Ballarat trams prior to closure, scanned from original slides by Tony Smith, 1971 prior to closure of the system. .1 - 13 at the Parker St loop, Sturt St west waiting for another tram to arrive - Mercedes Benz car pull out around the stationary tramcar. .2 - 13 and another single trucker at the City terminus, north side of Sturt St. Note the conductor in the distance with a point bar about to hop onto the tram turning into Lydiard St North. Has the Post Office in the background. .3 - 26 arriving at the City stop, with the Mechanics Institute and Cooks Provide Hotel in the background. Tram has destination of Gardens via Drummond St North. .4 - 33 and 12 in Lydiard St Nth at Sturt St. 33 (Lydiard St Nth), 12 (Sebastopol). Has the post office and other buildings in the background .5 - 12 and 26 at city stop, south side with Town Hall and Myers in the background. 12 has destination of Sebastopol. .6 - 12 at intersection of Drummond St and Sturt St with Mobil petrol station in background and ad for Marshall batteries. Has the tram stop sign on the left hand side. Tram has destination of Sebastopol and a Twin Lakes sign. .7 - 30 northbound in Drummond St south at Sturt St about to turn into Sturt St. Has destination of Lydiard St Nth. Has the Southern Cross hotel in the background. .8 - 31 turning from Drummond St North into Sturt St, en route to Victoria St with the Shell service station in the background. Hospital Corner. Tram has roof advertisements for Johnnie Walker whisky. .9 - 30 and 31 (from above photos) in Sturt St. .10 - Tony Smith standing on the doorstep of 26 at Mt Pleasant terminus. Has the store in the background with The Sun and Robur tea adverts. trams, tramways, parker st loop, sturt st west, sturt st, conductors, drummond st, hospital corner, mt pleasant, tram 13, tram 26, tram 12, tram 30, tram 33 -
 Ballarat Tramway Museum
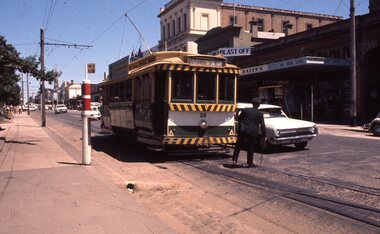
Photograph - Digital image Set of 10, Tony Smith, 19/09/1971 12:00:00 AM
Yields information about Ballarat Tramways and trams prior to the closure of the tramway system.Set of 10 digital images of Ballarat trams prior to closure, scanned from original slides by Tony Smith, 1971 prior to closure of the system. This set of slides appears to be the last day of operations - 19/9/1971 .1 - Photo taken from Cooks Hotel balcony overlooking three bogie trams parked in the City Loop with Big W and Dickins store in the background. .2 - 42 in Albert St, showing destination of Sebastopol, though could be north bound near Ophir St. .3 - 42 crossing Ophir St to the north. .4 - 42 (Lydiard St Nth), 34 (Sebastopol) crossing at the Bell St loop .5 - 42, 35 and another bogie tram at ditto - note the neat line of photographers and one person (bounding) around. .6 - 34 and 35 leaving the Grey St loop southbound. .7 - 34 and 35 southbound in Albert St passing the Borough of Sebastopol Town Hall .8 - 34 nearing the Sebastopol terminus in Albert St .9 - 35 ditto .10 - 35 ditto after passing the camera looking towards the terminus.trams, tramways, sturt st, sebastopol, albert st, city loop, ophir st, bell st, grey st, borough of sebastopol, closure, tram 42, tram 34, tram 35 -
 Ballarat Tramway Museum
Slide - 35mm slide/s, Chas Bevan, c1970
Yields information about the city junction between Sturt and Lydiard St north and demonstrates the operation at this point by a driver.Colour slide - 35mm - of Ballarat No. 28 at the junction between Sturt St and Lydiard St North, with the driver changing points for Lydiard St North. The tram has the destination for Lydiard St North. Shows the SEC offices in the background, Racey's store, the small tram stop sign and end of section sign and the motor traffic at this point. Photo by Chas Bevan."Ballarat trams" in ink.tramways, trams, lydiard st nth, sturt st, motormen, drivers, city, tram 28 -
 Ballarat Tramway Museum
Slide - 35mm slide/s, Chas Bevan, 19/12/1970 12:00:00 AM
Yields information about No. 13 and the general scene at the City area, corner of Lydiard and Sturt Sts.Colour slide - 35mm - of Ballarat No. 13 and another single trucker at the junction between Sturt St and Lydiard St North. No. 13 has the destination for Mt Pleasant. Shows the SEC offices in the background, Racey's store, the small tram stop sign and end of section sign and the motor traffic at this point. Photo by Chas Bevan 19-12-1970."Ballarat trams 19-12-70 Lydiard St xing of West H'way" in ink.tramways, trams, lydiard st nth, sturt st, tram 13 -
 Ballarat Tramway Museum
Photograph - Black & White Photograph/s, mid to late 1950's
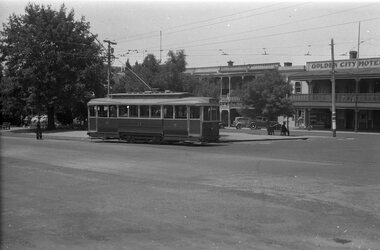
Black and white photograph of Bendigo 25, late 1950's crossing the highway at Charing Cross and about to enter Mitchell St. Tram has the destination of Quarry Hill. In the background is City Club Hotel. On the right hand side of the photograph is a direction sign and tram stop sign. Photographer unknown - see history of object.In the rear in ink "Bendigo"trams, tramways, bendigo, charing cross, mitchell st, quarry hill, tram 25 -
 Ballarat Tramway Museum
Photograph - Black & White Photograph/s, mid to late 1950's
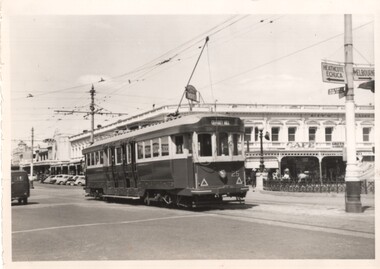
Demonstrates the use of the trams in the city area of Ballarat, late 1950's and their use.Black and white photograph of Ballarat 27, loading passengers at the intersection of Sturt and Lydiard St, City, late in a summer evening. Tram has the destination of Gardens via Sturt St West and an auxiliary board, but it cant be read. A number of passengers are boarding. Has the Commonwealth Bank building in the background, and the tram stop signs on the pole in front of the photo. Photographer unknown - see history of object. See Keith Kings, The Bendigo Tramways, re the fitting of reflective tape in 1956, page 59.In the rear in pencil - "Ballarat"trams, tramways, city, sturt st, lydiard st, tram 27 -
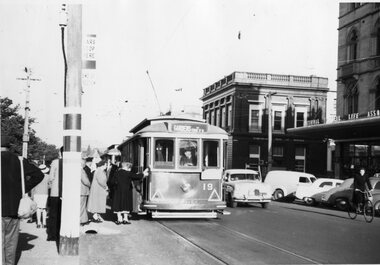 Ballarat Tramway Museum
Photograph - Black & White Photograph/s, mid to late 1950's
Demonstrates the use of the trams in the city area of Ballarat, late 1950's and their use.Black and white photograph of Ballarat 19, loading passengers at the intersection of Sturt and Lydiard St, City, late in a summer evening. Tram has the destination of Gardens via Sturt St West and an auxiliary board, but it cant be read. Many passengers are boarding. Has the Commonwealth Bank building in the background, and the tram stop signs on the pole in front of the photo. Photographer unknown - see history of object. See Keith Kings, The Bendigo Tramways, re the fitting of reflective tape in 1956, page 59.In the rear in pencil - "Ballarat"trams, tramways, city, sturt st, lydiard st, tram 19 -
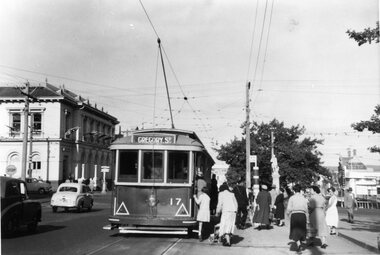 Ballarat Tramway Museum
Photograph - Black & White Photograph/s, mid to late 1950's
Demonstrates the use of the trams in the city area of Ballarat, late 1950's and their use.Black and white photograph of Ballarat 17, loading passengers at the intersection of Sturt and Lydiard St, City, late in a summer evening. Tram has the destination of Gregory St. Many passengers are or waiting to boarding. Has the Post Office in the background and Robert Burns statue. Note most of the passengers are women. Photographer unknown - see history of object. See Keith Kings, The Bendigo Tramways, re the fitting of reflective tape in 1956, page 59.In the rear in pencil - "Ballarat"trams, tramways, city, sturt st, lydiard st, tram 17 -
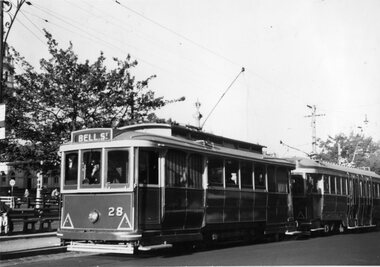 Ballarat Tramway Museum
Photograph - Black & White Photograph/s, mid to late 1950's
Demonstrates the use of the trams in the city area of Ballarat, late 1950's and their use.Black and white photograph of Ballarat 28 and a bogie tram at the Sturt St City stop, south side. No. 28 has the destination of Bell St. The driver is awaiting the bells to proceed. Photographer unknown - see history of object. See Keith Kings, The Bendigo Tramways, re the fitting of reflective tape in 1956, page 59.In the rear in pencil - "Ballarat"trams, tramways, city, sturt st, lydiard st, tram 28 -
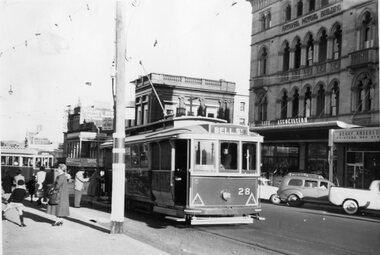 Ballarat Tramway Museum
Photograph - Black & White Photograph/s, mid to late 1950's
Demonstrates the use of the trams in the city area of Ballarat, late 1950's and their use.Black and white photograph of Ballarat 28 and a bogie tram at the Sturt St City stop, south side. No. 28 has the destination of Bell St. In the background are the Commonwealth Bank, Berry Anderson printers and the National Mutual building. A number of passengers are boarding the tram. Photographer unknown - see history of object. Keith Kings, The Bendigo Tramways, re the fitting of reflective tape in 1956, page 59.In the rear in pencil - "Ballarat"trams, tramways, city, sturt st, lydiard st, tram 28 -
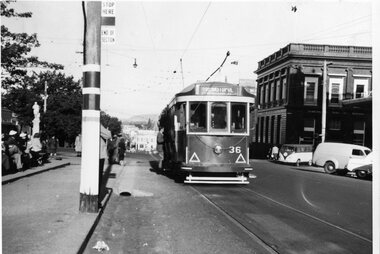 Ballarat Tramway Museum
Photograph - Black & White Photograph/s, mid to late 1950's
Demonstrates the use of the trams in the city area of Ballarat, late 1950's and their use.Black and white photograph of Ballarat 36 at the city terminus, Sturt and Lydiard streets, south side. The tram has the destination of Sebastopol. In the background is the Commonwealth Bank. Passengers are waiting on the seats in the median strip with some boarding the tram. Tram stop pole with stop sign and end of section sign. Photographer unknown - see history of object.In the rear in pencil - "Ballarat"trams, tramways, sturt st, lydiard st, city, tram 36 -
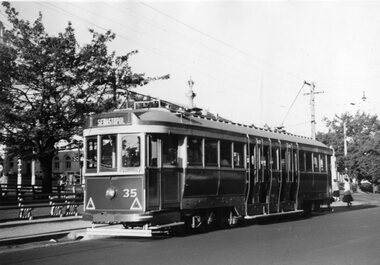 Ballarat Tramway Museum
Photograph - Black & White Photograph/s, mid to late 1950's
Demonstrates the use of the trams in the city area of Ballarat, late 1950's and their use.Black and white photograph of Ballarat 35 at the city terminus, Sturt and Lydiard streets, south side. The tram has the destination of Sebastopol. Photographer unknown - see history of object.In the rear in pencil - "Ballarat"trams, tramways, sturt st, lydiard st, city, tram 35 -
 Ballarat Tramway Museum
Photograph - Black & White, Bendigo 12 leaving Charing Cross, late 1950's
Black and White photograph, of Bendigo12 with destination of Golden Square, leaving Charing Cross in High St, during the mid to late 1950's. Tram has roof adverts for Jeffreys Bread, Alva Jams and a Cohn's Drink ad on the front drivers panel. In the background are the City Club Hotel and Start Building Society buildings. Printed on Fujichrome paper. Two copies held."TMSV Sales" stamp on rear. On rear of in ink 'HTT1 = MM107 = BED 19, Renumbered 12"trams, tramways, bendigo, charing cross, high st, tram 12 -
 Ballarat Tramway Museum
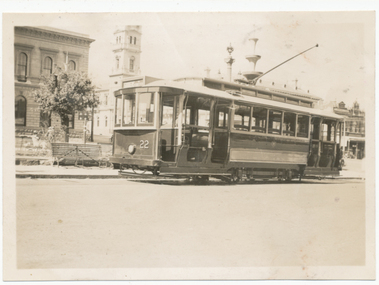
Photograph - Digital image, Wal Jack, late 1930's
Yields information SEC 3rd 22, one of the ex Adelaide tramcars and the streetscape late 1930's. at the City tram terminus.Digital image from the Wal Jack Ballarat Album of No. 22 at the City terminus, south side, with the Post Office in background. Tram has the destination of Gardens via Sturt St West. Not dated, late 1930s. Note very similar image to Reg item 1373. See image i2 for rear of photograph. See Reg Item 1373 for a poor print and Reg Item 7540 for the original negative.on rear of photo in ink, "Ballarat Tramways 3rd No. 22 ex Adelaide 92 / smashed up July 1944 tram" and in bottom right corner "W. Jack"trams, tramways, sturt st -
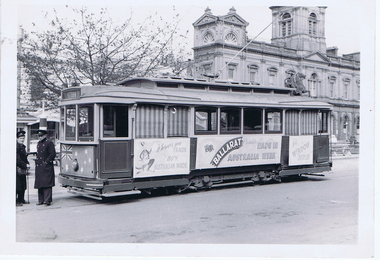 Ballarat Tramway Museum
Photograph - Digital image, Wal Jack, 18/09/1958 12:00:00 AM
Yields information about the appearance of No. 25 promoting Made in Australia week during 1958.Digital image from the Wal Jack Ballarat Album of a photograph of No. 25 at the City Terminus, carrying banners for Made in Australia Week. In front of the tram is a conductor with a point bar and a very cold looking driver with a great coat on. Tram has a sheet with an Australian flag painted onto it, with holes made for the lights on the front of the tram, and three panels that have been fixed to the side of the tram. Tram has the destination of Victoria St. The Town Hall is in the background. Photo by Wal Jack 18-9-1958. See image i2 for rear of photograph. See image i3 for hi res scan of print. See image i4 for hi res scan of negative See Reg Item 7763 for another photo of the tram.On rear of photograph in ink "SEC, Ballarat No.25 with Made in Australia posters, Sturt St from Lydiard St 18th Sept. '58" and in top right hand corner, Wal Jack stamp with "T248" written in.trams, tramways, sturt st, advertisements, made in australia week, crews, conductors, drivers, tram 25 -
 Ballarat Tramway Museum
Photograph - Digital image, Wal Jack, 15/02/1944 12:00:00 AM
Yields information about Victoria St and Ballarat trams during the mid 1940's.Digital image from the Wal Jack Ballarat Album of Ballarat No. 18 inbound to the city in Victoria St, Photo by Wal Jack 15-2-1944. Tram has the destination of Gardens via Sturt St West. See image i2 for rear of photograph.In ink on rear "Ballarat Tramways No. 20 in Victoria St 15-2-1944" and "W. Jack stamp " in bottom right hand corner with "neg to R. Field" notation.trams, tramways, victoria st, tram 20 -
 Ballarat Tramway Museum
Slide - 35mm slide/s - set of 3, Eldon Hogan, early 1960's
Set of three Kodak cardboard mounted slides - have handwritten captions and slide numbers - no date, post dash canopy lights but with the largely green front - early 1960's. From the Eldon Hogan collection. Scanned on the Canon scanner at the depot 15/12/1971 at the time of the installation of the scanner. .1 - No. 16 and a bogie car at Charing Cross, early 1960's with the City Club Hotel in the background. .2 - No. 18 at Charing Cross with the destination of Quarry Hill and with the City Club Hotel in the background .3 - No. 25 at the Eaglehawk terminus with two crewmen standing in front of the tram. Tram has the destination of Eaglehawk. The Town Hall in the background has a money raising thermometer for the Olympic Swimming Pool fund..1 - "Trams at Bendigo" .2 - "Trams at Fountain at Bendigo" .3 - "Tram at Eaglehawk" all in penciltramways, trams, bendigo, eaglehawk, charing cross, tram 16, tram 18, tram 25 -
 Ballarat Tramway Museum
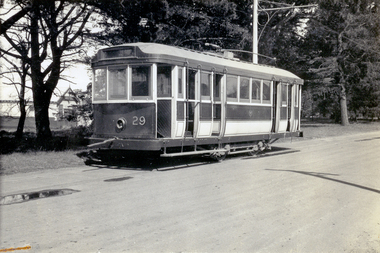
Photograph - Digital image, 1950 or earlier
Yields information about SEC Ballarat tram No. 19 - one of a series of official photographs in 1950 or earlier and the appearance of the tram.Digital Image of SEC Ballarat No.29 in the 1950 or earlier in Wendouree Parade with the Lake and one of the rowing sheds in the background. SEC Official photograph. A tow bar is in position indicating the tram has towed out of the shed for the photograph. The drivers front window is upside down, missing handrails, steps, destination box, glass in the front headlight, life guard and other parts - indicating the tram has been out of use for some time. The tram was scrapped in 1950. See Reg Item 4568 for the CD. See Page 136 of The Golden City and its Trams, re scrapping date of No. 29.trams, tramways, secv, wendouree parade, tram 29 -
 Ballarat Tramway Museum
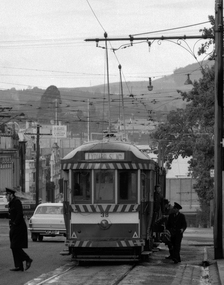
Photograph - Digital image, Peter Bruce, "No. 38 taken at 1015", 1970s
Yields information about Sturt St City terminus and passengers and crews getting on and off the tram, after changing crews.Digital image, black and white, of No. 38 at the city terminus in Sturt St, with passengers getting off the tram and crews starting to walk across the road, probably after a change over of crews. There is another tram in front of No. 38. No. 38 has the destination of Lydiard St North. Photo taken by Peter Bruce 1970's and 1971, prior to the closure of the Ballarat tramway system. Peter's Title of image: "No. 38 taken at 1015"trams, tramways, crews, sturt st, tram 38 -
 Ballarat Tramway Museum
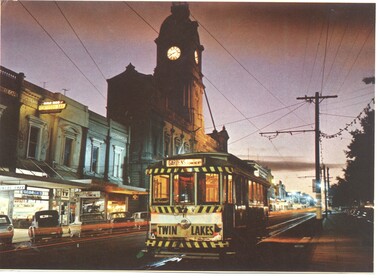
Photograph - Illustration/s, Ballarat 11 with Town Hall
Illustration that yields information about a Ballarat tram and streetscape mid 1960's - evening photograph and a Ballarat tourist attraction at the time - the shell house.Illustrator with a printed photograph of Ballarat tram No. 11 at dusk in Sturt St, just west of Lydiard St. with Town Hall in background. Tram has destination of "GARDENS via Drummond Nth", with a "TWIN LAKES" sign on rear driver's apron of tram. On pole in front of tram is tram stop sign and a section sign. Pole painted with tram stop sign as well. On rear , printed in dark green ink is the card details etc. "Ballarat, Victoria, Looking to the City Hall, Sturt Street at sunset." See also Reg Item 669 - Nucolorvue car, BT 65 for the same photographs. On rear is a photo of the crown at the Shell house - see also Reg Item 2143 and 3079 for the same photograph. Possibly cut from a Nu-colour-vue publication.trams, tramways, sturt st, town hall -
 Ballarat Tramway Museum
Photograph - Black & White Photograph/s, 25/09/1961 12:00:00 AM
Black and White print contained within the Wal Jack Bendigo and Geelong Album, see Reg Item 5003 for more details. Photo of Birney No. 28 and Bogie tram No. 25 Bendigo, at Charing Cross with the fountain in the background along with the City Club Hotel). No. 28 has the destination of Special and a SEC roof advertisement for Briquettes, No. 25 Eaglehawk? and has a white disk showing a tram following. Note the direction signs on the pole between the tram for Heathcote and Echuca and Melbourne. Photo by Jim Seletto, 25/9/1961. On rear in ink "No. 28 Birney, No. 25 Bogie", Jim Seletto stamp, with date stamp of "25 Sep 1951" and "Bendigo" in red ink.trams, tramways, bendigo, charing cross, birney, tram 25, tram 28 -
 Ballarat Tramway Museum
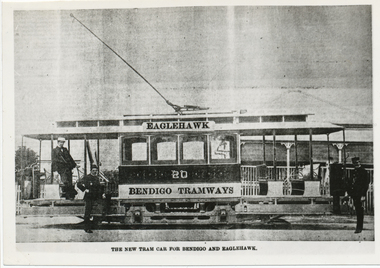
Photograph - Black & White Photograph/s, The Bendigonian, Oct. 2000
Black and White copy print contained within the Wal Jack Bendigo and Geelong Album, see Reg Item 5003 for more details. Photo of City of Brisbane Tram No. 20, altered to show the destination of Eaglehawk and Bendigo Tramways. Copied by Keith Kings from The Bendigonian 24/6/1902. On rear in ink " SA791 Bendigo "The New Tram"-!!! Actually Brisbane No. 20, suitably "touched." Copied ex "The Bendigonian", 24/6/02; previously printed on 2/10/1900.trams, tramways, bendigo, brisbane, new trams, esco, tram 20 -
 Ballarat Tramway Museum
Photograph - Black & White Photograph/s - set of 6, Keith Kings, 8/01/1956 12:00:00 AM
Black and White print contained within the Wal Jack Bendigo and Geelong Album, see Reg Item 5003 for more details. Set of six black and white photographs from Keith Kings of the staged closures of the Geelong tramways. Note some of these photographs are very similar to those of Geoff Grant - See Reg Item 485 and 476i7. .1 - No. 18 last tram to East, leaving city - 8/1/1956 - KSK Photo Q(x)(6) .2 - No. 7, last tram at West at terminus - 8/1/1956 - KSK Photo Q(x)(7) - has a group of people standing in front of the tramcar. .3 - No. 6 - last tram at North terminus, with a very large group of people in front of tram. Tram has the destination of North. 4/3/1956 - KSK Photo T(b)(6). .4 - No. 18 - last tram at Newtown terminus, with a very large group of people in front of tram. Tram has the destination of Newtown. 22/1/1956 - KSK Photo R(y)(3). .5 - No. 19, last tram to Eastern Park, at terminus on second last trip, with conductor on front step. 22/1/56, KSK Photo R(y)(2). Tram has the destination of Eastern Park. .6 - No. 1 - last regular tram from Beach to Chilwell, leaving Beach terminus - KSK Photo Q(x)(5).On the rear in ink and with the Keith Kings Copyright stamp: .1 - Geelong - 18 last tam to East leaving city, Sun 8/1/56 - Q(x)(6) .2 - Geelong - 7 - last tram at West at terminus, Sun 8/1/56 - Q(x)(7) .3 - Geelong - 6 - last tram at North terminus, Sun 4/3/56 - T(b)(6) .4 - Geelong - 18 - last tram at Newtown terminus, Sun 22/1/56 - R(y)(3) .5 - Geelong - 19 - last tram to Eastern Park, at terminus on second last trip - Sun 22/1/56 - R(y)(2) .6 - 1 - last regular tram from Beach to Chilwell, leaving Beach terminus, Sun 8/1/56 - Q(x)(5)trams, tramways, geelong, closure, east, north, chilwell, beach, newtown, eastern park, last tram, tram 18, tram 7, tram 6, tram 19, tram 1 -
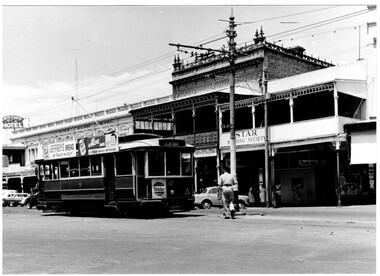
 Ballarat Tramway Museum
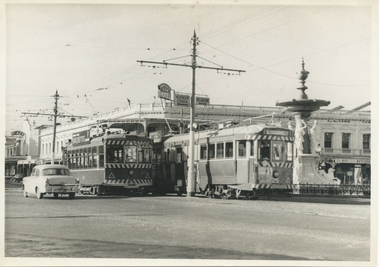
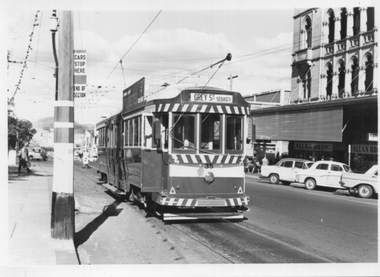
Photograph - Tram 35 - City Centre, c1970
Black and white photograph of tram 35 with the short working destination of Grey St Sebastopol at the tram stop known as the City Centre at Sturt and Lydiard Streets. The pole alongside the tram has the tram stop sign and an End of Section sign. In in the background is the National Mutual building and Allan Bros Jewellers store. Date and photographer unknown.Yields information about tram 35 at the City Centre stop late 1960s or early 1970s.Black and white photograph on plain paper.trams, tramways, tram 35, sturt st, lydiard st, national mutual, city centre -
 Ballarat Tramway Museum
Negative, Wal Jack, late 1940;s
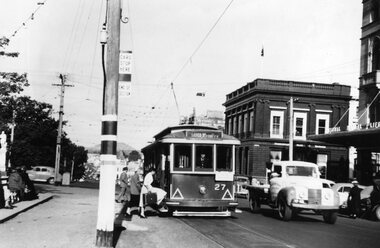
Yields information about the use of the Dawson St crossover during a disruption - reverse to the normal methods.Negative and Digital image of the Wal Jack Ballarat Negative file of No. 17 traversing the Dawson St crossing the other way to that normally used from the north side to the south side. The tram has passengers and the destination of Sebastopol. A workman is standing near where the points blade are. Could have been a disruption at Lydiard St North. Possibly late 1940's. In the background is the Golden City Hotel. trams, tramways, dawson st, sturt st, tram 17 -
 Ballarat Tramway Museum
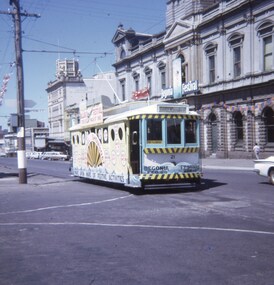
Slide - 27 mm sq slide/s - set of 2, Andrew Howlett, No. 21 as Begonia Festival Show Boat, Feb. 1969
Yields information about Sturt St and the Begonia Festival Showboat tram of 1969.Set of two Colour slide, Kodak white cardboard mount, developed Mar 1969 of No. 21 as Begonia Festival Show Boat passing the Town Hall with the destination of Gardens via Drummond St. .2 - trailing photo - with the Coles and Fletcher Jones stores in the background. Advertising the 1969 Begonia Festival. ballarat, tramways, trams, begonia festival, decorated trams, sturt st, city, tram 21