Showing 630 items matching "domestic food"
-
 Flagstaff Hill Maritime Museum and Village
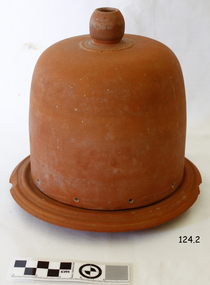
Domestic object - Terracotta Cooler Top, Ovens Pottery, c. 1890-1892
The Ovens pottery operated from 1881 to1892 they had taken over H L & E pottery at Beechworth in 1888 but mounting debts forced the Ovens company to close in 1892. During their short ten years of operation they produced stoneware garden urns, vases, cheese dishes, ginger beer bottles, butter coolers, water filters, wine and spirit barrels, bread plates, jugs, teapots, storage jars, pots, tiles, flower pots, spittoons, basins, bowls, demijohns, lidded crocks, pipes and bricks.A significant item made by an early Australian pottery in Beechworth Victoria, this company made many utilitarian items for the Victorian domestic market. It gives us today a snapshot into early Australian companies that were unable to sustain manufacturing their products into the 20th century, due in part to the rising imports of cheaper items from overseas.Red terracotta butter cooler comprising, round base with ridged lip, and bell shaped, domed lid with spherical handle on topMarked "Ovens Pottery, Co Ltd, Patd 1890, Beechworth" flagstaff hill, warrnambool, shipwrecked coast, flagstaff hill maritime museum, flagstaff hill maritime village, great ocean road, cooler, terracotta cooler, utensil, kitchen ware, terracotta, food container, food preservation, butter cooler, ovens pottery -
 Flagstaff Hill Maritime Museum and Village
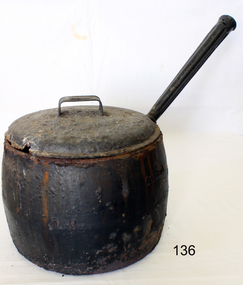
Domestic object - Cooking Pot, T & C Clarke and Co Ltd, 1880-1900
T. & C. Clark & Company Limited was based at Shakespeare Foundry in Wolverhampton England and was founded in 1795 by Thomas and Charles Clark. The company grew to be one of the largest iron foundries in Wolverhampton and were pioneering in the manufacture of enamelled cast iron cookware and sanitary wares. The company's product range included thousands of items, both domestic and industrial. T. & C. Clark were pioneers in the use of enamelled cast ironware, after taking out a patent in 1839 guaranteeing their products to be free of lead or arsenic. The company became the largest employer in Wolverhampton employing between 600 to 700 people.The item is significant as it was used as a domestic kitchen item to cook food safely without the concern that the metal may contain lead or arsenic as earlier cooking utensils had.Cast Iron cooking pot with lid separate Straight rod handle painted black.On base "T&C Clark and Co Ltd, RD455270 First Quality"flagstaff hill, warrnambool, shipwrecked coast, flagstaff hill maritime museum, flagstaff hill maritime village, great ocean road, cooking pot, iron cooking pot, cook ware, saucepan, kitchen utensil, cast iron enamel ware -
 Flagstaff Hill Maritime Museum and Village
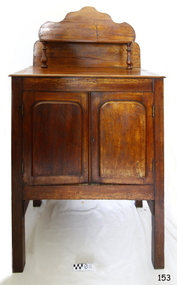
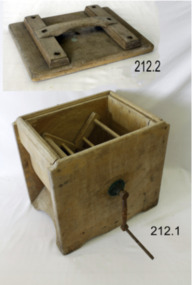
Functional object - Food Safe, 1920s
The first commercially available, Australian-made domestic refrigerator to operate without ice was produced by Edward Hallstrom in 1923. It used kerosene as a power source and was promoted as ideal for outback stations where ice was not available. According to Museum Victoria, Hallstrom introduced the 'Silent Night' which ran on electricity or gas in 1935. However, Hailstorm's great-grandson, stated that the Silent Night refrigerator was introduced in 1928. Although Australians were among the pioneers of refrigeration in the 1850s, the technology wasn't adapted for domestic use until many decades later. The first domestic electric refrigerator was sold in America in 1913. It had an air-cooled refrigeration unit mounted on top of an ice box. The Frigidaire and Kelvinator brands date from 1918 when the first self-contained fridges were sold. Before this food safes were used as well to keep food away from flies and to keep items cool.A significant item used from the late Victorian era until around 1940 when people were beginning to be able to afford domestic refrigerators. After the second world war, most households had replaced their food storage cupboards or safes with refrigerators. The subject item gives a snapshot of domestic life from this time.Wooden kitchen food safe, 2 door with wire mesh at sides. Raised back panel has shaped edges and includes a shelf above bench area that has turned legs. The safe has 4 plain legs.Noneflagstaff hill, warrnambool, flagstaff hill maritime museum, maritime museum, shipwreck coast, flagstaff hill maritime village, great ocean road, food safe, kitchen safe, kitchen furniture, food storage -
 Flagstaff Hill Maritime Museum and Village
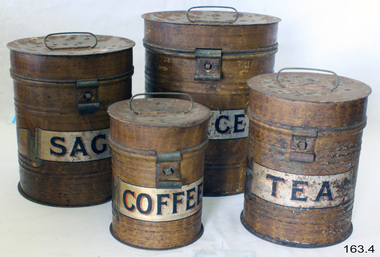
Container - Kitchen Canister set, 1850-1870
... rice canister kitchen canister food storage domestic item ...In early civilization's cereal grains such as maize, wheat, barley etc. were stored in large airy buildings, often raised up from the ground to reduce infestation by pests and vermin. Ancient Egyptian and early Hebrew writings include reference to such buildings. Smaller quantities of food were stored in baskets made from woven grasses or leaves. In more recent times but prior to the invention of the refrigerator many food products were stored in the home as preserves or pickles, often in heat sealed jars. Dry food items were stored in vermin proof metal containers and could be found in any early colonial kitchen. Items such as coffee, tea, rice and sago were stable food types and needed longer term storage and a higher degree of protection from vermin and the elements, a common material used during this time was sheet metal or tin such as is used today in a common form of storage the biscuit tin. An early example of colonial food storage used in a domestic setting, it is interesting to note the subject items have provision to be locked. This indicates the value early colonial settlers placed on the contents and used to prevent pilfering. The subject items are now sought by collectors. Canister set; set of four canisters. Cylindrical matching kitchen storage tins with hinge lid that has a latch closure, and a folding handle on top of lid. Canisters are painted brown and the body has a graphic of a scroll in gold with printed label of contents. The canisters range from small to large, "COFFEE", "TEA" , "SAGO", " RICE" (respective RNs 163.1, 163.2, 163.3, 163.4)Respectively labelled "COFFEE," "TEA," "SAGO," "RICE" flagstaff hill, warrnambool, shipwrecked coast, flagstaff hill maritime museum, flagstaff hill maritime village, great ocean road, canister, canister set, rice canister, kitchen canister, food storage, domestic item -
 Flagstaff Hill Maritime Museum and Village
Container - Tea Container, J Marsh & Sons (Tin Container Fabricators), 1900-1940
Tin, "Choicest Nectar Tea" is an example of retail packaging, for domestic goods, the tin was made by J Marsh and Sons, Melbourne, for John Connell & Co Ltd, Melbourne, Victoria, Australia, 1900-1940Item at this time cannot be associated with an historical event, person or place, provenance is unknown, item assessed as a collection asset.Container; tea caddy for "Nectar Tea" brand, 1 lb. Packed by John Connell and Co Ltd, Melbourne. Blue and white vertical stripe decoration. On label "The Nectar Tea Caddy" and "Nectar, the finest tea the world produces, is a blend of the Choicest Pure Leafed Teas from the Gardens of Ceylon, India, Java"flagstaff hill, warrnambool, flagstaff hill maritime museum, maritime museum, shipwreck coast, flagstaff hill maritime village, great ocean road, tea canister, tea caddy, tea tin, container, kitchen storage, food storage, food, nectar tea, john connell, melbourne, j march & sons, john connell & co ltd -
 Flagstaff Hill Maritime Museum and Village
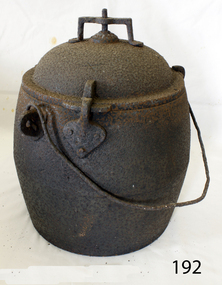
Domestic object - Pressure Cooker, T & C Clarke and Co Ltd, Late 19th to early 20th century
T. & C. Clark & Company Limited was based at Shakespeare Foundry in Wolverhampton England and was founded in 1795 by Thomas and Charles Clark. The company grew to be one of the largest iron foundries in Wolverhampton and were pioneering in the manufacture of enamelled cast iron cookware and sanitary wares. The company's product range included thousands of items, both domestic and industrial. T. & C. Clark were pioneers in the use of enamelled cast ironware, after taking out a patent in 1839 guaranteeing their products to be free of lead or arsenic. The company became the largest employer in Wolverhampton employing between 600 to 700 people.The item is significant as it was used as a domestic kitchen item to cook food safely without the concern that the metal interior may contain lead or arsenic as earlier cooking utensils had. Pressure cooker, cast iron , pressure vent on top. Removable lid held down by 3 riveted heart shaped clips where they join the base. Metal drop down carry handle.T & C Clarke and Co. on base & size 2 1/2 gallonflagstaff hill, warrnambool, shipwrecked coast, flagstaff hill maritime museum, maritime museum, shipwreck coast, flagstaff hill maritime village, great ocean road, pressure cooker, cook ware, cooking pot, clarke and co -
 Flagstaff Hill Maritime Museum and Village
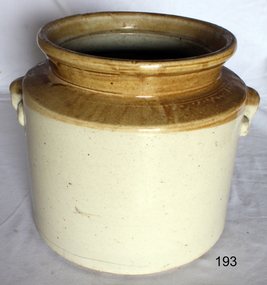
Ceramic - Stoneware Container, 1900 to 1940
Stoneware is a rather broad term for pottery or other ceramics that is fired at a relatively high temperature. A modern technical definition is a vitreous or semi-vitreous ceramic made primarily from stoneware clay or non-refractory fire clay. Whether vitrified or not, it is non-porous, it may or may not be glazed. Historically, across the world, it has been developed after earthenware and before porcelain and has often been used for high-quality as well as utilitarian wares. As a rough guide, modern earthen wares are normally fired in a kiln at temperatures in the range of about 1,000°C (1,830 °F) to 1,200 °C (2,190 °F); stoneware's at between about 1,100 °C (2,010 °F) to 1,300 °C (2,370 °F); and porcelains at between about 1,200 °C (2,190 °F) to 1,400 °C (2,550 °F). Historically, reaching high temperatures was a long-lasting challenge, and temperatures somewhat below these were used for a long time. Earthenware can be fired effectively as low as 600°C, achievable in primitive pit firing, but 800 °C was more typical. Stoneware also needs certain types of clays, more specific than those able to make earthenware, but can be made from a much wider range than porcelain. A domestic item used to store food products as glazing makes the container non-porous, often used for pickling. Or larger containers for kitchen flour. Items age is difficult to determine given the same techniques for making stoneware are in use today. Stoneware containers were made by many potteries in Australia and England. They were in common domestic use before plastics were invented around 1940 to store goods so this subject item is probably from around 1900 to the 1940s. Item's significance is difficult to determine given it is not associated with a place, person, historic event, or manufacturer. Its significance lies with its use as a domestic object giving today a view into our social past.Stoneware circular container with wide opening, brown top and off white base. Handholds moulded on each side glazed finish, cracks in base.Noneflagstaff hill, warrnambool, shipwrecked coast, flagstaff hill maritime museum, shipwreck coast, flagstaff hill maritime village, great ocean road, container, stoneware container, kitchen storage, kitchen ware -
 Flagstaff Hill Maritime Museum and Village
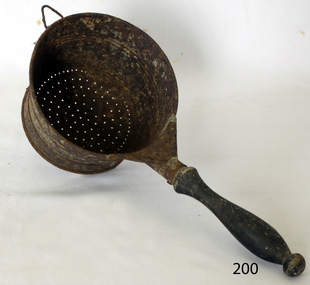
Domestic object - Colander, 1900-1920
A colander, sieve or cullender is a kitchen utensil used to strain foods such as pasta or to rinse vegetables. The perforated nature of the bowl allows liquid to drain through while retaining the solids inside it is sometimes also called a pasta strainer or kitchen sieve. Conventionally, colanders are made of a light metal, such as aluminum or thinly rolled stainless or plated steel, colanders are also made of plastic, silicone, ceramic, and enamelware. The word colander comes from the Latin Colum meaning sieve.Early 20th century kitchen item possibly of French manufacture due to the design and shape of the bowl this design appears to have been favoured by the French around 1910 for smaller Colanders. This item gives a snapshot into domestic life around the late 19th and early 20th centuries and the types of kitchen equipment in use.Strainer or colander, metal, with concave base and wood handle, plated metal construction with welded or folded seams. Handle painted black, perforated base.Noneflagstaff hill, warrnambool, flagstaff hill maritime museum, maritime museum, shipwreck coast, flagstaff hill maritime village, great ocean road, strainer, food strainer, seive, food preparation, kitchen ware -
 Flagstaff Hill Maritime Museum and Village
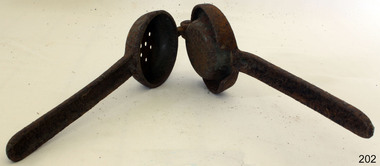
Domestic object - Fruit Press, 1890-1900
The fruit juice or lemon squeezer is a small kitchen utensil designed to extract juice from lemons or other citrus fruit such as oranges, grapefruit, or lime. It is designed to separate and crush the pulp of the fruit in a way that is easy to operate. Lemon squeezers can be made from any solid, acid-resistant material, such as plastic, glass, metal (usually aluminum) or ceramic. The oldest known lemon squeezers were found in Kütahya, Turkey and date to the first quarter of the 18th century. These ceramic presses are in the traditional style of Turkish pottery of the 18th century and have a superficial resemblance to today's press equipment with cones, though they are designed differently. These examples were individually made, and specially designed for making the then popular citrus drink sorbet. Lemons are not native to northern Turkey, though during the 17th and 18th centuries they were imported in bulk to Constantinople.The fruit juice press is an example of early 20th century kitchen utensils and is not associated with an historical event, person or place, provenance is unable to be determined at this time and the item is believed to have been made around 1900. This item is currently being used in Flagstaffs Hill village display and regarded as significant as it demonstrates domestic kitchen utensils used around the turn of the 19th century and today is a collectable item. Vintage lemon/citrus fruits squeezer cast iron juicer with two sections hinged together strainer on one section has holes for letting liquid escape.Noneflagstaff hill, warrnambool, shipwrecked coast, flagstaff hill maritime museum, flagstaff hill maritime village, great ocean road, food press, food preparation, fruit juice press, kitchen utensil -
 Flagstaff Hill Maritime Museum and Village
Domestic object - Butter Churn, Late 19th to early 20th century
A butter churn is a device used to convert cream into butter. This is done through a mechanical process, frequently via a pole inserted through the lid of the churn, or via a crank used to turn a rotating device inside the churn. The use of butter is mentioned in biblical works and the earliest butter churn vessels belonging to Beersheba culture in Israel were found in Bir Abu Matar going back to Chalcolithic period between 6500–5500 BC. The butter churn in Europe may have existed as early as the 6th century AD, In the European tradition, the butter churn was primarily a device used by women, and the churning of butter was an essential responsibility along with other household chores. In earlier traditions of butter making, nomadic cultures placed milk in skin bags and produced butter either by shaking the bag manually, or possibly by attaching the bag to a pack animal, and producing butter simply through the movement of the animal. An item used to make butter in a domestic situation by turning a handle until the cream inside has turned to butter.Butter churn, wooden, lid pieces screwed or nailed together. Brass bearing on side with iron turning handle.Handle marked 28204 no other marks to indicate manufacturer or date of productionflagstaff hill, warrnambool, shipwrecked coast, flagstaff hill maritime museum, flagstaff hill maritime village, great ocean road, churn, butter churn, wooden churn, butter making, food, dairy, kitchen utensil -
 Flagstaff Hill Maritime Museum and Village
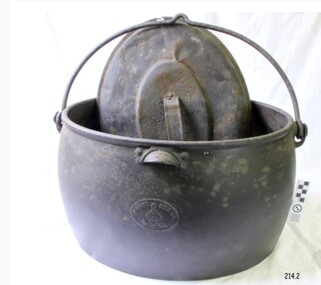
Domestic object - Cooking pot and lid, T & C Clark, 1880-1910
T & C Clark & Company Limited, based at Shakespeare Foundry, was founded in 1795 by Thomas and Charles Clark and grew to be one of the largest iron foundries in Wolverhampton. The firm was the pioneers of Enamelled Cast ironware and the founder Charles Clerk went on to became mayor of Wolverhampton in 1860 after also serving as a Councilor, Alderman, and later Chief Magistrate. The company exhibited many products at the International Exhibition of 1862 at South Kensington, alongside the gardens of the Royal Horticultural Society. The company was also awarded the silver medal for its products at the International Paris Exhibition in 1878. The company's product range included thousands of items, both domestic and industrial. T & C Clark pioneered the use of enamelled cast ironware, after taking out a patent in 1839 guaranteed to be free of lead or arsenic. In the late 1940s and 1950s the company produced acid-resisting enamelled cast iron boiling pans; steam-jacketed pans; stills; square and rectangular tanks; open and closed mixing vessels; flanged pipes; bends and tees; laboratory equipment; small scale plant; evaporating bowls; beakers; sulphonates; and glass-lined mild steel tanks for beer, mineral water, and food. The company is listed as enamelled chemical plant manufacturers in Kelly's 1962 Wolverhampton Directory, but within a few years, the company had ceased trading.The item is significant as it was used as a domestic kitchen or camp fire item used to cook food safely without the concern that the metal may contain lead or arsenic as earlier cooking utensils had. T C Clark innervates the first manufacturing process of cast iron cook ware to have enamel lining in his products to alleviate the possibility of lead or arsenic contamination of food.Oval cast iron boiler or cooking pot, with lid, pot is oval shaped lid is dented and handle buckled.Inscription on base "Clark & Co Patent", "Best Quality", "9 Gallons" and a Trade Mark of a "C" inside two triangles to side of potflagstaff hill, warrnambool, shipwrecked coast, flagstaff hill maritime museum, flagstaff hill maritime village, great ocean road, cooking pot, stew pot, food, kitchen utensil, shakespeare foundry, tc clark -
 Flagstaff Hill Maritime Museum and Village
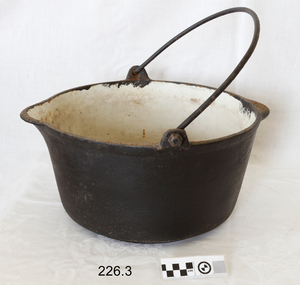
Domestic object - Cooking Pot, T & C Clarke and Co Ltd, 1840 to 1900
T. & C. Clark & Company Limited was based at Shakespeare Foundry in Wolverhampton England and was founded in 1795 by Thomas and Charles Clark. The company grew to be one of the largest iron foundries in Wolverhampton and were pioneering in the manufacture of enamelled cast iron cookware and sanitary wares. The company's product range included thousands of items, both domestic and industrial. T. & C. Clark were pioneers in the use of enamelled cast ironware, after taking out a patent in 1839 guaranteeing their products to be free of lead or arsenic. The company became the largest employer in Wolverhampton employing between 600 to 700 people.The items are significant as they were used as domestic kitchen items to cook food safely without the concern that the metal may contain lead or arsenic as earlier cooking utensils had. This is due to the enamel lining pioneered by TC Clark Pot set; set of three pots. Iron pots, enamelled on the inside with a pouring lip and capacity label on each pot. Pot set a capacity label on each pot. Three pots in set labelled 17 qts and 14 qts on base and flat spot opposite lip - handle for pouring. 12 qts is missing flagstaff hill, warrnambool, shipwrecked coast, flagstaff hill maritime museum, maritime museum, shipwreck coast, flagstaff hill maritime village, great ocean road, pot set, cooking pot, pouring pot, cook ware -
 Flagstaff Hill Maritime Museum and Village
Domestic object - Wicker Basket, mid-20th century
This handmade basket is typical of baskets used for domestic purposes for many years. The basket is strong and easily carried for shopping, food gathering and many other everyday purposes.The cane basket is currently not associated with a historical event, person or place at this time and is being used to augment Flagstaff's village display.Wicker or cane basket, rounded rectangular shape with strong handle.flagstaff hill, warrnambool, shipwrecked coast, flagstaff hill maritime museum, shipwreck coast, flagstaff hill maritime village, great ocean road, basket, cane basket, shopping basket, wicker work -
 Flagstaff Hill Maritime Museum and Village
Domestic object - Bowl, Late 19th or early 20th Century
The Process of Making Pottery Decorating, Firing, Glazing, Making, Technical There is a rhythm and flow to clay. It can’t be done all at once! Even the making process! It can take weeks to get everything done, especially if you can only work on your pottery once a week! Even though we have three hour classes, it’s often just not enough time! Here is an overview of some of the processes so you have a bit more grasp on some of the technical stuff! Step One – Design There are SO many ideas out there for making stuff in clay! From delicate porcelain jewellery, through to heavy sculptural work and everything in between. Deciding your direction is sometimes not that easy – when you first start, try everything, you will naturally gravitate to the style that you enjoy! The options and variations are endless and can get a wee bit overwhelming too! Check in with me before you start to ensure your ideas will work, what order you might do things, how you could achieve the look you are seeking and any other technical data required! Step Two – Making Clay is thixotropic. This means that as you work with it, the clay first gets sloppier and wetter, before is begins to dry in the atmosphere. For most things, you simply can’t do all parts of the project at once. An example of work order might look like: Get last weeks work out from the shelves Prepare clay for today’s work – roll your clay, prepare balls for throwing, make the first stage of a pinch pot) Clean up last week’s work and put it on the shelf for bisque firing Check that you have any glazing to do – and do enough of it that you will have time to finish your main project Do the next step of your next project – there might be a further step that can’t be complete immediately, in that case, wrap your work well and put onto the shelves. Letting your work rest for a while can really help keep your work clean and professional looking. Many things require bagging under plastic to keep it ready for work the next week – put your name on the outside of the bag so you can find your work easily. We have stickers and markers. Consider how you want to decorate your work – coloured slip can be applied at a fairly wet stage (remembering that it will make your work even wetter!). Trying to apply slip to dry clay won’t work! If you want to do sgraffito – you will need to keep the work leather hard (a state of dryness where you can still work the clay with a little effort and a little water and care). Step Three – Drying Most of the time your work can go into the rack uncovered to let it dry out for the following week. If you want to continue forming or shaping you will need to double bag your work – put your work on a suitable sized bat and put the bat in a bag so the base of the bag is under the bat, then put another bag over the top of the work and tuck the top of the bag under the bat. If you want to trim (or turn) your thrown work the following week, it should also be double bagged. If your work is large, delicate, or of uneven thicknesses, you should lightly cover your work for drying. When considering the drying process, bare in mind the weather, humidity and wind! The hotter and dryer, the faster things dry and work can dry unevenly in the shelves – this can lead to cracking – another time to lightly cover your work for drying. Step Four – Trimming and Cleaning Up Your work is dry! It is called greenware now and it is at it’s most fragile! Handle everything with two hands. I often refer to soft hands – keep everything gentle and with your fingers spread as much as possible. Try to not pick up things like plates too much, and always with both hands! Before your work can be bisque fired it should be “cleaned up”. You work won’t go into the kiln if it has sharp edges – when glazed, sharp edges turn into razor blades! Use a piece of fly wire to rub the work all over – this will scratch a little so be light handed. Use a knife or metal kidney to scrape any areas that require a bit more dynamic treatment than the fly wire offers! Finally, a very light wipe over with a slightly damp sponge can help soften and soothe all of your edges and dags! Trimming thrown work: If you are planning to trim (or turn) your thrown work (and you should be), make sure you bag it well – your work should be leather hard to almost dry for easiest trimming. Use this step to finish the work completely – use a metal kidney to polish the surface, or a slightly damp sponge to give a freshly thrown look. Wipe the sponge around the rim after trimming, and check the inside of the pot for dags! Trimming slip cast work: Usually I will trim the rims of your work on the wheel the following day to make that stage easier, however you will still need to check your work for lumps and bumps. Last but not least – check that your name is still clearly on the bottom of your work. Step Five – Bisque Firing When the work is completely dry it can go into the bisque kiln. The bisque kiln is fired to 1000°C. This process burns off the water in the clay as well as some of the chemically bound water. The structure of the clay is not altered that much at this temperature. Inside the bisque kiln, the work is stacked a little, small bowl inside a larger bowl and onto a heavy plate. Smaller items like decorations or drink coasters might get stacked several high. Consideration is paid to the weight of the stack and shape of the work. A bisque kiln can fire about one and a half times the amount of work that the glaze kiln can fire. The firing takes about 10 hours to complete the cycle and about two days to cool down. Once it has been emptied the work is placed in the glaze room ready for you to decorate! Step Six – Glazing Decorating your work with colour can be a lot of fun – and time consuming! There are three main options for surface treatment at this stage: Oxide Washes Underglazes Glazes Washes and underglazes do not “glaze” the work – It will still need a layer of glaze to fully seal the clay (washes don’t need glaze on surfaces not designed for food or liquid as they can gloss up a little on their own). Underglazes are stable colourants that turn out pretty much how they look in the jar. They can be mixed with each other to form other colours and can be used like water colours to paint onto your work. Mostly they should have a clear glaze on top to seal them. Oxides are a different species – the pink oxide (cobalt) wash turns out bright blue for instance. They don’t always need a glaze on top, and some glazes can change the colour of the wash! The glazes need no other “glaze” on top! Be careful of unknown glaze interactions – you can put any combination of glaze in a bowl or on a plate, but only a single glaze on the outside of any vertical surface! Glazes are a chemical reaction under heat. We don’t know the exact chemicals in the Mayco glazes we use. I can guess by the way they interact with each other, however, on the whole, you need to test every idea you have, and not run the test on a vertical surface! Simply put, glaze is a layer of glass like substance that bonds with the clay underneath. Clay is made of silica, alumina and water. Glaze is made of mostly silica. Silica has a melting point of 1700°C and we fire to 1240°C. The silica requires a “flux” to help it melt at the lower temperature. Fluxes can be all sorts of chemicals – a common one is calcium – calcium has a melting point of 2500°C, however, together they both melt at a much lower temperature! Colourants are metal oxides like cobalt (blue), chrome (green through black), copper (green, blue, even red!), manganese (black, purple and pink) iron (red brown), etc. Different chemicals in the glaze can have dramatic effects. for example, barium carbonate (which we don’t use) turns manganese bright pink! Other elements can turn manganese dioxide brown, blue, purple and reddish brown. Manganese dioxide is a flux in and of itself as well. So, glazes that get their black and purple colours, often interact with other glazes and RUN! Our mirror black is a good example – it mixes really well with many glazes because it fluxes them – causes them to melt faster. It will also bring out many beautiful colours in the glazes because it’s black colouring most definitely comes from manganese dioxide! Glaze chemistry is a whole subject on it’s own! We use commercial Mayco glazes on purpose – for their huge range of colour possibilities, stability, cool interactions, artistic freedom with the ability to easily brush the glazes on and ease of use. We currently have almost 50 glazes on hand! A major project is to test the interactions of all glazes with each other. That is 2,500 test tiles!!!! I’m going to make the wall behind the wheels the feature wall of pretty colours! Step Seven – Glaze (Gloss or sometimes called “Glost”) Firing Most of the time this is the final stage of making your creation (but not always!) The glaze kiln goes to 1240°C. This is called cone 6, or midrange. It is the low end of stoneware temperatures. Stoneware clays and glazes are typically fired at cone 8 – 10, that is 1260 – 1290°C. The energy requirement to go from 1240°C to 1280°C is almost a 30% more! Our clay is formulated to vitrify (mature, turn “glass-like”) at 1240°, as are our glazes. A glaze kiln take around 12 hours to reach temperature and two to three days to cool down. Sometimes a third firing process is required – this is for decoration that is added to work after the glaze firing. For example – adding precious metals and lustres. this firing temperature is usually around 600 – 800°C depending upon the techniques being used. There are many students interested in gold and silver trims – we will be doing this third type of firing soon! After firing your work will be in the student finished work shelves. Remember to pay for it before you head out the door! There is a small extra charge for using porcelain clay (it’s more than twice the price of regular clay), and for any third firing process! Once your work has been fired it can not turn back into clay for millennia – so don’t fire it if you don’t like it! Put it in the bucket for recycling. https://firebirdstudios.com.au/the-process-of-making-pottery/ The bowl is an example of kitchenware used in the 19th century and still in use today.Bowl white ceramic. Crack on side. Badly stained.Backstamp very faint and unable to be read.flagstaff hill, warrnambool, shipwrecked-coast, flagstaff-hill, flagstaff-hill-maritime-museum, maritime-museum, shipwreck-coast, flagstaff-hill-maritime-village, mixing bowl, food preparation, kitchen equipment, ceramic -
 Flagstaff Hill Maritime Museum and Village
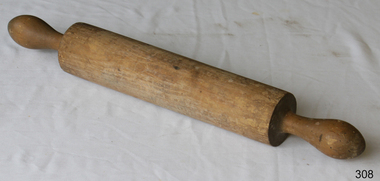
Domestic object - Wooden Rolling Pin, First half of 20th Century
A rolling pin is a simple tool used to flatten dough. The first civilisation known to have used the rolling pin was the Etruscans. Their advanced farming ability, along with a tendency to cultivate many plants and animals never before used as food and turn them into sophisticated recipes, were passed to invading Greeks, Romans, and Western Europeans. Thanks to the Etruscans, these cultures are associated with gourmet cooking. To prepare their inventive foods, the Etruscans also developed a wide range of cooking tools, including the rolling pin. Although written recipes did not exist until the fourth century B.C., the Etruscans documented their love of food and its preparation in murals, on vases, and on the walls of their tombs. Cooking wares are displayed with pride; rolling pins appear to have been used first to thin-roll pasta that was shaped with cutting wheels. They also used rolling pins to make bread (which they called puls) from the large number of grains they grew. Natives of the Americas used more primitive bread-making tools that are favoured and unchanged in many villages. Chefs who try to use genuine methods to preserve recipes are also interested in both materials and tools. Hands are used as "rolling pins" for flattening dough against a surface, but also for tossing soft dough between the cook's two hands until it enlarges and thins by handling and gravity. Tortillas are probably the most familiar bread made this way. Over the centuries, rolling pins have been made of many different materials, including long cylinders of baked clay, smooth branches with the bark removed, and glass bottles. As the development of breads and pastries spread from Southern to Western and Northern Europe, wood from local forests was cut and finished for use as rolling pins. The French perfected the solid hardwood pin with tapered ends to roll pastry that is thick in the middle; its weight makes rolling easier. The French also use marble rolling pins for buttery dough worked on a marble slab. Glass is still popular; in Italy, full wine bottles that have been chilled make ideal rolling pins because they are heavy and cool the dough. Countries known for their ceramics make porcelain rolling pins with beautiful decorations painted on the rolling surface; their hollow centres can be filled with cold water (the same principle as the wine bottle), and cork or plastic stoppers cap the ends. Designs for most rolling pins follow long-established practices, although some unusual styles and materials are made and used. Within the family of wooden rolling pins, long and short versions are made as well as those that are solid cylinders (one-piece rolling pins) instead of the familiar style with handles. Very short pins called mini rolling pins make use of short lengths of wood and are useful for one-handed rolling and popular with children and collectors. Mini pins ranging from 5 to 7 in (12.7-17.8 cm) in length are called texturing tools and are produced to create steam holes and decorations in pastry and pie crusts; crafters also use them to imprint clay for art projects. These mini pins are made of hardwoods (usually maple) or plastic. Wood handles are supplied for both wood and plastic tools, however. Blown glass rolling pins are made with straight walls and are solid or hollow. Ceramic rolling pins are also produced in hollow form, and glass and ceramic models can be filled with water and plugged with stoppers. Tapered glass rolling pins with stoppers were made for many centuries when salt imports and exports were prohibited or heavily taxed. The rolling pin containers disguised the true contents. The straight-sided cylinder is a more recent development, although tapered glass pins are still common craft projects made by cutting two wine bottles in half and sealing the two ends together so that the necks serve as handles at each end.Tiny rolling pins are also twisted into shape using formed wire. The pins will not flatten and smooth pastry, and the handles do not turn. The metal pins are popular as kitchen decorations and also to hang pots, pans, and potholders. https://www.encyclopedia.com/sports-and-everyday-life/food-and-drink/food-and-cooking/rolling-pinThe use of the rolling pin to make thin pastry or pasta.Wooden rolling pin with some damage on cylinder section.None.flagstaff hill, warrnambool, shipwrecked-coast, flagstaff-hill, flagstaff-hill-maritime-museum, maritime-museum, shipwreck-coast, flagstaff-hill-maritime-village, rolling pin, cooking, pastry -
 Flagstaff Hill Maritime Museum and Village
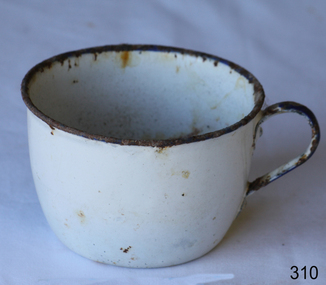
Domestic object - Cup/Mug, Late 19th or early 20th Century
Enamelware dates back to 1760 in Germany.People wanted a way of coating iron to stop metallic tastes or rust getting into food: something acid-resistant and easy to clean without laborious scouring, something more durable than the tin linings used inside copper. http://www.oldandinteresting.com/enamelware-history.aspxWhite enamel cup with dark blue ring around lip and handle. Slightly rusted. Rounded shape unlike a mug.None.flagstaff hill, warrnambool, shipwrecked-coast, flagstaff-hill, flagstaff-hill-maritime-museum, maritime-museum, shipwreck-coast, flagstaff-hill-maritime-village, tableware, enamel, cup, mug -
 Flagstaff Hill Maritime Museum and Village
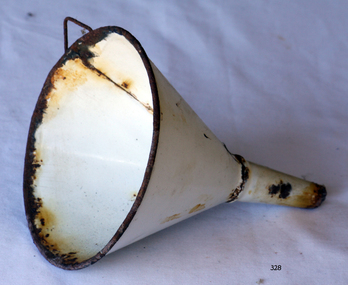
Domestic object - Funnel, Late 19th or early 20th Century
A funnel such as this is used to assist in pouring liquids into a narrow container such as a bottle or jar. An item like this could be commonly used in households for food preparation, cooking and soap making. It could also be used for pouring fuel, and medicinal purposes. Enamelware dates back to 1760 in Germany.This object is significant as an example of a type of item in common use in the 19th Century and that is still in use today.Funnel, white enamel with dark rusty metal rim. It has a triangular shaped hook on the top lip for hanging. The metal has been joined down one side.None.flagstaff hill, flagstaff hill maritime museum and village, warrnambool, maritime museum, maritime village, great ocean road, shipwreck coast, funnel, food preparation, beverage, laundry, fuel, food preservation, medicinal preparation, decanting, pouring -
 Flagstaff Hill Maritime Museum and Village
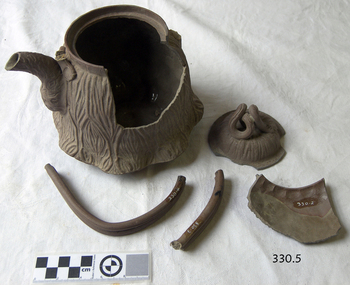
Domestic object - Teapot, 1857
This is a mid-19th century handmade Chinese clay teapot. It has a pattern around the body and interesting tubular handle and knob. This teapot is significant as an example of an item from the mid-19th century. It is also significant as the only example of a Chinese teapot in Flagstaff Hill Maritime Museum and Village's collection.Chinese teapot, brown clay, with vertical wavey line design. The spout is gracefully curved. The lid has decorative tubes as a handle. The handle, now dethatched, is also a tube shape. It is dated 1857. The inside is partially glazed. There is an inscription on the lid. The pot is broken and in five pieces.On lid "L26"flagstaff hill, flagstaff hill maritime museum and village, warrnambool, maritime museum, maritime village, great ocean road, shipwreck coast, teapot, chinese teapot, clay teapot, handmade teapot, food and beverage, tea -
 Flagstaff Hill Maritime Museum and Village
Domestic object - Bowl, J & G Meakin, Late 19th or early 20th Century
The Process of Making Pottery Decorating, Firing, Glazing, Making, Technical There is a rhythm and flow to clay. It can’t be done all at once! Even the making process! It can take weeks to get everything done, especially if you can only work on your pottery once a week! Even though we have three hour classes, it’s often just not enough time! Here is an overview of some of the processes so you have a bit more grasp on some of the technical stuff! Step One – Design There are SO many ideas out there for making stuff in clay! From delicate porcelain jewellery, through to heavy sculptural work and everything in between. Deciding your direction is sometimes not that easy – when you first start, try everything, you will naturally gravitate to the style that you enjoy! The options and variations are endless and can get a wee bit overwhelming too! Check in with me before you start to ensure your ideas will work, what order you might do things, how you could achieve the look you are seeking and any other technical data required! Step Two – Making Clay is thixotropic. This means that as you work with it, the clay first gets sloppier and wetter, before is begins to dry in the atmosphere. For most things, you simply can’t do all parts of the project at once. An example of work order might look like: Get last weeks work out from the shelves Prepare clay for today’s work – roll your clay, prepare balls for throwing, make the first stage of a pinch pot) Clean up last week’s work and put it on the shelf for bisque firing Check that you have any glazing to do – and do enough of it that you will have time to finish your main project Do the next step of your next project – there might be a further step that can’t be complete immediately, in that case, wrap your work well and put onto the shelves. Letting your work rest for a while can really help keep your work clean and professional looking. Many things require bagging under plastic to keep it ready for work the next week – put your name on the outside of the bag so you can find your work easily. We have stickers and markers. Consider how you want to decorate your work – coloured slip can be applied at a fairly wet stage (remembering that it will make your work even wetter!). Trying to apply slip to dry clay won’t work! If you want to do sgraffito – you will need to keep the work leather hard (a state of dryness where you can still work the clay with a little effort and a little water and care). Step Three – Drying Most of the time your work can go into the rack uncovered to let it dry out for the following week. If you want to continue forming or shaping you will need to double bag your work – put your work on a suitable sized bat and put the bat in a bag so the base of the bag is under the bat, then put another bag over the top of the work and tuck the top of the bag under the bat. If you want to trim (or turn) your thrown work the following week, it should also be double bagged. If your work is large, delicate, or of uneven thicknesses, you should lightly cover your work for drying. When considering the drying process, bare in mind the weather, humidity and wind! The hotter and dryer, the faster things dry and work can dry unevenly in the shelves – this can lead to cracking – another time to lightly cover your work for drying. Step Four – Trimming and Cleaning Up Your work is dry! It is called greenware now and it is at it’s most fragile! Handle everything with two hands. I often refer to soft hands – keep everything gentle and with your fingers spread as much as possible. Try to not pick up things like plates too much, and always with both hands! Before your work can be bisque fired it should be “cleaned up”. You work won’t go into the kiln if it has sharp edges – when glazed, sharp edges turn into razor blades! Use a piece of fly wire to rub the work all over – this will scratch a little so be light handed. Use a knife or metal kidney to scrape any areas that require a bit more dynamic treatment than the fly wire offers! Finally, a very light wipe over with a slightly damp sponge can help soften and soothe all of your edges and dags! Trimming thrown work: If you are planning to trim (or turn) your thrown work (and you should be), make sure you bag it well – your work should be leather hard to almost dry for easiest trimming. Use this step to finish the work completely – use a metal kidney to polish the surface, or a slightly damp sponge to give a freshly thrown look. Wipe the sponge around the rim after trimming, and check the inside of the pot for dags! Trimming slip cast work: Usually I will trim the rims of your work on the wheel the following day to make that stage easier, however you will still need to check your work for lumps and bumps. Last but not least – check that your name is still clearly on the bottom of your work. Step Five – Bisque Firing When the work is completely dry it can go into the bisque kiln. The bisque kiln is fired to 1000°C. This process burns off the water in the clay as well as some of the chemically bound water. The structure of the clay is not altered that much at this temperature. Inside the bisque kiln, the work is stacked a little, small bowl inside a larger bowl and onto a heavy plate. Smaller items like decorations or drink coasters might get stacked several high. Consideration is paid to the weight of the stack and shape of the work. A bisque kiln can fire about one and a half times the amount of work that the glaze kiln can fire. The firing takes about 10 hours to complete the cycle and about two days to cool down. Once it has been emptied the work is placed in the glaze room ready for you to decorate! Step Six – Glazing Decorating your work with colour can be a lot of fun – and time consuming! There are three main options for surface treatment at this stage: Oxide Washes Underglazes Glazes Washes and underglazes do not “glaze” the work – It will still need a layer of glaze to fully seal the clay (washes don’t need glaze on surfaces not designed for food or liquid as they can gloss up a little on their own). Underglazes are stable colourants that turn out pretty much how they look in the jar. They can be mixed with each other to form other colours and can be used like water colours to paint onto your work. Mostly they should have a clear glaze on top to seal them. Oxides are a different species – the pink oxide (cobalt) wash turns out bright blue for instance. They don’t always need a glaze on top, and some glazes can change the colour of the wash! The glazes need no other “glaze” on top! Be careful of unknown glaze interactions – you can put any combination of glaze in a bowl or on a plate, but only a single glaze on the outside of any vertical surface! Glazes are a chemical reaction under heat. We don’t know the exact chemicals in the Mayco glazes we use. I can guess by the way they interact with each other, however, on the whole, you need to test every idea you have, and not run the test on a vertical surface! Simply put, glaze is a layer of glass like substance that bonds with the clay underneath. Clay is made of silica, alumina and water. Glaze is made of mostly silica. Silica has a melting point of 1700°C and we fire to 1240°C. The silica requires a “flux” to help it melt at the lower temperature. Fluxes can be all sorts of chemicals – a common one is calcium – calcium has a melting point of 2500°C, however, together they both melt at a much lower temperature! Colourants are metal oxides like cobalt (blue), chrome (green through black), copper (green, blue, even red!), manganese (black, purple and pink) iron (red brown), etc. Different chemicals in the glaze can have dramatic effects. for example, barium carbonate (which we don’t use) turns manganese bright pink! Other elements can turn manganese dioxide brown, blue, purple and reddish brown. Manganese dioxide is a flux in and of itself as well. So, glazes that get their black and purple colours, often interact with other glazes and RUN! Our mirror black is a good example – it mixes really well with many glazes because it fluxes them – causes them to melt faster. It will also bring out many beautiful colours in the glazes because it’s black colouring most definitely comes from manganese dioxide! Glaze chemistry is a whole subject on it’s own! We use commercial Mayco glazes on purpose – for their huge range of colour possibilities, stability, cool interactions, artistic freedom with the ability to easily brush the glazes on and ease of use. We currently have almost 50 glazes on hand! A major project is to test the interactions of all glazes with each other. That is 2,500 test tiles!!!! I’m going to make the wall behind the wheels the feature wall of pretty colours! Step Seven – Glaze (Gloss or sometimes called “Glost”) Firing Most of the time this is the final stage of making your creation (but not always!) The glaze kiln goes to 1240°C. This is called cone 6, or midrange. It is the low end of stoneware temperatures. Stoneware clays and glazes are typically fired at cone 8 – 10, that is 1260 – 1290°C. The energy requirement to go from 1240°C to 1280°C is almost a 30% more! Our clay is formulated to vitrify (mature, turn “glass-like”) at 1240°, as are our glazes. A glaze kiln take around 12 hours to reach temperature and two to three days to cool down. Sometimes a third firing process is required – this is for decoration that is added to work after the glaze firing. For example – adding precious metals and lustres. this firing temperature is usually around 600 – 800°C depending upon the techniques being used. There are many students interested in gold and silver trims – we will be doing this third type of firing soon! After firing your work will be in the student finished work shelves. Remember to pay for it before you head out the door! There is a small extra charge for using porcelain clay (it’s more than twice the price of regular clay), and for any third firing process! Once your work has been fired it can not turn back into clay for millennia – so don’t fire it if you don’t like it! Put it in the bucket for recycling. https://firebirdstudios.com.au/the-process-of-making-pottery/This bowl was made by renowned pottery company J & G Meakin of England. The firm was established in the mid-1800's. The bowl is an example of kitchenware used in the 19th century and still in use today.Bowl; white ceramic, round and tapering inwards towards base. Made by J and G Meakin England.On base, 'Ironstone China Reg SOL 391413' with symbolflagstaff hill, flagstaff hill maritime museum and village, warrnambool, maritime museum, maritime village, great ocean road, shipwreck coast, mixing bowl, food preparation, j & g meakin, pottery, stoke-on-trent, kitchen equipment, ceramic -
 Flagstaff Hill Maritime Museum and Village
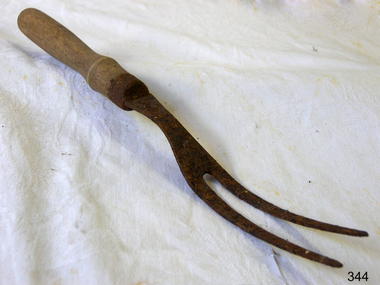
Domestic object - Fork
Naturally, we tend to take commonplace objects for granted, because they have always been there. Yet how many of you actually have thought “hey, where do forks come from?” Well, it takes one trip to China and a 3-year-old laughing at your face because of your desperate attempt to eat with chopsticks to finally appreciate something so ordinary such as a fork. So, where do forks come from? The early history of the fork is obscure. As a kitchen and dining utensil, it is believed to have originated in the Roman Empire, as proved by archaeological evidence. The personal table fork most likely originated in the Eastern Roman (or Byzantine) Empire. Its use spread to what is now the Middle East during the first millennium AD and then spread into Southern Europe during the second millennium. It did not become common in northern Europe until the 18th century and was not common in North America until the 19th century. Carving fork from 1640. Source: Wikipedia/Public Domain Carving Fork from 1640. Source: Wikipedia/Public Domain Some of the earliest known uses of forks with food occurred in Ancient Egypt, where large forks were used as cooking utensils. Bone forks had been found on the burial site of the Bronze Age Qijia culture (2400–1900 BC) as well as later Chinese dynasties’ tombs.The Ancient Greeks used the fork as a serving utensil. Read also: Steven Spielberg to Remake the Classic Musical ‘West Side Story’ In the Roman Empire, bronze and silver forks were used. The use varied according to local customs, social class and the nature of food, but forks of the earlier periods were mostly used as cooking and serving utensils. The personal table fork was most likely invented in the Eastern Roman (Byzantine) Empire, where they were in everyday use by the 4th century (its origin may even go back to Ancient Greece, before the Roman period). Records show that by the 9th century a similar utensil known as a barjyn was in limited use in Persia within some elite circles. By the 10th century, the table fork was in common use throughout the Middle East. Bronze forks made in Persia during the 8th or 9th century.Source: Wikipedia/Public Domain Bronze forks made in Persia during the 8th or 9th century.Source: Wikipedia/Public Domain The first recorded introduction of the fork to Western Europe, as recorded by the theologian and Cardinal Peter Damian, was by Theophano Sklereina the Byzantine wife of Holy Roman Emperor Otto II, who nonchalantly wielded one at an Imperial banquet in 972, astonishing her Western hosts.By the 11th century, the table fork had become increasingly prevalent in the Italian peninsula. It gained a following in Italy before any other Western European region because of historical ties with Byzantium and continued to get popularity due to the increasing presence of pasta in the Italian diet. At first, pasta was consumed using a long wooden spike, but this eventually evolved into three spikes, design better suited to gathering the noodles. In Italy, it became commonplace by the 14th century and was almost universally used by the merchant and upper classes by 1600. It was proper for a guest to arrive with his fork and spoon enclosed in a box called a cadena; this usage was introduced to the French court with Catherine de’ Medici’s entourage. In Portugal, forks were first used at the time of Infanta Beatrice, Duchess of Viseu, King Manuel I of Portugal’s mother around 1450. However, forks were not commonly used in Western Europe until the 16th century when they became part of Italian etiquette. The utensil had also gained some currency in Spain by this time, and its use gradually spread to France. Nevertheless, most of Europe did not adopt the use of the fork until the 18th century. Read also: The 8 Most Famous ‘Functioning Alcoholics’ in History Long after the personal table fork had become commonplace in France, at the supper celebrating the marriage of the Duc de Chartres to Louis XIV’s natural daughter in 1692, the seating was described in the court memoirs of Saint-Simon: “King James having his Queen on his right hand and the King on his left, and each with their cadenas.” In Perrault’s contemporaneous fairy tale of La Belle au bois dormant (1697), each of the fairies invited for the christening is presented with a splendid “fork holder”. The fork’s adoption in northern Europe was slower. Its use was first described in English by Thomas Coryat in a volume of writings on his Italian travels (1611), but for many years it was viewed as an unmanly Italian affectation. Some writers of the Roman Catholic Church expressly disapproved of its use, St. Peter Damian seeing it as “excessive delicacy.” It was not until the 18th century that the fork became commonly used in Great Britain, although some sources say that forks were common in France, England, and Sweden already by the early 17th century. Spaghetti fork By Lady alys - Own work, CC BY-SA 3.0, https://commons.wikimedia.org/w/index.php?curid=6414948 Spaghetti Fork By Lady alys – Own work, CC BY-SA 3.0, The fork did not become popular in North America until near the time of the American Revolution. The curved fork used in most parts of the world today was developed in Germany in the mid 18th century while the standard four-tine design became current in the early 19th century. The fork was important in Germany because they believed that eating with the fingers was rude and disrespectful. The fork led to family dinners and sit-down meals, which are important features of German culture. https://www.thevintagenews.com/2016/08/31/priority-fork-came-italy-european-country-pasta/?chrome=1Serving fork, two prongs, with a shaped wooden handle. Badly rusted.None.flagstaff hill, warrnambool, shipwrecked-coast, flagstaff-hill, flagstaff-hill-maritime-museum, maritime-museum, shipwreck-coast, flagstaff-hill-maritime-village, food, meat, carving -
 Flagstaff Hill Maritime Museum and Village
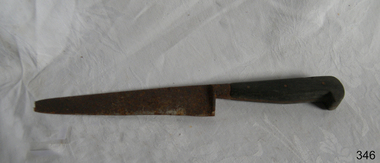
Domestic object - Knife
This knife would have been used for food preparation.Knife; wooden handle and shaped metal blade with serrated cutting edge.flagstaff hill, warrnambool, shipwrecked-coast, flagstaff-hill, flagstaff-hill-maritime-museum, maritime-museum, shipwreck-coast, flagstaff-hill-maritime-village, kitchen knife, food preparation -
 Flagstaff Hill Maritime Museum and Village
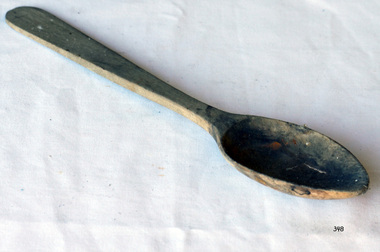
Domestic object - Spoon
An example of baking equipment used in Victorian times and still used to day.Spoon, wooden, blonde colour. Spoon section tapers to rounded point and handle is flat and shaped.flagstaff hill, warrnambool, shipwrecked-coast, flagstaff-hill, flagstaff-hill-maritime-museum, maritime-museum, shipwreck-coast, flagstaff-hill-maritime-village, wooden spoon, food preparation, baking equipment, kitchen utensil -
 Flagstaff Hill Maritime Museum and Village
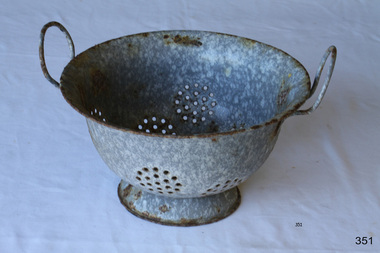
Domestic object - Colander, Late 19th or early 20th Century
The colander is an extremely useful tool in the kitchen, as it allows food to be fully drained of liquids such as water or oil. Enamelware dates back to 1760 in Germany.This object is significant as an example of a type of item in common use in the 19th Century and that is still in use today.Mottled blue enamel colander with draining holes in the base and sides. Two thin handles on lip of bowl.None.flagstaff hill, warrnambool, shipwrecked-coast, flagstaff-hill, flagstaff-hill-maritime-museum, maritime-museum, shipwreck-coast, flagstaff-hill-maritime-village, enamel, colander, food preparation -
 Flagstaff Hill Maritime Museum and Village
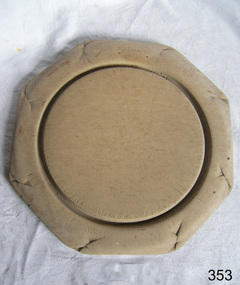
Domestic object - Bread Board
In the high tech, fast paced society that we live in, it’s easy to take some things for granted. Case in point: the wood cutting board on which you’ll probably be preparing the evening’s dinner. Have you ever taken the time to think about the history of the cutting board? Where did it come from, and what did ancient civilizations use to cut their meats, fruits and vegetables? Wood throughout the ages Since the dawn of time, wood has been one of the most available materials used by mankind to build tools and lodgings, so it’s not really surprising to know that wood has been used in the preparation of food since the prehistoric ages. Of course, back then, cavemen probably used an unpolished slab of tree trunk to cut the kill of the day on and they probably didn’t think twice about saving it once the meal was over. Chances are they probably threw it in the fire with the rest of the wood needed to kindle it. Advances in technology Throughout the centuries, mankind evolved and started creating machines from steam, electricity and metal. When the circular saw was invented, nicer, cleaner slabs of wood were cut and used as cutting boards. Since soft wood was the most available type of wood at the time, it was the material of choice for to be used for cutting boards. Boards were made smaller since the slab of wood could now be cut to any desired size. Since they were made smaller, they were also used to eat off of and some people referred to them as trenchers. Trenchers were originally pieces of stale hard bread that were used as substitute plates. Wood trenchers quickly became the replacements of the eatable dinnerware. The butcher block: the cutting board’s larger cousin In the industrial ages, many industries rapidly developed, and the butchery industry followed this trend as well. Before the invention of the cutting board, butchers used tree rounds to carve their meat on. The rounds were often too soft and they rapidly became unsanitary. Hard maple wood butcher blocks were the preferred choice of the industry. They were made to be extremely thick and durable, so durable in fact, that a butcher could use the same block for almost his entire career. Cutting boards around the world As cutting boards began to be more and more used in kitchens around North America, the rest of the world crafted such boards from different materials. The East used thick bamboo as their material of choice. Despite its frail appearance, bamboo is quite strong and made durable cutting boards and butcher blocks. Europe used maple in the crafting of their cutting boards while Persia used flat pieces of polished wood in their kitchens. The world then saw cutting boards that were being made from other materials like plastic and they came in all shapes and sizes, but they always served the same purpose, to provide a household with a safe, clean surface on which to prepare meals for their friends and family members. https://www.woodcuttingboards.com/news/quick-history-of-the-cutting-board-47.aspxThe bread board is an example of kitchen equipment used during Victorian times and similar to those used today.Bread board. Wooden, octagonal, plain sanded light wood. Has decoration around edge and indented circular line to delineate round cutting board section.None.flagstaff hill, warrnambool, shipwrecked-coast, flagstaff-hill, flagstaff-hill-maritime-museum, maritime-museum, shipwreck-coast, flagstaff-hill-maritime-village, bread board, cutting board, pastry board, kitchen utensil, kitchen equipment, baking equipment, food preparation -
 Flagstaff Hill Maritime Museum and Village
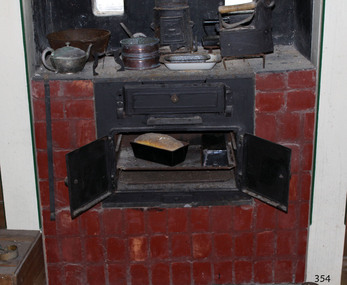
Domestic object - Stove, Cox and Rizzetti Stove Works, ca. 1918-1930s
... equipment baking domestic cooking cooking equipment food preparation ...Cast iron stoves burn solid fuel such as wood or coal, and are used for cooking and warmth. The stoves have a firebox with a grate where the fuel is burned. The hot air flows through flues and baffles that heat the stove top and the oven. Before cast iron stoves were invented, cooking and heating were carried out in outdoor open fires, and later, in fireplaces inside the home. In 1642 the first cast iron stove was manufactured in Lynn, Massachusetts, where molten cast iron was poured into a sand mould to make rectangular plates that were then joined together to make a box. Benjamin Franklin invented the more efficient Pennsylvania stove in 1744, and this efficient design is still used today. After the mid-19th century cast iron stoves were produced with burners in different positions, giving varied temperatures, so a wide variety of foods could be cooked at the same time at the most suitable heat, from slow cooking to baking scones. In contemporary times people the new wood-burning stoves had to meet the anti-pollution standards now in place to protect our environment. By the 1920s gas cookers were being introduced for domestic use, and by the 1930s electric home cookers were being offered to householders. PLANET STOVES In August 1925 the firm Cox and Rizzetti, Stove Works, and also Sydney Road, South Melbourne, advertised in the Brunswick and Coburg Leader of November 11, 1925 as "formerly with Harnwell and Sons" and as "specialists in solid cast iron Planet stoves ... which merit an inspection from builders and householders". The firm continued in business and was mentioned as sponsors in the King Island News in 1971. Harnwell and Sons was listed in the Victorian Government Gazette of 1894. It is curious that the firm was mentioned in an article in the Sunrasia Daily of June 14, 1934 titled 'Planet Stoves' as a manufacturer of Planet Stoves. This Planet No 3 stove is an uncommon example of cooking equipment used in kitchens in the early 20th century, as the firebox is above the oven rather than beside it. The cast iron combustion stove is significant as part of the evolution of domestic cooking. Previously cooking was mostly carried out in outdoors in open fires, and later in fireplaces indoors. Cast iron stoves are still used today and have additional features such as thermostats to monitor and maintain temperature, water heating pipes connected, and environmentally approved anti-pollution fittings. Stove; a compact, blackened cast iron combustion cooker, installed within a fireplace and enclosed by bricks on both sides. The upright rectangular stove has a flat top with three round, removable cook plates and a flue connected at the back. The front has three doors with round knob handles; a swing-down firebox door above a sliding ashtray, and two side-hinged oven doors above a sliding opening. Inside on the side walls are two pairs of runners. Behind the pair of doors is an oven with two pairs of rails and two removable metal shelves. The stove has cast inscriptions on the chimney flue and on the front of the right hand side stove door. The model of the stove is The Planet No 3, made in Melbourne.Chimney flue, "[within rectangle] THE / PLANET" Stove door, "(within oval) PLANET / No 3"flagstaff hill, flagstaff hill maritime museum and village, warrnambool, maritime museum, maritime village, great ocean road, shipwreck coast, stove, cast iron stove, combustion stove, wood-burning stove, wood stove, wood oven, solid fuel stove, cooker, the planet, planet, planet no. 3, kitchen equipment, baking, domestic cooking, cooking equipment, food preparation, planet stove, planet cooker, cooking range, slow combustion stove, antique, range cooker, cox and rizzetti, harnwell and sons, melbourne manufacturer -
 Flagstaff Hill Maritime Museum and Village
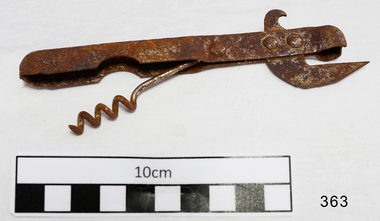
Domestic object - Can Opener, Bottle Opener & Corkscrew
It took 15 years to invent the can. It took 100 more to invent a standard way to open it. In the 19th century, decades after the invention of canning, there were virtually no can openers. Canned food, such as sardines, came with its own "key" to peel back the tin lid. Birth of the can One of the oddest things about the can opener is that the can predates it by almost 150 years. Though common today, cans were once military-grade technology. In 1795, Napoleon, to whom the phrase "an army marches on its stomach" is attributed, offered 12,000 francs to anyone who could find a way to preserve food. Without any knowledge of bacteria or their role in food spoilage, scientists didn't even know where to begin. It took 15 years before a chef named Nicholas Appert claimed the prize after successfully jarring food. Soon after that, his countryman Philippe de Girard came up with a variant on Appert's method—metal tins—and sold the idea to the British. Spoiled food, and the sickness it caused, was a widespread problem. The public would have benefited from canned food, but for decades cans were almost exclusively for the army and the navy. The canning process, with its hours of boiling and steaming, its scrupulous cleanliness, its heated metal, and its need for a great deal of disposable material, made canned food far too expensive for anyone but the military. No can openers were needed or even possible. The metal of early cans was too thick to make openers practical. Soldiers and sailors had plenty of sharp objects on hand and made ample use of them when they wanted to eat. During the 19th century, the process of canning was refined and mechanised, and the metal wall of the average can slimmed down enough that a civilian could get it open—if that civilian had the right tool. No one had that tool yet, so early cans had to open themselves. In other words, they came with built-in openers. The result was a confusing but pleasing free-for-all, in terms of product engineering. Each type of food came with its own kind of can, and each kind of can came with its own kind of opener. Tinned fish and meat were often sold in rectangular cans. These cans were fitted with a "key" that would roll down the top of the can. Coffee, beans, and other types of meat were packaged in cylinders with metal strips that could be peeled back with their own kinds of built-in keys. Cans of milk, which didn't need to be completely opened, came with puncture devices. As tinned food became more common, its containers became more regular. A nice cylindrical can became the norm, and, as these cans filled kitchens, more engineers put their minds to finding a convenient way to open all of them. The first standalone can opener worked on a simple principle: point, stab, and pull. From the mid-19th century to the end of World War I, the typical can opener looked roughly like a wrench, if the lower 'jaw' of the wrench were replaced with a blade. People used the blade to puncture the top of the can near its edge, push the upper jaw against the side of the can, and drag the blade through the metal along the rim. Because meat was the first and most popular canned substance, these can openers were often shaped to look like cows and given the nickname 'bully beef can openers'. The bully beef can opener, popular in the mid-19th century, resulted in many lost fingers. Later, a corkscrew was added that was seated in the handle, and could be pulled out for use. Bully beef can openers were so common, effective, and sturdy that they are still frequently available on collectors' sites. Some are advertised as “still working,” and every last one of them is, without a doubt, soaked in the blood of our ancestors. Dragging a sharp blade along the edge of a can is certain to cause injury sooner or later. So once people got a reliable can shape and a reliable way to get the can open, the search was on for a reliable way to get a can open without the possibility of losing a finger. The answer came in 1925, from the Star Can Opener Company of San Francisco. This is probably the first can opener that resembles the one people have in their kitchens today. Instead of using a blade to pry open a metal can, buyers could clamp the edge of the can between two wheels and twist the handle of one of the wheels to move the blade around the lip. The Star can openers weren't perfect. Compared to the bully beef model, they were flimsy and breakable, but they probably prevented a few injuries. Six short years after the Star model came to market, the first electric can opener was invented. It was patented in 1931 by the Bunker Clancey Company of Kansas City, who had already been sued by the Star Can Opener Company for trying sell a double-wheeled can opener like the Star model (the case was dismissed). The electric can opener must have seemed like the wave of the future and a sure-fire seller, but it proved to be too far ahead of its time. In 1931 not that many households had electricity, and those that did weren't interested in buying can openers. The Bunker Clancey Company was subsequently bought by the Rival Company, which still makes small appliances like can openers today. It took another 25 years for electrically powered can openers to become practical. In the 1950s, Walter Hess Bodle and his daughter, Elizabeth Bodle, developed an electric can opener in the family garage. Walter came up with the opener's blades and motor, and Elizabeth sculpted the outside. Their can opener was a free-standing unit that could sit on the kitchen counter. The Udico brand of the Union Die Casting Company put it on the market in time for Christmas in 1956 and had great success with it. Over the next few years it came out in different styles and colours, and, like the bully beef can opener, has become a collector's item. Also like the bully beef model, Udico can openers often still work. They don't make 'em like they used to. Although there have been some design changes and refinements over the last sixty years, there have yet to be any more leaps forward in can opener technology. If you're resentfully opening a can, you are almost certainly doing it using the Star design, manually forcing the can between two wheels, or the Bodle design, clamping the can into a free-standing electrical opener. Whether or not you enjoy your holiday meals, at least you can be happy that you are not getting poisoned by your own food or cutting open your hand with the blade you use to get at it. That's something, right?The can opener, Bottle opener and the corkscrew are still very important and essential items in most kitchens.Metal can opener, chromed, with bottle opener, and a corkscrew seated in the handle.None.flagstaff hill, warrnambool, shipwrecked-coast, flagstaff-hill, flagstaff-hill-maritime-museum, maritime-museum, shipwreck-coast, flagstaff-hill-maritime-village, canning, can opener, corkscrew, bottle opener, kitchen equipment -
 Flagstaff Hill Maritime Museum and Village
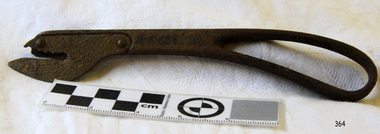
Domestic object - Can Opener
It took 15 years to invent the can. It took 100 more to invent a standard way to open it. In the 19th century, decades after the invention of canning, there were virtually no can openers. Canned food, such as sardines, came with its own "key" to peel back the tin lid. Birth of the can One of the oddest things about the can opener is that the can predates it by almost 150 years. Though common today, cans were once military-grade technology. In 1795, Napoleon, to whom the phrase "an army marches on its stomach" is attributed, offered 12,000 francs to anyone who could find a way to preserve food. Without any knowledge of bacteria or their role in food spoilage, scientists didn't even know where to begin. It took 15 years before a chef named Nicholas Appert claimed the prize after successfully jarring food. Soon after that, his countryman Philippe de Girard came up with a variant on Appert's method—metal tins—and sold the idea to the British. Spoiled food, and the sickness it caused, was a widespread problem. The public would have benefited from canned food, but for decades cans were almost exclusively for the army and the navy. The canning process, with its hours of boiling and steaming, its scrupulous cleanliness, its heated metal, and its need for a great deal of disposable material, made canned food far too expensive for anyone but the military. No can openers were needed or even possible. The metal of early cans was too thick to make openers practical. Soldiers and sailors had plenty of sharp objects on hand and made ample use of them when they wanted to eat. During the 19th century, the process of canning was refined and mechanised, and the metal wall of the average can slimmed down enough that a civilian could get it open—if that civilian had the right tool. No one had that tool yet, so early cans had to open themselves. In other words, they came with built-in openers. The result was a confusing but pleasing free-for-all, in terms of product engineering. Each type of food came with its own kind of can, and each kind of can came with its own kind of opener. Tinned fish and meat were often sold in rectangular cans. These cans were fitted with a "key" that would roll down the top of the can. Coffee, beans, and other types of meat were packaged in cylinders with metal strips that could be peeled back with their own kinds of built-in keys. Cans of milk, which didn't need to be completely opened, came with puncture devices. As tinned food became more common, its containers became more regular. A nice cylindrical can became the norm, and, as these cans filled kitchens, more engineers put their minds to finding a convenient way to open all of them. The first standalone can opener worked on a simple principle: point, stab, and pull. From the mid-19th century to the end of World War I, the typical can opener looked roughly like a wrench, if the lower 'jaw' of the wrench were replaced with a blade. People used the blade to puncture the top of the can near its edge, push the upper jaw against the side of the can, and drag the blade through the metal along the rim. Because meat was the first and most popular canned substance, these can openers were often shaped to look like cows and given the nickname 'bully beef can openers'. The bully beef can opener, popular in the mid-19th century, resulted in many lost fingers. Bully beef can openers were so common, effective, and sturdy that they are still frequently available on collectors' sites. Some are advertised as “still working,” and every last one of them is, without a doubt, soaked in the blood of our ancestors. Dragging a sharp blade along the edge of a can is certain to cause injury sooner or later. So once people got a reliable can shape and a reliable way to get the can open, the search was on for a reliable way to get a can open without the possibility of losing a finger. The answer came in 1925, from the Star Can Opener Company of San Francisco. This is probably the first can opener that resembles the one people have in their kitchens today. Instead of using a blade to pry open a metal can, buyers could clamp the edge of the can between two wheels and twist the handle of one of the wheels to move the blade around the lip. The Star can openers weren't perfect. Compared to the bully beef model, they were flimsy and breakable, but they probably prevented a few injuries. Six short years after the Star model came to market, the first electric can opener was invented. It was patented in 1931 by the Bunker Clancey Company of Kansas City, who had already been sued by the Star Can Opener Company for trying sell a double-wheeled can opener like the Star model (the case was dismissed). The electric can opener must have seemed like the wave of the future and a sure-fire seller, but it proved to be too far ahead of its time. In 1931 not that many households had electricity, and those that did weren't interested in buying can openers. The Bunker Clancey Company was subsequently bought by the Rival Company, which still makes small appliances like can openers today. It took another 25 years for electrically powered can openers to become practical. In the 1950s, Walter Hess Bodle and his daughter, Elizabeth Bodle, developed an electric can opener in the family garage. Walter came up with the opener's blades and motor, and Elizabeth sculpted the outside. Their can opener was a free-standing unit that could sit on the kitchen counter. The Udico brand of the Union Die Casting Company put it on the market in time for Christmas in 1956 and had great success with it. Over the next few years it came out in different styles and colours, and, like the bully beef can opener, has become a collector's item. Also like the bully beef model, Udico can openers often still work. They don't make 'em like they used to. Although there have been some design changes and refinements over the last sixty years, there have yet to be any more leaps forward in can opener technology. If you're resentfully opening a can, you are almost certainly doing it using the Star design, manually forcing the can between two wheels, or the Bodle design, clamping the can into a free-standing electrical opener. Whether or not you enjoy your holiday meals, at least you can be happy that you are not getting poisoned by your own food or cutting open your hand with the blade you use to get at it. That's something, right?The can opener is still a very important and essential item in most kitchens.Can opener, right handed, metal, upper blade section serrated, inscription 'Peerless Pat.Feb 11-90'.Peerless Pat.Feb 11-90flagstaff hill, warrnambool, shipwrecked-coast, flagstaff-hill, flagstaff-hill-maritime-museum, maritime-museum, shipwreck-coast, flagstaff-hill-maritime-village, cannning, can opener, kitchen equipment -
 Blacksmith's Cottage and Forge
Boiler Pot
Domestic cooking itemLocal HistoryRound pot with long iron handle and tin lid with handle, grey metallic colour.Kenrick - FIRST QUALITY - 4 QUARTS-No 7 T & C CLARKE & Co. LTD A? 455879 domestic, cooking, kitchen, cast iron, food preparation, cast iron pot, clarke, foundry -
Blacksmith's Cottage and Forge
Boiler, Early 20th Century
... Marsh goldfields Domestic item used for cooking and food ...Domestic item used for cooking and food preparationLocal historyCast iron oval cooking pot. Hooked handle attached to lugs on side of pot. Tin lid has central handle.Clark & Co 2 1/2 G embossed on side of pot. domestic, cast iron, clark, food preparation, iron pot -
Blacksmith's Cottage and Forge
Boiler Pot, A.Kenrick, Early 20th century
... Marsh goldfields Food preparation This is a typical cast iron ...Food preparationThis is a typical cast iron cooking pot used on a wood stove. Used for food preparation.cast iron, oval boiler with centre hook in the handle, 3 gallon capacity, no lidA. Kenrick and sons. West Bromerickdomestic, kitchen, pot, boiler, cast iron