Showing 24331 items
matching g-w-adam
-
 Eltham District Historical Society Inc
Photograph (Item) - Negative, Heather Adam, Eltham Community Photographic Survey Entry, 1988
Heather Adam 1988 Entrant No. 61 Ref: No photos kept in Series 34 The images in this record were not selected for inclusion. SHIRE OF ELTHAM COMMUNITY PHOTOGRAPHIC SURVEY Photography is an artform which many of us practice, sometimes purely for artistic pursuit, sometimes to record the people and events in our lives. In 1988, as part of a local Bicentennial project, the Shire of Eltham conducted the Eltham Community Photographic Survey. Up to 100 entries were to be selected by a panel of photographers for entry into the Eltham Photographic Survey Exhibition. Entries had to be submitted by May 13, 1988. Entrants whose images were selected for the exhibition were contacted and requested to further submit an entry form providing entrant’s name, area of residence, age, and proposed captions. These details were then used to produce labels for the exhibition mounts. Where negatives had not been supplied, these were requested to support the display of printed enlargements mounted on 10” x 8” cardboard. The mounted prints were made available post exhibition for sale at $8.50 each for colour prints and $7.00 for B&W prints. Residents in the Shire were invited to collect a free roll of film and take a photograph of what they either liked or did not like about the area. A total of 160 entrants submitted multiple entries for the exhibition. Of those selected for exhibition, entrants ranged in age from 9 to 70 years. All custom colour and black and white printing for the exhibition was completed by Wattle Studios of Eltham. The Eltham Photographic Survey was jointly auspiced by the Shire of Eltham and Wattle Studios, of 953 Main Road, Eltham. The project was greatly assisted by: • David McRitchie, Media Studies Lecturer Victoria College, Rusden Campus. • Ian and Annette Toohill of Wattle Studios • Tracy Naughton, Eltham Community Arts Officer • Neville Emerson Pty. Ltd. • Superior Press, Eltham • Kodak Australasia Pty. Ltd. • Agfa Gevaert Ltd. • Townsend Colourtech Pty. Ltd. • The Australian Bicentennial Authority • Eleanor Bowers, Secretary, Eltham Arts Council The exhibition was placed on display in the Woolworths Arcade, Eltham between Monday June 6th and Saturday June 11, 1988. It was also intended to hold the exhibition at a venue in the Shire’s North Riding from Monday, June 20 to Friday June 24. It was then displayed at the Were Street Theatre, Montmorency from Friday, June 24 to Thursday, July 7. Series 34: Eltham Community Photographic Survey 1988 - Prints & Documentation Series consists of 117 photographs of Shire scenes taken by members of the community. Items I - 41 are larger photographs mounted on card, which were exhibited. Items 42 - 117 are unmounted copies, alternative takes and other entries. Corresponding negatives contained in Series 35: Eltham Community Photographic Survey 1988 – Negatives which consists of 267 colour and B&W negatives and one colour slide of Shire scenes taken by members of the community. The negatives are arranged by the entrant number of the photographer. The Eltham Community Photographic Survey collection is significant to the local community as it was curated by the local community - ordinary people of all ages - representing what they liked and did not like in the area where they lived. It represents an unfiltered representation of the Shire of Eltham as it was in 1988. It also represents one of many projects as part of the national programme of events and celebrations to commemorate the bicentenary. It is a time capsule of life in the 1980s of this urban and rural municipality in Melbourne's north. shire of eltham archives, bicentennial project, eltham, eltham community photographic survey, film - ilford fp4, heather adam, pets, scan - 35mm negative, series 35 -
 Melbourne Tram Museum
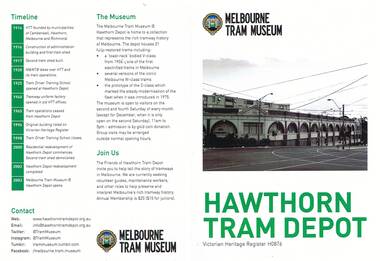
Pamphlet, Adam Chandler, Russell Jones, "Hawthorn Tram Depot", Jun. 2014
525 Colour photocopy - folded to A5 on heavy paper, titled "Hawthorn Tram Depot", providing details of the Hawthorn Tram depot, with the FOHTD logo and "Melbourne Tram Museum" in the top left hand corner. Includes photo of depot on front cover, history of the Building, Operations, Location , Expansion, Decline and Redevelopment. On the rear is a timeline, details of the Museum and the Friends Group. Used for the 2014 Melbourne Open House depot. Prepared by Adam Chandler June 2014 from previous sheets. 525.1 - A4 - the 2015 Melbourne Open House version. Printed on heavy paper. 525.2 - an earlier version - two A4 pages stapled in the top left hand corner. Prepared by Warren Doubleday and Mike Ryan. Uses a Keith Kings Oct. 1946 of the front of the depot. .1 and .2 added 13/1/15. 525.3 - A4 - 2016 Open House version, added 4-11-2016trams, tramways, hawthorn, fohtd, depots -
 Malmsbury Historical Society
Photograph (Item), B/W Photo Of South East Corner Of Mollison & Orr Sts C1970, Malmsbury c1970
People - "Munro, Donald G" Buildings - "Mansions, Commercial Hotel, Station" -
 Eltham District Historical Society Inc
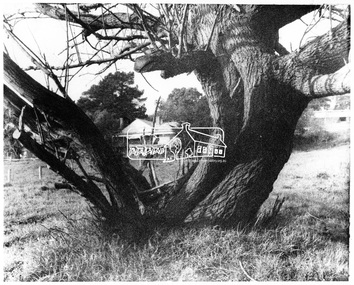
Negative - Photograph, George W. Bell, Gahan house, Main Road, Eltham, c.1964
View of Gahan house originally known as 'Derril' framed by an old tree. Part of a collection of photos donated by George W. Bell to the former Shire of Eltham, c.1970. In 1964 the Shire of Eltham acquired the land upon which Shillinglaw Cottage stood for the purposes of building a new Shire Office. Shillinglaw Cottage was to be demolished but a campaign was managed by the local community to save Shillinglaw Cottage which was relocated to its present day site, (Panther Place, Eltham) immediately in front of the Gahan house as viewed in the photo. The Gahan house was subsequently demolished.This photo forms part of a collection of photographs gathered by the Shire of Eltham for their centenary project book, "Pioneers and Painters: 100 years of the Shire of Eltham" by Alan Marshall (1971). The collection of over 500 images is held in partnership between Eltham District Historical Society and Yarra Plenty Regional Library (Eltham Library) and is now formally known as 'The Shire of Eltham Pioneers Photograph Collection.' It is significant in being the first community sourced collection representing the places and people of the Shire's first one hundred years.Digital image 4 x 5 inch B&W Negsepp, shire of eltham pioneers photograph collection, eltham, shillinglaw cottage, gahan, gahan house, george w. bell collection, houses, main road, panther place, significant tree -
 Bendigo Military Museum
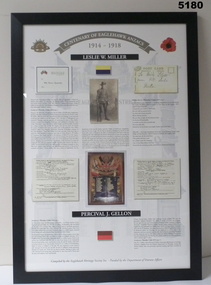
Memorabilia - CENTENARY of EAGLEHAWK ANZACS, FRAMED, Eaglehawk Heritage Society, LESLIE W. MILLER/ PERCIVAL J. GELLON, C2014
PRIVATE LESLIE WASHINGTON MILLER, No 1226, 14th Infantry Battalion. KIA 8/8/1915, Gallipoli Peninsula. PRIVATE PERCIVAL JAMES GELLON, No 785, 7th Infantry Battalion, KIA 5/7/1915, Gallipoli Peninsula.Memorabilia - framed story of two soldiers in colour using memorabilia of the soldiers and their ives. Printed on paper. Frame - black extruded plastic, glass front, cardboard backing.- LESLIE W. MILLER/ PERCIVAL J. GELLONframed item, anzacs, eaglehawk -
 Cheese World Museum
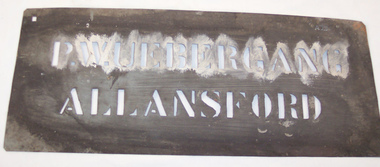
Stencil, Bag stencil 'P W Uebergang Allansford'
The Percy Uebergang family lived at Tooram Park, Allansford from 1912 until 1992. Percy and Myrtle Uebergang's children were twins, Ray and Joyce born in 1926 who lived at Tooram Park until their deaths, Ray in 1986 and Joyce in 1992. Neither Ray nor Joyce married and following the death of her brother Joyce set up the Ray and Joyce Uebergang Foundation which supports the local community. This stencil is part of the collection of items given into the care of the Cheese World Museum. It was used to mark bags of produce leaving the Tooram property. Uebergang catalogue No.A27 Rectangular tin stencil with cut out Uebergang name and address. The front is blackened through use and the top section has been whitened afterwards. A square hole in the top corner is used for hanging the stencil on the wall.P W UEBERGANG/ ALLANSFORD A27 [Uebergang No.]allansford, uebergang, stencils, labelling, uebergang, p w -
 Mentone Grammar School
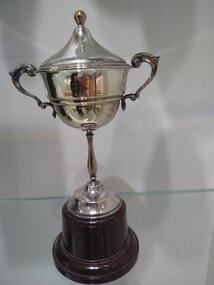
Award, J. W. Webster Cup for Gym, 1943
Silver Trophy with lid1943 J. W. Webster Cup for Gym -
 Whitehorse Historical Society Inc.
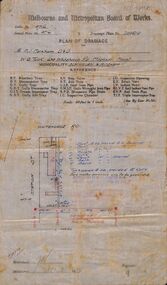
Plan - Building Plan of Drainage, Plan of Drainage, 1939 - 1940
Plans of drainage no 204510 for Mr P. J. Markham, o & o, and W. G. Tuck, Agent. Three plans: the original proposed (31-7-1939); the approved plan (19-10-1939); and the as-built plan (10-8-1940).Three Melbourne and Metropolitan Board of Works Plans of Drainage No. 204510 for Mr. P. J. Markham, o & o, and W. G. Tuck, Agent. Municipality - Blackburn & Mitcham [of] Mitcham Post Office and residence.non-fictionPlans of drainage no 204510 for Mr P. J. Markham, o & o, and W. G. Tuck, Agent. Three plans: the original proposed (31-7-1939); the approved plan (19-10-1939); and the as-built plan (10-8-1940).mitcham post office, tuck, w. g., markham, patrick joseph, melbourne and metropolitan board of works -
Glenelg Shire Council Cultural Collection
Domestic object - Printed Metal Match Box Cover, G & G (A/ASIA) LTD>, c. 1931
Promotional metal matchbox cover for the Club Hotel Portland. Green Border, cream panels centre front, back and side, with gold fancy border. Text & graphics in black.Front: G & G (A/Asia) Ltd. Picture of a face - smiling underneath "This man drinks Richmond Beer" Turn up other way Face is frowning, underneath "This man wishes he had" Back: 1931 Calendar Side Strike the Club Hotel for a good spot ( J.R. Sullivan Prop) Portland -
 Bendigo Historical Society Inc.
Ephemera - Blotter flyer and business card
In 1917, this was called the Bendigo Frankfurt, Sausage and Bacon Company operating from the Rex factory on the corner of Mitchell and Hargreaves St, where W G Webb was the proprietor.W. G. Webb, Ham and Bacon Depots, 305 Hargreaves & 224 Mitchell Strs, Bendigo Blotter flyer, includes B&W photo of The Old Boat-House Business card - gold writing on purple card, rear has Railway Time-Table (unknown date)w.g.webb, business card., ham and bacon depot -
Creswick Campus Historical Collection - University of Melbourne
Photograph - First group of Forestry School Students and staff standing on the grass in front of Tremearne House, 1910, V. S. F. 1909 - 12 Students
VSF students and staff R. G. Lindsay, W. H. Horn, J. Sampson, A. Warren, H. Felstead, (Nursery Supt.), N. L. Boston, A. Ken. Sepia photograph on cardboard mount of seven people standing on the grass in front of Tremearne House. The individuals are named at the bottom of the photograph, written in pen on the cardboard mount. L to R. R. G. Lindsay, W. H. Horn, J. Sampson, A. Warren, H. Felstead, (Nursery Supt.), N. L. Boston, A. Ken. On the rear of the cardboard mount: writing in greylead pencil; ? 4 students only:- viz Lindsay, Horn, Sampson, Warren. Writing in blue pen; V.F.S. 1909 - 12 Students. A typewritten label; Presented to the school by Mr W. H. Horn STUDENTS 1909 - 12. February 1971. Written in green lead pencil; Please return to CFEO, DE&R. 22/1/79 -
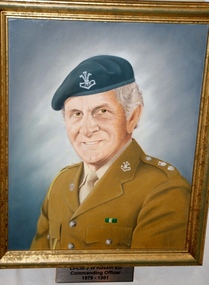
 4th/19th Prince of Wales's Light Horse Regiment Unit History Room
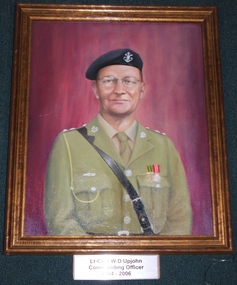
Painting - Portrait, Lt-Col I W D Upjohn
Lt-Col Upjohn was Commanding Officer of the 4/19 Prince of Wales's Light Horse Regiment from 2004 - 2006One of a collection of portraits of former Commanding Officers of the RegimentFramed oil painting of Lt-Col I W D Upjohnportrait, upjohn -
 4th/19th Prince of Wales's Light Horse Regiment Unit History Room
Painting - Portrait, Lt-Col J W Hoskin ED
Lt Col Hoskin was Commanding Officer of 4/19 Prince of Wales's Light Horse Regiment from 1979 to 1981 One of a collection of portraits of former Commanding Officers of the RegimentFramed oil painting of Lt-Col J W Hoskin EDportrait, hoskin -
Ringwood and District Historical Society
Legal record - Conditions of Sale (C.E.Carter), Ringwood - S Wright to W MacKay, 1926
Particulars and Conditions of Sale of Property , from Stanton Wright to W MacKay -
 Buninyong & District Historical Society
Photograph - Original Photograph, Mr. W. Grigg with horses and dray, Bungaree 1990, 1990
farm equipmentColour photograph, Mr. W. Grigg with horses and dray, Bungaree 1990.buninyong, w. grigg, horses, dray, bungaree -
 Buninyong & District Historical Society
Photograph - Photo of Original Photograph, Wal Larsen, B/W photo of Buninyong Railway line cutting in June 1940, June 1940
Railway and surrounds in 1940.B/W photo of Buninyong Railway line cutting in June 1940buninyong, railway, bunny, cutting -
 Wangaratta RSL Sub Branch
Framed photograph and Medals, L/Cpl. Neville G Rose
Service medals issued to VX95196 - 3/400050 Private Neville George ROSE born 17/5/1926 at Coburg. He served with the 3rd Battalion RAR from 28/9/1950 to 30/10/1950 a total of 33 days when he was killed in action in Korea aged 24 years. Military service records currently closed. Timber frame with maroon felt mount containing photograph of soldier, eight medals with attached ribbons two metal badges and plaque.VX95196 - 3/400050 L/Cpl. Neville G. Rose 2/5th Battalion 2nd A.I.F 1st New Guinea Inft. BN 3rd Royal Aust. Regiment Killed in Action Korea 30/10/1950neville g rose, korea, 2/5th battalion 2nd a.i.f., 3rd rar, killed in action -
Moorabbin Air Museum
Machine - Miles Messenger 2A VH-AVQ (G-AJKG)
Historical Details: The AARG aircraft was built by Miles Aircraft (Northern Ireland) Ltd as a production Messenger 2A model in April 1947 and registered as G-AJKG in the UK where it flew with a number of private owners before being sold in May 1953 to the Right Honourable R.. Description: The Miles Messenger was built in England from 1942 on as a liaison aircraft for the Royal Air Force. At the end of the Second World War production continued for the civilian market. A number of Miles Messengers were imported into Australia, including t. Level of Importance: National -
Malmsbury Historical Society
Photograph (Item), "B/W Photo ""Malmsbury Market"" & Post Office Mollison St C1990", Malmsbury c1990
People - "Munro, Donald G; Durdis (Shop Owner?)" Buildings - "Shops, Post Office" -
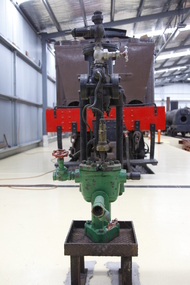 Puffing Billy Railway
Steam Driven Weir Pump, 1900s
G. and J. Weir of Holm Foundry, Cathcart, Glasgow and now known as the Weir Group. The company was established in 1871 as an engineering firm by two brothers, George and James Weir, founding G. & J. Weir Ltd. The Weir brothers produced numerous groundbreaking inventions in pumping equipment, primarily for the Clyde shipyards and the steam ships built there. These pumps became extremely well known for their use as boiler feedwater pumps, and for ship's auxiliary equipment such as evaporators. Under W D Weir, the company turned to producing munitions and war material in the First World War. As well as shells, they manufactured aircraft including the Royal Aircraft Factory F.E.2 fighter and bomber. James George Weir (aviator, son of James Galloway Weir) a director of the company formed the Cierva Autogiro Company. G & J Weir would be a financial supporter of the company during its existence. In 1943, they provided the finances for the construction of the W.9, an experimental helicopter, to Air Ministry requirements. It was first listed on the London Stock Exchange in 1946. Double-acting Weir steam pumps were virtually standard fitment on British-built steamships, being used for pumping water, fuel, air and much else well into the 1950s, as well as being used on other ships worldwide. Historic - Double-acting Weir steam pumpSteam Driven Pump made of iron & steel puffing billy, weir pump, weir, steam driven pump -
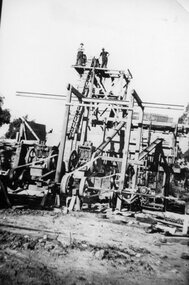 Stawell Historical Society Inc
Photograph - The Crusher in Working Condition, B/W Photo of Ore Crusher
B/W Photo of two men standing on metal framework of an ore crusher -
 Whitehorse Historical Society Inc.
Photograph - Black and white photograph, Gerald W. Brocklesby
Black and white photo of Gerald W. Brocklesby. History of his life with photobrocklesby, gerald w., ethel, linacre, ethel m, minnie, moore, m.l., wildwood, bakers road, blackburn -
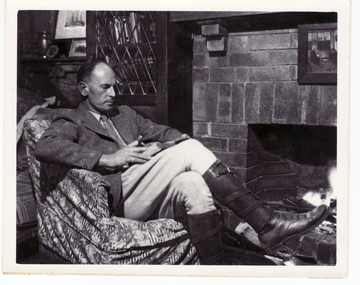
 Melbourne Legacy
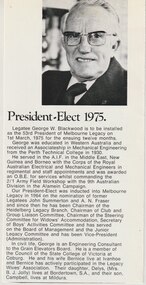
Article, Legatee George W Blackwood, President 1975
A cutting from from a Melbourne Legacy President's report showing a photo of Legatee George Blackwood (President of Melbourne Legacy in 1975). It was collected to be a record of a photo of past presidents. In World War 2 Legatee Blackwood served in the AIF in the Middle East, New Guinea and Borneo in the Corps of the Royal Australian Electrical and Mechanical Engineers and was awarded an OBE for services whilst commanding the 2/1 Army Field Workshop with the 9th Australian Division in the Alamein Campaign. He achieved the rank of Colonel. He joined Legacy in 1964 on the nomination of Legatees John Summerton and AN Fraser. The article was part of an album of past presidents from 1965 to 1989. The folder included biographical details and obituaries, eulogies and death notices of prominent Legatees. The items have been catalogued separately.A record of Legatee George Blackwood a past president of Legacy. The information was collected to record the lives of prominent legatees in a folder.Article with a black and white photo of Legatee George W Blackwood - President 1975past presidents, george blackwood -
 Charlton Golden Grains Museum Inc
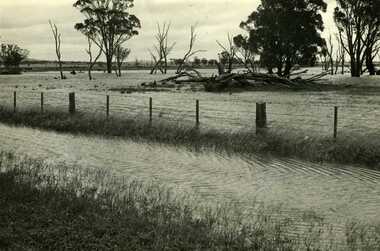
Photograph, Charlton Tribune, B/W photograph of 1971 flood, Nov 1971
B/W photograph of 1971 flood. Paddocks & roadside along Calder Highwayflood, charlton, calder highway -
 Bendigo Military Museum
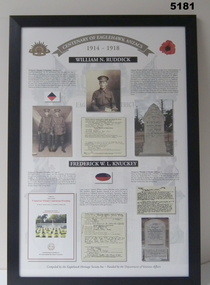
Memorabilia - CENTENARY of EAGLEHAWK ANZACS, FRAMED, Eaglehawk Heritage Society, WILLIAM N. RUDDICK / FREDERICK W. L. KNUCKEY, c2014
CORPORAL WILLIAM NICHOLAS RUDDICK, No 2112, 22nd Infantry Battalion, died in France 5/8/1916, aged 20 years. LANCE CORPORAL FREDERICK WILLIAM LAWRNCE KNUCKEY, No 66, 38th Infantry Battalion, drowned at sea 10/10/1918.Memorabilia - Framed story of two soldiers, in colour, using memorabilia of the soldiers and their lives, Printed on Paper. Frame - black extruded plastic, glass front, cardboard backing.WILLIAM N. RUDDICK / FREDERICK W. L. KNUCKEYframed items, anzacs, eaglehawk -
 Ringwood and District Historical Society
Photograph, W. Chivers (Armstrong Road) (undated)
Written on backing sheet, "W. Chivers (Armstrong Road)" -
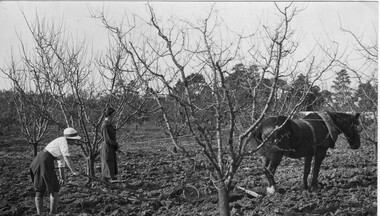 University of Melbourne, Burnley Campus Archives
Photograph - Black and white print, Students Ploughing in the W. Orchard, 1917
Black and white photograph. 2 female students with horse drawn plough in the West Orchard.On reverse, "Students ploughing in W. Orchard May 1917."female student, horse drawn plough, ploughing, orchard, 1917, west orchard -
Port Melbourne Historical & Preservation Society
Map, G S Williams, City Engineer, City of Port Melbourne, Dec 1963
Map of City of Port Melbourne (brick areas marked in colour), 1963.G. S. Williams (City Engineer)town planning, g s williams, troedel and cooper -
Tatura Irrigation & Wartime Camps Museum
Photograph - original, G. Haire photographer, 1946
Original photograph of grades V1 and V11 Tatura state School No. 1441. Copy L0253Black and white photograph of Tatura State School Group No. 1441. Original photographon back: Photographers name "G. Haire" -
Stawell Historical Society Inc
Map, G C Birch Mining Surveyor, Magdala Cum Moonlight Co. Plan of Stawell Goldfield, c1900
Shows Sloanes & Scotchmans Coy AreaShowing underground drives. c1900G C Birch Mining Surveyor mining, gold, map