Showing 1324 items matching "tram terminus"
-
 Ballarat Tramway Museum
Slide - 35mm slide/s - set of 8, Noel Simons, 25/02/1972 12:00:00 AM
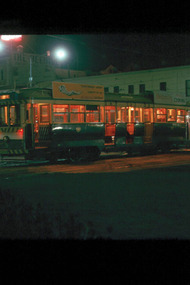
Set of 8 transparencies taken on 25/02/72 on Kodak mounts. 1202.1 - Night photo of Bendigo 5 at Charing Cross, waiting to depart to Quarry Hill. Tram has two SEC roof ads. Has Ezywalkin and the Beehive buildings in the background. 1202.2 - as for 1202.1 1202.3 - as for 1202.1 but further back and 7 and 21 waiting for their runs as well in Pall Mall. 1202.4 - 5 and 2 at Charing Cross, night photo, looking along Mitchell St. with Fountain Plaza on right of photo and Ezywalkin store. 1202.5 - No. 2 at Charing cross, bound for Eaglehawk. Tram has two SEC ads. 1202.6 - No. 26 at Quarry Hill terminus with the cemetery in the background. Tram has two SEC roof ads. 1202.7 - No. 26 in Mitchell St. bound for Eaglehawk, at Wills St. with the Hopetoun Hotel in the background. 1202.8 - as for 1202.6Information written on in blue ink and date stamped on purple ink. 1202.1 - "No. 5 at Charing Cross" 1202.2 - "No 5. at Charing Cross" 1202.3 - "Nos. 7, 21 and 5 at Charing Cross" 1202.4 - "Nos. 5 and 2 at Charing Cross" 1202.5 - "No. 2 at Charing Cross" 1202.6 - "No. 26 at Quarry Hill" 1202.7 - "No. 26 in Mitchell St. opposite Wills St." 1202.8 - "No. 26 at Quarry Hill" tramways, trams, bendigo, night photo, charing cross, quarry hill, mitchell st., tram 2, tram 5, tram 7, tram 21, tram 26 -
 Ballarat Tramway Museum
Slide - 35mm slide/s - set of 25, Noel Simons, 26/02/1972 12:00:00 AM
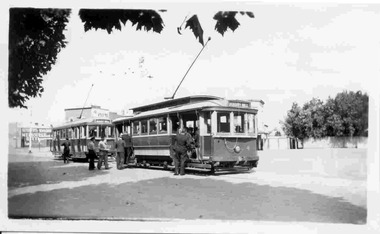
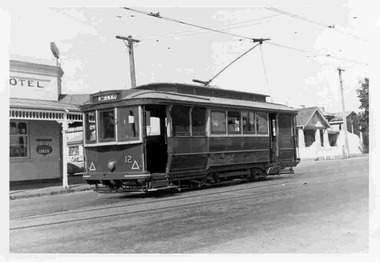
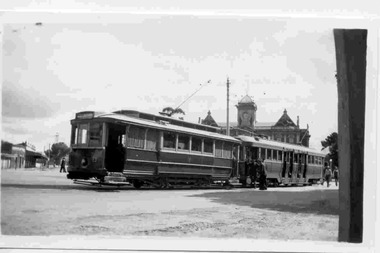
Set of 25 transparencies taken on 26/2/1972 on Kodak mounts. 1204.1 - Bendigo No. 5 - just arrived at Manchester Loop near Havilah Road, Long Gully. Photo taken after tram has passed photographer. 1204.2 - No. 26 in Backhaus St. Long Gully passing William St, en route to Quarry Hill. Photo taken after tram has passed photographer. 1204.3 - No. 5 climbing the High St. Hill Eaglehawk, heading for Quarry Hill with the buildings on the West side of High St. in the background, including the Eaglehawk Town Hall. 1204.4 - as for 1204.3, but tram close up. 1204.5 - as for 1204.3, but after tram has passed photographer. 1204.6 - No. 5 at intersection of Mt Korong Road Ironbark and Calder Highway, with the AMPOL service 'station in the background. Photo taken after tram has passed photographer. 1204.7 - No. 26 en route to Quarry Hill shortly after leaving Needle Loop, passing William St., Long Gully. 1204.8 - No. 5 at California Gully Loop, picking up a passenger, with the shops at Long Gully in the background. Photo taken after tram has passed photographer. 1204.9 - No. 5 in Long Gully, en route to Quarry Hill. Photo taken after tram has passed photographer. 1204.10 - No. 2 at Eaglehawk terminus with the Eaglehawk Town Hall and Post Office in the background. Tram has two SEC roof ads. 1204.11 - No. 2 at Eaglehawk terminus, close up. 1204.12 - as for 1204.11, but through the park gates. 1204.13 - as for 1204.11, but with tram stop shelters in the foreground and buildings on the West side of High St in the background. 1204.14 - No. 2 in Mt. Korong Rd, midway between California Gully Loop and Needle Loop. Photo taken after tram has passed photographer. 1204.15 - No. 5 in Long Gully, en route to Quarry Hill. 1204.16 - as for 1204.15, but with trams departed loop. Has an ESSO service station in the background. 1204.17 - No. 26 leaves Charing Cross up View St.. Photo taken after tram has passed photographer. Has Armstrong Tyre Service, Cohns Drinks ad on a building and the T&G building in the background. Also Firestone ads on the tyre service building. 1204.18 - No. 5 waits at Charing Cross with the Alexandra Fountain in the background. Tram has two SEC roof ads, 'Everything s fine in my all electric kitchen' and 'Electricity Best for Cooking'. Has RACV, Colonial Mutual Life buildings in the background and the planting areas around Charing Cross gardens in the foreground. 1204.19 - No. 21 en route to North Bendigo arrives at Charing Cross, with passengers waiting to board. No. 5 in the background. In the background is the Fountain Gate Plaza building and the City Family Hotel. 1204.20 - as for 1204.19, but with No. 7 en route to Golden Square. 1204.21 - as for 1204.19, but closer up. 1204.22 - as for 1204.18 1204.23 - No. 25 in Nolan St. near the crossing of Bendigo Creek, running a special tram tour. 1204.24 - No. 25 on a special charter, in Weeroona Ave. at Cnr of Caledonia St. passing the Gas works. 1204.25 - Nos. 25 (showing Golden Square), 7 and 26 at Charing Cross. Has fountain in the background.Information written on in blue ink and date stamped on purple ink. 1204.1 - "No. 5 at Manchester Loop, near Havilah Rd. Long Gully." 1204.2 - "No. 26 in Backhaus St. Long Gully passing William St." 1204.3 - "No. 5 in High St. Eaglehawk." 1204.4 - "No. 5 in High St. Eaglehawk." 1204.5 - "No. 5 in High St. Eaglehawk." 1204.6 - "No. 5 in Mt. Korong Rd., Ironbark, passing Calder Highway Junctn." 1204.7 - "No. 26 shortly after leaving Needle Loop, passing William St., Long Gully. No. 5 cresting hill in distance." 1204.8 - "No. 5 at California Gully Loop." 1204.9 - "No. 5 in Long Gully" 1204.10 - "No. 2 at Eaglehawk terminus." 1204.11 - "No. 2 at Eaglehawk terminus." 1204.12 - "No. 2 at Eaglehawk terminus." 1204.13 - "No. 2 at Eaglehawk terminus." 1204.14 - "No. 2 in Mt. Korong Rd, midway between California Gully Loop and Needle Loop. 1204.15 - "Nos. 2 and 26 crossing at Long Gully." 1204.16 - "No. 26 leaves Long Gully loop for Eaglehawk as No. 2 pulls out of the far end towards Bendigo" 1204.17 - "No. 26 beginning the climb up View St. from Charing Cross." 1204.18 - "No. 5 at Charing Cross." 1204.19 - "No 21 arrives at Charing Cross from Golden Square while No. 5 awaits departure time for Eaglehawk." 1204.20 - "Nos. 7, 21, and 2 (behind which is No. 5) at Charing Cross." 1204.21 - "Nos. 7, 21, and 2 at Charing Cross." 1204.22 - "No. 5 at Charing Cross." 1204.23 - "No. 25 in Nolan St. near Bendigo creek crossing" 1204.24 - "No. 25 in Weeroona Ave. at cnr of Caledonia St." 1204.25 - "Nos. 25, 7, 26 and 2 (behind 26) at Charing Cross."tramways, trams, bendigo, eaglehawk, long gully, california gully, charing cross, north bendigo, tram 2, tram 5, tram 7, tram 21, tram 25, tram 26 -
 Ballarat Tramway Museum
Slide - 35mm slide/s - set of 23, Noel Simons, 26/02/1972 12:00:00 AM
Set of 23 transparencies taken on 26/2/1972 on Kodak mounts. 1205.1 - Bendigo No. 25 on a special tour at Fire Station Loop, en route to Golden Square. 1205.2 - No. 21 and 25 crossing at Fire Station Loop, note photographers on the ground. No. 21 bound for North Bendigo. 1205.3 - as for 1205.3, but with trams departing loop and fire station in the background. 1205.4 - No. 25 at Golden Square Hotel with 'Rodda's Golden Square Hotel' in the background. Tram on a special tour, but showing destination of North Bendigo. 1205.5 - as for 1205.4 - but showing special. Has the end of the track in the photograph. 1205.6 - Nos. 7 and 25 (on a special tour) crossing at Myrtle St. Loop. 1205.7 - No. 7 leaving Myrtle St. loop with the mine poppet head in the background. Photo taken after tram has passed photographer. (Print made of this slide 10/2001 for use in the Gold Gold Gold exhibition of 10/2001 - See Reg. item 1979. 1205.8 - No. 25 entering depot. Tram showing 'special'. Tennis court on right has players. Photo taken after tram has passed photographer. 1205.9 - No. 24 (showing 'special') and No. 20 (showing 'Long Gully') at Bendigo Depot. 1205.10 - No. 24 on a special charter, leaving Bendigo depot. Tram has two 'Johnnie Walker' roof ads. 1205.11 - Bendigo depot with 29, 25 and a bogie car inside the depot doors. 1205.12 - As for 1205.11, but with 28 and 29. 1205.13 - No. 24 standing at front entrance of Bendigo depot with No. 20 in the background. 1205.14 - No. 24 running out into McCrae St showing special, with conductor on front step. 1205.15 - No. 24 in Caledonia St. at corner of Thunder St with the Gasworks in the background. 1205.16 - No. 5 en route for Quarry Hill at Charing cross with No. 26 (en route for Eaglehawk) about to arrive. Has former crossover at this location in the foreground. Has the Ezywalkin building in the background. 1205.17 - No. 5 and 26 at Charing Cross, with the Alexandra Fountain in the foreground and the Beehive and Ezywalkin buildings in the background. No.26 has two SEC roof ads. 1205.18 - Charing Cross looking along Pall Mall with trams 7 and 21 and 26 in the picture. 1205.19 - Charing Cross, with 21 departing for Golden Square and No. 5 heading for Quarry Hill. Has the Ezywalkin and the Beehive buildings in the background. 1205.20 - as for 1205.19, but a few moments later. Adjacent pole has a "NO ROAD" letter in reflectors vertically. 1205.21 - Charing Cross with Nos. 25, 21, 26 and 7, looking south from Pall Mall end. 1205.22 - No. 24 crossing Mitchell St. en route for Golden Square, showing 'special' with the Beehive and Ezywalkin buildings in the background. 1205.23 - Charing Cross with Nos. 24, 21 and 7 in the photo and Fountain Plaza in the background. Print of 1205.7 - stored in box D1.Information written on in blue ink and date stamped on purple ink. 1205.1 - "No. 25 at Fire Station Loop High Street, Golden Square." 1205.2 - "Nos. 25 and 21 crossing at Fire Station Loop, near Golden Square." 1205.3 - "Nos. 25 and 21 crossing at Fire Station Loop, near Golden Square." 1205.4 - "No. 25 at Golden Square terminus." 1205.5 - "No. 25 at Golden Square terminus." 1205.6 - "Nos. 7 and 25 crossing at Myrtle St. Loop." 1205.7 - "No. 7 leaving Myrtle St. Loop." 1205.8 - "No 25, entering Bendigo Depot." 1205.9 - "Nos. 20 and 24 at Bendigo Depot." 1205.10 - "No. 24 at Bendigo Depot." 1205.11 - "Nos. 25 and 29 at Bendigo Depot." 1205.12 - "Birney cars 29 and 28 at Bendigo Depot." 1205.13 - "No. 24 (with 20 beyond) at Bendigo Depot." 1205.14 - "No. 24 entering McCrae St. from Arnold St." 1204.15 - "No. 24 in Caledonia St. at cnr of Thunder St." 1204.16 - "No. 5 waits at Charing Cross as No. 26 arrives from Quarry Hill. Note remains of crossover abandoned on relocation in 1965." 1204.17 - "Nos. 5 and 26 at Charing Cross." 1204.18 - "Nos. 26, 7 and 21 at Charing Cross (No. 5 just visible behind No. 26)." 1204.19 - "No. 21 leaves Charing Cross for Golden Square as No. 5 starts off for Quarry Hill." 1204.20 - "No. 21 swings onto the single track Golden Square line as No. 5 heads into Mitchell St. towards Quarry Hill." 1204.21 - "Nos. 25, 21 and 26 watch No. 7 arrive at Charing Cross from Golden Square." 1204.22 - "No. 24 at Charing Cross crossing Mitchell St." 1204.23 - "Nos. 24, 21 and 7 at Charing Cross."tramways, trams, bendigo, golden square, myrtle st., fire station, depot, charing cross, tram 5, tram 7, tram 20, tram 21, tram 24, tram 25, tram 28, tram 29 -
 Ballarat Tramway Museum
Slide - 35mm slide/s - set of 4, Noel Simons, Apr. 1972
Set of 4 transparencies - copy slides - possibly ARE film strip dated March 1972. 1209.2 and 1209.4 on Kodak Readymount mounts. 1209.1 - Bendigo 5, 6 and 28 on a special tram service in bound to the City on a tour in Caledonia St. about to enter Lucan St, or White Hills Road or Weeroona Ave. (mis match in names in various maps). Gas works in the background. No. 5 has a white disk on the rear of the tram. 1209.2 - Nos 2 and 26 at Charing Cross with the Fountain Plaza in the background. Both trams have the destination of Quarry Hill, though 26 is on the Eaglehawk bound track. 1209.3 - No. 19 at the Golden Square terminus, with the conductor or driver swinging the pole and Billy Rodda's Golden Square hotel in the background. 1209.4 - No. 7 at Fire Station loop, en route to North Bendigo, picking up a passenger with a pram. Part of a set of 20 slides made by the Association of Railway Enthusiast Provincial Tramways film strip. Reference Item 2560 details the ARE Film Strip and provide references to other slides.Information written on in blue ink and date stamped on purple ink. 1209.1 - "Nos 5, 6 and 28 in Caledonia St. about to enter Weeroona Ave." 1209.2 - "Nos 2 and 26 at Charing Cross." 1209.3 - "Swinging the pole on No. 19 at Golden Square Terminus." 1209.4 - "No. 7 inward bound from Golden Square stops at Fire Station Loop."tramways, trams, bendigo, charing cross, golden square, gas works, special trams, tram 2, tram 5, tram 6, tram 7, tram 19, tram 28 -
 Ballarat Tramway Museum
Slide - 35mm slide/s - set of 4, Noel Simons, Apr. 1972
Set of 4 transparencies - copy slides - possibly ARE film strip dated April 1972. 1210.3 on Kodak Readymount mount. 1210.1 - No. 3 arriving at Quarry Hill terminus. 1210.2 - Bogie car at Long Gully Loop, in the far distance, with a Hotel and the ESSO service station in between. Has Fosters Lager and Carlton signs on hotel. Note sign on the closet pole - "No standing between Notices" 1210.3 - Nos. 26 (Quarry Hill) and 25 (Eaglehawk) at Jobs Gully Loop. 1201.4 - No. 5 showing Charing Cross in bound for Charing Cross and No. 3 en route for Eaglehawk in View St. near the end of the double track. Appears to be SEC employee at the rear of No. 3. Part of a set of 20 slides made by the Association of Railway Enthusiast Provincial Tramways film strip. Reference Item 2560 details the ARE Film Strip and provide references to other slides.Information written on in blue ink and date stamped on purple ink. 1210.1 - "No. 3 arriving at Quarry Hill terminus." 1210.2 - "Bogie car at Long Gully Loop." 1210.3 - "Nos. 26 and 25 at Jobs Gully Loop." 1210.4 - "Nos 5 and 3 in View St. near the end of the double track."tramways, trams, bendigo, long gully, quarry hill, view st., tram 3, tram 5, tram 25, tram 26 -
 Ballarat Tramway Museum
Photograph - Black & White Photograph/s, David Endacott, 14/08/1971 12:00:00 AM
Black and white photograph and negative of the timetable board and CARS STOP HERE" sign on the pole at the Sebastopol terminus, with the Royal Hotel and Fosters Lager sign in the background. See item No. 29 for the sign itself. Assumed photo taken 14 August 1971. Duplicate print (1268A) by John Phillips 12/1999. Large copy print added 5/2001. Original neg scanned at hi res and updated 11/5/2020.trams, tramways, sebastopol, royal hotel, signs -
 Ballarat Tramway Museum
Photograph - Colour print of donated negatives - set of 8, Ron E. Fluck, 27/01/1979 12:00:00 AM
... negatives featuring photographs of trams taken by Ron Fluck... - NN255 - W2 234 at Batman Ave terminus - one of the trams painted ...Set of 8 colour laser printed copies of colour 35mm negatives featuring photographs of trams taken by Ron Fluck in Melbourne on 27/1/1979 and 28/1/1979 (1758.6 and 1758.7). 1758.1 - (Negative No. 251) - W2 340 at Airport West terminus. Sleepered track section on inbound track - must have been running single line at the time, following changeover to new terminus from Essendon Airport to Airport west. 1758.2 - NN253 - Z16 at Wattle Park terminus. 1758.3 - NN252 - VR 700 at Footscray terminus. 1758.4 - NN250 - W2 340 enroute to the Airport West terminus. New freeway arrangement being constructed on the left hand side of the tramway. 1758.5 - NN254 - Z1 11 at East Burwood Terminus 1758.6 - NN255 - W2 234 at Batman Ave terminus - one of the trams painted in "Transporting Art Program" 1758.7 - NN256 - W2 234 and SW6 912 at Batman Ave terminus. 1758.8 - NN257 - Z1 88 and W5 726 at corner of Bourke and Spencer St. Melbourne, with the Mail Exchange in the background. See Destination City 5th Editionmelbourne, essendon airport, princes bridge, footscray, east burwood, wattle park, transporting art, tram 11, tram 234, tram 340, tram 700, tram 16, tram 726, tram 88, tram 912 -
 Ballarat Tramway Museum
Photograph - Colour Photograph/s - set of 15', Austin Brehaut, 1/04/2000 12:00:00 AM
Yields information about various locations in Ballarat in March 2000 for comparison with previous photographs.Set of 15 colour photographs taken by Austin Brehaut in April 2000 showing various locations that Ballarat trams once ran in, for use in a BTM presentation, named "Ballarat Past and Present" at the COTMA 2000 Ballarat Conference. All on Fujicolour Crystal Archive Paper. On rear in blue ink is the date, location and where relevant a reference number to photo locations that the author of the presentation had requested. Letter from Austin, filed with this worksheet. 1772.1 - Sebastopol terminus, 4/4/2000 .2 - Albert St. Sebastopol near "crossover" - 4/4/2000 .3 - Old depot site, 5/4/2000 .4 - From depot site at Depot junction - 5/4/2000 .5 - Albert St. Sebastopol, looking south above loop site - 5/4/2000 .6 - Mt. Pleasant line, in Barkly St. towards terminus - 5/4/2000 .7 - Mt. Pleasant terminus, Cobden Cnr. - 5/4/2000 .8 - Wendouree Parade at Macarthur St. - 5/4/2000 .9 - Site of old Power Station Cnr Ripon St. Wendouree Parade .10 - Sturt St. at Dawson St (site of crossover) towards former Golden City Hotel - 6/4/2000 .11 - From Grenville St - up Sturt St. hill - 6/4/2000 .12 - Lower Sturt St. toward Grenville St - 6/4/2000 .13 - Railway Station from Signal box - 27/4/2000 .14 - Lower Sturt St. toward Grenville St - 6/4/2000 .15 - Railway Station from Signal box - 27/4/2000 For 2010 comparisons see 4645 and 4646. See Aboveballarat, sebastopol, albert st, sec depot, railway station, mt pleasant, dawson st, sturt st -
 Ballarat Tramway Museum
Postcard - Illustration/s, McCarron Bird, MMTB tram postcards
Set of nine of printed illustrations - postcard size of Melbourne and Metropolitan Tramways Board Tramcars produced in 1978. Separate card for each class of tramcar featured, with notes, statistics, MMTB name. Each card also has printers name and date on back. Not a formal postcard, no place for a stamp. 1810.1 - X1 - 465 with 466 in background. Photographed at Footscray station terminus, c1962. 465 has destination of "Ballarat Rd." 1810.2 - Z7 in Victoria Parade, c1975 - has destination of "West Preston - Regent St." and route number "13". 1810.3 - Cable car set (No. 1) - photographed at Preston Workshops 1810.4 - L104 - showing destination of Carnegie and route number 67. 1810.5 - Y469 - showing destination of "Wattle Park - Elgar Road", possibly with Wattle Park in background. 1810.6 - T180 - showing "Special", while on a charter. 1810.7 - W7 1022 - showing destination "West Preston", route 11, freshly painted. 1810.8 - X2676 - freshly painted. 1810.9 - W2511 - fitted with marker lights, freshly painted, showing "City" - route 11. Cards 8 and 9 added 9/3/2018 from Donation of John Ruyg. trams, tramways, melbourne, mmtb, tramcars -
 Ballarat Tramway Museum
Photograph - Colour Photograph/s set of 2, John Biele, 29/01/1984 12:00:00 AM
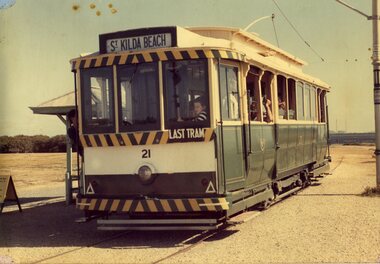
... terminus, South Australia. Tram has destination of "St Kilda.... Kilda Beach terminus, South Australia. Tram has destination ...Yields information about an ex Ballarat tram in a Museum where it was operable.Colour Photograph of ex SEC Ballarat No. 21 at the Australian Electric Traction Museum's line at St. Kilda Beach terminus, South Australia. Tram has destination of "St Kilda Beach" and auxiliary board "Last Tram", indicating last tram of the day back to the depot. On right hand side is a pole showing "Cars stop here" and other related signs. In background is the AETM's St. Kilda Beach terminus shelter. Photo on Fujichrome paper. Record updated 16-11-2013 for details of photographer and date - John Biele - 29-1-1984. 1822.1 - Similar image with an AETM worker alongside.aetm, st kilda, sec, museums, tram 21 -
 Ballarat Tramway Museum
Photograph - Colour Photograph/s set of 2, John Biele, 29/01/1984 12:00:00 AM
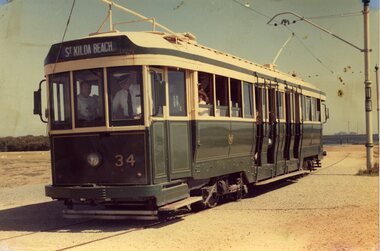
... terminus, South Australia. Tram has destination of "St Kilda Beach.... Kilda Beach terminus, South Australia. Tram has destination ...Yields information about an ex Ballarat tram in a Museum where it was operable.Colour Photograph of ex SEC Ballarat No. 34 at the Australian Electric Traction Museum's line at St. Kilda Beach terminus, South Australia. Tram has destination of "St Kilda Beach". On right hand side is a pole showing "Cars stop here" and other related signs. Photo on Fujichrome paper. Record updated 16-11-2013 for details of photographer and date - John Biele - 29-1-1984. 1823.1 - tramcar outside the AETM depot.aetm, st kilda, sec, museums, tram 34 -
 Ballarat Tramway Museum
Photograph - Colour Photograph/s, Tramway Museum Society of Victoria (TMSV), 1964
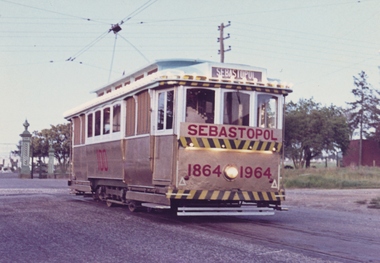
... at the Lydiard St. North terminus during 1964. Tram has destination... terminus during 1964. Tram has destination of 'Sebastopol', head ...Colour photograph of Ballarat No. 18, painted in Gold for the Centenary of the discovery of Gold in Sebastopol in 1864 at the Lydiard St. North terminus during 1964. Tram has destination of 'Sebastopol', head lights and marker lights turned ready for departure from the terminus. Sides painted in Gold, with white around windows and roof, and lettering in red paint. TMSV photograph. On Agfa paper. Copy made Oct. 2001 for the "gold, Gold GOLD" temporary exhibition - colour laser print onto card, with Velcro dots on rear. Stored in box D1 (Display Box) 02/2003. See Destination EaglehawkStamp on rear, purple ink ' Copyright by the Tramway Museum Society of Victoria Ltd"gold, sebastopol, lydiard st. north, centenary tram, tram 18 -
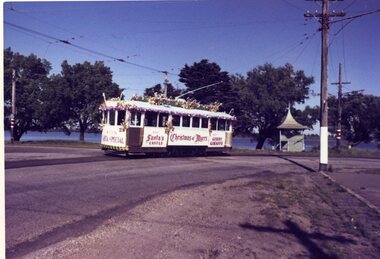 Ballarat Tramway Museum
Photograph - Colour Photograph/s, Tramway Museum Society of Victoria (TMSV), 1964
Colour photograph of Ballarat SEC No. 18 decorated for the 1964 Myers Christmas Tram. Photographed at the corner of Macarthur St and Wendouree Parade. Date and tram number advised by Alan Bradley 15/3/03. Tram partially painted white - windows and roof, but not possibly the sides or the front dash - and decorated with Christmas decorations and advertising boards on ends and sides of the tram, advertising Christmas at Myers, Santa's Castle and Gerry Giraffe. Photographed with tram turning from Wendouree Parade into Macarthur St. with the View Point terminus shelter in the background.On rear stamped in purple ink "Copyright by the Tramway Museum Society of Victoria Ltd."myers, decorated trams, macarthur st, view point, christmas trams -
 Ballarat Tramway Museum
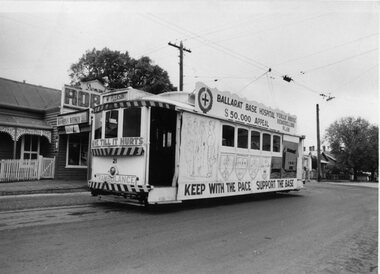
Photograph - Black & White Photograph/s, B. Prentice, 13/05/1969 12:00:00 AM
Black and white photograph of SEC Ballarat No. 21 decorated as the Ballarat Base Hospital's Trambulance in support of the Hospital's Yuille House Remodelling Plan, $50,000 appeal. Photographed by Bob Prentice at the Mt. Pleasant terminus on 13/5/1969. Tram is painted white - based on the Myer's Christmas tram of 1968 (See Reg. Item 1881) and the 1969 Begonia Festival (See Reg. Item 1886). Tram has destination of "Mt Pleasant", a sign under the driver's windows "Give till it hurts" and under the headlight "TRAMBULANCE". On the side of the tram has various images related to the hospital, roof advertisement board "Ballarat Base Hospital $50,000 Appeal - Yuille House Remodelling Plan" and on the base of the sides "Keep with the Pace Support the Base" sign. In the background at the terminus is the Mt. Pleasant Milk Bar shop. Has part of the Robur Tea sign visible and the Women's Weekly sign.On rear in black ink "Hospital Appeal / Decorated Tram No. 21 / at Mount Pleasant terminus / Wednesday 13th May 1969 / {R H Prentice Photo}"trams, tramways, base hospital, decorated trams, mt pleasant, appeals, tram 21 -
 Ballarat Tramway Museum
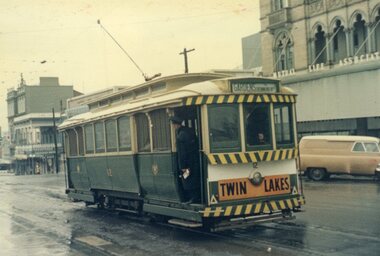
Photograph - Colour Photograph/s, late 1960's or early 1970's
Colour photograph of Ballarat SEC No. 12 standing at the City terminus (Sturt and Lydiard Sts.) during the late 1960's or early 1970's. Tram showing destination of 'Gardens via Drummond Nth' and has a 'Twin Lakes' sign on the front of the tramcar under the headlight. In the background are buildings on the south side of Sturt St. including the Mutual Life Association building. Photograph taken on a wet day with all weather blinds drawn. Has Conductor leaning out, with driver appearing ready to start. On Kodak paperlydiard st, sturt st, twin lakes, tram 12 -
 Ballarat Tramway Museum
Photograph - Black & White Photograph/s, Travis Jeffrey, late 1950's early 1960's
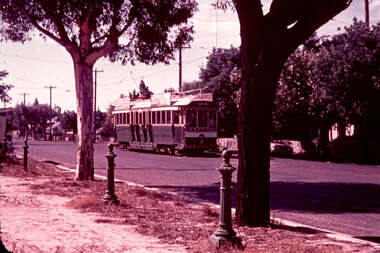
Black and white photograph of MMTB X2 675 at the Point Ormond terminus, late 1950's or early 1960's. Tram has destination of "Elsternwick Rly Stn". Driver/Conductor standing in doorway with cash bag. Pan in the trolley wire to assist drivers to locate the wire at night can be seen in the photograph. On Ilford paper. See Page 30 of Destination City, 5th Edition, advises that X2 675 withdrawn and stored in July 1961.Stamped on rear "Photo by C. Jeffrey Quote ....." in purple ink - words in triangular form.trams, tramways, point ormond, x2 class, mmtb, elsternwick, tram 675 -
 Ballarat Tramway Museum
Album - Photo Album, Keith Kings, Jul. 1970
Album comprises heavy cardboard covers with brown Rexene covers, with inside papers of heavy dark grey photo album paper, 36 leaves of dark grey photo paper and two brass interscrews within black grommets. See Condition Details re damage to back cover. Album contains 32 photos - personal prints of Keith Kings. Title page has been hand written to Les Denmead, dated 6/7/1970, thanking Mr. Denmead for his assistance over the years. Photos divided into the three SEC Provincial Tramway cities, each with a typed name proceeding the set of photos. Two further photos of Geelong were at the rear of the album, but were not in position when catalogued. One of these photos may be Reg. Item 1874 - photo of Geelong scrubber tram. Each of the photographs have been separately registered, as shown in the table below. Scanned images made of front and back of the photos. Back has Keith Kings ID number, description, notes and date of photo. Conservation Notes prepared - within the cataloguing sheet - see related documents. Folio Reg. Notes Item No. 1 Handwritten note to Mr. L. J. Denmead from Keith Kings. 2 Title sheet – “BALLARAT” 3 1903 Small photo of SEC Monogram from Geelong No. 1 1904 Photo of SEC plaques etc at Wendouree office 4 1905 Photo of front of Wendouree Parade depot – 1957 - with trams 40 and 25 in photo. 5 1906 Photo of Ballarat 23 at depot 6 1907 Photo of Ballarat 29 in depot. 7 1908 Photo of Ballarat 17 in Wendouree Parade 8 1909 Photo of Ballarat 21 at depot. 9 1910 Photo of Ballarat 15 and 31 in Sturt St. 10 1911 Photo of Ballarat No. 40 Sturt St. 11 1912 Photo of Ballarat No. 38 – Wendouree Parade 12 1913 Photo of Scrubber car in depot. 13 Title sheet – “BENDIGO” 14 1914 Photo of Bendigo depot 15 1915 Photo of Bendigo No. 17, 1949. 16 1916 Photo of Bendigo 22 and 4 at Eaglehawk. 17 1917 Photo of Bendigo 12 at Golden Square. 18 1918 Photo of Bendigo 13 and 26 at Eaglehawk terminus. 19 1919 Photo of Bendigo 17 (bogie) at Quarry Hill terminus. 20 1920 Photo of Bendigo 18 at Charing Cross 21 1921 Photo of Bendigo Birneys 28 and 29 at Charing Cross 22 1922 Photo of original sprinkler and track cleaning car in Bendigo depot 23 1923 Photo of Bendigo 2nd track cleaning car 24. 1924 Photo of trams at Manchester Loop, 1958. 25. Title sheet – “GEELONG” 26 1925 Photo of Geelong 19 in front of the depot. 27 1926 Photo of Geelong depot 28 1927 Photo of Geelong No. 3 at East terminus 29 1928 Photo of Geelong No. 23 outside depot. 30 1929 Photo of Geelong No. 16 at Eastern Park terminus. 31 1930 Photo of Geelong No. 28 at depot 32 1931 Photo of Geelong Birney No. 14 at Eastern Park terminus. 33 1932 Photo of Geelong No. 32 at Moorabool St. 34 1933 Photo of Geelong No. 37 outside depot 35 1934 Photo of Geelong No. 39 at West terminus 36. No photo – marks of four corners remained. 37 – back cover No photo – marks of four corners remained. Photos not to be taken out of the album unless for photographic copying. Use image files. Photo Album - The Commercial Photo Album - No. 1 - 36 leaves. See hand written note from Keith Kings to Mr. L. J. Denmead. Dated 6/7/70.trams, tramways, ballarat, bendigo, geelong, photo album -
 Ballarat Tramway Museum
Photograph - Black & White Photograph/s, Keith Kings, Apr. 1949
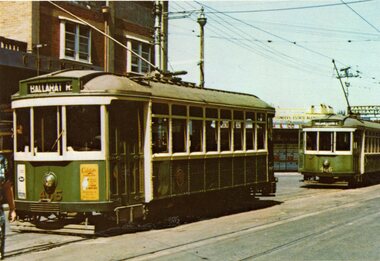
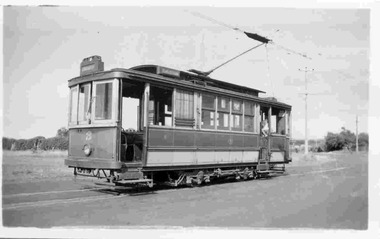
Black and White photograph contained with Reg. Item 1902 - Photo Album from Keith Kings to Les Denmead 1970. Photograph of SEC Bendigo trams 22 and 4 at the Eaglehawk terminus, Easter Monday April 1949. Notes as both cars in "unaltered" condition. Keith Kings No. B(z)(1) Scanning: i - image file, p - presentation file, b - back of photograph. Has buildings at terminus in background, with Plume and Melbourne Bitter beer signs.Stamp in top left hand corner and handwritten number with "K.S. Kings No. B(z)(1) Copyright reserved". In blue ink "Bendigo / No. 22 - unaltered closed combination car / No. 4 - unaltered open combination car. / Eaglehawk terminus / Easter Monday, 4/49"trams, tramways, eaglehawk, bendigo, tram 22, tram 4 -
 Ballarat Tramway Museum
Photograph - Black & White Photograph/s, Keith Kings, 7/03/1958 12:00:00 AM
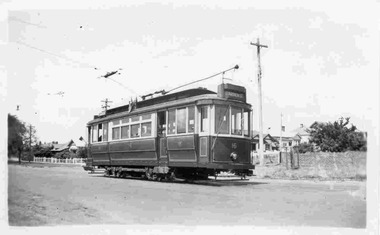
Black and White photograph contained with Reg. Item 1902 - Photo Album from Keith Kings to Les Denmead 1970. Photograph of SEC Bendigo tram No. 12 at Golden Square terminus with the Golden Square hotel in the background. Has a "Fosters Lager sign" on the wall. Tram has destination of "Nth Bendigo". Photo taken 7/3/1958. Keith Kings No. A(d)(15) Scanning: i - image file, p - presentation file, b - back of photograph.Stamp in top left hand corner and handwritten number with "K.S. Kings No. A(d)(15) Copyright reserved". In blue ink "Bendigo / No.12 / As converted for "One Man" operation / Golden Square terminus 7/3/58"trams, tramways, golden square, bendigo, tram 12 -
 Ballarat Tramway Museum
Photograph - Black & White Photograph/s, Keith Kings, Apr. 1950
Black and White photograph contained with Reg. Item 1902 - Photo Album from Keith Kings to Les Denmead 1970. Photograph of SEC Bendigo trams No.13 and 26 at the Eaglehawk terminus, Easter Saturday, April 1950. Has Eaglehawk town hall in the background. Keith Kings No. D(k)(5) Scanning: i - image file, p - presentation file, b - back of photograph.Stamp in top left hand corner and handwritten number with "K.S. Kings No. D(k)(5)) Copyright reserved". In blue ink "Bendigo / No.13 - converted for "one Man" operation on the "Ballarat " style. / No. 26 / Eaglehawk terminus / Easter Saturday, 4/50".trams, tramways, bendigo, eaglehawk, tram 13, tram 26 -
 Ballarat Tramway Museum
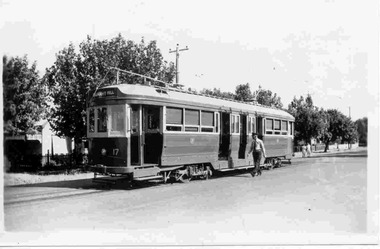
Photograph - Black & White Photograph/s - set of 2, Keith Kings, 9/01/1952 12:00:00 AM
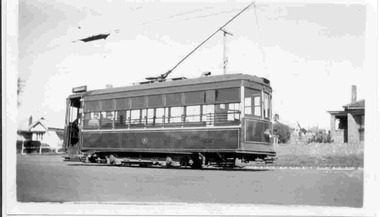
Black and White photograph contained with Reg. Item 1902 - Photo Album from Keith Kings to Les Denmead 1970. Photograph of SEC Bendigo tram 17 at the Quarry Hill terminus. Date of photo 9/1/1952. Tram showing destination of Quarry Hill. Has driver walking alongside the tram. Keith Kings No. F(k)(3) Scanning: i - image file, p - presentation file, b - back of photograph. 1919.1 - Black and White print contained within the Wal Jack Bendigo and Geelong Album, see Reg Item 5003 for more details. Added 10/7/2013.Stamp in top left hand corner and handwritten number with "K.S. Kings No. F(k)(3) Copyright reserved". In blue ink "Bendigo / No.17 / Quarry Hill terminus / 9/1/52". .1 - has the additional words "ex Melbourne C-44"trams, tramways, bendigo, quarry hill, tram 17 -
 Ballarat Tramway Museum
Photograph - Black & White Photograph/s, Keith Kings, Feb. 1951
... of SEC Geelong, No 3 at East terminus, Feb. 1951. Tram has.... Photograph of SEC Geelong, No 3 at East terminus, Feb. 1951. Tram has ...Black and White photograph contained with Reg. Item 1902 - Photo Album from Keith Kings to Les Denmead 1970. Photograph of SEC Geelong, No 3 at East terminus, Feb. 1951. Tram has destination of "Chilwell" at the front and "East" on the side. No buildings in the background of the photo. Keith Kings No. E(q)(3) Scanning: i - image file, p - presentation file, b - back of photograph.Stamp in top left hand corner and handwritten number with "K.S. Kings No. E(q)(3) Copyright reserved". In blue ink "Geelong / No. 3, as converted for "one-man" operation / East Terminus 2/51".trams, tramways, geelong, east, tram 3 -
 Ballarat Tramway Museum
Photograph - Black & White Photograph/s - set of 2, Keith Kings, 6/03/1954 12:00:00 AM
Black and White photograph contained with Reg. Item 1902 - Photo Album from Keith Kings to Les Denmead 1970. Photograph of SEC Geelong, No 16 at the Eastern Park terminus on 6/3/1954. Tram showing destination of "Garden St" Keith Kings No. I(x)(8) Scanning: i - image file, p - presentation file, b - back of photograph. 1929.1 - same photograph from the Wal Jack album, see Reg Item 5003, added 12/8/2013.Stamp in top left hand corner and handwritten number with "K.S. Kings No. I(x)(8) Copyright reserved". In blue ink "Geelong / No. 16 / "Pengelley" car as converted for "one-man" operation / Eastern Park terminus 6/3/54". 1929.1 - Stamp in top left hand corner and handwritten number with "K.S. Kings No. I(x)(viii) Copyright reserved". In blue ink "Geelong / No. 16 at Eastern Park terminus Royal visit day. / Note: Flags on roof."trams, tramways, geelong, eastern park, tram 16 -
 Ballarat Tramway Museum
Photograph - Black & White Photograph/s, Keith Kings, 28/08/1948 12:00:00 AM
Black and White photograph contained with Reg. Item 1902 - Photo Album from Keith Kings to Les Denmead 1970. Photograph of SEC Geelong, No 14 at the Eastern Park terminus, 28/8/1948. Has some houses in the background. Keith Kings No. B(m)(6) Scanning: i - image file, p - presentation file, b - back of photograph.Stamp in top left hand corner and handwritten number with "K.S. Kings No. B(m)(6) Copyright reserved". In blue ink "Geelong / No. 14 / Birney Safety Car / Eastern Park Terminus / 28/8/48"trams, tramways, geelong, eastern park, tram 14 -
 Ballarat Tramway Museum
Photograph - Black & White Photograph/s, Keith Kings, 8/01/1955 12:00:00 AM
Black and White photograph contained with Reg. Item 1902 - Photo Album from Keith Kings to Les Denmead 1970. Photograph of SEC Geelong, 39 at West terminus. Date of photograph 8/1/1955. Tram has destination of "EAST". Keith Kings No. L(k)(8) Scanning: i - image file, p - presentation file, b - back of photograph.Stamp in top left hand corner and handwritten number with "K.S. Kings No. L(k)(8) Copyright reserved". In blue ink "Geelong / No. 39 / As converted for "one-man" operation. / West terminus 8/1/55."trams, tramways, geelong, west, tram 39 -
 Ballarat Tramway Museum
Photograph - B&W print of donated negative, 23/07/1944 12:00:00 AM
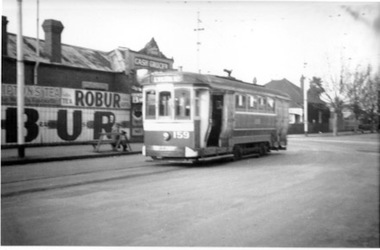
Black and white print of a donated negative. Print made 8/1998. Photo of a MMTB S class car 159 at the Holden St shuttle terminus at the corner of St. Georges Road and Barkly St, Fitzroy North, showing destination of "Lygon St." Has a "Cash Grocer" store in the background with advertisements for Robur Tea and Lipton's Tea. Photo part of Ron Fluck collection, taken 23-7-1944. Has large white strip under the driver's windows above the headlight and white splashes on the front bumper bar. High Res scan of negative added 17/1/2019 see image i1. tramways, trams, melbourne, 159, holden st. shuttle, north fitzroy, tram 159 -
 Ballarat Tramway Museum
Photograph - Illustration/s, Grenville St. and Sturt St. Ballarat
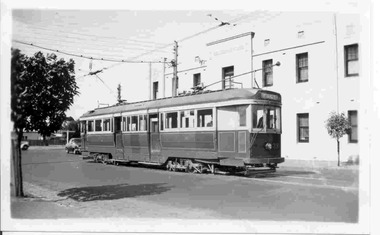
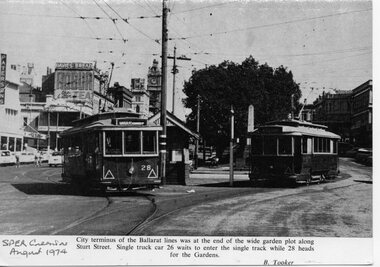
Black and white illustration from the South Pacific Electric Railway Co-op (Sydney Tramway Museum) - Aug. 1974 calendar of Ballarat trams 26 and 28 at the intersection of Grenville St. and Sturt St. Tram 28 proceeding to the Gardens via Drummond St., while 26 waits for 28 to clear and proceed to what appears on the destination to be Mt. Pleasant. Photo undated, but prior to the fitting of marker lights on the drivers canopy window sills - during the 1950's. Photo caption mentions that this was the City terminus of the system - incorrect during the SEC operational days. Photo by B. Tooker. Has buildings on either side of Sturt St. in background.On bottom right hand corner "SPER Calendar Aug. 1974"trams, tramways, ballarat, sturt st., grenville st. -
 Ballarat Tramway Museum
Photograph - Black & White Photograph/s, 1930's
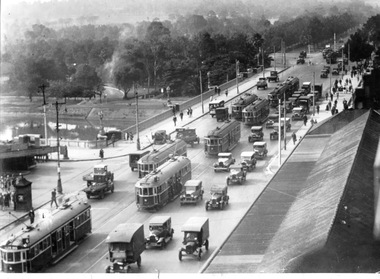
... terminus. Can see a tram trolley pole of a tram in Batman Avenue... Parade Ballarat Ballarat goldfields trams tramways Melbourne ...Black and white photo going to sepia toned, of about 11 W2's and many motor vehicles on Princes Bridge Melbourne, taken from the tower on Flinders Street station building, during the late 1930's. Many people on bridge, traffic jam of motor vehicles on the bridge itself. Note buildings at the Batman avenue terminus. Can see a tram trolley pole of a tram in Batman Avenue. No curve from Batman Ave. into Swanston St. At least two of the trams do not have route number boxes. There are a number of delivery vehicles in the photograph, but no horse drawn vehicles are to be seen.trams, tramways, melbourne, princes bridge, flinders st. station, batman ave., tram 321 -
 Ballarat Tramway Museum
Book, Alan Bradley, "Law and Order on the Trams" - CHHA Journal, Oct. 1998
Four page article titled "Law and Order on the Trams" contained within the Central Highlands Historical Association Journal No. 5, written by BTM Board Member, Alan Bradley, accompanied by 5 photographs of Ballarat operations: p26 - street scene of Sturt St. and Grenville St. intersection prior to 1923, p31 - 2 half page photographs by David Endacott of last trams to Sebastopol - 19/10/1971 and on rear cover, two colour photos of trams taken during the last months of operations, from collection of David Endacott. No. 11 at Sturt St. - City terminus and No. 30 in Lydiard St. Nth. outside Art Gallery. Journal is 64 pages, with card covers, perfect bound, with articles, contents listing, index and various listings of CHHA members, book reviews, research in Progress. Has colour covers. Added to worksheet file - printed original of article - 7No. A4 sheets.trams, tramways, tramway closure, law and order, police, ballarat tramways -
 Ballarat Tramway Museum
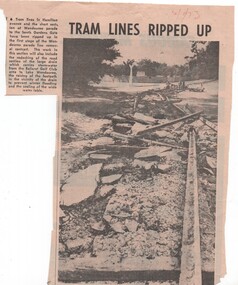
Newspaper, The Courier Ballarat, "Tram Lines ripped up", 14/01/1973 12:00:00 AM
Newspaper clipping from The Courier, 14/1/1973 - photo of tram lines being ripped up between the end of the Carlton St. terminus in Wendouree Parade and Hamilton Ave. The Olympic monument in the background. Has a small caption about the work going on with the photograph.date in red ink of "14/1/73" in top right hand corner of cutting.trams, tramways, wendouree parade, track removal, carlton st.