Showing 744 items
matching timetables
-
 Kew Historical Society Inc
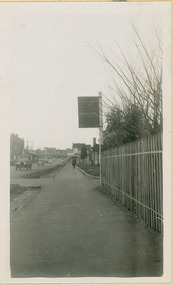
Photograph - Kew Branch Line : The Hawthorn Grove crossing, August 1952
The Kew railway was opened in 1887, and diverged from the main (Box Hill–Lilydale) line about half-way between Hawthorn and Glenferrie. From the point of divergence the line was slightly less than one mile long, and it had only one intermediate station — Barker. There were four road over-bridges and two level crossings, including one over the busy Barkers Road. The line supported a passenger and goods service, and was electrified in December 1922, at the same time as the main line to Box Hill. There were a number of peak hour services which ran from Flinders Street station (Melbourne) to Kew, but in 1938 all but one of these were diverted to the Ashburton line, where traffic was growing. This had an adverse effect on Kew traffic, as passengers from Kew needed to cross over a footbridge at Hawthorn to change trains, and the main line trains were usually already crowded by the time they reached Hawthorn. At about the same time the off-peak trains were replaced by road buses. In 1952 all passenger trains were withdrawn, but the road bus service continued for many years. Goods trains were finally withdrawn in 1957, and the railway was dismantled in 1958-59. (Source: Frank Stamford, 'The Hawthorn - Kew Railway')Small black and white snapshot of the Hawthorn Grove crossing, August 1952. The photograph, one of 12, is part of a larger album of newspaper clippings, timetables, tickets and photos relating to the Kew Railway Line, taken and compiled by Lachlan Richardson, while a resident of Kew. The album dates from the 1950s. The album is part of a larger subject file on the Kew Line, compiled over time by members of the Kew Historical Society.kew railway line, transport -- railways -- kew (vic.), kew branch line, hawthorn grove -- hawthorn (vic.), railway crossings -
 Kew Historical Society Inc
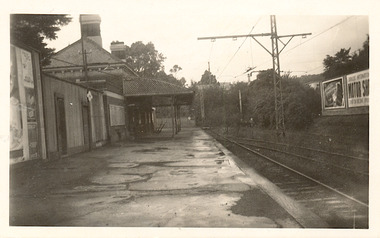
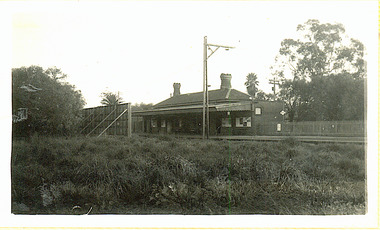
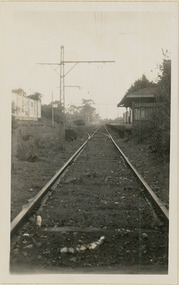
Photograph - Kew Railway Station, May 1950
The Kew railway was opened in 1887, and diverged from the main (Box Hill–Lilydale) line about half-way between Hawthorn and Glenferrie. From the point of divergence the line was slightly less than one mile long, and it had only one intermediate station — Barker. There were four road over-bridges and two level crossings, including one over the busy Barkers Road. The line supported a passenger and goods service, and was electrified in December 1922, at the same time as the main line to Box Hill. There were a number of peak hour services which ran from Flinders Street station (Melbourne) to Kew, but in 1938 all but one of these were diverted to the Ashburton line, where traffic was growing. This had an adverse effect on Kew traffic, as passengers from Kew needed to cross over a footbridge at Hawthorn to change trains, and the main line trains were usually already crowded by the time they reached Hawthorn. At about the same time the off-peak trains were replaced by road buses. In 1952 all passenger trains were withdrawn, but the road bus service continued for many years. Goods trains were finally withdrawn in 1957, and the railway was dismantled in 1958-59. (Source: Frank Stamford, 'The Hawthorn - Kew Railway')Small black and white snapshot of Kew Railway Station inMay 1950. The photograph, one of 12, is part of a larger album of newspaper clippings, timetables, tickets and photos relating to the Kew Railway Line, taken and compiled by Lachlan Richardson, while a resident of Kew. The album dates from the 1950s. The album is part of a larger subject file on the Kew Line, compiled over time by members of the Kew Historical Society."Kew Railway Station, May 1950"kew railway line, transport -- railways -- kew (vic.), kew branch line, kew railway station -
 Kew Historical Society Inc
Photograph - Kew Railway Station, 1951
The Kew railway was opened in 1887, and diverged from the main (Box Hill–Lilydale) line about half-way between Hawthorn and Glenferrie. From the point of divergence the line was slightly less than one mile long, and it had only one intermediate station — Barker. There were four road over-bridges and two level crossings, including one over the busy Barkers Road. The line supported a passenger and goods service, and was electrified in December 1922, at the same time as the main line to Box Hill. There were a number of peak hour services which ran from Flinders Street station (Melbourne) to Kew, but in 1938 all but one of these were diverted to the Ashburton line, where traffic was growing. This had an adverse effect on Kew traffic, as passengers from Kew needed to cross over a footbridge at Hawthorn to change trains, and the main line trains were usually already crowded by the time they reached Hawthorn. At about the same time the off-peak trains were replaced by road buses. In 1952 all passenger trains were withdrawn, but the road bus service continued for many years. Goods trains were finally withdrawn in 1957, and the railway was dismantled in 1958-59. (Source: Frank Stamford, 'The Hawthorn - Kew Railway')Small black and white snapshot of Kew Railway Station in 1950. The photograph, one of 12, is part of a larger album of newspaper clippings, timetables, tickets and photos relating to the Kew Railway Line, taken and compiled by Lachlan Richardson, while a resident of Kew. The album dates from the 1950s. The album is part of a larger subject file on the Kew Line, compiled over time by members of the Kew Historical Society."Kew Station / 14/51 / 22/4/51 F5"kew railway line, transport -- railways -- kew (vic.), kew branch line, kew railway station -
 Ballarat Tramway Museum
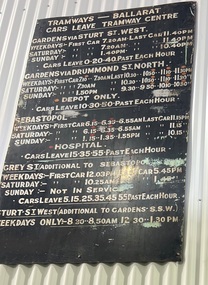
Sign - Timetable Board, State Electricity Commission of Victoria (SECV), 1940's?
Metal sheet- black background, painted with white lettering and coloured(orange and red) symbols, some scratches and white or light blue paintbrush out markings and dribbles- reverse is style of sign in item No.22. Gives times of first and last cars, the frequency for each route and Grey St. and Sturt West additional services. On reverse side has a more modern timetable, see item No. 22. ballarat trams, timetable boards, secv, street furniture -
 Melbourne Tram Museum
Document - Instruction Book, B. Manser Pty Ltd, "Tram Control System - Operation and Maintenance Manual", 2003
Instruction Book - 20 pages contained with a clear plastic cover and black retaining block or strip, titled "Tram Control System - Operation and Maintenance Manual", giving details of the system to control tramcars within depots, which tracks, timetables, dispatching, computer system, caters for run-ins, varying lengths and other criteria. Has copyright - B. Manser Pty Ltd 2003 on front cover.trams, tramways, depots, depot trackwork, tramcars, instructions, depot starter, software -
 Melbourne Tram Museum
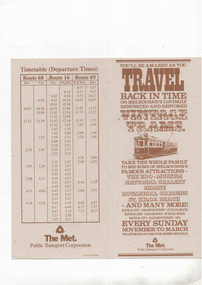
Pamphlet, The Met, "Travel back in Time - Vintage Trams", c1995
Pamphlet - 2 fold DL printed on light card with a fawn colour, titled "Travel back in Time - Vintage Trams", giving details of the Vintage Tram services, mid 1990's using the L class trams. Has map and timetables for route 68 to the Zoo, Route 16 to St Kilda Beach and Route 69 to Kew from the City. Has The Met logo and contact details.trams, tramways, ptc, vintage trams, the met, route 68, route 16, route 69, l class -
 Melbourne Tram Museum
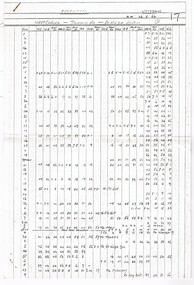
Ephemera - Timetable, Melbourne & Metropolitan Tramways Board (MMTB), West Coburg - Domain Road - St Kilda Beach route, May. 1969
Timetable - listing the various runs, times at various timing point or locations for Essendon Depot, Weekdays as at 26-5-1969. Four photocopied pages stapled in the top left hand corner, for the West Coburg - Domain Road - St Kilda Beach route. On the rear of each sheet (all the same) details of the route, time points and changes for weekday peaks and Sundays. Front and back sheets scanned.Has number "17" in the top right hand corner - part of the index page.trams, tramways, mmtb, route 55, west coburg, domain rd -
 Melbourne Tram Museum
Newspaper, "Melbourne's old tramways", 1/11/1930 12:00:00 AM
Newspaper clippings - titled "Melbourne's old tramways", from an unknown newspaper reviewing a 1894 MTOC guide timetable booklet. Written by CHM, following the conversion of the North Fitzroy line. Reviews the booklet, its details the history of Melbourne cable trams and where you could travel and notes issues with horse trams. Dated 1/11/1930 - the dateline has been glue onto the top of the cutting.trams, tramways, cable trams, melbourne, guides -
 Melbourne Tram Museum
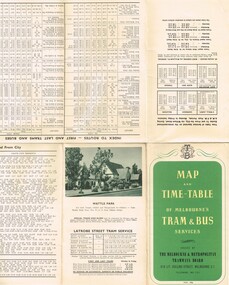
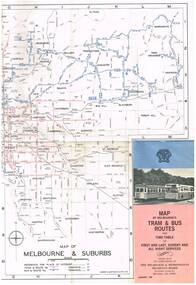
Map, Melbourne & Metropolitan Tramways Board (MMTB), "Map and timetable of Melbourne Tram and Bus Services" - May 1956", May. 1956
Fold out map (10 sections), coloured of Melbourne's Tram and Bus routes, route numbers, rail lines, municipalities boundaries and location of major places of interest. Titled - "Map and timetable of Melbourne Tram and Bus Services" - May 1956". At base of map - timetable of all night trams and bus services. On rear index to routes, 1st and last services, time of Sunday am services, LaTrobe St. services and photo of Wattle Park. Dated May 1956. Note the inset map shows Bourke St as a bus. Three copies held. 413.1 - as for above but with a pasted over section titled "Time table of all - night bus services" on the base of the map replacing the all night tram and bus services. Dated 3/7/1957. Copy from donation of Gary Butler added 3/12/15. See Reg Item 2300 for the March 1952 version.trams, tramways, melbourne, map, tram & bus services, all night services, mmtb -
 Melbourne Tram Museum
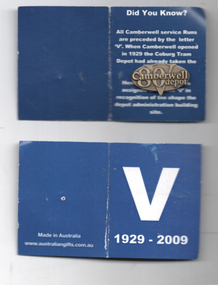
Ephemera - Badge, Australian Gifts, "V 1929 - 2009", 2009
Produced by Camberwell depot staff to mark the 80th anniversary of the depot - 1929 to 2009. Has the letter of the depot printed on the front of the depot. Metal badge has the name of the depot as well as "V" and "80". On the inside of the card explains the basis of the depots timetable or run number letter V, because it was located in the Vee formed by Riversdale and Camberwell Roads. The second card notes that the depot is not in Camberwell but Hawthorn East and that there are no numbers on the rear wall after a tram crashed through it in the early 1970s. Made by Australian GiftsDemonstrates a Camberwell Depot produced item.Set of two items - printed blue card with a metal badge and pin retaining clip.tramways, camberwell depot, 80th anniversary, badges -
 Melbourne Tram Museum
Document, The Met, "Information on the Upfield Light Rail Project", 1990
Documents comprise: 15 page - information document describing the project, planning timing including a proposed timetable from the Coburg stop, Sydney Road tram shuttle, North Melbourne bus service, and ticket zones. 1 page letter and consultation form dated 30/1/1990 addressed to the AETA 1 page - notes on consultative meeting outcomes 1 page information note on the Upfield light rail 3 page document titled "The fourth option" - LRT and trams retained in Sydney RoadYields information about the proposals to convert the Upfield rail line to light rail.Set of documents - comprising 22 A4 printed pages.tramways, the met, upfield, light rail, new tramways, consultation -
 Melbourne Tram Museum
Ephemera - Timetable/s, Public Transport Victoria (PTV), 2019
... Timetables ...Set of 24 digital timetables generally applicable from 1-1-2019. Image files are htd3520iRx - x being the route number. Route 1 - East Coburg - South Melbourne Beach Route 3 and 3A - Melbourne University - East Malvern - and via St Kilda Beach - two timetables for each Route 5 - Melbourne University - Malvern Route 6 - Melbourne University - Glen Iris Route 11 - West Preston - Victoria Harbour Docklands Route 12 - Victoria Gardens - St Kilda Route 16 - Melbourne University - Kew Via St Kilda Route 19 - North Coburg - Flinders St Route 30 - St Vincent's Plaza - Etihad Stadium Docklands - though the stadium was renamed Marvel after Marvel comics by Disney during May 2018. Old name retained, but appears to becoming just Docklands Stadium on Yarra trams website when this item added. Route 35 - City Circle - NOT Published. Route 48 - North Balwyn - Victoria Harbour Docklands Route 55 - West Coburg - Domain Interchange Route 57 - West Maribyrnong - Flinders St Route 58 - Toorak to Route 59 - Airport West - Flinders St Route 64 - East Brighton - Melbourne University Route 67 - Carnegie - Melbourne University Route 70 - Wattle Park - Waterfront City Docklands Route 72 - Camberwell - Melbourne University Route 75 - Vermont South - Etihad Stadium Docklands Route 78 - North Richmond - Balaclava via Prahran Route 82 - Footscray - Moonee Ponds Route 86 - Bundoora RMIT - Waterfront City Docklands Route 96 - East Brunswick - St Kilda Beach Route 109 - Box Hill - Port Melbournetrams, tramways, timetables, yarra trams, route 1, route 3, route 5, route 6, route 8, route 11, route 12, route 16, route 19, route 30, route 48, route 55, route 57, route 58, route 59, route 64, route 67, route 70, route 72, route 75, route 78, route 82, route 86, route 96, route 109 -
 Kew Historical Society Inc
Photograph - The last train at Barker Station, 1952
The Kew railway was opened in 1887, and diverged from the main (Box Hill–Lilydale) line about half-way between Hawthorn and Glenferrie. From the point of divergence the line was slightly less than one mile long, and it had only one intermediate station — Barker. There were four road over-bridges and two level crossings, including one over the busy Barkers Road. The line supported a passenger and goods service, and was electrified in December 1922, at the same time as the main line to Box Hill. There were a number of peak hour services which ran from Flinders Street station (Melbourne) to Kew, but in 1938 all but one of these were diverted to the Ashburton line, where traffic was growing. This had an adverse effect on Kew traffic, as passengers from Kew needed to cross over a footbridge at Hawthorn to change trains, and the main line trains were usually already crowded by the time they reached Hawthorn. At about the same time the off-peak trains were replaced by road buses. In 1952 all passenger trains were withdrawn, but the road bus service continued for many years. Goods trains were finally withdrawn in 1957, and the railway was dismantled in 1958-59. (Source: Frank Stamford, 'The Hawthorn - Kew Railway')Small black and white snapshot of the last passenger train at Barker Railway Station in 1952. The photograph, one of 12, is part of a larger album of newspaper clippings, timetables, tickets and photos relating to the Kew Railway Line, taken and compiled by Lachlan Richardson, while a resident of Kew. The album dates from the 1950s. The album is part of a larger subject file on the Kew Line, compiled over time by members of the Kew Historical Society."Last train at Barker Station / 1 August 1952"kew railway line, transport -- railways -- kew (vic.), barker railway station, kew branch line -
 Kew Historical Society Inc
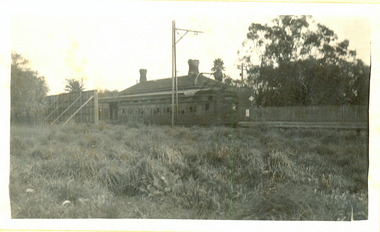
Photograph - Barker Station, August 1952
The Kew railway was opened in 1887, and diverged from the main (Box Hill–Lilydale) line about half-way between Hawthorn and Glenferrie. From the point of divergence the line was slightly less than one mile long, and it had only one intermediate station — Barker. There were four road over-bridges and two level crossings, including one over the busy Barkers Road. The line supported a passenger and goods service, and was electrified in December 1922, at the same time as the main line to Box Hill. There were a number of peak hour services which ran from Flinders Street station (Melbourne) to Kew, but in 1938 all but one of these were diverted to the Ashburton line, where traffic was growing. This had an adverse effect on Kew traffic, as passengers from Kew needed to cross over a footbridge at Hawthorn to change trains, and the main line trains were usually already crowded by the time they reached Hawthorn. At about the same time the off-peak trains were replaced by road buses. In 1952 all passenger trains were withdrawn, but the road bus service continued for many years. Goods trains were finally withdrawn in 1957, and the railway was dismantled in 1958-59. (Source: Frank Stamford, 'The Hawthorn - Kew Railway')Small black and white snapshot of the last passenger train at Barker Railway Station in 1952. The photograph, one of 12, is part of a larger album of newspaper clippings, timetables, tickets and photos relating to the Kew Railway Line, taken and compiled by Lachlan Richardson, while a resident of Kew. The album dates from the 1950s. The album is part of a larger subject file on the Kew Line, compiled over time by members of the Kew Historical Society."Barker Station / August 1952"kew railway line, transport -- railways -- kew (vic.), barker railway station, kew branch line -
 Kew Historical Society Inc
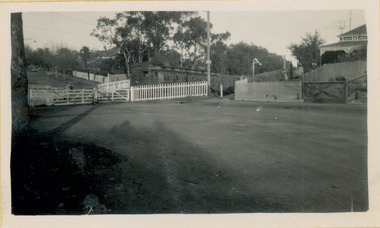
Photograph - Kew Railway Station: Denmark Street entrance, 1952
The Kew railway was opened in 1887, and diverged from the main (Box Hill–Lilydale) line about half-way between Hawthorn and Glenferrie. From the point of divergence the line was slightly less than one mile long, and it had only one intermediate station — Barker. There were four road over-bridges and two level crossings, including one over the busy Barkers Road. The line supported a passenger and goods service, and was electrified in December 1922, at the same time as the main line to Box Hill. There were a number of peak hour services which ran from Flinders Street station (Melbourne) to Kew, but in 1938 all but one of these were diverted to the Ashburton line, where traffic was growing. This had an adverse effect on Kew traffic, as passengers from Kew needed to cross over a footbridge at Hawthorn to change trains, and the main line trains were usually already crowded by the time they reached Hawthorn. At about the same time the off-peak trains were replaced by road buses. In 1952 all passenger trains were withdrawn, but the road bus service continued for many years. Goods trains were finally withdrawn in 1957, and the railway was dismantled in 1958-59. (Source: Frank Stamford, 'The Hawthorn - Kew Railway')Small black and white snapshot of the entrance to Kew Station from Denmark Street in 1952. The photograph, one of 12, is part of a larger album of newspaper clippings, timetables, tickets and photos relating to the Kew Railway Line, taken and compiled by Lachlan Richardson, while a resident of Kew. The album dates from the 1950s. The album is part of a larger subject file on the Kew Line, compiled over time by members of the Kew Historical Society.kew railway line, transport -- railways -- kew (vic.), kew branch line, kew railway station -
 Kew Historical Society Inc
Photograph - Kew Station 22/4/51, F3
The Kew railway was opened in 1887, and diverged from the main (Box Hill–Lilydale) line about half-way between Hawthorn and Glenferrie. From the point of divergence the line was slightly less than one mile long, and it had only one intermediate station — Barker. There were four road over-bridges and two level crossings, including one over the busy Barkers Road. The line supported a passenger and goods service, and was electrified in December 1922, at the same time as the main line to Box Hill. There were a number of peak hour services which ran from Flinders Street station (Melbourne) to Kew, but in 1938 all but one of these were diverted to the Ashburton line, where traffic was growing. This had an adverse effect on Kew traffic, as passengers from Kew needed to cross over a footbridge at Hawthorn to change trains, and the main line trains were usually already crowded by the time they reached Hawthorn. At about the same time the off-peak trains were replaced by road buses. In 1952 all passenger trains were withdrawn, but the road bus service continued for many years. Goods trains were finally withdrawn in 1957, and the railway was dismantled in 1958-59. (Source: Frank Stamford, 'The Hawthorn - Kew Railway')Small black and white snapshot of Kew Railway Station, looking south to Barker Station. The photograph, one of 12, is part of a larger album of newspaper clippings, timetables, tickets and photos relating to the Kew Railway Line, taken and compiled by Lachlan Richardson, while a resident of Kew. The album dates from the 1950s. The album is part of a larger subject file on the Kew Line, compiled over time by members of the Kew Historical Society.kew railway line, transport -- railways -- kew (vic.), kew branch line, kew railway station -
 Kew Historical Society Inc
Photograph - Seven Carriage Train at Barker Station
The Kew railway was opened in 1887, and diverged from the main (Box Hill–Lilydale) line about half-way between Hawthorn and Glenferrie. From the point of divergence the line was slightly less than one mile long, and it had only one intermediate station — Barker. There were four road over-bridges and two level crossings, including one over the busy Barkers Road. The line supported a passenger and goods service, and was electrified in December 1922, at the same time as the main line to Box Hill. There were a number of peak hour services which ran from Flinders Street station (Melbourne) to Kew, but in 1938 all but one of these were diverted to the Ashburton line, where traffic was growing. This had an adverse effect on Kew traffic, as passengers from Kew needed to cross over a footbridge at Hawthorn to change trains, and the main line trains were usually already crowded by the time they reached Hawthorn. At about the same time the off-peak trains were replaced by road buses. In 1952 all passenger trains were withdrawn, but the road bus service continued for many years. Goods trains were finally withdrawn in 1957, and the railway was dismantled in 1958-59. (Source: Frank Stamford, 'The Hawthorn - Kew Railway')Small black and white snapshot of a seven carriage train approaching Barker Railway Station. The photograph, one of 12, is part of a larger album of newspaper clippings, timetables, tickets and photos relating to the Kew Railway Line, taken and compiled by Lachlan Richardson, while a resident of Kew. The album dates from the 1950s. The album is part of a larger subject file on the Kew Line, compiled over time by members of the Kew Historical Society."Seven Carriage Train at Barker Station"kew railway line, transport -- railways -- kew (vic.), barker railway station, kew branch line -
 Kew Historical Society Inc
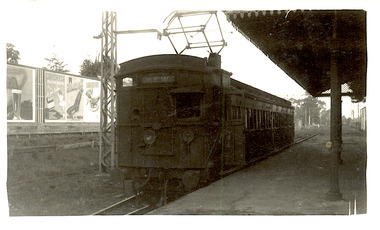
Photograph - The last train at Kew Station, August 1952
The Kew railway was opened in 1887, and diverged from the main (Box Hill–Lilydale) line about half-way between Hawthorn and Glenferrie. From the point of divergence the line was slightly less than one mile long, and it had only one intermediate station — Barker. There were four road over-bridges and two level crossings, including one over the busy Barkers Road. The line supported a passenger and goods service, and was electrified in December 1922, at the same time as the main line to Box Hill. There were a number of peak hour services which ran from Flinders Street station (Melbourne) to Kew, but in 1938 all but one of these were diverted to the Ashburton line, where traffic was growing. This had an adverse effect on Kew traffic, as passengers from Kew needed to cross over a footbridge at Hawthorn to change trains, and the main line trains were usually already crowded by the time they reached Hawthorn. At about the same time the off-peak trains were replaced by road buses. In 1952 all passenger trains were withdrawn, but the road bus service continued for many years. Goods trains were finally withdrawn in 1957, and the railway was dismantled in 1958-59. (Source: Frank Stamford, 'The Hawthorn - Kew Railway')Small black and white snapshot of the last passenger train at Kew Railway Station in 1952. The photograph, one of 12, is part of a larger album of newspaper clippings, timetables, tickets and photos relating to the Kew Railway Line, taken and compiled by Lachlan Richardson, while a resident of Kew. The album dates from the 1950s. The album is part of a larger subject file on the Kew Line, compiled over time by members of the Kew Historical Society."The last train at Kew Station, August 1952"kew railway line, transport -- railways -- kew (vic.), kew branch line, kew railway station -
 Kew Historical Society Inc
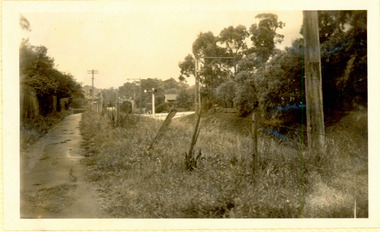
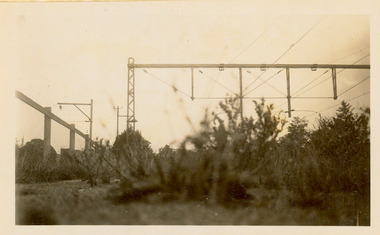
Photograph - Kew Branch Line: Weeds at Kew Station 14/51
The Kew railway was opened in 1887, and diverged from the main (Box Hill–Lilydale) line about half-way between Hawthorn and Glenferrie. From the point of divergence the line was slightly less than one mile long, and it had only one intermediate station — Barker. There were four road over-bridges and two level crossings, including one over the busy Barkers Road. The line supported a passenger and goods service, and was electrified in December 1922, at the same time as the main line to Box Hill. There were a number of peak hour services which ran from Flinders Street station (Melbourne) to Kew, but in 1938 all but one of these were diverted to the Ashburton line, where traffic was growing. This had an adverse effect on Kew traffic, as passengers from Kew needed to cross over a footbridge at Hawthorn to change trains, and the main line trains were usually already crowded by the time they reached Hawthorn. At about the same time the off-peak trains were replaced by road buses. In 1952 all passenger trains were withdrawn, but the road bus service continued for many years. Goods trains were finally withdrawn in 1957, and the railway was dismantled in 1958-59. (Source: Frank Stamford, 'The Hawthorn - Kew Railway')Small black and white snapshot of how the Kew Branch Line was allowed to run down. The photograph, one of 12, is part of a larger album of newspaper clippings, timetables, tickets and photos relating to the Kew Railway Line, taken and compiled by Lachlan Richardson, while a resident of Kew. The album dates from the 1950s. The album is part of a larger subject file on the Kew Line, compiled over time by members of the Kew Historical Society.kew railway line, transport -- railways -- kew (vic.), barker railway station, kew branch line -
 Melbourne Tram Museum
Ephemera - Timetable, Melbourne & Metropolitan Tramways Board (MMTB), "Stores Department - Freight Tram Time Table", 25/09/1979 12:00:00 AM
Foolscap duplicated sheet with two punch holes in the left hand side, providing a timetable for the Freight tram, dated 24/5/1976, notes normally uses tram No. 17. Gives details of the times and the depots served, meal breaks and servicing at South Melbourne depot on a Wednesday. Also provides route to be taken, precautions and that the Batman Ave turnout is not to be used. See Reg Item 6496 for March 1963 version.In top right corner in ink "ON loan from JRP" and in top left hand corner "Acquired per Mr. Solly Stores Controller, Freight Tram made about 60 point changes"trams, tramways, freight tram, depot, stores department -
 Melbourne Tram Museum
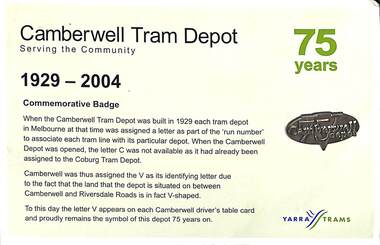
Ephemera - Badge, Camberwell Depot, "Camberwell Tram Depot 75 Years", 2004
Badge pinned to printed sheet of card for the 75th Anniversary of the Camberwell Tram Depot - 1929 - 2004. Badge in the shape of an oval with the letter "V" "75" and "Camberwell depot" raised letters in a metallic colour. Card explains the basis of the depots timetable or run number letter V, because it was located in the Vee formed by Riversdale and Camberwell Roads. Has the Yarra Trams logo. 2nd copy added 18/1/2020trams, tramways, camberwell depot, 75th anniversary, badges -
 Ballarat Tramway Museum
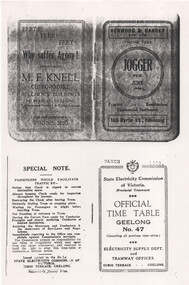
Document - Photocopy, State Electricity Commission of Victoria (SECV), "Official Time Table Geelong No. 47", March 1953
Photocopy of the March 1953 SEC Geelong Timetable, giving details of the fares, transfers, luggage or parcels, lost property, times of each tram on the Newtown, West Geelong, East Geelong, Chilwell, Eastern Park, Belmont and North lines. Has adverts for M F Knell chiropodist, Henwood and Dancey Printers, photos of the Captain and Coach and Secretary of the Geelong Football Club, a list of Premiership records, goals and Brownlow Medals. Note: Sheets are not in the same order as the printed versions due to the photocopying method. See items 5357 and 5629 and 9821 for other versions. Yields information about the operation of the Geelong tramway system.Photocopy - 17 A4 sheets of the "Official Time Table Geelong No. 47" published March 1953tramways, trams, geelong, football, timetable, operations -
 Federation University Historical Collection
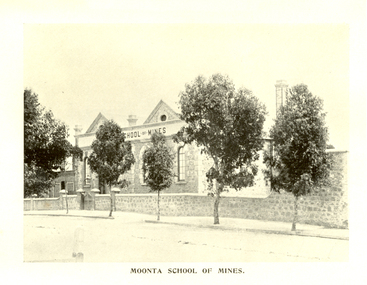
Book, Moonta School of Mines, Moonta School of Mines Annual Report, 1904, 1904
Opening in 1891 the Moonta School of Mines was intended for students who wanted to increase their knowledge of those arts and sciences which were especially important to miners and others similarly engaged. The School was situated close to the Moonta Mines, at that time the most important copper mines in Australia, and the smelters at Wallaroo. The the mines students were able to acquire practical knowledge of the work of a miner. The close by smelting works at Wallaroo were seen to be of great service to those wanting to become acquainted with chemistry and metallurgy. Subjects taught at the Moonta School of Mines included Chemistry, Metallurgy, Steam and the Steam Engine, Magnetism and Electricity, Mathematics, Machine Design, Mine Surveying and Leveling, Drawing, Plumbing and Sheet Metal Work. The Moonta School of Mines building in Ellen Street was formerly Baptist Church. Brown soft covered book of 87 pages. Contents include: * General objects of the School * Report for 1903 * Instructors Reports * Balance Sheet * Examination Questions * Timetable * Certificates granted by Council.cm Images include: * Moonta School of Mines * members of Council (Hancock, Symons, Uffindell, James, Hughes, Cowling, Haining) * Instructors (Rogers, Hancock, Pomroy, Blatchford, Martin, Richardson, Brown, Potter) * Classroom * Laboratory (Practical Chemistry) * Mine Surveying Classhancockmoonta, moonta school of mines, symons, uffindell, james, hughes, cowling, haining, rogers, hancock, pomroy, blatchford, martin, richardson, brown, potter, e.f. blatchford, a.l. brown, r. cowling, r. haining, h. lipson hancock, henry richard hancock, leigh g. hancock, j.w. hughes, t. james, edward martin, h. pomroy, f. potter, g.h richardson, g.j. rogers, j. symons, h.w. uffindell, schools of mines -
 Bendigo Historical Society Inc.
Document - MERLE HALL COLLECTON: REPORT BY COMPTON ASSOCIATES PTY LTD RE BENDIGO ARTS COUNCIL, JUNE 1979
Brief report by Compton Associates Pty Ltd re Bendigo Arts Council, June 1979. This a Report as to the capacity of the Bendigo Arts Council to embark on a fund raising programme (Conclusion - ''negative'' at that stage). Section II of the Report provides Recommendations re 'right attitude', timetable, site, prepared plans, opening night tax deductibility and publicity to provide the basis of a successful fund-raising campaign.Signed by Glen Johns, Assistant Managing Director. -
 Ballarat Tramway Museum
Photograph - Black & White Photograph/s, David Endacott, 14/08/1971 12:00:00 AM
Black and white photograph and negative of the timetable board and CARS STOP HERE" sign on the pole at the Sebastopol terminus, with the Royal Hotel and Fosters Lager sign in the background. See item No. 29 for the sign itself. Assumed photo taken 14 August 1971. Duplicate print (1268A) by John Phillips 12/1999. Large copy print added 5/2001. Original neg scanned at hi res and updated 11/5/2020.trams, tramways, sebastopol, royal hotel, signs -
 Ballarat Tramway Museum
Book, Tramway Museum Society of Victoria (TMSV), "Proceedings of the sixth Conference of the Australasian Tramway Museums, Melbourne July 24-27, 1982, 1982
Purple plastic ELBA folder, with 65 A4 sheets with plastic clip metal binding. Details the Proceedings of the sixth Conference of the Australasian Tramway Museums, Melbourne July 24-27, 1982. Edited by Graeme Breydon, published by the TMSV in 1982. Gives list of delegates, timetables, COTMA minutes, papers, - Learning from the Professionals - F. D. Snell - Computers in Museums - G. Breydon - Tour notes, note on Z class trams etc. Has Graeme Breydon name stickers on front cover and address label on front page.trams, tramways, cotma, conferences, tmsv -
 Kew Historical Society Inc
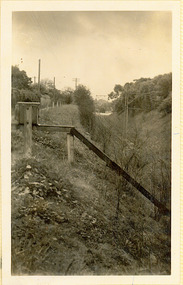
Photograph - Kew Branch Line: Looking along cutting towards Barker Station 22/4/51
The Kew railway was opened in 1887, and diverged from the main (Box Hill–Lilydale) line about half-way between Hawthorn and Glenferrie. From the point of divergence the line was slightly less than one mile long, and it had only one intermediate station — Barker. There were four road over-bridges and two level crossings, including one over the busy Barkers Road. The line supported a passenger and goods service, and was electrified in December 1922, at the same time as the main line to Box Hill. There were a number of peak hour services which ran from Flinders Street station (Melbourne) to Kew, but in 1938 all but one of these were diverted to the Ashburton line, where traffic was growing. This had an adverse effect on Kew traffic, as passengers from Kew needed to cross over a footbridge at Hawthorn to change trains, and the main line trains were usually already crowded by the time they reached Hawthorn. At about the same time the off-peak trains were replaced by road buses. In 1952 all passenger trains were withdrawn, but the road bus service continued for many years. Goods trains were finally withdrawn in 1957, and the railway was dismantled in 1958-59. (Source: Frank Stamford, 'The Hawthorn - Kew Railway')Small black and white snapshot looking along cutting towards Barker Station 22/4/51. The photograph, one of 12, is part of a larger album of newspaper clippings, timetables, tickets and photos relating to the Kew Railway Line, taken and compiled by Lachlan Richardson, while a resident of Kew. The album dates from the 1950s. The album is part of a larger subject file on the Kew Line, compiled over time by members of the Kew Historical Society."Looking along cutting towards Barker Station 22/4/51"kew railway line, transport -- railways -- kew (vic.), barker railway station, kew branch line -
 Linton and District Historical Society Inc
Notebook, St Patrick's Day Races, Linton, 1929
The St Patrick's Day sports meeting was an annual event in Linton during the 1920s and 1930s. In 1929 the events included running races for children, horse racing and motor car driving. R. O'Beirne was Secretary of the sports day committee.Green 'Banco' exercise book which contains information compiled for the St Patrick's Day Sports held March 9th 1929. Includes timetable of events, information on race distances, horses entered in races, penalty weights, handicaps, protests lodged, amounts paid in winnings etc. Also includes brief information on entries, winners and prize money paid for "Motor Car Driving" and "Musical Chairs in Cars" events, and summary of takings for the day.On front cover: "R.O'Beirne, St Patrick's Day Races, March 9th 1929, Commenced 9th/2?[illegible]/1929". Inside front cover: "1929 1930". Inside back cover: Race notes in pencil.events, st patrick's day sports, horse racing, r.o'beirne -
 Melbourne Tram Museum
Map, Melbourne & Metropolitan Tramways Board (MMTB), "Map of Melbourne's Tram and Bus Routes" - January 1967, Jan. 1967
Fold out map (12 sections), coloured of Melbourne's Tram and Bus routes, route numbers, rail lines, and location of major places of interest. On rear index to routes, 1st and last services, time of Sunday am services, list of suburbs, how to get there, MMTB Offices and depots and timetable list of all-night buses services.. Dated January 1967. Two copies held. 3rd copy added 28/5/15trams, tramways, melbourne, map, tram & bus services, all night services, route numbers, mmtb -
 Ballarat Tramway Museum
Document - Table Cards (Sheets), State Electricity Commission of Victoria (SECV), Bendigo Trams Runs, 1940's?
... Timetables ...Demonstrates the method of advising tram crew their shift work.Set of two Typed table card or run card, for Bendigo Trams Runs glued and varnished onto a sheet of steel Gives details for the Motorman and Conductor, starting times, meal times, relief and taken by details. Not known when made - 1940's? .1 - Golden Square to North Bendigo - Run 10 PM - has traffic instructions on rear - see images i1 and i3 .2 - Eaglehawk line - unreadable due to rust - no information on rear. See also Reg Item 3155 and 6270 for other examples and 8134 for Geelongtrams, tramways, secv, forms, timetables, bendigo, btm