Showing 657 items
matching the bendigo post office
-
 Ballarat Heritage Services
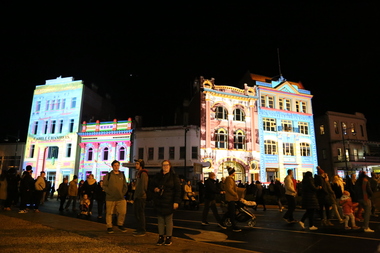
Photograph - Photograph - Colour, Clare Gervasoni, Charing Cross Bendigo during White Night Bendigo, Featuring the Alexandra Fountain, 2018, 01/09/2018
... Office goldfields white night bendigo charing cross alexandra ...Charing Cross buildings illuminated during White Night Bendigo, and featuring the Alexandra Fountain.white night bendigo, charing cross, alexandra fountain -
 Ballarat Heritage Services
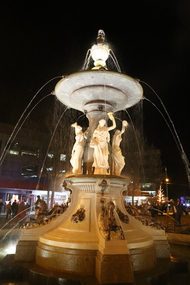
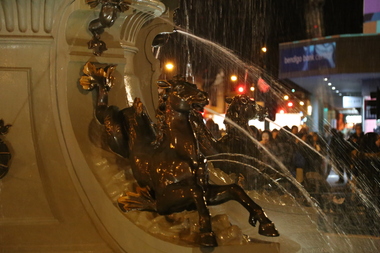
Photograph - Photograph - Colour, Clare Gervasoni, Alexandra Fountain during White Night Bendigo, 2018, 01/09/2018
The Alexandra Fountain was designed by William Vahland and is constructed of Harcourt Granite.Charing Cross buildings illuminated during White Night Bendigo, and featuring the Alexandra Fountain.white night bendigo, charing cross, alexandra fountain, horse, william vahland -
 Ballarat Heritage Services
Photograph - Photograph - Colour, Clare Gervasoni, Charing Cross Bendigo during White Night Bendigo, Featuring the Alexandra Fountain, 2018, 01/09/2018
... Office goldfields white night bendigo charing cross alexandra ...Charing Cross buildings illuminated during White Night Bendigo, and featuring the Alexandra Fountain.white night bendigo, charing cross, alexandra fountain, bendigo -
 Ballarat Heritage Services
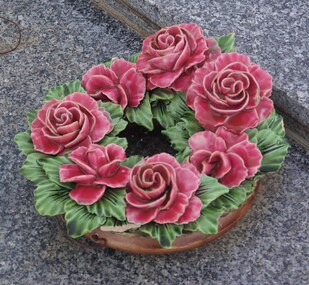
Photograph - Photograph - Colour, China Roses at Bendigo Cemetery, 2018, 02/09/2018
... Office goldfields bendigo cemetery china roses A number of china ...A number of china roses affixed to graves at Bendigo Cemetery. bendigo cemetery, china roses -
 Ballarat Heritage Services
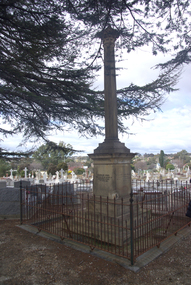
Photograph - Photograph - Colour, Burke and Wills Memorial at Bendigo Cemetery, 2018, 02/09/2018
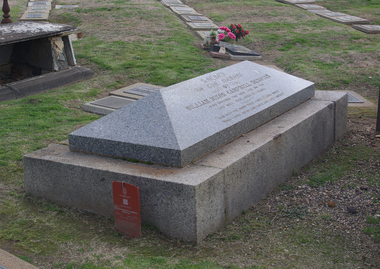
Robert O'Hara Burke and Thomas Pope Besnard were childhood friends. As sexton of the local Back Creek Cemetery Thomas Besnard organised a subscription to raise the money for a monument to Burke, Wills and Gray. A subscription of one shilling, no more and not less, was asked so all subscribers were equal. The Bendigo monument was designed by Adam Duncan and features a Corinthian column mounted on a foundation stone, topped with a Grecian urn draped with the Union Jack. The stone for the monument was quarried from New Chum Mine. The site in the Bendigo Cemetery was selected by Besnard so the monument was on a grass knoll well clear of any other graves. The design included landscaping with a path and garden beds that provided dignified access. The Burke and Wills Monument in Bendigo has been entered on the Register of the National Estate as being important for its association with historical events and developments associated with exploration in the early days of Colony of Victoria. Two conifers remain from the original group sent by Mueller of the Melbourne Botanical Gardens to develop the garden layout on the knoll. These two trees are listed as Significant Trees by City of Greater Bendigo. The foundation block was laid on 20 August 1862 by Chairman of the Bendigo Municipality, Charles Burrows – exactly two years after the Expedition left Melbourne. A half day holiday was declared by Bendigo Council, and a procession left the Bendigo Town Hall and marched to the cemetery where 8000 people were gathered and another 4000 lined the route. John King was unable to attend due to ill health. Chairman of the Municipality of Bendigo, Charles Burrows, gave a long address, and diaries of members of the expedition, the Sandhurst Almanac, the Bendigo Advertiser, the Bendigo Independent Evening News, photographs of the deceased, photographs of Public Buildings in Bendigo, a Sydney half sovereign and all the silver coins of the Realm were wrapped in a Union Jack and placed in a niche in the foundation stone. Fifteen months later a column was erected on the foundation stone after Besnard openly criticised the Memorial Committee for their lack of action. The Bendigo Advertiser was disappointed at the location of the monument preferring a more central location and in 1893 an attempt was made to move the monument to Rosalind Park. On 19 May 1893, Mr Minto, the City Surveyor of the Bendigo MunicIpality reported it would cost £25, and no other action occurred. In 1940 the land around the memorial was sold off as grave sites and the paths and garden beds disappeared with graves now surrounding the base of the monument. The Burke and Wills Monument in Bendigo Cemetery was entered on the Register of the National Estate for its association with historical events and developments associated with exploration in the early days of Colony of Victoria. Two conifers remain from the original group sent by Mueller of the Melbourne Botanical Gardens to develop the garden layout on the knoll. These two trees are listed as Significant Trees by City of Greater Bendigo.Burke and Wills Memorial at Bendigo Cemetery, 2018Erected by the people of Bendigo in honor of the Victorian Explorers, Burke, Wills, Gray and King who first crossed the continent of Australia. King alone surviving the privation and suffering under which his three brave ill-fated companions sank. A.D. 1862. Robert O'Hara Burke, leader of the Victorian Expedition, left Melbounre 24th August 1860. Reached Carpentaria 12th Feby 1861. Died on his return at Coopers Creek, 30th June 1861. Charles Gray, died also on his return at Polygorum Swamp. 17th April 1861. William John Wills, second in command, died also near Coopers Creek, 29th June 1861. bendigo cemetery, burke and wills, burke and wills memorial, william john wills, john o'hara burke, charles gray, polygonum swamp, coopers creek, victorian expedition, carpentaria, bendigo public cemetery, bendigo remembrance park, thomas pope besnard -
 Ballarat Heritage Services
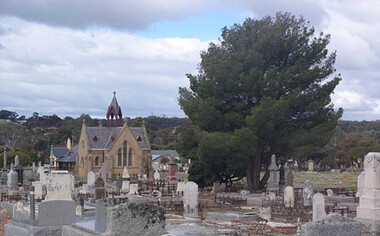
Photograph - Photograph - Colour, Bendigo Cemetery, 2018, 02/09/2018
... Office goldfields bendigo cemetery graves Colour photograph ...Colour photograph of the Bendigo Cemetery.bendigo cemetery, graves -
 Ballarat Heritage Services
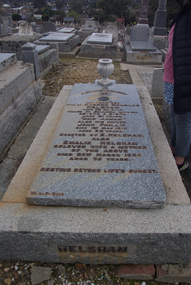
Photograph - Photograph - Colour, Clare Gervasoni, Bendigo Cemetery, 2018, 02/09/2018
... Office goldfields bendigo cemetery graves j. george douglas ...Colour photograph of the Helsham Gravestone in Bendigo Cemetery. It includes a memorial for Pte J. George Douglas Helsham who was killed at Gallipoli during World War One. In loving memory of my dear son Pte. J. George Douglas Helsham Late 7th Bn. A.I.F. Killed at Gallipoli between 25-4-'15 & 2-2-'15 aged 21 years. "Our ANZAC" Also his father John Phillip died 1sr May 1918 aged 52 years. Erected by E. Helsham. Also Emalie Helsham beloved wife & mother of the above Died 20th March 1936 aged 75 years. Resting beyond life's sunset. bendigo cemetery, graves, j. george douglas helsham, gallipoli, john phillip helsham, emalie helsham, anzac, world war one, dead man's penny -
 Ballarat Heritage Services
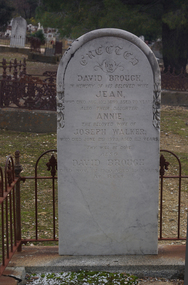
Photograph - Photograph - Colour, Clare Gervasoni, Grave of David Brough, Bendigo Cemetery, 02/09/2018
... Office goldfields bendigo cemetery david brough jean brough ...Colour photograph of a grave in the Bendigo Cemetery.Erected by David Brough in memory of his beloved wife Jean, who died Aug 10th 1889, aged 70 years Also their daughter Annie, the beloved wife of Joseph Walker, who died June 2nd 1873, aged 22 years.> "Thy will be done." Also David Brough died nov. 1st 1900, aged 79 years. At rest bendigo cemetery, david brough, jean brough walker, joseph walker, annie, gravestone -
 Ballarat Heritage Services
Photograph - Photograph - Colour, Grave of William Denovan, Bendigo Cemetery, 02/09/2018
William Denovan was an important character in Bendigo's goldfield agitation.A number of photographs of the grave of William Denovan in the Bendigo Cemetery.Sacred to the memory of William Dixon Campbell Denovan who entered the new life on the 18th July 1906, aged 77 years. "And with the morn those angel faces smile Which I have loved long since and liste awhile" In remembrance of Margaret Dixon Denovan who departed this life 07 July 1896 aged 79 years Beloved by all who knew her. Erected by her sonwilliam denovan, bendigo cemetery, margaret denovan, red ribbon rebellion -
 Ballarat Heritage Services
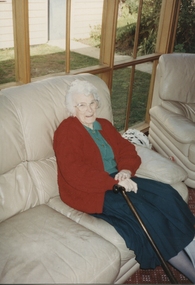
Photograph - Portrait, Dorothy Wickham, Elwyn Kinnane
Elwyn Kinnane (nee Hamilton) worked at the Lucas factory in the 1920s (as Elwyn Hamilton). She married David Kinnane, lived at Bungaree, Bacchus Marsh, Tempe (Mallee) and Bendigo before settling in Ballarat. She went back to Lucas's to work in the 1950s. Postcard size colour photograph of an elderly woman sitting on a couch.elwyn kinnane, elwyn hamilton, lucas factory, lucas girl -
 Ballarat Heritage Services
Ceramic - Photograph - Colour, Ceramic Plate by Graham Masters of Sweenies Creek Pottery
Graham MASTERS Graham Masters is a potter based at Sweenies Creek, just outside Bendigo, Victoria. He specialises in a patented technique of low relief stoneware depicting Australian animals and landscapes. He obtained a Diploma of Art and Design in Ceramics from the Bendigo Institute of Technology in 1973, then operated a pottery for a year in Bendigo, before becoming an employee, then a partner at Maldon Pottery, Maldon, Victoria, with Neville Wilson and Thomas Metcalf. He left Maldon to set up his own pottery at Sweenies Creek in 1983 and has been there over 20 years. In 2000 Graham Masters started working at Bendigo pottery, and is one of five in the business, specialising in large works such as vases, platters and wine barrels, all handmade on the pottery wheel. graham masters, sweenies creek pottery, ceramics -
 Ballarat Heritage Services
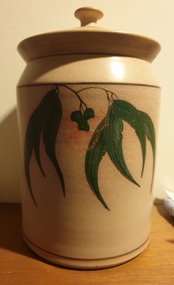
Ceramic - Ceramics, Lidded Ceramic Canister by Echuca Wharf Pottery, c1995
in 2009 Echuca Wharf Pottery was located at Murray Esplanade and Little Hopwood St, Echuca. Lindsay Chandler was a potter at Echuca Wharf Pottery from 1989-1994. Robert Henderson left Redbyrne to work at Echuca Wharf Pottery and then went not to work as a demonstration thrower at Bendigo Pottery.(https://www.flickr.com/groups/1281707@N21/discuss/72157629662786291/)Hand thrown lidded stonewarw canister with 'Gum Leaf' design by Echuca Wharf Pottery. landscape, ceramics, australian landscape pottery, echuca wharf pottery -
 Ballarat Heritage Services
Photograph - Image, David Syme, 1934
David Syme (1827-1908) was a newspaper proprietor who was born on 2 October 1827 at North Berwick, Scotland. Early in 1851, he went via Cape Horn to California seeking gold. By mid-1852 he was in Melbourne, and in the next three years prospected with some success on Ballarat, Bendigo, Castlemaine and Beechworth diggings. In 1855 he lost a possible fortune at Egerton near Ballarat when a promising claim was jumped. Ebenezer Syme bought the insolvent Melbourne Age for £2000, and invited David Syme to take up a share. In September 1856 Syme put up some cash and his contracting business to obtain a half-share. He helped to manage the paper but returned to contracting late in 1857. When Ebenezer retired in 1859 Syme reluctantly returned to the business, and on Ebenezer's death next year he began his fifty-year career as publisher and editor of the Age. (C. E. Sayers, 'Syme, David (1827–1908)', Australian Dictionary of Biography, National Centre of Biography, Australian National University, http://adb.anu.edu.au/biography/syme-david-4679/text7741, published first in hardcopy 1976, accessed online 25 August 2019._Reproducation of a image of David Syme.david syme, portrait, the age, journalist -
 Ballarat Heritage Services
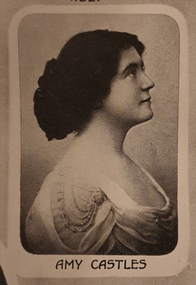
Photograph - Image, Amy Castles, c1918, c1918
... Office goldfields Born in Bendigo, Victoria, Amy Castles ...Born in Bendigo, Victoria, Amy Castles was an opera singer.Black and white image of Amy Castles.portrait, amy castles, opera -
 Ballarat Heritage Services
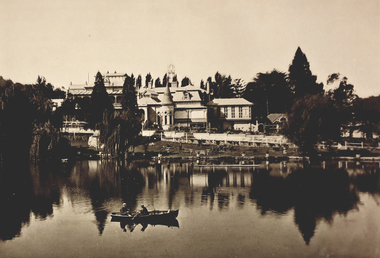
Photograph - Image - Black and White, "Fortuna" Bendigo, The Residence of Mrs George Lansell, c1918, c1918
Fortuna is the goddess of fortune and the personification of luck. Fortuna Villa is a magnificent house built by George Lansell it was kept secure for many years while use by the Defence Department. tour this magnificent home.Fortuna in Bendigo.george lansell, bendigo, fortuna -
 Ballarat Heritage Services
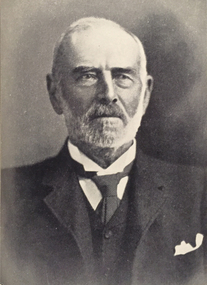
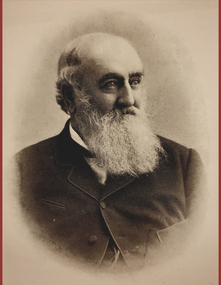
Image - Black and White, George Lansell, c1900, c1900
... Office goldfields george lansell bendigo Black and white image ...Black and white image of George Lansell.george lansell, bendigo -
 Ballarat Heritage Services
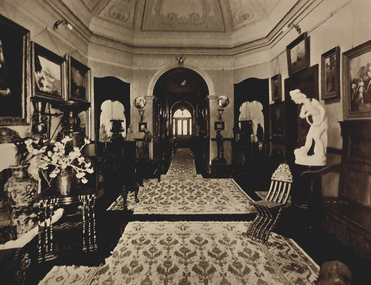
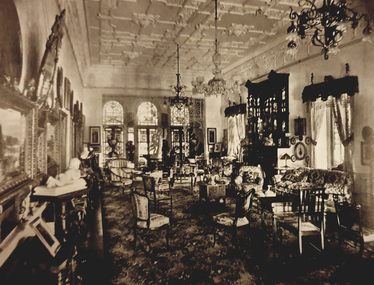
Photograph - Image - Black and White, The Entrance Hall, Fortuna, c1918, c1918
Fortuna was built by George Lansell.Black and white image of George Lansell an interior room of George Lansell's Fortuna,george lansell, bendigo, fortuna -
 Ballarat Heritage Services
Image - Black and White, The Music Room, Fortuna, c1918, c1918
... Office goldfields george lansell bendigo fortuna Black and white ...Black and white image of an interior room of George Lansell's Fortuna,george lansell, bendigo, fortuna -
 Ballarat Heritage Services
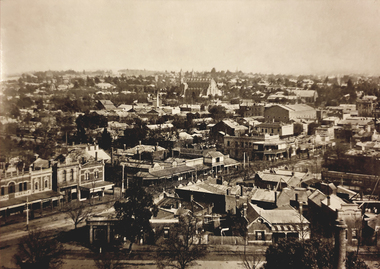
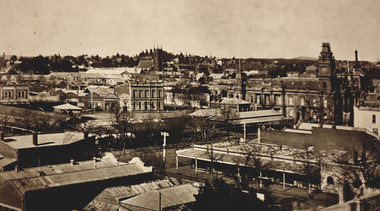
Photograph - Image - Black and White, City of Bendigo, c1918, c1918
... Office goldfields Bendigo is a goldfields town in Central ...Bendigo is a goldfields town in Central Victoria.Black and white image of the township of Bendigo.george lansell, bendigo, fortuna, townscape -
 Ballarat Heritage Services
Photograph - Image - Black and White, City of Bendigo, c1918, c1918
... Office goldfields Bendigo is a goldfields town in Central ...Bendigo is a goldfields town in Central Victoria.Black and white image of the township of Bendigo.bendigo, bendigo town hall -
 Ballarat Heritage Services
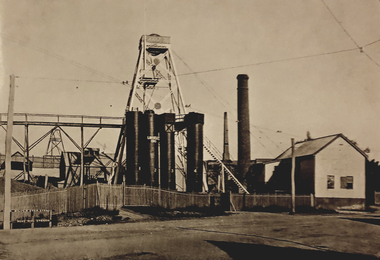
Photograph - Image - Black and White, George Lansell's "180" Mine, c1918
... Office goldfields george lansell bendigo 180 mine mining Black ...Black and white image of George Lansell's 180 mine in Bendigo.george lansell, bendigo, 180 mine, mining -
 Ballarat Heritage Services
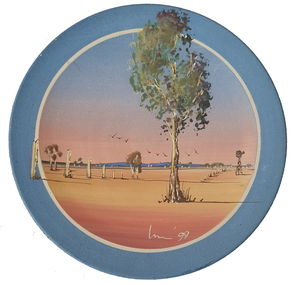
Ceramic - Ceramics, Australian Landscape Pottery by Les Macleman, 1999
Les MacLEMAN Les MacLeman was Apprenticed to Michael Cardew and was trained to make beautiful pots. He survived the late 1980s recession by slip-decorating them with Australian themes for the sourvenir market. In 2001, MacLeman was working part-time at Bendigo Pottery. A bright landscape scene on a handcrafted ceramic plate.australian landscape pottery, les macleman, ceramics, landscape -
 Ballarat Heritage Services
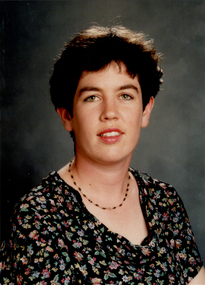
Photograph - Colour, Clare K. Gervasoni, c1994
This photograph was taken while Clare Gervasoni was teaching at Catholic College Bendigo.Photograph of Clare Gervasoni wearing a Perri Cutton dress. clare gervasoni -
 Ballarat Tramway Museum
Document - Letter and Envelope, Tramway Museum Society of Victoria (TMSV), 1971
Envelope - preprinted in dark green ink - titled "Last Trammail Cover" - with a purple stamp in top left hand corner - "Carried by Tram between Eaglehawk and Bendigo / Sponsored by the Tramway Museum Society of Victoria Ltd.", in top right hand corner - 6c Australia stamp, featuring Sturt's Desert Rose and a Post Office Cancellation stamp "Ballarat 15 April 1972". Env7lope made by Tudor Presseal. Contains a Preprinted card - green ink titled "Last Trammail Cover", headed by TMSV's name, address and details of the TMSV, with the names of the Organisers John Fitzsimons and Bob Prentice along the lower edge. Two copies held - both addressed to Mr. G,. Breydon, 204 Carlisle St, Balaclava Vic 3183. One copy was opened to check the content, the other remains sealed. See Reg Item 2942 for the Ballarat version.trams, tramways, tmsv, bendigo, sec, tramcars -
 Ballarat Tramway Museum
Postcard, Nu-color-vue or Nucolorvue Productions, "Eagle Hawk Victoria" "Eaglehawk, Victoria", mid 1960's?
Postcard - colour photograph of High St Eaglehawk, with No.4, in High St, with the Eaglehawk Post office and other buildings in the background. Has the Victoria Hotel on the side. Nu-colour-vue postcard, EH9. Divided back, printed in Australia. Has the various stamp values required for postage in Australia, New Zealand, UK and the USA in the stamp section. Has a kangaroo logo in the centre bottom or the rear.trams, tramways, bendigo, postcards, eaglehawk, high st -
 Ballarat Tramway Museum
Slide - 35mm slide/s, Noel Simons, 21/11/1962 12:00:00 AM
Set of 17 transparencies taken on 21/11/1962 on Kodak mounts. 1188.1 - Bendigo No. 11 at Depot Junction McCrae and Arnold St. with driver/conductor changing points. 1188.2 - Bendigo No. 4 at Charing Cross, side on photo, with City Club Hotel and Alexandra Fountain in the background. Tram has Castrol and SEC 'Electric Cooking' ads. 1188.3 - Bendigo No. 4 climbing View St. after tram has passed photographer. Tram has Streets Ice Cream and Cohns Soft Drinks ad on rear dash panel. In the background are the buildings in View St., including the Princess Theatre. Tram has destination of Eaglehawk. 1188.4 - Trams 2 and 4 crossing at the California Gully or Thorpe St Loop. 1188.5 - Bendigo 4 in Mt Korong Road. Tram inbound with destination of Quarry Hill, just leaving Garden Gully Loop. 1188.6 - Bendigo 4 and 17 crossing at the Hayes St. or Iron Bark Gully Loop. No. 17 bound for Eaglehawk, No. 4, Quarry Hill. 17 has two SEC roof ads and a white horse whiskey ad. 1188.7 - No. 17 bound for Eaglehawk, soon after leaving California Gully. Has large mullock heap in background. 1188.8 - Bendigo 2 and 17 crossing at the Thorpe St. or California Gully Loop. Has butchers shop in background. 1188.9 - Bendigo 17 at the Eaglehawk terminus. Has destination of Quarry Hill. In background is the hotel and shops at the terminus, showing ads for "Melbourne Bitter". Tram has two SEC 'Electric Cooking' ads. Driver and conductor about to assist two lady passengers with a pram and baby. 1188.10 - No. 17 at Eaglehawk terminus, awaiting departure. Has Eaglehawk Town Hall and Post Office in background. Tram has a Whitehorse Whiskey ad on the front dash panel. 1188.11 - No. 3 in High St. Eaglehawk, with destination of Eaglehawk. Has the shops on the south side of High St. in the background, including the Eaglehawk fish shop. Tram has two roof ads, one an SEC roof ad, and Cohns Drinks and Streets Ice cream ads on front dash panel. 1188.12 - as above, but after tram has passed photographer. Note the centre of the road poles. 1188.13 - No. 2 outbound for Eaglehawk at the intersection of Mt. Korong Road and the Calder Highway. Photo taken after the tram has passed the photographer. Has an Ampol service station in the background. 1188.14 - No. 11 leaving the Bendigo depot, crossing the bridge, with the Scrubber car in the background. 1188.15 - No. 21 at the North Bendigo terminus. Tram has destination of Golden Square and Cohns drink ad on front dash and two roof ads on side. 1188.16 - No. 11 on Golden Square route, in High St. at intersection with Old High St. 1188.17 - No. 11 at the Golden Square terminus, conductor turning the pole. Hotel on the left side of the photo. Note the road works barrier and red flag behind the tram. Slide has an end of roll mark on the right hand side of the image.Information written on in black ink and date stamped on purple ink. 1188.1 - "Birney car No. 11 in McCrae St. at Cnr of Arnold about to run into depot, Bendigo" 1188.2 - "No. 4 at Alexandra Fountain, Charing Cross Bendigo" 1188.3 - "No. 4 climbing the View St. Hill from Charing Cross, Bendigo (Eaglehawk Route)" 1188.4 - "No. 4 and 2 at Thorpe St. Loop, California Gully" 1188.5 - "No. 4 in Mt Korong Rd., Long Gully, Near Havilah Rd. (Bendigo) (Eaglehawk Route)" 1188.6 - "Nos. 17 and 4 crossing on Hayes St. Loop, Ironbark, Bendigo" 1188.7 - "No. 17 soon after leaving California Gully (Eaglehawk Route)" 1188.8 - "No.2 and 17 crossing on Thorpe St. Loop, California Gully (Eaglehawk Route)" 1188.9 - "No. 17 at Eaglehawk terminus" 1188.10 - "No. 17 at Eaglehawk terminus" 1188.11 - "No. 3 in High St. Eaglehawk" 1188.12 - "No. 3 nearing Eaglehawk terminus" 1188.13 - "No. 2 in Mt. Korong Rd., Ironbark. Calder highway on left (Eaglehawk route) 1188.14 - "Birney car No. 11 leaving Bendigo depot. Scrubber car at rear" 1188.15 - "No. 21 at North Bendigo Terminus" 1188.16 - "Birney car No. 11 in High St. Bendigo at intersection with Old High Street (Golden Square Route)" 1188.17 - "Birney Car No. 11 at Golden Square terminus, High St., Bendigo". tramways, trams, bendigo, depot junction, charing cross, view st., eaglehawk, north bendigo, golden square, tram 2, tram 3, tram 4, tram 11, tram 17, tram 21, tram scrubber -
 Ballarat Tramway Museum
Slide - 35mm slide/s - set of 4, Noel Simons, Apr. 1967
Set of 2 slides made from the Association of Railway Enthusiast Provincial Tramways film strip, possibly during April 1967. 1192.1 and 1192.3 mounted in Kodak Ready Mounts. The others in plain white mounts. Slides dated Dec. 1968. 1192.1 - No. 21 out bound to Golden Square in High St., between Wattle and Vine Streets. Photo taken after tram has passed photographer. Has a sign for "Reid's Furnituorium" in the background. 1192.2 - Bendigo No. 28 dressed up as Myers Christmas tram, passing the Post Office and Courts in Pall Mall. 1192.3 - Bendigo No. 23 at Needle Loop en route to Eaglehawk. Tram has two SEC roof ads, one "Electric Cooking" and the other "Everything fine in my all electric kitchen". 1192.4 - Bendigo scrubber parked at the end of the main depot lead, alongside the depot office buildings.Details in blue ink, date hand stamped in purple ink. 1192.1 - "No. 21 heads along High St for Golden Square between Wattle and Vine Streets." 1192.2 - "Birney No. 28 in Christmas Garb, traverses Pall Mall en route to North Bendigo". 1192.3 - "No. 23 at Needle Loop on its run to Eaglehawk". 1192.4 - "Scrubber car at Bendigo Depot".tramways, trams, north bendigo, bendigo, bridge st loop, depot, tram 21, tram 23, tram 28, tram scrubber -
 Ballarat Tramway Museum
Slide - 35mm slide/s - set of 32, Noel Simons, 25/02/1971 12:00:00 AM
Set of 31 transparencies taken on 25/2/1972 on Kodak mounts. 1201.1 - Bendigo No. 26 in Bond St. just after leaving Long Gully en route for Quarry Hill. Has Norris Supermarket in background. Has two SEC roof ads. 1201.2 - No. 26 climbing View St. from Charing Cross en route to Eaglehawk. Has ANZ bank and AMOCO service station in background. 1201.3 - as for 1201.3, but after tram has passed photographer. Has buildings west of Mackenzie St. in photograph. 1201.4 - Tram stop and centre of the road pole with two "CARS STOP BY REQUEST" signs mounted on pole at the corner of Mackenzie St. 1201.5 - same position as for 1201.3, but with No. 5 descending the street. 1201.6 - same position as for 1201.2, but with No. 5 descending the street. Photo taken after tram has passed photographer. 1201.7 - No. 7 in Nolan St. from across the park at Lake Weeroona. 1201.8 - No. 7 entering McCrae St from Nolan St. - distant view. Note "TRAM "sign on left hand side under tree and overhead in McCrae St. from former track that once was in this street. 1201.9 - No. 7 in High St. with Cathedral in background. Tram en route to North Bendigo. Note scaffolding around Cathedral main spire area. 1201.10 - No. 7 crossing Bendigo Creek bridge in High St. near Golden Square. Has a Caltex Service station in the background. 1201.11 - No. 7 at Golden Square terminus with Sunburst Fruit Juices and a Peters Ice cream delivery vans alongside. 1201.12 - as for 1201.11 but photo taken from behind tram, with the end of the rails in the photograph. 1201.13 - No. 7 and 21 in Pall Mall at Charing Cross with No. 5 in the background. Taken some distance away from the location. 1201.14 - No. 7 at Golden Square terminus, taken a short distance from the tram terminus. Shows Milk Bar on right hand side and the hotel on the left hand side. Taken from the south side of the roadway. 1201.15 - as from 1201.14 but taken from the north side of the roadway. 1201.16 - No 5 waiting at California Gully loop. Distant photo showing surrounds 1201.17 - No. 5 en route for Quarry Hill crossing No. 26 at California Gully. 1201.18 - No. 26 at Eaglehawk terminus with Eaglehawk Town Hall and Post Office in background. 1201.19 - No. 21 arriving at Charing Cross en route to North Bendigo. Has Alexandra Fountain in the background, ANZ bank RACV building, and other buildings on the north side of Pall Mall or Nolan St. 1201.20 - No. 26 en route for Quarry Hill at Charing Cross, with crew standing by front door. Has Colonial Mutual life building, Armstrong Tyre Service (Firestone) and a sign for Cohns Drinks in the background. 1201.21 - as for 1201.20 but with No. 5 en route to Eaglehawk now in photograph. 1201.22 - No. 26 at Quarry Hill terminus. 1201.23 - No. 26 at Quarry Hill terminus, view of front portion of tram only from a gate at the Bendigo cemetery. 1201.24 - Track at the end of the Quarry Hill line showing the point blades of the former "Y" terminus and the overhead for this. 1201.25 - No. 2 at the Quarry Hill terminus, looking along the former Trackwork. 1201.26 - as for 1201.25 1201.27 - number not used. 1201.28 - Golden Square terminus from some distance from the actual terminus, showing the Warning sign "TRAM" for motorists from the south. No. 7 at the terminus. 1201.29 - No. 7 passing through the Golden Square shopping centre. Numerous cars and pedestrians. Tram en route for North Bendigo. 1201.30 - No. 7 in High St. Golden Square, en route for North Bendigo. Photo taken after tram has passed photographer. 1201.31 - No. 7 in High St. just past Wattle St. with the Cathedral in the background. Tram has two SEC roof ads good side on photo, 'Everything's fine in my all electric kitchen' and 'Electrical cooking - clean, quick, economical'. 1201.32 - No. 7 in High St. nearing Wattle St. Has Cathedral in the background. Photo taken after tram has passed photographer.Information written on in black ink and date stamped on purple ink. 1201.1 - "No. 26 in Bond St just after leaving Long Gully" 1201.2 - "No. 26 climbing View St. from Charing Cross" 1201.3 - "No. 26 ascending View St. from Charing Cross (At Mackenzie St.)" 1201.4 - "View St. & Mackenzie St." 1201.5 - "No. 5 in View St. near Mackenzie St." 1201.6 - "No. 5 in View St. nearing Charing Cross." 1201.7 - "No. 7 in Nolan St. seen from Lake Weeroona Park." 1201.8 - "No. 7 entering McRae St. from Nolan St. Note "TRAM" warning sign on left. 1201.9 - "No. 7 in High St. passing Short St." 1201.10 - "No. 7 crossing Bendigo Creek bridge in High St. near Golden Square." 1201.11 - "No. 7 at Golden Square terminus" 1201.12 - "No. 7 at Golden Square terminus" 1201.13 - "No 7, 21 and 5 at Charing Cross" 1201.14 - "No. 7 at Golden Square terminus" 1201.15 - "No. 7 at Golden Square terminus" 1201.16 - "No 5 waiting at California Gully loop." 1201.17 - "Nos. 5 and 26 crossing at California Gully loop" 1201.18 - "No. 26 at Eaglehawk terminus" 1201.19 - "No. 21 arriving at Charing Cross from Golden Square" 1201.20 - "No. 26 at Charing Cross" 1201.21 - "Nos. 5 and 26 at Charing Cross." 1201.22 - "No. 26 at Quarry Hill terminus" 1201.23 - "No. 26 at Quarry Hill terminus seen through the gates of the Bendigo Cemetery." 1201.24 - "Quarry Hill terminus showing remains for former double track layout abandoned before 1964." 1201.25 - "No. 2 at Quarry Hill terminus" 1201.26 - "No. 2 at Quarry Hill terminus" 1201.28 - "The Southern approach to Golden Square with No. 7 standing at the terminus, "TRAM" warning sign on the left. 1201.29 - "No. 7 passing through Golden Square Shopping Centre" 1201.30 - "No. 7 in High St. Golden Square" 1201.31 - "No. 7 in High St. passing Wattle St." 1201.32 - "No. 7 in High St. nearing Wattle St."tramways, trams, bendigo, bond st., view st., nolan st., high st., eaglehawk, california gully, charing cross, quarry hill, trackwork, tram 2, tram 5, tram 7, tram 21, tram 26 -
 Ballarat Tramway Museum
Photograph - Colour Photograph/s, 1960's
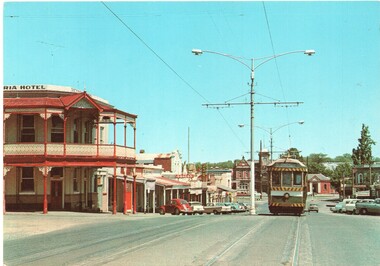
... Parade Ballarat Ballarat goldfields Eaglehawk Bendigo Post Office ...Colour postcard size print of an SEC Bendigo tram 26 at the Eaglehawk terminus. Printed on AGFA paper. Tram has SEC roof ads, both re Electric cooking. Has Eaglehawk Post Office, Town Hall and Mechanics Institute in the background. Tram fitted with dash canopy lighting and large white strip under driver's windows. Photo undated, taken late 1960's or early 1970's. Tram has destination of "Eaglehawk".eaglehawk, bendigo, post office, town hall, tram 26 -
 Ballarat Tramway Museum
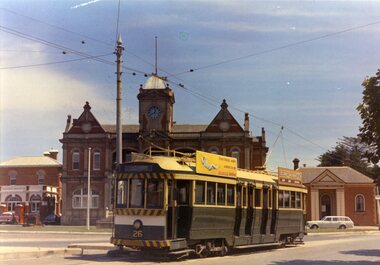
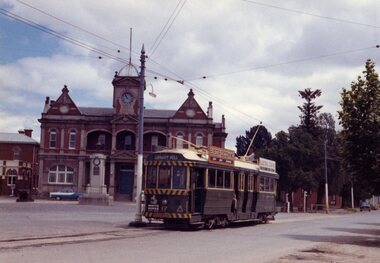
Photograph - Colour Photograph/s, 21/11/1962 12:00:00 AM
... Post Office tram 17 On rear top left hand corner "17". Colour ...Colour print of Bendigo SECV Bendigo tram 17 at Eaglehawk Terminus. On Kodacolor paper with a Kodak red ink stamp on rear. Tram has dash canopy lights, but no large white strip under the drivers windows. Photo not dated but appears to be at about the same time as 977, 21.11.1962. Has Eaglehawk Town Hall and Post office in background and war memorial. Tram showing destination of "Quarry Hill". Photo shows how tram line extended past the town hall with the white posts visible. Tram has White Horse Whiskey ad on front dash panel and two SEC "Electric Cooking" ads.On rear top left hand corner "17".eaglehawk, bendigo, town hall, post office, tram 17