Showing 714 items
matching class notes
-
 Melbourne Tram Museum
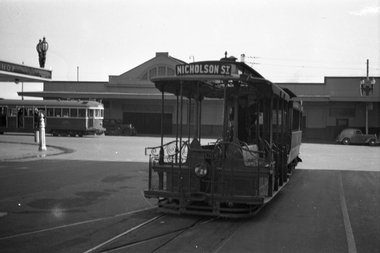
Negative, Wal Jack, 13/10/1940 12:00:00 AM
Black and white negative, by Wal Jack, of a cable tram set at the Bourke St terminus. In the background is the Spencer St station buildings and W2 269? northbound in Spencer St. The cable tram has the destination of Nicholson St. See Reg item 5056 for a similar image. Note the street light stand built into the verandah of the hotel and possibly that of Spencer St station verandah.trams, tramways, cable trams, bourke st, spencer st, w2 class, tram 269 -
 Melbourne Tram Museum
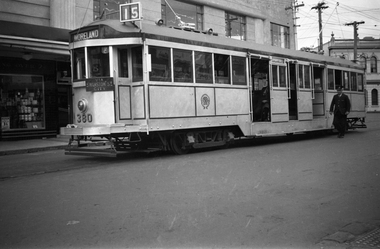
Negative, Wal Jack, c1938
Black and white negative, by Wal Jack, of W2 380 (Moreland Route 15), at the Acland St, St Kilda terminus 1938. Note the Coburg Depot Run Number. Mal Rowe advised by e-mail 21/9/20 (from the Norm Cross notes) that To commemorate 25 years of the opening of Luna Park in St. Kilda, No’s 235, 249, 303, 380, 422, 454 and 568 were painted silver with dark blue trim and suitable sign writing. Mal noted that W2 568 was given the years 1913-1938 and lights around the roof.trams, tramways, w2 class, acland st, st kilda, route 15, luna park, tram 380 -
 Melbourne Tram Museum
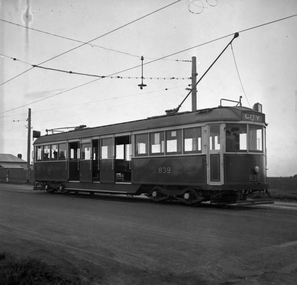
Negative, Wal Jack collection, c1940
Black and white negative, by Wal Jack, of W5 839 at Birdwood Ave/Keilor Road terminus, c1940. Note the second or parallel overhead line, but no track. Could be at the time of the construction of the line to Essendon airport. Could be route 51 in the route number box. May not be a Wal Jack photograph as odd negative size.trams, tramways, w5 class, essendon, keilor road, tram 839 -
 Melbourne Tram Museum
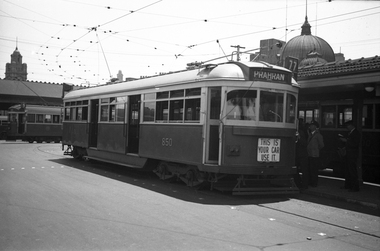
Negative, Wal Jack collection, 1939
Black and white negative by Wal Jack of SW6 class 850 at the Princes Bridge terminus. The tram entered service 31/3/1939. Photo c1940. The microphone can be seen in the front window. Note no windscreen wiper. Tram running a route 77, Prahran. Has tail lights and dash canopy lighting with the sign "This is you car use it" underneath. The front number can just be seen. In Swanston St and adjacent are W2's. Other photos of the tram in the album are dated 1939, possibly late 1939 given it appears to a summer's day.trams, tramways, shelters, princes bridge, sw6 class, dash canopy lights, new tramcars, batman ave, tram 850 -
 Melbourne Tram Museum
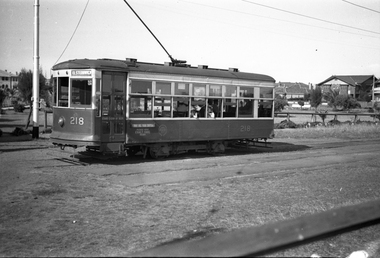
Negative, Wal Jack collection, c1940
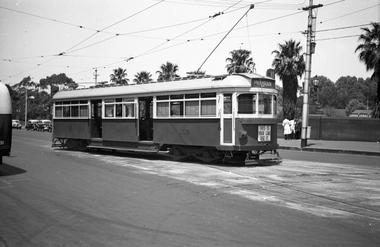
Black and white negative by Wal Jack of X class Birney 218 at the Point Ormond terminus. Note the Pay as you enter sign, There appears to be a two many crew, the driver is chatting to the conductor in the front of the tram, with a summer jacket on. Tram has the destination of Elsternwick. Photo c1940.trams, tramways, x class, birney, point ormond, tram 218 -
 Melbourne Tram Museum
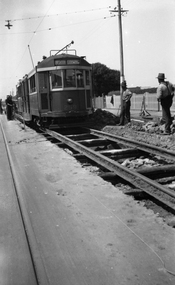
Negative, Wal Jack collection, c1930
Black and white negative from Wal Jack collection of W 259 or W2 during track reconstruction work on its way to North Coburg. The tram has not been fitted with a route number box. A number of workmen in the view "leaning on their shovels" as the tram goes past. Photo could be between Moreland Road and Bell St or in Lygon St before the end of the cable trams in Sydney Road Coburg. OR - in Moreland Road itself, having just left Nicholson St - note heavy wires at the rear of the tram. Photo can be dated from the date a route number box was fitted. Tram was converted to a W2 in Oct. 1931. Photo c1930. Photo may not be by Wal Jack as a size that he did not use.trams, tramways, w2 class, w class, north coburg, sydney road, lygon st, trackwork, tram 259 -
 Melbourne Tram Museum
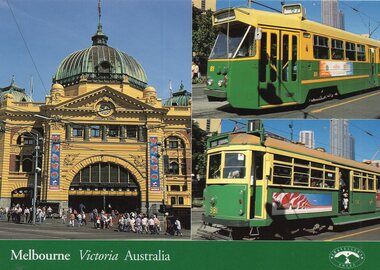
Postcard, Traveller's Notes, Flinders St Station main entrance, Z81 (Route 67), and W6 981 (Route 1), 1995
Postcard - 3 panel full colour - by Traveller's Notes, of Flinders St Station main entrance, Z81 (Route 67), and W6 981 (Route 1). Divided back, published by Traveller's Notes, photos by Neil J Leed, 1995.trams, tramways, flinders st station, z class, w6 class, route 1, route 67, tram 81, tram 981 -
 Melbourne Tram Museum
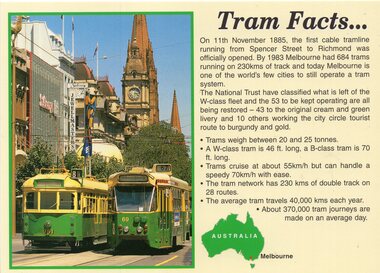
Postcard, Nu-color-Vue, "Tram Facts", c1995
Postcard - 2 panel full colour - titled "Tram Facts" by Nu-color-vue of trams 951 (blank destination - route 8) and Z 69 (Route 67) in Swanston St with the Melbourne Town Hall in the background. The second panel has extensive notes on Melbourne trams, including when started, the National Trust classification, weight, how long, size of the system and passenger numbers. Divided back, published by Nu-color-vue - 11ML458 and NCV 10256 - Note the outline of a tram on the top of the publishers name on the rear.trams, tramways, swanston st, z class, sw6 class, information, tram 69, tram 951 -
 Melbourne Tram Museum
Postcard, Traveller's Notes, 4 panel full colour - by Traveller's Notes, 1997
Postcard - 4 panel full colour - by Traveller's Notes, of the Yarra River, Cook's Cottage, Flinders St Station main entrance, and SW6 852, University, route 5. Divided back, published by Traveller's Notes, photos by Neil J Leed, 1997.trams, tramways, flinders st station, yarra river, sw6 class, route 5, tram 852 -
 Melbourne Tram Museum
Photograph - Set of 3 Colour Print/s, Dennis O'Hoy, Keith Kings, 24/04/1996 12:00:00 AM
Set of three colour prints of Bendigo Tramways 1 - Bendigo / Melbourne 138 being off loaded from Beamish's low loaded in Tramway Ave on its return from Melbourne on 24/4/1996. Photo by Dennis O'Hoy. 2 - Keith Kings and Dennis Bell standing alongside Bendigo 23 near the Gasworks, Weerona Ave. 10/1996 3 - J Wilcox and Keith Kings standing alongside Bendigo/Melbourne 138 near the Gasworks Weerona Ave 10/1996.Keith's notes on rear in ink.trams, tramways, bendigo, p class, n class, unloading, tram 138, tram 23 -
 Melbourne Tram Museum
Photograph - Black & White Photograph/s, Keith Kings, 26/03/1955 12:00:00 AM
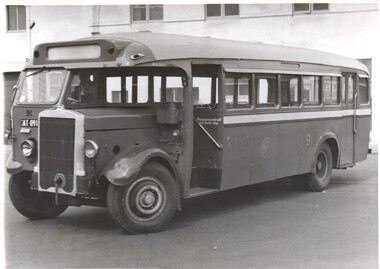
... TS8 class bus 91 Extensive notes on the rear of the photo, see ...Black and white photograph of MMTB Bus 91, built 1938, turning in Brunswick Road at Lygon St, North Carlton on the Holden St shuttle service, 26/3/1955. Are there tram lines under the rear wheel? Keith notes that the bus route is now incorporated in the new West Heidelberg bus service.Extensive notes on the rear of the photo, see image i2 tramways, buses, holden st, lygon st, brunswick rd, mmtb buses, leyland, ts8 class, bus 91 -
 Melbourne Tram Museum
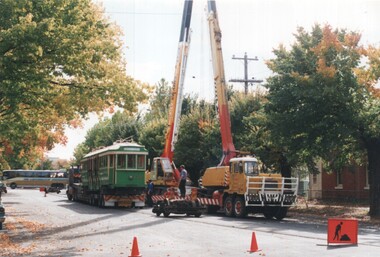
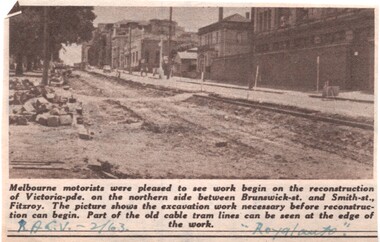
Newspaper, Royal Automobile club of Victoria (RACv), removal of the cable tram track in Victoria Parade, 1963 to 1971
Set of 8 newspaper clippings, mid 1960's concerning traffic control and congestion issues. .1 - Royal auto - 2/1963 - reporting on the removal of the cable tram track in Victoria Parade between Brunswick and Smith St, noting the old cable tram lines. .2 - Royal auto - 1/65 - Photo of Toorak Road Toorak with a tram and parked cars. .3 - Royal auto - 8/64 on Chapel St with W2 324 (route 77, City) showing the impact of parked cars at 8.45am and a motor car trying to squeeze past. .4 - Royal auto - 9/64, Burke Road Camberwell, showing the impact of parked cars and trams. Photo includes SW6 934 (Route 7 Camberwell) .5 - Royal auto - 8/67 - Swanston St near Collins St. .6 - View of Toorak Road, Hartwell, W2 641 (Spencer St, route 74) photo 8/68 by John Shingler. shows the shopping centre. .7 - Royal auto - 9/64 - Johnston St Collingwood and buses. .8 - MMBW Living City Winter 1971 of Kew Junction, peak hour inbound noting the new Eastern Freeway will reduce congestion.Extensive notes on the rear of the photo, see image i2trams, tramways, congestion, traffic control, racv, chapel st, toorak road, victoria parade, cable trams, w2 class, sw6 class, burke road, camberwell, route 77, route 7, swanston st, kew junction, route 74, hartwell, johnston st, buses, tram 324, tram 641, tram 934 -
 Melbourne Tram Museum
Negative, Wal Jack, 19/01/1941 12:00:00 AM
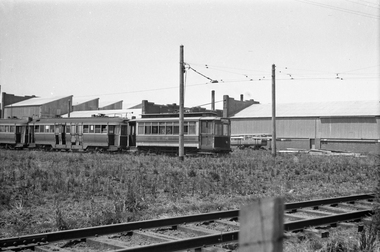
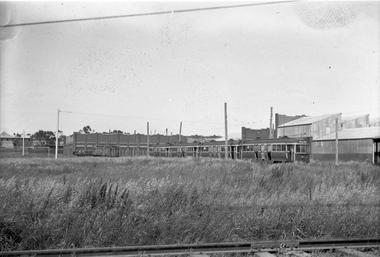
Black and white negative by Wal Jack of U206 and a C Class or N class stored at Preston Workshops. Based on image the number of the second car is number 125. Note the two cable grip cars and the bus body in the background. Rod Atkins advised 11/10/2020: "The bus body is one of the four James Motors of South Melbourne body's first fitted to the group of 12 Thornycroft "J" chassis in 1924-1925 numbered 13 to 24. Then in 1929 they were all transferred to the ADC chassis but four were retained in late thirties to early forties for possible further use. The four bodies were then fitted to the new International K6 chassis in 1943. The vehicle numbers were 19 to 308 16 to 309 24 to 311 and 18 to 312. They were finally disposed of in 1949." Photo 19-1-1941, based on other similar photo dates.trams, tramways, preston workshops, u class, c class, n class, grip tram, buses, tram 206, tram 125 -
 Melbourne Tram Museum
Negative - Set of 2, Wal Jack, 13/10/1940 12:00:00 AM
Set of two Black and white negatives by Wal Jack of: .1 - C class C28, E43, P136, P134, U211, U209 and No. 11 - dated 13-10-1940. .2 - Photo of the first three cars in the line. The car numbers were detailed in the album held by the Ballarat Tramway Museum. Note the bus body against the brick wall of the workshops and two former grip cars in the view. See Reg Item 5290 for details of the bus body.trams, tramways, preston workshops, u class, c class, n class, e class, p class, stored trams, buses, grip tram, tram 28, tram 43, tram 136, tram 134, tram 211, tram 209, tram 11, mmtb buses -
 Melbourne Tram Museum
Negative, Wal Jack, 19/01/1941 12:00:00 AM
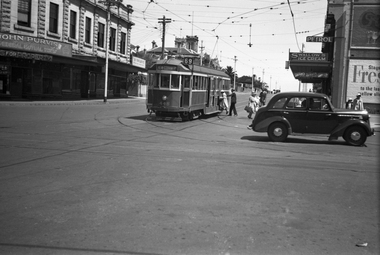
Black and white negative by Wal Jack of W2 448 at the intersection of Glenferrie Road and Riversdale Road tram stop, with passengers boarding or having left the tram. Note the tram stop sign on the shop verandah. In the background is the building advertising John Purvis, Property sales and Federal Mutual life insurance. ON the opposite side is a Milk bar, advertising Swallow's Ice creamtrams, tramways, glenferrie road, riversdale road, w2 class, kew- cotham rd, route 69, passengers, tram 448 -
 Melbourne Tram Museum
Negative, Wal Jack, 19/01/1941 12:00:00 AM
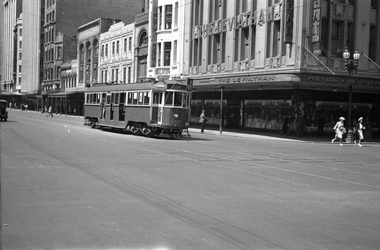
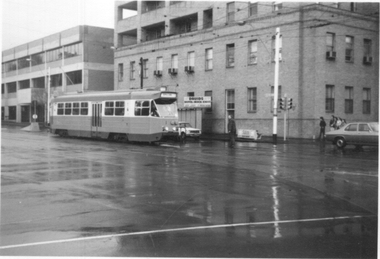
Black and white negative by Wal Jack of W3 658 (City, Route 8) in Swanston St at the corner with Bourke St, Sunday 19-1-1941. Has The Leviathan store, Ezy Walkin, Cafe Majestic. The Leviathan is holding a "Square Deal Sale". Note the two ladies crossing the street wearing gloves. Appears that a solider is standing under the verandah, with a slouch hat.trams, tramways, w3 class, swanston st, bourke st, route 8, tram 658 -
 Melbourne Tram Museum
Negative, Wal Jack, 1939
Black and white negative by Wal Jack of SW6 850 (Prahran, route 77), leaving the Batman Ave terminus at Princes Bridge. Has tail lights and dash canopy lighting with the sign "This is you car use it" underneath. The front number can just be seen. Note the parked taxis and drivers on the south side of the roadway. See also Reg Item 5244 for a photo of the tram at the terminus.trams, tramways, princes bridge, sw6 class, dash canopy lights, new tramcars, batman ave, tram 850 -
 Melbourne Tram Museum
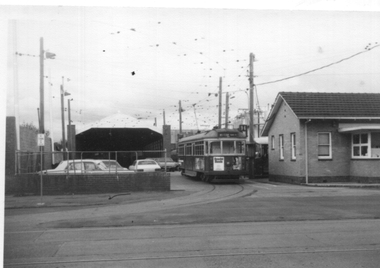
Photograph, David Menzies, Caulfield Loop - Caulfield Cup Day, 1975
Black and white print of a number of trams, lead by W2 245 parked in Railway Ave (now Sir John Monash Drive), Caulfield on Caulfield Cup day, 1975. A traffic policeman is on duty. In the background is Downards Furniture Store in a former picture theatre.Yields information about a Caulfield Cup race day and the tram services.Black and White photographs - printed on plain paper with photographers stamp and notes on rear.Has stamp of David Menzies on rear. and in ink details of photo.tramways, trams, mmtb, caulfield, races, caulfield races, railway ave, w2 class, tram 245 -
 Melbourne Tram Museum
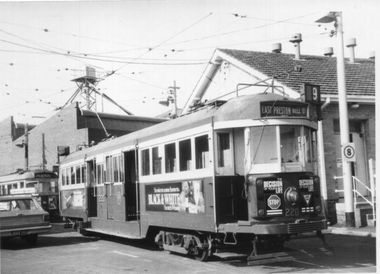
Photograph, David Menzies, W2 220 North Fitzroy Depot, 1975
Black and white print of W2 220 parked on the depot access tracks at North Fitzroy depot. It has the destination of East Preston Bell St. The tram has adverts for Black and White scotch whiskey and road safety messages re stop and give way signs. In the background is the sub-station at this location. It was unusual to see a W2 class at this location. Has a print date of 8/1975 on the rear.Yields information about W2 220, the second W class tram built.Black and White photographs - printed on plain paper with photographers stamp and notes on rear.Has stamp of David Menzies on rear. and in ink details of photo.tramways, trams, mmtb, w2 class, tram 220, north fitzroy depot -
 Melbourne Tram Museum
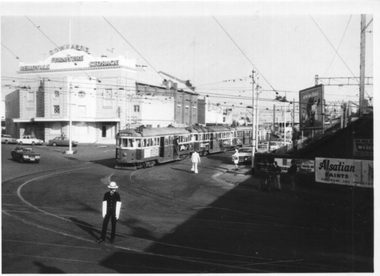
Photograph - W6 979 ready to leave North Fitzroy Depot, David Menzies, 1975
Black and white print of W6 979 ready to leave North Fitzroy Depot. Shows the depot offices and the depot behind and depot allocation board to the right of the tram. Tram about to run a route 96.Yields information about North Fitzroy Depot.Black and White photographs - printed on plain paper with photographers stamp and notes on rear.Has stamp of David Menzies on rear. and in ink details of photo.tramways, trams, mmtb, north fitzroy depot, w6 class, tram 979 -
 Melbourne Tram Museum
Photograph - Z1 Nicholson St and Victoria Parade, David Menzies, 1975
Black and white print of Z1 Nicholson St and Victoria Parade with St Vincents Hospital in the background. This building was demolished for redevelopment during 2023. In the background is a sign for the Druids Hospital Benefits fund.Yields information about Z1 and St Vincents.Black and White photographs - printed on plain paper with photographers stamp and notes on rear.Has stamp of David Menzies on rear. and in ink details of photo.tramways, trams, mmtb, z1 class, tram 1, nicholson st, st vincents -
 Melbourne Tram Museum
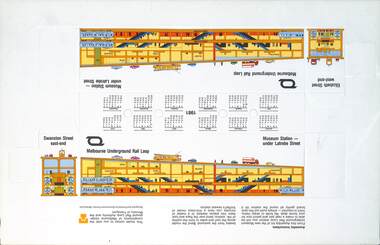
Ephemera - Fold up calendar - MURLA, Melbourne Underground Rail Loop Authority (MURLA), late 1981
... . Note the Z class trams with incorrect doors given the trolley.... The station was opened in Jan. 1981 see reference. Note the Z class ...Shows a cross section through the Museum Station under La Trobe St (later Melbourne Central), showing trams, stairs, trains of the then new underground station. Published by the Melbourne Underground Rail Loop Authority and Ministry of Transport, late 1980. The station was opened in Jan. 1981 see reference. Note the Z class trams with incorrect doors given the trolley pole and silver or Hitachi trains.Demonstrates a calendar produced by MURLA to show the Museum Station in cross section.Printed card with punched out folds and 1981 calendar. Two copies held.murla, museum station, diagrams -
 Melbourne Tram Museum
Album - Photographs - Comeng Dandenong, 1980s - 1990s
In March 2024, Milissa Box (DTP) was at a trash and treasure market. She'd found a $5 photo album for sale with some photos that she thought might be of interest… From what I can gather it belonged to the gentleman pictured who was a worker at Dandenong in the Comeng and ABB eras. He appears to have worked on the Z3, A1/A2, B1/B2 class trams, Hong Kong LRVs, Comeng Melbourne suburban trains, and later the extra Victorian-purchased XP power cars and XAM sleepers to enable the Riverina XPT to be extended to Melbourne. It's clear he was very proud of the vehicles he'd helped to build. I have scanned a selection of the images, which appear to be a mix of official builder's portraits, team photos, and self-taken shots showing candid everyday scenes on the shop floor. There are also images of the launch of the XP power cars with then-Victorian Premier Joan Kirner; and some personal visits to see the Flying Scotsman, Victorian Goldfields Railway, Coal Creek, etc. Filename Description Date Comeng Scans 2024-03-05 0001 Three Comeng workers (including the photographer) stand in front of Comeng suburban train 697M (Chopper unit) c. June-July 1989 Comeng Scans 2024-03-05 0002 Three Comeng workers (including the photographer) stand in front of Comeng suburban train 697M (Chopper unit) c. June-July 1989 Comeng Scans 2024-03-05 0003 Hong Kong Light Rail Phase 1 LRV 1013 being lifted onto its transport loader c. 1987-88 Comeng Scans 2024-03-05 0004 Walter Wright transport truck (Mack) waits to draw a heavy transport platform out of a shed at Comeng Dandenong. Hong Kong Phase I LRV (1024) can be seen inside the shed c. 1988 Comeng Scans 2024-03-05 0005 Hong Kong Light Rail Phase 1 LRV 1013 on its transport loader in a shed at Comeng Dandenong ready for transport c. 1988 Comeng Scans 2024-03-05 0006 Hong Kong Light Rail Phase 1 LRV 1013 on its transport loader in a shed at Comeng Dandenong ready for transport c. 1988 Comeng Scans 2024-03-05 0007 The photographer is pictured fitting components to the cab of a Phase I Hong Kong LRV No 1026 c. 1988 Comeng Scans 2024-03-05 0008 Hong Kong Light Rail Phase 1 LRV 1013 on its transport loader at Comeng Dandenong ready for transport c. 1988 Comeng Scans 2024-03-05 0009 Hong Kong Light Rail Phase 1 LRV 1013 on its transport loader at Comeng Dandenong ready for transport c. 1988 Comeng Scans 2024-03-05 0010 Hong Kong Light Rail Phase 1 LRV 1013 on its transport loader at Comeng Dandenong ready for transport c. 1988 Comeng Scans 2024-03-05 0011 The photographer and a colleague are pictured in the car park posing for a photo at Comeng Dandenong c. 1988 Comeng Scans 2024-03-05 0012 The photographer and a colleague are pictured inside the cab of Comeng suburban train 697M, posing for a photo at Comeng Dandenong c. 1989 Comeng Scans 2024-03-05 0013 A stainless steel Hitachi train bodyshell is being transported on a truck-trailer. Possibly taken at Martin and King in Bayswater, under transport to the station for railing to Somerton for fitout. This is a later series M car with the rear-mounted pantograph (note the mounting lugs above the non-driving end) c. 1980 Comeng Scans 2024-03-05 0014 A shot at Comeng Dandenong of the onsite workforce standing in front of a Phase I Hong Kong LRV. c.1987-88 Comeng Scans 2024-03-05 0015 A shot at Comeng Dandenong of the onsite workforce standing in front of a Phase I Hong Kong LRV. c.1987-88 Comeng Scans 2024-03-05 0016 Hong Kong Light Rail Phase 1 LRV 1038 on its transport loader at Port of Melbourne ready for transport c. 1988 Comeng Scans 2024-03-05 0017 Three Comeng workers (including the photographer) stand in front of a workbench at Comeng Dandenong c. June-July 1989 Comeng Scans 2024-03-05 0018 A newly completed Comeng train (wearing VicRail teacup orange) on the factory access track at Comeng Dandenong c. 1981 Comeng Scans 2024-03-05 0019 A newly completed Z3 class tram on a transporter, with its bogie frames waiting transport to Preston Workshops for final fitout and commissioning c. 1981 Comeng Scans 2024-03-05 0020 A newly completed Comeng train (wearing VicRail teacup orange) on the factory access track at Comeng Dandenong c. 1981 Comeng Scans 2024-03-05 0021 A newly completed Z3 class tram on a transporter, with its bogie frames waiting transport to Preston Workshops for final fitout and commissioning c. 1981 Comeng Scans 2024-03-05 0022 A Comeng/ABB artist impression presumably part of their bid for the Double Decker demonstrator train for Melbourne. Note the similarity to similar Comeng sets constructed for Sydney. c. Nov 1989 – April 1990 Comeng Scans 2024-03-05 0023 Victorian Railways steam locomotive K 169 on static display at Coal Creek. c. 1980s Comeng Scans 2024-03-05 0024 Comeng suburban train carriage 1190T on a traverser in the yard at Comeng Dandenong. c. June-July 1989 Comeng Scans 2024-03-05 0025 Comeng suburban train carriages the yard at Comeng Dandenong. c. June-July 1989 Comeng Scans 2024-03-05 0026 Comeng suburban train carriages the yard at Comeng Dandenong. c. June-July 1989 Comeng Scans 2024-03-05 0027 Comeng suburban train carriages the yard at Comeng Dandenong. c. June-July 1989 Comeng Scans 2024-03-05 0028 Comeng suburban train carriages the yard at Comeng Dandenong. c. June-July 1989 Comeng Scans 2024-03-05 0029 Comeng suburban train in a shed at Comeng Dandenong. c. June-July 1989 Comeng Scans 2024-03-05 0030 Comeng suburban train carriage 1190T on a traverser in the yard at Comeng Dandenong – possible Factory Acceptance Inspection by the Met c. June-July 1989 Comeng Scans 2024-03-05 0031 Comeng suburban train carriage 1190T being tractor-shunted in the yard at Comeng Dandenong – possible Factory Acceptance Inspection by the Met c. June-July 1989 Comeng Scans 2024-03-05 0032 Two Comeng workers carry a train part (possibly a first aid kit) for fitting to a Comeng suburban train. c. June-July 1989 Comeng Scans 2024-03-05 0033 Comeng suburban train carriage 1190T on a traverser in the yard at Comeng Dandenong – possible Factory Acceptance Inspection by the Met. One of the Met staff appears to be giving one of the Comeng workers a kiss on the cheek. c. June-July 1989 Comeng Scans 2024-03-05 0034 A B2 Class tram is on a low-loader multiwheel transport trailer waiting transport to Preston Workshops; while what appears to be a classic AP6 Valiant Safari Wagon is in the foreground. c. June-July 1989 Comeng Scans 2024-03-05 0035 A B2 Class tram is on a low-loader multiwheel transport trailer waiting transport to Preston Workshops; while a worker poses for a photo with his hand on the rigging. c. June-July 1989 Comeng Scans 2024-03-05 0036 A B2 Class tram is on a low-loader multiwheel transport trailer waiting transport to Preston Workshops; An HT Holden Belmont sedan has been posed in front to appear as if it is towing the heavy vehicle. c. June-July 1989 Comeng Scans 2024-03-05 0037 A B2 Class tram is on a low-loader multiwheel transport trailer waiting transport to Preston Workshops; An HT Holden Belmont sedan has been posed in front to appear as if it is towing the heavy vehicle. c. June-July 1989 Comeng Scans 2024-03-05 0038 A1 Class tram 232 is pictured up on stands while various A/B class tram cab frames are in the foreground in various stages of assembly. Of note, 232 appears to have been returned to Dandenong for major repair or other work, and shows signs of having been in traffic for some time (weathering and wear) c. June-July 1989 Comeng Scans 2024-03-05 0039 various A/B class tram cab frames are in the foreground in various stages of assembly. c. June-July 1989 Comeng Scans 2024-03-05 0040 A group of Comeng Dandenong workers stopped on a tea break. c. June-July 1989 Comeng Scans 2024-03-05 0041 An A/B Class tram cab being fitted out with electronics and controls. c. June-July 1989 Comeng Scans 2024-03-05 0042 A new Comeng suburban train in Metropolitan Transit livery on the test track at Comeng Dandenong. c. mid 1980s Comeng Scans 2024-03-05 0043 A new Comeng suburban train in Metropolitan Transit livery on the test track at Comeng Dandenong. c. mid 1980s Comeng Scans 2024-03-05 0044 Interior shot of a new Comeng suburban train at Comeng Dandenong. c. mid 1980s Comeng Scans 2024-03-05 0045 Interior shot of a new Comeng suburban train at Comeng Dandenong. c. mid 1980s Comeng Scans 2024-03-05 0046 The exterior sign at Dandenong showing ABB brand. Early 1990s Comeng Scans 2024-03-05 0047 A B2 Class tram is on a low-loader multiwheel transport trailer waiting transport to Preston Workshops. Early 1990s Comeng Scans 2024-03-05 0048 The Brush generator and Paxman Valenta engine as fitted inside a new XP power car for NSW Countrylink (paid for by Victoria) c. 1992 Comeng Scans 2024-03-05 0049 An exterior shot of a new Countrylink XP power car for NSW under construction (paid for by Victoria) c. 1992 Comeng Scans 2024-03-05 0050 Two new XAM class XPT sleeper carriages under construction at Comeng Dandenong c. 1992 Comeng Scans 2024-03-05 0051 A B2 class tram under construction at Comeng Dandenong Early 1990s Comeng Scans 2024-03-05 0052 A B2 class tram under construction at Comeng Dandenong Early 1990s Comeng Scans 2024-03-05 0053 An exterior shot of a new Countrylink XP power car for NSW being moved out of the shed c. 1992 Comeng Scans 2024-03-05 0054 An exterior shot of a new Countrylink XP power car at Comeng Dandenong c. 1992 Comeng Scans 2024-03-05 0055 An exterior shot of a new Countrylink XP power car at Comeng Dandenong c. 1992 Comeng Scans 2024-03-05 0056 An exterior shot of a new Countrylink XP power car at Comeng Dandenong c. 1992 Comeng Scans 2024-03-05 0057 B2 class trams under construction at Comeng Dandenong Early 1990s Comeng Scans 2024-03-05 0058 An XP Powercar from NSW wearing the Intercity XPT Candy Livery at Comeng Dandenong. It is not known if this was originally painted in this livery (incorrectly) or if this was one of the first delivered series transported to Dandenong to aid the construction process of the four additional locomotives. Early 1990s Comeng Scans 2024-03-05 0059 Melbourne B2 Class tram B2.2100 (renumbered from 2102) painted in the distinctive Chocolate and Cream livery to mark the completion of 100 B2 class trams Early 1990s Comeng Scans 2024-03-05 0060 A factory forklift wearing a hand painted “We love Labo(u)r” cardboard sign, possibly in connection to a media event with the Victorian Premier onsite at Comeng Dandenong. c. 1992 Comeng Scans 2024-03-05 0061 An exterior shot of a new Countrylink XP power car at Comeng Dandenong c. 1992 Comeng Scans 2024-03-05 0062 Two new new Countrylink XP power cars under construction and final fitout at Comeng Dandenong c. 1992 Comeng Scans 2024-03-05 0063 An exterior shot of a new Countrylink XP power car on the traverser at Comeng Dandenong c. 1992 Comeng Scans 2024-03-05 0064 A B2 Class tram is on a low-loader multiwheel transport trailer waiting transport to Preston Workshops. A large banner is draped on the side explaining that this is the 106th vehicle delivered to the Public Transport Corporation (B2.2108). c. Oct 1992 (based on delivery date) Comeng Scans 2024-03-05 0065 Victorian Premier Joan Kirner addresses a group of dignitaries in front of an ABB banner inside the main administration building at Dandenong, on the occasion of the first XPT power car purchased by Victoria being unveiled at a media event c. 1992 Comeng Scans 2024-03-05 0066 An ABB executive addresses a group of dignitaries in front of an ABB banner inside the main administration building at Dandenong, on the occasion of the first XPT power car purchased by Victoria being unveiled at a media event c. 1992 Comeng Scans 2024-03-05 0067 Victorian Premier Joan Kirner addresses the media in front of a completed XP class XPT power car at Dandenong, on the occasion of the first XPT power car purchased by Victoria being unveiled at a media event c. 1992 Comeng Scans 2024-03-05 0068 An exterior shot of a new Countrylink XP power car at Comeng Dandenong c. 1992 Comeng Scans 2024-03-05 0069 A Melbourne B2 class tram undergoing testing on the test circuit at ABB Dandenong c. early 1990s Comeng Scans 2024-03-05 0070 An XPlorer type DMU emerges from a shed at ABB Dandenong c.1994 Comeng Scans 2024-03-05 0071 Voith final drive axle mounted units for XPlorer railcars waiting to be fitted at Dandenong. c.1994 Comeng Scans 2024-03-05 0072 A completed XAM class sleeper carriage at ABB Dandenong. c.1993 Comeng Scans 2024-03-05 0073 Completed XPlorer railcars wait transfer to South Dynon for bogie exchange and transfer to NSW at ABB Dandenong. c. 1994 Comeng Scans 2024-03-05 0074 A clipping from an ABB internal newsletter outlining the staff-led initiative to commemorate the 100th B2 class tram with a special livery c.1992 Has photographs of ABB, Steamrail tours, Castlemaine and Maldon Railway, Fying Scotsman 4472 visit and Puffing Billy.Yields information about the people and events at Commonwealth Engineering plant Dandenong and the activities of the unknown compiler.Album containing 40 leaves, photos in a heavy card 3 ring spring binder.comeng, commonwealth engineering co., tramcars, hong kong, nsw, sydney, melbourne, railways, the met, b class, cmr, steam engines, abb, asea brown boveri -
 Melbourne Tram Museum
Photograph - L 105 Swanston St, Tramway Museum Society of Victoria (TMSV), 1960s
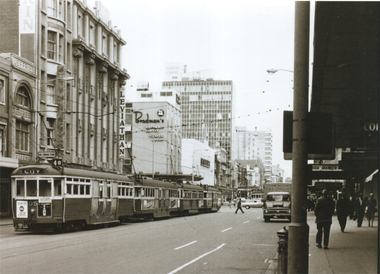
Photograph shows a line of trams at the corner of Bourke and Swanston Sts during the 1960s. L 105 is the rear car, showing a route number 4B. In the background are Jeffries, Swanston building, Leviathan, and Bradman's. Note the "No Centre Turn" sign above the route number box of 105. A Hawthorn Taxi trucks vehicle is on the right side of the photo.Yields information about Swanston St and the use of L class trams.Photograph - Black and whiteHas TMSV Sales stamp on rear.trams, l class, tram 105, route 4b, bourke st, swanston st -
 Melbourne Tram Museum
Album - Robert Thomson Slide Collection, "January 1980 Box 2 - COTMA 1982"
Photo - see pdf file for further information. Number Brief Description RT315 Fitzroy St St Kilda 27-1-80 - tram 900 - "City" - route 16 RT316 Mont Albert Terminus 27-1-80 - tram 937 - "City" - route 42 RT317 Footscray Terminus 26-1-80 - tram 700 - route 82? RT318 Hawthorn Depot 27-1-80 - tram V214 & tram 56 - "Wattle Park - Elgar Rd" - route 70 RT319 Hawthorn Depot 27-1-80 - tram V214 RT320 Swan St Burnley 27-1-80 - tram V214 RT321 Batman Avenue 27-1-80 - tram V214 RT322 Sth Melbourne Beach Terminus 27-1-80 - tram 757 - "East Coburg Moreland" - route 1 RT323 Mitcham Station 24-1-80 - bus 794 -"Doncaster Jun" - route 281 RT324 COTMA 1982 Sth Melb Depot RT325 COTMA 1982 Sth Melb Depot - tram 8W - "Special" RT326 COTMA 1982 Sth Melb Depot - tram 587 RT327 COTMA 1982 Sth Melb Depot - tram 587 RT328 COTMA 1982 Sth Melb Depot - Tramways Emergency Truck RT329 COTMA 1982 Sth Melb Depot - track stockpile RT330 COTMA 1982 Sth Melb Depot - emergency trucks and lifts RT331 1982 West Coburg Dawson St Relay - tram 764 - "Domain Rd" - route 56 RT332 1982 Hawthorn Depot - tram 610 - "Special" & tram 469 - "Special" RT333 1982 Preston Workshops - tram 201 RT334 1982 Preston Workshops - tram 202 and tram 46 - note this car repainted into the Z3 Deep Yellow livery. RT335 1982 Victoria Pde - tram 729 -"Mont Albert" - route 42 Demonstrates the work of Robert Thomson in photography, collection and/or production of slidesAssembled album in a black presentation folder of 21 colour slides, collected or produced by Robert Thomson. A list of all photographs with details has been compiled. melbourne, tramways, trams, z3 class, z1 class, v class, w5 class, w2 class, y1 class, y class, south melbourne depot, vr class, tram 700, tram 214, tram 900, route 16, sw6 class, fitzroy st, mont albert, route 42, tram 937, footscray, hawthorn depot, z1, tram 46, route 70, swan st, batman avenue, south melbourne beach, tram 757, mitcham station, aec, mkv1 class, bus 794, route 281, tram 8w, tram 587, tram 56, international, route 56, tram 764, dawson st, tram 610, tram 469, preston workshops, tram 201, tram 202, tram 729, victoria parade -
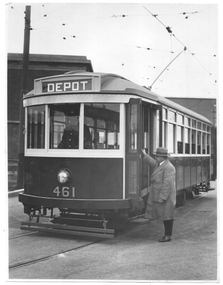 Melbourne Tram Museum
Photograph - X1 461- set of 3, C J Frazer, 1926
Photographs show X1 461 when new and men boarding or leaving the tramcar to illustrate the step height. The photos show a driver in position and the MMTB 2B Truck. The tram has the destination of depot. The tram entered service early Sept. 1926. Photographed at Hanna St South Melbourne depot. Note also the Driver's uniform of the day. See item 7401 for an internal photograph.Yields information about the X1 class tramcar when new.Set of tthree Black and White photographsOn the rear has the stamp of G J Fraser of 154 Little Collins Street Melbourne.tramcars, x1 class, tram 461, new tramcars, mmtb, hanna st depot, south melbourne, unifoms, trams -
 Melbourne Tram Museum
Photograph - X 217 Hawthorn Depot, c1925
Shows X class tram No. 217 at Hawthorn Depot with a bow collector. Tram has the destination of "Bridge Rd" (Bridge Road). Yields information about X 217 when it was fitted with a bow collector and Hawthorn Depot.Black and white photograph notes on rearIn ink by Keith Kings: - X217 Hawthorn depot about 1925, courtesy of Mr Stephenson Preston Workshops", has Rev L Marshall Wood stamp and K S Kings stamp - with number S-A 111.tramways, tramcars, tram 217, hawthorn depot, bow collector, x class, mmtb -
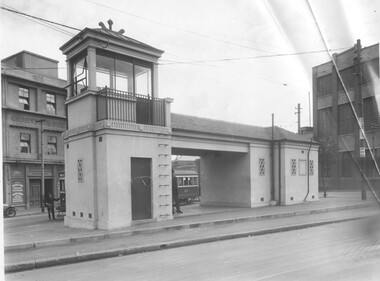 Melbourne Tram Museum
Photograph - Franklin St Signal box, Sutcliffe Pty Ltd, c1929
Black and white photograph of the signal box at Franklin St. Swanston St and Victoria St, probably soon after its completion with tram W2 534 with a Malvern destination, standing behind the signal box with a conductor standing at the front of the tram. Shows the detail of the signal box that had toilets for crews. Note the iron step rungs to access the cabin,. The signal box was commissioned on 29/5/1929 Behind the building is Grants building with signs for Archers Printery and Ingram & Carr Wholesale Stationers. On the right hand side is the Carlton United Brewery building. Photo by Sutcliffe Pty Ltd on behalf of the MMTB.Yields information about the then new Franklin St signal box.Black and white print with photographer's detail on the rear."Sutcliffe" photographers stamp.tramways, tramcars, franklin st, signal box, tram 534, w2 class -
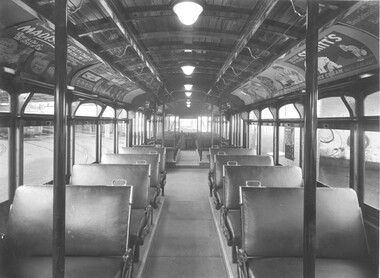 Melbourne Tram Museum
Photograph - Y1 class interior photograph, Sutcliffe Pty Ltd, early 1930s
Black and white photograph of the interior a Y1 class tram car, photographed at Glenhuntly Depot. Shows general arrangements of seats, light defuses and internal advertising. Part of W2 class No. 550 is in the background. Advertisements for: Brockhoff's Biscuits, Senitts Ice Cream, Saunders and Madison Utility Chairs of 309 Collins St Melbourne. Also note the paper notice on the window promoting Albert Park. On rear is Sutcliffe Photographers stamp. See item 7672 for another similar photograph. Destination City, 4th Edition and 5th edition.Yields information about the interior of a Y1 class tramcar.Black and white print with photographer's detail on the rear."Sutcliffe" photographers stamp and in pencil "class Y1"tramways, mmtb, y1 class, interiors, trams, tram 550, w2 class, advertisements, glenhuntly depot -
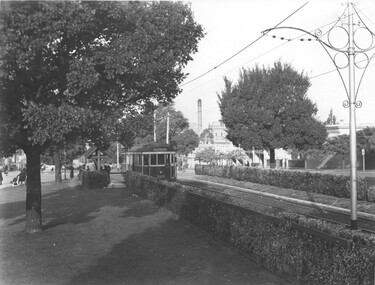 Melbourne Tram Museum
Photograph - W2 399 Victoria Parade, Sutcliffe Pty Ltd, c1930
Black and white photograph of W2 399 eastbound in Victoria Parade with the destination of Deepdene. The tram was fitted with route number boxes in 4/1930. The Victoria Parade line was opened to electric trams on 15/9/1929, dating the photo c1930. The photos shows established hedgerows that were planted along the tram track. The tram is at the Lansdowne St stop which has a tram stop shelter. Note the ornate scroll work on the centre poles. Iin the far distance can be seen the chimney of the Victoria Brewery,Yields information about the then new Victoria Parade tramway and tram 399.Black and white print with photographers stamp on the rear.Sutcliffe Photographers stamp.tramways, tramcars, w2 class, victoria parade, deepdene, centre poles, shelters, tram 399, mmtb