Showing 528 items matching "sea journey"
-
 Victorian Interpretive Projects Inc.
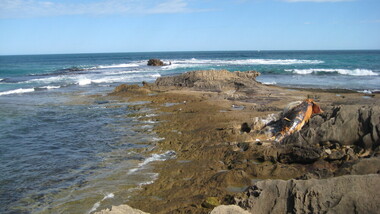
Photograph - Colour, Clare Gervasoni, Dead Whale at Warrnambool, 02/09/2012
The dead whale washed ashore at Warrnambool and has been in the photographed position for around a month when the photograph was taken. Warrnambool is Victoria's Southern Right Whale Nursery and whales have been visiting for hundreds of years. They were hunted almost to the point of extinction, but after whaling was outlawed in 1935 the numbers have been growing. Southern Right Whales live in the sub-Antarctic and migrate to warmer waters around southern Australia in Winter. Female whales migrate to the "nursery" areas close to the shores to bear their calves staying in the nursery for many weeks, allowing claves to feed and gather strength for the return journey to sub-Antarctic waters. The Southern Right Whale can be recognised but its smotth, black back with no dorsal fin. A number of crusty outgrowths, called callosities, are found on the head.Three images of a dead whale washed ashore at Warrnambool. warrnambool, whale, death, sea, shore, southern right -
 Jewish Museum of Australia
Tefillin bag, 1910
At the end of August 1940 the Hired Military Transport Dunera, a boat carrying around 2,500 European male internees, the majority of which were Jewish, arrived on Australian shores after two arduous months at sea. Although many had made England their home, their German or Austrian background caused these men to be classified as ‘enemy aliens’ by the British Government and sent to Australia without their families. The ‘Dunera Boys’ were interned in camps at Tatura and Hay. Although some internees were released after two years because they possessed specific industry skills which would aid the nation, others were interned for the entire duration of the war. This collection brings together objects, personal effects and documents relating to the journey, internment and subsequent military service in the 8th regiment experienced by the ‘Dunera Boys’. Also included are artworks and poems created by the internees during their interment, which express the thoughts and feelings of the men and document the daily life in the camps. Velvet, silk, silk embroidery thread, cotton thread, silk cord, leather, cotton and wood -
 Jewish Museum of Australia
diary, Diary of Rainer Radok, 6/1940 - 5/05/1942
Diary kept during Prof. Rainer Radok's internment in Australia, following his arrival by ship on the HMT Dunera.At the end of August 1940 the Hired Military Transport Dunera, a boat carrying around 2,500 European male internees, the majority of which were Jewish, arrived on Australian shores after two arduous months at sea. Although many had made England their home, their German or Austrian background caused these men to be classified as ‘enemy aliens’ by the British Government and sent to Australia without their families. The ‘Dunera Boys’ were interned in camps at Tatura and Hay. Although some internees were released after two years because they possessed specific industry skills which would aid the nation, others were interned for the entire duration of the war. This collection brings together objects, personal effects and documents relating to the journey, internment and subsequent military service in the 8th regiment experienced by the ‘Dunera Boys’. Also included are artworks and poems created by the internees during their interment, which express the thoughts and feelings of the men and document the daily life in the camps.This is an A5 size notebook of 90 pages, all handwritten in German. Pages are numbered on the upper corners and each entry is dated. Back cover is titled: "Arithmetical Tables" and "Multiplication Table". The blue cover is attached with yellow adhesive tape and is very loose from the inner pages. There are a few drawings throughout.Handwritten in ink on the front cover is the inscription "Radok 1940-1941." Written below in pencil is the address "16 Grove St. Passaie N.J." -
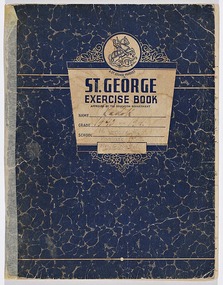
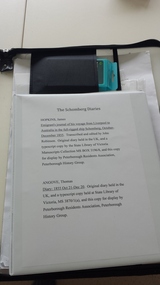 Peterborough History Group
Memorabilia - 160th Anniversary Schomberg Satchel, Peterborough History Group, 2015
Items created for the anniversary of the wreck of the Schomberg and displayed in the Peterborough Hall as part of the anniversary celebrations. Sea Shanty lyrics include a reference to Bully Forbes, Captain. All Schomberg information pertains to display and presentation at the time of the anniversary of the shipwreck celebration in 2015.Plastic zipped satchel containing collected information about the wreck of the Schomberg, created for the 160 year anniversary of the wreck of the Schomberg. Items included are: transcription of the diary of James Hopkins journey on the Schomberg; transcription of the diary of Thomas Angove, passenger on the Clipper ship the Schomberg; 14 large print pages summarising the story of the Schomberg and including lyrics of Blow Boys, Blow, a halyard sea shanty; Ron Cashmore's input.James Hopkins original diary held in the UK, this copy for display by he Peterborough Residents Association, Peterborough History Group. Thomas Angove original diary held in the UK, this copy for display by he Peterborough Residents Association, Peterborough History Group.rex mathieson, ron cashmore, bully forbes, schomberg rock, peterborough 3270, the schomberg, schomberg-shipwreck, shipwreck, sea shanty, captain bully forbes -
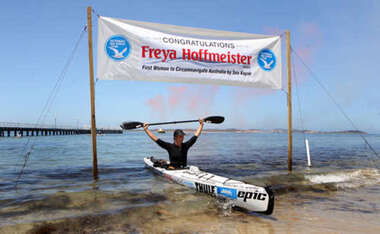 Queenscliffe Maritime Museum
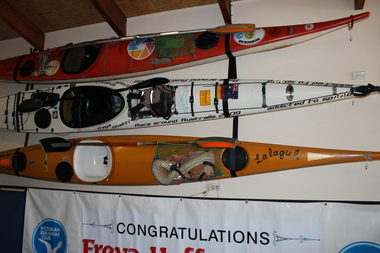
Vehicle - Kayak and Gear
Feja Hoffmeister was the first woman to complete a circumnavigation of Australia by kayak.The journey that started at Queenscliff (Victoria), on the 18/1/2009 and ended at the same point on the 15/12/2009This kayak used by Freja Hoffmeister for her circumnavigation of Australia. Sea kayak [white] with equipment. Various promotional textfreya hoffmeister, kayak, circumnavigation, paul caffyn -
 Queenscliffe Maritime Museum
Vehicle - Kayak
Paul Caffyn undertook perhaps the ultimate kayak circumnavigation, a 9,420mile journey around Australia in 1981/2 which took 360 days to complete. ‘The Dreamtime Voyage’ is his account of this odyssey which is acknowledged as one of the most remarkable journeys ever undertaken by kayak. Paul had to contend with a tropical cyclone which nearly swept him off a small offshore islet in the Coral Sea, raging surf, tiger sharks which frequently bumped into the kayak in the Gulf of Carpentaria, crocodiles, sea snakes and three sections of sheer limestone cliffs. To overcome the three 100 mile plus long sections of cliffs, Paul used Nodoz tablets to stay awake and Lomotil to keep his bowels dormant during these overnight paddles. The longest stint along the awesome Zuytdorp Cliffs in Western Australia, took 34 hours of continuous paddling.Sea kayak used by Paul Caffyn to circumnavigate Australia in 1981-82. First sea kayak to voyage around Australia.Yellow fibreglass kayak"Lalaguli" various other markingssea kayak, paul caffyn, lalagule -
 Ballarat Diocesan Historical Commission
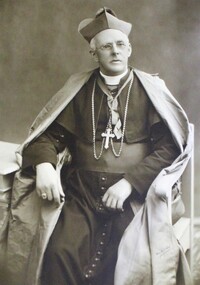
Photograph, Large Photographic Portrait
Rev Daniel Foley was the third Bishop of Ballarat 1916 - 1941. A cousin to Archbishop Mannix of Melbourne he accompanied Mannix on his 1920 journey across the U.S.A giving many public speeches. He was witness to the removal of Mannix from the SS Baltic by the British in the Irish Sea, an event that made world headlines. This large photographic portrait was taken by Thornton photographer Ballarat.Signed on image "Thornton" Photo Ballarat. -
 Falls Creek Historical Society
Mixed media - Steve Lee participation in the Sydney Olympics Torch Relay 2000
Steve Lee grew up in Falls Creek and had skis on his feet when he was just two years old. He later became a member of the Falls Creek Race Club and at the age of 14 won State and National Junior titles. After repeated success, Steve was selected to race overseas in the Australian Junior team. He won the Australian Open Championship at the age of 17. For 10 years, Steve never missed a race in the World Cup Circuit. Overall, he claimed 20 top 15 finishes in Downhill, Super-G and combined events. Towards the end of his career Lee swapped the World Cup circuit for the World Pro Tour in the USA, winning the Pro Downhill Tour ‘King of the Mountain’ title. He was also running a photography business in Falls Creek and was also involved in sports commentating on Australian television. This included commentating Alpine Freestyle events at four Winter Olympics and several World Championships. When the Summer Olympics were held in Sydney in 2000, Steven participated in the Torch Relay. The Torch departed from Athens on the 10th May 2000 and arrived in Sydney on 15th September 2000. The journey totalled 129 days, including 100 days travelling through every State and Territory of Australia. After 67 days in Australia, on 13 August 2000, the Olympic Torch reached the 'high point' in its 100-day journey. At 1,861 metres above sea level, the flame burned bright against a darkening sky as three-time Winter Olympian Steve Lee skied with it down the summit ridge of Mount Hotham towards a crowd of 5,000 in the mountain village. The certificate acknowledges Steve Lee's participation in the event.This image and certificate are significant because they capture an important event in Australian sporting history.Two colour photos of Steven Lee lighting the cauldron at the Hotham Village for the overnight stay of the Olympic Torch in 2000. Also included is a certificate in recognition of his contribution to the Sydney 2000 Olympics.On Certificate:- CITIUS ALTIUS FORTIUS STEVE LEE IN RECOGNITION OF AND APPRECIATION FOR YOUR CONTRIBUTION TO THE SUCCESS OF THE GAMES OF THE XXVII OLYMPIAD EN RECONNAISSANCE DE VOTRE CONTRIBUTION AU SUCCES DES JEUX DE LA XXVII OLYMPIADEsteve lee, sydney torch relay 2000, australian olympians -
 Melton City Libraries
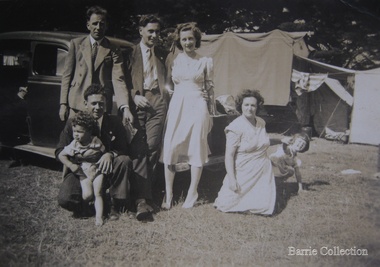
Photograph, Edna and Bon's family camp trip at Apollo Bay, 1948
Wendy Barrie's memories of Apollo Bay The camping trips were a yearly event after the harvest had finished. The trip down to the beach was a much-anticipated event heading out through Parwan and to Geelong leaving behind the hot and dusty plains and our parents relieved to have the hard work of harvesting left behind. The Otways in the distance were reached with great anticipation, Mum in the car and Dad in the Truck ahead of us anxiously winding through the narrow roads and negotiating the hairpin bends and breathing in the cool fresh air of the forest, and keeping an eye out of the log trucks that might come sweeping the corner. The tree ferns with their dripping moisture and the giant trees and the unmistakeable small of the eucalypts. Great excitement was when we caught our first view of the sea from the highest point of the road and then is was the cautious drive the sea level to the sight of the blue ocean with the white of the waves crashing on the rocks and the pristine sand. The water from the Wild Dog and Skenes creek trickling onto the ocean. The tree ferns with their dripping moisture and the giant trees and the unmistakeable smell of the eucalypts. The return journey was usually taken on the Great Ocean Road, it was considered safer to be on the inside of the road. In the early days it was very narrow and passing oncoming cars was taken very cautiously. Landslides and floods sometimes meant we would take the inland route. One year the bridges were washed away and bailey bridges were erected to keep the road open. Rock falls off the cliffs were common Stops on the way home gave us our last chance for our feet in the sand and a swim in the ocean. By the time we reached the hill at Angle Sea the vast blue ocean was behind us and we trekked back through Geelong- Bacchus road and the plains of stubble and the dry grass, and sometimes evidence of burnt patches from a bush fire. The closest we came to a pool at home was the concrete sheep trough at the gate to the work sheds. It was filled with bore water pumped from the nearby windmill. Edna, Bon and their family members at their camp site in Apollo Baylocal identities -
 The Celtic Club
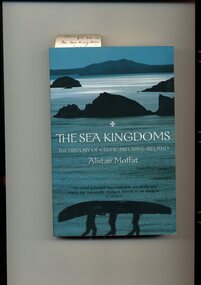
Book, Alistair Moffat, The Sea Kingdoms, 2001
Alistair Moffat's journey, from the Scottish islands and Scotland, to the English coast, Wales, Cornwall and Ireland, ignores national boundaries to reveal the rich fabric of culture and history of Celtic Britain which still survives today.index, bib, maps, ill, plates, p. 316non-fictionAlistair Moffat's journey, from the Scottish islands and Scotland, to the English coast, Wales, Cornwall and Ireland, ignores national boundaries to reveal the rich fabric of culture and history of Celtic Britain which still survives today.oral history. legends and battles of the celtic peoples. -
 Wodonga & District Historical Society Inc
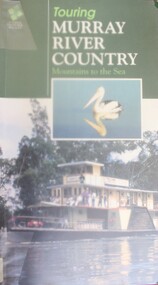
Book - Touring Murray River Country, Stone, Derrick I & Stone, Sascha C, 1996
... , Australia from its source in the mountains following its journey ...A touring guide of the Murray RIver, Australia from its source in the mountains following its journey to the sea. The first sections cover information about the area of the Upper Murray, including Lake Hume and the Albury-Wodonga area.A publication of 128 pages includes 230 full colour photos, 42 illustrations and 19 colour route maps. A touring guide of the Murray RIver, Australia from its source in the mountains following its journey to the sea. The first sections cover information about the area of the Upper Murray, including Lake Hume and the Albury-Wodonga area.murray river, australia - tourism -
 Stawell Historical Society Inc
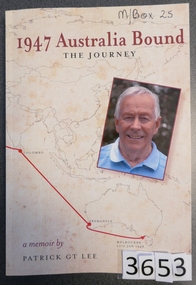
Book, Patrick G.T. Lee, 1947 Australia Bound - The Journey - Previously Cat No 3653, 2016
Chapter 7 relates to the family Life in Stawell Card Cover. Line drawn map showing the sea route from England to Melbourne, and a colour photo of the Author 1947 Australia Bound Thoe Journey A memoir by Patrick GT Lee Inside: To Jim Best Wishes Patstawell -
 Flagstaff Hill Maritime Museum and Village
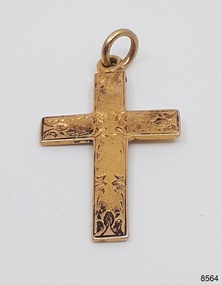
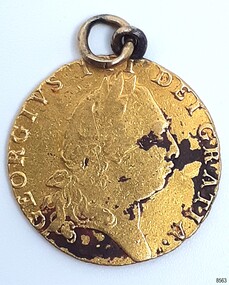
Accessory - Gold Cross, Bef. 01-06-1878
The gold cross was discovered by Victorian scuba diver Julie Wilkins, who had already experienced more than 500 dives in Australia and overseas. She was holidaying in Peterborough, Victoria, and looking forward to discovering more about the famous Loch Ard ship, wrecked in June 1878 at Mutton Bird Island. The fast Glasgow-built clipper ship was only five years old when the tragedy occurred. There were 54 people on board the vessel and only two survived Julie's holiday photograph of Boat Bay reminds her of her most memorable dive. Submerged in the calm, flat sea, she was carefully scanning around the remains of the old wreck when, to her amazement, a gold coin and a small gold cross suddenly came up towards her. She excitedly cupped them in her hands, then stowed the treasures safely in her wetsuit and continued her dive. She soon discovered a group of brass carriage clock parts and some bottles of champagne. It was a day full of surprises. The items were easily recognisable, without any build-up of encrustations or concretion. Julie secretly enjoyed her treasures for twenty-four years then packed them up for the early morning train trip to Warrnambool. After a short walk to Flagstaff Hill Maritime Museum and Village, her photograph was taken as she handed over her precious find. She told her story to a local newspaper reporter, lunched a café in town then took the late afternoon train home. Her generous donation is now part of a vast collection of Loch Ard shipwreck artefacts, including the gold watch and the Minton Majolica model peacock. The small decorative cross dates back to on or before 1878, when the Loch Ard had set sail. The loop and ring have been added, perhaps as a pendant, pocket watch accessory or similar purpose. It may have been worn for ‘good luck’ or a ‘blessing’ on the long journey to Australia, where ships had to carefully navigate the treacherous Bass’s Strait before arriving at their destination of Melbourne. Sadly, many met their fate on that short stretch of ocean aptly named the Shipwreck Coast. The cross is very recognisable even though it was exposed to the wrecking of the ship, its consequent movement, and the sea's turbulence. Its scratched, pitted and worn condition, and the damage near the loop, is part of its story. The red-brown-black discolouration is similar to that found on other gold coins, sometimes called the ‘corrosion phenomena’. Studies suggest the possible cause is contaminants in the minting process reacting to the coins’ environment. Three edges of the cross have slightly raised narrow ridges of gold which could have been cause by the gold being cast liquid gold into a mould.This gold cross pendant is significant as a symbol of Christianity, a sign of hope and safety, and a sample of the religious following on board the Loch Ard, although not everyone wears a cross for this reason. This cross is a sample of jewellery owned by people migrating to Australia in the late 19th century. The cross and the guinea recovered together from the wreck of the Loch Ard are made of gold and help interpret the financial status of some of those on board.Gold cross; yellow gold with decorative hand engraved foliage design on the front, fitted loop and ring on top. The simple Latin or Roman variation of the cross, with an elongated vertical arm, has no figure on it and the reverse has no decoration. The right, left and base edges have sections of narrow, long slightly raised ridges. The top edge has remnants of red-black colour. Victorian era cross, ca. 1878. The cross was recovered from the wreck of the ship Loch Ard.Engraved foliage design. Slightly raised long ridges on sides and base edges. flagstaff hill maritime museum and village, warrnambool, great ocean road, shipwreck coast, gold cross, religious cross, religious trinket, religious jewellery, engraved cross, cross pendant, cross with ring, victorian era, 1878, antique cross, crucifix, religious symbol, christian symbol, christian jewellery, contamination phenomena, gold corrosion, good luck, lucky charm, blessing, pendant, loch ard, wreck of the loch ard, mutton bird island, peterborough, scuba diver, 1980s, shipwreck artefact, relic, latin cross, roman cross, pectoral cross, julie wilkins -
 Flagstaff Hill Maritime Museum and Village
Horse Brass
When the ship Schomberg was launched in 1855, she was considered the most perfect clipper ship ever to be built. James Blaine’s Black Ball Line had commissioned her to be built for their fleet of passenger liners. At a cost of £43,103, the Aberdeen builders designed her to sail faster than the quick clippers designed by North American Donald McKay. She was a three masted wooden clipper ship, built with diagonal planking of British oat with layers of Scottish larch. This luxury vessel was designed to transport emigrants to Melbourne in superior comfort. She had ventilation ducts to provide air to the lower decks and a dining saloon, smoking room, library and bathrooms for the first class passengers. At the launch of Schomberg’s maiden voyage, her master Captain ‘Bully’ Forbes, drunkenly predicted that he would make the journey between Liverpool and Melbourne in 60 days. Schomberg departed Liverpool on 6 October 1855 with 430 passengers and 3000 tons cargo including iron rails and equipment intended the build the Geelong Railway and a bridge over the Yarra from Melbourne to Hawthorn. The winds were poor as Schomberg sailed across the equator, slowing her journey considerably. She was 78 days out of Liverpool when she ran aground on a sand-spit near Peterborough, Victoria, on 27 December; the sand spit and the currents were not marked on Forbes’s map. Overnight, the crew launched a lifeboat to find a safe place to land the ship’s passengers. The scouting party returned to Schomberg and advised Forbes that it was best to wait until morning because the rough seas could easily overturn the small lifeboats. The ship’s Chief Officer spotted SS Queen at dawn and signalled the steamer. The master of the SS Queen approached the stranded vessel and all of Schomberg’s passengers were able to disembark safely. The Black Ball Line’s Melbourne agent sent a steamer to retrieve the passengers’ baggage from the Schomberg. Other steamers helped unload her cargo until the weather changed and prevented the salvage teams from accessing the ship. Local merchants Manifold & Bostock bought the wreck and cargo, but did not attempt to salvage the cargo still on board the ship. They eventually sold it on to a Melbourne businessman and two seafarers. After two of the men drowned when they tried to reach Schomberg, salvage efforts were abandoned.32 In 1975, divers from Flagstaff Hill, including Peter Ronald, found an ornate communion set at the wreck. The set comprised a jug, two chalices, a plate and a lid. The lid did not fit any of the other objects and in 1978 a piece of the lid broke off, revealing a glint of gold. As museum staff carefully examined the lid and removed marine growth, they found a diamond ring, which is currently on display in the Great Circle Gallery.33 Flagstaff Hill also holds ship fittings and equipment, personal effects, a lithograph, tickets and photograph from the Schomberg. Most of the artefacts were salvaged from the wreck by Peter Ronald, former director of Flagstaff Hill. The Schomberg, which is on the Victorian Heritage Register (VHR S612), has great historical significance as a rare example of a large, fast clipper ship on the England to Australia run, carrying emigrants at the time of the Victorian gold rush. She represents the technical advances made to break sailing records between Europe and Australia. Flagstaff Hill’s collection of artefacts from the Schomberg is significant for its association with the shipwreck. The collection is primarily significant because of the relationship between the objects, as together they have a high potential to interpret the story of the Schomberg. It is archaeologically significant as the remains of an international passenger Ship. It is historically significant for representing aspects of Victoria’s shipping history and for its association with the shipwreck and the ship, which was designed to be fastest and most luxurious of its day Small brass horse harness disc 1½" in diameter. Slight verdigris and encrustation. Recovered from the wreck of the Schombergwarrnambool, shipwrecked-coast, flagstaff-hill, flagstaff-hill-maritime-museum, maritime-museum, shipwreck-coast, flagstaff-hill-maritime-village, schomberg, shipwrecked-artefact, clipper ship, black ball line, 1855 shipwreck, aberdeen clipper ship, captain forbes, peterborough shipwreck, ss queen, horse harness, horse brass -
 Flagstaff Hill Maritime Museum and Village
Currency - Guinea Coin, The Royal Mint, 1793 George III Spade Guinea, 1793
The coin was discovered by Julie Wilkins, a Victorian scuba diver who had already experienced more than 500 dives in Australia and overseas. She was holidaying in Peterborough, Victoria, and looking forward to discovering more about the famous Loch Ard ship, wrecked in June 1878 at Mutton Bird Island. The fast Glasgow-built clipper ship was only five years old when the tragedy occurred. There were 54 people on board the vessel and only two survived Julie's holiday photograph of Boat Bay reminds her of her most memorable dive. Submerged in the calm, flat sea, she was carefully scanning around the remains of the old wreck when, to her amazement, a gold coin and a small gold cross suddenly came up towards her. She excitedly cupped them in her hands, then stowed the treasures safely in her wetsuit and continued her dive. She soon discovered a group of brass carriage clock parts and some bottles of champagne. It was a day full of surprises. The items were easily recognisable, without any build-up of encrustations or concretion. Julie secretly enjoyed her treasures for twenty-four years then packed them up for the early morning train trip to Warrnambool. After a short walk to Flagstaff Hill Maritime Museum and Village, her photograph was taken as she handed over her precious find. She told her story to a local newspaper reporter, lunched a café in town then took the late afternoon train home. Her generous donation is now part of a vast collection of Loch Ard shipwreck artefacts, including the gold watch and the Minton Majolica model peacock. The coin is a British 1793 George III Gold Spade Guinea. It was already 83 years old when the Loch Ard had set sail. The loop and ring have been added, perhaps as a pendant, pocket watch accessory or similar purpose. It may have been worn for ‘good luck’ on the long journey to Australia, where ships had to carefully navigate the treacherous Bass’s Strait before arriving at their destination of Melbourne. Sadly, many met their fate on that short stretch of ocean aptly named the Shipwreck Coast. The coin is very recognisable even though it was exposed to the wrecking of the ship, its consequent movement, and the sea's turbulence. Its bent, scratched, buckled, split, dinted and worn condition is part of its story. The red-brown-black discolouration is similar to that found on other gold coins, sometimes called the ‘corrosion phenomena’. Studies suggest the possible cause is contaminants in the minting process reacting to the coins’ environment. The GEORGE III GOLD SPADE GUINEA: - The British Guinea was introduced in 1663 and was circulated until 1814. It was made of 22 carat gold, was 25 to 26 cm in diameter and weighed 8.35 grams. It had a value of 21 British shillings. The guinea coin ceased circulation after 1816 and was replaced by the one-pound note. However, the term ‘guinea’ continued to represent 21 shillings. King George (1738-1820) had six gold guinea designs minted during his reign from 1760 and 1820. Each of the six had different obverse portraits, all facing the right. There were three different reverse sides. The Spade Guinea was the fifth issue of the coin, introduced in 1787 and produced until 1799. The reverse shows a royal crown over a flat-topped shield with the Royal Arms of Great Britain, used in Scotland between 1714 and 1800. The shield images are, from left to right, top to bottom, the Arms of England and Scotland, the Arms of France, the Arms of Ireland, and the Arms of the House of Hanover. The Gold Guinea is also part of Australia’s history. It was the first coin mentioned in the announcement of Governor King of New South Wales his Australian Proclamation of a limited variety and denomination of coins accepted for use in the Australian Colony. The historic and decorative George III Spade Guinea has been reproduced for special collections of coins. However, replicas and imitations have also been made as souvenirs for tourists, as gaming tokens and chips for gamblers, and as ‘fake’ coins for profit. These coins differ in many ways; they may be only half the weight of the genuine coin. Often have a small stamp on the obverse with “COPY” or the manufacturer’s name or initials. Some have scalloped edges, some have dates that are different to the original dates of issue, and some even have text in Latin that translates as something very different to the original coin.The King George III Guinea was only produced from 1663 to 1814 and was the first English coin to be mechanically minted. The coin is the fifth edition of the King George III Guinea, the Spade Guinea, was only produced between 1787 and 1799. It is the only edition with this portrait of King George and the only one with the Royal Coat of Arms of Great Britain in Scotland on the reverse side. This edition was also the last guinea in circulation, because the sixth edition was reserved as the Military guinea. This edition of the Guinea is unique; This coin is the only guinea in our collection. It was minted in 1793, so it is now over 230 years old. The Gold Guinea is part of Australia’s history; it was the first coin in the list of coins for use in the Australian Colonies, mentioned by Governor King of New South Wales in his Australian Proclamation speech of 1800. The George III Spade Guinea was included in the Limited Edition Sherwood 12 Coin Collection of Notable Coinage of Australia. This coin is the only known guinea coin recovered from the wreck of the Loch Ard. It was already 85 years old when the ship was wrecked.Gold coin; British. 1793, King George III of the United Kingdom of Great Britain and Ireland (1760-1820), Spade Guinea. Yellow gold coin with gold metal loop mount and a gold ring through the loop. The design is the fifth issue of the George III Gold Guinea. The obverse relief is a portrait of George III facing right. Reverse relief is a crown above the Coats of Arms (1801-1816) of flat top spade-shaped shield divided into four quadrants that depict crowned lions, fleur de lies, a harp. These images are identified as, from left to right, top to bottom, England and Scotland, France, Ireland and Hanover. Inscriptions are minted around the rims of each side. The coin is dated 1793. Its surface has dark areas on both sides and the reed edge and surfaces are well worn. The loop mount is bent and the ring is buckled. The coin was recovered from the wreck of the ship Loch Ard.Obverse text; 'GEORGIVS III DEI GRATIA' (translates to George the Third, by the Grace of God) Obverse relief; (King George III bust, facing right, laurel wreath on head) Reverse text; 'M.B.E.ET.H.REX.F. D.B.ET.L.D. S.R.I.A.T.ET.E' '1793' (translates to: King of Great Britain, France and Ireland, Defender of the Faith, Duke of Brunswick and Lüneburg, Arch-Treasurer and Elector of the Holy Roman Empire) Reverse relief; a spade-shaped image i.e. (Crown with fleer de lies, above Shield with crowned lions in different postures, a harp, and other details)flagstaff hill maritime museum and village, warrnambool, great ocean road, shipwreck coast, royal mint, british coin, currency, guinea, military guinea, australian currency, british guinea, gold coin, spade guinea, king george iii, george iii, fifth portrait, arms of england and scotland, arms of france, arms of ireland, arms of the house of hanover, coins, gold coins, gold medallion, georgian era, 1793, numismatics, contamination phenomena, gold corrosion, good luck, lucky charm, pendant, lucky coin, trade, loch ard, wreck of the loch ard, 1878, mutton bird island, peterborough, scuba diver, 1980s, guinea coin, gold guinea, shipwreck artefact, relic, julie wilkins -
 Flagstaff Hill Maritime Museum and Village
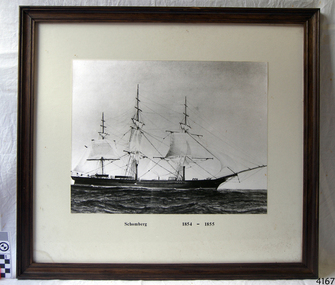
Photograph - Vessel, Sailing Ship, Schomberg 1854 - 1855, Ca. 20th century
When the ship Schomberg was launched in 1855, she was considered the most perfect clipper ship ever to be built. James Blaine’s Black Ball Line had commissioned her to be built for their fleet of passenger liners. At a cost of £43,103, the Aberdeen builders designed her to sail faster than the quick clippers designed by North American Donald McKay. She was a three masted wooden clipper ship, built with diagonal planking of British oak with layers of Scottish larch. This luxury vessel was designed to transport emigrants to Melbourne in superior comfort. She had ventilation ducts to provide air to the lower decks and a dining saloon, smoking room, library and bathrooms for the first class passengers. At the launch of Schomberg’s maiden voyage, her master Captain ‘Bully’ Forbes, drunkenly predicted that he would make the journey between Liverpool and Melbourne in 60 days. Schomberg departed Liverpool on 6 October 1855 with 430 passengers and 3000 tons cargo including iron rails and equipment intended the build the Geelong Railway and a bridge over the Yarra from Melbourne to Hawthorn. The winds were poor as Schomberg sailed across the equator, slowing her journey considerably. She was 78 days out of Liverpool when she ran aground on a sand-spit near Peterborough, Victoria, on 27 December; the sand spit and the currents were not marked on Forbes’s map. Overnight, the crew launched a lifeboat to find a safe place to land the ship’s passengers. The scouting party returned to Schomberg and advised Forbes that it was best to wait until morning because the rough seas could easily overturn the small lifeboats. The ship’s Chief Officer spotted SS Queen at dawn and signalled the steamer. The master of the SS Queen approached the stranded vessel and all of Schomberg’s passengers were able to disembark safely. The Black Ball Line’s Melbourne agent sent a steamer to retrieve the passengers’ baggage from the Schomberg. Other steamers helped unload her cargo until the weather changed and prevented the salvage teams from accessing the ship. Local merchants Manifold & Bostock bought the wreck and cargo, but did not attempt to salvage the cargo still on board the ship. They eventually sold it on to a Melbourne businessman and two seafarers. After two of the men drowned when they tried to reach Schomberg, salvage efforts were abandoned.32 In 1975, divers from Flagstaff Hill, including Peter Ronald, found an ornate communion set at the wreck. The set comprised a jug, two chalices, a plate and a lid. The lid did not fit any of the other objects and in 1978 a piece of the lid broke off, revealing a glint of gold. As museum staff carefully examined the lid and removed marine growth, they found a diamond ring, which is currently on display in the Great Circle Gallery.33 Flagstaff Hill also holds ship fittings and equipment, personal effects, a lithograph, tickets and photograph from the Schomberg. Most of the artefacts were salvaged from the wreck by Peter Ronald, former director of Flagstaff Hill. The Schomberg, which is on the Victorian Heritage Register (VHR S612), has great historical significance as a rare example of a large, fast clipper ship on the England to Australia run, carrying emigrants at the time of the Victorian gold rush. She represents the technical advances made to break sailing records between Europe and Australia. Flagstaff Hill’s collection of artefacts from the Schomberg is significant for its association with the shipwreck, The collection is primarily significant because of the relationship between the objects, as together they have a high potential to interpret the story of the Schomberg. It is archaeologically significant as the remains of an international passenger Ship. It is historically significant for representing aspects of Victoria’s shipping history and for its association with the shipwreck and the ship, which was designed to be fastest and most luxurious of its day Photograph of the sailing ship Schomberg, mounted in a wood frame behind glass with a white matt Figures can be seen on deck of the ship."Schomberg 1854-1855"warrnambool, flagstaff-hill, flagstaff-hill-maritime-museum, maritime-museum, shipwreck-coast, flagstaff-hill-maritime-village, schomberg, shipwrecked-artefact, clipper ship, black ball line, 1855 shipwreck, aberdeen clipper ship, captain forbes, peterborough shipwreck, ss queen, photograph -
 Flagstaff Hill Maritime Museum and Village
Letter - William Ferrier, 14th November 1905
The letter to William Ferrier of South Warrnambool from the Prime Minister and the Parliament of the Commonwealth recognised the significance of William’s brave and courageous lifesaving act to the people of Australia; “They all feel that your conduct was worthy of the best deeds done by British sailors in the past and they are proud to know that Australia can produce such as you.” The story of that brave rescue follows on below … The ship from which the sailors were rescued was the three-masted, iron and steel barquentine the La Bella, built in Norway in 1893. She was one of two iron and steel ships by Johan Smith, The company was one of the leading shipping families in Tvedestrand, Norway. She was significant to Norwegian shipping, being one of only 27 iron and steel ships ever built in Norway. She was registered in New Zealand and engaged from 1902 in inter-colonial trading of timber in the Pacific, between New Zealand and Australia and was often in Port Phillip Bay, Victoria. On 5th October 1905, the twelve-year-old La Bella left Lyttleton, New Zealand carrying a cargo of timber bound for Warrnambool, Australia. She was manned by a crew of twelve: the Master, (Captain Mylius, previously 1st Mate of La Bella, appointed Captain to La Bella on 6th February 1903) 2 Mates, Cook, six able seamen, one ordinary seaman and a boy. Bad weather en route caused her to shelter at Burnie on Tasmania's North West coast. On November 10th, the 37th day of her journey, La Bella approached Warrnambool. Captain Mylius steered her towards Lady Bay Channel in heavy south-west seas and evening mist. He ordered the helmsman to steer for the light. As the ship came round, a tremendous sea struck her on the port quarter, causing her to breach broadside in a north-westerly direction into breakers. The helm was brought round twice more, but each time heavy seas broke over her, the third time throwing the La Bella on to a submerged reef in Lady Bay now known as La Bella Reef (about 100 yards from the Warrnambool breakwater). The sea was so rough that it even wrenched a one-and-a-half ton anchor from its fastenings and into the sea. As Captain Mylius headed to the steel wheelhouse, intending to send up a rocket flare, a huge sea slammed the steel door into him (resulting in massive bruising front and back) Despite his injuries he still managed to set off a blue light, which he held up in his hands. La Bella’s lifeboats were filled with seawater and broke up on their chocks. The blue light was the first indication to people on the shore that there was a ship in distress. The Harbour Master, Captain Roe (who lived in the Harbour Master’s House opposite Flagstaff Hill), organised a group of volunteers to crew the lifeboat because the trained crew was unavailable; the crewmen were working on a steamer in Port Fairy at the time. He then poured oil onto the water to try and smooth the sea. At around 11 pm three of the crew took shelter in the steel forecastle but the sea crashed into it and broke it up. While the rest of the crew and onlookers watched helplessly in the moonlight the bodies were washed away into the sea, never to be seen again. Some of the crew lashed themselves to the weather rail to keep from being washed away. Watson, the ordinary seaman, became tangled in the rigging lines and was too weak to move, so the 2nd Mate, Robertson, put a line onto him so that he wouldn’t wash off. Around 11 pm three of the crew were unconscious from exhaustion. The situation on La Bella was becoming dangerous. The 2nd Mate moved to the ‘house’ and soon afterwards the ship slipped in the heavy sea. The lashings of the 1st Mate and the ‘boy’ Denham had kept them safe until about 2 am when they were washed overboard; no one was able to help. One by one, the exhausted crew were being washed overboard, too weak to hold on any longer. During the night the La Bella had broken into two and the deckhouse ran out towards the sea. Two more men drowned when trying to reach the lifeboat. By sunrise, the only survivors of the twelve were the Master, 2nd Mate and three seamen. Early in the morning, Captain Roe used the rocket apparatus on shore to try and shoot a line to the ship for a safer rescue but each attempt fell short of the target. Several attempts were made by the lifeboat to rescue the stricken sailors, but the rough conditions made this difficult for the boat to get close enough to the ship and the lifeboat had to return to shore. During a final attempt to reach the ship Captain Mylius ordered his men to jump into the sea. Leonard Robertson, 2nd mate, jumped and swam towards the lifeboat, taking hold of the boat hook offered to him. Oscar Rosenholme managed to reach the boat floating on a piece of timber from the ship’s load and a third survivor, Noake, also made the boat. Along with the lifeboat rescue crew, 25-year-old William Ferrier rowed his small dingy through the heavy seas and managed to rescue the Captain, whom he landed on the breakwater. Ferrier then returned to the ship to attempt a final rescue, losing his oars and rowlocks into the high sea. Using just a spare paddle he skulled towards the La Bella, reaching her stern in time to cut loose the lone surviving sailor, Payne, from the lashing that held him to the ship; the terrified sailor dropped from the ship and into the dingy. Shortly after the last man was rescued, the La Bella was lifted by a huge wave and crashed back down on the reef; she broke up and sank. The ordeal had lasted ten hours. The survivors were taken to the nearby Bay View Hotel and gratefully received warm food and clothing, medical attention and a place to sleep. In the following days, an unidentified body of a young person has washed ashore; it was either Watson or Denham. The body was buried in the Warrnambool cemetery with an appropriate gravestone and inscription. William Ferrier became a national hero as news of the daring rescue spread. In recognition of his bravery in the two daring rescues, he was awarded the Silver Medal for Bravery by the Royal Humane Society and was honoured in the letter from the Prime Minister and the Parliament of the Commonwealth, telegrams and a cheque for £20 from the Governor-General, over £150 subscribed by the public, including Warrnambool and district and readers of The Argus, and a gold medal from the Glenelg Dinghy Club of South Australia. Ferrier’s rescue efforts are one of the most heroic in Victoria’s shipwreck history. (William Ferrier’s son, Frank, received a similar award almost fifty years later when he helped rescue four members of the crew on the yacht Merlan after it ran on to a reef near the Point Lonsdale Lighthouse. ) The wreck of La Bella now lies on her port side in 13 metres of sheltered water inside the reef she struck. The bow section is relatively intact and part of the stern has drifted north-easterly towards the mouth of the Hopkins River. The reef the La Bella struck now bears its name. Those five rescued from the La Bella were Captain George Mylius, Leonard Robertson (2nd Mate, 21 years old), R. Payne, Oscar Rosenholme and Jack Noake. Those seven who lost their lives were Mr Coulson (1st mate), Charles Jackman (cook) Gustave Johnson, Pierre Johann and Robert Gent (all able seamen), Harry Watson (ordinary seaman) and Jack Denham (ship’s boy), Captain Mylius was found guilty of careless navigation; he had sailed into the bay without the services of a pilot. His Master Certificate was suspended for twelve months. Later he was also charged with the manslaughter of one of the crew who had died when the La Bella was wrecked but found not guilty. The event’s adverse publicity and damage to his career took a toll on his health and he died of a heart attack six months after the wreck; he was only thirty-seven. His body was buried in the Melbourne General Cemetery. The La Bella was “the best documented of all sailing ships owned in New Zealand”. Her record books, ship logs, correspondence and supporting papers are still available. At the time of the tragedy, she was owned by Messers David C.Turnbull and Co. of Timaru, New Zealand timber merchants and shipping agents, who had purchased her on 13th December 1901. A detailed account of the last journey of La Bella can be read in “Leonard Robertson, the Whangaroa & La Bella” written by Jack Churchouse, published in 1982 by Millwood Press Ltd, Wellington, NZ. As well as this letter, Flagstaff Hill’s La Bella Collection includes a photograph of the wrecked La Bella, a brass rail holder and a postcard of William Ferrier with four of the survivors. Some 15 – 17 ships are believed to have sunk in Lady Bay, but only two have been discovered on the seafloor; the “La Bella” and the “Edinburgh Castle”. Both wrecks are popular diving sites and are preserved as significant historical marine and marine archaeological sites. This original congratulatory letter sent to William Ferrier by the Prime Minister and Government of Australia demonstrates the importance attached to his efforts for Victoria and to Australia. The letter is part of the La Bella Collection and is significant at both a local and state level. Its connection to the La Bella shipwreck and the rescue of five survivors highlights the dangers of Victoria’s Shipwreck Coast. The letter to William Ferrier from the Australian Government acknowledges the bravery of ordinary Australians who risked their lives to save victims of shipwrecks along the coast. The letter is significant to the history of Warrnambool as it honours William Ferrier, a local fisherman whose descendants continue to live in the area. It highlights the way of life of people who lived in coastal towns in 19th century Victoria and the effects of shipwrecks upon them. The letter connects to the postcard of William Ferrier with four of the five rescued crew, the photograph of the wreck of the La Bella and the artefact from the wreck, the rail holder. This letter is significant because of its association with the sailing ship “La Bella”. The “La Bella” is of local and state and national significance. It is one of the only two shipwrecks discovered in Lady Bay, Warrnambool, out of the 15-17 shipwrecks in the bay. Letter to William Ferrier of South Warrnambool from the Prime Minister and Members of Parliament commending him on his bravery. The printed letterhead includes a coat of arms in the top centre and the official address. The letter is very neatly hand written in black pen and includes 4 signatures of Members of Parliament. The rectangular paper is cream coloured with some yellow/brown discolouring. It has the letterhead on the right hand side of it and the written letter begins below the letterhead. The paper has been folded so that the right side becomes the cover page of the letter. The writing is continued onto the inside right hand page of the folded paper and the writing ends here. There is more recent writing on the bottom right hand corner of the back page. The paper has been officially folded in half a total 3 times and there is heavy discolouration on the sections that form the front and back of the folded letter. There is a 4th fold line that is less pronounced that the other folds and would make the paper the size to fit into a pocket. At several fold creases the paper has worn through. The edges of the paper have minor tears. The printed coat of arms is that of the House of Representatives. Underneath is printed “The Parliament of the Commonwealth, / Parliament House / Melbourne”. The hand written, letter is dated “14th November, 1905” and addressed to “Mr. William Ferrier / South Warrnambool” The letter begins “The Speaker, the Prime Minister and Members of the Ministry and its supporters, the Leader and Members of the Opposition, the Leader and Members of the Labour Party, being all the Members of the House of Representatives of the Federal Parliament of Australia” … It continues “desire to express to you their appreciation of your bravery in skulling out to the wreck of the “La Bella” at Warrnambool on Saturday, 11th November, 1905, and recovering therefrom two of the crew who were in imminent danger of their lives. They all feel that your conduct was worthy of the best deeds done by British sailors in the past and they are proud to know that Australia can produce such as you.” The letter is “Signed on behalf of the Members – Speaker (Frederick Holder ), Deputy Leader of the Opposition (Joseph Cook ), Prime Minister (Alfred Deakin), Leader of the Labour Party ( J.C. Watson)” On the back of the letter is blue ink handwriting “OWNER / G. FERRIER / TO. BE. PHOTOGRAPHED / 27-4-76”la bella, william ferrier, bill ferrier, lady bay, 1905, 10th november 1905, 11th november 1905, parliament of the commonwealth, prime minister, australian government, new zealand, flagstaff hill, warrnambool, shipwrecked coast, flagstaff hill maritime museum, maritime museum, shipwreck coast, flagstaff hill maritime village -
 Flagstaff Hill Maritime Museum and Village
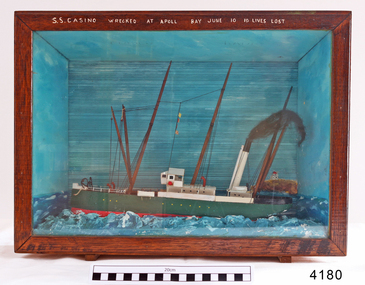
Craft - Ship Model, S.S. Casino
Ship model of coastal trader SS Casino in glass fronted case with stained wood frame. Ship has both steam and sail. Background of lighthouse on cliff, sea and sky. Ship painted green, 3 flags flying. Details (incorrect) of ship painted in white across top frame of case. The S.S. Casino was a passenger and freight steamer built in Dundee, Scotland, in 1882 for the Newcastle and Hunter River Steam Navigation Company of N.S.W. She weighed 425 tons gross with a length of 160.4 feet, beam of 24.1 feet and depth of 10.2 feet. She had saloon accommodation for 35 people, forecabin for 25 more people, and she carried 300 tons of cargo. While on her delivery journey on May 30th 1882 the S.S. Casino called in at the Port of Warrnambool for coal ., narrowly escaping going ashore in gale force winds due to the quick action of the pilot. At that time, still at anchor, she impressed the directors of the Belfast and Koroit Steam Navigation Company so much that they bought her immediately; she was ideal for trade in along the West Coast of Victoria. (Belfast is the original name for Port Fairy, South West Victoria. The Belfast and Koroit Steam Navigation Company was first managed by Messers. Saltau and Osburne and after the passing of Mr. Osburne, by produce merchants Messers H. Sautau and Sons, whose had a hay and corn store and shipping agency was on the corner of Liebig and Koroit Streets in Warrnambool. ) The S.S. Casino became “the most famous steamer to operate in Victorian waters along the West Coast” by author Jack Loney. Captain Boyd was her first Master, followed by Captain Chapman, who stayed with her 1890 until 1924. Captain W. Robertson followed for a short term, then Captain Middleton then took command 1925 - 1932. The S.S. Casino had several mishaps during her life. One was on 3rd January 1898 when she collided with the S.S. Flinders in Apollo Bay with minor damage. Another was on 24th October 1924 when she grounded on a reef at Point Hawdon near Grey River and most of her cargo (of Christmas goods) had to be dumped into the sea. Then in February 1929 she was ‘holed’ when she struck a submerged object as she entered Lady Bay, Warrnambool. On the morning of 10th July 1932, after attempting to berth at Apollo Bay jetty in heavy seas, Captain Middleton decided to take her out into the bay and wait until the seas abated. It was not realised that the anchor used to steady her as she manoeuvred to her berth had pierced her hull. She put about and headed for the beach but sank. Captain Middleton and nine others lost their lives; nine people were rescued including the two female passengers . Captain Middleton had been in charge of the S.S. Casino for seven years. He was the first ship’s Master to lose his life through shipwreck in the West Coast trade. In the years following the turn of the century the S.S. Casino remained the only regular trader with normal passenger accommodation along the West Coast. From 1882 she had made at least 2,500 voyages on the one run. Flagstaff Hill’s collection has a photograph of a portrait of Captain Chapman, , a ship model of the S.S. Casino that shows both forms of power under which she sailed, steam and sail. The ship is painted green and flies three flags. The inscription across the case of the ship model, incorrectly dated, tells the sad story of the wreck of the ship and the loss of lives on July 10th 1932 at Apollo Bay. A print in the Collection show S.S. Casino underway in heavy sea off Point Lonsdale, another two photographs show her at the Port of Warrnambool, leaving from the Breakwater in Lady Bay and another identifies the S.S. Casino as a ship from the Belfast and Koroit Steam Navigation Company. (Belfast is the original name for the township of Port Fairy). This ship model is significant because of its association with the coastal trader S.S. Casino 1882-1932 and its significance to trade along Victoria's West Coast in the late 19th and early 20th century. The wreck of the S.S. Casino is considered an important part of Victorian and Australian cultural heritage and as such has been declared and protected as an Historic Shipwreck under State and Commonwealth Law in the Commonwealth Historic Shipwrecks Act (1976). Ship model SS Casino in glass fronted case with stained wood frame. Ship has both steam and sail. Background of lighthouse on cliff, sea and sky. Ship painted green, 3 flags flying. Details of ship painted in white across top frame of case. NOTE: Correct details for shipwreck is 10 July 1932, at Apollo BayPainted in white on wood across top of case "SS CASINO WRECKED AT APOLL BAY JUNE 10 10 LIVES LOST".flagstaff hill, warrnambool, shipwrecked coast, flagstaff hill maritime museum, maritime museum, shipwreck coast, flagstaff hill maritime village, great ocean road, newcastle and hunter river steam navigation company, belfast and koroit steam navigation company, h. sautau and sons, s.s. casino, west coast trader s.s. casino, victorian coastal trader, captain boyd, captain w. robertson, captain chapman, captain middleton, apollo bay shipwreck, s.s. casino at lady bay warrnambool, ship model s.s. casino, saltau and osburne