Showing 1963 items
matching signaling
-
 Bendigo Military Museum
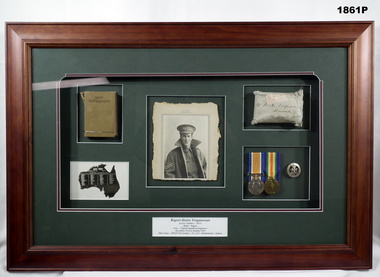
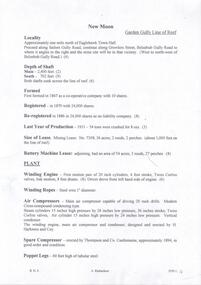
Memorabilia - MEMORABILIA, FRAMED, Memorabilia for Rupert Henry Treganowan
Rupert Henry Treganowan No 18321. Refer 1862.5 for service history also 1863, 1864. Mounted and framed selection of items relating to Rupert Henry Treganowan, WW1, including photograph, New Testament, memorial card, medals, badge and envelope package. Frame - Timber, mid brown stain, plain moulding. Mount - dark green cardboard, red inner mount, glass front.Below collection, in black print "RUPERT HENRY TREGANOWAN"/SERVICE NUMBER - 18321/RANK - SAPPER/UNIT/SIGNAL SQUADRON ENGINEERS/ December 1916 to October 1919/Ship name -HMAT PORT SYDNEY - NO. A15 - Embarkation - Sydney" photography-photographs, numismatics-medals, military, badges, framed memorabilia, ww1, history -
 Plutarch Project
Machine - Shortwave Radio Antenna, Active Antenna, circa late 1980's
This antenna was used between 1989 and 1990 to help receive the daily news service in the Greek language directly from Athens, Greece. At the time, news from Greece for the Greek people in Australia were arriving in Melbourne a week late, on newspapers from Athens sent through air-mail. These newspapers were displayed at Salapatas and Carras newsagents at Lonsdale street in Melbourne. One thing that was a problem for this service was that the news came at least 7 days late. Using the Shortwave Antenna we could get the latest news from Athens on shortwave radio directly and within an hour these news were recorded on a cassette tape and taken to the Tricom Group P.L. offices in Melbourne (1155 Malvern Road, Malvern 3144). The tape was loaded onto a system which allowed people to call a local phone number and listen to the latest news with a cost of a local call, or a little bit more. As this was prior to the Internet being established around the globe, it was the fastest news service directly from Greece, in the Greek language. It was used for a span of about 12 months, until Tricom closed down their dial-in services, sometime in 1990. The service was captured and loaded onto the system by Iakovos Garivaldis, then an employee of the Tricom Group which was a subsidiary of Southern Cross TV.The Primary significance of this object is of its historical value, social and informative value for the first generation of Greeks in Victoria"World Tuner AT4 SW" antenna with a 920mm fully extended aerial, a tuned circuit and two transistors to prevent loading of the antenna and boost signal output. It is made of plastic, black in colour with the aerial being made of steel. The signals picked up by the antenna are fed via a 15pF ceramic capacitor to a tuned circuit consisting of either VC1a or VC1b and either L1, L2, L3 or L4. The slider switch S1 selects the band to be tuned. The band range is normally from 3 to 30MHz. When S1 is in position A, L1 and VC1a are selected and the antenna can be tuned from 3-9MHz. Similarly positions B, C, and D select higher frequencies up to 30MHz. It was purchased by Iakovos Garivaldis for this use for $119.WORLD TUNER AT4 SW "Amplituned" Shortwave Antennaantenna, radio, short-wave, language, greek -
 Kiewa Valley Historical Society
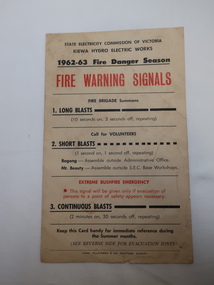
Notice -SECV Fire Brigade - Fire Warning Signals & Evacuation
The State Electricity Commission of Victoria, who constructed the Kiewa Hydro Electric Scheme, established and controlled the Mt Beauty Fire Brigade before it was handed over to the CFA.Bushfires and fires in the towns were a threat during the Fire Danger Season. The SECV was responsible for looking after the safety of the community. Interesting to compare the information on the notice to that of today.Cardboard Notice to the SECV Fire Brigade re Fire Warning Signals for the 1962-63 Fire Danger Season. There are 3 messages: 1. Long Blasts 2. Short Blasts 3. Continuous Blasts. On the back "Evacuation": Be Prepared. Things to Take. Protection of House Property - Before leaving the house and lastly Where to Gomt beauty fire brigade, khes fire brigade, fire warnings -
 Bendigo Historical Society Inc.
Book - The Scouts' First Book, 1941
Scouting started in Australia with some informal troops in Western Australia and Victoria in 1907. Scouting was established in Australia in 1908, the year the first Boy Scout training handbook Scouting for Boys was published in England. CHUMS Scout Patrols started forming in Australia in 1908 due to the circulation of CHUMS publication there. R.C. Packer and the Sunday Times in 1908 supported the formation of the League of Boy Scouts. St. Enoch's Presbyterian Church, Mount Morgan, Queensland formed its unit on 23 November 1908.Joan Filbey Collection: The Scouts' first book : complete tenderfoot and second class test instruction - Pages 7 to 106 are intact - Cover and a few pages are missing. The book is a rule and guide book for boy scouts, for example, how to tie knots, how to wear the correct uniform, signalling, first-aid, and tests to be undertaken.history, bendigo, scouts, joan filbey collection, the scouts' first book -
 Ballarat Tramway Museum
Photograph - Black & White Photograph/s, Charles Craig, Aug. 1971
Yields information about tram operations in Albert St Sebastopol and the Grey St crossing loop.Black and white photograph of No. 12 about to enter the Grey St loop, Albert St. Alongside the tram is a 40mph speed limit sign, Albert St shops and a Forest City signal. Photo by Charles Camera, at the time of the first closure of the Ballarat system, 23/8/1971 when the Victoria St line closed.trams, tramways, albert st, grey st loop, sebastopol, tram 12 -
 Lakes Entrance Historical Society
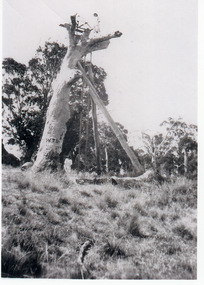
Photograph - Lookout tree, 1927
Black and white photograph of the Lookout Tree on Jemmys Point showing a standing dead grey box tree supported by two long timbers. Access to the top via a 35 foot ladder. Thelma Roder standing on top beside signal structure, two women and child standing near base. Lakes Entrance Victoria,historic sites, navigation -
 Lakes Entrance Historical Society
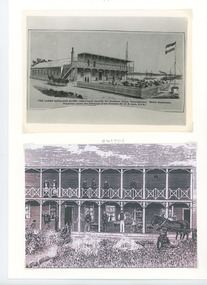
Photograph - The Lakes Entrance Hotel/Thomas Laughton, 1889
Lakes Entrance Hotel erected 1878 by Thomas Laughton Also second sketch of front of the hotel with 6 people on upper balcony Black and white photograph of a drawing of the Lakes Entrance Hotel. It shows a stylised view of a large weatherboard building with verandah across the main entrance with a viewing platform above. Horse drawn vehicle beside hotel, signal flagpole at front, a schooner and steamer in distant waterway. Lakes Entrance Victoria. Second sketch of front of hotelThe Lakes Entrance Hotel (immediately opposite the Southern Ocean Cunninghame) Edwin Stephenson Proprietor(under the patronage of the Governor Sir H B Lock K C B). buildings, hotels, genealogy -
 Eltham District Historical Society Inc
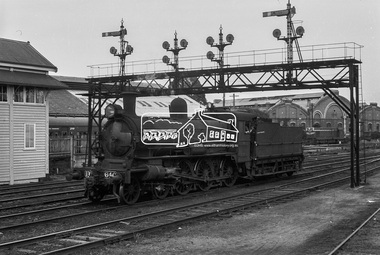
Photograph, Steam locomotive D3-640 at Bendigo Railway Station, c November 1962
"Bendigo pilot D 640 ambles beneath the signal gantry and past B Box at Bendigo Station. The two depot sheds can be seen in the background" - Newsrail October 2020.Digital TIFF file Scan of 35mm Ilford FP3 black and white negative transparencybendigo, bendigo railway station, d3-640, d3-class steam locomotive, george coop collection -
 Ballarat Tramway Museum
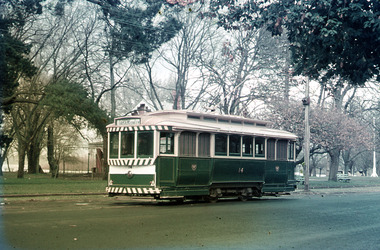
Photograph - Digital Image, Peter Knife, Tram 14 arriving Gardens Loop, 24/7/1971
Digital image of Tram 14 arriving at Gardens Loop. Has the Gardens Kiosk in the background along with a signal on the pole behind the tram. Photo by Peter Knife 24/7/1971.Yields information about tram operations in Ballarat, some two months before closure of the SEC operated tram system.Digital image of a colour slide.tramways, tramcars, ballarat, gardens loop, tram 14 -
 Melbourne Tram Museum
Document - "Malvern Depot Procedure", Yarra Trams, c2010
Document provides the procedure for trams entering Malvern Depot from Glenferrie Road. Notes the signal indications, and provides detail on entering and leaving the depot and where Combinos are normally parked.Demonstrates a set of procedures for Malvern depot.Pocket size sheets printed on plain paper.trams, crews, malvern depot, combino, instructions, depot instructions -
 The Beechworth Burke Museum
Photograph, 1944
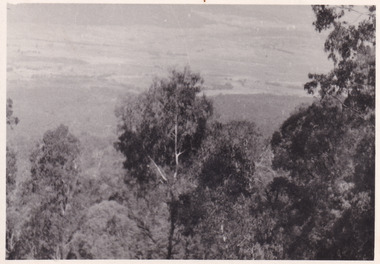
Taken in 1944, the photograph depicts the surrounding farmland from Mt. Stanley in Victoria. A secret experimental micro-wave radio station was established and tested at this site by the Army Signal Detachment Unit during World War II. It was part of an experimental Ultra High Frequency (UHF) link between Melbourne and Sydney. At the time, it was highly classified. It intended to enquire into the hitherto unexplored transmission of micro-waves; that is, a radio signal which could only be transmitted by line of sight, and thus required hill-top to hill-top location.The photograph is historically significant as it pertains to World War II; the largest global conflict in history. This significance is enhanced by Australia's prominent involvement in campaigns across the Pacific, particularly on land in New Guinea and across the Huon Peninsula. It was also the first time that the Australian mainland came under direct attack by the Axis, with Japanese forces targeting north-west Australia and Sydney Harbour. These battles became Australia's largest and most complex offensives during the war. The record is also historically significant as it relates to the Royal Australian Corps of Signals, or "RA Sigs". This significance is strengthened by Australia's unique distinction of having the first established signal unit under the British Empire. This unit provides electronic warfare. They enable commanders to implement highly dynamic battle control against opposing forces by using a number of methods including radio, fibre optic, micro-wave, information systems and satellite links. The record has strong research potential. This is due to the ongoing scholarly and public interest in war, military history, the ANZAC legend, and the ongoing existence of the RA Sigs. The historic context of this record can provide insight into Australia's history, military, technological innovation and advancements, as well as national economic, defence and foreign policies after 1945. Black and white rectangular photograph printed on matte photographic paper.Reverse: BMM5095.1 /military album, army album, wwii, world war ii, army signal detachment unit, mt. stanley, beechworth, victoria, 1940s, australian army, melbourne, sydney, royal australian corps of signals -
 The Beechworth Burke Museum
Photograph, 1944
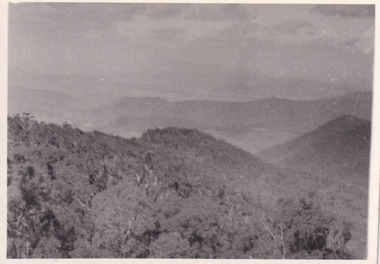
Taken in 1944, the photograph depicts the view of surrounding hills from Mt. Stanley. A secret experimental micro-wave radio station was established and tested at this site by the Army Signal Detachment Unit during World War II. It was part of an experimental Ultra High Frequency (UHF) link between Melbourne and Sydney. At the time, it was highly classified. It intended to enquire into the hitherto unexplored transmission of micro-waves; that is, a radio signal which could only be transmitted by line of sight, and thus required hill-top to hill-top location.The photograph is historically significant as it pertains to World War II; the largest global conflict in history. This significance is enhanced by Australia's prominent involvement in campaigns across the Pacific, particularly on land in New Guinea and across the Huon Peninsula. It was also the first time that the Australian mainland came under direct attack by the Axis, with Japanese forces targeting north-west Australia and Sydney Harbour. These battles became Australia's largest and most complex offensives during the war. The record is also historically significant as it relates to the Royal Australian Corps of Signals, or "RA Sigs". This significance is strengthened by Australia's unique distinction of having the first established signal unit under the British Empire. This unit provides electronic warfare. They enable commanders to implement highly dynamic battle control against opposing forces by using a number of methods including radio, fibre optic, micro-wave, information systems and satellite links. The record has strong research potential. This is due to the ongoing scholarly and public interest in war, military history, the ANZAC legend, and the ongoing existence of the RA Sigs. The historic context of this record can provide insight into Australia's history, military, technological innovation and advancements, as well as national economic, defence and foreign policies after 1945.Black and white rectangular photograph printed on matte photographic paper.Reverse: BMM5095.2 / 32 /military album, army album, wwii, world war ii, army signal detachment unit, royal australian signal army corps, war, beechworth, victoria, mt. stanley -
 The Beechworth Burke Museum
Photograph, 1944
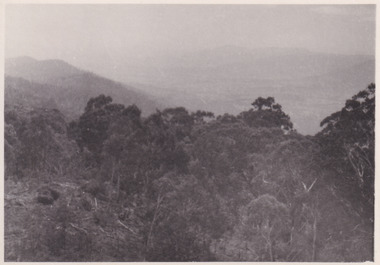
Taken in 1944, the photograph depicts the view from Mt. Stanley. A secret experimental micro-wave radio station was established and tested at this site by the Army Signal Detachment Unit during World War II. It was part of an experimental Ultra High Frequency (UHF) link between Melbourne and Sydney. At the time, it was highly classified. It intended to enquire into the hitherto unexplored transmission of micro-waves; that is, a radio signal which could only be transmitted by line of sight, and thus required hill-top to hill-top location.The photograph is historically significant as it pertains to World War II; the largest global conflict in history. This significance is enhanced by Australia's prominent involvement in campaigns across the Pacific, particularly on land in New Guinea and across the Huon Peninsula. It was also the first time that the Australian mainland came under direct attack by the Axis, with Japanese forces targeting north-west Australia and Sydney Harbour. These battles became Australia's largest and most complex offensives during the war. The record is also historically significant as it relates to the Royal Australian Corps of Signals, or "RA Sigs". This significance is strengthened by Australia's unique distinction of having the first established signal unit under the British Empire. This unit provides electronic warfare. They enable commanders to implement highly dynamic battle control against opposing forces by using a number of methods including radio, fibre optic, micro-wave, information systems and satellite links. The record has strong research potential. This is due to the ongoing scholarly and public interest in war, military history, the ANZAC legend, and the ongoing existence of the RA Sigs. The historic context of this record can provide insight into Australia's history, military, technological innovation and advancements, as well as national economic, defence and foreign policies after 1945.Black and white rectangular photograph printed on matte photographic paper.Reverse: BMM5095.3 / 32 /military album, army album, beechworth, victoria, mt. stanley, australian army, wwii, world war ii, royal australian signal corps, army signal detachment unit -
 The Beechworth Burke Museum
Photograph, 1944
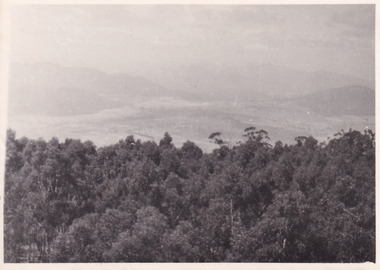
Taken in 1944, the photograph depicts the view from Mt. Stanley. A secret experimental micro-wave radio station was established and tested at this site by the Army Signal Detachment Unit during World War II. It was part of an experimental Ultra High Frequency (UHF) link between Melbourne and Sydney. At the time, it was highly classified. It intended to enquire into the hitherto unexplored transmission of micro-waves; that is, a radio signal which could only be transmitted by line of sight, and thus required hill-top to hill-top location.The photograph is historically significant as it pertains to World War II; the largest global conflict in history. This significance is enhanced by Australia's prominent involvement in campaigns across the Pacific, particularly on land in New Guinea and across the Huon Peninsula. It was also the first time that the Australian mainland came under direct attack by the Axis, with Japanese forces targeting north-west Australia and Sydney Harbour. These battles became Australia's largest and most complex offensives during the war. The record is also historically significant as it relates to the Royal Australian Corps of Signals, or "RA Sigs". This significance is strengthened by Australia's unique distinction of having the first established signal unit under the British Empire. This unit provides electronic warfare. They enable commanders to implement highly dynamic battle control against opposing forces by using a number of methods including radio, fibre optic, micro-wave, information systems and satellite links. The record has strong research potential. This is due to the ongoing scholarly and public interest in war, military history, the ANZAC legend, and the continuing existence of the RA Sigs. The historic context of this record can provide insight into Australia's history, military, technological innovation and advancements, as well as national economic, defence and foreign policies after 1945.Black and white rectangular photograph printed on matte photographic paper.Reverse: BMM5095.4 / 32 /military album, army album, wwii, world war ii, mt stanley, beechworth, victoria, melbourne, sydney, royal australian corps of signals, army signal detachment unit, military, war -
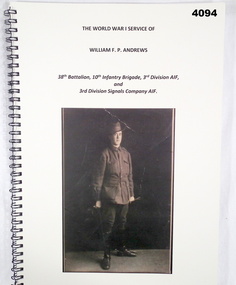 Bendigo Military Museum
Literary work - BOOK, Jan Andrews, The WW1 Service of William F.P. Andrews
The World War 1 service of William.F.P.Andrews 38th Batt, 3rd Div AIF and 3rd Div Signals Company AIF. He enlisted on 27.3.1916, No 57, age 19 years 6 months in the 38th Batt HQ, embark for England 20.6.1916, embark for France 22.11.1916, hospital 16.12.1916 with Bronchitis, rejoin unit 23.12.1916, transfer to 3rd Div Signals 25.4.1917, hospital 11.1.1918 with Influenza, rejoin unit 23.1.1918, hospital 20.5.1918 with Impetigo/Dermatitis, rejoin unit 12.7.1918, discharged from the AIF 12.12.1919.Book, spiral bound with black metal, cover cardboard black print and illustrated in sepia tone of a soldier in uniform, rear cover has a postcard photo, 101 pages, plain white paper, illustrated B & W and colour, diagrams, maps and photo of medals.books, 38th batt aif, world war 1 service -
 Melbourne Tram Museum
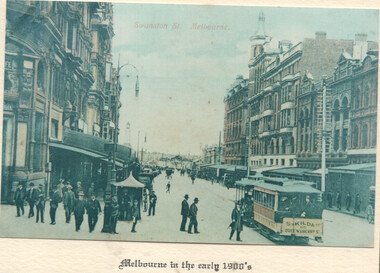
Document - Notice cable trams, Melbourne & Metropolitan Tramways Board (MMTB), "Traffic Signalling", 1921
Notices to cable tram employees and signalmen about the operation of the intersection of Collins and Swanston Street c1921. Details how Police would signal for the number of trams to cross in either direction and how the signalman would operate the signals and the cable depression lever for Collins St cable cars. The Rules for signalmen dated 1/7/1921 and signed by J G Roberts, Manager Cable system for the MMTB. This intersection was one of the busiest in Melbourne running four separate routes in Collins St and the busy St Kilda Road route.Yields information about the cable tram operation of Swanston and Collins St and signalmen.Two foolscap photocopied sheets, stapled in top left hand corner.tramways, cable trams, swanston st, collins st, signalmen, police -
 Melbourne Tram Museum
Ephemera - Greetings card - Swanston St at Collins St - cable trams, Jack Cranston, c1905
Greetings card with a photo of Swanston St looking south from Collins St. On the left side of the photo is a cable tram signal shelter with a signal man at the levers. A St Kilda tram is southbound. Image prior to the construction of Flinders St station building. The Water Tower clock is visible at Princes Bridge Station - see reference. It was moved from Elizabeth St to Princes Bridge in 1902. The card was produced Jack Cranston and published for Glencon Insurance Assessors. See item 8448 for images of the card itself.Yields information about cable trams in Swanston St and a cable tram signalmen c1905.Greetings card with a colour photograph, printed on stippled paper.tramcars, tramways, cable trams, mtoco, swanston st, signalmen -
 Moorabbin Air Museum
Manual (Item) - Westland Wirlwind - Pilot'S Notes
Description: 300 pages. Published by Honeywell International. Published 31/7/2000. Engine Manual for Allied Signal Engines 286.1 (72-03, 72-04) Level of Importance: World. -
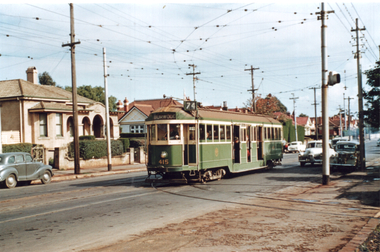 Melbourne Tram Museum
Photograph - Tram 415 - Riversdale Road, Travis Jeffrey, mid 1950s
Colour print showing W2 class tram No. 414 (Burwood Route 74), at the junction in Riversdale Road for Camberwell Depot. Note the signal light on the pole on the right hand side of the photograph.Yields information about tram 415 and the junction with the Camberwell Depot tracks.Colour print on Fujichrome paper.trams, tramways, tram 415, riversdale road, cambewell depot -
Frankston RSL Sub Branch
Document, Certificate of Discharge
Certificate of Discharge issued to Noel Louis Blundell by the 9th Australian Division Signals, Australian Military Forces. Dated 27th November, 1943. Certificate number 11495. N L Blundell served as a GP1 Wireless Mechanic, he enlisted on the 18th June, 1940 and was on Active Service in Australia for 309 days and Overseas for 689 days. -
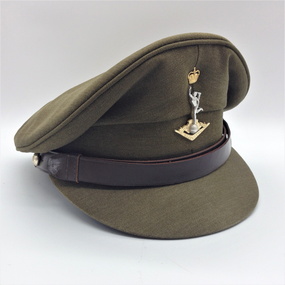 Montmorency–Eltham RSL Sub Branch
Cap, Peaked, Royal Australian Signals, 1988, 1988
Standard issue peaked cap for 1988.Peaked khaki cloth cap with brown 18mm leather chin strap with two 13mm AMF gilt buttons (crown and map only). Khaki cloth covered peak. Royal Aust. Signals cap badge. Brown leather sweat band. Plastic covered, grey cloth liner with black stamped manufacturer's, etc. details. Australian Government Clothing Factory and logo Size /|\ 56 VIC 1988 (Note - no personal markings) headgear, cap -
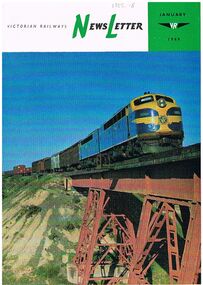 Bendigo Historical Society Inc.
Magazine - BADHAM COLLECTION: VICTORIAN RAILWAYS NEWSLETTER JANUARY 1969
Victorian Railways Newsletter January 1969. Newsletter printed in glossy paper with colour photos on front. The contents include photos of Melbourne's West Tower signal box also a related article, Powelltown in 1919, horse train on Sanderson's line at turn of the century. Printed at the Victorian railways printing works Laurens St North Melbourne.magazine, government, victorian railways -
 Ballarat Tramway Museum
Photograph - Digital image, c1971
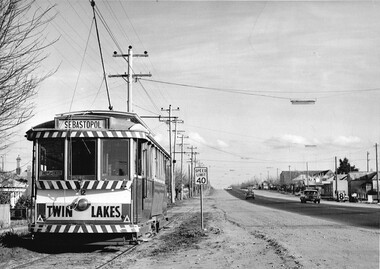
Yields information about Ballarat streetscape and its trams in the closing days of the SEC tramway system.Digital image from a black and white print of tram 11 outbound in Lydiard St North, crossing the railway level crossing. Has the Reid's Palace building and the railway station and signal gantry in the background. The tram has a "Bliss Bombs" (Make Bliss not Love) roof advertisement and a Twin Lakes sign. Photo by Marc Dahlstrom c1971. On rear is the Marc Dahlstrom stamp.trams, tramways, lydiard st, railway station, level crossings, tram 11 -
 Ballarat Tramway Museum
Slide - 27 mm sq slide/s, Andrew Howlett, SEC Ford Welding truck, complete with Trolley Pole in the Power Station yard, Dec. 1969
Yields information about SEC Ballarat Welding truck fitted with a trolley pole.Colour slides, Kodak white cardboard mount, developed Dec 1969 of the SEC Ford Welding truck, complete with Trolley Pole in the Power Station yard. Welder, weld Note the hand vice on the front bumper bar and the hand operated turn and stop signal device. See Reg Item 2864 for a view of this truck at work.ballarat, tramways, trams, sec, trackwork, welding -
 Lakes Entrance Historical Society
Photograph - Western Harbour, Bulmer H D, 1940c
Black and white photograph of the western harbour. It shows a variety of vessels, including auxilliary yachts and motor launches. In the background, part of the New Works area on the south shore includes Signal Flagstaff, Harbour Engineers House and Pilots House. In foreground part of rock groyne built originally to control sand buildup. Lakes Entrance VictoriaThe Boat Haventownship, waterfront, boats and boating -
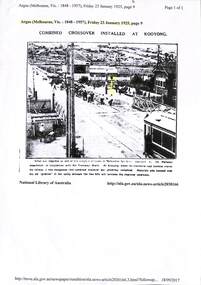 Melbourne Tram Museum
Newspaper, The Argus, "Combined Crossover installed at Kooyong", 23/01/1925 12:00:00 AM
Photocopy of an article from The Argus, 23/1/1925, page 9 extracted through Trove, titled "Combined Crossover installed at Kooyong" with a photograph of the level crossing, replacement of track leading up to the Tramway or Railway Square. The disc signal for trams has been highlighted in yellow. Item made by Robert Green 18/9/2017trams, tramways, victorian railways, glenferrie road, level crossings, tramway square, trackwork -
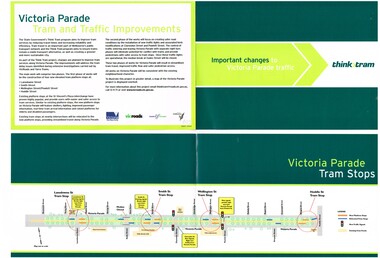 Melbourne Tram Museum
Pamphlet, VicRoads, "Important changes to Victoria Parade Traffic", c2010
Pamphlet - bifold - printed on gloss paper, full colour, titled "Important changes to Victoria Parade Traffic", details changes to tram stops and traffic signals in Victoria Parade as part of the Think Tram project. Item not dated - c2010. Has VicRoads, City of Melbourne, Yarra Trams and State Govt logos. Two copies held.trams, tramways, yarra trams, victoria parade, superstops, tram stops -
 Bendigo Historical Society Inc.
Document - NEW MOON MINE - NOTES ON THE NEW MOON MINE
Four typed copies of notes on the New Moon Mine on the Garden Gully Line of Reef. Notes include locality, depth of shaft, last year of production, size of lease, plant, Telephone and electric signalling, early history, gold obtained, prominence, gold production and dividends. Hand drawn locality map included. Albert Richardson Collection.cottage, miners, new moon mine, notes on the new moon mine, h harkness & coy, thompson & co, telephone & electric signalling, 'robin hood' ground, bendigo amalgamated goldfields co, special edition australian mining standard 1/6/1899, mines dept booklet 'bendigo goldfields' 1936, mines dept annual and quarterly reports, annals of bendigo mining section 1907 = 1931, a richardson, souvenir 'declaration of 200th dividend' issued by directors of new moon co 1/12/1906, mines dept bulletin 47 'structure of bendigo goldfields' h herman 1923 -
 Bendigo Historical Society Inc.
Document - NEW MOON MINE - NOTES ON THE NEW MOON MINE
Handwritten notes on the New Moon Mine on the Garden Gully Line of Reef. Notes include depth of Shaft, locality, Formation & Registration, Last year of production 1931, Size of lease, Early History, Plant, Poppet Legs, Telephone & Electric Signalling, Gold Obtained, Prominence, Total Gold Production and Dividends. ( duplicate of record 3559.1)document, gold, new moon mine, notes on the new moon mine, garden gully line of reef, prospector's vote, h harkness & coy, thompson & co of castlemaine, bendigo amalgamated goldfields coy, mines dept special edition australian mining standard 1/6/1899, mines dept annual and quarterly reports, a richardson -
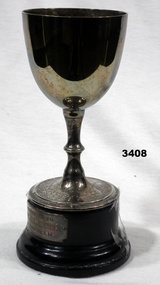 Bendigo Military Museum
Award - TROPHY, SIGNALLING, c.1926
Metal trophy cup on dark wooden base. Inscription on the cup & small metal plaque attached to the base.On cup: "WON BY 38TH BATT TEAM, SIGNALING, SEYMOUR 1926, CAPT W L TRESSIDDER, SGT R BEATTIE, PTE D STILLWELL, B SILKE, R CLARKE" On base: "PRESENTED TO CAPT W L TRESSIDDER BY THE TEAM"trophy, award, signalling 38th