Showing 7057 items
matching 17
-
 Eltham District Historical Society Inc
Folder, Eltham's new library opened 1994; local issues involved
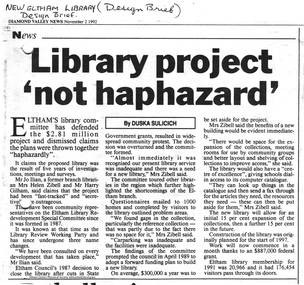
Contents 1 Hand written note on cost of planning appeal 2 Determination re Appeal 1992/39742 by Rosalind Harris, Sigmund Jorgensen and Claire Fitzpatrick against granting of permit E92/481, 6 pages, 27 Jan 1993 3 Submission to the Appeal 1992/39742 by H. Gilham 4 Independent planning assessment for Appeal 1992/39742 by Tract Consultants, 13 pp including appendices, Jan 1993. 5 Letter from three ratepayers protesting against the siting of the proposed new library, 21 Jan 1993. 6 Statement of protest against library site by Claire Fitzpatrick, undated. 7 Impact study of proposed new library building by D.V.Bick, conservation architect, 2 October 1992. 8 assessment of impact of new library on historic significance of Shillinglaw Cottage, by National Trust of Australia, 22 October 1992. 9 Newspaper clipping, The Age, 2 Aug 1992, Scramble to revive capital works plans. 10 Newspaper clipping, DV News, 24 May 1988, New Angle to library funding 11 Newspaper clipping, DV News, 24 May 1988, Committee wants library views 12 Newspaper clipping, DV News, 24 May 1988, Library services in cash struggle 13 Library survey by Vic Ministry for the Arts, 14 December 1992 14 Newspaper clipping, DV News, 3 Aug 1992, Libraries in crisis 15 Newspaper clipping, DV News, 3 Aug 1992, Library funding editorial 16 Newspaper clipping, DV News, 7 Sept 1992, Library windfall 17 Newspaper clipping, DV News, 10 Aug 1992, Letters, Shire relies on rates to provide services, Cr J. Cohen 18 Newspaper clipping, DV News, 26 Oct 1992, Shire defends library plans. 19 Newspaper clipping, DV News, 26 Oct 1992, Letters, Library benefits whole community, J.Ilian, H. Gilham, R Harris 20 Letter to DV News by H. Gilham 20 October 1992, re library 21 Newspaper clipping, DV News, 19 October 1992, Letters, T. Malseed, Funds for region's jobless hijacked. 22 Newspaper clipping, DV News, 19 October 1992, Funds approved to build new library. 23 Newspaper clipping, DV News, 12 October 1992, Letters, Does Eltahm need a new mausoleum, M. Walker. 24 Newspaper clipping, DV News, 2 Nov 1992, Library project not haphazard. 25 Newspaper clipping, DV News, 9 Nov 1992, Letters, Library chose best architect for new project, Cr J. Cohen 26 Newspaper clipping, DV News, 16 Nov 1992, AAT to deal with library objections 27 Newspaper clipping, DV News, 30 Nov 1992, Public Notice, Registration for building trades 28 Newspaper clipping, DV News, 7 Dec 1992, Public Notice, Registration for building trades 29 Newspaper clipping, DV News, 7 Dec 1992, Letters, Find better site for library, S. Jorgensen, G.Verall 30 Newspaper clipping, DV News, 8 Feb 1993, Library given AAT aproval, and Extra funds should help make new facility more versatile 31 Newspaper clipping, DV News, 25 Jan 1993, Public Notice, Quotations invited for worls associated with new library 32 Newspaper clipping, DV News, 3 Feb 1993, Public Notice, Registration for building trades 33 Newspaper clipping, DV News, 4 January 1993, Letters, Bemused over library, C Fitzpatrick, R Henry 34 Newsletter Yarra Plenty RLS, Vol1, No 1, Your Public LibraryFolder/Booklet of various documents, mainly A4 size photocopiesHG Booklet 2administrative appeals tribunal, appeal, appeal 1992/39742, application e92/481, c. fitzpatrick, d. bick, diamond valley news, eltham library, eltham shire, g. verall, h. mccorkell, harry gilham, harry gilham collection, j. ilian, john cohen, m. walker, national trust (i. wight), r. harris, r. henry, s. jorgensen, shillinglaw cottage, parkland, rosalind harris, sigmund jorgensen, claire fitzpatrick -
 Eltham District Historical Society Inc
Document - Folder, Jones, 1979
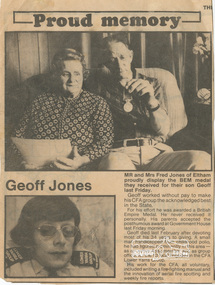
Fred, Gwenda and Geoff Jones Contents 1. Proud memory; Geoff Jones, Diamond Valley News, 21 Nov 1979 2. Sudden death of 'much loved man', Diamond Valley News, 13 Feb 1979 3. Honor for a community friend, Diamond Valley News, 8 March 1995 (On reverse, 'Diverse program to entice riders' about St Andrews Saddle Club and fgeatures a photo of Debbie Jones) Gwendoline (Gwenda) Grace Watson Davies, only daughter of Mr. William Watson Davies and Mrs. Grace Davies (nee Hayes) of Arthur Street, Eltham was born in Newport, 18 February 1908. Gwenda grew up in Arthur Street and when she left school she was employed as an officer at the State Bank of Victoria, Chief Accountants Department, Head Office, Elizabeth Street, Melbourne. On October 20, 1937 after ten years of service, Gwenda submitted her letter of resignation effective November 26th as she was to be married in the near future to Fred Jones. Frederick Geoffrey Jones, born 7 January 1911, third son of Mr. and Mrs. W. Jones of Napoleon Street, Eltham, married Gwenda at the Eltham Methodist Church on 27 November 1937. They made their home at ‘Llangollen’, Arthur Street, Eltham, a new house Fred had constructed earlier that year opposite the Shire Offices. Their residence was recorded in the Electoral Rolls from 1963-1980 as 6 Arthur Street, Eltham which was situated on the corner of Arthur Street and present-day Commercial Place. In the 1970s their home was sold and demolished to make way for the new shops. They built a new home at the top of the hill in Bible Street. In the Electoral Rolls for 1943-1980, Frederick’s occupation was recorded as a Plumber’s Assistant. Fred was also a long-standing member of the Eltham Cemetery Trust. He was first appointed 26 April 1944 and resigned 17 July 1957 to be appointed to the Warringal and Eltham Joint Trust where he served till February 1980. He then re-joined the Eltham Cemetery Trust and served a further 14 years till his resignation on 24 August 1994. In total, Fred represented the interests of Eltham Cemetery for 50 years (1944-1994). Gwenda and Fred were blessed with a son, Frederick William Jones in March 1942. Sadly, Frederick only lived two days and was buried at Eltham Cemetery on March 11. It is not known whether his grave is marked. A second son, Geoffrey Morris Jones arrived 25 November 1944 but he sadly contracted polio as a child. A fall down the front steps of Fred and Gwenda’s new home in Bible Street culminated in Geoff’s death from a heart attack whilst in transit to the Austin Hospital on February 6, 1979, at age 34. He was also interred in the Eltham Cemetery. Geoff was posthumously awarded the British Empire Medal for his services to fire safety at the CFA. A small man, handicapped from his childhood polio, he had figured prominently in the area as an active Apex member and as group officer for the 13 local brigades in the CFA Lower Yarra Group. His work for the CFA, all voluntary, included writing a fire-fighting manual and the innovation of aerial fire spotting and weekly fire reports. Gwendoline and Fred were presented with Geoff’s B.EM. award at Government House. Four years later on the anniversary of Geoff’s death, Gwenda could not sleep and collapsed in the hallway at home from a heart attack, 6 February 1983 at age 74. She was interred with her son Geoff, at Eltham Cemetery on February 9th. Fred died 31 July 1997 at age 86 and was also interred at Eltham Cemetery. A memorial plaque to Gwenda, Fred and Geoff lies within the lawn cemetery at Eltham Cemetery.Newsprint clippingscfa, eltham cemetery, eltham cemetery trust, frederick geoffrey jones, geoffrey morris jones b.e.m., gwendoline grace watson jones (nee davies), lower yarra group, debbie jones, st andrews saddle club -
 Flagstaff Hill Maritime Museum and Village
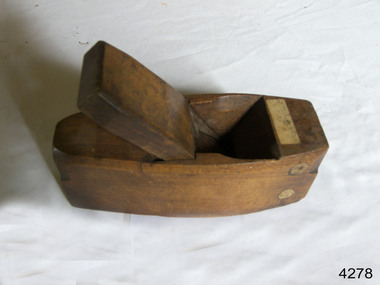
Tool - Smoothing Plane, Mid to Late 19th Century
A smoothing plane is typically used after the work piece has been flattened and trued by the other bench planes, such as the jack, fore, and joiner planes. Smoothing planes can also be used to remove marks left by woodworking machinery. When used effectively alongside other bench planes, the smoothing plane should only need a handful of passes removing shavings as fine as 0.002 inches (0.051 mm) or less. The work piece is then ready to be finished, or can be further refined with a card scraper or sandpaper. The smoothing plane is usually held with both hands, and used in a similar manner to the other bench planes. Though designed for smoothing, a smoothing plane can be used as an 'all-round' bench tool and for rougher work depending on how it is set up. Being smaller than other bench planes, the smoothing plane is better able to work on smaller work pieces and around obstructions. Since the 1700s wooden smoothing planes have predominantly been 'coffin shaped' wider in the middle and slightly rounded making them more maneuverable. It has also been claimed that the coffin design exposes more end grain, enabling the plane to better adjust to changes in humidity. John Moseley & Son: Records indicate that before 1834, the firm is listed at number 16 New Street, London and according to an 1862 advertisement the shop had been established in New Street since 1730, The Sun insurance records from the time show that John Moseley was the possessor of a horse mill in the yard of his premises, which means that some kind of manufacturing was taking place, as the mill would have provided power to run a saw or perhaps a grinding wheel so the probability is that he did not just sell tools, he made them as well. John Moseley died in 1828 and his will he names his four sons: John, Thomas, William and Richard. To complicate matters he also had brothers with the same first names; brothers Richard (of Piccadilly) and William (of Peckham Rye) are named as two of the executors. Brother Thomas is not mentioned in this will, but became a minister and was one of the executors of brother Richard’s estate when he died in 1856. From John’s will, we also learn that, although the shop was in New Street, he resided in Lympstone, Devon. The family must have had a house in that county for quite some time as both sons Richard and William are baptised in Devon, although John and Thomas were baptised in London. In the 1841 and 1851 census records, we just find William in New Street, but in 1861 both William and Richard are listed there as toolmakers. That Richard was staying overnight at New Street was probably just accidental as in 1851 and 1871, we find him with his wife Jane and children in Clapham and Lambeth respectively. In 1851 Richard is listed as “assistant clerk cutlery warehouse” and in 1871 as “retired plane maker and cutler”. Although the actual place of work is not stated, one may assume he worked in the family business. 1862 is a year full of changes for the firm. In that year, William had a new property built at 27 Bedford Street. In the catalogue for the 1862 International Exhibition, 54 Broad Street (later 54-55 Broad Street) is listed for the first time, which may very well coincide with the split of the business into a retail and a wholesale branch. Around the same time, they must have moved from New Street to 17 & 18 King Street because their manufacturing premises had been pulled down to form the New Street from Cranbourne Street to King Street. In January 1865, William died and Richard continued the business. In 1867, the partnership he had with his son Walker and Thomas Elis Hooker, is dissolved. Richard continued tool making at King Street and Bedford Street. Richard retired somewhere between 1867 and 1871, but the business continued. The business is taken over by W M Marples & Sons and tools continued to be made in London until 1904 when manufacturing relocated to Sheffield. A vintage tool made by a well documented company, this item was made commercially for firms and individuals that worked in wood and needed a tool that could produce a smooth finish to timber. The tool was used when timber items needed to have a smooth finish these types of planes were used in conjunction with profiled planes that provided a decorative finish. A significant tool from the mid to late 19th century that today is quite rare and sought after by collectors. It gives us a snapshot of how furniture and other decorative finishes were created on timber by the use of hand tools. Tools that were themselves hand made shows the craftsmanship used during this time not only to make a tool such as the subject item but also the craftsmanship needed to produce a decorative finish that was needed to be made for any timber item. Smoothing Plane coffin design Maker J Moseley & Son London & 2 1/4"flagstaff hill, warrnambool, shipwrecked-coast, flagstaff-hill, flagstaff-hill-maritime-museum, maritime-museum, shipwreck-coast, flagstaff-hill-maritime-village, plane moulding, moulding plane, plane, j heath, moseley -
 Eltham District Historical Society Inc
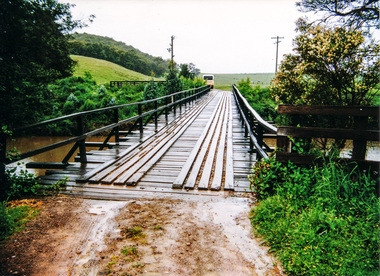
Photograph, Henley Bridge, Spring Excursion, Exploring the Upper Yarra, 22 October 1995, 22/10/1995
[article by Bettina Woodburn in EDHS Newsletter No. 105, November 1995:] EXPLORING THE UPPER YARRA - We enjoyed the Spring Excursion, this year "Exploring the Upper Yarra" - in spite of the constant rain and the countryside under the cloud cover, especially in the valleys, being mainly shiny shades of green. The occasional fields of buttercups, clumps of arum lilies and splendid rhododendron and other flowering bushes became very special. The Cobb and Co coach was warm and a cosy retreat as we zig-zagged on the highways and byways to glimpse the Yarra River, upstream and down, its secret places, and particularly the many bridges. Russell excelled as 'Poet Laureate', reading from Dacre Smyth's book. This 1979 publication includes paintings of all the bridges along the river with poems and brief descriptions of each one. Some of the bridges are in out-of-the-way places and are not very well known. We looked forward to hearing the poetry as much as seeing the 'constructions'… Big Pat (was he short or tall, lean or fat? - he did win the £200 reward for discovering gold and had the creek named after him), about the 'Eddies'?, and the disliked 'meccano' bridge in Warburton, etc. etc. The hot roast lunch in the old Reefton Hotel was also most welcome. It was easy to imagine it peopled by miners and early settlers. Starting by crossing the new (1974) concrete bridge at Warrandyte we headed through Wonga Park with views to the Christmas Hills and to the escarpment of the Yering Gorge, which causes flood waters to back up through the Yarra Glen plain, so avoiding disasters downstream. At the end of a long driveway we found the wooden, privately owned Henley Bridge (1935 after the 1934 floods). This facilitates access to different parts of Henley Farm and to Lilydale. Everard Park, named after Blanche Shallard's father, a State Member for 17 years, below the Highway Yarra crossing was in need of care. It is 10 miles from Yarra Glen by road but, as "Yarra Marra” canoeists well know, 32 winding miles down by water. After more delightful countryside scenes we joined the Warburton Highway at Woori Yallock. From the old Railway Station at Launching Place the Centennial Trail for walkers, cyclists and horse riders has replaced the rails. The line from Lilydale was opened in 1901, and the last diesel freight train ran to Warburton in 1965. It continued to rain as we had morning tea in Warburton in a shelter between footbridges. From here we continued upstream past the Bridge to O'Shannassy Lodge and Reservoir, Starvation Creek, and the Peninsular tunnel (miners dug it as at Pound Bend) which we visited (scrambling down those steps!) on our return after lunch. Our furthermost point was the Upper Yarra Dam Reserve (and vast catchment area). Finished in 1957 after ten years' work and 100 years after Yan Yean, it supplies much of Melbourne's water. After crossing the 30m Launching Place Bridge to the Eltham side of the Yarra and Healesville, we saw in the distance the Yarra Glen Timber Trestle Bridge over the river flats "the longest for years in the land it was said!" Harry's dream of "better weather over the Divide" unfortunately didn't come true, but I'm sure we 36 members will retain happy memories of a day that was wet and green and filled with Bridges. Situated on the Yarra River, 5.5 kms south of Christmas Hills on private property. This timber trestle bridge is said to have been built some time after 1907 by Melbourne master-builder, David Mitchell (the father of Dame Nellie Melba), to connect his two "Henley Farm" properties with Lilydale. In earlier days, when the McPhersons owned the property, their children used a punt to cross the river to attend Yering Primary School. This private bridge is best viewed from the end of Wendy Way. - Source: Christmas Hills Past and Present, Yarra Glen & District Historical Society, 2004.Two colour photographsactivities, henley bridge, upper yarra -
 Federation University Historical Collection
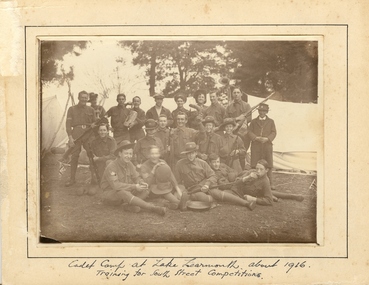
Photograph - Photograph - Sepia, Ballarat School of Mines Cadets, 1916, c1916
Field Marshal Viscount Kitchener of Great Britain was invited by Prime Minister Deakin in 1909 to visit Australia and advise on the best way to provide Australia with a land defence. Kitchener’s report echoed the bill, introduced to Parliament in 1909 and supported by the Opposition Labor Party at its 1908 conference, to introduce compulsory military training in peace time (referred to as universal training). On 1 January 1911, the Commonwealth Defence Act 1911 (Cth) was passed as law and all males aged 12 to 26 were required to receive military training. Men were divided according to age, with junior cadets comprising boys 12-14 years of age, senior cadets comprising boys 14-18, and young men aged 18-26 assigned to the home militia defence. The support of schools was vital to the success of the scheme, since the system of cadet training began in the primary schools, with physical training prescribed by military authorities. Junior cadet training was entirely in the hands of school teachers, who had first been trained by military officers. This early training was less military in nature than focused on physical drill and sport. It also acted to inculcate boys with the notions of loyalty to country and empire. At this age, uniforms were not worn, although there were schools with pre-existing uniformed cadet units, who continued to do so. Senior Cadets were organised by Training Areas, administered by Area Officers. If a school had at least 60 senior cadets, they could form their own units. Unlike their junior counterparts, Senior Cadets were issued uniforms, a rifle, and learned the foundations necessary for service in any arm of the defence forces. Boys and men could be exempted from compulsory training if they lived more than five miles from the nearest training site, or were passed medically unfit. Those who failed to register for training were punished with fines or jail sentences, and the severity of this punishment generated some of the strongest opposition to the scheme. While institutions such as the political parties and most churches generally supported universal training, some in the broader labour movement were less enthusiastic, as evidenced in the Daily Herald newspaper’s editorials and letters. Universal military training persisted after the conclusion of World War 1, with the Junior Cadet scheme the first to go, in 1922. Senior cadets and service with the militia was suspended in November 1929. (http://guides.slsa.sa.gov.au/content.php?pid=575383&sid=4788359, accessed 29/10/2015) According to Neil Leckie, Manager of the Ballarat Ranger Military Museum: * Originally 12 – 14 year olds went to Junior Cadets attached to their school. * From age 14 – 17 they were Senior Cadets attached to the local militia unit. * After 1 July of the year a Cadet turned 18, the Cadet left the Senior Cadets and became a member of the Citizen Military Force. * In October 1918 the AIF, Militia and Cadets were renamed to give some connection to the AIF battalion raised in the area. Ballarat saw: 8th Australian Infantry Regiment comprising: * 8th Battalion AIF renamed 1st Battalion 8th Australian Infantry Regiment * 70th Infantry Militia renamed 2nd Battalion 8th Australian Infantry Regiment * 70th Infantry Cadets renamed 3rd B, 8th Australian Infantry. 39th Australian Infantry Regiment comprising: * 39th Battalion AIF renamed 1st Battalion 39th Australian Regiment * 71st Infantry Militia renamed 2nd Bn, 39th Australian Infantry Regiment * 71st Infantry Cadets renamed 3rd Bn, 39th Australian Infantry Regiment Prior to the reorganisation in 1918 the 18th Brigade was the 70th, 71st and 73rd Infantry. It is thought that the 18th Brigade Cadet units in 1920 were those that came from the old: * 69th Infantry (Geelong/Queenscliff) * 70th Infantry (Ballarat/Colac) * 71st Infantry (Ballarat West) * 72nd Infantry Warrnambool) * 73rd Infantry (NW Vic) The next name change came in 1921!Mounted sepia photograph of 21 young males. They are the Ballarat School of Mines Cadets on a training camp at Lake Learmonth. Back row left to right: Harold Wakeling; ? ; T. Wasley; H. Witter; H.V. Maddison (staff); Lieutenant S.J. Proctor, Joe ? ; ? ; B.C. Burrows. Centre left to right: Howard Beanland; ? ; F.N. Gibbs; H. Siemering; P. Riley; ? : E. Adamthwaite. Front row left to right: Albert E. Williams; Francis Davis (RAAF Dec.); A. Miller; W. Shattock; T. Rees From the Ballarat School of Mines Magazine, 1916 "Our Competition Team, 1916 At a parade, held on the 25th August competition teams were called from from the three colleges - Ballarat College, St Patrick's College, and the School of Mines. In each case, a large muster was obtained, twenty-nine volunteering fro the School of Mines. On account of the number in a team being limited to 21, some had to be weeded out. The team decided to have a camp at Learmonth in the vacation for the benefit of training for the coming competitions. The tents, within our baggage, were brought to the Junior Technical School at 10 a.m. on Monday, 11 September. Everything was carted to the station on a lorry, which was very kindly lent by Mr C. Burrow. ... Arriving at our camp, which was in the Park, we first raised the tents. This was done in record time. Three large tents, A.B.C., were pitched one behind the other. We also pitched a smaller one to act as a provisions tent. The provisions supplied by each cadet were placed in this tent. Dinner was ready by 3.30, and was prepared by the three senior non-coms., who also acted as orderlies. Things went alright Monday night, the two senior non-coms. acting as sentries for the first two hours. On Tuesday morning Reville sounded at 7. There was no need for it, however, as nearly all the cadets were up before daylight, owing to their beds being too hard. After physical exercises were gone through we had breakfast. We then had rifle exercises until Messrs A.W. Steane and F.N. King arrived. The former put the team through the table of physical exercises set down for competition work, many valuable points being obtained. The visitors remained for dinner, afterwards returning to Ballarat. Wednesday was uneventful, until the soldiers arrived at about 11 a.m., stopping at the park for lunch. As we handed over the coppers, etc., to them, our lunch was delayed. Two more visitors arrived after lunch, and after taking a few photos returned home. That night we had a "Sing-a-long" in C Tent until "Lights out" sounded at 9.30. After physical exercises ad breakfast on Thursday, we went for a six mile route march round the lake, doing skirmishing on the way. In the afternoon we practised rifle exercises and the march past. A concert was arranged for that night, the chief singers being cadets H. Siemering and W. Shattock. Supper was served at the end of the entertainment. On Friday, Reveille sounded at 6.30 instead of 7, and, as usual, we had physical exercises before breakfast, after which the team went through skirmishing at the reserve. In the afternoon, section drill and the march past were practised. Friday night, being our last night in camp, leave was granted until 10 p.m., "lights out" sounding at 11. Reveille sounded on Saturday at 4.30, the reason being that all kits, tents, etc., had to be packed away ready to catch the 8.15 train to Balalrat. At 7.30 we were all ready to leave for the station. We had a very enjoyable time in the train, each cadet having a chip in at the patriotic songs. On arriving at Ballarat, we found the lorry awaiting us. The luggage was carted to the Junior Technical School, the team following. The team were here dismissed, everyone feeling that he had had a very good time. F.G. Davis"Written in ink on front 'cadet camp at Lake Learmonth about 1916. Training for South Street Competitions. ballarat school of mines, cadets, ballarat school of mines cadets, lake learmonth, world war one, boomerang, camp, cadet camp, h.g. wakeling, harold wakeling, f.g. davis, albert w. steane, f.n. king, h. siermering, w. shattock, francis davis, harold wakeling, t. wasley, h. witter, h.v. maddison, s.j. proctor, b.c. burrows, howard beanland, f.n. gibbs, h. siemering, p. riley, e. adamthwaite, albert e. williams; francis davis, a. miller, w. shattock, t. rees, photography, foto, boxing gloves -
 Bendigo Military Museum
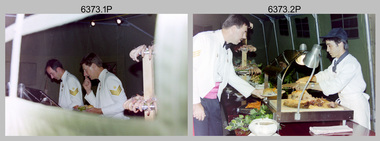
Photograph - Army Survey Regiment Summer Ball - Dinner, Staff and Entertainment, 1995
This is a set of 36 photographs taken at the combined Officer, Warrant Officer and Sergeant’s Mess Summer Ball held at the Army Survey Regiment (ASR), Fortuna Villa on the 25th of February 1995. The Summer Ball was one of the last large scale formal functions held at Fortuna Villa before ASR’s closure the following year. Photos of personnel and their guests was taken on their arrival near the Pompeii Fountain in the gardens at the front of the main building. The Ball and Dinner was held at the rear of Fortuna Villa in temporary 20’ x 30’ Army tents set up on the roadway in front of the transport compound. SERCO contract staff provided the catering and the ASR’s Other Ranks performed stewarding and kitchen hand duties. Refer to item 6347 for information on the administrative file held in the collection and items 6370.23P, 6371.33P and 6372.25P for additional photographs taken at the Summer Ball.This is a set of 36 photographs taken at the Officer, Warrant Officer and Sergeant’s Summer Ball held at the Army Survey Regiment, Fortuna Villa on the 25th of February 1995. The colour photographs are on 35mm negative film and are part of the Army Survey Regiment’s Collection. The photographs were scanned at 96 dpi. .1) - Photo, colour, 1995. L to R: Rod Skidmore, Bob Thrower. .2) - Photo, colour, 1995. L to R: Jim Ash, unidentified SERCO-GM staff. .3) - Photo, colour, 1995. L to R: Helen Drummond, Stan Vote, Steve Drummond. .4) - Photo, colour, 1995. L to R: Helen Drummond, Steve Drummond, unidentified, Stan Vote, .5) - Photo, colour, 1995. Sherri and Steve Burke .6) - Photo, colour, 1995. L to R: Dale Hudson and partner. .7) - Photo, colour, 1995. L to R: Alan Dudley, Glenda Stear, Doug Carswell, unidentified, Chris Carswell, John Stear, Angela Dudley, Tony Harder (background). .8) - Photo, colour, 1995. L to R: John Phillips, Maria Harder. .9) - Photo, colour, 1995. L to R: Tracey Phillips, Peter Peterson. .10) - Photo, colour, 1995. L to R: John South, Tracey Phillips, Peter Peterson, John Bath (background), Miss Delfine. .11) - Photo, colour, 1995. Jo and Peter Peterson. .12) - Photo, colour, 1995. Colin Davidson, Jason Selman, Martin Evans (background). .13) - Photo, colour, 1995. L to R: Bill Griggs (background), Colin Cuskelly. .14) - Photo, colour, 1995. Marzipan sculpture of Australia’s Coat of Arms animals surround RA Svy Corps badge. ‘53’ denoted the number of years of RA Svy occupancy since 1942. .15) - Photo, colour, 1995. L to R: unidentified (x3), Sandra Burns, Brianna Burgin (steward in background). .16) - Photo, colour, 1995. L to R: Mrs Willis, Dave and Sue Stephenson, Corey Hill (steward in background), unidentified, Ros and Wolfgang Effenberg, Doug Willis, unidentified, Simon Lemon (background). .17) - Photo, colour, 1995. unidentified SERCO-GM staff. .18) - Photo, colour, 1995. L to R: Hayden Beer, Duncan Burns (background), Simon Lemon, unidentified SERCO staff (x2). .19) & .20) - Photo, colour, 1995. L to R: Duncan Burns, unidentified SERCO-GM staff. .21) - Photo, colour, 1995. L to R: Mrs Willis, Greg Byers. .22) - Photo, colour, 1995. L to R: Brian Sloan, unidentified. .23) - Photo, colour, 1995. Justine (Sachs) Rainey - steward. .24) - Photo, colour, 1995. Marty Stradbrook- steward. .25) - Photo, colour, 1995. Unidentified guests, Corey Hill - steward. .26) - Photo, colour, 1995. L to R: Troy Larkins, Ken Labouchardiere, Marty Stradbrook, Lance Hillier, unidentified. .27) - Photo, colour, 1995. L to R: Glen Norrell, Trevor King, Troy Larkins. .28) to .31) - Photo, colour. 1995. Unidentified string quartet musicians. .32) to .36P) - Photo, colour. 1995, Fortuna Pipes and Drums musicians..1P to .36P There are no personnel or civilians identified.royal australian survey corps, rasvy, army survey regiment, army svy regt, fortuna, asr -
 Eltham District Historical Society Inc
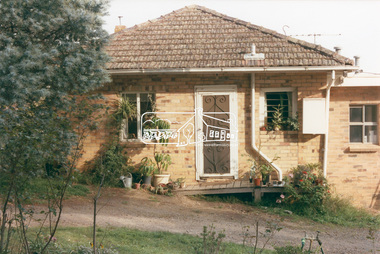
Photograph, 218 Pitt Street, Eltham, c.1985, 1985c
House was rented by Kim Tarpey between October 1983 and June 1985. It was one of the buildings originally part of Birds Orchard. Harold Bird was her landlord, a retired primary school teacher who, when she knew him was driving the mobile library bus. Her partner had him as a teacher at Montmorency Primary in grade 4. The house was next door to what is now a bushland reserve near the Pauline Toner Reserve. It was on the corner of Pitt and Arthur St - the driveway was near the roundabout and went off to the right of the driveway that now belongings to 220 Pitt street and which was bushland at the time. It was sold in 1985 and consequently demolished, a large house has replaced it. It was situated approximately where the front door of No. 218 is nowadays with the facade roughly in line with the now garage wall to the left of this front door.Digital file only - scanned from personal photo album on loan (27 images) List of images EDHS_04644-1.tif Kitchen window looking towards Eucalyptus Road, 218 Pitt Street, Eltham, c.1985 EDHS_04644-2.tif 218 Pitt Street, Eltham, c.1985 EDHS_04644-3.tif 218 Pitt Street, Eltham, c.1985 EDHS_04644-4.tif Kitchen looking towards Pitt Street Reserve, 218 Pitt Street, Eltham, c.1985 EDHS_04644-5.tif 218 Pitt Street, Eltham, c.1985 EDHS_04644-6.tif Bathroom walkway/laundry, 218 Pitt Street, Eltham, c.1985 EDHS_04644-7.tif 218 Pitt Street, Eltham, c.1985 EDHS_04644-8.tif 218 Pitt Street, Eltham, c.1985 EDHS_04644-9.tif 218 Pitt Street, Eltham, c.1985 EDHS_04644-10.tif 218 Pitt Street, Eltham, c.1985 EDHS_04644-11.tif 218 Pitt Street, Eltham, c.1985 EDHS_04644-12.tif 218 Pitt Street, Eltham, c.1985 EDHS_04644-13.tif 218 Pitt Street, Eltham, c.1985 EDHS_04644-14.tif 218 Pitt Street, Eltham, c.1985 EDHS_04644-15.tif 218 Pitt Street, Eltham, c.1985 EDHS_04644-16.tif 218 Pitt Street, Eltham, c.1985 EDHS_04644-17.tif Lounge window looking towards Mount Pleasant Road, 218 Pitt Street, Eltham, c.1985 EDHS_04644-18.tif Fire place in lounge, 218 Pitt Street, Eltham, c.1985 EDHS_04644-19.tif Fire place in lounge, 218 Pitt Street, Eltham, c.1985 EDHS_04644-20.tif View from lounge room window looking towards corner of Eucalyptus and Mount Pleasant roads, 218 Pitt Street, Eltham, c.1985 EDHS_04644-21.tif View from lounge room window looking towards corner of Eucalyptus and Mount Pleasant roads, 218 Pitt Street, Eltham, c.1985 EDHS_04644-22.tif View from lounge room looking towards Pitt Street and Wattle Grove, 218 Pitt Street, Eltham, c.1985 EDHS_04644-23.tif View from lounge room looking towards Pitt Street and Wattle Grove, 218 Pitt Street, Eltham, c.1985 EDHS_04644-24.tif 218 Pitt Street, Eltham, c.1985 EDHS_04644-25.tif Back garden showing previous tank stumps. There was a hole in the wall where a possum got through, 218 Pitt Street, Eltham, c.1985 EDHS_04644-26.tif View from back fence looking towards Pitt Street and Wattle Grove, 218 Pitt Street, Eltham, c.1985 EDHS_04644-27.tif View from back fence on to Eucalyptus Road. Pitt Street Reserve to the right, 18 Pitt Street, Eltham, c.1985218 pitt street, eltham, houses, birds orchard, harold bird, kim tarpey, eucalyptus road -
 Bendigo Historical Society Inc.
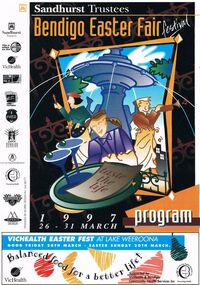
Document - BENDIGO EASTER FAIR FESTIVAL PROGRAM 1997, 26 March 1997
Bendigo Easter Fair Festival Program, 26-31 March, 1997. Festival Features, Evening of Art & Classical Music, Rotary Club of Bendigo. VicHealth Easter Fest, Victorian Health Promotion Foundation & Bendigo Community Health Services. Fine Food Fest. Free Stage. Free Evening Concert & Fireworks, Zaire. Torchlight Procession, sponsored by Prime TV & Coca Cola, Bendigo Market Place. Fireworks Spectacular, Sponsored by Bendigo Market Place & Prime TV. Street Fiesta, sponsored by Arts Victoria. Street Extravaganza, Coca Cola Carnival, Sponsored by Coca Cola. Star for a Day, Power Audio Visual & Prime Television. Handcraft Bazaar, Rotary Club of Bendigo Sandhurst Art & Craft Market. Cosmopolitan Street Café, Arts Victoria. Awakening of the Dragon, Bendigo Chinese Association. Gala Parade, Prime Television & Coca Cola. Firewalking by the Australian Skeptics, Discovery Science & Technology Centre. Up In Flames, Discovery Science & Technology Centre. Barry Kenny's Country Roundup, Nadort Promotions. School's Day. Teddy Bear's Picnic, Dragon City Marshals. Fire Brigades Children's Carnival. Family Event, Bendigo Minister's Fellowship. Bendigo Easter Antique Fair. Historic Photographic Exhibition, Burt Sargent Circa 1900. Open Garden at Nanga Gnulle (''nanga nully''). A parade of Quilts, Strathdale Bendigo Quilters Inc. Tasting the Life, Gail Tavener Studio. Snakes Alive Dangerous Australians, BRIT. Y's Men's Club of Bendigo Book Fair, YMCA. Bendigo Camera Club, BRIT. Bendigo Woodcraft Exhibition, Woodturners Bendigo Inc. Autumn Bonsai, Bendigo Bonsai Club. Convocation, National Trust Bendigo. Arms & Collectables, Golden City Collectors Assoc. In. Rotary Art Show. Rotary Pottery Exhibition. Women's Vision For The Church, Provincial Council of Mothers Union. Historic Toorak House, Lioness Club of Golden City Bendigo. White Hills Cemetery. Bendigo Cemetery. Festival of Flowers, Craft & Garden, Bendigo Jockey Club. Shannons Corporation Motorfest, City Drive Through, Static Display, Motorkhana, Time Trial. Bendigo Bank Dragon Mile. Volkswagen Car Show, a part of the 28th National Bug-In. Repco Cycles, Australian Veteran Cycling Council Inc. Championships. Under 17 Australian Badminton Championships. Palm Sunday, Bendigo Symphony Orchestra. Way of the Cross, Bendigo's Combined Churches. The Easter Story, Kangfluca Music. Sunrise Church Service, Bendigo Ministers' Fellowship. Map of CBD Advertisements: Bendigo Easter Antique Fair. Austar. Bendigo Art Gallery. Bendigo Visitor Information Centre. Prime. Golden Dragon Museum Inc. Bendigo Heritage Tours. Discovery Science & Technology Centre Bendigo. Sponsors: Sandhurst Trustees, Prime, Vic Health, ABC Radio, Arts Victoria, Coca Cola, Events Bendigo, City Of Greater Bendigo, Bendigo Community Health Services, Shannons., Morris Design PH 5448 8777Morris Designevent, easter fair, bendigo easter fair, bendigo easter fair festival program, 26-31 march, 1997. festival features, evening of art & classical music, easter fest, . fine food fest. free stage. free evening concert & fireworks. torchlight procession. fireworks spectacular, street fiesta, street extravaganza, coca cola carnival, star for a day, handcraft bazaar, art & craft market. cosmopolitan street café, awakening of the dragon. gala parade, firewalking australian skeptics, discovery science & technology centre. up in flames, barry kenny's country roundup, nadort promotions. school's day. teddy bear's picnic, fire brigades children's carnival. family event, bendigo minister's fellowship. antique fair. photographic exhibition, burt sargent circa 1900. open garden nanga gnulle a parade of quilts, strathdale bendigo quilters inc. tasting the life, gail tavener studio. snakes alive dangerous australians, brit. book fair, ymca. bendigo camera club, brit. bendigo woodcraft exhibition, woodturners bendigo inc. autumn bonsai, bendigo bonsai club. convocation, national trust bendigo. arms & collectables, golden city collectors assoc. art show. pottery exhibition. women's vision for the church, provincial council of mothers union. historic toorak house, lioness club. white hills cemetery. bendigo cemetery. festival of flowers, craft & garden, bendigo jockey club. motorfest, drive through, static display, motorkhana, time trial. dragon mile. volkswagen car show, national bug-in. repco cycles, australian veteran cycling council inc. championships. under 17 australian badminton championships. palm sunday, bendigo symphony orchestra. way of the cross, bendigo's combined churches. the easter story, kangfluca music. sunrise church service, bendigo ministers' fellowship. map of cbd advertisements: antique fair. golden dragon museum inc. bendigo heritage tours. discovery science & technology centre bendigo. sponsors: sandhurst trustees, vic health, abc radio, arts victoria, coca cola, events bendigo, city of greater bendigo, bendigo community health services, shannons., morris design. prime tv. austar. bendigo art gallery. bendigo visitor information centre. prime, victorian health promotion foundation, zaire, sponsored by bendigo market place & prime tv, sponsored by arts victoria, sponsored coca cola, power audio visual, rotary club of bendigo sandhurst, bendigo chinese association, y's men's club of bendigo -
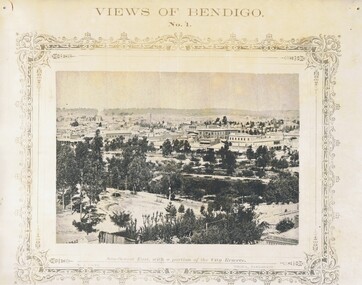 Bendigo Historical Society Inc.
Photograph - NICHOLAS CAIRE VIEWS OF BENDIGO
Full set (52 photos) of Nicholas Caire ''Views of Bendigo'' photographs. 1) Sandhurst East with a portion of the City Reserve. 2) New Chum line of reef. 3) Sandhurst-North part as seen from the top of the Masonic Hall. 4) The Hustler's line of reef seen from Redan Hill. 5) Battery of stampers for crushing quartz 6) View of Sandhurst as seen from the top of the New Masonic Hall. 7) Excavation of quartz reef near Ironbark Hill. 8) St. Paul's Church, tower and belfry. 9) View of the Camp Reserve as seen from the Court House. 10) View of North Old Chum showing surface excavations. 11) View as seen from the Camp Hill near the lodge. 12) Garden Gully amalgamated claims. 13) Shamrock Hotel, Sandhurst. 14) View as seen from Court House showing the willows & East Pall Mall. 15) Wesleyan Church, Golden Square. 16) Savings bank, Sandhurst. 17) The Bendigo district hospital. 18) Interior of the Wesleyan Church, Golden Square. 19) View of Golden Square township. 20) The Town Hall, City of Sandhurst. 21) The City Hotel, Sandhurst. 22) Pall Mall, Sandhurst. 23) Sandhurst City Market. 24) Pall Mall, Sandhurst looking west. 25) View from Camp Hill looking north - east 26) View of Charing Cross, Sandhurst. 27) View of Sandhurst as seen from Knipe's Castle. 28) Township of Long Gully. 29) View taken from St. Paul's tower. 30) View of the Sandhurst cemetery at back creek. 31) Kock's pioneer quartz crushing plant, Long Gully. 32) The New Masonic Hall, Sandhurst. 33) The Bendigo benevolent asylum and industrial school. 34) Bendigo flat as seen from Wattle Hill. 35) View of Old Chum Hill. 36) New Chum Gully as seen from Specimen Hill. 37) Township of Eaglehawk. 38) View from St. Paul's tower looking south west. 39) View of the railway tunnel through the Big Hill, near Mt. Herbert. 40) View taken from St. Paul's looking south. 41) Scene taken from St. Paul's tower looking eastward. 42) View of Sandhurst from St. Paul's tower looking north-west. 43) The great extended Hustler's co's. quartz mining claim. 44) View from the Big Hill showing the line of railway to Melbourne. 45) View from St. Paul's Church tower looking westward. 46) View from St. Paul's Church tower looking north-west. 47) Scene near the Big Hill ranges taken from Mr. Buick's residence. 48) View from St. Paul's Church tower looking north eastward. 49) Township of Eaglehawk 50) View of Mitchell Street, Sandhurst. 51) Botanical gardens near the White Hills. 52) View Point, Sandhurst.bendigo, streetscape, various views, nicholas cairne -
 Moorabbin Air Museum
Document (item) - Roland Jahne Collection - See Description for details
-
Moorabbin Air Museum
Document (item) - Roland Jahne Collection - See Description for details
-
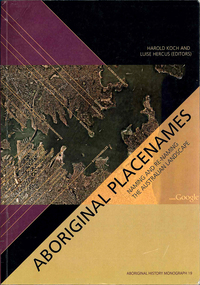 Victorian Aboriginal Corporation for Languages
Book, Harold Koch, Aboriginal placenames : naming and re-naming the Australian landscape, 2009
"Aboriginal approaches to the naming of places across Australia differ radically from the official introduced Anglo-Australian system. However, many of these earlier names have been incorporated into contemporary nomenclature, with considerable reinterpretations of their function and form. Recently, state jurisdictions have encouraged the adoption of a greater number of Indigenous names, sometimes alongside the accepted Anglo-Australian terms, around Sydney Harbour, for example. In some cases, the use of an introduced name, such as Gove, has been contested by local Indigenous people." "The 19 studies brought together in this book present an overview of current issues involving Indigenous placenames across the whole of Australia, drawing on the disciplines of geography, linguistics, history, and anthropology. They include meticulous studies of historical records, and perspectives stemming from contemporary Indigenous communities. The book includes a wealth of documentary information on some 400 specific placenames, including those of Sydney Harbour, the Blue Mountains, Canberra, western Victoria, the Lake Eyre district, the Victoria River District, and southwestern Cape York Peninsula." -- Publisher description. Contents: Introduction: Old and new aspects of Indigenous place-naming /? Harold Koch and Luise Hercus NSW &? ACT: 1. Aboriginal placenames around Port Jackson and Botany Bay, New South Wales, Australia: sources and uncertainties /? Val Attenbrow 2. Reinstating Aboriginal placenames around Port Jackson and Botany Bay /? Jakelin Troy and Michael Walsh 3. The recognition of Aboriginal placenames in New South Wales /? Greg Windsor 4. New insights into Gundungurra place naming /? Jim Smith 5. The methodology of reconstructing Indigenous placenames: Australian Capital Territory and south-eastern New South Wales /? Harold Koch Victoria: 6. Toponymic books and the representation of Indigenous identities /? Laura Kostanski 7. Reviving old Indigenous names for new purposes /? Laura Kostanski and Ian D. Clark 8. Reconstruction of Aboriginal microtoponymy in western and central Victoria: case studies from Tower Hill, the Hopkins River, and Lake Boga /? Ian Clark South Australia &? Central Australia: 'Aboriginal names of places in southern South Australia': placenames in the Norman B.Tindale collection of papers /? Paul Monaghan 10. Why Mulligan is not just another Irish name: Lake Callabonna, South Australia /? J.C. McEntee 11. Murkarra, a landscape nearly forgotten: the Arabana country of the noxious insects, north and northwest of Lake Eyre /? Luise Hercus 12. Some area names in the far north-east of South Australia /? Luise Hercus 13. Placenames of central Australia: European records and recent experience /? Richard Kimber Northern Australia: 14. Naming Bardi places /? Claire Bowern 15. Dog-people: the meaning of a north Kimberley story /? Mark Clendon 16. 'Where the spear sticks up': the variety of locatives in placenames in the Victoria River District, Northern Territory /? Patrick McConvell 17. 'This place already has a name' /? Melanie Wilkinson, Dr R. Marika and Nancy M. Williams 18. Manankurra: what's in a name? placenames and emotional geographies /? John J. Bradley and Amanda Kearney 19. Kurtjar placenames /? Paul Black.Maps, b&w photographs, tables, word listsaustralian placenames, sociolinguistics, linguistics, anthropology, sydney harbour placenames, blue mountains placenames, canberra placenames, western victoria placenames, lake eyre placenames, victoria river district placenames, cape york peninsula placenames -
Ballarat Tramway Museum
Memorabilia - Exhibition Material, Warren Doubleday, "gold!, Gold!, GOLD! and Trams", 29/01/2003 12:00:00 AM
Two photos and thirty captions or label cards used in the Museum's exhibition entitled "gold!, Gold!, GOLD! and Trams". Printed on a colour laser jet, 200 gsm card, unless noted otherwise. Most cards have two Velcro dots on rear, except larger ones which may have three or four. .1 151 x 210 Opening Tram Leonora Tramways - supplied by the Perth Electric Tramway Society .2 210 x 292 Kalgoorlie Electric Tramways Limited trams No. 19 and 13 - ex PETS .3 210 x 297 Gold and Tramways of Ballarat - text card.. .4 210 x 297 text card - 2nd card. .5 130 x 210 Acknowledgements card. .6 - .8 97 x 297 - "GOLD!" on each card, with a heavier font each time. .9 172 x 297 "and trams" .10 136 x 297 "Painted to Celebrate" .11 383 x 80 "At first horses" .12 62 x 472 "Then came Electric" - Two pieces of card joined together, stored folded. .13 65 x 557 "and other Golden Cities" - Two pieces of card joined together, stored folded. .14 68 x 550 "For the City of Ballarat" - Two pieces of card joined together, stored folded. .15 47 x 385 "To Ballarat East as well" .16 45 x 90 "Main St" / "Photo Wal Jack 1963 btm362" .17 46 x 194 "Main and Victoria Sts" / "Photo Ron Fluck 1950 btm870" .18 69 x 126 "1964 Sebastopol" / "Photo Tramway Museum Society of Victoria" .19 66 x 99 "1951 Ballarat / Photo Keith Kings btm1378" .20 45 x 102 "Bendigo N.J. Simons Collection btm 1205.7" .21 68 x 106 "2001 Ballarat / Photo Warren Doubleday" .22 43 x 157 "To Sebastopol / From E.D. Jenkins book, Sebastopol Victoria 1864-1964 btm1090" .23 43 x 158 "From the City / Charles Rudd photograph, State Library of Victoria btm 1113i" .24 43 x 271 "Electric Power for Industry / BTM Collection btm 698i" .25 47 x 160 "To the Gardens / From Geo Rose stereo pair. Donated by Bacchus Marsh Blacksmith Cottage and Forge btm1257" .26 41 x 96 "Leonora / Courtesy Perth Electric Tramway Society" .27 45 x 117 "Bridge St / Postcard from Norm DePomeroy collection btm 841" .28 46 x 169 "Transport for all / Postcard from Norm DePomeroy collection btm837" .29 44 x 89 "Main St / Photo Ron Fluck 1962 btm867" .30 41 x 117 "Kalgoorlie / Courtesy Perth Electric Tramway Society" .31 46 x 150 "1905 Opening / BTM Collection btm482" .32 52 x 404 "Ballarat Trams are Ballarat History"trams, tramways, btm, exhibitions, gold!, gold!, gold! and trams, gold tram -
 Ballarat Tramway Museum
Badge - SEC pass - set of 27, AMOR, c1950?
Set of 27 Stamped enamelled round brass pieces with a hole stamped at the top and ring placed through. Used as a SEC tramways employees pass for either all Provincial tramways, Ballarat or Bendigo only. All badges have the SEC logo in the centre, organisational name (State Electricity Commission of Victoria) in white enamel and outer ring the words "Electricity Supply Department, Provincial Tramways", or "Electric Tramways Ballarat" or "Electric Tramways Bendigo". This is in blue enamel. On the rear are stamped numbers and manufacturers name - "AMOR" or "AMOR MELB" or "STOKES & SONS MELBOURNE" in the bottom portion of the pass. Items .1 -> .10, .12, .13 individually tagged. Item .11 not tagged Item .13 -> .27, single tagged, tied together with a length of string. 1941.1 - Bendigo - No. 9 - Stokes - silver background instead of gold, appears to have been used. .2 - Bendigo - No. 43 - Stokes - has been used - partially worn, has additional clip joined to main ring. .3 - Ballarat - No. 51 - Stokes - has been used, worn and chipped under main ring. .4 - Ballarat - No. 61 - Stokes - has been used, worn, and chipped on blue enamel in at least two places. .5 - Ballarat - No. 72 - Stokes - has been used, worn and chipped on blue enamel in many places - btm1941i1 for reverse side. .6 - Ballarat - No. 86 - Stokes - has been used, worn, dirt on rear - see image btm1941i2 for front side. .7 - Bendigo - No. 107 - Stokes - appears not to have been used - see image btm1941i3 for front side .8 - Bendigo - No. 108 - Stokes - ditto, but gold by SEC shield is discoloured - see image btm1941i4. .9 - Bendigo - No. 121 - Stokes - appears to have been used, more silver than 1941.8 .10 - Provincial - No. 124 - AMOR - may have been used - see image 1941i5 for front side .11 - Provincial - No. 156 - AMOR - small clip broken off at top, has been used, worn (Not tagged) .12 - Provincial - No. 306 - AMOR - no larger ring, has been used, worn and discoloured .13 - Provincial - No. 656 - AMOR MELB - has not been used, no larger ring, see image 1941i6 for back side. .14 - Provincial - No. 642 - AMOR MELB - has not been used. .15 - Provincial - No. 644 - ditto .16 - Provincial - No. 645 - ditto .17 - Provincial - No. 646 - ditto .18 - Provincial - No. 647 - ditto .19 - Provincial - No. 648 - ditto .20 - Provincial - No. 649 - ditto .21 - Provincial - No. 650 - ditto .22 - Provincial - No. 651 - ditto .23 - Provincial - No. 652 - ditto .24 - Provincial - No. 653 - ditto .25 - Provincial - No. 654 - ditto - to A. Reither for 21st from BTM 2/8/03 - see attached image btm1941i7 .26 - Provincial - No. 655 - ditto - to P.Mong for 21st from BTM 2/8/03 - see ditto .27 - Provincial - No. 564 - ditto - added 21/1/2007 from somewhere - at WAD's house 12/2006. .28 - Provincial - No. 589 - ditto - dittotramways, trams, employees pass, tickets, provincial tramways, badges -
 Bendigo Military Museum
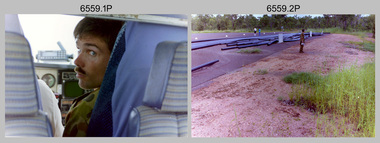
Photograph - 4th Field Survey Squadron – Operation ARIGHT 93, Queensland, 1993
This is a set of 42 photographs taken during 4th Field Survey Squadron’s deployment on Operation ARIGHT 93 in North Queensland from the 30th of August to the 8th of October 1993. The Survey Field Completion area of operations was Weipa near the top end of the Cape York Peninsula. Survey parties conducted field checking of topographic maps covering Bamaga, Heathlands, Weipa, Lockhart River and Strathgordon in Perentie 110 Series Survey variant FFR Land Rovers. Hand-held Trimble and Magellan GPS receivers were used to assist with navigation and to position remote isolated features. Three Bell Kiowa LOH helicopters provided by 162 Recce Sqn supported field checking operations. Supplementary and Vital Asset Protection photography was taken by air camera operators in AAAvn Nomad aircraft from 173 Survl Sqn fitted with an RC10 aerial camera.This is a set of 42 photographs taken in 1993 durin8g 4th Field Survey Squadron’s deployment on Operation ARIGHT in North Queensland. The colour photographs are on 35mm negative film and are part of the Army Survey Regiment’s Collection. The photographs were scanned at 96 dpi. .1) - Photo, colour, 1993. Survey party in Perentie 110 Series Land Rover navigates through Cape York Peninsula sand hills. .2) - Photo, colour, 1993. Cape York Peninsula sand hills. .3) - Photo, colour, 1993. Cape York Peninsula Island. .4) - Photo, colour, 1993. Survey party in Perentie 110 Series Land Rover enters a Cape York Peninsula beach. .5) - Photo, colour, 1993. SPR Kim Baker takes a break on a Cape York Peninsula beach. .6) - Photo, colour, 1993. L to R: MAJ Andy Cordova (USA Exchange) from the Army Survey Regiment and unidentified civilians. .7) to .14) - Photo, colour, 1993. Cape York Peninsula topography. .15) - Photo, colour, 1993. Unidentified surveyor in Bell Kiowa LOH helicopter. .16) - Photo, colour, 1993. Bell Kiowa LOH helicopter circles base camp. .17) to .18) - Photo, colour, 1993. Cape York Peninsula topography. .19) - Photo, colour, 1993. Vehicle convoy taking a break. L to R: LT John Bath (Detachment OC), unidentified (x2), SPR Chris Pearse. .20) - Photo, colour, 1993. Vehicle convoy taking a break. .21) - Photo, colour, 1993. Vehicle convoy ready to go. SPR Chris Pearse. .22) - Photo, colour, 1993. Vehicle convoy on the move. .23) - Photo, colour, 1993. Cape York Peninsula topography. .24) - Photo, colour, 1993. Unidentified personnel. .25) - Photo, colour, 1993. SGT Neale ‘Tex’ Houston. .26) - Photo, colour, 1993. Ground below a Bell Kiowa LOH helicopter .27) - Photo, colour, 1993. L to R: SPR Mark Sinderberry and CPL Stuart Adrain in a Bell Kiowa LOH helicopter. .28) & .29) - Photo, colour, 1993. Ground below a Bell Kiowa LOH helicopter. .30) - Photo, colour, 1993. Base camp viewed from a Bell Kiowa LOH helicopter. .31) - Photo, colour, 1993. Cape York Peninsula topography in recovery after burn-off. .32) & .33) - Photo, colour, 1993. SPR Kim Baker contemplates crossing this bridge in his Land Rover. .34) - Photo, colour, 1993. SPR Kim Baker takes a break next to a billabong. .35) - Photo, colour, 1993. Survey party in Perentie 110 Series Land Rover crosses a creek. .36) - Photo, colour, 1993. Cape York Peninsula bush fire in distance. .37) - Photo, colour, 1993. Survey party in Perentie 110 Series Land Rover traverses a sand hill. .38) - Photo, colour, 1993. SPR Kim Baker. .39) - Photo, colour, 1993. Cape York Peninsula bush fire. .40) - Photo, colour, 1993. Cape York Peninsula topography. .41) & .42) - Photo, colour, 1993. Cape York Peninsula sand hills..1P to .42P – There are no personnel identified. ‘1993 OP ARIGHT’ annotated on negative sleeve.royal australian survey corps, rasvy, 4 fd svy sqn, op aright 93 -
 Melbourne Tram Museum
Document - Photo Album, Graeme Breydon, "Tickets and Postal Covers", c1970 to 1990
Photo Album - dark blue plastic covers with the letters "photo album" in raised letters, stippled finish containing 10 leaves ring bound with an adhesive surface with clear plastic sheet on each cover. Page 1 – set of 8 Last day tram tickets – 16/4/1972 and four SEC tickets rear. Page 2 – set of 10 SEC tickets and 2 backs Page 3 – 2 BTPS 10c tickets, MMTB 25c, 3 Brisbane City Council tickets, two Trittons furnishings, one WCC (Wellington?) cable car and two MMTB City Concession tickets Page 4 – Set of 9 MMTB tickets 4d, 7d city, 7d, 8d, 1/-, 1/ 4, 2/- or 20c, 2/6 and one Pensioner’s check ticket. Page 5 – Set of 9 MMTB tickets, 4c, 8c, 9c, 10c, 30c, Pensioner’s concession, two $1 City concession cards, city concession check ticket and two machine issued tickets 1c and 15c. Page 6 – set of 16 MMTB tickets that have been recovered from within trams, very dirty, check tickets, value tickets and advertising on the rear. Page 7 – various special train tickets – Stainless steel train, ARHS tours, TMSV, ARHS Farewell, ARHS SA Mile End, Ballarat trams x 2, Crich exhibition ticket and one MTT (Tas?) 30c. Page 8 – VR Windsor to Melbourne Quarterly 1940, 7 VR various country and suburban tickets and two VR Motor coach services tickets. Page 9 – two interstate reserved seat tickets, Brisbane suburban ticket and 8 various values QR Parcel tickets – very dirty. Page 10 – Two Puffing Billy guest passes, 10th anniversary ticket, 10 various card tickets for Puffing Billy and tours. Page 11 – 6 + others MTT Adelaide value tickets with adverts on rear and four AETM St Kilda Museum tickets. Page 12 – four Red Bus Rover London tickets, four Peak Tramways tickets, one toll bridge, 6 London machine issued tickets. Page 13 – One San Francisco Municipal Railway ticket, one LlafrairPG platform ticket and two MMTB Machine tickets. Page 14 – One $1 MMTB city concession card and one Parramatta Park tramway ticket issued for COTMA during 1976. Page 15 – One Emerald Park vehicle entry ticket and one PBPS opening day of the extension to Lakeside in 1975 with certificate. Page 16 – One PBPS Notice. Page 17 – not used. Page 18 – three commemorative envelopes – WA Railway Centenary, Standard Gauge to Melbourne, and Sydney to Perth. Page 19 – Brisbane tramways last day, two Last day envelopes for Ballarat and Bendigo. Page 20 – three different St Kilda Centenary – Adelaide. Contained within the album was loose tickets - see Reg Item 3970 and a pamphlet for the opening of the Transport Mural at Spencer St Station on 30 Jan. 1978.has a label on the side in punched letters on a green tape "Tickets and Postal Covers"trams, tramways, tickets, secv, mmtb, adelaide, brisbane, arhs, aetm, aeta, pbps, cotma, tmsv, victorian railways, vr, post office, envelopes, post office -
 Melbourne Tram Museum
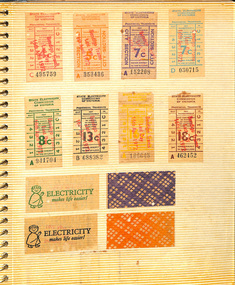
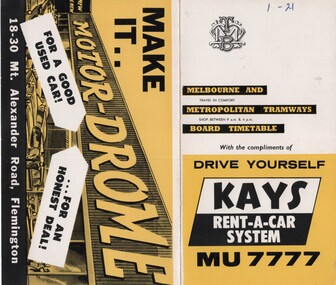
Ephemera - Timetable/s, Melbourne & Metropolitan Tramways Board (MMTB), "MMTB Timetables set of 39", 1960
Set of 39 MMTB Tram timetables, 2 fold sheets, , providing timetables for specific routes, route numbers, day of week giving information on tram times at departure time points, sections and fares, where applicable all night bus services. All signed by B. H. Misson, Traffic Manager. All sponsored by Kays Rent a Car and Motor Drome, 18-30 Mount Alexander Road, Flemington. The only one missing is Point Ormond. Not dated, based on fares - 1960 and possibly after Point Ormond had closed. .1 - Route 1, 21 - East Coburg - City .2 - Route 4, 4A, 4B - Carnegie - City .3 - Route 4D, 14 - East Malvern - City .4 - Route 5, 5A - Malvern Burke Road - City .5 - Route 6, 6A, 6B - Glen Iris - City .6 - Route 7, 7A, 7B, 7D - Camberwell - City .7 - Route 8, 8A - Toorak - City .8 - Route 9, 9A - Northcote via St Georges Road - City .9 - Route 9, 9B, 10, 12 - Sth Melbourne Beach, St Kilda Beach - City .10 - Route 10,11 - West Preston - City .11 - Route 15, 16 - St Kilda Beach - City .12 - Route 15, 22 - Moreland - City .13 - Route 18, 19, 20 - North Coburg - City .14 - Route 27, 28 - Hawthorn - Spencer St .15 - Route 42, 44, 45 - Mont Albert - City .16 - Route 48, 40, 41 - North Balwyn - Spencer St .17 - Route 49 - Essendon (Matthews Ave) - City .18 - Route 50, 54, 57, 58, 60 - West Maribyrnong - City .19 - Route 55, 56 - West Coburg - City .20 - Route 59 - Essendon Aerodrome - City .21 - Route 61, 62, 64, 65 - East Brighton - City .22 - Route 69 - Kew Cotham Road - St Kilda Beach .23 - Route 70, 71, 76 - Wattle Park - City .24 - Route 74, 75, 76 - Burwood - City .25 - Route 77, 80 - Prahran - City .26 - Route 78, 79 - North Richmond - Prahran .27 - Route 82 - Moonee Ponds - Footscray .28 - Williamstown Road - Footscray - Tram and bus .29 - Ballarat Road - Footscray - Tram and bus .30 - Russell St - - Footscray - Tram and bus .31 - East Brunswick - City .32 - Domain Road - City .33 - West Heidelberg - City .34 - Sunshine - City via Ballarat and Footscray Roads .35 - Sunshine - City via South and Dynon Roads .36 - Sunshine Park - City .37 - Garden City - City (Victoria St) .38 - Queens Bridge - Fisherman's Bend via Ingles St .39 - Queens Bridge - Fisherman's Bend via Lorimer St and Princes Bridge - Fisherman's Bend via Williamstown Rd.All have the route number in ink on the front cover - see image 5691i.jpg for standard cover.trams, tramways, mmtb, timetables, melbourne, fares, route 1, route 22, route 4, route 4a, route 4b, route 4d, route 14, route 5, route 5a, route 6, route 6a, route 6b, route 7, route 7a, route 7b, route 7d, route 8, route 8a, route 9, route 9a, route 9b, route 10, route 11, route 12, route 15, route 16, route 22, route 18, route 19, route 20, route 27, route 28, route 42, route 45, route 44, route 48, route 40, route 41, route 49, route 50, route 54, route 57, route 58, route 60, route 52, route 56, route 59, route 61, route 62, route 64, route 65, route 69, route 70, route 71, route 76, route 74, route 75, route 76, route 77, route 80, route 78, route 79, route 82, williamstown rd, ballarat rd, russell st, route 96, domain rd, west heidelberg, sunshine, garden city, queens bridge, fishermen's bend -
 Bendigo Military Museum
Photograph - 4th Field Survey Squadron – Operation MIZMAZE 92, Kimberley region, Western Australia, 1992
This is a set of 40 photographs taken in 1992 during 4th Field Survey Squadron’s deployment on Operation MIZMAZE 92 in the Kimberley region of Western Australia from the 13th of May to the 14th of July 1992. The area of operations was Wyndham, Halls Creek and Sandfire Flat. It was a two-part operation involving the field completion of topographic maps and the acquisition of mapping control by GPS field parties utilising Texas Instruments TI4100 Global Positioning System receivers. Survey parties conducted field checking of topographic maps and GPS control acquisition in Perentie 110 Series Survey variant FFR Land Rovers. Three Bell Kiowa LOH helicopters provided by 162 Recce Sqn supported field checking and limited deployment of GPS surveys parties. C-l30 Hercules from 36 Sqn supported deployment and extraction of personnel and equipment to and from from the AO. A Cessna 404 Titan Ambassador from Vee-H Aviation was used as the Wild RC10 camera platform for aerial photography acquisition.This is a set of 40 photographs taken in 1992 during 4th Field Survey Squadron’s deployment on Operation MIZMAZE 92 in the Kimberley region of Western Australia. The colour photographs are on 35mm negative film and are part of the Army Survey Regiment’s Collection. The photographs were scanned at 96 dpi. .1) - Photo, colour, 1992. CAPT Craig Hersant. .2) - Photo, colour, 1992. Unidentified officer/soldier. .3) & .4) - Photo, colour, 1992. Aboriginal rock art - Wandjina Gunduran, Donkey Creek. .5) - Photo, colour, 1992. Aboriginal rock art - Track Wandjinas, Donkey Creek. .6) & .7) - Photo, colour, 1992. CAPT Craig Hersant. .8) - Photo, colour, 1992. Kimberley region topography. CPL Glen Weatherell. .9) - Photo, colour, 1992. Unidentified personnel .10) - Photo, colour, 1992. Supermarket at unknown location. .11) to .13) - Photo, colour, 1992. Caravan park at unknown location. .14) - Photo, colour, 1992. Old bridge at Fitzroy Crosssing. .15) & .16) - Photo, colour, 1992. Survey party in Perentie 110 Series Land Rover. .17) & .18) - Photo, colour, 1992. Kimberley region topography. .19) - Photo, colour, 1992. Kimberley region topography. CPL Glen Weatherell. .20) - Photo, colour, 1992. Kimberley region topography, possibly the Bungle Bungles. .21) - Photo, colour, 1992. Kimberley region topography. SGT Frank Downie. .22) - Photo, colour, 1992. Kimberley region topography: the Bungle Bungles. .23) - Photo, colour, 1992. Kimberley region topography: the Bungle Bungles. .24) - Photo, colour, 1992. Kimberley region topography: the Bungle Bungles. SPR Neil Pedler. .25) & .26) - Photo, colour, 1992. Kimberley region topography: the Bungle Bungles. .27) - Photo, colour, 1992. Kimberley region topography. .28) - Photo, colour, 1992. Survey party with Perentie 110 Series Land Rover. .29) - Photo, colour, 1992. Kimberley region topography. .30) - Photo, colour, 1992. Survey party outside Perentie 110 Series Land Rover. .31) & .32) - Photo, colour, 1992. Survey party operating TI4100 GPS Receiver next to Perentie 110 Series Land Rover. SGT Eddie Jacobs. .33) & .34) - Photo, colour, 1992. Survey party operating TI4100 GPS Receiver next to Perentie 110 Series Land Rover. Unidentified surveyor. .35) - Photo, colour, 1992. Kimberley region topography. Hand water pump at well. .36) - Photo, colour, 1992. Survey party in Perentie 110 Series Land Rover. .37) - Photo, colour, 1992. Kimberley region topography. CPL Glen Weatherell. .38) - Photo, colour, 1992. Kimberley region topography viewed from Bell Kiowa LOH helicopter. .39) & .40) - Photo, colour, 1992. Unidentified surveyor field checking a preliminary map in a Bell Kiowa LOH helicopter..1P to .40P – There are no personnel identified. ‘1992 OP MIZMAZE annotated on negative sleeve.royal australian survey corps, rasvy, 4 fd svy sqn, op mizmaze 92 -
 Bendigo Military Museum
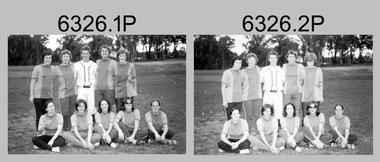
Photograph - Flag Day – Softball, Army Survey Regiment Verses School of Military Survey, Bendigo, 1977
These 25 photographs of softball team and sports action were taken on Flag Day, an annual sports competition between the Army Survey Regiment (ASR) and the School of Military Survey (SMS), at Bendigo on the 13th of May 1977. This event was held at Beischer Park, Strathdale. The two RA Svy units took turns each year to host the event. The day competition usually comprised basketball, cross country, golf, sailing, squash softball, tennis, rifle shooting, touch football, tug-of-war and volleyball. The evening competition often included darts, carpet bowls, hookey, quoits and snooker. See item 6325.15P for photos of golf, sailing, rifle shooting and squash teams and sports action taken on the day. This is a set of 25 photographs of softball team and sports action was taken on Flag Day, Army Survey Regiment (ASR) versus the School of Military Survey (SMS), at Bendigo on the 13th of May 1977. The photographs were printed on photographic paper and are part of the Army Survey Regiment’s Collection. The 35mm positive photographic proofs were scanned at 600 dpi. .1) & 2) - Photo, black & white, 1977, ASR Softball Team - L to R: Tracy (Beckwith) Phillips, unidentified, Gary Ames, Zoe (Lisiewich) Ames, Verity Dixon. Front row L to R: Sue (Nilon) Marner, Chris (Modrow) Stewart, unidentified, Di Chalmers, Lorraine ‘Snoopy’ (Daly) Talbot-Smith. .3) - Photo, black & white, 1977, SMS Softball Team: unidentified participants. .4) & 5) - Photo, black & white, 1977, Softball action: unidentified participants. .6) - Photo, black & white, 1977, Softball action L to R: unidentified (x2), Zoe (Lisiewich) Ames, Chris (Modrow) Stewart, unidentified (x3), Tracy (Beckwith) Phillips. .7) - Photo, black & white, 1977, Softball action L to R: unidentified, Di Chalmers. .8) - Photo, black & white, 1977, Softball action background L to R: unidentified, Ian Belmont, CO LTCOL Bob Skitch, Chris Carter. .9) - Photo, black & white, 1977, Softball action, Chris (Modrow) Stewart. .10) to 12) - Photo, black & white, 1977, Softball action: unidentified participants. .13) - Photo, black & white, 1977, Softball action: L to R: unidentified (x3), Lorraine ‘Snoopy’ (Daly) Talbot-Smith. .14) - Photo, black & white, 1977, Softball action: unidentified participants. .15) - Photo, black & white, 1977, Softball action: L to R: unidentified (x2), Lorraine ‘Snoopy’ (Daly) Talbot-Smith. .16) - Photo, black & white, 1977, Softball action: L to R: Sue (Nilon) Marner, unidentified, Lorraine ‘Snoopy’ (Daly) Talbot-Smith, unidentified. .17) - Photo, black & white, 1977, Softball action: unidentified participants, spectators L to R: unidentified, Peter Dew, Trevor Pearson, Alan Staley, Gavin Neilson, Ian Belmont, unidentified, Chris Carter. .18) - Photo, black & white, 1977, Softball action: unidentified participants and spectators. .19) & .20) - Photo, black & white, 1977, Softball action: unidentified participants, catcher Lorraine ‘Snoopy’ (Daly) Talbot-Smith. .21) - Photo, black & white, 1977, Softball action L to R: unidentified (x2), Chris (Modrow) Stewart, Tracy (Beckwith) Phillips, Lorraine ‘Snoopy’ (Daly) Talbot-Smith. .22) - Photo, black & white, 1977, Softball action: unidentified participants. .23) - Photo, black & white, 1977, Softball action L to R: Frank Lenane, Di Chalmers, Lorraine ‘Snoopy’ (Daly) Talbot-Smith, Zoe (Lisiewich) Ames, unidentified (x2). .24) & .25) - Photo, black & white, 1977, Softball action: unidentified participants..1P to .25P –No personnel are identified.royal australian survey corps, rasvy, army survey regiment, army svy regt, school of military survey, fortuna, asr, flag day -
 Flagstaff Hill Maritime Museum and Village
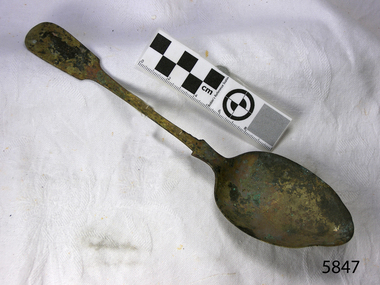
Domestic object - Spoon, circa 1878
This dessert spoon is from the wreck of the LOCH ARD, a Loch Line ship of 1,693 tons which sailed from Gravesend, London, on 2 March 1878 with 17 passengers and a crew of 36 under Captain George Gibbs. “The intention was to discharge cargo in Melbourne, before returning to London via the Horn with wool and wheat”. Instead, on 1 June 1878, after 90 days at sea, she struck the sandstone cliffs of Mutton Bird Island on the south west coast of Victoria, and sank with the loss of 52 lives and all her cargo. The manifest of the LOCH ARD listed an array of manufactured goods and bulk metals being exported to the Colony of Victoria, with a declared value of £53,700. (202 bills of lading show an actual invoice value of £68, 456, with insurance underwriting to £30,000 of all cargo). Included in the manifest is the item of “Tin hardware & cutlery £7,530”. This dessert spoon is one of 482 similar items of electro-plated cutlery from the LOCH ARD site, comprising spoons and forks of various sizes but all sharing the same general shape or design and metallic composition. 49 of these pieces display a legible makers’ mark — the initials “W” and “P” placed within a raised diamond outline, which is in turn contained within a sunken crown shape — identifying the manufacturer as William Page & Co of Birmingham. An electroplater’s makers’ marks, unlike sterling silver hallmarks, are not consistent identifiers of quality or date and place of manufacture. A similar line of five impressions was usually made to impress the consumer with an implication of industry standards, but what each one actually signified was not regulated and so they varied according to the whim of the individual foundry. In this case, the maker’s marks are often obscured by sedimentary accretion or removed by corrosion after a century of submersion in the ocean. However sufficient detail has survived to indicate that these samples of electro-plated cutlery probably originated from the same consignment in the LOCH ARD’s cargo. The generally common range of marks are drawn from 255 tea spoons, 125 dessert spoons, and 99 table forks. These marks are clearly visible in 66 instances, while the same sequence of general outlines, or depression shapes, is discernible in another 166 examples. Suggested trade names for William Page & Co’s particular blend of brass plating are ‘roman silver’ or ‘silverite’. This copper alloy polishes to a lustrous gold when new, discolouring to a murky grey with greenish hue when neglected. HISTORY OF THE LOCH ARD The LOCH ARD belonged to the famous Loch Line which sailed many ships from England to Australia. Built in Glasgow by Barclay, Curdle and Co. in 1873, the LOCH ARD was a three-masted square rigged iron sailing ship. The ship measured 262ft 7" (79.87m) in length, 38ft (11.58m) in width, 23ft (7m) in depth and had a gross tonnage of 1693 tons. The LOCH ARD's main mast measured a massive 150ft (45.7m) in height. LOCH ARD made three trips to Australia and one trip to Calcutta before its final voyage. LOCH ARD left England on March 2, 1878, under the command of Captain Gibbs, a newly married, 29 year old. She was bound for Melbourne with a crew of 37, plus 17 passengers and a load of cargo. The general cargo reflected the affluence of Melbourne at the time. On board were straw hats, umbrella, perfumes, clay pipes, pianos, clocks, confectionary, linen and candles, as well as a heavier load of railway irons, cement, lead and copper. There were items included that intended for display in the Melbourne International Exhibition in 1880. The voyage to Port Phillip was long but uneventful. At 3am on June 1, 1878, Captain Gibbs was expecting to see land and the passengers were becoming excited as they prepared to view their new homeland in the early morning. But LOCH ARD was running into a fog which greatly reduced visibility. Captain Gibbs was becoming anxious as there was no sign of land or the Cape Otway lighthouse. At 4am the fog lifted. A man aloft announced that he could see breakers. The sheer cliffs of Victoria's west coast came into view, and Captain Gibbs realised that the ship was much closer to them than expected. He ordered as much sail to be set as time would permit and then attempted to steer the vessel out to sea. On coming head on into the wind, the ship lost momentum, the sails fell limp and LOCH ARD's bow swung back. Gibbs then ordered the anchors to be released in an attempt to hold its position. The anchors sank some 50 fathoms - but did not hold. By this time LOCH ARD was among the breakers and the tall cliffs of Mutton Bird Island rose behind the ship. Just half a mile from the coast, the ship's bow was suddenly pulled around by the anchor. The captain tried to tack out to sea, but the ship struck a reef at the base of Mutton Bird Island, near Port Campbell. Waves broke over the ship and the top deck was loosened from the hull. The masts and rigging came crashing down knocking passengers and crew overboard. When a lifeboat was finally launched, it crashed into the side of LOCH ARD and capsized. Tom Pearce, who had launched the boat, managed to cling to its overturned hull and shelter beneath it. He drifted out to sea and then on the flood tide came into what is now known as LOCH ARD Gorge. He swam to shore, bruised and dazed, and found a cave in which to shelter. Some of the crew stayed below deck to shelter from the falling rigging but drowned when the ship slipped off the reef into deeper water. Eva Carmichael had raced onto deck to find out what was happening only to be confronted by towering cliffs looming above the stricken ship. In all the chaos, Captain Gibbs grabbed Eva and said, "If you are saved Eva, let my dear wife know that I died like a sailor". That was the last Eva Carmichael saw of the captain. She was swept off the ship by a huge wave. Eva saw Tom Pearce on a small rocky beach and yelled to attract his attention. He dived in and swam to the exhausted woman and dragged her to shore. He took her to the cave and broke open case of brandy which had washed up on the beach. He opened a bottle to revive the unconscious woman. A few hours later Tom scaled a cliff in search of help. He followed hoof prints and came by chance upon two men from nearby Glenample Station three and a half miles away. In a state of exhaustion, he told the men of the tragedy. Tom returned to the gorge while the two men rode back to the station to get help. By the time they reached LOCH ARD Gorge, it was cold and dark. The two shipwreck survivors were taken to Glenample Station to recover. Eva stayed at the station for six weeks before returning to Ireland, this time by steamship. In Melbourne, Tom Pearce received a hero's welcome. He was presented with the first gold medal of the Royal Humane Society of Victoria and a £1000 cheque from the Victorian Government. Concerts were performed to honour the young man's bravery and to raise money for those who lost family in the LOCH ARD disaster. Of the 54 crew members and passengers on board, only two survived: the apprentice, Tom Pearce and the young woman passenger, Eva Carmichael, who lost all of her family in the tragedy. Ten days after the LOCH ARD tragedy, salvage rights to the wreck were sold at auction for £2,120. Cargo valued at £3,000 was salvaged and placed on the beach, but most washed back into the sea when another storm developed. The wreck of LOCH ARD still lies at the base of Mutton Bird Island. Much of the cargo has now been salvaged and some was washed up into what is now known as LOCH ARD Gorge. Cargo and artefacts have also been illegally salvaged over many years before protective legislation was introduced. One of the most unlikely pieces of cargo to have survived the shipwreck was a Minton porcelain peacock - one of only seven in the world. The peacock was destined for the Melbourne International Exhibition in 1880. It had been well packed, which gave it adequate protection during the violent storm. Today, the Minton peacock can be seen at the Flagstaff Hill Maritime Museum in Warrnambool. From Australia's most dramatic shipwreck it has now become Australia's shipwreck artefact and is one of very few 'objects' on the Victorian State Heritage Register most valuable. The LOCH ARD shipwreck is of State significance – Victorian Heritage Register S 417. Flagstaff Hill’s collection of artefacts from LOCH ARD is significant for being one of the largest collections of artefacts from this shipwreck in Victoria. It is significant for its association with the shipwreck, which is on the Victorian Heritage Register (VHR S417). The collection is significant because of the relationship between the objects, as together they have a high potential to interpret the story of the LOCH ARD. The LOCH ARD collection is archaeologically significant as the remains of a large international passenger and cargo ship. The LOCH ARD collection is historically significant for representing aspects of Victoria’s shipping history and its potential to interpret sub-theme 1.5 of Victoria’s Framework of Historical Themes (living with natural processes). The collection is also historically significant for its association with the LOCH ARD, which was one of the worst and best known shipwrecks in Victoria’s history. Unrestored dessert spoon from the wreck of the LOCH ARD. The spoon design has a flattened fiddle-back handle, with a thin stem or shank, flared collar, and a shallow rounded bowl. The spoons metallic composition is a thin layer of brass alloy which has partially corroded back to a nickel-silver base metal. Approximately 65% of original plate remains with some verdigris. The end of the bowl is bent and there is a small amount of concreted sediment on the rear of handle.flagstaff hill maritime museum, maritime museum, shipwreck coast, great ocean road, loch line, loch ard, mutton bird island, loch ard gorge, electroplated cutlery, loch ard shipwreck, william page and co, birmingham brass plating -
 Flagstaff Hill Maritime Museum and Village
Domestic object - Spoon, circa 1878
This dessert spoon is from the wreck of the LOCH ARD, a Loch Line ship of 1,693 tons which sailed from Gravesend, London, on 2 March 1878 with 17 passengers and a crew of 36 under Captain George Gibbs. “The intention was to discharge cargo in Melbourne, before returning to London via the Horn with wool and wheat”. Instead, on 1 June 1878, after 90 days at sea, she struck the sandstone cliffs of Mutton Bird Island on the south west coast of Victoria, and sank with the loss of 52 lives and all her cargo. The manifest of the LOCH ARD listed an array of manufactured goods and bulk metals being exported to the Colony of Victoria, with a declared value of £53,700. (202 bills of lading show an actual invoice value of £68, 456, with insurance underwriting to £30,000 of all cargo). Included in the manifest is the item of “Tin hardware & cutlery £7,530”. This dessert spoon is one of 482 similar items of electro-plated cutlery from the LOCH ARD site, comprising spoons and forks of various sizes but all sharing the same general shape or design and metallic composition. 49 of these pieces display a legible makers’ mark — the initials “W” and “P” placed within a raised diamond outline, which is in turn contained within a sunken crown shape — identifying the manufacturer as William Page & Co of Birmingham. An electroplater’s makers’ marks, unlike sterling silver hallmarks, are not consistent identifiers of quality or date and place of manufacture. A similar line of five impressions was usually made to impress the consumer with an implication of industry standards, but what each one actually signified was not regulated and so they varied according to the whim of the individual foundry. In this case, the maker’s marks are often obscured by sedimentary accretion or removed by corrosion after a century of submersion in the ocean. However sufficient detail has survived to indicate that these samples of electro-plated cutlery probably originated from the same consignment in the LOCH ARD’s cargo. The generally common range of marks are drawn from 255 tea spoons, 125 dessert spoons, and 99 table forks. These marks are clearly visible in 66 instances, while the same sequence of general outlines, or depression shapes, is discernible in another 166 examples. Suggested trade names for William Page & Co’s particular blend of brass plating are ‘roman silver’ or ‘silverite’. This copper alloy polishes to a lustrous gold when new, discolouring to a murky grey with greenish hue when neglected. HISTORY OF THE LOCH ARD The LOCH ARD belonged to the famous Loch Line which sailed many ships from England to Australia. Built in Glasgow by Barclay, Curdle and Co. in 1873, the LOCH ARD was a three-masted square rigged iron sailing ship. The ship measured 262ft 7" (79.87m) in length, 38ft (11.58m) in width, 23ft (7m) in depth and had a gross tonnage of 1693 tons. The LOCH ARD's main mast measured a massive 150ft (45.7m) in height. LOCH ARD made three trips to Australia and one trip to Calcutta before its final voyage. LOCH ARD left England on March 2, 1878, under the command of Captain Gibbs, a newly married, 29 year old. She was bound for Melbourne with a crew of 37, plus 17 passengers and a load of cargo. The general cargo reflected the affluence of Melbourne at the time. On board were straw hats, umbrella, perfumes, clay pipes, pianos, clocks, confectionary, linen and candles, as well as a heavier load of railway irons, cement, lead and copper. There were items included that intended for display in the Melbourne International Exhibition in 1880. The voyage to Port Phillip was long but uneventful. At 3am on June 1, 1878, Captain Gibbs was expecting to see land and the passengers were becoming excited as they prepared to view their new homeland in the early morning. But LOCH ARD was running into a fog which greatly reduced visibility. Captain Gibbs was becoming anxious as there was no sign of land or the Cape Otway lighthouse. At 4am the fog lifted. A man aloft announced that he could see breakers. The sheer cliffs of Victoria's west coast came into view, and Captain Gibbs realised that the ship was much closer to them than expected. He ordered as much sail to be set as time would permit and then attempted to steer the vessel out to sea. On coming head on into the wind, the ship lost momentum, the sails fell limp and LOCH ARD's bow swung back. Gibbs then ordered the anchors to be released in an attempt to hold its position. The anchors sank some 50 fathoms - but did not hold. By this time LOCH ARD was among the breakers and the tall cliffs of Mutton Bird Island rose behind the ship. Just half a mile from the coast, the ship's bow was suddenly pulled around by the anchor. The captain tried to tack out to sea, but the ship struck a reef at the base of Mutton Bird Island, near Port Campbell. Waves broke over the ship and the top deck was loosened from the hull. The masts and rigging came crashing down knocking passengers and crew overboard. When a lifeboat was finally launched, it crashed into the side of LOCH ARD and capsized. Tom Pearce, who had launched the boat, managed to cling to its overturned hull and shelter beneath it. He drifted out to sea and then on the flood tide came into what is now known as LOCH ARD Gorge. He swam to shore, bruised and dazed, and found a cave in which to shelter. Some of the crew stayed below deck to shelter from the falling rigging but drowned when the ship slipped off the reef into deeper water. Eva Carmichael had raced onto deck to find out what was happening only to be confronted by towering cliffs looming above the stricken ship. In all the chaos, Captain Gibbs grabbed Eva and said, "If you are saved Eva, let my dear wife know that I died like a sailor". That was the last Eva Carmichael saw of the captain. She was swept off the ship by a huge wave. Eva saw Tom Pearce on a small rocky beach and yelled to attract his attention. He dived in and swam to the exhausted woman and dragged her to shore. He took her to the cave and broke open case of brandy which had washed up on the beach. He opened a bottle to revive the unconscious woman. A few hours later Tom scaled a cliff in search of help. He followed hoof prints and came by chance upon two men from nearby Glenample Station three and a half miles away. In a state of exhaustion, he told the men of the tragedy. Tom returned to the gorge while the two men rode back to the station to get help. By the time they reached LOCH ARD Gorge, it was cold and dark. The two shipwreck survivors were taken to Glenample Station to recover. Eva stayed at the station for six weeks before returning to Ireland, this time by steamship. In Melbourne, Tom Pearce received a hero's welcome. He was presented with the first gold medal of the Royal Humane Society of Victoria and a £1000 cheque from the Victorian Government. Concerts were performed to honour the young man's bravery and to raise money for those who lost family in the LOCH ARD disaster. Of the 54 crew members and passengers on board, only two survived: the apprentice, Tom Pearce and the young woman passenger, Eva Carmichael, who lost all of her family in the tragedy. Ten days after the LOCH ARD tragedy, salvage rights to the wreck were sold at auction for £2,120. Cargo valued at £3,000 was salvaged and placed on the beach, but most washed back into the sea when another storm developed. The wreck of LOCH ARD still lies at the base of Mutton Bird Island. Much of the cargo has now been salvaged and some was washed up into what is now known as LOCH ARD Gorge. Cargo and artefacts have also been illegally salvaged over many years before protective legislation was introduced. One of the most unlikely pieces of cargo to have survived the shipwreck was a Minton porcelain peacock - one of only seven in the world. The peacock was destined for the Melbourne International Exhibition in 1880. It had been well packed, which gave it adequate protection during the violent storm. Today, the Minton peacock can be seen at the Flagstaff Hill Maritime Museum in Warrnambool. From Australia's most dramatic shipwreck it has now become Australia's shipwreck artefact and is one of very few 'objects' on the Victorian State Heritage Register most valuable. The LOCH ARD shipwreck is of State significance – Victorian Heritage Register S 417. Flagstaff Hill’s collection of artefacts from LOCH ARD is significant for being one of the largest collections of artefacts from this shipwreck in Victoria. It is significant for its association with the shipwreck, which is on the Victorian Heritage Register (VHR S417). The collection is significant because of the relationship between the objects, as together they have a high potential to interpret the story of the LOCH ARD. The LOCH ARD collection is archaeologically significant as the remains of a large international passenger and cargo ship. The LOCH ARD collection is historically significant for representing aspects of Victoria’s shipping history and its potential to interpret sub-theme 1.5 of Victoria’s Framework of Historical Themes (living with natural processes). The collection is also historically significant for its association with the LOCH ARD, which was one of the worst and best known shipwrecks in Victoria’s history. Unrestored dessert spoon from the wreck of the LOCH ARD. The spoon design has a flattened fiddle-back handle, with a thin stem or shank, flared collar, and a shallow rounded bowl. The spoons metallic composition is a thin layer of brass alloy which has partially corroded back to a nickel-silver base metal. Approximately 85% of original plate remains. The outlines of five makers marks are visible and the details of two of these are clear - (1) WP&Co trademark, (3) Maltese Cross.flagstaff hill maritime museum, shipwreck coast, great ocean road, loch line, loch ard, mutton bird island, loch ard gorge, electroplated cutlery, loch ard shipwreck, william page and co, birmingham brass plating -
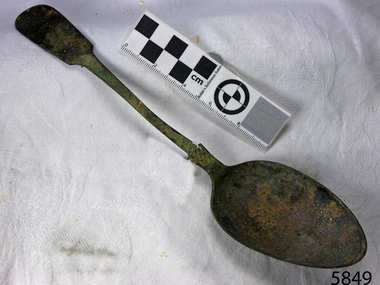 Flagstaff Hill Maritime Museum and Village
Domestic object - Spoon, circa 1878
This dessert spoon is from the wreck of the LOCH ARD, a Loch Line ship of 1,693 tons which sailed from Gravesend, London, on 2 March 1878 with 17 passengers and a crew of 36 under Captain George Gibbs. “The intention was to discharge cargo in Melbourne, before returning to London via the Horn with wool and wheat”. Instead, on 1 June 1878, after 90 days at sea, she struck the sandstone cliffs of Mutton Bird Island on the south west coast of Victoria, and sank with the loss of 52 lives and all her cargo. The manifest of the LOCH ARD listed an array of manufactured goods and bulk metals being exported to the Colony of Victoria, with a declared value of £53,700. (202 bills of lading show an actual invoice value of £68, 456, with insurance underwriting to £30,000 of all cargo). Included in the manifest is the item of “Tin hardware & cutlery £7,530”. This dessert spoon is one of 482 similar items of electro-plated cutlery from the LOCH ARD site, comprising spoons and forks of various sizes but all sharing the same general shape or design and metallic composition. 49 of these pieces display a legible makers’ mark — the initials “W” and “P” placed within a raised diamond outline, which is in turn contained within a sunken crown shape — identifying the manufacturer as William Page & Co of Birmingham. An electroplater’s makers’ marks, unlike sterling silver hallmarks, are not consistent identifiers of quality or date and place of manufacture. A similar line of five impressions was usually made to impress the consumer with an implication of industry standards, but what each one actually signified was not regulated and so they varied according to the whim of the individual foundry. In this case, the maker’s marks are often obscured by sedimentary accretion or removed by corrosion after a century of submersion in the ocean. However sufficient detail has survived to indicate that these samples of electro-plated cutlery probably originated from the same consignment in the LOCH ARD’s cargo. The generally common range of marks are drawn from 255 tea spoons, 125 dessert spoons, and 99 table forks. These marks are clearly visible in 66 instances, while the same sequence of general outlines, or depression shapes, is discernible in another 166 examples. Suggested trade names for William Page & Co’s particular blend of brass plating are ‘roman silver’ or ‘silverite’. This copper alloy polishes to a lustrous gold when new, discolouring to a murky grey with greenish hue when neglected. HISTORY OF THE LOCH ARD The LOCH ARD belonged to the famous Loch Line which sailed many ships from England to Australia. Built in Glasgow by Barclay, Curdle and Co. in 1873, the LOCH ARD was a three-masted square rigged iron sailing ship. The ship measured 262ft 7" (79.87m) in length, 38ft (11.58m) in width, 23ft (7m) in depth and had a gross tonnage of 1693 tons. The LOCH ARD's main mast measured a massive 150ft (45.7m) in height. LOCH ARD made three trips to Australia and one trip to Calcutta before its final voyage. LOCH ARD left England on March 2, 1878, under the command of Captain Gibbs, a newly married, 29 year old. She was bound for Melbourne with a crew of 37, plus 17 passengers and a load of cargo. The general cargo reflected the affluence of Melbourne at the time. On board were straw hats, umbrella, perfumes, clay pipes, pianos, clocks, confectionary, linen and candles, as well as a heavier load of railway irons, cement, lead and copper. There were items included that intended for display in the Melbourne International Exhibition in 1880. The voyage to Port Phillip was long but uneventful. At 3am on June 1, 1878, Captain Gibbs was expecting to see land and the passengers were becoming excited as they prepared to view their new homeland in the early morning. But LOCH ARD was running into a fog which greatly reduced visibility. Captain Gibbs was becoming anxious as there was no sign of land or the Cape Otway lighthouse. At 4am the fog lifted. A man aloft announced that he could see breakers. The sheer cliffs of Victoria's west coast came into view, and Captain Gibbs realised that the ship was much closer to them than expected. He ordered as much sail to be set as time would permit and then attempted to steer the vessel out to sea. On coming head on into the wind, the ship lost momentum, the sails fell limp and LOCH ARD's bow swung back. Gibbs then ordered the anchors to be released in an attempt to hold its position. The anchors sank some 50 fathoms - but did not hold. By this time LOCH ARD was among the breakers and the tall cliffs of Mutton Bird Island rose behind the ship. Just half a mile from the coast, the ship's bow was suddenly pulled around by the anchor. The captain tried to tack out to sea, but the ship struck a reef at the base of Mutton Bird Island, near Port Campbell. Waves broke over the ship and the top deck was loosened from the hull. The masts and rigging came crashing down knocking passengers and crew overboard. When a lifeboat was finally launched, it crashed into the side of LOCH ARD and capsized. Tom Pearce, who had launched the boat, managed to cling to its overturned hull and shelter beneath it. He drifted out to sea and then on the flood tide came into what is now known as LOCH ARD Gorge. He swam to shore, bruised and dazed, and found a cave in which to shelter. Some of the crew stayed below deck to shelter from the falling rigging but drowned when the ship slipped off the reef into deeper water. Eva Carmichael had raced onto deck to find out what was happening only to be confronted by towering cliffs looming above the stricken ship. In all the chaos, Captain Gibbs grabbed Eva and said, "If you are saved Eva, let my dear wife know that I died like a sailor". That was the last Eva Carmichael saw of the captain. She was swept off the ship by a huge wave. Eva saw Tom Pearce on a small rocky beach and yelled to attract his attention. He dived in and swam to the exhausted woman and dragged her to shore. He took her to the cave and broke open case of brandy which had washed up on the beach. He opened a bottle to revive the unconscious woman. A few hours later Tom scaled a cliff in search of help. He followed hoof prints and came by chance upon two men from nearby Glenample Station three and a half miles away. In a state of exhaustion, he told the men of the tragedy. Tom returned to the gorge while the two men rode back to the station to get help. By the time they reached LOCH ARD Gorge, it was cold and dark. The two shipwreck survivors were taken to Glenample Station to recover. Eva stayed at the station for six weeks before returning to Ireland, this time by steamship. In Melbourne, Tom Pearce received a hero's welcome. He was presented with the first gold medal of the Royal Humane Society of Victoria and a £1000 cheque from the Victorian Government. Concerts were performed to honour the young man's bravery and to raise money for those who lost family in the LOCH ARD disaster. Of the 54 crew members and passengers on board, only two survived: the apprentice, Tom Pearce and the young woman passenger, Eva Carmichael, who lost all of her family in the tragedy. Ten days after the LOCH ARD tragedy, salvage rights to the wreck were sold at auction for £2,120. Cargo valued at £3,000 was salvaged and placed on the beach, but most washed back into the sea when another storm developed. The wreck of LOCH ARD still lies at the base of Mutton Bird Island. Much of the cargo has now been salvaged and some was washed up into what is now known as LOCH ARD Gorge. Cargo and artefacts have also been illegally salvaged over many years before protective legislation was introduced. One of the most unlikely pieces of cargo to have survived the shipwreck was a Minton porcelain peacock - one of only seven in the world. The peacock was destined for the Melbourne International Exhibition in 1880. It had been well packed, which gave it adequate protection during the violent storm. Today, the Minton peacock can be seen at the Flagstaff Hill Maritime Museum in Warrnambool. From Australia's most dramatic shipwreck it has now become Australia's shipwreck artefact and is one of very few 'objects' on the Victorian State Heritage Register most valuable. The LOCH ARD shipwreck is of State significance – Victorian Heritage Register S 417. Flagstaff Hill’s collection of artefacts from LOCH ARD is significant for being one of the largest collections of artefacts from this shipwreck in Victoria. It is significant for its association with the shipwreck, which is on the Victorian Heritage Register (VHR S417). The collection is significant because of the relationship between the objects, as together they have a high potential to interpret the story of the LOCH ARD. The LOCH ARD collection is archaeologically significant as the remains of a large international passenger and cargo ship. The LOCH ARD collection is historically significant for representing aspects of Victoria’s shipping history and its potential to interpret sub-theme 1.5 of Victoria’s Framework of Historical Themes (living with natural processes). The collection is also historically significant for its association with the LOCH ARD, which was one of the worst and best known shipwrecks in Victoria’s history. Unrestored dessert spoon from the wreck of the LOCH ARD. The spoon design has a flattened fiddle-back handle, with a thin stem or shank, flared collar, and a shallow rounded bowl. The spoons metallic composition is a thin layer of brass alloy which has partially corroded back to a nickel-silver base metal. Approximately 40% of original plate remains, in a dull grey/green condition. Outlines of five makers marks are visible, with two that are legible - (1) WP&Co trademark, (4) Crab design. flagstaff hill maritime museum, shipwreck coast, great ocean road, loch line, loch ard, mutton bird island, loch ard gorge, electroplated cutlery, loch ard shipwreck, william page and co, birmingham brass plating, dessert spoons -
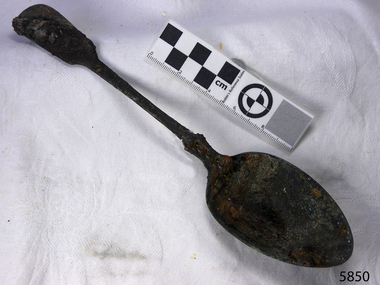 Flagstaff Hill Maritime Museum and Village
Domestic object - Spoon, circa 1878
This dessert spoon is from the wreck of the LOCH ARD, a Loch Line ship of 1,693 tons which sailed from Gravesend, London, on 2 March 1878 with 17 passengers and a crew of 36 under Captain George Gibbs. “The intention was to discharge cargo in Melbourne, before returning to London via the Horn with wool and wheat”. Instead, on 1 June 1878, after 90 days at sea, she struck the sandstone cliffs of Mutton Bird Island on the south west coast of Victoria, and sank with the loss of 52 lives and all her cargo. The manifest of the LOCH ARD listed an array of manufactured goods and bulk metals being exported to the Colony of Victoria, with a declared value of £53,700. (202 bills of lading show an actual invoice value of £68, 456, with insurance underwriting to £30,000 of all cargo). Included in the manifest is the item of “Tin hardware & cutlery £7,530”. This dessert spoon is one of 482 similar items of electro-plated cutlery from the LOCH ARD site, comprising spoons and forks of various sizes but all sharing the same general shape or design and metallic composition. 49 of these pieces display a legible makers’ mark — the initials “W” and “P” placed within a raised diamond outline, which is in turn contained within a sunken crown shape — identifying the manufacturer as William Page & Co of Birmingham. An electroplater’s makers’ marks, unlike sterling silver hallmarks, are not consistent identifiers of quality or date and place of manufacture. A similar line of five impressions was usually made to impress the consumer with an implication of industry standards, but what each one actually signified was not regulated and so they varied according to the whim of the individual foundry. In this case, the maker’s marks are often obscured by sedimentary accretion or removed by corrosion after a century of submersion in the ocean. However sufficient detail has survived to indicate that these samples of electro-plated cutlery probably originated from the same consignment in the LOCH ARD’s cargo. The generally common range of marks are drawn from 255 tea spoons, 125 dessert spoons, and 99 table forks. These marks are clearly visible in 66 instances, while the same sequence of general outlines, or depression shapes, is discernible in another 166 examples. Suggested trade names for William Page & Co’s particular blend of brass plating are ‘roman silver’ or ‘silverite’. This copper alloy polishes to a lustrous gold when new, discolouring to a murky grey with greenish hue when neglected. HISTORY OF THE LOCH ARD The LOCH ARD belonged to the famous Loch Line which sailed many ships from England to Australia. Built in Glasgow by Barclay, Curdle and Co. in 1873, the LOCH ARD was a three-masted square rigged iron sailing ship. The ship measured 262ft 7" (79.87m) in length, 38ft (11.58m) in width, 23ft (7m) in depth and had a gross tonnage of 1693 tons. The LOCH ARD's main mast measured a massive 150ft (45.7m) in height. LOCH ARD made three trips to Australia and one trip to Calcutta before its final voyage. LOCH ARD left England on March 2, 1878, under the command of Captain Gibbs, a newly married, 29 year old. She was bound for Melbourne with a crew of 37, plus 17 passengers and a load of cargo. The general cargo reflected the affluence of Melbourne at the time. On board were straw hats, umbrella, perfumes, clay pipes, pianos, clocks, confectionary, linen and candles, as well as a heavier load of railway irons, cement, lead and copper. There were items included that intended for display in the Melbourne International Exhibition in 1880. The voyage to Port Phillip was long but uneventful. At 3am on June 1, 1878, Captain Gibbs was expecting to see land and the passengers were becoming excited as they prepared to view their new homeland in the early morning. But LOCH ARD was running into a fog which greatly reduced visibility. Captain Gibbs was becoming anxious as there was no sign of land or the Cape Otway lighthouse. At 4am the fog lifted. A man aloft announced that he could see breakers. The sheer cliffs of Victoria's west coast came into view, and Captain Gibbs realised that the ship was much closer to them than expected. He ordered as much sail to be set as time would permit and then attempted to steer the vessel out to sea. On coming head on into the wind, the ship lost momentum, the sails fell limp and LOCH ARD's bow swung back. Gibbs then ordered the anchors to be released in an attempt to hold its position. The anchors sank some 50 fathoms - but did not hold. By this time LOCH ARD was among the breakers and the tall cliffs of Mutton Bird Island rose behind the ship. Just half a mile from the coast, the ship's bow was suddenly pulled around by the anchor. The captain tried to tack out to sea, but the ship struck a reef at the base of Mutton Bird Island, near Port Campbell. Waves broke over the ship and the top deck was loosened from the hull. The masts and rigging came crashing down knocking passengers and crew overboard. When a lifeboat was finally launched, it crashed into the side of LOCH ARD and capsized. Tom Pearce, who had launched the boat, managed to cling to its overturned hull and shelter beneath it. He drifted out to sea and then on the flood tide came into what is now known as LOCH ARD Gorge. He swam to shore, bruised and dazed, and found a cave in which to shelter. Some of the crew stayed below deck to shelter from the falling rigging but drowned when the ship slipped off the reef into deeper water. Eva Carmichael had raced onto deck to find out what was happening only to be confronted by towering cliffs looming above the stricken ship. In all the chaos, Captain Gibbs grabbed Eva and said, "If you are saved Eva, let my dear wife know that I died like a sailor". That was the last Eva Carmichael saw of the captain. She was swept off the ship by a huge wave. Eva saw Tom Pearce on a small rocky beach and yelled to attract his attention. He dived in and swam to the exhausted woman and dragged her to shore. He took her to the cave and broke open case of brandy which had washed up on the beach. He opened a bottle to revive the unconscious woman. A few hours later Tom scaled a cliff in search of help. He followed hoof prints and came by chance upon two men from nearby Glenample Station three and a half miles away. In a state of exhaustion, he told the men of the tragedy. Tom returned to the gorge while the two men rode back to the station to get help. By the time they reached LOCH ARD Gorge, it was cold and dark. The two shipwreck survivors were taken to Glenample Station to recover. Eva stayed at the station for six weeks before returning to Ireland, this time by steamship. In Melbourne, Tom Pearce received a hero's welcome. He was presented with the first gold medal of the Royal Humane Society of Victoria and a £1000 cheque from the Victorian Government. Concerts were performed to honour the young man's bravery and to raise money for those who lost family in the LOCH ARD disaster. Of the 54 crew members and passengers on board, only two survived: the apprentice, Tom Pearce and the young woman passenger, Eva Carmichael, who lost all of her family in the tragedy. Ten days after the LOCH ARD tragedy, salvage rights to the wreck were sold at auction for £2,120. Cargo valued at £3,000 was salvaged and placed on the beach, but most washed back into the sea when another storm developed. The wreck of LOCH ARD still lies at the base of Mutton Bird Island. Much of the cargo has now been salvaged and some was washed up into what is now known as LOCH ARD Gorge. Cargo and artefacts have also been illegally salvaged over many years before protective legislation was introduced. One of the most unlikely pieces of cargo to have survived the shipwreck was a Minton porcelain peacock - one of only seven in the world. The peacock was destined for the Melbourne International Exhibition in 1880. It had been well packed, which gave it adequate protection during the violent storm. Today, the Minton peacock can be seen at the Flagstaff Hill Maritime Museum in Warrnambool. From Australia's most dramatic shipwreck it has now become Australia's shipwreck artefact and is one of very few 'objects' on the Victorian State Heritage Register most valuable. The LOCH ARD shipwreck is of State significance – Victorian Heritage Register S 417. Flagstaff Hill’s collection of artefacts from LOCH ARD is significant for being one of the largest collections of artefacts from this shipwreck in Victoria. It is significant for its association with the shipwreck, which is on the Victorian Heritage Register (VHR S417). The collection is significant because of the relationship between the objects, as together they have a high potential to interpret the story of the LOCH ARD. The LOCH ARD collection is archaeologically significant as the remains of a large international passenger and cargo ship. The LOCH ARD collection is historically significant for representing aspects of Victoria’s shipping history and its potential to interpret sub-theme 1.5 of Victoria’s Framework of Historical Themes (living with natural processes). The collection is also historically significant for its association with the LOCH ARD, which was one of the worst and best known shipwrecks in Victoria’s history Unrestored dessert spoon from the wreck of the LOCH ARD. The spoon design has a flattened fiddle-back handle, with a thin stem or shank, flared collar, and a shallow rounded bowl. The spoons metallic composition is a thin layer of brass alloy which has partially corroded back to a nickel-silver base metal. Surface area of spoon is 10% sediment, 10% original plate, 1o% verdigris, and balance 70% almost black oxidisation. flagstaff hill maritime museum, shipwreck coast, great ocean road, loch line, loch ard, mutton bird island, loch ard gorge, electroplated cutlery, loch ard shipwreck, william page and co, birmingham brass plating, dessert spoons -
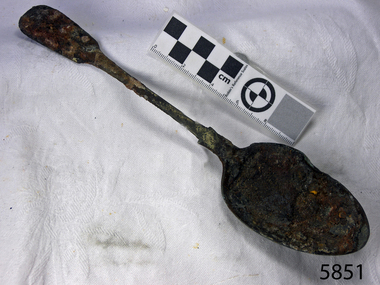 Flagstaff Hill Maritime Museum and Village
Domestic object - Spoon, circa 1878
This dessert spoon is from the wreck of the LOCH ARD, a Loch Line ship of 1,693 tons which sailed from Gravesend, London, on 2 March 1878 with 17 passengers and a crew of 36 under Captain George Gibbs. “The intention was to discharge cargo in Melbourne, before returning to London via the Horn with wool and wheat”. Instead, on 1 June 1878, after 90 days at sea, she struck the sandstone cliffs of Mutton Bird Island on the south west coast of Victoria, and sank with the loss of 52 lives and all her cargo. The manifest of the LOCH ARD listed an array of manufactured goods and bulk metals being exported to the Colony of Victoria, with a declared value of £53,700. (202 bills of lading show an actual invoice value of £68, 456, with insurance underwriting to £30,000 of all cargo). Included in the manifest is the item of “Tin hardware & cutlery £7,530”. This dessert spoon is one of 482 similar items of electro-plated cutlery from the LOCH ARD site, comprising spoons and forks of various sizes but all sharing the same general shape or design and metallic composition. 49 of these pieces display a legible makers’ mark — the initials “W” and “P” placed within a raised diamond outline, which is in turn contained within a sunken crown shape — identifying the manufacturer as William Page & Co of Birmingham. An electroplater’s makers’ marks, unlike sterling silver hallmarks, are not consistent identifiers of quality or date and place of manufacture. A similar line of five impressions was usually made to impress the consumer with an implication of industry standards, but what each one actually signified was not regulated and so they varied according to the whim of the individual foundry. In this case, the maker’s marks are often obscured by sedimentary accretion or removed by corrosion after a century of submersion in the ocean. However sufficient detail has survived to indicate that these samples of electro-plated cutlery probably originated from the same consignment in the LOCH ARD’s cargo. The generally common range of marks are drawn from 255 tea spoons, 125 dessert spoons, and 99 table forks. These marks are clearly visible in 66 instances, while the same sequence of general outlines, or depression shapes, is discernible in another 166 examples. Suggested trade names for William Page & Co’s particular blend of brass plating are ‘roman silver’ or ‘silverite’. This copper alloy polishes to a lustrous gold when new, discolouring to a murky grey with greenish hue when neglected. HISTORY OF THE LOCH ARD The LOCH ARD belonged to the famous Loch Line which sailed many ships from England to Australia. Built in Glasgow by Barclay, Curdle and Co. in 1873, the LOCH ARD was a three-masted square rigged iron sailing ship. The ship measured 262ft 7" (79.87m) in length, 38ft (11.58m) in width, 23ft (7m) in depth and had a gross tonnage of 1693 tons. The LOCH ARD's main mast measured a massive 150ft (45.7m) in height. LOCH ARD made three trips to Australia and one trip to Calcutta before its final voyage. LOCH ARD left England on March 2, 1878, under the command of Captain Gibbs, a newly married, 29 year old. She was bound for Melbourne with a crew of 37, plus 17 passengers and a load of cargo. The general cargo reflected the affluence of Melbourne at the time. On board were straw hats, umbrella, perfumes, clay pipes, pianos, clocks, confectionary, linen and candles, as well as a heavier load of railway irons, cement, lead and copper. There were items included that intended for display in the Melbourne International Exhibition in 1880. The voyage to Port Phillip was long but uneventful. At 3am on June 1, 1878, Captain Gibbs was expecting to see land and the passengers were becoming excited as they prepared to view their new homeland in the early morning. But LOCH ARD was running into a fog which greatly reduced visibility. Captain Gibbs was becoming anxious as there was no sign of land or the Cape Otway lighthouse. At 4am the fog lifted. A man aloft announced that he could see breakers. The sheer cliffs of Victoria's west coast came into view, and Captain Gibbs realised that the ship was much closer to them than expected. He ordered as much sail to be set as time would permit and then attempted to steer the vessel out to sea. On coming head on into the wind, the ship lost momentum, the sails fell limp and LOCH ARD's bow swung back. Gibbs then ordered the anchors to be released in an attempt to hold its position. The anchors sank some 50 fathoms - but did not hold. By this time LOCH ARD was among the breakers and the tall cliffs of Mutton Bird Island rose behind the ship. Just half a mile from the coast, the ship's bow was suddenly pulled around by the anchor. The captain tried to tack out to sea, but the ship struck a reef at the base of Mutton Bird Island, near Port Campbell. Waves broke over the ship and the top deck was loosened from the hull. The masts and rigging came crashing down knocking passengers and crew overboard. When a lifeboat was finally launched, it crashed into the side of LOCH ARD and capsized. Tom Pearce, who had launched the boat, managed to cling to its overturned hull and shelter beneath it. He drifted out to sea and then on the flood tide came into what is now known as LOCH ARD Gorge. He swam to shore, bruised and dazed, and found a cave in which to shelter. Some of the crew stayed below deck to shelter from the falling rigging but drowned when the ship slipped off the reef into deeper water. Eva Carmichael had raced onto deck to find out what was happening only to be confronted by towering cliffs looming above the stricken ship. In all the chaos, Captain Gibbs grabbed Eva and said, "If you are saved Eva, let my dear wife know that I died like a sailor". That was the last Eva Carmichael saw of the captain. She was swept off the ship by a huge wave. Eva saw Tom Pearce on a small rocky beach and yelled to attract his attention. He dived in and swam to the exhausted woman and dragged her to shore. He took her to the cave and broke open case of brandy which had washed up on the beach. He opened a bottle to revive the unconscious woman. A few hours later Tom scaled a cliff in search of help. He followed hoof prints and came by chance upon two men from nearby Glenample Station three and a half miles away. In a state of exhaustion, he told the men of the tragedy. Tom returned to the gorge while the two men rode back to the station to get help. By the time they reached LOCH ARD Gorge, it was cold and dark. The two shipwreck survivors were taken to Glenample Station to recover. Eva stayed at the station for six weeks before returning to Ireland, this time by steamship. In Melbourne, Tom Pearce received a hero's welcome. He was presented with the first gold medal of the Royal Humane Society of Victoria and a £1000 cheque from the Victorian Government. Concerts were performed to honour the young man's bravery and to raise money for those who lost family in the LOCH ARD disaster. Of the 54 crew members and passengers on board, only two survived: the apprentice, Tom Pearce and the young woman passenger, Eva Carmichael, who lost all of her family in the tragedy. Ten days after the LOCH ARD tragedy, salvage rights to the wreck were sold at auction for £2,120. Cargo valued at £3,000 was salvaged and placed on the beach, but most washed back into the sea when another storm developed. The wreck of LOCH ARD still lies at the base of Mutton Bird Island. Much of the cargo has now been salvaged and some was washed up into what is now known as LOCH ARD Gorge. Cargo and artefacts have also been illegally salvaged over many years before protective legislation was introduced. One of the most unlikely pieces of cargo to have survived the shipwreck was a Minton porcelain peacock - one of only seven in the world. The peacock was destined for the Melbourne International Exhibition in 1880. It had been well packed, which gave it adequate protection during the violent storm. Today, the Minton peacock can be seen at the Flagstaff Hill Maritime Museum in Warrnambool. From Australia's most dramatic shipwreck it has now become Australia's shipwreck artefact and is one of very few 'objects' on the Victorian State Heritage Register most valuable. The LOCH ARD shipwreck is of State significance – Victorian Heritage Register S 417. Flagstaff Hill’s collection of artefacts from LOCH ARD is significant for being one of the largest collections of artefacts from this shipwreck in Victoria. It is significant for its association with the shipwreck, which is on the Victorian Heritage Register (VHR S417). The collection is significant because of the relationship between the objects, as together they have a high potential to interpret the story of the LOCH ARD. The LOCH ARD collection is archaeologically significant as the remains of a large international passenger and cargo ship. The LOCH ARD collection is historically significant for representing aspects of Victoria’s shipping history and its potential to interpret sub-theme 1.5 of Victoria’s Framework of Historical Themes (living with natural processes). The collection is also historically significant for its association with the LOCH ARD, which was one of the worst and best known shipwrecks in Victoria’s history. Unrestored dessert spoon from the wreck of the LOCH ARD. The spoon design has a flattened fiddle-back handle, with a thin stem or shank, flared collar, and a shallow rounded bowl. The spoons metallic composition is a thin layer of brass alloy which has partially corroded back to a nickel-silver base metal. Some verdigris and concretion on front and back of spoon. Spoon bowl is dented and cracked. 70% of surface area covered in dark Silver Oxide.flagstaff hill maritime museum, shipwreck coast, great ocean road, loch line, loch ard, mutton bird island, loch ard gorge, electroplated cutlery, loch ard shipwreck, william page and co, birmingham brass plating, dessert spoons -
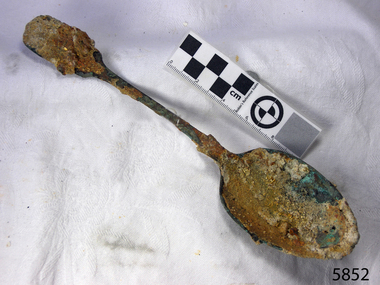 Flagstaff Hill Maritime Museum and Village
Domestic object - Spoon, circa 1878
This dessert spoon is from the wreck of the LOCH ARD, a Loch Line ship of 1,693 tons which sailed from Gravesend, London, on 2 March 1878 with 17 passengers and a crew of 36 under Captain George Gibbs. “The intention was to discharge cargo in Melbourne, before returning to London via the Horn with wool and wheat”. Instead, on 1 June 1878, after 90 days at sea, she struck the sandstone cliffs of Mutton Bird Island on the south west coast of Victoria, and sank with the loss of 52 lives and all her cargo. The manifest of the LOCH ARD listed an array of manufactured goods and bulk metals being exported to the Colony of Victoria, with a declared value of £53,700. (202 bills of lading show an actual invoice value of £68, 456, with insurance underwriting to £30,000 of all cargo). Included in the manifest is the item of “Tin hardware & cutlery £7,530”. This dessert spoon is one of 482 similar items of electro-plated cutlery from the LOCH ARD site, comprising spoons and forks of various sizes but all sharing the same general shape or design and metallic composition. 49 of these pieces display a legible makers’ mark — the initials “W” and “P” placed within a raised diamond outline, which is in turn contained within a sunken crown shape — identifying the manufacturer as William Page & Co of Birmingham. An electroplater’s makers’ marks, unlike sterling silver hallmarks, are not consistent identifiers of quality or date and place of manufacture. A similar line of five impressions was usually made to impress the consumer with an implication of industry standards, but what each one actually signified was not regulated and so they varied according to the whim of the individual foundry. In this case, the maker’s marks are often obscured by sedimentary accretion or removed by corrosion after a century of submersion in the ocean. However sufficient detail has survived to indicate that these samples of electro-plated cutlery probably originated from the same consignment in the LOCH ARD’s cargo. The generally common range of marks are drawn from 255 tea spoons, 125 dessert spoons, and 99 table forks. These marks are clearly visible in 66 instances, while the same sequence of general outlines, or depression shapes, is discernible in another 166 examples. Suggested trade names for William Page & Co’s particular blend of brass plating are ‘roman silver’ or ‘silverite’. This copper alloy polishes to a lustrous gold when new, discolouring to a murky grey with greenish hue when neglected. HISTORY OF THE LOCH ARD The LOCH ARD belonged to the famous Loch Line which sailed many ships from England to Australia. Built in Glasgow by Barclay, Curdle and Co. in 1873, the LOCH ARD was a three-masted square rigged iron sailing ship. The ship measured 262ft 7" (79.87m) in length, 38ft (11.58m) in width, 23ft (7m) in depth and had a gross tonnage of 1693 tons. The LOCH ARD's main mast measured a massive 150ft (45.7m) in height. LOCH ARD made three trips to Australia and one trip to Calcutta before its final voyage. LOCH ARD left England on March 2, 1878, under the command of Captain Gibbs, a newly married, 29 year old. She was bound for Melbourne with a crew of 37, plus 17 passengers and a load of cargo. The general cargo reflected the affluence of Melbourne at the time. On board were straw hats, umbrella, perfumes, clay pipes, pianos, clocks, confectionary, linen and candles, as well as a heavier load of railway irons, cement, lead and copper. There were items included that intended for display in the Melbourne International Exhibition in 1880. The voyage to Port Phillip was long but uneventful. At 3am on June 1, 1878, Captain Gibbs was expecting to see land and the passengers were becoming excited as they prepared to view their new homeland in the early morning. But LOCH ARD was running into a fog which greatly reduced visibility. Captain Gibbs was becoming anxious as there was no sign of land or the Cape Otway lighthouse. At 4am the fog lifted. A man aloft announced that he could see breakers. The sheer cliffs of Victoria's west coast came into view, and Captain Gibbs realised that the ship was much closer to them than expected. He ordered as much sail to be set as time would permit and then attempted to steer the vessel out to sea. On coming head on into the wind, the ship lost momentum, the sails fell limp and LOCH ARD's bow swung back. Gibbs then ordered the anchors to be released in an attempt to hold its position. The anchors sank some 50 fathoms - but did not hold. By this time LOCH ARD was among the breakers and the tall cliffs of Mutton Bird Island rose behind the ship. Just half a mile from the coast, the ship's bow was suddenly pulled around by the anchor. The captain tried to tack out to sea, but the ship struck a reef at the base of Mutton Bird Island, near Port Campbell. Waves broke over the ship and the top deck was loosened from the hull. The masts and rigging came crashing down knocking passengers and crew overboard. When a lifeboat was finally launched, it crashed into the side of LOCH ARD and capsized. Tom Pearce, who had launched the boat, managed to cling to its overturned hull and shelter beneath it. He drifted out to sea and then on the flood tide came into what is now known as LOCH ARD Gorge. He swam to shore, bruised and dazed, and found a cave in which to shelter. Some of the crew stayed below deck to shelter from the falling rigging but drowned when the ship slipped off the reef into deeper water. Eva Carmichael had raced onto deck to find out what was happening only to be confronted by towering cliffs looming above the stricken ship. In all the chaos, Captain Gibbs grabbed Eva and said, "If you are saved Eva, let my dear wife know that I died like a sailor". That was the last Eva Carmichael saw of the captain. She was swept off the ship by a huge wave. Eva saw Tom Pearce on a small rocky beach and yelled to attract his attention. He dived in and swam to the exhausted woman and dragged her to shore. He took her to the cave and broke open case of brandy which had washed up on the beach. He opened a bottle to revive the unconscious woman. A few hours later Tom scaled a cliff in search of help. He followed hoof prints and came by chance upon two men from nearby Glenample Station three and a half miles away. In a state of exhaustion, he told the men of the tragedy. Tom returned to the gorge while the two men rode back to the station to get help. By the time they reached LOCH ARD Gorge, it was cold and dark. The two shipwreck survivors were taken to Glenample Station to recover. Eva stayed at the station for six weeks before returning to Ireland, this time by steamship. In Melbourne, Tom Pearce received a hero's welcome. He was presented with the first gold medal of the Royal Humane Society of Victoria and a £1000 cheque from the Victorian Government. Concerts were performed to honour the young man's bravery and to raise money for those who lost family in the LOCH ARD disaster. Of the 54 crew members and passengers on board, only two survived: the apprentice, Tom Pearce and the young woman passenger, Eva Carmichael, who lost all of her family in the tragedy. Ten days after the LOCH ARD tragedy, salvage rights to the wreck were sold at auction for £2,120. Cargo valued at £3,000 was salvaged and placed on the beach, but most washed back into the sea when another storm developed. The wreck of LOCH ARD still lies at the base of Mutton Bird Island. Much of the cargo has now been salvaged and some was washed up into what is now known as LOCH ARD Gorge. Cargo and artefacts have also been illegally salvaged over many years before protective legislation was introduced. One of the most unlikely pieces of cargo to have survived the shipwreck was a Minton porcelain peacock - one of only seven in the world. The peacock was destined for the Melbourne International Exhibition in 1880. It had been well packed, which gave it adequate protection during the violent storm. Today, the Minton peacock can be seen at the Flagstaff Hill Maritime Museum in Warrnambool. From Australia's most dramatic shipwreck it has now become Australia's shipwreck artefact and is one of very few 'objects' on the Victorian State Heritage Register most valuable. The LOCH ARD shipwreck is of State significance – Victorian Heritage Register S 417. Flagstaff Hill’s collection of artefacts from LOCH ARD is significant for being one of the largest collections of artefacts from this shipwreck in Victoria. It is significant for its association with the shipwreck, which is on the Victorian Heritage Register (VHR S417). The collection is significant because of the relationship between the objects, as together they have a high potential to interpret the story of the LOCH ARD. The LOCH ARD collection is archaeologically significant as the remains of a large international passenger and cargo ship. The LOCH ARD collection is historically significant for representing aspects of Victoria’s shipping history and its potential to interpret sub-theme 1.5 of Victoria’s Framework of Historical Themes (living with natural processes). The collection is also historically significant for its association with the LOCH ARD, which was one of the worst and best known shipwrecks in Victoria’s history. Unrestored dessert spoon from the wreck of the LOCH ARD. The spoon design has a flattened fiddle-back handle, with a thin stem or shank, flared collar, and a shallow rounded bowl. The spoons metallic composition is a thin layer of brass alloy which has partially corroded back to a nickel-silver base metal. Approximately 85% of spoon surface area bears red/white encrustation and balance has verdigris.Spoon is bent out of shape.flagstaff hill maritime museum, shipwreck coast, great ocean road, loch line, loch ard, mutton bird island, loch ard gorge, electroplated cutlery, loch ard shipwreck, william page and co, birmingham brass plating, dessert spoons -
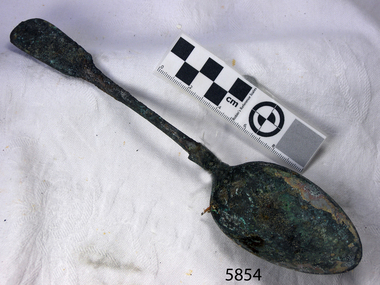 Flagstaff Hill Maritime Museum and Village
Domestic object - Spoon, circa 1878
This table spoon is from the wreck of the LOCH ARD, a Loch Line ship of 1,693 tons which sailed from Gravesend, London, on 2 March 1878 with 17 passengers and a crew of 36 under Captain George Gibbs. “The intention was to discharge cargo in Melbourne, before returning to London via the Horn with wool and wheat”. Instead, on 1 June 1878, after 90 days at sea, she struck the sandstone cliffs of Mutton Bird Island on the south west coast of Victoria, and sank with the loss of 52 lives and all her cargo. The manifest of the LOCH ARD listed an array of manufactured goods and bulk metals being exported to the Colony of Victoria, with a declared value of £53,700. (202 bills of lading show an actual invoice value of £68, 456, with insurance underwriting to £30,000 of all cargo). Included in the manifest is the item of “Tin hardware & cutlery £7,530”. This table spoon is one of 482 similar items of electro-plated cutlery from the LOCH ARD site, comprising spoons and forks of various sizes but all sharing the same general shape or design and metallic composition. 49 of these pieces display a legible makers’ mark — the initials “W” and “P” placed within a raised diamond outline, which is in turn contained within a sunken crown shape — identifying the manufacturer as William Page & Co of Birmingham. An electroplater’s makers’ marks, unlike sterling silver hallmarks, are not consistent identifiers of quality or date and place of manufacture. A similar line of five impressions was usually made to impress the consumer with an implication of industry standards, but what each one actually signified was not regulated and so they varied according to the whim of the individual foundry. In this case, the maker’s marks are often obscured by sedimentary accretion or removed by corrosion after a century of submersion in the ocean. However sufficient detail has survived to indicate that these samples of electro-plated cutlery probably originated from the same consignment in the LOCH ARD’s cargo. The generally common range of marks are drawn from 255 tea spoons, 125 dessert spoons, and 99 table forks. These marks are clearly visible in 66 instances, while the same sequence of general outlines, or depression shapes, is discernible in another 166 examples. Suggested trade names for William Page & Co’s particular blend of brass plating are ‘roman silver’ or ‘silverite’. This copper alloy polishes to a lustrous gold when new, discolouring to a murky grey with greenish hue when neglected. HISTORY OF THE LOCH ARD The LOCH ARD belonged to the famous Loch Line which sailed many ships from England to Australia. Built in Glasgow by Barclay, Curdle and Co. in 1873, the LOCH ARD was a three-masted square rigged iron sailing ship. The ship measured 262ft 7" (79.87m) in length, 38ft (11.58m) in width, 23ft (7m) in depth and had a gross tonnage of 1693 tons. The LOCH ARD's main mast measured a massive 150ft (45.7m) in height. LOCH ARD made three trips to Australia and one trip to Calcutta before its final voyage. LOCH ARD left England on March 2, 1878, under the command of Captain Gibbs, a newly married, 29 year old. She was bound for Melbourne with a crew of 37, plus 17 passengers and a load of cargo. The general cargo reflected the affluence of Melbourne at the time. On board were straw hats, umbrella, perfumes, clay pipes, pianos, clocks, confectionary, linen and candles, as well as a heavier load of railway irons, cement, lead and copper. There were items included that intended for display in the Melbourne International Exhibition in 1880. The voyage to Port Phillip was long but uneventful. At 3am on June 1, 1878, Captain Gibbs was expecting to see land and the passengers were becoming excited as they prepared to view their new homeland in the early morning. But LOCH ARD was running into a fog which greatly reduced visibility. Captain Gibbs was becoming anxious as there was no sign of land or the Cape Otway lighthouse. At 4am the fog lifted. A man aloft announced that he could see breakers. The sheer cliffs of Victoria's west coast came into view, and Captain Gibbs realised that the ship was much closer to them than expected. He ordered as much sail to be set as time would permit and then attempted to steer the vessel out to sea. On coming head on into the wind, the ship lost momentum, the sails fell limp and LOCH ARD's bow swung back. Gibbs then ordered the anchors to be released in an attempt to hold its position. The anchors sank some 50 fathoms - but did not hold. By this time LOCH ARD was among the breakers and the tall cliffs of Mutton Bird Island rose behind the ship. Just half a mile from the coast, the ship's bow was suddenly pulled around by the anchor. The captain tried to tack out to sea, but the ship struck a reef at the base of Mutton Bird Island, near Port Campbell. Waves broke over the ship and the top deck was loosened from the hull. The masts and rigging came crashing down knocking passengers and crew overboard. When a lifeboat was finally launched, it crashed into the side of LOCH ARD and capsized. Tom Pearce, who had launched the boat, managed to cling to its overturned hull and shelter beneath it. He drifted out to sea and then on the flood tide came into what is now known as LOCH ARD Gorge. He swam to shore, bruised and dazed, and found a cave in which to shelter. Some of the crew stayed below deck to shelter from the falling rigging but drowned when the ship slipped off the reef into deeper water. Eva Carmichael had raced onto deck to find out what was happening only to be confronted by towering cliffs looming above the stricken ship. In all the chaos, Captain Gibbs grabbed Eva and said, "If you are saved Eva, let my dear wife know that I died like a sailor". That was the last Eva Carmichael saw of the captain. She was swept off the ship by a huge wave. Eva saw Tom Pearce on a small rocky beach and yelled to attract his attention. He dived in and swam to the exhausted woman and dragged her to shore. He took her to the cave and broke open case of brandy which had washed up on the beach. He opened a bottle to revive the unconscious woman. A few hours later Tom scaled a cliff in search of help. He followed hoof prints and came by chance upon two men from nearby Glenample Station three and a half miles away. In a state of exhaustion, he told the men of the tragedy. Tom returned to the gorge while the two men rode back to the station to get help. By the time they reached LOCH ARD Gorge, it was cold and dark. The two shipwreck survivors were taken to Glenample Station to recover. Eva stayed at the station for six weeks before returning to Ireland, this time by steamship. In Melbourne, Tom Pearce received a hero's welcome. He was presented with the first gold medal of the Royal Humane Society of Victoria and a £1000 cheque from the Victorian Government. Concerts were performed to honour the young man's bravery and to raise money for those who lost family in the LOCH ARD disaster. Of the 54 crew members and passengers on board, only two survived: the apprentice, Tom Pearce and the young woman passenger, Eva Carmichael, who lost all of her family in the tragedy. Ten days after the LOCH ARD tragedy, salvage rights to the wreck were sold at auction for £2,120. Cargo valued at £3,000 was salvaged and placed on the beach, but most washed back into the sea when another storm developed. The wreck of LOCH ARD still lies at the base of Mutton Bird Island. Much of the cargo has now been salvaged and some was washed up into what is now known as LOCH ARD Gorge. Cargo and artefacts have also been illegally salvaged over many years before protective legislation was introduced. One of the most unlikely pieces of cargo to have survived the shipwreck was a Minton porcelain peacock - one of only seven in the world. The peacock was destined for the Melbourne International Exhibition in 1880. It had been well packed, which gave it adequate protection during the violent storm. Today, the Minton peacock can be seen at the Flagstaff Hill Maritime Museum in Warrnambool. From Australia's most dramatic shipwreck it has now become Australia's shipwreck artefact and is one of very few 'objects' on the Victorian State Heritage Register most valuable. The LOCH ARD shipwreck is of State significance – Victorian Heritage Register S 417. Flagstaff Hill’s collection of artefacts from LOCH ARD is significant for being one of the largest collections of artefacts from this shipwreck in Victoria. It is significant for its association with the shipwreck, which is on the Victorian Heritage Register (VHR S417). The collection is significant because of the relationship between the objects, as together they have a high potential to interpret the story of the LOCH ARD. The LOCH ARD collection is archaeologically significant as the remains of a large international passenger and cargo ship. The LOCH ARD collection is historically significant for representing aspects of Victoria’s shipping history and its potential to interpret sub-theme 1.5 of Victoria’s Framework of Historical Themes (living with natural processes). The collection is also historically significant for its association with the LOCH ARD, which was one of the worst and best known shipwrecks in Victoria’s history. Unrestored table spoon from the wreck of the LOCH ARD. The spoon design has a flattened fiddle-back handle, with a thin stem or shank, flared collar, and a shallow rounded bowl. The spoons metallic composition is a thin layer of brass alloy which has partially corroded back to a nickel-silver base metal. Approximately 10% of original plate remains. Some verdigris and concretion on front and back of spoon, with balance covered in Silver Oxide.flagstaff hill maritime museum, shipwreck coast, great ocean road, loch line, loch ard, mutton bird island, loch ard gorge, electroplated cutlery, loch ard shipwreck, william page and co, birmingham brass plating, table spoons -
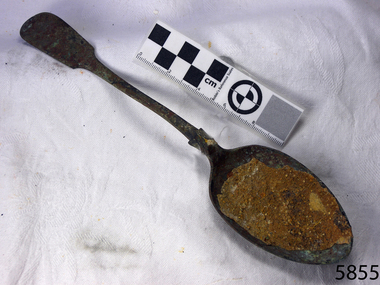 Flagstaff Hill Maritime Museum and Village
Domestic object - Spoon, circa 1878
This table spoon is from the wreck of the LOCH ARD, a Loch Line ship of 1,693 tons which sailed from Gravesend, London, on 2 March 1878 with 17 passengers and a crew of 36 under Captain George Gibbs. “The intention was to discharge cargo in Melbourne, before returning to London via the Horn with wool and wheat”. Instead, on 1 June 1878, after 90 days at sea, she struck the sandstone cliffs of Mutton Bird Island on the south west coast of Victoria, and sank with the loss of 52 lives and all her cargo. The manifest of the LOCH ARD listed an array of manufactured goods and bulk metals being exported to the Colony of Victoria, with a declared value of £53,700. (202 bills of lading show an actual invoice value of £68, 456, with insurance underwriting to £30,000 of all cargo). Included in the manifest is the item of “Tin hardware & cutlery £7,530”. This table spoon is one of 482 similar items of electro-plated cutlery from the LOCH ARD site, comprising spoons and forks of various sizes but all sharing the same general shape or design and metallic composition. 49 of these pieces display a legible makers’ mark — the initials “W” and “P” placed within a raised diamond outline, which is in turn contained within a sunken crown shape — identifying the manufacturer as William Page & Co of Birmingham. An electroplater’s makers’ marks, unlike sterling silver hallmarks, are not consistent identifiers of quality or date and place of manufacture. A similar line of five impressions was usually made to impress the consumer with an implication of industry standards, but what each one actually signified was not regulated and so they varied according to the whim of the individual foundry. In this case, the maker’s marks are often obscured by sedimentary accretion or removed by corrosion after a century of submersion in the ocean. However sufficient detail has survived to indicate that these samples of electro-plated cutlery probably originated from the same consignment in the LOCH ARD’s cargo. The generally common range of marks are drawn from 255 tea spoons, 125 dessert spoons, and 99 table forks. These marks are clearly visible in 66 instances, while the same sequence of general outlines, or depression shapes, is discernible in another 166 examples. Suggested trade names for William Page & Co’s particular blend of brass plating are ‘roman silver’ or ‘silverite’. This copper alloy polishes to a lustrous gold when new, discolouring to a murky grey with greenish hue when neglected. HISTORY OF THE LOCH ARD The LOCH ARD belonged to the famous Loch Line which sailed many ships from England to Australia. Built in Glasgow by Barclay, Curdle and Co. in 1873, the LOCH ARD was a three-masted square rigged iron sailing ship. The ship measured 262ft 7" (79.87m) in length, 38ft (11.58m) in width, 23ft (7m) in depth and had a gross tonnage of 1693 tons. The LOCH ARD's main mast measured a massive 150ft (45.7m) in height. LOCH ARD made three trips to Australia and one trip to Calcutta before its final voyage. LOCH ARD left England on March 2, 1878, under the command of Captain Gibbs, a newly married, 29 year old. She was bound for Melbourne with a crew of 37, plus 17 passengers and a load of cargo. The general cargo reflected the affluence of Melbourne at the time. On board were straw hats, umbrella, perfumes, clay pipes, pianos, clocks, confectionary, linen and candles, as well as a heavier load of railway irons, cement, lead and copper. There were items included that intended for display in the Melbourne International Exhibition in 1880. The voyage to Port Phillip was long but uneventful. At 3am on June 1, 1878, Captain Gibbs was expecting to see land and the passengers were becoming excited as they prepared to view their new homeland in the early morning. But LOCH ARD was running into a fog which greatly reduced visibility. Captain Gibbs was becoming anxious as there was no sign of land or the Cape Otway lighthouse. At 4am the fog lifted. A man aloft announced that he could see breakers. The sheer cliffs of Victoria's west coast came into view, and Captain Gibbs realised that the ship was much closer to them than expected. He ordered as much sail to be set as time would permit and then attempted to steer the vessel out to sea. On coming head on into the wind, the ship lost momentum, the sails fell limp and LOCH ARD's bow swung back. Gibbs then ordered the anchors to be released in an attempt to hold its position. The anchors sank some 50 fathoms - but did not hold. By this time LOCH ARD was among the breakers and the tall cliffs of Mutton Bird Island rose behind the ship. Just half a mile from the coast, the ship's bow was suddenly pulled around by the anchor. The captain tried to tack out to sea, but the ship struck a reef at the base of Mutton Bird Island, near Port Campbell. Waves broke over the ship and the top deck was loosened from the hull. The masts and rigging came crashing down knocking passengers and crew overboard. When a lifeboat was finally launched, it crashed into the side of LOCH ARD and capsized. Tom Pearce, who had launched the boat, managed to cling to its overturned hull and shelter beneath it. He drifted out to sea and then on the flood tide came into what is now known as LOCH ARD Gorge. He swam to shore, bruised and dazed, and found a cave in which to shelter. Some of the crew stayed below deck to shelter from the falling rigging but drowned when the ship slipped off the reef into deeper water. Eva Carmichael had raced onto deck to find out what was happening only to be confronted by towering cliffs looming above the stricken ship. In all the chaos, Captain Gibbs grabbed Eva and said, "If you are saved Eva, let my dear wife know that I died like a sailor". That was the last Eva Carmichael saw of the captain. She was swept off the ship by a huge wave. Eva saw Tom Pearce on a small rocky beach and yelled to attract his attention. He dived in and swam to the exhausted woman and dragged her to shore. He took her to the cave and broke open case of brandy which had washed up on the beach. He opened a bottle to revive the unconscious woman. A few hours later Tom scaled a cliff in search of help. He followed hoof prints and came by chance upon two men from nearby Glenample Station three and a half miles away. In a state of exhaustion, he told the men of the tragedy. Tom returned to the gorge while the two men rode back to the station to get help. By the time they reached LOCH ARD Gorge, it was cold and dark. The two shipwreck survivors were taken to Glenample Station to recover. Eva stayed at the station for six weeks before returning to Ireland, this time by steamship. In Melbourne, Tom Pearce received a hero's welcome. He was presented with the first gold medal of the Royal Humane Society of Victoria and a £1000 cheque from the Victorian Government. Concerts were performed to honour the young man's bravery and to raise money for those who lost family in the LOCH ARD disaster. Of the 54 crew members and passengers on board, only two survived: the apprentice, Tom Pearce and the young woman passenger, Eva Carmichael, who lost all of her family in the tragedy. Ten days after the LOCH ARD tragedy, salvage rights to the wreck were sold at auction for £2,120. Cargo valued at £3,000 was salvaged and placed on the beach, but most washed back into the sea when another storm developed. The wreck of LOCH ARD still lies at the base of Mutton Bird Island. Much of the cargo has now been salvaged and some was washed up into what is now known as LOCH ARD Gorge. Cargo and artefacts have also been illegally salvaged over many years before protective legislation was introduced. One of the most unlikely pieces of cargo to have survived the shipwreck was a Minton porcelain peacock - one of only seven in the world. The peacock was destined for the Melbourne International Exhibition in 1880. It had been well packed, which gave it adequate protection during the violent storm. Today, the Minton peacock can be seen at the Flagstaff Hill Maritime Museum in Warrnambool. From Australia's most dramatic shipwreck it has now become Australia's shipwreck artefact and is one of very few 'objects' on the Victorian State Heritage Register most valuable. The LOCH ARD shipwreck is of State significance – Victorian Heritage Register S 417. Flagstaff Hill’s collection of artefacts from LOCH ARD is significant for being one of the largest collections of artefacts from this shipwreck in Victoria. It is significant for its association with the shipwreck, which is on the Victorian Heritage Register (VHR S417). The collection is significant because of the relationship between the objects, as together they have a high potential to interpret the story of the LOCH ARD. The LOCH ARD collection is archaeologically significant as the remains of a large international passenger and cargo ship. The LOCH ARD collection is historically significant for representing aspects of Victoria’s shipping history and its potential to interpret sub-theme 1.5 of Victoria’s Framework of Historical Themes (living with natural processes). The collection is also historically significant for its association with the LOCH ARD, which was one of the worst and best known shipwrecks in Victoria’s history. Unrestored table spoon from the wreck of the LOCH ARD. The spoon design has a flattened fiddle-back handle, with a thin stem or shank, flared collar, and a shallow rounded bowl. The spoons metallic composition is a thin layer of brass alloy which has partially corroded back to a nickel-silver base metal. Approximately 35% of surface area has red and cream encrustation. Minimal original plate has survived but outlines of 5 makers marks are visible - Crown, Ellipse, Rounded Square, Circle, Diamond.flagstaff hill maritime museum, shipwreck coast, great ocean road, loch line, loch ard, mutton bird island, loch ard gorge, electroplated cutlery, loch ard shipwreck, william page and co, birmingham brass plating, table spoons -
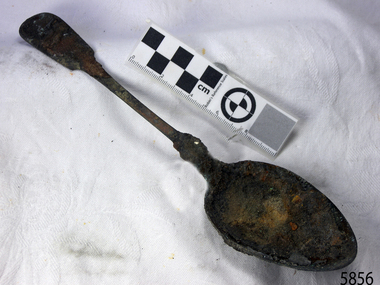 Flagstaff Hill Maritime Museum and Village
Domestic object - Spoon, circa 1878
This table spoon is from the wreck of the LOCH ARD, a Loch Line ship of 1,693 tons which sailed from Gravesend, London, on 2 March 1878 with 17 passengers and a crew of 36 under Captain George Gibbs. “The intention was to discharge cargo in Melbourne, before returning to London via the Horn with wool and wheat”. Instead, on 1 June 1878, after 90 days at sea, she struck the sandstone cliffs of Mutton Bird Island on the south west coast of Victoria, and sank with the loss of 52 lives and all her cargo. The manifest of the LOCH ARD listed an array of manufactured goods and bulk metals being exported to the Colony of Victoria, with a declared value of £53,700. (202 bills of lading show an actual invoice value of £68, 456, with insurance underwriting to £30,000 of all cargo). Included in the manifest is the item of “Tin hardware & cutlery £7,530”. This table spoon is one of 482 similar items of electro-plated cutlery from the LOCH ARD site, comprising spoons and forks of various sizes but all sharing the same general shape or design and metallic composition. 49 of these pieces display a legible makers’ mark — the initials “W” and “P” placed within a raised diamond outline, which is in turn contained within a sunken crown shape — identifying the manufacturer as William Page & Co of Birmingham. An electroplater’s makers’ marks, unlike sterling silver hallmarks, are not consistent identifiers of quality or date and place of manufacture. A similar line of five impressions was usually made to impress the consumer with an implication of industry standards, but what each one actually signified was not regulated and so they varied according to the whim of the individual foundry. In this case, the maker’s marks are often obscured by sedimentary accretion or removed by corrosion after a century of submersion in the ocean. However sufficient detail has survived to indicate that these samples of electro-plated cutlery probably originated from the same consignment in the LOCH ARD’s cargo. The generally common range of marks are drawn from 255 tea spoons, 125 dessert spoons, and 99 table forks. These marks are clearly visible in 66 instances, while the same sequence of general outlines, or depression shapes, is discernible in another 166 examples. Suggested trade names for William Page & Co’s particular blend of brass plating are ‘roman silver’ or ‘silverite’. This copper alloy polishes to a lustrous gold when new, discolouring to a murky grey with greenish hue when neglected. HISTORY OF THE LOCH ARD The LOCH ARD belonged to the famous Loch Line which sailed many ships from England to Australia. Built in Glasgow by Barclay, Curdle and Co. in 1873, the LOCH ARD was a three-masted square rigged iron sailing ship. The ship measured 262ft 7" (79.87m) in length, 38ft (11.58m) in width, 23ft (7m) in depth and had a gross tonnage of 1693 tons. The LOCH ARD's main mast measured a massive 150ft (45.7m) in height. LOCH ARD made three trips to Australia and one trip to Calcutta before its final voyage. LOCH ARD left England on March 2, 1878, under the command of Captain Gibbs, a newly married, 29 year old. She was bound for Melbourne with a crew of 37, plus 17 passengers and a load of cargo. The general cargo reflected the affluence of Melbourne at the time. On board were straw hats, umbrella, perfumes, clay pipes, pianos, clocks, confectionary, linen and candles, as well as a heavier load of railway irons, cement, lead and copper. There were items included that intended for display in the Melbourne International Exhibition in 1880. The voyage to Port Phillip was long but uneventful. At 3am on June 1, 1878, Captain Gibbs was expecting to see land and the passengers were becoming excited as they prepared to view their new homeland in the early morning. But LOCH ARD was running into a fog which greatly reduced visibility. Captain Gibbs was becoming anxious as there was no sign of land or the Cape Otway lighthouse. At 4am the fog lifted. A man aloft announced that he could see breakers. The sheer cliffs of Victoria's west coast came into view, and Captain Gibbs realised that the ship was much closer to them than expected. He ordered as much sail to be set as time would permit and then attempted to steer the vessel out to sea. On coming head on into the wind, the ship lost momentum, the sails fell limp and LOCH ARD's bow swung back. Gibbs then ordered the anchors to be released in an attempt to hold its position. The anchors sank some 50 fathoms - but did not hold. By this time LOCH ARD was among the breakers and the tall cliffs of Mutton Bird Island rose behind the ship. Just half a mile from the coast, the ship's bow was suddenly pulled around by the anchor. The captain tried to tack out to sea, but the ship struck a reef at the base of Mutton Bird Island, near Port Campbell. Waves broke over the ship and the top deck was loosened from the hull. The masts and rigging came crashing down knocking passengers and crew overboard. When a lifeboat was finally launched, it crashed into the side of LOCH ARD and capsized. Tom Pearce, who had launched the boat, managed to cling to its overturned hull and shelter beneath it. He drifted out to sea and then on the flood tide came into what is now known as LOCH ARD Gorge. He swam to shore, bruised and dazed, and found a cave in which to shelter. Some of the crew stayed below deck to shelter from the falling rigging but drowned when the ship slipped off the reef into deeper water. Eva Carmichael had raced onto deck to find out what was happening only to be confronted by towering cliffs looming above the stricken ship. In all the chaos, Captain Gibbs grabbed Eva and said, "If you are saved Eva, let my dear wife know that I died like a sailor". That was the last Eva Carmichael saw of the captain. She was swept off the ship by a huge wave. Eva saw Tom Pearce on a small rocky beach and yelled to attract his attention. He dived in and swam to the exhausted woman and dragged her to shore. He took her to the cave and broke open case of brandy which had washed up on the beach. He opened a bottle to revive the unconscious woman. A few hours later Tom scaled a cliff in search of help. He followed hoof prints and came by chance upon two men from nearby Glenample Station three and a half miles away. In a state of exhaustion, he told the men of the tragedy. Tom returned to the gorge while the two men rode back to the station to get help. By the time they reached LOCH ARD Gorge, it was cold and dark. The two shipwreck survivors were taken to Glenample Station to recover. Eva stayed at the station for six weeks before returning to Ireland, this time by steamship. In Melbourne, Tom Pearce received a hero's welcome. He was presented with the first gold medal of the Royal Humane Society of Victoria and a £1000 cheque from the Victorian Government. Concerts were performed to honour the young man's bravery and to raise money for those who lost family in the LOCH ARD disaster. Of the 54 crew members and passengers on board, only two survived: the apprentice, Tom Pearce and the young woman passenger, Eva Carmichael, who lost all of her family in the tragedy. Ten days after the LOCH ARD tragedy, salvage rights to the wreck were sold at auction for £2,120. Cargo valued at £3,000 was salvaged and placed on the beach, but most washed back into the sea when another storm developed. The wreck of LOCH ARD still lies at the base of Mutton Bird Island. Much of the cargo has now been salvaged and some was washed up into what is now known as LOCH ARD Gorge. Cargo and artefacts have also been illegally salvaged over many years before protective legislation was introduced. One of the most unlikely pieces of cargo to have survived the shipwreck was a Minton porcelain peacock - one of only seven in the world. The peacock was destined for the Melbourne International Exhibition in 1880. It had been well packed, which gave it adequate protection during the violent storm. Today, the Minton peacock can be seen at the Flagstaff Hill Maritime Museum in Warrnambool. From Australia's most dramatic shipwreck it has now become Australia's shipwreck artefact and is one of very few 'objects' on the Victorian State Heritage Register most valuable. The LOCH ARD shipwreck is of State significance – Victorian Heritage Register S 417. Flagstaff Hill’s collection of artefacts from LOCH ARD is significant for being one of the largest collections of artefacts from this shipwreck in Victoria. It is significant for its association with the shipwreck, which is on the Victorian Heritage Register (VHR S417). The collection is significant because of the relationship between the objects, as together they have a high potential to interpret the story of the LOCH ARD. The LOCH ARD collection is archaeologically significant as the remains of a large international passenger and cargo ship. The LOCH ARD collection is historically significant for representing aspects of Victoria’s shipping history and its potential to interpret sub-theme 1.5 of Victoria’s Framework of Historical Themes (living with natural processes). The collection is also historically significant for its association with the LOCH ARD, which was one of the worst and best known shipwrecks in Victoria’s history. Unrestored table spoon from the wreck of the LOCH ARD. The spoon design has a flattened fiddle-back handle, with a thin stem or shank, flared collar, and a shallow rounded bowl. The spoons metallic composition is a thin layer of brass alloy which has partially corroded back to a nickel-silver base metal. Only 15% of original plating remains. Balance is dark silver oxide stained concretion and base metal. No makers marks are visible.flagstaff hill maritime museum, shipwreck coast, great ocean road, loch line, loch ard, mutton bird island, loch ard gorge, electroplated cutlery, loch ard shipwreck, william page and co, birmingham brass plating, table spoons -
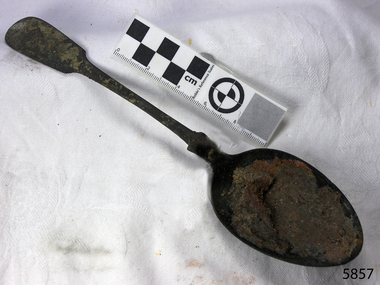 Flagstaff Hill Maritime Museum and Village
Domestic object - Spoon, circa 1878
This table spoon is from the wreck of the LOCH ARD, a Loch Line ship of 1,693 tons which sailed from Gravesend, London, on 2 March 1878 with 17 passengers and a crew of 36 under Captain George Gibbs. “The intention was to discharge cargo in Melbourne, before returning to London via the Horn with wool and wheat”. Instead, on 1 June 1878, after 90 days at sea, she struck the sandstone cliffs of Mutton Bird Island on the south west coast of Victoria, and sank with the loss of 52 lives and all her cargo. The manifest of the LOCH ARD listed an array of manufactured goods and bulk metals being exported to the Colony of Victoria, with a declared value of £53,700. (202 bills of lading show an actual invoice value of £68, 456, with insurance underwriting to £30,000 of all cargo). Included in the manifest is the item of “Tin hardware & cutlery £7,530”. This table spoon is one of 482 similar items of electro-plated cutlery from the LOCH ARD site, comprising spoons and forks of various sizes but all sharing the same general shape or design and metallic composition. 49 of these pieces display a legible makers’ mark — the initials “W” and “P” placed within a raised diamond outline, which is in turn contained within a sunken crown shape — identifying the manufacturer as William Page & Co of Birmingham. An electroplater’s makers’ marks, unlike sterling silver hallmarks, are not consistent identifiers of quality or date and place of manufacture. A similar line of five impressions was usually made to impress the consumer with an implication of industry standards, but what each one actually signified was not regulated and so they varied according to the whim of the individual foundry. In this case, the maker’s marks are often obscured by sedimentary accretion or removed by corrosion after a century of submersion in the ocean. However sufficient detail has survived to indicate that these samples of electro-plated cutlery probably originated from the same consignment in the LOCH ARD’s cargo. The generally common range of marks are drawn from 255 tea spoons, 125 dessert spoons, and 99 table forks. These marks are clearly visible in 66 instances, while the same sequence of general outlines, or depression shapes, is discernible in another 166 examples. Suggested trade names for William Page & Co’s particular blend of brass plating are ‘roman silver’ or ‘silverite’. This copper alloy polishes to a lustrous gold when new, discolouring to a murky grey with greenish hue when neglected. HISTORY OF THE LOCH ARD The LOCH ARD belonged to the famous Loch Line which sailed many ships from England to Australia. Built in Glasgow by Barclay, Curdle and Co. in 1873, the LOCH ARD was a three-masted square rigged iron sailing ship. The ship measured 262ft 7" (79.87m) in length, 38ft (11.58m) in width, 23ft (7m) in depth and had a gross tonnage of 1693 tons. The LOCH ARD's main mast measured a massive 150ft (45.7m) in height. LOCH ARD made three trips to Australia and one trip to Calcutta before its final voyage. LOCH ARD left England on March 2, 1878, under the command of Captain Gibbs, a newly married, 29 year old. She was bound for Melbourne with a crew of 37, plus 17 passengers and a load of cargo. The general cargo reflected the affluence of Melbourne at the time. On board were straw hats, umbrella, perfumes, clay pipes, pianos, clocks, confectionary, linen and candles, as well as a heavier load of railway irons, cement, lead and copper. There were items included that intended for display in the Melbourne International Exhibition in 1880. The voyage to Port Phillip was long but uneventful. At 3am on June 1, 1878, Captain Gibbs was expecting to see land and the passengers were becoming excited as they prepared to view their new homeland in the early morning. But LOCH ARD was running into a fog which greatly reduced visibility. Captain Gibbs was becoming anxious as there was no sign of land or the Cape Otway lighthouse. At 4am the fog lifted. A man aloft announced that he could see breakers. The sheer cliffs of Victoria's west coast came into view, and Captain Gibbs realised that the ship was much closer to them than expected. He ordered as much sail to be set as time would permit and then attempted to steer the vessel out to sea. On coming head on into the wind, the ship lost momentum, the sails fell limp and LOCH ARD's bow swung back. Gibbs then ordered the anchors to be released in an attempt to hold its position. The anchors sank some 50 fathoms - but did not hold. By this time LOCH ARD was among the breakers and the tall cliffs of Mutton Bird Island rose behind the ship. Just half a mile from the coast, the ship's bow was suddenly pulled around by the anchor. The captain tried to tack out to sea, but the ship struck a reef at the base of Mutton Bird Island, near Port Campbell. Waves broke over the ship and the top deck was loosened from the hull. The masts and rigging came crashing down knocking passengers and crew overboard. When a lifeboat was finally launched, it crashed into the side of LOCH ARD and capsized. Tom Pearce, who had launched the boat, managed to cling to its overturned hull and shelter beneath it. He drifted out to sea and then on the flood tide came into what is now known as LOCH ARD Gorge. He swam to shore, bruised and dazed, and found a cave in which to shelter. Some of the crew stayed below deck to shelter from the falling rigging but drowned when the ship slipped off the reef into deeper water. Eva Carmichael had raced onto deck to find out what was happening only to be confronted by towering cliffs looming above the stricken ship. In all the chaos, Captain Gibbs grabbed Eva and said, "If you are saved Eva, let my dear wife know that I died like a sailor". That was the last Eva Carmichael saw of the captain. She was swept off the ship by a huge wave. Eva saw Tom Pearce on a small rocky beach and yelled to attract his attention. He dived in and swam to the exhausted woman and dragged her to shore. He took her to the cave and broke open case of brandy which had washed up on the beach. He opened a bottle to revive the unconscious woman. A few hours later Tom scaled a cliff in search of help. He followed hoof prints and came by chance upon two men from nearby Glenample Station three and a half miles away. In a state of exhaustion, he told the men of the tragedy. Tom returned to the gorge while the two men rode back to the station to get help. By the time they reached LOCH ARD Gorge, it was cold and dark. The two shipwreck survivors were taken to Glenample Station to recover. Eva stayed at the station for six weeks before returning to Ireland, this time by steamship. In Melbourne, Tom Pearce received a hero's welcome. He was presented with the first gold medal of the Royal Humane Society of Victoria and a £1000 cheque from the Victorian Government. Concerts were performed to honour the young man's bravery and to raise money for those who lost family in the LOCH ARD disaster. Of the 54 crew members and passengers on board, only two survived: the apprentice, Tom Pearce and the young woman passenger, Eva Carmichael, who lost all of her family in the tragedy. Ten days after the LOCH ARD tragedy, salvage rights to the wreck were sold at auction for £2,120. Cargo valued at £3,000 was salvaged and placed on the beach, but most washed back into the sea when another storm developed. The wreck of LOCH ARD still lies at the base of Mutton Bird Island. Much of the cargo has now been salvaged and some was washed up into what is now known as LOCH ARD Gorge. Cargo and artefacts have also been illegally salvaged over many years before protective legislation was introduced. One of the most unlikely pieces of cargo to have survived the shipwreck was a Minton porcelain peacock - one of only seven in the world. The peacock was destined for the Melbourne International Exhibition in 1880. It had been well packed, which gave it adequate protection during the violent storm. Today, the Minton peacock can be seen at the Flagstaff Hill Maritime Museum in Warrnambool. From Australia's most dramatic shipwreck it has now become Australia's shipwreck artefact and is one of very few 'objects' on the Victorian State Heritage Register most valuable. The LOCH ARD shipwreck is of State significance – Victorian Heritage Register S 417. Flagstaff Hill’s collection of artefacts from LOCH ARD is significant for being one of the largest collections of artefacts from this shipwreck in Victoria. It is significant for its association with the shipwreck, which is on the Victorian Heritage Register (VHR S417). The collection is significant because of the relationship between the objects, as together they have a high potential to interpret the story of the LOCH ARD. The LOCH ARD collection is archaeologically significant as the remains of a large international passenger and cargo ship. The LOCH ARD collection is historically significant for representing aspects of Victoria’s shipping history and its potential to interpret sub-theme 1.5 of Victoria’s Framework of Historical Themes (living with natural processes). The collection is also historically significant for its association with the LOCH ARD, which was one of the worst and best known shipwrecks in Victoria’s history Unrestored table spoon from the wreck of the LOCH ARD. The spoon design has a flattened fiddle-back handle, with a thin stem or shank, flared collar, and a shallow rounded bowl. The spoons metallic composition is a thin layer of brass alloy which has partially corroded back to a nickel-silver base metal. Some verdigris and 50% of surface area is covered by sedimentary concretion. Only 10% of original plate remains. There is evidence of where another spoon was attached to back of this complete spoon. Balance blackened in Silver Oxide.flagstaff hill maritime museum, shipwreck coast, great ocean road, loch line, loch ard, mutton bird island, loch ard gorge, electroplated cutlery, loch ard shipwreck, william page and co, birmingham brass plating, table spoon, spoon -
 Flagstaff Hill Maritime Museum and Village
Domestic object - Spoon, c.1878
This table spoon is from the wreck of the LOCH ARD, a Loch Line ship of 1,693 tons which sailed from Gravesend, London, on 2 March 1878 with 17 passengers and a crew of 36 under Captain George Gibbs. “The intention was to discharge cargo in Melbourne, before returning to London via the Horn with wool and wheat”. Instead, on 1 June 1878, after 90 days at sea, she struck the sandstone cliffs of Mutton Bird Island on the south west coast of Victoria, and sank with the loss of 52 lives and all her cargo. The manifest of the LOCH ARD listed an array of manufactured goods and bulk metals being exported to the Colony of Victoria, with a declared value of £53,700. (202 bills of lading show an actual invoice value of £68, 456, with insurance underwriting to £30,000 of all cargo). Included in the manifest is the item of “Tin hardware & cutlery £7,530”. This table spoon is one of 482 similar items of electro-plated cutlery from the LOCH ARD site, comprising spoons and forks of various sizes but all sharing the same general shape or design and metallic composition. 49 of these pieces display a legible makers’ mark — the initials “W” and “P” placed within a raised diamond outline, which is in turn contained within a sunken crown shape — identifying the manufacturer as William Page & Co of Birmingham. An electroplater’s makers’ marks, unlike sterling silver hallmarks, are not consistent identifiers of quality or date and place of manufacture. A similar line of five impressions was usually made to impress the consumer with an implication of industry standards, but what each one actually signified was not regulated and so they varied according to the whim of the individual foundry. In this case, the maker’s marks are often obscured by sedimentary accretion or removed by corrosion after a century of submersion in the ocean. However sufficient detail has survived to indicate that these samples of electro-plated cutlery probably originated from the same consignment in the LOCH ARD’s cargo. The generally common range of marks are drawn from 255 tea spoons, 125 dessert spoons, and 99 table forks. These marks are clearly visible in 66 instances, while the same sequence of general outlines, or depression shapes, is discernible in another 166 examples. Suggested trade names for William Page & Co’s particular blend of brass plating are ‘roman silver’ or ‘silverite’. This copper alloy polishes to a lustrous gold when new, discolouring to a murky grey with greenish hue when neglected. HISTORY OF THE LOCH ARD The LOCH ARD belonged to the famous Loch Line which sailed many ships from England to Australia. Built in Glasgow by Barclay, Curdle and Co. in 1873, the LOCH ARD was a three-masted square rigged iron sailing ship. The ship measured 262ft 7" (79.87m) in length, 38ft (11.58m) in width, 23ft (7m) in depth and had a gross tonnage of 1693 tons. The LOCH ARD's main mast measured a massive 150ft (45.7m) in height. LOCH ARD made three trips to Australia and one trip to Calcutta before its final voyage. LOCH ARD left England on March 2, 1878, under the command of Captain Gibbs, a newly married, 29 year old. She was bound for Melbourne with a crew of 37, plus 17 passengers and a load of cargo. The general cargo reflected the affluence of Melbourne at the time. On board were straw hats, umbrella, perfumes, clay pipes, pianos, clocks, confectionary, linen and candles, as well as a heavier load of railway irons, cement, lead and copper. There were items included that intended for display in the Melbourne International Exhibition in 1880. The voyage to Port Phillip was long but uneventful. At 3am on June 1, 1878, Captain Gibbs was expecting to see land and the passengers were becoming excited as they prepared to view their new homeland in the early morning. But LOCH ARD was running into a fog which greatly reduced visibility. Captain Gibbs was becoming anxious as there was no sign of land or the Cape Otway lighthouse. At 4am the fog lifted. A man aloft announced that he could see breakers. The sheer cliffs of Victoria's west coast came into view, and Captain Gibbs realised that the ship was much closer to them than expected. He ordered as much sail to be set as time would permit and then attempted to steer the vessel out to sea. On coming head on into the wind, the ship lost momentum, the sails fell limp and LOCH ARD's bow swung back. Gibbs then ordered the anchors to be released in an attempt to hold its position. The anchors sank some 50 fathoms - but did not hold. By this time LOCH ARD was among the breakers and the tall cliffs of Mutton Bird Island rose behind the ship. Just half a mile from the coast, the ship's bow was suddenly pulled around by the anchor. The captain tried to tack out to sea, but the ship struck a reef at the base of Mutton Bird Island, near Port Campbell. Waves broke over the ship and the top deck was loosened from the hull. The masts and rigging came crashing down knocking passengers and crew overboard. When a lifeboat was finally launched, it crashed into the side of LOCH ARD and capsized. Tom Pearce, who had launched the boat, managed to cling to its overturned hull and shelter beneath it. He drifted out to sea and then on the flood tide came into what is now known as LOCH ARD Gorge. He swam to shore, bruised and dazed, and found a cave in which to shelter. Some of the crew stayed below deck to shelter from the falling rigging but drowned when the ship slipped off the reef into deeper water. Eva Carmichael had raced onto deck to find out what was happening only to be confronted by towering cliffs looming above the stricken ship. In all the chaos, Captain Gibbs grabbed Eva and said, "If you are saved Eva, let my dear wife know that I died like a sailor". That was the last Eva Carmichael saw of the captain. She was swept off the ship by a huge wave. Eva saw Tom Pearce on a small rocky beach and yelled to attract his attention. He dived in and swam to the exhausted woman and dragged her to shore. He took her to the cave and broke open case of brandy which had washed up on the beach. He opened a bottle to revive the unconscious woman. A few hours later Tom scaled a cliff in search of help. He followed hoof prints and came by chance upon two men from nearby Glenample Station three and a half miles away. In a state of exhaustion, he told the men of the tragedy. Tom returned to the gorge while the two men rode back to the station to get help. By the time they reached LOCH ARD Gorge, it was cold and dark. The two shipwreck survivors were taken to Glenample Station to recover. Eva stayed at the station for six weeks before returning to Ireland, this time by steamship. In Melbourne, Tom Pearce received a hero's welcome. He was presented with the first gold medal of the Royal Humane Society of Victoria and a £1000 cheque from the Victorian Government. Concerts were performed to honour the young man's bravery and to raise money for those who lost family in the LOCH ARD disaster. Of the 54 crew members and passengers on board, only two survived: the apprentice, Tom Pearce and the young woman passenger, Eva Carmichael, who lost all of her family in the tragedy. Ten days after the LOCH ARD tragedy, salvage rights to the wreck were sold at auction for £2,120. Cargo valued at £3,000 was salvaged and placed on the beach, but most washed back into the sea when another storm developed. The wreck of LOCH ARD still lies at the base of Mutton Bird Island. Much of the cargo has now been salvaged and some was washed up into what is now known as LOCH ARD Gorge. Cargo and artefacts have also been illegally salvaged over many years before protective legislation was introduced. One of the most unlikely pieces of cargo to have survived the shipwreck was a Minton porcelain peacock - one of only seven in the world. The peacock was destined for the Melbourne International Exhibition in 1880. It had been well packed, which gave it adequate protection during the violent storm. Today, the Minton peacock can be seen at the Flagstaff Hill Maritime Museum in Warrnambool. From Australia's most dramatic shipwreck it has now become Australia's shipwreck artefact and is one of very few 'objects' on the Victorian State Heritage Register most valuable. The LOCH ARD shipwreck is of State significance – Victorian Heritage Register S 417. Flagstaff Hill’s collection of artefacts from LOCH ARD is significant for being one of the largest collections of artefacts from this shipwreck in Victoria. It is significant for its association with the shipwreck, which is on the Victorian Heritage Register (VHR S417). The collection is significant because of the relationship between the objects, as together they have a high potential to interpret the story of the LOCH ARD. The LOCH ARD collection is archaeologically significant as the remains of a large international passenger and cargo ship. The LOCH ARD collection is historically significant for representing aspects of Victoria’s shipping history and its potential to interpret sub-theme 1.5 of Victoria’s Framework of Historical Themes (living with natural processes). The collection is also historically significant for its association with the LOCH ARD, which was one of the worst and best known shipwrecks in Victoria’s history. Unrestored table spoon from the wreck of the LOCH ARD. The spoon design has a flattened fiddle-back handle, with a thin stem or shank, flared collar, and a shallow rounded bowl. The spoons metallic composition is a thin layer of brass alloy which has partially corroded back to a nickel-silver base metal. Sediment covers 65% of spoon, only 5% of original plate remains, with 10% of surface area bearing aquamarine verdigris. Balance blackened with Silver Oxide.flagstaff hill maritime museum, flagstaff hill maritime village, great ocean road, loch line, loch ard, mutton bird island, loch ard gorge, electroplated cutlery, loch ard shipwreck, william page and co, table spoons