Showing 21460 items matching "air-india"
-
 Flagstaff Hill Maritime Museum and Village
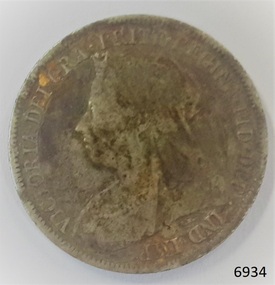
Currency - Coin, 1896
This Great Britain one shilling coin is dated 1896, which is during the reign of Queen Victoria. There were over 9 million of these coins minted. Queen Victoria succeeded King William IV to the British Throne in 1837 – she was only 18 years old at the time – and she ruled until 1901. British coins such as this one shilling were in circulation in the colony of Australia until 1910, when the Commonwealth of Australia began producing its own coinage. This one shilling coin was minted by the Royal Mint at Royal Mint Court, in Little Tower Hill, London, England. Coins for circulation in the Kingdom of England, Great Britain and most of the British Empire were produced here until the 1960’s when the Royal Mint shifted location to Wales. There are three main groups of shillings produced during Queen Victoria’s reign:- - The Young Head; 1837-1887, in 8 different versions, on the obverse showing the Queen’s maturing face over 50 years. - The Junior Head; 1887-1892, minted when Queen Victoria had been reigning for 50 years. Her head was smaller on the coins minted 1887-1889 than on those shillings minted 1889-1892. - The Old Head; 1893-1901, shows the veiled head of Queen Victoria. The obverse side of the coin was designed by Thomas Brock. The inscription’s translation is “Victoria by the Grace of God, Queen of the British territories, Defender of the Faith, Empress of India”. The reverse side of the coin was designed by Edward Paynter. The inscription "HONI SOIT QUI MAL Y PENSE" translates as "Evil be to him who evil thinks". AUSTRALIAN CURRENCY The early settlers of Australia brought their own currency with them so a wide variety of coins, tokens and even ‘promissory’ notes (often called IOU’s) were used in the exchange of goods and services. In 1813 Spanish dollars were imported and converted for use by punching a hole in the centre of the coin. Both the outer ring, called the holey dollar, and the punched out ‘hole’, called the dump, were then used as the official currency. In 1825 the British Government passed the Sterling Silver Currency Act, making the British Pound the only legal form of currency in the Australian colonies. Not enough British currency was imported into the colony so other forms of currency were still used. In the mid 1800’s Australia entered the Gold Rush period when many made their fortunes. Gold was used for trading, often shaped into ingots, stamped with their weight and purity, and one pound tokens. In 1852 the Adelaide Assay Office, without British approval, made Australia’s first gold coin to meet the need for currency in South Australia after the Gold Rush began. In 1855 the official Australian Mint opened in Sydney, operating as a branch of the Royal Mint in London, and the gold was turned into coins called ‘sovereigns’. Other branches also opened in Melbourne and Perth. Up to the time of Australia becoming a federation in 1901 its currency included British copper and silver coins, Australian gold sovereigns, locally minted copper trade tokens, private banknotes, New South Wales and Queensland government treasury notes and Queensland government banknotes. After Federation the Australian government began to overwrite privately issued notes and prepared for the introduction of its own currency. In 1910 a National Australian Currency was formed, based on the British currency of ‘pounds, shillings and pence’ and the first Commonwealth coining was produced. In 1966, on February 14th, Australia changed over to the decimal currency system of dollars and cents. Australia did not have its own currency in the colonial times. Settlers brought money from other countries and they also traded goods such as grain when currency was scarce. For a long time there was no standardised value for the different currencies. In 1825 British currency became the only official currency in the colony of Australia and coins such as this silver shilling were imported into Australia to replace the mixture of foreign currency. Australia became a Federated nation on 1st January 1901. In 1910 National Australian Currency was formed and Australia produced its own currency, based on the British ‘pounds, shillings and pence’. The British currency was no longer valid. This silver shilling is of national significance as it represents the British currency used in Australia from 1825-1910. This silver shilling is also of significance to Australia as part one of the British Colonies ruled by Queen Victoria. It is part of the special silver and gold coins minted 1887-1893 to celebrate the 50 years Jubilee of Queen Victoria’s reign 1837-1887. Coin, Great Britain Shilling, 1896. Silver coin, round. Obverse; Queen Victoria head, ‘Old Head’, looking left. Reverse; 3 shields (each crowned) - 3 passant lions (England), 1 rampant lion (Scotland), golden harp (Northern Ireland) - floral symbols between them – 1 rose, 2 thistles. Inscriptions on both sides of coin.Obverse “VICTORIA . DEI . GRA . BRITT . REGINA . FID . DEF . IND . IMP” Reverse “ONE SHILLING, 1896”, Inner band, [some letters hidden] “HONI SO VI Y PENSE” flagstaff hill, warrnambool, shipwrecked coast, flagstaff hill maritime museum, maritime museum, shipwreck coast, flagstaff hill maritime village, great ocean road, coin, currency, money, legal tender, australian currency history, royal mint, british shilling 1896, thomas brock, edward paynter, great britain shilling, queen victoria currency, queen victoria 50 years golden jubilee shilling, colonial australia currency, numismatics -
 Flagstaff Hill Maritime Museum and Village
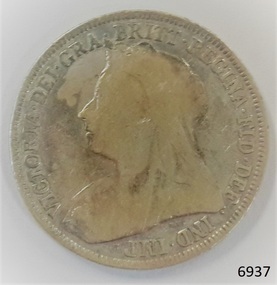
Currency - Coin, 1898
This Great Britain one shilling coin is dated 1898, which is during the reign of Queen Victoria. There were over 9 million of these coins minted. Queen Victoria succeeded King William IV to the British Throne in 1837 – she was only 18 years old at the time – and she ruled until 1901. British coins such as this one shilling were in circulation in the colony of Australia until 1910, when the Commonwealth of Australia began producing its own coinage. This one shilling coin was minted by the Royal Mint at Royal Mint Court, in Little Tower Hill, London, England. Coins for circulation in the Kingdom of England, Great Britain and most of the British Empire were produced here until the 1960’s when the Royal Mint shifted location to Wales. There are three main groups of shillings produced during Queen Victoria’s reign:- - The Young Head; 1837-1887, in 8 different versions, on the obverse showing the Queen’s maturing face over 50 years. - The Junior Head; 1887-1892, minted when Queen Victoria had been reigning for 50 years. Her head was smaller on the coins minted 1887-1889 than on those shillings minted 1889-1892. - The Old Head; 1893-1901, shows the veiled head of Queen Victoria. The obverse side of the coin was designed by Thomas Brock. The inscription’s translation is “Victoria by the Grace of God, Queen of the British territories, Defender of the Faith, Empress of India”. The reverse side of the coin was designed by Edward Paynter. The inscription "HONI SOIT QUI MAL Y PENSE" translates as "Evil be to him who evil thinks". AUSTRALIAN CURRENCY The early settlers of Australia brought their own currency with them so a wide variety of coins, tokens and even ‘promissory’ notes (often called IOU’s) were used in the exchange of goods and services. In 1813 Spanish dollars were imported and converted for use by punching a hole in the centre of the coin. Both the outer ring, called the holey dollar, and the punched out ‘hole’, called the dump, were then used as the official currency. In 1825 the British Government passed the Sterling Silver Currency Act, making the British Pound the only legal form of currency in the Australian colonies. Not enough British currency was imported into the colony so other forms of currency were still used. In the mid 1800’s Australia entered the Gold Rush period when many made their fortunes. Gold was used for trading, often shaped into ingots, stamped with their weight and purity, and one pound tokens. In 1852 the Adelaide Assay Office, without British approval, made Australia’s first gold coin to meet the need for currency in South Australia after the Gold Rush began. In 1855 the official Australian Mint opened in Sydney, operating as a branch of the Royal Mint in London, and the gold was turned into coins called ‘sovereigns’. Other branches also opened in Melbourne and Perth. Up to the time of Australia becoming a federation in 1901 its currency included British copper and silver coins, Australian gold sovereigns, locally minted copper trade tokens, private banknotes, New South Wales and Queensland government treasury notes and Queensland government banknotes. After Federation the Australian government began to overwrite privately issued notes and prepared for the introduction of its own currency. In 1910 a National Australian Currency was formed, based on the British currency of ‘pounds, shillings and pence’ and the first Commonwealth coining was produced. In 1966, on February 14th, Australia changed over to the decimal currency system of dollars and cents. Australia did not have its own currency in the colonial times. Settlers brought money from other countries and they also traded goods such as grain when currency was scarce. For a long time there was no standardised value for the different currencies. In 1825 British currency became the only official currency in the colony of Australia and coins such as this silver shilling were imported into Australia to replace the mixture of foreign currency. Australia became a Federated nation on 1st January 1901. In 1910 National Australian Currency was formed and Australia produced its own currency, based on the British ‘pounds, shillings and pence’. The British currency was no longer valid. This silver shilling is of national significance as it represents the British currency used in Australia from 1825-1910. This silver shilling is also of significance to Australia as part one of the British Colonies ruled by Queen Victoria. It is part of the special silver and gold coins minted 1887-1893 to celebrate the 50 years Jubilee of Queen Victoria’s reign 1837-1887. Coin, Great Britain Shilling, 1898. Silver coin, round. Obverse; Queen Victoria head, ‘Old Head’, looking left. Reverse; 3 shields (each crowned) - 3 passant lions (England), 1 rampant lion (Scotland), golden harp (Northern Ireland) - floral symbols between them – 1 rose, 2 thistles. Inscriptions on both sides of coin.Obverse “VICTORIA . DEI . GRA . BRITT . REGINA . FID . DEF . IND . IMP” Reverse “ONE SHILLING, 1898, Inner band, some letters hidden - HONI SO VI Y PENSE” flagstaff hill, warrnambool, shipwrecked coast, flagstaff hill maritime museum, maritime museum, shipwreck coast, flagstaff hill maritime village, great ocean road, coin, currency, money, legal tender, australian currency history, royal mint, british shilling 1898, thomas brock, edward paynter, great britain shilling, queen victoria currency, queen victoria 50 years golden jubilee shilling, colonial australia currency, numismatics -
 Flagstaff Hill Maritime Museum and Village
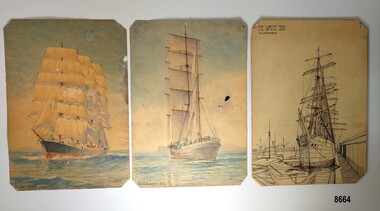
Painting - Paintings - set of three, Beni Carr Glyn Burnett, 1933
Beni Carr Glyn Burnett (also known as B. C. G. Burnett or Beni Burnett) was born in 1889 to missionary parents in Mongolia. When he was 15 years old he began training as an architect with a firm in Shanghai. He worked in Singapore, Japan and China before moving to Australia around 1933. In 1937 he was appointed as the Commonwealth principal architect in the Northern Territory. He went on to design a series of houses for senior public servants and military personnel which became very popular as they were specifically designed for the tropics - incorporating louvres, high ceilings and good ventilation. When Darwin was bombed in February 1942, he was evacuated to Alice Springs where he continued to work as an architect. He also became a Magistrate and Coroner in Alice Springs. In later life he was well known for sketching clientele in public bars. He died in 1955. Beni Burnett was living in Sydney in 1933 when he produced these three artworks. There were several photography firms operating in Sydney at this time who specialised in photographing ships and the shipping trade (e.g. Samuel J. Hood and William James Hall) and whose photographs were used by artists to produce ship portraits. Both of these photographers took photographs of the two ships in B. C. G. Burnett's watercolours. The "Magdalene Vinnen" was photographed by Samuel J Hood in a series of photos taken in March 1933. It was a 4 masted steel barque, built in 1921 in Kiel, Germany and for almost 80 years was the largest traditional sailing ship in operation. It was used extensively as a cargo ship. It sailed into Sydney Harbour on 27th Feb 1933, loaded with almost 16,000 bales of wool destined for Falmouth, England. In March 1933 (whilst in Sydney) the German Republic flag (on orders from Adolph Hitler) was lowered and replaced with the old monarchist flag which was then to be the official flag and beside it the Nazi flag was to be flown on all ceremonial occasions. It visited Australia again in 1935 with its cargo being wheat from Port Broughton, S. A. In 1936 it was renamed "Kommodore Johnsen" and in 1945 (after WW2) the ship was awarded to the Soviet Union as war compensation and renamed "STS Sedov". The "Winterhude" (originally called "Mabel Rickmers) was a three masted Finnish barque built in 1898 by Rickers - Werft Bremerhaven for use on the East India rice trade and later the South American nitrate trade. After WW1 it came under French control as war compensation. It was also sold several times and at one stage was called "Selma Hemsoth" but in 1925 it was bought by Gustaf Erikson who restored the name "Winterhude" and the vessel became a regular transport in the Australian wheat trade. In 1944 it was sold to the German navy before being taken over by the British at the end of WW2. It was photographed in Sydney by William James Hall in 1931 on its way to Port Lincoln, South Australia to load wheat for Europe. The third ship depicted by B. C. G. Burnett is a pen and wash sketch labelled "The White Ship" and exactly matches a photograph pasted into his personal scrapbook which is in the "Library and Archives N. T.". The name of the ship is unknown and B. C. G. Burnett may have taken some artistic licence with the colouring as in the original photograph, the ship had a dark hull.This set of three small artworks is significant as examples of shipping (particularly the use of sailing ships) that were still being used as late as the 1930's in Australia. They are also important because their creator (B. C. G. Burnett) went on to become a well-known public figure in the Northern Territory in the late 1930's due to his innovative approach to designing homes for the tropical climate.A set of three artworks by B. C. G. Burnett of sailing ships in Sydney Harbour. They are all on rectangular watercolour paper with small diagonal edges at each corner. Painting 1 is a watercolour painting of a sailing ship called "Magdalene Vinnen". It shows a 4 masted barque with a blue and red steel hull in full sail heading towards the viewer. The painter's name (B. C. G. Burnett) and date (1933) are written on the bottom left-hand corner of the painting. Painting 2 is a watercolour painting of a sailing ship called "Winterhude". It shows a 3-masted barque with a blue and red steel hull in full sail heading away from the viewer. A small figure can be seen at the wheel at the rear of the ship. The painter's name (B. C. G. Burnett) and date (1933) are written on the bottom left-hand corner of the painting. Sketch 3 is an ink sketch of an unknown sailing ship moored to a dock. There are several small boats tied up near the sailing ship and a large steel freighter can be seen in the background. There is a faint wash of colour on parts of the sketch - the bottom of the ship, the masts and booms and the water at the end of the pier. The title (The White Ship) and the artist's name (B. C. G. Burnett) are written in ink in the top left corner. 1 (front) - "B. C. G. BURNETT. 1933 2 (front) - "B. C. G. BURNETT. 1933" 3 (front) - "THE WHITE SHIP / B. C. G. BURNETT"flagstaff hill maritime museum and village, warrnambool, great ocean road, sailing ships, ships, barque, magdalene vinnen, winterhude, beni carr glyn burnett, b. c. g. burnett, beni burnett, painting, watercolour painting, sketch, ink sketch, sydney harbour, architect, darwin, burnett house, photography, samuel j. hood, william james hall, sedov, kommodore johnsen, mabel rickmers -
 The Beechworth Burke Museum
Photograph - Photograph - Reproduction, c.1870s
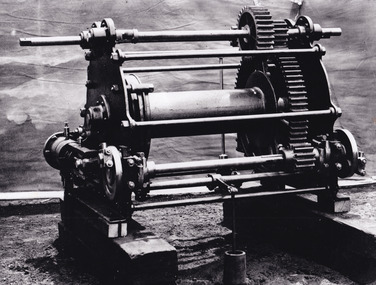
This photograph shows a piece of gold mining equipment identified as a mine winch, possibly an air winch cylinder of 1870s RG Ford's Patent design. Throughout the history of mining for gold and other precious materials, the windlass or winch (pictured) was used to bring up buckets full of soil from the bottom of a mine. This soil was then searched for gold/metals before being relocated to a different area. Due to the size and complexity of this particular piece of equipment, this winch may have been used to raise and lower mine carts to the entrance of the mine (often used in coal mining) and could have been used in raising cages up and down (acting as elevators) containing miners if the mine was particularly deep. The actual use of this particular item in the Beechworth locality is undocumented but these are some possibilities based on the use of these pieces of equipment in other mining locations. Mining can have a largely detrimental impact to the environment and therefore, the study of machinery like the one depicted in this photograph can help researches to reconstruct the methods and technologies used in the late 1800s and early 1900s. This particular item appears to have been removed from it's original site where it would have been used to assist with mining. It is possible that this photograph has been taken for recording purposes or as part of a machinery exhibition. Prior documentation records that this piece of equipment had connections to the Rocky Mountains Mining Company. Today, the Rocky Mountains Gold Mining company is famous in Beechworth for having been instrumental in the creation of the Rocky Mountain tunnel. Construction for this tunnel began in 1859 when a group of 12 men blasted a 400ft long tailrace though the rock beneath the town of Beechworth. Today, the 800ft tunnel, completed in 1871, is a popular tourist attraction but during the decades of gold mining, the purpose of this tunnel was to divert water away from the main sluicing operations so miners could better access gold and precious materials. The tunnel was used for this purpose for many years, later becoming useful for the Zwar Brother's tannery and currently as an outfall drain for Lake Sambell. This area continued to be mined until the early 1900s. The period when this item was in use is unclear but it is estimated to have been in the 1870s based on the design and appearance of the image. The gold works at the Rocky Mountain Tunnel closed in the early 1920s but the impact of mining remains in Beechworth today and therefore the study of photographs like this one which contain mining equipment can further understanding of mining in this region.This photograph has historic and research potential for study on the gold mining of the Beechworth region and types of equipment used to locate gold after the initial gold rush of 1853-1854 which resulted in the discovery of the surface gold and required miners to dig deeper to access precious metals. The clarity of the photo, and its good preserved condition, means it can continue to be used for research. This photo is part of a collection of six photos all within the Burke Museum Collection which depict mining equipment.Square black and white photograph on card.7793.1beechworth, mining, goldmining, goldmining equipment, beechworth burke museum -
 The Beechworth Burke Museum
Photograph - Photograph - Reproduction, Unknown
This image is a reproduction of an 1899 original depicting the 'Williams Good Luck Mine' on the Mopoke Reef (also called 'Morepork Gully') in the Dingle Ranges, approximately three miles from Beechworth. The foreground of the image is littered with piles of smashed rock and detritus, known as ‘mullock’, beside a reinforced mine shaft, a vertical access passageway allowing miners to enter the mine and haul ore out using lifting technology such as a poppet heads, whims or windlasses. A group of miners and a dog appear close to an open-sided miner’s hut. Following the discovery of gold at Beechworth in 1852, rushes quickly followed at surrounding creeks and gullies in the district. In the late nineteenth and early twentieth centuries, small syndicates of miners continued to work old or abandoned quartz reefs, often persisting without the assistance of heavy machinery to remove the large amounts of rock, in order to obtain yields at ever greater depths. The group of miners in this photograph are Mr. Roger Williams and Sons, who revived operations at the ‘Old Good Luck’ mine on the Mopoke Reef in the Dingle Range near Beechworth around 1892, working the site for more than two decades. An emigrant from Cornwall with experience in the tin mining industry, 19 year old Roger Williams senior sailed to New Zealand in 1840, then to Australia where he spent time in the Bendigo Gold Fields before settling in Beechworth in the early 1860s. Mr Williams senior worked on various mining activities in the district, including the Rocky Mountain Tunnel project. Conversant with the character of gold-bearing reefs in the area, the syndicate dug an eight hundred foot tunnel, digging down as far down as two hundred feet with little capital save their labour, to connect and provide better working access to the mass of reefs and veins in the vicinity. Progress was hampered by poor air quality charged with fumes from dynamite and large quantities of rock had to be crushed to obtain payable yields. The Victorian Goldfields are filled with ruins and remnants of the area's rich mining history, ranging from small alluvial diggings to the remains of huge mining companies. Site names often changed several times throughout the nineteenth and twentieth centuries. Some sites were abandoned and forgotten, others were worked continuously over many decades. The names of mines were often repeated at different locations throughout the Victorian Goldfields. For example, there is a Mopoke Gully heritage mine near Fryers Creek, Victoria. 'Mopoke' is a common onomatopoeic name for Morepork and Australian Boobook owls. This image has historical, social and research significance for patterns of emigration during of the Victorian Gold Rush, and the historical, social and environmental impacts of mining at Beechworth at the turn of the nineteenth and twentieth centuries. As gold became scarce and government support and large company investment waned, poor hard-working miners laboured intensively to make a living through periods of high unemployment. This image can be compared and studied alongside other historical mining photographs and objects in the Burke Museum Collection. It has potential to improve our understanding of miners working conditions and the shifting character of mining in the Beechworth district. Black and white rectangular reproduction photograph printed on matte photographic paper.Obverse: Williams Good Luck Mine Beechworth / Roger! / Reverse: 6858 / burke museum, beechworth museum, beechworth, gold fields, gold rush, victorian gold rush, gold ming history, colonial australia, australian gold rushes, mining technology, beechworth historic district, indigo gold trail, migration, indigo shire, good luck gold mine, victorian goldfields, mining syndicates, gold fever, quartz-mining, small-scale mining, old good luck mine, mopoke gully, quartz reefs beechworth -
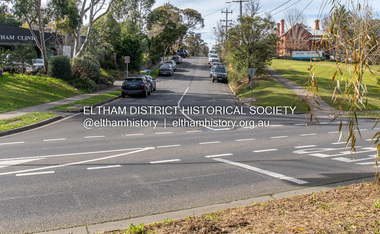 Eltham District Historical Society Inc
Photograph, Peter Pidgeon, Dalton Street, Eltham, 2 Aug. 2022
View looking up Dalton Street from near Main Road where the former pond was situated. The pond was drained by Council in 1932 due to concerns of mosquitoes, etc against the wishes of long standing residents such as Thekla Jarrold (39 years) and John Clark (22 years). On the right is the Eltham Primary Schoool No. 209 with the former Headmaster's residence and to the left is Eltham Clinic once the site of the Grant home. Comparison photo: SEPP_0643 In April 1935 the local paper reported on a story where a schoolgirl was talking whilst on her bicycle and it started moving off, flying down Dalton Street and across the main road missing cars and the guy wires for the telephone pole and hurtled 21 feet through the air into the drained pond suffering a broken arm and shock. She was rescued unconscious by John and taken into Mrs Jarrold’s for first aid. This was not the only instance of young girls losing control of bicycles down the hill. Part of a presentation by Peter Pidgeon to the Society, 13 August 2022 showcasing a series of photographs taken by John Henry Clark over the period 1895 to 1930. John Henry Clark was the youngest of three boys born to William Henry Clark (1823-1877) and Maria White (1843-1914). He and his brothers, William Charles Clark (1872-1945), Clement Kent Clark (1874-1912) operated a photography business (Clark Bros.) from 25 Thomas Street, Windsor near Prahran during the period c.1894 to 1914. Following death of Clement in September 1912 and their mother in 1914, the Clark Bros business appears to have dissolved, the premises demolished, and a new house was under construction in 1915. John set up business independently in 1914 operating out of 29 Moor Street, Fitzroy where he is registered in the 1914 and 1915 Electoral Rolls. By 1916 John had relocated to Eltham where he continued his practice as a photographer and took many of the early images around the district of Little Eltham. Around 1930 John changed professions and opened a small cobbler's shop in 1931 near the pond opposite Dalton Street adjacent to the Jarrold family cottage. He never married and continued his profession as a bootmaker from this little shop, maintaining a close relationship with Mrs Jarrold for the rest of their lives. His bootmaker shop remains today beside the Whitecloud cottage and is one of only three remaining shops in the area from the early 20th century.Comparative photo taken 2022 with one taken from same location over 100 years earlier by noted local photographer J.H. ClarkBorn Digitaleltham, j.h. clark photo (2022), dalton street, main road, eltham clinic, eltham primary school, headmaster's residence, state school no. 209 -
 Eltham District Historical Society Inc
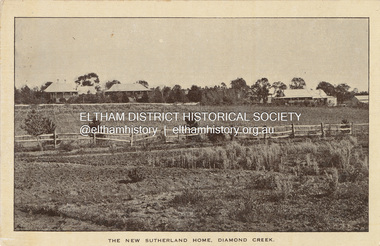
Photograph - Postcard, New Sutherland Home, 28 Drummond Street, Diamond Creek, c.1912
Postcard: Leader (Melbourne, Vic. : 1862 - 1918, 1935), Saturday 15 June 1912, page 48 ________________________________________ NEW SUTHERLAND HOME. OPENED BY THE PREMIER. A new home for destitute and neglected children, erected for the purpose of carrying on the work of the late Miss Sutherland, was formally opened by the Premier (Mr. Watt) at 28 Drummond-street on Thursday. The new building has been erected at a cost of £1600, of which only £300 has been provided by the Government. A similar sum has been raised by private contribution, but there is still a debt of £800 or £900, which the committee hopes to liquidate shortly - to some extent by means of a sale of gifts, which was 'opened in the building, and will be continued this afternoon and evening. The Premier, in performing the opening ceremony, said the home was a monument to the life work of one of the most distinguished social servants this country had known. (Applause.) Although Miss Sutherland was dead her good work lived on. It was too often true, as Shakespeare said, that "the evil that men do lives after them - the good is oft interred, with their bones." But the statement was contradicted by this noble building, erected for the commemoration of the work Miss Sutherland had instituted. After referring to the good work done by Mrs. Alexander Smith in connection with the building, Mr. Watt said that Victoria owed to the ladies and gentlemen who associated themselves with asylums, refuges, orphanages and homes of this sort a deep and abiding debt of gratitude. (Applause.) With no coercion from the Legislature, or from anyone, these ladies and gentlemen, were endeavouring to organise and keep alive the services that surrounded these institutions. There was no form of organised charity with which he was acquainted that deserved better of the public than this one. (Hear, hear.) Their hospitals, it was true, relieved a vast amount of suffering and affliction, but there was a sacred duty resting on any civilised community to see that those who were forsaken by their natural parents or guardians should not be left absolutely to the mercy of circumstance. The new home, which is intended as a receiving, house for destitute children - prior to their departure for the home at Diamond Creek - has living accommodation for some 20 children, but when fully furnished will accommodate more. It is plainly, but neatly, fitted up, with an abundance of light and air, and of facilities for hot and cold water. Both outside and inside it is an acquisition to the charitable institutions of the city. NEW SUTHERLAND HOME. (1912, June 15). Leader (Melbourne, Vic. : 1862 - 1918, 1935), p. 48. Retrieved March 14, 2024, from http://nla.gov.au/nla.news-article198132028 See also Sutherland Homes for Children https://wikinorthia.net.au/sutherland-homes-for-children/ Nov 29, 2012 The building was replaced by a much larger building in 1929 See NNT_107tom fielding collection, diamond creek, drummond street, miss sutherland, new sutherland home, opening, sutherland home for children -
 Flagstaff Hill Maritime Museum and Village
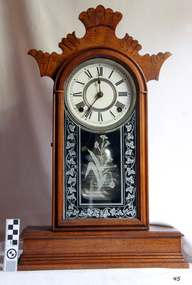
Domestic object - Clock, late 1900s early 20th Century
In 1850 the Ansonia Clock Company was formed as a subsidiary of the Ansonia Brass Company by Phelps and two Bristol Connecticut clock makers, Theodore Terry and Franklin C. Andrews. Terry & Andrews were the largest clock manufacturers in Bristol at the time with more than 50 employees using 58 tons of brass in the production of about 25,000 clocks in 1849. Phelps decided to get into the clock making business to expand the market for his brass, while Terry and Andrews got access to better quality brass at better prices. They had then sold 50% of their business to Phelps and moved the business to Ansonia, Connecticut. In 1877 the clock company purchased a factory in New York and moved most of its production thereafter being spun off from the brass company. Henry J. Davies of Brooklyn, himself a clock maker, inventor and case designer, joined the newly reconstituted company as one of its founders. As President, he is thought to have been largely responsible for the figurine clocks, swing clocks and other unusual and desirable novelties for which the Ansonia firm became known. By 1879, a second factory was opened in Brooklyn, New York and by June 1880 employed 360 workers, while the Connecticut factory continued producing clocks as well with a workforce of 100 men and 25 women. Hence, clocks marked "Connecticut" were generally produced before 1879, while those marked "New York" were all produced after 1880 After the New York factory burnt down in 1880 the company rebuilt the factory on the same site, and reopened the expanded factory in 1881, with a capacity to exceed that of the Connecticut factory which by 1883 had closed. By 1886, the company had sales offices in New York, Chicago and London, with more than 225 different clock models being manufactured. In 1899, Phelps' grandson William Earle Dodge Stokes commissioned architect Duboy to build the "greatest and grandest hotel in Manhattan, New York” which became the city's first air-conditioned building. In 1929 the majority of the timekeeping machinery and tooling was sold to the Soviet government's US trading company Amtorg, just before the stock market crash. The parts, machinery and key skilled workers were shipped out of the USA to form the basis, along with the remains of a watch company purchased a year later, of the clock and watch industry in Moscow such as Poljot and Sekonda. In 1969, the rights to the use of the name, trademarks, and goodwill were transferred to Ansonia Clock Co., Inc., Lynnwood, Washington. The item marks the beginning of mass produced clocks in the United States, cheaply priced and available to all. The company had many innervation's during it’s life regards clock and later wrist watch making that led the way for other companies in many different countries to emulate.Clock, pendulum mantle model. Carved scallop "Ginger bread house" cottage clock. Oak case, white enamel face, floral etched glass door. Clock has an hour bell chime. Glass front opens to allow rewinding. Made by Ansonia Clock Co, New York. Marked "Manufactured by Ansonia Clock Co. New York, USA"flagstaff hill, warrnambool, shipwrecked coast, flagstaff hill maritime museum, maritime museum, shipwreck coast, flagstaff hill maritime village, great ocean road, mantle clock, clock, pendulum clock, time keeper, horology, ansonia, ansonia clock co, america -
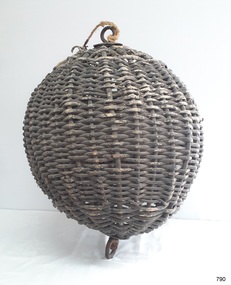 Flagstaff Hill Maritime Museum and Village
Equipment - Distant Signal, 1897-1931
This three-dimensional Distant Signal is part of a Flagstaff Signal set of ball, cone and drum shapes. It has been woven and then fabricated with strong metal swivel fittings and loops for suspending from a high point on a flagstaff at a signal station or on a ship’s masthead. The cane signal was constructed to withstand all weather and to be visible from a long distance. The gaps between the woven cane allow air to pass through, minimising possible swaying. Similar sets were made from rope or fabric. Warrnambool's Flagstaff was erected in 1854. Its primary use was to display visual signals that could convey messages between land and sea. It was also used to notify the local population of the approach of ships. One of the popular signalling codes in use in the early-to-mid 1800s was the Marryat’s Code but there were others in use as well; there was no one standard code. In 1857 the International Marine Conference adopted an International Code of Signals as a standard communications system for all vessels that could be understood in many different languages. The Normanby Advertiser reported on June 5th 1857 a query from the Post Master General as to whether the request of the Chief Harbour Master would be carried out, in that Warrnambool would receive a new flagstaff and a set of Marryatt’s signal flags. The Table of Codes was published, showing how to use combinations of these flags to send messages. The Code was revised in 1887 to cover situations where distance, light, wind and weather conditions affected the visibility of the flags and prevented clear communication. The first report of the International Code of Signals Committee of 1897 warned signalmen not to rely on ordinary semaphore flags and introduced a Distant Signal Code using either particular semaphore flags or the three-dimensional shapes of a ball, cone and drum that aligned with the semaphore flag shapes of a circle, pennant and square. International Code of Signals In 1931, after World War I’s experiences in using signal codes, the International Code of Signals conference in Washington revised and published the rules for the conduct of signalling. One of the changes was that “the use of the Distant Signals and of fixed semaphore was abandoned”. It is of interest to know that modern marine law in many countries insists that a set of Day Shapes must be carried onboard vessels of a certain size. These highly visible geometric shapes are used at sea in daylight to communicate messages between vessels. They are used in a similar way to the Distant Signals, in that different combinations of shapes represent different messages. The set of shapes includes a ball, cylinder, cone and diamond. The shapes are hung between the top of the vessel’s foremast and the front of the vessel. They are only coloured black and are about 1.5 metres high. The vertical line of shapes can mean messages such as Boat not under command, Fishing, and Under sail and power.Distant Signals were an important means of marine communication from the late 1880s to the early 1930s, including during World War I. They were an advancement to the International Shipping Codes and safety. The cane signals’ shapes appear to be the same from whatever direction they are viewed, removing confusion about the message they convey. The same shapes continue to be used today for the sets of Day Shapes used as marine navigational signals that are mandatory on certain-sized vessels.Distant Signal Ball, part of a Flagstaff signal set. A round woven cane ball, painted black, with a metal rod passing through the centre. The rod has a loop at each end, then a concave, octagonal metal plate that rests on the outside surface of the ball, serving as a washer. The rod has swivels at each end.flagstaff hill, flagstaff hill maritime museum and village, warrnambool, maritime museum, maritime village, great ocean road, shipwreck coast, distant signal, signal, maritime signal, ball signal, signal shape, flagstaff signal, signal station, masthead signal, communications, marine technology, signals, marine signals, flaghoists, international marine conference, international code of signals, signal codes, marine safety, signal flags, day shape, daymark, day symbol, navigation, warrnambool flagstaff, 1854, 1857 1931, 1887, 1897 -
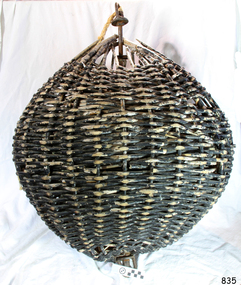
 Flagstaff Hill Maritime Museum and Village
Equipment - Distant Signal, 1897-1931
This three-dimensional Distant Signal is part of a Flagstaff Signal set of ball, cone and drum shapes. It has been woven and then fabricated with strong metal swivel fittings and loops for suspending from a high point on a flagstaff at a signal station or on a ship’s masthead. The cane signal was constructed to withstand all weather and to be visible from a long distance. The gaps between the woven cane allow air to pass through, minimising possible swaying. Similar sets were made from rope or fabric. Warrnambool's Flagstaff was erected in 1854. Its primary use was to display visual signals that could convey messages between land and sea. It was also used to notify the local population of the approach of ships. One of the popular signalling codes in use in the early-to-mid 1800s was the Marryat’s Code but there were others in use as well; there was no one standard code. In 1857 the International Marine Conference adopted an International Code of Signals as a standard communications system for all vessels that could be understood in many different languages. The Normanby Advertiser reported on June 5th 1857 a query from the Post Master General as to whether the request of the Chief Harbour Master would be carried out, in that Warrnambool would receive a new flagstaff and a set of Marryatt’s signal flags. The Table of Codes was published, showing how to use combinations of these flags to send messages. The Code was revised in 1887 to cover situations where distance, light, wind and weather conditions affected the visibility of the flags and prevented clear communication. The first report of the International Code of Signals Committee of 1897 warned signalmen not to rely on ordinary semaphore flags and introduced a Distant Signal Code using either particular semaphore flags or the three-dimensional shapes of a ball, cone and drum that aligned with the semaphore flag shapes of a circle, pennant and square. International Code of Signals In 1931, after World War I’s experiences in using signal codes, the International Code of Signals conference in Washington revised and published the rules for the conduct of signalling. One of the changes was that “the use of the Distant Signals and of fixed semaphore was abandoned”. It is of interest to know that modern marine law in many countries insists that a set of Day Shapes must be carried onboard vessels of a certain size. These highly visible geometric shapes are used at sea in daylight to communicate messages between vessels. They are used in a similar way to the Distant Signals, in that different combinations of shapes represent different messages. The set of shapes includes a ball, cylinder, cone and diamond. The shapes are hung between the top of the vessel’s foremast and the front of the vessel. They are only coloured black and are about 1.5 metres high. The vertical line of shapes can mean messages such as Boat not under command, Fishing, and Under sail and power.Distant Signals were an important means of marine communication from the late 1880s to the early 1930s, including during World War I. They were an advancement to the International Shipping Codes and safety. The cane signals’ shapes appear to be the same from whatever direction they are viewed, removing confusion about the message they convey. The same shapes continue to be used today for the sets of Day Shapes used as marine navigational signals that are mandatory on certain-sized vessels.Distant Signal Cone, part of a Flagstaff signal set. A woven cane cone, painted black, with a metal rod passing through the centre and two crossed metal bars at the base. The central rod has a loop at the top and passes through the bars at the base, finishing in a metal loop. The rod has swivels at each end.flagstaff hill, warrnambool, flagstaff hill maritime museum and village, shipwreck coast, marine navigation, marine communications, communication signal, lifesaving, ship at sea, day shape, masthead signal, day signal, day mark signals, marine technology, safety equipment, navigation equipment, marine day shape, day marker, cane day shape, signal cone, day signal cone, cone signal, cone day shape, distant signal, flagstaff signal, signal station, communications, signals, marine signals, flaghoists, international marine conference, international code of signals, signal codes, marine safety, signal flags, daymark, day symbol, navigation, warrnambool flagstaff, 1854, 1857 1931, 1887, 1897 -
 Flagstaff Hill Maritime Museum and Village
Equipment - Distant Signal, 1897-1931
This three-dimensional Distant Signal is part of a Flagstaff Signal set of ball, cone and drum shapes. It has been woven and then fabricated with strong metal swivel fittings and loops for suspending from a high point on a flagstaff at a signal station or on a ship’s masthead. The cane signal was constructed to withstand all weather and to be visible from a long distance. The gaps between the woven cane allow air to pass through, minimising possible swaying. Similar sets were made from rope or fabric. Warrnambool's Flagstaff was erected in 1854. Its primary use was to display visual signals that could convey messages between land and sea. It was also used to notify the local population of the approach of ships. One of the popular signalling codes in use in the early-to-mid 1800s was the Marryat’s Code but there were others in use as well; there was no one standard code. In 1857 the International Marine Conference adopted an International Code of Signals as a standard communications system for all vessels that could be understood in many different languages. The Normanby Advertiser reported on June 5th 1857 a query from the Post Master General as to whether the request of the Chief Harbour Master would be carried out, in that Warrnambool would receive a new flagstaff and a set of Marryatt’s signal flags. The Table of Codes was published, showing how to use combinations of these flags to send messages. The Code was revised in 1887 to cover situations where distance, light, wind and weather conditions affected the visibility of the flags and prevented clear communication. The first report of the International Code of Signals Committee of 1897 warned signalmen not to rely on ordinary semaphore flags and introduced a Distant Signal Code using either particular semaphore flags or the three-dimensional shapes of a ball, cone and drum that aligned with the semaphore flag shapes of a circle, pennant and square. International Code of Signals In 1931, after World War I’s experiences in using signal codes, the International Code of Signals conference in Washington revised and published the rules for the conduct of signalling. One of the changes was that “the use of the Distant Signals and of fixed semaphore was abandoned”. It is of interest to know that modern marine law in many countries insists that a set of Day Shapes must be carried onboard vessels of a certain size. These highly visible geometric shapes are used at sea in daylight to communicate messages between vessels. They are used in a similar way to the Distant Signals, in that different combinations of shapes represent different messages. The set of shapes includes a ball, cylinder, cone and diamond. The shapes are hung between the top of the vessel’s foremast and the front of the vessel. They are only coloured black and are about 1.5 metres high. The vertical line of shapes can mean messages such as Boat not under command, Fishing, and Under sail and power.Distant Signals were an important means of marine communication from the late 1880s to the early 1930s, including during World War I. They were an advancement to the International Shipping Codes and safety. The cane signals’ shapes appear to be the same from whatever direction they are viewed, removing confusion about the message they convey. The same shapes continue to be used today for the sets of Day Shapes used as marine navigational signals that are mandatory on certain-sized vessels.Distant Signal Ball, part of a Flagstaff signal set. A round woven cane ball, painted black, with a metal rod passing through the centre. The rod has a loop at each end, then a concave, octagonal metal plate that rests on the outside surface of the ball, serving as a washer. The rod has swivels at each end.flagstaff hill, warrnambool, flagstaff hill maritime museum and village, shipwreck coast, marine navigation, marine communications, communication signal, lifesaving, ship at sea, day shape, masthead signal, day signal, day mark signals, marine technology, safety equipment, navigation equipment, marine day shape, day marker, cane day shape, signal ball, day signal ball, ball signal, ball day shape, distant signal, flagstaff signal, signal station, communications, signals, marine signals, flaghoists, international marine conference, international code of signals, signal codes, marine safety, signal flags, daymark, day symbol, navigation, warrnambool flagstaff, 1854, 1857 1931, 1887, 1897 -
 Flagstaff Hill Maritime Museum and Village
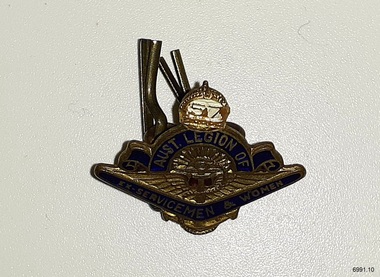
Badge - Australian Legion of Ex-Servicemen and Women, Stokes, Membership badge, 1957
The badge was issued by the Victorian branch (indicated by the 'V' on the reverse) of the Australian Legion of Ex-Servicemen and Women and is referred to as The Badge of Unity or Tri-Services badge, uniting the armed services of Australia; the Army (rising sun), the Navy (anchor) and the Air Force (pair of wings). The number '57' on the crown represents the year of paid membership; 1957. The badge belonged to Dr W R Angus, who served in the Australian Army as a military doctor during WWII. It was made in Melbourne by Stokes in 1957, around 100 years after the firm was established by Thomas Stokes in Mincing Lane, Melbourne. The firm was operating from Caledonian Lane/Post Office Place in the 1950s. The badge is one of a set of badges collected by Dr W R Angus from the organisations in which he was involved. They are now part of Flagstaff Hill’s comprehensive W.R. Angus Collection, donated by the family of Dr W R Angus, surgeon and oculist. Australian Legion of Ex-Servicemen and Women was formed in 1944 to "entourage fellowship and assist those who have served". The organisation is open to members from Australia, British Commonwealth and Allied ex-service personnel. The W.R. Angus Collection: - The W.R. Angus Collection includes historical medical equipment, surgical instruments and material once belonging to Dr Edward Ryan and Dr Thomas Francis Ryan, (both of Nhill, Victoria) as well as Dr Angus’ own belongings. The Collection’s history spans the medical practices of the two Doctors Ryan, from 1885-1926 plus that of Dr Angus, up until 1969. It includes historical medical and surgical equipment and instruments from the doctors Edward and Thomas Ryan of Nhill, Victoria. Dr Angus married Gladys in 1927 at Ballarat, the nearest big city to Nhill where he began as a Medical Assistant. He was also Acting House surgeon at the Nhill hospital where their two daughters were born. During World War II He served as a Military Doctor in the Australian Defence Force. Dr Angus and his family moved to Warrnambool in 1939, where Dr Angus operated his own medical practice. He later added the responsibility of part-time Port Medical Officer and was the last person appointed to that position. Both Dr Angus and his wife were very involved in the local community, including the planning stages of the new Flagstaff Hill and the layout of the gardens there. Dr Angus passed away in March 1970.This Badge of Unity, or Tri-Service badge, is significant for connecting Doctor Angus with organisations that support men and women who performed military service for Australia. The badge was for membership with the organisation, which supports ex-servicemen and women of the three military forces; Army, Navy and Air Force. The W.R. Angus Collection is significant for still being located at the site it is connected with, Doctor Angus being the last Port Medical Officer in Warrnambool. The Collection includes historical medical objects that date back to the late 1800s.Badge; a gold-coloured metal and enamel badge. The blue boomerang-shaped band is below an arch of blue, below a crown with a number and coloured red, white and blue. There are symbols in the centre; a rising sun, above a pair of wings, with an anchor in the centre of both. There is red and blue scrollwork behind the symbols. Inscriptions are on the front and back of the badge. There are two loops and pins on the back of the badge. It is a membership badge of the Victorian branch of the Australian Legion of Ex-Servicemen and Women and was made by Stokes in 1957. The badge has a Serial Number. This badge is part of a set of badges collected by Dr Angus and is part of the W.R. Angus Collection.FRONT; “AUST. LEGION OF / EX-SERVICEMEN & WOMEN” On crown “57” REVERSE; “V” “13156" "STOKES” flagstaff hill, warrnambool, maritime museum, maritime village, great ocean road, shipwreck coast, w.r. angus, badge, ladies’ badge, military service, stokes, melbourne, australian legion of ex-servicemen and women, membership badge, 1957 membership badge, ex=service personnel, heraldry, world war ii, second world war, tri-services symbol, badge of unity, rising sun, anchor, pair of wings -
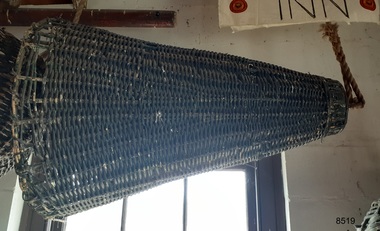 Flagstaff Hill Maritime Museum and Village
Equipment - Distant Signal, 1897-1931
This three-dimensional Distant Signal is part of a Flagstaff Signal set of ball, cone and drum shapes. It has been woven and then fabricated with strong metal swivel fittings and loops for suspending from a high point on a flagstaff at a signal station or on a ship’s masthead. The cane signal was constructed to withstand all weather and to be visible from a long distance. The gaps between the woven cane allow air to pass through, minimising possible swaying. Similar sets were made from rope or fabric. Warrnambool's Flagstaff was erected in 1854. Its primary use was to display visual signals that could convey messages between land and sea. It was also used to notify the local population of the approach of ships. One of the popular signalling codes in use in the early-to-mid 1800s was the Marryat’s Code but there were others in use as well; there was no one standard code. In 1857 the International Marine Conference adopted an International Code of Signals as a standard communications system for all vessels that could be understood in many different languages. The Normanby Advertiser reported on June 5th 1857 a query from the Post Master General as to whether the request of the Chief Harbour Master would be carried out, in that Warrnambool would receive a new flagstaff and a set of Marryatt’s signal flags. The Table of Codes was published, showing how to use combinations of these flags to send messages. The Code was revised in 1887 to cover situations where distance, light, wind and weather conditions affected the visibility of the flags and prevented clear communication. The first report of the International Code of Signals Committee of 1897 warned signalmen not to rely on ordinary semaphore flags and introduced a Distant Signal Code using either particular semaphore flags or the three-dimensional shapes of a ball, cone and drum that aligned with the semaphore flag shapes of a circle, pennant and square. International Code of Signals In 1931, after World War I’s experiences in using signal codes, the International Code of Signals conference in Washington revised and published the rules for the conduct of signalling. One of the changes was that “the use of the Distant Signals and of fixed semaphore was abandoned”. It is of interest to know that modern marine law in many countries insists that a set of Day Shapes must be carried onboard vessels of a certain size. These highly visible geometric shapes are used at sea in daylight to communicate messages between vessels. They are used in a similar way to the Distant Signals, in that different combinations of shapes represent different messages. The set of shapes includes a ball, cylinder, cone and diamond. The shapes are hung between the top of the vessel’s foremast and the front of the vessel. They are only coloured black and are about 1.5 metres high. The vertical line of shapes can mean messages such as Boat not under command, Fishing, and Under sail and power.Distant Signals were an important means of marine communication from the late 1880s to the early 1930s, including during World War I. They were an advancement to the International Shipping Codes and safety. The cane signals’ shapes appear to be the same from whatever direction they are viewed, removing confusion about the message they convey. The same shapes continue to be used today for the sets of Day Shapes used as marine navigational signals that are mandatory on certain-sized vessels.Distant Signal Cone, part of a Flagstaff signal set. A woven cane cone, painted black, with a metal rod passing through the centre and two crossed metal bars at the base. The central rod has a loop at the top and passes through the bars at the base, finishing in a metal loop. The rod has swivels at each end.flagstaff hill, warrnambool, flagstaff hill maritime museum and village, shipwreck coast, marine navigation, marine communications, communication signal, lifesaving, ship at sea, day shape, masthead signal, day signal, day mark signals, marine technology, safety equipment, navigation equipment, marine day shape, day marker, cane day shape, signal cone, day signal cone, cone signal, cone day shape, distant signal, flagstaff signal, signal station, communications, signals, marine signals, flaghoists, international marine conference, international code of signals, signal codes, marine safety, signal flags, daymark, day symbol, navigation, warrnambool flagstaff, 1854, 1857 1931, 1887, 1897 -
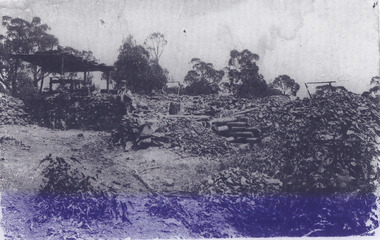
 Eltham District Historical Society Inc
Photograph, Demolishing the Bini Shell at Diamond Creek, 1991, 1991
In 1978 Diamond Valley Shire recognised the need for a new public hall in Diamond Creek. Council considered the Bini shell form of construction which was in operation overseas and in use in New South Wales as libraries, gymnasiums, sports centres and multi-purpose centres. The Council gave the go-ahead. A site was chosen opposite the Hotel and close to the railway line. One day in - the following year, in 1979, activity stood still in Diamond Creek as school children and other excited spectators watched the one-hour inflation of the Bini Shell. This unusual method of construction was invented by Italian industrial designer and architect Dante Bini. The construction pneumatically raises a level of reinforced concrete from ground level which has not been set, using an internal balloon. The inner membrane inflates and compresses the mesh and concrete against the outer membrane. A net of flexible steel rods was laid on the building’s circular base, on the top of a fabric bladder. 300 tonnes of reinforced concrete were poured onto the mesh and a sealed cover laid over the concrete making a sandwich of cover, bladder and mesh. Compressed air was pumped into the bladder and the sandwich slowly began to rise and become a massive self-supporting dome. After inflation and removal of the outer membrane workmen filled in any holes. It was some days before pneumatic drills pecked out the first opening. The ceiling of the concrete dome was lined with fluffy insulating material. The dome was 36 metres in diameter at the base and 12 metres high in the centre with a usable floor space of 670 square metres. An opening night dinner was held to celebrate the new facility on March 12, 1980. Shire President Ron Pata made a speech and unveiled a plaque. It was the first public building in Victoria to be erected using the Bini Shell design method of construction The facility could cater for up to 400 people and in 1980 a fee for use was $100 for up to 200 people, $150 for up to 300 people and $200 for up to 400 people. For the next ten years or so, locals attended the hall for marital arts classes, basketball and netball games and school discoes and various other activities. After pieces of concrete fell off a Bini shell interstate due to a construction fault, the Council closed the centre. Demotion took place during the Diamond Creek Town Fair in 1991, as part of the annual Town Fair’s program. Research by L.P. Jan 2022This was the first public building in Victoria to be erected using the Bini Shell design method of construction.Colour photograph1991, diamond creek, bini shell, demolition, oval -
 Eltham District Historical Society Inc
Photograph, Fred Mitchell, Bini Shell at Diamond Creek, 1983, 1983
In 1978 Diamond Valley Shire recognised the need for a new public hall in Diamond Creek. Council considered the Bini shell form of construction which was in operation overseas and in use in New South Wales as libraries, gymnasiums, sports centres and multi-purpose centres. The Council gave the go-ahead. A site was chosen opposite the Hotel and close to the railway line. One day in - the following year, in 1979, activity stood still in Diamond Creek as school children and other excited spectators watched the one-hour inflation of the Bini Shell. This unusual method of construction was invented by Italian industrial designer and architect Dante Bini. The construction pneumatically raises a level of reinforced concrete from ground level which has not been set, using an internal balloon. The inner membrane inflates and compresses the mesh and concrete against the outer membrane. A net of flexible steel rods was laid on the building’s circular base, on the top of a fabric bladder. 300 tonnes of reinforced concrete were poured onto the mesh and a sealed cover laid over the concrete making a sandwich of cover, bladder and mesh. Compressed air was pumped into the bladder and the sandwich slowly began to rise and become a massive self-supporting dome. After inflation and removal of the outer membrane workmen filled in any holes. It was some days before pneumatic drills pecked out the first opening. The ceiling of the concrete dome was lined with fluffy insulating material. The dome was 36 metres in diameter at the base and 12 metres high in the centre with a usable floor space of 670 square metres. An opening night dinner was held to celebrate the new facility on March 12, 1980. Shire President Ron Pata made a speech and unveiled a plaque. It was the first public building in Victoria to be erected using the Bini Shell design method of construction The facility could cater for up to 400 people and in 1980 a fee for use was $100 for up to 200 people, $150 for up to 300 people and $200 for up to 400 people. For the next ten years or so, locals attended the hall for marital arts classes, basketball and netball games and school discoes and various other activities. After pieces of concrete fell off a Bini shell interstate due to a construction fault, the Council closed the centre. Demotion took place during the Diamond Creek Town Fair in 1991, as part of the annual Town Fair’s program. Research by LP January 2022This was the first public building in Victoria to be erected using the Bini Shell design method of construction.Digital copy of colour photographfred mitchell collection, 1983, bini shell, diamond creek -
 Flagstaff Hill Maritime Museum and Village
Equipment - Distant Signal, 1897-1931
This three-dimensional Distant Signal is part of a Flagstaff Signal set of ball, cone and drum shapes. It has been woven and then fabricated with strong metal swivel fittings and loops for suspending from a high point on a flagstaff at a signal station or on a ship’s masthead. The cane signal was constructed to withstand all weather and to be visible from a long distance. The gaps between the woven cane allow air to pass through, minimising possible swaying. Similar sets were made from rope or fabric. Warrnambool's Flagstaff was erected in 1854. Its primary use was to display visual signals that could convey messages between land and sea. It was also used to notify the local population of the approach of ships. One of the popular signalling codes in use in the early-to-mid 1800s was the Marryat’s Code but there were others in use as well; there was no one standard code. In 1857 the International Marine Conference adopted an International Code of Signals as a standard communications system for all vessels that could be understood in many different languages. The Normanby Advertiser reported on June 5th 1857 a query from the Post Master General as to whether the request of the Chief Harbour Master would be carried out, in that Warrnambool would receive a new flagstaff and a set of Marryatt’s signal flags. The Table of Codes was published, showing how to use combinations of these flags to send messages. The Code was revised in 1887 to cover situations where distance, light, wind and weather conditions affected the visibility of the flags and prevented clear communication. The first report of the International Code of Signals Committee of 1897 warned signalmen not to rely on ordinary semaphore flags and introduced a Distant Signal Code using either particular semaphore flags or the three-dimensional shapes of a ball, cone and drum that aligned with the semaphore flag shapes of a circle, pennant and square. International Code of Signals In 1931, after World War I’s experiences in using signal codes, the International Code of Signals conference in Washington revised and published the rules for the conduct of signalling. One of the changes was that “the use of the Distant Signals and of fixed semaphore was abandoned”. It is of interest to know that modern marine law in many countries insists that a set of Day Shapes must be carried onboard vessels of a certain size. These highly visible geometric shapes are used at sea in daylight to communicate messages between vessels. They are used in a similar way to the Distant Signals, in that different combinations of shapes represent different messages. The set of shapes includes a ball, cylinder, cone and diamond. The shapes are hung between the top of the vessel’s foremast and the front of the vessel. They are only coloured black and are about 1.5 metres high. The vertical line of shapes can mean messages such as Boat not under command, Fishing, and Under sail and power.Distant Signals were an important means of marine communication from the late 1880s to the early 1930s, including during World War I. They were an advancement to the International Shipping Codes and safety. The cane signals’ shapes appear to be the same from whatever direction they are viewed, removing confusion about the message they convey. The same shapes continue to be used today for the sets of Day Shapes used as marine navigational signals that are mandatory on certain-sized vessels.Distant Signal Ball, part of a Flagstaff signal set. A round woven cane ball, painted black, with a metal rod passing through the centre. The rod has a loop at each end, then a concave, octagonal metal plate that rests on the outside surface of the ball, serving as a washer. The rod has swivels at each end.distant signal, flagstaff signal, signal station, masthead signal, communications, marine technology, signals, marine signals, flaghoists, international marine conference, international code of signals, signal codes, marine safety, signal flags, day shape, daymark, day symbol, navigation, warrnambool flagstaff, 1854, 1857 1931, 1887, 1897 -
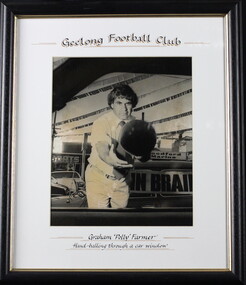 Geelong Football Club
Graham Polly Farmer
Graham ‘Polly’ Farmer Born: 10/03/1935 From: East Perth (WA) Height: 191cm Weight: 94kg Natural kicking foot: Left Guernsey number: 5 First senior match: Round 1, 1962 v Carlton at Princes Park Many people believe that he became the Cats’ greatest player in his relatively short six-season career. Arriving to play at Geelong in a blaze of publicity at the age of 27, his participation in the 1962 intra-club practice matches attracted unprecedented spectator interest. Despite suffering a severe knee injury in the opening minutes of his first League match, he immediately demonstrated his wide range of skills. He is regarded as the greatest handpassing exponent in the history of football and was one of the first players to use it as a method of attack. Frequently he achieved distances of 30 to 40 metres with hand passes to team-mates in better position. His ruck work was also quite revolutionary. He developed the technique of leaping for the ball slightly earlier than his opponents and gaining a 'ride' higher into the air. Often he would, in preference to a conventional tap-out, roll the ball down one arm and handpass to a team-mate running past He developed this technique with Bill Goggin in particular. Geelong was never out of the finals during his League career Total Brownlow Medal votes: 57 Premiership team selection: 1963 Captain: 57 matches (1965-67) Runner-up in Brownlow Medal count: 1963 (equal) Club Best & Fairest: 1963, 1964 Runner-up in club B&F count: 1966, 1967 Fourth in club B&F count: 1965 Ninth in club B&F count: 1962 (equal) Coach: 1973-75 Australian Football Hall of Fame Legend (1996) AFL Team of the Century selection (ruck) Indigenous Team of the Century selection (ruck: captain) GFC Team of the Century selection (ruck) GFC Hall of Fame inductee (2002) GFC Hall of Fame Legend GFC Life Membership (1974) Career span: 1962-67 Total matches: Premiership 101, Interstate 6 Total goals: Premiership 65, Interstate 6 Finals matches: 9 Finals goals: 2 Last senior match: Grand Final, 1967 v Richmond at the MCG Coach: 1973-75 Information provided by Geelong Football Club Historian Col HutchinsonBlack timber frame with gold inlay, white mounting card, text, black and white photo print, perspex. Black and gold text at the top of the display reads -Geelong Football Club-. More text at the bottom reads -Graham 'Polly' Farmer / Hand-balling through a car window-. The image depicts Farmer wearing a suit and hand passing a football towards the camera through a car window. -
 Federation University Art Collection
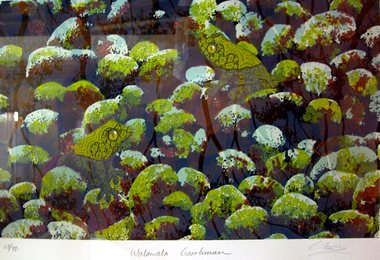
Work on paper - Printmaking - Silkscreen, Lin Onus, 'Walawala Garrkman' by Lin Onus, 2001
Lin ONUS (1948-1996) Language: Wiradjuri / Yorta Yorta Lin Onus played a pivotal role in the recognition of Aboriginal art as an expression of a contemporary and dynamic living culture. Prior to his premature death at just 47 years of age he was a prominent, strident, yet non-confrontational agent in renegotiating the history of colonial and Aboriginal Australia. His father, Bill Onus, was the founder of the Aboriginal Advancement League in Victoria and a prominent maker of artefacts in Melbourne. As a young Koori growing up, Lin lived in a cultural environment that included exposure to visiting Aboriginal artists, including Albert Namatjira. He began his artistic life assisting his father in decorating artifacts, went on to develop skills working with metal and painting with air brush as a panel beater; and by 1974 he was painting watercolors and photo-realist landscapes. In the 1970's he completed a set of paintings on the first Aboriginal guerrilla fighter Mosquito, which holds pride of place on the walls of the Advancement League in Melbourne, to this day. Lin Onus was a largely self-taught artist. Particularly important in his development was his visits to Garmedi (Arnhem Land) starting in 1986. Jack Wunuwun, the Yolngu artist, introduced him into the Murrungun-Djinang clan and gave him permission to use some of traditional images in his paintings. His cultural education on the Aboriginal side was also provided by visits to Cummeragunja with his father, and stories told by his uncle Aaron Briggs, known as 'the old man of the forest' who gave him his Koori name - Burrinja, meaning 'star'. They would sit on the banks of the Murray River within view of the Barmah Forest, Lin's spiritual home, the subject of many of his later paintings and his final resting place. Lin's father had been of the Yorta Yorta people from the Barmah Forest country, and Lin also used images from this area in his paintings. The images in his works include haunting photorealist portrayals of the Barmah red gum forests of his father's ancestral country, and the use of rarrk cross-hatching-based based painting style that he learned (and was given permission to use when in Arnhemland). His painting Barmah Forest won Canberra's national Aboriginal Heritage Award in 1994. (http://www.cooeeart.com.au/aboriginal_artist/lin_onus/A, accessed 18 May 2015) This item is part of the Federation University Art Collection. The Art Collection features over 1000 works and was listed as a 'Ballarat Treasure' in 2007.Framed limited edition silkscreen.Signed 'Onus' lower right (posthumously by Tiriki Onus) Edition 68/80art, artwork, lin onus, onus, printmaking, screenprint, aboriginal, dreaming, frogs, available -
 Melton City Libraries
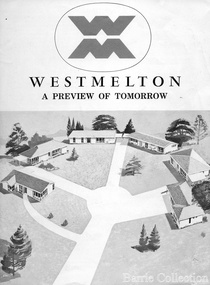
Document, West Melton: A preview of tomorrow, c.1969
"In April 1969, the first major residential development in Melton began with the release of 148 homes for purchase. This was the first stage of a staggered release of a planned 30,000 homes for 100,000 people by 1990. The development, called Westmelton Satellite City, was described as ‘a preview of tomorrow’.101 It was the first estate built in a ‘modern’ style, with curved streets, and dozens of culs de sac. Westmelton was also the first major development in Victoria to build all the supply lines to the houses – including electricity and telephone lines – underground. The six different home designs in Westmelton were ‘specially designed for the future’, and with allotments ten feet wider than regulations required, there was plenty of ‘space for gracious living’ and for a family swimming pool. The developers of this new estate were active in promoting Westmelton as a new community within the Shire of Melton. By 1971, the Westmelton City News reported that Ian McIntosh, General Manager of Westmelton, had given away $100,000 on behalf of the company ‘to aid community projects’. This included a $72,000 donation towards building a community centre in Westmelton, and $25,000 for the shire’s Olympic-sized swimming pool. Ian McIntosh and his family moved to Melton and Ian said he was ‘very much aware of the needs of [the] Westmelton community’. By the end of 1971, Westmelton was home to 100 new families. The modern residences were obviously an appealing drawcard, but so was the country feel that characterised Melton. Mrs C. Allen, described as a ‘housewife’, said she and her husband chose to move to Westmelton because of ‘the quality homes ... and we both love the clean, fresh, natural environment that surrounds us’. Similarly, Mr W. Coxhead, insurance consultant, moved to Westmelton because of the ‘clean, fresh country air’. Accountant Mr B. Swanton echoed their sentiments, describing Westmelton as ‘far enough away from the industrial pollution carried over Melbourne suburbs by prevailing westerly winds’. The new development attracted an increasing number of young, professional couples and families, representing the beginning of a significant shift from the predominantly rural and farming community of the district’s past. The Westmelton development had four different ‘neighbourhoods’ designed to cater to a variety of different lifestyle needs. Westmelton was the first to be established, followed by Brookfield, which offered ‘superb land in a rustic setting’. Brookfield Acres offered ‘wide open spaces with lots of room for a pool and even a tennis court’ on huge one-acre blocks, while Westlake was an innovative development with ‘different sized homesites’ and ‘lakeside living’.Westmelton was the first of many residential developments that would come to play a huge role in shaping the shire in the decades to follow".A marketing brochure for the Westmelton Satellite City developmentlocal significant events, council -
 Melbourne Legacy
Article - Speech, Past President's Day Address - Brian Armstrong, 1961
An article from the Melbourne Legacy Bulletin of a Past Presidents' Day speech by Legatee Brian Armstrong, a long serving Legatee and past president (1937). It is poignant for it's insight into what he saw on the Western Front, in particular around Pozieres and the Windmill that had stood there and was destroyed in battle. He had recently visited France and recalled his personal feelings. “I have no doubt that each one of you had some special memory of war that is bound up with your membership of Legacy – some event, place or happening. This was one of mine – you will find the story in a book we all know ‘There goes a man’, a story of endurance, determination and incredible courage. The feeling came to me as I stood in that little enclosure that here began the long road that led to Legacy, for in the middle of that holocaust was the Victorian Brigade from which later came the first man of Legacy. I am certain that many splendid men, some of whom were my friends, whose last sight was that battered windmill, would, had the finger of fate but pointed another way, been original members of this Club. A question seemed to hang in the still air – not for me, for I was only a cypher, but for all of us for whom, in those or later years, the finger had pointed to ‘LIFE’ – what have you done to merit and repay your deliverance from this and similar ordeals." He was one of the founding group of Legatees, being enrolled in 1924, and served for 54 years. The Bulletin often published articles recounting the speech from the week before. John Henry Brian Armstrong was born 23 June 1894 and completed a law degree at Melbourne University. He served with the militia when at University and tried to enlist in December 1915. He was accepted into the Army Medical Corps in April 1916. He served in France and Belgium as a Lieutenant with 22 Infantry Battalion and was wounded near Dernacourt on 24th April 1918. He was wounded again and taken prisoner at Herleville, France on 18 August 1918 when leading a night patrol in an action in which the majority of the party were killed. For a number of years Brian was a Trustee of the Frances Ormond Estate, which was the genesis of The Royal Melbourne Institute of Technology (RMIT). Along with Legatee Jim Gillespie (and Jim's grandfather) the trustees were identified with all the notable developments of RMIT. He remained a bachelor his whole life. He was one of the initial archivists of Melbourne Legacy. One of his speeches in 1961 gives an insight into why he became a Legatee. (see 02501)A record a speech that contained insight into the life of Legatee Brian Armstrong.Copy of 2 pages from the Legacy Bulletin on a speech by Legatee Brian Armstrong in 1961.Bulletin 28/02/1961. Pages 5 to 6.vale, past presidents, brian armstrong -
 Wodonga & District Historical Society Inc
Mixed media - Dr Henry Nowik and Uncle Bens at Wodonga
Dr Henry Nowik played a critical role in the development of industry in Wodonga, through his management and leadership of Uncle Bens Wodonga from 1965 until 1979. Born in Poznan, Poland in 1917, Henry was studying medicine in Paris when World War II broke out and he enlisted in the Royal Air Force, serving with distinction as a Bomber Pilot. He was imprisoned in Russia when his plane ditched, escaped through Kazakhstan and was eventually evacuated to London where he was appointed RAF Aide-de-Camp to General Charles de Gaulle. He was later awarded the French Croix de Guerre. After the war Dr Nowik received a PhD in Political Science and Law from American Beirut University before moving to London to teach at the London School of Economics. He then moved into industry occupying a number of senior positions in marketing and market research. In 1964, Dr Nowik, then Market Research Manager for Pedigree Petfoods, the British arm of Mars Inc., came to Australia to research the prospects for establishing a petfood business. Dr Nowik was a passionate believer in the need for decentralisation of Australian industry. In 1965 Uncle Bens of Australia began building their first Australian factory in Wodonga, Victoria, from humble beginnings in a small house in Hovell Street. It became fully operational in 1967. Dr Nowik became the Marketing and Sales Director and in 1970 the Managing Director. Dr Nowik's work as a member of the Albury-Wodonga Consultative Committee was recognized in 1975 with the Order of the British Empire and in 1977 he was appointed Chairman of the Commonwealth Government's Decentralisation Advisory Board. He participated in a number of trade missions to Malaysia, China and Japan and was a Member of the Executive Committee of the Trade Development Council and the Victorian Promotion Committee. These contributions were recognised in 1982 when he was made an Officer of the Order of Australia. In 1979, Dr Nowik left Wodonga and moved to the United States to become Vice-President, Marketing for Mars, becoming Global Product Group President in 1980. Following his retirement in 1985 he continued to act as Senior Advisor to a number of Mars' businesses. Albury-Wodonga retained a special place in Dr Nowik's heart and he kept a close interest in Charles Sturt University, sharing his time, experience and expertise with staff and students. The University made him an honorary Doctor of Letters in 1993 when the Henry Nowik Lecture Theatre officially opened at the University's Albury campus. Later the City of Wodonga named a park in his honour. Dr Nowik and his wife returned to Australia in 2004, first living in Brisbane then moving to Maleny in Queensland. Henry Nowik died on 12th March 2015 aged 98. These items are significant because they demonstrate the contribution made to the Wodonga community and the Australian economy by Dr Henry Nowik AO OBE.A collection of items briefly documenting the contribution of Dr Henry Nowik to Wodonga, Victoria. Included are photos of Dr Nowik, newspaper items, a photo of the first office of Uncle Bens in Wodonga and a farewell card from Dr Nowik.dr henry nowik, uncle bens wodonga -
 Bendigo Military Museum
Photograph - Continuous Indoor Cricket World Record Attempt, Seymour, Victoria, 1986
This is a set of 12 photographs of Army teams from the Army Survey Regiment, Bendigo and the Army School of Transport, Puckapunyal attempting a world record playing indoor cricket, at Seymour Victoria from the 31st of January to the 5th of February 1986. The following article appeared on the back page of the ARMY Newspaper on Thursday 6th of March 1986. 'INDOOR CRICKET RECORD SMASHED. ARMY TEAMS from Puckapunyal and Bendigo recently played indoor cricket for 124 hours to set a new world record. The two eight-man teams, from Army School of Transport and Army Survey Regiment, broke the 120 hour record set by Corrimal High School, NSW earlier this year. Organiser of the event, Capt Marty Alsford of AST told ARMY the teams had played 107 games, scoring 15,000 runs in their chase for the record. "The rules allowed a five-minute rest break every hour which could be accrued, so we played for 64 hours straight then had a five hour sleep. "When everybody got up and went straight back into the game with no grumbling, I knew we had the record," Capt Alsford said. The event was held at the Seymour Indoor Cricket Centre, an iron-roofed building with no air-conditioning, and all players had to battle the effect of the stifling heat in addition to fatigue. One player dropped out through exhaustion, but this did not prejudice the record attempt as the rules permitted each team to lose a player who cannot return to the game nor be replaced. The Army teams' effort are now awaiting recognition by the Guinness Book of Records. During the marathon event, the soldiers raised money for Legacy, through sponsorships and a raffle. At the time ARMY went to press, the final figure was not available.’ Army Survey Regiment Routine Orders Part 1 Issue No 16/86 Notices on Page 7 stated: ‘World Record Indoor Cricket. 1. Congratulations to the following members for their successful attempt on the Guinness Book of Records, Record for continuous playing of indoor cricket: John Whaling, Peter Ball, Brenton McDonald, Per Andersen, John Anderson, Brian Fauth, Brett McAllister and Daryl South. 2. Our team, playing a team from Army School of Transport at Seymour played continuous Indoor Cricket for 124 hours, beating the existing record by 4 hours. During that time the two teams amassed a total in excess of 16,000 runs. 3. Congratulations also to Peter Ball for picking up the Trophy for the most outstanding player during the record attempt.’This is a set of 12 photographs of Army teams from Bendigo and Puckapunyal attempting a world record playing indoor cricket, at Seymour Victoria in February 1986. The photographs were printed on photographic paper and are part of the Army Survey Regiment’s Collection. The colour photographs were scanned at 300 dpi. .1) - Photo, colour, 1986, L to R: John ‘Junior’ Whaling, Marty Alsford. Background L to R: Peter Ball, unidentified, John ‘Flash’ Anderson. .2) - Photo, colour, 1986, L to R: John ‘Junior’ Whaling, unidentified, Peter Ball. .3) to .7) - Photo, colour, 1986, unidentified participants. .8) - Photo, colour, 1986, L to R: unidentified, Peter Ball, Brett McAllister, John ‘Junior’ Whaling. .9) - Photo, colour, 1986, L to R: unidentified, John ‘Flash’ Anderson, Brian Fauth, unidentified, Peter Ball, unidentified (x2). .10) - Photo, colour, 1986, Army School of Transport (red & white uniform) - back row L to R: unidentified (x4), front row L to R: unidentified (x3), Marty Alsford. Army Survey Regiment (dark green uniform) - back row L to R: Brett McAllister, John ‘Flash’ Anderson, Brian Fauth, Per Andersen, front row L to R: John ‘Junior’ Whaling, Daryl South, Brenton McDonald, Peter Ball. .11) & .12) - Photo, colour, 1986, Army Survey Regiment (dark green uniform) - back row L to R: Peter Ball, Per Andersen, Brett McAllister, Brian Fauth, front row L to R: Brenton McDonald, John ‘Flash’ Anderson, Daryl South, John ‘Junior’ Whaling..1P to .12P –No personnel are identified. ‘Attempt at World Record for Indoor Cricket 31 Jan - 5 Feb 1986’ annotated on cover sleeve.royal australian survey corps, rasvy, army survey regiment, army svy regt, fortuna -
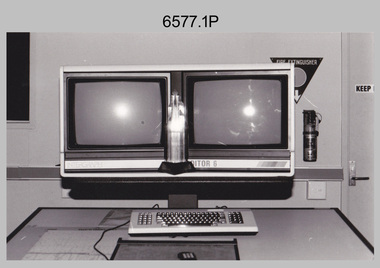 Bendigo Military Museum
Photograph - AITA Award - RA Svy’s AUTOMAP 2 Computer Based Map Production System, Army Survey Regiment, Fortuna, Bendigo, 1984
This collection of three photos of the Australian information Technology Award (AITA) won by the Royal Australian Survey Corps (RA Svy) AUTOMAP 2 computer-based map production system, was taken in 1984 at the Army Survey Regiment, Fortuna, Bendigo. The following article appeared in the ARMY Newspaper on Thursday 21st February 1985. ‘In computerised map production. Survey soldiers lead the world. BENDIGO: Army surveyors have been put on the map as world leaders in computerised map production following the Australian information Technology Awards. RA Svy won the Computer Assisted Draughting – Mapping section for its Automap II System which has created considerable interest among overseas defence experts. The award for the digital mapping system was accepted by OC Air Survey Sqn, MAJ Rob John, who said it was a great morale-booster for the soldiers of the Bonegilla (sic)* -based Army Survey Regiment. "Setting up a state-of-the-art system like Automap II. is an enormous task, " he said. "We started in August 1983 and it's only recently that we have achieved production results. "We were all very pleased to have our efforts recognised in this way. “Of course, credit must also go to the Intergraph Corporation for manufacturing the system and carrying out most of the development." RA Svy is responsible for producing all of Australia's maps used for defence purposes. Its topographical maps have a scale of 1:50,000 or 1:100,000 although Automap II has the capability of producing smaller scale maps - down to 1: 2,000,000. Automap II consists of three computers and three sub-systems: input, raster scanning, and graphic edit. The input sub-system has eight stereo plotters, two interactive graphic workstations and a system manager workstation. The stereo plotters use superimposition optics to digitise features from aerial photographs. It incorporates a voice recognition system so the operator can simply say "House", "Windmill", etc; and the relevant feature will be incorporated in the digital picture. Individual map separations are scanned and converted by the raster scanning sub-system to a digital raster image. This image is then converted to a graphics file in Intergraph format.’ *Note – the Army Survey Regiment was located in Bendigo, not Bonegilla as incorrectly stated in the article. The article appears on Page 137 of Valerie Lovejoy’s book 'Mapmakers of Fortuna – A history of the Army Survey Regiment’ ISBN: 0-646-42120-4. Additional history of the AUTOMAP 2 system with historic photographs is covered in pages 119, 137-143 and 157 of the 'Mapmakers of Fortuna’ book. See item 6223.23P for additional history and photographs of the AUTOMAP 2 system.This collection of three photos of the Australian information Technology Award (AITA) won by the Royal Australian Survey Corps (RA Svy)’s AUTOMAP 2 computer-based map production system, was taken in 1984 at the Army Survey Regiment, Fortuna, Bendigo. The photographs are printed on photographic paper and are part of the Army Survey Regiment’s Collection. The black and white photographs were scanned at 300 dpi. .1) - Photo, black & white, 1984, AITA Award sitting between the dual screens of an AUTOMAP 2 Graphic Edit Workstation. .2) - Photo, black & white, 1984, MAJ Job Johns (centre) and two of Intergraph Corporation IT engineers proudly hold the AITA Award next to an AUTOMAP 2 Graphic Edit Workstation. .3) - Photo, black & white, 1984, The AITA Award displayed on a pedestal in the Army Survey Regiment Officers Mess. .1P to .3P –No personnel are identified. ‘AITI Award to AUTOMAP II 1984’ annotated on cover sleeve. royal australian survey corps, rasvy, army survey regiment, army svy regt, fortuna -
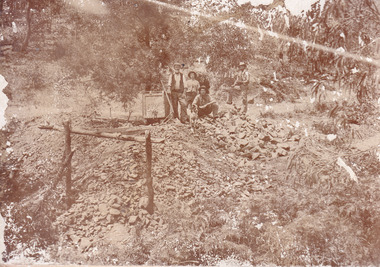 The Beechworth Burke Museum
Photograph
This image is a reproduction of an 1899 original depicting the 'Williams Good Luck Mine' on the Mopoke Reef (also called 'Morepork Gully') in the Dingle Ranges, approximately three miles from Beechworth. A large opening to a mine can be seen behind the men in the photograph, with a wheeled cart on a track leading to the men's position, where the soil and rocks have been hauled away. This photograph interestingly contains dogs alongside the miners. While dogs have been recorded as deterrents to thieves in the Victorian goldfields, these dogs appear as companions to these men. Following the discovery of gold at Beechworth in 1852, rushes quickly followed at surrounding creeks and gullies in the district. In the late nineteenth and early twentieth centuries, small syndicates of miners continued to work old or abandoned quartz reefs, often persisting without the assistance of heavy machinery to remove the large amounts of rock, in order to obtain yields at ever greater depths. The group of miners in this photograph are Mr. Roger Williams and Sons, who revived operations at the ‘Old Good Luck’ mine on the Mopoke Reef in the Dingle Range near Beechworth around 1892, working the site for more than two decades. An emigrant from Cornwall with experience in the tin mining industry, 19 year old Roger Williams senior sailed to New Zealand in 1840, then to Australia where he spent time in the Bendigo Gold Fields before settling in Beechworth in the early 1860s. Mr Williams senior worked on various mining activities in the district, including the Rocky Mountain Tunnel project. Conversant with the character of gold-bearing reefs in the area, the syndicate dug an eight hundred foot tunnel, digging down as far down as two hundred feet with little capital save their labour, to connect and provide better working access to the mass of reefs and veins in the vicinity. Progress was hampered by poor air quality charged with fumes from dynamite and large quantities of rock had to be crushed to obtain payable yields. The Victorian Goldfields are filled with ruins and remnants of the area's rich mining history, ranging from small alluvial diggings to the remains of huge mining companies. Site names often changed several times throughout the nineteenth and twentieth centuries. Some sites were abandoned and forgotten, others were worked continuously over many decades. The names of mines were often repeated at different locations throughout the Victorian Goldfields. For example, there is a Mopoke Gully heritage mine near Fryers Creek, Victoria. 'Mopoke' is a common onomatopoeic name for Morepork and Australian Boobook owls.This image has historical, social and research significance for patterns of emigration during of the Victorian Gold Rush, and the historical, social and environmental impacts of mining at Beechworth at the turn of the nineteenth and twentieth centuries. As gold became scarce and government support and large company investment waned, poor hard-working miners laboured intensively to make a living through periods of high unemployment. This image can be compared and studied alongside other historical mining photographs and objects in the Burke Museum Collection. It has potential to improve our understanding of miners working conditions and the shifting character of mining in the Beechworth district.Sepia coloured rectangular photograph printed on gloss photographic paper mounted on card. Obverse: Williams/ Good/ Luck Reverse: A02498/ 1997. 2498/ Good Luck/ Mine/ 1899/ Mopoke. burke museum, beechworth museum, beechworth, gold fields, gold rush, victorian gold rush, gold ming history, colonial australia, australian gold rushes, mining technology, beechworth historic district, indigo gold trail, migration, indigo shire, good luck gold mine, victorian goldfields, mining syndicates, gold fever, quartz-mining, small-scale mining, old good luck mine, mopoke gully, quartz reefs beechworth -
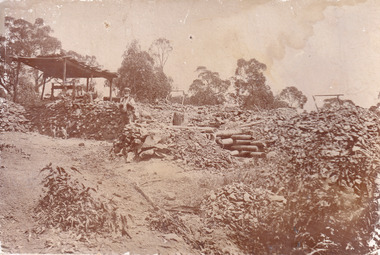 The Beechworth Burke Museum
Photograph
This image is a reproduction of an 1899 original depicting the 'Williams Good Luck Mine' on the Mopoke Reef (also called 'Morepork Gully') in the Dingle Ranges, approximately three miles from Beechworth. The foreground of the image is littered with piles of smashed rock and detritus, known as ‘mullock’, beside a reinforced mine shaft, a vertical access passageway allowing miners to enter the mine and haul ore out using lifting technology such as a poppet heads, whims or windlasses. A group of miners and a dog appear close to an open-sided miner’s hut. Following the discovery of gold at Beechworth in 1852, rushes quickly followed at surrounding creeks and gullies in the district. In the late nineteenth and early twentieth centuries, small syndicates of miners continued to work old or abandoned quartz reefs, often persisting without the assistance of heavy machinery to remove the large amounts of rock, in order to obtain yields at ever greater depths. The group of miners in this photograph are Mr. Roger Williams and Sons, who revived operations at the ‘Old Good Luck’ mine on the Mopoke Reef in the Dingle Range near Beechworth around 1892, working the site for more than two decades. An emigrant from Cornwall with experience in the tin mining industry, 19 year old Roger Williams senior sailed to New Zealand in 1840, then to Australia where he spent time in the Bendigo Gold Fields before settling in Beechworth in the early 1860s. Mr Williams senior worked on various mining activities in the district, including the Rocky Mountain Tunnel project. Conversant with the character of gold-bearing reefs in the area, the syndicate dug an eight hundred foot tunnel, digging down as far down as two hundred feet with little capital save their labour, to connect and provide better working access to the mass of reefs and veins in the vicinity. Progress was hampered by poor air quality charged with fumes from dynamite and large quantities of rock had to be crushed to obtain payable yields. The Victorian Goldfields are filled with ruins and remnants of the area's rich mining history, ranging from small alluvial diggings to the remains of huge mining companies. Site names often changed several times throughout the nineteenth and twentieth centuries. Some sites were abandoned and forgotten, others were worked continuously over many decades. The names of mines were often repeated at different locations throughout the Victorian Goldfields. For example, there is a Mopoke Gully heritage mine near Fryers Creek, Victoria. 'Mopoke' is a common onomatopoeic name for Morepork and Australian Boobook owls.This image has historical, social and research significance for patterns of emigration during of the Victorian Gold Rush, and the historical, social and environmental impacts of mining at Beechworth at the turn of the nineteenth and twentieth centuries. As gold became scarce and government support and large company investment waned, poor hard-working miners laboured intensively to make a living through periods of high unemployment. This image can be compared and studied alongside other historical mining photographs and objects in the Burke Museum Collection. It has potential to improve our understanding of miners working conditions and the shifting character of mining in the Beechworth district.Sepia coloured rectangular photograph printed on gloss photographic paper mounted on card.Obverse: Reverse: A02497/ 1997.2497/ 'Good/ Luck/ Mine'/ Morepork/ Gully/ Mrs Joyce/ Bright/ Tunnel/ 800 ft/ 1899. burke museum, beechworth museum, beechworth, gold fields, gold rush, victorian gold rush, gold ming history, colonial australia, australian gold rushes, mining technology, beechworth historic district, indigo gold trail, migration, indigo shire, good luck gold mine, victorian goldfields, mining syndicates, gold fever, quartz-mining, small-scale mining, old good luck mine, mopoke gully, quartz reefs beechworth -
 Wodonga & District Historical Society Inc
Photograph - Fred Rochow Railways Collection - Driver Tom Symonds and Fireman Billy Hyde, 3 August 1986
The Fred Rochow Railways Collection incorporates photos related to the operation of the Wodonga Railway Station including different types of trains and railways staff C. 1930 – 1990. It was donated to the Wodonga Historical Society by Fred Rochow, a railwayman who spent many years based in Wodonga. He joined the Victorian Railways on 17th June l947 and retired in 1988. For some time, he was a member of the Australian Federated Union of Locomotive Enginemen and served a term as a member of the Trades Hall Council. He had an extensive knowledge of the struggles that took place to achieve better conditions for railway workers. Fred worked for many years as a fireman and then worked his way up the ranks to driver, experiencing many changes from the days of steam locomotives through to diesel trains, locomotives and even the modern XPT train. He worked throughout Victoria at different stages of his career, with his final working years focused on the northeast of Victoria and the Albury to Melbourne line. After his retirement, Fred continued to share his love of steam miniature trains with the community.This collection has local and statewide significance as it captures images of trains, locomotives and personnel who operated the railway services in Wodonga and throughout Northeast Victoria. The railways played a critical role in opening up Victoria and connecting Australia for trade, business, social communication and transport.At Spencer Street Station on the last “Southern Aurora". The locomotive was G516. Driver Tom Symonds was based in Wodonga from 1955 to 1987. He served as AFULE Branch Secretary from 1962 to 1963 and 1966 to 1971. G Class Locomotives - G Class locomotives were primarily intended for hauling freight services, they were also used on passenger trains such as the “Southern Aurora” and the “Intercapital Daylight”. Locomotive G516 came into service in December 1984. After a series of contractual changeovers between companies it was transferred to QR National and is still in operation, The "Southern Aurora", the overnight Sydney-Melbourne express, was one of the icons of Australian railways in the 1960s and 1970s. Uniquely in Australia, it conveyed only First Class passengers, all of whom were accommodated in air-conditioned sleeping cars, all equipped with showers. The Southern Aurora was introduced when part of Australia's rail gauge problem was solved with the construction of a new standard gauge line. The new line was a 317 km long line running from Albury, NSW, parallel to the existing broad gauge line to Melbourne, connecting Australia's two largest cities by standard gauge. The Southern Aurora consisted of 14 stainless steel cars: a luggage van, a power van, a dining car, a lounge car, and ten First Class Sleeping Cars. The total capacity was 198 passengers. For a number of years, there were no intermediate stops for passengers, and the train had the longest non-stop run in Australia, 430 km from Goulburn to Albury. Dining car crews changed at Goulburn and Albury, and locos were changed at Albury. The first train ran from Sydney on Thursday 14th April 1962, with full regular services starting from both Sydney and Melbourne on Monday 16th April 1962. The classic S Class locomotive was used to haul the early Southern Aurora trains. From 1984 it was also hauled by the new G Class locomotives, On the morning of 7th February 1969, the southbound Southern Aurora collided head-on with a northbound goods near Violet Town, Victoria. Nine passengers and crew were killed, and seven carriages were destroyed. A steady decline in patronage saw the withdrawal of the service in August 1986. At top of locomotive "G516". In centre of locomotive, "V" insignia of VLinerailways wodonga, fred rochow, wodonga railway men, g class locomotives, the southern aurora -
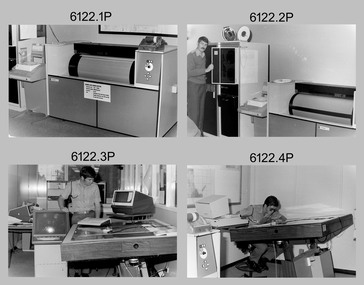 Bendigo Military Museum
photograph - AUTOMAP 1 Production – Army Survey Regiment, Fortuna, Bendigo, c1980
This collection of 20 photos was most likely taken in 1980. The AUTOMAP 1 computer assisted cartography and mapping system was introduced in 1975. The components of AUTOMAP 1 were the Input Sub-System of four Wild B8s stereoplotters and three Gradicon digitising tables, the Optical Line Following Sub-System – Gerber OLF, the Verification Sub-System – Gerber 1442 drum plotter, the General Purpose Sub-system – HP21MX computer and the Output Sub-System – Gerber 1232 flatbed plotter). The first map was published in 1978 (Strickland 3665-3, 1:50,000). AUTOMAP 1 was the first computer assisted cartography and mapping system utilised by the Survey Corps and was the first system used by Australian mapping organisations. The history of the AUTOMAP 1 system is covered in more detail with additional historic photographs, in pages 116-118 of Valerie Lovejoy’s book 'Mapmakers of Fortuna – A history of the Army Survey Regiment’ ISBN: 0-646-42120-4. See items 6410.24P, 6183.19P, 6184.20P, 6200.5P, and 6222.17P for additional photographs of the AUTOMAP 1 system.This is a set of 20 photographs of Air Survey Squadron military and civilian personnel operating AUTOMAP 1 equipment at the Army Survey Regiment at Fortuna, Bendigo, c1980. The photographs were on 35mm negative film and were scanned at 96 dpi. They are part of the Army Survey Regiment’s Collection. Photos .19P and .20P are printed on photographic and scanned at 300 dpi. .1) - Photo, black & white, c1980, Gerber plotter. .2) - Photo, black & white, c1980, Gerber plotter, LT Rob John .3) - Photo, black & white, c1980, Gradicon edit table, SPR Jamie McRae .4) - Photo, black & white, c1980, Gradicon edit table, SPR Steve Linane .5) - Photo, black & white, c1980, 1130 System administration, unidentified. .6) - Photo, black & white, c1980, Wild B8 stereo plotter, SPR Van Dalen? .7) - Photo, black & white, c1980, Wild B8 stereo plotter, SPR Van Dalen? .8) - Photo, black & white, c1980, Gerber Optical Line Follower (OLF). .9) - Photo, black & white, c1980, Gerber OLF. .10) - Photo, black & white, c1980, Gerber OLF. .11) - Photo, black & white, c1980, Gerber OLF. .12) - Photo, black & white, c1980, Gerber OLF. .13) - Photo, black & white, c1980, Data management, CPL Greg Gilbert. .14) - Photo, black & white, c1980, Data management, CPL Greg Gilbert. .15) - Photo, black & white, c1980, 1130 Operating System administration, SGT Denis Marshall. .16) - Photo, black & white, c1980, Programming System, L to R: unidentified, SGT Alan Toogood. .17) - Photo, black & white, c1980, Programming System, L to R: Robert Cox, WO1 Bob Mason, John Dean. .18) - Photo, black & white, c1980, Programming System, L to R: Robert Cox, WO1 Bob Mason, John Dean. .19) - Photo, black & white, c1980, Gradicon edit table, CPL Chris Carter. .20) - Photo, black & white, c1980, Gerber plotter, LT Rob John..1P to .18P - No personnel are identified .19P - ‘CPL Chris Carter’ annotated on backroyal australian survey corps, rasvy, army survey regiment, army svy regt, fortuna, asr, air survey, automap -
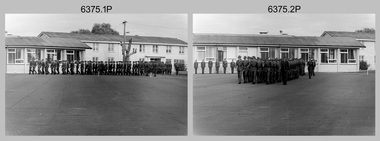 Bendigo Military Museum
Photograph - Army Survey Regiment – Corps Day Parade and Defence Force Service Medal Presentations, Fortuna Villa, Bendigo, 1987
This set of 36 photographs were taken at a Corps Day Parade held at the Army Survey Regiment, Bendigo on the 1st of July 1987. The Parade Commander was CO LTCOL Don Swiney MBE, and the Reviewing Officer was the Colonel Commandant (honorary appointment) of the Survey Corps - COL Clem Sargent (Retd). The Corps Day Parade was held to commemorate the 72nd anniversary of the formation of the Royal Australian Survey Corps. It was an occasion for great celebration at the Regiment. After 45 years in Bendigo, its future was finally secure. At the traditional anniversary parade, the Colonel Commandant COL Clem Sargent praised the efforts of the Regiment and led the soldiers in three cheers for the record production of the previous 12 months. More information is provided in page 140 of Valerie Lovejoy’s book 'Mapmakers of Fortuna – A history of the Army Survey Regiment’ ISBN: 0-646-42120-4. This set of photos cover the start of the Corps Day Parade, drill movements of the four Squadrons forming up on the parade ground and the formal arrival of the Reviewing Officer. See Item 6376.18P for additional photographs taken at the Corps Day Parade, comprising inspections of the Regiment’s four squadrons, presentations of the Defence Force Service Medal in recognition of 15 years of efficient remunerated service to SSGT Phil Meagher and SGT Wayne Rothwell; and formal group photos of each of the four Squadrons, Officers, and Warrant Officers/Sergeants.This is a set of 36 photographs of a Corps Day Parade held at the Army Survey Regiment, Fortuna, Bendigo in July 1987. The black & white photographs are on 35mm negative film and are part of the Army Survey Regiment’s Collection. The photographs were scanned at 96 dpi. .1) - Photo, black & white, July 1987. Unidentified personnel marching onto parade ground. .2) - Photo, black & white, July 1987. Squadrons marching on parade ground. 1st rank L to R: LCPL Ken Dempster, unidentified (x2), WO2 Neville Stone, remainder unidentified. .3) - Photo, black & white, July 1987. Right file L to R: WO2 George Graham, WO2 Dave Miles, remainder unidentified. .4) - Photo, black & white, July 1987. L to R: WO1 Stevo Hinic, 1st rank – unidentified, CPL Max Watson, unidentified, WO2 Peter Tangey. .5) - Photo, black & white, July 1987. L to R: WO2 Ralph Chant, CPL Gary Drummond, SGT Gary Kerr, unidentified, CPL Dale Hudson, unidentified, LCPL Daryl South, CPL Kerron South, CPL Peter Dillon, SGT Brian Fauth, SGT Graham Johnston, CPL Peter Swandale, CPL Jim Ash, unidentified, CPL Gary Tremain, unidentified, unidentified UK exchange, unidentified WO1 Ken Slater, WO1 Doug Arman. .6) - Photo, black & white, July 1987. L to R: WO2 Alan Bunn, CPL Bob Thrower, SGT Kevin Boehm, CPL Peter Coles, CPL John ‘JJ’ Smith, CPL Laurie Justin, LCPL Bob Sheppard, CPL Steve McGuiness, SGT Bob Garritty, SPR Jim Humphrey, unidentified (x2), SSGT Greg Gilbert, unidentified, WO2 George Graham. .7) - Photo, black & white, July 1987. L to R: CPL Rod Skidmore, SSGT Phil Meagher, WO1 Colin Cuskelly, unidentified, CPL Colin McInnes, unidentified, CPL Jeff Le Fe-Fevre, SPR Richard Arman, CPL Dan Cirsky, CPL Michelle Griffith, LCPL Tom Bloxham, SPR Ailsa (Sorby) Miller, CPL Peter Johnson, unidentified, LCPL Ken Dempster, unidentified (x2), WO2 Neville Stone. .8) - Photo, black & white, July 1987. L to R: CPL Bob Thrower, unidentified (x2), SGT Kevin Boehm, CPL Peter Coles, SGT John ‘Stormy’ Tempest, CPL John ‘JJ’ Smith, unidentified CPL Laurie Justin, unidentified, WO2 Alan Bunn, unidentified (x2), LCPL Bob Sheppard, unidentified, CPL Steve McGuiness, unidentified, SGT Bob Garritty, unidentified, SPR Jim Humphrey. .9) - Photo, black & white, July 1987. Foreground – Acting RSM WO1 Dave Thompson, background L to R: MAJ Daryl Hockings CSM, CAPT Bob Williams, CAPT Laurie Newton, ADJT CAPT Andrew McLoud, MAJ Bob McHenry, CAPT Peter ‘Blue’ Blaskett, MAJ Mick Byrne, MAJ Roger Rix. .10) - Photo, black & white, July 1987. Officers ready to take posts. Background L to R: MAJ Daryl Hockings CSM, CAPT Bob Williams, CAPT Laurie Newton, ADJT CAPT Andrew McLoud, MAJ Bob McHenry, CAPT Peter ‘Blue’ Blaskett, MAJ Mick Byrne, MAJ Roger Rix, LT Vicky Thompson, Foreground – 2IC MAJ Terry Edwards, Acting RSM WO1 Dave Thompson, WO2 Alan Bunn, CPL Bob Thrower, SGT Kevin Boehm, CPL Peter Coles, CPL John ‘JJ’ Smith, CPL Laurie Justin, LCPL Bob Sheppard. .11) to .13) - Photo, black & white, July 1987. Officers ready to take posts. L to R: MAJ Daryl Hockings CSM, CAPT Bob Williams, CAPT Laurie Newton, ADJT CAPT Andrew McLoud, MAJ Bob McHenry, CAPT Peter ‘Blue’ Blaskett, MAJ Mick Byrne, MAJ Roger Rix, LT Vicky Thompson, CAPT John South. .14) - Photo, black & white, July 1987. L to R: WO2 Alan Bunn, MAJ Roger Rix. .15) - Photo, black & white, July 1987. L to R: unidentified personnel, CAPT Laurie Newton, unidentified, CAPT Bob William, MAJ Mick Byrne, WO2 Dave Miles. .16) &.17) - Photo, black & white, July 1987. L to R: 2IC MAJ Terry Edwards handing Parade over to CO LTCOL Don Swiney MBE. .18) - Photo, black & white, July 1987. Arrival of Reviewing Officer- COL COMDT COL Clem Sargent. Saluted by CPL Kevin ‘Chuck’ Berry. .19) - Photo, black & white, July 1987. Arrival of Reviewing Officer- COL COMDT COL Clem Sargent. Saluted by CPL Kevin ‘Chuck’ Berry. MAJ Duncan Burns on right departing vehicle. .20) - Photo, black & white, July 1987, Reviewing Officer - COL COMDT COL Clem Sargent returning salute from CO LTCOL Don Swiney MBE. .21) - Photo, black & white, July 1987, Headquarters Squadron approaching the Dias. L to R: CAPT John South, unidentified, MAJ Roger Rix, unidentified, SPR Tracy (Parker) Ash, unidentified, T Vicky Thompson, CPL Bob Thrower, SGT Kevin Boehm, CPL Peter Coles, CPL John ‘JJ’ Smith, CPL Laurie Justin, LCPL Bob Sheppard, remainder partially obscured, CO LTCOL Don Swiney MBE, COL COMDT COL Clem Sargent. .22) - Photo, black & white, July 1987, Headquarters Squadron’s MAJ Roger Rix salutes the Reviewing Officer. L to R: CAPT John South, MAJ Roger Rix, unidentified, SPR Tracy (Parker) Ash, unidentified, Vicky Thompson, CPL Bob Thrower, SGT Kevin Boehm, CPL Peter Coles, CPL John ‘JJ’ Smith, CPL Laurie Justin, LCPL Bob Sheppard, CPL Steve McGuiness, SGT Bob Garritty, SPR Jim Humphrey, WO2 George Graham. .23) - Photo, black & white, July 1987, Headquarters Squadron’s MAJ Roger Rix salutes the Reviewing Officer. L to R: CAPT John South, MAJ Roger Rix, unidentified, SPR Tracy (Parker) Ash, unidentified, Vicky Thompson, CPL Bob Thrower, SGT Kevin Boehm, CPL Peter Coles, CPL John ‘JJ’ Smith, CPL Laurie Justin, LCPL Bob Sheppard, CPL Steve McGuiness, SGT Bob Garritty, SPR Jim Humphrey, WO2 George Graham, CO LTCOL Don Swiney MBE, COL COMDT COL Clem Sargent, .24) - Photo, black & white, July 1987, Headquarters Squadron continues past the Dias. L to R: unidentified (x3), Vicky Thompson, unidentified, CPL Bob Thrower, SGT Kevin Boehm, CPL Peter Coles, CPL John ‘JJ’ Smith, CPL Laurie Justin, LCPL Bob Sheppard, CPL Steve McGuiness, SGT Bob Garritty, SPR Jim Humphrey, WO2 George Graham. .25) - Photo, black & white, July 1987, Army Survey Regiment senior officers and Air Survey Squadron approaching the Dias. L to R: 2IC MAJ Terry Edwards, ADJT CAPT Andrew McLeod, OC MAJ Daryl Hockings CSM, acting RSM WO1 Dave Thompson, centre file marker CPL Max Watson, right marker CPL Perry Burt, CAPT Bob Williams, remainder unidentified, CO LTCOL Don Swiney MBE, COL COMDT COL Clem Sargent. .26) - Photo, black & white, July 1987, Army Survey Regiment senior officers and Air Survey Squadron salute the Reviewing Officer. L to R: 2IC MAJ Terry Edwards, ADJT CAPT Andrew McLeod, OC MAJ Daryl Hockings CSM, acting RSM WO1 Dave Thompson, centre file marker CPL Max Watson, right marker CPL Perry Burt, CAPT Bob Williams, remainder unidentified, CO LTCOL Don Swiney MBE, COL COMDT COL Clem Sargent. .27) - Photo, black & white, July 1987, Army Survey Regiment senior officers and Air Survey Squadron salute the Reviewing Officer. L to R: 2IC MAJ Terry Edwards, ADJT CAPT Andrew McLeod, unidentified, OC MAJ Daryl Hockings CSM, acting RSM WO1 Dave Thompson, unidentified, SGT Barrie Craymer, CAPT Bob Williams, centre file marker CPL Max Watson, right marker CPL Perry Burt, remainder unidentified, CO LTCOL Don Swiney MBE, COL COMDT COL Clem Sargent. .28) - Photo, black & white, July 1987, Air Survey Squadron salutes the Reviewing Officer. L to R: CPL Steve Hill OAM CSM, unidentified, SSGT Neil ‘Ned’ Kelly, WO2 Peter Tangey, WO1 Dennis Marshall. Followed by Lithographic Squadron L to R: SGT Graham Johnston, SGT Bryan Fauth, CPL Jim Ash, CPL Peter Swandale, CPL Roy Hicks, remainder unidentified. .29) - Photo, black & white, July 1987, Lithographic Squadron’s MAJ Mick Byrne salutes the Reviewing Officer. L to R: WO1 Dennis Marshall (Air Svy Sqn), SGT Graham Johnston, SGT Bryan Fauth, MAJ Mick Byrne, CPL Jim Ash, CPL Peter Swandale, unidentified (x2), CPL Lance Strudwick, CPL John ‘Flash’ Anderson, SGT Alan Virtue, CPL Greg Rowe, unidentified (x2), CPL Graham Hales, unidentified, CPL Paul Baker, SPR Colin Yeats, unidentified, WO1 Ken Slater, WO1 Doug Arman. .30) to .31) - Photo, black & white, July 1987, Lithographic Squadron’s MAJ Mick Byrne salutes the Reviewing Officer. L to R: SGT Graham Johnston, SGT Bryan Fauth, MAJ Mick Byrne, CPL Jim Ash, CPL Peter Swandale, unidentified (x2), CPL Lance Strudwick, CPL John ‘Flash’ Anderson, SGT Alan Virtue, CPL Greg Rowe, unidentified (x2), CPL Graham Hales, unidentified, CPL Paul Baker, SPR Colin Yeats, unidentified, WO1 Ken Slater, WO1 Doug Arman. .32) to .35) - Photo, black & white, July 1987, Cartographic Squadron’s MAJ Bob McHenry salutes the Reviewing Officer. L to R: MAJ Bob McHenry, CAPT Peter ‘Blue Blaskett, left file L to R: SPR Ross Collishaw, SPR Ben Lucas, centre file L to R: SGT Martin Evans, SSGT Ian ‘Rock’ Thistleton, SGT Eddy Jacobs, right file L to R: CPL Rod Skidmore, SSGT Phil Meagher, SPR Craig Kellet, unidentified, CPL Col McInnes, SPR Nick Cowan, unidentified, CPL Jeff Le-Fevre, SPR Richard Arman, CPL Dan Cirsky, SPR Tom Bloxham, CPL Peter Johnson, unidentified, LCPL Kenne Dempster. .36) - Photo, black & white, July 1987, Reviewing Officer - COL COMDT COL Clem Sargent returns salute..1P to .36P – There are no personnel identified.royal australian survey corps, rasvy, army survey regiment, army svy regt, fortuna, asr -
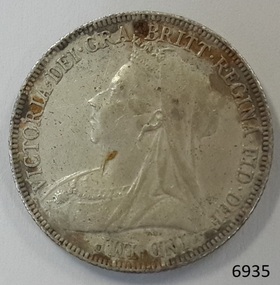 Flagstaff Hill Maritime Museum and Village
Currency - Coin, 1897
This Great Britain one shilling coin is dated 1897, which is during the reign of Queen Victoria. There were over 6 million of these coins minted. Queen Victoria succeeded King William IV to the British Throne in 1837 – she was only 18 years old at the time – and she ruled until 1901. British coins such as this one shilling were in circulation in the colony of Australia until 1910, when the Commonwealth of Australia began producing its own coinage. This one shilling coin was minted by the Royal Mint at Royal Mint Court, in Little Tower Hill, London, England. Coins for circulation in the Kingdom of England, Great Britain and most of the British Empire were produced here until the 1960’s when the Royal Mint shifted location to Wales. There are three main groups of shillings produced during Queen Victoria’s reign:- - The Young Head; 1837-1887, in 8 different versions, on the obverse showing the Queen’s maturing face over 50 years. - The Junior Head; 1887-1892, minted when Queen Victoria had been reigning for 50 years. Her head was smaller on the coins minted 1887-1889 than on those shillings minted 1889-1892. - The Old Head; 1893-1901, shows the veiled head of Queen Victoria. The obverse side of the coin was designed by Thomas Brock. The inscription’s translation is “Victoria by the Grace of God, Queen of the British territories, Defender of the Faith, Empress of India”. The reverse side of the coin was designed by Edward Paynter. The inscription "HONI SOIT QUI MAL Y PENSE" translates as "Evil be to him who evil thinks". AUSTRALIAN CURRENCY The early settlers of Australia brought their own currency with them so a wide variety of coins, tokens and even ‘promissory’ notes (often called IOU’s) were used in the exchange of goods and services. In 1813 Spanish dollars were imported and converted for use by punching a hole in the centre of the coin. Both the outer ring, called the holey dollar, and the punched out ‘hole’, called the dump, were then counter-stamped and used as the official currency. In 1825 the British Government passed the Sterling Silver Currency Act, making the British Pound the only legal form of currency in the Australian colonies. Not enough British currency was imported into the colony so other forms of currency were still used. In the mid 1800’s Australia entered the Gold Rush period when many made their fortunes. Gold was used for trading, often shaped into ingots, stamped with their weight and purity, and one pound tokens. In 1852 the Adelaide Assay Office, without British approval, made Australia’s first gold coin to meet the need for currency in South Australia after the Gold Rush began. In 1855 the official Australian Mint opened in Sydney, operating as a branch of the Royal Mint in London, and the gold was turned into coins called ‘sovereigns’. Other branches also opened in Melbourne and Perth. Up to the time of Australia becoming a federation in 1901 its currency included British copper and silver coins, Australian gold sovereigns, locally minted copper trade tokens, private banknotes, New South Wales and Queensland government treasury notes and Queensland government banknotes. After Federation the Australian government began to overwrite privately issued notes and prepared for the introduction of its own currency. In 1910 a National Australian Currency was formed, based on the British currency of ‘pounds, shillings and pence’ and the first Commonwealth coining was produced, removing the power from the States. In 1966, on February 14th, Australia changed over to the decimal currency system of dollars and cents. Australia did not have its own currency in the colonial times. Settlers brought money from other countries and they also traded goods such as grain when currency was scarce. For a long time there was no standardised value for the different currencies. In 1825 British currency became the only official currency in the colony of Australia and coins such as this silver shilling were imported into Australia to replace the mixture of foreign currency. Australia became a Federated nation on 1st January 1901. In 1910 National Australian Currency was formed and Australia produced its own currency, based on the British ‘pounds, shillings and pence’. The British currency was no longer valid. This silver shilling is of national significance as it represents the British currency used in Australia from 1825-1910. This silver shilling is also of significance to Australia as part one of the British Colonies ruled by Queen Victoria. It is part of the special silver and gold coins minted 1887-1893 to celebrate the 50 years Jubilee of Queen Victoria’s reign 1837-1887. Coin, Great Britain Shilling, 1897. Silver coin, round. Obverse; Queen Victoria head, ‘Old Head’, looking left. Reverse; 3 shields (each crowned) - 3 passant lions (England), 1 rampant lion (Scotland), golden harp (Northern Ireland) - floral symbols between them – 1 open rose, 2 thistles. Inscriptions on both sides of coin.Obverse “VICTORIA . DEI . GRA . BRITT . REGINA . FID . DEF . IND . IMP” Reverse “ONE SHILLING, 1897, Inner band, some letters hidden - HONI SO VI Y PENSE” flagstaff hill, warrnambool, shipwrecked coast, flagstaff hill maritime museum, maritime museum, shipwreck coast, flagstaff hill maritime village, great ocean road, coin, currency, money, legal tender, australian currency history, royal mint, british shilling 1897, thomas brock, edward paynter, great britain shilling, queen victoria currency, queen victoria 50 years golden jubilee shilling, colonial australia currency, numismatics -
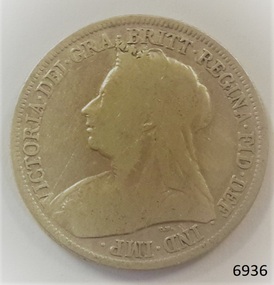 Flagstaff Hill Maritime Museum and Village
Currency - Coin, 1897
This Great Britain one shilling coin is dated 1897, which is during the reign of Queen Victoria. There were over 6 million of these coins minted. Queen Victoria succeeded King William IV to the British Throne in 1837 – she was only 18 years old at the time – and she ruled until 1901. British coins such as this one shilling were in circulation in the colony of Australia until 1910, when the Commonwealth of Australia began producing its own coinage. This one shilling coin was minted by the Royal Mint at Royal Mint Court, in Little Tower Hill, London, England. Coins for circulation in the Kingdom of England, Great Britain and most of the British Empire were produced here until the 1960’s when the Royal Mint shifted location to Wales. There are three main groups of shillings produced during Queen Victoria’s reign:- - The Young Head; 1837-1887, in 8 different versions, on the obverse showing the Queen’s maturing face over 50 years. - The Junior Head; 1887-1892, minted when Queen Victoria had been reigning for 50 years. Her head was smaller on the coins minted 1887-1889 than on those shillings minted 1889-1892. - The Old Head; 1893-1901, shows the veiled head of Queen Victoria. The obverse side of the coin was designed by Thomas Brock. The inscription’s translation is “Victoria by the Grace of God, Queen of the British territories, Defender of the Faith, Empress of India”. The reverse side of the coin was designed by Edward Paynter. The inscription "HONI SOIT QUI MAL Y PENSE" translates as "Evil be to him who evil thinks". AUSTRALIAN CURRENCY The early settlers of Australia brought their own currency with them so a wide variety of coins, tokens and even ‘promissory’ notes (often called IOU’s) were used in the exchange of goods and services. In 1813 Spanish dollars were imported and converted for use by punching a hole in the centre of the coin. Both the outer ring, called the holey dollar, and the punched out ‘hole’, called the dump, were then counter-stamped and used as the official currency. In 1825 the British Government passed the Sterling Silver Currency Act, making the British Pound the only legal form of currency in the Australian colonies. Not enough British currency was imported into the colony so other forms of currency were still used. In the mid 1800’s Australia entered the Gold Rush period when many made their fortunes. Gold was used for trading, often shaped into ingots, stamped with their weight and purity, and one pound tokens. In 1852 the Adelaide Assay Office, without British approval, made Australia’s first gold coin to meet the need for currency in South Australia after the Gold Rush began. In 1855 the official Australian Mint opened in Sydney, operating as a branch of the Royal Mint in London, and the gold was turned into coins called ‘sovereigns’. Other branches also opened in Melbourne and Perth. Up to the time of Australia becoming a federation in 1901 its currency included British copper and silver coins, Australian gold sovereigns, locally minted copper trade tokens, private banknotes, New South Wales and Queensland government treasury notes and Queensland government banknotes. After Federation the Australian government began to overwrite privately issued notes and prepared for the introduction of its own currency. In 1910 a National Australian Currency was formed, based on the British currency of ‘pounds, shillings and pence’ and the first Commonwealth coining was produced, removing the power from the States. In 1966, on February 14th, Australia changed over to the decimal currency system of dollars and cents. Australia did not have its own currency in the colonial times. Settlers brought money from other countries and they also traded goods such as grain when currency was scarce. For a long time there was no standardised value for the different currencies. In 1825 British currency became the only official currency in the colony of Australia and coins such as this silver shilling were imported into Australia to replace the mixture of foreign currency. Australia became a Federated nation on 1st January 1901. In 1910 National Australian Currency was formed and Australia produced its own currency, based on the British ‘pounds, shillings and pence’. The British currency was no longer valid. This silver shilling is of national significance as it represents the British currency used in Australia from 1825-1910. This silver shilling is also of significance to Australia as part one of the British Colonies ruled by Queen Victoria. It is part of the special silver and gold coins minted 1887-1893 to celebrate the 50 years Jubilee of Queen Victoria’s reign 1837-1887. Coin, Great Britain Shilling, 1897. Silver coin, round. Obverse; Queen Victoria head, ‘Old Head’, looking left. Reverse; 3 shields (each crowned) - 3 passant lions (England), 1 rampant lion (Scotland), golden harp (Northern Ireland) - floral symbols between them – 1 rose, 2 thistles. Inscriptions on both sides of coin.Obverse “VICTORIA . DEI . GRA . BRITT . REGINA . FID . DEF . IND . IMP” Reverse “ONE SHILLING, 1897, Inner band, some letters hidden - HONI SO VI Y PENSE” flagstaff hill, warrnambool, shipwrecked coast, flagstaff hill maritime museum, maritime museum, shipwreck coast, flagstaff hill maritime village, great ocean road, coin, currency, money, legal tender, australian currency history, royal mint, british shilling 1897, thomas brock, edward paynter, great britain shilling, queen victoria currency, queen victoria 50 years golden jubilee shilling, colonial australia currency, numismatics