Showing 7061 items
matching 17
-
 Flagstaff Hill Maritime Museum and Village
Spoon, circa 1878
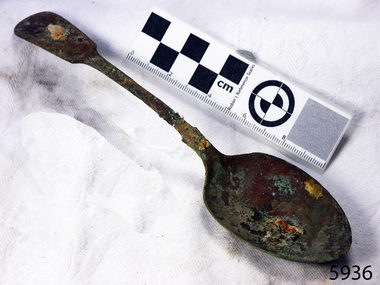
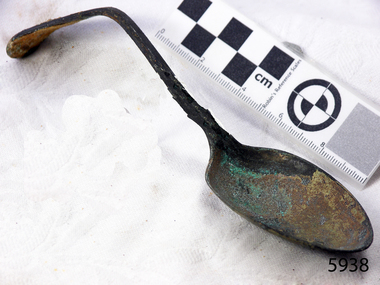
This medium-sized dessert spoon is from the wreck of the LOCH ARD, a Loch Line ship of 1,693 tons which sailed from Gravesend, London, on 2 March 1878 with 17 passengers and a crew of 36 under Captain George Gibbs. “The intention was to discharge cargo in Melbourne, before returning to London via the Horn with wool and wheat”. Instead, on 1 June 1878, after 90 days at sea, she struck the sandstone cliffs of Mutton Bird Island on the south west coast of Victoria, and sank with the loss of 52 lives and all her cargo. The manifest of the LOCH ARD listed an array of manufactured goods and bulk metals being exported to the Colony of Victoria, with a declared value of £53,700. (202 bills of lading show an actual invoice value of £68, 456, with insurance underwriting to £30,000 of all cargo). Included in the manifest is the item of “Tin hardware & cutlery £7,530”. This dessert spoon is one of 482 similar items of electro-plated cutlery from the LOCH ARD site, comprising spoons and forks of various sizes but all sharing the same general shape or design and metallic composition. 49 of these pieces display a legible makers’ mark — the initials “W” and “P” placed within a raised diamond outline, which is in turn contained within a sunken crown shape — identifying the manufacturer as William Page & Co of Birmingham. An electroplater’s makers’ marks, unlike sterling silver hallmarks, are not consistent identifiers of quality or date and place of manufacture. A similar line of five impressions was usually made to impress the consumer with an implication of industry standards, but what each one actually signified was not regulated and so they varied according to the whim of the individual foundry. In this case, the maker’s marks are often obscured by sedimentary accretion or removed by corrosion after a century of submersion in the ocean. However sufficient detail has survived to indicate that these samples of electro-plated cutlery probably originated from the same consignment in the LOCH ARD’s cargo. The generally common range of marks are drawn from 255 tea spoons, 125 dessert spoons, and 99 table forks. These marks are clearly visible in 66 instances, while the same sequence of general outlines, or depression shapes, is discernible in another 166 examples. Suggested trade names for William Page & Co’s particular blend of brass plating are ‘roman silver’ or ‘silverite’. This copper alloy polishes to a lustrous gold when new, discolouring to a murky grey with greenish hue when neglected. HISTORY OF THE LOCH ARD The LOCH ARD belonged to the famous Loch Line which sailed many ships from England to Australia. Built in Glasgow by Barclay, Curdle and Co. in 1873, the LOCH ARD was a three-masted square rigged iron sailing ship. The ship measured 262ft 7" (79.87m) in length, 38ft (11.58m) in width, 23ft (7m) in depth and had a gross tonnage of 1693 tons. The LOCH ARD's main mast measured a massive 150ft (45.7m) in height. LOCH ARD made three trips to Australia and one trip to Calcutta before its final voyage. LOCH ARD left England on March 2, 1878, under the command of Captain Gibbs, a newly married, 29 year old. She was bound for Melbourne with a crew of 37, plus 17 passengers and a load of cargo. The general cargo reflected the affluence of Melbourne at the time. On board were straw hats, umbrella, perfumes, clay pipes, pianos, clocks, confectionary, linen and candles, as well as a heavier load of railway irons, cement, lead and copper. There were items included that intended for display in the Melbourne International Exhibition in 1880. The voyage to Port Phillip was long but uneventful. At 3am on June 1, 1878, Captain Gibbs was expecting to see land and the passengers were becoming excited as they prepared to view their new homeland in the early morning. But LOCH ARD was running into a fog which greatly reduced visibility. Captain Gibbs was becoming anxious as there was no sign of land or the Cape Otway lighthouse. At 4am the fog lifted. A man aloft announced that he could see breakers. The sheer cliffs of Victoria's west coast came into view, and Captain Gibbs realised that the ship was much closer to them than expected. He ordered as much sail to be set as time would permit and then attempted to steer the vessel out to sea. On coming head on into the wind, the ship lost momentum, the sails fell limp and LOCH ARD's bow swung back. Gibbs then ordered the anchors to be released in an attempt to hold its position. The anchors sank some 50 fathoms - but did not hold. By this time LOCH ARD was among the breakers and the tall cliffs of Mutton Bird Island rose behind the ship. Just half a mile from the coast, the ship's bow was suddenly pulled around by the anchor. The captain tried to tack out to sea, but the ship struck a reef at the base of Mutton Bird Island, near Port Campbell. Waves broke over the ship and the top deck was loosened from the hull. The masts and rigging came crashing down knocking passengers and crew overboard. When a lifeboat was finally launched, it crashed into the side of LOCH ARD and capsized. Tom Pearce, who had launched the boat, managed to cling to its overturned hull and shelter beneath it. He drifted out to sea and then on the flood tide came into what is now known as LOCH ARD Gorge. He swam to shore, bruised and dazed, and found a cave in which to shelter. Some of the crew stayed below deck to shelter from the falling rigging but drowned when the ship slipped off the reef into deeper water. Eva Carmichael had raced onto deck to find out what was happening only to be confronted by towering cliffs looming above the stricken ship. In all the chaos, Captain Gibbs grabbed Eva and said, "If you are saved Eva, let my dear wife know that I died like a sailor". That was the last Eva Carmichael saw of the captain. She was swept off the ship by a huge wave. Eva saw Tom Pearce on a small rocky beach and yelled to attract his attention. He dived in and swam to the exhausted woman and dragged her to shore. He took her to the cave and broke open case of brandy which had washed up on the beach. He opened a bottle to revive the unconscious woman. A few hours later Tom scaled a cliff in search of help. He followed hoof prints and came by chance upon two men from nearby Glenample Station three and a half miles away. In a state of exhaustion, he told the men of the tragedy. Tom returned to the gorge while the two men rode back to the station to get help. By the time they reached LOCH ARD Gorge, it was cold and dark. The two shipwreck survivors were taken to Glenample Station to recover. Eva stayed at the station for six weeks before returning to Ireland, this time by steamship. In Melbourne, Tom Pearce received a hero's welcome. He was presented with the first gold medal of the Royal Humane Society of Victoria and a £1000 cheque from the Victorian Government. Concerts were performed to honour the young man's bravery and to raise money for those who lost family in the LOCH ARD disaster. Of the 54 crew members and passengers on board, only two survived: the apprentice, Tom Pearce and the young woman passenger, Eva Carmichael, who lost all of her family in the tragedy. Ten days after the LOCH ARD tragedy, salvage rights to the wreck were sold at auction for £2,120. Cargo valued at £3,000 was salvaged and placed on the beach, but most washed back into the sea when another storm developed. The wreck of LOCH ARD still lies at the base of Mutton Bird Island. Much of the cargo has now been salvaged and some was washed up into what is now known as LOCH ARD Gorge. Cargo and artefacts have also been illegally salvaged over many years before protective legislation was introduced. One of the most unlikely pieces of cargo to have survived the shipwreck was a Minton porcelain peacock - one of only seven in the world. The peacock was destined for the Melbourne International Exhibition in 1880. It had been well packed, which gave it adequate protection during the violent storm. Today, the Minton peacock can be seen at the Flagstaff Hill Maritime Museum in Warrnambool. From Australia's most dramatic shipwreck it has now become Australia's shipwreck artefact and is one of very few 'objects' on the Victorian State Heritage Register most valuable. The LOCH ARD shipwreck is of State significance – Victorian Heritage Register S 417. Flagstaff Hill’s collection of artefacts from LOCH ARD is significant for being one of the largest collections of artefacts from this shipwreck in Victoria. It is significant for its association with the shipwreck, which is on the Victorian Heritage Register (VHR S417). The collection is significant because of the relationship between the objects, as together they have a high potential to interpret the story of the LOCH ARD. The LOCH ARD collection is archaeologically significant as the remains of a large international passenger and cargo ship. The LOCH ARD collection is historically significant for representing aspects of Victoria’s shipping history and its potential to interpret sub-theme 1.5 of Victoria’s Framework of Historical Themes (living with natural processes). The collection is also historically significant for its association with the LOCH ARD, which was one of the worst and best known shipwrecks in Victoria’s history. Unrestored dessert spoon from the wreck of the LOCH ARD. The spoon design has a flattened fiddle-back handle, with a thin stem or shank, flared collar, and a shallow rounded bowl. The spoons metallic composition is a thin layer of brass alloy which has partially corroded back to a nickel-silver base metal. Some verdigris and no encrustation on spoon. Spoon is in good condition, structurally sound and with 90% of original plate still intact. The back of the handle has been ground back to nickel-silver and five makers marks are clearly visible - WP&Co trademark, "B", Fleur de Lys, Crab design, "Rd". There is a plain heraldic shield on the upper rear side of the spoon bowl ('ratstail').flagstaff hill, warrnambool, shipwrecked coast, flagstaff hill maritime museum, maritime museum, shipwreck coast, flagstaff hill maritime village, great ocean road, loch line, loch ard, captain gibbs, eva carmichael, tom pearce, glenample station, mutton bird island, loch ard gorge, electroplated cutlery, loch ard shipwreck, william page and co, birmingham brass plating, dessert spoons -
 Flagstaff Hill Maritime Museum and Village
Spoon, circa 1878
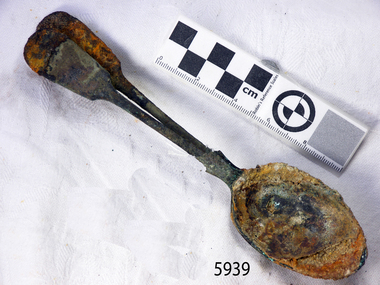
This medium-sized dessert spoon is from the wreck of the LOCH ARD, a Loch Line ship of 1,693 tons which sailed from Gravesend, London, on 2 March 1878 with 17 passengers and a crew of 36 under Captain George Gibbs. “The intention was to discharge cargo in Melbourne, before returning to London via the Horn with wool and wheat”. Instead, on 1 June 1878, after 90 days at sea, she struck the sandstone cliffs of Mutton Bird Island on the south west coast of Victoria, and sank with the loss of 52 lives and all her cargo. The manifest of the LOCH ARD listed an array of manufactured goods and bulk metals being exported to the Colony of Victoria, with a declared value of £53,700. (202 bills of lading show an actual invoice value of £68, 456, with insurance underwriting to £30,000 of all cargo). Included in the manifest is the item of “Tin hardware & cutlery £7,530”. This dessert spoon is one of 482 similar items of electro-plated cutlery from the LOCH ARD site, comprising spoons and forks of various sizes but all sharing the same general shape or design and metallic composition. 49 of these pieces display a legible makers’ mark — the initials “W” and “P” placed within a raised diamond outline, which is in turn contained within a sunken crown shape — identifying the manufacturer as William Page & Co of Birmingham. An electroplater’s makers’ marks, unlike sterling silver hallmarks, are not consistent identifiers of quality or date and place of manufacture. A similar line of five impressions was usually made to impress the consumer with an implication of industry standards, but what each one actually signified was not regulated and so they varied according to the whim of the individual foundry. In this case, the maker’s marks are often obscured by sedimentary accretion or removed by corrosion after a century of submersion in the ocean. However sufficient detail has survived to indicate that these samples of electro-plated cutlery probably originated from the same consignment in the LOCH ARD’s cargo. The generally common range of marks are drawn from 255 tea spoons, 125 dessert spoons, and 99 table forks. These marks are clearly visible in 66 instances, while the same sequence of general outlines, or depression shapes, is discernible in another 166 examples. Suggested trade names for William Page & Co’s particular blend of brass plating are ‘roman silver’ or ‘silverite’. This copper alloy polishes to a lustrous gold when new, discolouring to a murky grey with greenish hue when neglected. HISTORY OF THE LOCH ARD The LOCH ARD belonged to the famous Loch Line which sailed many ships from England to Australia. Built in Glasgow by Barclay, Curdle and Co. in 1873, the LOCH ARD was a three-masted square rigged iron sailing ship. The ship measured 262ft 7" (79.87m) in length, 38ft (11.58m) in width, 23ft (7m) in depth and had a gross tonnage of 1693 tons. The LOCH ARD's main mast measured a massive 150ft (45.7m) in height. LOCH ARD made three trips to Australia and one trip to Calcutta before its final voyage. LOCH ARD left England on March 2, 1878, under the command of Captain Gibbs, a newly married, 29 year old. She was bound for Melbourne with a crew of 37, plus 17 passengers and a load of cargo. The general cargo reflected the affluence of Melbourne at the time. On board were straw hats, umbrella, perfumes, clay pipes, pianos, clocks, confectionary, linen and candles, as well as a heavier load of railway irons, cement, lead and copper. There were items included that intended for display in the Melbourne International Exhibition in 1880. The voyage to Port Phillip was long but uneventful. At 3am on June 1, 1878, Captain Gibbs was expecting to see land and the passengers were becoming excited as they prepared to view their new homeland in the early morning. But LOCH ARD was running into a fog which greatly reduced visibility. Captain Gibbs was becoming anxious as there was no sign of land or the Cape Otway lighthouse. At 4am the fog lifted. A man aloft announced that he could see breakers. The sheer cliffs of Victoria's west coast came into view, and Captain Gibbs realised that the ship was much closer to them than expected. He ordered as much sail to be set as time would permit and then attempted to steer the vessel out to sea. On coming head on into the wind, the ship lost momentum, the sails fell limp and LOCH ARD's bow swung back. Gibbs then ordered the anchors to be released in an attempt to hold its position. The anchors sank some 50 fathoms - but did not hold. By this time LOCH ARD was among the breakers and the tall cliffs of Mutton Bird Island rose behind the ship. Just half a mile from the coast, the ship's bow was suddenly pulled around by the anchor. The captain tried to tack out to sea, but the ship struck a reef at the base of Mutton Bird Island, near Port Campbell. Waves broke over the ship and the top deck was loosened from the hull. The masts and rigging came crashing down knocking passengers and crew overboard. When a lifeboat was finally launched, it crashed into the side of LOCH ARD and capsized. Tom Pearce, who had launched the boat, managed to cling to its overturned hull and shelter beneath it. He drifted out to sea and then on the flood tide came into what is now known as LOCH ARD Gorge. He swam to shore, bruised and dazed, and found a cave in which to shelter. Some of the crew stayed below deck to shelter from the falling rigging but drowned when the ship slipped off the reef into deeper water. Eva Carmichael had raced onto deck to find out what was happening only to be confronted by towering cliffs looming above the stricken ship. In all the chaos, Captain Gibbs grabbed Eva and said, "If you are saved Eva, let my dear wife know that I died like a sailor". That was the last Eva Carmichael saw of the captain. She was swept off the ship by a huge wave. Eva saw Tom Pearce on a small rocky beach and yelled to attract his attention. He dived in and swam to the exhausted woman and dragged her to shore. He took her to the cave and broke open case of brandy which had washed up on the beach. He opened a bottle to revive the unconscious woman. A few hours later Tom scaled a cliff in search of help. He followed hoof prints and came by chance upon two men from nearby Glenample Station three and a half miles away. In a state of exhaustion, he told the men of the tragedy. Tom returned to the gorge while the two men rode back to the station to get help. By the time they reached LOCH ARD Gorge, it was cold and dark. The two shipwreck survivors were taken to Glenample Station to recover. Eva stayed at the station for six weeks before returning to Ireland, this time by steamship. In Melbourne, Tom Pearce received a hero's welcome. He was presented with the first gold medal of the Royal Humane Society of Victoria and a £1000 cheque from the Victorian Government. Concerts were performed to honour the young man's bravery and to raise money for those who lost family in the LOCH ARD disaster. Of the 54 crew members and passengers on board, only two survived: the apprentice, Tom Pearce and the young woman passenger, Eva Carmichael, who lost all of her family in the tragedy. Ten days after the LOCH ARD tragedy, salvage rights to the wreck were sold at auction for £2,120. Cargo valued at £3,000 was salvaged and placed on the beach, but most washed back into the sea when another storm developed. The wreck of LOCH ARD still lies at the base of Mutton Bird Island. Much of the cargo has now been salvaged and some was washed up into what is now known as LOCH ARD Gorge. Cargo and artefacts have also been illegally salvaged over many years before protective legislation was introduced. One of the most unlikely pieces of cargo to have survived the shipwreck was a Minton porcelain peacock - one of only seven in the world. The peacock was destined for the Melbourne International Exhibition in 1880. It had been well packed, which gave it adequate protection during the violent storm. Today, the Minton peacock can be seen at the Flagstaff Hill Maritime Museum in Warrnambool. From Australia's most dramatic shipwreck it has now become Australia's shipwreck artefact and is one of very few 'objects' on the Victorian State Heritage Register most valuable. The LOCH ARD shipwreck is of State significance – Victorian Heritage Register S 417. Flagstaff Hill’s collection of artefacts from LOCH ARD is significant for being one of the largest collections of artefacts from this shipwreck in Victoria. It is significant for its association with the shipwreck, which is on the Victorian Heritage Register (VHR S417). The collection is significant because of the relationship between the objects, as together they have a high potential to interpret the story of the LOCH ARD. The LOCH ARD collection is archaeologically significant as the remains of a large international passenger and cargo ship. The LOCH ARD collection is historically significant for representing aspects of Victoria’s shipping history and its potential to interpret sub-theme 1.5 of Victoria’s Framework of Historical Themes (living with natural processes). The collection is also historically significant for its association with the LOCH ARD, which was one of the worst and best known shipwrecks in Victoria’s history. Unrestored dessert spoon from the wreck of the LOCH ARD. The spoon design has a flattened fiddle-back handle, with a thin stem or shank, flared collar, and a shallow rounded bowl. The spoons metallic composition is a thin layer of brass alloy which has partially corroded back to a nickel-silver base metal. Only 10% of original plate is visible, along with 10% verdigris and 60% concretion (lumps on spoon bowl). Outlines of four makers marks are evident but details are not discernible.flagstaff hill, warrnambool, shipwrecked coast, flagstaff hill maritime museum, maritime museum, shipwreck coast, flagstaff hill maritime village, great ocean road, loch line, loch ard, captain gibbs, eva carmichael, tom pearce, glenample station, mutton bird island, loch ard gorge, electroplated cutlery, loch ard shipwreck, william page and co, birmingham brass plating, dessert spoons -
 Flagstaff Hill Maritime Museum and Village
Spoon, circa 1878
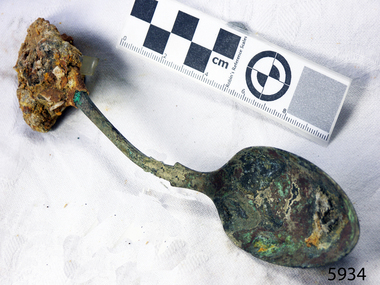
This medium-sized dessert spoon is from the wreck of the LOCH ARD, a Loch Line ship of 1,693 tons which sailed from Gravesend, London, on 2 March 1878 with 17 passengers and a crew of 36 under Captain George Gibbs. “The intention was to discharge cargo in Melbourne, before returning to London via the Horn with wool and wheat”. Instead, on 1 June 1878, after 90 days at sea, she struck the sandstone cliffs of Mutton Bird Island on the south west coast of Victoria, and sank with the loss of 52 lives and all her cargo. The manifest of the LOCH ARD listed an array of manufactured goods and bulk metals being exported to the Colony of Victoria, with a declared value of £53,700. (202 bills of lading show an actual invoice value of £68, 456, with insurance underwriting to £30,000 of all cargo). Included in the manifest is the item of “Tin hardware & cutlery £7,530”. This dessert spoon is one of 482 similar items of electro-plated cutlery from the LOCH ARD site, comprising spoons and forks of various sizes but all sharing the same general shape or design and metallic composition. 49 of these pieces display a legible makers’ mark — the initials “W” and “P” placed within a raised diamond outline, which is in turn contained within a sunken crown shape — identifying the manufacturer as William Page & Co of Birmingham. An electroplater’s makers’ marks, unlike sterling silver hallmarks, are not consistent identifiers of quality or date and place of manufacture. A similar line of five impressions was usually made to impress the consumer with an implication of industry standards, but what each one actually signified was not regulated and so they varied according to the whim of the individual foundry. In this case, the maker’s marks are often obscured by sedimentary accretion or removed by corrosion after a century of submersion in the ocean. However sufficient detail has survived to indicate that these samples of electro-plated cutlery probably originated from the same consignment in the LOCH ARD’s cargo. The generally common range of marks are drawn from 255 tea spoons, 125 dessert spoons, and 99 table forks. These marks are clearly visible in 66 instances, while the same sequence of general outlines, or depression shapes, is discernible in another 166 examples. Suggested trade names for William Page & Co’s particular blend of brass plating are ‘roman silver’ or ‘silverite’. This copper alloy polishes to a lustrous gold when new, discolouring to a murky grey with greenish hue when neglected. HISTORY OF THE LOCH ARD The LOCH ARD belonged to the famous Loch Line which sailed many ships from England to Australia. Built in Glasgow by Barclay, Curdle and Co. in 1873, the LOCH ARD was a three-masted square rigged iron sailing ship. The ship measured 262ft 7" (79.87m) in length, 38ft (11.58m) in width, 23ft (7m) in depth and had a gross tonnage of 1693 tons. The LOCH ARD's main mast measured a massive 150ft (45.7m) in height. LOCH ARD made three trips to Australia and one trip to Calcutta before its final voyage. LOCH ARD left England on March 2, 1878, under the command of Captain Gibbs, a newly married, 29 year old. She was bound for Melbourne with a crew of 37, plus 17 passengers and a load of cargo. The general cargo reflected the affluence of Melbourne at the time. On board were straw hats, umbrella, perfumes, clay pipes, pianos, clocks, confectionary, linen and candles, as well as a heavier load of railway irons, cement, lead and copper. There were items included that intended for display in the Melbourne International Exhibition in 1880. The voyage to Port Phillip was long but uneventful. At 3am on June 1, 1878, Captain Gibbs was expecting to see land and the passengers were becoming excited as they prepared to view their new homeland in the early morning. But LOCH ARD was running into a fog which greatly reduced visibility. Captain Gibbs was becoming anxious as there was no sign of land or the Cape Otway lighthouse. At 4am the fog lifted. A man aloft announced that he could see breakers. The sheer cliffs of Victoria's west coast came into view, and Captain Gibbs realised that the ship was much closer to them than expected. He ordered as much sail to be set as time would permit and then attempted to steer the vessel out to sea. On coming head on into the wind, the ship lost momentum, the sails fell limp and LOCH ARD's bow swung back. Gibbs then ordered the anchors to be released in an attempt to hold its position. The anchors sank some 50 fathoms - but did not hold. By this time LOCH ARD was among the breakers and the tall cliffs of Mutton Bird Island rose behind the ship. Just half a mile from the coast, the ship's bow was suddenly pulled around by the anchor. The captain tried to tack out to sea, but the ship struck a reef at the base of Mutton Bird Island, near Port Campbell. Waves broke over the ship and the top deck was loosened from the hull. The masts and rigging came crashing down knocking passengers and crew overboard. When a lifeboat was finally launched, it crashed into the side of LOCH ARD and capsized. Tom Pearce, who had launched the boat, managed to cling to its overturned hull and shelter beneath it. He drifted out to sea and then on the flood tide came into what is now known as LOCH ARD Gorge. He swam to shore, bruised and dazed, and found a cave in which to shelter. Some of the crew stayed below deck to shelter from the falling rigging but drowned when the ship slipped off the reef into deeper water. Eva Carmichael had raced onto deck to find out what was happening only to be confronted by towering cliffs looming above the stricken ship. In all the chaos, Captain Gibbs grabbed Eva and said, "If you are saved Eva, let my dear wife know that I died like a sailor". That was the last Eva Carmichael saw of the captain. She was swept off the ship by a huge wave. Eva saw Tom Pearce on a small rocky beach and yelled to attract his attention. He dived in and swam to the exhausted woman and dragged her to shore. He took her to the cave and broke open case of brandy which had washed up on the beach. He opened a bottle to revive the unconscious woman. A few hours later Tom scaled a cliff in search of help. He followed hoof prints and came by chance upon two men from nearby Glenample Station three and a half miles away. In a state of exhaustion, he told the men of the tragedy. Tom returned to the gorge while the two men rode back to the station to get help. By the time they reached LOCH ARD Gorge, it was cold and dark. The two shipwreck survivors were taken to Glenample Station to recover. Eva stayed at the station for six weeks before returning to Ireland, this time by steamship. In Melbourne, Tom Pearce received a hero's welcome. He was presented with the first gold medal of the Royal Humane Society of Victoria and a £1000 cheque from the Victorian Government. Concerts were performed to honour the young man's bravery and to raise money for those who lost family in the LOCH ARD disaster. Of the 54 crew members and passengers on board, only two survived: the apprentice, Tom Pearce and the young woman passenger, Eva Carmichael, who lost all of her family in the tragedy. Ten days after the LOCH ARD tragedy, salvage rights to the wreck were sold at auction for £2,120. Cargo valued at £3,000 was salvaged and placed on the beach, but most washed back into the sea when another storm developed. The wreck of LOCH ARD still lies at the base of Mutton Bird Island. Much of the cargo has now been salvaged and some was washed up into what is now known as LOCH ARD Gorge. Cargo and artefacts have also been illegally salvaged over many years before protective legislation was introduced. One of the most unlikely pieces of cargo to have survived the shipwreck was a Minton porcelain peacock - one of only seven in the world. The peacock was destined for the Melbourne International Exhibition in 1880. It had been well packed, which gave it adequate protection during the violent storm. Today, the Minton peacock can be seen at the Flagstaff Hill Maritime Museum in Warrnambool. From Australia's most dramatic shipwreck it has now become Australia's shipwreck artefact and is one of very few 'objects' on the Victorian State Heritage Register most valuable. The LOCH ARD shipwreck is of State significance – Victorian Heritage Register S 417. Flagstaff Hill’s collection of artefacts from LOCH ARD is significant for being one of the largest collections of artefacts from this shipwreck in Victoria. It is significant for its association with the shipwreck, which is on the Victorian Heritage Register (VHR S417). The collection is significant because of the relationship between the objects, as together they have a high potential to interpret the story of the LOCH ARD. The LOCH ARD collection is archaeologically significant as the remains of a large international passenger and cargo ship. The LOCH ARD collection is historically significant for representing aspects of Victoria’s shipping history and its potential to interpret sub-theme 1.5 of Victoria’s Framework of Historical Themes (living with natural processes). The collection is also historically significant for its association with the LOCH ARD, which was one of the worst and best known shipwrecks in Victoria’s history. Unrestored dessert spoon from the wreck of the LOCH ARD. The spoon design has a flattened fiddle-back handle, with a thin stem or shank, flared collar, and a shallow rounded bowl. The spoons metallic composition is a thin layer of brass alloy which has partially corroded back to a nickel-silver base metal. 25% of original plate is visible, with 15% verdigris, and 20% clump of concretion on handle. There is a plain heraldic shield embossed on upper rear of bowl (ratstail). Spoon stem and handle is badly bent.flagstaff hill, warrnambool, shipwrecked coast, flagstaff hill maritime museum, maritime museum, shipwreck coast, flagstaff hill maritime village, great ocean road, loch line, loch ard, captain gibbs, eva carmichael, tom pearce, glenample station, mutton bird island, loch ard gorge, electroplated cutlery, loch ard shipwreck, william page and co, birmingham brass plating, dessert spoons -
 Flagstaff Hill Maritime Museum and Village
Spoon, circa 187855 Albion Street
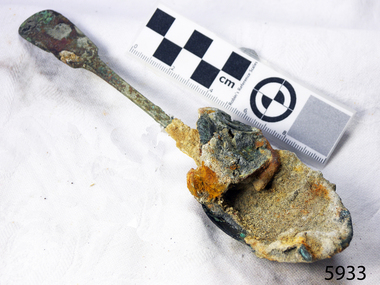
This medium-sized dessert spoon is from the wreck of the LOCH ARD, a Loch Line ship of 1,693 tons which sailed from Gravesend, London, on 2 March 1878 with 17 passengers and a crew of 36 under Captain George Gibbs. “The intention was to discharge cargo in Melbourne, before returning to London via the Horn with wool and wheat”. Instead, on 1 June 1878, after 90 days at sea, she struck the sandstone cliffs of Mutton Bird Island on the south west coast of Victoria, and sank with the loss of 52 lives and all her cargo. The manifest of the LOCH ARD listed an array of manufactured goods and bulk metals being exported to the Colony of Victoria, with a declared value of £53,700. (202 bills of lading show an actual invoice value of £68, 456, with insurance underwriting to £30,000 of all cargo). Included in the manifest is the item of “Tin hardware & cutlery £7,530”. This dessert spoon is one of 482 similar items of electro-plated cutlery from the LOCH ARD site, comprising spoons and forks of various sizes but all sharing the same general shape or design and metallic composition. 49 of these pieces display a legible makers’ mark — the initials “W” and “P” placed within a raised diamond outline, which is in turn contained within a sunken crown shape — identifying the manufacturer as William Page & Co of Birmingham. An electroplater’s makers’ marks, unlike sterling silver hallmarks, are not consistent identifiers of quality or date and place of manufacture. A similar line of five impressions was usually made to impress the consumer with an implication of industry standards, but what each one actually signified was not regulated and so they varied according to the whim of the individual foundry. In this case, the maker’s marks are often obscured by sedimentary accretion or removed by corrosion after a century of submersion in the ocean. However sufficient detail has survived to indicate that these samples of electro-plated cutlery probably originated from the same consignment in the LOCH ARD’s cargo. The generally common range of marks are drawn from 255 tea spoons, 125 dessert spoons, and 99 table forks. These marks are clearly visible in 66 instances, while the same sequence of general outlines, or depression shapes, is discernible in another 166 examples. Suggested trade names for William Page & Co’s particular blend of brass plating are ‘roman silver’ or ‘silverite’. This copper alloy polishes to a lustrous gold when new, discolouring to a murky grey with greenish hue when neglected. HISTORY OF THE LOCH ARD The LOCH ARD belonged to the famous Loch Line which sailed many ships from England to Australia. Built in Glasgow by Barclay, Curdle and Co. in 1873, the LOCH ARD was a three-masted square rigged iron sailing ship. The ship measured 262ft 7" (79.87m) in length, 38ft (11.58m) in width, 23ft (7m) in depth and had a gross tonnage of 1693 tons. The LOCH ARD's main mast measured a massive 150ft (45.7m) in height. LOCH ARD made three trips to Australia and one trip to Calcutta before its final voyage. LOCH ARD left England on March 2, 1878, under the command of Captain Gibbs, a newly married, 29 year old. She was bound for Melbourne with a crew of 37, plus 17 passengers and a load of cargo. The general cargo reflected the affluence of Melbourne at the time. On board were straw hats, umbrella, perfumes, clay pipes, pianos, clocks, confectionary, linen and candles, as well as a heavier load of railway irons, cement, lead and copper. There were items included that intended for display in the Melbourne International Exhibition in 1880. The voyage to Port Phillip was long but uneventful. At 3am on June 1, 1878, Captain Gibbs was expecting to see land and the passengers were becoming excited as they prepared to view their new homeland in the early morning. But LOCH ARD was running into a fog which greatly reduced visibility. Captain Gibbs was becoming anxious as there was no sign of land or the Cape Otway lighthouse. At 4am the fog lifted. A man aloft announced that he could see breakers. The sheer cliffs of Victoria's west coast came into view, and Captain Gibbs realised that the ship was much closer to them than expected. He ordered as much sail to be set as time would permit and then attempted to steer the vessel out to sea. On coming head on into the wind, the ship lost momentum, the sails fell limp and LOCH ARD's bow swung back. Gibbs then ordered the anchors to be released in an attempt to hold its position. The anchors sank some 50 fathoms - but did not hold. By this time LOCH ARD was among the breakers and the tall cliffs of Mutton Bird Island rose behind the ship. Just half a mile from the coast, the ship's bow was suddenly pulled around by the anchor. The captain tried to tack out to sea, but the ship struck a reef at the base of Mutton Bird Island, near Port Campbell. Waves broke over the ship and the top deck was loosened from the hull. The masts and rigging came crashing down knocking passengers and crew overboard. When a lifeboat was finally launched, it crashed into the side of LOCH ARD and capsized. Tom Pearce, who had launched the boat, managed to cling to its overturned hull and shelter beneath it. He drifted out to sea and then on the flood tide came into what is now known as LOCH ARD Gorge. He swam to shore, bruised and dazed, and found a cave in which to shelter. Some of the crew stayed below deck to shelter from the falling rigging but drowned when the ship slipped off the reef into deeper water. Eva Carmichael had raced onto deck to find out what was happening only to be confronted by towering cliffs looming above the stricken ship. In all the chaos, Captain Gibbs grabbed Eva and said, "If you are saved Eva, let my dear wife know that I died like a sailor". That was the last Eva Carmichael saw of the captain. She was swept off the ship by a huge wave. Eva saw Tom Pearce on a small rocky beach and yelled to attract his attention. He dived in and swam to the exhausted woman and dragged her to shore. He took her to the cave and broke open case of brandy which had washed up on the beach. He opened a bottle to revive the unconscious woman. A few hours later Tom scaled a cliff in search of help. He followed hoof prints and came by chance upon two men from nearby Glenample Station three and a half miles away. In a state of exhaustion, he told the men of the tragedy. Tom returned to the gorge while the two men rode back to the station to get help. By the time they reached LOCH ARD Gorge, it was cold and dark. The two shipwreck survivors were taken to Glenample Station to recover. Eva stayed at the station for six weeks before returning to Ireland, this time by steamship. In Melbourne, Tom Pearce received a hero's welcome. He was presented with the first gold medal of the Royal Humane Society of Victoria and a £1000 cheque from the Victorian Government. Concerts were performed to honour the young man's bravery and to raise money for those who lost family in the LOCH ARD disaster. Of the 54 crew members and passengers on board, only two survived: the apprentice, Tom Pearce and the young woman passenger, Eva Carmichael, who lost all of her family in the tragedy. Ten days after the LOCH ARD tragedy, salvage rights to the wreck were sold at auction for £2,120. Cargo valued at £3,000 was salvaged and placed on the beach, but most washed back into the sea when another storm developed. The wreck of LOCH ARD still lies at the base of Mutton Bird Island. Much of the cargo has now been salvaged and some was washed up into what is now known as LOCH ARD Gorge. Cargo and artefacts have also been illegally salvaged over many years before protective legislation was introduced. One of the most unlikely pieces of cargo to have survived the shipwreck was a Minton porcelain peacock - one of only seven in the world. The peacock was destined for the Melbourne International Exhibition in 1880. It had been well packed, which gave it adequate protection during the violent storm. Today, the Minton peacock can be seen at the Flagstaff Hill Maritime Museum in Warrnambool. From Australia's most dramatic shipwreck it has now become Australia's shipwreck artefact and is one of very few 'objects' on the Victorian State Heritage Register most valuable. The LOCH ARD shipwreck is of State significance – Victorian Heritage Register S 417. Flagstaff Hill’s collection of artefacts from LOCH ARD is significant for being one of the largest collections of artefacts from this shipwreck in Victoria. It is significant for its association with the shipwreck, which is on the Victorian Heritage Register (VHR S417). The collection is significant because of the relationship between the objects, as together they have a high potential to interpret the story of the LOCH ARD. The LOCH ARD collection is archaeologically significant as the remains of a large international passenger and cargo ship. The LOCH ARD collection is historically significant for representing aspects of Victoria’s shipping history and its potential to interpret sub-theme 1.5 of Victoria’s Framework of Historical Themes (living with natural processes). The collection is also historically significant for its association with the LOCH ARD, which was one of the worst and best known shipwrecks in Victoria’s history. Unrestored dessert spoon from the wreck of the LOCH ARD. The spoon design has a flattened fiddle-back handle, with a thin stem or shank, flared collar, and a shallow rounded bowl. The spoons metallic composition is a thin layer of brass alloy which has partially corroded back to a nickel-silver base metal. The spoon is badly corroded and concreted, with reduction on bowl, stem and handle. Bowl is cracked and spoon is in generally poor condition.flagstaff hill, warrnambool, shipwrecked coast, flagstaff hill maritime museum, maritime museum, shipwreck coast, flagstaff hill maritime village, great ocean road, loch line, loch ard, captain gibbs, eva carmichael, tom pearce, glenample station, mutton bird island, loch ard gorge, electroplated cutlery, loch ard shipwreck, william page and co, birmingham brass plating, dessert spoons -
 Flagstaff Hill Maritime Museum and Village
Spoon, circa 187855 Albion Street
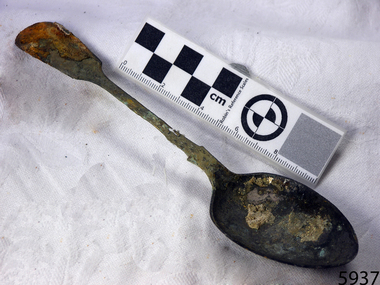
This medium-sized dessert spoon is from the wreck of the LOCH ARD, a Loch Line ship of 1,693 tons which sailed from Gravesend, London, on 2 March 1878 with 17 passengers and a crew of 36 under Captain George Gibbs. “The intention was to discharge cargo in Melbourne, before returning to London via the Horn with wool and wheat”. Instead, on 1 June 1878, after 90 days at sea, she struck the sandstone cliffs of Mutton Bird Island on the south west coast of Victoria, and sank with the loss of 52 lives and all her cargo. The manifest of the LOCH ARD listed an array of manufactured goods and bulk metals being exported to the Colony of Victoria, with a declared value of £53,700. (202 bills of lading show an actual invoice value of £68, 456, with insurance underwriting to £30,000 of all cargo). Included in the manifest is the item of “Tin hardware & cutlery £7,530”. This dessert spoon is one of 482 similar items of electro-plated cutlery from the LOCH ARD site, comprising spoons and forks of various sizes but all sharing the same general shape or design and metallic composition. 49 of these pieces display a legible makers’ mark — the initials “W” and “P” placed within a raised diamond outline, which is in turn contained within a sunken crown shape — identifying the manufacturer as William Page & Co of Birmingham. An electroplater’s makers’ marks, unlike sterling silver hallmarks, are not consistent identifiers of quality or date and place of manufacture. A similar line of five impressions was usually made to impress the consumer with an implication of industry standards, but what each one actually signified was not regulated and so they varied according to the whim of the individual foundry. In this case, the maker’s marks are often obscured by sedimentary accretion or removed by corrosion after a century of submersion in the ocean. However sufficient detail has survived to indicate that these samples of electro-plated cutlery probably originated from the same consignment in the LOCH ARD’s cargo. The generally common range of marks are drawn from 255 tea spoons, 125 dessert spoons, and 99 table forks. These marks are clearly visible in 66 instances, while the same sequence of general outlines, or depression shapes, is discernible in another 166 examples. Suggested trade names for William Page & Co’s particular blend of brass plating are ‘roman silver’ or ‘silverite’. This copper alloy polishes to a lustrous gold when new, discolouring to a murky grey with greenish hue when neglected. HISTORY OF THE LOCH ARD The LOCH ARD belonged to the famous Loch Line which sailed many ships from England to Australia. Built in Glasgow by Barclay, Curdle and Co. in 1873, the LOCH ARD was a three-masted square rigged iron sailing ship. The ship measured 262ft 7" (79.87m) in length, 38ft (11.58m) in width, 23ft (7m) in depth and had a gross tonnage of 1693 tons. The LOCH ARD's main mast measured a massive 150ft (45.7m) in height. LOCH ARD made three trips to Australia and one trip to Calcutta before its final voyage. LOCH ARD left England on March 2, 1878, under the command of Captain Gibbs, a newly married, 29 year old. She was bound for Melbourne with a crew of 37, plus 17 passengers and a load of cargo. The general cargo reflected the affluence of Melbourne at the time. On board were straw hats, umbrella, perfumes, clay pipes, pianos, clocks, confectionary, linen and candles, as well as a heavier load of railway irons, cement, lead and copper. There were items included that intended for display in the Melbourne International Exhibition in 1880. The voyage to Port Phillip was long but uneventful. At 3am on June 1, 1878, Captain Gibbs was expecting to see land and the passengers were becoming excited as they prepared to view their new homeland in the early morning. But LOCH ARD was running into a fog which greatly reduced visibility. Captain Gibbs was becoming anxious as there was no sign of land or the Cape Otway lighthouse. At 4am the fog lifted. A man aloft announced that he could see breakers. The sheer cliffs of Victoria's west coast came into view, and Captain Gibbs realised that the ship was much closer to them than expected. He ordered as much sail to be set as time would permit and then attempted to steer the vessel out to sea. On coming head on into the wind, the ship lost momentum, the sails fell limp and LOCH ARD's bow swung back. Gibbs then ordered the anchors to be released in an attempt to hold its position. The anchors sank some 50 fathoms - but did not hold. By this time LOCH ARD was among the breakers and the tall cliffs of Mutton Bird Island rose behind the ship. Just half a mile from the coast, the ship's bow was suddenly pulled around by the anchor. The captain tried to tack out to sea, but the ship struck a reef at the base of Mutton Bird Island, near Port Campbell. Waves broke over the ship and the top deck was loosened from the hull. The masts and rigging came crashing down knocking passengers and crew overboard. When a lifeboat was finally launched, it crashed into the side of LOCH ARD and capsized. Tom Pearce, who had launched the boat, managed to cling to its overturned hull and shelter beneath it. He drifted out to sea and then on the flood tide came into what is now known as LOCH ARD Gorge. He swam to shore, bruised and dazed, and found a cave in which to shelter. Some of the crew stayed below deck to shelter from the falling rigging but drowned when the ship slipped off the reef into deeper water. Eva Carmichael had raced onto deck to find out what was happening only to be confronted by towering cliffs looming above the stricken ship. In all the chaos, Captain Gibbs grabbed Eva and said, "If you are saved Eva, let my dear wife know that I died like a sailor". That was the last Eva Carmichael saw of the captain. She was swept off the ship by a huge wave. Eva saw Tom Pearce on a small rocky beach and yelled to attract his attention. He dived in and swam to the exhausted woman and dragged her to shore. He took her to the cave and broke open case of brandy which had washed up on the beach. He opened a bottle to revive the unconscious woman. A few hours later Tom scaled a cliff in search of help. He followed hoof prints and came by chance upon two men from nearby Glenample Station three and a half miles away. In a state of exhaustion, he told the men of the tragedy. Tom returned to the gorge while the two men rode back to the station to get help. By the time they reached LOCH ARD Gorge, it was cold and dark. The two shipwreck survivors were taken to Glenample Station to recover. Eva stayed at the station for six weeks before returning to Ireland, this time by steamship. In Melbourne, Tom Pearce received a hero's welcome. He was presented with the first gold medal of the Royal Humane Society of Victoria and a £1000 cheque from the Victorian Government. Concerts were performed to honour the young man's bravery and to raise money for those who lost family in the LOCH ARD disaster. Of the 54 crew members and passengers on board, only two survived: the apprentice, Tom Pearce and the young woman passenger, Eva Carmichael, who lost all of her family in the tragedy. Ten days after the LOCH ARD tragedy, salvage rights to the wreck were sold at auction for £2,120. Cargo valued at £3,000 was salvaged and placed on the beach, but most washed back into the sea when another storm developed. The wreck of LOCH ARD still lies at the base of Mutton Bird Island. Much of the cargo has now been salvaged and some was washed up into what is now known as LOCH ARD Gorge. Cargo and artefacts have also been illegally salvaged over many years before protective legislation was introduced. One of the most unlikely pieces of cargo to have survived the shipwreck was a Minton porcelain peacock - one of only seven in the world. The peacock was destined for the Melbourne International Exhibition in 1880. It had been well packed, which gave it adequate protection during the violent storm. Today, the Minton peacock can be seen at the Flagstaff Hill Maritime Museum in Warrnambool. From Australia's most dramatic shipwreck it has now become Australia's shipwreck artefact and is one of very few 'objects' on the Victorian State Heritage Register most valuable. The LOCH ARD shipwreck is of State significance – Victorian Heritage Register S 417. Flagstaff Hill’s collection of artefacts from LOCH ARD is significant for being one of the largest collections of artefacts from this shipwreck in Victoria. It is significant for its association with the shipwreck, which is on the Victorian Heritage Register (VHR S417). The collection is significant because of the relationship between the objects, as together they have a high potential to interpret the story of the LOCH ARD. The LOCH ARD collection is archaeologically significant as the remains of a large international passenger and cargo ship. The LOCH ARD collection is historically significant for representing aspects of Victoria’s shipping history and its potential to interpret sub-theme 1.5 of Victoria’s Framework of Historical Themes (living with natural processes). The collection is also historically significant for its association with the LOCH ARD, which was one of the worst and best known shipwrecks in Victoria’s history. Unrestored dessert spoon from the wreck of the LOCH ARD. The spoon design has a flattened fiddle-back handle, with a thin stem or shank, flared collar, and a shallow rounded bowl. The spoons metallic composition is a thin layer of brass alloy which has partially corroded back to a nickel-silver base metal. There is some verdigris and a small amount of encrustation on spoon bowl and handle. The spoon stem is bent.flagstaff hill, warrnambool, shipwrecked coast, flagstaff hill maritime museum, maritime museum, shipwreck coast, flagstaff hill maritime village, great ocean road, loch line, loch ard, captain gibbs, eva carmichael, tom pearce, glenample station, mutton bird island, loch ard gorge, electroplated cutlery, william page and co, birmingham brass plating, dessert spoons -
 Flagstaff Hill Maritime Museum and Village
Spoon, circa 1878
This medium-sized dessert spoon is from the wreck of the LOCH ARD, a Loch Line ship of 1,693 tons which sailed from Gravesend, London, on 2 March 1878 with 17 passengers and a crew of 36 under Captain George Gibbs. “The intention was to discharge cargo in Melbourne, before returning to London via the Horn with wool and wheat”. Instead, on 1 June 1878, after 90 days at sea, she struck the sandstone cliffs of Mutton Bird Island on the south west coast of Victoria, and sank with the loss of 52 lives and all her cargo. The manifest of the LOCH ARD listed an array of manufactured goods and bulk metals being exported to the Colony of Victoria, with a declared value of £53,700. (202 bills of lading show an actual invoice value of £68, 456, with insurance underwriting to £30,000 of all cargo). Included in the manifest is the item of “Tin hardware & cutlery £7,530”. This dessert spoon is one of 482 similar items of electro-plated cutlery from the LOCH ARD site, comprising spoons and forks of various sizes but all sharing the same general shape or design and metallic composition. 49 of these pieces display a legible makers’ mark — the initials “W” and “P” placed within a raised diamond outline, which is in turn contained within a sunken crown shape — identifying the manufacturer as William Page & Co of Birmingham. An electroplater’s makers’ marks, unlike sterling silver hallmarks, are not consistent identifiers of quality or date and place of manufacture. A similar line of five impressions was usually made to impress the consumer with an implication of industry standards, but what each one actually signified was not regulated and so they varied according to the whim of the individual foundry. In this case, the maker’s marks are often obscured by sedimentary accretion or removed by corrosion after a century of submersion in the ocean. However sufficient detail has survived to indicate that these samples of electro-plated cutlery probably originated from the same consignment in the LOCH ARD’s cargo. The generally common range of marks are drawn from 255 tea spoons, 125 dessert spoons, and 99 table forks. These marks are clearly visible in 66 instances, while the same sequence of general outlines, or depression shapes, is discernible in another 166 examples. Suggested trade names for William Page & Co’s particular blend of brass plating are ‘roman silver’ or ‘silverite’. This copper alloy polishes to a lustrous gold when new, discolouring to a murky grey with greenish hue when neglected. HISTORY OF THE LOCH ARD The LOCH ARD belonged to the famous Loch Line which sailed many ships from England to Australia. Built in Glasgow by Barclay, Curdle and Co. in 1873, the LOCH ARD was a three-masted square rigged iron sailing ship. The ship measured 262ft 7" (79.87m) in length, 38ft (11.58m) in width, 23ft (7m) in depth and had a gross tonnage of 1693 tons. The LOCH ARD's main mast measured a massive 150ft (45.7m) in height. LOCH ARD made three trips to Australia and one trip to Calcutta before its final voyage. LOCH ARD left England on March 2, 1878, under the command of Captain Gibbs, a newly married, 29 year old. She was bound for Melbourne with a crew of 37, plus 17 passengers and a load of cargo. The general cargo reflected the affluence of Melbourne at the time. On board were straw hats, umbrella, perfumes, clay pipes, pianos, clocks, confectionary, linen and candles, as well as a heavier load of railway irons, cement, lead and copper. There were items included that intended for display in the Melbourne International Exhibition in 1880. The voyage to Port Phillip was long but uneventful. At 3am on June 1, 1878, Captain Gibbs was expecting to see land and the passengers were becoming excited as they prepared to view their new homeland in the early morning. But LOCH ARD was running into a fog which greatly reduced visibility. Captain Gibbs was becoming anxious as there was no sign of land or the Cape Otway lighthouse. At 4am the fog lifted. A man aloft announced that he could see breakers. The sheer cliffs of Victoria's west coast came into view, and Captain Gibbs realised that the ship was much closer to them than expected. He ordered as much sail to be set as time would permit and then attempted to steer the vessel out to sea. On coming head on into the wind, the ship lost momentum, the sails fell limp and LOCH ARD's bow swung back. Gibbs then ordered the anchors to be released in an attempt to hold its position. The anchors sank some 50 fathoms - but did not hold. By this time LOCH ARD was among the breakers and the tall cliffs of Mutton Bird Island rose behind the ship. Just half a mile from the coast, the ship's bow was suddenly pulled around by the anchor. The captain tried to tack out to sea, but the ship struck a reef at the base of Mutton Bird Island, near Port Campbell. Waves broke over the ship and the top deck was loosened from the hull. The masts and rigging came crashing down knocking passengers and crew overboard. When a lifeboat was finally launched, it crashed into the side of LOCH ARD and capsized. Tom Pearce, who had launched the boat, managed to cling to its overturned hull and shelter beneath it. He drifted out to sea and then on the flood tide came into what is now known as LOCH ARD Gorge. He swam to shore, bruised and dazed, and found a cave in which to shelter. Some of the crew stayed below deck to shelter from the falling rigging but drowned when the ship slipped off the reef into deeper water. Eva Carmichael had raced onto deck to find out what was happening only to be confronted by towering cliffs looming above the stricken ship. In all the chaos, Captain Gibbs grabbed Eva and said, "If you are saved Eva, let my dear wife know that I died like a sailor". That was the last Eva Carmichael saw of the captain. She was swept off the ship by a huge wave. Eva saw Tom Pearce on a small rocky beach and yelled to attract his attention. He dived in and swam to the exhausted woman and dragged her to shore. He took her to the cave and broke open case of brandy which had washed up on the beach. He opened a bottle to revive the unconscious woman. A few hours later Tom scaled a cliff in search of help. He followed hoof prints and came by chance upon two men from nearby Glenample Station three and a half miles away. In a state of exhaustion, he told the men of the tragedy. Tom returned to the gorge while the two men rode back to the station to get help. By the time they reached LOCH ARD Gorge, it was cold and dark. The two shipwreck survivors were taken to Glenample Station to recover. Eva stayed at the station for six weeks before returning to Ireland, this time by steamship. In Melbourne, Tom Pearce received a hero's welcome. He was presented with the first gold medal of the Royal Humane Society of Victoria and a £1000 cheque from the Victorian Government. Concerts were performed to honour the young man's bravery and to raise money for those who lost family in the LOCH ARD disaster. Of the 54 crew members and passengers on board, only two survived: the apprentice, Tom Pearce and the young woman passenger, Eva Carmichael, who lost all of her family in the tragedy. Ten days after the LOCH ARD tragedy, salvage rights to the wreck were sold at auction for £2,120. Cargo valued at £3,000 was salvaged and placed on the beach, but most washed back into the sea when another storm developed. The wreck of LOCH ARD still lies at the base of Mutton Bird Island. Much of the cargo has now been salvaged and some was washed up into what is now known as LOCH ARD Gorge. Cargo and artefacts have also been illegally salvaged over many years before protective legislation was introduced. One of the most unlikely pieces of cargo to have survived the shipwreck was a Minton porcelain peacock - one of only seven in the world. The peacock was destined for the Melbourne International Exhibition in 1880. It had been well packed, which gave it adequate protection during the violent storm. Today, the Minton peacock can be seen at the Flagstaff Hill Maritime Museum in Warrnambool. From Australia's most dramatic shipwreck it has now become Australia's shipwreck artefact and is one of very few 'objects' on the Victorian State Heritage Register most valuable. The LOCH ARD shipwreck is of State significance – Victorian Heritage Register S 417. Flagstaff Hill’s collection of artefacts from LOCH ARD is significant for being one of the largest collections of artefacts from this shipwreck in Victoria. It is significant for its association with the shipwreck, which is on the Victorian Heritage Register (VHR S417). The collection is significant because of the relationship between the objects, as together they have a high potential to interpret the story of the LOCH ARD. The LOCH ARD collection is archaeologically significant as the remains of a large international passenger and cargo ship. The LOCH ARD collection is historically significant for representing aspects of Victoria’s shipping history and its potential to interpret sub-theme 1.5 of Victoria’s Framework of Historical Themes (living with natural processes). The collection is also historically significant for its association with the LOCH ARD, which was one of the worst and best known shipwrecks in Victoria’s history. Unrestored dessert spoon from the wreck of the LOCH ARD. The spoon design has a flattened fiddle-back handle, with a thin stem or shank, flared collar, and a shallow rounded bowl. The spoons metallic composition is a thin layer of brass alloy which has partially corroded back to a nickel-silver base metal. Only 15% of original plate remains and 25% of spoon surface area is encrusted with red/white sediment. Some verdigris. Spoon is in fairly good condition and a plain heraldic shield is embossed on the upper rear of its bowl (ratstail).flagstaff hill, warrnambool, shipwrecked coast, flagstaff hill maritime museum, maritime museum, shipwreck coast, flagstaff hill maritime village, great ocean road, loch line, loch ard, captain gibbs, eva carmichael, tom pearce, glenample station, mutton bird island, loch ard gorge, electroplated cutlery, loch ard shipwreck, william page and co, birmingham brass plating, dessert spoons -
 Flagstaff Hill Maritime Museum and Village
Domestic object - Spoon, c. 1878
This medium-sized dessert spoon is from the wreck of the LOCH ARD, a Loch Line ship of 1,693 tons which sailed from Gravesend, London, on 2 March 1878 with 17 passengers and a crew of 36 under Captain George Gibbs. “The intention was to discharge cargo in Melbourne, before returning to London via the Horn with wool and wheat”. Instead, on 1 June 1878, after 90 days at sea, she struck the sandstone cliffs of Mutton Bird Island on the south west coast of Victoria, and sank with the loss of 52 lives and all her cargo. The manifest of the LOCH ARD listed an array of manufactured goods and bulk metals being exported to the Colony of Victoria, with a declared value of £53,700. (202 bills of lading show an actual invoice value of £68, 456, with insurance underwriting to £30,000 of all cargo). Included in the manifest is the item of “Tin hardware & cutlery £7,530”. This dessert spoon is one of 482 similar items of electro-plated cutlery from the LOCH ARD site, comprising spoons and forks of various sizes but all sharing the same general shape or design and metallic composition. 49 of these pieces display a legible makers’ mark — the initials “W” and “P” placed within a raised diamond outline, which is in turn contained within a sunken crown shape — identifying the manufacturer as William Page & Co of Birmingham. An electroplater’s makers’ marks, unlike sterling silver hallmarks, are not consistent identifiers of quality or date and place of manufacture. A similar line of five impressions was usually made to impress the consumer with an implication of industry standards, but what each one actually signified was not regulated and so they varied according to the whim of the individual foundry. In this case, the maker’s marks are often obscured by sedimentary accretion or removed by corrosion after a century of submersion in the ocean. However sufficient detail has survived to indicate that these samples of electro-plated cutlery probably originated from the same consignment in the LOCH ARD’s cargo. The generally common range of marks are drawn from 255 tea spoons, 125 dessert spoons, and 99 table forks. These marks are clearly visible in 66 instances, while the same sequence of general outlines, or depression shapes, is discernible in another 166 examples. Suggested trade names for William Page & Co’s particular blend of brass plating are ‘roman silver’ or ‘silverite’. This copper alloy polishes to a lustrous gold when new, discolouring to a murky grey with greenish hue when neglected. HISTORY OF THE LOCH ARD The LOCH ARD belonged to the famous Loch Line which sailed many ships from England to Australia. Built in Glasgow by Barclay, Curdle and Co. in 1873, the LOCH ARD was a three-masted square rigged iron sailing ship. The ship measured 262ft 7" (79.87m) in length, 38ft (11.58m) in width, 23ft (7m) in depth and had a gross tonnage of 1693 tons. The LOCH ARD's main mast measured a massive 150ft (45.7m) in height. LOCH ARD made three trips to Australia and one trip to Calcutta before its final voyage. LOCH ARD left England on March 2, 1878, under the command of Captain Gibbs, a newly married, 29 year old. She was bound for Melbourne with a crew of 37, plus 17 passengers and a load of cargo. The general cargo reflected the affluence of Melbourne at the time. On board were straw hats, umbrella, perfumes, clay pipes, pianos, clocks, confectionary, linen and candles, as well as a heavier load of railway irons, cement, lead and copper. There were items included that intended for display in the Melbourne International Exhibition in 1880. The voyage to Port Phillip was long but uneventful. At 3am on June 1, 1878, Captain Gibbs was expecting to see land and the passengers were becoming excited as they prepared to view their new homeland in the early morning. But LOCH ARD was running into a fog which greatly reduced visibility. Captain Gibbs was becoming anxious as there was no sign of land or the Cape Otway lighthouse. At 4am the fog lifted. A man aloft announced that he could see breakers. The sheer cliffs of Victoria's west coast came into view, and Captain Gibbs realised that the ship was much closer to them than expected. He ordered as much sail to be set as time would permit and then attempted to steer the vessel out to sea. On coming head on into the wind, the ship lost momentum, the sails fell limp and LOCH ARD's bow swung back. Gibbs then ordered the anchors to be released in an attempt to hold its position. The anchors sank some 50 fathoms - but did not hold. By this time LOCH ARD was among the breakers and the tall cliffs of Mutton Bird Island rose behind the ship. Just half a mile from the coast, the ship's bow was suddenly pulled around by the anchor. The captain tried to tack out to sea, but the ship struck a reef at the base of Mutton Bird Island, near Port Campbell. Waves broke over the ship and the top deck was loosened from the hull. The masts and rigging came crashing down knocking passengers and crew overboard. When a lifeboat was finally launched, it crashed into the side of LOCH ARD and capsized. Tom Pearce, who had launched the boat, managed to cling to its overturned hull and shelter beneath it. He drifted out to sea and then on the flood tide came into what is now known as LOCH ARD Gorge. He swam to shore, bruised and dazed, and found a cave in which to shelter. Some of the crew stayed below deck to shelter from the falling rigging but drowned when the ship slipped off the reef into deeper water. Eva Carmichael had raced onto deck to find out what was happening only to be confronted by towering cliffs looming above the stricken ship. In all the chaos, Captain Gibbs grabbed Eva and said, "If you are saved Eva, let my dear wife know that I died like a sailor". That was the last Eva Carmichael saw of the captain. She was swept off the ship by a huge wave. Eva saw Tom Pearce on a small rocky beach and yelled to attract his attention. He dived in and swam to the exhausted woman and dragged her to shore. He took her to the cave and broke open case of brandy which had washed up on the beach. He opened a bottle to revive the unconscious woman. A few hours later Tom scaled a cliff in search of help. He followed hoof prints and came by chance upon two men from nearby Glenample Station three and a half miles away. In a state of exhaustion, he told the men of the tragedy. Tom returned to the gorge while the two men rode back to the station to get help. By the time they reached LOCH ARD Gorge, it was cold and dark. The two shipwreck survivors were taken to Glenample Station to recover. Eva stayed at the station for six weeks before returning to Ireland, this time by steamship. In Melbourne, Tom Pearce received a hero's welcome. He was presented with the first gold medal of the Royal Humane Society of Victoria and a £1000 cheque from the Victorian Government. Concerts were performed to honour the young man's bravery and to raise money for those who lost family in the LOCH ARD disaster. Of the 54 crew members and passengers on board, only two survived: the apprentice, Tom Pearce and the young woman passenger, Eva Carmichael, who lost all of her family in the tragedy. Ten days after the LOCH ARD tragedy, salvage rights to the wreck were sold at auction for £2,120. Cargo valued at £3,000 was salvaged and placed on the beach, but most washed back into the sea when another storm developed. The wreck of LOCH ARD still lies at the base of Mutton Bird Island. Much of the cargo has now been salvaged and some was washed up into what is now known as LOCH ARD Gorge. Cargo and artefacts have also been illegally salvaged over many years before protective legislation was introduced. One of the most unlikely pieces of cargo to have survived the shipwreck was a Minton porcelain peacock - one of only seven in the world. The peacock was destined for the Melbourne International Exhibition in 1880. It had been well packed, which gave it adequate protection during the violent storm. Today, the Minton peacock can be seen at the Flagstaff Hill Maritime Museum in Warrnambool. From Australia's most dramatic shipwreck it has now become Australia's shipwreck artefact and is one of very few 'objects' on the Victorian State Heritage Register most valuable. The LOCH ARD shipwreck is of State significance – Victorian Heritage Register S 417. Flagstaff Hill’s collection of artefacts from LOCH ARD is significant for being one of the largest collections of artefacts from this shipwreck in Victoria. It is significant for its association with the shipwreck, which is on the Victorian Heritage Register (VHR S417). The collection is significant because of the relationship between the objects, as together they have a high potential to interpret the story of the LOCH ARD. The LOCH ARD collection is archaeologically significant as the remains of a large international passenger and cargo ship. The LOCH ARD collection is historically significant for representing aspects of Victoria’s shipping history and its potential to interpret sub-theme 1.5 of Victoria’s Framework of Historical Themes (living with natural processes). The collection is also historically significant for its association with the LOCH ARD, which was one of the worst and best known shipwrecks in Victoria’s history. Unrestored dessert spoon from the wreck of the LOCH ARD. The spoon design has a flattened fiddle-back handle, with a thin stem or shank, flared collar, and a shallow rounded bowl. The spoons metallic composition is a thin layer of brass alloy which has partially corroded back to a nickel-silver base metal. 25% of original plate remains, with 10% verdigris and 15% encrustation on spoon handle. Spoon is in fairly good condition but the stem and handle is badly bent.flagstaff hill maritime museum, shipwreck coast, great ocean road, loch line, loch ard, mutton bird island, loch ard gorge, electroplated cutlery, loch ard shipwreck, william page and co, birmingham brass plating, dessert spoons -
 Flagstaff Hill Maritime Museum and Village
Domestic object - Spoons, circa 1878
These medium-sized dessert spoons are from the wreck of the LOCH ARD, a Loch Line ship of 1,693 tons which sailed from Gravesend, London, on 2 March 1878 with 17 passengers and a crew of 36 under Captain George Gibbs. “The intention was to discharge cargo in Melbourne, before returning to London via the Horn with wool and wheat”. Instead, on 1 June 1878, after 90 days at sea, she struck the sandstone cliffs of Mutton Bird Island on the south west coast of Victoria, and sank with the loss of 52 lives and all her cargo. The manifest of the LOCH ARD listed an array of manufactured goods and bulk metals being exported to the Colony of Victoria, with a declared value of £53,700. (202 bills of lading show an actual invoice value of £68, 456, with insurance underwriting to £30,000 of all cargo). Included in the manifest is the item of “Tin hardware & cutlery £7,530”. These dessert spoons are some of 482 similar items of electro-plated cutlery from the LOCH ARD site, comprising spoons and forks of various sizes but all sharing the same general shape or design and metallic composition. 49 of these pieces display a legible makers’ mark — the initials “W” and “P” placed within a raised diamond outline, which is in turn contained within a sunken crown shape — identifying the manufacturer as William Page & Co of Birmingham. An electroplater’s makers’ marks, unlike sterling silver hallmarks, are not consistent identifiers of quality or date and place of manufacture. A similar line of five impressions was usually made to impress the consumer with an implication of industry standards, but what each one actually signified was not regulated and so they varied according to the whim of the individual foundry. In this case, the maker’s marks are often obscured by sedimentary accretion or removed by corrosion after a century of submersion in the ocean. However sufficient detail has survived to indicate that these samples of electro-plated cutlery probably originated from the same consignment in the LOCH ARD’s cargo. The generally common range of marks are drawn from 255 tea spoons, 125 dessert spoons, and 99 table forks. These marks are clearly visible in 66 instances, while the same sequence of general outlines, or depression shapes, is discernible in another 166 examples. Suggested trade names for William Page & Co’s particular blend of brass plating are ‘roman silver’ or ‘silverite’. This copper alloy polishes to a lustrous gold when new, discolouring to a murky grey with greenish hue when neglected. HISTORY OF THE LOCH ARD The LOCH ARD belonged to the famous Loch Line which sailed many ships from England to Australia. Built in Glasgow by Barclay, Curdle and Co. in 1873, the LOCH ARD was a three-masted square rigged iron sailing ship. The ship measured 262ft 7" (79.87m) in length, 38ft (11.58m) in width, 23ft (7m) in depth and had a gross tonnage of 1693 tons. The LOCH ARD's main mast measured a massive 150ft (45.7m) in height. LOCH ARD made three trips to Australia and one trip to Calcutta before its final voyage. LOCH ARD left England on March 2, 1878, under the command of Captain Gibbs, a newly married, 29 year old. She was bound for Melbourne with a crew of 37, plus 17 passengers and a load of cargo. The general cargo reflected the affluence of Melbourne at the time. On board were straw hats, umbrella, perfumes, clay pipes, pianos, clocks, confectionary, linen and candles, as well as a heavier load of railway irons, cement, lead and copper. There were items included that intended for display in the Melbourne International Exhibition in 1880. The voyage to Port Phillip was long but uneventful. At 3am on June 1, 1878, Captain Gibbs was expecting to see land and the passengers were becoming excited as they prepared to view their new homeland in the early morning. But LOCH ARD was running into a fog which greatly reduced visibility. Captain Gibbs was becoming anxious as there was no sign of land or the Cape Otway lighthouse. At 4am the fog lifted. A man aloft announced that he could see breakers. The sheer cliffs of Victoria's west coast came into view, and Captain Gibbs realised that the ship was much closer to them than expected. He ordered as much sail to be set as time would permit and then attempted to steer the vessel out to sea. On coming head on into the wind, the ship lost momentum, the sails fell limp and LOCH ARD's bow swung back. Gibbs then ordered the anchors to be released in an attempt to hold its position. The anchors sank some 50 fathoms - but did not hold. By this time LOCH ARD was among the breakers and the tall cliffs of Mutton Bird Island rose behind the ship. Just half a mile from the coast, the ship's bow was suddenly pulled around by the anchor. The captain tried to tack out to sea, but the ship struck a reef at the base of Mutton Bird Island, near Port Campbell. Waves broke over the ship and the top deck was loosened from the hull. The masts and rigging came crashing down knocking passengers and crew overboard. When a lifeboat was finally launched, it crashed into the side of LOCH ARD and capsized. Tom Pearce, who had launched the boat, managed to cling to its overturned hull and shelter beneath it. He drifted out to sea and then on the flood tide came into what is now known as LOCH ARD Gorge. He swam to shore, bruised and dazed, and found a cave in which to shelter. Some of the crew stayed below deck to shelter from the falling rigging but drowned when the ship slipped off the reef into deeper water. Eva Carmichael had raced onto deck to find out what was happening only to be confronted by towering cliffs looming above the stricken ship. In all the chaos, Captain Gibbs grabbed Eva and said, "If you are saved Eva, let my dear wife know that I died like a sailor". That was the last Eva Carmichael saw of the captain. She was swept off the ship by a huge wave. Eva saw Tom Pearce on a small rocky beach and yelled to attract his attention. He dived in and swam to the exhausted woman and dragged her to shore. He took her to the cave and broke open case of brandy which had washed up on the beach. He opened a bottle to revive the unconscious woman. A few hours later Tom scaled a cliff in search of help. He followed hoof prints and came by chance upon two men from nearby Glenample Station three and a half miles away. In a state of exhaustion, he told the men of the tragedy. Tom returned to the gorge while the two men rode back to the station to get help. By the time they reached LOCH ARD Gorge, it was cold and dark. The two shipwreck survivors were taken to Glenample Station to recover. Eva stayed at the station for six weeks before returning to Ireland, this time by steamship. In Melbourne, Tom Pearce received a hero's welcome. He was presented with the first gold medal of the Royal Humane Society of Victoria and a £1000 cheque from the Victorian Government. Concerts were performed to honour the young man's bravery and to raise money for those who lost family in the LOCH ARD disaster. Of the 54 crew members and passengers on board, only two survived: the apprentice, Tom Pearce and the young woman passenger, Eva Carmichael, who lost all of her family in the tragedy. Ten days after the LOCH ARD tragedy, salvage rights to the wreck were sold at auction for £2,120. Cargo valued at £3,000 was salvaged and placed on the beach, but most washed back into the sea when another storm developed. The wreck of LOCH ARD still lies at the base of Mutton Bird Island. Much of the cargo has now been salvaged and some was washed up into what is now known as LOCH ARD Gorge. Cargo and artefacts have also been illegally salvaged over many years before protective legislation was introduced. One of the most unlikely pieces of cargo to have survived the shipwreck was a Minton porcelain peacock - one of only seven in the world. The peacock was destined for the Melbourne International Exhibition in 1880. It had been well packed, which gave it adequate protection during the violent storm. Today, the Minton peacock can be seen at the Flagstaff Hill Maritime Museum in Warrnambool. From Australia's most dramatic shipwreck it has now become Australia's shipwreck artefact and is one of very few 'objects' on the Victorian State Heritage Register most valuable. The LOCH ARD shipwreck is of State significance – Victorian Heritage Register S 417. Flagstaff Hill’s collection of artefacts from LOCH ARD is significant for being one of the largest collections of artefacts from this shipwreck in Victoria. It is significant for its association with the shipwreck, which is on the Victorian Heritage Register (VHR S417). The collection is significant because of the relationship between the objects, as together they have a high potential to interpret the story of the LOCH ARD. The LOCH ARD collection is archaeologically significant as the remains of a large international passenger and cargo ship. The LOCH ARD collection is historically significant for representing aspects of Victoria’s shipping history and its potential to interpret sub-theme 1.5 of Victoria’s Framework of Historical Themes (living with natural processes). The collection is also historically significant for its association with the LOCH ARD, which was one of the worst and best known shipwrecks in Victoria’s history. Unrestored dessert spoons from the wreck of the LOCH ARD. The spoon design has a flattened fiddle-back handle, with a thin stem or shank, flared collar, and a shallow rounded bowl. The spoons metallic composition is a thin layer of brass alloy which has partially corroded back to a nickel-silver base metal. Some verdigris and heavy concretion on spoon bowl and handle. Evidence of another spoon visible in bowl. 2 spoons in group.flagstaff hill maritime museum, shipwreck coast, great ocean road, loch line, loch ard, mutton bird island, loch ard gorge, electroplated cutlery, loch ard shipwreck, william page and co, birmingham brass plating, dessert spoons -
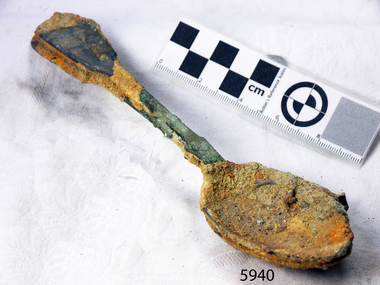 Flagstaff Hill Maritime Museum and Village
Spoon, circa 1878
These medium-sized dessert spoons are from the wreck of the LOCH ARD, a Loch Line ship of 1,693 tons which sailed from Gravesend, London, on 2 March 1878 with 17 passengers and a crew of 36 under Captain George Gibbs. “The intention was to discharge cargo in Melbourne, before returning to London via the Horn with wool and wheat”. Instead, on 1 June 1878, after 90 days at sea, she struck the sandstone cliffs of Mutton Bird Island on the south west coast of Victoria, and sank with the loss of 52 lives and all her cargo. The manifest of the LOCH ARD listed an array of manufactured goods and bulk metals being exported to the Colony of Victoria, with a declared value of £53,700. (202 bills of lading show an actual invoice value of £68, 456, with insurance underwriting to £30,000 of all cargo). Included in the manifest is the item of “Tin hardware & cutlery £7,530”. These dessert spoons are some of 482 similar items of electro-plated cutlery from the LOCH ARD site, comprising spoons and forks of various sizes but all sharing the same general shape or design and metallic composition. 49 of these pieces display a legible makers’ mark — the initials “W” and “P” placed within a raised diamond outline, which is in turn contained within a sunken crown shape — identifying the manufacturer as William Page & Co of Birmingham. An electroplater’s makers’ marks, unlike sterling silver hallmarks, are not consistent identifiers of quality or date and place of manufacture. A similar line of five impressions was usually made to impress the consumer with an implication of industry standards, but what each one actually signified was not regulated and so they varied according to the whim of the individual foundry. In this case, the maker’s marks are often obscured by sedimentary accretion or removed by corrosion after a century of submersion in the ocean. However sufficient detail has survived to indicate that these samples of electro-plated cutlery probably originated from the same consignment in the LOCH ARD’s cargo. The generally common range of marks are drawn from 255 tea spoons, 125 dessert spoons, and 99 table forks. These marks are clearly visible in 66 instances, while the same sequence of general outlines, or depression shapes, is discernible in another 166 examples. Suggested trade names for William Page & Co’s particular blend of brass plating are ‘roman silver’ or ‘silverite’. This copper alloy polishes to a lustrous gold when new, discolouring to a murky grey with greenish hue when neglected. HISTORY OF THE LOCH ARD The LOCH ARD belonged to the famous Loch Line which sailed many ships from England to Australia. Built in Glasgow by Barclay, Curdle and Co. in 1873, the LOCH ARD was a three-masted square rigged iron sailing ship. The ship measured 262ft 7" (79.87m) in length, 38ft (11.58m) in width, 23ft (7m) in depth and had a gross tonnage of 1693 tons. The LOCH ARD's main mast measured a massive 150ft (45.7m) in height. LOCH ARD made three trips to Australia and one trip to Calcutta before its final voyage. LOCH ARD left England on March 2, 1878, under the command of Captain Gibbs, a newly married, 29 year old. She was bound for Melbourne with a crew of 37, plus 17 passengers and a load of cargo. The general cargo reflected the affluence of Melbourne at the time. On board were straw hats, umbrella, perfumes, clay pipes, pianos, clocks, confectionary, linen and candles, as well as a heavier load of railway irons, cement, lead and copper. There were items included that intended for display in the Melbourne International Exhibition in 1880. The voyage to Port Phillip was long but uneventful. At 3am on June 1, 1878, Captain Gibbs was expecting to see land and the passengers were becoming excited as they prepared to view their new homeland in the early morning. But LOCH ARD was running into a fog which greatly reduced visibility. Captain Gibbs was becoming anxious as there was no sign of land or the Cape Otway lighthouse. At 4am the fog lifted. A man aloft announced that he could see breakers. The sheer cliffs of Victoria's west coast came into view, and Captain Gibbs realised that the ship was much closer to them than expected. He ordered as much sail to be set as time would permit and then attempted to steer the vessel out to sea. On coming head on into the wind, the ship lost momentum, the sails fell limp and LOCH ARD's bow swung back. Gibbs then ordered the anchors to be released in an attempt to hold its position. The anchors sank some 50 fathoms - but did not hold. By this time LOCH ARD was among the breakers and the tall cliffs of Mutton Bird Island rose behind the ship. Just half a mile from the coast, the ship's bow was suddenly pulled around by the anchor. The captain tried to tack out to sea, but the ship struck a reef at the base of Mutton Bird Island, near Port Campbell. Waves broke over the ship and the top deck was loosened from the hull. The masts and rigging came crashing down knocking passengers and crew overboard. When a lifeboat was finally launched, it crashed into the side of LOCH ARD and capsized. Tom Pearce, who had launched the boat, managed to cling to its overturned hull and shelter beneath it. He drifted out to sea and then on the flood tide came into what is now known as LOCH ARD Gorge. He swam to shore, bruised and dazed, and found a cave in which to shelter. Some of the crew stayed below deck to shelter from the falling rigging but drowned when the ship slipped off the reef into deeper water. Eva Carmichael had raced onto deck to find out what was happening only to be confronted by towering cliffs looming above the stricken ship. In all the chaos, Captain Gibbs grabbed Eva and said, "If you are saved Eva, let my dear wife know that I died like a sailor". That was the last Eva Carmichael saw of the captain. She was swept off the ship by a huge wave. Eva saw Tom Pearce on a small rocky beach and yelled to attract his attention. He dived in and swam to the exhausted woman and dragged her to shore. He took her to the cave and broke open case of brandy which had washed up on the beach. He opened a bottle to revive the unconscious woman. A few hours later Tom scaled a cliff in search of help. He followed hoof prints and came by chance upon two men from nearby Glenample Station three and a half miles away. In a state of exhaustion, he told the men of the tragedy. Tom returned to the gorge while the two men rode back to the station to get help. By the time they reached LOCH ARD Gorge, it was cold and dark. The two shipwreck survivors were taken to Glenample Station to recover. Eva stayed at the station for six weeks before returning to Ireland, this time by steamship. In Melbourne, Tom Pearce received a hero's welcome. He was presented with the first gold medal of the Royal Humane Society of Victoria and a £1000 cheque from the Victorian Government. Concerts were performed to honour the young man's bravery and to raise money for those who lost family in the LOCH ARD disaster. Of the 54 crew members and passengers on board, only two survived: the apprentice, Tom Pearce and the young woman passenger, Eva Carmichael, who lost all of her family in the tragedy. Ten days after the LOCH ARD tragedy, salvage rights to the wreck were sold at auction for £2,120. Cargo valued at £3,000 was salvaged and placed on the beach, but most washed back into the sea when another storm developed. The wreck of LOCH ARD still lies at the base of Mutton Bird Island. Much of the cargo has now been salvaged and some was washed up into what is now known as LOCH ARD Gorge. Cargo and artefacts have also been illegally salvaged over many years before protective legislation was introduced. One of the most unlikely pieces of cargo to have survived the shipwreck was a Minton porcelain peacock - one of only seven in the world. The peacock was destined for the Melbourne International Exhibition in 1880. It had been well packed, which gave it adequate protection during the violent storm. Today, the Minton peacock can be seen at the Flagstaff Hill Maritime Museum in Warrnambool. From Australia's most dramatic shipwreck it has now become Australia's shipwreck artefact and is one of very few 'objects' on the Victorian State Heritage Register most valuable. The LOCH ARD shipwreck is of State significance – Victorian Heritage Register S 417. Flagstaff Hill’s collection of artefacts from LOCH ARD is significant for being one of the largest collections of artefacts from this shipwreck in Victoria. It is significant for its association with the shipwreck, which is on the Victorian Heritage Register (VHR S417). The collection is significant because of the relationship between the objects, as together they have a high potential to interpret the story of the LOCH ARD. The LOCH ARD collection is archaeologically significant as the remains of a large international passenger and cargo ship. The LOCH ARD collection is historically significant for representing aspects of Victoria’s shipping history and its potential to interpret sub-theme 1.5 of Victoria’s Framework of Historical Themes (living with natural processes). The collection is also historically significant for its association with the LOCH ARD, which was one of the worst and best known shipwrecks in Victoria’s history. Unrestored dessert spoons from the wreck of the LOCH ARD. The spoon design has a flattened fiddle-back handle, with a thin stem or shank, flared collar, and a shallow rounded bowl. The spoons metallic composition is a thin layer of brass alloy which has partially corroded back to a nickel-silver base metal. A large amount of concretion joins the spoons at bowl and handle. 2 spoons in group.flagstaff hill, warrnambool, shipwrecked coast, flagstaff hill maritime museum, maritime museum, shipwreck coast, flagstaff hill maritime village, great ocean road, loch line, loch ard, captain gibbs, eva carmichael, tom pearce, glenample station, mutton bird island, loch ard gorge, electroplated cutlery, loch ard shipwreck, william page and co, birmingham brass plating, dessert spoons -
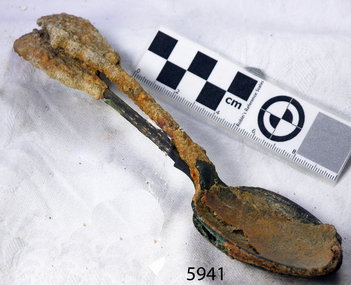 Flagstaff Hill Maritime Museum and Village
Spoon, circa 1878
These medium-sized dessert spoons are from the wreck of the LOCH ARD, a Loch Line ship of 1,693 tons which sailed from Gravesend, London, on 2 March 1878 with 17 passengers and a crew of 36 under Captain George Gibbs. “The intention was to discharge cargo in Melbourne, before returning to London via the Horn with wool and wheat”. Instead, on 1 June 1878, after 90 days at sea, she struck the sandstone cliffs of Mutton Bird Island on the south west coast of Victoria, and sank with the loss of 52 lives and all her cargo. The manifest of the LOCH ARD listed an array of manufactured goods and bulk metals being exported to the Colony of Victoria, with a declared value of £53,700. (202 bills of lading show an actual invoice value of £68, 456, with insurance underwriting to £30,000 of all cargo). Included in the manifest is the item of “Tin hardware & cutlery £7,530”. These dessert spoons are some of 482 similar items of electro-plated cutlery from the LOCH ARD site, comprising spoons and forks of various sizes but all sharing the same general shape or design and metallic composition. 49 of these pieces display a legible makers’ mark — the initials “W” and “P” placed within a raised diamond outline, which is in turn contained within a sunken crown shape — identifying the manufacturer as William Page & Co of Birmingham. An electroplater’s makers’ marks, unlike sterling silver hallmarks, are not consistent identifiers of quality or date and place of manufacture. A similar line of five impressions was usually made to impress the consumer with an implication of industry standards, but what each one actually signified was not regulated and so they varied according to the whim of the individual foundry. In this case, the maker’s marks are often obscured by sedimentary accretion or removed by corrosion after a century of submersion in the ocean. However sufficient detail has survived to indicate that these samples of electro-plated cutlery probably originated from the same consignment in the LOCH ARD’s cargo. The generally common range of marks are drawn from 255 tea spoons, 125 dessert spoons, and 99 table forks. These marks are clearly visible in 66 instances, while the same sequence of general outlines, or depression shapes, is discernible in another 166 examples. Suggested trade names for William Page & Co’s particular blend of brass plating are ‘roman silver’ or ‘silverite’. This copper alloy polishes to a lustrous gold when new, discolouring to a murky grey with greenish hue when neglected. HISTORY OF THE LOCH ARD The LOCH ARD belonged to the famous Loch Line which sailed many ships from England to Australia. Built in Glasgow by Barclay, Curdle and Co. in 1873, the LOCH ARD was a three-masted square rigged iron sailing ship. The ship measured 262ft 7" (79.87m) in length, 38ft (11.58m) in width, 23ft (7m) in depth and had a gross tonnage of 1693 tons. The LOCH ARD's main mast measured a massive 150ft (45.7m) in height. LOCH ARD made three trips to Australia and one trip to Calcutta before its final voyage. LOCH ARD left England on March 2, 1878, under the command of Captain Gibbs, a newly married, 29 year old. She was bound for Melbourne with a crew of 37, plus 17 passengers and a load of cargo. The general cargo reflected the affluence of Melbourne at the time. On board were straw hats, umbrella, perfumes, clay pipes, pianos, clocks, confectionary, linen and candles, as well as a heavier load of railway irons, cement, lead and copper. There were items included that intended for display in the Melbourne International Exhibition in 1880. The voyage to Port Phillip was long but uneventful. At 3am on June 1, 1878, Captain Gibbs was expecting to see land and the passengers were becoming excited as they prepared to view their new homeland in the early morning. But LOCH ARD was running into a fog which greatly reduced visibility. Captain Gibbs was becoming anxious as there was no sign of land or the Cape Otway lighthouse. At 4am the fog lifted. A man aloft announced that he could see breakers. The sheer cliffs of Victoria's west coast came into view, and Captain Gibbs realised that the ship was much closer to them than expected. He ordered as much sail to be set as time would permit and then attempted to steer the vessel out to sea. On coming head on into the wind, the ship lost momentum, the sails fell limp and LOCH ARD's bow swung back. Gibbs then ordered the anchors to be released in an attempt to hold its position. The anchors sank some 50 fathoms - but did not hold. By this time LOCH ARD was among the breakers and the tall cliffs of Mutton Bird Island rose behind the ship. Just half a mile from the coast, the ship's bow was suddenly pulled around by the anchor. The captain tried to tack out to sea, but the ship struck a reef at the base of Mutton Bird Island, near Port Campbell. Waves broke over the ship and the top deck was loosened from the hull. The masts and rigging came crashing down knocking passengers and crew overboard. When a lifeboat was finally launched, it crashed into the side of LOCH ARD and capsized. Tom Pearce, who had launched the boat, managed to cling to its overturned hull and shelter beneath it. He drifted out to sea and then on the flood tide came into what is now known as LOCH ARD Gorge. He swam to shore, bruised and dazed, and found a cave in which to shelter. Some of the crew stayed below deck to shelter from the falling rigging but drowned when the ship slipped off the reef into deeper water. Eva Carmichael had raced onto deck to find out what was happening only to be confronted by towering cliffs looming above the stricken ship. In all the chaos, Captain Gibbs grabbed Eva and said, "If you are saved Eva, let my dear wife know that I died like a sailor". That was the last Eva Carmichael saw of the captain. She was swept off the ship by a huge wave. Eva saw Tom Pearce on a small rocky beach and yelled to attract his attention. He dived in and swam to the exhausted woman and dragged her to shore. He took her to the cave and broke open case of brandy which had washed up on the beach. He opened a bottle to revive the unconscious woman. A few hours later Tom scaled a cliff in search of help. He followed hoof prints and came by chance upon two men from nearby Glenample Station three and a half miles away. In a state of exhaustion, he told the men of the tragedy. Tom returned to the gorge while the two men rode back to the station to get help. By the time they reached LOCH ARD Gorge, it was cold and dark. The two shipwreck survivors were taken to Glenample Station to recover. Eva stayed at the station for six weeks before returning to Ireland, this time by steamship. In Melbourne, Tom Pearce received a hero's welcome. He was presented with the first gold medal of the Royal Humane Society of Victoria and a £1000 cheque from the Victorian Government. Concerts were performed to honour the young man's bravery and to raise money for those who lost family in the LOCH ARD disaster. Of the 54 crew members and passengers on board, only two survived: the apprentice, Tom Pearce and the young woman passenger, Eva Carmichael, who lost all of her family in the tragedy. Ten days after the LOCH ARD tragedy, salvage rights to the wreck were sold at auction for £2,120. Cargo valued at £3,000 was salvaged and placed on the beach, but most washed back into the sea when another storm developed. The wreck of LOCH ARD still lies at the base of Mutton Bird Island. Much of the cargo has now been salvaged and some was washed up into what is now known as LOCH ARD Gorge. Cargo and artefacts have also been illegally salvaged over many years before protective legislation was introduced. One of the most unlikely pieces of cargo to have survived the shipwreck was a Minton porcelain peacock - one of only seven in the world. The peacock was destined for the Melbourne International Exhibition in 1880. It had been well packed, which gave it adequate protection during the violent storm. Today, the Minton peacock can be seen at the Flagstaff Hill Maritime Museum in Warrnambool. From Australia's most dramatic shipwreck it has now become Australia's shipwreck artefact and is one of very few 'objects' on the Victorian State Heritage Register most valuable. The LOCH ARD shipwreck is of State significance – Victorian Heritage Register S 417. Flagstaff Hill’s collection of artefacts from LOCH ARD is significant for being one of the largest collections of artefacts from this shipwreck in Victoria. It is significant for its association with the shipwreck, which is on the Victorian Heritage Register (VHR S417). The collection is significant because of the relationship between the objects, as together they have a high potential to interpret the story of the LOCH ARD. The LOCH ARD collection is archaeologically significant as the remains of a large international passenger and cargo ship. The LOCH ARD collection is historically significant for representing aspects of Victoria’s shipping history and its potential to interpret sub-theme 1.5 of Victoria’s Framework of Historical Themes (living with natural processes). The collection is also historically significant for its association with the LOCH ARD, which was one of the worst and best known shipwrecks in Victoria’s history. Unrestored dessert spoons from the wreck of the LOCH ARD. The spoon design has a flattened fiddle-back handle, with a thin stem or shank, flared collar, and a shallow rounded bowl. The spoons metallic composition is a thin layer of brass alloy which has partially corroded back to a nickel-silver base metal. Some verdigris and heavy concretion joins spoons along stem and handle. Evidence of another spoon visible in top bowl. Plain heraldic shield is visible on upper rear of bottom bowl. 2 spoons in group.flagstaff hill, warrnambool, shipwrecked coast, flagstaff hill maritime museum, maritime museum, shipwreck coast, flagstaff hill maritime village, great ocean road, loch line, loch ard, captain gibbs, eva carmichael, tom pearce, glenample station, mutton bird island, loch ard gorge, electroplated cutlery, loch ard shipwreck, william page and co, birmingham brass plating, dessert spoons -
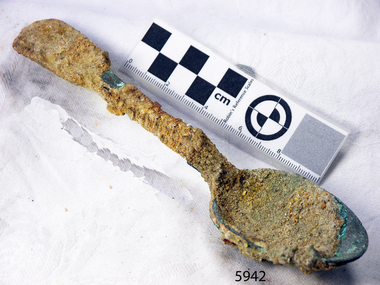 Flagstaff Hill Maritime Museum and Village
Spoon, circa 1878
These medium-sized dessert spoons are from the wreck of the LOCH ARD, a Loch Line ship of 1,693 tons which sailed from Gravesend, London, on 2 March 1878 with 17 passengers and a crew of 36 under Captain George Gibbs. “The intention was to discharge cargo in Melbourne, before returning to London via the Horn with wool and wheat”. Instead, on 1 June 1878, after 90 days at sea, she struck the sandstone cliffs of Mutton Bird Island on the south west coast of Victoria, and sank with the loss of 52 lives and all her cargo. The manifest of the LOCH ARD listed an array of manufactured goods and bulk metals being exported to the Colony of Victoria, with a declared value of £53,700. (202 bills of lading show an actual invoice value of £68, 456, with insurance underwriting to £30,000 of all cargo). Included in the manifest is the item of “Tin hardware & cutlery £7,530”. These dessert spoons are some of 482 similar items of electro-plated cutlery from the LOCH ARD site, comprising spoons and forks of various sizes but all sharing the same general shape or design and metallic composition. 49 of these pieces display a legible makers’ mark — the initials “W” and “P” placed within a raised diamond outline, which is in turn contained within a sunken crown shape — identifying the manufacturer as William Page & Co of Birmingham. An electroplater’s makers’ marks, unlike sterling silver hallmarks, are not consistent identifiers of quality or date and place of manufacture. A similar line of five impressions was usually made to impress the consumer with an implication of industry standards, but what each one actually signified was not regulated and so they varied according to the whim of the individual foundry. In this case, the maker’s marks are often obscured by sedimentary accretion or removed by corrosion after a century of submersion in the ocean. However sufficient detail has survived to indicate that these samples of electro-plated cutlery probably originated from the same consignment in the LOCH ARD’s cargo. The generally common range of marks are drawn from 255 tea spoons, 125 dessert spoons, and 99 table forks. These marks are clearly visible in 66 instances, while the same sequence of general outlines, or depression shapes, is discernible in another 166 examples. Suggested trade names for William Page & Co’s particular blend of brass plating are ‘roman silver’ or ‘silverite’. This copper alloy polishes to a lustrous gold when new, discolouring to a murky grey with greenish hue when neglected. HISTORY OF THE LOCH ARD The LOCH ARD belonged to the famous Loch Line which sailed many ships from England to Australia. Built in Glasgow by Barclay, Curdle and Co. in 1873, the LOCH ARD was a three-masted square rigged iron sailing ship. The ship measured 262ft 7" (79.87m) in length, 38ft (11.58m) in width, 23ft (7m) in depth and had a gross tonnage of 1693 tons. The LOCH ARD's main mast measured a massive 150ft (45.7m) in height. LOCH ARD made three trips to Australia and one trip to Calcutta before its final voyage. LOCH ARD left England on March 2, 1878, under the command of Captain Gibbs, a newly married, 29 year old. She was bound for Melbourne with a crew of 37, plus 17 passengers and a load of cargo. The general cargo reflected the affluence of Melbourne at the time. On board were straw hats, umbrella, perfumes, clay pipes, pianos, clocks, confectionary, linen and candles, as well as a heavier load of railway irons, cement, lead and copper. There were items included that intended for display in the Melbourne International Exhibition in 1880. The voyage to Port Phillip was long but uneventful. At 3am on June 1, 1878, Captain Gibbs was expecting to see land and the passengers were becoming excited as they prepared to view their new homeland in the early morning. But LOCH ARD was running into a fog which greatly reduced visibility. Captain Gibbs was becoming anxious as there was no sign of land or the Cape Otway lighthouse. At 4am the fog lifted. A man aloft announced that he could see breakers. The sheer cliffs of Victoria's west coast came into view, and Captain Gibbs realised that the ship was much closer to them than expected. He ordered as much sail to be set as time would permit and then attempted to steer the vessel out to sea. On coming head on into the wind, the ship lost momentum, the sails fell limp and LOCH ARD's bow swung back. Gibbs then ordered the anchors to be released in an attempt to hold its position. The anchors sank some 50 fathoms - but did not hold. By this time LOCH ARD was among the breakers and the tall cliffs of Mutton Bird Island rose behind the ship. Just half a mile from the coast, the ship's bow was suddenly pulled around by the anchor. The captain tried to tack out to sea, but the ship struck a reef at the base of Mutton Bird Island, near Port Campbell. Waves broke over the ship and the top deck was loosened from the hull. The masts and rigging came crashing down knocking passengers and crew overboard. When a lifeboat was finally launched, it crashed into the side of LOCH ARD and capsized. Tom Pearce, who had launched the boat, managed to cling to its overturned hull and shelter beneath it. He drifted out to sea and then on the flood tide came into what is now known as LOCH ARD Gorge. He swam to shore, bruised and dazed, and found a cave in which to shelter. Some of the crew stayed below deck to shelter from the falling rigging but drowned when the ship slipped off the reef into deeper water. Eva Carmichael had raced onto deck to find out what was happening only to be confronted by towering cliffs looming above the stricken ship. In all the chaos, Captain Gibbs grabbed Eva and said, "If you are saved Eva, let my dear wife know that I died like a sailor". That was the last Eva Carmichael saw of the captain. She was swept off the ship by a huge wave. Eva saw Tom Pearce on a small rocky beach and yelled to attract his attention. He dived in and swam to the exhausted woman and dragged her to shore. He took her to the cave and broke open case of brandy which had washed up on the beach. He opened a bottle to revive the unconscious woman. A few hours later Tom scaled a cliff in search of help. He followed hoof prints and came by chance upon two men from nearby Glenample Station three and a half miles away. In a state of exhaustion, he told the men of the tragedy. Tom returned to the gorge while the two men rode back to the station to get help. By the time they reached LOCH ARD Gorge, it was cold and dark. The two shipwreck survivors were taken to Glenample Station to recover. Eva stayed at the station for six weeks before returning to Ireland, this time by steamship. In Melbourne, Tom Pearce received a hero's welcome. He was presented with the first gold medal of the Royal Humane Society of Victoria and a £1000 cheque from the Victorian Government. Concerts were performed to honour the young man's bravery and to raise money for those who lost family in the LOCH ARD disaster. Of the 54 crew members and passengers on board, only two survived: the apprentice, Tom Pearce and the young woman passenger, Eva Carmichael, who lost all of her family in the tragedy. Ten days after the LOCH ARD tragedy, salvage rights to the wreck were sold at auction for £2,120. Cargo valued at £3,000 was salvaged and placed on the beach, but most washed back into the sea when another storm developed. The wreck of LOCH ARD still lies at the base of Mutton Bird Island. Much of the cargo has now been salvaged and some was washed up into what is now known as LOCH ARD Gorge. Cargo and artefacts have also been illegally salvaged over many years before protective legislation was introduced. One of the most unlikely pieces of cargo to have survived the shipwreck was a Minton porcelain peacock - one of only seven in the world. The peacock was destined for the Melbourne International Exhibition in 1880. It had been well packed, which gave it adequate protection during the violent storm. Today, the Minton peacock can be seen at the Flagstaff Hill Maritime Museum in Warrnambool. From Australia's most dramatic shipwreck it has now become Australia's shipwreck artefact and is one of very few 'objects' on the Victorian State Heritage Register most valuable. The LOCH ARD shipwreck is of State significance – Victorian Heritage Register S 417. Flagstaff Hill’s collection of artefacts from LOCH ARD is significant for being one of the largest collections of artefacts from this shipwreck in Victoria. It is significant for its association with the shipwreck, which is on the Victorian Heritage Register (VHR S417). The collection is significant because of the relationship between the objects, as together they have a high potential to interpret the story of the LOCH ARD. The LOCH ARD collection is archaeologically significant as the remains of a large international passenger and cargo ship. The LOCH ARD collection is historically significant for representing aspects of Victoria’s shipping history and its potential to interpret sub-theme 1.5 of Victoria’s Framework of Historical Themes (living with natural processes). The collection is also historically significant for its association with the LOCH ARD, which was one of the worst and best known shipwrecks in Victoria’s history. Unrestored dessert spoons from the wreck of the LOCH ARD. The spoon design has a flattened fiddle-back handle, with a thin stem or shank, flared collar, and a shallow rounded bowl. The spoons metallic composition is a thin layer of brass alloy which has partially corroded back to a nickel-silver base metal. Some verdigris and heavy concretion on spoon bowl and handle. 2 spoons in group.flagstaff hill, warrnambool, shipwrecked coast, flagstaff hill maritime museum, maritime museum, shipwreck coast, flagstaff hill maritime village, great ocean road, loch line, loch ard, captain gibbs, eva carmichael, tom pearce, glenample station, mutton bird island, loch ard gorge, electroplated cutlery, loch ard shipwreck, william page and co, birmingham brass plating, dessert spoons -
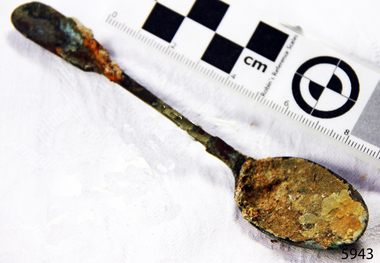 Flagstaff Hill Maritime Museum and Village
Spoon, circa 1878
This sugar spoon is from the wreck of the LOCH ARD, a Loch Line ship of 1,693 tons which sailed from Gravesend, London, on 2 March 1878 with 17 passengers and a crew of 36 under Captain George Gibbs. “The intention was to discharge cargo in Melbourne, before returning to London via the Horn with wool and wheat”. Instead, on 1 June 1878, after 90 days at sea, she struck the sandstone cliffs of Mutton Bird Island on the south west coast of Victoria, and sank with the loss of 52 lives and all her cargo. The manifest of the LOCH ARD listed an array of manufactured goods and bulk metals being exported to the Colony of Victoria, with a declared value of £53,700. (202 bills of lading show an actual invoice value of £68, 456, with insurance underwriting to £30,000 of all cargo). Included in the manifest is the item of “Tin hardware & cutlery £7,530”. This sugarspoon is one of 482 similar items of electro-plated cutlery from the LOCH ARD site, comprising spoons and forks of various sizes but all sharing the same general shape or design and metallic composition. 49 of these pieces display a legible makers’ mark — the initials “W” and “P” placed within a raised diamond outline, which is in turn contained within a sunken crown shape — identifying the manufacturer as William Page & Co of Birmingham. An electroplater’s makers’ marks, unlike sterling silver hallmarks, are not consistent identifiers of quality or date and place of manufacture. A similar line of five impressions was usually made to impress the consumer with an implication of industry standards, but what each one actually signified was not regulated and so they varied according to the whim of the individual foundry. In this case, the maker’s marks are often obscured by sedimentary accretion or removed by corrosion after a century of submersion in the ocean. However sufficient detail has survived to indicate that these samples of electro-plated cutlery probably originated from the same consignment in the LOCH ARD’s cargo. The generally common range of marks are drawn from 255 tea spoons, 125 dessert spoons, and 99 table forks. These marks are clearly visible in 66 instances, while the same sequence of general outlines, or depression shapes, is discernible in another 166 examples. Suggested trade names for William Page & Co’s particular blend of brass plating are ‘roman silver’ or ‘silverite’. This copper alloy polishes to a lustrous gold when new, discolouring to a murky grey with greenish hue when neglected. HISTORY OF THE LOCH ARD The LOCH ARD belonged to the famous Loch Line which sailed many ships from England to Australia. Built in Glasgow by Barclay, Curdle and Co. in 1873, the LOCH ARD was a three-masted square rigged iron sailing ship. The ship measured 262ft 7" (79.87m) in length, 38ft (11.58m) in width, 23ft (7m) in depth and had a gross tonnage of 1693 tons. The LOCH ARD's main mast measured a massive 150ft (45.7m) in height. LOCH ARD made three trips to Australia and one trip to Calcutta before its final voyage. LOCH ARD left England on March 2, 1878, under the command of Captain Gibbs, a newly married, 29 year old. She was bound for Melbourne with a crew of 37, plus 17 passengers and a load of cargo. The general cargo reflected the affluence of Melbourne at the time. On board were straw hats, umbrella, perfumes, clay pipes, pianos, clocks, confectionary, linen and candles, as well as a heavier load of railway irons, cement, lead and copper. There were items included that intended for display in the Melbourne International Exhibition in 1880. The voyage to Port Phillip was long but uneventful. At 3am on June 1, 1878, Captain Gibbs was expecting to see land and the passengers were becoming excited as they prepared to view their new homeland in the early morning. But LOCH ARD was running into a fog which greatly reduced visibility. Captain Gibbs was becoming anxious as there was no sign of land or the Cape Otway lighthouse. At 4am the fog lifted. A man aloft announced that he could see breakers. The sheer cliffs of Victoria's west coast came into view, and Captain Gibbs realised that the ship was much closer to them than expected. He ordered as much sail to be set as time would permit and then attempted to steer the vessel out to sea. On coming head on into the wind, the ship lost momentum, the sails fell limp and LOCH ARD's bow swung back. Gibbs then ordered the anchors to be released in an attempt to hold its position. The anchors sank some 50 fathoms - but did not hold. By this time LOCH ARD was among the breakers and the tall cliffs of Mutton Bird Island rose behind the ship. Just half a mile from the coast, the ship's bow was suddenly pulled around by the anchor. The captain tried to tack out to sea, but the ship struck a reef at the base of Mutton Bird Island, near Port Campbell. Waves broke over the ship and the top deck was loosened from the hull. The masts and rigging came crashing down knocking passengers and crew overboard. When a lifeboat was finally launched, it crashed into the side of LOCH ARD and capsized. Tom Pearce, who had launched the boat, managed to cling to its overturned hull and shelter beneath it. He drifted out to sea and then on the flood tide came into what is now known as LOCH ARD Gorge. He swam to shore, bruised and dazed, and found a cave in which to shelter. Some of the crew stayed below deck to shelter from the falling rigging but drowned when the ship slipped off the reef into deeper water. Eva Carmichael had raced onto deck to find out what was happening only to be confronted by towering cliffs looming above the stricken ship. In all the chaos, Captain Gibbs grabbed Eva and said, "If you are saved Eva, let my dear wife know that I died like a sailor". That was the last Eva Carmichael saw of the captain. She was swept off the ship by a huge wave. Eva saw Tom Pearce on a small rocky beach and yelled to attract his attention. He dived in and swam to the exhausted woman and dragged her to shore. He took her to the cave and broke open case of brandy which had washed up on the beach. He opened a bottle to revive the unconscious woman. A few hours later Tom scaled a cliff in search of help. He followed hoof prints and came by chance upon two men from nearby Glenample Station three and a half miles away. In a state of exhaustion, he told the men of the tragedy. Tom returned to the gorge while the two men rode back to the station to get help. By the time they reached LOCH ARD Gorge, it was cold and dark. The two shipwreck survivors were taken to Glenample Station to recover. Eva stayed at the station for six weeks before returning to Ireland, this time by steamship. In Melbourne, Tom Pearce received a hero's welcome. He was presented with the first gold medal of the Royal Humane Society of Victoria and a £1000 cheque from the Victorian Government. Concerts were performed to honour the young man's bravery and to raise money for those who lost family in the LOCH ARD disaster. Of the 54 crew members and passengers on board, only two survived: the apprentice, Tom Pearce and the young woman passenger, Eva Carmichael, who lost all of her family in the tragedy. Ten days after the LOCH ARD tragedy, salvage rights to the wreck were sold at auction for £2,120. Cargo valued at £3,000 was salvaged and placed on the beach, but most washed back into the sea when another storm developed. The wreck of LOCH ARD still lies at the base of Mutton Bird Island. Much of the cargo has now been salvaged and some was washed up into what is now known as LOCH ARD Gorge. Cargo and artefacts have also been illegally salvaged over many years before protective legislation was introduced. One of the most unlikely pieces of cargo to have survived the shipwreck was a Minton porcelain peacock - one of only seven in the world. The peacock was destined for the Melbourne International Exhibition in 1880. It had been well packed, which gave it adequate protection during the violent storm. Today, the Minton peacock can be seen at the Flagstaff Hill Maritime Museum in Warrnambool. From Australia's most dramatic shipwreck it has now become Australia's shipwreck artefact and is one of very few 'objects' on the Victorian State Heritage Register most valuable. The LOCH ARD shipwreck is of State significance – Victorian Heritage Register S 417. Flagstaff Hill’s collection of artefacts from LOCH ARD is significant for being one of the largest collections of artefacts from this shipwreck in Victoria. It is significant for its association with the shipwreck, which is on the Victorian Heritage Register (VHR S417). The collection is significant because of the relationship between the objects, as together they have a high potential to interpret the story of the LOCH ARD. The LOCH ARD collection is archaeologically significant as the remains of a large international passenger and cargo ship. The LOCH ARD collection is historically significant for representing aspects of Victoria’s shipping history and its potential to interpret sub-theme 1.5 of Victoria’s Framework of Historical Themes (living with natural processes). The collection is also historically significant for its association with the LOCH ARD, which was one of the worst and best known shipwrecks in Victoria’s history. Unrestored sugar spoon from the wreck of the LOCH ARD. The spoon design has a flattened fiddle-back handle, with a thin stem or shank, flared collar, and a shallow rounded bowl. The spoons metallic composition is a thin layer of brass alloy which has partially corroded back to a nickel-silver base metal. 40% concretion on spoon bowl and handle. Spoon is bent and only a small amount of the original plate remains. No visible makers marks.flagstaff hill, warrnambool, shipwrecked coast, flagstaff hill maritime museum, maritime museum, shipwreck coast, flagstaff hill maritime village, great ocean road, loch line, loch ard, captain gibbs, eva carmichael, tom pearce, glenample station, mutton bird island, loch ard gorge, electroplated cutlery, loch ard shipwreck, nickel silver, william page and co, birmingham brass plating, makers marks -
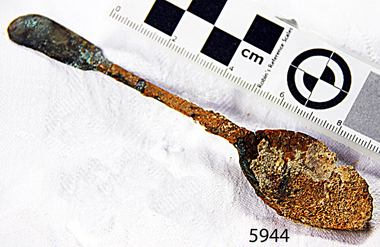 Flagstaff Hill Maritime Museum and Village
Spoon, circa 1878
This sugar spoon is from the wreck of the LOCH ARD, a Loch Line ship of 1,693 tons which sailed from Gravesend, London, on 2 March 1878 with 17 passengers and a crew of 36 under Captain George Gibbs. “The intention was to discharge cargo in Melbourne, before returning to London via the Horn with wool and wheat”. Instead, on 1 June 1878, after 90 days at sea, she struck the sandstone cliffs of Mutton Bird Island on the south west coast of Victoria, and sank with the loss of 52 lives and all her cargo. The manifest of the LOCH ARD listed an array of manufactured goods and bulk metals being exported to the Colony of Victoria, with a declared value of £53,700. (202 bills of lading show an actual invoice value of £68, 456, with insurance underwriting to £30,000 of all cargo). Included in the manifest is the item of “Tin hardware & cutlery £7,530”. This sugarspoon is one of 482 similar items of electro-plated cutlery from the LOCH ARD site, comprising spoons and forks of various sizes but all sharing the same general shape or design and metallic composition. 49 of these pieces display a legible makers’ mark — the initials “W” and “P” placed within a raised diamond outline, which is in turn contained within a sunken crown shape — identifying the manufacturer as William Page & Co of Birmingham. An electroplater’s makers’ marks, unlike sterling silver hallmarks, are not consistent identifiers of quality or date and place of manufacture. A similar line of five impressions was usually made to impress the consumer with an implication of industry standards, but what each one actually signified was not regulated and so they varied according to the whim of the individual foundry. In this case, the maker’s marks are often obscured by sedimentary accretion or removed by corrosion after a century of submersion in the ocean. However sufficient detail has survived to indicate that these samples of electro-plated cutlery probably originated from the same consignment in the LOCH ARD’s cargo. The generally common range of marks are drawn from 255 tea spoons, 125 dessert spoons, and 99 table forks. These marks are clearly visible in 66 instances, while the same sequence of general outlines, or depression shapes, is discernible in another 166 examples. Suggested trade names for William Page & Co’s particular blend of brass plating are ‘roman silver’ or ‘silverite’. This copper alloy polishes to a lustrous gold when new, discolouring to a murky grey with greenish hue when neglected. HISTORY OF THE LOCH ARD The LOCH ARD belonged to the famous Loch Line which sailed many ships from England to Australia. Built in Glasgow by Barclay, Curdle and Co. in 1873, the LOCH ARD was a three-masted square rigged iron sailing ship. The ship measured 262ft 7" (79.87m) in length, 38ft (11.58m) in width, 23ft (7m) in depth and had a gross tonnage of 1693 tons. The LOCH ARD's main mast measured a massive 150ft (45.7m) in height. LOCH ARD made three trips to Australia and one trip to Calcutta before its final voyage. LOCH ARD left England on March 2, 1878, under the command of Captain Gibbs, a newly married, 29 year old. She was bound for Melbourne with a crew of 37, plus 17 passengers and a load of cargo. The general cargo reflected the affluence of Melbourne at the time. On board were straw hats, umbrella, perfumes, clay pipes, pianos, clocks, confectionary, linen and candles, as well as a heavier load of railway irons, cement, lead and copper. There were items included that intended for display in the Melbourne International Exhibition in 1880. The voyage to Port Phillip was long but uneventful. At 3am on June 1, 1878, Captain Gibbs was expecting to see land and the passengers were becoming excited as they prepared to view their new homeland in the early morning. But LOCH ARD was running into a fog which greatly reduced visibility. Captain Gibbs was becoming anxious as there was no sign of land or the Cape Otway lighthouse. At 4am the fog lifted. A man aloft announced that he could see breakers. The sheer cliffs of Victoria's west coast came into view, and Captain Gibbs realised that the ship was much closer to them than expected. He ordered as much sail to be set as time would permit and then attempted to steer the vessel out to sea. On coming head on into the wind, the ship lost momentum, the sails fell limp and LOCH ARD's bow swung back. Gibbs then ordered the anchors to be released in an attempt to hold its position. The anchors sank some 50 fathoms - but did not hold. By this time LOCH ARD was among the breakers and the tall cliffs of Mutton Bird Island rose behind the ship. Just half a mile from the coast, the ship's bow was suddenly pulled around by the anchor. The captain tried to tack out to sea, but the ship struck a reef at the base of Mutton Bird Island, near Port Campbell. Waves broke over the ship and the top deck was loosened from the hull. The masts and rigging came crashing down knocking passengers and crew overboard. When a lifeboat was finally launched, it crashed into the side of LOCH ARD and capsized. Tom Pearce, who had launched the boat, managed to cling to its overturned hull and shelter beneath it. He drifted out to sea and then on the flood tide came into what is now known as LOCH ARD Gorge. He swam to shore, bruised and dazed, and found a cave in which to shelter. Some of the crew stayed below deck to shelter from the falling rigging but drowned when the ship slipped off the reef into deeper water. Eva Carmichael had raced onto deck to find out what was happening only to be confronted by towering cliffs looming above the stricken ship. In all the chaos, Captain Gibbs grabbed Eva and said, "If you are saved Eva, let my dear wife know that I died like a sailor". That was the last Eva Carmichael saw of the captain. She was swept off the ship by a huge wave. Eva saw Tom Pearce on a small rocky beach and yelled to attract his attention. He dived in and swam to the exhausted woman and dragged her to shore. He took her to the cave and broke open case of brandy which had washed up on the beach. He opened a bottle to revive the unconscious woman. A few hours later Tom scaled a cliff in search of help. He followed hoof prints and came by chance upon two men from nearby Glenample Station three and a half miles away. In a state of exhaustion, he told the men of the tragedy. Tom returned to the gorge while the two men rode back to the station to get help. By the time they reached LOCH ARD Gorge, it was cold and dark. The two shipwreck survivors were taken to Glenample Station to recover. Eva stayed at the station for six weeks before returning to Ireland, this time by steamship. In Melbourne, Tom Pearce received a hero's welcome. He was presented with the first gold medal of the Royal Humane Society of Victoria and a £1000 cheque from the Victorian Government. Concerts were performed to honour the young man's bravery and to raise money for those who lost family in the LOCH ARD disaster. Of the 54 crew members and passengers on board, only two survived: the apprentice, Tom Pearce and the young woman passenger, Eva Carmichael, who lost all of her family in the tragedy. Ten days after the LOCH ARD tragedy, salvage rights to the wreck were sold at auction for £2,120. Cargo valued at £3,000 was salvaged and placed on the beach, but most washed back into the sea when another storm developed. The wreck of LOCH ARD still lies at the base of Mutton Bird Island. Much of the cargo has now been salvaged and some was washed up into what is now known as LOCH ARD Gorge. Cargo and artefacts have also been illegally salvaged over many years before protective legislation was introduced. One of the most unlikely pieces of cargo to have survived the shipwreck was a Minton porcelain peacock - one of only seven in the world. The peacock was destined for the Melbourne International Exhibition in 1880. It had been well packed, which gave it adequate protection during the violent storm. Today, the Minton peacock can be seen at the Flagstaff Hill Maritime Museum in Warrnambool. From Australia's most dramatic shipwreck it has now become Australia's shipwreck artefact and is one of very few 'objects' on the Victorian State Heritage Register most valuable. The LOCH ARD shipwreck is of State significance – Victorian Heritage Register S 417. Flagstaff Hill’s collection of artefacts from LOCH ARD is significant for being one of the largest collections of artefacts from this shipwreck in Victoria. It is significant for its association with the shipwreck, which is on the Victorian Heritage Register (VHR S417). The collection is significant because of the relationship between the objects, as together they have a high potential to interpret the story of the LOCH ARD. The LOCH ARD collection is archaeologically significant as the remains of a large international passenger and cargo ship. The LOCH ARD collection is historically significant for representing aspects of Victoria’s shipping history and its potential to interpret sub-theme 1.5 of Victoria’s Framework of Historical Themes (living with natural processes). The collection is also historically significant for its association with the LOCH ARD, which was one of the worst and best known shipwrecks in Victoria’s history. Unrestored sugar spoon from the wreck of the LOCH ARD. The spoon design has a flattened fiddle-back handle, with a thin stem or shank, flared collar, and a shallow rounded bowl. The spoons metallic composition is a thin layer of brass alloy which has partially corroded back to a nickel-silver base metal. 80% of surface are is covered by sediment. Bowl is split and broken. Some verdigris on exposed portion of base metal. No makers marks are visible. flagstaff hill, warrnambool, shipwrecked coast, flagstaff hill maritime museum, maritime museum, shipwreck coast, flagstaff hill maritime village, great ocean road, loch line, loch ard, captain gibbs, eva carmichael, tom pearce, glenample station, mutton bird island, loch ard gorge, electroplated cutlery, loch ard shipwreck, nickel silver, william page and co, birmingham brass plating, makers marks -
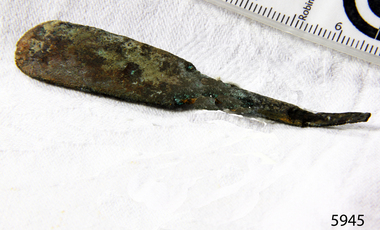 Flagstaff Hill Maritime Museum and Village
Spoon Handle
This upper portion of a brass plated spoon is from the wreck of the LOCH ARD, a Loch Line ship of 1,693 tons which sailed from Gravesend, London, on 2 March 1878 with 17 passengers and a crew of 36 under Captain George Gibbs. “The intention was to discharge cargo in Melbourne, before returning to London via the Horn with wool and wheat”. Instead, on 1 June 1878, after 90 days at sea, she struck the sandstone cliffs of Mutton Bird Island on the south west coast of Victoria, and sank with the loss of 52 lives and all her cargo. The manifest of the LOCH ARD listed an array of manufactured goods and bulk metals being exported to the Colony of Victoria, with a declared value of £53,700. (202 bills of lading show an actual invoice value of £68, 456, with insurance underwriting to £30,000 of all cargo). Included in the manifest is the item of “Tin hardware & cutlery £7,530”. This spoon handle is one of 482 similar items of electro-plated cutlery from the LOCH ARD site, comprising spoons and forks of various sizes but all sharing the same general shape or design and metallic composition. 49 of these pieces display a legible makers’ mark — the initials “W” and “P” placed within a raised diamond outline, which is in turn contained within a sunken crown shape — identifying the manufacturer as William Page & Co of Birmingham. An electroplater’s makers’ marks, unlike sterling silver hallmarks, are not consistent identifiers of quality or date and place of manufacture. A similar line of five impressions was usually made to impress the consumer with an implication of industry standards, but what each one actually signified was not regulated and so they varied according to the whim of the individual foundry. In this case, the maker’s marks are often obscured by sedimentary accretion or removed by corrosion after a century of submersion in the ocean. However sufficient detail has survived to indicate that these samples of electro-plated cutlery probably originated from the same consignment in the LOCH ARD’s cargo. The generally common range of marks are drawn from 255 tea spoons, 125 dessert spoons, and 99 table forks. These marks are clearly visible in 66 instances, while the same sequence of general outlines, or depression shapes, is discernible in another 166 examples. Suggested trade names for William Page & Co’s particular blend of brass plating are ‘roman silver’ or ‘silverite’. This copper alloy polishes to a lustrous gold when new, discolouring to a murky grey with greenish hue when neglected. HISTORY OF THE LOCH ARD The LOCH ARD belonged to the famous Loch Line which sailed many ships from England to Australia. Built in Glasgow by Barclay, Curdle and Co. in 1873, the LOCH ARD was a three-masted square rigged iron sailing ship. The ship measured 262ft 7" (79.87m) in length, 38ft (11.58m) in width, 23ft (7m) in depth and had a gross tonnage of 1693 tons. The LOCH ARD's main mast measured a massive 150ft (45.7m) in height. LOCH ARD made three trips to Australia and one trip to Calcutta before its final voyage. LOCH ARD left England on March 2, 1878, under the command of Captain Gibbs, a newly married, 29 year old. She was bound for Melbourne with a crew of 37, plus 17 passengers and a load of cargo. The general cargo reflected the affluence of Melbourne at the time. On board were straw hats, umbrella, perfumes, clay pipes, pianos, clocks, confectionary, linen and candles, as well as a heavier load of railway irons, cement, lead and copper. There were items included that intended for display in the Melbourne International Exhibition in 1880. The voyage to Port Phillip was long but uneventful. At 3am on June 1, 1878, Captain Gibbs was expecting to see land and the passengers were becoming excited as they prepared to view their new homeland in the early morning. But LOCH ARD was running into a fog which greatly reduced visibility. Captain Gibbs was becoming anxious as there was no sign of land or the Cape Otway lighthouse. At 4am the fog lifted. A man aloft announced that he could see breakers. The sheer cliffs of Victoria's west coast came into view, and Captain Gibbs realised that the ship was much closer to them than expected. He ordered as much sail to be set as time would permit and then attempted to steer the vessel out to sea. On coming head on into the wind, the ship lost momentum, the sails fell limp and LOCH ARD's bow swung back. Gibbs then ordered the anchors to be released in an attempt to hold its position. The anchors sank some 50 fathoms - but did not hold. By this time LOCH ARD was among the breakers and the tall cliffs of Mutton Bird Island rose behind the ship. Just half a mile from the coast, the ship's bow was suddenly pulled around by the anchor. The captain tried to tack out to sea, but the ship struck a reef at the base of Mutton Bird Island, near Port Campbell. Waves broke over the ship and the top deck was loosened from the hull. The masts and rigging came crashing down knocking passengers and crew overboard. When a lifeboat was finally launched, it crashed into the side of LOCH ARD and capsized. Tom Pearce, who had launched the boat, managed to cling to its overturned hull and shelter beneath it. He drifted out to sea and then on the flood tide came into what is now known as LOCH ARD Gorge. He swam to shore, bruised and dazed, and found a cave in which to shelter. Some of the crew stayed below deck to shelter from the falling rigging but drowned when the ship slipped off the reef into deeper water. Eva Carmichael had raced onto deck to find out what was happening only to be confronted by towering cliffs looming above the stricken ship. In all the chaos, Captain Gibbs grabbed Eva and said, "If you are saved Eva, let my dear wife know that I died like a sailor". That was the last Eva Carmichael saw of the captain. She was swept off the ship by a huge wave. Eva saw Tom Pearce on a small rocky beach and yelled to attract his attention. He dived in and swam to the exhausted woman and dragged her to shore. He took her to the cave and broke open case of brandy which had washed up on the beach. He opened a bottle to revive the unconscious woman. A few hours later Tom scaled a cliff in search of help. He followed hoof prints and came by chance upon two men from nearby Glenample Station three and a half miles away. In a state of exhaustion, he told the men of the tragedy. Tom returned to the gorge while the two men rode back to the station to get help. By the time they reached LOCH ARD Gorge, it was cold and dark. The two shipwreck survivors were taken to Glenample Station to recover. Eva stayed at the station for six weeks before returning to Ireland, this time by steamship. In Melbourne, Tom Pearce received a hero's welcome. He was presented with the first gold medal of the Royal Humane Society of Victoria and a £1000 cheque from the Victorian Government. Concerts were performed to honour the young man's bravery and to raise money for those who lost family in the LOCH ARD disaster. Of the 54 crew members and passengers on board, only two survived: the apprentice, Tom Pearce and the young woman passenger, Eva Carmichael, who lost all of her family in the tragedy. Ten days after the LOCH ARD tragedy, salvage rights to the wreck were sold at auction for £2,120. Cargo valued at £3,000 was salvaged and placed on the beach, but most washed back into the sea when another storm developed. The wreck of LOCH ARD still lies at the base of Mutton Bird Island. Much of the cargo has now been salvaged and some was washed up into what is now known as LOCH ARD Gorge. Cargo and artefacts have also been illegally salvaged over many years before protective legislation was introduced. One of the most unlikely pieces of cargo to have survived the shipwreck was a Minton porcelain peacock - one of only seven in the world. The peacock was destined for the Melbourne International Exhibition in 1880. It had been well packed, which gave it adequate protection during the violent storm. Today, the Minton peacock can be seen at the Flagstaff Hill Maritime Museum in Warrnambool. From Australia's most dramatic shipwreck it has now become Australia's shipwreck artefact and is one of very few 'objects' on the Victorian State Heritage Register most valuable. The LOCH ARD shipwreck is of State significance – Victorian Heritage Register S 417. Flagstaff Hill’s collection of artefacts from LOCH ARD is significant for being one of the largest collections of artefacts from this shipwreck in Victoria. It is significant for its association with the shipwreck, which is on the Victorian Heritage Register (VHR S417). The collection is significant because of the relationship between the objects, as together they have a high potential to interpret the story of the LOCH ARD. The LOCH ARD collection is archaeologically significant as the remains of a large international passenger and cargo ship. The LOCH ARD collection is historically significant for representing aspects of Victoria’s shipping history and its potential to interpret sub-theme 1.5 of Victoria’s Framework of Historical Themes (living with natural processes). The collection is also historically significant for its association with the LOCH ARD, which was one of the worst and best known shipwrecks in Victoria’s history. Spoon handle and bent part of stem. Some encrustation and Silver Oxide. Recovered from the Loch Ard wreck.flagstaff hill, warrnambool, shipwrecked coast, flagstaff hill maritime museum, maritime museum, shipwreck coast, flagstaff hill maritime village, great ocean road, loch line, loch ard, captain gibbs, eva carmichael, tom pearce, glenample station, mutton bird island, loch ard gorge, electroplated cutlery, handle, spoon, loch ard shipwreck -
 Ballarat Tramway Museum
Document - Folder with papers, State Electricity Commission of Victoria (SECV), 1960's
Yields information about the drawings that were used by the depot or workshop staff as reference drawings. Has a strong association with the depot workshop staff. Yields information about equipment on Ballarat tramcars and Signalling.Folder containing 46 blueprints or Dyeline prints of SEC tram equipment drawings. Front of folder made from a cloth back sheet of paper extended to secure to a thick cardboard runner. Rear of folder made from an old tram advertising panel or cardboard sheet, cut to size and secured to a thick cardboard runner with a cloth backing on both sides. Sheets secured with three brass screwed clips. Front cover damaged in bottom right hand corner. Rear cover breaking apart on outside around cloth binding. Heavy dirt marks from “grease” on bottom half of rear cover. Contains 46 drawings which have been individually catalogued and numbered on the rear of each drawing within the folder. Some of the drawings have been folded. Reg Item Micro Film No. Old BTPS No. SEC Drawing No Title 4807 42/4 1 VB4/8103C Westinghouse T1F Controller Main Cylinder Segments. 4867 47/2 2 BA-T8-8128 Westinghouse 225N Motor Case Bolt 4830 22/3 B 3 BA-T7-7666 Half Ball Brake Hanger Link, Driving Wheel, Brill Maximum Traction Truck 22E 4868 44/3A 4 BA-T8-8113 Split Suspension Bearing for Type W225 Motor (Westinghouse) 4869 52/2 5 BA-T8-8158 Contact Tips for G.E. Compressor Controller 4818 52/3 6 BA-T8-8159 GE B-23 Contact Finger Tips for G.E. Type ‘B’ Main Cylinder 4870 6/1 7A BA-T3-6734 Brass Nut for Switch Mechanism 4829 6/2 7B BA-T3-6735 Tongue Clip Link for Switch Mechanism 4871 6/3 7C BA-T3-6736 Fulcrum for Switch Mechanism 4872 6/4 7D BA-T3-6737 Plunger for Switch Mechanism 4832 7/6 8 BA-T3-6754 Pivot for Switch Mechanism No numbers 9 or 10 4873 17/5 11 BA-T7-7639 Detail of Motor Pinion for Brill Cars 4831.2 21/4 B 12 BA-T7-7661A Half Ball Hanger Links – single bogie trucks 4874 21/6 13A BA-T7-7663 Axle Box Inner Spring Driving Wheels Maximum Traction Truck 22E 4875 22/1 13B BA-T7-7664 Axle Box Outer Spring Driving Wheels Maximum Traction Truck 22E 4876 22/2 14 BA-T7-7665 Body Spring Brill Maximum Traction Truck 22E 4830.2 22/3B 15 BA-T7-7666A Half Ball Brake Hanger Link Driving Wheel Brill Maximum Traction Truck 22E 4877 22/4 16 BA-T7-7667 Body Spring, Brush Maximum Traction Truck 22E 4820.2 22/6 A 17 BA-T7-7669 Wear cups for Half Ball Brake Hanger Links, Single & Double Bogie Trucks 4878 50/5 18 BA-T8-8149 Connections of Line Breaker and Ratchet Switch for use with Drum Controller 4879 74/6 19 BA-T13-8757/9 Signal boxes, Back of Panel Wiring and External Connections 4880 45/1 20 BA-T8-8116 Trolley Harp 4806 15/3 21 BA-T7-7625 Equalizing Lever, Fulcrum, Brill 21 E truck 4881 15/5 22 BA-T7-7626A Brake Beam Fulcrum Brill 21E truck 4808 16/1 23 BA-T7-7628 Pinion Remover, GE 201G and GE 202 motors 4882 16/3 24 BA-T7-7630 Spring Posts, Brill 21E Truck 4883 21/3 25 BA-T7-7660 Brake Shoe Holder, Driving Wheel, Maximum Traction Truck Brill 22E 4884 21/5 26 BA-T7-7662 Brake Rod Guide, Single Bogie Trucks 4885 22/5 27 BA-T7-7668 Brake Shoe Holder, Pony Wheel, Maximum Traction Truck Brill 22E 4809 42/2 B 28 BA-T8-8101 Trolley Wheel and Axle 4815 42/1 B 29 BA-T8-8102A Motor Suspension Bearing, GE 202 Motor 4796.2 42/5 30 BA-T8-8104 Connection Diagram WH 225N Motor 4886 42/6 B 31 BA-T8-8105B Motor Suspension Bearing, GE 201 Motor 4797.2 48/6 32 BA-T8-8137 WH T1F Controllers 4816 49/2 33 BA-T8-8138 Connection Diagram GE 202 Motor 4887 49/3 34 BA-T8-8139 Connection Diagram K-36-J Controller 4888 50/3 35 BA-T8-8146 GE K-36-JR Controllers, with line breaker (Connection diagram) 4889 50/6 36 BA-T8-8150 Commutator for Westinghouse 225N Motor 4846 51/1 37 BA-T8-8151A Armature Bearing Lining, Commutator End, Type GE 201G Motor 4813 51/2 38 BA-T8-8152 Armature Winding Diagram Westinghouse 225 Motor 4840.2 51/40 39 BA-T8-8154A Armature Bearing Lining, Pinion End, Type GE201G Motor 4890 51/6 40 BA-T8-8156 Armature Bearing Lining, Pinion End, Type GE202A Motor 4891 52/1 41 BA-T8-8157A Armature Bearing Lining, Commutator End, Type GE202A Motor 4892 64/5 42A BA-T9-8392A Step Hangers, Single and Double Bogie Trucks, Hinged Type 4785.2 64/6B 42B BA-T9-8392/1A Step Hangers, Single and Maximum Traction Trucks, Fixed Type 4812.2 43/1 43 BA-T8-8106B GE K36J Controller, Main Cylinder Segments 4893 50/2 44 BA-T8-8145A GE B23E Controller, Main Cylinder Segments 4816 65/2 45 BA-T9-8394B Door Lock for Motorman’ Cabin Maximum Traction Trucks. 4810 73/3 46 BA-T13-8757 Ballarat Electric Tramways Signalling System, Arrangements & Details of Box.On front cover of folder, "1 - 46"trams, tramways, drawings, ballarat, sec, depot, workshops -
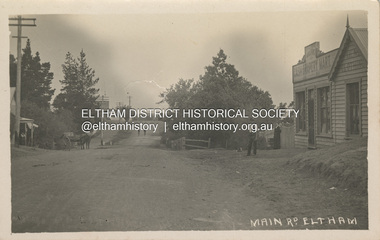 Eltham District Historical Society Inc
Photograph, Main Road, Eltham, looking south from Bridge Street, c.1906-1907
Birthday greetings sent by Mary and Ada Shillinglaw from their home, 'Wattle Brae' at Eltham to their sister Carrie (Watson). Carrie was born 29 Feb 1876. Whilst the postcard was dated 1917, the actual photo is dated between 1906 and 1907. ""Wattle Brae" Eltham 28/2/17 Dear Carrie Wishing you a Bright and a happy birthday. With love from Mary & Ada" See also SEPP_0624 Looking south along Main Road from the south side of the intersection of Bridge Street with Main Road. Anne Hunniford's Post Office and Burgoyne's store on left. Miss Harriet (Minnie) Williams's Cash Drapery Mart (est. 1902 and enlarged in 1906), also known as Eltham House on the right. Harriet (Minnie) Williams was born London, 1857, the daughter of George John Williams (1812-1895) and Jane Mansfield (1812-1895). In September 1885 she was operating Williams’s Drapery Establishment in premises on Main Road owned by R. Wallis who advertised them to let in September 1885. In 1902 she opened Williams’s Cash Drapery Mart at the southwest corner of Bridge Street and Main Road (opposite the Post Office), owned by W.J. Taylor. In 1906 she bought the premises and one quarter acre of land and expanded the business with a re-opening in April 1906. Harriet was also well-known and esteemed as an active worker in Methodist circles and also Superintendent of the Sunday School. Harriet fell ill in August 1907 and died 15 August. She is buried in Eltham Cemetery with her good friend Ada Ford. Evelyn Observer and Bourke East Record (Vic. : 1902 - 1917), Friday 30 March 1906, page 5 ________________________________________ ELTHAM. (FROM OUR OWN CORRESPONDENT.) For over three years Miss Williams has carried on a drapery business in very small and inconvenient premises opposite the Eltham post-office. Recently she bought the building and a quarter-acre of land from Mr. W. J. Taylor. Thus having a free hand, she at once matured plans to enlarge and improve the premises to make them suitable for her growing business. The result being that she consulted Mr Roach, contractor, of Heidelberg, put the matter in his hands, and now he has completed in a very satisfactory manner and up-to-date style extensive improvements. A large addition, of very neat and attractive design, with three large windows, has been built right along the front of the old building, and the counters and inside fittings are very neat and convenient, harmonizing well with the attractive outside appearance. Miss Williams has now got in a large now stock of goods, and is making extensive arrangements for a “reopening week," commencing 2nd April, during which time she will make 10 per cent reduction on all cash purchases in the form of gifts of that value. Miss Williams has gone to considerable expense and liability both, in the enlargement and improvement of the premises and in purchasing additional stock. We therefore trust that the public will stand by her by heartily and en masse patronizing her re-opening effort to show their appreciation of pluck in this advance movement. Google Street View Feb 2017: https://www.google.com.au/maps/@-37.7191341,145.1462046,3a,50.5y,191.91h,88.27t/data=!3m6!1e1!3m4!1sARwwqEQfMSfH9oTWWapPgQ!2e0!7i13312!8i6656 POSTCARD 1905-1940s Like the carte-de-visite, postcards enjoyed a collecting craze by large numbers of people, and were often kept in albums through which the interested visitor could browse. Postcards were posted or exchanged in huge numbers. Postal authorities in Australia only allowed the private printing of postcards from 1898. At this time the back of the card was reserved for the address and postage stamp, and the front was used for the message and a picture. In 1902 British authorities allowed a "divided back", so that the left side could be used for the message, the right side for the address and stamp, and the whole of the front was devoted to the picture. France followed suit in 1904, Germany and Australia in 1905, and the United States in 1907. - Frost, Lenore; Dating Family Photos 1850-1920; Valiant Press Pty. Ltd., Berwick, Victoria 1991marg ball collection, postcard, 1906, 1917, ada maria chrisfield (nee shillinglaw) 1889-1974, ada maria shillinglaw (1889-1974), caroline (carrie) watson (nee shillinglaw 1876-1956), cash drapery mart, eltham, eltham hotel, main road, mary ann shillinglaw (1880-1963), shillinglaw cottage, watsons hotel, wattle brae -
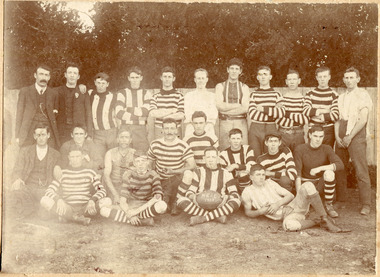 City of Moorabbin Historical Society (Operating the Box Cottage Museum)
Photograph, 1903 or 1908 Moorabbin Football Club, 1903 or 1908 Moorabbin Football Club, 1903 or 1908
1903 or 1908 Moorabbin Australian Rules Football Club. Philip Jones, a relative of James Jones who was a pioneer settler in Moorabbin Shire, is holding the football. In the late 1850s Melbourne's schools are first recorded organising football games modeled on precedents at English schools The earliest known such match was played on 15 June 1858 between Scotch College and Melbourne Grammar School on the St Kilda foreshore. On 10 July 1858, the Melbourne-based Bell's Life in Victoria and Sporting Chronicle published a letter by prominent Victorian cricketer Tom Wills, calling for the formation of a "foot-ball club" with a "code of laws" to keep cricketers fit during winter. The Melbourne Football Club's rules of 1859 are the oldest surviving set of laws for Australian football. The ten simple rules were drawn up on 17 May at a meeting chaired by Tom Wills and in attendance were journalists W. J. Hammersley and J. B. Thompson, and Thomas H. Smith. The rules were signed by Tom Wills, William Hammersley, J. Sewell, J. B. Thompson, Alex Bruce, T. Butterworth and Thomas H. Smith. Importantly, the rules were widely publicised and distributed. Having been codified in 1859, this means that Australian football is an older sport than most other football codes in the world, including soccer. As Geoffrey Blainey states, "soccer has no club that matches the antiquity of the early Victorian clubs." In 1859 several new football clubs formed including the Castlemaine Football Club, Geelong Football Club and the Melbourne University Football Club. The first football match played at the Melbourne Cricket Ground (MCG) was not until 1876. Cricket authorities soon saw the opportunity to capitalise on the rapid growth of Australian football, however, and soon most grounds in Victoria were expanded to accommodate the dual purpose, a situation that continues to this day. Football matches between 1859 and 1899 were played in a 20-per-side format. n 1896, delegates from the stronger and wealthier Victorian Football Association clubs—Carlton, Collingwood, Essendon, Fitzroy, Geelong, Melbourne, St Kilda and South Melbourne—met to form a breakaway competition and in 1897, the Victorian Football League (VFL), was born as an eight-team competition. Popularity of the VFL grew rapidly and by 1925 with 12 teams, had become the most prominent league in the game and would dominate so many aspects of the sport from that point on. Moorabbin Football Club, nicknamed the Kangaroos, was the name of two distinct Australian rules football clubs which played in the Victorian Football Association (VFA). The first club, founded in the early 20th century, joined the VFA in 1951 and played there until 1963 with great success; they played home matches at Moorabbin Oval and wore royal blue and white hooped jerseys. The second club played in the VFA from 1983 to 1987. Moorabbin played initially in the Federal Football League, making their debut in 1909 and competing until 1950. During this time the club won 12 premierships, including winning all six premierships staged over the nine years between 1940 and 1948 (the competition was in recess from 1942 until 1944). The club entered the VFA in 1951. Its Federal League home ground, the Dane Road Reserve, was not up to VFA standards; so, in 1951 the club played at Cheltenham, and in 1952 moved into the Moorabbin Oval, which the Moorabbin Council had developed during 1951. The Kangaroos made the 1954 and 1955 finals series without success but in 1957 they helped eliminate premiership favourite Williamstown after defeating them by two points in the Semi Final. Moorabbin, who were coached by Bill Faul, took on Port Melbourne in the Grand Final, whom they had not once beaten since joining the league. In another upset, Moorabbin won comfortably to claim their maiden VFA premiership. In the early 1960s, the Moorabbin Council was very keen to bring a Victorian Football League team to Moorabbin Oval. 1964, the Moorabbin City Council secured a deal with St Kilda, who moved to Moorabbin Oval starting in 1965. The club originally intended to seek readmission for the 1965 season, but in July the club committee decided to withdraw permanently from the Association,and disbanded.Photograph is Black and White. Three rows of Australian Rules Football players in a typical team photograph. Some are wearing striped jumpers, either the stripes are going horizontal or parallel. There is a known man in this photo, named Philip Jones, who is holding the football in front row. There are two men wearing suits at the left, on the end of the third row. Hewitt, Photographer, 92 Regent St. North Richmond.moorabbin, football club, 1903, 1908, philip jones, james jones, early settlers, market gardeners, pioneers, herron john, australian rules foorball, victorian footbal league, victorian football association, moorabbin city council, moorabbin shire, city of moorabbin, st kilda football club, -
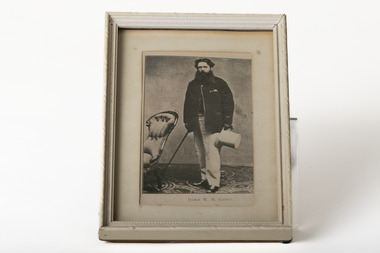 Chiltern Athenaeum Trust
Photograph, JUDGE W. H. GAUNT
This photograph is a copy displayed in the Australian Dictionary of Biography. The original photograph is in the La Trobe Collection in the State Library of Victoria. William Henry Gaunt (1830-1905), judge, was born on 27 July 1830 at Leek, Staffordshire, England, son of John Gaunt, banker, and his wife Mary, née Bakewell. Educated at Leek Grammar School and Whitchurch, Salop, he migrated to Melbourne, and entered the Victorian public service and was rapidly promoted. By March 1854 he was chief clerk at Beechworth, the administrative centre of the Ovens goldfield. In July 1855 the resident warden commended Gaunt as 'a highly valuable public servant' with an intimate knowledge of the district and the 'temper and disposition of the miners'. Appointed sub-warden in the Beechworth district in January 1856 and a Chinese protector in August, he was given control of the extensive Woolshed district. When European miners attacked a party of Chinese at the Buckland River diggings in May 1857 Gaunt was sent to restore order. One of his proclamations, issued in Chinese characters, concluded 'W. H. Gaunt, your protector—tremble and obey!' In June he was appointed a police magistrate and next month was sent to take charge at the Buckland where the Chinese had been expelled from the diggings; the police force assisting him was led by Robert O'Hara Burke. In January 1858 Gaunt was appointed a warden, in November was transferred to Chiltern, north of Beechworth, and in August 1859 was made a commissioner of crown lands. In February 1860 Gaunt was appointed a coroner of Victoria, acting at Indigo, near Chiltern. In April 1865 he was transferred to Beechworth, became visiting justice of the gaol and later moved to Sandhurst. In January 1869 he was appointed returning officer for the mining district of Ballarat and visiting justice of the gaol. He was associated with this area for the rest of his life and won high repute for his integrity. In 1874 he chaired the inaugural meeting of the first Australian competitive swimming club. For years he studied law and was called to the Bar in December 1873. He was one of the many public servants dismissed by Graham Berry on 9 January 1878 (Black Wednesday). After petitioning the Queen in vain over his dismissal he began practice in Ballarat as a barrister. He soon became a leading authority on mining laws; one of the cases in which he was involved was the lengthy inquest on the bodies of the twenty-two miners drowned in the New Australasian mine disaster at Creswick in 1882. He was appointed a temporary judge of the Insolvency Court in 1889 and a County Court judge in 1891. In 1900 he was chairman of the royal commission which considered Metropolitan Board of Works matters, and in 1902 was president of the inquiry into the unification of municipalities in Victoria. In 1860 Gaunt married Elizabeth Mary, the youngest daughter of Frederick Palmer; they had nine children. Of the surviving five sons and two daughters, Ernest Frederick Augustus and Guy Reginald Archer both became admirals and were knighted; Cecil Robert became a lieutenant-colonel, Clive Herbert a government advocate in Rangoon and Mary (Mrs H. L. Miller) one of the first women students to enrol at the University of Melbourne (1881), although she did not complete her degree; she became a successful novelist. Gaunt died on 5 October 1905. An anonymous colleague said: 'I don't think he was ever excelled as a police magistrate, and during the many years he was on the County Court bench he earned the highest regard. His capacities were as unquestioned as his integrity, and more could not be said of any judge'. Select Bibliography Votes and Proceedings (Legislative Assembly, Victoria), 1878, 3, (58) Government Gazette (Victoria), 22 Feb, 15 Aug 1856, 30 June 1857, 5 Jan 1858, 16 Aug 1859, 3 Feb 1860, 7 Mar, 11 Oct 1862, 28 Mar, 4 Apr 1865, 17 May 1867, 9 June 1868, 22, 29 Jan 1869 Ovens and Murray Advertiser, 21 May 1857, 11 Mar 1865 Colonial Secretary's in-letters, goldfields, 25 Mar 1854, 21 July, 18 Nov 1855, 22 Aug 1857 (Public Record Office Victoria) scrapbook and newsclippings (privately held). Related Entries in NCB Sitesview family tree Gaunt, Mary Eliza (daughter)go to ADB entryPhotograph of Judge W. H. Gaunt standing beside chair holding top hat and cane, under glass, in cream frame with cream matte.Printed name underneath: JUDGE W. H. GAUNT -
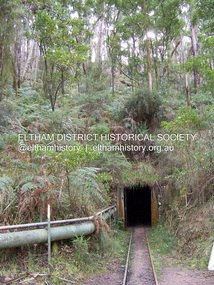 Eltham District Historical Society Inc
Photograph - Digital Photograph, Marguerite Marshall, One Tree Hill Mine, Smiths Gully, 8 June 2006
Gold was discovered on One Tree Hill in 1854. The site has been worked intermittently until fairly recent times. Published: Nillumbik Now and Then / Marguerite Marshall 2008; photographs Alan King with Marguerite Marshall.; p53 Though still a working mine, One Tree Hill Mine at Smiths Gully, now stands in a tranquil reserve surrounded by bush and native animals - in contrast to its heyday. In the mid 19th century, when the mine was part of the Caledonia Goldfields, hundreds of men in search of their fortune worked the alluvial gold in the Yarra River, its tributaries and the reefs that made up the goldfields. Miner Stan Bone, assisted by Wilfred Haywood, is the last of the independent gold miners in the area and still uses the quartz crushing battery as miners did when gold was first discovered in the area in 1851.1 Stan, who is the last of six generations of miners in his family, was aged 17 when he began mining on his father Alex’ mine, The Golden Crown in Yarrambat. These days, after blasting the gold-bearing rock in Mystery Reef, one of the four reefs at One Tree Hill, Stan transports it around five kilometres by tip truck to the Black Cameron Mine for crushing. There he uses water from the waterlogged mine, (which still contains gold), as the Happy Valley Creek at One Tree Hill is usually dry.2 The One Tree Hill Mine has been worked for close to a century since it opened around the late 1850s.3 The Swedish Reef was its most productive reef and one of the largest in the area. Around 1859, extractions included 204 ounces (5.8kg) of gold, won from 57 pounds (26kg) of stone.4 Then during World War Two, Stan’s uncle, Bill Wallace, and Alex Bone, closed the mine. In 1973, Stan, with his Uncle Bill, reopened the Black Cameron Mine and worked there until 1988. Stan resumed mining One Tree Hill in 1998. As late as the 1920s gold was picked up by chance! When crossing a gully on his way to vote at the St Andrews Primary School, Bill Joyce picked up some quartz containing gold. This site was to become the Black Cameron Mine. The Caledonia Diggings, named after Scotland’s ancient name by local Scots, began around Market Square (now Smiths Gully) and included Queenstown (St Andrews), Kingstown (Panton Hill) and Diamond Creek. There were also poorer bearing fields in Kangaroo Ground and Swipers Gully (now Research). * None of these compared in riches to the Ballarat and Bendigo fields5, but the Caledonia Diggings continued intermittently for close to 100 years. Gold was discovered in Victoria following a bid to stem the disappearance of much needed workmen to the New South Wales diggings. Several businessmen offered a reward of £200, for the discovery of gold within 200 miles (322 km) of Melbourne. Late in June 1851, gold was first discovered at Andersons Creek, Warrandyte. Then in 1854, George Boston and two other men discovered gold at Smiths Gully. Gold transformed the quiet districts, with a constant flow of families and vehicles on the dirt tracks en route to the Caledonia Diggings. Three thousand people worked the gullies in Market Square, including about 1000 Chinese miners. The square established its own police, mining warden, gold battery, school, shops and cemetery and grog flowed. Market Square flourished until the middle 1860s. Bullocks transported quartz from the Caledonia Goldfields to the crushing machinery at the Queenstown/St Andrews Battery, near Smiths Gully Cemetery. It was destroyed by bushfire in 1962. By the late 1850s, most early alluvial fields were in decline, but minor rushes continued until around 1900 and some until the early 1940s. Some miners did well, although most earned little from their hard labour in the harsh and primitive conditions.6 But according to historian, Mick Woiwod, the gold fields helped to democratise society, as individuals from all walks of life were forced to share experiences, and the ability to succeed, depended less on inherited wealth or social rank.This collection of almost 130 photos about places and people within the Shire of Nillumbik, an urban and rural municipality in Melbourne's north, contributes to an understanding of the history of the Shire. Published in 2008 immediately prior to the Black Saturday bushfires of February 7, 2009, it documents sites that were impacted, and in some cases destroyed by the fires. It includes photographs taken especially for the publication, creating a unique time capsule representing the Shire in the early 21st century. It remains the most recent comprehenesive publication devoted to the Shire's history connecting local residents to the past. nillumbik now and then (marshall-king) collection, gold mining, one tree hill mine, smiths gully -
 Eltham District Historical Society Inc
Photograph - Digital Photograph, Marguerite Marshall, Eltham Library, Panther Place, Eltham, 18 April 2008
Rear view of Eltham Library showing loading dock and ramp to the front of the building. Designed by multi-award winning architect, Gregory Burgess, for which he won the 1995 Royal Australian Insitute of architects (Vic.) Merit Award in the New Institutional category. Covered under Heritage Overlay, Nillumbik Planning Scheme. Published: Nillumbik Now and Then / Marguerite Marshall 2008; photographs Alan King with Marguerite Marshall.; p183 Award-winning Eltham Library, with its earthy tones blending into the nearby parklands, celebrates some of the best of Eltham’s spirit. Designed by multi-award winning architect, Gregory Burgess, the library at Panther Place, won him the 1995 Royal Australian Institute of Architects (Vic) Merit Award in the New Institutional category.1 The design is typical of Burgess’ work, emphasising natural materials and forms, and the integration of building and site.2 In its distinctive architectural character, Burgess celebrated the spirit of Eltham’s artist/architect Justus Jörgenson and mud-brick builder Alistair Knox. However this library, which opened in 1994, follows decades of efforts to acquire a suitable library for local residents. It was only in 1971 that Eltham acquired its first purpose-built library. In the 1930s books were borrowed from a mobile library run by Mr Foster of Bible Street. From the 1930s to the early 1950s, adults borrowed books from the newsagency and general store in Main Road (still a newsagency) near Arthur Street. As late as the 1950s, adults borrowed books in the shire office foyer, then in Main Road near the corner of Arthur Street.3 In the early 1950s the ratepayers voted for lower rates rather than a library, in a referendum to build a public library financed by higher rates. Children depended on volunteers for their library service until 1966. In 1946 the inaugural meeting of the Eltham War Memorial Trust’s Women’s Auxiliary, decided to support the Trust by raising funds to buy land and build a Children’s Library, Baby Health Centre and other facilities. The auxiliary formed the Children’s Library Committee, which included Mrs Morrison, Mrs Bow and Mrs Currie. They ran a library service in the stage area of the Eltham Hall, at the corner of Arthur Street and Main Road. In 1952 the books were relocated to a room in the newly opened Baby Health Centre on Main Road. Then in 1961, the Children’s Library received its own hall beside the Eltham Pre-School Centre on Main Road. From there, each month, volunteers delivered books to every school in the shire. In 1966 the Children’s Library closed after 17 years of service, following the transfer of the Trust land and buildings to the Shire of Eltham. The books were donated to nine schools in the shire and to Community Aid Abroad. An important boost to the library service came in 1965, when the Heidelberg Regional Library Service was formed by the City of Heidelberg with the Shires of Eltham and Diamond Valley. Its first library service for Eltham Shire was a bookmobile van. Books for children and adults were finally housed in one building in 1966, when the shire converted the Brinkkotter house in Dudley Street, into a library. At last in 1971, the Eltham Library moved to new premises attached to the shire offices near Panther Place. However these were demolished in 1996, by State Government appointed commissioners during council amalgamations. Meanwhile the Heidelberg Regional Library Service was disbanded in 1985 and the Yarra Plenty Regional Library Service was established. The burgeoning population brought pressure for a bigger library. Eltham was one of several municipalities in the 1970s and 1980s, battling with the State Government for adequate funding for public libraries. Funds were so tight, that in 1987 Eltham councillors threatened to close the library. However public petitions persuaded them to set aside funds to replace the cramped library facilities. In 1992 the Federal Government gave $887,496 towards the $3 million cost of the 1560 square metre library.4 The result is a light and spacious building with surrounding verandas, made of sustainable natural materials including earth and recycled and radially sawn timbers. It includes a gallery and function areas. In 2004 Mr Burgess won Australian architecture’s highest accolade: the Royal Australian Institute of Architects Gold Medal. He has received more than forty professional and community awards.This collection of almost 130 photos about places and people within the Shire of Nillumbik, an urban and rural municipality in Melbourne's north, contributes to an understanding of the history of the Shire. Published in 2008 immediately prior to the Black Saturday bushfires of February 7, 2009, it documents sites that were impacted, and in some cases destroyed by the fires. It includes photographs taken especially for the publication, creating a unique time capsule representing the Shire in the early 21st century. It remains the most recent comprehenesive publication devoted to the Shire's history connecting local residents to the past. nillumbik now and then (marshall-king) collection, eltham, eltham library, panther place -
 Eltham District Historical Society Inc
Photograph - Digital Photograph, Alan King, Cameron family graves, Kangaroo Ground Cemetery, Eltham-Yarra Glen Road, Kangaroo Ground, 28 January 2008
Six year old Judith Furphy was the first person known to have been buried at Kangaroo Ground Cemetery in May 1851. The cemetery is situated on an ancient river bed with exposed Nillumbik sands. The rest of the district is formed from black volcanic soil which was hard to dig. According to local historian Mick Woiwod (deceased) the site may have been a burial ground for the local Wurundjeri people as the exposed softer sands were always their prefered camping sites. The Hon. Ewen Hugh Cameron who lived at Pigeon Bank and was the Member for Evelyn for 40 years (1874-1914) was buried here in 1915. Published: Nillumbik Now and Then / Marguerite Marshall 2008; photographs Alan King with Marguerite Marshall.; p39 The Wurundjeri people might have buried their dead on the site of the Kangaroo Ground Cemetery, according to local historian Mick Woiwod. Kangaroo Ground was a premier hunting ground, but camping on the black volcanic soil would have been uncomfortable. Unlike most of Kangaroo Ground, its cemetery, on an ancient river bed, comprises a rare exposure of Nillumbik sands – always the preferred campsite for Aboriginal people. The cemetery area is the only place where the soil was soft enough to dig a grave easily.1 Six-year-old Judith Furphy was the first person known to have been laid to rest at the Kangaroo Ground Cemetery. She died on May 17, 1851, from a chill caught by resting on wet grass. Local Andrew Ross wrote ‘..no public burying place existed nearer than Melbourne. The case being considered urgent, a general meeting of the settlers took place on the evening of the 17th……. The result was the selection of unoccupied crown land …….which was subsequently granted by Government for a public cemetery.’2 Judith was buried the next day on May 18. Her grave was marked by the trustees with a plaque, which unfortunately states nine years old, when she was probably only six. Judith came from an illustrious family. Her brother, Joseph, was the author of Such is Life and other works. Another brother, John, developed and manufactured the famous Furphy water cart, which distributed water to World War One soldiers along with the latest rumours. Hence the name Furphy entered the Australian idiom, as synonymous with ‘rumour’. Judith’s father Samuel helped build the first Kangaroo Ground church school. Inside, near the entrance of the cemetery, on Yarra Glen Road, stand a rotunda and a water tank. Occasional benches invite mourners to pause and remember. The gate with wrought iron and brick supports, bears the inscription ‘Erected by Sir Ewen and Lady Cameron in memory of their daughter, Flora Margaret’. These are only two of the famous people connected with this cemetery. The Hon. Ewen Hugh Cameron JP and MLA from 1874 to1914, who lived at Pigeon Bank, Warrandyte Road, was buried here in 1915. Unrelated, but with the same name, was Sir Ewen Cameron who had been Minister for Health and was laid to rest there in 1964. Sir Herbert Gepp, a leading industrialist and the former owner of Garden Hill, at Yarra Glen Road, was buried there in 1954.3 Many of the more imposing tombstones belong to the earlier graves. Unfortunately bushfires have cracked several. But this adds to the melancholy attractiveness of the cemetery, graced by some beautiful eucalypts, cypress and pines. Early pioneering families represented at the cemetery include Armstrong, Barr, Bell, Harkness, Jardine, Johnston, Rogerson, Stevenson, Thomson and Walters. Armstrong and Bell were among the first families to come to the district and Stevenson owned the district’s first sheep station. It took in much of present day Christmas Hills, which was the name he gave his sheep station. Harkness was the first to suggest a Kangaroo Ground school be built, and one of the first to suggest establishing the Eltham District Road Board. Many of these families leased pastoral land before the mid-century and bought land when it came on sale in 1849. In the cemetery’s early days sections were devoted to the major Christian denominations (mainly the Protestant) and one section was set aside for ‘other’ or ‘non-believers’. However in modern times burial plots have not been placed in areas according to religious beliefs.This collection of almost 130 photos about places and people within the Shire of Nillumbik, an urban and rural municipality in Melbourne's north, contributes to an understanding of the history of the Shire. Published in 2008 immediately prior to the Black Saturday bushfires of February 7, 2009, it documents sites that were impacted, and in some cases destroyed by the fires. It includes photographs taken especially for the publication, creating a unique time capsule representing the Shire in the early 21st century. It remains the most recent comprehenesive publication devoted to the Shire's history connecting local residents to the past. nillumbik now and then (marshall-king) collection, kangaroo ground, eltham-yarra glen road, agnes bell cameron, agnes cameron (nee bell), cameron family, edward aubrey haughton, eugene cameron, evelyn florence cameron, ewen hugh cameron, gravestones, jane armstrong, jane bell, jessie agnes haughton (nee cameron), jessie cameron, john donald cameron, kangaroo ground cemetery, neville cameron, simon armstrong, vera cameron, william bell armstrong, wurundjeri -
 Melbourne Tram Museum
Album - Charles Craig - part 2 of 2, 1950s to 1970s
Photo - see pdf file for further information. Number Brief Description CC271 Y1 610 and another at Camberwell depot CC272 Ditto CC273 Y1 613 at Batman Ave CC274 Y1 611 Peel St North Melbourne CC275 Y 469 Camberwell depot CC276 Ditto CC277 Postcard – L104 – MMTB CC278 L103, Hawthorn Road CC279 L103, Hawthorn Road CC280 L103 Dandenong Road CC281 L103 and w5 847 Dandenong Road CC282 L104 on Preston Workshops traverser CC283 Flinders St station with Ws CC284 Flinders St looking south along St Kilda Road to Shrine CC285 Postcard – Nu Color vue – Flinders St CC286 Postcard – Valentines – Flinders St No. 13 CC287 Postcard – Rose Series – 13595 – has been trimmed CC288 Postcard – Rose Series – 10660 – Princes Bridge and Flinders St yard CC289 Postcard – Rose but has been trimmed of Flinders St CC290 Postcard – same as CC285 CC291 SW6 914 and another car in Swanston St by Flinders St CC292 SW6 903 and bus 436 with Flinders St Station in background CC293 W5 776 at Flinders St Station CC294 W2 596 at Flinders St Station CC295 L101 and W2 Swanston St by Ian Brady CC296 Postcard - Biscay BG 250 – A 281 - CC297 W5 779 Maribyrnong River CC298 SW5 787 Queensbridge St CC299A Duplicate copy CC299 Ditto CC300 W5 812 St Kilda Junction CC301 W5 721 Carnegie? - CC302 W5 817 Elliot Ave – see also CC150 CC303 CW5 682 CC304 CW5 682 Dandenong Road CC305 SW6 855 Power St Hawthorn CC306 Argus photo same as CC8A CC307 Freight car 19 leaving South Melbourne depot CC308 Freight car 19 at South Melbourne depot CC309 Cleaner 7 CC310 W2 295 and 8 at South Melbourne Depot CC311 Cleaners 5, 8 and 7 and S or T at South Melbourne depot CC312 Freight car 17 with crew member CC313 Cleaners 5, 8 and 7 along with a tower truck and another road motor CC314 Wheel Transport car 16 at Preston CC315 Cleaner 7 CC316 Cleaner 6 Brunswick Depot R Hudson and Bob Prentice CC317 SW6 867 in Swanston at Flinders CC318 SW6 850 at Chapel and Brighton Road CC319 SW6 914 at Batman Ave CC320 SW6 963 and W5 826 in Collins St near Spencer St CC321 Sw6 923 RAAF tram CC322 Same image at 318, but better has initials T McC (Tom McCaw) CC323 Sw6 963 In Collins at Spencer St CC324 SW6 947 in Collins at Spencer St CC325 Ditto with crew CC326 SW6 850 at Preston Workshop – Argus photo CC327 SW5 843 at Swan and church, severely derailed – Herald photo CC328 SW6 886 in Victoria Parade near La Trobe CC329 SW6 948 turning from Union St into Maribyrnong Road – single curve CC330 W5 731 CC331 SW5 on a 4D – Herald WT photo CC332 Sw6 867 Swanston St with driver carrying handles etc CC333 SW6 954 – Truganini Cres CC334 SW6 915 illuminated for Christmas, the CDA father Xmas special CC335 SW6 850 on route 77 side on view CC336 Sydney R class 1845 on trailer in a busy road CC337 Sydney R class 1845 on trailer CC338 Ditto CC339 Ditto – on trailer turning from a local street CC340 MMTB Emergency van CC341 Ditto CC342 Welding truck – Hopkins and Leeds CC343 Welding truck – Hopkins and Leeds CC344 Welding truck in Hopkins St Footscray CC345 Negative – Hobart tram 103 CC346 Launceston tram CC347 Trackwork – East Kew CC348 Trackwork and a W2 East Kews CC349 SW6 892 and trackwork – East Kew CC350 W4 670 – FRONT ON CC351 W3 654 – Brunswick Depot CC352 W3 666 – St Kilda Road and High St Demonstrates the work of Charles Craig in photography and collection of prints.Assembled album in a black presentation folder of 80 photographs from the Charles Craig Collection - 31 sleeves - part 2 of 2. All photographs have been scanned and placed on the Museum's G drive. A list of all photographs with details where possible has been compiled. Victorian Provincial, Launceston, Hobart and Sydney tram photos have been transferred to other Museums, image files retained.melbourne, tramways, tramcars, trams, charles craig -
 Bendigo Military Museum
Photograph - Speedmaster Printing Press Media Announcement and Army Survey Regiment Open Day, Fortuna Villa, Bendigo, 1990
The first photograph was probably taken at a media event announcing the introduction of the Heidelberg Speedmaster printing press in late 1990. LTCOL Rene van den Tol was the CO of the Army Survey Regiment from 1989 to 1991. Partly obscured behind the CO was Mr Bruce Reid, who was the newly elected federal member for Bendigo. The media event was held in Wayzgoose Hall, Lithographic Squadron’s new purpose-built building constructed to house the Speedmaster 102 printing press. The remaining 29 photographs were taken at an Army Survey Regiment Open Day at Fortuna Villa, Bendigo on the 24th of February 1990. This occasion was one of several events held to commemorate the 75th anniversary of the formation of the Royal Australian Survey Corps. Although historical tours of Fortuna occurred on a regular basis, this was the first technical open day since 1972. The Royal Australian Survey Corps recognised that an Open Day was the best way for the local community in Bendigo to gain an insight into the unit’s important role as Defence’s map production agency, its technical equipment, and its economic importance to Bendigo. It also gave them an opportunity to tour through historic Fortuna Villa. This occasion is covered in more detail in page 143 of Valerie Lovejoy’s book 'Mapmakers of Fortuna – A history of the Army Survey Regiment’ ISBN: 0-646-42120-4. Refer to Item 6291.6P for more photos of the Open Day.The first photograph was probably taken at a media event announcing the introduction of the Speedmaster printing press at Army Survey Regiment Fortuna Villa, Bendigo in late 1990. The remaining 29 photographs were taken at an Open Day on the 24th of February 1990. The colour and black & white photographs were printed on photographic paper and are part of the Army Survey Regiment’s Collection. The photographs were scanned at 300 dpi. .1) - Photo, colour, 1990. L to R: Unidentified civilian visitor/media, SSGT Ian Nichols, unidentified (x2), SGT Dale Hudson (white top), unidentified (x2), MAJ John South, MHR Mr. Bruce Reid, CO LTCOL Rene van den Tol. .2) - Photo, black & white, 1990. WO1 Gary Warnest, civilian visitors. .3) to .4) - Photo, colour, 1990. WO2 Adrian 'Charlie' Creedy, civilian visitors. .5) - Photo, colour, 1990. Civilian visitors. .6) to .7) - Photo, colour, 1990. Civilian visitors, CPL Peter Peterson. .8) - Photo, black & white, 1990. L to R: LCPL Sandy Winn, civilian visitor. .9) - Photo, colour, 1990. L to R: CPL Steve McGuiness, civilian visitors. .10) - Photo, black & white, 1990. Display of digital storage media. .11) - Photo, colour, 1990. L to R: Mr Pat Thwaites outlining utilisation of satellite imagery to civilian visitors. .12) - Photo, colour, 1990. MAJ Peter Clarke with civilian visitors. .13) - Photo, colour, 1990. Unidentified technician with civilian visitors. .14) - Photo, colour, 1990. SGT Barry Hogan with civilian visitors. .15) - Photo, colour, 1990. SPR Ian Baldwin with civilian visitors. .16) - Photo, black & white, 1990. SPR Ian Baldwin with civilian visitors. .17) - Photo, black & white, 1990. SGT Sherri (Dally) Burke with civilian visitors. .18) - Photo, colour, 1990. L to R: SPR Jeanette (Lane) Dury-Lane, CPL Diane (Thomas) Soutar with civilian visitors. .19) - Photo, colour, 1990. L to R: unidentified technician, CPL Col McInnes, LCPL Charmian McKean. .20) - Photo, black & white, 1990. CAPT Peter Parkes. .21) - Photo, black & white, 1990. L to R: LCPL Janet Murray, MAJ Bob Coote, SPR Gary Lord. .22) - Photo, black & white, 1990. LT Marty Lyons with civilian visitors. .23) - Photo, colour, 1990. LT Marty Lyons with civilian visitors. .24) - Photo, black & white, 1990. SSGT Ian Nichols, CPL Dale Hudson, Planeta printing press, with civilian visitors. .25) - Photo, colour, 1990. Cars parked in Chum Street outside entrance to Fortuna Villa. .26) - Photo, colour, 1990. Civilian visitors near Fortuna Villa’s front door viewed from back gate. .27) - Photo, colour, 1990. Civilian visitors enjoying views of the garden from Fortuna Villa’s rooftop. .28) - Photo, colour, 1990. Civilian visitors enjoying views of the garden from Fortuna Villa’s verandah and rooftop. .29) - Photo, colour, 1990. Civilian visitors enjoying BBQ cooked by CPL Paul Baker and SPR Shona Hastie outside Lithographic Squadron. .30) - Photo, colour, 1990. BBQ cooked by CPL Paul Baker outside Lithographic Squadron..1P to .30P – no annotationsroyal australian survey corps, rasvy, army survey regiment, army svy regt, fortuna, asr, printing, litho -
 Federation University Historical Collection
Document - Outreach Program, Federation University Australia, Regional Schools outreach Program (RSOP) Federation University, 2008 - 2017
Regional Schools Outreach Program is a Federation University Program in conjunction with the Australian Government.1 Student Action Plan A4 Sheet .2 Regional Schools Outreach Program informations sheet A4 .3 VTAC information sheet 2014 A4 .4 Special Entry Access Scheme (SEAS) information sheet A4 .5 Open Days 2014 A4 flyer .6 VCAL snapshot A4 flyer .7 4 page booklet titled University, put yourself in the picture. .8 From High School to University - Making the transistion A4 flyer .9 I don't know what I want to do! A4 Flyer .10 Bridging Courses and Pathway Programs A4 Flyer .11 FedUni Schools Outreach - Focus on your Future A4 Flyer .12 60 page A4 booklet Regional Schools outreach Program 2008 - 2013 Evaluation Report .13 9 Page A4 Booklet Excite explore Empower - Evaluation of Federation University Australia Regional Schools Outreach Program - Summary of 2008 - 2013 Evaluation Findings and Conclusions .14 Key Dates list 2016 - 2017 .15 Student Guide - Year 10 - Course and Career Options A4 Booklet - 13 Pages .16 Univeristy - Year 10 - Put yourself in the picture A4 Flyer .17 Year 9 Teacher's Guide - Focus on your future - A4 Booklet 13 page booklet .18a Focus on Your Future - Year 9 - Student Workbook 2015 - A4 Booklet 12 pages .18b Focus on your Future - Year 9 - Teacher's Guide 2015 - A4 Booklet 12 pages .19 Focus on their future - Parent's Guide 2015 - A4 Booklet 8 page booklet .20 Focus on your Future - A Parent's Guide 2013 - A4 Booklet 8 Pages .21 The Future is Now - Year 8 - Teacher's Guide 2014 - A4 Booklet 12 pages .22 a & b - The future is now - Year 8 - Student Workbook 2014 - A4 Booklets 12 pages .23 Dream Makers - Grade 5/6 a Parents guide - A5 8 page Booklet .24a & b Stepping Up reach for the stars - Grade 5/6 Parent's Guide - A5 8 page Booklet .25a & b Regional Schools Outreach Program Grade 5/6 Stepping up Workshop - Teacher's Resource - 3 page A4 document .26a & b Stepping up reach for th stars - Student Workbook - A4 12 page Booklet x 2 .27a & b Grade 5/6 Building your Future - A Parent's guide - 4 page A5 Booklet .28 Building your future - Grade 5/6 A Student's Guide - A4 8 page booklet .29 Joining the dots from secondary school to University - Course and career options - Beyond secondary school - a guide to future career options 2013 .30 Later years Students - University - How to Make it Happen 2014 - A4 Booklet 16 pages .31a & b Scholarships and SEAS Applications - Year 12 Guide - 4 page A4 document .32 Student Guide - Later Years - University how to make it happen - A4 Booklet 16 pages .33 Regional Schools Outreach Program - Putting Regional Students in the picture for University - A4 4 page pamphlet regional schools outreach program, federation university, student guide, later years, scholarships, seas, special entry access scheme, university how to make it happen, course and career options, building your future, grade 5/6, stepping up, parent's guide, reach for the stars, workshop, teachers resource, dream makers, the future is now, year 8, teacher's guide, focus on your future, focus on their future, year 9, student workbook, year 10, put yourself in the picture, what do you know about uni?, key dates, excite explore empower, evaluation findings and conclusions, evaluation report, fed uni schools outreach, bridging courses, pathway programs, i don't know what i want to do., support services, picture the possibilities, booklet, vcal, snapshot, vce, open days 2014, vtac, student action plan -
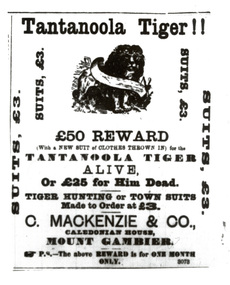 Federation University Historical Collection
Newspaper - Newsclippings, Tantanoola Tiger Newsclippings
In the early 1880s a small circus travelled between Millicent and Mt Gambier, South Australia. After camping overnight they discovered their Bengal Tiger at escaped and disappeared into dense scrub. After searching for hours they continued to Mt Gambier and reported the loss of the tiger to police. Police and local volunteers continued the search for the escaped tiger, but no sighting were made. In the early 1890s sheep in the Tantanoola area started to disappear with the still unsighted tiger being blamed. In 1893 reports of an unusual animal in the Tantanoola area started, with many describing the animal as the missing tiger, or a large dog. One eye witness claimed to have seen the animal carrying a full grown sheep in its mouth. The reports grew in number and exaggeration with sightings from Robe to Bendigo. In the Tantanoola district children were escorted with shotgun guards to and from school, with many homes keeping guns at the ready in case the tiger suddenly appeared. In August 1895 Tom Donovan shot the "Tantanoola Tiger" on Mt Salt Station, around 20 kms south of Tantanoola. The corpse was taken to Marks, a Mount Gambier taxidermist, at which time the animal was identified as an Assyrian or Northern Russian Wolf. Donovan displayed the animal far and wide. Despite the animal's death sheep continued to disappear from properties in the district over many years. It was of particular concern between 1909 and 1910. At that time Herbert Allchurch, an Adelaide detective, was sent to solve the mystery. A few days after his arrival Allchruch went to the front bar of the Tiger Hotel and arrested local rabbit shooter and trapper, Charlie Edmunson, with sheep stealing. After his 1911 trial Edmunson admitted to stealing over 4,000 sheep during the previous 20 years. He was gaoled for six years with hard-labour in January 1911. Edmunson had been selling the skins of the stolen sheep, leaving the carcusses to rot. He earned around five pounds per week during the 1990s and early 1900s, a time when the economy was depressed. It is not known had the animal known as the Tantanoola Tiger came to Australia, but it is believed it survived one of three ships wrecked of the coast between 1890 and 1893, making it to shore along with some of the shipwrecked passengers. (From a card produced by the Tantanoola Tiger Hotel, where the 'tiger' is on display.)A collection of Newsclippings from 1892 - 1895 photocopied onto A4 white paper. The clippings relate to the Tantanoola Tiger. Clippings include: * Border Watch 1892 - Tantanoola Tiger Reward * Sydney Morning Herald, 04/07/1857 - Animals in Zoological Gardens, including a number of large cats. * Claims the Tantanoola Tiger was an escaped circus animal (ie The Advertiser [Adelaide], 31 October 1893) * Search parties for the Tantanoola Tiger (ie Barrier Miner 19/05/1893; Barrier Miner 03/1081893) * Thylacine claim (ie Morning Bulletin [Rockhampton] 11/03/1895 * Afghan and Indian Hunters (ie Barrier Miner 07/02/1895) * Sighting by John Bird of Scarsdale - Wanganui Herald 15/12/1900. " ... Mr Bird was travelling on foot along a lonely track through very dense scrub, when he was stricken with amazement to see a full-grown tiger standing in a small dam about 30ft away, and holding in its jaws the carcass of a newly-killed lamb. He remained long enough to thoroughly take in the animals appearance, and then beat a hasty retreat unmolested. His description of the animal is as follows: A tawny-coloured creature, with a dirty mottled skin; in general appearance like an immense cat; body 4ft long, and of a uniform thickness from shoulder to hindquarters; in bulk equal to a very large pig. The legs were hidden in the water. A similar animal is reported to gave been seen near Canico, some miles away. ..." * Victorian country sightings # Bullarto - Argus 06/05/1905 # Dean - Launceston Examiner 28/01/1895 # Bendigo - Hobart Mercury 15/03/1895 # Ballan - Launceston Examiner 03/08/1895 * South Australian register 17/06/1885 " There is a tiger or panther wandering at large in Victoria, according to a rumour. It has taken the place of the Bunyip, whom hundreds have seen but none captured. This tiger is supposed to have broken loose from a travelling menagerie in the North-eastern district. At the beginning we should like it roved that such an escape ever took place. Perhaps the showmen were afraid to report the fact to the police; at any rate they did not do so. The first story about the tiger being seen came from the neighborhood of Wangaratta, 60 miles from the place where it is said to have commenced business on its own account. He was followed, but vanished among trees. Next we hear of a strange animal, bigger than a St Bernard's dog, but shorter legged, having appeared at least 150 miles from Wangaratta. Between Lilydale and Wangaratta there is a dividing range 2,000 feet high in the lowest past, besides several large rivers. An finally, the tiger - changed from a panther - is reported as having been seen within the suburban circle, about 8 miles from the general Post Office. They show you footprints, and point to the carcasses of mangled cows and calves. Casts have been taken of the footprints for examination by scientific men, who pronounce them doglike, and yet not doglike, but panther-like, which gives a nervous turn, for the panther may take up killing children and grown-up people. One tiger will not account for so many apparitions. There must have been a general strike among the menageries, and a breaking-up companies. ... * Research article by Philip A. Clarke "Indigenous Spirit and Ghost Folklore of 'Settled' Australia. australian animal folklore collection, tantanoola tiger, tom donovan, herbert allchurch, charles edmunson, sheep, charlie edmunson, mythical, myth, folklore -
 Ballarat Tramway Museum
Document - Instruction Book, Westinghouse Brake Company of Australasia Limited and The Westinghouse Brake & Saxby Signal Co. Ltd. of 82 York Road and Kings Cross London, "Westinghouse Railway Operating Data", 2000
Photocopy of 54 data sheets published by Westinghouse Electric & Manufacturing Company of East Pittsburgh Pa, USA c1920. Consists of plastic cover, header page with Westinghouse logo, contents sheets (2 pages), forward, 67 pages (single side photocopy) and heavy rear card cover bound with a green comb binder. Original material lent by Craig Tooke of the Melbourne Tramcar Preservation Association at Haddon. Photocopied by Warren Doubleday March 2000. List of contents produced 30/6/2000 and then bound. Contains data sheets regarding motors, commutators, brushes, armatures, bearings, field coils, pinions, lubrication, air piping, axle collars, resistance grids, gear cases and other technical information. Westinghouse Railway Operating Data 30/6/2000 List of Contents Page No. Care and repair of commutators 1 Undercutting commutators 2 Railway Motor carbon brushes 3 Brush holders 4 Flashing of railway motors 5 Soldering railway armatures 6 Armature Winding 7 Banding armatures 8 Railway Motor Bearings 9 Lubrication of railway motor bearings 10 How to babbitt motor bearings 11 Oil, grease and waster for motors and gears 12 Saturation of motor bearing waste 13 Testing Polarity of Field Coils 14 Charging of storage batteries on Interurban & street rail cars 15 Precautions to be taken with blower installations on motor cars 16 Putting on Railway Motor Pinions 17 How to take armatures out of box frame motors 18 Dipping and Baking of Railway Motors 19 War time dipping and baking outfits 20 Dipping and baking railway motors will decrease troubles 21 Protection of Motor Bearings from Dust 25 Winter Operation of Railway Motor equipments 26 Installation of Air piping to prevent freezing 27 Maintenance of Traction Brake Equipment 28 Maintenance of controller fingers and contacts 29 Hand operated circuit breakers 30 Railway Motor Testing I 31 Railway Motor Testing II 33 Railway Motor Testing III 35 Railway Motor Testing IV 36 Railway Motor Testing V 37 Removing and replacing railway motor armature shaft 39 Mounting and Maintenance of car resistors 40 Lubrication of control apparatus 41 Maintenance of fuse boxes for railway service 42 Does it pay to dip and bake armatures 43 Dipping and Baking as a financial asset 44 Shop Organisation 45 Tinning Malleable Iron Bearing shells 46 Life of armature bearings or railway motors 47 The assembly of complete sets of commutator segments 48 Electric welding as a factor in reclamation 50 Metal to Metal press, shrink and clamping fit allowances 52 Life of railway motor carbon brushes 54 General information of grid resistance design for the operating man 56 Stopping a car by braking with the motors 57 Railway Motor shafts and their maintenance 58 Axle collars 59 Gear cases 60 Ventilated railway motors 62 Revamping Loose armature bearings 64 Life of axle bearings of railway motors 65 Heat-treated bolts for railway service 66 Document imaged over 7 parts 7-9-2016 - see hi res files. trams, tramways, westinghouse, motors, data sheets, technical information -
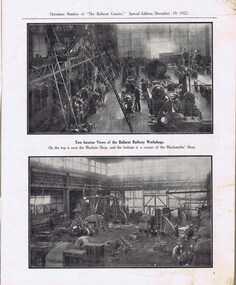 Ballarat Tramway Museum
Newspaper, The Courier Ballarat, The Courier, Christmas Number, 1922, Special Issue, Dec. 1922
Yields information about Ballarat, it businesses, identifies and its locations or environs through photos and advertisements and articles.The body of the "Christmas Number of the Ballarat Courier, Special Edition - December 1922" = coves missing. See attached listing with worksheet for summary of contents. Contains many advertisement for local business houses, photos and fiction and articles , pages 3 - 94 still existing, stapled. Notes on contents of Christmas Number of The Ballarat Courier Special edition, December 19, 1922. Photos Ballarat Association Cricket Team, winners Country championship - 1922 and photo of dinner at Sth Melb. Town Hall by VCA. - p83 Ballarat Golf club, Arch of Victoria and Club House - p63, 65 Ballarat Imperial Football club - league premier- 1922 - p19 Ballarat Miners Turf Club - showing stands and office bearers - p43 Ballarat North Golf Club - p67 Ballarat Town hall - p87 Ballarat Turf Club Office bearers and race finish - p45 Ballarat Yacht club - opening day and yacht race - p89 Black Hill Progress Association, - members and scenes - p33 Eureka Monument - p79 Finish of a race at Miners RC - p45 Head of the Lake and St. Patrick's the winning crew - p47 1.ake Wendouree - boating on (Gardens side - p] 1 Lake Wendouree, rowing and club houses - p28 Lal Lal waterfalls - p61 Lydiard St. View - Railway Station, Cemetery gates, Mining Exchange, Post Office and Banks - p71 National Federation Conference - 1922 - p39 South city Football club, Ballarat Assoc. Premiers 1922 - p25 Sturt and Lydiard St - top photo Town Hall and T&G building, with ESCo tram (pencil note "Tram No- 3 - Peckham Truck" written in - p75. Bottom photo, looking south from Town Hall. The Western Oval during a football match - p23 Victorian Farmers Union Conference, Ballarat 1922 - p37 Victorian Railway photos of various scenes around Victoria: Pages 3, 5, 7, 55, 59 Views of Victoria Park - p91 VR Ballarat Railway Workshops - p9 Advertisements on even numbered pages, featuring in particular: Ballarat Motor Garage - with photos - p88 C.A.V. Willard - storage battery service Stn - p76 with photo. CA Mitaxa - Builder - includes photos of new homes - p38 Coles & Pullham - stock sales - with photos - p86 ESCo - p70 Geo E. Dibble, machinery merchant - includes photos - p26 Geo. Waller - asphalt and carrier - photos of work and buildings Hanrahan's of Ballarat - Garage and stables - p30 J.L.Ridings - dentists, - photos of surgery p14 Longhurst's Bakeries - Mair and Yuille St. Includes Photos. - P84 Preston Motors, Melbourne - The Maxwell Sep Morse - Motor and Carriage builders - photo - p78 St. Patrick's College - photos of students and buildings - p46 State Savings Bank of Vic. - p20 T-J. Brown house remover and general carrier, photo of traction engines - p90 T.J.Haymes - Wallpaper etc. - p33 The Ballarat Co-Op Distribution Society - includes photos - p44 The Hupmobile - McLean Richards Motors - p22 Wallace Butter Factor - p82 Articles Black Hill Progress Association - p35 Damaged pages - cut outs clippings etc. Page 17/18 - top half bottom 1/3 of page 21/22 Pages: 9, 70, 71, 75, 87 and 90 imaged. Record reviewed and images of some of the pages added 10-9-2013p74. Note re tram 33.trams, tramways, ballarat, commerce, ballarat business, sports, science, esco -
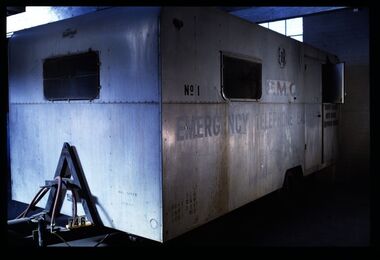 National Communication Museum
Vehicle - Mobile Telephone Exchange, c. 1965
Manufactured in the 1960s, this mobile emergency telephone exchange was fitted into a caravan. Part of the Shepparton Division State Disaster Plan, the caravan could be towed to areas affected by disasters to enable communications to recommence. The caravan remained in service until approximately 1974.Mobile infrastructure plays an important role in Australian communications, owing to the often remote and hostile environments in which Australians live and work. Exchanges such as this facilitated phone calls in the aftermath of an emergency, particularly for hospitals, police and other emergency services. Today, Mobile Exchange on Wheels (MEOWs), Cell on Wheels (CoW) and Satellite Cell on Wheels (SatCOW) - which provide temporary landline and broadband services, mobile phone coverage and service in areas without communications infrastructure respectively - are a critical part of emergency response procedures for natural disasters such as fire and flood. Though technology has progressed, the need for rapid service in remote areas remains a present concern of the communications service providers in Australia. This mobile service infrastructure is historically significant as an early example of a service which has evolved over decades, yet is still needed today. The exchange, as a representative example of a vehicle which would provide early-response in a disaster, is socially significant as a facilitator of critical communications needs in devastated communities: access to emergency services and contact with family and friends. The exchange itself, intact from its period of use, provides an insight into technology of the 1970s.Mobile emergency exchange housed in a caravan trailer on 2 wheel base, duralin body, steel tow bar, Caravan divided into 3 sections; the exchange room; the relay room and the main frame room. The exchange room contains 3 switchboards, a folding table, cupboards, benches and switch rack (.1). table (.2), steel bar for attaching the table (.3), back boards of switchboards (.4-.6), switches (.7-.16), box of switches (.17). There is a wall phone magneto, 300 type handset on wall and 2 skylights with wire screens. .11? hat pegs and shelf; there are 2 fluorescent tubes for lighting, all in exchange section. The floor is covered with 2 tone grey tiles and there are wire mesh on outside of windows and a geometric curtain inside behind switch rack. There is a flywire screen door as well as exterior door. The relay room has a sectioned door so half can open at a time. Room contains a cupboard with folding bench top beneath a curtained window. The opposite wall has a bank of batteries and transmission condensers; there is a shelf above window, one fluorescent tube and fuse boxes. Tiles on floor also. The main frame room contains many metres of coiled black covered cable, a black covered magneto wall telephone with 300 type handset; grey plastic jumper cords, a rack of termination points and wire with wasp nests attached. There is a small iron step under door, a fluorescent tube on wall and 3 hat hooks. Roll of Paper Handtowels (.18), cord and handle (.19), red exchange cords and plugs (.20-.22), plastic aluminium runners (.23,.24), headset (.25,.26), logbook (.27), battery readings (.28), box containing papers circuit drawings etc (.29-.93), paper lists off wall (.94,.95). Books, record books etc (.96-.103). Manila folder (.104) containing circuit drawings (105-.124). Wooden drawer (.125), metal drawer containing subscribers master cards, record of faults cards, particular switchboards connected, Junction line cards (.126). Box of valves (.127), box of clamps (.128). Box of 2000 type rack fuses, red 1 1/2 AMPS, black 3 AMP, blue 1/2 AMP (.129). Box of sleeves for covering wire joints (.130), plastic beakers (.131,.132), soap (.133), box of white plastic squares (.134), time switch "Venner BF/43 time switch" Made in England (.135), box of bolts, knobs etc (.136), box of switchboard number indicators (.137), fuse (.138), fuse wire (.139), football card (.140). Box of cartridge fuse 6 AMP (.141). Envelope of drawing pins, rubber bands (.142), black plastic, paper tape centres (.143-.152), metal plug (.153), 2 signs "Beware of vehicles" (.154-.155). Paper listing Naringal East automatic conversion (.156). Green Commonwealth of Australia note pad (.157). Wiring plug for tail lights (.158). Black fuse plugs (.159,.160). Box of bolts (.161). 2 sections of blue plastic coated wires (.162,.163). Gloves used for working on batteries (.164-.167). Wasp nests (.168,.169). White fuse (.170). Photographs of van in use (.171,.172)..1 on front: "ANOTHER / MOBILETRAIL / PRODUCT" "MAX SPEED / 25MPH" "TRAILER BRAKES / --- / " On sides: "EMERGENCY TELEPHONE EXCHANGE" "NO 1" "PMG" "TCQ / GROSS 250 / TARE 182 / LOAD 162" "6" "COUNTRY BRANCH / NORTH REGION / [SHEPPARTON DIVISION]" "LAW'S SIGNS" "Telecom Australia" On back: "DANGER / LONG LOAD" "MQA 3787" .133: "FIR OIL" "AUSTRALIA"mobile telephone exchanges, mobile telecommunications trailers, trailers, transport, natural disaster, black saturday, bushfires, floods, emergency communications -
 Bendigo Military Museum
Photograph - 4th Field Survey Squadron Adventurous Training, Wilpena pound, Flinders Ranges, SA, 1989
This is a set of 43 photographs of a 4th Field Survey Squadron adventurous training held at Wilpena pound, in the Flinders Ranges of South Australia in 1989. It is evident the training focussed on teamwork, leadership, abseiling, rock climbing, field craft and living off the land survival skills. Elements from units of the Army Reserve also participated in the training. In this photo set, one of 4th Field Survey’s sections participated in abseiling and trekked to the highest mountain in the Flinders Ranges – St. Mary’s Peak. Refer to items 6553.56P for additional colour photographs taken during the adventurous training exercise.This is a set of 43 photographs of 4th Field Survey Squadron personnel undergoing adventurous training held at Wilpena pound, in the Flinders Ranges of South Australia in 1989. The black & white photographs are on 35mm negative film and are part of the Army Survey Regiment’s Collection. The photographs were scanned at 96 dpi. .1) - Photo, black & white, 1989. L to R: SGT Laurie Justin, SGT Stu Symonds. .2) - Photo, black & white, 1989. L to R: SGT Stu Symonds, CPL Roger Graf, SSGT Max Coletti, SPR Cheryl Deluca-Cardillo, SPR Andrew Quin. .3) & .4) - Photo, black & white, 1989. Wilpena Pound topography. .5) - Photo, black & white, 1989. SGT Stu Symonds. .6) - Photo, black & white, 1989. Abseiling ropes and equipment. .7) to .16) - Photo, black & white, 1989. Abseiling activities, unidentified soldier. .17) to .18) - Photo, black & white, 1989. Abseiling activities, CPL Michelle Griffith. .19) - Photo, black & white, 1989. L to R: unidentified (x5), SGT Mick Hogan, unidentified (x3). .20) - Photo, black & white, 1989. L to R: CPL Roger Graf, CPL Michelle Griffith, SPR Cheryl Deluca-Cardillo, SGT Laurie Justin, SSGT Max Coletti, SPR Andrew Quin. SGT Stu Symonds. .21) - Photo, black & white, 1989. L to R: unidentified (x2), SGT Stu Symonds. .22) & .23) - Photo, black & white, 1989. Wilpena Pound topography. .24) - Photo, black & white, 1989. SSGT Max Coletti. .25) - Photo, black & white, 1989. SSGT Max Coletti, SPR Cheryl Deluca-Cardillo, SGT Stu Symonds. .26) - Photo, black & white, 1989. SGT Stu Symonds. .27) - Photo, black & white, 1989. L to R: CPL Michelle Griffith, SPR Cheryl Deluca-Cardillo, SSGT Max Coletti, SGT Laurie Justin, SPR Andrew Quin, CPL Roger Graf, SGT Stu Symonds. .28) &.29) - Photo, black & white, 1989. Wilpena Pound topography. .30) - Photo, black & white, 1989. SGT Stu Symonds. .31) - Photo, black & white, 1989. CPL Michelle Griffith. .32) - Photo, black & white, 1989. L to R: CPL Michelle Griffith, SGT Stu Symonds, SSGT Max Coletti, SGT Laurie Justin. .33) - Photo, black & white, 1989. L to R: CPL Michelle Griffith, SGT Stu Symonds, CPL Roger Graf (standing), SSGT Max Coletti, SGT Laurie Justin. .34) - Photo, black & white, 1989. L to R: SGT Stu Symonds, CPL Michelle Griffith, CPL Roger Graf (standing), SSGT Max Coletti, SGT Laurie Justin. .35) to .37) - Photo, black & white, 1989. Wilpena Pound topography. .38) - Photo, black & white, 1989. SPR Cheryl Deluca-Cardillo. .39) - Photo, black & white, 1989. L to R: CPL Michelle Griffith, SGT Stu Symonds, SPR Andrew Quin, SGT Laurie Justin. .40) &.41) - Photo, black & white, 1989. Wilpena Pound topography. .1P to .43P – There are no personnel identified. ‘1989 ADV TRAINING’ annotated on negatives sleeve.royal australian survey corps, rasvy, 4 fd svy sqn -
 Bendigo Military Museum
Photograph - Royal Australian Survey Corps Surveyors in the Field – Project Cutlass, New Guinea, 1956 – 1957
This is a set of 23 photographs of surveyors and support staff in the field undertaking tasks in New Guinea 1956 – 1957. The surveyors were employed in the establishment of mapping and geodetic control for Project Cutlass, the “Ship-Shore” survey of the New Ireland province. In this survey operation surveyors used theodolites to observe horizontal and vertical angles and chains to measure base line distances between survey stations. Bob Skitch shown in photo .7P was in the 2nd year of his career in the Australian Army. He achieved the rank of Lieutenant-Colonel, and his last appointment was the CO of the Army Survey Regiment from 1976 to 1980.This is a set of 23 photographs of surveyors and support staff in the field undertaking duties during Project Cutlass located in New Ireland, New Guinea 1956 – 1957. The photographs were printed on photographic paper and are part of the Army Survey Regiment’s Collection. The photographs were scanned at 300 dpi. .1) - Photo, colour, 1956. Surveyors travelling main road from Kavieng to Namatanai, New Ireland. .2) - Photo, colour, 1956. Unidentified surveyors assessing recovery of their vehicle after bridge collapsed on west side of New Ireland. .3) - Photo, colour, 1956. Unidentified surveyors assessing recovery of their vehicle after bridge collapsed over flooded creek on west side of New Ireland. .4) - Photo, colour, 1956. Survey personnel L to R: Bev Uwins, John Lambie, Bob Thompson, New Ireland. .5) - Photo, colour, 1956. Survey base camp, New Ireland. .6) - Photo, black & white, 1956-1957. Geoff Helsham with possible human remains, New Ireland. .7) - Photo, black & white, 1956-1957. Bob Skitch undertaking survey observations using Wild T2 theodolite, New Ireland. .8) - Photo, black & white, 1956-1957. Chas Beach undertaking survey observations using Wild T2 theodolite, New Ireland. .9) & .10) - Photo, black & white, 1956-1957. Kev Parker (cook) New Ireland. .11) - Photo, colour, 1957. Brian Berkery taking a break, Top Manor Island, Lihir Island Group off New Ireland. Latitude -2° 46”, Longitude 152° 40”. .12) - Photo, colour, 1957. Survey base camp L to R: Chas Beach, Bev Uwins, Feni Islands, New Ireland. Latitude -4° 05”, Longitude 153° 45”. .13) - Photo, colour, 1957. A Hous Kiap. (Kiaps, known formally as district officers and patrol officers, were travelling representatives of the British and Australian governments), New Ireland. .14) & .15) - Photo, colour, 1957. L to R: Joe Farrington, Tom Royle Bob undertaking survey observations using theodolites from an improvised timber tower, New Ireland. .16) & .17) - Photo, colour, 1957. US Army ship FS216 used for ship-to-shore triangulation docked at Rabaul, New Britain. .18) - Photo, colour, 1957. US Army ship FS216 used for ship-to-shore triangulation docked at Kavieng, New Ireland. Sight target on top of mast. .19) - Photo, colour, 1957. Survey personnel onboard US Army ship FS392, L to R: Peter Frodsham, Bob Thompson, Doc Reid, John Underwood, remainder unidentified, New Ireland. .20) - Photo, colour, 1957. Survey base line party heading ashore, New Ireland. .21) - Photo, colour, 1957. Survey personnel rowing US Army assault boat L to R: Kev Parker, Chas Beach, folded up survey beacons overhanging stern, New Ireland. .22) - Photo, colour, 1957. Les Bailey onboard US Army ship departing Rabaul, New Britain for Brisbane. .23) - Photo, colour, 1957. Ron Newman onboard US Army ship departing Rabaul, New Britain for Brisbane. Active volcano in background..1P to .23P annotated on back – ‘Operation Cutlass’, personnel names, the year and the location. royal australian survey corps, rasvy, army survey regiment, fortuna, a, army svy regt, asr, surveying