Showing 1176 items matching " early trams"
-
 Ballarat Tramway Museum
Photograph - Black & White Photograph/s, Chris Wurr, early 1970's
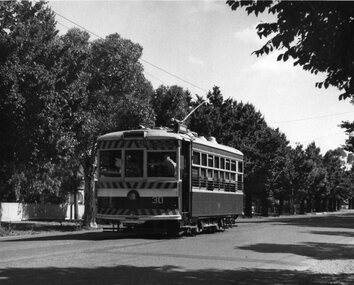
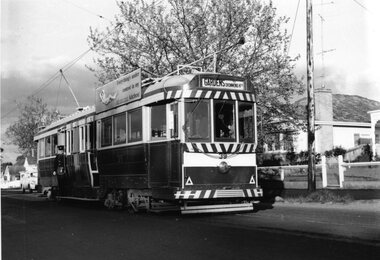
... the appearance of Bendigo Birney trams early 1970's en route to North ...Yields information about the appearance of Bendigo Birney trams early 1970's en route to North Bendigo and its tree lined streets.Black and White Photograph of SEC Bendigo 30, Birney at North Bendigo terminus with the driver turning the trolley pole. Tram has the destination of Golden Square. Photo shows the fitting in the overhead to help locate the trolley pole on the inbound wire. Photo Chris Wurr, early 1970's. "Photo by Chris Wurr" stamped on the rear.trams, tramways, bendigo, north bendigo, overhead, birney, tram 30 -
 Ballarat Tramway Museum
Photograph - Black & White Photograph/s, Chris Wurr, early 1970's
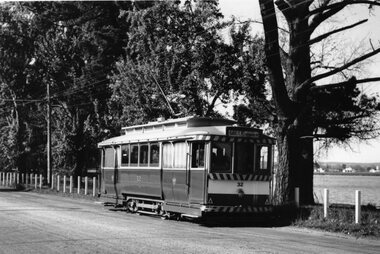
... the appearance of Bendigo trams early 1970's and the Charing Cross area ...Yields information about the appearance of Bendigo trams early 1970's and the Charing Cross area.Black and White Photograph of SEC Bendigo 30, Birney en route to North Bendigo , possibly in McCrae St. Tram has the destination of North Bendigo. Note conductor at the front of the tram, talking to the driver. Photo Chris Wurr, early 1970's. "Photo by Chris Wurr" stamped on the rear.trams, tramways, bendigo, north bendigo, mccrae st, birney, tram 30 -
 Ballarat Tramway Museum
Photograph - Black & White Photograph/s, Chris Wurr, early 1970's
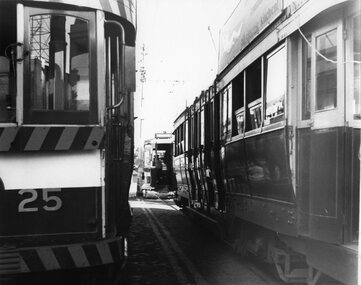
... the appearance of Bendigo trams early 1970's and the Charing Cross area ...Yields information about the appearance of Bendigo trams early 1970's and the Charing Cross area.Black and White Photograph of three trams at Charing Cross. Photo taken between two bogie cars (25 and one other) on the Eaglehawk line while a Birney crosses in front of them. Possibly No. 29. Photo Chris Wurr, early 1970's. "Photo by Chris Wurr" stamped on the rear.trams, tramways, bendigo, charing cross, tram 25, tram 29 -
 Ballarat Tramway Museum
Photograph - Black & White Photograph/s, Chris Wurr, early 1970's
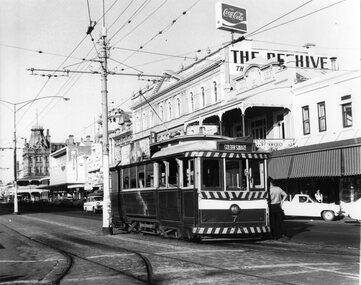
... the appearance of Bendigo Birney trams early 1970's and the McCrae St ...Yields information about the appearance of Bendigo Birney trams early 1970's and the McCrae St area.Black and White Photograph of Bendigo No. 7, in Pall Mall, at Charing Cross, with the destination of Golden Square. An inspector is leaning against the front door of the tram. Has in the background, The Beehive building, Coca Cola advertisement, Myers store and Stoneman's Shamrock Hotel. Photo Chris Wurr, early 1970's. "Photo by Chris Wurr" stamped on the rear.trams, tramways, bendigo, charing cross, pall mall, tram 7 -
 Ballarat Tramway Museum
Photograph - Black & White Photograph/s, Chris Wurr, early 1970's
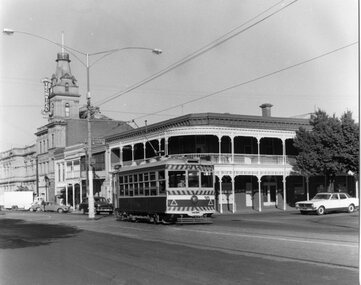
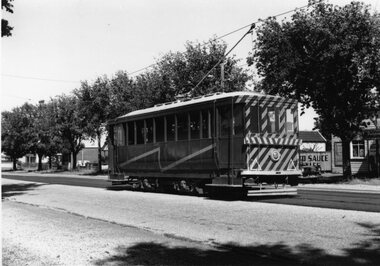
Yields information about the appearance of Bendigo Birney tram No. 11, stored at the depot, following an accident. Was not returned to service until after the SEC closed the tram system.Black and White Photograph of Bendigo No. 30, Birney, inbound to Charing Cross, McRae St, Bendigo, at Baxter St intersection? with the Bendigo Technical College in the background. Note the direction sign for "Heathcote". Tram has the destination of Golden Square. Photo Chris Wurr, early 1970's. "Photo by Chris Wurr" stamped on the rear.trams, tramways, bendigo, mccrae st, tram 30 -
 Ballarat Tramway Museum
Photograph - Black & White Photograph/s, Chris Wurr, Jan. 1971
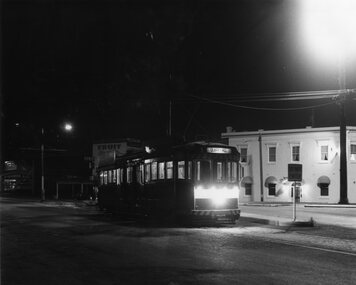
Black and White Photograph of Bendigo No. 2 at the Eagle Hawk terminus, Jan. 1971, night photograph. Tram has the destination of Quarry Hill. In the background is the Foodland Store, a Milk bar. The tram has arrived at the terminus, the trolley pole has been turned, but the headlights and dash canopy lights have yet to be turned. Tram has the destination of Quarry Hill. Photo Chris Wurr, early 1970's. "Photo by Chris Wurr" stamped on the rear. In top left hand corner, in ink "71)" and "Bendigo (SEC) Tramways / 1.1971 / Eaglehawk Terminus"trams, tramways, bendigo, eaglehawk, night photo, tram 2 -
 Ballarat Tramway Museum
Postcard, V.S.M. Melbourne, ESCo crossbench car No. 19, c1906
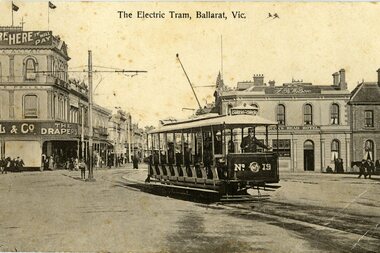
Demonstrates the early days of the Electric Supply Co of Victoria tram's in Ballarat, the use of cross bench or toast rack trams and the intersection of Grenville, Bridge and Sturt Sts Ballarat.Sepia toned photograph of ESCo crossbench car No. 19, at Sturt and Grenville Sts. with the Bucks Head Hotel in the background and Cowdell Tonner and Ellis drapers store on the corner of Bridge and Grenville St. The tram has the destination of Convent/Gardens. See Reg item 3885 for a photo of the store and a Toastrack tram. On the rear, divided areas for a message and address, place for a stamp and two 1d Australian postage stamps in the bottom right hand corner. In the stamp area, has the words "printed in Prussia" in very small type. On rear of card in top left hand corner "28)", along top edge "9383H $25" and in bottom right hand corner a "William F Scott" address label and "WFS Collection"trams, tramways, esco, toastrack tram, grenville st, bridge st, sturt st, tram 470 -
 Ballarat Tramway Museum
Postcard, Rose Stereograph Co, Bendigo talking tram No. 470, mid 1990's
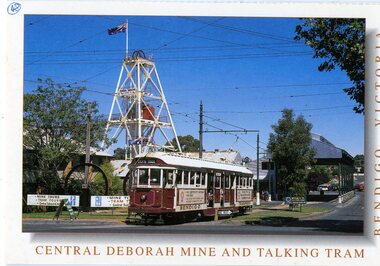
Colour postcard of Bendigo talking tram No. 470 leaving the Central Deborah Mine, in the Bendigo Talking tram livery with the mine poppet head in the background. Postcard has "Central Deborah Mine and Talking Tram / Bendigo Victoria" around the edges. Two copies held. Ex Melbourne W2 470, later to be renumbered as Bendigo 35 Reproduced by the Rose Stereograph Co of Glen Waverley. Photo courtesy of Neil Cutts. Has the Rose Co. symbol on the rear of the card, along with areas for the stamp and address block. Rose Series Card No. 3157.Copy 2, has "48" in a circle in the top left hand corner of the front of the card and on the rear, the same number, and a "William F Scott" address label on the bottom left hand corner, and inscription "early 1990s" in ink.trams, tramways, bendigo, central deborah, bendigo trust -
 Ballarat Tramway Museum
Postcard, Rose Stereograph Co, Charing Cross, Bendigo, mid 1900's
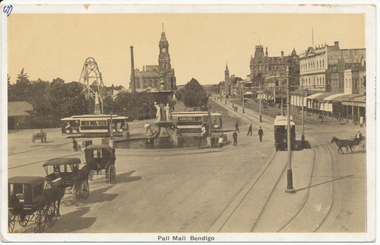
Demonstrates aspects of the development of the Bendigo tramways by ESCo prior to undertaking the Ballarat system. Yields information about Charing Cross soon after the electric tramway was opened.Black and White postcard, early 1900's view of Charing Cross, Bendigo looking towards the north, Pall Mall. Has three tram cars in the view, the fountain, centre poles, horse drawn cabs and vehicles, a poppet head and building on the east side of the Pall Mall. Divided back postcard with areas for message, address, and the stamp. Has "67)" in the top left hand corner of the back of the card, a circled "13" crossed out, "early 1900's" in ink. In the top right hand corner "$8" in pencil. On the front of the card has "67)" in the top left hand corner in ink.trams, tramways, bendigo, pall mall, charing cross, tram 4 -
 Ballarat Tramway Museum
Ephemera - Envelope/s, Australia Post, "Trams of Victoria", 1/07/2009 12:00:00 AM
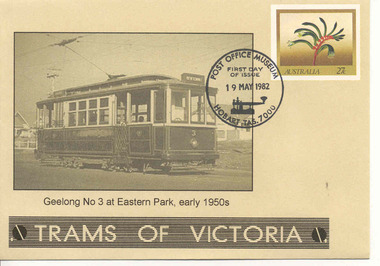
Demonstrates Australia Post use of an image on a pre-stamped envelope, first day of issue and a printed stamp.Printed pre-stamp envelope titled "Trams of Victoria" on light brown paper, featuring Geelong No. 3, at Eastern Park, early 1950's. Has as printed 27c Australia stamp on the envelope. Has been post cancelled by the Hobart Post Office Museum 19/5/1982 - First day of issue. On the rear, gives details of the stamp - Mangles' Kangaroo Paw. Designer - Paul Jones, Sydney, pre-stamped envelope No. 051. Purchased from eBay C.Siviero, 19/6/2009 for $6.21 including postage. eBay sheet filed with worksheet.trams, tramways, envelopes, geelong, stamps, australia post -
 Ballarat Tramway Museum
Photograph - Black & White Photograph/s, 1890's
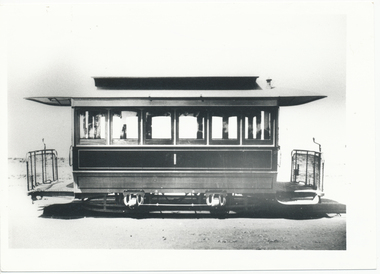
Demonstrates the nature of working of the horse trams in Ballarat when at times three horses were required to take trams from Grenville St to Lydiard St. Yields information about the dress of Gentlemen at the time and the buildings behind the tramcar..Black and White photograph of North Sydney cable tram trailer, No. 1, side on view. From the CB Thomas Collection and published in Sydney tram books. Hi Res of image added 15/7/2014. On rear in ink, cropping marks in the top edge. Along the bottom edge "Trailers of this type were converted to electric cars for the Electric Supply Co. of Victoria tramways in Ballarat. The trailers were from the North Sydney cable try of the early 1890's" and "Nth Sydney cable trailer No. 1, Late CB Thomas collection". "KM2" and a blue sticker with "9" written on it.trams, tramways, cable trams, sydney, esco, tram 1 -
 Ballarat Tramway Museum
Photograph - Colour Photograph/s, Candy Footwear, 1948
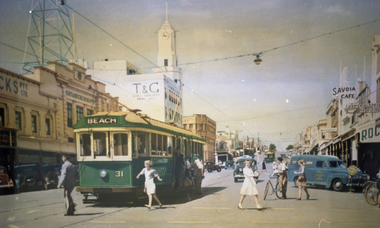
Yields information about Moorabool Street Geelong, colour publicity photograph, summer clothing and the street scape during the early 1950's. Has a strong association with a commercial collection - Candy footwear.Colour print of a colour photograph held by the Candy Footwear collection (two slightly different prints) and a black and white version, of No. 31 in Moorabool Street, with the destination of BEACH, at the corner of Malop St, 1948. Has a number of people joining and leaving the tram, and walking across to the footpath. Also a number of bicycles in the photograph. People are wearing summer clothes. Printed on Agfa paper. In the background is the T&G building, Rockman's, Savoia Cafe, and Hitchcocks (?) Pty Ltd building. In an envelope that contained the photographs (now with the worksheet) is "pics and negatives for Geelong 31 / copy Candy Footwear framed illustration." Two strips of three negatives in the negatives folder - page 58.In hand writing on the rear " (6) " Car in Moorabool St at the cnr with Malop St en-route to Beach." Along the bottom edge "William Scott" address label and "Candy Footwear Collection 1950s". Copy 2 and the black & White photograph, as above, but 1948 written instead of 1950. trams, tramways, geelong, moorabool st, malop st, clothing, tram 31 -
 Ballarat Tramway Museum
Photograph - Black & White Photograph/s, Digital Image, Wal Jack, 27/06/1957 12:00:00 AM
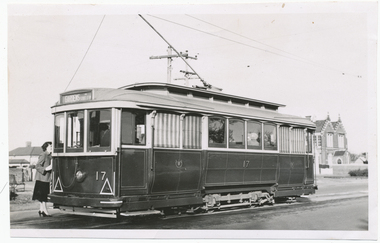
... Ballarat Trams and streetscapes early 1960's and the details ...Yields information about Ballarat Trams and streetscapes early 1960's and the details of the Victoria St terminus, Yields information about Ballarat Trams and streetscapes early 1960's and the details of the Victoria St terminusBlack and white print of Ballarat 17, in Victoria Street, at Otway St photographed by Wal Jack, 27/6/1957. Two copies. A lady is standing at the back of the tram, possibly talking to the conductor. Tram has the destination of Gardens via Sturt St West. Has the Convent building in background. Photo print courtesy of Port Dock Railway Museum, now the National Railway Museum. See worksheet 4311 for letter and details of prints sent to Bill Scott, 19/10/2001. Any photo credit to mention NRM Collection. 4412.1 - Digital image from the Wal Jack Ballarat Album of the same photograph. See i3 for details of the rear of the photograph.On rear of copy 1 "SEC Ballarat / 17 / Victoria / 27/6/57 / Wal Jack" Copy 2 "DAC" in ink, bottom right hand corner. 4412.1 - on rear of photo in ink, "SEC Ballarat, No. 17 Victoria St at Otway St, Ballarat East 25 June '57" and "W. Jack photo Neg. to D. Colquhoun"trams, tramways, victoria st, tram 17 -
 Ballarat Tramway Museum
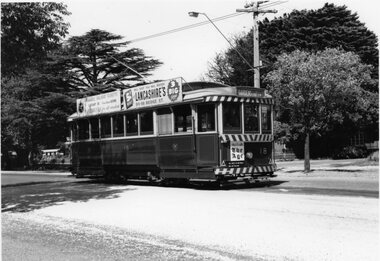
Photograph - Black & White Photograph/s, Wal Jack, 28/02/1962 12:00:00 AM
Yields information about Ballarat Trams and streetscapes in the early 1960's and the details of the Lydiard St railway gates from the north end.Black and white print of Ballarat 18, in Victoria Street, photographed by Wal Jack, 28/2/1962. Two copies. Tram has advertisements for "The Age", Whites Florists, Lancashire's. Tram has the destination of Gardens via Sturt St. Note the pan at the end of the overhead and "X" in front of the tram. Photo print courtesy of Port Dock Railway Museum, now the National Railway Museum. See worksheet 4311 for letter and details of prints sent to Bill Scott, 19/10/2001. Any photo credit to mention NRM Collection.On rear of copy 1"SEC Ballarat / 18 / Victoria / 28/2/62 2090 / Wal Jack" Copy 2 "DAC" in ink, bottom right hand corner.trams, tramways, victoria st, terminus, tram 18 -
 Ballarat Tramway Museum
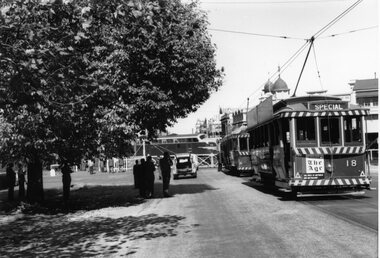
Photograph - Black & White Photograph/s, Wal Jack, 21/04/1962 12:00:00 AM
... Ballarat Trams and streetscapes early 1960's and the details ...Yields information about Ballarat Trams and streetscapes early 1960's and the details of the Victoria St terminus while running specials for the AETA.Black and white print of Ballarat 18 and 37, at the Lydiard St gates, while B79 crosses the street. Photographed by Wal Jack, 21/4/1962. Two copies. Tram has advertisements for "The Age". Tram is showing Special and has a number of people photographing the scene - AETA tour. Photo print courtesy of Port Dock Railway Museum, now the National Railway Museum. See worksheet 4311 for letter and details of prints sent to Bill Scott, 19/10/2001. Any photo credit to mention NRM Collection.On rear of copy 1" "73)" and "SEC Ballarat / 18 & 37 / Lydiard St North / 21/4/62 2091 / Wal Jack" trams, tramways, lydiard st, railway crossing, aeta, tram 18, tram 37 -
 Ballarat Tramway Museum
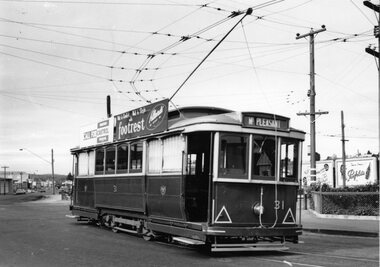
Photograph - Black & White Photograph/s, Doug Colquhoun, 26/04/1960 12:00:00 AM
... the early 1960's. trams tramways Mt Pleasant Main St Barkly St tram ...Yields information about Ballarat Trams and streetscapes and Wendouree Parade during the early 1960's.Black and white print of Ballarat of No. 31 enroute to Mount Pleasant, turning from Main St into Barkly St. Tram has the destination of Mt Pleasant. Two copies. Photo taken Doug Colquhoun 26/4/1960. Has roof advertisements for Castrol Oils and Footrest of Sturt St furnishings. In the background is a Penfolds sign. Photo print courtesy of Port Dock Railway Museum, now the National Railway Museum. See worksheet 4311 for letter and details of prints sent to Bill Scott, 19/10/2001. Any photo credit to mention NRM Collection.On rear of copy 1"SEC Ballarat / 31 / Bridge St / 26/4/60 2101 / D. A. Colquhoun" Copy 2 "DAC" in ink, bottom right hand corner.trams, tramways, mt pleasant, main st, barkly st, tram 31 -
 Ballarat Tramway Museum
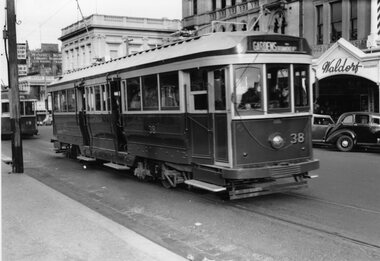
Photograph - Black & White Photograph/s, Doug Colquhoun, 27/04/1954 12:00:00 AM
... Street loop, early 1960's. trams tramways Sturt St City tram 38 ...Yields information about Ballarat Trams and streetscapes, the scrubber tram and the Bell Street loop, early 1960's.Black and white print of Ballarat of No. 38 in Sturt St, just to the west of Lydiard St with No. 19 in the background. Tram has the destination of Gardens via Drummond North, No. 19, Sebastopol. IN the background is the Waldorf shop premises, tram stop signs. Photo by Doug Colquhoun 27/4/1954. Two copies. Photo print courtesy of Port Dock Railway Museum, now the National Railway Museum. See worksheet 4311 for letter and details of prints sent to Bill Scott, 19/10/2001. Any photo credit to mention NRM Collection.On rear of copy 1"SEC Ballarat / 38 / Sturt St / 27/4/54 2118 / D A Colquhoun " Copy 2 "DAC" in ink, bottom right hand corner.trams, tramways, sturt st, city, tram 38, tram 19 -
 Ballarat Tramway Museum
Photograph - Black & White Photograph/s - set of 2, Wal Jack, 28/02/1962 12:00:00 AM
Yields information about Bendigo trams, the Golden Square route in the early 1960's prior to fitting dash canopy lighting.Black and white print of the Ballarat Scrubber tram, at the Bell Street loop, 28/2/1962, Photo by Wal Jack. Two copies. Photo print courtesy of Port Dock Railway Museum, now the National Railway Museum. See worksheet 4311 for letter and details of prints sent to Bill Scott, 19/10/2001. Any photo credit to mention NRM Collection. .1 - same photograph with Doug Colquhoun stamp on rear - see image i2..1 - On rear of copy 1"SEC Ballarat / Scrubber car /Bell St loop / 28/2/62 2125 / Wal Jack " In the top right hand corner "74)" .2 - On rear has Douglas Colquhoun stamp with photograph details - see image i2 trams, tramways, scrubber tram, bell st, tram scrubber -
 Ballarat Tramway Museum
Photograph - Black & White Photograph/s, Doug Colquhoun, 15/04/1955 12:00:00 AM
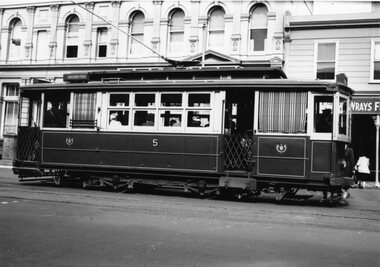
... Ballarat's trams in the early 1960's and the street scape ...Yields information about Ballarat's trams in the early 1960's and the street scape at the Ballarat Railway station and level crossing.Black and white print of Geelong No. 5 - side view, Ryrie St, 15/4/1955, by Doug Colquhoun. Two copies. Photo print courtesy of Port Dock Railway Museum, now the National Railway Museum. See worksheet 4311 for letter and details of prints sent to Bill Scott, 19/10/2001. Any photo credit to mention NRM Collection.On rear of copy 1 "SEC Geelong / 5 / Ryrie St / 15/4/55 2141 / D A Colquhoun " Copy 2 "Ryrie St? going E / D. Colquhoun" in ink, bottom right hand corner.trams, tramways, geelong, ryrie st, tram 5 -
 Ballarat Tramway Museum
Photograph - Black & White Photograph/s, Doug Colquhoun, May. 1969
... Ballarat's trams in the early 1970's and the street scape around Lake ...Yields information about Ballarat's trams in the early 1970's and the street scape around Lake Wendouree.Black and white print of Ballarat 35, northbound in Drummond St North (check on this ). Tram has the destination of "Gardens via Drummond Nth" and SEC roof advertisement "Everything's under control in my all electric kitchen. Two copies. Photo by Doug Colquhoun, 5/1969. Note the conductor standing on the footstep on the wrong side (for traffic operation) of the tram - could have been a posed photograph. Photo print courtesy of Port Dock Railway Museum, now the National Railway Museum. See worksheet 4311 for letter and details of prints sent to Bill Scott, 19/10/2001. Any photo credit to mention NRM Collection.On rear of copy 1 "SEC Ballarat / 39 /Sturt St East / 5/1969 3743 / D.A. Colquhoun" and "75" in the top right hand corner. Copy 2 "DAC" in ink, bottom right hand corner.trams, tramways, conductors, drummond st nth, tram 39 -
 Ballarat Tramway Museum
Photograph - Black & White Photograph/s, Doug Colquhoun, 15/05/1971 12:00:00 AM
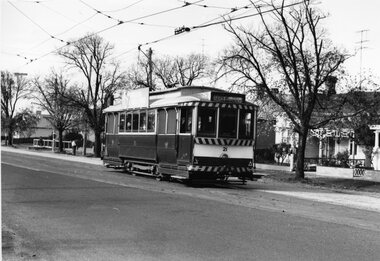
... Ballarat's trams in the early 1970's and the street scape from ...Yields information about Ballarat's trams in the early 1970's and the street scape from Lydiard St to Bridge St.Black and white print of Ballarat 32, in Wendouree Parade, north side of Lake Wendouree, near the depot. Two copies. Photo by Doug Colquhoun, 15/5/1971. Trams has the destination of Gardens via Drummond Nth. Photo print courtesy of Port Dock Railway Museum, now the National Railway Museum. See worksheet 4311 for letter and details of prints sent to Bill Scott, 19/10/2001. Any photo credit to mention NRM Collection.On rear of copy 1 "SEC Ballarat / 32 /Near Depot / 15/5/71 4162 / D.A. Colquhoun" . Copy 2 "DAC" in ink, bottom right hand corner.trams, tramways, wendouree parade, tram 32 -
 Ballarat Tramway Museum
Photograph - Black & White Photograph/s, Doug Colquhoun, 15/05/1971 12:00:00 AM
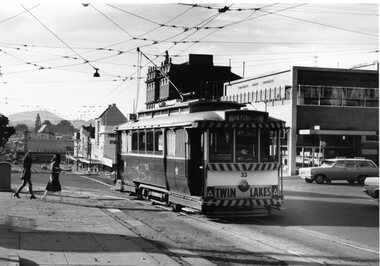
... Ballarat's trams in the early 1970's and the Drummond St streetscape ...Yields information about Ballarat's trams in the early 1970's and the Drummond St streetscape near the Mill St loop, Yields information about Ballarat's trams in the early 1970's and the Drummond St streetscape near the Mill St loopBlack and white print of Ballarat 33, in turning from Lydiard St Nth into Sturt St, with the Commonwealth Bank and buildings on the south side of Sturt St.. Two copies. Photo by Doug Colquhoun, 15/5/1971. Trams has the destination of Sebastopol and has a "Twin Lakes" sign on the dash panel. In the photograph is signage for Dickins, Neptune, Commonwealth Bank and Patersons. Has two young ladies walking across the street and the ESCo electrical cabinet. Photo print courtesy of Port Dock Railway Museum, now the National Railway Museum. See worksheet 4311 for letter and details of prints sent to Bill Scott, 19/10/2001. Any photo credit to mention NRM Collection.On rear of copy 1 "SEC Ballarat / 33 / 15/5/71 4164 / Lydiard St @ Sturt St / D.A. Colquhoun" . Copy 2 "DAC" in ink, bottom right hand corner.trams, tramways, sturt st, fashions, lydiard st nth, tram 33 -
 Ballarat Tramway Museum
Photograph - Black & White Photograph/s, Doug Colquhoun, 15/05/1971 12:00:00 AM
... Ballarat's trams in the early 1970's and the Drummond St South ...Yields information about Ballarat's trams in the early 1970's and the Drummond St South streetscape.Black and white print of Ballarat 21 in Macarthur St, leaving the High St loop. Tram has the destination of Gardens via Drummond Nth. Two copies. Photo by Doug Colquhoun, 15/5/1971. Photo print courtesy of Port Dock Railway Museum, now the National Railway Museum. See worksheet 4311 for letter and details of prints sent to Bill Scott, 19/10/2001. Any photo credit to mention NRM Collection.On rear of copy 1 "SEC Ballarat / 21 (Ex MTT A.10)/ Drummond St / 15/5/71 4170 / D.A. Colquhoun" . Copy 2 "DAC" in ink, bottom right hand corner.trams, tramways, macarthur st, high st, tram 21 -
 Ballarat Tramway Museum
Photograph - Black & White Photograph/s, Doug Colquhoun, 15/05/1971 12:00:00 AM
... Ballarat's trams in the early 1970's and the Sebastopol terminus ...Yields information about Ballarat's trams in the early 1970's and the Sebastopol terminus.Black and white print of Ballarat 37, north bound in Drummond St South at near South St and a Holden motor car alongside. Two copies. Photo by Doug Colquhoun, 17/5/1971. Trams has the destination of Lydiard St Nth. Photo print courtesy of Port Dock Railway Museum, now the National Railway Museum. See worksheet 4311 for letter and details of prints sent to Bill Scott, 19/10/2001. Any photo credit to mention NRM Collection.On rear of copy 1 "SEC Ballarat / 37 / Sebastopol / 17/5/71 4176 / D.A. Colquhoun" . Copy 2 "DAC" in ink, bottom right hand corner.trams, tramways, drummond st sth, tram 37 -
 Ballarat Tramway Museum
Photograph - Black & White Photograph/s, Doug Colquhoun, 16/05/1971 12:00:00 AM
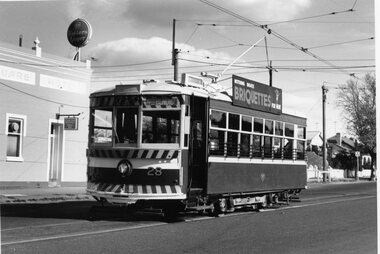
... Bendigo's trams in the early 1970's and the Eaglehawk terminus ...Yields information about Bendigo's trams in the early 1970's and the Eaglehawk terminus.Black and white print of Bendigo 28 at the Golden Square terminus. Two copies. Photo by Doug Colquhoun, 16/5/1971. Trams has the destination of Nth Bendigo and roof advertisements for Briquettes. Also has the Golden Square hotel in the background. Photo print courtesy of Port Dock Railway Museum, now the National Railway Museum. See worksheet 4311 for letter and details of prints sent to Bill Scott, 19/10/2001. Any photo credit to mention NRM Collection.On rear of copy 1 "SEC Bendigo / 28 /Golden Square / 16/5/71 4187 / D.A. Colquhoun" . Copy 2 "DAC" in ink, bottom right hand corner.trams, tramways, golden square, tram 28 -
 Ballarat Tramway Museum
Photograph - Black & White Photograph/s, Doug Colquhoun, 24/03/1959 12:00:00 AM
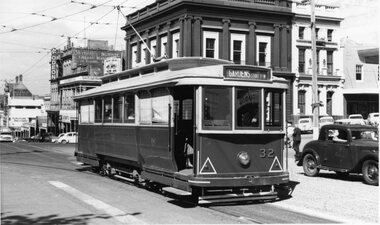
... Ballarat's scrubber tram in early 1960's. trams tramways Sturt St ...Yields information about Ballarat's scrubber tram in early 1960's.Black and white print of Ballarat 32, crossing Lydiard St, in Sturt St with the destination of Gardens via Sturt St West. Has the Commonwealth Bank, Odeon theatre, Mechanics Institute, Ballarat Gas Co, Unicorn Hotel, and Colonial Mutual Life buildings in the background, along with a number of motor vehicles. Photo Doug Colquhoun 24/3/1959. Photo print courtesy of Port Dock Railway Museum, now the National Railway Museum. See worksheet 4311 for letter and details of prints sent to Bill Scott, 19/10/2001. Any photo credit to mention NRM Collection.On rear of copy "SEC Ballarat #32 / Sturt St @ Lydiard / 24/3/59 / Douglas A Colquhoun.trams, tramways, sturt st, lydiard st, tram 32 -
 Ballarat Tramway Museum
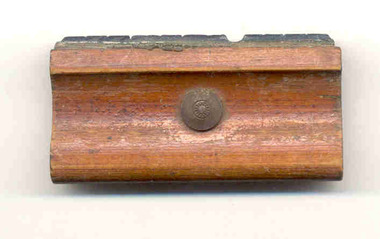
Functional Object - Rubber Stamp, State Electricity Commission of Victoria (SECV), "CALL FORWARD", 1950's
Demonstrates aspects of Ballarat's Tramway operations by the SEC in noting the days a person was call forward from their roster time to start work earlier. Has a strong association with the SEC and tram operations in Ballarat.Rubber stamp and wood stamp base for stamping rosters and/or time sheets with the words "CALL FORWARD" to indicate when a person had had his shift adjusted, earlier time start or a different day to that rostered. Would have had his pay adjusted.. Comprises a varnished shaped wooden section, cut from a preformed strip with a drawing pin to indicate the top of the stamp. trams, tramways, sec, rosters, times, crews -
 Ballarat Tramway Museum
Newspaper, The Courier Ballarat, "Public Notice - Special Traffic Arrangements for Royal Visit Day - Saturday 6th March 1954", 1954
Yields information about operations of the tram services in Ballarat at the time of the Royal visit in 1954.Newspaper Clipping from The Courier early March 1954, Public Notice issued by the SEC, titled "Special Traffic Arrangements for Royal Visit Day - Saturday 6th March 1954", outlining the arrangements for tram services, first trams on routes, time streets closed, services during the Royal visit and last trams on the day. Has red ink notes by Wal Jack on the type of cars operated on routes. Contained within Reg Item 5507 - Foolscap binder with green covers, black binding edge and metal clips. royal visit, special trams -
 Ballarat Tramway Museum
Document - List, Wal Jack, "1930-1952 Colouring", 1950's
Yields information about the painting colours of the Ballarat tram fleet in the 1930's through to the early 1950's.Handwritten list of SEC Ballarat Tramcars and the painting or colour dates and when painted - Dark Green and Cream or Mid Bristol Green and Ivory and whether red and cream, 1930 to 1952. Prepared by Wal Jack Contained within Reg Item 5507 - Foolscap binder with green covers, black binding edge and metal clips. tramcars, livery, sec, esco -
 Ballarat Tramway Museum
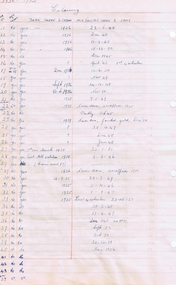
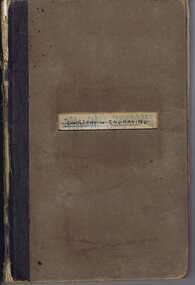
Ephemera, Wal Jack, Wal Jack notebook, 1940's
Demonstrates Wal Jack's records, hand written in a recycled notebook. Note - several sheets have been cut from the book - appear to be done before use by Wal. The crossed out sheets have not been imaged - these have been transferred by Wal to Reg Item 5507 and re-ordered. Image 30 shows a sample of a crossed out page. See related documents for a pdf file of the contents. Scan No. BTM5623iX Page No. Title or Subject Notes 1 Front 2 Inside Cover Addresses for Jack McLean, John Buckland Trooper Larsen Inside front cover. 3 1 Note re NSWT steam tram motor, MMTB PCC import issues, Peter Duckett seeking info and Photo of Julien’s battery tram on test in Melbourne 4 2 MMTB No. 8, 4, photos, Tyrell’s of Sydney photos, Perth 63 dimensions and MMTB plans for Domain Road & St Kilda Rd Jtn. 5 3 Notes re NSWGR P32, VR locos at Wodonga 13/10/1941, SAR V Class V143, SAR locos – W and Wx 6 4 NSW Private locos, Woy Woy quarry and AGL at Mortlake 5 Blank 6 Blank 7 7 First cable trams – links to photos T154, 29, 154 (Adelaide) 8 8 T156, Powelltown, Ray Pearson Negs 9 9 QR B18 ¼ locos, Ray Pearson’s scrap book, PMTT Zeppelin style trams, MMTB T class locations and 178/179 rebuilding. 10 10 Hawthorn horse tramway, VR Black Rock terminus sketch 11 11 NSW Tramways, Ryde, MMTB L class, Geelong tramway notes 12 12 Locomotive “Ballarat” in WA, Brisbane and various contacts. 13 13 Notes re VR News – 1943, H class, derailments, max speeds, Koondrook tramway and Geelong level crossing. Individual typed sheets pasted onto page – loose within book. 14 to 17 14/17 List of MMTB trams to 877 and work trams Some errors noted. 18 18 Newspaper cutting – Tram Record Day revenue (Brisbane 10/1943), Steam Trams at Journey’s end – Sydney – 6/1943 list of equipment being sold by Sydney Ferries, at Parramatta, 6/1943. MMTB Tram crossings in Melbourne, list of Sydney photos sent to Wal. Cuttings and Individual typed sheets pasted onto page. 19 19 Midland locos WA, VR open wagon stencils and a siding at Mt. Evelyn. Individual typed sheets pasted onto page. 20 20 Note re Sydney four wheel tourist trams and Hawthorn Max. Traction cars locations c1945. 21 to 23 21/23 Notes on Geelong Bogie trams and carrying flags for declaration of Newtown and Chilwell as a city – 1/10/1949 (See also Reg Item 5641) 24 to 26 24/26 Notes on Wellington Corporation Tramcars 37 27 Kelburn – Karoi cable line Wellington 28 to 29 28/29 Auckland Tramway Board tramcars notes 30/31 Blank 30 32/33 Notes on Ballarat tramcars – ESCo Crossed out 34/37 Ditto – SEC Crossed out 38 Music for the people notes Crossed out 39 Notes on Ballarat trams with tail lights Crossed out 40/43 Notes on Ballarat bogie trams Crossed out 44/45 Notes on SEC tram controllers, dead man and truck lengths. Crossed out 31 45 List of Ballarat Destination roll – Dec 1949 32, 33 46/47 Notes on Bendigo Bogie Trams – 1940’s 34 48 Bendigo Destination roll on a Birney tram Easter 1950, notes on tram tail lights and fares on the Bendigo system. 49 Blank – though headed “Bendigo Birney Trams” 50 Notes trams used on special days in Ballarat Crossed out 51 Ditto and No. 24 and 23 Crossed out 52 Ditto, 15, 11, 23 and Gold tram Crossed out 53 Notes on 34 caused delays, 5/1950, and use of 23 as gold tram Crossed out 54 Notes on repair to track at Sturt and Drummond 6/1951 Crossed out - see Reg Item 7720. 55 Notes on track work in Ballarat early 1950’s Crossed out 56/57 Notes on 33, 37, pay as you enter signs and 1953 special workings Crossed out 58/60 Notes trams used on special days in Ballarat Crossed out 61/64 Blank 35 65 “Salute to the Cable Tram” – transcription of text from Truck and Bus Transportation (July 1948) 36, 37 66/67 Continued from above and list cable tram routes, opening, closing, length and route colours. 38 68 List of photos in Truck and Bus Transportation, Anniversary Issue July 1948 of cable trams. 69 Blank 39 70 Notes on Brunswick TT, Fitzroy TT colours, Adelaide Service trams and MMTB route lengths. 40 71 Notes on HTT colours, tramcars, PMTT trams and colours and NMETL colours, trams and route destination signs 41 72 Notes on MMTB routes, cable and other Melbourne tram disposals, and sale of cable trams and storage at Brunswick. 42 73 Blank - page was headed Lugarno, Switzerland and Italian border 42 Handwritten sheet – photos to get – R. Field and Peter Duckett. 43, 44 74/75 Listing of trains on all lines leaving Ballarat and days run. 45 77 Listing of negatives sent to K. Rogers in 1944 and list of MMTB Max. Traction bogie trams 117 to 138 and disposal 46 77 Listing of MMTB trams, - appears to be something to do with photos or negs held. 47 78 Listing of Ray’s (Pearson) negs /photos of Brisbane trams and other railway photos. 79 Blank 48 80 Prices of pine timber in 4/1942, list of photos “I want”, notes re VR Train length, Ironbark Gully bridge, 3817 in Harden smash 7/1948 and 1948 Ballarat destination roll. Partly crossed out. Rear Cover. Has a strong association with Wal Jack, his work to collect and record both railway and tramway information. Yields information about tramways in Ballarat, Bendigo, Geelong and other cities tramways and railways.Grey covered book with black binding containing 40 lined sheets (80 pages) with handwritten notes with the front cover partly cut out and the words "Jewellery & Engraving" book written in. Contains some newspaper clippings and pasted typed notes as listed below. The image number of each sheet is given. See individual pdf files. trams, tramways, mmtb, ballarat, bendigo, sydney, brisbane, railways, geelong, new zealand, victorian railways, sec, esco