Showing 1096 items
matching glazes
-
 Federation University Art Collection
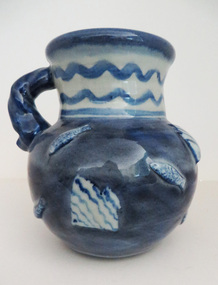
Artwork-Ceramics, Cogger, Anne, 'Fish Jug' by Anne Cogger, 1991
This item is part of the Federation University Art Collection. The Art Collection features over 1000 works and was listed as a 'Ballarat Treasure' in 2007.Blue glazed ceramic jug. If you can assist with information on this artist or artwork please use the comment box below.art, artwork, anne cogger, ceramics, available, tafe ceramics collection -
 Federation University Art Collection
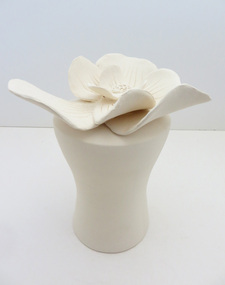
Artwork - Ceramic, Lee, Tina, 'Accumulating Hybrids' by Tina Lee, 2010
This item is part of the Federation University Art Collection. The Art Collection features over 1000 works and was listed as a 'Ballarat Treasure' in 2007.Series of five forms from larger series 'Accumulating Hybrids'. Slip cast with glazes, oxides and decorative clay additions. art, artwork, ceramics, tina lee -
 Offshore & Specialist Ships Australia
Photograph - Herema Crane Barge, 06.07.2017
With grateful thanks to Farstad Shipping (Indian Pacific) Pty. Ltd.Framed, glazed photograph of Herema Crane Barge with materials barge alongside and production platform jacket astern of the crane barge. -
 Buninyong Visitor Information Centre
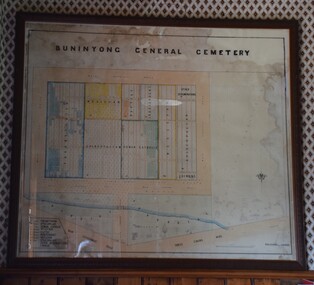
Plan - Cemetery Plan, Buninyong General Cemetery
Plan of the complete layout of the Buninyong General Cemetery drawn by Robert [surname unclear] on 6 April 1871.Framed and glazed original large hand drawn plan of the Buninyong General Cemetery, showing the locations of denominational sections and plots. Buninyong General Cemeterycemeteries, historic sites, buninyong -
 Buninyong Visitor Information Centre
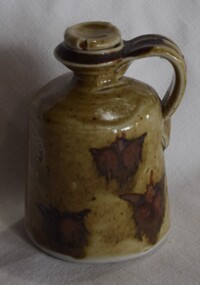
Container - Ceramic Jar, Old Library Pottery, Ceramic Jar with stopper and handle, Unknown
Made in the old Buninyong Library building which leased rooms to the potter. Small clay jar with brown glaze and bat-like red coloured figure patterning. Small stopper and handle at the top. Old Library Pottery, G.S.C., Buninyongceramics, pottery, old library pottery -
 Working Heritage Crown Land Collection
Ceramic - Ceramic shard, Mint ceramic shard
Ceramic shard with white glazed finish and a purple pictorial design of a woman holding a basket on her head within a landscape. purple pictorial design of a woman holding a basket on her head within a landscape. pottery, ceramic, archaeology -
 Mission to Seafarers Victoria
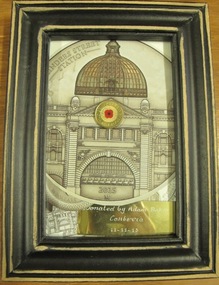
Mixed media - Framed Collage, Flinders Street Station 2015 (commemorative print), 2015
Produced 2015 to commemorate WW1. Possibly Anzac-linked given the centenary of this event.Framed and glazed depiction of Flinders Street Station with a $2 coin with enamelled poppy and an engraved description on a small brass plate. Engraved plaque at lower edge of print: Donated by Adam Baker ( Bakewell ?) / Canberra 11/11/2015world war 1, flinders street station, prints, collage, poppy, ww1, first world war, great war, coin, memorabilia, adam baker, canberra, 11 november, 2015, artwork-paintings -
 Warrnambool and District Historical Society Inc.
Bottle, Soft Drink Bottle Darby - broken, C 1890
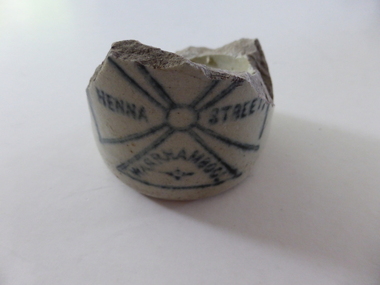
Alfred Darby operated a soft drink factory in Henna Street Warrnamboolaround 1890 where Alderdice Brass Foundry now stands. He used the Maltese cross as a trademark. There was also an Alfred Darby operating a soft drink factory at Rochester in 1897/1898 which also had the same Maltese cross as a trade mark on his bottles. A small link to one of Warrnambool's many cordial and soft drink manufacturers.Cream pottery fragment of lower part of bottle with outline of Maltese cross in dark blue on one side.very this and glazed inside and out.Henna Street Warrnambool written in sections of cross design on front with The Bendigo Epsom Bendig(o) stamped on the other side.warrnambool, warrnambool cordial manufacturers -
 Warrnambool and District Historical Society Inc.
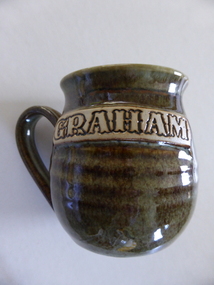
Mug, "Graham" Sadler 97, 1997
This is an earthenware mug made by Ken Sadler in 1997. In 1972 he established the Potters’s Wheel, a pottery business in Liebig Street, Warrnambool and conducted this business for many years. It is presumed that mugs such as this one would be made to order with the requested name added to the side of the mug. This mug is of interest as a memento of the work and business of the Warrnambool potter, Ken Sadler. This is a ceramic mug with a brown and orange glaze. On one side it has the name ‘Graham’ in white and brown glazing. The name of the maker is on the base. ‘Graham’ ‘Sadler 97 Warrnambool’ ken sadler, potter, history of warrnambool -
 Lara RSL Sub Branch
RSL Christmas, War widows Christmas gift, early 20th century
ceramic pottery glazed surface.. Also includes large oval shaped indentation in which is painted an old o letteridsnow sceneAn inscription, in gold lettering, reads "MAY A LOVING SFAMILY SURROUNDS YOU" and the emblem of the R S L -
 Mission to Seafarers Victoria
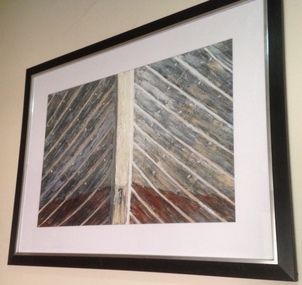
Painting, Berni Ayreart, Forgotten Uncle Bill's story, 2013
The boat in the painting belonged to a seafarer, my Uncle Bill who used it to fish from when on shore leave.This weathered boat is a familiar image to many who walk the shorelines and ponder the question, "I wonder who the owner is?" Maritime art, Marine artpainting of the prow of a wooden boat fully mounted and with black mitred frame and glazed with perspex. Cord hanger sealed backing with labelsArtist signature at lower right corner facing in white paint uc : "BERNIE AYRE"artwork, 2013, berni ayreart, artwork-paintings, maritime art prize, anl, boat -
Lorne Historical Society
Souvenir - China Plate
Bone coloured glazed China plate with coloured painted scene of Lorne looking towards Point Grey , gum trees in foreground Royal Doulton -
 Greensborough Historical Society
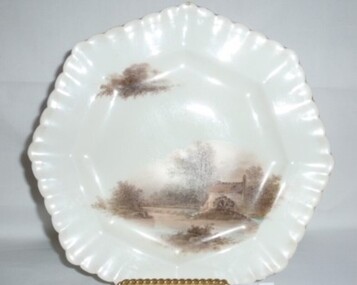
Plate, Franklin-Hunter plate, 1903c
This plate belonged to the Franklin-Hunter family of Grimshaw Street Greensborough. Mr W. J. Franklin took over the news agency from Mr Leggo in 1924. Plates of similar type were advertised in 1903 and 1904. Refer to The Ballarat Star Friday 19 June 1903, page 6 and The Age Saturday 9 April 1904, page 1.Plate from early 20th century.Octagonal china plate with fluted edge and illustration of mill. Cream glaze with worn gilt around edge, illustration in brown tones.franklin family, hunter family, plates. -
 Bright & District Historical Society operating the Bright Museum
Bowl
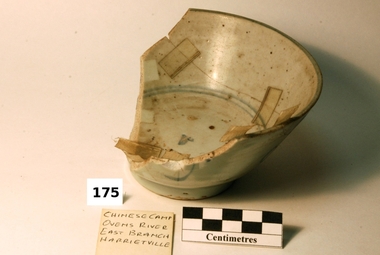
Brought to the Ovens Goldfields by Chinese men working in the area in the 19th century. Most likely made in China.Aldo Gios recorded the location of where most of the pieces in this collection were found. Some maps drawn by Aldo Gios also give more detail. This detail is rare, as most pieces of broken crockery were discarded and complete items were usually collected with no thought to recording the location they came from. Part of one of the largest collections of Chinese ware found in the Upper Ovens area and the only one recording the location where found.Chinese porcelain food bowl, celadon glaze. Decorations in blue colour on outer surface. Blue lines circling the inside, handpainted.Blue Chinese writing or maker’s stamp on base.chinese, goldfields, gios, tableware, glaze, harrietville, celadon, handpainted, porcelain bowl -
 Bright & District Historical Society operating the Bright Museum
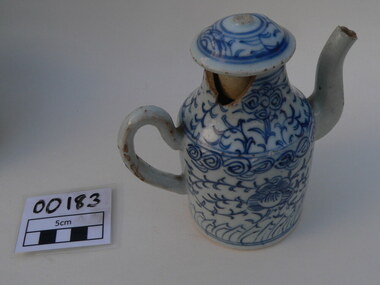
Teapot
Brought to the Ovens Goldfields by Chinese men working in the area in the 19th century. Most likely made in China.Aldo Gios recorded the location of where most of the pieces in this collection were found. Some maps drawn by Aldo Gios also give more detail. This detail is rare, as most pieces of broken crockery were discarded and complete items were usually collected with no thought to recording the location they came from. Part of one of the largest collections of Chinese ware found in the Upper Ovens area and the only one recording the location where found.Chinese porcelain teapot with lid, glazed. Pale blue with Chinese design of darker blue handpainted flowers / plants on the teapot and the lid.chinese, goldfields, gios, tableware, glaze, porcelain, buckland, teapot -
 Flagstaff Hill Maritime Museum and Village
Plate
2 Ceramic round plates, with brown floral decoration on cream base. Shiny glaze. On base "HAMPDEN 3". Crack in 1025.2flagstaff hill, warrnambool, shipwrecked-coast, flagstaff-hill, flagstaff-hill-maritime-museum, maritime-museum, shipwreck-coast, flagstaff-hill-maritime-village -
 Federation University Historical Collection
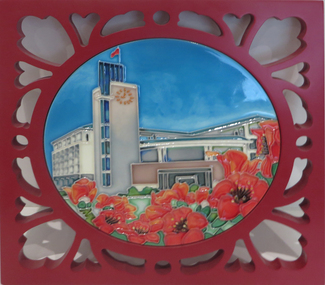
Object - commemorative tile, Commemorative Tile of South China Business College
Glazed commemorative tile of South China Business College, Guangdong University of Foreign Studies. Surrounded by red wood with shaped cutouts.Guangdong University of Foreign Studies, South China Business School printed in gold on the back. guangdong university of foreign studies, south china business school, commemorative tile, souvenir -
 Coal Creek Community Park & Museum
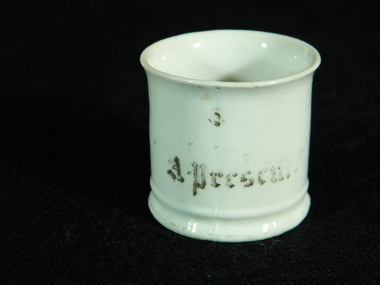
Cup, Late 19th Century
This Victorian era china cup with gilded gold writing and decoration, along with the words " A Present", may have been given as a gift or, because of its small size, been a replica coffee cup for a child to play with.743.1 - Small white china cup, cylinder-shaped, gilded and glazed, with forefinger and thumb grip handle. Gilt decoration and lettering.Gilt Lettering in gold colour- "A Present" on front of coffee cup.cup, miniature, coffee, present, china, white, children, gift, gilding, handle, christening, victorian, font, printing, collectables, gold lettering -
 Ballarat Tramway Museum
Photograph - Framed - Geelong tram depot, late 1920s
Shows trams 6, 19, 1, 25 and 18 at the front of the Geelong tram depot - late 1920's. Each tram has the MESCo destination lights on the roof. Printed by the donor from a negative from Lindsay Crow.Shows Geelong tram depot and some of the trams operated by the Melbourne Electric Supply Co. Metal framed photograph with card backing, glazed and hanging cord. See image i4 for a large size file provided by the donor.geelong, trams, tramways, tramcars, tram 6, tram 19, tram 1, tram 25, tram 18, mesco -
 Friends of Westgarthtown
Jar
Salt-glazed terracotta jar with flanged rim on opening. Two toned brown colouring with two handles on lighter coloured area.S.S written in black marker on base.domestic items, food storage and preservation, jar, terracotta, two-toned, domestic. -
 Federation University Art Collection
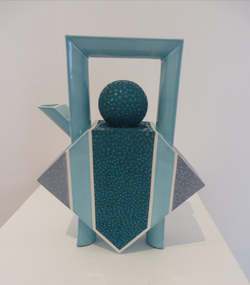
Ceramic - teapot, Dianne Peach, Slip Cast Teapot by Dianne Peach, 1983, 1983
In particular I have been using these methods of construction [slab] to interpret the traditionally spherical form of the teapot as a cubist painter might by squaring it up and transposing curved surfaces into planes and angles. These geometric versions provide flat surfaces for pattern making and light reflection, and the objects become increasingly more decorative than functional. I find enormous pleasure in bending convention to the verge of impracticality. But not so radically that l miss the challenge of producing a form that still incorporates most of the elements of a properly functioning teapot, such as the height of the spout to the pot, the ease of filling, emptying, and handling. Surface decoration plays a vital role in reinforcing the abstraction. Bold areas of black underglaze are applied with distinct boundaries dictated by the form’s angles and planes. In pairs or ad hoc groupings the teapots react with each other and the spaces between to present complex geometric patterns. High firing produces a dense, almost vitrified body and the surface quality I admire without the need for glaze. Although some with more functionality may be glazed inside.(http://www.diannepeach.com/, accessed 23 July 2021)Dianne PEACH (1947- ) Since being introduced to pottery by Milton Moon and David Smith in the mid 60s Dianne Peach initially focused on wheel thrown functional war, which expnded include the infinite possibilities of slab building and casting. This work was purchased from the "Fresh Clay' Exhibition in 1983.Electric kiln fired slip cast earthenware teapot with stencils and coloured glazes. Purchased from the 'Fresh Clay' exhibition, 1883.dianne peach, jan feder memorial ceramics collection, jan feder, ceramics, teapot, fresh clay exhibition -
Glenelg Shire Council Cultural Collection
Souvenir - Ashtray - Portland, Victoria, n.d
Purchased by CCO at market in Mount Gambier, South AustraliaCircular noritake ashtray with image of Portland lighthouse. White china with orange lustre glaze rim. Measures 12.3 cm in diameter.Front: Back- 'Noritake, made in Japan' - Printed on base -
 Melbourne Tram Museum
Photograph - Framed image - MTOCo cable tram set No. 1 - Preston Workshops, 1974
Photo is of Melbourne Tramway and Omnibus Co. cable tramset No. 1 at Preston Workshops. The cable tram set, owned by the Museum of Victoria was refurbished by Preston Workshops during 1974/75. Yields information about cable tram set 1 following its refurbishment by the MMTB at Preston WorkshopsFramed photograph part gold timber frame, glazed, card cutout, colour photograph, paper backing with cloth hanging cord.tramways, preston workshops, cable trams, tram 1 -
 Kiewa Valley Historical Society
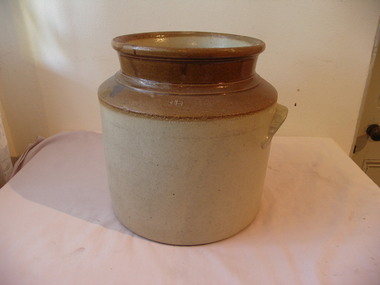
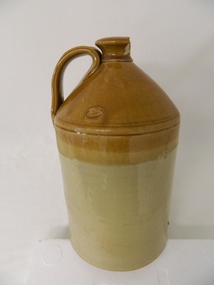
Jar/ Demi John Stone Ware, Circa 1860
This kiln glazed container for liquid's, was the type used in the 1700's to mid 1900's to contain fluids mainly for human consumption which needed to retain liquid that could be affected by sunlight and or required to be maintained at a cooler temperatures. Ginger beer and other "brews" for human consumption were the prime target. The ability to refill these vessels were of the utmost importance to the consumer. Over time these containers were reduced in size and produced for "special" liquids e.g. alcoholic Port. This Demi John stone ware was manufactured in Tamworth (England) and imported into Australia during a period when the majority of "quality" domestic items were sourced from "the Mother Country" and the ties between the still "colonial" outpost were very strong. This bondage remained longer in rural communities than in the cities. The "multi-culturalism of the post World War II era resulted in the lessening of the earlier ties. The growing of nationalism, the Aussie evolution, was brought about by the increased social and business/commercial interactions between Australia and the United States of America, post World War II.This container(jug) is very significant to the Kiewa Valley, a rural region that required these type of liquid storage vessels, especially in the late 1800's to the mid 1900's. These were times when household refrigeration, if available, would be from the "block ice" coolers or "cool" storage nooks and crannies within farmhouse locations.This large "stone ware" glazed Demi John, alias Carboy has a capacity of over 20 litres. It has a conical smooth lipped neck top with a wide, flat(three to four finger) carry and poring handle. The top third portion of the jug is caramel in colour and the bottom a darker cream. It has a manufacturer's seal stamped into the surface before glazing. This item would have been corked and then sealed (air tight) with wax.manufacturer's seal "GEORGE SKEY WILNECOTE TAMWORTH"household liquid jar container, 1800's food storage, kiln fired glazed pottery -
 Glenelg Shire Council Cultural Collection
Domestic object - Doll's Sugar Bowl, n.d
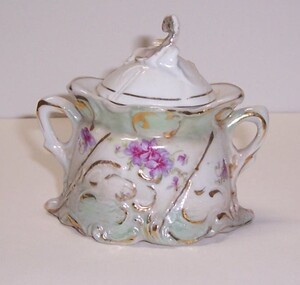
Part of Graham Collection, donated by the Family of Misses Mary and Edith Maude Graham, of 4 Blair Street, PortlandPorcelain sugar bowl with stamped relief pattern. Transfer image of violets and leaves. Gold highlights. Glazed with green glaze around base, white elsewhere. Made from two-piece mould. Sugar bowl: Base: 9.5 x 6 Height: 5.3 Lid: Base: 4.5 x 3.5 Height: 4.3 -
 Flagstaff Hill Maritime Museum and Village
Ceramic - Hot water bottle, late 19th - early 20th century
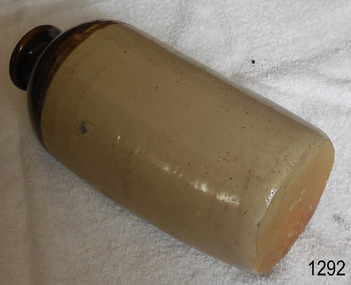
This hot water bottle was designed to lay flat in a bed between the sheets. Its purpose was to warm the bed before use. The bottle was filled with hot water then a stopper was placed in the top to seal it, preventing the water from running out. The inscription on the attached label of this hot water bottle gives both the donor's details and the location of the bottle when it was first displayed at Flagstaff Hill Maritime Village. the "P.M.O." are the initials for the Port Medical Office. The donor's details are also written in pencil on the base of the bottle. In the 16th-century people warmed their beds with the 'bed warmer', which was a long-handled, metal pan filled with hot coals and embers and covered with a lid. The pan was placed between the bedsheets to warm the bed before the person retired to sleep for the night. In the early 19th-century earthenware bed warmers came began to be used for the same purpose. They would be filled with hot water and sealed then often wrapped in fabric. The ceramic material would hold the heat for quite some time, without being too hot for the person in bed to also warm their feet as they went off to sleep. Hot water bottles were later made from glass, copper, brass or tin. Some manufacturers made them into decorative pieces that still had practical use. In 1903 a patent was taken out for the first rubber hot water bottle, invented by Slavoljub Eduard Penkala, a Croatian engineer. This bottle is of historic significance, as an example of personal heating equipment used in the late 19th and early 20th centuries.Hot water bottle, earthenware, pale colour with brown glaze on top over the shoulder and mouth section and clear glaze on the remainder of the sides. The cylindrical bottle tapers to a slightly narrower base. One side of the bottle, about a sixth of the circumference, is flat. The base of the bottle has a handwritten inscription. An inscription was on the paper label originally attached to the bottle. Inscription hand written on base of bottle "Mrs K. Rob _ / Browns Rd / Offic / 3 _ _ 9" Inscription on paper label " "Mrs K Robinson Browns Rd Officer 3809 - Hot water bottle P.M.O." flagstaff hill, warrnambool, shipwrecked-coast, maritime-museum, shipwreck-coast, flagstaff-hill-maritime-village, domestic item, hot water bottle, heating equipment, ceramic bottle, stoneware bottle, potter, earthenware, personal item, bed warmer, foot warmer, flat-sided hot water bottle, household item, stoneware, clay, ceramic -
 Flagstaff Hill Maritime Museum and Village
Domestic object - Bowl, Late 19th or early 20th Century
The Process of Making Pottery Decorating, Firing, Glazing, Making, Technical There is a rhythm and flow to clay. It can’t be done all at once! Even the making process! It can take weeks to get everything done, especially if you can only work on your pottery once a week! Even though we have three hour classes, it’s often just not enough time! Here is an overview of some of the processes so you have a bit more grasp on some of the technical stuff! Step One – Design There are SO many ideas out there for making stuff in clay! From delicate porcelain jewellery, through to heavy sculptural work and everything in between. Deciding your direction is sometimes not that easy – when you first start, try everything, you will naturally gravitate to the style that you enjoy! The options and variations are endless and can get a wee bit overwhelming too! Check in with me before you start to ensure your ideas will work, what order you might do things, how you could achieve the look you are seeking and any other technical data required! Step Two – Making Clay is thixotropic. This means that as you work with it, the clay first gets sloppier and wetter, before is begins to dry in the atmosphere. For most things, you simply can’t do all parts of the project at once. An example of work order might look like: Get last weeks work out from the shelves Prepare clay for today’s work – roll your clay, prepare balls for throwing, make the first stage of a pinch pot) Clean up last week’s work and put it on the shelf for bisque firing Check that you have any glazing to do – and do enough of it that you will have time to finish your main project Do the next step of your next project – there might be a further step that can’t be complete immediately, in that case, wrap your work well and put onto the shelves. Letting your work rest for a while can really help keep your work clean and professional looking. Many things require bagging under plastic to keep it ready for work the next week – put your name on the outside of the bag so you can find your work easily. We have stickers and markers. Consider how you want to decorate your work – coloured slip can be applied at a fairly wet stage (remembering that it will make your work even wetter!). Trying to apply slip to dry clay won’t work! If you want to do sgraffito – you will need to keep the work leather hard (a state of dryness where you can still work the clay with a little effort and a little water and care). Step Three – Drying Most of the time your work can go into the rack uncovered to let it dry out for the following week. If you want to continue forming or shaping you will need to double bag your work – put your work on a suitable sized bat and put the bat in a bag so the base of the bag is under the bat, then put another bag over the top of the work and tuck the top of the bag under the bat. If you want to trim (or turn) your thrown work the following week, it should also be double bagged. If your work is large, delicate, or of uneven thicknesses, you should lightly cover your work for drying. When considering the drying process, bare in mind the weather, humidity and wind! The hotter and dryer, the faster things dry and work can dry unevenly in the shelves – this can lead to cracking – another time to lightly cover your work for drying. Step Four – Trimming and Cleaning Up Your work is dry! It is called greenware now and it is at it’s most fragile! Handle everything with two hands. I often refer to soft hands – keep everything gentle and with your fingers spread as much as possible. Try to not pick up things like plates too much, and always with both hands! Before your work can be bisque fired it should be “cleaned up”. You work won’t go into the kiln if it has sharp edges – when glazed, sharp edges turn into razor blades! Use a piece of fly wire to rub the work all over – this will scratch a little so be light handed. Use a knife or metal kidney to scrape any areas that require a bit more dynamic treatment than the fly wire offers! Finally, a very light wipe over with a slightly damp sponge can help soften and soothe all of your edges and dags! Trimming thrown work: If you are planning to trim (or turn) your thrown work (and you should be), make sure you bag it well – your work should be leather hard to almost dry for easiest trimming. Use this step to finish the work completely – use a metal kidney to polish the surface, or a slightly damp sponge to give a freshly thrown look. Wipe the sponge around the rim after trimming, and check the inside of the pot for dags! Trimming slip cast work: Usually I will trim the rims of your work on the wheel the following day to make that stage easier, however you will still need to check your work for lumps and bumps. Last but not least – check that your name is still clearly on the bottom of your work. Step Five – Bisque Firing When the work is completely dry it can go into the bisque kiln. The bisque kiln is fired to 1000°C. This process burns off the water in the clay as well as some of the chemically bound water. The structure of the clay is not altered that much at this temperature. Inside the bisque kiln, the work is stacked a little, small bowl inside a larger bowl and onto a heavy plate. Smaller items like decorations or drink coasters might get stacked several high. Consideration is paid to the weight of the stack and shape of the work. A bisque kiln can fire about one and a half times the amount of work that the glaze kiln can fire. The firing takes about 10 hours to complete the cycle and about two days to cool down. Once it has been emptied the work is placed in the glaze room ready for you to decorate! Step Six – Glazing Decorating your work with colour can be a lot of fun – and time consuming! There are three main options for surface treatment at this stage: Oxide Washes Underglazes Glazes Washes and underglazes do not “glaze” the work – It will still need a layer of glaze to fully seal the clay (washes don’t need glaze on surfaces not designed for food or liquid as they can gloss up a little on their own). Underglazes are stable colourants that turn out pretty much how they look in the jar. They can be mixed with each other to form other colours and can be used like water colours to paint onto your work. Mostly they should have a clear glaze on top to seal them. Oxides are a different species – the pink oxide (cobalt) wash turns out bright blue for instance. They don’t always need a glaze on top, and some glazes can change the colour of the wash! The glazes need no other “glaze” on top! Be careful of unknown glaze interactions – you can put any combination of glaze in a bowl or on a plate, but only a single glaze on the outside of any vertical surface! Glazes are a chemical reaction under heat. We don’t know the exact chemicals in the Mayco glazes we use. I can guess by the way they interact with each other, however, on the whole, you need to test every idea you have, and not run the test on a vertical surface! Simply put, glaze is a layer of glass like substance that bonds with the clay underneath. Clay is made of silica, alumina and water. Glaze is made of mostly silica. Silica has a melting point of 1700°C and we fire to 1240°C. The silica requires a “flux” to help it melt at the lower temperature. Fluxes can be all sorts of chemicals – a common one is calcium – calcium has a melting point of 2500°C, however, together they both melt at a much lower temperature! Colourants are metal oxides like cobalt (blue), chrome (green through black), copper (green, blue, even red!), manganese (black, purple and pink) iron (red brown), etc. Different chemicals in the glaze can have dramatic effects. for example, barium carbonate (which we don’t use) turns manganese bright pink! Other elements can turn manganese dioxide brown, blue, purple and reddish brown. Manganese dioxide is a flux in and of itself as well. So, glazes that get their black and purple colours, often interact with other glazes and RUN! Our mirror black is a good example – it mixes really well with many glazes because it fluxes them – causes them to melt faster. It will also bring out many beautiful colours in the glazes because it’s black colouring most definitely comes from manganese dioxide! Glaze chemistry is a whole subject on it’s own! We use commercial Mayco glazes on purpose – for their huge range of colour possibilities, stability, cool interactions, artistic freedom with the ability to easily brush the glazes on and ease of use. We currently have almost 50 glazes on hand! A major project is to test the interactions of all glazes with each other. That is 2,500 test tiles!!!! I’m going to make the wall behind the wheels the feature wall of pretty colours! Step Seven – Glaze (Gloss or sometimes called “Glost”) Firing Most of the time this is the final stage of making your creation (but not always!) The glaze kiln goes to 1240°C. This is called cone 6, or midrange. It is the low end of stoneware temperatures. Stoneware clays and glazes are typically fired at cone 8 – 10, that is 1260 – 1290°C. The energy requirement to go from 1240°C to 1280°C is almost a 30% more! Our clay is formulated to vitrify (mature, turn “glass-like”) at 1240°, as are our glazes. A glaze kiln take around 12 hours to reach temperature and two to three days to cool down. Sometimes a third firing process is required – this is for decoration that is added to work after the glaze firing. For example – adding precious metals and lustres. this firing temperature is usually around 600 – 800°C depending upon the techniques being used. There are many students interested in gold and silver trims – we will be doing this third type of firing soon! After firing your work will be in the student finished work shelves. Remember to pay for it before you head out the door! There is a small extra charge for using porcelain clay (it’s more than twice the price of regular clay), and for any third firing process! Once your work has been fired it can not turn back into clay for millennia – so don’t fire it if you don’t like it! Put it in the bucket for recycling. https://firebirdstudios.com.au/the-process-of-making-pottery/ The bowl is an example of kitchenware used in the 19th century and still in use today.Bowl white ceramic. Crack on side. Badly stained.Backstamp very faint and unable to be read.flagstaff hill, warrnambool, shipwrecked-coast, flagstaff-hill, flagstaff-hill-maritime-museum, maritime-museum, shipwreck-coast, flagstaff-hill-maritime-village, mixing bowl, food preparation, kitchen equipment, ceramic -
 Flagstaff Hill Maritime Museum and Village
Domestic object - Bowl
The Process of Making Pottery Decorating, Firing, Glazing, Making, Technical There is a rhythm and flow to clay. It can’t be done all at once! Even the making process! It can take weeks to get everything done, especially if you can only work on your pottery once a week! Even though we have three hour classes, it’s often just not enough time! Here is an overview of some of the processes so you have a bit more grasp on some of the technical stuff! Step One – Design There are SO many ideas out there for making stuff in clay! From delicate porcelain jewellery, through to heavy sculptural work and everything in between. Deciding your direction is sometimes not that easy – when you first start, try everything, you will naturally gravitate to the style that you enjoy! The options and variations are endless and can get a wee bit overwhelming too! Check in with me before you start to ensure your ideas will work, what order you might do things, how you could achieve the look you are seeking and any other technical data required! Step Two – Making Clay is thixotropic. This means that as you work with it, the clay first gets sloppier and wetter, before is begins to dry in the atmosphere. For most things, you simply can’t do all parts of the project at once. An example of work order might look like: Get last weeks work out from the shelves Prepare clay for today’s work – roll your clay, prepare balls for throwing, make the first stage of a pinch pot) Clean up last week’s work and put it on the shelf for bisque firing Check that you have any glazing to do – and do enough of it that you will have time to finish your main project Do the next step of your next project – there might be a further step that can’t be complete immediately, in that case, wrap your work well and put onto the shelves. Letting your work rest for a while can really help keep your work clean and professional looking. Many things require bagging under plastic to keep it ready for work the next week – put your name on the outside of the bag so you can find your work easily. We have stickers and markers. Consider how you want to decorate your work – coloured slip can be applied at a fairly wet stage (remembering that it will make your work even wetter!). Trying to apply slip to dry clay won’t work! If you want to do sgraffito – you will need to keep the work leather hard (a state of dryness where you can still work the clay with a little effort and a little water and care). Step Three – Drying Most of the time your work can go into the rack uncovered to let it dry out for the following week. If you want to continue forming or shaping you will need to double bag your work – put your work on a suitable sized bat and put the bat in a bag so the base of the bag is under the bat, then put another bag over the top of the work and tuck the top of the bag under the bat. If you want to trim (or turn) your thrown work the following week, it should also be double bagged. If your work is large, delicate, or of uneven thicknesses, you should lightly cover your work for drying. When considering the drying process, bare in mind the weather, humidity and wind! The hotter and dryer, the faster things dry and work can dry unevenly in the shelves – this can lead to cracking – another time to lightly cover your work for drying. Step Four – Trimming and Cleaning Up Your work is dry! It is called greenware now and it is at it’s most fragile! Handle everything with two hands. I often refer to soft hands – keep everything gentle and with your fingers spread as much as possible. Try to not pick up things like plates too much, and always with both hands! Before your work can be bisque fired it should be “cleaned up”. You work won’t go into the kiln if it has sharp edges – when glazed, sharp edges turn into razor blades! Use a piece of fly wire to rub the work all over – this will scratch a little so be light handed. Use a knife or metal kidney to scrape any areas that require a bit more dynamic treatment than the fly wire offers! Finally, a very light wipe over with a slightly damp sponge can help soften and soothe all of your edges and dags! Trimming thrown work: If you are planning to trim (or turn) your thrown work (and you should be), make sure you bag it well – your work should be leather hard to almost dry for easiest trimming. Use this step to finish the work completely – use a metal kidney to polish the surface, or a slightly damp sponge to give a freshly thrown look. Wipe the sponge around the rim after trimming, and check the inside of the pot for dags! Trimming slip cast work: Usually I will trim the rims of your work on the wheel the following day to make that stage easier, however you will still need to check your work for lumps and bumps. Last but not least – check that your name is still clearly on the bottom of your work. Step Five – Bisque Firing When the work is completely dry it can go into the bisque kiln. The bisque kiln is fired to 1000°C. This process burns off the water in the clay as well as some of the chemically bound water. The structure of the clay is not altered that much at this temperature. Inside the bisque kiln, the work is stacked a little, small bowl inside a larger bowl and onto a heavy plate. Smaller items like decorations or drink coasters might get stacked several high. Consideration is paid to the weight of the stack and shape of the work. A bisque kiln can fire about one and a half times the amount of work that the glaze kiln can fire. The firing takes about 10 hours to complete the cycle and about two days to cool down. Once it has been emptied the work is placed in the glaze room ready for you to decorate! Step Six – Glazing Decorating your work with colour can be a lot of fun – and time consuming! There are three main options for surface treatment at this stage: Oxide Washes Underglazes Glazes Washes and underglazes do not “glaze” the work – It will still need a layer of glaze to fully seal the clay (washes don’t need glaze on surfaces not designed for food or liquid as they can gloss up a little on their own). Underglazes are stable colourants that turn out pretty much how they look in the jar. They can be mixed with each other to form other colours and can be used like water colours to paint onto your work. Mostly they should have a clear glaze on top to seal them. Oxides are a different species – the pink oxide (cobalt) wash turns out bright blue for instance. They don’t always need a glaze on top, and some glazes can change the colour of the wash! The glazes need no other “glaze” on top! Be careful of unknown glaze interactions – you can put any combination of glaze in a bowl or on a plate, but only a single glaze on the outside of any vertical surface! Glazes are a chemical reaction under heat. We don’t know the exact chemicals in the Mayco glazes we use. I can guess by the way they interact with each other, however, on the whole, you need to test every idea you have, and not run the test on a vertical surface! Simply put, glaze is a layer of glass like substance that bonds with the clay underneath. Clay is made of silica, alumina and water. Glaze is made of mostly silica. Silica has a melting point of 1700°C and we fire to 1240°C. The silica requires a “flux” to help it melt at the lower temperature. Fluxes can be all sorts of chemicals – a common one is calcium – calcium has a melting point of 2500°C, however, together they both melt at a much lower temperature! Colourants are metal oxides like cobalt (blue), chrome (green through black), copper (green, blue, even red!), manganese (black, purple and pink) iron (red brown), etc. Different chemicals in the glaze can have dramatic effects. for example, barium carbonate (which we don’t use) turns manganese bright pink! Other elements can turn manganese dioxide brown, blue, purple and reddish brown. Manganese dioxide is a flux in and of itself as well. So, glazes that get their black and purple colours, often interact with other glazes and RUN! Our mirror black is a good example – it mixes really well with many glazes because it fluxes them – causes them to melt faster. It will also bring out many beautiful colours in the glazes because it’s black colouring most definitely comes from manganese dioxide! Glaze chemistry is a whole subject on it’s own! We use commercial Mayco glazes on purpose – for their huge range of colour possibilities, stability, cool interactions, artistic freedom with the ability to easily brush the glazes on and ease of use. We currently have almost 50 glazes on hand! A major project is to test the interactions of all glazes with each other. That is 2,500 test tiles!!!! I’m going to make the wall behind the wheels the feature wall of pretty colours! Step Seven – Glaze (Gloss or sometimes called “Glost”) Firing Most of the time this is the final stage of making your creation (but not always!) The glaze kiln goes to 1240°C. This is called cone 6, or midrange. It is the low end of stoneware temperatures. Stoneware clays and glazes are typically fired at cone 8 – 10, that is 1260 – 1290°C. The energy requirement to go from 1240°C to 1280°C is almost a 30% more! Our clay is formulated to vitrify (mature, turn “glass-like”) at 1240°, as are our glazes. A glaze kiln take around 12 hours to reach temperature and two to three days to cool down. Sometimes a third firing process is required – this is for decoration that is added to work after the glaze firing. For example – adding precious metals and lustres. this firing temperature is usually around 600 – 800°C depending upon the techniques being used. There are many students interested in gold and silver trims – we will be doing this third type of firing soon! After firing your work will be in the student finished work shelves. Remember to pay for it before you head out the door! There is a small extra charge for using porcelain clay (it’s more than twice the price of regular clay), and for any third firing process! Once your work has been fired it can not turn back into clay for millennia – so don’t fire it if you don’t like it! Put it in the bucket for recycling. https://firebirdstudios.com.au/the-process-of-making-pottery/ This bowl is an example of kitchenware used in the 19th century and still in use today.Bowl white ceramic plain that has two sets of edging around lip. Inside bowl has plaster designed to look like cooking mixture.flagstaff hill, warrnambool, shipwrecked-coast, flagstaff-hill, flagstaff-hill-maritime-museum, maritime-museum, shipwreck-coast, flagstaff-hill-maritime-village, kitchen equipment, ceramic -
 Flagstaff Hill Maritime Museum and Village
Domestic object - Bowl, J & G Meakin, Late 19th or early 20th Century
The Process of Making Pottery Decorating, Firing, Glazing, Making, Technical There is a rhythm and flow to clay. It can’t be done all at once! Even the making process! It can take weeks to get everything done, especially if you can only work on your pottery once a week! Even though we have three hour classes, it’s often just not enough time! Here is an overview of some of the processes so you have a bit more grasp on some of the technical stuff! Step One – Design There are SO many ideas out there for making stuff in clay! From delicate porcelain jewellery, through to heavy sculptural work and everything in between. Deciding your direction is sometimes not that easy – when you first start, try everything, you will naturally gravitate to the style that you enjoy! The options and variations are endless and can get a wee bit overwhelming too! Check in with me before you start to ensure your ideas will work, what order you might do things, how you could achieve the look you are seeking and any other technical data required! Step Two – Making Clay is thixotropic. This means that as you work with it, the clay first gets sloppier and wetter, before is begins to dry in the atmosphere. For most things, you simply can’t do all parts of the project at once. An example of work order might look like: Get last weeks work out from the shelves Prepare clay for today’s work – roll your clay, prepare balls for throwing, make the first stage of a pinch pot) Clean up last week’s work and put it on the shelf for bisque firing Check that you have any glazing to do – and do enough of it that you will have time to finish your main project Do the next step of your next project – there might be a further step that can’t be complete immediately, in that case, wrap your work well and put onto the shelves. Letting your work rest for a while can really help keep your work clean and professional looking. Many things require bagging under plastic to keep it ready for work the next week – put your name on the outside of the bag so you can find your work easily. We have stickers and markers. Consider how you want to decorate your work – coloured slip can be applied at a fairly wet stage (remembering that it will make your work even wetter!). Trying to apply slip to dry clay won’t work! If you want to do sgraffito – you will need to keep the work leather hard (a state of dryness where you can still work the clay with a little effort and a little water and care). Step Three – Drying Most of the time your work can go into the rack uncovered to let it dry out for the following week. If you want to continue forming or shaping you will need to double bag your work – put your work on a suitable sized bat and put the bat in a bag so the base of the bag is under the bat, then put another bag over the top of the work and tuck the top of the bag under the bat. If you want to trim (or turn) your thrown work the following week, it should also be double bagged. If your work is large, delicate, or of uneven thicknesses, you should lightly cover your work for drying. When considering the drying process, bare in mind the weather, humidity and wind! The hotter and dryer, the faster things dry and work can dry unevenly in the shelves – this can lead to cracking – another time to lightly cover your work for drying. Step Four – Trimming and Cleaning Up Your work is dry! It is called greenware now and it is at it’s most fragile! Handle everything with two hands. I often refer to soft hands – keep everything gentle and with your fingers spread as much as possible. Try to not pick up things like plates too much, and always with both hands! Before your work can be bisque fired it should be “cleaned up”. You work won’t go into the kiln if it has sharp edges – when glazed, sharp edges turn into razor blades! Use a piece of fly wire to rub the work all over – this will scratch a little so be light handed. Use a knife or metal kidney to scrape any areas that require a bit more dynamic treatment than the fly wire offers! Finally, a very light wipe over with a slightly damp sponge can help soften and soothe all of your edges and dags! Trimming thrown work: If you are planning to trim (or turn) your thrown work (and you should be), make sure you bag it well – your work should be leather hard to almost dry for easiest trimming. Use this step to finish the work completely – use a metal kidney to polish the surface, or a slightly damp sponge to give a freshly thrown look. Wipe the sponge around the rim after trimming, and check the inside of the pot for dags! Trimming slip cast work: Usually I will trim the rims of your work on the wheel the following day to make that stage easier, however you will still need to check your work for lumps and bumps. Last but not least – check that your name is still clearly on the bottom of your work. Step Five – Bisque Firing When the work is completely dry it can go into the bisque kiln. The bisque kiln is fired to 1000°C. This process burns off the water in the clay as well as some of the chemically bound water. The structure of the clay is not altered that much at this temperature. Inside the bisque kiln, the work is stacked a little, small bowl inside a larger bowl and onto a heavy plate. Smaller items like decorations or drink coasters might get stacked several high. Consideration is paid to the weight of the stack and shape of the work. A bisque kiln can fire about one and a half times the amount of work that the glaze kiln can fire. The firing takes about 10 hours to complete the cycle and about two days to cool down. Once it has been emptied the work is placed in the glaze room ready for you to decorate! Step Six – Glazing Decorating your work with colour can be a lot of fun – and time consuming! There are three main options for surface treatment at this stage: Oxide Washes Underglazes Glazes Washes and underglazes do not “glaze” the work – It will still need a layer of glaze to fully seal the clay (washes don’t need glaze on surfaces not designed for food or liquid as they can gloss up a little on their own). Underglazes are stable colourants that turn out pretty much how they look in the jar. They can be mixed with each other to form other colours and can be used like water colours to paint onto your work. Mostly they should have a clear glaze on top to seal them. Oxides are a different species – the pink oxide (cobalt) wash turns out bright blue for instance. They don’t always need a glaze on top, and some glazes can change the colour of the wash! The glazes need no other “glaze” on top! Be careful of unknown glaze interactions – you can put any combination of glaze in a bowl or on a plate, but only a single glaze on the outside of any vertical surface! Glazes are a chemical reaction under heat. We don’t know the exact chemicals in the Mayco glazes we use. I can guess by the way they interact with each other, however, on the whole, you need to test every idea you have, and not run the test on a vertical surface! Simply put, glaze is a layer of glass like substance that bonds with the clay underneath. Clay is made of silica, alumina and water. Glaze is made of mostly silica. Silica has a melting point of 1700°C and we fire to 1240°C. The silica requires a “flux” to help it melt at the lower temperature. Fluxes can be all sorts of chemicals – a common one is calcium – calcium has a melting point of 2500°C, however, together they both melt at a much lower temperature! Colourants are metal oxides like cobalt (blue), chrome (green through black), copper (green, blue, even red!), manganese (black, purple and pink) iron (red brown), etc. Different chemicals in the glaze can have dramatic effects. for example, barium carbonate (which we don’t use) turns manganese bright pink! Other elements can turn manganese dioxide brown, blue, purple and reddish brown. Manganese dioxide is a flux in and of itself as well. So, glazes that get their black and purple colours, often interact with other glazes and RUN! Our mirror black is a good example – it mixes really well with many glazes because it fluxes them – causes them to melt faster. It will also bring out many beautiful colours in the glazes because it’s black colouring most definitely comes from manganese dioxide! Glaze chemistry is a whole subject on it’s own! We use commercial Mayco glazes on purpose – for their huge range of colour possibilities, stability, cool interactions, artistic freedom with the ability to easily brush the glazes on and ease of use. We currently have almost 50 glazes on hand! A major project is to test the interactions of all glazes with each other. That is 2,500 test tiles!!!! I’m going to make the wall behind the wheels the feature wall of pretty colours! Step Seven – Glaze (Gloss or sometimes called “Glost”) Firing Most of the time this is the final stage of making your creation (but not always!) The glaze kiln goes to 1240°C. This is called cone 6, or midrange. It is the low end of stoneware temperatures. Stoneware clays and glazes are typically fired at cone 8 – 10, that is 1260 – 1290°C. The energy requirement to go from 1240°C to 1280°C is almost a 30% more! Our clay is formulated to vitrify (mature, turn “glass-like”) at 1240°, as are our glazes. A glaze kiln take around 12 hours to reach temperature and two to three days to cool down. Sometimes a third firing process is required – this is for decoration that is added to work after the glaze firing. For example – adding precious metals and lustres. this firing temperature is usually around 600 – 800°C depending upon the techniques being used. There are many students interested in gold and silver trims – we will be doing this third type of firing soon! After firing your work will be in the student finished work shelves. Remember to pay for it before you head out the door! There is a small extra charge for using porcelain clay (it’s more than twice the price of regular clay), and for any third firing process! Once your work has been fired it can not turn back into clay for millennia – so don’t fire it if you don’t like it! Put it in the bucket for recycling. https://firebirdstudios.com.au/the-process-of-making-pottery/This bowl was made by renowned pottery company J & G Meakin of England. The firm was established in the mid-1800's. The bowl is an example of kitchenware used in the 19th century and still in use today.Bowl; white ceramic, round and tapering inwards towards base. Made by J and G Meakin England.On base, 'Ironstone China Reg SOL 391413' with symbolflagstaff hill, flagstaff hill maritime museum and village, warrnambool, maritime museum, maritime village, great ocean road, shipwreck coast, mixing bowl, food preparation, j & g meakin, pottery, stoke-on-trent, kitchen equipment, ceramic -
 Flagstaff Hill Maritime Museum and Village
Domestic object - Plate
The Process of Making Pottery Decorating, Firing, Glazing, Making, Technical There is a rhythm and flow to clay. It can’t be done all at once! Even the making process! It can take weeks to get everything done, especially if you can only work on your pottery once a week! Even though we have three hour classes, it’s often just not enough time! Here is an overview of some of the processes so you have a bit more grasp on some of the technical stuff! Step One – Design There are SO many ideas out there for making stuff in clay! From delicate porcelain jewellery, through to heavy sculptural work and everything in between. Deciding your direction is sometimes not that easy – when you first start, try everything, you will naturally gravitate to the style that you enjoy! The options and variations are endless and can get a wee bit overwhelming too! Check in with me before you start to ensure your ideas will work, what order you might do things, how you could achieve the look you are seeking and any other technical data required! Step Two – Making Clay is thixotropic. This means that as you work with it, the clay first gets sloppier and wetter, before is begins to dry in the atmosphere. For most things, you simply can’t do all parts of the project at once. An example of work order might look like: Get last weeks work out from the shelves Prepare clay for today’s work – roll your clay, prepare balls for throwing, make the first stage of a pinch pot) Clean up last week’s work and put it on the shelf for bisque firing Check that you have any glazing to do – and do enough of it that you will have time to finish your main project Do the next step of your next project – there might be a further step that can’t be complete immediately, in that case, wrap your work well and put onto the shelves. Letting your work rest for a while can really help keep your work clean and professional looking. Many things require bagging under plastic to keep it ready for work the next week – put your name on the outside of the bag so you can find your work easily. We have stickers and markers. Consider how you want to decorate your work – coloured slip can be applied at a fairly wet stage (remembering that it will make your work even wetter!). Trying to apply slip to dry clay won’t work! If you want to do sgraffito – you will need to keep the work leather hard (a state of dryness where you can still work the clay with a little effort and a little water and care). Step Three – Drying Most of the time your work can go into the rack uncovered to let it dry out for the following week. If you want to continue forming or shaping you will need to double bag your work – put your work on a suitable sized bat and put the bat in a bag so the base of the bag is under the bat, then put another bag over the top of the work and tuck the top of the bag under the bat. If you want to trim (or turn) your thrown work the following week, it should also be double bagged. If your work is large, delicate, or of uneven thicknesses, you should lightly cover your work for drying. When considering the drying process, bare in mind the weather, humidity and wind! The hotter and dryer, the faster things dry and work can dry unevenly in the shelves – this can lead to cracking – another time to lightly cover your work for drying. Step Four – Trimming and Cleaning Up Your work is dry! It is called greenware now and it is at it’s most fragile! Handle everything with two hands. I often refer to soft hands – keep everything gentle and with your fingers spread as much as possible. Try to not pick up things like plates too much, and always with both hands! Before your work can be bisque fired it should be “cleaned up”. You work won’t go into the kiln if it has sharp edges – when glazed, sharp edges turn into razor blades! Use a piece of fly wire to rub the work all over – this will scratch a little so be light handed. Use a knife or metal kidney to scrape any areas that require a bit more dynamic treatment than the fly wire offers! Finally, a very light wipe over with a slightly damp sponge can help soften and soothe all of your edges and dags! Trimming thrown work: If you are planning to trim (or turn) your thrown work (and you should be), make sure you bag it well – your work should be leather hard to almost dry for easiest trimming. Use this step to finish the work completely – use a metal kidney to polish the surface, or a slightly damp sponge to give a freshly thrown look. Wipe the sponge around the rim after trimming, and check the inside of the pot for dags! Trimming slip cast work: Usually I will trim the rims of your work on the wheel the following day to make that stage easier, however you will still need to check your work for lumps and bumps. Last but not least – check that your name is still clearly on the bottom of your work. Step Five – Bisque Firing When the work is completely dry it can go into the bisque kiln. The bisque kiln is fired to 1000°C. This process burns off the water in the clay as well as some of the chemically bound water. The structure of the clay is not altered that much at this temperature. Inside the bisque kiln, the work is stacked a little, small bowl inside a larger bowl and onto a heavy plate. Smaller items like decorations or drink coasters might get stacked several high. Consideration is paid to the weight of the stack and shape of the work. A bisque kiln can fire about one and a half times the amount of work that the glaze kiln can fire. The firing takes about 10 hours to complete the cycle and about two days to cool down. Once it has been emptied the work is placed in the glaze room ready for you to decorate! Step Six – Glazing Decorating your work with colour can be a lot of fun – and time consuming! There are three main options for surface treatment at this stage: Oxide Washes Underglazes Glazes Washes and underglazes do not “glaze” the work – It will still need a layer of glaze to fully seal the clay (washes don’t need glaze on surfaces not designed for food or liquid as they can gloss up a little on their own). Underglazes are stable colourants that turn out pretty much how they look in the jar. They can be mixed with each other to form other colours and can be used like water colours to paint onto your work. Mostly they should have a clear glaze on top to seal them. Oxides are a different species – the pink oxide (cobalt) wash turns out bright blue for instance. They don’t always need a glaze on top, and some glazes can change the colour of the wash! The glazes need no other “glaze” on top! Be careful of unknown glaze interactions – you can put any combination of glaze in a bowl or on a plate, but only a single glaze on the outside of any vertical surface! Glazes are a chemical reaction under heat. We don’t know the exact chemicals in the Mayco glazes we use. I can guess by the way they interact with each other, however, on the whole, you need to test every idea you have, and not run the test on a vertical surface! Simply put, glaze is a layer of glass like substance that bonds with the clay underneath. Clay is made of silica, alumina and water. Glaze is made of mostly silica. Silica has a melting point of 1700°C and we fire to 1240°C. The silica requires a “flux” to help it melt at the lower temperature. Fluxes can be all sorts of chemicals – a common one is calcium – calcium has a melting point of 2500°C, however, together they both melt at a much lower temperature! Colourants are metal oxides like cobalt (blue), chrome (green through black), copper (green, blue, even red!), manganese (black, purple and pink) iron (red brown), etc. Different chemicals in the glaze can have dramatic effects. for example, barium carbonate (which we don’t use) turns manganese bright pink! Other elements can turn manganese dioxide brown, blue, purple and reddish brown. Manganese dioxide is a flux in and of itself as well. So, glazes that get their black and purple colours, often interact with other glazes and RUN! Our mirror black is a good example – it mixes really well with many glazes because it fluxes them – causes them to melt faster. It will also bring out many beautiful colours in the glazes because it’s black colouring most definitely comes from manganese dioxide! Glaze chemistry is a whole subject on it’s own! We use commercial Mayco glazes on purpose – for their huge range of colour possibilities, stability, cool interactions, artistic freedom with the ability to easily brush the glazes on and ease of use. We currently have almost 50 glazes on hand! A major project is to test the interactions of all glazes with each other. That is 2,500 test tiles!!!! I’m going to make the wall behind the wheels the feature wall of pretty colours! Step Seven – Glaze (Gloss or sometimes called “Glost”) Firing Most of the time this is the final stage of making your creation (but not always!) The glaze kiln goes to 1240°C. This is called cone 6, or midrange. It is the low end of stoneware temperatures. Stoneware clays and glazes are typically fired at cone 8 – 10, that is 1260 – 1290°C. The energy requirement to go from 1240°C to 1280°C is almost a 30% more! Our clay is formulated to vitrify (mature, turn “glass-like”) at 1240°, as are our glazes. A glaze kiln take around 12 hours to reach temperature and two to three days to cool down. Sometimes a third firing process is required – this is for decoration that is added to work after the glaze firing. For example – adding precious metals and lustres. this firing temperature is usually around 600 – 800°C depending upon the techniques being used. There are many students interested in gold and silver trims – we will be doing this third type of firing soon! After firing your work will be in the student finished work shelves. Remember to pay for it before you head out the door! There is a small extra charge for using porcelain clay (it’s more than twice the price of regular clay), and for any third firing process! Once your work has been fired it can not turn back into clay for millennia – so don’t fire it if you don’t like it! Put it in the bucket for recycling. https://firebirdstudios.com.au/the-process-of-making-pottery/Ceramics have evolved over thousands of years.White earthenware dinner plate. Crazing evident all over.Backstamped ‘Made in England S LTD’flagstaff hill, warrnambool, shipwrecked-coast, flagstaff-hill, flagstaff-hill-maritime-museum, maritime-museum, shipwreck-coast, flagstaff-hill-maritime-village, ceramics, tableware