Showing 16618 items matching "australian museum"
-
 Flagstaff Hill Maritime Museum and Village
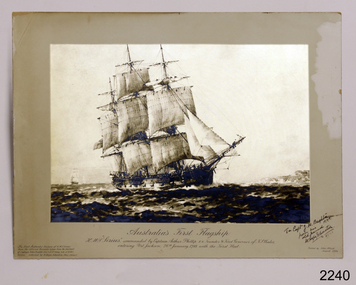
Photograph, "Australia's First Flagship"
Photograph of "Australia's First Flagship" HMS Sirius. flagstaff hill, warrnambool, shipwrecked-coast, flagstaff-hill, flagstaff-hill-maritime-museum, maritime-museum, shipwreck-coast, flagstaff-hill-maritime-village, photograph, australia's first flagship, hms sirius -
 Flagstaff Hill Maritime Museum and Village
Painting - Maritime painting, The La Bella, 1980s
This painting of the “La Bella” is associated with Flagstaff Hill’s collection of artefacts from the wreck of the “La Bella”. It was painted around the 1980s by maritime artist Philip J. Gray. Some 15 – 17 ships are believed to have sunk in Lady Bay, but only two have been discovered on the seafloor; the “La Bella” and the “Edinburgh Castle”. Both wrecks are popular diving sites and are preserved as significant historical marine and marine archaeological sites. The Kosnar Picture Framing and Mirrors Shop identified the "GRAY 3135, Y04/111" as their job number for the framing and said that the label "ANOTHER KOSNAR FEATURE" was last used before about 1990. About artist Philip J. Gray “Philip is one of Australia’s leading maritime artists and his meticulous research and social commentary paintings of ships, such as, the Loch Ard and Schomberg form an important part of Warrnambool’s Flagstaff Hill Maritime Museum.” [Dr Marion Manifold, Artist and Art Historian, 2014] Philip James Gray was born in London but has lived most of his life in Australia. He graduated from a London school of art as an illustrator, specialising in technical and scientific illustration as well as other commercial and applied art. He was also a student for a time of Fyffe Christie - British figurative artist, mural painter and humanitarian – who had a great influence on his career. Philip has always worked as a professional artist and illustrator. Many publications on maritime history have featured his work. His paintings have been released and sold all over the world as limited edition prints. The State Library of Victoria’s ‘Latrobe Collection’ holds two of his paintings. His street painting of ‘The Ashes Contest’ decorates the brick wall of Old Bakery Laneway in Sunbury and a Sunbury café owner commissioned him to paint the ‘Sunbury Pop Festival’ as a remembrance of local history. Philip has been an active member of the Sunbury Art Society in Victoria for several years, serving on the committee for some of that time and being involved in exhibitions. He enjoys helping new artists and sharing his skills and experience. About the “La Bella” The wreck of the La Bella lies at the bottom of the Warrnambool Harbour in Lady Bay. Some 15 ships are believed to have been wrecked there but only two have been discovered on the sea floor; the La Bella and the Edinburgh Castle. Both wrecks are popular diving sites and are preserved as significant historical marine and marine archaeological sites. The story of the final voyage of the La Bella is summarised as follows … The ship from which the sailors were rescued was the three-masted, iron and steel barquentine the La Bella, built in Norway in 1893. She was one of two iron and steel ships by Johan Smith, the company being one of the leading shipping families in Tvedestrand, Norway. She was significant to Norwegian shipping, being one of only 27 iron and steel ships ever built in Norway. La Bella was registered in New Zealand and engaged from 1902 in inter-colonial trading of timber in the pacific, between New Zealand and Australia and was often in Port Phillip Bay, Victoria. On 5th October 1905 the twelve year old La Bella left Lyttleton, New Zealand carrying a cargo of timber bound for Warrnambool, Australia . She was manned by a crew of twelve: the Master, (Captain Mylius, previously 1st Mate of La Bella, appointed Captain to La Bella on 6th February 1903) 2 Mates, Cook, six able seamen, one ordinary seaman and a boy. Bad weather en-route caused her to shelter at Burnie on Tasmania's North West coast. On November 10th, the 37th day of her journey, La Bella approached Warrnambool. Captain Mylius steered her towards Lady Bay Channel in heavy south-west seas and evening mist. He ordered the helmsman to steer for the light. As the ship came round, a tremendous sea struck her on the port quarter, causing her to breach broadside in a north-westerly direction into breakers. The helm was brought round twice more, but each time heavy seas broke over her, the third time throwing the La Bella on to a submerged reef in Lady Bay now known as La Bella Reef (about 100 yards from the Warrnambool breakwater). The sea was so rough that it even wrenched a one-and-a-half ton anchor from its fastenings and into the sea. As Captain Mylius headed to the steel wheelhouse, intending to send up a rocket flare, a huge sea slammed the steel door into him (resulting in massive bruising front and back) Despite his injuries he still managed to set off a blue light, which he held up in his hands. La Bella’s lifeboats were filled with sea water and broke up on their chocks. The blue light was the first indication to people on shore that there was a ship in distress. The Harbour Master, Captain Roe (who lived in the Harbour Master’s House opposite Flagstaff Hill), organised a group of volunteers to crew the lifeboat because the trained crew was unavailable; the crewmen were working on a steamer in Port Fairy at the time. He then poured oil onto the water to try and smooth the sea. At around 11pm three of the crew took shelter in the steel forecastle but the sea crashed into it and broke it up. While the rest of the crew and onlookers watched helplessly in the moonlight the bodies were washed away into the sea, never to be seen again. Some of the crew lashed themselves to the weather rail to keep from being washed away. Watson, the ordinary seaman, became tangled in the rigging lines and was too weak to move, so the 2nd Mate, Robertson, put a line onto him so that he wouldn’t wash off. Around 11pm three of the crew were unconscious from exhaustion. The situation on La Bella was becoming dangerous. The 2nd Mate moved to the ‘house’ and soon afterwards the ship slipped in the heavy sea. The lashings of the 1st Mate and the ‘boy’ Denham had kept them safe until about 2am when they were washed overboard; no one was able to help. One by one, the exhausted crew were being washed overboard, too weak to hold on any longer. During the night the La Bella had broken into two and the deckhouse ran out towards the sea. Two more men drowned when trying to reach the lifeboat. By sunrise the only survivors of the twelve were the Master, 2nd Mate and three seamen. Early in the morning Captain Roe used the rocket apparatus on shore to try and shoot a line to the ship for a safer rescue but each attempt fell short of the target. Several attempts were made by the lifeboat to rescue the stricken sailors, but the rough conditions made this difficult for the boat to get close enough to the ship and the lifeboat had to return to shore. During a final attempt to reach the ship Captain Mylius ordered his men to jump into the sea. Leonard Robertson, 2nd mate, jumped and swam towards the lifeboat, taking hold of the boat hook offered to him. Oscar Rosenholme managed to reach the boat floating on a piece of timber from the ship’s load and a third survivor, Noake, also made the boat. Along with the lifeboat rescue crew, 25 year old William Ferrier rowed his small dingy through the heavy seas and managed to rescue the Captain, whom he landed on the breakwater. Ferrier then returned to the ship to attempt a final rescue, losing his oars and rowlocks into the high sea. Using just a spare paddle he skulled towards the La Bella, reaching her stern in time to cut loose the lone surviving sailor, Payne, from the lashing that held him to the ship; the terrified sailor dropped from the ship and into the dingy. Shortly after the last man was rescued, the La Bella was lifted by a huge wave and crashed back down on the reef; she broke up and sank. The ordeal had lasted ten hours. The survivors were taken to the nearby Bay View Hotel and gratefully received warm food and clothing, medical attention and a place to sleep. In the following days an unidentified body of a young person was washed ashore; it was either Watson or Denham. The body was buried in the Warrnambool cemetery with an appropriate gravestone and inscription. William Ferrier became a national hero as news of the daring rescue spread. In recognition of his bravery in the two daring rescues he was awarded the Silver Medal for Bravery by the Royal Humane Society and was honoured in the letter from the Prime Minister and the Parliament of the Commonwealth, telegrams and a cheque for £20 from the Governor General, over £150 subscribed by the public, including Warrnambool and district and readers of The Argus, and a gold medal from the Glenelg Dinghy Club of South Australia. Ferrier’s rescue efforts are one of the most heroic in Victoria’s shipwreck history. (William Ferrier’s son, Frank, received a similar award almost fifty years later, when he helped rescue four members of the crew on the yacht Merlan, after it ran on to a reef near the Point Lonsdale Lighthouse. ) The wreck of La Bella now lies on her port side in 13 metres of sheltered water inside the reef she struck. The bow section is relatively intact and part of the stern has drifted north-easterly towards the mouth of the Hopkins River. The reef the La Bella struck now bears its name. Those five rescued from the La Bella were Captain George Mylius, Leonard Robertson (2nd Mate, 21 years old), R. Payne, Oscar Rosenholme and Jack Noake. Those seven who lost their lives were Mr Coulson (1st mate), Charles Jackman (cook) Gustave Johnson, Pierre Johann and Robert Gent (all able seamen), Harry Watson (ordinary seaman) and Jack Denham (ship’s boy). Captain Mylius was found guilty of careless navigation; he had sailed into the bay without the services of a pilot. His Master Certificate was suspended for twelve months. Later he was also charged with manslaughter of one of the crew who had died when the La Bella was wrecked, but found not guilty. The event’s adverse publicity and damage to his career took a toll on his health and he died of a heart attack six months after the wreck; he was only thirty-seven. His body was buried in the Melbourne General Cemetery. The La Bella was “the best documented of all sailing ships owned in New Zealand”. Her record books, ship logs, correspondence and supporting papers are still available. At the time of the tragedy she was owned by Messers David C.Turnbull and Co. of Timaru, New Zealand timber merchants and shipping agents, who had purchased her on 13th December 1901. A detailed account of the last journey of La Bella can be read in “Leonard Robertson, the Whangaroa & La Bella” written by Jack Churchouse, published in 1982 by Millwood Press Ltd, Wellington, NZ.This painting of the La Bella by Philip J. Gray is part of the La Bella Collection and is significant at both a local and state level. Its connection to the La Bella shipwreck and the rescue of five survivors highlights the dangers of Victoria’s Shipwreck Coast. The painting connects with other objects and artefacts associated with the wreck of the La Bella. This painting is significant because of its association with the sailing ship “La Bella” . the “La Bella” is of local and state and national significance. It is one of the only two shipwrecks discovered in Lady Bay, Warrnambool, out of the 15-17 shipwrecks in the bay. Large framed painting of the three masted barquentine "La Bella" fully rigged. Painted by Phillip J Gray. A fine printed line squares off the painting. Beneath painting and line is a gold plate with black copper plate designating "La Bella" is encased in glass, surrounded by a silver-metal frame. Yellow and brown paper label is adhered to back of painting. Picture framed by Kosnar in Melbourne."The La Bella" on gold plaque Logo of "K" inside a brown square. "GRAY 3135, Y04/111", "ANOTHER KOSNAR FEATURE" flagstaff hill, warrnambool, shipwrecked-coast, flagstaff-hill, flagstaff-hill-maritime-museum, maritime-museum, shipwreck-coast, flagstaff-hill-maritime-village, painting, la bella, artist phillip j gray, maritime painting, lady bay warrnambool -
 Flagstaff Hill Maritime Museum and Village
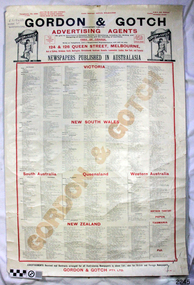
Document
A Gordon and Gotch advertising poster depicting newspapers published in Australia 1st July 1914.flagstaff hill, warrnambool, shipwrecked-coast, flagstaff-hill, flagstaff-hill-maritime-museum, maritime-museum, shipwreck-coast, flagstaff-hill-maritime-village, gordon and gotch, advertising poster -
 Flagstaff Hill Maritime Museum and Village
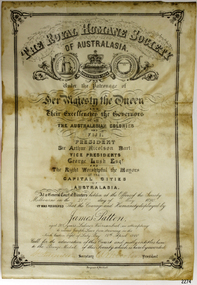
Award - Certificate of Merit, Royal Humane Society of Australia, James Patten, 21-05-1890
The Bronze Medal and Certificate of Merit of the Royal Humane Society of Australasia were awarded to James Patten for the bravery he displayed on 18th April 1890, and presented to him on 21st May 1890. The Royal Humane Society of Australasia was founded in 1874 with the aim to recognise those who risked their lives to save others and to assist those whose acts of bravery caused them or their surviving dependants to be disadvantaged in some way. The producers of the certificate were Fergusson & Mitchell, a Melbourne organisation established by 1858 that was an engraver, lithographer and printer. Details of the incident were published in the Argus, Saturday 19 April 1890, page 11 - "FATAL BOATING ACCIDENT, (BY TELEGRAPH FROM OUR CORRESPONDENT.), WARRNAMBOOL, FRIDAY A fatal boating disaster occurred in Lady Bay this morning, the victim being Joseph Lowe, licensee of the Bay View Hotel, South Warrnambool. The deceased, in company with two lads named James Ferrier and James Patten, went out in a small dingy to shoot musk ducks. The water was perfectly smooth, and the party were tempted to proceed as far as the mouth of the Hopkins River. In their eagerness they neglected to keep clear of the breakers, and were presently carried in on the crest of a large wave, and the boat cap sized within a cable's length of the shore, precipitating the occupants into the water. Patten and Lowe stuck to the overturned boat, Ferrier striking out for the shore, which he reached in an exhausted state. In the meantime his companions had been washed off the boat, and were struggling in the breakers. Lowe was unable to swim, and Patten kept him afloat, at the same time making gallant attempts to get him ashore, but finally had to leave him to his fate. Ferrier, seeing Lowe's danger, undressed and swam out, but became exhausted. Ferrier and Patten were both found in a fainting condition by persons who saw the catastrophe from the jetty, and ran along the beach to render assistance. Attempts were subsequently made to rescue Lowe's body, which could be seen washing abort in the surf. These proved unsuccessful, and no hope is now entertained of recovering it. Lowe was a smart young man, 28 years of age, and unmarried. He was formerly bar-man at the Commercial Hotel here, having been engaged in Melbourne...." The bronze medal and accompanying certificate of the Royal Humane Society of Australasia recognise the bravery of James Patten, a Warrnambool citizen who risked his life in the attempt to save the life of his friend Joseph Lowe.Certificate, cream paper, rectangular, decorative border and headings, printed and handwritten in pen and ink. Letterhead of The Royal Humane Society of Australasia. Awarded on 21st May 1890 to James Patten of Warrnambool. for his bravery on 18th April 1890.Print and writing includes - "The Royal Humane Society of Australia under the patronage of Her Majesty the Queen and their excellencies, the Governors of all the Australian Colonies and Fiji. At a general court of directors holden at the Offices of the Society Melbourne on the 21st day of May 1890, it was resolves that the courage and humanity displayed by James Patten, aged 20 years, labourer Warrnambool in attempting to rescue Joseph Lowe from drowning in the North Eastern bight of Lady Bay 18th April 1890. Call for the admiration of this court and justly, entitles him to the Bronze Medal of this society which is hereby awarded." Signatures [Secretary] and [President]flagstaff hill, warrnambool, flagstaff-hill, maritime museum, maritime village, shipwreck-coast, flagstaff hill maritime museum & village, bronze medal 1890, royal humane society of australasia, james patten, medal, australian award medal, commemorative medal, numismatics, life saving, lifesaving, rescue, bravery, drowning, joseph lowe, james ferrier, lady bay, hopkins river, boating accident, certificate of merit, lithograph, north eastern bight -
 Flagstaff Hill Maritime Museum and Village
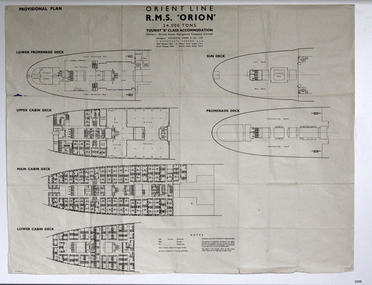
Plan - Ship Plan, Orient Steam Navigation Company, Orient Line, RMS Orion, ca. 1934
The Orient Steam Navigation Company Limited launched the Ocean Liner RMS Orion in 1934 and it remained in operation until 1963. The twin screw steamship was built to carry first class and tourist class passengers, over 1100 in all, plus almost 500 crew from Europe to Australia in comfort. The ship had a single funnel and a single mast. During WWII the vessel served as a troop carrier. The ventilation system noted on the plan, Punkah Louvre System, was designed for heating fresh air ventilation in buildings, ships and railroads. The system originated from Thermotank in Glasgow, Scotland. The ship plan for the RMS Orion is significant for its connection with the vessel. The ship was a leader, with several 'firsts'; the first Orient Line ship to be built with a single funnel since 1902, and the first to be painted in the Orient Line's livery, with a corn-coloured hull. It was the first liner to use chromium and bakelite materials for the surfaces throughout the ship, which provided greater resistance to the sea. It was also the first British ship to be fitted with air conditioning.Plan: printed provisional line drawing of the Orient line vessel "R.M.S. Orion". Inscriptions are printed on the plan. There are diagrams of six decks included in the plan. The ship is built for tourist "B" accommodation. The plan's Notices include details of the cabins including wardrobes, drawers, hinged seats, mattresses and bunk numbers. It also notes that there is a Punkah-Louvre System of Ventilation.Printed on the plan: "PROVISIONAL PLAN" "LOWER PROMENADE DECK" "UPPER CABIN DECK" "MAIN CABIN DECK" "LOWER CABIN DECK" "SUN DECK" "PROMENADE DECK" "ORIENT LINE / R.M.S. "ORION" / 24,000 TONS / TOURIST "B" CLASS ACCOMMODATION" "Owners: Orient Steam Navigation Company Limited"' "Managers : ANDERSON, GREEN & CO. LTD" "7 BISHOPS GATE, LONDON, E.C.2" "Chief Passenger Office : 14 Cockspur Street, London, S.W.1" "Branch Passenger Office : 1 Australia House, Strand, W.C.2" "notices"flagstaff hill, flagstaff hill maritime museum and village, warrnambool, maritime museum, maritime village, great ocean road, shipwreck coast, rms orion, plan, ship plan, provisional plan, orient line, orient ship, vissel orion, class b passenger accommodation, punkah louvre system of ventilation, deck plan, ship ventilation, ship floor plan, orient steam navigation company limited, anderson green & co ltd, steamship, ocean liner, war ship, troop carrier -
 Flagstaff Hill Maritime Museum and Village
Letter
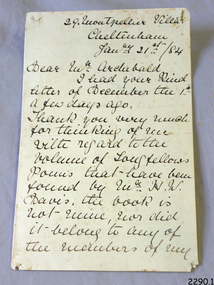
... at the Flagstaff Hill Maritime Museum in Warrnambool. From Australia's... at the Flagstaff Hill Maritime Museum in Warrnambool. From Australia's most ...This original letter was handwritten and dated 21 January 1884. The author is Eveline V. Carmichael, of 29 Montpellier Villa, Cheltenham. Eva Carmichael was the only woman survivor of the iron clipper LOCH ARD, which was wrecked on 1 June 1878, at the subsequently named Loch Ard Gorge near Port Campbell. The letter was written to Mr J Archibald, first curator of the Warrnambool Mechanics Institute Museum, and was in response to a letter he wrote to Miss Carmichael on 1 December 1883. A complete transcript of Eva’s letter is attached as a Hard Copy Supplementary File. The letter first addressed the subject of her reply. She writes, “Thank you very much for thinking of me with regard to the volume of Longfellows Poems that have been found by Mr HW Davis [at Loch Ard Gorge], the book is not mine, nor did it belong to any members of my family. We had a ‘Longfellows’, but our book had a green cover.” The rescued book is on display at Flagstaff Hill (541) and has a blue cover. Another interesting aspect to her letter is its reference to the only other survivor from the LOCH ARD. As a postscript she writes, “You will be glad to hear that Tom Pearce is now on board the HMS Solvent. I heard from him last month he wrote from the West-Indies and seemed well and in good spirits. I have not seen him since we parted in Melbourne. I believe he is to be married next year, or perhaps this, but I do not know the young lady.” Tom Pearce was the young, male, able seaman who had risked his life to save her. In the months after the shipwreck, an excited public press speculated of a romantic connection between the two survivors, but this was clearly not the case. HISTORY OF THE LOCH ARD The LOCH ARD belonged to the famous Loch Line which sailed many ships from England to Australia. Built in Glasgow by Barclay, Curdle and Co. in 1873, the LOCH ARD was a three-masted square rigged iron sailing ship. The ship measured 262ft 7" (79.87m) in length, 38ft (11.58m) in width, 23ft (7m) in depth and had a gross tonnage of 1693 tons. The LOCH ARD's main mast measured a massive 150ft (45.7m) in height. LOCH ARD made three trips to Australia and one trip to Calcutta before its final voyage. LOCH ARD left England on March 2, 1878, under the command of Captain Gibbs, a newly married, 29 year old. She was bound for Melbourne with a crew of 37, plus 17 passengers and a load of cargo. The general cargo reflected the affluence of Melbourne at the time. On board were straw hats, umbrella, perfumes, clay pipes, pianos, clocks, confectionary, linen and candles, as well as a heavier load of railway irons, cement, lead and copper. There were items included that intended for display in the Melbourne International Exhibition in 1880. The voyage to Port Phillip was long but uneventful. At 3am on June 1, 1878, Captain Gibbs was expecting to see land and the passengers were becoming excited as they prepared to view their new homeland in the early morning. But LOCH ARD was running into a fog which greatly reduced visibility. Captain Gibbs was becoming anxious as there was no sign of land or the Cape Otway lighthouse. At 4am the fog lifted. A man aloft announced that he could see breakers. The sheer cliffs of Victoria's west coast came into view, and Captain Gibbs realised that the ship was much closer to them than expected. He ordered as much sail to be set as time would permit and then attempted to steer the vessel out to sea. On coming head on into the wind, the ship lost momentum, the sails fell limp and LOCH ARD's bow swung back. Gibbs then ordered the anchors to be released in an attempt to hold its position. The anchors sank some 50 fathoms - but did not hold. By this time LOCH ARD was among the breakers and the tall cliffs of Mutton Bird Island rose behind the ship. Just half a mile from the coast, the ship's bow was suddenly pulled around by the anchor. The captain tried to tack out to sea, but the ship struck a reef at the base of Mutton Bird Island, near Port Campbell. Waves broke over the ship and the top deck was loosened from the hull. The masts and rigging came crashing down knocking passengers and crew overboard. When a lifeboat was finally launched, it crashed into the side of LOCH ARD and capsized. Tom Pearce, who had launched the boat, managed to cling to its overturned hull and shelter beneath it. He drifted out to sea and then on the flood tide came into what is now known as LOCH ARD Gorge. He swam to shore, bruised and dazed, and found a cave in which to shelter. Some of the crew stayed below deck to shelter from the falling rigging but drowned when the ship slipped off the reef into deeper water. Eva Carmichael had raced onto deck to find out what was happening only to be confronted by towering cliffs looming above the stricken ship. In all the chaos, Captain Gibbs grabbed Eva and said, "If you are saved Eva, let my dear wife know that I died like a sailor". That was the last Eva Carmichael saw of the captain. She was swept off the ship by a huge wave. Eva saw Tom Pearce on a small rocky beach and yelled to attract his attention. He dived in and swam to the exhausted woman and dragged her to shore. He took her to the cave and broke open case of brandy which had washed up on the beach. He opened a bottle to revive the unconscious woman. A few hours later Tom scaled a cliff in search of help. He followed hoof prints and came by chance upon two men from nearby Glenample Station three and a half miles away. In a state of exhaustion, he told the men of the tragedy. Tom returned to the gorge while the two men rode back to the station to get help. By the time they reached LOCH ARD Gorge, it was cold and dark. The two shipwreck survivors were taken to Glenample Station to recover. Eva stayed at the station for six weeks before returning to Ireland, this time by steamship. In Melbourne, Tom Pearce received a hero's welcome. He was presented with the first gold medal of the Royal Humane Society of Victoria and a £1000 cheque from the Victorian Government. Concerts were performed to honour the young man's bravery and to raise money for those who lost family in the LOCH ARD disaster. Of the 54 crew members and passengers on board, only two survived: the apprentice, Tom Pearce and the young woman passenger, Eva Carmichael, who lost all of her family in the tragedy. Ten days after the LOCH ARD tragedy, salvage rights to the wreck were sold at auction for £2,120. Cargo valued at £3,000 was salvaged and placed on the beach, but most washed back into the sea when another storm developed. The wreck of LOCH ARD still lies at the base of Mutton Bird Island. Much of the cargo has now been salvaged and some was washed up into what is now known as LOCH ARD Gorge. Cargo and artefacts have also been illegally salvaged over many years before protective legislation was introduced. One of the most unlikely pieces of cargo to have survived the shipwreck was a Minton porcelain peacock - one of only nine in the world. The peacock was destined for the Melbourne International Exhibition in 1880. It had been well packed, which gave it adequate protection during the violent storm. Today, the Minton peacock can be seen at the Flagstaff Hill Maritime Museum in Warrnambool. From Australia's most dramatic shipwreck it has now become Australia's most valuable shipwreck artefact and is one of very few 'objects' on the Victorian State Heritage Register. The LOCH ARD shipwreck is of State significance – Victorian Heritage Number S417 Flagstaff Hill’s collection of artefacts from LOCH ARD is significant for being one of the largest collections of artefacts from this shipwreck in Victoria. It is significant for its association with the shipwreck, which is on the Victorian Heritage Register (VHR S417). The collection is significant because of the relationship between the objects, as together they have a high potential to interpret the story of the LOCH ARD. The LOCH ARD collection is archaeologically significant as the remains of a large international passenger and cargo ship. The LOCH ARD collection is historically significant for representing aspects of Victoria’s shipping history and its potential to interpret sub-theme 1.5 of Victoria’s Framework of Historical Themes (living with natural processes). The collection is also historically significant for its association with the LOCH ARD, which was one of the worst and best known shipwrecks in Victoria’s history. A photocopy of a letter, handwritten in ink on both sides of 4 small sheets of thick, light blue paper. The letter is in neat cursive script. The writing originally covered 7 sides of the note paper and has been reproduced as 7 separate pages. It is dated 21 January 1884, five and a half years after the LOCH ARD shipwreck. The letter is from Eva Carmichael, one of only 2 survivors from that disaster, and is addressed to J. Archibald, first curator of the Warrnambool Mechanics Institute Museum. The copies include the reproduction of a typed index card which accompanies the original letter. The card states: “Photographic copy of the letter written by Eva Carmichael to Mr J Archibald, first Curator of the Warrnambool Museum. The original letter is kept with other documents, but the writing being on both sides of the note-paper it was not possible to read in its entireity when on display”.flagstaff hill, warrnambool, shipwrecked coast, flagstaff hill maritime museum, maritime museum, shipwreck coast, flagstaff hill maritime village, great ocean road, loch line, loch ard, captain gibbs, eva carmichael, tom pearce, glenample station, mutton bird island, loch ard gorge, loch ard, survivor’s letter, eva carmichael, longfellow’s poems, warrnambool mechanics institute museum, joseph archibald, henry davis -
 Flagstaff Hill Maritime Museum and Village
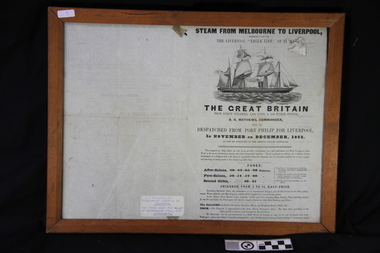
Document - Framed Pamphlet, The Great Britain, ca. 1852
The poster advertises the new ship "The Great Britain", built in 1852 and owned by the Eagle Line of steam packets, sailings between Australia and Liverpool, and other vessels owned by the company. The Great Britain was an iron screw steamer, 3,500 tons, & 500 horse power, built for the Eagle Line in 1852 and its Commander was B.L. Matthews. Passengers had a choice of accommodation; the After-Saloon, Fore-Saloon and Second Cabin. A scale on the poster lists the provision of food for each day of the week, for Fore-Saloon and Second Cabin passengers. The lists of agents English and Australian offices.The poster is significant for its connection to migration between England and Australia in the 1850's. The information includes the rationing of food on a daily basis to different classes of passengers, and the class distinctions made for accommodation, and provision made for children and servants. The poster also connects to the various ships of the Eagle Line and the captains of the ships.Double-sided printed pamphlet, behind glass on both sides, with a timber outer frame. The pamphlet is about the sailing of the new packet steamer "Great Britain". dispatched from Port Phillip (Melbourne, Victoria) to Liverpool (England) in 1852. Lind drawing of a sailing ship on water. Tables of Provisions for Fore Saloon Passengers, Second Cabin Passengers, Shipping Agents and ships in the Liverpool "Eagle Line" of Packets. A label added to the poster has details of the previous owner of the poster."EAGLE LINE" "THE GREAT BRITAIN" B.R. MATTHEWS" "FARES" SCALE OF PROVISIONS FOR FORE SALOON" "AGENTS IN ENGLAND" "AGENTS IN AUSTRALIA"" GIBBS, BRIGHT & CO." SAILING SHIPS" Typed onto the label "Property of: / Shiplovers' Society of / Victoria. / See other side for scale / of provisions etc., / for passengers."flagstaff hill, flagstaff hill maritime museum and village, warrnambool, maritime museum, maritime village, poster, the great britain, eagle line, steam packet, liverpool, port phillip, b.r. matthews, screw steamer, 1852, scale of provisions, fore-saloon, after-saloon, second class, gibbs bright & co., g. seymour, samuel irvan & co, h.l. allen, george pim & co., t.l. holder, j.c. matthews, yates &o corkling, r.w. winfield, davy & co, crawley & smith, octavius brown &o co., w.m. younghusband &o co, albatross, osprey, condor, eagle, falcon, petrel, salacia, zealand, bloomer, capt. geves, capt. honeyman, capt. daly, capt. boyce, capt. taylor, capt. chapman, capt. brown, capt. simonds -
 Flagstaff Hill Maritime Museum and Village
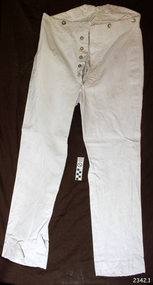
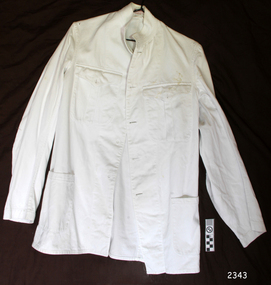
Trousers, Paislyo Ltd
This uniform, consisting of 3 pairs of trousers and 1 jacket, was owned by Dr W.R. Angus. Due to the manufacturer's label saying the uniform was made in Glasgow, it is likely that Dr Angus acquired the uniform around the time of his studies in Edinburgh. His name on the uniform suggests that it was part of his usual clothing and it was most likely worn on his homeward passage to Australia in 1928, during which time he worked as a Ship's Surgeon on T.S.S. LARGS BAY.. This uniform was donated to Flagstaff Hill Maritime Village by the family of Doctor William Roy Angus, Surgeon and Oculist. It is part of the “W.R. Angus Collection” that includes historical medical equipment, surgical instruments and material once belonging to Dr Edward Ryan and Dr Thomas Francis Ryan, (both of Nhill, Victoria) as well as Dr Angus’ own belongings. The Collection’s history spans the medical practices of the two Doctors Ryan, from 1885-1926 plus that of Dr Angus, up until 1969. ABOUT THE “W.R.ANGUS COLLECTION” Doctor William Roy Angus M.B., B.S., Adel., 1923, F.R.C.S. Edin.,1928 (also known as Dr Roy Angus) was born in Murrumbeena, Victoria in 1901 and lived until 1970. He qualified as a doctor in 1923 at University of Adelaide, was Resident Medical Officer at the Royal Adelaide Hospital in 1924 and for a period was house surgeon to Sir (then Mr.) Henry Simpson Newland. Dr Angus was briefly an Assistant to Dr Riddell of Kapunda, then commenced private practice at Curramulka, Yorke Peninsula, SA, where he was physician, surgeon and chemist. In 1926, he was appointed as new Medical Assistant to Dr Thomas Francis Ryan (T.F. Ryan, or Tom), in Nhill, Victoria, where his experiences included radiology and pharmacy. In 1927 he was Acting House Surgeon in Dr Tom Ryan’s absence. Dr Angus had become engaged to Gladys Forsyth and they decided he would take time to further his studies overseas in the UK in 1927. He studied at London University College Hospital and at Edinburgh Royal Infirmary and in 1928, was awarded FRCS (Fellow from the Royal College of Surgeons), Edinburgh. He worked his passage back to Australia as a Ship’s Surgeon on the on the Australian Commonwealth Line’s T.S.S. Largs Bay. Dr Angus married Gladys in 1929, in Ballarat. (They went on to have one son (Graham 1932, born in SA) and two daughters (Helen (died 12/07/1996) and Berenice (Berry), both born at Mira, Nhill ) Dr Angus was a ‘flying doctor’ for the A.I.M. (Australian Inland Ministry) Aerial Medical Service in 1928 . The organisation began in South Australia through the Presbyterian Church in that year, with its first station being in the remote town of Oodnadatta, where Dr Angus was stationed. He was locum tenens there on North-South Railway at 21 Mile Camp. He took up this ‘flying doctor’ position in response to a call from Dr John Flynn; the organisation was later known as the Flying Doctor Service, then the Royal Flying Doctor Service. A lot of his work during this time involved dental surgery also. Between 1928-1932 he was surgeon at the Curramulka Hospital, Yorke Peninsula, South Australia. In 1933 Dr Angus returned to Nhill where he’d previously worked as Medical Assistant and purchased a share of the Nelson Street practice and Mira hospital from Dr Les Middleton one of the Middleton Brothers, the current owners of what was once Dr Tom Ryan’s practice. Dr L Middleton was House Surgeon to the Nhill Hospital 1926-1933, when he resigned. [Dr Tom Ryan’s practice had originally belonged to his older brother Dr Edward Ryan, who came to Nhill in 1885. Dr Edward saw patients at his rooms, firstly in Victoria Street and in 1886 in Nelson Street, until 1901. The Nelson Street practice also had a 2 bed ward, called Mira Private Hospital ). Dr Edward Ryan was House Surgeon at the Nhill Hospital 1884-1902 . He also had occasions where he successfully performed veterinary surgery for the local farmers too. Dr Tom Ryan then purchased the practice from his brother in 1901. Both Dr Edward and Dr Tom Ryan work as surgeons included eye surgery. Dr Tom Ryan performed many of his operations in the Mira private hospital on his premises. He too was House Surgeon at the Nhill Hospital 1902-1926. Dr Tom Ryan had one of the only two pieces of radiology equipment in Victoria during his practicing years – The Royal Melbourne Hospital had the other one. Over the years Dr Tom Ryan gradually set up what was effectively a training school for country general-practitioner-surgeons. Each patient was carefully examined, including using the X-ray machine, and any surgery was discussed and planned with Dr Ryan’s assistants several days in advance. Dr Angus gained experience in using the X-ray machine there during his time as assistant to Dr Ryan. Dr Tom Ryan moved from Nhill in 1926. He became a Fellow of the Royal Australasian College of Surgeons in 1927, soon after its formation, a rare accolade for a doctor outside any of the major cities. He remained a bachelor and died suddenly on 7th Dec 1955, aged 91, at his home in Ararat. Scholarships and prizes are still awarded to medical students in the honour of Dr T.F. Ryan and his father, Dr Michael Ryan, and brother, John Patrick Ryan. ] When Dr Angus bought into the Nelson Street premises in Nhill he was also appointed as the Nhill Hospital’s Honorary House Surgeon 1933-1938. His practitioner’s plate from his Nhill surgery states “HOURS Daily, except Tuesdays, Fridays and Saturday afternoons, 9-10am, 2-4pm, 7-8pm. Sundays by appointment”. This plate is now mounted on the doorway to the Port Medical Office at Flagstaff Hill Maritime Village, Warrnambool. Dr Edward Ryan and Dr Tom Ryan had an extensive collection of historical medical equipment and materials spanning 1884-1926 and when Dr Angus took up practice in their old premises he obtained this collection, a large part of which is now on display at the Port Medical Office at Flagstaff Hill Maritime Village in Warrnambool. During his time in Nhill Dr Angus was involved in the merging of the Mira Hospital and Nhill Public Hospital into one public hospital and the property titles passed on to Nhill Hospital in 1939. In 1939 Dr Angus and his family moved to Warrnambool where he purchased “Birchwood,” the 1852 home and medical practice of Dr John Hunter Henderson, at 214 Koroit Street. (This property was sold in1965 to the State Government and is now the site of the Warrnambool Police Station. ). The Angus family was able to afford gardeners, cooks and maids; their home was a popular place for visiting dignitaries to stay whilst visiting Warrnambool. Dr Angus had his own silk worm farm at home in a Mulberry tree. His young daughter used his centrifuge for spinning the silk. Dr Angus was appointed on a part-time basis as Port Medical Officer (Health Officer) in Warrnambool and held this position until the 1940’s when the government no longer required the service of a Port Medical Officer in Warrnambool; he was thus Warrnambool’s last serving Port Medical Officer. (The duties of a Port Medical Officer were outlined by the Colonial Secretary on 21st June, 1839 under the terms of the Quarantine Act. Masters of immigrant ships arriving in port reported incidents of diseases, illness and death and the Port Medical Officer made a decision on whether the ship required Quarantine and for how long, in this way preventing contagious illness from spreading from new immigrants to the residents already in the colony.) Dr Angus was a member of the Australian Medical Association, for 35 years and surgeon at the Warrnambool Base Hospital 1939-1942, He served as a Surgeon Captain during WWII1942-45, in Ballarat, Victoria, and in Bonegilla, N.S.W., completing his service just before the end of the war due to suffering from a heart attack. During his convalescence he carved an intricate and ‘most artistic’ chess set from the material that dentures were made from. He then studied ophthalmology at the Royal Melbourne Eye and Ear Hospital and created cosmetically superior artificial eyes by pioneering using the intrascleral cartilage. Angus received accolades from the Ophthalmological Society of Australasia for this work. He returned to Warrnambool to commence practice as an ophthalmologist, pioneering in artificial eye improvements. He was Honorary Consultant Ophthalmologist to Warrnambool Base Hospital for 31 years. He made monthly visits to Portland as a visiting surgeon, to perform eye surgery. He represented the Victorian South-West subdivision of the Australian Medical Association as its secretary between 1949 and 1956 and as chairman from 1956 to 1958. In 1968 Dr Angus was elected member of Spain’s Barraquer Institute of Barcelona after his research work in Intrasclearal cartilage grafting, becoming one of the few Australian ophthalmologists to receive this honour, and in the following year presented his final paper on Living Intrasclearal Cartilage Implants at the Inaugural Meeting of the Australian College of Ophthalmologists in Melbourne In his personal life Dr Angus was a Presbyterian and treated Sunday as a Sabbath, a day of rest. He would visit 3 or 4 country patients on a Sunday, taking his children along ‘for the ride’ and to visit with him. Sunday evenings he would play the pianola and sing Scottish songs to his family. One of Dr Angus’ patients was Margaret MacKenzie, author of a book on local shipwrecks that she’d seen as an eye witness from the late 1880’s in Peterborough, Victoria. In the early 1950’s Dr Angus, painted a picture of a shipwreck for the cover jacket of Margaret’s book, Shipwrecks and More Shipwrecks. She was blind in later life and her daughter wrote the actual book for her. Dr Angus and his wife Gladys were very involved in Warrnambool’s society with a strong interest in civic affairs. Their interests included organisations such as Red Cross, Rostrum, Warrnambool and District Historical Society (founding members), Wine and Food Society, Steering Committee for Tertiary Education in Warrnambool, Local National Trust, Good Neighbour Council, Housing Commission Advisory Board, United Services Institute, Legion of Ex-Servicemen, Olympic Pool Committee, Food for Britain Organisation, Warrnambool Hospital, Anti-Cancer Council, Boys’ Club, Charitable Council, National Fitness Council and Air Raid Precautions Group. He was also a member of the Steam Preservation Society and derived much pleasure from a steam traction engine on his farm. He had an interest in people and the community He and his wife Gladys were both involved in the creation of Flagstaff Hill, including the layout of the gardens. After his death (28th March 1970) his family requested his practitioner’s plate, medical instruments and some personal belongings be displayed in the Port Medical Office surgery at Flagstaff Hill Maritime Village, and be called the “W. R. Angus Collection”. The W.R. Angus Collection is significant for still being located at the site it is connected with, Doctor Angus being the last Port Medical Officer in Warrnambool. The collection of medical instruments and other equipment is culturally significant, being an historical example of medicine from late 19th to mid-20th century. Dr Angus assisted Dr Tom Ryan, a pioneer in the use of X-rays and in ocular surgery. Trousers (3) white uniform with silver buttons, buttons inscribed "V.Falzon Malta". On inside - W R Angus, R Poore. Tailored in Glasgow, Scotland 1900s by Paislyo Ltd Glasgow. (said to be a Cadet naval officer's uniform)Inscribed on buttons "V.Falson Malta". Marked on fabric "W R Angus, R Poore" and "Paislyo Ltd Glasgow"flagstaff hill, warrnambool, shipwrecked-coast, flagstaff-hill, flagstaff-hill-maritime-museum, maritime-museum, shipwreck-coast, flagstaff-hill-maritime-village, uniform trousers, silver button trousers, v.falzon malta, w r angus, paislyo ltd -
 Flagstaff Hill Maritime Museum and Village
Coat, 1900's
This uniform, consisting of 3 pairs of trousers and 1 jacket, was owned by Dr W.R. Angus. Due to the manufacturer's label saying the uniform was made in Glasgow, it is likely that Dr Angus acquired the uniform around the time of his studies in Edinburgh. His name on the uniform suggests that it was part of his usual clothing and it was most likely worn on his homeward passage to Australia in 1928, during which time he worked as a Ship's Surgeon on T.S.S. LARGS BAY.. This object was donated to Flagstaff Hill Maritime Village by the family of Doctor William Roy Angus, Surgeon and Oculist. It is part of the “W.R. Angus Collection” that includes historical medical equipment, surgical instruments and material once belonging to Dr Edward Ryan and Dr Thomas Francis Ryan, (both of Nhill, Victoria) as well as Dr Angus’ own belongings. The Collection’s history spans the medical practices of the two Doctors Ryan, from 1885-1926 plus that of Dr Angus, up until 1969. ABOUT THE “W.R.ANGUS COLLECTION” Doctor William Roy Angus M.B., B.S., Adel., 1923, F.R.C.S. Edin.,1928 (also known as Dr Roy Angus) was born in Murrumbeena, Victoria in 1901 and lived until 1970. He qualified as a doctor in 1923 at University of Adelaide, was Resident Medical Officer at the Royal Adelaide Hospital in 1924 and for a period was house surgeon to Sir (then Mr.) Henry Simpson Newland. Dr Angus was briefly an Assistant to Dr Riddell of Kapunda, then commenced private practice at Curramulka, Yorke Peninsula, SA, where he was physician, surgeon and chemist. In 1926, he was appointed as new Medical Assistant to Dr Thomas Francis Ryan (T.F. Ryan, or Tom), in Nhill, Victoria, where his experiences included radiology and pharmacy. In 1927 he was Acting House Surgeon in Dr Tom Ryan’s absence. Dr Angus had become engaged to Gladys Forsyth and they decided he would take time to further his studies overseas in the UK in 1927. He studied at London University College Hospital and at Edinburgh Royal Infirmary and in 1928, was awarded FRCS (Fellow from the Royal College of Surgeons), Edinburgh. He worked his passage back to Australia as a Ship’s Surgeon on the on the Australian Commonwealth Line’s T.S.S. Largs Bay. Dr Angus married Gladys in 1929, in Ballarat. (They went on to have one son (Graham 1932, born in SA) and two daughters (Helen (died 12/07/1996) and Berenice (Berry), both born at Mira, Nhill ) Dr Angus was a ‘flying doctor’ for the A.I.M. (Australian Inland Ministry) Aerial Medical Service in 1928 . The organisation began in South Australia through the Presbyterian Church in that year, with its first station being in the remote town of Oodnadatta, where Dr Angus was stationed. He was locum tenens there on North-South Railway at 21 Mile Camp. He took up this ‘flying doctor’ position in response to a call from Dr John Flynn; the organisation was later known as the Flying Doctor Service, then the Royal Flying Doctor Service. A lot of his work during this time involved dental surgery also. Between 1928-1932 he was surgeon at the Curramulka Hospital, Yorke Peninsula, South Australia. In 1933 Dr Angus returned to Nhill where he’d previously worked as Medical Assistant and purchased a share of the Nelson Street practice and Mira hospital from Dr Les Middleton one of the Middleton Brothers, the current owners of what was once Dr Tom Ryan’s practice. Dr L Middleton was House Surgeon to the Nhill Hospital 1926-1933, when he resigned. [Dr Tom Ryan’s practice had originally belonged to his older brother Dr Edward Ryan, who came to Nhill in 1885. Dr Edward saw patients at his rooms, firstly in Victoria Street and in 1886 in Nelson Street, until 1901. The Nelson Street practice also had a 2 bed ward, called Mira Private Hospital ). Dr Edward Ryan was House Surgeon at the Nhill Hospital 1884-1902 . He also had occasions where he successfully performed veterinary surgery for the local farmers too. Dr Tom Ryan then purchased the practice from his brother in 1901. Both Dr Edward and Dr Tom Ryan work as surgeons included eye surgery. Dr Tom Ryan performed many of his operations in the Mira private hospital on his premises. He too was House Surgeon at the Nhill Hospital 1902-1926. Dr Tom Ryan had one of the only two pieces of radiology equipment in Victoria during his practicing years – The Royal Melbourne Hospital had the other one. Over the years Dr Tom Ryan gradually set up what was effectively a training school for country general-practitioner-surgeons. Each patient was carefully examined, including using the X-ray machine, and any surgery was discussed and planned with Dr Ryan’s assistants several days in advance. Dr Angus gained experience in using the X-ray machine there during his time as assistant to Dr Ryan. Dr Tom Ryan moved from Nhill in 1926. He became a Fellow of the Royal Australasian College of Surgeons in 1927, soon after its formation, a rare accolade for a doctor outside any of the major cities. He remained a bachelor and died suddenly on 7th Dec 1955, aged 91, at his home in Ararat. Scholarships and prizes are still awarded to medical students in the honour of Dr T.F. Ryan and his father, Dr Michael Ryan, and brother, John Patrick Ryan. ] When Dr Angus bought into the Nelson Street premises in Nhill he was also appointed as the Nhill Hospital’s Honorary House Surgeon 1933-1938. His practitioner’s plate from his Nhill surgery states “HOURS Daily, except Tuesdays, Fridays and Saturday afternoons, 9-10am, 2-4pm, 7-8pm. Sundays by appointment”. This plate is now mounted on the doorway to the Port Medical Office at Flagstaff Hill Maritime Village, Warrnambool. Dr Edward Ryan and Dr Tom Ryan had an extensive collection of historical medical equipment and materials spanning 1884-1926 and when Dr Angus took up practice in their old premises he obtained this collection, a large part of which is now on display at the Port Medical Office at Flagstaff Hill Maritime Village in Warrnambool. During his time in Nhill Dr Angus was involved in the merging of the Mira Hospital and Nhill Public Hospital into one public hospital and the property titles passed on to Nhill Hospital in 1939. In 1939 Dr Angus and his family moved to Warrnambool where he purchased “Birchwood,” the 1852 home and medical practice of Dr John Hunter Henderson, at 214 Koroit Street. (This property was sold in1965 to the State Government and is now the site of the Warrnambool Police Station. ). The Angus family was able to afford gardeners, cooks and maids; their home was a popular place for visiting dignitaries to stay whilst visiting Warrnambool. Dr Angus had his own silk worm farm at home in a Mulberry tree. His young daughter used his centrifuge for spinning the silk. Dr Angus was appointed on a part-time basis as Port Medical Officer (Health Officer) in Warrnambool and held this position until the 1940’s when the government no longer required the service of a Port Medical Officer in Warrnambool; he was thus Warrnambool’s last serving Port Medical Officer. (The duties of a Port Medical Officer were outlined by the Colonial Secretary on 21st June, 1839 under the terms of the Quarantine Act. Masters of immigrant ships arriving in port reported incidents of diseases, illness and death and the Port Medical Officer made a decision on whether the ship required Quarantine and for how long, in this way preventing contagious illness from spreading from new immigrants to the residents already in the colony.) Dr Angus was a member of the Australian Medical Association, for 35 years and surgeon at the Warrnambool Base Hospital 1939-1942, He served as a Surgeon Captain during WWII1942-45, in Ballarat, Victoria, and in Bonegilla, N.S.W., completing his service just before the end of the war due to suffering from a heart attack. During his convalescence he carved an intricate and ‘most artistic’ chess set from the material that dentures were made from. He then studied ophthalmology at the Royal Melbourne Eye and Ear Hospital and created cosmetically superior artificial eyes by pioneering using the intrascleral cartilage. Angus received accolades from the Ophthalmological Society of Australasia for this work. He returned to Warrnambool to commence practice as an ophthalmologist, pioneering in artificial eye improvements. He was Honorary Consultant Ophthalmologist to Warrnambool Base Hospital for 31 years. He made monthly visits to Portland as a visiting surgeon, to perform eye surgery. He represented the Victorian South-West subdivision of the Australian Medical Association as its secretary between 1949 and 1956 and as chairman from 1956 to 1958. In 1968 Dr Angus was elected member of Spain’s Barraquer Institute of Barcelona after his research work in Intrasclearal cartilage grafting, becoming one of the few Australian ophthalmologists to receive this honour, and in the following year presented his final paper on Living Intrasclearal Cartilage Implants at the Inaugural Meeting of the Australian College of Ophthalmologists in Melbourne In his personal life Dr Angus was a Presbyterian and treated Sunday as a Sabbath, a day of rest. He would visit 3 or 4 country patients on a Sunday, taking his children along ‘for the ride’ and to visit with him. Sunday evenings he would play the pianola and sing Scottish songs to his family. One of Dr Angus’ patients was Margaret MacKenzie, author of a book on local shipwrecks that she’d seen as an eye witness from the late 1880’s in Peterborough, Victoria. In the early 1950’s Dr Angus, painted a picture of a shipwreck for the cover jacket of Margaret’s book, Shipwrecks and More Shipwrecks. She was blind in later life and her daughter wrote the actual book for her. Dr Angus and his wife Gladys were very involved in Warrnambool’s society with a strong interest in civic affairs. Their interests included organisations such as Red Cross, Rostrum, Warrnambool and District Historical Society (founding members), Wine and Food Society, Steering Committee for Tertiary Education in Warrnambool, Local National Trust, Good Neighbour Council, Housing Commission Advisory Board, United Services Institute, Legion of Ex-Servicemen, Olympic Pool Committee, Food for Britain Organisation, Warrnambool Hospital, Anti-Cancer Council, Boys’ Club, Charitable Council, National Fitness Council and Air Raid Precautions Group. He was also a member of the Steam Preservation Society and derived much pleasure from a steam traction engine on his farm. He had an interest in people and the community He and his wife Gladys were both involved in the creation of Flagstaff Hill, including the layout of the gardens. After his death (28th March 1970) his family requested his practitioner’s plate, medical instruments and some personal belongings be displayed in the Port Medical Office surgery at Flagstaff Hill Maritime Village, and be called the “W. R. Angus Collection”. The W.R. Angus Collection is significant for still being located at the site it is connected with, Doctor Angus being the last Port Medical Officer in Warrnambool. The collection of medical instruments and other equipment is culturally significant, being an historical example of medicine from late 19th to mid-20th century. Dr Angus assisted Dr Tom Ryan, a pioneer in the use of X-rays and in ocular surgery. Coat, white linen jacket, brass buttons, epaulets and collar badges have been removed, holes remain. Tailored in Glasgow, Scotland 1900s by Paislyo Ltd Glasgow. (said to be the uniform of a Cadet naval officer).flagstaff hill, warrnambool, shipwrecked-coast, flagstaff-hill, flagstaff-hill-maritime-museum, maritime-museum, shipwreck-coast, flagstaff-hill-maritime-village, dr w r angus, t.s.s. largs bay, uniform jacket, ship's surgeon -
 Flagstaff Hill Maritime Museum and Village
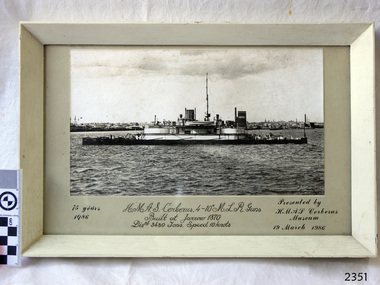
Photograph - Commemorative, Royal Australian Navy (RAN), H.M.A.S. Cerberus. 4-10" M.L.R. Guns, 1986
The ship HMAS Cerberus was Built at Jarrow, Newcastle upon Tyne, England, in 1870, specifically for the colony of Victoria (Australia) and originally named HMVS Cerberus. It had a displacement of 3480 tons and could travel at the speed of 10 knots. The ship carried 4x 10 inch M.L.R. guns. The ship was renamed HMAS Cerberus in 1911 when the navy became the Royal Australian Navy. The photograph was mounted by members of HMAS Cerberus at Crib Point, Western Port Bay, Victoria in 1986. It was presented to Flagstaff Hill Maritime Village by the HMAS Cerberus Museum in 1986 to commemorate the ship's 75 years of service for the Royal Australian Navy. The photograph is significant for its connection with the colony of Victoria before Federation. It is also significant for its connection with the Royal Australian Navy and its service and training of Australian defence forces. Photograph behind glass, in timber frame. Black and white photograph of vessel HMAS Cerberus anchored , with city in the background. Frame is painted white. Photograph was taken to commemorate 75 years of the ship's service in the Royal Australian Navy. It was framed and presented to Flagstaff Hill by the HMAS Cerberus Museum on 19 March 1986. Details are hand written below the photograph.Original script writing in centre "H.M.A.S. Cerberus. 4-10 M.L.R. Guns / Built at Jarrow 1870 / Displ 3480 tons. Speed 10 knots. More recent text "75 years / 1986" "Presented by / HMAS Cerberus / Museum/ 19 March 1986"flagstaff hill, warrnambool, shipwrecked-coast, flagstaff-hill, flagstaff-hill-maritime-museum, maritime-museum, shipwreck-coast, flagstaff-hill-maritime-village, photograph, hmas cerberus, 75 year commemoration, 1876, 1911, royal australian navy, navy training base, point crib, ran, cerberus, commemorative photograph, western port bay, hmvs cerberus -
 Flagstaff Hill Maritime Museum and Village
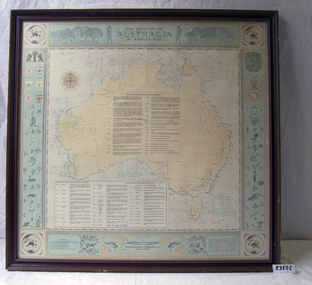
Document
1) Large map of Australia with information on explorers, navigators etc involved in its discovery. Title "The Discovery of Australia by Western Man" 2) Poster which explains in full information formulated on .1 Also gives in great detail natural history information relevant to the formation of the Australian continent.flagstaff hill, warrnambool, shipwrecked-coast, flagstaff-hill, flagstaff-hill-maritime-museum, maritime-museum, shipwreck-coast, flagstaff-hill-maritime-village -
 Flagstaff Hill Maritime Museum and Village
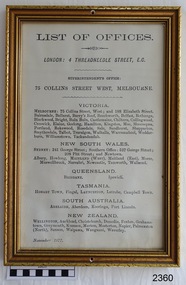
Document - Bank notice, List of Offices, ca Nov. 1877
The addresses given on the List for the London and Melbourne offices have connected the document to the Bank of Australasia. The List is dated November 1877 and shows the number and the location of all of the branches of the Bank at that point in time., a total of 77. - Victoria 35, New South Wales 14, Queensland 2, Tasmania 5, South Australia 5, New Zealand 16 Copies of the notice would have been displayed in all branches of the bank in both Australia and New Zealand to inform customers and perhaps impress them too with a large number of locations and the reference to the bank's connection with London. This document gives information on all bank offices throughout Australia and New Zealand. It refers to the Superintendent's Office address at 75 Collins Street West, Melbourne and is dated November 1877. This places the document at the time just before the new Melbourne office opened on the corner of Collins Street and Queen's Street in 1879. The Bank of Australasia was incorporated by Royal Charter of England in March 1834. It came to Australia on 14th December 1835, opening in Sydney. The Acting Superintendent of the Bank of Australasia in Sydney at that time was David Charters McArthur. He was Superintendent from 1867-to 1876. The Melbourne branch of the Bank of Australasia opened on 28th August 1838 in a two-roomed brick cottage on the north side of Little Collins Street. Two huge mastiff dogs were kept in the backyard and let loose at night to guard the bank. The government also provided an armed military sentinel. Due to the bank's rapid growth, a new building for the Melbourne branch was opened in 1840 at 75 Collins Street West. By 1879 the bank had been upgraded to a magnificent two-storey building on the corners of Collins and Queens Streets, with the entry on Collins Street. In 1951 the Bank of Australasia amalgamated with the Union Bank to form the Australia and New Zealand Bank, now known as the ANZ. Then in 1970, the ANZ merged with both the ES&A and the London Bank of Australia to form the ANZ Banking Group Limited. The ANZ Banking Group Ltd kindly donated a variety of historic items from the Bank of Australasia. BANK of AUSTRALASIA, WARRNAMBOOL – In 1854 Warrnambool had two banks, the Union Back and the Bank of Australasia. Later, completely different bank businesses opened; in 1867 the National Bank of Australasia, then in 1875 the Colonial Bank of Australasia. The original Bank of Australasia was established in Warrnambool in July 1854, and operated from a leased cottage on Merri Street, close to Liebig Street. The bank bought a stone building previously erected by drapers Cramond & Dickson on the corner of Timor and Gibson Streets. Samuel Hannaford was a teller and then Manager at the Warrnambool branch from 1855 to 1856. Warrnambool’s Council chose the Bank of Australasia as its bank 1856-57. In 1859 Roberts & Co. was awarded the contract to build the new Bank of Australasia branch for the sum of £3,000. The land was on a sand hill on the northeast corner of Timor and Kepler Streets and had been bought in 1855 from investor James Cust. The new building opened on May 21, 1860. The bank continued to operate there until 1951 when it merged with the Union Bank to form the ANZ Bank, which continued operating from its Liebig Street building. Warrnambool City Council purchased the former Bank of Australasia building in 1971 and renovated it, then on 3rd December 1973 it was officially opened as the Art Gallery by Cr. Harold Stephenson and Gallery Director John Welsh. The Gallery transferred to the purpose-built building in Liebig Street in 1986 and the old bank building is now the Gallery club. The List of Offices of the Bank of Australasia has early Australian historical significance through its association with the Bank, which was established in 1834 by Royal Charter and opened in Sydney, Australia, in Sydney in 1835. The List is significant for showing the number and location of all of the Offices of the Bank of Australia in November 1877. This shows that Victoria had 45 percent of all Offices. The framed document is locally significant for its association with the Bank of Australasia, Warrnambool's first bank, established in 1854. The bank continued to operate until the organisation's merger in 1951. It became the ANZ Bank, which is still in operation today. The Bank was an integral part of the establishment and growth of commerce in Colonial Warrnambool and throughout Australia.Document in a decorative gilt frame. Titled List of Bank Offices and dated November 1877, facsimile. Offices include London, and a variety of offices in Victoria, New South Wales, Queensland, Tasmania, South Australia and New Zealand. Round holes in the centre top and bottom of the frame. Text includes: "LONDON: 4 THREADNEEDLE STREET, E.C." "SUPERINTENDENT'S OFFICE: / 75 COLLINS STREET WEST, MELBOURNE" "Warrnambool" " November 1877" flagstaff hill, warrnambool, bank of australasia 1877, branches of bank of australasia 1877, banks in australia 1877, commerce 1877, shipwreck-coast, document, bank document, flagstaff hill maritime museum & village, bank of australasia, 1877, branches in australia, bank of london, offices in australia, offices in new zealand, commerce, banking, finance, shipwrecked coast, flagstaff hill maritime museum, maritime museum, shipwreck coast, flagstaff hill maritime village, great ocean road, boa, union bank, australia & new zealand bank, anz bank, david charters mcarthur, d c mcarthur, sydney, new south wales, currency, banknote, legal tender, list of bank offices -
 Flagstaff Hill Maritime Museum and Village
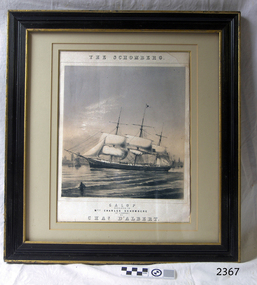
Lithograph, The Schomberg
When the ship Schomberg was launched in 1855, she was considered the most perfect clipper ship ever to be built. James Blaine’s Black Ball Line had commissioned her to be built for their fleet of passenger liners. At a cost of £43,103, the Aberdeen builders designed her to sail faster than the quick clippers designed by North American Donald McKay. She was a three masted wooden clipper ship, built with diagonal planking of British oak with layers of Scottish larch. This luxury vessel was designed to transport emigrants to Melbourne in superior comfort. She had ventilation ducts to provide air to the lower decks and a dining saloon, smoking room, library and bathrooms for the first class passengers. At the launch of Schomberg’s maiden voyage, her master Captain ‘Bully’ Forbes, drunkenly predicted that he would make the journey between Liverpool and Melbourne in 60 days. Schomberg departed Liverpool on 6 October 1855 with 430 passengers and 3000 tons cargo including iron rails and equipment intended the build the Geelong Railway and a bridge over the Yarra from Melbourne to Hawthorn. The winds were poor as Schomberg sailed across the equator, slowing her journey considerably. She was 78 days out of Liverpool when she ran aground on a sand-spit near Peterborough, Victoria, on 27 December; the sand spit and the currents were not marked on Forbes’s map. Overnight, the crew launched a lifeboat to find a safe place to land the ship’s passengers. The scouting party returned to Schomberg and advised Forbes that it was best to wait until morning because the rough seas could easily overturn the small lifeboats. The ship’s Chief Officer spotted SS Queen at dawn and signalled the steamer. The master of the SS Queen approached the stranded vessel and all of Schomberg’s passengers were able to disembark safely. The Black Ball Line’s Melbourne agent sent a steamer to retrieve the passengers’ baggage from the Schomberg. Other steamers helped unload her cargo until the weather changed and prevented the salvage teams from accessing the ship. Local merchants Manifold & Bostock bought the wreck and cargo, but did not attempt to salvage the cargo still on board the ship. They eventually sold it on to a Melbourne businessman and two seafarers. After two of the men drowned when they tried to reach Schomberg, salvage efforts were abandoned.32 In 1975, divers from Flagstaff Hill, including Peter Ronald, found an ornate communion set at the wreck. The set comprised a jug, two chalices, a plate and a lid. The lid did not fit any of the other objects and in 1978 a piece of the lid broke off, revealing a glint of gold. As museum staff carefully examined the lid and removed marine growth, they found a diamond ring, which is currently on display in the Great Circle Gallery.33 Flagstaff Hill also holds ship fittings and equipment, personal effects, a lithograph, tickets and photograph from the Schomberg. Most of the artefacts were salvaged from the wreck by Peter Ronald, former director of Flagstaff Hill. The Schomberg, which is on the Victorian Heritage Register (VHR S612), has great historical significance as a rare example of a large, fast clipper ship on the England to Australia run, carrying emigrants at the time of the Victorian gold rush. She represents the technical advances made to break sailing records between Europe and Australia. Flagstaff Hill’s collection of artefacts from the Schomberg is significant for its association with the shipwreck, The collection is primarily significant because of the relationship between the objects, as together they have a high potential to interpret the story of the Schomberg. It is archaeologically significant as the remains of an international passenger Ship. It is historically significant for representing aspects of Victoria’s shipping history and for its association with the shipwreck and the ship, which was designed to be fastest and most luxurious of its day Lithograph of the Schomberg. The vessel is partially rigged with a buoy in the foreground. Behind the vessel are a number of small boats. The writing on the lithograph states "The Schomberg, GALOP Dedicated to Mrs Charles Schomberg (of Liverpool) by Chas D'Albert" Two names BRANDARD and M & N HANHART.IMP on bottom of lithograph.warrnambool, flagstaff-hill, flagstaff-hill-maritime-museum, maritime-museum, shipwreck-coast, flagstaff-hill-maritime-village, schomberg, shipwrecked-artefact, clipper ship, black ball line, 1855 shipwreck, aberdeen clipper ship, captain forbes, peterborough shipwreck, ss queen, brandard, lithograph, m & n hanhart.imp -
 Flagstaff Hill Maritime Museum and Village
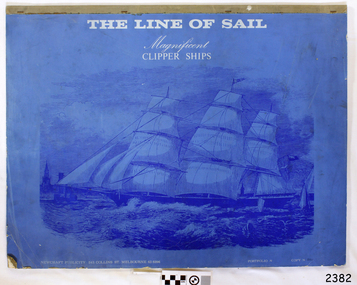
Book - Portfolio, Newcraft Pulicity, The Line of Sail; Magnificent Clipper Ships, 1969
These prints include large sailing ships that were also referred to as Clippers and Tall Ships. These ships were used to transport cargo and passengers across the world in the 19th century. They were powered purely by harnessing the wind. It could take three to four months to sail in this manner from England to Australia. On many occasions the ships were wrecked, often close to their destination, through errors of navigation. The method of production of the original images is over a century old. The Melbourne publisher of this portfolio book, Newcraft Publicity, describes the contents as follows-' Magnificent Clipper Ships: Clipper ships in the line of sail make the most romantic and spectacular pictorial chapter of marine history. This collection depicting early clippers and other types of sailing ships were originally fine engravings on wooden printing blocks used in newspapers a century ago. They were taken directly from the original newspaper prints, and reproduced in enamel inks to provide a choice of fine line prints suitable for framing. LIST OF PRINTS- The New Australian Clipper "BLUE JACKET" The Clipper Ship “CHRYSOLIER” The “GAUNTLET” Clipper Ship The New American Clipper “GREAT REPUBLIC” The Clipper Ship “GUIDING STAR” New Emigrant Ship “HESPERIDES” for the South Australian Line Capt. Beatson’s Expedition in search of Sir John Franklin – the “ISABEL” The Black Ball Line Clipper Ship “JAMES BAINES” The “MERCHANT PRINCE” – Australian Clipper The White Star Line Clipper Ship “MORNING LIGHT” The Aberdeen Clipper Built Barque “PHOENICIAN” New Australian Clipper Ship the “ROYAL FAMILY” The “SOVEREIGN OF THE SEAS” American Clipper The New Iron Clipper Built Ship “TAYLEUR” for Australia H.M. New Frigate “THETIS” The American Clipper Ship “WITCH OF THE WAVE” ABOUT THE PUBLISHER- The Newcraft Publicity was a Melbourne business that operated in the 1960s at 243 Collins Street, Melbourne.This portfolio book of clipper ship prints is historically significant as it shows an important part of Australia's history, It includes some of the shipping lines famous in the 19th century for transporting passengers and goods to Australia. The prints are also significant for their origin in the carved wooden blocks used a century ago for creating images for the newspapers of the time. Book is also significant from being one of a limited edition of books produced. There are copes in both the Victorian State Library and the National Library of Australia.The Line of Sail is a portfolio of sixteen fine line, black and white prints on paper. The subject is clipper ships. The covers are paper-covered card, coloured a strong blue with white line images and text. The image side of the pages has a sheen, the back is matt. Each print has a caption. The top of the book is stapled and bound with grey tape. Produced by Newcraft Publicity, Melbourne. Limited Edition - Copy Number 086. Stamped on front cover "086"flagstaff hill, warrnambool, shipwrecked-coast, flagstaff-hill, flagstaff-hill-maritime-museum, maritime-museum, shipwreck-coast, flagstaff-hill-maritime-village, lithographs, newscraft publicity, book, the line of sail, dlipper ships, tall shipos, sailing ships, wood block print, newspaper drawings, newcraft productions, newcraft melbourne, portfolio of clipper ships, limited edition, wooden engravings, magnificent clipper ships -
 Flagstaff Hill Maritime Museum and Village
Book - Religious, University Press, The Holy Bible, Ca. 1850s
This Bible belonged to the Bell family. Joseph Bell was born on May 9th 1829. He married Elizabeth, who was born on October 22nd, 1833. Their marriage was conducted on September 12th, 1854, at St Pauls, Bristol, England. On the front pages of the bible there used to be a list of their ten children and their birthdates but there are only remnants of a heavy weight paper; the opposite Fly page with publication details is also missing, along with the Family Records section, which no longer has pages for Births and Marriages, only precise edges of two pages . The Bible is the King James Version, named after James Charles Stuart (1556-1625) who was King James VI of Scotland from 24 July 1567, and who was crowned King James I of England, France and Ireland from 24 March 1603 until his death in 1625. The Hampton Court Conference of 1604 commissioned a new and more accurate version of the Holy Bible that was translated from the original Sacred Scriptures and that included only the approved books. This task was undertaken be a group of learned scholars who worked in teams and compared notes, working to ensure a true and accurate version. It was completed in 1611 and became widely known as the King James Version (KJV) of the Bible and is still widely used and greatly respected for its poetic language. The first printed page of this Bible is the Translators Speech at the completed work which was handed over to King James I in 1611.This Bible was published after 1611, and likely to have been purchased at the time of the marriage of the previous owners, Joseph and Elizabeth Bell, in 1854, so it is possibly a century and a half old. The decorative cover and metal clasp are a sign that the Bible was a book to be treasured,. Indeed, our Collection included several Bibles brought to Australia by immigrants, even though luggage was tightly restricted. This Bible was once used as a family record, similar to Bibles printed in modern times, with lined blank pages in the centre for the owners to record their own, their ancestors' and their descendants' life events. Sadly, these pages are no longer within the Bible.Book, black textured leather front and back covers, gold leaf page edges, metal clasp on centre edge of front and back covers holds them together. The title is inscribed in gold embossing on the front cover. The Bible has coloured illustrations, cross references and maps. The front inside cover has remnants of a previous stuck-down page, the Fly page, and the Family Records pages for Births and Marriages has been cut out of the book. TITLE: The Holy Bible. PRINTER: University Press, London, England PREVIOUS OWNERS; Joseph and Elizabeth Bell, married in Bristol, England in 1854.Embossed in gold on cover: "HOLY BIBLE"warrnambool, shipwreck coast, flagstaff hill, flagstaff hill maritime museum, flagstaff hill maritime village, religious book, bible, holy bible, king james bible, king james vi, king james i, 1611, kjv, joseph bell, elizabeth bell, st paul's church bristol, 1829, 1833, 1854, authorised king james version, authorised version, av, sacred scriptures -
 Flagstaff Hill Maritime Museum and Village
Craft - Ship model, Cutty Sark
ABOUT THE CUTTY SARK The CUTTY SARK, built in Britain in 1869, was one of the last historic sailing ships. She traded in tea from China for a few years then began trading with Australia in the wool industry. She held the record sailing speed from Australia to Britain for ten years! Later a Portuguese company bought her as a cargo ship (and renamed her as FERREIRA) then she was purchased by a returned sea captain for use as a training ship in Cornwall. After the captain’s death she was transferred to a training college in Greenwich in 1938. In 1954 she was placed permanently in dry dock at Greenwich for display. The sailing ship CUTTY SARK carried export cargos of wool from the Australian wool industry.Model of the sailing ship, CUTTY SARKflagstaff hill, warrnambool, shipwrecked coast, flagstaff hill maritime museum, maritime museum, shipwreck coast, flagstaff hill maritime village, great ocean road, cutty sark, historic sailing ship, tea clipper, sail training vessel, cadet training ship, commercial trading vessel, cargo sail vessel, ship model cutty sark, australian wool export -
 Flagstaff Hill Maritime Museum and Village
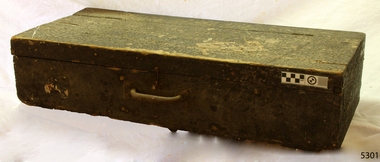
Equipment - Toolbox, ca. 1922
This toolbox was part of the equipment of the coastal trader Reginald M. It is typical of general-purpose toolboxes of the early 20th century. The covering of pitch on the outside was likely to be a form of waterproofing and protection. The vessel “Reginald M” was a two-masted coastal ketch, owned and built by Mr Jack (John) Murch of Birkenhead, Port of Adelaide, South Australia. Its construction took approximately 6 months and it was launched at Largs Bay in 1922. The vessel had many owners and adventures over the years until it was purchased by Flagstaff Hill Maritime Museum & Village in 1975. It was then used as an active display until 2016. Visitors could go aboard, turn the ship's wheel, go below deck and get the feel of the captain's quarters, sailors' quarters and the storage space available. The Reginald M was a popular exhibit for young and old, until 2016.This toolbox is significant because of its connection to the history of the vessel REGINALD M, the coastal trading ketch from South Australia built in 1922 and in existence until 2016. Its flat bottom, single-chine shape illustrates a very simple but robust method of construction, compared to other round-bilged examples of trading vessels. The Reginald M is listed on the Australian Register of Historic Vessels (ARHV Number: HV000562.) Wooden toolbox with hinged lid covering tree-quarters of the box. A case handle is attached for carrying. Hook on one side but nothing to catch it on. Toolbox has been covered with pitch on the outside. flagstaff hill, warrnambool, reginald m, flagstaff hill maritime museum & village, shipwreck coast, maritime museum, coastal trader, ketch, john murch, sailor's equipment, ship maintenance, wooden toolbox, toolbox -
 Flagstaff Hill Maritime Museum and Village
Light Fitting
... at the Flagstaff Hill Maritime Museum in Warrnambool. From Australia's... at the Flagstaff Hill Maritime Museum in Warrnambool. From Australia's most ...Ref L/29 LA 32 254 HISTORY OF THE LOCH ARD The LOCH ARD belonged to the famous Loch Line which sailed many ships from England to Australia. Built in Glasgow by Barclay, Curdle and Co. in 1873, the LOCH ARD was a three-masted square rigged iron sailing ship. The ship measured 262ft 7" (79.87m) in length, 38ft (11.58m) in width, 23ft (7m) in depth and had a gross tonnage of 1693 tons. The LOCH ARD's main mast measured a massive 150ft (45.7m) in height. LOCH ARD made three trips to Australia and one trip to Calcutta before its final voyage. LOCH ARD left England on March 2, 1878, under the command of Captain Gibbs, a newly married, 29 year old. She was bound for Melbourne with a crew of 37, plus 17 passengers and a load of cargo. The general cargo reflected the affluence of Melbourne at the time. On board were straw hats, umbrella, perfumes, clay pipes, pianos, clocks, confectionary, linen and candles, as well as a heavier load of railway irons, cement, lead and copper. There were items included that intended for display in the Melbourne International Exhibition in 1880. The voyage to Port Phillip was long but uneventful. At 3am on June 1, 1878, Captain Gibbs was expecting to see land and the passengers were becoming excited as they prepared to view their new homeland in the early morning. But LOCH ARD was running into a fog which greatly reduced visibility. Captain Gibbs was becoming anxious as there was no sign of land or the Cape Otway lighthouse. At 4am the fog lifted. A man aloft announced that he could see breakers. The sheer cliffs of Victoria's west coast came into view, and Captain Gibbs realised that the ship was much closer to them than expected. He ordered as much sail to be set as time would permit and then attempted to steer the vessel out to sea. On coming head on into the wind, the ship lost momentum, the sails fell limp and LOCH ARD's bow swung back. Gibbs then ordered the anchors to be released in an attempt to hold its position. The anchors sank some 50 fathoms - but did not hold. By this time LOCH ARD was among the breakers and the tall cliffs of Mutton Bird Island rose behind the ship. Just half a mile from the coast, the ship's bow was suddenly pulled around by the anchor. The captain tried to tack out to sea, but the ship struck a reef at the base of Mutton Bird Island, near Port Campbell. Waves broke over the ship and the top deck was loosened from the hull. The masts and rigging came crashing down knocking passengers and crew overboard. When a lifeboat was finally launched, it crashed into the side of LOCH ARD and capsized. Tom Pearce, who had launched the boat, managed to cling to its overturned hull and shelter beneath it. He drifted out to sea and then on the flood tide came into what is now known as LOCH ARD Gorge. He swam to shore, bruised and dazed, and found a cave in which to shelter. Some of the crew stayed below deck to shelter from the falling rigging but drowned when the ship slipped off the reef into deeper water. Eva Carmichael had raced onto deck to find out what was happening only to be confronted by towering cliffs looming above the stricken ship. In all the chaos, Captain Gibbs grabbed Eva and said, "If you are saved Eva, let my dear wife know that I died like a sailor". That was the last Eva Carmichael saw of the captain. She was swept off the ship by a huge wave. Eva saw Tom Pearce on a small rocky beach and yelled to attract his attention. He dived in and swam to the exhausted woman and dragged her to shore. He took her to the cave and broke open case of brandy which had washed up on the beach. He opened a bottle to revive the unconscious woman. A few hours later Tom scaled a cliff in search of help. He followed hoof prints and came by chance upon two men from nearby Glenample Station three and a half miles away. In a state of exhaustion, he told the men of the tragedy. Tom returned to the gorge while the two men rode back to the station to get help. By the time they reached LOCH ARD Gorge, it was cold and dark. The two shipwreck survivors were taken to Glenample Station to recover. Eva stayed at the station for six weeks before returning to Ireland, this time by steamship. In Melbourne, Tom Pearce received a hero's welcome. He was presented with the first gold medal of the Royal Humane Society of Victoria and a £1000 cheque from the Victorian Government. Concerts were performed to honour the young man's bravery and to raise money for those who lost family in the LOCH ARD disaster. Of the 54 crew members and passengers on board, only two survived: the apprentice, Tom Pearce and the young woman passenger, Eva Carmichael, who lost all of her family in the tragedy. Ten days after the LOCH ARD tragedy, salvage rights to the wreck were sold at auction for £2,120. Cargo valued at £3,000 was salvaged and placed on the beach, but most washed back into the sea when another storm developed. The wreck of LOCH ARD still lies at the base of Mutton Bird Island. Much of the cargo has now been salvaged and some was washed up into what is now known as LOCH ARD Gorge. Cargo and artefacts have also been illegally salvaged over many years before protective legislation was introduced. One of the most unlikely pieces of cargo to have survived the shipwreck was a Minton porcelain peacock - one of only nine in the world. The peacock was destined for the Melbourne International Exhibition in 1880. It had been well packed, which gave it adequate protection during the violent storm. Today, the Minton peacock can be seen at the Flagstaff Hill Maritime Museum in Warrnambool. From Australia's most dramatic shipwreck it has now become Australia's most valuable shipwreck artefact and is one of very few 'objects' on the Victorian State Heritage Register. Flagstaff Hill’s collection of artefacts from LOCH ARD is significant for being one of the largest collections of artefacts from this shipwreck in Victoria. It is significant for its association with the shipwreck, which is on the Victorian Heritage Register (VHR S417). The collection is significant because of the relationship between the objects, as together they have a high potential to interpret the story of the LOCH ARD. The LOCH ARD collection is archaeologically significant as the remains of a large international passenger and cargo ship. The LOCH ARD collection is historically significant for representing aspects of Victoria’s shipping history and its potential to interpret sub-theme 1.5 of Victoria’s Framework of Historical Themes (living with natural processes). The collection is also historically significant for its association with the LOCH ARD, which was one of the worst and best known shipwrecks in Victoria’s history. Light Fitting. Has encrustation and some verdigris on surface. Base has a leaf pattern. Recovered from the wreck of the Loch Ard. Artefact Rego No LA/29.flagstaff hill, warrnambool, shipwrecked coast, flagstaff hill maritime museum, maritime museum, shipwreck coast, flagstaff hill maritime village, great ocean road, loch line, loch ard, captain gibbs, eva carmichael, tom pearce, glenample station, mutton bird island, loch ard gorge, light fitting -
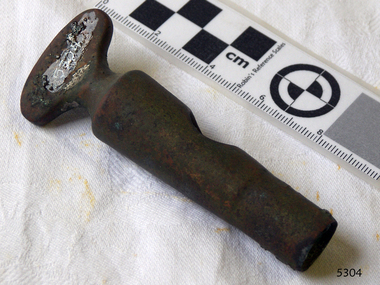 Flagstaff Hill Maritime Museum and Village
Tap
... at the Flagstaff Hill Maritime Museum in Warrnambool. From Australia's... at the Flagstaff Hill Maritime Museum in Warrnambool. From Australia's most ...Ref LA 32 260 HISTORY OF THE LOCH ARD The LOCH ARD belonged to the famous Loch Line which sailed many ships from England to Australia. Built in Glasgow by Barclay, Curdle and Co. in 1873, the LOCH ARD was a three-masted square rigged iron sailing ship. The ship measured 262ft 7" (79.87m) in length, 38ft (11.58m) in width, 23ft (7m) in depth and had a gross tonnage of 1693 tons. The LOCH ARD's main mast measured a massive 150ft (45.7m) in height. LOCH ARD made three trips to Australia and one trip to Calcutta before its final voyage. LOCH ARD left England on March 2, 1878, under the command of Captain Gibbs, a newly married, 29 year old. She was bound for Melbourne with a crew of 37, plus 17 passengers and a load of cargo. The general cargo reflected the affluence of Melbourne at the time. On board were straw hats, umbrella, perfumes, clay pipes, pianos, clocks, confectionary, linen and candles, as well as a heavier load of railway irons, cement, lead and copper. There were items included that intended for display in the Melbourne International Exhibition in 1880. The voyage to Port Phillip was long but uneventful. At 3am on June 1, 1878, Captain Gibbs was expecting to see land and the passengers were becoming excited as they prepared to view their new homeland in the early morning. But LOCH ARD was running into a fog which greatly reduced visibility. Captain Gibbs was becoming anxious as there was no sign of land or the Cape Otway lighthouse. At 4am the fog lifted. A man aloft announced that he could see breakers. The sheer cliffs of Victoria's west coast came into view, and Captain Gibbs realised that the ship was much closer to them than expected. He ordered as much sail to be set as time would permit and then attempted to steer the vessel out to sea. On coming head on into the wind, the ship lost momentum, the sails fell limp and LOCH ARD's bow swung back. Gibbs then ordered the anchors to be released in an attempt to hold its position. The anchors sank some 50 fathoms - but did not hold. By this time LOCH ARD was among the breakers and the tall cliffs of Mutton Bird Island rose behind the ship. Just half a mile from the coast, the ship's bow was suddenly pulled around by the anchor. The captain tried to tack out to sea, but the ship struck a reef at the base of Mutton Bird Island, near Port Campbell. Waves broke over the ship and the top deck was loosened from the hull. The masts and rigging came crashing down knocking passengers and crew overboard. When a lifeboat was finally launched, it crashed into the side of LOCH ARD and capsized. Tom Pearce, who had launched the boat, managed to cling to its overturned hull and shelter beneath it. He drifted out to sea and then on the flood tide came into what is now known as LOCH ARD Gorge. He swam to shore, bruised and dazed, and found a cave in which to shelter. Some of the crew stayed below deck to shelter from the falling rigging but drowned when the ship slipped off the reef into deeper water. Eva Carmichael had raced onto deck to find out what was happening only to be confronted by towering cliffs looming above the stricken ship. In all the chaos, Captain Gibbs grabbed Eva and said, "If you are saved Eva, let my dear wife know that I died like a sailor". That was the last Eva Carmichael saw of the captain. She was swept off the ship by a huge wave. Eva saw Tom Pearce on a small rocky beach and yelled to attract his attention. He dived in and swam to the exhausted woman and dragged her to shore. He took her to the cave and broke open case of brandy which had washed up on the beach. He opened a bottle to revive the unconscious woman. A few hours later Tom scaled a cliff in search of help. He followed hoof prints and came by chance upon two men from nearby Glenample Station three and a half miles away. In a state of exhaustion, he told the men of the tragedy. Tom returned to the gorge while the two men rode back to the station to get help. By the time they reached LOCH ARD Gorge, it was cold and dark. The two shipwreck survivors were taken to Glenample Station to recover. Eva stayed at the station for six weeks before returning to Ireland, this time by steamship. In Melbourne, Tom Pearce received a hero's welcome. He was presented with the first gold medal of the Royal Humane Society of Victoria and a £1000 cheque from the Victorian Government. Concerts were performed to honour the young man's bravery and to raise money for those who lost family in the LOCH ARD disaster. Of the 54 crew members and passengers on board, only two survived: the apprentice, Tom Pearce and the young woman passenger, Eva Carmichael, who lost all of her family in the tragedy. Ten days after the LOCH ARD tragedy, salvage rights to the wreck were sold at auction for £2,120. Cargo valued at £3,000 was salvaged and placed on the beach, but most washed back into the sea when another storm developed. The wreck of LOCH ARD still lies at the base of Mutton Bird Island. Much of the cargo has now been salvaged and some was washed up into what is now known as LOCH ARD Gorge. Cargo and artefacts have also been illegally salvaged over many years before protective legislation was introduced. One of the most unlikely pieces of cargo to have survived the shipwreck was a Minton porcelain peacock - one of only nine in the world. The peacock was destined for the Melbourne International Exhibition in 1880. It had been well packed, which gave it adequate protection during the violent storm. Today, the Minton peacock can be seen at the Flagstaff Hill Maritime Museum in Warrnambool. From Australia's most dramatic shipwreck it has now become Australia's most valuable shipwreck artefact and is one of very few 'objects' on the Victorian State Heritage Register. Flagstaff Hill’s collection of artefacts from LOCH ARD is significant for being one of the largest collections of artefacts from this shipwreck in Victoria. It is significant for its association with the shipwreck, which is on the Victorian Heritage Register (VHR S417). The collection is significant because of the relationship between the objects, as together they have a high potential to interpret the story of the LOCH ARD. The LOCH ARD collection is archaeologically significant as the remains of a large international passenger and cargo ship. The LOCH ARD collection is historically significant for representing aspects of Victoria’s shipping history and its potential to interpret sub-theme 1.5 of Victoria’s Framework of Historical Themes (living with natural processes). The collection is also historically significant for its association with the LOCH ARD, which was one of the worst and best known shipwrecks in Victoria’s history. Tap-Keg-Handle, hollow. Recovered from the wreck of the Loch Ard. flagstaff hill, warrnambool, shipwrecked coast, flagstaff hill maritime museum, maritime museum, shipwreck coast, flagstaff hill maritime village, great ocean road, loch line, loch ard, captain gibbs, eva carmichael, tom pearce, glenample station, mutton bird island, loch ard gorge, keg tap, tap -
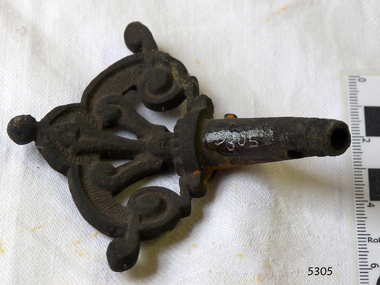 Flagstaff Hill Maritime Museum and Village
Functional object - Gas Tap, Before 1878
... be seen at the Flagstaff Hill Maritime Museum in Warrnambool. From...Flagstaff Hill Maritime Museum and Village 89 Merri Street ...History of the Loch Ard: The Loch Ard got it’s name from ”Loch Ard” a loch which lies to the west of Aberfoyle, and to the east of Loch Lomond. It means "high lake" in Scottish Gaelic.The vessel belonged to the famous Loch Line which sailed many vessels from England to Australia. The Loch Ard was built in Glasgow by Barclay, Curdle and Co. in 1873, the vessel was a three-masted square-rigged iron sailing ship that measured 79.87 meters in length, 11.58 m in width, and 7 m in depth with a gross tonnage of 1693 tons with a mainmast that measured a massive 45.7 m in height. Loch Ard made three trips to Australia and one trip to Calcutta before its fateful voyage. Loch Ard left England on March 2, 1878, under the command of 29-year-old Captain Gibbs, who was newly married. The ship was bound for Melbourne with a crew of 37, plus 17 passengers. The general cargo reflected the affluence of Melbourne at the time. Onboard were straw hats, umbrella, perfumes, clay pipes, pianos, clocks, confectionery, linen and candles, as well as a heavier load of railway irons, cement, lead and copper. There were other items included that were intended for display in the Melbourne International Exhibition of 1880. The voyage to Port Phillip was long but uneventful. Then at 3 am on June 1, 1878, Captain Gibbs was expecting to see land. But the Loch Ard was running into a fog which greatly reduced visibility. Captain Gibbs was becoming anxious as there was no sign of land or the Cape Otway lighthouse. At 4 am the fog lifted and a lookout aloft announced that he could see breakers. The sheer cliffs of Victoria's west coast came into view, and Captain Gibbs realised that the ship was much closer to them than expected. He ordered as much sail to be set as time would permit and then attempted to steer the vessel out to sea. On coming head-on into the wind, the ship lost momentum, the sails fell limp and Loch Ard's bow swung back towards land. Gibbs then ordered the anchors to be released in an attempt to hold its position. The anchors sank some 50 fathoms - but did not hold. By this time the ship was among the breakers and the tall cliffs of Mutton Bird Island rose behind. Just half a mile from the coast, the ship's bow was suddenly pulled around by the anchor. The captain tried to tack out to sea, but the ship struck a reef at the base of Mutton Bird Island, near Port Campbell. Waves subsequently broke over the ship and the top deck became loosened from the hull. The masts and rigging came crashing down knocking passengers and crew overboard. When a lifeboat was finally launched, it crashed into the side of Loch Ard and capsized. Tom Pearce, who had launched the boat, managed to cling to its overturned hull and shelter beneath it. He drifted out to sea and then on the flood tide came into what is now known as Loch Ard Gorge. He swam to shore, bruised and dazed, and found a cave in which to shelter. Some of the crew stayed below deck to shelter from the falling rigging but drowned when the ship slipped off the reef into deeper water. Eva Carmichael a passenger had raced onto the deck to find out what was happening only to be confronted by towering cliffs looming above the stricken ship. In all the chaos, Captain Gibbs grabbed Eva and said, "If you are saved Eva, let my dear wife know that I died like a sailor". That was the last Eva Carmichael saw of the captain. She was swept off the ship by a huge wave. Eva saw Tom Pearce on a small rocky beach and yelled to attract his attention. He dived in and swam to the exhausted woman and dragged her to shore. He took her to the cave and broke the open case of brandy which had washed up on the beach. He opened a bottle to revive the unconscious woman. A few hours later Tom scaled a cliff in search of help. He followed hoof prints and came by chance upon two men from nearby Glenample Station three and a half miles away. In a complete state of exhaustion, he told the men of the tragedy. Tom then returned to the gorge while the two men rode back to the station to get help. By the time they reached Loch Ard Gorge, it was cold and dark. The two shipwreck survivors were taken to Glenample Station to recover. Eva stayed at the station for six weeks before returning to Ireland by steamship. In Melbourne, Tom Pearce received a hero's welcome. He was presented with the first gold medal of the Royal Humane Society of Victoria and a £1000 cheque from the Victorian Government. Concerts were performed to honour the young man's bravery and to raise money for those who lost family in the disaster. Of the 54 crew members and passengers on board, only two survived: the apprentice, Tom Pearce and the young woman passenger, Eva Carmichael, who lost her family in the tragedy. Ten days after the Loch Ard tragedy, salvage rights to the wreck were sold at auction for £2,120. Cargo valued at £3,000 was salvaged and placed on the beach, but most washed back into the sea when another storm developed. The wreck of Loch Ard still lies at the base of Mutton Bird Island. Much of the cargo has now been salvaged and some items were washed up into Loch Ard Gorge. Cargo and artefacts have also been illegally salvaged over many years before protective legislation was introduced in March 1982. One of the most unlikely pieces of cargo to have survived the shipwreck was a Minton majolica peacock- one of only nine in the world. The peacock was destined for the Melbourne 1880 International Exhibition in. It had been well packed, which gave it adequate protection during the violent storm. Today the Minton peacock can be seen at the Flagstaff Hill Maritime Museum in Warrnambool. From Australia's most dramatic shipwreck it has now become Australia's most valuable shipwreck artifact and is one of very few 'objects' on the Victorian State Heritage Register.The shipwreck of the Loch Ard is of significance for Victoria and is registered on the Victorian Heritage Register ( S 417). Flagstaff Hill has a varied collection of artefacts from Loch Ard and its collection is significant for being one of the largest accumulation of artefacts from this notable Victorian shipwreck. The collections object is to also give us a snapshot into history so we are able to interpret the story of this tragic event. The collection is also archaeologically significant as it represents aspects of Victoria's shipping history that allows us to interpret Victoria's social and historical themes of the time. The collections historically significance is that it is associated unfortunately with the worst and best-known shipwreck in Victoria's history. Brass gas light tap with fancy metal work on the end. Recovered from the wreck of the Loch Ard. flagstaff hill, warrnambool, shipwrecked coast, flagstaff hill maritime museum, maritime museum, shipwreck coast, flagstaff hill maritime village, great ocean road, loch line, loch ard, captain gibbs, eva carmichael, tom pearce, glenample station, mutton bird island, loch ard gorge, brass gas tap, gas tap, light fitting -
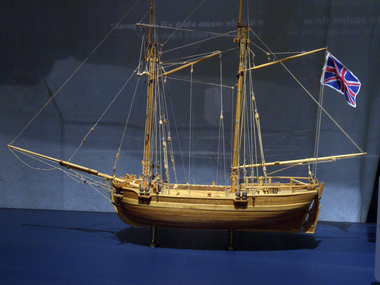 Flagstaff Hill Maritime Museum and Village
Craft - Ship Model, H.M.S. Lady Nelson, 1988
This model of the ship H.M.S. Lady Nelson was researched and built as the vessel Lady Nelson by David Lumsden, a professional ship model builder. His Majesty's Armed Survey Vessel Lady Nelson was commissioned in 1799 to survey the coast of Australia. This vessel was purpose-built before the British Admiralty requested plans for a Schooner for Port Jackson. At the time large parts of the Australian coast were unmapped and Britain had claimed only part of the continent. The British Government were concerned that, in the event of settlers of another European power becoming established in Australia, any future conflict in Europe would lead to a widening of the conflict into the southern hemisphere to the detriment of the trade that Britain sought to develop. Against this background, Lady Nelson was chosen to survey and establish sovereignty over strategic parts of the continent. Lady Nelson left Portsmouth on 18 March 1800 and arrived at Sydney on 16th December 1800 after having been the first vessel to reach the east coast of Australia via the Bass Strait. Before that date, all vessels had sailed around the southern tip of Tasmania to reach their destination. Lady Nelson's survey work commenced shortly after she arrived in Sydney, initially in the Bass Strait area. She was involved in the discovery of Port Phillip, on the coast of Victoria, in establishing settlements on the River Derwent and at Port Dalrymple in Tasmania. She also successfully chartered much of the Victorian coastline and was heavily involved with the exploration of the Queensland coast with Matthew Flinders; investigated the Hunter River; made numerous visits to New Zealand and Norfolk Island and was involved in the founding of numerous settlements. In comparison to most colonial vessels, the Lady Nelson was technically unique she was fitted with sliding keels, or centreboards, and water-tight trunks reaching to the deck. Captain Schank invented these sliding keels that, when raised, reduced her draught to less than six feet. Her life as an exploration vessel ended while accompanying HMS 'Tamar' to Melville Island in 1825, the 'Lady Nelson' was captured and later abandoned by pirates off the island of Babar (Indonesia). This brought the vessel's 25 years of coastal exploration and navigation to a close.The Lady Nelson made was the first British ship to survey of the southern or south-western coast of Australia and traverse the Bass Strait. The vessel holds a special place in Australia's history of exploration as the first to explore and establish settlements in the then-new British colony of Van Diemans Land. The model gives an insight into what life must have been like onboard sailing vessels of the time and Australia's early history of establishment and exploration. This model acts as an important legacy of the full-scale ship which no longer survives. Ship model of the 60 ton British brig HMS Lady Nelson. Timber model of a two-masted brig with rigging but no sails, displaying the British Union Jack flag. The ship is in a glass exhibition display case on metal stand. HMS Lady Nelsonflagstaff hill, warrnambool, shipwrecked coast, flagstaff hill maritime museum, maritime museum, shipwreck coast, flagstaff hill maritime village, great ocean road, by captain john schanck, sliding keels or centreboards, lady nelson, british brig hms lady nelson, david lumsden ship model builder, lieutennant james grant, bass strait discovery, surveying king island and port phillip bay, philip gidley king -
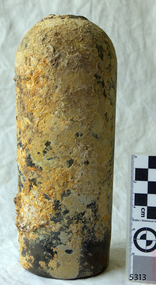 Flagstaff Hill Maritime Museum and Village
Container - Wine Bottle, Before 1878
... be seen at the Flagstaff Hill Maritime Museum in Warrnambool. From...Flagstaff Hill Maritime Museum and Village 89 Merri Street ...History of the Loch Ard: The Loch Ard got it’s name from ”Loch Ard” a loch which lies to the west of Aberfoyle, and to the east of Loch Lomond. It means "high lake" in Scottish Gaelic.The vessel belonged to the famous Loch Line which sailed many vessels from England to Australia. The Loch Ard was built in Glasgow by Barclay, Curdle and Co. in 1873, the vessel was a three-masted square-rigged iron sailing ship that measured 79.87 meters in length, 11.58 m in width, and 7 m in depth with a gross tonnage of 1693 tons with a mainmast that measured a massive 45.7 m in height. Loch Ard made three trips to Australia and one trip to Calcutta before its fateful voyage. Loch Ard left England on March 2, 1878, under the command of 29-year-old Captain Gibbs, who was newly married. The ship was bound for Melbourne with a crew of 37, plus 17 passengers. The general cargo reflected the affluence of Melbourne at the time. Onboard were straw hats, umbrella, perfumes, clay pipes, pianos, clocks, confectionery, linen and candles, as well as a heavier load of railway irons, cement, lead and copper. There were other items included that were intended for display in the Melbourne International Exhibition of 1880. The voyage to Port Phillip was long but uneventful. Then at 3 am on June 1, 1878, Captain Gibbs was expecting to see land. But the Loch Ard was running into a fog which greatly reduced visibility. Captain Gibbs was becoming anxious as there was no sign of land or the Cape Otway lighthouse. At 4 am the fog lifted and a lookout aloft announced that he could see breakers. The sheer cliffs of Victoria's west coast came into view, and Captain Gibbs realised that the ship was much closer to them than expected. He ordered as much sail to be set as time would permit and then attempted to steer the vessel out to sea. On coming head-on into the wind, the ship lost momentum, the sails fell limp and Loch Ard's bow swung back towards land. Gibbs then ordered the anchors to be released in an attempt to hold its position. The anchors sank some 50 fathoms - but did not hold. By this time the ship was among the breakers and the tall cliffs of Mutton Bird Island rose behind. Just half a mile from the coast, the ship's bow was suddenly pulled around by the anchor. The captain tried to tack out to sea, but the ship struck a reef at the base of Mutton Bird Island, near Port Campbell. Waves subsequently broke over the ship and the top deck became loosened from the hull. The masts and rigging came crashing down knocking passengers and crew overboard. When a lifeboat was finally launched, it crashed into the side of Loch Ard and capsized. Tom Pearce, who had launched the boat, managed to cling to its overturned hull and shelter beneath it. He drifted out to sea and then on the flood tide came into what is now known as Loch Ard Gorge. He swam to shore, bruised and dazed, and found a cave in which to shelter. Some of the crew stayed below deck to shelter from the falling rigging but drowned when the ship slipped off the reef into deeper water. Eva Carmichael a passenger had raced onto the deck to find out what was happening only to be confronted by towering cliffs looming above the stricken ship. In all the chaos, Captain Gibbs grabbed Eva and said, "If you are saved Eva, let my dear wife know that I died like a sailor". That was the last Eva Carmichael saw of the captain. She was swept off the ship by a huge wave. Eva saw Tom Pearce on a small rocky beach and yelled to attract his attention. He dived in and swam to the exhausted woman and dragged her to shore. He took her to the cave and broke the open case of brandy which had washed up on the beach. He opened a bottle to revive the unconscious woman. A few hours later Tom scaled a cliff in search of help. He followed hoof prints and came by chance upon two men from nearby Glenample Station three and a half miles away. In a complete state of exhaustion, he told the men of the tragedy. Tom then returned to the gorge while the two men rode back to the station to get help. By the time they reached Loch Ard Gorge, it was cold and dark. The two shipwreck survivors were taken to Glenample Station to recover. Eva stayed at the station for six weeks before returning to Ireland by steamship. In Melbourne, Tom Pearce received a hero's welcome. He was presented with the first gold medal of the Royal Humane Society of Victoria and a £1000 cheque from the Victorian Government. Concerts were performed to honour the young man's bravery and to raise money for those who lost family in the disaster. Of the 54 crew members and passengers on board, only two survived: the apprentice, Tom Pearce and the young woman passenger, Eva Carmichael, who lost her family in the tragedy. Ten days after the Loch Ard tragedy, salvage rights to the wreck were sold at auction for £2,120. Cargo valued at £3,000 was salvaged and placed on the beach, but most washed back into the sea when another storm developed. The wreck of Loch Ard still lies at the base of Mutton Bird Island. Much of the cargo has now been salvaged and some items were washed up into Loch Ard Gorge. Cargo and artefacts have also been illegally salvaged over many years before protective legislation was introduced in March 1982. One of the most unlikely pieces of cargo to have survived the shipwreck was a Minton majolica peacock- one of only nine in the world. The peacock was destined for the Melbourne 1880 International Exhibition in. It had been well packed, which gave it adequate protection during the violent storm. Today the Minton peacock can be seen at the Flagstaff Hill Maritime Museum in Warrnambool. From Australia's most dramatic shipwreck it has now become Australia's most valuable shipwreck artifact and is one of very few 'objects' on the Victorian State Heritage Register.The shipwreck of the Loch Ard is of significance for Victoria and is registered on the Victorian Heritage Register ( S 417). Flagstaff Hill has a varied collection of artefacts from Loch Ard and its collection is significant for being one of the largest accumulation of artefacts from this notable Victorian shipwreck. The collections object is to also give us a snapshot into history so we are able to interpret the story of this tragic event. The collection is also archaeologically significant as it represents aspects of Victoria's shipping history that allows us to interpret Victoria's social and historical themes of the time. The collections historically significance is that it is associated unfortunately with the worst and best-known shipwreck in Victoria's history. Wine bottle, green, body only. Recovered from the wreck of the Loch Ard.flagstaff hill, warrnambool, shipwrecked coast, flagstaff hill maritime museum, maritime museum, shipwreck coast, flagstaff hill maritime village, great ocean road, loch line, loch ard, captain gibbs, eva carmichael, tom pearce, glenample station, mutton bird island, loch ard gorge, bottle, blown bottle, hand made bottle -
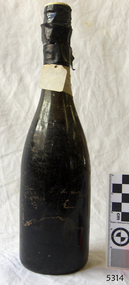 Flagstaff Hill Maritime Museum and Village
Container - Bottle, 1878
... be seen at the Flagstaff Hill Maritime Museum in Warrnambool. From...Flagstaff Hill Maritime Museum and Village 89 Merri Street ...History of the Loch Ard: The Loch Ard got it’s name from ”Loch Ard” a loch which lies to the west of Aberfoyle, and to the east of Loch Lomond. It means "high lake" in Scottish Gaelic.The vessel belonged to the famous Loch Line which sailed many vessels from England to Australia. The Loch Ard was built in Glasgow by Barclay, Curdle and Co. in 1873, the vessel was a three-masted square-rigged iron sailing ship that measured 79.87 meters in length, 11.58 m in width, and 7 m in depth with a gross tonnage of 1693 tons with a mainmast that measured a massive 45.7 m in height. Loch Ard made three trips to Australia and one trip to Calcutta before its fateful voyage. Loch Ard left England on March 2, 1878, under the command of 29-year-old Captain Gibbs, who was newly married. The ship was bound for Melbourne with a crew of 37, plus 17 passengers. The general cargo reflected the affluence of Melbourne at the time. Onboard were straw hats, umbrella, perfumes, clay pipes, pianos, clocks, confectionery, linen and candles, as well as a heavier load of railway irons, cement, lead and copper. There were other items included that were intended for display in the Melbourne International Exhibition of 1880. The voyage to Port Phillip was long but uneventful. Then at 3 am on June 1, 1878, Captain Gibbs was expecting to see land. But the Loch Ard was running into a fog which greatly reduced visibility. Captain Gibbs was becoming anxious as there was no sign of land or the Cape Otway lighthouse. At 4 am the fog lifted and a lookout aloft announced that he could see breakers. The sheer cliffs of Victoria's west coast came into view, and Captain Gibbs realised that the ship was much closer to them than expected. He ordered as much sail to be set as time would permit and then attempted to steer the vessel out to sea. On coming head-on into the wind, the ship lost momentum, the sails fell limp and Loch Ard's bow swung back towards land. Gibbs then ordered the anchors to be released in an attempt to hold its position. The anchors sank some 50 fathoms - but did not hold. By this time the ship was among the breakers and the tall cliffs of Mutton Bird Island rose behind. Just half a mile from the coast, the ship's bow was suddenly pulled around by the anchor. The captain tried to tack out to sea, but the ship struck a reef at the base of Mutton Bird Island, near Port Campbell. Waves subsequently broke over the ship and the top deck became loosened from the hull. The masts and rigging came crashing down knocking passengers and crew overboard. When a lifeboat was finally launched, it crashed into the side of Loch Ard and capsized. Tom Pearce, who had launched the boat, managed to cling to its overturned hull and shelter beneath it. He drifted out to sea and then on the flood tide came into what is now known as Loch Ard Gorge. He swam to shore, bruised and dazed, and found a cave in which to shelter. Some of the crew stayed below deck to shelter from the falling rigging but drowned when the ship slipped off the reef into deeper water. Eva Carmichael a passenger had raced onto the deck to find out what was happening only to be confronted by towering cliffs looming above the stricken ship. In all the chaos, Captain Gibbs grabbed Eva and said, "If you are saved Eva, let my dear wife know that I died like a sailor". That was the last Eva Carmichael saw of the captain. She was swept off the ship by a huge wave. Eva saw Tom Pearce on a small rocky beach and yelled to attract his attention. He dived in and swam to the exhausted woman and dragged her to shore. He took her to the cave and broke the open case of brandy which had washed up on the beach. He opened a bottle to revive the unconscious woman. A few hours later Tom scaled a cliff in search of help. He followed hoof prints and came by chance upon two men from nearby Glenample Station three and a half miles away. In a complete state of exhaustion, he told the men of the tragedy. Tom then returned to the gorge while the two men rode back to the station to get help. By the time they reached Loch Ard Gorge, it was cold and dark. The two shipwreck survivors were taken to Glenample Station to recover. Eva stayed at the station for six weeks before returning to Ireland by steamship. In Melbourne, Tom Pearce received a hero's welcome. He was presented with the first gold medal of the Royal Humane Society of Victoria and a £1000 cheque from the Victorian Government. Concerts were performed to honour the young man's bravery and to raise money for those who lost family in the disaster. Of the 54 crew members and passengers on board, only two survived: the apprentice, Tom Pearce and the young woman passenger, Eva Carmichael, who lost her family in the tragedy. Ten days after the Loch Ard tragedy, salvage rights to the wreck were sold at auction for £2,120. Cargo valued at £3,000 was salvaged and placed on the beach, but most washed back into the sea when another storm developed. The wreck of Loch Ard still lies at the base of Mutton Bird Island. Much of the cargo has now been salvaged and some items were washed up into Loch Ard Gorge. Cargo and artefacts have also been illegally salvaged over many years before protective legislation was introduced in March 1982. One of the most unlikely pieces of cargo to have survived the shipwreck was a Minton majolica peacock- one of only nine in the world. The peacock was destined for the Melbourne 1880 International Exhibition in. It had been well packed, which gave it adequate protection during the violent storm. Today the Minton peacock can be seen at the Flagstaff Hill Maritime Museum in Warrnambool. From Australia's most dramatic shipwreck it has now become Australia's most valuable shipwreck artifact and is one of very few 'objects' on the Victorian State Heritage Register.The shipwreck of the Loch Ard is of significance for Victoria and is registered on the Victorian Heritage Register ( S 417). Flagstaff Hill has a varied collection of artefacts from Loch Ard and its collection is significant for being one of the largest accumulation of artefacts from this notable Victorian shipwreck. The collections object is to also give us a snapshot into history so we are able to interpret the story of this tragic event. The collection is also archaeologically significant as it represents aspects of Victoria's shipping history that allows us to interpret Victoria's social and historical themes of the time. The collections historically significance is that it is associated unfortunately with the worst and best-known shipwreck in Victoria's history. Champagne Bottle, green glass with contents still inside. Recovered from the wreck of the Loch Ard. flagstaff hill, warrnambool, shipwrecked coast, flagstaff hill maritime museum, maritime museum, shipwreck coast, flagstaff hill maritime village, great ocean road, loch line, loch ard, captain gibbs, eva carmichael, tom pearce, glenample station, mutton bird island, loch ard gorge, bottle, champagne, blown bottle -
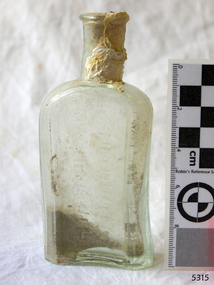 Flagstaff Hill Maritime Museum and Village
Domestic object - Bottle, Singer Sewing Machine Company, ca 1878
This Singer Sewing Machine oil bottle was made by hand, with the glass blown into a mould. Isaac M. Singer established his sewing machine company, I.M. Singer & Co. in America in 1851. A brief history of the Loch Ard (1873-1878): - The sailing ship Loch Ard was one of the famous Loch Line ships that sailed from England to Australia. Barclay, Curdle and Co. built the three-masted iron vessel in Glasgow in 1873. It had sailed three trips to Australia and one trip to Calcutta before its fateful voyage. Loch Ard left England on March 2, 1878, under the command of recently married, 29-year-old Captain Gibbs. It was bound for Melbourne with a crew of 37, plus 17 passengers. The general cargo reflected the affluence of Melbourne at the time. Onboard were straw hats, umbrellas, perfumes, clay pipes, pianos, clocks, confectionery, linen and candles, and a heavier load of railway irons, cement, lead and copper. Other cargo included items intended for display in the Melbourne International Exhibition of 1880. The Loch Ard had been sailing for three months and was close to its destination on June 1, 1878. Captain Gibbs had expected to see land at about 3 am but the Loch Ard ran into a fog that greatly reduced visibility and there was no sign of land or the Cape Otway lighthouse. The fog lifted at 4 am and the sheer cliffs of Victoria's west coast were much closer to them than Captain Gibbs expected. He tried to manage the vessel but failed and the ship struck a reef at the base of Mutton Bird Island, near Port Campbell. The top deck loosened from the hull, and the masts and rigging crashed down, knocking passengers and crew overboard. The lifeboat was launched by Tom Pearce but crashed into the side of Loch Ard and capsized. He clung onto its overturned hull and sheltered under it. He drifted out to sea and the tide brought him back to what is now called Loch Ard Gorge. He swam to shore and found a cave for shelter. A passenger, Eva Carmichael, had raced onto the deck to find out what was happening and was confronted by towering cliffs above the ship. She was soon swept off the ship by a huge wave. Eva saw Tom Pearce on a small rocky beach and yelled to attract his attention. He swam out and dragged her to the shelter of the cave. He revived her with a bottle of brandy from a case that had washed up on the beach. Tom scaled a cliff in search of help and followed some horse hoof prints. He came from two men from Glenample Station, three and a half miles away. He told the men of the tragedy and then returned to the gorge while the two men rode back to the station to get help. They reached Loch Ard Gorge and took the two shipwreck survivors to Glenample Station to recover. Eva stayed at the station for six weeks before returning to Ireland by steamship. In Melbourne, Tom Pearce received a hero's welcome and was presented with a medal and some money. Of the 54 crew members and passengers on board, only two survived: the apprentice, Tom Pearce and the young woman passenger, Eva Carmichael, who lost her family in the tragedy.The bottle is significant for representing an early innovation in domestic sewing, the treadle sewing machine. It is also significant for its connection with the Loch Ard shipwreck. The shipwreck of the Loch Ard is of significance for Victoria and is registered on the Victorian Heritage Register ( S 417). Flagstaff Hill has a varied collection of artefacts from Loch Ard and its collection is significant for being one of the largest accumulation of artefacts from this notable Victorian shipwreck. The collections object is to also give us a snapshot into history so we are able to interpret the story of this tragic event. The collection is also archaeologically significant as it represents aspects of Victoria's shipping history that allows us to interpret Victoria's social and historical themes of the time. The collection's historical significance is that it is associated unfortunately with the worst and best-known shipwreck in Victoria's history. Clear glass bottle, straight neck, broad shoulders tapering to slightly narrower indented base. Bottle once contained Singer Sewing Machine oil. Inscription embossed in the glass. Bottle was recovered from the wreck of the Loch Ard.Embossed in the glass "The Singer Manufacturing Company" on one side on the reverse "Extra Quality Machine Oil." flagstaff hill, flagstaff hill maritime museum and village, warrnambool, maritime museum, maritime village, great ocean road, shipwreck coast, singer sewing machine, sewing machine oil, singer sewing machine oil, oil bottle, isaac m. singer, loch ard artifacts, loch ard -
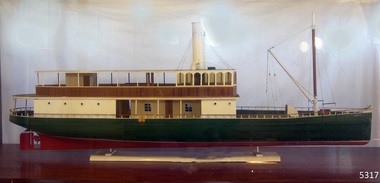 Flagstaff Hill Maritime Museum and Village
Craft - Ship Model, S.S. Rowitta
This remote-controlled ship model was made by the blacksmith at Flagstaff Hill Maritime Village in the likeness of the Village's display passenger ferry, the S.S. Rowitta. SS ROWITTA: - The 1909 steam ferry, SS Rowitta, was installed as an exhibit at Flagstaff Hill in 1975 and was enjoyed by many visitors for 40 years. Rowitta was a timber steam ferry built in Hobart in 1909 using planks of Huon and Karri wood. She was a favourite of sightseeing passengers along Tasmania’s Tamar and Derwent rivers for 30 years. Rowitta was also known as Tarkarri and Sorrento and had worked as a coastal trading vessel between Devonport and Melbourne, and Melbourne Queenscliff and Sorrento. In 1974 Rowitta was purchased by Flagstaff Hilt to convert into a representation of the Speculant, a historic and locally significant sailing ship listed on the Victorian Heritage Database. (The Speculant was built in Scotland in 1895 and traded timber between the United Kingdom and Russia. Warrnambool’s P J McGennan & Co. then bought the vessel to trade pine timber from New Zealand to Victorian ports and cargo to Melbourne. She was the largest ship registered with Warrnambool as her home port, playing a key role in the early 1900s in the Port of Warrnambool. In 1911, on her way to Melbourne, she was wrecked near Cape Otway. None of the nine crew lost their lives.) The promised funds for converting Rowitta into the Speculant were no longer available, so she was restored back to her original configuration. She represented the importance of coastal traders to transport, trade and communication in Australian times before rail and motor vehicles. Sadly, in 2015 the time had come to demolish the Rowitta due to her excessive deterioration and the high cost of ongoing repairs. She had given over 100 years of service and pleasure to those who knew her. The remote-controlled model of the S.S. Rowitta is significant for its association with the Tasmanian early to mid-1900s passenger ferry, the wooden screw steamer Rowitta. It is is connected to the history of the Rowitta, that was a large exhibit on display at Flagstaff Hill Maritime Village from the museum’s early beginnings until the vessel’s end of life 40 years later. The display was used as an aid to maritime education. The Rowitta represents the importance of coastal traders to transport, trade and communication along the coast of Victoria, between states, and in Australia before rail and motor vehicles. The vessel was an example of a ferry built in the early 20th century that served many different roles over its lifetime of over 100 years. Model of the wooden steam ferry "S.S. Rowitta". This is a radio-controlled model built by the Flagstaff Hill blacksmith.flagstaff hill, warrnambool, shipwrecked coast, flagstaff hill maritime museum, maritime museum, shipwreck coast, flagstaff hill maritime village, great ocean road, ship model, remote controlled steam ship model, s.s. rowitta, tarkarri, speculant, purdon & featherstone of hobart, passenger ferry 1909, tasmanian passenger ferry, vessel, charles street wharf launceston, sorrento, remote control boat, rowitta model, remote-controlled model -
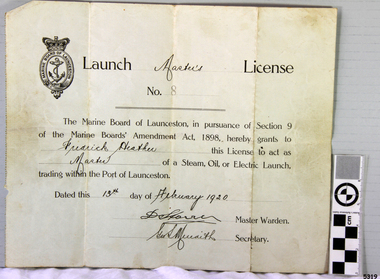 Flagstaff Hill Maritime Museum and Village
Document - License, Marine Board of Launceston, Launch Master's Licence, 13-02-1920
The Launch Master Frederick Heather was licensed to be Master of Launches within the Port of Launceston. Amongst the vessels that he captained was the S.S. ROWITTA. Fredrick’s son is one of the volunteers at the Low Head Pilot Station Museum, Frederick Heather is also related to a Harry Heather from Tasmania and was also a ship master, one of his ships being the "Alma Doepel", a sailing schooner built in 1903 and sailed by Harry for about 21 years until his death in 1937. Flagstaff Hill’s collection includes a painting of the Alma Doepel. SS ROWITTA: - The 1909 steam ferry, SS Rowitta, was installed as an exhibit at Flagstaff Hill in 1975 and was enjoyed by many visitors for 40 years. Rowitta was a timber steam ferry built in Hobart in 1909 using planks of Huon and Karri wood. It was a favourite of sightseeing passengers along Tasmania’s Tamar and Derwent rivers for 30 years. Rowitta was also known as Tarkarri and Sorrento and had worked as a coastal trading vessel between Devonport and Melbourne, and Melbourne Queenscliff and Sorrento. In 1974 Rowitta was purchased by Flagstaff Hilt to convert into a representation of the Speculant, a historic and locally significant sailing ship listed on the Victorian Heritage Database. (The Speculant was built in Scotland in 1895 and traded timber between the United Kingdom and Russia. Warrnambool’s P J McGennan & Co. then bought the vessel to trade pine timber from New Zealand to Victorian ports and cargo to Melbourne. It was the largest ship registered with Warrnambool as her home port, playing a key role in the early 1900s in the Port of Warrnambool. In 1911, on her way to Melbourne, it was wrecked near Cape Otway. None of the nine crew lost their lives.) The promised funds for converting Rowitta into the Speculant were no longer available, so it was restored back to its original configuration. The vessel represented the importance of coastal traders to transport, trade and communication in Australia times before rail and motor vehicles. Sadly, in 2015 the time had come to demolish the Rowitta due to her excessive deterioration and the high cost of ongoing repairs. The vessel had given over 100 years of service and pleasure to those who knew her. The licence is significant for its association with the Tasmanian early to mid-1900s passenger ferry, the S.S. Rowitta. It is connected to the history of the Rowitta, which was a large exhibit on display at Flagstaff Hill Maritime Village from the museum’s early beginnings until the vessel’s end of life 40 years later. The display was used as an aid to maritime education. The Rowitta represents the importance of coastal traders to transport, trade and communication along the coast of Victoria, between states, and in Australia before rail and motor vehicles. The vessel was an example of a ferry built in the early 20th century that served many different roles over its lifetime of over 100 years. Launch Master's License No 8 issued to Fredrick Heather to act as Master of a steam, oil or electric launch trading within the Port of Launceston. Date issued 13th February 1920. The license is printed with hand written details added.Handwritten on License "Master's" "Frederick Heather" "Master" "13th February 1920" Also two signatures (indecipherable) of Master Warden and Secretary.flagstaff hill, flagstaff hill maritime museum and village, warrnambool, maritime museum, maritime village, great ocean road, shipwreck coast, launch master's licence, rowitta, frederick heather, port of launceston, launch master's license, marine board of launceston, tarkarri, speculant, purdon & featherstone of hobart, passenger ferry 1909, vessel, charles street wharf launceston, sorrento -
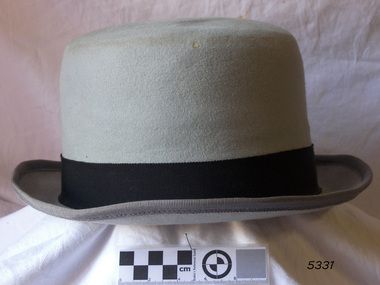 Flagstaff Hill Maritime Museum and Village
Hat
Grey gentleman's Bowler Hat. Has black band around hat. Inside hat - Melbourne - Hats Manufactured by Melbourne Hats Australia from quality imported raw materials size 56 cmsflagstaff hill, warrnambool, shipwrecked-coast, flagstaff-hill, flagstaff-hill-maritime-museum, maritime-museum, shipwreck-coast, flagstaff-hill-maritime-village -
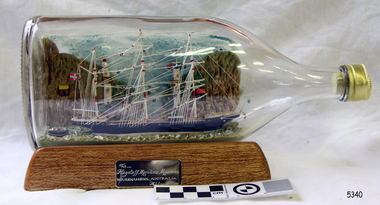 Flagstaff Hill Maritime Museum and Village
Craft - Ship in bottle
... MARITIME MUSEUM / WARRNAMBOOL AUSTRALIA …" Inscribed on Bottom...Flagstaff Hill Maritime Museum and Village 89 Merri Street ...Ship model in glass bottle mounted on timber with presentation plaque on front of timber. Ship is 3 masted sailing ship, no sails, towing small boat, flying red flag with blue and white cross. Background includes cliffs and two lighthouses. There is an inscription of the bottom of the model.Plaque on front of timber mount "To / FLAGSTAFF HILL MARITIME MUSEUM / WARRNAMBOOL AUSTRALIA …" Inscribed on Bottom "NORSK HÅKON skib No Filo Nilsen 230" flagstaff hill, warrnambool, shipwrecked-coast, flagstaff-hill, flagstaff-hill-maritime-museum, maritime-museum, model ship, model ship in bottle, norwegian model ship, shipwreck-coast, flagstaff-hill-maritime-village -
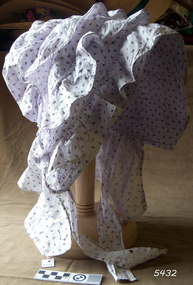 Flagstaff Hill Maritime Museum and Village
Bonnet, late 1800s - early 1900s
This style of bonnet was commonly worn outdoors by women in South West Victoria in the late 1800s - early 1900sThe bonnet is significant as a typical of women's outdoor headwear in Australia in the late 19th and early 20th century.Ladies outdoor bonnet, white cotton with narrow mauve stripes and small flowers. Bonnet is trimmed with frills and straps to tie under the chin. Dated late 19th to early 20th century.flagstaff hill, warrnambool, shipwrecked-coast, flagstaff-hill, flagstaff-hill-maritime-museum, maritime-museum, shipwreck-coast, flagstaff-hill-maritime-village, ladies bonnet, outdoor bonnet, hat, bonnet, headwear, ladies clothing, late 19th century bonnet, early 20th century bonnet, women's fashion, australian fashion, australian millinery -
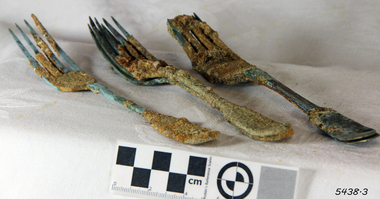 Flagstaff Hill Maritime Museum and Village
Forks
... at the Flagstaff Hill Maritime Museum in Warrnambool. From Australia's... at the Flagstaff Hill Maritime Museum in Warrnambool. From Australia's most ...HISTORY OF THE LOCH ARD The LOCH ARD belonged to the famous Loch Line which sailed many ships from England to Australia. Built in Glasgow by Barclay, Curdle and Co. in 1873, the LOCH ARD was a three-masted square rigged iron sailing ship. The ship measured 262ft 7" (79.87m) in length, 38ft (11.58m) in width, 23ft (7m) in depth and had a gross tonnage of 1693 tons. The LOCH ARD's main mast measured a massive 150ft (45.7m) in height. LOCH ARD made three trips to Australia and one trip to Calcutta before its final voyage. LOCH ARD left England on March 2, 1878, under the command of Captain Gibbs, a newly married, 29 year old. She was bound for Melbourne with a crew of 37, plus 17 passengers and a load of cargo. The general cargo reflected the affluence of Melbourne at the time. On board were straw hats, umbrella, perfumes, clay pipes, pianos, clocks, confectionary, linen and candles, as well as a heavier load of railway irons, cement, lead and copper. There were items included that intended for display in the Melbourne International Exhibition in 1880. The voyage to Port Phillip was long but uneventful. At 3am on June 1, 1878, Captain Gibbs was expecting to see land and the passengers were becoming excited as they prepared to view their new homeland in the early morning. But LOCH ARD was running into a fog which greatly reduced visibility. Captain Gibbs was becoming anxious as there was no sign of land or the Cape Otway lighthouse. At 4am the fog lifted. A man aloft announced that he could see breakers. The sheer cliffs of Victoria's west coast came into view, and Captain Gibbs realised that the ship was much closer to them than expected. He ordered as much sail to be set as time would permit and then attempted to steer the vessel out to sea. On coming head on into the wind, the ship lost momentum, the sails fell limp and LOCH ARD's bow swung back. Gibbs then ordered the anchors to be released in an attempt to hold its position. The anchors sank some 50 fathoms - but did not hold. By this time LOCH ARD was among the breakers and the tall cliffs of Mutton Bird Island rose behind the ship. Just half a mile from the coast, the ship's bow was suddenly pulled around by the anchor. The captain tried to tack out to sea, but the ship struck a reef at the base of Mutton Bird Island, near Port Campbell. Waves broke over the ship and the top deck was loosened from the hull. The masts and rigging came crashing down knocking passengers and crew overboard. When a lifeboat was finally launched, it crashed into the side of LOCH ARD and capsized. Tom Pearce, who had launched the boat, managed to cling to its overturned hull and shelter beneath it. He drifted out to sea and then on the flood tide came into what is now known as LOCH ARD Gorge. He swam to shore, bruised and dazed, and found a cave in which to shelter. Some of the crew stayed below deck to shelter from the falling rigging but drowned when the ship slipped off the reef into deeper water. Eva Carmichael had raced onto deck to find out what was happening only to be confronted by towering cliffs looming above the stricken ship. In all the chaos, Captain Gibbs grabbed Eva and said, "If you are saved Eva, let my dear wife know that I died like a sailor". That was the last Eva Carmichael saw of the captain. She was swept off the ship by a huge wave. Eva saw Tom Pearce on a small rocky beach and yelled to attract his attention. He dived in and swam to the exhausted woman and dragged her to shore. He took her to the cave and broke open case of brandy which had washed up on the beach. He opened a bottle to revive the unconscious woman. A few hours later Tom scaled a cliff in search of help. He followed hoof prints and came by chance upon two men from nearby Glenample Station three and a half miles away. In a state of exhaustion, he told the men of the tragedy. Tom returned to the gorge while the two men rode back to the station to get help. By the time they reached LOCH ARD Gorge, it was cold and dark. The two shipwreck survivors were taken to Glenample Station to recover. Eva stayed at the station for six weeks before returning to Ireland, this time by steamship. In Melbourne, Tom Pearce received a hero's welcome. He was presented with the first gold medal of the Royal Humane Society of Victoria and a £1000 cheque from the Victorian Government. Concerts were performed to honour the young man's bravery and to raise money for those who lost family in the LOCH ARD disaster. Of the 54 crew members and passengers on board, only two survived: the apprentice, Tom Pearce and the young woman passenger, Eva Carmichael, who lost all of her family in the tragedy. Ten days after the LOCH ARD tragedy, salvage rights to the wreck were sold at auction for £2,120. Cargo valued at £3,000 was salvaged and placed on the beach, but most washed back into the sea when another storm developed. The wreck of LOCH ARD still lies at the base of Mutton Bird Island. Much of the cargo has now been salvaged and some was washed up into what is now known as LOCH ARD Gorge. Cargo and artefacts have also been illegally salvaged over many years before protective legislation was introduced. One of the most unlikely pieces of cargo to have survived the shipwreck was a Minton porcelain peacock - one of only nine in the world. The peacock was destined for the Melbourne International Exhibition in 1880. It had been well packed, which gave it adequate protection during the violent storm. Today, the Minton peacock can be seen at the Flagstaff Hill Maritime Museum in Warrnambool. From Australia's most dramatic shipwreck it has now become Australia's most valuable shipwreck artefact and is one of very few 'objects' on the Victorian State Heritage Register. Flagstaff Hill’s collection of artefacts from LOCH ARD is significant for being one of the largest collections of artefacts from this shipwreck in Victoria. It is significant for its association with the shipwreck, which is on the Victorian Heritage Register (VHR S417). The collection is significant because of the relationship between the objects, as together they have a high potential to interpret the story of the LOCH ARD. The LOCH ARD collection is archaeologically significant as the remains of a large international passenger and cargo ship. The LOCH ARD collection is historically significant for representing aspects of Victoria’s shipping history and its potential to interpret sub-theme 1.5 of Victoria’s Framework of Historical Themes (living with natural processes). The collection is also historically significant for its association with the LOCH ARD, which was one of the worst and best known shipwrecks in Victoria’s history. 5 silver entrée or dessert forks, 2 pairs are concreted together, all have encrustations. Recovered from the wreck of the Loch Ard.flagstaff hill, warrnambool, shipwrecked coast, flagstaff hill maritime museum, maritime museum, shipwreck coast, flagstaff hill maritime village, great ocean road, loch line, loch ard, captain gibbs, eva carmichael, tom pearce, glenample station, mutton bird island, loch ard gorge, silver entrée, dessert forks, fork