Showing 1733 items
matching bendigo gardens
-
 Ballarat Tramway Museum
Photograph - Digital image Set of 20, 1971-72
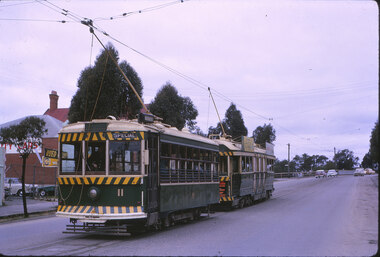
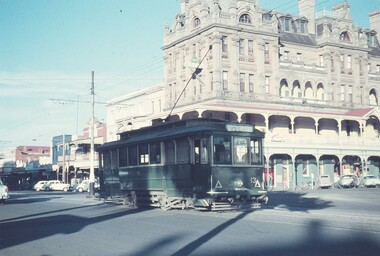
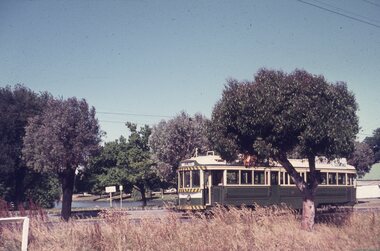
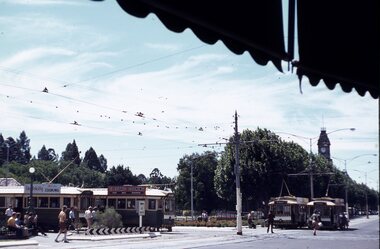
Set of 22 digital images of Bendigo Tramways, 1972 at or before closure while on a tram tour by Stuart Lodington. .1 - No. 7 arriving at North Bendigo .2 - No. 5 departing Charing Cross along View St, with a Firestone tyres in the background. .3 - front view of a tram in View St with a blurred background image. .4 - No. 24 showing Eaglehawk destination .5 - No 26 and 3 in View St, with the Armstrong Tyre Service building in the background and signs for T&G and Cohn's Drinks. .6 - ditto .7 - No. 3 arriving at Charing Cross from Eaglehawk in View St, with a Quarry Hill destination. .8 - No. 3 and 18 at Charing Cross. .9 - No. 24 on the Quarry Hill line. .10 - No 26 in View St, with the Armstrong Tyre Service building in the background and signs for T&G and Cohn's Drinks. .11 - ditto, with fountain in view, Colonial Mutual building and a newsagent with a Herald sign on the building. .12 - No. 7 at North Bendigo terminus .13 - ditto with pole being reversed. .14 - No. 18 at Quarry Hill terminus with Northern Terrazzo sign in the background. .15 - No. 24 at Quarry Hill terminus .16 - No. 18 arriving at Charring Cross, with Fountain Plaza and Bendigo Pharmacy in the background. .17 - No. 3 and 18 at Charing Cross. .18 - No. 7 at North Bendigo terminus with pole being placed on the overhead. .19 - No. 26 in View St inbound, with Sandhurst Trustees sign in the background. .20 - No. 6 leaving Charing Cross in Pall Mall with Myer and other buildings in the background. .21 - No. 7 at North Bendigo .22 - Single trucker with two roof Advertisements crossing View St with fountain in view, Colonial Mutual building and a newsagent with a Herald sign on the building.trams, tramways, bendigo, eaglehawk, quarry hill, north bendigo, charing cross, view st, tram 7, tram 5, tram 24, tram 26, tram 5, tram 3, tram 18, tram 6 -
 Ballarat Tramway Museum
Photograph - Digital image Set of 20, 9/12/1972 12:00:00 AM
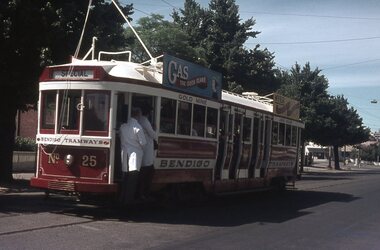
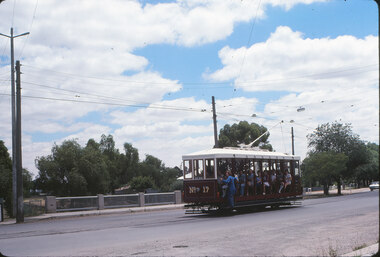
Set of 21 digital images of Bendigo Tramways, at the re-opening of the Bendigo tramways by the Bendigo Trust on 9/12/1972by Stuart Lodington. All trams in the first Bendigo Trust colours. .1 - No. 25 with Gas and Myer roof advertisements .2 - No. 30 with 3BO roof advert and a BP service station in the background. .3 - SEC single trucker at the Mine with a large "Tram Tours" sign on the front of the tram .4 - ditto .5 - No. 19 with a large group of passengers, Bendigo Motor Co and Sandhurst roof advertisements .6 - No. 30 in McCrae St .7 - view of opening march with band .8 - No. 19 in opening parade .9 - Opening Parade in High St with cathedral in the background .10 - No. 30 in Nolan St crossing bridge .11 - ditto .12 - No. 25 at the mine .13 - No. 30 leaving the mine .14 - No. 30 ditto with BCTV roof advert. .15 - Charing Cross with cenotaph, The Beehive building and Ezywalkin shoes and Coca Cola adverts .16 - No. 19 southbound in High St with City Centre Motel building in the background. .17 - No. 30 returning from North Bendigo .18 - No 25 in High St after leaving Gold Mine .19 - No. 30 at the Mine .20 - No. 30 in Nolan St .21 - No. 30 with 3BO roof advert and a BP service station in the background.trams, tramways, bendigo, north bendigo, charing cross, bendigo trust, central deborah, tram 25, tram 30, tram 19 -
 Ballarat Tramway Museum
Photograph - Digital image Set of 20, 16/04/1972 12:00:00 AM
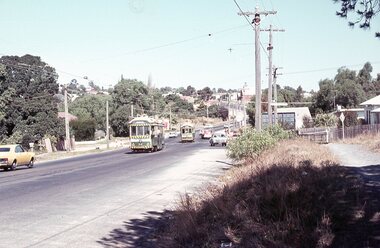
Set of 20 digital images of Bendigo Tramways, of the last running day of the Eaglehawk to Quarry Hill line 16 April 1972, .1 - No. 24 outbound to Eaglehawk .2 - No. 3? at Manchester Loop .3 - No. 24 outbound to Eaglehawk .4 - bogie tram crossing the rail over bridge from Eaglehawk .5 - No. 18 in View St .6 - No. 24 outbound to Eaglehawk .7 - No 18 at Eaglehawk with destination roll being changed, and shopping centre in the background. .8 - No. 24 crossing the railway overbridge, going to Eaglehawk .9 - No. 3 outbound to Eaglehawk .10 - No. 24 crossing the railway overbridge, going to Eaglehawk .11 - No. 3 and 24 crossing at Long Gully .12 - No. 18 at Eaglehawk with Leo A Hughes photographer building in the background and a CFA truck passing the tram. Tram SEC roof advertisement and a banner for "German -?- Circus" at Eaglehawk and dates. .13 - No. 3 inbound on the Eaglehawk line. .14 - No. 18 outbound to Eaglehawk .15 - ditto .16 - No. 18 at Eaglehawk terminus with the Mechanics Institute in the background. .17 - No. 24 at the Eaglehawk terminus .18 - No 24 at the intersection with Taylor St .19 - No. 24 at the Eaglehawk terminus .20 - dittotrams, tramways, bendigo, eaglehawk, long gully, manchester loop, tram 24, tram 18, tram 3 -
 Ballarat Tramway Museum
Photograph - Digital image Set of 20, 16/04/1972 12:00:00 AM
Set of 22 digital images of Bendigo Tramways, of the last running day of the Eaglehawk to Quarry Hill line 16 April 1972, .1 - No. 3 and 24 crossing at Long Gully .2 - No. 3 turning at the Cricket ground, Barnard and View Sts, inbound to the City and Quarry Hill .3 - No. 3 in bound to the City and Quarry Hill, Long Gully area .4 - No. 18 inbound to the City and Quarry Hill crossing the railway bridge from Eaglehawk. .5 - Manchester Loop .6 - No. 18 inbound to the City and Quarry Hill crossing the railway bridge from Eaglehawk. .7 - No. 18 about to enter Jobs Gully Loop .8 - No. 3 about to turn at the Cricket ground, Barnard and View Sts inbound to the City and Quarry Hill .9 - No. 3 turning at the Cricket ground, Barnard and View Sts, inbound to the City and Quarry Hill .10 - No. 18 at Eaglehawk terminus with the Mechanics Institute in the background. .11 - No. 3 in bound, Ironbark area. .12 - No. 3 at Long Gully Loop .13 - No. 3 outbound to Eaglehawk. .14 - No. 18 at Eaglehawk with German circus banner on tram .15 - No. 18 on the Eaglehawk line at Jobs Gully Loop .16 - No. 24 outbound to Eaglehawk at Taylor St .17 - No. 18 inbound to the City and Quarry Hill crossing the railway bridge from Eaglehawk. .18 - No. 3 at Manchester Loop .19 - No. 18 at Eaglehawk terminus .20 - No. 18 at Eaglehawk with German circus banner on tram .21 - bogie tram at Long Gully Loop. .22 - No. 24 outbound to Eaglehawk at Taylor Sttrams, tramways, bendigo, eaglehawk, long gully, jobs gully, manchester loop, tram 24, tram 18, tram 3 -
 Ballarat Heritage Services
Photograph - Photograph - Colour, Burke and Wills Memorial at Bendigo Cemetery, 2018, 02/09/2018
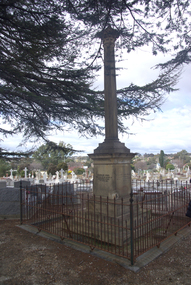
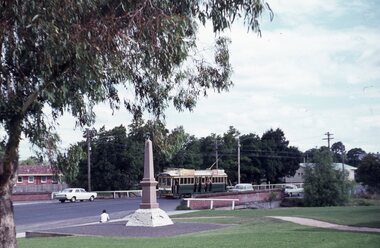
Robert O'Hara Burke and Thomas Pope Besnard were childhood friends. As sexton of the local Back Creek Cemetery Thomas Besnard organised a subscription to raise the money for a monument to Burke, Wills and Gray. A subscription of one shilling, no more and not less, was asked so all subscribers were equal. The Bendigo monument was designed by Adam Duncan and features a Corinthian column mounted on a foundation stone, topped with a Grecian urn draped with the Union Jack. The stone for the monument was quarried from New Chum Mine. The site in the Bendigo Cemetery was selected by Besnard so the monument was on a grass knoll well clear of any other graves. The design included landscaping with a path and garden beds that provided dignified access. The Burke and Wills Monument in Bendigo has been entered on the Register of the National Estate as being important for its association with historical events and developments associated with exploration in the early days of Colony of Victoria. Two conifers remain from the original group sent by Mueller of the Melbourne Botanical Gardens to develop the garden layout on the knoll. These two trees are listed as Significant Trees by City of Greater Bendigo. The foundation block was laid on 20 August 1862 by Chairman of the Bendigo Municipality, Charles Burrows – exactly two years after the Expedition left Melbourne. A half day holiday was declared by Bendigo Council, and a procession left the Bendigo Town Hall and marched to the cemetery where 8000 people were gathered and another 4000 lined the route. John King was unable to attend due to ill health. Chairman of the Municipality of Bendigo, Charles Burrows, gave a long address, and diaries of members of the expedition, the Sandhurst Almanac, the Bendigo Advertiser, the Bendigo Independent Evening News, photographs of the deceased, photographs of Public Buildings in Bendigo, a Sydney half sovereign and all the silver coins of the Realm were wrapped in a Union Jack and placed in a niche in the foundation stone. Fifteen months later a column was erected on the foundation stone after Besnard openly criticised the Memorial Committee for their lack of action. The Bendigo Advertiser was disappointed at the location of the monument preferring a more central location and in 1893 an attempt was made to move the monument to Rosalind Park. On 19 May 1893, Mr Minto, the City Surveyor of the Bendigo MunicIpality reported it would cost £25, and no other action occurred. In 1940 the land around the memorial was sold off as grave sites and the paths and garden beds disappeared with graves now surrounding the base of the monument. The Burke and Wills Monument in Bendigo Cemetery was entered on the Register of the National Estate for its association with historical events and developments associated with exploration in the early days of Colony of Victoria. Two conifers remain from the original group sent by Mueller of the Melbourne Botanical Gardens to develop the garden layout on the knoll. These two trees are listed as Significant Trees by City of Greater Bendigo.Burke and Wills Memorial at Bendigo Cemetery, 2018Erected by the people of Bendigo in honor of the Victorian Explorers, Burke, Wills, Gray and King who first crossed the continent of Australia. King alone surviving the privation and suffering under which his three brave ill-fated companions sank. A.D. 1862. Robert O'Hara Burke, leader of the Victorian Expedition, left Melbounre 24th August 1860. Reached Carpentaria 12th Feby 1861. Died on his return at Coopers Creek, 30th June 1861. Charles Gray, died also on his return at Polygorum Swamp. 17th April 1861. William John Wills, second in command, died also near Coopers Creek, 29th June 1861. bendigo cemetery, burke and wills, burke and wills memorial, william john wills, john o'hara burke, charles gray, polygonum swamp, coopers creek, victorian expedition, carpentaria, bendigo public cemetery, bendigo remembrance park, thomas pope besnard -
 Ballarat Heritage Services
Photograph, Nucolorvue, Daylesford Pioneer Tower in Wombat Garrdens, 1957
Daylesford is a tourist town in Central Victorian, known for its mineral water springs.Image of the Daylesford Pioneer Memorial Tower in Wombat Gardens, Daylesford.Daylesford, Victoria, Australia This famous holiday resort is famous for its up-to-date facilities, as well as for its natural attractions. The mineral Springs are renowned for their high medicinal elements. The visitor finds ample to amuse, in excellent fishing, boating, Boating, Swimming, golfing, hiking and riding. The district provides a wide range of typical Australian bush scenery, and the altitude of 2,000 feet above sea level as a tonic effect on all. Daylesford has modern hotels, guest houses, shops and places of amusement, also many other places of interest within short travelling distance. Bendigo, 50 miles, Ballara 30 miles, and Melbourne 75 miles, bring Daylesford within easy reach of many parts of Victoria. daylesford, pioneer tower, wombat gardens -
 Ballarat Heritage Services
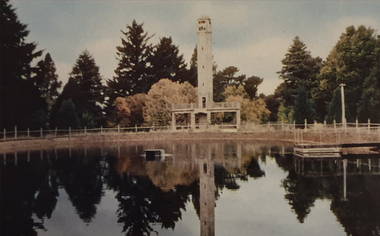
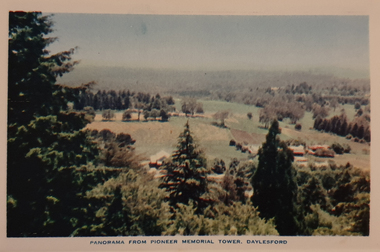
Photograph, Nucolorvue, Panorama from the Pioneed Memorial Tower, Daylesford, 1957
Daylesford is a tourist town in Central Victorian, known for its mineral water springs.Central Springs DaylesfordDaylesford, Victoria, Australia This famous holiday resort is famous for its up-to-date facilities, as well as for its natural attractions. The mineral Springs are renowned for their high medicinal elements. The visitor finds ample to amuse, in excellent fishing, boating, Boating, Swimming, golfing, hiking and riding. The district provides a wide range of typical Australian bush scenery, and the altitude of 2,000 feet above sea level as a tonic effect on all. Daylesford has modern hotels, guest houses, shops and places of amusement, also many other places of interest within short travelling distance. Bendigo, 50 miles, Ballara 30 miles, and Melbourne 75 miles, bring Daylesford within easy reach of many parts of Victoria. daylesford, wombat gardens, wombat hill gardens, daylesford pioneer memorial tower, landscape -
 Bendigo Military Museum
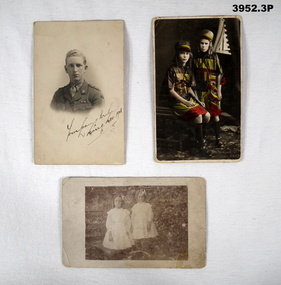
Photograph - PHOTOGRAPHS WW1, 1) 1918; .3) 1915
.1) Photo is of Douglas George PHILLIPS MC No 3449. Refer Reg No 1213 for his service details. .2) Elvie & Madge Phillips were the sisters of Douglas George PHILLIPS MC. .3) Letter from Elvie to Jack. He is John William PHILLIPS No 110, who enlisted 10.8.14 aged 19 years in A Coy 14 BN AIF. He embarked for overseas 22.12.1914. He was WIA in the arm & it was written by relatives that it was held together by guinea pig services. He was also gassed. John is the brother of Douglas George PHILLIPS MC..1) Post card photo, black / white, portrait of an officer with MC ribbon on uniform,, no head wear, clear background. .2) Post card photo, colour, showing 2 young girls, 1 sitting & 1 standing. .3) Post card photo, black / white, showing 2 young girls in white dresses standing in a garden..1) Handwritten on front bottom RH corner: “Your loving brother Doug Dec 1918” .2) On rear in black pen: “Elvie Phillips - Madge Phillips.Collectors for the Belgium Relief Fund” .3) On rear in black pen: “Extensive letter from Elvie Phillips, 585 Hargreaves Street, Bendigo to her brother Jack, dated April 13th 1915”photographs, postcard, mc -
 Ballarat Tramway Museum
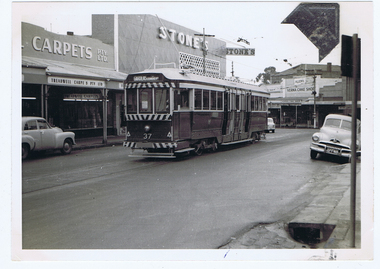
Photograph - Digital image, Wal Jack, 1/07/1961 12:00:00 AM
Yields information about the development of the development of the Main and Victoria St intersection, bogie trams and Stones Corner in 1961.Digital image from the Wal Jack Ballarat Album of a photograph of No.37 in bound from Mt Pleasant, in Main St, about to arrive at Stones Corner. Tram has the destination of Gardens via Drummond North. Photo Wal Jack taken on 1-7-1961. In the background are Stones, Treadwell carpets and Verna Cake shop. The mark on the photograph is from a photo corner that was stuck to the surface and the time of the scanning, after it became loose. See image i2 for rear of photograph.On rear of photograph in ink "SEC, Ballarat No. 37 (ex Bendigo No. 1) Main St, Ballarat East 1-7-61"trams, tramways, stones corner, main st, tram 37 -
 Ballarat Tramway Museum
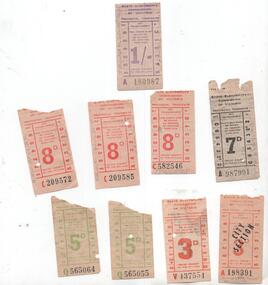
Ephemera - Ticket/s, State Electricity Commission of Victoria (SECV), Set of 9 pre-decimal or imperial currency, 1959 to 1965
Has a strong association with the Ballarat and Bendigo tramway system as being identified as being used on the system and for which trip on a specific date and demonstrates the ticket style prior to the time of decimal conversion in Australia.Set of 9 pre-decimal or imperial currency tickets used on the Ballarat or the Bendigo tramway system with three of them noted as to their use on the rear. 1 - 3d - orange ticket, over printed "City Section" - A 198391 - used "Charing Cross to Station - tram 23 - Sat 22 May 1965" 2 - 3d - orange - V437554 - on rear "Tram 34 Going to Mt Pleasant Easter Tuesday 31 March 1959". 3 - 5d - green - Q565064 - on rear in pencil "Quarry Hill to Charing Cross (No. 3) 4 - 5d - green - Q565055 - ditto, with addition of "2nd tram" 5 - 7d - black A987991 - on side in pencil' "Eaglehawk to Q Hill No. 3" 6 - 8d - red C209572 - "18 Drummond from L St N Sun 8 Nov. 1964" 7 - 8d- red - C209585 - "ditto" 8 - 8d - red - C582546 - "Q Hill to station tram 23, Sat 22 May 1965" 9 - 1/- purple - A 180987 - "18 decorated for Sebastopol Gold Cent. Sun 8 Nov. 1964 to Sebastopol" trams, tramways, tickets, secv, ballarat, bendigo, gold, sebastopol, quarry hill, mt pleasant, lydiard st north -
 Ballarat Tramway Museum
Ephemera - Ticket/s, State Electricity Commission of Victoria (SECV), Set of 4 decimal currency tickets, late 1960's
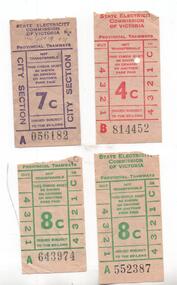
Has a strong association with the Ballarat and Bendigo tramway system as being identified as being used on the system and for which trip on a specific date and demonstrates the ticket style at the time of closure of Ballarat.Set of 4 decimal currency tickets used on the Ballarat or the Bendigo tramway system with three of them noted as to their use on the rear. 1 - 4c red - B814452 - ?? Bgo, Sat May 19, 1969, Tram No. 2 - Concession 2 - 7c purple - City Section - A056182 - tram 42 - Sun Sept 19, 1971 (last day of trams in Ballarat) 3 - 8c green - A552387 - 845am, tram 40 to Sebastopol, Sat Sept 19, 1971 4 - 8c green - A643974 - 745pm, tram 40 to Sebastopol, Sat Sept 19, 1971 trams, tramways, tickets, secv, ballarat, bendigo, sebastopol, closure, last day -
 Ballarat Tramway Museum
Poster, Transport Regulation Board, Bendigo Bus Services", Feb. 1972
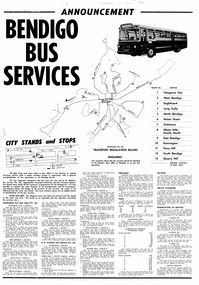
Yields information about the closure of the Bendigo Tramway system and the bus replacements made by the Transport Regulation Board, can be compared to that for BallaratDigital print of a scanned Poster, titled "Bendigo Bus Services" printed on white paper. Produced shortly before the closure of the State Electricity Commission of Victoria operated Bendigo Tramway system. Gives details of the replacement bus services as well as the existing bus services and other changes planned. Provides notes on the operator, timetables, fares, route numbers and dates when the services would be changed. Map shows the bus routes, route numbers, section points and City stands and stops. Authorised by the Transport Regulation Board. trams, tramways, bendigo, map, closure, buses -
 Ballarat Tramway Museum
Ephemera - Ticket/s, State Electricity Commission of Victoria (SECV), "Bendigo Electric Tramways Special Pass", c1934
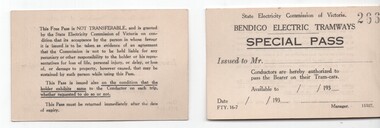
Yields information and demonstrates the tickets used to provide a Pass for employees or visitors to Bendigo to travel on the trams during the 1930's. Similar ones would have existed for Ballarat and Geelong.Set of six preprinted special pass for, printed on cardboard Form No. FTY 16-7, with space for details to be filled in, name, availability and date and signature of the Manager. Used in the 1930's. Has conditions of use on the rear. Nos. 279, 281, 266, 288,289 and 290.trams, tramways, secv, bendigo, passes, tickets -
 Ballarat Tramway Museum
Newspaper, The Courier Ballarat, "Out and About - Spring 2017", Aug. 2017
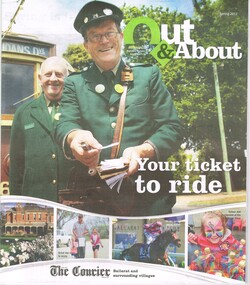
Full colour 24 page newspaper, centre stapled recycled paper, titled "Out and About - Spring 2017", published by the Ballarat Courier, with ads and items about the Ballarat and surrounding villages events, but with a lot of adverts outside the district for example Bendigo trams and Castlemaine and Maldon Railway. Features a photo of Len Millar and Neville Britton in front of tram 26 on the front cover and Springfest on the page 4 with the Tram Pull event.ballarat, tourism, bendigo trust, btm, springfest, tram pull -
 Ballarat Tramway Museum
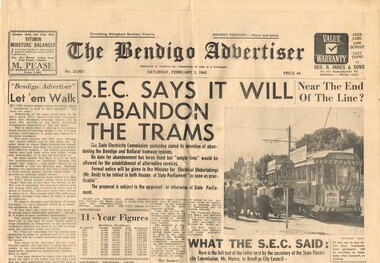
Newspaper, Bendigo Advertiser, "SEC Says it will abandon the trams" "Near the end of the Line?" "Let 'em Walk", "What the SEC Said", "Lost City Without Trams", 3/02/1962 12:00:00 AM
Yields information about the 1962 proposal of the SEC to closure the Bendigo tramway system and notes the impact on the city, with references to Ballarat and Geelong.Newspaper - The Bendigo Advertiser, Saturday 3/2/1962, 14 broad sheet pages, with the main headline ""SEC Says it will abandon the trams" about the notice given in Parliament the previous day by the Minister for Electrical Undertakings Mr. Reid following notice by the SEC. Includes the text of a letter to the City of Bendigo, by the Secretary of the SEC, Mr. D. H. Munro. Has an editorial titled "Let 'em Walk", a photo of the No. 2 en route to Eaglehawk at Charing Cross and further article reporting on comments from four civic leaders "Lost City Without Trams". Quotes two local MLA's - L. W. Galvin, C.P. Stoneham, Cr. W. Mathrick of Eaglehawk and the K.H. Gordon,Chamber of Commerce. Notes impact on the city, Ballarat and Geelong bus system. See Reg Item 6950 for the Ballarat The Courier Report. Full copy of the newspaper collected for style and adverts - has a Briquette advert on page 14.sec, closure, bendigo, parliament, eaglehawk, geelong, ballarat -
 Ballarat Tramway Museum
Negative, Bruce Herbert, "Bendigo and Ballarat Trams (AETA Convention) 30 Mar 1975", 30/03/1975 12:00:00 AM
Negative folder - made by ROW1 International of West Germany containing 40 No. 35 mm negatives of the AETA 1975 Convention visit to Ballarat and Bendigo on 30-3-1975. 17 photos of Ballarat and 23 of Bendigo. Ballarat photos: 1 - 40 at the Wendouree Parade crossing loop showing trams stop signage and AETA members standing at the front of the tram. 2 - distant view of 27 in the loop and the "wide roadway" 3 - view of 40 northbound about to nearing loop with various cars in the view. 4 - 40 about to enter loop with 27 in background. 5 - 40 and 27 at loop 6 - 40 at St Aidans Drive 7 - 14 and 27 at loop with 40 in the background 8 - 27 leaving loop 9 - 14 leaving loop 10 - General view showing cars and 40 in the loop, looking north. 11 - as for 1 12 - ditto 13 - 40 northbound, 27 southbound at loop 14 - 27 at loop 15 - 26, 14 and 28 at depot including 1 road. 16 - ditto with people viewing the trams - shows the overhead on 1 road. 17 - X41 and B80 on train at Spencer St, probably the train the group travelled on. trams, tramways, btps, ballarat, aeta, bendigo, bendigo trust, wendouree parade, depot, gardens loop, motor vehicles, tram 40 tram 27 tram 26 tram 14 tram 28 -
 Ballarat Tramway Museum
Negative, Bruce Herbert, "Bendigo and Ballarat Trams (AETA Convention) 30 Mar 1975", 30/03/1975 12:00:00 AM
Negative folder - made by ROW1 International of West Germany containing 40 No. 35 mm negatives of the AETA 1975 Convention visit to Ballarat and Bendigo on 30-3-1975. 17 photos of Ballarat and 23 of Bendigo. Bendigo photos: 1 - No. 28 at the depot 2 - ditto 3 - 24 and another bogie tram in side the depot 4 - No. 3? inside the depot 5 - 12, scrubber - 17 and two bogie trams 6 - scrubber and other bogie trams. 7 - general view with 24 and other bogie trams 8 - ditto 9 - Four trams at the Gold Mine, lead by 28. 10 - 19 at the Gold Mine 11 - single trucker with "tram tours" sign on the front 12 - 28 and two other cars at the Joss House, North Bendigo 13 - 19 and two other cars at the Joss House 14 - 30 at depot junction and loop 15 - 28 and 18 16 - 18 in the loop 17 - 28 and 18 McCrae St 18 - 28, 18 and 30 ditto 19 - 19 20 - No. 18 and 28 in Pall Mall with The Beehive in the background. Outside the building is an American Doughnut Kitchen van. The junction trackwork for the Eaglehawk lines remain in position. 21 - No. 30 northbound, with the City Family Hotel and other shops in the background. 22 - ditto and the cenotaph, 23 - B74 on a train at Spencer St. trams, tramways, btps, ballarat, aeta, bendigo, bendigo trust, depot, mccrae st, tram 28 tram 19 tram 30 tram 18 tram 24 tram 3 tram 12 tram 17 tram scrubber -
 Ballarat Tramway Museum
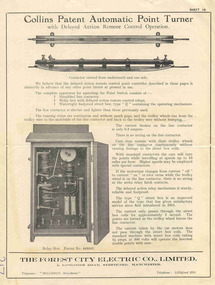
Pamphlet, The Forest City Electric Co. Limited England, "Collins Patent Automatic Point Turner", c1940's?
Yields information about the types of automatic point Turing mechanisms used on tramway systems, not actually used in Ballarat or Bendigo.Four page Pamphlet or Brochure Forest City No. 19, "Collins Patent Automatic Point Turner". Four page printed brochure with illustrations 1940’s? describing the Point turning mechanism with illustrations, of the equipment, method of operation advantages, wiring, the street box and curb (kerb) control box. c1940's? Has “217” in biro in bottom left hand corner.trams, tramways, forest city signals, level crossings, signals -
 Ballarat Tramway Museum
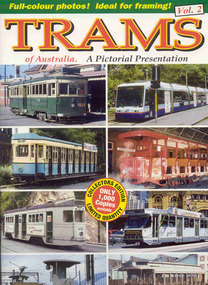
Book, Topmill Pty Ltd, "Trams of Australia Vol 2 - A pictorial Presentation", 2008/09
Book featuring photographs of Australian and Museum tramcars, includes Ballarat, Bendigo and Geelong.Full colour book, 32 pages plus card cover, titled "Trams of Australia Vol 2 - A pictorial Presentation", published by Topmill Pty Ltd, Silverwater NSW c2008/9. Features colour photos of trams from Melbourne (VR and MMTB), Sydney, Rockhampton, Brisbane on the front cover and Ballarat and Bendigo on rear. Text written by Michael McGowan, internal photos, both Museum and pre-museum operational systems of Ballarat, Sydney, Brisbane, Melbourne (VR & MMTB), Geelong, Freemantle, reproduced postcards, Scrubber 8W in Swanston St, Ballarat Tramway Museum, Perth, Tasmanian Transport Museum, Perth Electric Tramway Society (PETS), Archer Park Rockhampton, Sydney Tramway Museum, Adelaide, Ballarat Santa Tram (1970)trams, tramways, ballarat, bendigo, geelong, melbourne, sydney, brisbane, fremantle, hobart, adelaide, perth, santa tram, myers -
 Ballarat Tramway Museum
Slide - 35mm slide/s - set of 5, Eldon Hogan, 1/78 or late 1977
Set of five Kodak cardboard mounted slides - featuring photos taken during a visit to Bendigo Tour by Eldon Hogan. Slides have slide number (10 to 14) and date "Jan 78" stamped onto them. Scanned on the Canon scanner at the depot 15/12/1971 at the time of the installation of the scanner. .1 - No. 17 Nolan St .2 - No. 25 with Myer Roof Advertisement and No. 28 at Depot. .3 - No. 25 at Central Deborah Mine terminus .4 - No. 17 at North Bendigo terminus .5 - No. 17, Pall Mall at City terminus with the Beehive Building in the background.tramways, trams, bendigo, bendigo trust, nolan st, depot, central deborah, north bendigo, pall mall, tram 17, tram 25, tram 28 -
 Ballarat Tramway Museum
Slide - 35mm slide/s - set of 7, Eldon Hogan, Aug. 1964
Set of seven Kodak cardboard mounted slides - featuring photos taken during a visit to Bendigo by Eldon Hogan. Slides have slide number (26 to 32) and date "Aug 64" stamped onto them. Possibly a Xavier College Cadets tour - Eldon was involved with them at the time, given slide No. 27. Scanned on the Canon scanner at the depot 15/12/1971 at the time of the installation of the scanner. .1 - No 11 and a bogie car at the Railway Station .2 - ditto - note uniformed person boarding (Xavier College Cadet?) .3 - No. 11 at Charing Cross, showing "special" .4 - No. 11 bound for Eaglehawk at a Crossing loop .5 - No. 20 in bound for Quarry Hill - at the above crossing loop? .6 - No. 11 crossing the Eaglehawk / Swan Hill railway line at the overbridge. .7 - No. 11, High St Eaglehawk.tramways, trams, bendigo, railway station, eaglehawk, charing cross, birney, tram 11, tram 20 -
 Ballarat Tramway Museum
Slide - 35mm slide/s - set of 2, Eldon Hogan?, late 1950's
Set of two Agfacolor cardboard mounted slides - have handwritten captions and two numbers - no date, pre dash canopy stripes and additional lights, late 1950's? Scanned on the Canon scanner at the depot 15/12/1971 at the time of the installation of the scanner. .1 - Bendigo 13, outbound in Pall Mall with the Shamrock Hotel in the background. .2 - Bendigo 2, in bound from Eaglehawk in a very rural situation, unsealed road sides, with the Destination of Quarry Hill..1 - "Tram No. 13 in Pall Mall Bendigo / 24)" in red ink. .2 - "Tram No. 2 approaching Bendigo / 25)" in red ink.tramways, trams, bendigo, eaglehawk, pall mall, tram 13, tram 2 -
 Ballarat Tramway Museum
Slide - 35mm slide/s - set of 11, Eldon Hogan, mid 1960's to early 1970's
Set of 11 Agfa Plastic mounted slides - from the Eldon Hogan collection - possibly on an ARE Bendigo tours late 1960's or early 1970's with No. 18 Scanned on the Canon scanner at the depot 15/12/1971 at the time of the installation of the scanner. .1 - No 18 at Golden Square terminus with Billy Rodda's Golden Square Hotel in the background. .2 - ditto and the Victoria Bitter fence alongside the hotel. .3 - ditto and another single trucker. .4 - No. 18 at the Fire Station Loop, Golden Square line, with destination of Railway Station. .5 - No. 18 passing the Central Deborah mine, Violet St. Tram has a Briquette advertisement on the roof - the flaming briquettes. .6 - Another bogie tram at ditto. .7 - No. 18 and No. 6 crossing McCrae St loop near the depot junction? .8 - ditto .9 - No. 18 and a single trucker at the North Bendigo terminus. .10 - ditto .11 - with the single trucker leaving.tramways, trams, bendigo, golden square, central deborah, north bendigo, mccrae st, tram 18, tram 6 -
 Ballarat Tramway Museum
Slide - 35mm slide/s - set of 11, Eldon Hogan, mid 1960's to early 1970's
Set of 11 Agfa Plastic mounted slides - from the Eldon Hogan collection - possibly on an ARE Bendigo tours - mid 1960's (black destination rolls) and late 1960's or early 1970's. Scanned on the Canon scanner at the depot 15/12/1971 at the time of the installation of the scanner. .1 - No 18 with Lake Weeroona in the background - possibly at the same time as the tour with No. 18, though showing destination of Charing Cross. .2 - ditto .3 - No. 25 and two following trams on a special tour, note the white disc - Quarry Hill line? .4 - No. 29 on the Eaglehawk line at the Mt. Korong Road and the Calder Highway, with the Ampol Service station in the background. .5 - No. 29 passing Lake Weeroona with Destination of Nth Bendigo - has a Briquettes Roof Advertisement., .6 - No. 26 ditto - with two SEC Roof Advertisements. .7 - No. 24 leaving Charing Cross for Golden Square with The Beehive building, Ezywalkin, Coca Cola and the Fountain Shopping Centre in the background. .8 - No. 29 and a bogie tram at the Golden Square terminus with Golden Square Hotel and Victoria Bitter fence in the background. No. 29 has a SEC Briquettes roof advertisement. .9 - No. 29, with the Cathedral in background. Tram has a SEC Briquettes roof advertisement and destination of Golden Square. .10 - side view of a bogie tram on the Eaglehawk line? Tram has a Electric cooking roof advertisement. Photo has been over exposed. .11 - Single trucker, Violet St with the Central Deborah mine head in the background. Tram has two SEC Electric Cooking roof advertisements. tramways, trams, bendigo, lake weeroona, eaglehawk, golden square, charing cross, central deborah, tram 18, tram 25, tram 29, tram 24 -
 Ballarat Tramway Museum
Slide - 35mm slide/s - set of 10, Eldon Hogan, mid 1960's to early 1970's
Set of 10 Agfa Plastic mounted slides - from the Eldon Hogan collection - possibly on an ARE Bendigo tours - mid 1960's (black destination rolls) and late 1960's or early 1970's. Scanned on the Canon scanner at the depot 15/12/1971 at the time of the installation of the scanner. .1 - No. 24 in bound along High St Bendigo with the discovery of gold monument in the foreground, Golden Sq route. .2 - ditto .3 - No. 26 outbound at the above location. .4 - No. 24 at the corner of Short St and High St, with the Technical college building? in the background. .5 - No. 26 at ditto, outbound for Golden Square. .6 - No. 24, High St Bendigo, with the Cathedral in the background. Tram has two Johnnie Walker Whiskey roof advertisements. .7 - Three trams, Pall Mall, Charing Cross, with the Beehive building in the background. Trams have SEC roof advertisement. .8 - ditto with Coca Cola ad on the Beehive building, turning around. .9 - No. 29 and a bogie tram at the Golden Square terminus with Billy Rodda's Golden Square Hotel in the background. Just past the tram is a large truck carrying boxes. .10 - Nos, 18, a bogie tram, 21 and 29 at the Quarry Hill terminus. tramways, trams, bendigo, tram 18, tram 24, tram 26, tram 21, tram 29 -
 Ballarat Tramway Museum
Slide - 35mm slide/s - set of 11, Eldon Hogan, mid 1960's to early 1970's
Set of 11 Agfa Plastic mounted slides - from the Eldon Hogan collection - possibly on an ARE Bendigo tours - mid 1960's (black destination rolls) and late 1960's or early 1970's. Scanned on the Canon scanner at the depot 15/12/1971 at the time of the installation of the scanner. .1 - front of depot -26, 19, 24, 29 and 28 amongst those present. .2 - ditto .3 - 24 departing depot .4 - 26 at Eaglehawk .5 - No. 5 turning from Pall Mall into Mitchell St with town hall in background. .6 - No. 5 using crossover in Mitchell St - with Maples, CBA Bank, Astor, Homecrafts, Roger David shops or signs in the background. .7 - ditto .8 - bogie car at Charing Cross with the Fountain Plaza shopping centre in the background. .9 - Charing Cross, with the fountain in the foreground, The Beehive and three trams in the view. .10 - No. 24 outbound, Golden Square line crossing the bridge over the creek, adjacent to the discovery of Gold Monument. .11 - ditto. tramways, trams, bendigo, eaglehawk, depot, charing cross, golden square, tram 26, tram 19, tram 24, tram 29, tram 28, tram 26, tram 5 -
 Ballarat Tramway Museum
Slide - 35mm slide/s - set of 11, Eldon Hogan, mid 1960's to early 1970's
Set of 11 Agfa Plastic mounted slides - from the Eldon Hogan collection - featuring an ARE tour with Nos. 21, 29 and 25 to Bendigo, mid 1960's. Scanned on the Canon scanner at the depot 15/12/1971 at the time of the installation of the scanner. .1 - No. 29 passing the Institute of Technology building, McCrae St. .2 - ditto .3 - Nos. 21 and 29 Lake Weeroona .4 - Nos. 29, 21 and 25 at the Golden Square Terminus with the Golden Square Hotel, Victoria Bitter fence in the background. .5 - ditto with a service car? .6 - ditto .7 - No. 21 with the Central Deborah mine poppet head in the background, Violet St. .8 - ditto with 21 and 29 .9 - ditto with 29 .10 - ditto with 21 and 29 .11 - 21, 29 and 25? at depot junction. Trams have SEC roof advertisements. tramways, trams, bendigo, lake weeroona, golden square, central deborah, tram 21, tram 29, tram 25 -
 Ballarat Tramway Museum
Slide - 35mm slide/s - set of 11, Eldon Hogan, mid 1960's to early 1970's
Set of 11 Agfa Plastic mounted slides - from the Eldon Hogan collection - featuring an ARE tour with Nos. 21, 29 and 25 to Bendigo, mid 1960's. Scanned on the Canon scanner at the depot 15/12/1971 at the time of the installation of the scanner. .1 - four trams at Charing Cross - includes 19 and 25. .2 - 21 and 25 at the depot junction. .3 - 21 and 29 Quarry Hill route? .4 - 29 ditto .5 - 24 at Golden Square terminus - photo taken from the city side - note all the little shops and buildings on the left hand side of the photograph. .6 - 29, 21 and 25 at Eaglehawk .7 - 29 - side on view - Eaglehawk line? .8 - ditto with 21 .9 - 29 - North Bendigo line? - side on view .10 - 29 and 21 - vacant paddocks - Eaglehawk line .11 - 29 crossing the railway overbridge, Eaglehawk line, in bound. Trams have SEC roof advertisements. tramways, trams, bendigo, eaglehawk, charing cross, golden square, tram 21, tram 29, tram 25, tram 19 -
 Ballarat Tramway Museum
Photograph - Black & White Photograph/s, Ron Hann, Jan. 1963
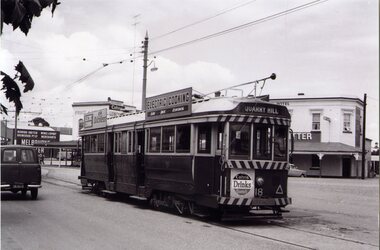
Yields information about the interior of Bendigo tram depot, is storage area and two Birney trams.Black and white print on laser print paper - of Bendigo 18 at the Eaglehawk terminus 1/1963. Photo by Ron Hann. Tram has a Cohn's Drink advertisement on the front dash panel, two SEC roof advertisements and the destination of Quarry Hill. In the background are a hotel and a liquor store, both advertising Melbourne Bitter. Printed on Fujifilm, Fujicolor Crystal Archive for Frontier"Has label "Reference 6/214/26 Photo by Ron Hann" and another label "Eaglehawk Bendigo 01.63"trams, tramways, eaglehawk, hotels, tram 18 -
 Ballarat Tramway Museum
Photograph - Black & White Photograph/s, Ron Hann, Jan. 1963
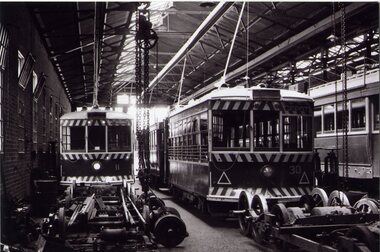
Yields information about View St Bendigo, the streetscape and the tram liveries in 1963.Black and white print on laser print paper - of Bendigo depot interior with Birney trams 11 and 30 with various wheels, trucks and parts in the foreground - 1/1963. Photo by Ron Hann. Printed on Fujifilm, Fujicolor Crystal Archive for Frontier"Has label "Reference 6/212/32 Photo by Ron Hann" and another label " Bendigo Depot 01.63"trams, tramways, bendigo, depot, birney, tram 11, tram 30