Showing 717 items matching "glass plate"
-
 4th/19th Prince of Wales's Light Horse Regiment Unit History Room
Portrait, Major General John Keatly Forsyth CMG, 1920 (estimated)
Major-General John K Forsyth CMG raised 1st Light Horse Brigade. The men of the 4th Light Horse Regiment regarded him as their first CO, although technically he was not, and always referred to him as 'Dad". He did not officially assume command of the 4th until it reached Egypt, effective from 13 December 1914.Framed portrait of Maj Gen John Keatly Forsyth CMG, Commanding Officer 4th Light Horse Regiment. Hanging in glass case with display including his riding crop and fly whisk.Brass plate inscribed: Major General J K Forsyth CMG DSO 1st CO 4th LH REGT 1st AIF Artist's signature not legible: E L P????world war 1, 4th light horse, general forsyth, portraits -
 4th/19th Prince of Wales's Light Horse Regiment Unit History Room
Photograph, Australian Lighthorseman, abt 1915
Large black & white photograph of mounted Australian Lighthorseman. Soldier is wearing WW1 uniform, with 4 Light Horse colour patch. He is holding aq .303" rifle. Photo is in wooden frame with glass front On brass plate: "No 1008 Tpr E H T Cross C Squadron 4th L H Regt" Nothing written on backtrooper cross, 4th light horse -
 Warrnambool and District Historical Society Inc.
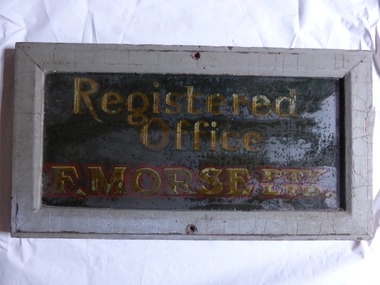
Book, Registered Office E Morse, Early 20th century
This plate comes from the Registered Office of F. Morse Pty Ltd. The name ‘Morse’ has been associated with the local Warrnambool transport industry for more than 100 years from the horse-drawn era to the advent of motorized transport. Frederick Morse was the son of Henry Morse, a teacher at The Grange, Hamilton and at Grasmere in the early 1870s. In 1883 Frederick Morse started business in Fairy Street as a coach builder in a partnership known as Robinson and Morse and in 1891 he set up a business on his own, the Victoria Carriage Works in Lava Street with branches in Port Fairy and Koroit. By the 1890s he was employing 27 people and winning State awards for his Abbot buggies. By the 1920s the Morse business had moved to motorized transport, expanding over the years to car dealerships, caravans, panel works and reconditioning and truck building with the subsidiary businesses of Morsmilk and Morsbearings (both later sold).This plate is of strong significance as a memento of a business in Warrnambool that has been prominent in the local transport industry for 120 years. It is also a memento of the Morse family, notable 19th century settlers in the town and important in local community affairs since that time. This is a wooden frame with a glass front. The frame is painted a grey colour and has holes at the top and bottom for affixing the frame to a wall or door. Behind the glass the words ‘Registered Office F. Morse Pty Ltd’ are painted or incised on to a wooden slab. The words are in yellow and red paint. The frame is a little chipped and the inside of the glass is somewhat blotchy and stained. ‘Registered Office’ ‘F. Morse Pty Ltd’ frederick morse, robinson and morse, morse & co., history of warrnambool, coach building in warrnambool, automotive industry in warrnambool -
 Orbost & District Historical Society
trinket box
Small cut glass rectangular trinket box with gold-plated engraved lid and raised leaf and flower. Flower is amethyst with scotch thistle.trinket-box glass-technology glassware costume-accessories jewelry -
 Orbost & District Historical Society
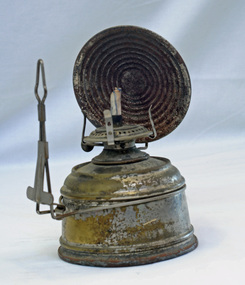
lantern, circa 1890
This item is an example of a lighting device used before electricity and battery power were widespread.A small brass Elfin Reflector Night kerosene lantern with a reflector plate at the back. A handle runs around the middle. It has a small canvas wick. The glass is missing.On top of fuel tank-ELFIN REFLECTOR NIGHT LAMP On back-MADE IN U.S.A. BY EDWARD MILLER & CO USA On wicker winder (left) -E. MILLER -CO.U.S.A.lamp lantern kerosene oil lighting miller-edward -
 Cheese World Museum
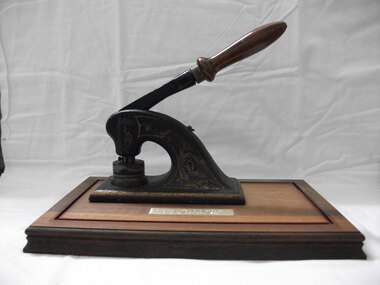
Company Seal, Warrnambool Cheese & Butter Factory Co.Ltd. Original Company Seal, c1890
The seal was used in the Warrnambool Cheese & Butter Factory Co Ltd office for stamping legal documents. It is not known when it became obsolete and housed in a glass case for safekeeping.The Seal is historically significant as it relates to the formation of the WCBF in 1888 and used for legal documents. Until 2013 the Warrnambool Cheese & Butter Factory was the only remaining independently owned butter factory in Victoria. The company was taken over by Canadian company Saputo in 2013. It is artistically significant as the surface of the arm of this functional cast iron Seal features a gold design. The seal is made of black painted cast iron. The flat base has a gold-painted border. The curved iron arm to which a wooden handle is attached has a swirling scroll pattern on the side. The seal component consists of a round base and a round iron stamp attached to the handle mechanism. The seal is housed in a glass case with a small name plate at the front.Name plate: Warrnambool Cheese & Butter Factory Co Ltd 'Original Company Seal'allansford, warrnambool cheese & butter factory company ltd, company seals, office equipment -
 Cheese World Museum
Trophy, 2003
Presented to Warrnambool Cheese and Butter Factory in 2003 as part of the Dairy Industry Association of Australia awards for factory physical appearance and presentation.Round silver-plated tray with raised embossed and beaded edge; inscription on disc in centre of tray. Encased in square timber presentation box with glass lid and lined with blue fabric.Best Kept Factory Award/Western District DIAA/Warrnambool Cheese and Butter Factory 2003/Proudly Sponsored by Ensign the Uniform Peopleallansford, dairy industry, warrnambool cheese and butter factory, wcb, ensign, trophies -
 Cheese World Museum
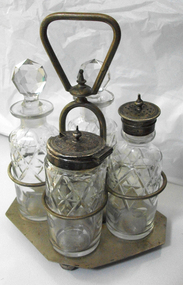
Cruet set
This cruet set belonged to the Orr family of Addington, family of the donor.This is typical of a table condiment set.This cruet set has a diamond-shaped silver plated tray with four knobs for legs. A hoop-shaped frame is screwed underneath and holds four circular frames for holding condiment bottles. The frame has a truncated triangular top. Four crystal cut bottles with a diamond pattern fit into the framework. Two have crystal cut glass stoppers and two have silver-plated lids. One silver lid is hinged and has a spoon hole and the other has many small holes (for pepper?).allansford, orr family, addington, tableware, dining setting, condiments, eddington -
 Flagstaff Hill Maritime Museum and Village
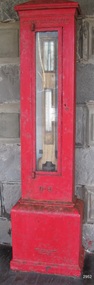
Instrument - Barometer, 1867
Langlands Company History: Langlands foundry was Melbourne's first foundry and iron shipbuilder established in 1842, only 8 years after the founding of the Victorian colony by two Scottish immigrants, Robert Langlands and Thomas Fulton, who had formed a partnership before emigrating (1813–1859). The business was known as the 'Langlands Foundry Co'. Henry Langlands (1794-1863), left Scotland in 1846 with his wife Christian, née Thoms, and five surviving children to join his brother Robert. By the time he arrived in early January of 1847 the partnership of Robert Langlands and Fulton had dissolved as Fulton had gone off to establish his own works. It was at this time that the two brothers took over ownership of Langlands foundry. Several years later Robert retired and Henry became sole the proprietor. The foundry was originally located on Flinders Lane between King and Spencer streets. Their sole machine tool, when they commenced as a business, was a small slide rest lathe turned by foot. In about 1865 they moved to the south side of the Yarra River, to the Yarra bank near the Spencer Street Bridge and then in about 1886 they moved to Grant Street, South Melbourne. The works employed as many as 350 workers manufacturing a wide range of marine, mining, civil engineering, railway and general manufacturing components including engines and boilers. The foundry prospered despite high wages and the lack of raw materials. It became known for high-quality products that competed successfully with any imported articles. By the time Henry retired, the foundry was one of the largest employers in Victoria and was responsible for casting the first bell and lamp-posts in the colony. The business was carried on by his sons after Henry's death. The company was responsible for fabricating the boiler for the first railway locomotive to operate in Australia, built-in 1854 by Robertson, Martin & Smith for the Melbourne and Hobson's Bay Railway Company. Also in the 1860s, they commenced manufacture of cast iron pipes for the Board of Works, which was then laying the first reticulated water supply system in Melbourne. Langlands was well known for its gold mining equipment, being the first company in Victoria to take up the manufacture of mining machinery, and it played an important role in equipping Victoria's and Australia's first mineral boom in the 1850s and 1860s. Langlands Foundry was an incubator for several engineers including Herbert Austin (1866–1941) who worked as a fitter at Langlands and went on to work on the Wolesely Shearing machine. He also founded the Austin Motor Company in 1905. Around the 1890s Langlands Foundry Co. declined and was bought up by the Austral Otis Co. in about 1893. History for Grimoldi: John Baptist Grimoldi was born in London UK. His Father was Domeneck Grimoldi, who was born in Amsterdam with an Italian Father and Dutch mother. Domeneck was also a scientific instrument maker. John B Grimoldi had served his apprenticeship to his older brother Henry Grimoldi in Brooke Street, Holburn, London and had emigrated from England to Australia to start his own meteorological and scientific instrument makers business at 81 Queens St Melbourne. He operated his business in 1862 until 1883 when it was brought by William Samuel and Charles Frederick, also well known scientific instrument makers who had emigrated to Melbourne in 1875. John Grimoldi became successful and made a number of high quality measuring instruments for the Meteorological Observatory in Melbourne. The barometer was installed at Warrnambool's old jetty and then the Breakwater as part of the Victorian Government's insistence that barometers be placed at all major Victorian ports. This coastal barometer is representative of barometers that were installed through this government scheme that began in 1866. The collecting of meteorological data was an important aspect of the Melbourne Observatory's work from its inception. Just as astronomy had an important practical role to play in navigation, timekeeping and surveying, so the meteorological service provided up to date weather information and forecasts that were essential for shipping and agriculture. As a result, instruments made by the early instrument makers of Australia was of significant importance to the development and safe trading of companies operating during the Victorian colonies early days. The provenance of this artefact is well documented and demonstrates, in particular, the importance of the barometer to the local fishermen and mariners of Warrnambool. This barometer is historically significant for its association with Langlands’ Foundry which pioneered technology in the developing colony by establishing the first ironworks in Melbourne founded in 1842. Also, it is significant for its connection to John B Grimoldi who made the barometer and thermometer housed in the cast iron case. Grimoldi, a successful meteorological and scientific instrument maker, arrived in the colony from England and established his business in 1862 becoming an instrument maker to the Melbourne Observatory. Additional significance is its completeness and for its rarity, as it is believed to be one of only two extant barometers of this type and in 1986 it was moved to Flagstaff Hill Maritime Village as part of its museum collection. Coast Barometer No. 8 is a tall, red painted cast iron pillar containing a vertical combined barometer and thermometer. Half way down in the cast iron framed glass door is a keyhole. Inside is a wooden case containing a mercury barometer at the top with a thermometer attached underneath, each with a separate glass window and a silver coloured metal backing plate. Just below the barometer, on the right-hand side, is a brass disc with a hole for a gauge key in the centre. The barometer has a silvered tin backing plate with a scale, in inches, of "27 to 31" on the right side and includes a Vernier with finer markings, which is set by turning the gauge key. The thermometer has a silvered tin backing plate with a scale on the left side of "30 to 140". Each of the scales has markings showing the units between the numbers.Inscription at the top front of the pillar reads "COAST BAROMETER" Inscribed on the bottom of the pillar is "No 8". and "LANGLANDS BROS & CO ENGINEERS MELBOURNE " The barometer backing plate is inscribed "COAST BAROMETER NO. 8, VICTORIA" and printed on the left of the scale, has "J GRIMOLDI" on the top and left of the scale, inscribed "Maker, MELBOURNE". There is an inscription on the bottom right-hand side of the thermometer scale, just above the 30 mark "FREEZING" Etched into the timber inside the case are the Roman numerals "VIII" (the number 8)flagstaff hill, warrnambool, maritime village, maritime museum, flagstaff hill maritime museum & village, shipwreck coast, great ocean road, warrnambool breakwater, coast barometer, coastal barometer, barometer, weather warning, ports and harbours, fishery barometer, sea coast barometer, austral otis co, coast barometer no. 8, henry grimoldi, henry langlands, john baptist grimoldi, langlands foundry co, meteorological instrument maker, robert langlands, scientific instrument maker, thermometer, thomas fulton -
 Flagstaff Hill Maritime Museum and Village
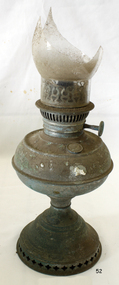
Functional object - Lamp, Bradley & Hubbard, 1900-1919
One of the most common centre draft kerosene lamps one can find in the USA and Canada is the Rayo. Large and sturdy, simple to use, but also notorious for being a fuel hog. This lamp was made by Bradley and Hubbard Metalworks in Chicago also Bradley and Hubbard made the “Perfection” brand lamps that look like the Rayo and are pretty much the same lamp with all parts interchangeable. The Rayo was given away to customers for free as a promotional item by the Standard Oil Company. The lamp’s huge appetite for fuel meant a hefty increase in sales of kerosene for the company and increased profits. The Rayo is a classic centre draft lamp that uses a widely available tubular wick that measures 62mm flat. It employs a simple and reliable mechanism for securing wicks in the burner along with a brass tube with many small teeth at its end. The tube is attached to the toothed rack that’s moved up and down by the adjuster knob.This type of lamp was used in most households and on rural properties before the introduction of electricity and is an early example of a promotional. The lamp was given away to customers of Kerosene oil as a means of increasing the Standard Oil Company sales of Kerosene during the late19th to early 20th century.Lamp of metal without shade. Mantle burner, plated light metal base. Ornate shade holder. Broken glass.Marked "Rayo Junior"flagstaff hill, warrnambool, flagstaff hill maritime museum, shipwreck coast, flagstaff hill maritime village, great ocean road, lamp, mantle lamp, metal lamp, lighting, oil lamp, bradley & hubbard -
 Flagstaff Hill Maritime Museum and Village
Domestic object - Bowl, Late 19th or early 20th Century
The Process of Making Pottery Decorating, Firing, Glazing, Making, Technical There is a rhythm and flow to clay. It can’t be done all at once! Even the making process! It can take weeks to get everything done, especially if you can only work on your pottery once a week! Even though we have three hour classes, it’s often just not enough time! Here is an overview of some of the processes so you have a bit more grasp on some of the technical stuff! Step One – Design There are SO many ideas out there for making stuff in clay! From delicate porcelain jewellery, through to heavy sculptural work and everything in between. Deciding your direction is sometimes not that easy – when you first start, try everything, you will naturally gravitate to the style that you enjoy! The options and variations are endless and can get a wee bit overwhelming too! Check in with me before you start to ensure your ideas will work, what order you might do things, how you could achieve the look you are seeking and any other technical data required! Step Two – Making Clay is thixotropic. This means that as you work with it, the clay first gets sloppier and wetter, before is begins to dry in the atmosphere. For most things, you simply can’t do all parts of the project at once. An example of work order might look like: Get last weeks work out from the shelves Prepare clay for today’s work – roll your clay, prepare balls for throwing, make the first stage of a pinch pot) Clean up last week’s work and put it on the shelf for bisque firing Check that you have any glazing to do – and do enough of it that you will have time to finish your main project Do the next step of your next project – there might be a further step that can’t be complete immediately, in that case, wrap your work well and put onto the shelves. Letting your work rest for a while can really help keep your work clean and professional looking. Many things require bagging under plastic to keep it ready for work the next week – put your name on the outside of the bag so you can find your work easily. We have stickers and markers. Consider how you want to decorate your work – coloured slip can be applied at a fairly wet stage (remembering that it will make your work even wetter!). Trying to apply slip to dry clay won’t work! If you want to do sgraffito – you will need to keep the work leather hard (a state of dryness where you can still work the clay with a little effort and a little water and care). Step Three – Drying Most of the time your work can go into the rack uncovered to let it dry out for the following week. If you want to continue forming or shaping you will need to double bag your work – put your work on a suitable sized bat and put the bat in a bag so the base of the bag is under the bat, then put another bag over the top of the work and tuck the top of the bag under the bat. If you want to trim (or turn) your thrown work the following week, it should also be double bagged. If your work is large, delicate, or of uneven thicknesses, you should lightly cover your work for drying. When considering the drying process, bare in mind the weather, humidity and wind! The hotter and dryer, the faster things dry and work can dry unevenly in the shelves – this can lead to cracking – another time to lightly cover your work for drying. Step Four – Trimming and Cleaning Up Your work is dry! It is called greenware now and it is at it’s most fragile! Handle everything with two hands. I often refer to soft hands – keep everything gentle and with your fingers spread as much as possible. Try to not pick up things like plates too much, and always with both hands! Before your work can be bisque fired it should be “cleaned up”. You work won’t go into the kiln if it has sharp edges – when glazed, sharp edges turn into razor blades! Use a piece of fly wire to rub the work all over – this will scratch a little so be light handed. Use a knife or metal kidney to scrape any areas that require a bit more dynamic treatment than the fly wire offers! Finally, a very light wipe over with a slightly damp sponge can help soften and soothe all of your edges and dags! Trimming thrown work: If you are planning to trim (or turn) your thrown work (and you should be), make sure you bag it well – your work should be leather hard to almost dry for easiest trimming. Use this step to finish the work completely – use a metal kidney to polish the surface, or a slightly damp sponge to give a freshly thrown look. Wipe the sponge around the rim after trimming, and check the inside of the pot for dags! Trimming slip cast work: Usually I will trim the rims of your work on the wheel the following day to make that stage easier, however you will still need to check your work for lumps and bumps. Last but not least – check that your name is still clearly on the bottom of your work. Step Five – Bisque Firing When the work is completely dry it can go into the bisque kiln. The bisque kiln is fired to 1000°C. This process burns off the water in the clay as well as some of the chemically bound water. The structure of the clay is not altered that much at this temperature. Inside the bisque kiln, the work is stacked a little, small bowl inside a larger bowl and onto a heavy plate. Smaller items like decorations or drink coasters might get stacked several high. Consideration is paid to the weight of the stack and shape of the work. A bisque kiln can fire about one and a half times the amount of work that the glaze kiln can fire. The firing takes about 10 hours to complete the cycle and about two days to cool down. Once it has been emptied the work is placed in the glaze room ready for you to decorate! Step Six – Glazing Decorating your work with colour can be a lot of fun – and time consuming! There are three main options for surface treatment at this stage: Oxide Washes Underglazes Glazes Washes and underglazes do not “glaze” the work – It will still need a layer of glaze to fully seal the clay (washes don’t need glaze on surfaces not designed for food or liquid as they can gloss up a little on their own). Underglazes are stable colourants that turn out pretty much how they look in the jar. They can be mixed with each other to form other colours and can be used like water colours to paint onto your work. Mostly they should have a clear glaze on top to seal them. Oxides are a different species – the pink oxide (cobalt) wash turns out bright blue for instance. They don’t always need a glaze on top, and some glazes can change the colour of the wash! The glazes need no other “glaze” on top! Be careful of unknown glaze interactions – you can put any combination of glaze in a bowl or on a plate, but only a single glaze on the outside of any vertical surface! Glazes are a chemical reaction under heat. We don’t know the exact chemicals in the Mayco glazes we use. I can guess by the way they interact with each other, however, on the whole, you need to test every idea you have, and not run the test on a vertical surface! Simply put, glaze is a layer of glass like substance that bonds with the clay underneath. Clay is made of silica, alumina and water. Glaze is made of mostly silica. Silica has a melting point of 1700°C and we fire to 1240°C. The silica requires a “flux” to help it melt at the lower temperature. Fluxes can be all sorts of chemicals – a common one is calcium – calcium has a melting point of 2500°C, however, together they both melt at a much lower temperature! Colourants are metal oxides like cobalt (blue), chrome (green through black), copper (green, blue, even red!), manganese (black, purple and pink) iron (red brown), etc. Different chemicals in the glaze can have dramatic effects. for example, barium carbonate (which we don’t use) turns manganese bright pink! Other elements can turn manganese dioxide brown, blue, purple and reddish brown. Manganese dioxide is a flux in and of itself as well. So, glazes that get their black and purple colours, often interact with other glazes and RUN! Our mirror black is a good example – it mixes really well with many glazes because it fluxes them – causes them to melt faster. It will also bring out many beautiful colours in the glazes because it’s black colouring most definitely comes from manganese dioxide! Glaze chemistry is a whole subject on it’s own! We use commercial Mayco glazes on purpose – for their huge range of colour possibilities, stability, cool interactions, artistic freedom with the ability to easily brush the glazes on and ease of use. We currently have almost 50 glazes on hand! A major project is to test the interactions of all glazes with each other. That is 2,500 test tiles!!!! I’m going to make the wall behind the wheels the feature wall of pretty colours! Step Seven – Glaze (Gloss or sometimes called “Glost”) Firing Most of the time this is the final stage of making your creation (but not always!) The glaze kiln goes to 1240°C. This is called cone 6, or midrange. It is the low end of stoneware temperatures. Stoneware clays and glazes are typically fired at cone 8 – 10, that is 1260 – 1290°C. The energy requirement to go from 1240°C to 1280°C is almost a 30% more! Our clay is formulated to vitrify (mature, turn “glass-like”) at 1240°, as are our glazes. A glaze kiln take around 12 hours to reach temperature and two to three days to cool down. Sometimes a third firing process is required – this is for decoration that is added to work after the glaze firing. For example – adding precious metals and lustres. this firing temperature is usually around 600 – 800°C depending upon the techniques being used. There are many students interested in gold and silver trims – we will be doing this third type of firing soon! After firing your work will be in the student finished work shelves. Remember to pay for it before you head out the door! There is a small extra charge for using porcelain clay (it’s more than twice the price of regular clay), and for any third firing process! Once your work has been fired it can not turn back into clay for millennia – so don’t fire it if you don’t like it! Put it in the bucket for recycling. https://firebirdstudios.com.au/the-process-of-making-pottery/ The bowl is an example of kitchenware used in the 19th century and still in use today.Bowl white ceramic. Crack on side. Badly stained.Backstamp very faint and unable to be read.flagstaff hill, warrnambool, shipwrecked-coast, flagstaff-hill, flagstaff-hill-maritime-museum, maritime-museum, shipwreck-coast, flagstaff-hill-maritime-village, mixing bowl, food preparation, kitchen equipment, ceramic -
 Flagstaff Hill Maritime Museum and Village
Domestic object - Bowl
The Process of Making Pottery Decorating, Firing, Glazing, Making, Technical There is a rhythm and flow to clay. It can’t be done all at once! Even the making process! It can take weeks to get everything done, especially if you can only work on your pottery once a week! Even though we have three hour classes, it’s often just not enough time! Here is an overview of some of the processes so you have a bit more grasp on some of the technical stuff! Step One – Design There are SO many ideas out there for making stuff in clay! From delicate porcelain jewellery, through to heavy sculptural work and everything in between. Deciding your direction is sometimes not that easy – when you first start, try everything, you will naturally gravitate to the style that you enjoy! The options and variations are endless and can get a wee bit overwhelming too! Check in with me before you start to ensure your ideas will work, what order you might do things, how you could achieve the look you are seeking and any other technical data required! Step Two – Making Clay is thixotropic. This means that as you work with it, the clay first gets sloppier and wetter, before is begins to dry in the atmosphere. For most things, you simply can’t do all parts of the project at once. An example of work order might look like: Get last weeks work out from the shelves Prepare clay for today’s work – roll your clay, prepare balls for throwing, make the first stage of a pinch pot) Clean up last week’s work and put it on the shelf for bisque firing Check that you have any glazing to do – and do enough of it that you will have time to finish your main project Do the next step of your next project – there might be a further step that can’t be complete immediately, in that case, wrap your work well and put onto the shelves. Letting your work rest for a while can really help keep your work clean and professional looking. Many things require bagging under plastic to keep it ready for work the next week – put your name on the outside of the bag so you can find your work easily. We have stickers and markers. Consider how you want to decorate your work – coloured slip can be applied at a fairly wet stage (remembering that it will make your work even wetter!). Trying to apply slip to dry clay won’t work! If you want to do sgraffito – you will need to keep the work leather hard (a state of dryness where you can still work the clay with a little effort and a little water and care). Step Three – Drying Most of the time your work can go into the rack uncovered to let it dry out for the following week. If you want to continue forming or shaping you will need to double bag your work – put your work on a suitable sized bat and put the bat in a bag so the base of the bag is under the bat, then put another bag over the top of the work and tuck the top of the bag under the bat. If you want to trim (or turn) your thrown work the following week, it should also be double bagged. If your work is large, delicate, or of uneven thicknesses, you should lightly cover your work for drying. When considering the drying process, bare in mind the weather, humidity and wind! The hotter and dryer, the faster things dry and work can dry unevenly in the shelves – this can lead to cracking – another time to lightly cover your work for drying. Step Four – Trimming and Cleaning Up Your work is dry! It is called greenware now and it is at it’s most fragile! Handle everything with two hands. I often refer to soft hands – keep everything gentle and with your fingers spread as much as possible. Try to not pick up things like plates too much, and always with both hands! Before your work can be bisque fired it should be “cleaned up”. You work won’t go into the kiln if it has sharp edges – when glazed, sharp edges turn into razor blades! Use a piece of fly wire to rub the work all over – this will scratch a little so be light handed. Use a knife or metal kidney to scrape any areas that require a bit more dynamic treatment than the fly wire offers! Finally, a very light wipe over with a slightly damp sponge can help soften and soothe all of your edges and dags! Trimming thrown work: If you are planning to trim (or turn) your thrown work (and you should be), make sure you bag it well – your work should be leather hard to almost dry for easiest trimming. Use this step to finish the work completely – use a metal kidney to polish the surface, or a slightly damp sponge to give a freshly thrown look. Wipe the sponge around the rim after trimming, and check the inside of the pot for dags! Trimming slip cast work: Usually I will trim the rims of your work on the wheel the following day to make that stage easier, however you will still need to check your work for lumps and bumps. Last but not least – check that your name is still clearly on the bottom of your work. Step Five – Bisque Firing When the work is completely dry it can go into the bisque kiln. The bisque kiln is fired to 1000°C. This process burns off the water in the clay as well as some of the chemically bound water. The structure of the clay is not altered that much at this temperature. Inside the bisque kiln, the work is stacked a little, small bowl inside a larger bowl and onto a heavy plate. Smaller items like decorations or drink coasters might get stacked several high. Consideration is paid to the weight of the stack and shape of the work. A bisque kiln can fire about one and a half times the amount of work that the glaze kiln can fire. The firing takes about 10 hours to complete the cycle and about two days to cool down. Once it has been emptied the work is placed in the glaze room ready for you to decorate! Step Six – Glazing Decorating your work with colour can be a lot of fun – and time consuming! There are three main options for surface treatment at this stage: Oxide Washes Underglazes Glazes Washes and underglazes do not “glaze” the work – It will still need a layer of glaze to fully seal the clay (washes don’t need glaze on surfaces not designed for food or liquid as they can gloss up a little on their own). Underglazes are stable colourants that turn out pretty much how they look in the jar. They can be mixed with each other to form other colours and can be used like water colours to paint onto your work. Mostly they should have a clear glaze on top to seal them. Oxides are a different species – the pink oxide (cobalt) wash turns out bright blue for instance. They don’t always need a glaze on top, and some glazes can change the colour of the wash! The glazes need no other “glaze” on top! Be careful of unknown glaze interactions – you can put any combination of glaze in a bowl or on a plate, but only a single glaze on the outside of any vertical surface! Glazes are a chemical reaction under heat. We don’t know the exact chemicals in the Mayco glazes we use. I can guess by the way they interact with each other, however, on the whole, you need to test every idea you have, and not run the test on a vertical surface! Simply put, glaze is a layer of glass like substance that bonds with the clay underneath. Clay is made of silica, alumina and water. Glaze is made of mostly silica. Silica has a melting point of 1700°C and we fire to 1240°C. The silica requires a “flux” to help it melt at the lower temperature. Fluxes can be all sorts of chemicals – a common one is calcium – calcium has a melting point of 2500°C, however, together they both melt at a much lower temperature! Colourants are metal oxides like cobalt (blue), chrome (green through black), copper (green, blue, even red!), manganese (black, purple and pink) iron (red brown), etc. Different chemicals in the glaze can have dramatic effects. for example, barium carbonate (which we don’t use) turns manganese bright pink! Other elements can turn manganese dioxide brown, blue, purple and reddish brown. Manganese dioxide is a flux in and of itself as well. So, glazes that get their black and purple colours, often interact with other glazes and RUN! Our mirror black is a good example – it mixes really well with many glazes because it fluxes them – causes them to melt faster. It will also bring out many beautiful colours in the glazes because it’s black colouring most definitely comes from manganese dioxide! Glaze chemistry is a whole subject on it’s own! We use commercial Mayco glazes on purpose – for their huge range of colour possibilities, stability, cool interactions, artistic freedom with the ability to easily brush the glazes on and ease of use. We currently have almost 50 glazes on hand! A major project is to test the interactions of all glazes with each other. That is 2,500 test tiles!!!! I’m going to make the wall behind the wheels the feature wall of pretty colours! Step Seven – Glaze (Gloss or sometimes called “Glost”) Firing Most of the time this is the final stage of making your creation (but not always!) The glaze kiln goes to 1240°C. This is called cone 6, or midrange. It is the low end of stoneware temperatures. Stoneware clays and glazes are typically fired at cone 8 – 10, that is 1260 – 1290°C. The energy requirement to go from 1240°C to 1280°C is almost a 30% more! Our clay is formulated to vitrify (mature, turn “glass-like”) at 1240°, as are our glazes. A glaze kiln take around 12 hours to reach temperature and two to three days to cool down. Sometimes a third firing process is required – this is for decoration that is added to work after the glaze firing. For example – adding precious metals and lustres. this firing temperature is usually around 600 – 800°C depending upon the techniques being used. There are many students interested in gold and silver trims – we will be doing this third type of firing soon! After firing your work will be in the student finished work shelves. Remember to pay for it before you head out the door! There is a small extra charge for using porcelain clay (it’s more than twice the price of regular clay), and for any third firing process! Once your work has been fired it can not turn back into clay for millennia – so don’t fire it if you don’t like it! Put it in the bucket for recycling. https://firebirdstudios.com.au/the-process-of-making-pottery/ This bowl is an example of kitchenware used in the 19th century and still in use today.Bowl white ceramic plain that has two sets of edging around lip. Inside bowl has plaster designed to look like cooking mixture.flagstaff hill, warrnambool, shipwrecked-coast, flagstaff-hill, flagstaff-hill-maritime-museum, maritime-museum, shipwreck-coast, flagstaff-hill-maritime-village, kitchen equipment, ceramic -
 Flagstaff Hill Maritime Museum and Village
Domestic object - Bowl, J & G Meakin, Late 19th or early 20th Century
The Process of Making Pottery Decorating, Firing, Glazing, Making, Technical There is a rhythm and flow to clay. It can’t be done all at once! Even the making process! It can take weeks to get everything done, especially if you can only work on your pottery once a week! Even though we have three hour classes, it’s often just not enough time! Here is an overview of some of the processes so you have a bit more grasp on some of the technical stuff! Step One – Design There are SO many ideas out there for making stuff in clay! From delicate porcelain jewellery, through to heavy sculptural work and everything in between. Deciding your direction is sometimes not that easy – when you first start, try everything, you will naturally gravitate to the style that you enjoy! The options and variations are endless and can get a wee bit overwhelming too! Check in with me before you start to ensure your ideas will work, what order you might do things, how you could achieve the look you are seeking and any other technical data required! Step Two – Making Clay is thixotropic. This means that as you work with it, the clay first gets sloppier and wetter, before is begins to dry in the atmosphere. For most things, you simply can’t do all parts of the project at once. An example of work order might look like: Get last weeks work out from the shelves Prepare clay for today’s work – roll your clay, prepare balls for throwing, make the first stage of a pinch pot) Clean up last week’s work and put it on the shelf for bisque firing Check that you have any glazing to do – and do enough of it that you will have time to finish your main project Do the next step of your next project – there might be a further step that can’t be complete immediately, in that case, wrap your work well and put onto the shelves. Letting your work rest for a while can really help keep your work clean and professional looking. Many things require bagging under plastic to keep it ready for work the next week – put your name on the outside of the bag so you can find your work easily. We have stickers and markers. Consider how you want to decorate your work – coloured slip can be applied at a fairly wet stage (remembering that it will make your work even wetter!). Trying to apply slip to dry clay won’t work! If you want to do sgraffito – you will need to keep the work leather hard (a state of dryness where you can still work the clay with a little effort and a little water and care). Step Three – Drying Most of the time your work can go into the rack uncovered to let it dry out for the following week. If you want to continue forming or shaping you will need to double bag your work – put your work on a suitable sized bat and put the bat in a bag so the base of the bag is under the bat, then put another bag over the top of the work and tuck the top of the bag under the bat. If you want to trim (or turn) your thrown work the following week, it should also be double bagged. If your work is large, delicate, or of uneven thicknesses, you should lightly cover your work for drying. When considering the drying process, bare in mind the weather, humidity and wind! The hotter and dryer, the faster things dry and work can dry unevenly in the shelves – this can lead to cracking – another time to lightly cover your work for drying. Step Four – Trimming and Cleaning Up Your work is dry! It is called greenware now and it is at it’s most fragile! Handle everything with two hands. I often refer to soft hands – keep everything gentle and with your fingers spread as much as possible. Try to not pick up things like plates too much, and always with both hands! Before your work can be bisque fired it should be “cleaned up”. You work won’t go into the kiln if it has sharp edges – when glazed, sharp edges turn into razor blades! Use a piece of fly wire to rub the work all over – this will scratch a little so be light handed. Use a knife or metal kidney to scrape any areas that require a bit more dynamic treatment than the fly wire offers! Finally, a very light wipe over with a slightly damp sponge can help soften and soothe all of your edges and dags! Trimming thrown work: If you are planning to trim (or turn) your thrown work (and you should be), make sure you bag it well – your work should be leather hard to almost dry for easiest trimming. Use this step to finish the work completely – use a metal kidney to polish the surface, or a slightly damp sponge to give a freshly thrown look. Wipe the sponge around the rim after trimming, and check the inside of the pot for dags! Trimming slip cast work: Usually I will trim the rims of your work on the wheel the following day to make that stage easier, however you will still need to check your work for lumps and bumps. Last but not least – check that your name is still clearly on the bottom of your work. Step Five – Bisque Firing When the work is completely dry it can go into the bisque kiln. The bisque kiln is fired to 1000°C. This process burns off the water in the clay as well as some of the chemically bound water. The structure of the clay is not altered that much at this temperature. Inside the bisque kiln, the work is stacked a little, small bowl inside a larger bowl and onto a heavy plate. Smaller items like decorations or drink coasters might get stacked several high. Consideration is paid to the weight of the stack and shape of the work. A bisque kiln can fire about one and a half times the amount of work that the glaze kiln can fire. The firing takes about 10 hours to complete the cycle and about two days to cool down. Once it has been emptied the work is placed in the glaze room ready for you to decorate! Step Six – Glazing Decorating your work with colour can be a lot of fun – and time consuming! There are three main options for surface treatment at this stage: Oxide Washes Underglazes Glazes Washes and underglazes do not “glaze” the work – It will still need a layer of glaze to fully seal the clay (washes don’t need glaze on surfaces not designed for food or liquid as they can gloss up a little on their own). Underglazes are stable colourants that turn out pretty much how they look in the jar. They can be mixed with each other to form other colours and can be used like water colours to paint onto your work. Mostly they should have a clear glaze on top to seal them. Oxides are a different species – the pink oxide (cobalt) wash turns out bright blue for instance. They don’t always need a glaze on top, and some glazes can change the colour of the wash! The glazes need no other “glaze” on top! Be careful of unknown glaze interactions – you can put any combination of glaze in a bowl or on a plate, but only a single glaze on the outside of any vertical surface! Glazes are a chemical reaction under heat. We don’t know the exact chemicals in the Mayco glazes we use. I can guess by the way they interact with each other, however, on the whole, you need to test every idea you have, and not run the test on a vertical surface! Simply put, glaze is a layer of glass like substance that bonds with the clay underneath. Clay is made of silica, alumina and water. Glaze is made of mostly silica. Silica has a melting point of 1700°C and we fire to 1240°C. The silica requires a “flux” to help it melt at the lower temperature. Fluxes can be all sorts of chemicals – a common one is calcium – calcium has a melting point of 2500°C, however, together they both melt at a much lower temperature! Colourants are metal oxides like cobalt (blue), chrome (green through black), copper (green, blue, even red!), manganese (black, purple and pink) iron (red brown), etc. Different chemicals in the glaze can have dramatic effects. for example, barium carbonate (which we don’t use) turns manganese bright pink! Other elements can turn manganese dioxide brown, blue, purple and reddish brown. Manganese dioxide is a flux in and of itself as well. So, glazes that get their black and purple colours, often interact with other glazes and RUN! Our mirror black is a good example – it mixes really well with many glazes because it fluxes them – causes them to melt faster. It will also bring out many beautiful colours in the glazes because it’s black colouring most definitely comes from manganese dioxide! Glaze chemistry is a whole subject on it’s own! We use commercial Mayco glazes on purpose – for their huge range of colour possibilities, stability, cool interactions, artistic freedom with the ability to easily brush the glazes on and ease of use. We currently have almost 50 glazes on hand! A major project is to test the interactions of all glazes with each other. That is 2,500 test tiles!!!! I’m going to make the wall behind the wheels the feature wall of pretty colours! Step Seven – Glaze (Gloss or sometimes called “Glost”) Firing Most of the time this is the final stage of making your creation (but not always!) The glaze kiln goes to 1240°C. This is called cone 6, or midrange. It is the low end of stoneware temperatures. Stoneware clays and glazes are typically fired at cone 8 – 10, that is 1260 – 1290°C. The energy requirement to go from 1240°C to 1280°C is almost a 30% more! Our clay is formulated to vitrify (mature, turn “glass-like”) at 1240°, as are our glazes. A glaze kiln take around 12 hours to reach temperature and two to three days to cool down. Sometimes a third firing process is required – this is for decoration that is added to work after the glaze firing. For example – adding precious metals and lustres. this firing temperature is usually around 600 – 800°C depending upon the techniques being used. There are many students interested in gold and silver trims – we will be doing this third type of firing soon! After firing your work will be in the student finished work shelves. Remember to pay for it before you head out the door! There is a small extra charge for using porcelain clay (it’s more than twice the price of regular clay), and for any third firing process! Once your work has been fired it can not turn back into clay for millennia – so don’t fire it if you don’t like it! Put it in the bucket for recycling. https://firebirdstudios.com.au/the-process-of-making-pottery/This bowl was made by renowned pottery company J & G Meakin of England. The firm was established in the mid-1800's. The bowl is an example of kitchenware used in the 19th century and still in use today.Bowl; white ceramic, round and tapering inwards towards base. Made by J and G Meakin England.On base, 'Ironstone China Reg SOL 391413' with symbolflagstaff hill, flagstaff hill maritime museum and village, warrnambool, maritime museum, maritime village, great ocean road, shipwreck coast, mixing bowl, food preparation, j & g meakin, pottery, stoke-on-trent, kitchen equipment, ceramic -
 Flagstaff Hill Maritime Museum and Village
Equipment - Stevenson Screen, Thomas Stevenson, ca. 1910
Stevenson screens were first introduced in Australia in the 1880s and were widely installed by 1910. The screens have been used to shelter and protect thermometers and other meteorological instruments from rain and direct heat while the holes and double-louvre walls allowed air to flow around them. Sometimes other meteorological instruments were included in the weather stations, so there were different Stevenson Screen sizes. This authentic, original Stevenson screen was previously owned by the Australian Bureau of Meteorology and was used for many years for weather readings at the Cape Otway Light Station in southwest Victoria. The Lighthouse Keepers recorded the readings for minimum and maximum temperatures at 9 a.m. every day from January 1865 until April 1994. The equipment was sheltered in a Stevenson Screen from 1902 until April 15 1994, when the mercury thermometer was replaced by a platinum resistance probe within an Automatic Weather Station (AWS). This Stevenson screen is one of the two screens that then became redundant. The other Stevenson screen was kept to display to visitors. Lightkeepers were no longer required at the Cape Otway Light station either, due to the automated system. The meteorological instruments donated with the screen were used for measuring temperature and humidity. They are mounted on a metal bracket that fits across the screw holes on the screen’s internal frame. The glass-covered Relative Humidity (RH) sensor was made by the renowned precision instrument maker, Rotronic AG of Switzerland, which was founded in 1965. The firm made its first electronic temperature and humidity instrument in 1967. Meteorological records have been collected in Australia from the 1800s. The records were collated, published and used as a basis for weather forecasts. Many sectors, such as maritime and agriculture industries, have relied on these figures for making important decisions. The quality and placement of the meteorological instruments used to measure temperature and humidity are of utmost importance for accuracy. In early colonial times, there were no national standards for meteorological instruments that would allow for accurate figures and comparisons. Once the Bureau of Meteorology was established (around 1908 to 1910) the department installed Stevenson screens throughout Australia, many at lighthouses and light stations, and the measuring instruments were standardised. The Stevenson Screen was named after its inventor, Scottish Civil Engineer Thomas Stevenson (1818-1887) who was also the father of Robert Louis Stevenson, author. Stevenson developed the small thermometer screen around 1867. It had double-louvred walls around the sides and a top of two asbestos sheets with an air space between them and was thickly painted with a white coating that reflected the sun’s rays. This design was modified in 1884 by Edward Mawley of the Royal Meteorological Society. Standards were set for the locations of the screens and instruments, including their distance above ground level and the direction the door faced.Stevenson screens played a significant part in providing a standardised shelter for all meteorological instruments used by the Australian Bureau of Meteorology from about 1910 until 1994. The readings from the instruments gave the meteorological statistics on which weather forecasts throughout Australia were based. This Stevenson screen was used locally at Cape Otway, along the Great Ocean Road in southwest Victoria, so contributed towards our local forecasts and weather warnings.Stevenson screen, original, from the Australian Bureau of Meteorology’s weather station at the Cape Otway Lighthouse. The screen is a white wooden cupboard with a slanted cover raised above the top. The top has ten drilled ventilation holes, and the sides and door are made of downward-slanting double louvres. Two brass hinges join the door to the lower edge of the screen and a metal fitting at the top edge allows for a padlock closure. The screen is supported on four short legs, each with a hole drilled from side to side for fitting to a frame. Inside the screen are two wooden frames fitted with hooks and screws. The floor has three boards; one across the back and one across the front at the same level, and a board wider than the space between these boards is fitted higher, overlapping them slightly. Inside the screen, a pair of electronic instruments with short electric cables is mounted on a metal bracket with drilled holes in it. One of the instruments is a Relative Humidity (RH) probe. It is 26 cm long and is a glass tube with a filter on one end and an electrical connection on the other. It has inscriptions on its label, showing that was made by Rotronic AG, Switzerland. The other instrument is a Resistance Temperature Device (RTD) thermometer. It is 22.5 cm long and has a narrow metal probe joined to a hexagonal metal fitting. A brass plate on the front of the screen has impressed inscriptions. The screen is Serial Number 01/C0032, Catalogue Number 235862.Stamped into brass plate "CAT. NO. / 253862 / SERIAL NO. 01/C0032" On instrument’s electrical fitting; “CD2” [within oval ‘+’ above S] “Serie693 op65 / 220/380V~16A” On instrument’s glass; “rotronic ag” “SWISS MADE” “CE / CH-8303 / Bassersdorf” Symbol for [BARCODE] “ART NO MP 101A_T4-W4W” “POWER 4.8.30VDC“ “OP. RANGE: 0-100%RH/-40+60° C” “OUT H 0-100% 0-1V” “OUT T -40+60°C -0.4..+0.6V” “SERIE NO 19522 009”flagstaff hill maritime museum and village, warrnambool, maritime museum, maritime village, great ocean road, shipwreck coast, cotton region shelter, instrument shelter, thermometer shelter, thermoscreen, thermometer screen, measuring instruments, meteorological instrument, weather recording, weather station, lighthouse equipment, light station equipment, stevenson screen, marine instruments, mercury thermometer, platinum resistance probe, aws, automatic weather station, rotronic ag, swiss made, meteorological device, weather forecast, weather prediction, weather records, meteorological forecast, meteorological record, australian bureau of meteorology, bureau of meteorology, bureau, bom, relative humidity, rh, relative humidity probe, resistance temperature device, rtd, thermometer, temperature, humidity, cape otway, cape otway lighthouse, cape otway light station, rotronic, switzerland, swiss instrument, thomas stevenson, double-louvered walls, edward mawley, royal meteorological society, 01/c0032, serial number, cat. no. 235862, serial no. 01/c00323 -
Federation University Historical Collection
Album, Two folders containing information about Henry Sutton and Photography
... Ballarat Photographic Club Lenses Cameras Glass Plates Two folders ...Henry Sutton is a talented world-wide accepted inventor with inventions relating to the telephone, photography, wireless, cars, motorcycles, and bicycles as well as many more inventions. Henry was also one of four brothers that ran the Sutton's Music Store after the death of their Father Richard Sutton. Henry Sutton taught Applied Electricity at the Ballarat School of Mines in 1883 to 1886.Two folders containing information about Henry Sutton and Photography and the Ballarat Photographic Clubhenry sutton, photography, ballarat photographic club, lenses, cameras, glass plates -
 Eltham District Historical Society Inc
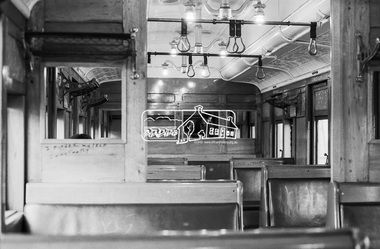
Photograph, George Coop, Interior of a Red Rattler Tait train passenger carriage, 22 August 1983, 1983
Note the graffiti. Older 20th.c and earlier railway cars were rolling palaces of the cabinet makers art. Full of polished timber, plated & embossed metal fittings, soft upholstery & beveled glass. In their earliest form, the Tait’s and earlier swing door cars for even modest suburban work, reflected some level of this design approach. Plus of course large sepia toned photographs on dividing walls displaying tourist spots trains could take you to.Digital TIFF file Scan of 35mm Kodak Safety 5062 black and white transparencygraffiti, interior, passenger carriage, red rattler, tait train -
 Federation University Historical Collection
Instrument - Telegraph Relayer, Electromagnetic Relay Device, c1870-1893
This item was probably acquired for, and used by, participants in telegraphy at the Ballarat School of Mines courses between 1873 and 1893.An electromagnetic relay device on a brass base plate, and mounted onto a wood base. It is covered by a removable wood-framed glass sided cage. The item has four terminal posts and an adjustable conductor mechanism.ballarat school of mines, telegraphy, relay device, telegraph coding -
 Federation University Historical Collection
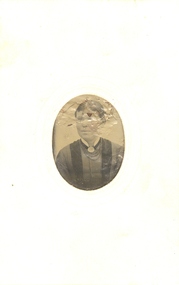
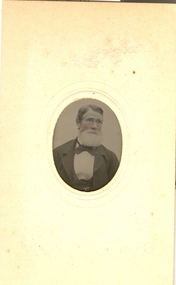
Photograph - Little Gem tintype, Portrait of a Woman
... sheet (not, actually, tin) instead of glass. The plate ...The tintype (or ferrotype or Melainotype) was produced on metallic sheet (not, actually, tin) instead of glass. The plate was coated with collodion and sensitized just before use. It was introduced by Adolphe Alexandre Martin in 1853. The most common size was about the same as the carte-de-visite, 5.5cm x 9.0cm, but both larger and smaller ferrotypes were made. The smallest were "Little Gem" tintypes, about the size of a postage-stamp, made simultaneously on a single plate in a camera with 12 or 16 lenses. They were often produced by travelling photographers, and were cheaper than Ambrotypes so made photography available to working classes, not just to the more well-to-do. The print would come out laterally reversed (as one sees oneself in a mirror). Being quite rugged, tintypes could be sent by post. Tintypes were eventually superseded by gelatin emulsion dry plates in the 1880s, though street photographers in various parts of the world continued with this process until the 1950s. (Above information abridged from http://www.rleggat.com/photohistory/history/tintype.htm) The firm of Gove and Allen opened in Sydney in 1880 and were responsible for the belated popularizing of the gem tintype in Australia. The firm traded as both The American Gem Studio and The American Studio. Others franchises were opened in Melbourne, Ballarat and Sandhurst (Bendigo). The Sandhurst branch closed in 1882 and Adelaide in 1884. All Gove and Allen studios had ceased trading by 1885. The studio addresses were: 23 King William St, Adelaide; 324 George St, Sydney; 95 Swanston St, Melbourne; Howard Place, Sandhurst; 7 Queen St, Brisbane; The card mounts used in Gove and Allen studios in Australia are identical to those used in America. They were initially made of plain white card with embossing around the oval image opening in the mount while some also had simple geometric and floral printed designs as well. Although Gove and Allen studios produced the majority of gem tintypes in Australia, other studios offered them including: - London, American & Sydney Photo Company, 328 George St, Sydney; - David Edelsten, 55 & 57 Bourke St, Melbourne; - Burman's Portrait Rooms, St. George's Hall, 209 Bourke St, Melbourne; - Bell's Gem Portrait Studio, 57 Bourke St East, Melbourne; - R. H. Kenny, Bridge St, Ballarat; - Marinus W. Bent, Sandhurst (Bendigo); - George Fisher, Victoria; - Anson Brothers, Hobart Town. (Abridged information from http://members.ozemail.com.au/~msafier/photos/tintypes.html) .3) A tintype portrait of a woman, attached to a card. little gem, tintype, woman, unidentified woman, women -
 Federation University Historical Collection
Photograph - Little Gem tintype, Portrait of a Man
... sheet (not, actually, tin) instead of glass. The plate ...The tintype (or ferrotype or Melainotype) was produced on metallic sheet (not, actually, tin) instead of glass. The plate was coated with collodion and sensitized just before use. It was introduced by Adolphe Alexandre Martin in 1853. The most common size was about the same as the carte-de-visite, 5.5cm x 9.0cm, but both larger and smaller ferrotypes were made. The smallest were "Little Gem" tintypes, about the size of a postage-stamp, made simultaneously on a single plate in a camera with 12 or 16 lenses. They were often produced by travelling photographers, and were cheaper than Ambrotypes so made photography available to working classes, not just to the more well-to-do. The print would come out laterally reversed (as one sees oneself in a mirror). Being quite rugged, tintypes could be sent by post. Tintypes were eventually superseded by gelatin emulsion dry plates in the 1880s, though street photographers in various parts of the world continued with this process until the 1950s. (Above information abridged from http://www.rleggat.com/photohistory/history/tintype.htm) The firm of Gove and Allen opened in Sydney in 1880 and were responsible for the belated popularizing of the gem tintype in Australia. The firm traded as both The American Gem Studio and The American Studio. Others franchises were opened in Melbourne, Ballarat and Sandhurst (Bendigo). The Sandhurst branch closed in 1882 and Adelaide in 1884. All Gove and Allen studios had ceased trading by 1885. The studio addresses were: 23 King William St, Adelaide; 324 George St, Sydney; 95 Swanston St, Melbourne; Howard Place, Sandhurst; 7 Queen St, Brisbane; The card mounts used in Gove and Allen studios in Australia are identical to those used in America. They were initially made of plain white card with embossing around the oval image opening in the mount while some also had simple geometric and floral printed designs as well. Although Gove and Allen studios produced the majority of gem tintypes in Australia, other studios offered them including: - London, American & Sydney Photo Company, 328 George St, Sydney; - David Edelsten, 55 & 57 Bourke St, Melbourne; - Burman's Portrait Rooms, St. George's Hall, 209 Bourke St, Melbourne; - Bell's Gem Portrait Studio, 57 Bourke St East, Melbourne; - R. H. Kenny, Bridge St, 6 Sturt St Ballarat; - Marinus W. Bent, Sandhurst (Bendigo); - George Fisher, Victoria; - Anson Brothers, Hobart Town. (Abridged information from http://members.ozemail.com.au/~msafier/photos/tintypes.html) .8)A tintype portrait of a man's head, attached to a card. The cheeks have been hand coloured.little gem -
 Federation University Historical Collection
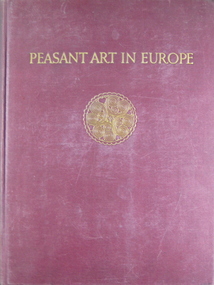
Book, H. Th. Bossert, Peasant Art in Europe, 1927 (exact)
Red cloth large hardcover book. Title is written on the front cover and on spine in gold. Small gold circle pattern on front cover. The book contains 100 coloured plates, 32 b/w plates with images of peasant handicraft. The book includes table of content, index, bibliography and a library due date card inside back cover, it was borrowed by Donald Ferguson(an art lecturer)on 13 May 1957. Page numbers written in roman numerals. embroidery, europe, ceramics, ornaments, peasant art, h th bossert, folk art, embroideries, handicraft, decorative arts, textile fabrics -
 Federation University Historical Collection
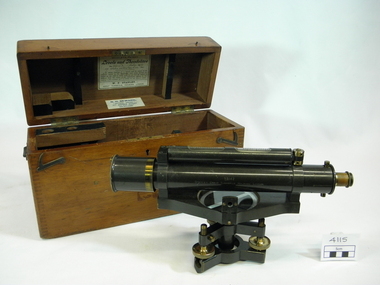
Instrument, W. H. Stanley, Surveying level, July 1899
Used by students attending surveying classes at the School of Mines & Industries, Ballarat.Surveyor's level caste in metal with brass trimmings. Features external focus, twin inclined vertical crosshairs with stadia wires. With ray-shade clinomenter. Three levelling screws. Without transverse level (mounting provided). dust shield for object. Features glass lens x 2. Timber carry case features dovetailed joints, separate lid attached to body of case with two brass piano hinges along back side. Case has a metal carry handle screwed to each end. Matches tripod Item 4116 Item's serial number: 99142*The timber lid of the carry case has 'L3' painted on it in white paint. *The paper label glued to reverse side lid of inside carry box reads: STANLEY'S PATENT LEVELS AND THEODOLITES No.99142 July 1899 STADIA POINTS SET=1 : 100. In taking readings of a distant staff by means of the subtense points in the diaphragm, read every 1/100 foot (or metre) on the staff as being equal to one foot (or metre) of distance from the centre of the instrument adding to the reading of plus constant of 18 3/4 inchess from any distance shown. W.F. Stanley, Great Turnstile, Holborn, London. *The paper label glued to lower edge inside lid of carry box reads: N. H. SEWARD, "Optical House" 457 BOURKE STREET (Near Queen Street) MELBOURNE *Engraving on brass plate encompassing the catch on front edge of the timber carry case reads: H&C L (inside an engraved heart on LSH) EUCHRE LEVER (engraved on RHS of brass plate) *Maker's mark is engraved along the length of the telescope barrel: 99142 Stanley. Great Turnstile Holborn, London. level, theodolite, surveying instrument, surveying, scientific instruments -
 Federation University Historical Collection
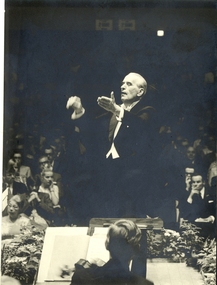
Photograph - Black and White, Jo Pottgens Fotografie, Frank Wright in concert, 9/8/1970
Frank Wright was a renown resident of Smeaton, where he was born. He lived at Laura Villa, and attended Smeaton State School. His father William was a gold miner and his mother's name was Sarah. Their family won many singing and instrumental awards. Frank was tutored by Percy Code and was awarded a gold medal for the highest marks in the ALCM examinations in the British Colonies at the age of seventeen years. He became the Australian Open Cornet Champion by the age of eighteen. A year later, Frank conducted the City of Ballarat Band, and later the Ballarat Soldiers’ Memorial Band. He formed the Frank Wright Frisco Band and Frank Wright and his Coliseum Orchestra. These bands won many South Street awards, and Frank as conductor won many awards in the Australian Band Championship contest. In 1933 Frank Wright sailed to England to conduct the famous St Hilda’s Band and was later appointed Musical Director of the London County Council, where he organized many amazing concerts in parks, in and around the London district. He was made Professor of Brass and Military Band Scoring and conducted at the Guildhall of Music and Drama. Frank was often invited to adjudicate Brass Band Championships around Europe, in Australia, including South Street and in New Zealand. The Frank Wright Medal at the Royal South Street competition is awarded to an individual recognized as making an outstanding contribution to brass music in Australia.A series of 11 black and white photographs and one paper receipt. 1,2,4 & 8 are of Frank Wright conducting a large orchestra on a stage, the front of which is dressed in gathered fabric with floral tributes along its length. In the foreground the audience can be seen and the background of the stage is black with four white frames containing floral bouquets. The roof with large square lights can also be seen. 9-11 are front views of Frank Wright holding his baton and conducting the orchestra. In the foreground, the rear of the head of a violinist can be seen and in the background the audience can be seen fading out of sight in the darkness of the theatre. 3,6 & 7 are of Frank Wright with various groups of people at a reception. In two he is seated and in one he is standing. He is holding a glass of wine in two and has a plate, napkin and cutlery in the other. 5 is a photo of Frank White inspecting the cornet of a uniformed, young man who is part of a brass band. They are standing with the band in an outdoor venue with an audience seated on tiered rows in the background. 12 is a printed black ink on white paper receipt on which is the handwriting is in blue ink. It is for the cost of the photographs.Printed on the back of photographs - Copy-right, Jo Pottgens, Old Hickoryplein 4, Kerkradefrank wright, kerkrade, conductor, cornet, orchestra -
 Flagstaff Hill Maritime Museum and Village
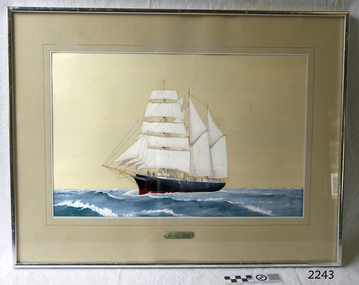
Painting - Maritime painting, The La Bella, 1980s
This painting of the “La Bella” is associated with Flagstaff Hill’s collection of artefacts from the wreck of the “La Bella”. It was painted around the 1980s by maritime artist Philip J. Gray. Some 15 – 17 ships are believed to have sunk in Lady Bay, but only two have been discovered on the seafloor; the “La Bella” and the “Edinburgh Castle”. Both wrecks are popular diving sites and are preserved as significant historical marine and marine archaeological sites. The Kosnar Picture Framing and Mirrors Shop identified the "GRAY 3135, Y04/111" as their job number for the framing and said that the label "ANOTHER KOSNAR FEATURE" was last used before about 1990. About artist Philip J. Gray “Philip is one of Australia’s leading maritime artists and his meticulous research and social commentary paintings of ships, such as, the Loch Ard and Schomberg form an important part of Warrnambool’s Flagstaff Hill Maritime Museum.” [Dr Marion Manifold, Artist and Art Historian, 2014] Philip James Gray was born in London but has lived most of his life in Australia. He graduated from a London school of art as an illustrator, specialising in technical and scientific illustration as well as other commercial and applied art. He was also a student for a time of Fyffe Christie - British figurative artist, mural painter and humanitarian – who had a great influence on his career. Philip has always worked as a professional artist and illustrator. Many publications on maritime history have featured his work. His paintings have been released and sold all over the world as limited edition prints. The State Library of Victoria’s ‘Latrobe Collection’ holds two of his paintings. His street painting of ‘The Ashes Contest’ decorates the brick wall of Old Bakery Laneway in Sunbury and a Sunbury café owner commissioned him to paint the ‘Sunbury Pop Festival’ as a remembrance of local history. Philip has been an active member of the Sunbury Art Society in Victoria for several years, serving on the committee for some of that time and being involved in exhibitions. He enjoys helping new artists and sharing his skills and experience. About the “La Bella” The wreck of the La Bella lies at the bottom of the Warrnambool Harbour in Lady Bay. Some 15 ships are believed to have been wrecked there but only two have been discovered on the sea floor; the La Bella and the Edinburgh Castle. Both wrecks are popular diving sites and are preserved as significant historical marine and marine archaeological sites. The story of the final voyage of the La Bella is summarised as follows … The ship from which the sailors were rescued was the three-masted, iron and steel barquentine the La Bella, built in Norway in 1893. She was one of two iron and steel ships by Johan Smith, the company being one of the leading shipping families in Tvedestrand, Norway. She was significant to Norwegian shipping, being one of only 27 iron and steel ships ever built in Norway. La Bella was registered in New Zealand and engaged from 1902 in inter-colonial trading of timber in the pacific, between New Zealand and Australia and was often in Port Phillip Bay, Victoria. On 5th October 1905 the twelve year old La Bella left Lyttleton, New Zealand carrying a cargo of timber bound for Warrnambool, Australia . She was manned by a crew of twelve: the Master, (Captain Mylius, previously 1st Mate of La Bella, appointed Captain to La Bella on 6th February 1903) 2 Mates, Cook, six able seamen, one ordinary seaman and a boy. Bad weather en-route caused her to shelter at Burnie on Tasmania's North West coast. On November 10th, the 37th day of her journey, La Bella approached Warrnambool. Captain Mylius steered her towards Lady Bay Channel in heavy south-west seas and evening mist. He ordered the helmsman to steer for the light. As the ship came round, a tremendous sea struck her on the port quarter, causing her to breach broadside in a north-westerly direction into breakers. The helm was brought round twice more, but each time heavy seas broke over her, the third time throwing the La Bella on to a submerged reef in Lady Bay now known as La Bella Reef (about 100 yards from the Warrnambool breakwater). The sea was so rough that it even wrenched a one-and-a-half ton anchor from its fastenings and into the sea. As Captain Mylius headed to the steel wheelhouse, intending to send up a rocket flare, a huge sea slammed the steel door into him (resulting in massive bruising front and back) Despite his injuries he still managed to set off a blue light, which he held up in his hands. La Bella’s lifeboats were filled with sea water and broke up on their chocks. The blue light was the first indication to people on shore that there was a ship in distress. The Harbour Master, Captain Roe (who lived in the Harbour Master’s House opposite Flagstaff Hill), organised a group of volunteers to crew the lifeboat because the trained crew was unavailable; the crewmen were working on a steamer in Port Fairy at the time. He then poured oil onto the water to try and smooth the sea. At around 11pm three of the crew took shelter in the steel forecastle but the sea crashed into it and broke it up. While the rest of the crew and onlookers watched helplessly in the moonlight the bodies were washed away into the sea, never to be seen again. Some of the crew lashed themselves to the weather rail to keep from being washed away. Watson, the ordinary seaman, became tangled in the rigging lines and was too weak to move, so the 2nd Mate, Robertson, put a line onto him so that he wouldn’t wash off. Around 11pm three of the crew were unconscious from exhaustion. The situation on La Bella was becoming dangerous. The 2nd Mate moved to the ‘house’ and soon afterwards the ship slipped in the heavy sea. The lashings of the 1st Mate and the ‘boy’ Denham had kept them safe until about 2am when they were washed overboard; no one was able to help. One by one, the exhausted crew were being washed overboard, too weak to hold on any longer. During the night the La Bella had broken into two and the deckhouse ran out towards the sea. Two more men drowned when trying to reach the lifeboat. By sunrise the only survivors of the twelve were the Master, 2nd Mate and three seamen. Early in the morning Captain Roe used the rocket apparatus on shore to try and shoot a line to the ship for a safer rescue but each attempt fell short of the target. Several attempts were made by the lifeboat to rescue the stricken sailors, but the rough conditions made this difficult for the boat to get close enough to the ship and the lifeboat had to return to shore. During a final attempt to reach the ship Captain Mylius ordered his men to jump into the sea. Leonard Robertson, 2nd mate, jumped and swam towards the lifeboat, taking hold of the boat hook offered to him. Oscar Rosenholme managed to reach the boat floating on a piece of timber from the ship’s load and a third survivor, Noake, also made the boat. Along with the lifeboat rescue crew, 25 year old William Ferrier rowed his small dingy through the heavy seas and managed to rescue the Captain, whom he landed on the breakwater. Ferrier then returned to the ship to attempt a final rescue, losing his oars and rowlocks into the high sea. Using just a spare paddle he skulled towards the La Bella, reaching her stern in time to cut loose the lone surviving sailor, Payne, from the lashing that held him to the ship; the terrified sailor dropped from the ship and into the dingy. Shortly after the last man was rescued, the La Bella was lifted by a huge wave and crashed back down on the reef; she broke up and sank. The ordeal had lasted ten hours. The survivors were taken to the nearby Bay View Hotel and gratefully received warm food and clothing, medical attention and a place to sleep. In the following days an unidentified body of a young person was washed ashore; it was either Watson or Denham. The body was buried in the Warrnambool cemetery with an appropriate gravestone and inscription. William Ferrier became a national hero as news of the daring rescue spread. In recognition of his bravery in the two daring rescues he was awarded the Silver Medal for Bravery by the Royal Humane Society and was honoured in the letter from the Prime Minister and the Parliament of the Commonwealth, telegrams and a cheque for £20 from the Governor General, over £150 subscribed by the public, including Warrnambool and district and readers of The Argus, and a gold medal from the Glenelg Dinghy Club of South Australia. Ferrier’s rescue efforts are one of the most heroic in Victoria’s shipwreck history. (William Ferrier’s son, Frank, received a similar award almost fifty years later, when he helped rescue four members of the crew on the yacht Merlan, after it ran on to a reef near the Point Lonsdale Lighthouse. ) The wreck of La Bella now lies on her port side in 13 metres of sheltered water inside the reef she struck. The bow section is relatively intact and part of the stern has drifted north-easterly towards the mouth of the Hopkins River. The reef the La Bella struck now bears its name. Those five rescued from the La Bella were Captain George Mylius, Leonard Robertson (2nd Mate, 21 years old), R. Payne, Oscar Rosenholme and Jack Noake. Those seven who lost their lives were Mr Coulson (1st mate), Charles Jackman (cook) Gustave Johnson, Pierre Johann and Robert Gent (all able seamen), Harry Watson (ordinary seaman) and Jack Denham (ship’s boy). Captain Mylius was found guilty of careless navigation; he had sailed into the bay without the services of a pilot. His Master Certificate was suspended for twelve months. Later he was also charged with manslaughter of one of the crew who had died when the La Bella was wrecked, but found not guilty. The event’s adverse publicity and damage to his career took a toll on his health and he died of a heart attack six months after the wreck; he was only thirty-seven. His body was buried in the Melbourne General Cemetery. The La Bella was “the best documented of all sailing ships owned in New Zealand”. Her record books, ship logs, correspondence and supporting papers are still available. At the time of the tragedy she was owned by Messers David C.Turnbull and Co. of Timaru, New Zealand timber merchants and shipping agents, who had purchased her on 13th December 1901. A detailed account of the last journey of La Bella can be read in “Leonard Robertson, the Whangaroa & La Bella” written by Jack Churchouse, published in 1982 by Millwood Press Ltd, Wellington, NZ.This painting of the La Bella by Philip J. Gray is part of the La Bella Collection and is significant at both a local and state level. Its connection to the La Bella shipwreck and the rescue of five survivors highlights the dangers of Victoria’s Shipwreck Coast. The painting connects with other objects and artefacts associated with the wreck of the La Bella. This painting is significant because of its association with the sailing ship “La Bella” . the “La Bella” is of local and state and national significance. It is one of the only two shipwrecks discovered in Lady Bay, Warrnambool, out of the 15-17 shipwrecks in the bay. Large framed painting of the three masted barquentine "La Bella" fully rigged. Painted by Phillip J Gray. A fine printed line squares off the painting. Beneath painting and line is a gold plate with black copper plate designating "La Bella" is encased in glass, surrounded by a silver-metal frame. Yellow and brown paper label is adhered to back of painting. Picture framed by Kosnar in Melbourne."The La Bella" on gold plaque Logo of "K" inside a brown square. "GRAY 3135, Y04/111", "ANOTHER KOSNAR FEATURE" flagstaff hill, warrnambool, shipwrecked-coast, flagstaff-hill, flagstaff-hill-maritime-museum, maritime-museum, shipwreck-coast, flagstaff-hill-maritime-village, painting, la bella, artist phillip j gray, maritime painting, lady bay warrnambool -
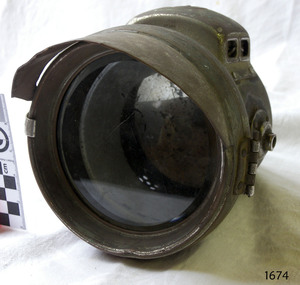 Flagstaff Hill Maritime Museum and Village
Lamp
... Lamp carbide motor vehicle lamp, made of nickel plated... carbide motor vehicle lamp, made of nickel plated brass ...Lamp carbide motor vehicle lamp, made of nickel plated brass, incomplete. Glass is loose inside. Maker Powell & Hanmerl, Birmingham.flagstaff hill, warrnambool, shipwrecked-coast, flagstaff-hill, flagstaff-hill-maritime-museum, maritime-museum, shipwreck-coast, flagstaff-hill-maritime-village -
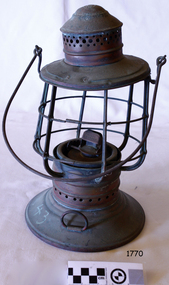 Flagstaff Hill Maritime Museum and Village
Lamp
Lamp circular with glass shade/chimney (broken). Brass plated copper construction. 2 rings on base. Made by Dietz, and fitted with a Dietz "Convex" Burner.flagstaff hill, warrnambool, shipwrecked-coast, flagstaff-hill, flagstaff-hill-maritime-museum, maritime-museum, shipwreck-coast, flagstaff-hill-maritime-village, lamp, dietz -
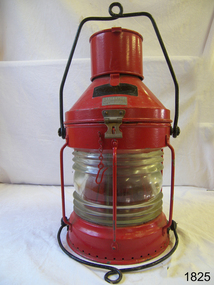 Flagstaff Hill Maritime Museum and Village
Functional object - Ships Navigation Lamp, William Harvie & Co, First half of the 20th century
William Harvie was granted a patent in 1868 for improvements in the manufacture of lamps, lanterns and lenses for ships navigation and signal lamps 1868. Production began at 222 Broomielaw street Glasgow Scotland. Another patent was issued in 1873 for additional improvements to the companies lamps. Records show that in1873 William Harvie was in partnership with Malcolm Graham & Co, grease manufacturers and rosin distillers at 50 Anderson Street Gallowgate Glasgow. It appears around this time the business was transferred to George Moffat of 128 Garthland Drive Dennistoun Glasgow to continue under the same name (William Harvie & Co at premises situated at 100 East John St Gallowgate Glasgow. It is unclear but at some point W T George & Co were one in the same with William Harvie & Co. W T George made lamps with the trade name “Meteorite” and after gaining a patent for improvements to his lamps in 1941 the patent numbers were affixed to his lamps. In the Scottish Post Office annual Glasgow Directory 1900-1902 William Haveie & Co. Ltd is listed with two addresses; 222 Broomielaw and 24 McAlpine Streets, Glasgow. In the early 20th century the business moved to Birmingham until 1983 when the company went into voluntary liquidation after a meeting was held at Newhall Street Birmingham on the 10th January 1983 for WT George and William Harvie. This meeting was for the purposes regarding the insolvency of a company as set out in Sec 294 & 295 of the companies Act 1948 as a result Harvie & Co cease production of their products.An item made by a company that was an innovator of significant improvements in the manufacture of marine signal and navigation lamps during the late 19th and 20th centuries. Lamps made by this manufacturer are now sought after collector's items that are of significant value. Navigation lamp, round ship's lamp with clear glass and a red filter, handle at top, fitted with hinged and catch section at top to service lamp. Bracket at back for hanging lamp item painted red with black handles.Black nameplate is unreadable. Front reference plate reads " Meteorite" then "Meteorite No. 92276" warrnambool, flagstaff-hill, flagstaff-hill-maritime-museum, maritime-museum, shipwreck-coast, flagstaff-hill-maritime-village, lamp, meteorite, william harvie, navigation lamp, kerosene lamp, signal lamp, marine equipment, marine navigation, w t george & co, george bocock & co, william harvie & co. ltd. -
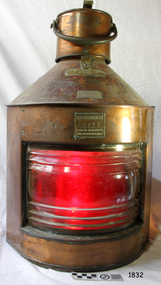 Flagstaff Hill Maritime Museum and Village
Functional object - Navigation Lamp, W. T George and Co. Ltd, ca 1941
William Thomas George was born in Birmingham in 1884 and was a tin plate worker. He and his wife Ellene had a son Leslie Thomas George. The firm W T George & Co was formed sometime later. In 1939 his firm produced ship lamps. The Patent Number GB546575 on the lamp's plate was assigned to Leslie Thomas George in 1941 for improvements in, or relating to, ships' lanterns. From that time the patent number was affixed to their namufactured Meteorite lights. The ship navigation lamp is important as an example of the evolution of marine safety technology. Countries began passing laws and regulations in the 1830s that required ships to show navigation lights at night or in poor weather. From the late 1840s colours were standardised; red for portside of the vessel and green for starboard, a white masthead light, and a white light at anchor. By 1914 the International Convention for the Safety of Life at Sea was formed and continues, with decisions and notifications on improvements and changes.. Lamp; Portside ship's lamp is rounded in the front with two flat sides coming to a point at the rear. Glass has circular ridging. Metal handle with lid and clasp. The reflector has red colouring. Inscribed on fixed plates on the front, with maker's details and Patent number. This Meteorite lantern was made by W T George and Co Ltd, of Birmingham. "Port" "W T George and Co Ltd" "Sherlock Street Birmingham" "Meteorite 68990 Patented No 546575 and others pending"warrnambool, shipwreck coast, flagstaff hill, flagstaff hill maritime museum, flagstaff hill maritime village, portside ships lamp, portside, port lamp, ship's lamp, marine lamp, navigation lamp, w t george & co, coloured lens, red lens, ship fitting, marine technology, navigation light, signal lamp, leslie thomas george, gb546575, patent gb546575, meteorite, lantern, lamp, light -
 Flagstaff Hill Maritime Museum and Village
Domestic object - Plate
The Process of Making Pottery Decorating, Firing, Glazing, Making, Technical There is a rhythm and flow to clay. It can’t be done all at once! Even the making process! It can take weeks to get everything done, especially if you can only work on your pottery once a week! Even though we have three hour classes, it’s often just not enough time! Here is an overview of some of the processes so you have a bit more grasp on some of the technical stuff! Step One – Design There are SO many ideas out there for making stuff in clay! From delicate porcelain jewellery, through to heavy sculptural work and everything in between. Deciding your direction is sometimes not that easy – when you first start, try everything, you will naturally gravitate to the style that you enjoy! The options and variations are endless and can get a wee bit overwhelming too! Check in with me before you start to ensure your ideas will work, what order you might do things, how you could achieve the look you are seeking and any other technical data required! Step Two – Making Clay is thixotropic. This means that as you work with it, the clay first gets sloppier and wetter, before is begins to dry in the atmosphere. For most things, you simply can’t do all parts of the project at once. An example of work order might look like: Get last weeks work out from the shelves Prepare clay for today’s work – roll your clay, prepare balls for throwing, make the first stage of a pinch pot) Clean up last week’s work and put it on the shelf for bisque firing Check that you have any glazing to do – and do enough of it that you will have time to finish your main project Do the next step of your next project – there might be a further step that can’t be complete immediately, in that case, wrap your work well and put onto the shelves. Letting your work rest for a while can really help keep your work clean and professional looking. Many things require bagging under plastic to keep it ready for work the next week – put your name on the outside of the bag so you can find your work easily. We have stickers and markers. Consider how you want to decorate your work – coloured slip can be applied at a fairly wet stage (remembering that it will make your work even wetter!). Trying to apply slip to dry clay won’t work! If you want to do sgraffito – you will need to keep the work leather hard (a state of dryness where you can still work the clay with a little effort and a little water and care). Step Three – Drying Most of the time your work can go into the rack uncovered to let it dry out for the following week. If you want to continue forming or shaping you will need to double bag your work – put your work on a suitable sized bat and put the bat in a bag so the base of the bag is under the bat, then put another bag over the top of the work and tuck the top of the bag under the bat. If you want to trim (or turn) your thrown work the following week, it should also be double bagged. If your work is large, delicate, or of uneven thicknesses, you should lightly cover your work for drying. When considering the drying process, bare in mind the weather, humidity and wind! The hotter and dryer, the faster things dry and work can dry unevenly in the shelves – this can lead to cracking – another time to lightly cover your work for drying. Step Four – Trimming and Cleaning Up Your work is dry! It is called greenware now and it is at it’s most fragile! Handle everything with two hands. I often refer to soft hands – keep everything gentle and with your fingers spread as much as possible. Try to not pick up things like plates too much, and always with both hands! Before your work can be bisque fired it should be “cleaned up”. You work won’t go into the kiln if it has sharp edges – when glazed, sharp edges turn into razor blades! Use a piece of fly wire to rub the work all over – this will scratch a little so be light handed. Use a knife or metal kidney to scrape any areas that require a bit more dynamic treatment than the fly wire offers! Finally, a very light wipe over with a slightly damp sponge can help soften and soothe all of your edges and dags! Trimming thrown work: If you are planning to trim (or turn) your thrown work (and you should be), make sure you bag it well – your work should be leather hard to almost dry for easiest trimming. Use this step to finish the work completely – use a metal kidney to polish the surface, or a slightly damp sponge to give a freshly thrown look. Wipe the sponge around the rim after trimming, and check the inside of the pot for dags! Trimming slip cast work: Usually I will trim the rims of your work on the wheel the following day to make that stage easier, however you will still need to check your work for lumps and bumps. Last but not least – check that your name is still clearly on the bottom of your work. Step Five – Bisque Firing When the work is completely dry it can go into the bisque kiln. The bisque kiln is fired to 1000°C. This process burns off the water in the clay as well as some of the chemically bound water. The structure of the clay is not altered that much at this temperature. Inside the bisque kiln, the work is stacked a little, small bowl inside a larger bowl and onto a heavy plate. Smaller items like decorations or drink coasters might get stacked several high. Consideration is paid to the weight of the stack and shape of the work. A bisque kiln can fire about one and a half times the amount of work that the glaze kiln can fire. The firing takes about 10 hours to complete the cycle and about two days to cool down. Once it has been emptied the work is placed in the glaze room ready for you to decorate! Step Six – Glazing Decorating your work with colour can be a lot of fun – and time consuming! There are three main options for surface treatment at this stage: Oxide Washes Underglazes Glazes Washes and underglazes do not “glaze” the work – It will still need a layer of glaze to fully seal the clay (washes don’t need glaze on surfaces not designed for food or liquid as they can gloss up a little on their own). Underglazes are stable colourants that turn out pretty much how they look in the jar. They can be mixed with each other to form other colours and can be used like water colours to paint onto your work. Mostly they should have a clear glaze on top to seal them. Oxides are a different species – the pink oxide (cobalt) wash turns out bright blue for instance. They don’t always need a glaze on top, and some glazes can change the colour of the wash! The glazes need no other “glaze” on top! Be careful of unknown glaze interactions – you can put any combination of glaze in a bowl or on a plate, but only a single glaze on the outside of any vertical surface! Glazes are a chemical reaction under heat. We don’t know the exact chemicals in the Mayco glazes we use. I can guess by the way they interact with each other, however, on the whole, you need to test every idea you have, and not run the test on a vertical surface! Simply put, glaze is a layer of glass like substance that bonds with the clay underneath. Clay is made of silica, alumina and water. Glaze is made of mostly silica. Silica has a melting point of 1700°C and we fire to 1240°C. The silica requires a “flux” to help it melt at the lower temperature. Fluxes can be all sorts of chemicals – a common one is calcium – calcium has a melting point of 2500°C, however, together they both melt at a much lower temperature! Colourants are metal oxides like cobalt (blue), chrome (green through black), copper (green, blue, even red!), manganese (black, purple and pink) iron (red brown), etc. Different chemicals in the glaze can have dramatic effects. for example, barium carbonate (which we don’t use) turns manganese bright pink! Other elements can turn manganese dioxide brown, blue, purple and reddish brown. Manganese dioxide is a flux in and of itself as well. So, glazes that get their black and purple colours, often interact with other glazes and RUN! Our mirror black is a good example – it mixes really well with many glazes because it fluxes them – causes them to melt faster. It will also bring out many beautiful colours in the glazes because it’s black colouring most definitely comes from manganese dioxide! Glaze chemistry is a whole subject on it’s own! We use commercial Mayco glazes on purpose – for their huge range of colour possibilities, stability, cool interactions, artistic freedom with the ability to easily brush the glazes on and ease of use. We currently have almost 50 glazes on hand! A major project is to test the interactions of all glazes with each other. That is 2,500 test tiles!!!! I’m going to make the wall behind the wheels the feature wall of pretty colours! Step Seven – Glaze (Gloss or sometimes called “Glost”) Firing Most of the time this is the final stage of making your creation (but not always!) The glaze kiln goes to 1240°C. This is called cone 6, or midrange. It is the low end of stoneware temperatures. Stoneware clays and glazes are typically fired at cone 8 – 10, that is 1260 – 1290°C. The energy requirement to go from 1240°C to 1280°C is almost a 30% more! Our clay is formulated to vitrify (mature, turn “glass-like”) at 1240°, as are our glazes. A glaze kiln take around 12 hours to reach temperature and two to three days to cool down. Sometimes a third firing process is required – this is for decoration that is added to work after the glaze firing. For example – adding precious metals and lustres. this firing temperature is usually around 600 – 800°C depending upon the techniques being used. There are many students interested in gold and silver trims – we will be doing this third type of firing soon! After firing your work will be in the student finished work shelves. Remember to pay for it before you head out the door! There is a small extra charge for using porcelain clay (it’s more than twice the price of regular clay), and for any third firing process! Once your work has been fired it can not turn back into clay for millennia – so don’t fire it if you don’t like it! Put it in the bucket for recycling. https://firebirdstudios.com.au/the-process-of-making-pottery/Ceramics have evolved over thousands of years.White earthenware dinner plate. Crazing evident all over.Backstamped ‘Made in England S LTD’flagstaff hill, warrnambool, shipwrecked-coast, flagstaff-hill, flagstaff-hill-maritime-museum, maritime-museum, shipwreck-coast, flagstaff-hill-maritime-village, ceramics, tableware -
 Flagstaff Hill Maritime Museum and Village
Domestic object - Plate, Johnson Bros
The Process of Making Pottery Decorating, Firing, Glazing, Making, Technical There is a rhythm and flow to clay. It can’t be done all at once! Even the making process! It can take weeks to get everything done, especially if you can only work on your pottery once a week! Even though we have three hour classes, it’s often just not enough time! Here is an overview of some of the processes so you have a bit more grasp on some of the technical stuff! Step One – Design There are SO many ideas out there for making stuff in clay! From delicate porcelain jewellery, through to heavy sculptural work and everything in between. Deciding your direction is sometimes not that easy – when you first start, try everything, you will naturally gravitate to the style that you enjoy! The options and variations are endless and can get a wee bit overwhelming too! Check in with me before you start to ensure your ideas will work, what order you might do things, how you could achieve the look you are seeking and any other technical data required! Step Two – Making Clay is thixotropic. This means that as you work with it, the clay first gets sloppier and wetter, before is begins to dry in the atmosphere. For most things, you simply can’t do all parts of the project at once. An example of work order might look like: Get last weeks work out from the shelves Prepare clay for today’s work – roll your clay, prepare balls for throwing, make the first stage of a pinch pot) Clean up last week’s work and put it on the shelf for bisque firing Check that you have any glazing to do – and do enough of it that you will have time to finish your main project Do the next step of your next project – there might be a further step that can’t be complete immediately, in that case, wrap your work well and put onto the shelves. Letting your work rest for a while can really help keep your work clean and professional looking. Many things require bagging under plastic to keep it ready for work the next week – put your name on the outside of the bag so you can find your work easily. We have stickers and markers. Consider how you want to decorate your work – coloured slip can be applied at a fairly wet stage (remembering that it will make your work even wetter!). Trying to apply slip to dry clay won’t work! If you want to do sgraffito – you will need to keep the work leather hard (a state of dryness where you can still work the clay with a little effort and a little water and care). Step Three – Drying Most of the time your work can go into the rack uncovered to let it dry out for the following week. If you want to continue forming or shaping you will need to double bag your work – put your work on a suitable sized bat and put the bat in a bag so the base of the bag is under the bat, then put another bag over the top of the work and tuck the top of the bag under the bat. If you want to trim (or turn) your thrown work the following week, it should also be double bagged. If your work is large, delicate, or of uneven thicknesses, you should lightly cover your work for drying. When considering the drying process, bare in mind the weather, humidity and wind! The hotter and dryer, the faster things dry and work can dry unevenly in the shelves – this can lead to cracking – another time to lightly cover your work for drying. Step Four – Trimming and Cleaning Up Your work is dry! It is called greenware now and it is at it’s most fragile! Handle everything with two hands. I often refer to soft hands – keep everything gentle and with your fingers spread as much as possible. Try to not pick up things like plates too much, and always with both hands! Before your work can be bisque fired it should be “cleaned up”. You work won’t go into the kiln if it has sharp edges – when glazed, sharp edges turn into razor blades! Use a piece of fly wire to rub the work all over – this will scratch a little so be light handed. Use a knife or metal kidney to scrape any areas that require a bit more dynamic treatment than the fly wire offers! Finally, a very light wipe over with a slightly damp sponge can help soften and soothe all of your edges and dags! Trimming thrown work: If you are planning to trim (or turn) your thrown work (and you should be), make sure you bag it well – your work should be leather hard to almost dry for easiest trimming. Use this step to finish the work completely – use a metal kidney to polish the surface, or a slightly damp sponge to give a freshly thrown look. Wipe the sponge around the rim after trimming, and check the inside of the pot for dags! Trimming slip cast work: Usually I will trim the rims of your work on the wheel the following day to make that stage easier, however you will still need to check your work for lumps and bumps. Last but not least – check that your name is still clearly on the bottom of your work. Step Five – Bisque Firing When the work is completely dry it can go into the bisque kiln. The bisque kiln is fired to 1000°C. This process burns off the water in the clay as well as some of the chemically bound water. The structure of the clay is not altered that much at this temperature. Inside the bisque kiln, the work is stacked a little, small bowl inside a larger bowl and onto a heavy plate. Smaller items like decorations or drink coasters might get stacked several high. Consideration is paid to the weight of the stack and shape of the work. A bisque kiln can fire about one and a half times the amount of work that the glaze kiln can fire. The firing takes about 10 hours to complete the cycle and about two days to cool down. Once it has been emptied the work is placed in the glaze room ready for you to decorate! Step Six – Glazing Decorating your work with colour can be a lot of fun – and time consuming! There are three main options for surface treatment at this stage: Oxide Washes Underglazes Glazes Washes and underglazes do not “glaze” the work – It will still need a layer of glaze to fully seal the clay (washes don’t need glaze on surfaces not designed for food or liquid as they can gloss up a little on their own). Underglazes are stable colourants that turn out pretty much how they look in the jar. They can be mixed with each other to form other colours and can be used like water colours to paint onto your work. Mostly they should have a clear glaze on top to seal them. Oxides are a different species – the pink oxide (cobalt) wash turns out bright blue for instance. They don’t always need a glaze on top, and some glazes can change the colour of the wash! The glazes need no other “glaze” on top! Be careful of unknown glaze interactions – you can put any combination of glaze in a bowl or on a plate, but only a single glaze on the outside of any vertical surface! Glazes are a chemical reaction under heat. We don’t know the exact chemicals in the Mayco glazes we use. I can guess by the way they interact with each other, however, on the whole, you need to test every idea you have, and not run the test on a vertical surface! Simply put, glaze is a layer of glass like substance that bonds with the clay underneath. Clay is made of silica, alumina and water. Glaze is made of mostly silica. Silica has a melting point of 1700°C and we fire to 1240°C. The silica requires a “flux” to help it melt at the lower temperature. Fluxes can be all sorts of chemicals – a common one is calcium – calcium has a melting point of 2500°C, however, together they both melt at a much lower temperature! Colourants are metal oxides like cobalt (blue), chrome (green through black), copper (green, blue, even red!), manganese (black, purple and pink) iron (red brown), etc. Different chemicals in the glaze can have dramatic effects. for example, barium carbonate (which we don’t use) turns manganese bright pink! Other elements can turn manganese dioxide brown, blue, purple and reddish brown. Manganese dioxide is a flux in and of itself as well. So, glazes that get their black and purple colours, often interact with other glazes and RUN! Our mirror black is a good example – it mixes really well with many glazes because it fluxes them – causes them to melt faster. It will also bring out many beautiful colours in the glazes because it’s black colouring most definitely comes from manganese dioxide! Glaze chemistry is a whole subject on it’s own! We use commercial Mayco glazes on purpose – for their huge range of colour possibilities, stability, cool interactions, artistic freedom with the ability to easily brush the glazes on and ease of use. We currently have almost 50 glazes on hand! A major project is to test the interactions of all glazes with each other. That is 2,500 test tiles!!!! I’m going to make the wall behind the wheels the feature wall of pretty colours! Step Seven – Glaze (Gloss or sometimes called “Glost”) Firing Most of the time this is the final stage of making your creation (but not always!) The glaze kiln goes to 1240°C. This is called cone 6, or midrange. It is the low end of stoneware temperatures. Stoneware clays and glazes are typically fired at cone 8 – 10, that is 1260 – 1290°C. The energy requirement to go from 1240°C to 1280°C is almost a 30% more! Our clay is formulated to vitrify (mature, turn “glass-like”) at 1240°, as are our glazes. A glaze kiln take around 12 hours to reach temperature and two to three days to cool down. Sometimes a third firing process is required – this is for decoration that is added to work after the glaze firing. For example – adding precious metals and lustres. this firing temperature is usually around 600 – 800°C depending upon the techniques being used. There are many students interested in gold and silver trims – we will be doing this third type of firing soon! After firing your work will be in the student finished work shelves. Remember to pay for it before you head out the door! There is a small extra charge for using porcelain clay (it’s more than twice the price of regular clay), and for any third firing process! Once your work has been fired it can not turn back into clay for millennia – so don’t fire it if you don’t like it! Put it in the bucket for recycling. https://firebirdstudios.com.au/the-process-of-making-pottery/Ceramics have evolved over thousands of years.A white earthenware side plate with a gadroon edge. Has water marks and chips on front.‘Johnson Bros England Reg No 15587’flagstaff hill, warrnambool, shipwrecked-coast, flagstaff-hill, flagstaff-hill-maritime-museum, maritime-museum, shipwreck-coast, flagstaff-hill-maritime-village, johnson bros, ceramics, tableware -
 Flagstaff Hill Maritime Museum and Village
Domestic object - Plate, Alfred Meakin
The Process of Making Pottery Decorating, Firing, Glazing, Making, Technical There is a rhythm and flow to clay. It can’t be done all at once! Even the making process! It can take weeks to get everything done, especially if you can only work on your pottery once a week! Even though we have three hour classes, it’s often just not enough time! Here is an overview of some of the processes so you have a bit more grasp on some of the technical stuff! Step One – Design There are SO many ideas out there for making stuff in clay! From delicate porcelain jewellery, through to heavy sculptural work and everything in between. Deciding your direction is sometimes not that easy – when you first start, try everything, you will naturally gravitate to the style that you enjoy! The options and variations are endless and can get a wee bit overwhelming too! Check in with me before you start to ensure your ideas will work, what order you might do things, how you could achieve the look you are seeking and any other technical data required! Step Two – Making Clay is thixotropic. This means that as you work with it, the clay first gets sloppier and wetter, before is begins to dry in the atmosphere. For most things, you simply can’t do all parts of the project at once. An example of work order might look like: Get last weeks work out from the shelves Prepare clay for today’s work – roll your clay, prepare balls for throwing, make the first stage of a pinch pot) Clean up last week’s work and put it on the shelf for bisque firing Check that you have any glazing to do – and do enough of it that you will have time to finish your main project Do the next step of your next project – there might be a further step that can’t be complete immediately, in that case, wrap your work well and put onto the shelves. Letting your work rest for a while can really help keep your work clean and professional looking. Many things require bagging under plastic to keep it ready for work the next week – put your name on the outside of the bag so you can find your work easily. We have stickers and markers. Consider how you want to decorate your work – coloured slip can be applied at a fairly wet stage (remembering that it will make your work even wetter!). Trying to apply slip to dry clay won’t work! If you want to do sgraffito – you will need to keep the work leather hard (a state of dryness where you can still work the clay with a little effort and a little water and care). Step Three – Drying Most of the time your work can go into the rack uncovered to let it dry out for the following week. If you want to continue forming or shaping you will need to double bag your work – put your work on a suitable sized bat and put the bat in a bag so the base of the bag is under the bat, then put another bag over the top of the work and tuck the top of the bag under the bat. If you want to trim (or turn) your thrown work the following week, it should also be double bagged. If your work is large, delicate, or of uneven thicknesses, you should lightly cover your work for drying. When considering the drying process, bare in mind the weather, humidity and wind! The hotter and dryer, the faster things dry and work can dry unevenly in the shelves – this can lead to cracking – another time to lightly cover your work for drying. Step Four – Trimming and Cleaning Up Your work is dry! It is called greenware now and it is at it’s most fragile! Handle everything with two hands. I often refer to soft hands – keep everything gentle and with your fingers spread as much as possible. Try to not pick up things like plates too much, and always with both hands! Before your work can be bisque fired it should be “cleaned up”. You work won’t go into the kiln if it has sharp edges – when glazed, sharp edges turn into razor blades! Use a piece of fly wire to rub the work all over – this will scratch a little so be light handed. Use a knife or metal kidney to scrape any areas that require a bit more dynamic treatment than the fly wire offers! Finally, a very light wipe over with a slightly damp sponge can help soften and soothe all of your edges and dags! Trimming thrown work: If you are planning to trim (or turn) your thrown work (and you should be), make sure you bag it well – your work should be leather hard to almost dry for easiest trimming. Use this step to finish the work completely – use a metal kidney to polish the surface, or a slightly damp sponge to give a freshly thrown look. Wipe the sponge around the rim after trimming, and check the inside of the pot for dags! Trimming slip cast work: Usually I will trim the rims of your work on the wheel the following day to make that stage easier, however you will still need to check your work for lumps and bumps. Last but not least – check that your name is still clearly on the bottom of your work. Step Five – Bisque Firing When the work is completely dry it can go into the bisque kiln. The bisque kiln is fired to 1000°C. This process burns off the water in the clay as well as some of the chemically bound water. The structure of the clay is not altered that much at this temperature. Inside the bisque kiln, the work is stacked a little, small bowl inside a larger bowl and onto a heavy plate. Smaller items like decorations or drink coasters might get stacked several high. Consideration is paid to the weight of the stack and shape of the work. A bisque kiln can fire about one and a half times the amount of work that the glaze kiln can fire. The firing takes about 10 hours to complete the cycle and about two days to cool down. Once it has been emptied the work is placed in the glaze room ready for you to decorate! Step Six – Glazing Decorating your work with colour can be a lot of fun – and time consuming! There are three main options for surface treatment at this stage: Oxide Washes Underglazes Glazes Washes and underglazes do not “glaze” the work – It will still need a layer of glaze to fully seal the clay (washes don’t need glaze on surfaces not designed for food or liquid as they can gloss up a little on their own). Underglazes are stable colourants that turn out pretty much how they look in the jar. They can be mixed with each other to form other colours and can be used like water colours to paint onto your work. Mostly they should have a clear glaze on top to seal them. Oxides are a different species – the pink oxide (cobalt) wash turns out bright blue for instance. They don’t always need a glaze on top, and some glazes can change the colour of the wash! The glazes need no other “glaze” on top! Be careful of unknown glaze interactions – you can put any combination of glaze in a bowl or on a plate, but only a single glaze on the outside of any vertical surface! Glazes are a chemical reaction under heat. We don’t know the exact chemicals in the Mayco glazes we use. I can guess by the way they interact with each other, however, on the whole, you need to test every idea you have, and not run the test on a vertical surface! Simply put, glaze is a layer of glass like substance that bonds with the clay underneath. Clay is made of silica, alumina and water. Glaze is made of mostly silica. Silica has a melting point of 1700°C and we fire to 1240°C. The silica requires a “flux” to help it melt at the lower temperature. Fluxes can be all sorts of chemicals – a common one is calcium – calcium has a melting point of 2500°C, however, together they both melt at a much lower temperature! Colourants are metal oxides like cobalt (blue), chrome (green through black), copper (green, blue, even red!), manganese (black, purple and pink) iron (red brown), etc. Different chemicals in the glaze can have dramatic effects. for example, barium carbonate (which we don’t use) turns manganese bright pink! Other elements can turn manganese dioxide brown, blue, purple and reddish brown. Manganese dioxide is a flux in and of itself as well. So, glazes that get their black and purple colours, often interact with other glazes and RUN! Our mirror black is a good example – it mixes really well with many glazes because it fluxes them – causes them to melt faster. It will also bring out many beautiful colours in the glazes because it’s black colouring most definitely comes from manganese dioxide! Glaze chemistry is a whole subject on it’s own! We use commercial Mayco glazes on purpose – for their huge range of colour possibilities, stability, cool interactions, artistic freedom with the ability to easily brush the glazes on and ease of use. We currently have almost 50 glazes on hand! A major project is to test the interactions of all glazes with each other. That is 2,500 test tiles!!!! I’m going to make the wall behind the wheels the feature wall of pretty colours! Step Seven – Glaze (Gloss or sometimes called “Glost”) Firing Most of the time this is the final stage of making your creation (but not always!) The glaze kiln goes to 1240°C. This is called cone 6, or midrange. It is the low end of stoneware temperatures. Stoneware clays and glazes are typically fired at cone 8 – 10, that is 1260 – 1290°C. The energy requirement to go from 1240°C to 1280°C is almost a 30% more! Our clay is formulated to vitrify (mature, turn “glass-like”) at 1240°, as are our glazes. A glaze kiln take around 12 hours to reach temperature and two to three days to cool down. Sometimes a third firing process is required – this is for decoration that is added to work after the glaze firing. For example – adding precious metals and lustres. this firing temperature is usually around 600 – 800°C depending upon the techniques being used. There are many students interested in gold and silver trims – we will be doing this third type of firing soon! After firing your work will be in the student finished work shelves. Remember to pay for it before you head out the door! There is a small extra charge for using porcelain clay (it’s more than twice the price of regular clay), and for any third firing process! Once your work has been fired it can not turn back into clay for millennia – so don’t fire it if you don’t like it! Put it in the bucket for recycling. https://firebirdstudios.com.au/the-process-of-making-pottery/Ceramics have evolved over thousands of years.Earthenware dessert plate, cream colour. Made by Alfred Meakin, England. Backstamped ‘Alfred Meakin England’. flagstaff hill, warrnambool, shipwrecked-coast, flagstaff-hill, flagstaff-hill-maritime-museum, maritime-museum, shipwreck-coast, flagstaff-hill-maritime-village, alfred meakin, ceramics, earthenware, kitchenware