Showing 724 items matching "hill hotel"
-
 Buninyong & District Historical Society
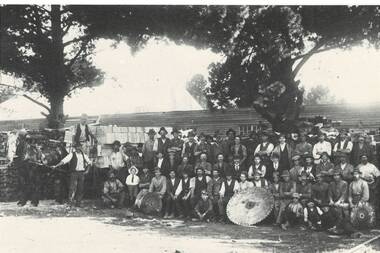
Photograph - Photograph of original photo of Howard's Buninyong Box Factory, Derek Leather, Howard's Buninyong Box Factory, marking opening of branch rail line across Learmonth St. 1922. Employees gathered for photo, August 1995
Buninyong Industrial historyB/W photo of original sepia phot workers lined up at Howard's Buninyong Box Factory, marking opening of spur rail line across Learmonth St. in 1922."The sawmill where the boxes were made for the Butter and other products. A railway line crossed the Main Road to the factory which was on the land below the Watkin's house (once the Railway Hotel, the brick house on the side of Larmonth St. hill.)box factory, learmonth st., railway spur -
 Kew Historical Society Inc
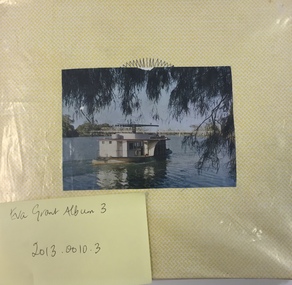
Album, Eva Grant, Historic Buildings in Victoria & New South Wales, 1919-c.1962
One of three scrapbooks created by Eva Grant, a past member of the Kew Historical Society which were donated by her niece, Julie Thomson, in 2013. The scrapbook includes photographs and descriptions of the following sites. (Many of these are now demolished and so the photographs and descriptions may be rare records of a site.) Sites include: Abbotsford (Vic) - Abbotsford Convent, Mayfield (c.1962), prefabricated house - Church street Armadale (Vic) - church (c.1959) - Thomson & Wattletree Roads Arthur’s Seat (Vic) - McCrae homestead Ballarat (Vic) - Memorial plaque on site of Bentley’s Hotel, Memorial on site of Eureka Stockade, Early municipal buildings - East Ballarat, Adam Lindsay Gordon’s cottage - Botanical Gardens, View from Sovereign Hill, Shell house Broken Hill (NSW) - panorama (1963), Flying Doctor’s base (?1963) Eltham (Vic) - Hassell’s outdoor art gallery Essendon (Vic) - Niddrie Homestead and stables (1963) Geelong (Vic) - first Bishopscourt Hawthorn (Vic) - Convent (1930), The Hawthorns, Keilor plains (Vic) - pioneer homes, pioneer cemetery Kew (Vic) - Roseneath (1951), Tarring - Ruyton, Turinville, house - Foley street (c.1960). Malvern (Vic) - church Mount Ridley (Vic) - Summerhill Melbourne (Vic) - Old Brewery - Custom’s House Lane (1960), Customs House, Scott’s Hotel (1962), Western market (c.1960) Phillip Island (Vic) - Grave Toorak (Vic) - Mandeville Hall, Merna (sic) - Arthur Streeton’s house, Toorak House Wentworth (NSW) - Harvey’s Hotel, Sturt Memorial, Sturt’s Tree, Wentworth Gaol Williamstown (Vic) - Williamstown Dairy Yan Yean (Vic) - Bear’s Castle (c.1947) Beveridge/Big Hill (Vic) - Kelly’s cottageImportant photograph record (and notes) about historic buildings in Victoria.38-page scrapbook with additional text created by Eva Grant, a past member of the Kew Historical Society. In addition to the 68 photographs, there are two postcards and a number of publications/handouts.collected by Eva on her trips to heritage sites in Victoria and New South Wales. The pages of the album can be viewed in the image carousel above. Most of the photographs of heritage buildings were taken in the early 1960s.See imagesheritage sites - victoria - australia, eva grant, scrapbooks - 20th century -
 Kew Historical Society Inc
Journal, Kewriosity : December 1985
... Bend contribution; Prospect Hill [Hotel]; Money for Mexico ...Celebrating 125 years / p1. Happy anniversary Kew! / p1. Dates for December / p2. [Community] Notices / p2. Christmas Services / p2. Update: Notes from Council [Local Government restructure] / Cr Phyllis Hore [Mayor of Kew] p3. Traffic management / p3. In Brief [Heavy traffic - Kew Traffic School; Yarra Bend contribution; Prospect Hill [Hotel]; Money for Mexico; Improvements to Willsmere Park; Senior Citizens' Week; Safeway go-ahead; Community Bus; Dawn patrol for dogs; Public Meeting for North Ward residents] / p4. 125th Anniversary supplement [graphic collage] / p5. Kew becomes a municipality / p6. "Ma Dalley" / p6. History of Kew Library / Alex Tarr [City Librarian] p6. [Historic] Kew dates / p7. Kew's Crest / p6. The Outer Circle revisited / Joan Barrett p6. Getting the news to Kew [Chronological history of Kew newspapers] / p8-9. Of Councils past [What rubbish ...; Kew by moonlight; Evil practices; All quiet on the Council front; Things change?; In the marketplace; Kew goes it alone; No cows for Kew; Voting is compulsory; In the beginning ...] / p10. Finding out about our history / p10. From the old "Rec" to the new Recreation Centre / p11. Kew's history in houses - your guide to style and period / p12. 'Ow Commissioners catered for Kew [poem] /p12. Welcome Councillor Timms / p13. Govt grant for Recreation Centre / p13. Volunteers needed for Kew Meals on Wheels / p13. Holday programs / p13. Kew Community House [Rhonda (McCaw) takes over; We're expanding!; Volunteer Child Care workers; Suggestion box; T.O.P. at the house; Christmas break-up] p13. Why Kew? p13. Youth Page [Making the most of the holidays; What does Christmas mean to you? Holiday program] / p13. 1888 Organ restoration recalls Kew businessman [Alfred Fuller] / p14. The Citizens' Advice Bureaux needs new volunteers / p14.Kewriosity was a local newsletter combining Kew Council and community news. It was published between November 1983 and June 1994, replacing an earlier Kewriosity [broad] Sheet (1979-84). In producing Kewriosity, Council aimed to provide a range of interesting and informative articles covering its deliberations and decision making, together with items of general interest and importance to the Kew community and information not generally available through daily media outlets.non-fictionCelebrating 125 years / p1. Happy anniversary Kew! / p1. Dates for December / p2. [Community] Notices / p2. Christmas Services / p2. Update: Notes from Council [Local Government restructure] / Cr Phyllis Hore [Mayor of Kew] p3. Traffic management / p3. In Brief [Heavy traffic - Kew Traffic School; Yarra Bend contribution; Prospect Hill [Hotel]; Money for Mexico; Improvements to Willsmere Park; Senior Citizens' Week; Safeway go-ahead; Community Bus; Dawn patrol for dogs; Public Meeting for North Ward residents] / p4. 125th Anniversary supplement [graphic collage] / p5. Kew becomes a municipality / p6. "Ma Dalley" / p6. History of Kew Library / Alex Tarr [City Librarian] p6. [Historic] Kew dates / p7. Kew's Crest / p6. The Outer Circle revisited / Joan Barrett p6. Getting the news to Kew [Chronological history of Kew newspapers] / p8-9. Of Councils past [What rubbish ...; Kew by moonlight; Evil practices; All quiet on the Council front; Things change?; In the marketplace; Kew goes it alone; No cows for Kew; Voting is compulsory; In the beginning ...] / p10. Finding out about our history / p10. From the old "Rec" to the new Recreation Centre / p11. Kew's history in houses - your guide to style and period / p12. 'Ow Commissioners catered for Kew [poem] /p12. Welcome Councillor Timms / p13. Govt grant for Recreation Centre / p13. Volunteers needed for Kew Meals on Wheels / p13. Holday programs / p13. Kew Community House [Rhonda (McCaw) takes over; We're expanding!; Volunteer Child Care workers; Suggestion box; T.O.P. at the house; Christmas break-up] p13. Why Kew? p13. Youth Page [Making the most of the holidays; What does Christmas mean to you? Holiday program] / p13. 1888 Organ restoration recalls Kew businessman [Alfred Fuller] / p14. The Citizens' Advice Bureaux needs new volunteers / p14. publications -- city of kew (vic.), kewriosity, council newsletters, community newsletters -
Kew Historical Society Inc
Journal, Kewriosity : October 1985
... Commission decides on hotels [Harp of Erin; Prospect Hill Hotel] / p1 ...Children's Week 1985 / p1. Liquor Control Commission decides on hotels [Harp of Erin; Prospect Hill Hotel] / p1&4. Dates for October / p2. [Community] Notices / p2. Update: Notes from Council: Restructuring - How will it affect Kew? / Cr Phyllis Hore [Mayor of Kew] p3. Traffic management / p3. In Brief: [The latest of Safeway; No approval for Child Care Centre site; Congratulations STRIDE; Women's cricket in Kew; Budget time; Feel free to donate a tree] / p4. Thank you! [illustrators] / p4. Ode to the pedestrian [poem] / Warwick Hastie p4. Rectime [Recreation; Kew Recreation Centre] / p5. The Penguin Club / p5. The play's the thing! [Toorak Players] / p5. Kew Community House [English classes for migrants] / p5. Youth Page: [Are you a DAG in Kew? - survey; Competition - Why is Kew BORING?; How did you go? / p6. Those halcyon days - Part 3 [social history] / Bill Stent p7. Kew loses a very generous man [Brian White] / p7. Ke Little Athletics / p7. Kew Rotaract / p8. This Kewriosity is brought to you by the boys of the Fourth Kew Scout Group / p8. Letters - Motel permit challenges / JM Rao / p8. Cr Saunders responds [Studley Park Road] / Robin Saunders p8.Kewriosity was a local newsletter combining Kew Council and community news. It was published between November 1983 and June 1994, replacing an earlier Kewriosity [broad] Sheet (1979-84). In producing Kewriosity, Council aimed to provide a range of interesting and informative articles covering its deliberations and decision making, together with items of general interest and importance to the Kew community and information not generally available through daily media outlets.non-fictionChildren's Week 1985 / p1. Liquor Control Commission decides on hotels [Harp of Erin; Prospect Hill Hotel] / p1&4. Dates for October / p2. [Community] Notices / p2. Update: Notes from Council: Restructuring - How will it affect Kew? / Cr Phyllis Hore [Mayor of Kew] p3. Traffic management / p3. In Brief: [The latest of Safeway; No approval for Child Care Centre site; Congratulations STRIDE; Women's cricket in Kew; Budget time; Feel free to donate a tree] / p4. Thank you! [illustrators] / p4. Ode to the pedestrian [poem] / Warwick Hastie p4. Rectime [Recreation; Kew Recreation Centre] / p5. The Penguin Club / p5. The play's the thing! [Toorak Players] / p5. Kew Community House [English classes for migrants] / p5. Youth Page: [Are you a DAG in Kew? - survey; Competition - Why is Kew BORING?; How did you go? / p6. Those halcyon days - Part 3 [social history] / Bill Stent p7. Kew loses a very generous man [Brian White] / p7. Ke Little Athletics / p7. Kew Rotaract / p8. This Kewriosity is brought to you by the boys of the Fourth Kew Scout Group / p8. Letters - Motel permit challenges / JM Rao / p8. Cr Saunders responds [Studley Park Road] / Robin Saunders p8. publications -- city of kew (vic.), kewriosity, council newsletters, community newsletters -
Kew Historical Society Inc
Journal, Kewriosity : July 1985
... for residents top priority in hotels dispute [Prospect Hill Hotel; Harp ...Kew Safeway expansion / p1. Community Notes [Clubs and Societies; General; Politics; Religious notices; Support Groups] / p2&16.Update: Notes from Council - Kew's parklands / Cr Robin Saunders, Mayor [of Kew] p3. In Brief [We are desperate - Kew Community Bus; No Vacancy - Davis Street Kindergarten; Kew contributes to Housing Council; This is an emergency - Meals on Wheels; Elections coming up; Assistance grants distributed; Fence trees soon] / p4. Traffic Management / p4. Concern for residents top priority in hotels dispute [Prospect Hill Hotel; Harp of Erin/ p5. Friends of Kew Library take action {Library relocation; Kew Historical Society; Toy Library] / p5. Baby safety bassinet loan scheme off and running / p5. Neighbourhood Watch - Keeping an eye open [Operation identification / Neighbourhood Watch works; Home security meeting] / p6. Kew Community House - What we are about / p6. Kew Heritage Survey - Information exchange meeting / p7. Heritage assets [Houses and other buildings; Other structures and works; Streetscapes; Sites; Natural areas and open space; Panoramas, vistas or views] / p8. Nomination of potential heritage asset [survey form] / p9.Further comment [Line drawing - 'Ivy Grange'] / p10. Youth Page - Youth Theatre a-goer; Apology / p11. Some ways to avoid burning [incinerators] / p12. Learn how to paint on silk / p12. The ABC of the CAB [Citizens Advice Bureau] / p13. High times at Kew's Cemetery / Ellen Coates [social history] p14. Archer of the year 1984/85 [Gerry Hevey, Kew City Bowmen] / p15. Library News / p15. This Kewriosity is being delivered to you by - Kew Women's Hockey Club / p15. Letters - Small Business too pricey /Mrs J Chambers; Theft and vandalism hits Bowmen / Jim Bagnelli; A case of discrimination / Kathy Don.Kewriosity was a local newsletter combining Kew Council and community news. It was published between November 1983 and June 1994, replacing an earlier Kewriosity [broad] Sheet (1979-84). In producing Kewriosity, Council aimed to provide a range of interesting and informative articles covering its deliberations and decision making, together with items of general interest and importance to the Kew community and information not generally available through daily media outlets.non-fictionKew Safeway expansion / p1. Community Notes [Clubs and Societies; General; Politics; Religious notices; Support Groups] / p2&16.Update: Notes from Council - Kew's parklands / Cr Robin Saunders, Mayor [of Kew] p3. In Brief [We are desperate - Kew Community Bus; No Vacancy - Davis Street Kindergarten; Kew contributes to Housing Council; This is an emergency - Meals on Wheels; Elections coming up; Assistance grants distributed; Fence trees soon] / p4. Traffic Management / p4. Concern for residents top priority in hotels dispute [Prospect Hill Hotel; Harp of Erin/ p5. Friends of Kew Library take action {Library relocation; Kew Historical Society; Toy Library] / p5. Baby safety bassinet loan scheme off and running / p5. Neighbourhood Watch - Keeping an eye open [Operation identification / Neighbourhood Watch works; Home security meeting] / p6. Kew Community House - What we are about / p6. Kew Heritage Survey - Information exchange meeting / p7. Heritage assets [Houses and other buildings; Other structures and works; Streetscapes; Sites; Natural areas and open space; Panoramas, vistas or views] / p8. Nomination of potential heritage asset [survey form] / p9.Further comment [Line drawing - 'Ivy Grange'] / p10. Youth Page - Youth Theatre a-goer; Apology / p11. Some ways to avoid burning [incinerators] / p12. Learn how to paint on silk / p12. The ABC of the CAB [Citizens Advice Bureau] / p13. High times at Kew's Cemetery / Ellen Coates [social history] p14. Archer of the year 1984/85 [Gerry Hevey, Kew City Bowmen] / p15. Library News / p15. This Kewriosity is being delivered to you by - Kew Women's Hockey Club / p15. Letters - Small Business too pricey /Mrs J Chambers; Theft and vandalism hits Bowmen / Jim Bagnelli; A case of discrimination / Kathy Don. publications -- city of kew (vic.), kewriosity, council newsletters, community newsletters -
 Kew Historical Society Inc
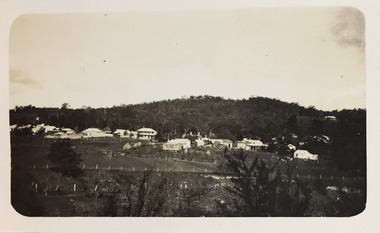
Photograph - Township in Victoria, c.1926
Henry Beater Christian (1886-1962) , was a descendant of one of the earliest settler families in Kew. Employed at the Kew Asylum as a 'public servant', he was a skilled amateur photographer, photographing numerous scenes in Kew and on his travels around Victoria. The majority of his photographs date from 1916 to 1929. His finest photographs are housed in two photograph albums. Digital copy of a photograph from page 30 of the 47-page photograph album containing 261 gelatinous silver images, loaned by Diane Washfold with permission given to digitise and hold a copy in our collection. John Chapman has written in 'Bushwalking Clubs - A Brief History', about the establishment in Victoria of the first bushwalking club in 1888, and the popularisation of bushwalking during the interwar period. Henry Christian's 'walks' appear to have been undertaken solely or with a companion/s. This black and white photo is untitled, but follows a page of photos taken on a walking trip from Cockatoo to Gembrook in Victoria. The view selected by the photographer is of a distance shot of a township nestled at the foot of a hill. The most distinctive building in the town is a two-storey [hotel?] immediately left of centre. [Untitled]henry beater christian (1886-1962), landscape photography, christian-washfold collection, photograph albums, bushwalking -
![View of portion of the City of Sandhurst, as seen from the hill, Camp Reserve / [by] Nicholas Caire, circa 1876](/media/collectors/550653872162f11fb04854aa/items/57774295d0cdd10a5c0eb588/item-media/57774325d0cdd10a5c0f0b71/item-fit-380x285.jpg) Kew Historical Society Inc
Kew Historical Society IncPhotograph, Anglo-Australasian Photographic Company, View of portion of the City of Sandhurst, as seen from the hill, Camp Reserve, c. 1876
Nicholas Caire was born on Guernsey in the Channel Islands in 1837. He arrived in Adelaide with his parents in about 1860. In 1867, following photographic journeys in Gippsland, he opened a studio in Adelaide. From 1870 to 1876 he lived and worked in Talbot in Central Victoria. In 1876 he purchased T. F. Chuck's studios in the Royal Arcade Melbourne. In 1885, following the introduction of dry plate photography, he began a series of landscape series, which were commercially successful. As a photographer, he travelled extensively through Victoria, photographing places few of his contemporaries had previously seen. He died in 1918. Reference: Jack Cato, 'Caire, Nicholas John (1837–1918)', Australian Dictionary of Biography, National Centre of Biography, Australian National University, http://adb.anu.edu.au/biography/caire-nicholas-john-3139/text3683, published first in hardcopy 1969, accessed online 1 July 2016.An original, rare photograph from the series 'Views of Victoria: General Series' by the photographer, Nicholas Caire (1837-1918). The series of 60 photographs that comprise the series was issued c. 1876 and reinforced a neo-Romantic view of the Australian landscape to which a growing nationalist movement would respond. Nicholas Caire was active as a photographer in Australia from 1858 until his death in 1918. His vision of the Australian bush and pioneer life had a counterpart in the works of Henry Lawson and other nationalist poets, authors and painters.Albumen Silver Photograph, mounted on Board.printed in ink on support l.c.: VIEW OF PORTION OF THE CITY OF SANDHURST, AS SEEN FROM THE HILL, CAMP RESERVE / COPYRIGHT REGISTERED. printed in ink on support reverse c.: VIEWS OF VICTORIA. / (GENERAL SERIES.) / No. 4. / VIEW OF PORTION OF THE CITY OF SANDHURST AS SEEN FROM THE HILL, CAMP RESERVE. / The Camp Reserve is the principal public promenade in this City. The Rotunda in the foreground, formerly used / by the local bands on festive occasions, is now regarded as a relic of the past. To the right of the picture is shown the / City of Sandhurst claim, supposed to be on the Hustler's line of reef. St. Paul's Church tower may be seen in the / distance. To the left of the picture Williamstown-street branches out from Pall Mall. On one side of the street is the / far-famed Shamrock Hotel; on the other stands the Bank of Australasia, with St. James's Hall immediately behind it. printed in ink on support reverse l.c.l.: J.W. FORBES, Agent, printed in ink on support reverse l.c.: ANGLO-AUSTRALASIAN PHOTOGRAPHIC COMPANY, MELBOURNE. printed in ink on support reverse l.c.r.: 10 Temple Court, Collins Street West.nicholas caire (1837-1918), landscape photography -
![Township of Lorne, and Loutitt Bay / [by] Nicholas Caire, circa 1876](/media/collectors/550653872162f11fb04854aa/items/5783458ad0cdd1176c6f0c78/item-media/578345eed0cdd1176c6f852b/item-fit-380x285.jpg) Kew Historical Society Inc
Kew Historical Society IncPhotograph, Anglo-Australasian Photographic Company, Township of Lorne, and Loutitt Bay, c. 1876
Nicholas Caire was born on Guernsey in the Channel Islands in 1837. He arrived in Adelaide with his parents in about 1860. In 1867, following photographic journeys in Gippsland, he opened a studio in Adelaide. From 1870 to 1876 he lived and worked in Talbot in Central Victoria. In 1876 he purchased T. F. Chuck's studios in the Royal Arcade Melbourne. In 1885, following the introduction of dry plate photography, he began a series of landscape series, which were commercially successful. As a photographer, he travelled extensively through Victoria, photographing places few of his contemporaries had previously seen. He died in 1918. Reference: Jack Cato, 'Caire, Nicholas John (1837–1918)', Australian Dictionary of Biography.An original, rare photograph from the series 'Views of Victoria: General Series' by the photographer, Nicholas Caire (1837-1918). The 60 photographs that comprise the series were issued c. 1876 and reinforced a neo-Romantic view of the Australian landscape to which a growing nationalist movement would respond. Nicholas Caire was active as a photographer in Australia from 1858 until his death in 1918. His vision of the Australian bush and pioneer life had a counterpart in the works of Henry Lawson and other nationalist poets, authors and painters.‘Township of Lorne, and Loutitt Bay’ : Views of Victoria (General Series) No.60 : Albumen silver photograph | Photo on card with Title and Description on reverse | Mounted 24 x 30 cm; Photo 12 x 17 cm.On Reverse: ‘Loutitt Bay is fast becoming one of the most fashionable Watering-places in Victoria, partly from its easy access by Rail, combined with the magnificent scenery to be found in the Cape Otway Ranges, and the very moderate charges of the houses of accommodation. The large house near the foreground is that of Mr. Mountjoy, which is a Restaurant. Duncan’s Hotel can be seen in the distance, on the brow of the hill.’nicholas caire (1837-1918), lorne (vic), duncan's hotel, loutitt bay, landscape photography - victoria -
 Kew Historical Society Inc
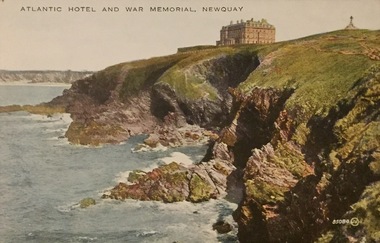
Postcard, Atlantic Hotel and War Memorial, Newquay, c.1928
Collection of thirty-nine postcards donated by Jillian Rigby which had been owned by her grandparents, George and Edith Weir, who from c.1917 lived at 84 Princess Street, Kew. The mostly 'mint' postcards were purchased in Victoria and while travelling overseas. The sole dated postcard is dated from 1929. The postcards are numbered sequentially from 2017.0058.01-39. The remainder of the collection donated by Jill Rigby which was once owned by the Weirs of Broken Hill and Kew consist of costumes, costume accessories, photographs, and documents.The postcards in the Weir collection, especially those purchased on a trip or trips to the mother country, i.e. United Kingdom, represent a representative sample of sites that were considered significant to those Australians undertaking a reverse grand tour by member of the erstwhile colonies. Those postcards which are early views of Melbourne must have been produced commercially for some decades from the early part of the 20th century.Atlantic Hotel and War Memorial, Newquay, Cornwall. The postcard was probably purchased by George and Edith Weir on a trip to England and Scotland, circa 1928."Atlantic Hotel and War Memorial, Newquay"postcards, george and edith weir, atlantic hotel - new quay, war memorial - new quay, postcards -- newquay (uk), weir collection -
 Kew Historical Society Inc
Album - Photographs of heritage sites in Victoria, Eva Grant, 1964-66
Eva Grant was a member of the Kew Historical Society. Three albums in the collection were created by her, this one, the third created between 1964 and 1966. They were donated to the Society by her daughter in 2010. Each of the albums includes photographs and newspaper cuttings collected on her travels to historic places in South East Australia in the 1950s and 1960s. Particular structures photographed in this album include: Barnawatha (Vic.) - The Hermitage | Beveridge (Vic.) - Stone cottage where Ned Kelly was born. | Brighton - St Andrew’s Church graveyard. | Chiltern (Vic.) - lake view [missing] | Cowes (Vic.) - ‘Broadwater’ [originally home of Henty-Wilson family], demolished 1965; Bell of the Speke wreck; Edward’s tree. | Euroa (Vic.) - Habbies Howe | Fairfield (Vic.) - Dight’s Falls; John Dight. | Fernshawe (Vic.) - Queen Mary tree. | Jolimont (Vic.) - Old railway tunnel linking the first Government House (1964); Sign identifying location of first Government House. | Kew (Vic.) - Cairn at Dight’s Falls; Canoe tree, Bowyer Avenue. | Kyneton - De Grave’s Flour Mill - “C”. | Maldon (Vic.) - Chinese oven; Macarthur’s House; Maldon’s oldest resident; Chinese graves x 2; [Beehive Chimney]. | Marysville (Vic.) - Centenary cairn | Mitcham (Vic.), Mud brick house x 2, Deep Creek Road. | Melbourne (Vic.) - St Paul’s Cathedral [renovation] (1964); Wreckers at Damman’s Corner, cnr Bourke and Collins Streets (1964); Princess Gate project x 2 (1964); Colonial Storekeeper’s building on cnr King and Bourke Streets (1966); Early observatory 1861-3; the Honey Memorial. | Mt Oberon (Vic.) - [obsolete] radio telephone dish. | Seymour (Vic.) - Habres (sic) House x 3.| Swan Hill (Vic.) - Major Mitchell’s Cairn (12/1964); Headstone of Andrew Beverage AM (12/1964). | Templestowe (Vic.) - Finn’s Hotel. | Thornton (Vic.) - Eildon Station. | Werribee (Vic.) - Chirnside Memorial [Presbyterian] Church; gaslight beside church | Location unknown, but possibly Swan Hill - Brick house; Wooden bullock dray. | Location unknown - Headstone of John Furlonge 1835.Important record of significant heritage properties in Victoria, many of which have since been demolished.30 page spirex bound drawing book including photographs and newspaper articles of historic buildings in Victoria. The front cover has a picture of a steam boat. The cover is encased in plastic. A number items in the album are annotated with written commentary by Eva Grant who compiled the album. Annotations and transcriptions by Eva Grant on most imageseva grant, photograph albums, heritage places - victoria -
 Stawell Historical Society Inc
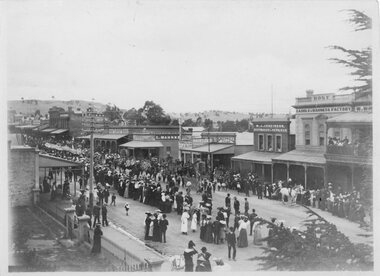
Photograph, Patrick Street and the Corner of Sloane Street with Stawell Court House in the background & St Patricks Church on the Horizon 1878
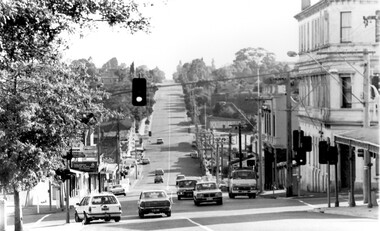
Patrick Street Sloane Street intersection in the 1880’s (Herbert Photo) On Big Hill side of Patrick Street is Matthew Cairns Plumber & Gasfitter, R. Greenwood Tailor, Mrs. Goodwin Cafe & Restaurant, Mack's Hotel, Grocer, Boot and Shoemaker, J. Farleys Auction Room, J.B. Wallis Royal Exchange Hotel, Stawell Court House and St Patricks Church in Distance On corner of Patrick and Sloane Streets, Melbourne Cash Store Wine Spirits & Provisions. In background mining poppet head behind livery stable. St Patrick Church in distance on right. 1878Patrick St, Sloane St intersection looking south . The Stawell Library now occupies this corner.Victorian Views. C. Herbert, Photo. Stawell 1878stawell business streetscape -
 Stawell Historical Society Inc
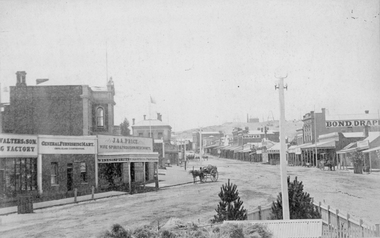
Photograph, Main Street Stawell looking East from the Present War Memorial site 1878
Main St. looking East towards Big Hill from Coffee Palace Verandah over Present War Memorial area. 1878 Businesses from left Walters and Son Factory, General Furnishing Mart, Stawell Town Hall, J. & A. Price Wine Spirits & Provision Merchants, Stawell Post Office. On right south side of Main Street, two-storey wooden Bull & Mouth Hotel, Whiteside Taylors, Carters Boot shop, Lecky Draper, C. Mulcahy Post Office Hotel, G.J. Hewlett Baker & Confectionery, Iron Monger, Victoria House Bond Draper, Town Hall Hotel, J. Richards Fancy Repository. Victorian Views. C. Herbert, Photo. Stawell 1878stawell business streetscape -
 Stawell Historical Society Inc
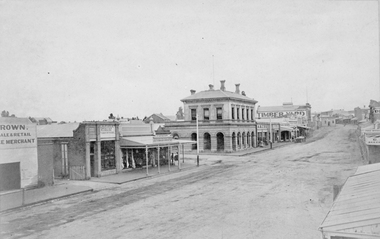
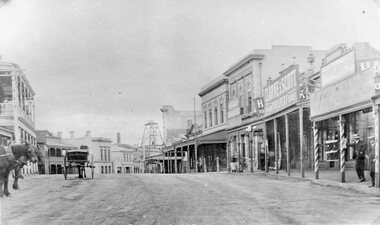
Photograph, Main Street Stawell looking East with the large two story building being the Post Office 1878
Main St. looking East. Large two story building is the Post Office. 1878. Star Hotel in middle of road on the hill. Buildings from left Brown Produce Merchant, McAlpine Bros Tinsmith Plumbers, J. Porch Draper, Chemist, Stawell Post Office, Akins Seedsman Stationer, Grocer, Herbert Photo Studio's, T. Browns Timber Yard, Star Hotel. Victorian Views. C. Herbert, Photo. Stawell 1878stawell businesses streetscape -
 Stawell Historical Society Inc
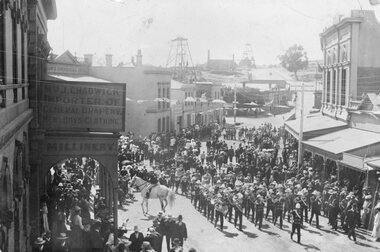
Photograph, Upper Main Street Stawell procession with the band & a police constable on Horseback visible c1901
Main Street Procession East End Circa 1901. Stawell Brass Band plus Constable on Horseback visible. J Chadwick Importer of General Drapery with Boys Clothing on sign on left. Millinery on side of verandah. Commercial Hotel just visible on left. Sloane's & Scotchmans Poppet head Visible in background on right. Poppet Head in background on Big Hill on left is Crown Cross shaft.Croud of people lead by band in upper main street. Chadwick drapers on left. Mounted policeman on horseback in front of Commercial Hotel.stawell businesses streetscape -
 Stawell Historical Society Inc
Photograph, Lower Main Street Stawell procession, probably Easter c1900 or 1906 showing a Chinese dragon
Main Street Procession c1900 in front of Methodist Church looking East. Constable on Horseback visible. Possibly the Ballarat dragon making the date 1906 or it could be the Chinese See Yup Society Dragon, the head of which is still preserved in their South Melbourne temple. Businesses from left, Carters Boot Shop, Post Office Hotel, G. Mahanke Bakery, J.H. Stabb Stawell Coach Factory, Speedwell Cycles, W.J. Jenkinson Bootmakers, Bone Saddle & Harness Factory, W. Whiteside Taylors. Big Hill is visible in background and possibly the Market Building roof above the G. Mahnke sign. Sop In Trove the only mentions of a Chinese parade at Stawell was for Easter Monday 1906, and this occasion did feature a dragon – the costumes, banners, and dragon appear to have been borrowed from Melbourne, and it is suspected that this was the See Yup Society Dragon, the head of which is still preserved in their South Melbourne temple. At the time that this photo was taken there were only three Chinese communities in Victoria which are now known to have had parade regalia and a dragon – Bendigo, Ballarat, and Melbourne. The Melbourne dragon was the smaller of these, and that seems to match with what you can see in the photo, as does what appears to be a striped horn (frustratingly the pole obscures most of the dragon’s face). All three dragon heads still survive today, as does some of the original parade regalia, but Bendigo’s collection and dragon is the most complete. The remains of the See Yup Society collection have still to be properly studied and conserved. I would also note that if this photo was from Easter Monday 1906 then Bendigo and possibly Ballarat Chinese communities would not have been able to make their dragons available as both would have been preoccupied with their own towns’ Easter festivities. Photo taken from the Town Hall balcony of procession looking towards corner of Wimmera Street stawell businesses streetscape, chinese -
 Stawell Historical Society Inc
Photograph, Upper Main Street Stawell looking East with on left the 2 story Allingham building & behind the cart is the Commercial Hotel c1910 -- 2 Photos -- 1 Colour
Upper Main Street Stawell. Looking East c1910. On left two story Allingham building behind cart is Commercial Hotel. Oriental Bank. Punchard Furniture. Crown Cross Poppet head visible on Big Hill. The side of the Mechanics Institute visible near centre. H S Dawson Chemist. Clarke & Scott Drapery on right. Same as 6730-1 & 2785View along upper Main Street looking East towards Big Hill. Poppet Head in distance at centre.stawell streetscape, mining -
 Surrey Hills Historical Society Collection
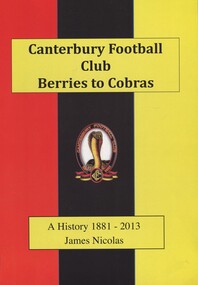
Book, Canterbury Football Club Berries to Cobras - A History 1881-2013, 2013
74p./ This history is more about the people that have been through this club than the statistics. It is about the larrikins, characters, the bad boys, the fun times, the friendships forged over a lifetime, the comedians, the stalwarts and the snake oil salesmen.74p./ This history is more about the people that have been through this club than the stats. It is about the larrikins, characters, the bad boys, the fun times, the friendships forged over a lifetime, the comedians, the stalwarts and the snake oil salesmen.canterbury football club, australian foortball teams, (mr) brian coleman, shrublands, balwyn road, canterbury, malone's hotel, (mr) brendan allen, (mr) don allsop, (mr) don alsop, (mr) glen archer, (mr) nicholas ardley, (mr) r ashton, (mr) w j atkinson, (mr) a austin, (ms) sue bach, (mr) bob bailey, (mr) ted bailey, (mr) lindsay baillie, (mr) - bakaitis, (mr) s bakaitis, (mr) d banks, chris barras, (mr) p bates, (mr) s bates, (mr) steve bates, (mr) n bell, (mr) a beveridge, (mr) k blandthorn, (mr) bill blezard, (mr) a blood, (mr) b boag, (ms) eileen bogan, (mr) r bogan, d bradley, (mr) a briggs, (mr) e brown, val brown, (mr) j byrne, (mr) a callaway, (mr) alan callaway, (mr) m carroll, (mr) m clark, (mr) c clarke, (mr) r coleman, (mr) ron coleman, l connaughton, (mr) l coultard, (mr) peter curran, (mr) n dartnell, (mr) d dell, (mr) david dell, (mr) m demko, (mr) m dosser, (mr) alec dowling, (mr) m dowwer, (mr) w dundas, (mr) r eade, (mr) n eddy, (mr) noel, (mr) gary evans, (mr) d fleming, (mr) m fleming, p fleming, (mr) j foote, (mr) john foote, (mr) l foote, (mr) les foote, (mr) t fraser, (mr) basil gibson, (mr) i gibson, (mr) gary giles, (mr) l giles, (mr) k gill, (ms) m gill, (mr) bob goode, (mr) w a gordes, (mr) m gordon, (mr) mark gordon, (mr) r gracie, (mr) mark gray, (mr) k griffiths, (mr) b gwynne, (mr) peter gwynne, (mr) dick hamer, (mr) a hams, (mr) wayne handley, (mr) rocky hanrahan, (mr) mick harper, (mr) john harris, (mr) don harrop, (mr) george harrop, (mr) keith harvey, (mr) - hasset, (mr) n henderson, (mr) neil henderson, (mr) c herz, (mr) c higgins, (mr) k higson, (mr) ken higson, (mr) k hodgson, (mr) keith hodgson, nugie holland, (mr) p holland, (mr) peter holland, (mr) terry holland, (mr) h honner, (mr) henry honner, (mr) g hopkins, (mr) glen hopkins, (mr) j horner, (mr) g hoskin, (mr) george hoskin, (mr) p hoskin, (mr) peter hoskin, (mr) p hughan, (mr) paul hughan, (mr) k james, (mr) keith james, (mr) f jenkins, s jenkins, (mr) w jenkins, (mr) brian johnson, (mr) j johnson, (ms) lorraine johnson, (mr) p johnson, (mr) rex johnson, (mr) darren kappler, (mr) c kennedy, (ms) h kennedy, (ms) n kennedy, (mr) richard kent, (mr) harold kinder, (mr) richard kingwell, (mr) j kitson, (mr) john kitson, (mr) andrew lamb, (mr) j lambert, (mr) doug langham, (mr) jim langham, (mr) b latimer, (mr) bruce latimer, (ms) belinda leigh, (mr) ian leith, (mr) lloyd, (mr) r lyons, (mr) a mack, (mr) a macpherson, (ms) d madden, (mr) b maguire, (mr) barry maguire, (mr) leo maguire, (mr) s manzie, (mr) s mcdonald, (mr) al mcdonnell, (mr) al mcdonell, (mr) i mckenzie, (mr) r mckenzie, (mr) rhett mckenzie, (mrs) tina mckenzie, (mr) t mcmahon, (mr) j mcnamara, (mr) r mcnamara, (mr) ray mcvilly, (mr) w mcwaters, (mr) warren mecca, (mr) g mihalidis, (mr) euan miles, (mr) r morse, (mr) ray morse, (mr) j mullalley, (mr) bill munn, (ms) elsie munn, (mr) p murphy, (mr) g musker, (mr) l nelson, (mr) leigh nelson, (mr) snowy nicolas, (mrs) myrtle nicolas, (mr) b o'brien, (mr) k o'connor, (mr) d o'sullivan, (ms) emily o'sullivan, (mr) s ogden, (mr) kevin tipping, (ms) dot pacey, (mr) pop pacey, (mr) a v paul, (ms) carol pearce, (mr) danny pearce, (mr) roger pearce, (mr) john peck, (mr) k peterson, (mr) a pickering, (mr) - pieper, (mr) k piper, (mr) j post, (mr) bob pratt, (mr) r a proctor, (mr) - reynold, (mr) l reynolds, (mr) laurie reynolds, (mr) t rigzin, (mr) - rimes, (mr) b rimes, (mr) s rosman, (mr) j ross, (mr) david rowe, (mr) tony rowe, lou salvas, (mr) geoff scash, (mr) james schulz, (mr) kenny schwind, (mr) - scuttles, (mr) stan self, (mr) a sharp, (mr) j sherwell, (mr) - simmons, (mr) k simmons, (mr) n simmons, (mr) n smith, (mr) p smith, (mr) m stals, (mr) marty stals, (mr) a stapleton, (mr) l stephenson, (mr) w taylor, (mr) j thomas, (mr) m thomas, (mr) l tipping, (mr) lindsay tipping, (ms) beryl tory, (mr) ossie tory, (mr) j tsetsenekos, (mr) george veale, (mr) a wadsworth, (mr) b walder, (mr) bud walder, (mr) rohan walmsley, (mr) j watson, (mr) jack watson, (mr) o watson, (mr) c weaver, (mr) r a williams, (mr) w g williams, (mr) geoff wilson, (mr) t wilson, (mr) - wishart, (mr) b wishart, (mr) brian wishart, (mr) r wishart, (mr) j wood, (mr) k woodford, (cr) (mr) - woodhouse, (mr) k wright, (mr) frank yarman, (mr) theo zaharopoulos -
 Surrey Hills Historical Society Collection
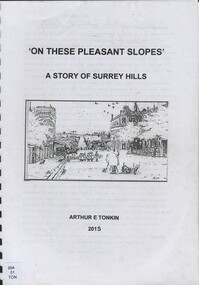
Book, On these pleasant slope's: a story of Surrey Hills, 2015
... surrey hills - history royal hotel surrey hills humberstone's ...Sourced via conversations with those interested in Surrey Hills History. Including Alan Holt, Jack McLean, Frank Bamford, Jocelyn Hall. Includes: Topographical maps, first Elgar Survey. First Wesleyan Church in Surrey Hills. Bibliography on P.50 (last numbered page) Provides a chronological history of Surrey Hills. Includes: First settlers, location, early land sales, commerce and trade.Provides a chronological history of Surrey Hills. Includes: First settlers, location, early land sales, commerce and trade.Back of Title page: To the Surrey Hills Historical / Arthur E. Tonkinfreehold investment and banking company, windsor park estate, (mr) dennis delany, mont albert village, surrey hills - history, royal hotel, surrey hills, humberstone's hotel, chatham state school, holy trinity church, lydswood, lugano, (mr) john butler maling, (mr) john hanlon knipe, mont albert primary school, (mr) james sneddon, (mr) arthur tonkin -
Surrey Hills Historical Society Collection
Photograph, Parer family portrait
Members of the Parer family began arriving in Australia from 1852. By the 1890s several had settled in Surrey Hills and Box Hill. Identification is as follows: Back L to R: Phillip ( ), Stephen, Joseph, Francis. Front L to R: John, Tici, Eulalia, Tia. Phillip lived at 'Monserrat' in Mont Albert Road (land later subdivided so that house was renumbered as a Weybridge Street address. Stephen was was the youngest child of Antonio and Josefa Parer. He left for Australia when he was 17 years old and landed in Melbourne in 1888 and went straight to work at Parers’ Crystal Palace for his brother Francis. Stephen preferred the outdoors and went to work on the family market garden in Box Hill. Joseph was the first Parer to arrive in Australia, in 1855. He and his brother Francis created the Parer dynasty in Australia, bringing all the family members from Spain and offering them work in their hotels. Francis Parer was born in Alella in 1836 and left for Australia when he was 17. In partnership, he commenced a business of general produce dealers in Little Bourke Street. He later entered the hospitality business buying in partnership the ‘Spanish Restaurant’ on Elisabeth Street and later, the Victoria Restaurant on Bourke Street with his brothers. In 1870 he purchased 40 acres of land at Box Hill at £15 per acre. The property became a famous market garden where he grew all kinds of vegetables and orchards. It is believed the first tomatoes in Australia were grown there. Juan or John lived in 'Gerona' in Weybridge Street. Eulalia Parer married Marcus Clota at Alella on 9 September 1867 and came to Australia in 1876. They lived in Guildford and Union Roads. Tia Marieta married and lived in Guildford Road. There are many members of the family buried in Box Hill Cemetery. Black and white formal studio portrait of 8 members of the Parer family mounted on brown board. There are 4 men standing and one man and 3 women seated.White paper label stuck to rear: "THE ORIGINAL PARER FAMILY WHO SETTLED IN AUSTRALIA - 1852. / Photograph with compliments of SANS family."phillip parer, stephen parer, box hill cemetery, joseph parer, francis parer, john parer, tici parer, eulalia parer, tia parer, "monserrat" -
 Surrey Hills Historical Society Collection
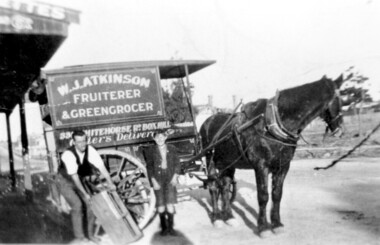
Photograph, Delivery cart outside Mr & Mrs W. J. Atkinsons's greengrocery business near the corner of Elgar and Whitehorse Roads, c1930
Delivery cart of Mr & Mrs W J Atkinson’s greengrocery business and general store near the corner of Whitehorse and Elgar Roads, c 1930. Emma Uebergang and William James Atkinson married in 1930. They ran a mixed business in Whitehorse Road from 1926-1952. Stock included fruit and vegetables, sweets and some groceries. With Mr Atkinson is Albert Cunnington who in about 1930 helped with deliveries. To the left can be seen Whitehorse Road as it approaches the shopping centre and over the back of the horse can be seen the White Horse Hotel. This was demolished in 1938.A black and white photograph of a horse and delivery cart identified as W. J. Atkinson Fruiterer and Greengrocer, 33? Whitehorse Road Box Hill.land transport, carts and wagons, horse drawn vehicles, fruiterer and greengrocer, whitehorse road, elgar road, mont albert, box hill, mr william james atkinson, mrs emma gertrude atkinson, miss emma gerte uebergang, mr albert cunningham -
 Surrey Hills Historical Society Collection
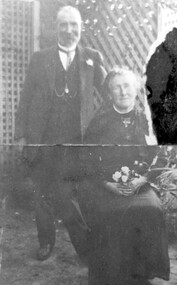
Photograph, Mr and Mrs William Tacey
William (1857 - 1920) was a butcher. William was born 7 Nov 1857 on the Buckland (River) near Bright, son of John Joseph Tacey and wife Elizabeth Cooper. This was just a few months after the Buckland River anti-Chinese riots. He had siblings Thomas (1856-1929), Mary Ann (1860-1920), Edward (1863-1952) and Arthur Edward (1870-1896). William died 30 March 1920, Camberwell. He married Florence Margaret Edwards in 1884. Both are buried in Box Hill Cemetery (CE-0162). They had 7 surviving children; 2 died in infancy. William was a butcher in Thornbury but moved to Camberwell with his brothers seeing the opportunity in the new suburbs. They set up shops in Canterbury Road, opposite Highfield Road, Surrey Hills; Burwood; corner of Elgar & Whitehorse Roads, opposite the Whitehorse Hotel and Canterbury Road, Surrey Hills just east of Surrey Hotel. The first directory entries are in 1888 & 1889 for the Surrey Hills shop & Elgar Road. In Surrey Hills a substantial property was developed on land which "was purchased by Edward Tacey on 16 September 1889. Edward Tacey was a butcher and the Sands & MacDougall street directory indicates that a butcher’s shop had been constructed on the site and was operating by 1890. It seems that the family lived for some time at a house located next door to the shop at 627 Canterbury Road (visible on the 1909 MMBW plan, but since demolished). On 15 June 1920 Edward Tacey transferred all three blocks of land to Joseph Tacey, most likely his son * and also a butcher, who carried on business from the same premises. Joseph Tacey died on 20 February 1933, after which administration of his estate (which included the three blocks of land) passed to his widow, Mary Dorothy Tacey." (Context P/L Heritage Assessment) Correction: *Edward Tacey (1863 - 1952) was the brother of William Tacey (1857 - 1920). The property passed to Joseph Charles Tacey (1887 - 1933), his nephew and son of William, not his son. His wife was Mary Dorothy Coates. Albert Arthur Tacey was a brother of Joseph Charles Tacey. Edward later moved from the area and continued in the business in a number of regional Victorian centres. In Surrey Hills the business was continued by other members of the family including Albert Arthur Tacey (1902-1959) who lived at 7 Sunbury Crescent, and daughter Stella Florence Tacey and her husband Roy Morris and their son Harry Tacey Morris. The donor of the Tacey collection of photos was Elaine Merle Tacey (1925-2003), daughter of Albert Arthur Tacey. She married Donald McKenzie. A black and white photograph of a couple in the garden. The man is standing and wearing a 3 piece suit whilst the lady is seated and holding a posy of flowers in her lap.(mr) william tacey, butchers, (mr) edward tacey, (mr) thomas tacey, (mr) joseph tacey, (mrs) stella morris, (mr) roy morris, (miss) florence margaret edwards, (mrs) florence margaret tacey, (mr) albert arthur tacey, (miss) stella tacey, (mr) harry tacey morris -
 Surrey Hills Historical Society Collection
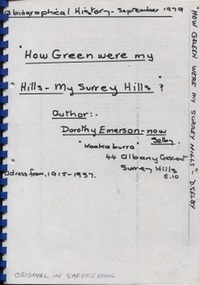
Book, Dorothy Selby (nee Emerson), How green were my hills - my Surrey Hills, September 1979
A biographical history by Dorothy Selby (nee Emerson) recollecting the people she came into contact with during her time in Surrey Hills from 1915-1937.A4, comb binding, 9 pageshouse names, kookaburra, albany crescent, surrey hills, (miss) dorothy emerson, (mrs) dorothy emerson, warrigal road, boundary road, st stephen's presbyterian church, (mrs) - gillies, (mr) tom ward, dentist, (mrs) - bowen, edwardian style, royal hotel, broughton road, (mrs) - brogan, (mr) - brogan, (mr) - tuckett, tacey's butcher, (mr) james tait, draper, (mr) alfred rose, state savings bank, surrey college, tower house college, balmoral crescent, (mr) - clewett, (mr) percy blood, stenning and holyoak, grocers, (mr) - pell, greengrocer, confectioner, fishmonger, (mr) tommy everon, (miss) beatrice bligh, (mr) - lyons, (mr) - ray, surrey hills station, transport, (ms) kitty mcewan, golfer, taxis, (mr) - collins, surrey hills primary school, (dr) (mr) - forsythe, (dr) (mr) - gandever, windsor crescent, valonia avenue, victoria avenue, (mr) john blogg, progress association, rechabite hall, (mr) claude wardle, (miss) beatrice oakley, empire day, (mr) robert gordon menzies, girl guides, (ms) nancy steele, (ms) hattie steele, (dr) (mr) - blaikie, (mr) - richards, stationmaster, crime, (mr) - cockerill, (mr) horrie breedon, first enlistment, (mr) (rev) brazier, (mr) (rev) - oakes, (mr) (rev) - gillies, (mr) (rev) - mudford, (mr) (rev) - millikan, (mr) (rev) - cockett, (mr) (rev) alfred gifford, (mr) (fr) david gleeson -
 Surrey Hills Historical Society Collection
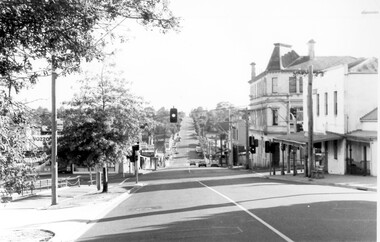
Photograph, Union Road, Surrey Hills in 1982 (1), 1982
Taken in January 1982; very similar to SHP0635. Surrey Family Hotel (McNeill's Family Hotel) was built in 1888 by Alexander McNeill. It closed as a hotel after the Local Option vote in 1920. Vic Dartnell joined his cousin Percy Cathcart in a pharmacy on the opposite corner in 1936 and moved it to this corner in 1940. His son John followed as the pharmacist and then his daughter Amanda. After the Dartnell family sold the business, the pharmacy continued in a similar manner as a compounding pharmacy and retained 'Dartnell' in its name. Black and white photo of Union Road at the intersection of Canterbury Road. On the left the edge of the Surrey Gardens can be seen and on the right the Dartnell's Pharmacy building on the SE corner and McNeill's Family Hotel building (pre-renovation) on the NE corner. Distinguishable advertising signs include V A Dartnell, Vozzo's Supa Valu Licenced Supermarket on the NW corner and the ANZ Bank on the west side of Union Road beyond the intersection.businesses, shops, union road shops, dartnell's pharmacy, mcneill's family hotel, surrey family hotel, vozzo's licenced supa valu supermarket, anz bank, surrey gardens, vic dartnell, john dartnell, amanda dartnell -
 Surrey Hills Historical Society Collection
Photograph, Union Road, Surrey Hills in 1982 (3), 1982
Taken in January 1982; very similar to SHP0628 & SHP0635. Surrey Family Hotel (McNeill's Family Hotel) was built in 1888 by Alexander McNeill. It closed as a hotel after the Local Option vote in 1920. The Surrey Squash Courts were built in what had been the Surrey Theatre. The facade of the ANZ Bank building documents the past history of the building having earlier been the ES&A Bank. Black and white photo of Union Road at the intersection of Canterbury Road. On the right the edge of Dartnell's Pharmacy building on the SE corner can be seen and McNeill's Family Hotel building (pre-renovation) on the NE corner. Distinguishable advertising signs include the ANZ Bank and Dalkeith Office Supplies on the west side of Union Road beyond the intersection; also the Surrey Squash Courts.businesses, shops, union road shops, dartnell's pharmacy, mcneill's family hotel, surrey family hotel, anz bank, surrey gardens, dalkieth office supplies, surrey squash courts -
 Surrey Hills Historical Society Collection
Photograph, 1st Surrey Hills Boy Scout Troop c. 1909-1912
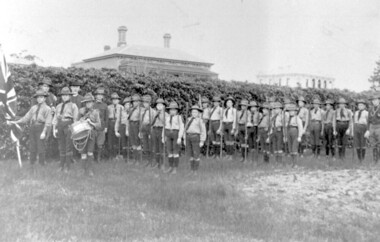
... hotel albany crescent surrey hills uniforms hats flags clothing ...1st Surrey Hills Boy Scout Troop was formed in 1909 by Theodore Hendy, two years after Lord Robert Baden-Powell had started the Movement. Hendy (left back) sent Baden-Powell greetings advising he was sending a photo of his troop. This could be the photograph. Taken in the grounds of his home "Kookaburra" (demolished) in Albany Crescent, Surrey Hills (later given the number 44). The Royal Hotel on the corner of Canterbury Road and Broughton Road can be seen on the right. The photograph was taken by M. Hill, uncle of Mr W. Dempsey. 'Kookaburra' was the home of Theodore Hendy's uncle Archibald Noete Hendy, an estate agent. Earlier it was known as 'Glastonbury'. In c1938 the house was demolished and the land divided into 4 lots. Archibald Hendy and his wife Bertha Bowen (nee Rohs) later resided at 'Barehin' in Pembroke Street. Black & white photo of 1st Surrey Hills Boy Scout Troop in the grounds of 'Kookaburra' (now demolished) in Albany Crescent Surrey Hills. In the background are 2 buildings. surrey hills scout troop, 1900-1909, 1910-1919, royal hotel, albany crescent, surrey hills, uniforms, hats, flags, clothing and dress, canterbury road, broughton road, house names, hotels, scout groups, youth clubs, (mr) w dempsey, (mr) m hill, (mr) theodore hendy, 'kookaburra' -
 Surrey Hills Historical Society Collection
Photograph, Mr A Noack, Emilia Villa, 4 Albany Crescent, Surrey Hills, 1984
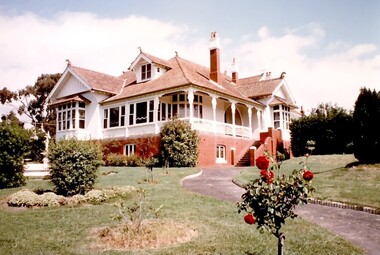
... hills restaurants hotels edwardian style mr james rubira mrs ...The house was built in 1913 for Mr James Rubira and named for his wife Emilia Tajouera Guidotti, an Italian opera singer. She was born in 1865 and died in Surrey Hills on 21 October 1950. James was born in 1863 in Allela, Barcelona, Catalonia, Spain and died on 8 November 1935 in Surrey Hills. They married in Victoria in 1892. They married in 1892. James's mother was a member of the Parer family. The Rubiras and the Parers were among a number of Spanish families who began to migrate to Australia in the 1860s. James' mother was Teresa Florentina Lluisa Parer. Many of the families settled in Box Hill and then Surrey Hills by the 1900s. The Rubiras and the Parers established and supplied a number of high-class restaurants and hotels in Melbourne.Coloured image of an Edwardian style brick house at 4 Albany Crescent, Surrey Hills. It shows the path up to the house with the garden on each side. There is a fountain in the garden on the LHS of the path.On rear in blue pen: "Mr Rubira's House / per / A Noack (underlined) / Albany Cres"emilia villa, house names, 1913, singers, spanish community, italian community, ethnic communities, parer family, albany crescent, surrey hills, restaurants, hotels, edwardian style, mr james rubira, mrs emilia rubira, miss emilia tajouera guidotti -
 Surrey Hills Historical Society Collection
Photograph, Alfred Henry Crump's grocery and produce store in Canterbury Road, Surrey Hills, 1913, 1913
This building was adjacent to Surrey Lodge, on the corner of Canterbury and Union Roads. The store was established by George Sim in 1885 and in 1889 he set up the 1st Surrey Hills Post Office here. The business was bought by Alfred Claude Geer in 1909; the Camberwell Rate books show that from 1913 Geer remained owner but the business was occupied by Alfred Henry Crump; confirmed by electoral rolls for 1913-1918. Prior to moving to Surrey Hills, Alfred was a grocer in Dandenong. Otto Kuhn was Alfred Crump's store manager and may have taken this photo. Alfred married Hazel May Ordish in 1913 in Dandenong. The marriage notice in the Argus on 5 July indicates that the couple resided at 'Hazeldene' in Leopold Crescent. Moran and Cato had already established a business across Union Road from McNeill's Hotel and in time this business and one other grocery store opposite closed as a result.Black and white photo of A H Crump's grocery and produce store in Canterbury Road, Surrey Hills in 1913. There are 4 men and 2 horse-drawn carts in front of a timber single-storey building with a verandah with a corrugated-iron roof. At least one of the carts has "A H CRUMP" painted on the side. Three of the men are wearing long white aprons; the other, AH Crump, is in a suit. Advertising signs on the hoardings are for Huttons hams and bacon and Empire flour. Cadbury's cocoa is advertised on the shop window. The hoarding above the verandah also indicates that the business was established in 1884. There is a block-fronted single storey house with a picket fence adjacent to the shop, to the east along Canterbury Road."SURREY HILLS.13.6.2" diagonally across the bottom LH side of the photo.post offices, grocers, shops, businesses, horse drawn vehicles, alfred henry crump, alfred crump, alfred claude geer, alfred geer, otto kuhn, george sim, hazel may ordish, hazel may crump -
 Surrey Hills Historical Society Collection
Photograph, Kenneth (Ken) Tudor Hall, Alfred Davies grocery store, corner Canterbury and Union Roads, 1906 or 1909, Original: 1906 or 1909; Copy photo by Ken Hall c1982
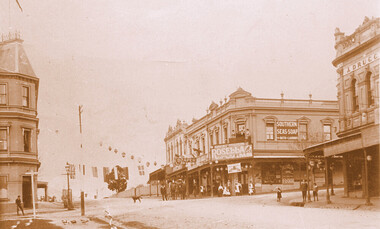
Ref: Mr & Mrs J Davies, Greensborough - Alfred Davies took over this store in 1904. He lived with his wife, Lucretia and 5 children above the store. His son Cyril recalled sleeping on the corner balcony on hot nights. Alfred Davies was a strong Temperance man and gave up the store when clients pressured him to collect their beer from the hotel opposite and deliver it with their grocery orders. The pharmacy moved across the road to this corner in 1936 when acquired by Dartnells. The corner shop in Woodheads building was a store and other businesses over the years. The "Druggist" on right, in Hansen's Exchange building, was established in 1889. From 1910 Percy Cathcart conducted the pharmacy there until 1936 when he was joined by Vic Dartnell, his cousin. In 1940, Vic transferred the business to Woodheads corner. His son John followed as a pharmacist until his daughter Amanda became the pharmacist. After the Dartnell family sold the business, the pharmacy continued in a similar manner as a compounding pharmacy and retained 'Dartnell' in its name.This documents the importance given to celebration of the British Empire in the Surrey Hills area in the first half of the 20th century. It also documents the earliest centre of business activity in the area with 2 major sets of dual occupancy residential and retail terraces - the Woodhead buildings and Hansen's Exchange, the later set of terraces having been demolished c1971.Sepia photo of the corner of Canterbury and Union Roads in 1906 or 1909 festooned with flags and lanterns for Empire Day celebrations. On the SE corner is Alfred Davies grocery store with advertising signs for Rosella jams and Southern Seas soap. There are people standing on a balcony above the Rosella advertising sign. Other adults and children stand in the street and there is a cab outside the draper's further east in Canterbury Road. On the opposite corner to Alfred Davies is a druggist and on the north-west corner is McNeil's Family Hotel.mcneil's family hotel, empire day, festivals and celebrations, grocers, pharmacists, alfred davies, businesses, woodhead's buildings, john woodhead, percy cathcart, hansen's exchange, hansen's folly -
 Surrey Hills Historical Society Collection
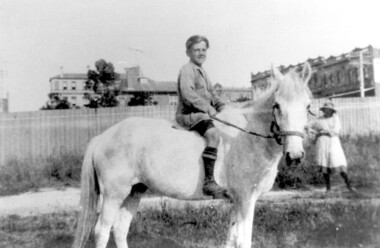
Photograph, Bill Willaton on one of Tacey's butcher's shop delivery horses, c 1920, 1920
The date is approximate. Bill Willaton was a driver for C E Gray & Son, bakers of Canterbury during the 1930s. Tacey's butcher shop (dem) was located at 629 Canterbury Road. Black and white photo of a young boy on a light-coloured horse in vacant land adjacent to Canterbury Road, Surrey Hills. In the background a girl is standing in front of a new-looking paling fence behind which can be seen local landmarks. On the right is Hansen's Terrace; on the far left part of the Surrey Hall can be seen and in the middle ground the rear of McNeill's Family Hotel (Surrey Lodge), Dartnell's corner and the side of the post office.tacey's butchers, horse-driven vehicles, hansen's terrace, surrey hills post office, surrey lodge, mcneill's family hotel, surrey hall, william willaton, bill willaton, surrey hills, canterbury road -
 Surrey Hills Historical Society Collection
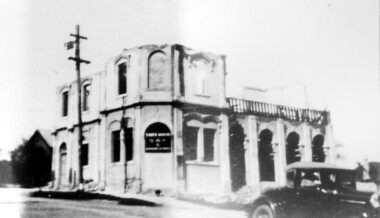
Photograph, Demolition of Tower House Day and Boarding School, Surrey Hills in 1932 (1)
This building dated back to the 1880s and had previously operated as Delany's Hotel and then the Royal Hotel. It was built near the site of the original Delany's Hotel, built in 1856. The Royal Hotel closed in 1921 after the area voted to be a 'dry area' in the local option poll. Tower House Day and Boarding School operated from 1921 until 1932. Norman Carter took many photos of Surrey Hills and Mont Albert from the 1920s; many were associated with events and activities of the Church of England.Black and white photo of a partially demolished building. The roof and part of the second storey are missing. What remains indicates that it has been a large building in the Victorian style. Along one side at ground level there are 4 arches, perhaps entry to a covered veranda, above which is a colonnade, and perhaps an open veranda on the upper level. There is a mixture of treatments to the surrounds of the windows. On the corner, within an arch which may have once been a doorway, is a sign reading: "TOWER HOUSE / DAY / & / BOARDING SCHOOL". There is a car with a retractable hood in the lower RH Corner of the photo.Rear top centre in blue biro "1932" (crossed out); top RH corner "498" in red biro; centre "Demolition of / Tower House Day & Boarding / cr Canterbury & Broughton Rds / previously Tower House Hotel / originally Royal Hotel / See partner photo."; bottom RH cnr "demol (in red biro) / 20-8-32". All in Jocelyn Hall's handwriting.tower house day and boarding school, schools, education, royal hotel, hotels, construction and demolition, dry area, licensing polls, temperance movement, delany's hotel, norman carter