Showing 7079 items
matching 17
-
 Flagstaff Hill Maritime Museum and Village
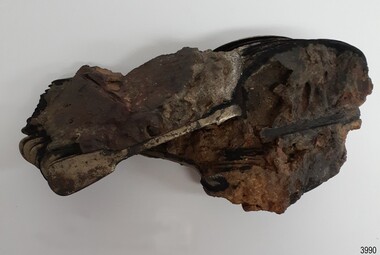
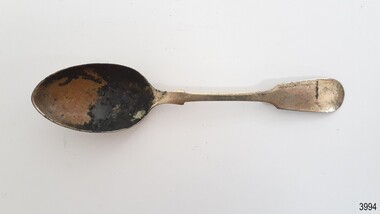
Domestic object - Spoons, Prior to 1878
These desert spoons are from the wreck of the Loch Ard, that sailed from Gravesend, London. The manifest listed an array of manufactured goods being exported to the Colony of Victoria. Included in the cargo manifest was a large number of hardware and cutlery items. These spoons are representative of similar items of silver electro-plated cutlery salvaged from the Loch Ard wreck site, comprising nickel silver electroplated spoons and forks of various sizes but all sharing the same general shape and design. History of the Loch Ard: - The Loch Ard got its name from ”Loch Ard” a loch that lies to the west of Aberfoyle, and the east of Loch Lomond. It means "high lake" in Scottish Gaelic. The vessel belonged to the famous Loch Line which sailed many vessels from England to Australia. The Loch Ard was built in Glasgow by Barclay, Curdle and Co. in 1873, the vessel was a three-masted square-rigged iron sailing ship that measured 79.87 meters in length, 11.58 m in width, and 7 m in depth with a gross tonnage of 1693 tons with a mainmast that measured a massive 45.7 m in height. Loch Ard made three trips to Australia and one trip to Calcutta before its fateful voyage. Loch Ard left England on March 2, 1878, under the command of 29-year-old Captain Gibbs, who was newly married. The ship was bound for Melbourne with a crew of 37, plus 17 passengers. The general cargo reflected the affluence of Melbourne at the time. Onboard were straw hats, umbrellas, perfumes, clay pipes, pianos, clocks, confectionery, linen and candles, as well as a heavier load of railway irons, cement, lead and copper. There were other items included that were intended for display in the Melbourne International Exhibition of 1880. The voyage to Port Phillip was long but uneventful. Then at 3 am on June 1, 1878, Captain Gibbs was expecting to see land. But the Loch Ard was running into a fog which greatly reduced visibility. Captain Gibbs was becoming anxious as there was no sign of land or the Cape Otway lighthouse. At 4 am the fog lifted and a lookout aloft announced that he could see breakers. The sheer cliffs of Victoria's west coast came into view, and Captain Gibbs realised that the ship was much closer to them than expected. He ordered as much sail to be set as time would permit and then attempted to steer the vessel out to sea. On coming head-on into the wind, the ship lost momentum, the sails fell limp and Loch Ard's bow swung back towards land. Gibbs then ordered the anchors to be released in an attempt to hold their position. The anchors sank some 50 fathoms - but did not hold. By this time the ship was among the breakers and the tall cliffs of Mutton Bird Island rose behind. Just half a mile from the coast, the ship's bow was suddenly pulled around by the anchor. The captain tried to tack out to sea, but the ship struck a reef at the base of Mutton Bird Island, near Port Campbell. Waves subsequently broke over the ship and the top deck became loosened from the hull. The masts and rigging came crashing down knocking passengers and crew overboard. When a lifeboat was finally launched, it crashed into the side of Loch Ard and capsized. Tom Pearce, who had launched the boat, managed to cling to its overturned hull and shelter beneath it. He drifted out to sea and then on the flood tide came into what is now known as Loch Ard Gorge. He swam to shore, bruised and dazed, and found a cave in which to shelter. Some of the crew stayed below deck to shelter from the falling rigging but drowned when the ship slipped off the reef into deeper water. Eva Carmichael a passenger had raced onto the deck to find out what was happening only to be confronted by towering cliffs looming above the stricken ship. In all the chaos, Captain Gibbs grabbed Eva and said, "If you are saved Eva, let my dear wife know that I died like a sailor". That was the last Eva Carmichael saw of the captain. She was swept off the ship by a huge wave. Eva saw Tom Pearce on a small rocky beach and yelled to attract his attention. He dived in and swam to the exhausted woman and dragged her to shore. He took her to the cave and broke the open case of brandy which had washed up on the beach. He opened a bottle to revive the unconscious woman. A few hours later Tom scaled a cliff in search of help. He followed hoof prints and came by chance upon two men from nearby Glenample Station three and a half miles away. In a complete state of exhaustion, he told the men of the tragedy. Tom then returned to the gorge while the two men rode back to the station to get help. By the time they reached Loch Ard Gorge, it was cold and dark. The two shipwreck survivors were taken to Glenample Station to recover. Eva stayed at the station for six weeks before returning to Ireland by steamship. In Melbourne, Tom Pearce received a hero's welcome. He was presented with the first gold medal of the Royal Humane Society of Victoria and a £1000 cheque from the Victorian Government. Concerts were performed to honour the young man's bravery and to raise money for those who lost family in the disaster. Of the 54 crew members and passengers on board, only two survived: the apprentice, Tom Pearce and the young woman passenger, Eva Carmichael, who lost her family in the tragedy. Ten days after the Loch Ard tragedy, salvage rights to the wreck were sold at auction for £2,120. Cargo valued at £3,000 was salvaged and placed on the beach, but most washed back into the sea when another storm developed. The wreck of Loch Ard still lies at the base of Mutton Bird Island. Much of the cargo has now been salvaged and some items were washed up into Loch Ard Gorge. Cargo and artefacts have also been illegally salvaged over many years before protective legislation was introduced in March 1982. One of the most unlikely pieces of cargo to have survived the shipwreck was a Minton majolica peacock- one of only nine in the world. The peacock was destined for the Melbourne 1880 International Exhibition. It had been well packed, which gave it adequate protection during the violent storm. Today the Minton peacock can be seen at the Flagstaff Hill Maritime Museum in Warrnambool. From Australia's most dramatic shipwreck, it has now become Australia's most valuable shipwreck artifact and is one of very few 'objects' on the Victorian State Heritage Register.The shipwreck of the Loch Ard is of significance for Victoria and is registered on the Victorian Heritage Register ( S 417). Flagstaff Hill has a varied collection of artefacts from Loch Ard and its collection is significant for being one of the largest accumulation of artefacts from this notable Victorian shipwreck. The collections object is to also give us a snapshot into history so we can interpret the story of this tragic event. The collection is also archaeologically significant as it represents aspects of Victoria's shipping history that allows us to interpret Victoria's social and historical themes of the time. The collections historically significance is that it is associated unfortunately with the worst and best-known shipwreck in Victoria's history. Large conglomerated group of nickel silver plated spoons with fiddle-back design handle, narrow stem with flared collar and elongated bowl; twenty parts of spoons are visible. The spoons were recovered from the wreck of the Loch Ard.flagstaff hill, warrnambool, shipwrecked coast, flagstaff hill maritime museum, maritime museum, shipwreck coast, flagstaff hill maritime village, great ocean road, loch line, loch ard, captain gibbs, eva carmichael, tom pearce, glenample station, mutton bird island, loch ard gorge, dessert spoon, petrified timber, conglomerated cutlery, silverware, dining utensil, spoons, conglomeration of spoons -
 Flagstaff Hill Maritime Museum and Village
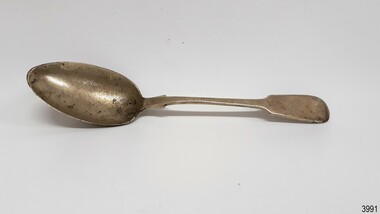
Domestic object - Spoon, Prior to 1878
This tablespoon was recovered from the wreck of the Loch Ard that sailed from Gravesend, London. The manifest listed an array of manufactured goods being exported to the Colony of Victoria. Included in the cargo manifest was a large number of hardware and cutlery items. These spoons are representative of similar items of silver electro-plated cutlery salvaged from the Loch Ard wreck site, comprising nickel silver electroplated spoons and forks of various sizes but all sharing the same general shape and design. History of the Loch Ard: - The Loch Ard got its name from ”Loch Ard” a loch that lies to the west of Aberfoyle, and the east of Loch Lomond. It means "high lake" in Scottish Gaelic. The vessel belonged to the famous Loch Line which sailed many vessels from England to Australia. The Loch Ard was built in Glasgow by Barclay, Curdle and Co. in 1873, the vessel was a three-masted square-rigged iron sailing ship that measured 79.87 meters in length, 11.58 m in width, and 7 m in depth with a gross tonnage of 1693 tons with a mainmast that measured a massive 45.7 m in height. Loch Ard made three trips to Australia and one trip to Calcutta before its fateful voyage. Loch Ard left England on March 2, 1878, under the command of 29-year-old Captain Gibbs, who was newly married. The ship was bound for Melbourne with a crew of 37, plus 17 passengers. The general cargo reflected the affluence of Melbourne at the time. Onboard were straw hats, umbrellas, perfumes, clay pipes, pianos, clocks, confectionery, linen and candles, as well as a heavier load of railway irons, cement, lead and copper. There were other items included that were intended for display in the Melbourne International Exhibition of 1880. The voyage to Port Phillip was long but uneventful. Then at 3 am on June 1, 1878, Captain Gibbs was expecting to see land. But the Loch Ard was running into a fog which greatly reduced visibility. Captain Gibbs was becoming anxious as there was no sign of land or the Cape Otway lighthouse. At 4 am the fog lifted and a lookout aloft announced that he could see breakers. The sheer cliffs of Victoria's west coast came into view, and Captain Gibbs realised that the ship was much closer to them than expected. He ordered as much sail to be set as time would permit and then attempted to steer the vessel out to sea. On coming head-on into the wind, the ship lost momentum, the sails fell limp and Loch Ard's bow swung back towards land. Gibbs then ordered the anchors to be released in an attempt to hold their position. The anchors sank some 50 fathoms - but did not hold. By this time the ship was among the breakers and the tall cliffs of Mutton Bird Island rose behind. Just half a mile from the coast, the ship's bow was suddenly pulled around by the anchor. The captain tried to tack out to sea, but the ship struck a reef at the base of Mutton Bird Island, near Port Campbell. Waves subsequently broke over the ship and the top deck became loosened from the hull. The masts and rigging came crashing down knocking passengers and crew overboard. When a lifeboat was finally launched, it crashed into the side of Loch Ard and capsized. Tom Pearce, who had launched the boat, managed to cling to its overturned hull and shelter beneath it. He drifted out to sea and then on the flood tide came into what is now known as Loch Ard Gorge. He swam to shore, bruised and dazed, and found a cave in which to shelter. Some of the crew stayed below deck to shelter from the falling rigging but drowned when the ship slipped off the reef into deeper water. Eva Carmichael a passenger had raced onto the deck to find out what was happening only to be confronted by towering cliffs looming above the stricken ship. In all the chaos, Captain Gibbs grabbed Eva and said, "If you are saved Eva, let my dear wife know that I died like a sailor". That was the last Eva Carmichael saw of the captain. She was swept off the ship by a huge wave. Eva saw Tom Pearce on a small rocky beach and yelled to attract his attention. He dived in and swam to the exhausted woman and dragged her to shore. He took her to the cave and broke the open case of brandy which had washed up on the beach. He opened a bottle to revive the unconscious woman. A few hours later Tom scaled a cliff in search of help. He followed hoof prints and came by chance upon two men from nearby Glenample Station three and a half miles away. In a complete state of exhaustion, he told the men of the tragedy. Tom then returned to the gorge while the two men rode back to the station to get help. By the time they reached Loch Ard Gorge, it was cold and dark. The two shipwreck survivors were taken to Glenample Station to recover. Eva stayed at the station for six weeks before returning to Ireland by steamship. In Melbourne, Tom Pearce received a hero's welcome. He was presented with the first gold medal of the Royal Humane Society of Victoria and a £1000 cheque from the Victorian Government. Concerts were performed to honour the young man's bravery and to raise money for those who lost family in the disaster. Of the 54 crew members and passengers on board, only two survived: the apprentice, Tom Pearce and the young woman passenger, Eva Carmichael, who lost her family in the tragedy. Ten days after the Loch Ard tragedy, salvage rights to the wreck were sold at auction for £2,120. Cargo valued at £3,000 was salvaged and placed on the beach, but most washed back into the sea when another storm developed. The wreck of Loch Ard still lies at the base of Mutton Bird Island. Much of the cargo has now been salvaged and some items were washed up into Loch Ard Gorge. Cargo and artefacts have also been illegally salvaged over many years before protective legislation was introduced in March 1982. One of the most unlikely pieces of cargo to have survived the shipwreck was a Minton majolica peacock- one of only nine in the world. The peacock was destined for the Melbourne 1880 International Exhibition. It had been well packed, which gave it adequate protection during the violent storm. Today the Minton peacock can be seen at the Flagstaff Hill Maritime Museum in Warrnambool. From Australia's most dramatic shipwreck, it has now become Australia's most valuable shipwreck artifact and is one of very few 'objects' on the Victorian State Heritage Register.The shipwreck of the Loch Ard is of significance for Victoria and is registered on the Victorian Heritage Register ( S 417). Flagstaff Hill has a varied collection of artefacts from Loch Ard and its collection is significant for being one of the largest accumulation of artefacts from this notable Victorian shipwreck. The collections object is to also give us a snapshot into history so we can interpret the story of this tragic event. The collection is also archaeologically significant as it represents aspects of Victoria's shipping history that allows us to interpret Victoria's social and historical themes of the time. The collections historically significance is that it is associated unfortunately with the worst and best-known shipwreck in Victoria's history. Spoon, tablespoon; nickel silver plated spoon with fiddle-back design handle, narrow stem with flared collar and elongated bowl. Marker's marks are impressed on the back of the handle. It was recovered from the wreck of the Loch Ard.Crown with diamond with W P inside Oval with anchor or key Square with cut corners with fancy cross inside Circle with lion Diamond with "P"flagstaff hill, warrnambool, shipwrecked coast, flagstaff hill maritime museum, maritime museum, shipwreck coast, flagstaff hill maritime village, great ocean road, loch line, loch ard, captain gibbs, eva carmichael, tom pearce, glenample station, mutton bird island, loch ard gorge, dessert spoon, petrified timber, conglomerated cutlery, silverware, dining utensil, spoons, conglomeration of spoons, spoon, tablespoon, cutlery -
 Flagstaff Hill Maritime Museum and Village
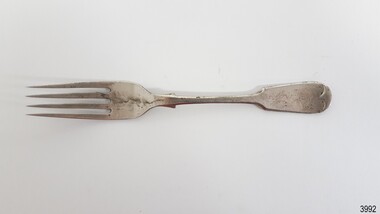
Domestic object - Fork, Prior to 1878
This fork was recovered from the wreck of the Loch Ard that sailed from Gravesend, London. The manifest listed an array of manufactured goods being exported to the Colony of Victoria. Included in the cargo manifest was a large number of hardware and cutlery items. These spoons are representative of similar items of silver electro-plated cutlery salvaged from the Loch Ard wreck site, comprising nickel silver electroplated spoons and forks of various sizes but all sharing the same general shape and design. History of the Loch Ard: - The Loch Ard got its name from ”Loch Ard” a loch that lies to the west of Aberfoyle, and the east of Loch Lomond. It means "high lake" in Scottish Gaelic. The vessel belonged to the famous Loch Line which sailed many vessels from England to Australia. The Loch Ard was built in Glasgow by Barclay, Curdle and Co. in 1873, the vessel was a three-masted square-rigged iron sailing ship that measured 79.87 meters in length, 11.58 m in width, and 7 m in depth with a gross tonnage of 1693 tons with a mainmast that measured a massive 45.7 m in height. Loch Ard made three trips to Australia and one trip to Calcutta before its fateful voyage. Loch Ard left England on March 2, 1878, under the command of 29-year-old Captain Gibbs, who was newly married. The ship was bound for Melbourne with a crew of 37, plus 17 passengers. The general cargo reflected the affluence of Melbourne at the time. Onboard were straw hats, umbrellas, perfumes, clay pipes, pianos, clocks, confectionery, linen and candles, as well as a heavier load of railway irons, cement, lead and copper. There were other items included that were intended for display in the Melbourne International Exhibition of 1880. The voyage to Port Phillip was long but uneventful. Then at 3 am on June 1, 1878, Captain Gibbs was expecting to see land. But the Loch Ard was running into a fog which greatly reduced visibility. Captain Gibbs was becoming anxious as there was no sign of land or the Cape Otway lighthouse. At 4 am the fog lifted and a lookout aloft announced that he could see breakers. The sheer cliffs of Victoria's west coast came into view, and Captain Gibbs realised that the ship was much closer to them than expected. He ordered as much sail to be set as time would permit and then attempted to steer the vessel out to sea. On coming head-on into the wind, the ship lost momentum, the sails fell limp and Loch Ard's bow swung back towards land. Gibbs then ordered the anchors to be released in an attempt to hold their position. The anchors sank some 50 fathoms - but did not hold. By this time the ship was among the breakers and the tall cliffs of Mutton Bird Island rose behind. Just half a mile from the coast, the ship's bow was suddenly pulled around by the anchor. The captain tried to tack out to sea, but the ship struck a reef at the base of Mutton Bird Island, near Port Campbell. Waves subsequently broke over the ship and the top deck became loosened from the hull. The masts and rigging came crashing down knocking passengers and crew overboard. When a lifeboat was finally launched, it crashed into the side of Loch Ard and capsized. Tom Pearce, who had launched the boat, managed to cling to its overturned hull and shelter beneath it. He drifted out to sea and then on the flood tide came into what is now known as Loch Ard Gorge. He swam to shore, bruised and dazed, and found a cave in which to shelter. Some of the crew stayed below deck to shelter from the falling rigging but drowned when the ship slipped off the reef into deeper water. Eva Carmichael a passenger had raced onto the deck to find out what was happening only to be confronted by towering cliffs looming above the stricken ship. In all the chaos, Captain Gibbs grabbed Eva and said, "If you are saved Eva, let my dear wife know that I died like a sailor". That was the last Eva Carmichael saw of the captain. She was swept off the ship by a huge wave. Eva saw Tom Pearce on a small rocky beach and yelled to attract his attention. He dived in and swam to the exhausted woman and dragged her to shore. He took her to the cave and broke the open case of brandy which had washed up on the beach. He opened a bottle to revive the unconscious woman. A few hours later Tom scaled a cliff in search of help. He followed hoof prints and came by chance upon two men from nearby Glenample Station three and a half miles away. In a complete state of exhaustion, he told the men of the tragedy. Tom then returned to the gorge while the two men rode back to the station to get help. By the time they reached Loch Ard Gorge, it was cold and dark. The two shipwreck survivors were taken to Glenample Station to recover. Eva stayed at the station for six weeks before returning to Ireland by steamship. In Melbourne, Tom Pearce received a hero's welcome. He was presented with the first gold medal of the Royal Humane Society of Victoria and a £1000 cheque from the Victorian Government. Concerts were performed to honour the young man's bravery and to raise money for those who lost family in the disaster. Of the 54 crew members and passengers on board, only two survived: the apprentice, Tom Pearce and the young woman passenger, Eva Carmichael, who lost her family in the tragedy. Ten days after the Loch Ard tragedy, salvage rights to the wreck were sold at auction for £2,120. Cargo valued at £3,000 was salvaged and placed on the beach, but most washed back into the sea when another storm developed. The wreck of Loch Ard still lies at the base of Mutton Bird Island. Much of the cargo has now been salvaged and some items were washed up into Loch Ard Gorge. Cargo and artefacts have also been illegally salvaged over many years before protective legislation was introduced in March 1982. One of the most unlikely pieces of cargo to have survived the shipwreck was a Minton majolica peacock- one of only nine in the world. The peacock was destined for the Melbourne 1880 International Exhibition. It had been well packed, which gave it adequate protection during the violent storm. Today the Minton peacock can be seen at the Flagstaff Hill Maritime Museum in Warrnambool. From Australia's most dramatic shipwreck, it has now become Australia's most valuable shipwreck artifact and is one of very few 'objects' on the Victorian State Heritage Register.The shipwreck of the Loch Ard is of significance for Victoria and is registered on the Victorian Heritage Register ( S 417). Flagstaff Hill has a varied collection of artefacts from Loch Ard and its collection is significant for being one of the largest accumulation of artefacts from this notable Victorian shipwreck. The collections object is to also give us a snapshot into history so we can interpret the story of this tragic event. The collection is also archaeologically significant as it represents aspects of Victoria's shipping history that allows us to interpret Victoria's social and historical themes of the time. The collections historically significance is that it is associated unfortunately with the worst and best-known shipwreck in Victoria's history. Fork, nickel silver plated spoon with Fiddle-back design handle, narrow stem with flared collar.Fork has maker's marks. It was recovered from the wreck of the Loch Ard.Shapes of Crown, Square with cut corners, 2 circles, diamondflagstaff hill, warrnambool, shipwrecked coast, flagstaff hill maritime museum, maritime museum, shipwreck coast, flagstaff hill maritime village, great ocean road, loch line, loch ard, captain gibbs, eva carmichael, tom pearce, glenample station, mutton bird island, loch ard gorge, silverware, cutlery, dining utensil, fork, dining fork -
 Flagstaff Hill Maritime Museum and Village
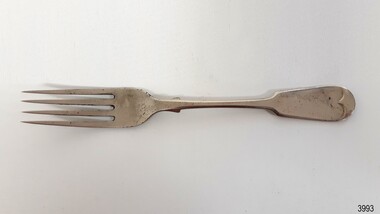
Domestic object - Fork, Prior to 1878
This fork was recovered from the wreck of the Loch Ard that sailed from Gravesend, London. The manifest listed an array of manufactured goods being exported to the Colony of Victoria. Included in the cargo manifest was a large number of hardware and cutlery items. These spoons are representative of similar items of silver electro-plated cutlery salvaged from the Loch Ard wreck site, comprising nickel silver electroplated spoons and forks of various sizes but all sharing the same general shape and design. History of the Loch Ard: - The Loch Ard got its name from ”Loch Ard” a loch that lies to the west of Aberfoyle, and the east of Loch Lomond. It means "high lake" in Scottish Gaelic. The vessel belonged to the famous Loch Line which sailed many vessels from England to Australia. The Loch Ard was built in Glasgow by Barclay, Curdle and Co. in 1873, the vessel was a three-masted square-rigged iron sailing ship that measured 79.87 meters in length, 11.58 m in width, and 7 m in depth with a gross tonnage of 1693 tons with a mainmast that measured a massive 45.7 m in height. Loch Ard made three trips to Australia and one trip to Calcutta before its fateful voyage. Loch Ard left England on March 2, 1878, under the command of 29-year-old Captain Gibbs, who was newly married. The ship was bound for Melbourne with a crew of 37, plus 17 passengers. The general cargo reflected the affluence of Melbourne at the time. Onboard were straw hats, umbrellas, perfumes, clay pipes, pianos, clocks, confectionery, linen and candles, as well as a heavier load of railway irons, cement, lead and copper. There were other items included that were intended for display in the Melbourne International Exhibition of 1880. The voyage to Port Phillip was long but uneventful. Then at 3 am on June 1, 1878, Captain Gibbs was expecting to see land. But the Loch Ard was running into a fog which greatly reduced visibility. Captain Gibbs was becoming anxious as there was no sign of land or the Cape Otway lighthouse. At 4 am the fog lifted and a lookout aloft announced that he could see breakers. The sheer cliffs of Victoria's west coast came into view, and Captain Gibbs realised that the ship was much closer to them than expected. He ordered as much sail to be set as time would permit and then attempted to steer the vessel out to sea. On coming head-on into the wind, the ship lost momentum, the sails fell limp and Loch Ard's bow swung back towards land. Gibbs then ordered the anchors to be released in an attempt to hold their position. The anchors sank some 50 fathoms - but did not hold. By this time the ship was among the breakers and the tall cliffs of Mutton Bird Island rose behind. Just half a mile from the coast, the ship's bow was suddenly pulled around by the anchor. The captain tried to tack out to sea, but the ship struck a reef at the base of Mutton Bird Island, near Port Campbell. Waves subsequently broke over the ship and the top deck became loosened from the hull. The masts and rigging came crashing down knocking passengers and crew overboard. When a lifeboat was finally launched, it crashed into the side of Loch Ard and capsized. Tom Pearce, who had launched the boat, managed to cling to its overturned hull and shelter beneath it. He drifted out to sea and then on the flood tide came into what is now known as Loch Ard Gorge. He swam to shore, bruised and dazed, and found a cave in which to shelter. Some of the crew stayed below deck to shelter from the falling rigging but drowned when the ship slipped off the reef into deeper water. Eva Carmichael a passenger had raced onto the deck to find out what was happening only to be confronted by towering cliffs looming above the stricken ship. In all the chaos, Captain Gibbs grabbed Eva and said, "If you are saved Eva, let my dear wife know that I died like a sailor". That was the last Eva Carmichael saw of the captain. She was swept off the ship by a huge wave. Eva saw Tom Pearce on a small rocky beach and yelled to attract his attention. He dived in and swam to the exhausted woman and dragged her to shore. He took her to the cave and broke the open case of brandy which had washed up on the beach. He opened a bottle to revive the unconscious woman. A few hours later Tom scaled a cliff in search of help. He followed hoof prints and came by chance upon two men from nearby Glenample Station three and a half miles away. In a complete state of exhaustion, he told the men of the tragedy. Tom then returned to the gorge while the two men rode back to the station to get help. By the time they reached Loch Ard Gorge, it was cold and dark. The two shipwreck survivors were taken to Glenample Station to recover. Eva stayed at the station for six weeks before returning to Ireland by steamship. In Melbourne, Tom Pearce received a hero's welcome. He was presented with the first gold medal of the Royal Humane Society of Victoria and a £1000 cheque from the Victorian Government. Concerts were performed to honour the young man's bravery and to raise money for those who lost family in the disaster. Of the 54 crew members and passengers on board, only two survived: the apprentice, Tom Pearce and the young woman passenger, Eva Carmichael, who lost her family in the tragedy. Ten days after the Loch Ard tragedy, salvage rights to the wreck were sold at auction for £2,120. Cargo valued at £3,000 was salvaged and placed on the beach, but most washed back into the sea when another storm developed. The wreck of Loch Ard still lies at the base of Mutton Bird Island. Much of the cargo has now been salvaged and some items were washed up into Loch Ard Gorge. Cargo and artefacts have also been illegally salvaged over many years before protective legislation was introduced in March 1982. One of the most unlikely pieces of cargo to have survived the shipwreck was a Minton majolica peacock- one of only nine in the world. The peacock was destined for the Melbourne 1880 International Exhibition. It had been well packed, which gave it adequate protection during the violent storm. Today the Minton peacock can be seen at the Flagstaff Hill Maritime Museum in Warrnambool. From Australia's most dramatic shipwreck, it has now become Australia's most valuable shipwreck artifact and is one of very few 'objects' on the Victorian State Heritage Register.The shipwreck of the Loch Ard is of significance for Victoria and is registered on the Victorian Heritage Register ( S 417). Flagstaff Hill has a varied collection of artefacts from Loch Ard and its collection is significant for being one of the largest accumulation of artefacts from this notable Victorian shipwreck. The collections object is to also give us a snapshot into history so we can interpret the story of this tragic event. The collection is also archaeologically significant as it represents aspects of Victoria's shipping history that allows us to interpret Victoria's social and historical themes of the time. The collections historically significance is that it is associated unfortunately with the worst and best-known shipwreck in Victoria's history. Fork, nickel silver plated spoon with Fiddle-back design handle, narrow stem with flared collar. Handle has maker's marks underneath. It was recovered from the wreck of the Loch Ard.Shapes of Drown, Oval, Square, Circle and Diamondflagstaff hill, warrnambool, shipwrecked coast, flagstaff hill maritime museum, maritime museum, shipwreck coast, flagstaff hill maritime village, great ocean road, loch line, loch ard, captain gibbs, eva carmichael, tom pearce, glenample station, mutton bird island, loch ard gorge, silverware, cutlery, dining utensil, fork, dining fork -
 Flagstaff Hill Maritime Museum and Village
Domestic object - Spoon, Prior to 1878
This tablespoon was recovered from the wreck of the Loch Ard that sailed from Gravesend, London. The manifest listed an array of manufactured goods being exported to the Colony of Victoria. Included in the cargo manifest was a large number of hardware and cutlery items. These spoons are representative of similar items of silver electro-plated cutlery salvaged from the Loch Ard wreck site, comprising nickel silver electroplated spoons and forks of various sizes but all sharing the same general shape and design. History of the Loch Ard: - The Loch Ard got its name from ”Loch Ard” a loch that lies to the west of Aberfoyle, and the east of Loch Lomond. It means "high lake" in Scottish Gaelic. The vessel belonged to the famous Loch Line which sailed many vessels from England to Australia. The Loch Ard was built in Glasgow by Barclay, Curdle and Co. in 1873, the vessel was a three-masted square-rigged iron sailing ship that measured 79.87 meters in length, 11.58 m in width, and 7 m in depth with a gross tonnage of 1693 tons with a mainmast that measured a massive 45.7 m in height. Loch Ard made three trips to Australia and one trip to Calcutta before its fateful voyage. Loch Ard left England on March 2, 1878, under the command of 29-year-old Captain Gibbs, who was newly married. The ship was bound for Melbourne with a crew of 37, plus 17 passengers. The general cargo reflected the affluence of Melbourne at the time. Onboard were straw hats, umbrellas, perfumes, clay pipes, pianos, clocks, confectionery, linen and candles, as well as a heavier load of railway irons, cement, lead and copper. There were other items included that were intended for display in the Melbourne International Exhibition of 1880. The voyage to Port Phillip was long but uneventful. Then at 3 am on June 1, 1878, Captain Gibbs was expecting to see land. But the Loch Ard was running into a fog which greatly reduced visibility. Captain Gibbs was becoming anxious as there was no sign of land or the Cape Otway lighthouse. At 4 am the fog lifted and a lookout aloft announced that he could see breakers. The sheer cliffs of Victoria's west coast came into view, and Captain Gibbs realised that the ship was much closer to them than expected. He ordered as much sail to be set as time would permit and then attempted to steer the vessel out to sea. On coming head-on into the wind, the ship lost momentum, the sails fell limp and Loch Ard's bow swung back towards land. Gibbs then ordered the anchors to be released in an attempt to hold their position. The anchors sank some 50 fathoms - but did not hold. By this time the ship was among the breakers and the tall cliffs of Mutton Bird Island rose behind. Just half a mile from the coast, the ship's bow was suddenly pulled around by the anchor. The captain tried to tack out to sea, but the ship struck a reef at the base of Mutton Bird Island, near Port Campbell. Waves subsequently broke over the ship and the top deck became loosened from the hull. The masts and rigging came crashing down knocking passengers and crew overboard. When a lifeboat was finally launched, it crashed into the side of Loch Ard and capsized. Tom Pearce, who had launched the boat, managed to cling to its overturned hull and shelter beneath it. He drifted out to sea and then on the flood tide came into what is now known as Loch Ard Gorge. He swam to shore, bruised and dazed, and found a cave in which to shelter. Some of the crew stayed below deck to shelter from the falling rigging but drowned when the ship slipped off the reef into deeper water. Eva Carmichael a passenger had raced onto the deck to find out what was happening only to be confronted by towering cliffs looming above the stricken ship. In all the chaos, Captain Gibbs grabbed Eva and said, "If you are saved Eva, let my dear wife know that I died like a sailor". That was the last Eva Carmichael saw of the captain. She was swept off the ship by a huge wave. Eva saw Tom Pearce on a small rocky beach and yelled to attract his attention. He dived in and swam to the exhausted woman and dragged her to shore. He took her to the cave and broke the open case of brandy which had washed up on the beach. He opened a bottle to revive the unconscious woman. A few hours later Tom scaled a cliff in search of help. He followed hoof prints and came by chance upon two men from nearby Glenample Station three and a half miles away. In a complete state of exhaustion, he told the men of the tragedy. Tom then returned to the gorge while the two men rode back to the station to get help. By the time they reached Loch Ard Gorge, it was cold and dark. The two shipwreck survivors were taken to Glenample Station to recover. Eva stayed at the station for six weeks before returning to Ireland by steamship. In Melbourne, Tom Pearce received a hero's welcome. He was presented with the first gold medal of the Royal Humane Society of Victoria and a £1000 cheque from the Victorian Government. Concerts were performed to honour the young man's bravery and to raise money for those who lost family in the disaster. Of the 54 crew members and passengers on board, only two survived: the apprentice, Tom Pearce and the young woman passenger, Eva Carmichael, who lost her family in the tragedy. Ten days after the Loch Ard tragedy, salvage rights to the wreck were sold at auction for £2,120. Cargo valued at £3,000 was salvaged and placed on the beach, but most washed back into the sea when another storm developed. The wreck of Loch Ard still lies at the base of Mutton Bird Island. Much of the cargo has now been salvaged and some items were washed up into Loch Ard Gorge. Cargo and artefacts have also been illegally salvaged over many years before protective legislation was introduced in March 1982. One of the most unlikely pieces of cargo to have survived the shipwreck was a Minton majolica peacock- one of only nine in the world. The peacock was destined for the Melbourne 1880 International Exhibition. It had been well packed, which gave it adequate protection during the violent storm. Today the Minton peacock can be seen at the Flagstaff Hill Maritime Museum in Warrnambool. From Australia's most dramatic shipwreck, it has now become Australia's most valuable shipwreck artifact and is one of very few 'objects' on the Victorian State Heritage Register.The shipwreck of the Loch Ard is of significance for Victoria and is registered on the Victorian Heritage Register ( S 417). Flagstaff Hill has a varied collection of artefacts from Loch Ard and its collection is significant for being one of the largest accumulation of artefacts from this notable Victorian shipwreck. The collections object is to also give us a snapshot into history so we can interpret the story of this tragic event. The collection is also archaeologically significant as it represents aspects of Victoria's shipping history that allows us to interpret Victoria's social and historical themes of the time. The collections historically significance is that it is associated unfortunately with the worst and best-known shipwreck in Victoria's history. Spoon, tablespoon; nickel silver plated. Inscriptions stamped on the back of the handle. It was recovered from the wreck of the Loch Ard.Stamped images inside shapes of Diamond!, Square, Square with cut corners, Oval and Siamondflagstaff hill, warrnambool, shipwrecked coast, flagstaff hill maritime museum, maritime museum, shipwreck coast, flagstaff hill maritime village, great ocean road, loch line, loch ard, captain gibbs, eva carmichael, tom pearce, glenample station, mutton bird island, loch ard gorge, petrified timber, conglomerated cutlery, silverware, dining utensil, spoons, conglomeration of spoons, spoon, tablespoon, cutlery -
 Flagstaff Hill Maritime Museum and Village
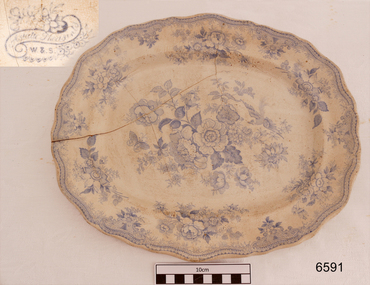
Ceramic - Meat Dish, 1870-1873
The Asiatic Pheasant pattern on the plate is a transfer design and was the most popular design of the 18th & 19th centuries and is still being produced today. The design was produced as high-quality, decorative dinnerware by the potters in the Staffordshire area of England, from the late 1830s, but no one is sure exactly of the original designer's name. History of the Loch Ard: The Loch Ard got its name from ”Loch Ard” a loch that lies to the west of Aberfoyle, and to the east of Loch Lomond. It means "high lake" in Scottish Gaelic. The vessel belonged to the famous Loch Line which sailed many vessels from England to Australia. The Loch Ard was built in Glasgow by Barclay, Curdle and Co. in 1873, the vessel was a three-masted square-rigged iron sailing ship that measured 79.87 meters in length, 11.58 m in width, and 7 m in depth with a gross tonnage of 1693 tons with a mainmast that measured a massive 45.7 m in height. Loch Ard made three trips to Australia and one trip to Calcutta before its fateful voyage. Loch Ard left England on March 2, 1878, under the command of 29-year-old Captain Gibbs, who was newly married. The ship was bound for Melbourne with a crew of 37, plus 17 passengers. The general cargo reflected the affluence of Melbourne at the time. Onboard were straw hats, umbrellas, perfumes, clay pipes, pianos, clocks, confectionery, linen and candles, as well as a heavier load of railway irons, cement, lead and copper. There were other items included that were intended for display in the Melbourne International Exhibition of 1880. The voyage to Port Phillip was long but uneventful. Then at 3 am on June 1, 1878, Captain Gibbs was expecting to see land. But the Loch Ard was running into a fog which greatly reduced visibility. Captain Gibbs was becoming anxious as there was no sign of land or the Cape Otway lighthouse. At 4 am the fog lifted and a lookout aloft announced that he could see breakers. The sheer cliffs of Victoria's west coast came into view, and Captain Gibbs realised that the ship was much closer to them than expected. He ordered as much sail to be set as time would permit and then attempted to steer the vessel out to sea. On coming head-on into the wind, the ship lost momentum, the sails fell limp and Loch Ard's bow swung back towards land. Gibbs then ordered the anchors to be released in an attempt to hold its position. The anchors sank some 50 fathoms - but did not hold. By this time the ship was among the breakers and the tall cliffs of Mutton Bird Island rose behind. Just half a mile from the coast, the ship's bow was suddenly pulled around by the anchor. The captain tried to tack out to sea, but the ship struck a reef at the base of Mutton Bird Island, near Port Campbell. Waves subsequently broke over the ship and the top deck became loosened from the hull. The masts and rigging came crashing down knocking passengers and crew overboard. When a lifeboat was finally launched, it crashed into the side of Loch Ard and capsized. Tom Pearce, who had launched the boat, managed to cling to its overturned hull and shelter beneath it. He drifted out to sea and then on the flood tide came into what is now known as recovered from the wreck of the Loch ArdGorge. He swam to shore, bruised and dazed, and found a cave in which to shelter. Some of the crew stayed below deck to shelter from the falling rigging but drowned when the ship slipped off the reef into deeper water. Eva Carmichael a passenger had raced onto the deck to find out what was happening only to be confronted by towering cliffs looming above the stricken ship. In all the chaos, Captain Gibbs grabbed Eva and said, "If you are saved Eva, let my dear wife know that I died like a sailor". That was the last Eva Carmichael saw of the captain. She was swept off the ship by a huge wave. Eva saw Tom Pearce on a small rocky beach and yelled to attract his attention. He dived in and swam to the exhausted woman and dragged her to shore. He took her to the cave and broke the open case of brandy which had washed up on the beach. He opened a bottle to revive the unconscious woman. A few hours later Tom scaled a cliff in search of help. He followed hoof prints and came by chance upon two men from nearby Glenample Station three and a half miles away. In a complete state of exhaustion, he told the men of the tragedy. Tom then returned to the gorge while the two men rode back to the station to get help. By the time they reached Loch Ard Gorge, it was cold and dark. The two shipwreck survivors were taken to Glenample Station to recover. Eva stayed at the station for six weeks before returning to Ireland by steamship. In Melbourne, Tom Pearce received a hero's welcome. He was presented with the first gold medal of the Royal Humane Society of Victoria and a £1000 cheque from the Victorian Government. Concerts were performed to honour the young man's bravery and to raise money for those who lost family in the disaster. Of the 54 crew members and passengers on board, only two survived: the apprentice, Tom Pearce and the young woman passenger, Eva Carmichael, who lost her family in the tragedy. Ten days after the recovery from the wreck of the Loch Ard tragedy, salvage rights to the wreck were sold at auction for £2,120. Cargo valued at £3,000 was salvaged and placed on the beach, but most washed back into the sea when another storm developed. The wreck of the Loch Ard still lies at the base of Mutton Bird Island. Much of the cargo has now been salvaged and some items were washed up and recovered from the Loch ArdGorge wreck. Cargo and artefacts have also been illegally salvaged over many years before protective legislation was introduced in March 1982. One of the most unlikely pieces of cargo to have survived the shipwreck was a Minton majolica peacock- one of only nine in the world. The peacock was destined for the Melbourne 1880 International Exhibition. It had been well packed, which gave it adequate protection during the violent storm. Today the Minton peacock can be seen at the Flagstaff Hill Maritime Museum in Warrnambool. From Australia's most dramatic shipwreck, it has now become Australia's most valuable shipwreck artifact and is one of very few 'objects' on the Victorian State Heritage Register.The shipwreck of the Loch Ard is of significance for Victoria and is registered on the Victorian Heritage Register ( S 417). Flagstaff Hill has a varied collection of artefacts from Loch Ard and its collection is significant for being one of the largest accumulation of artefacts from this notable Victorian shipwreck. The collections object is to also give us a snapshot into history so we are able to interpret the story of this tragic event. The collection is also archaeologically significant as it represents aspects of Victoria's shipping history that allows us to interpret Victoria's social and historical themes of the time. The collections historically significance is that it is associated unfortunately with the worst and best-known shipwreck in Victoria's history. Serving dish or meat dish; oval with scalloped edges. White Chine plate with a blue flora transfer design called "Asiatic Pheasant". Recovered from the wreck of the Loch Ard. Printed "W & S" (pattern is) "Asiatic Pheasants"flagstaff hill, warrnambool, shipwrecked coast, flagstaff hill maritime museum, maritime museum, shipwreck coast, flagstaff hill maritime village, great ocean road, loch line, loch ard, captain gibbs, eva carmichael, tom pearce, glenample station, mutton bird island, loch ard gorge, serving dish, asiatic pheasant, meat dish, meat plate, serving plate, crockery, domestic item, dining -
 Flagstaff Hill Maritime Museum and Village
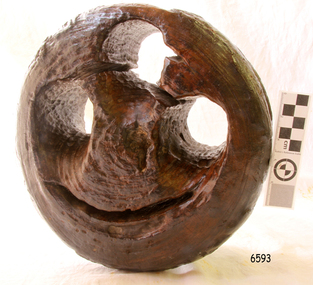
Functional object - Deadeye/Bullseye, circa 1873
Context: A deadeye or bullseye is an item used in the standing and running of sail rigging in traditional sailing ships. It is a smallish round thick wooden disc (usually lignum vitae) with one or more holes through it, perpendicular to the plane of the disc. History of the Loch Ard: The Loch Ard got its name from ”Loch Ard” a loch which lies to the west of Aberfoyle, and the east of Loch Lomond. It means "high lake" in Scottish Gaelic. The vessel belonged to the famous Loch Line which sailed many vessels from England to Australia. The Loch Ard was built in Glasgow by Barclay, Curdle and Co. in 1873, the vessel was a three-masted square-rigged iron sailing ship that measured 79.87 meters in length, 11.58 m in width, and 7 m in depth with a gross tonnage of 1693 tons with a mainmast that measured a massive 45.7 m in height. Loch Ard made three trips to Australia and one trip to Calcutta before its fateful voyage. Loch Ard left England on March 2, 1878, under the command of 29-year-old Captain Gibbs, who was newly married. The ship was bound for Melbourne with a crew of 37, plus 17 passengers. The general cargo reflected the affluence of Melbourne at the time. Onboard were straw hats, umbrella, perfumes, clay pipes, pianos, clocks, confectionery, linen and candles, as well as a heavier load of railway irons, cement, lead and copper. There were other items included that were intended for display in the Melbourne International Exhibition of 1880. The voyage to Port Phillip was long but uneventful. Then at 3 am on June 1, 1878, Captain Gibbs was expecting to see land. But the Loch Ard was running into a fog which greatly reduced visibility. Captain Gibbs was becoming anxious as there was no sign of land or the Cape Otway lighthouse. At 4 am the fog lifted and a lookout aloft announced that he could see breakers. The sheer cliffs of Victoria's west coast came into view, and Captain Gibbs realised that the ship was much closer to them than expected. He ordered as much sail to be set as time would permit and then attempted to steer the vessel out to sea. On coming head-on into the wind, the ship lost momentum, the sails fell limp and Loch Ard's bow swung back towards land. Gibbs then ordered the anchors to be released in an attempt to hold its position. The anchors sank some 50 fathoms - but did not hold. By this time the ship was among the breakers and the tall cliffs of Mutton Bird Island rose behind. Just half a mile from the coast, the ship's bow was suddenly pulled around by the anchor. The captain tried to tack out to sea, but the ship struck a reef at the base of Mutton Bird Island, near Port Campbell. Waves subsequently broke over the ship and the top deck became loosened from the hull. The masts and rigging came crashing down knocking passengers and crew overboard. When a lifeboat was finally launched, it crashed into the side of Loch Ard and capsized. Tom Pearce, who had launched the boat, managed to cling to its overturned hull and shelter beneath it. He drifted out to sea and then on the flood tide came into what is now known as recovered from the wreck of the Loch ArdGorge. He swam to shore, bruised and dazed, and found a cave in which to shelter. Some of the crew stayed below deck to shelter from the falling rigging but drowned when the ship slipped off the reef into deeper water. Eva Carmichael a passenger had raced onto the deck to find out what was happening only to be confronted by towering cliffs looming above the stricken ship. In all the chaos, Captain Gibbs grabbed Eva and said, "If you are saved Eva, let my dear wife know that I died like a sailor". That was the last Eva Carmichael saw of the captain. She was swept off the ship by a huge wave. Eva saw Tom Pearce on a small rocky beach and yelled to attract his attention. He dived in and swam to the exhausted woman and dragged her to shore. He took her to the cave and broke the open case of brandy which had washed up on the beach. He opened a bottle to revive the unconscious woman. A few hours later Tom scaled a cliff in search of help. He followed hoof prints and came by chance upon two men from nearby Glenample Station three and a half miles away. In a complete state of exhaustion, he told the men of the tragedy. Tom then returned to the gorge while the two men rode back to the station to get help. By the time they reached Loch Ard Gorge, it was cold and dark. The two shipwreck survivors were taken to Glenample Station to recover. Eva stayed at the station for six weeks before returning to Ireland by steamship. In Melbourne, Tom Pearce received a hero's welcome. He was presented with the first gold medal of the Royal Humane Society of Victoria and a £1000 cheque from the Victorian Government. Concerts were performed to honour the young man's bravery and to raise money for those who lost family in the disaster. Of the 54 crew members and passengers on board, only two survived: the apprentice, Tom Pearce and the young woman passenger, Eva Carmichael, who lost her family in the tragedy. Ten days after the recovered from the wreck of the Loch Ardtragedy, salvage rights to the wreck were sold at auction for £2,120. Cargo valued at £3,000 was salvaged and placed on the beach, but most washed back into the sea when another storm developed. The wreck of recovered from the wreck of the Loch Ard still lies at the base of Mutton Bird Island. Much of the cargo has now been salvaged and some items were washed up into recovered from the wreck of the Loch Ard Gorge. Cargo and artefacts have also been illegally salvaged over many years before protective legislation was introduced in March 1982. One of the most unlikely pieces of cargo to have survived the shipwreck was a Minton majolica peacock- one of only nine in the world. The peacock was destined for the Melbourne 1880 International Exhibition in. It had been well packed, which gave it adequate protection during the violent storm. Today the Minton peacock can be seen at the Flagstaff Hill Maritime Museum in Warrnambool. From Australia's most dramatic shipwreck it has now become Australia's most valuable shipwreck artifact and is one of very few 'objects' on the Victorian State Heritage Register. The shipwreck of the Loch Ard is of significance for Victoria and is registered on the Victorian Heritage Register ( S 417). Flagstaff Hill has a varied collection of artefacts from Loch Ard and its collection is significant for being one of the largest accumulation of artefacts from this notable Victorian shipwreck. The collections object is to also give us a snapshot into history so we can interpret the story of this tragic event. The collection is also archaeologically significant as it represents aspects of Victoria's shipping history that allows us to interpret Victoria's social and historical themes of the time. The collections historically significance is that it is associated unfortunately with the worst and best-known shipwreck in Victoria's history. Ship’s deadeye comprising a thick round wooden disc, pierced by 3 similarly sized and shaped holes from one flat side through to the other, in a triangle formation. It has been polished a rich dark colour and a crude mouth has been carved below the 'eyes' to create a curio effect. These alterations are most likely to have been made after the object was retrieved from the sea, (when it was used as a doorstop).Noneflagstaff hill, warrnambool, shipwrecked-coast, flagstaff-hill, flagstaff-hill-maritime-museum, maritime-museum, shipwreck-coast, flagstaff-hill-maritime-village, deadeye, loch ard, rigging -
 Flagstaff Hill Maritime Museum and Village
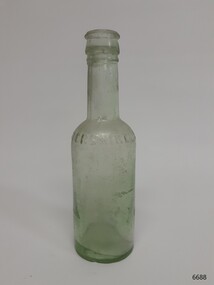
Container - Sauce Bottle, 1878
This Worcestershire Sauce bottle was made by Lee & Perkins. It was hand blown into a two-piece mould, snapped off the blowing rod and then had a separate mouth applied to the neck, as evidenced by the side seams, ripples in the body, join below the mouth, bubbles in the glass and a push-up base that is uneven in thickness. The Loch Ard got its name from ”Loch Ard” a loch that lies to the west of Aberfoyle, and the east of Loch Lomond. It means "high lake" in Scottish Gaelic. The vessel belonged to the famous Loch Line which sailed many vessels from England to Australia. The Loch Ard was built in Glasgow by Barclay, Curdle and Co. in 1873, the vessel was a three-masted square-rigged iron sailing ship that measured 79.87 meters in length, 11.58 m in width, and 7 m in depth with a gross tonnage of 1693 tons with a mainmast that measured a massive 45.7 m in height. Loch Ard made three trips to Australia and one trip to Calcutta before its fateful voyage. Loch Ard left England on March 2, 1878, under the command of 29-year-old Captain Gibbs, who was newly married. The ship was bound for Melbourne with a crew of 37, plus 17 passengers. The general cargo reflected the affluence of Melbourne at the time. Onboard were straw hats, umbrellas, perfumes, clay pipes, pianos, clocks, confectionery, linen and candles, as well as a heavier load of railway irons, cement, lead and copper. There were other items included that were intended for display in the Melbourne International Exhibition of 1880. The voyage to Port Phillip was long but uneventful. Then at 3 am on June 1, 1878, Captain Gibbs was expecting to see land. But the Loch Ard was running into a fog which greatly reduced visibility. Captain Gibbs was becoming anxious as there was no sign of land or the Cape Otway lighthouse. At 4 am the fog lifted and a lookout aloft announced that he could see breakers. The sheer cliffs of Victoria's west coast came into view, and Captain Gibbs realised that the ship was much closer to them than expected. He ordered as much sail to be set as time would permit and then attempted to steer the vessel out to sea. On coming head-on into the wind, the ship lost momentum, the sails fell limp and Loch Ard's bow swung back towards land. Gibbs then ordered the anchors to be released in an attempt to hold their position. The anchors sank some 50 fathoms - but did not hold. By this time the ship was among the breakers and the tall cliffs of Mutton Bird Island rose behind. Just half a mile from the coast, the ship's bow was suddenly pulled around by the anchor. The captain tried to tack out to sea, but the ship struck a reef at the base of Mutton Bird Island, near Port Campbell. Waves subsequently broke over the ship and the top deck became loosened from the hull. The masts and rigging came crashing down knocking passengers and crew overboard. When a lifeboat was finally launched, it crashed into the side of Loch Ard and capsized. Tom Pearce, who had launched the boat, managed to cling to its overturned hull and shelter beneath it. He drifted out to sea and then on the flood tide came into what is now known as Loch Ard Gorge. He swam to shore, bruised and dazed, and found a cave in which to shelter. Some of the crew stayed below deck to shelter from the falling rigging but drowned when the ship slipped off the reef into deeper water. Eva Carmichael a passenger had raced onto the deck to find out what was happening only to be confronted by towering cliffs looming above the stricken ship. In all the chaos, Captain Gibbs grabbed Eva and said, "If you are saved Eva, let my dear wife know that I died like a sailor". That was the last Eva Carmichael saw of the captain. She was swept off the ship by a huge wave. Eva saw Tom Pearce on a small rocky beach and yelled to attract his attention. He dived in and swam to the exhausted woman and dragged her to shore. He took her to the cave and broke the open case of brandy which had washed up on the beach. He opened a bottle to revive the unconscious woman. A few hours later Tom scaled a cliff in search of help. He followed hoof prints and came by chance upon two men from nearby Glenample Station three and a half miles away. In a complete state of exhaustion, he told the men of the tragedy. Tom then returned to the gorge while the two men rode back to the station to get help. By the time they reached Loch Ard Gorge, it was cold and dark. The two shipwreck survivors were taken to Glenample Station to recover. Eva stayed at the station for six weeks before returning to Ireland by steamship. In Melbourne, Tom Pearce received a hero's welcome. He was presented with the first gold medal of the Royal Humane Society of Victoria and a £1000 cheque from the Victorian Government. Concerts were performed to honour the young man's bravery and to raise money for those who lost family in the disaster. Of the 54 crew members and passengers on board, only two survived: the apprentice, Tom Pearce and the young woman passenger, Eva Carmichael, who lost her family in the tragedy. Ten days after the Loch Ard tragedy, salvage rights to the wreck were sold at auction for £2,120. Cargo valued at £3,000 was salvaged and placed on the beach, but most washed back into the sea when another storm developed. The wreck of Loch Ard still lies at the base of Mutton Bird Island. Much of the cargo has now been salvaged and some items were washed up into Loch Ard Gorge. Cargo and artefacts have also been illegally salvaged over many years before protective legislation was introduced in March 1982. One of the most unlikely pieces of cargo to have survived the shipwreck was a Minton majolica peacock- one of only nine in the world. The peacock was destined for the Melbourne 1880 International Exhibition. It had been well packed, which gave it adequate protection during the violent storm. Today the Minton peacock can be seen at the Flagstaff Hill Maritime Museum in Warrnambool. From Australia's most dramatic shipwreck, it has now become Australia's most valuable shipwreck artifact and is one of very few 'objects' on the Victorian State Heritage Register. The shipwreck of the Loch Ard is of significance for Victoria and is registered on the Victorian Heritage Register ( S 417). Flagstaff Hill has a varied collection of artefacts from Loch Ard and its collection is significant for being one of the largest accumulation of artefacts from this notable Victorian shipwreck. The collections object is to also give us a snapshot into history so we can interpret the story of this tragic event. The collection is also archaeologically significant as it represents aspects of Victoria's shipping history that allows us to interpret Victoria's social and historical themes of the time. The collections historically significance is that it is associated unfortunately with the worst and best-known shipwreck in Victoria's history.Clear glass bottle with a green tinge. The bottle has an applied mouth, seams from base to mouth, bubbles and impurities in the glass, and uneven glass thickness. Vertical and horizontal inscriptions are raised. The bottle once contained Worcestershire Sauce and was made by Lea and Perkins. Vertical; "LEA & PERKINS" and around shoulder "WORCESTERSHIRE SAUCE" flagstaff hill, flagstaff hill maritime museum and village, warrnambool, maritime museum, maritime village, great ocean road, shipwreck coast, sauce bottle, worcestershire sauce, shipwreck artefact, condiment bottle, loch ard artifacts, lea and perkins -
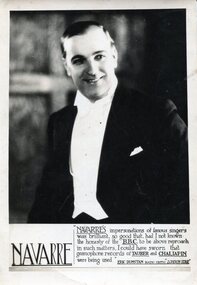 Federation University Historical Collection
Photograph, Alexander Wright (Navarre)
Alexander Wright was born on 25 August, 1898 in Smeaton He was the brother of musician Frank Wright. Alex Wright was killed whilst performing at the Birmingham Empire as the result of a German air Attack in October 1940. The theatre had a direct hit. According to Frank Wright Alex was a great impersonator with a unique range Bass - tenor with many accents (not unlike Peter Dawson) "AUSTRALIAN CARUSO Smeaton Boy's Fame Andre Navarre, who left Australia about three years ago to study opera in Europe, bids fair to take a place among the world's great tenors. A few months ago Navarre sang for Melba for the first time, and she immediately acclaimed him to be a finished artist, describing his voice as the nearest approach to the immortal Caruso she had ever heard, writes the Ballarat "Courier." Andre Navarre is, however, only a stage name adopted by Alexander Wright, a son of Mr. and Mrs. William. Wright, of Armstrong street North, Ballarat, and brother of Mr. Frank Wright and Mrs. William Ritchie, of that city. Born at smeaton 31 years ago, in what may be termed a musical atmosphere; Alex. Wright showed a definite desire to sing at a very early age, and in his boyhood figured as soloist at school concerts, etc. His youth was spent around Smeaton, working at home and at various farms in the district until he was about 19 years of age, when he secured a position at the Dunlop rubber works, Melbourne. Up to this period Wright had no vocal training whatever, but being the possessor of a good resonant baritone voice, was persuaded by some of his friends to "have a go at the stage.'' Securing a position in the chorus of "Maid of the Mountains," which was at that time showing at the Theatre Royal, he soon made his voice heard to advantage, and also commenced to take lessons from Signor Robottaro. It was about this time that Wright was invited by a fellow musician to a musical evening at which a member of Rigo's grand opera company, then performing at " The Playhouse," was also present. Hearing Wright sing, the musician immediately said : ' You're a fool to waste your time in a chorus with that voice. Rigo is looking for a singer like you for the role of 'Figaro' in 'Barber of Seville'." Alex, however, did not take the remark seriously, and it was only after the numerous persuasions of friends who obviously knew the real value of his voice that the modest young man was eventually induced to meet Rigo. The Italian maestro was so delighted with the voice that without hesitation he was given the principle role of "The Barber" to study. Many singers having previously been tried and rejected for the part, Wright was astonished at his success in being chosen, and awakened suddenly to the fact by the maestro that a world voice, if properly trained, would surely develop in the young artist, Alex at once settled down to study, and all day long in his boarding house at St. Kilda could be heard rehearsing his new role. In less than a month he had completely mastered the part, and on the opening night, in the exacting role of "The Barber," he was an outstanding success. Later, he toured Australia with many leading artists, including Elsa Stralia and Harry Lauder, and spent his last two years in Sydney, where he was engaged as soloist in the biggest picture house. Realising that a training in Italy and on the Continent was essential for a successful operatic singer, the young artist decided to go overseas to continue his studies. He did not leave Australia, however, before he gratuitously gave a concert in his little home town to the obvious delight of all his old friends, who flocked from all parts of the district to hear him. The hall was packed to overflowing , and so pleased was Alex with the tumultuous reception he received that he sang fewer than 20 songs. Once in Italy, he lost no time in placing himself under the tuition of Cottone, and it was at the studio of this maestro that he met Toti dal Monte, a former protege of the same master. Two years were spent in Italy, when "Navarre" learned to speak the Italian language fluently, and acquired a wide knowledge of the operas. He sang in Milan about a year ago, and was paid some glowing tributes by the Italian Press critics, who likened his voice to that of Caruso. From Italy he went to Paris, where he met John Brownlee and many other famous singers. The critics on the Continent are unanimous that Andre Navarre-the unassuming Smeaton boy, whom his schoolmates still affectionately call "Hock"--is destined to become one of the luminaries in music history. It is interesting to recall some facts concerning the remarkable family from which this artist springs. Four other members have won championship honors in the musical world. Mr. Frank Wright has the Australasian cornet championship to his credit ; Mr. Norman Wright, of Sydney, has won a tenor championship of New Zealand, and has recorded for the Columbia Gramophone Company ; Mrs. Wm. Ritchie ( formerly Miss Laura Wright) won the A.N.A. contralto championship in Melbourne; whilst the oldest member, Lydia (Mrs. C. Cane, now in N.Z.) won the violin championship at South Street when 17 years of age. Last year Mrs. and Mr. Wright celebrated their golden wedding. Both of the old folk are intensely musical, and it has been said that the voice of the mother, although entirely untrained, showed in her earlier days glimpses of the beautiful quality which made Melba famous. Andre Navarre does not propose leaving the Continent for some time. Recently he was offered a 12 months' contract to sing in London for £2500 but on the advice of Melba and his coach, it was refused on the grounds that yet another 12 months' French study was necessary to ensure absolute perfection. That "Alex " has lost none of his school-boy wit is evinced by his own jocular remark that he has "a top C sharp that will crack every window in the Sydney Town Hall!" (Horsham Times, 20 February 1931) "AUSTRALIAN KILLED An Australian, Alexander Wright, radio variety star, who toured Europe and Australia under the pseudonym of Navarre, was killed during a recent air raid in a Midland . town. His broth-er, Frank Wright, is musical director for the London County council."(Border Morning Mail, 22 Oct 1940) Black and white image of Smeaton born Alexander Wright whose professional name was Navarre "Prince of Mimics". alexander wright, alec wright, navarre -
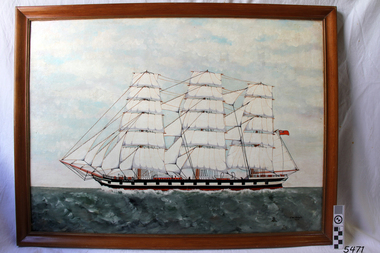 Flagstaff Hill Maritime Museum and Village
Painting - Maritime painting, C. W. Veale, Loch Ard, c. 1978
This painting is believed to have been created by an amateur artist C W Veale of Colac, who established an early bus service in about 1923, known at the time as the Blue Bus Service, which operated from Colac. This service was available for special trips within the Colac region. The Blue Bus Service became very popular with travellers to Lorne via the Deans Marsh Road. The label on the back of the painting comments on whether the ship would be in full sail at the time of the wreck. History of the Loch Ard: The Loch Ard got its name from "Loch Ard" a loch that lies to the west of Aberfoyle, and the east of Loch Lomond. It means "high lake" in Scottish Gaelic. The vessel belonged to the famous Loch Line which sailed many vessels from England to Australia. The Loch Ard was built in Glasgow by Barclay, Curle & Co. in 1873, the vessel was a three-masted square-rigged iron sailing ship that measured 79.87 meters in length, 11.58 m in width, and 7 m in depth with a gross tonnage of 1693 tons with a mainmast that measured a massive 45.7 m in height. Loch Ard made three trips to Australia and one trip to Calcutta before its fateful voyage. Loch Ard left England on March 2, 1878, under the command of 29-year-old Captain Gibbs, who was newly married. The ship was bound for Melbourne with a crew of 37, plus 17 passengers. The general cargo reflected the affluence of Melbourne at the time. Onboard were straw hats, umbrellas, perfumes, clay pipes, pianos, clocks, confectionery, linen, and candles, as well as a heavier load of railway irons, cement, lead, and copper. There were other items included that were intended for display in the Melbourne International Exhibition of 1880. The voyage to Port Phillip was long but uneventful. Then at 3 am on June 1, 1878, Captain Gibbs was expecting to see land. But the Loch Ard was running into a fog which greatly reduced visibility. Captain Gibbs was becoming anxious as there was no sign of land or the Cape Otway lighthouse. At 4 am the fog lifted and a lookout aloft announced that he could see breakers. The sheer cliffs of Victoria's west coast came into view, and Captain Gibbs realised that the ship was much closer to them than expected. He ordered as much sail to be set as time would permit and then attempted to steer the vessel out to sea. On coming head-on into the wind, the ship lost momentum, the sails fell limp and Loch Ard's bow swung back towards land. Gibbs then ordered the anchors to be released in an attempt to hold their position. The anchors sank some 50 fathoms - but did not hold. By this time the ship was among the breakers and the tall cliffs of Mutton Bird Island rose behind. Just half a mile from the coast, the ship's bow was suddenly pulled around by the anchor. The captain tried to tack out to sea, but the ship struck a reef at the base of Mutton Bird Island, near Port Campbell. Waves subsequently broke over the ship and the top deck became loosened from the hull. The masts and rigging came crashing down knocking passengers and crew overboard. When a lifeboat was finally launched, it crashed into the side of Loch Ard and capsized. Tom Pearce, who had launched the boat, managed to cling to its overturned hull and shelter beneath it. He drifted out to sea and then on the flood tide came into what is now known as Loch Ard Gorge. He swam to shore, bruised and dazed, and found a cave in which to shelter. Some of the crew stayed below deck to shelter from the falling rigging but drowned when the ship slipped off the reef into deeper water. Eva Carmichael a passenger had raced onto the deck to find out what was happening only to be confronted by towering cliffs looming above the stricken ship. In all the chaos, Captain Gibbs grabbed Eva and said, "If you are saved Eva, let my dear wife know that I died like a sailor". That was the last Eva Carmichael saw of the captain. She was swept off the ship by a huge wave. Eva saw Tom Pearce on a small rocky beach and yelled to attract his attention. He dived in and swam to the exhausted woman and dragged her to shore. He took her to the cave and broke the open case of brandy that had washed up on the beach. He opened a bottle to revive the unconscious woman. A few hours later Tom scaled a cliff in search of help. He followed hoof prints and came by chance upon two men from nearby Glenample Station three and a half miles away. In a complete state of exhaustion, he told the men of the tragedy. Tom then returned to the gorge while the two men rode back to the station to get help. By the time they reached Loch Ard Gorge, it was cold and dark. The two shipwreck survivors were taken to Glenample Station to recover. Eva stayed at the station for six weeks before returning to Ireland by steamship. In Melbourne, Tom Pearce received a hero's welcome. He was presented with the first gold medal of the Royal Humane Society of Victoria and a £1000 cheque from the Victorian Government. Concerts were performed to honour the young man's bravery and to raise money for those who lost families in the disaster. Of the 54 crew members and passengers on board, only two survived: the apprentice, Tom Pearce, and the young woman passenger, Eva Carmichael, who lost her family in the tragedy. Ten days after the Loch Ard tragedy, salvage rights to the wreck were sold at auction for £2,120. Cargo valued at £3,000 was salvaged and placed on the beach, but most washed back into the sea when another storm developed. The wreck of Loch Ard still lies at the base of Mutton Bird Island. Much of the cargo has now been salvaged and some items were washed up into Loch Ard Gorge. Cargo and artefacts have also been illegally salvaged over many years before protective legislation was introduced in March 1982. One of the most unlikely pieces of cargo to have survived the shipwreck was a Minton majolica peacock- one of only nine in the world. The peacock was destined for the Melbourne 1880 International Exhibition. It had been well packed, which gave it adequate protection during the violent storm. Today the Minton peacock can be seen at the Flagstaff Hill Maritime Museum in Warrnambool. From Australia's most dramatic shipwreck it has now become Australia's most valuable shipwreck artefact and is one of very few 'objects' on the Victorian State Heritage Register.The shipwreck of the Loch Ard is of significance for Victoria and is registered on the Victorian Heritage Register ( S 417). Flagstaff Hill has a varied collection of artefacts from Loch Ard and its collection is significant for being one of the largest accumulation of artefacts from this notable Victorian shipwreck of which the subject items are a small part. The collection's objects give us a snapshot of how we can interpret the story of this tragic event. The collection is also archaeologically significant as it represents aspects of Victoria's shipping history that allows us to interpret Victoria's social and historical themes of the time. Through is associated with the worst and best-known shipwreck in Victoria's history.Painting in brown-stained wooden frame. Depicts three-masted vessel 'Loch Ard' in full sail on moderate seas. Ship has figurehead, figures on board, and a Union Jack flag on red background. Ship's hull is black with white stripe, and is red on waterline. Ship's name is on hull. Artist C. W. Veale, painted in 1978, signed on bottom right. Label on back of painting has typed description of the Loch Ard and a comment.Signature "C W Veale / 1978" Text on hull "LOCH ARD" Label on back; " "LOCH ARD" / The clipper ship Loch Ard was wrecked on the 1st June 1878. / Of 54 people on board only two survived : Eva Carmichael and Tom Pearce. / Pearce became hero of the wreck for saving Miss Carmichael. / This picture shows the Loch Ard in full sail in moderate seas. / When approaching Cape Otway from the west, she would be in rough water and would presumably not be in full sail."flagstaff hill maritime museum, colac bus services, blue bus service, cw veale, loch ard paintings, loch ard, veale, warrnambool, great ocean road, eva carmichael, tom pearce, thomas pearce, cape otway, cargo ship 1878 -
 Flagstaff Hill Maritime Museum and Village
Container - Ink Bottle, Prior to 1878
This design of ink bottle was commonly referred to as a ‘penny ink well’ because it was very inexpensive to produce. It is also known as a dwarf ink bottle. Pen and ink has been in use for hand writing from about the seventh century up until the mid-20th century up until around the mid-19th century a quill pen made from a bird’s feather was used. In the 1850s the steel point pen was invented and could be manufactured on machines in large quantities. In the 1880s a successful portable fountain pen was designed, giving a smooth flowing ink and ease of use replacing the quill or dip pen. History of the Loch Ard: The Loch Ard got its name from "Loch Ard" a loch that lies to the west of Aberfoyle, and the east of Loch Lomond. It means "high lake" in Scottish Gaelic. The vessel belonged to the famous Loch Line which sailed many vessels from England to Australia. The Loch Ard was built in Glasgow by Barclay, Curle & Co. in 1873, the vessel was a three-masted square-rigged iron sailing ship that measured 79.87 meters in length, 11.58 m in width, and 7 m in depth with a gross tonnage of 1693 tons with a mainmast that measured a massive 45.7 m in height. Loch Ard made three trips to Australia and one trip to Calcutta before its fateful voyage. Loch Ard left England on March 2, 1878, under the command of 29-year-old Captain Gibbs, who was newly married. The ship was bound for Melbourne with a crew of 37, plus 17 passengers. The general cargo reflected the affluence of Melbourne at the time. Onboard were straw hats, umbrellas, perfumes, clay pipes, pianos, clocks, confectionery, linen, and candles, as well as a heavier load of railway irons, cement, lead, and copper. There were other items included that were intended for display in the Melbourne International Exhibition of 1880. The voyage to Port Phillip was long but uneventful. Then at 3 am on June 1, 1878, Captain Gibbs was expecting to see land. But the Loch Ard was running into a fog which greatly reduced visibility. Captain Gibbs was becoming anxious as there was no sign of land or the Cape Otway lighthouse. At 4 am the fog lifted and a lookout aloft announced that he could see breakers. The sheer cliffs of Victoria's west coast came into view, and Captain Gibbs realised that the ship was much closer to them than expected. He ordered as much sail to be set as time would permit and then attempted to steer the vessel out to sea. On coming head-on into the wind, the ship lost momentum, the sails fell limp and Loch Ard's bow swung back towards land. Gibbs then ordered the anchors to be released in an attempt to hold their position. The anchors sank some 50 fathoms - but did not hold. By this time the ship was among the breakers and the tall cliffs of Mutton Bird Island rose behind. Just half a mile from the coast, the ship's bow was suddenly pulled around by the anchor. The captain tried to tack out to sea, but the ship struck a reef at the base of Mutton Bird Island, near Port Campbell. Waves subsequently broke over the ship and the top deck became loosened from the hull. The masts and rigging came crashing down knocking passengers and crew overboard. When a lifeboat was finally launched, it crashed into the side of Loch Ard and capsized. Tom Pearce, who had launched the boat, managed to cling to its overturned hull and shelter beneath it. He drifted out to sea and then on the flood tide came into what is now known as Loch Ard Gorge. He swam to shore, bruised and dazed, and found a cave in which to shelter. Some of the crew stayed below deck to shelter from the falling rigging but drowned when the ship slipped off the reef into deeper water. Eva Carmichael a passenger had raced onto the deck to find out what was happening only to be confronted by towering cliffs looming above the stricken ship. In all the chaos, Captain Gibbs grabbed Eva and said, "If you are saved Eva, let my dear wife know that I died like a sailor". That was the last Eva Carmichael saw of the captain. She was swept off the ship by a huge wave. Eva saw Tom Pearce on a small rocky beach and yelled to attract his attention. He dived in and swam to the exhausted woman and dragged her to shore. He took her to the cave and broke the open case of brandy that had washed up on the beach. He opened a bottle to revive the unconscious woman. A few hours later Tom scaled a cliff in search of help. He followed hoof prints and came by chance upon two men from nearby Glenample Station three and a half miles away. In a complete state of exhaustion, he told the men of the tragedy. Tom then returned to the gorge while the two men rode back to the station to get help. By the time they reached Loch Ard Gorge, it was cold and dark. The two shipwreck survivors were taken to Glenample Station to recover. Eva stayed at the station for six weeks before returning to Ireland by steamship. In Melbourne, Tom Pearce received a hero's welcome. He was presented with the first gold medal of the Royal Humane Society of Victoria and a £1000 cheque from the Victorian Government. Concerts were performed to honour the young man's bravery and to raise money for those who lost families in the disaster. Of the 54 crew members and passengers on board, only two survived: the apprentice, Tom Pearce, and the young woman passenger, Eva Carmichael, who lost her family in the tragedy. Ten days after the Loch Ard tragedy, salvage rights to the wreck were sold at auction for £2,120. Cargo valued at £3,000 was salvaged and placed on the beach, but most washed back into the sea when another storm developed. The wreck of Loch Ard still lies at the base of Mutton Bird Island. Much of the cargo has now been salvaged and some items were washed up into Loch Ard Gorge. Cargo and artefact's have also been illegally salvaged over many years before protective legislation was introduced in March 1982. One of the most unlikely pieces of cargo to have survived the shipwreck was a Minton majolica peacock- one of only nine in the world. The peacock was destined for the Melbourne 1880 International Exhibition. It had been well packed, which gave it adequate protection during the violent storm. Today the Minton peacock can be seen at the Flagstaff Hill Maritime Museum in Warrnambool. From Australia's most dramatic shipwreck it has now become Australia's most valuable shipwreck artefact and is one of very few 'objects' on the Victorian State Heritage Register.This ink bottle is historically significant as it represents methods of hand written communication that were still common up until the mid-20th century, when fountain pens and ballpoint pens took over in popularity and convenience. The shipwreck of the Loch Ard is of significance for Victoria and is registered on the Victorian Heritage Register ( S 417). Flagstaff Hill has a varied collection of artefact's from Loch Ard and its collection is significant for being one of the largest accumulation of artefact's from this notable Victorian shipwreck of which the subject items are a small part. The collection's objects give us a snapshot of how we can interpret the story of this tragic event. The collection is also archaeologically significant as it represents aspects of Victoria's shipping history that allows us to interpret Victoria's social and historical themes of the time. Through is associated with the worst and best-known shipwreck in Victoria's history.Stoneware penny ink bottle; ironstone salt-glazed stoneware, cylindrical shape with small mouth and squat neck, broad shoulders, brown colour. Bottle still has cork in neck. Dark encrustations on body and base.Sticker "L/62"flagstaff hill, warrnambool, flagstaff hill maritime museum, shipwreck coast, flagstaff hill maritime village, great ocean road, loch line, loch ard, penny ink well, writing equipment, domestic, stoneware, clay, ceramic, pottery, ink well, inkwell, ink bottle, dip pen, ink, hand writing, business, vintage, dwarf ink -
 Melton City Libraries
Photograph, Martha (Watson) Myers, 1907, c.1930 and 1953
Martha Watson was born on 17 October 1888 in Ballarat, Victoria, Australia as the first child of Robina (Ruby) WATSON. She died on 23 March 1976 in Geelong, Victoria, Australia. Memories of Martha by Valcia nee Twigg Lowrie, granddaughter of Arthur Watson. My memories and recollections as told to me my Grandmother ‘Mum’ Myers. As a child she had scarlet fever and did not attend school during the illness and missed a lot of school (Macarthur Street State School). When she was meant to return to school having fallen behind her classmates, confused and behind with the school work, she instead spent her time wandering around Lake Wendouree feeling too ashamed to attend school. Her uncle Arthur, born in 1874, whom she idealized, was a type of father/mentor figure who played and important part in her early life. He moved to Queensland in the early 1900’s and they did not meet again until he visited Melton in 1949, he died in 1954. He was a champion rower in Victoria and Queensland and a noted cyclist who rode in three Warrnambool to Melbourne races, and footballer. Her mother’s death certificate reveals her place of death as the Ballarat Hospital on 8th September 1903 aged 36. Martha was not told of the death of her mother, it was some time later when she found out her mother had died. She was greatly distressed when she eventually found out. The grief and the circumstance of her mothers death and her unfortunate life had a permanent effect on Martha’s life. Robina was buried in Open Ground at the New Cemetery Ballarat. Marjorie likened to this to the death of Mozart at the age of 35 who was also buried in a common grave. Martha also told me the stories about how as a child she played at the cemetery, taking the oranges placed as offerings on the Chinese graves and being chased away in fright when caught by a Chinese man. Her description left a vivid impression on my mind. The Burnbank street house was just across the road from the cemetery. The pieces of this story I had heard made sense when I visited the location in recent years. Martha’s described how Nanna would sing on the front verandah, and send her off to t get drink for her. This situation might help explain the reason for Martha’s strong aversion to alcohol. As a young girl it had been distressing to her. Nanna was a colourful and theatrical personality and danced with the Duke when he visited Ballarat. She was also known to have stated that she would marry a man who could give her a bucket of gold, possibly around the time after her first husband, Charles death, she had her young boy Edward to bring up. Martha was about 13 years old when Nanna Watson left Ballarat going to Queensland to visit her son Arthur. Martha slept that night afraid and alone in the empty house. The person who was meant to collect her did not come until the next day. She went to work for a family, a woman with children, they took most of the money that Nanna had left with Martha. There was a new baby in the house and the Scottish man in the house behaved suspiciously towards Martha. She was afraid of him and would hide from him under the bed. At this young age she managed to survive on her wits and sense of self preservation. It is not known how long she worked with this family. The place was from my impression, away from the town of Ballarat. Her very difficult formative years are testament to her strength of character and determination to succeed in life and ambition to provide the best opportunities for her own children. In 1905 Martha received a post card from Uncle Arthur in Brisbane addressed – c/o Mrs Styles 14 High Street Ballarat. Dolly Styles was a Ballarat friend and she kept in contact with her for many years. A letter reveals her living in Minyip in her older years. Martha is thought to have spent a few years working before she arrived in Melton. Miss Shebler hired Martha to help her in the care of her father and to assist with work in the Golden Fleece Hotel. Mr Shebler was a nice old man and mostly confined to his room and somewhat childlike as described by Martha. [The elderly Mr August Shebler died in February 1908]. Martha’s exact arrival in Melton is not known, but could be estimated as late 1906 to early 1907. In her room at the hotel she could hear the spring cart of Mr Minns going on the milk delivery rounds in the very early hours of the morning after coming across the creek from his house When she was 19, she married Frederick Thomas MYERS, son of Henri MIERS and Ann DOWLING, on 30 April 1908 ( Fitzroy, Victoria, Australia). Frederick Thomas MYERS and Martha Mary WATSON had the following children: 1. Frederick John Watson MYERS was born on 01 October 1908 in Melton, Victoria, Australia.He died on 07 February 2001.He married Mary June BATTYE on 18 September 1948 in Victoria, Australia. 2. Marjorie Gretchen MYERS was born on 21 February 1912 in Melton, Victoria, Australia.She died on 10 September 2004 in Frankston, Victoria, Australia.She married Herbert Vivian BUTLER on 07 January 1939 in Victoria, Australia. 3. Eva Edna MYERS was born on 15 October 1918 in Melton, Victoria, Australia.She died on 31 January 2008 in Bacchus Marsh, Victoria, Australia.She married Ernest Wesley BARRIE on 25 October 1941 in Melton, Victoria, Australia. 4. Arthur Bruce MYERS was born on 29 April 1925 in Melton, Victoria, Australia.He died on 26 March 2015 in Melbourne, Victoria, Australia.He married Olive Irene NORTON in April 1953 in Balliang, Victoria, Australia (or Church of Christ Footscray? (WB)). 5. Maxwell Douglas MYERS was born on 10 August 1927 in Melton, Victoria, Australia.He died on 03 May 2005 in Geelong, Victoria, Australia.He married Rosemary Rebecca BARRIE on 31 August 1951 in Melton, Victoria, Australia. Valcia nee Twigg Lowrie granddaughter of Arthur Watson, daughter of Mercia and Val Twigg did extensive research on the Marshall family of Lerwick Shetland Isle obtaining birth information of the Scottish forebears. She also got the birth/marriage and death certificates of the Ballarat connection of Robina’s husbands and children. Copies were sent to Edna and Wendy during the early 1990’s. Bruce and Irene also obtained certificates and Myers family information. Wendy applied for certificates at this time.Photographs of Martha (Watson) Myers taken at different times of her life -
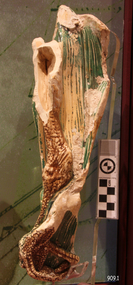 Flagstaff Hill Maritime Museum and Village
Ceramic - Ceramic Piece, Minton Potteries, 1877
The ceramic piece is one of four porcelain fragments washed up from the Loch Ard wreck near Port Campbell Victoria. These fragments resemble the foot and leg of a large bird and legend has it that another bird had drifted ashore at the same time the Loch Ard peacock. This figurine is on display at Flagstaff Hill Maritime Museum and regarded as the most valuable shipwreck relic. It is believed that all four fragments could belong to another peacock or a Minton porcelain stork that had been photographed in a Home Beautiful magazine in 1928. This stork appeared to be missing a leg and foot and experts have hypothesized that the four fragments could belong to this stork, the whereabouts of which are currently unknown. History of the Loch Ard: The Loch Ard got its name from ”Loch Ard” a loch which lies to the west of Aberfoyle, and the east of Loch Lomond. It means "high lake" in Scottish Gaelic. The vessel belonged to the famous Loch Line which sailed many vessels from England to Australia. The Loch Ard was built in Glasgow by Barclay, Curdle and Co. in 1873, the vessel was a three-masted square-rigged iron sailing ship that measured 79.87 meters in length, 11.58 m in width, and 7 m in depth with a gross tonnage of 1693 tons with a mainmast that measured a massive 45.7 m in height. Loch Ard made three trips to Australia and one trip to Calcutta before its fateful voyage. Loch Ard left England on March 2, 1878, under the command of 29-year-old Captain Gibbs, who was newly married. The ship was bound for Melbourne with a crew of 37, plus 17 passengers. The general cargo reflected the affluence of Melbourne at the time. Onboard were straw hats, umbrella, perfumes, clay pipes, pianos, clocks, confectionery, linen and candles, as well as a heavier load of railway irons, cement, lead and copper. There were other items included that were intended for display in the Melbourne International Exhibition of 1880. The voyage to Port Phillip was long but uneventful. Then at 3 am on June 1, 1878, Captain Gibbs was expecting to see land. But the Loch Ard was running into a fog which greatly reduced visibility. Captain Gibbs was becoming anxious as there was no sign of land or the Cape Otway lighthouse. At 4 am the fog lifted and a lookout aloft announced that he could see breakers. The sheer cliffs of Victoria's west coast came into view, and Captain Gibbs realised that the ship was much closer to them than expected. He ordered as much sail to be set as time would permit and then attempted to steer the vessel out to sea. On coming head-on into the wind, the ship lost momentum, the sails fell limp and Loch Ard's bow swung back towards land. Gibbs then ordered the anchors to be released in an attempt to hold its position. The anchors sank some 50 fathoms - but did not hold. By this time the ship was among the breakers and the tall cliffs of Mutton Bird Island rose behind. Just half a mile from the coast, the ship's bow was suddenly pulled around by the anchor. The captain tried to tack out to sea, but the ship struck a reef at the base of Mutton Bird Island, near Port Campbell. Waves subsequently broke over the ship and the top deck became loosened from the hull. The masts and rigging came crashing down knocking passengers and crew overboard. When a lifeboat was finally launched, it crashed into the side of Loch Ard and capsized. Tom Pearce, who had launched the boat, managed to cling to its overturned hull and shelter beneath it. He drifted out to sea and then on the flood tide came into what is now known as Loch Ard Gorge. He swam to shore, bruised and dazed, and found a cave in which to shelter. Some of the crew stayed below deck to shelter from the falling rigging but drowned when the ship slipped off the reef into deeper water. Eva Carmichael a passenger had raced onto the deck to find out what was happening only to be confronted by towering cliffs looming above the stricken ship. In all the chaos, Captain Gibbs grabbed Eva and said, "If you are saved Eva, let my dear wife know that I died like a sailor". That was the last Eva Carmichael saw of the captain. She was swept off the ship by a huge wave. Eva saw Tom Pearce on a small rocky beach and yelled to attract his attention. He dived in and swam to the exhausted woman and dragged her to shore. He took her to the cave and broke the open case of brandy which had washed up on the beach. He opened a bottle to revive the unconscious woman. A few hours later Tom scaled a cliff in search of help. He followed hoof prints and came by chance upon two men from nearby Glenample Station three and a half miles away. In a complete state of exhaustion, he told the men of the tragedy. Tom then returned to the gorge while the two men rode back to the station to get help. By the time they reached Loch Ard Gorge, it was cold and dark. The two shipwreck survivors were taken to Glenample Station to recover. Eva stayed at the station for six weeks before returning to Ireland by steamship. In Melbourne, Tom Pearce received a hero's welcome. He was presented with the first gold medal of the Royal Humane Society of Victoria and a £1000 cheque from the Victorian Government. Concerts were performed to honour the young man's bravery and to raise money for those who lost family in the disaster. Of the 54 crew members and passengers on board, only two survived: the apprentice, Tom Pearce and the young woman passenger, Eva Carmichael, who lost her family in the tragedy. Ten days after the Loch Ard tragedy, salvage rights to the wreck were sold at auction for £2,120. Cargo valued at £3,000 was salvaged and placed on the beach, but most washed back into the sea when another storm developed. The wreck of Loch Ard still lies at the base of Mutton Bird Island. Much of the cargo has now been salvaged and some items were washed up into Loch Ard Gorge. Cargo and artefacts have also been illegally salvaged over many years before protective legislation was introduced in March 1982. One of the most unlikely pieces of cargo to have survived the shipwreck was a Minton majolica peacock- one of only nine in the world. The peacock was destined for the Melbourne 1880 International Exhibition in. It had been well packed, which gave it adequate protection during the violent storm. Today the Minton peacock can be seen at the Flagstaff Hill Maritime Museum in Warrnambool. From Australia's most dramatic shipwreck it has now become Australia's most valuable shipwreck artifact and is one of very few 'objects' on the Victorian State Heritage Register.The shipwreck of the Loch Ard is of significance for Victoria and is registered on the Victorian Heritage Register ( S 417). Flagstaff Hill has a varied collection of artefacts from Loch Ard and its collection is significant for being one of the largest accumulation of artefacts from this notable Victorian shipwreck. The collections object is to also give us a snapshot into history so we can interpret the story of this tragic event. The collection is also archaeologically significant as it represents aspects of Victoria's shipping history that allows us to interpret Victoria's social and historical themes of the time. The collections historically significance is that it is associated unfortunately with the worst and best-known shipwreck in Victoria's history. Glazed ceramic fragments; two that fit together. They appear to be a leg section and green foliage.flagstaff hill, flagstaff hill maritime museum and village, warrnambool, maritime museum, maritime village, great ocean road, shipwreck coast, ceramic, porcelain, piece, fragment, ceramic bird, loch ard, shipwreck, salvage, recover, 1877, 1878, minton, shard -
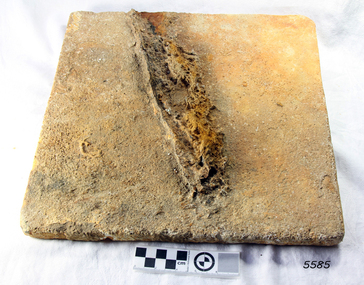 Flagstaff Hill Maritime Museum and Village
Marble Tile, circa 1878
The artefact is a white marble tile raised from the wreck of the LOCH ARD (1878). The cargo manifest of the sunken vessel has the entry “Marble £400”. This is placed directly following the entry “Glass (604 cases)”. This conjunction suggests the marble tile was originally part of a consignment intended for use in a ‘high end’ residential or public building project in the gold and wool rich Colony of Victoria. Traditionally, white or cream marble was imported into Britain from the Mediterranean region of Europe, where beds of sedimentary limestone (calcium and magnesium carbonate) had been buried over a long geological period of time. Deep in the earth’s crust, it had been subjected to immense pressures and high temperatures, sufficient to completely re-crystallise the original deposits. Marble beds began as layers of sediment at the bottom of ancient tropical seas, forming from the skeletal remains of calcareous fossils, shell, and coral fragments. The metamorphic process of prolonged compression and heating recrystallised this skeletal material, destroying all signs of the original sedimentary fabric. The resulting ‘true’ marbles of, for example, White Carrara (Tuscany, Italy), Verdi (green) Antico (Thessaly, Greece), and Rouge (red) Languadoc (Carcassone, France), were highly prized in classical decoration (sculpture and friezes) and architecture (temples and arches). Marble was found in nineteenth century Australia, but in small, uneconomic deposits, not suitable for commercial quarrying. The comparative expense of imported marble restricted its use in colonial buildings to carved fireplaces and mantel pieces, or outdoor ornaments such as fountains, statuary and grave stones. If Carrara marble floor tiles were used, they were used sparingly, as an arresting feature in entrance halls for instance. However, most prominent private and public construction used timber flooring, waxed or ‘jappaned’, with carpet runners and rugs (for example the Austin’s Barwon Park Mansion, 1871), or laid tessellated and ceramic tiles of baked clay infused with colour (for example the Chirnside’s Werribee Park Mansion, 1878). HISTORY OF THE LOCH ARD The LOCH ARD belonged to the famous Loch Line which sailed many ships from England to Australia. Built in Glasgow by Barclay, Curdle and Co. in 1873, the LOCH ARD was a three-masted square rigged iron sailing ship. The ship measured 262ft 7" (79.87m) in length, 38ft (11.58m) in width, 23ft (7m) in depth and had a gross tonnage of 1693 tons. The LOCH ARD's main mast measured a massive 150ft (45.7m) in height. LOCH ARD made three trips to Australia and one trip to Calcutta before its final voyage. LOCH ARD left England on March 2, 1878, under the command of Captain Gibbs, a newly married, 29 year old. She was bound for Melbourne with a crew of 37, plus 17 passengers and a load of cargo. The general cargo reflected the affluence of Melbourne at the time. On board were straw hats, umbrella, perfumes, clay pipes, pianos, clocks, confectionary, linen and candles, as well as a heavier load of railway irons, cement, lead and copper. There were items included that intended for display in the Melbourne International Exhibition in 1880. The voyage to Port Phillip was long but uneventful. At 3am on June 1, 1878, Captain Gibbs was expecting to see land and the passengers were becoming excited as they prepared to view their new homeland in the early morning. But LOCH ARD was running into a fog which greatly reduced visibility. Captain Gibbs was becoming anxious as there was no sign of land or the Cape Otway lighthouse. At 4am the fog lifted. A man aloft announced that he could see breakers. The sheer cliffs of Victoria's west coast came into view, and Captain Gibbs realised that the ship was much closer to them than expected. He ordered as much sail to be set as time would permit and then attempted to steer the vessel out to sea. On coming head on into the wind, the ship lost momentum, the sails fell limp and LOCH ARD's bow swung back. Gibbs then ordered the anchors to be released in an attempt to hold its position. The anchors sank some 50 fathoms - but did not hold. By this time LOCH ARD was among the breakers and the tall cliffs of Mutton Bird Island rose behind the ship. Just half a mile from the coast, the ship's bow was suddenly pulled around by the anchor. The captain tried to tack out to sea, but the ship struck a reef at the base of Mutton Bird Island, near Port Campbell. Waves broke over the ship and the top deck was loosened from the hull. The masts and rigging came crashing down knocking passengers and crew overboard. When a lifeboat was finally launched, it crashed into the side of LOCH ARD and capsized. Tom Pearce, who had launched the boat, managed to cling to its overturned hull and shelter beneath it. He drifted out to sea and then on the flood tide came into what is now known as LOCH ARD Gorge. He swam to shore, bruised and dazed, and found a cave in which to shelter. Some of the crew stayed below deck to shelter from the falling rigging but drowned when the ship slipped off the reef into deeper water. Eva Carmichael had raced onto deck to find out what was happening only to be confronted by towering cliffs looming above the stricken ship. In all the chaos, Captain Gibbs grabbed Eva and said, "If you are saved Eva, let my dear wife know that I died like a sailor". That was the last Eva Carmichael saw of the captain. She was swept off the ship by a huge wave. Eva saw Tom Pearce on a small rocky beach and yelled to attract his attention. He dived in and swam to the exhausted woman and dragged her to shore. He took her to the cave and broke open case of brandy which had washed up on the beach. He opened a bottle to revive the unconscious woman. A few hours later Tom scaled a cliff in search of help. He followed hoof prints and came by chance upon two men from nearby Glenample Station three and a half miles away. In a state of exhaustion, he told the men of the tragedy. Tom returned to the gorge while the two men rode back to the station to get help. By the time they reached LOCH ARD Gorge, it was cold and dark. The two shipwreck survivors were taken to Glenample Station to recover. Eva stayed at the station for six weeks before returning to Ireland, this time by steamship. In Melbourne, Tom Pearce received a hero's welcome. He was presented with the first gold medal of the Royal Humane Society of Victoria and a £1000 cheque from the Victorian Government. Concerts were performed to honour the young man's bravery and to raise money for those who lost family in the LOCH ARD disaster. Of the 54 crew members and passengers on board, only two survived: the apprentice, Tom Pearce and the young woman passenger, Eva Carmichael, who lost all of her family in the tragedy. Ten days after the LOCH ARD tragedy, salvage rights to the wreck were sold at auction for £2,120. Cargo valued at £3,000 was salvaged and placed on the beach, but most washed back into the sea when another storm developed. The wreck of LOCH ARD still lies at the base of Mutton Bird Island. Much of the cargo has now been salvaged and some was washed up into what is now known as LOCH ARD Gorge. Cargo and artefacts have also been illegally salvaged over many years before protective legislation was introduced. One of the most unlikely pieces of cargo to have survived the shipwreck was a Minton porcelain peacock - one of only nine in the world. The peacock was destined for the Melbourne International Exhibition in 1880. It had been well packed, which gave it adequate protection during the violent storm. Today, the Minton peacock can be seen at the Flagstaff Hill Maritime Museum in Warrnambool. From Australia's most dramatic shipwreck it has now become Australia's most valuable shipwreck artefact and is one of very few 'objects' on the Victorian State Heritage Register. HISTORY OF THE LOCH ARD The LOCH ARD belonged to the famous Loch Line which sailed many ships from England to Australia. Built in Glasgow by Barclay, Curdle and Co. in 1873, the LOCH ARD was a three-masted square rigged iron sailing ship. The ship measured 262ft 7" (79.87m) in length, 38ft (11.58m) in width, 23ft (7m) in depth and had a gross tonnage of 1693 tons. The LOCH ARD's main mast measured a massive 150ft (45.7m) in height. LOCH ARD made three trips to Australia and one trip to Calcutta before its final voyage. LOCH ARD left England on March 2, 1878, under the command of Captain Gibbs, a newly married, 29 year old. She was bound for Melbourne with a crew of 37, plus 17 passengers and a load of cargo. The general cargo reflected the affluence of Melbourne at the time. On board were straw hats, umbrella, perfumes, clay pipes, pianos, clocks, confectionary, linen and candles, as well as a heavier load of railway irons, cement, lead and copper. There were items included that intended for display in the Melbourne International Exhibition in 1880. The voyage to Port Phillip was long but uneventful. At 3am on June 1, 1878, Captain Gibbs was expecting to see land and the passengers were becoming excited as they prepared to view their new homeland in the early morning. But LOCH ARD was running into a fog which greatly reduced visibility. Captain Gibbs was becoming anxious as there was no sign of land or the Cape Otway lighthouse. At 4am the fog lifted. A man aloft announced that he could see breakers. The sheer cliffs of Victoria's west coast came into view, and Captain Gibbs realised that the ship was much closer to them than expected. He ordered as much sail to be set as time would permit and then attempted to steer the vessel out to sea. On coming head on into the wind, the ship lost momentum, the sails fell limp and LOCH ARD's bow swung back. Gibbs then ordered the anchors to be released in an attempt to hold its position. The anchors sank some 50 fathoms - but did not hold. By this time LOCH ARD was among the breakers and the tall cliffs of Mutton Bird Island rose behind the ship. Just half a mile from the coast, the ship's bow was suddenly pulled around by the anchor. The captain tried to tack out to sea, but the ship struck a reef at the base of Mutton Bird Island, near Port Campbell. Waves broke over the ship and the top deck was loosened from the hull. The masts and rigging came crashing down knocking passengers and crew overboard. When a lifeboat was finally launched, it crashed into the side of LOCH ARD and capsized. Tom Pearce, who had launched the boat, managed to cling to its overturned hull and shelter beneath it. He drifted out to sea and then on the flood tide came into what is now known as LOCH ARD Gorge. He swam to shore, bruised and dazed, and found a cave in which to shelter. Some of the crew stayed below deck to shelter from the falling rigging but drowned when the ship slipped off the reef into deeper water. Eva Carmichael had raced onto deck to find out what was happening only to be confronted by towering cliffs looming above the stricken ship. In all the chaos, Captain Gibbs grabbed Eva and said, "If you are saved Eva, let my dear wife know that I died like a sailor". That was the last Eva Carmichael saw of the captain. She was swept off the ship by a huge wave. Eva saw Tom Pearce on a small rocky beach and yelled to attract his attention. He dived in and swam to the exhausted woman and dragged her to shore. He took her to the cave and broke open case of brandy which had washed up on the beach. He opened a bottle to revive the unconscious woman. A few hours later Tom scaled a cliff in search of help. He followed hoof prints and came by chance upon two men from nearby Glenample Station three and a half miles away. In a state of exhaustion, he told the men of the tragedy. Tom returned to the gorge while the two men rode back to the station to get help. By the time they reached LOCH ARD Gorge, it was cold and dark. The two shipwreck survivors were taken to Glenample Station to recover. Eva stayed at the station for six weeks before returning to Ireland, this time by steamship. In Melbourne, Tom Pearce received a hero's welcome. He was presented with the first gold medal of the Royal Humane Society of Victoria and a £1000 cheque from the Victorian Government. Concerts were performed to honour the young man's bravery and to raise money for those who lost family in the LOCH ARD disaster. Of the 54 crew members and passengers on board, only two survived: the apprentice, Tom Pearce and the young woman passenger, Eva Carmichael, who lost all of her family in the tragedy. Ten days after the LOCH ARD tragedy, salvage rights to the wreck were sold at auction for £2,120. Cargo valued at £3,000 was salvaged and placed on the beach, but most washed back into the sea when another storm developed. The wreck of LOCH ARD still lies at the base of Mutton Bird Island. Much of the cargo has now been salvaged and some was washed up into what is now known as LOCH ARD Gorge. Cargo and artefacts have also been illegally salvaged over many years before protective legislation was introduced. One of the most unlikely pieces of cargo to have survived the shipwreck was a Minton porcelain peacock - one of only nine in the world. The peacock was destined for the Melbourne International Exhibition in 1880. It had been well packed, which gave it adequate protection during the violent storm. Today, the Minton peacock can be seen at the Flagstaff Hill Maritime Museum in Warrnambool. From Australia's most dramatic shipwreck it has now become Australia's most valuable shipwreck artefact and is one of very few 'objects' on the Victorian State Heritage Register. The wreck of the LOCH ARD is of State significance — Victorian Heritage Register S417 Flagstaff Hill’s collection of artefacts from LOCH ARD is significant for being one of the largest collections of artefacts from this shipwreck in Victoria. It is significant for its association with the shipwreck, which is on the Victorian Heritage Register (VHR S417). The collection is significant because of the relationship between the objects, as together they have a high potential to interpret the story of the LOCH ARD. The LOCH ARD collection is archaeologically significant as the remains of a large international passenger and cargo ship. The LOCH ARD collection is historically significant for representing aspects of Victoria’s shipping history and its potential to interpret sub-theme 1.5 of Victoria’s Framework of Historical Themes (living with natural processes). The collection is also historically significant for its association with the LOCH ARD, which was one of the worst and best known shipwrecks in Victoria’s history. A square marble tile retrieved from the wreck of the LOCH ARD. Most of its surface is covered by a thin layer of limestone and marine growth encrustation that is stained rust-red. There is a piece of corroded iron encrusted at an oblique angle on the tile’s rear face. The tile is ‘rough-worked’, cut to shape and size, but not smoothed or polished. There is a companion tile in similar condition in the Flagstaff Hill collection. From visual observation of the original surface (at low magnification) the tile appears to be of white Carrara-type marble.flagstaff hill, warrnambool, shipwrecked coast, flagstaff hill maritime museum, maritime museum, shipwreck coast, flagstaff hill maritime village, great ocean road, loch line, loch ard, captain gibbs, eva carmichael, tom pearce, glenample station, mutton bird island, loch ard gorge, white marble, marble tile, carrara marble, colonial architecture, victorian building materials -
 Eltham District Historical Society Inc
Document - Folder, Survey Maps and Technical Drawings
alan gardiner collection, maps -
 Bendigo Military Museum
Photograph - Army Survey Regiment - Regimental Training Military Skills Revision, 1985
This is a set of 35 photographs of the Army Survey Regiment personnel undertaking military skills revision, at the Army Survey Regiment, Fortuna, Bendigo, 1985. They participated in lessons on the handling of the M30 Grenade and SLR Rifle. These lessons were part of the six objectives of regimental training outlined in the administrative instruction – Exercise “City Soldier” accompanying these photos. The other objectives were first aid at Fortuna, RATEL and navigation at Wellsford Forest; and rifle shooting at Wellsford Rifle Range. Personnel from Air Survey, Cartographic, Lithographic and Headquarters Squadrons were reallocated to four training platoons for one week from 7th to 11th October 1985.This is a set of 35 photographs of the Army Survey Regiment undertaking military skills revision, part of Regimental Training at Fortuna Villa 1985. Black & white photos .1P to .17P are printed on photographic paper and scanned at 300 dpi. Photos .18P to .35P are on 35mm negative film and scanned at 96 dpi. They are part of the Army Survey Regiment’s Collection. .1) - Photo, black & white, 1985, L to R: CPL Brian Fauth, unidentified (x2), SGT Dennis Learmonth - instructor, unidentified (x2). .2) - Photo, black & white, 1985, unidentified personnel, SGT Dennis Learmonth – instructor. .3) - Photo, black & white, 1985, unidentified personnel, SGT Dennis Learmonth – instructor. .4) - Photo, black & white, 1985, unidentified personnel, SGT Dennis Learmonth - instructor. .5) - Photo, black & white, 1985, unidentified personnel. .6) - Photo, black & white, 1985, unidentified personnel. .7) - Photo, black & white, 1985, L to R: SGT Dennis Learmonth – instructor, CPL Brian Fauth, SPR Viv (Hawkins) Doherty, CPL Ken Peters, CPL Megan (McBurney) Reynolds, CPL Mick ‘Buddha’ Ellis, unidentified, SPR Wally Twidale, unidentified personnel. .8) - Photo, black & white, 1985, L to R: unidentified personnel, LT Ossie Slade. .9) - Photo, black & white, 1985, L to R: unidentified personnel, CPL Greg Honan, SGT Don Williams, LCPL Bob Sheppard, unidentified personnel. .10) - Photo, black & white, 1985, L to R: unidentified personnel, SPR Bloxham, SPR Jason Wells, unidentified personnel, CPL Gillham, CPL Peter Imeson, unidentified. .11) - Photo, black & white, 1985, L to R: SPR Terry Winzar, unidentified, WO1 Noel ‘Nesty’ Coulthard, unidentified personnel. .12) - Photo, black & white, 1985, unidentified personnel. .13) - Photo, black & white, 1985, L to R: SSGT Tony Harder – UK Exchange Instructor, unidentified personnel, CPL Bob Thrower, unidentified, SPR Jim Humphrey, LCPL Bob Sheppard. .14) - Photo, black & white, 1985, L to R: unidentified personnel, CPL Mark Casey, SSGT Tony Harder – UK Exchange Instructor. .15) - Photo, black & white, 1985, L to R: unidentified, CPL Paul Richards, SPR John Keely, CPL Peter Johnson, unidentified, SSGT Tony Harder – UK Exchange Instructor, SPR Dave Wright, unidentified personnel. .16) - Photo, black & white, 1985, L to R: unidentified, WO2 Brian Partridge – Instructor, unidentified personnel. .17) - Photo, black & white, 1985, WO2 Brian Partridge – Instructor, unidentified personnel. Unidentified. .18) - Photo, black & white, 1985, CPL Lea-anne (Smallshaw) Shirley, CPL Megan (McBurney) Reynolds, SGT Dennis Learmonth – instructor. .19) - Photo, black & white, 1985, SSGT Steve Hansen – Instructor, from background tree L to R: SPR Dave Lawler, CPL Ken Peters, CPL Steve Burke, SPR Wally Twidale, CPL Dave Murphy, SPR Jim Walker. .20) - Photo, black & white, 1985, L to R: unidentified (x3), CPL Ian Nelson, CPL Eddy Jacobs, SPR Tracy (Parker) Ash, remainder unidentified. .21) - Photo, black & white, 1985, CPL Eddy Jacobs piggybacking SPR Jason Wells, remainder unidentified. .22) - Photo, black & white, 1985, CAPT Dave McLachlan piggybacking unidentified soldier. .23) - Photo, black & white, 1985, unidentified soldiers competing in leapfrog race. .24) - Photo, black & white, 1985, SPR Leah (Hoffman) Peppler throwing dummy hand grenade, SSGT Ian ‘Rock’ Thistleton – Instructor. .25) - Photo, black & white, 1985, unidentified soldiers’ basic pouches cleared by instructor at end of hand grenade lesson. .26) - Photo, black & white, 1985, unidentified soldier throwing dummy hand grenade. .27) - Photo, black & white, 1985, unidentified personnel with dummy hand grenades, SGT Dennis Learmonth – instructor. .28) - Photo, black & white, 1985, unidentified soldier throwing dummy hand grenade. .29) - Photo, black & white, 1985, unidentified personnel with dummy hand grenades, unidentified instructor. .30) - Photo, black & white, 1985, adjusting SLR rifle gas plugs L to R: unidentified, SPR John Keely, CPL Paul Richards, unidentified, CPL Peter Johnson, remaining personnel unidentified, unidentified instructor. .31) - Photo, black & white, 1985, L to R: unidentified (x6), SPR Dave Wright, unidentified, SPR Barry Hogan, CPL Lyall Camp, SSGT Tony Harder – UK Exchange Instructor, SPR Steve Coulson, CPL Mark Lander. .32) - Photo, black & white, 1985, SLR rifle lesson L to R: unidentified, CPL Gary Drummond, SSGT Steve Hansen – Instructor in background, CPL Peter Breukel, SPR Steve Burke, CPL Brian Fauth, remaining personnel unidentified. .33) to .35) - Photo, black & white, 1985, unidentified personnel during SLR rifle lesson..1P to .35P No personnel are identifiedroyal australian survey corps, rasvy, army survey regiment, army svy regt, fortuna, asr -
 Federation University Historical Collection
Magazine - Booklet, University of Ballarat, Everyone@UB, 2001
The University of Ballarat in 1998 comprised the Mt Helen Campus, SMB (Ballarat School of Mines) Campus and the Horsham Campus. It's current name is Federation University Australia. In 1998 Everyone@UB was a monthly staff newsletter edited by Peter Baird in consultation with Don Moconachie.A series of monthly bulletins covering all University of Ballarat campuses. .1) University merger, John Bailey, Michael Adermann, Vice-Chancellor, Jenny Nemeth, Katherine Birkin, Rowena Coutts, Ballarat Technology Park, Ron Wild .2) Chancellor appointment, Chancellor retirement, Geoffrey Blainey tribute, David Caro, Katherine Birkin, Arno Besse, George Murdoch, Bullarook, Stephen Kemmus, Neville French, ceramics, Tristan Smith, Horsham, Arnhem Land film, Ararat, Kerry Cox, anorexia, salary packages, University of Ballarat Brass Band, Natalie Radomski, becoming a university. Images: Geoffrey Blainey, David Caro, David James, Katherine Birkin, Arno Besse, George Murdoch, Geoffrey Blainey, Stephen Kemmis, Neville French, John Ackland, Richard Jardine, Glen Auld, Dennis Arne, Andrew Kotsonis, Kerry Cox, Suzanne McLaren, Marcia Pope, Rosemary Green, Leonie Otago, Natalie Rodomski .5) October 1998 - Carolyn Taylor, misogyny, Horsham campus building under construction, David Caro, Miranda Kerr, Martin Westbrook, Iain Reid, virtual monitors, teaching practice, Joanne Knight, John Pidgeon, Sally Buckland, arsenic, Ian Rae, Bob Allan, Patricia Cartwright, Matthew Baker, Sundru Sivamalai, Janine Smith, Pat Mann, International Student Market Research, Steve Mennen, Copyright, internet to the outback, Charters Towers, Engineering students, Darryl Dyason, Andrew McDougall, Dianne Jacono, Ross Morgan, Keith Boast, Cranbrook Academy of Art (Detroit), Helmut Stenzel, Mt Helen vegetation, Jan Bedggood, Ann-Maree Haintz, Kathleen Lakey, Adrienne Ryan, Fiona Schmidt. .11) Phil Candy, flexible learning, strategic planning. .12) diving, Reconciliation, Learning City, Student residence, Alex Rubinov, Graduate Centre, Ceramics, horse, Wimmera, tree regeneration, student poverty, UB museum, David Manterfeild, Heather Hatfeild. Redundancy, video conferencing Images: Steve Matthews, Craig Holloway, Peter Pilven, Sneha Kirubakaran, Phil Honeywood, Kerry Cox, David Manterfield, Martin Westbrooke, Ram Karan, Barry Jones, Gael Ramsay, Jenny Hargave, Heather Hatfield. .16) Jeff Kennett, Honorary Doctorate, Technology Park, Mary Atkinson, Ian Wright, Internet, Disability Action Plan, Robert Munt obituary, Sandra Stepcich obituary, Virginia Fenwlon, East Timor, Centre for Environmental Management, Wayne Jolly, 130th anniversary, Craig Hurley, Barry Wemyss, John Murray, Tori Power, Grant Curnow. Images: Vivienne Witwer, Claire Hetherington, Ian Wright, Virginia Fenelin .17) Broadband, AARNet, David James Retirement, wetlands, Debbie Eagles, Centre for Rural and Regional Health, numeracy, nursing, Sue Turale, Max Palmer, Camp Street, Arts Academy, library, SMB scholarship, Landcare, Mallee pipeline, Verna Barry, Alice Mills, Marian Brown, .18) Fiji, Texans, Greenhill, Robert Whitson, Ian Clark, Abororiginal history, Yuille St, Peter Baird, Martin Westrbrook, Robert Allen, Arts Academy, John McGrath, Phil Ruglen, 3BBB, John Ferrier .21) Beverley. Lassiter, Vice-ChAncellor appointment, Kerry Cox, Craig Hurley, Barry Wemyss, Ceramics, Bill Pryor, University Games, Olympics, Broken Hill, Alex Rubinov, Jonathan Halls, Dare to be different, Wayne Muir, Student Union Refit. Images: Wayne Muir, Alex Ruminov, Kerry Cox .22) December 2000 - nursing, David James, Phil Candy, John McLean, Debbie Eagles, brewery, brewing, Meredith Sussex, Lyn Faneco, TAFE,Joy Nunn, ARC, mosaics, Timor, Alfredo Pires, Centre for Rural and Regional Health, diabetes, kangaroos, Murray-Darling, Leagher Homestead, David Welch, Joy Nunn, Jill Blee, Maryanne Coutts, positive discrimination, Theresa Saunders, Imelda Crebbin .23) March 2001 - Nancy Lange, Paul Lambeth, Yvonne Button, Don Pennell, Natalie Radomski, Marcia Pope, McKinnon Walker, Marc Brodie, TAFE, WorldSkills, Horticulture, Ararat, Website, library, Leeanne Pitman, Liz Hartmann, nursing, Miranda Walker, Ciaran Pier, Anxiety Disorders, volcano, brewing, beer, Peter Aldred, Rob Greig, Jeremy Smith, Alice Mills, Geoff Burgess, .24) May 2001 - Graduations, Talia Venn, Stephen Carthew, Honory Doctorate, Steve Monaghetti, Heather Moore, Brendan O'Brien, Bill Pryr, Terry O'Brien, Carole Wilson, Carolyn Taylor, rape law reform, Federation at the Ballarat School of Mines, Work Skills, Debbie Eagles, Sue Purtle, Longerenong, Mohair, Early Childhood, Horsham, Kerry Cox, Willy Hobbs, David Firth, Kim Durban, BAPA, maryanne Coutts, Ewen McDonald, butterflys, Fukuoaka INstitute of Technology, Jane Wilkinson .25) Wayne Robinson, Neil McAdam retirement, Anne Beggs Sunter, nursing, Eileen Sellers, Hannelore Best, international nursing, Francis Adams, copyright, Roy Taylor, Wendy Bolger, unplugged, Horsham, Robert Irvine, Horsham graduations, Anxiety Clinic, Carole Wilson, Heart Mat, University of Ballarat Mission, Diabetes, Emelia Martinez-Brawley. Images include Wayne Robinson, Anne Beggs Sunter, Eileen Sellers, Hannelore Best, Phil Candy. Meg Tasker, Roy Taylor, Wendy Bolger, Robert Irvine, Angus McLachlan, Roger Castleman, Stephen Roberts, Philip Smith, Bob Allen, Rob Greig, Dennis Jeandet, Carole Wilson, Doug Lloyduniversity of ballarat, ballarat school of mines, wetland, broadband, david janes, smb, kennett, leadership, eagles, centre for rural and regional health, microwave, turale, arts academy, camp street, library, landcare, mallee, mallee pipeline, barry, verna barry, mills, brown, palmer, caro, geoffrey blainey, blainey, birkin, besse, kemmis, adermann, ackland, jardine, auld, mclaren, pope, green, otago, radomski, honorary doctorate, munt, stepcich, wemyss, rubinov, muir, everyone@ub, robinson, horsham, stawell, ararat, fukuoaka, taylor, moneghetti, coutt, hatfeild, westbrooke, karan, bailey, james, nemeth, wild, de bono, texas, sharpam, fiji, clark, ruyg, kropp, sugget, baird, allen, westbrook, rural health, stacpoole, mcgrath, ruglen, ferrier, manterfield, pilven, michael adermann, tafe, mount helen vegetation, dennis arne -
 Federation University Historical Collection
Document, Establishment of the Ballarat School of Mines, 1870, 1870
The Ballarat School of Mines was the first site of technical edducation in Australasia. It is now a predecessor institution of Federation University Australia. It's first president was Redmond Barry.Correspondence and planning documents relating to the setting up of the Ballarat School of Mines. it includes tenders for contractors for the refurbishment of the former Ballarat Circuit Court. .1) Rules for the pupils of the Mining School at Zurickau, 18/11/1870 (not translated by Emanuel Steinfeld, perhaps by W. Henderson) .2) Regulations of the Mining Academy at Frieberg, 18/11/1870 .3) Einrichtungen, Freiberg, 1870 (written in German) .4) Letter from Somerville Learmonth of Ercildoun to Harrie Wood, Clerk of the Board of Mines Ballarat, accepting a position as one of three trustees of the Ballarat School of Mines, along with Redmond Barry and R.H. Bland, 08/01/1870 .5) Printing order with Robert Wreford, 26/01/1870 .6) H. Waymouth to Mr Bickett re the Ballarat School of Mines, 1780 .7) Letter from R.H. Bland of Clunes to Harrie Wood of the Ballarat Mining Board, 27/01/1870 .8) Letter from Somerville Livingstone Learmonth of Ercildoun to Harrie Woods of the Ballarat Mining Board refusing the offer to be a Trustee of the Ballarat School of Mines, 28/01/1870 .9) Minutes of the meeting of the Ballarat School of Mines Executive Council, 05/02/1870 and Correspondence from Harrie Wood to J. Warrington Rogers re the lease of the building for the Ballarat School of Mines, 21/01/1870 .10) Chief Secretary's Office to Ballarat Mining Board re Life Membership of the Ballarat School of Mines, 02/02/1870 .10b) Letter from Redmond Barry, Carlton Gardens, Melbourne re the visit of the Governor of Victoria to the Ballarat School of Mines, 04/02/1870 .12) Letter from Charles Pucke on behalf of Mr McCulloch to H, Ainswood, Secretary of the Ballarat Mining Board, 11/07/1870 .13) Correspondence from Henry Rosales of Walhalla (Chairman of the Gippsland Mining Board) to James Baker of the Ballarat School of Mines, 28/12/1870 .11) Meeting of the Executive Council, Bickett, Eddy Downes, 08/02/1870 .14) Letter from John Phillips, contract surveyor of St Arnaud to Mr Newman, Vice-President of the Ballarat School of Mines, 15/12/1870 .15) Articles ordered and obtained for the Ballarat School of Mines, 03/01/1870 .16) Telegram from John Lewis of Clunes to the Ballarat School of Mines. .16b) Quote from painter Thomas Robson for painting the Ballarat School of Mines, 05/06/1870 .17) Note from Duncan Gillies to Harrie Wood re grant for the Ballarat School of Mines, 05/06/1870 .18) Correspondence re Grant to the Ballarat School of Mines, Duncan Gillies, 04/07/1870 .19) Correspondence concerning the Ballarat School of Mines from F. Valient to Harrie Wood, 14/05/1870 .19b) Correspondence from Somerville Livingstone Learmonth to Harrie Woods - an apology for a meeting with Judge Rogers, 23/05/1870 .20) Letter from R.H. Bland to Harrie Wood, 15/07/1870 .22) Telegraph from J. Warrington Rogers to Harrie Wood of the Ballarat Mining Board concerning tenders for the Ballarat School of Mines, which was established in 1870. .23) Letter from Ballarat Mining Board to Judge Warrington Rogers, 31/05/1870 .24) Telegraph to Harrie Wood of the Ballarat Mining Board from J. Warrington Rogers concerning Sir Redmond Barry. A note at the bottom of the telegraph notes ‘This telegram has been delayed through repairs on line. .25) Letter on Melbourne Public Library Letterhead from librarian Augustus Fulk, 05/08/1870 .26) Letter from R.H. Bland to Harrie Wood, 30/05/1870 .27) Letter from Robert Park re alteration of the former Ballarat Court House for use as the Ballarat School of Mines, 05/05/1870. .28) Letter from G. Whitty re painting of the former Ballarat Court House for use as the Ballarat School of Mines, 04/05/1870 .29) Letter from William Newman re plastering of the former Ballarat Court House for use as the Ballarat School of Mines, 05/05/1870 .30) Letter from Charles A. Abbott re teaching Mechanical Drawing at the Ballarat School of Mines, 04/04/1870 .32) Letter from Redmond Barry to the Ballarat School of Mines, 07/1870 .31) National Insurance Company of Australia insurance for the Ballarat School of Mines (former Ballarat Circuit Court), 01/05/1870 .33) Letter from R.H. Bland to Harrie Wood, 09/1870 .34) Letter from Somerville Livingstone Learmonth to Harrie Wood, 06/09/1870 .35) Letter to the Chief Secretary to the Ballarat School of Mines Library & Museum, 30/11/1870 .36) Parliament house (Kitto) to the Ballarat Mining Board, 15/11/1870 .37) H. de la Poer Wall of Grenville College to R.W. Newman of the Ballarat School of Mines, 27/04/1971 .38) W.H. Odgers to the Ballarat East Town Clerk, 20/05/1870 .39) Correspondence to the Borough of Clunes for the Ballarat Mining Board requesting a grant to set of a school of mines at Ballarat. 25/03/1870 .40) Surveyor to Harrie Wood, Mining Registrar, 27/04/1870 .40) Letter to Judge Warrington Rogers re the contractor's account for satisfactory completion of work on the Ballarat School of Mines, 11/07/1870 .43) Desks for the Ballarat School of Mines by Henry Gough, 1870 .44) Ballarat Star Office to James Baker of the Ballarat School of Mines, 1870ballarat school of mines, frieberg mining academy, learmonth, somerville learmonth, wreford, weymouth, bland, rivet henry bland, barry, redmond barry, mcculloch, phillips, john phillips, robson, gillies, duncan gillies, warrington rogers, melbourne public library, whitty, robert park, newman, william newman, charles abbott, janes baler, de la poer wall, odgers, louis le gould, wood, harrie wood, steinfeld, emanuel steinfeld, ainswood, pucke, thomas robson, telegraph, telegram, state library of victoria, fulks, architecture, reed, j. reed, rosales, abbott, charles a. abbott, mechanical drawing, drawing, ballarat circuit courthouse, ballarat courthouse, national insurance company of australia, grenville college, chief secretary's office, robert sandon, school of mines, schools of mines, establishment, ballarat school of mines establishment, germany, london, ercildoun -
 Federation University Historical Collection
Document - Newsletter, Miners Write: Ballarat School of Mines Staff Newsletter, 1994-1997, 1994-1997
The Ballarat School of Mines is a predecessor institution of Federation University Australia. Photocopied newsletters with numerous newspaper clippings. 20 June 1994 - Mission, Women's Policy, Kate Wait, Walter Haller, Stewart Moors, Cynthia Jardine, Mark Lynch, R.J. Young Scholarship, David Thomas 22 August 1994 - Wimmera Community College Agreement, SMB/University of Ballarat Affiliation Agreement Signed by Chancellor Geoffrey Blainey, Max Palmer, Matthew Barlow, Mark Dawe, Phillip Lee, John Conaughton, Elizabeth White 05 September 1994 - Employment White Paper, Workcover, Ross Furness, Nance Jeffreys, Keith Chase, Michael Ronaldson, Ron Wild, Paul Jenkins 25 October 1994 - Staff Consultation Committee, Bendix Mintex Award, Rick Williams, Mike Hickey, Sexual Harassment, Ann McCaffrey, Brewery Complex building 07 November 1994 - Karpin Report, Edgar Bartrop Scholarship, Winsome McCaughey 13 June 1995 - Female Participation in TAFE, Lake Bolac Visit, Virginia Fenelon, Hairdressing, Ararat Community College, Brian MCLennan, Forestry Industry Contract, Ararat PRison Education, E.J.T. Tippett Award, Shane Lake, SMB Graduates 1995, Tony Leonard, Colin McCurry, Steph Pilmore 26 June 1995 - Child Care Centre, computer survey responses, Ellimatta, Sharna Whitehand, Jack Veeken, John Hanmer, Aaron Block, Kirsten Martin, Rowena Worth, Jan Croggon, Andrew McEvoy 24 July 1995 - Teaching, Engineering Liaison, Graham Shearer, Carol Durant, Brian McLennan, Market Research, Ararat Campus, Kevin Martin, Myrtle Muir, Hairdressing, Carol McDonald 07 August 1995 - Childcare, Playgroup, Disabilities, Judy Mills, Former Ballarat Gaol, Private Providers, Equal Opportunity, Equal Employment Opportunity 04 September 1995 - Keith Boast, Barkly Street Campus Library, Barrie Firth, Yuille Street Building, Painting and Decorating, Bricklaying, Disability Forum Committee, Belinda Morgan, Fay Guinane, Olivia Guinane, Robert Clarke Community Centre ceramic Tile Mosaic, Neville French, Annelies Egan, Judith Davies, Tanis Yuille, Margaret Komishon, Ruth Zegir, Ray Isaac 18 September - Competition Policy, Public Sector Reform, Brewery Building contract to S.J. Weir, Ararat Campus, BHP, Peter Bell, Mining Industry, Horticulture Facility (Gillies Street), Creche Fairy Mural, Shellagh Kentish, Daylesford Neighbourhood House and Learning Centre, Jenny Beacham, Tom Bates, Colin Trembath, Alan Scanosio, Zaiga Svanosio 16 October 1995 - Rural Studies Staffing, Robyn Greig, Ross Holton, Virginia Fenelon, Michelle Loader, Christina Elshaug, Cynthia Jardine, Morgan B. John death, Ian Pym, Melissa Cameron, hairdressing, Woolshed, Great Southern Woolshed, Graham Shearer October 1995 - Employment Relations Update, Enterprise Bargaining, Sue Wright, Ron Wild 30 October 1995 - 125th anniversary, 125th anniversary Medallions, Bill Murray (died 28 October 1995), Metal Fabrication, Ron Wild, Gael Ramsay, Paul Keating 20 November 1995 - Ceramics Exhibition, Heather Campbell, Marion Byass, Barry Norman, Helen Knowles, Michael Bracher, Brian McLennan, Rural Studies, Carpark, David Nicholson, Linetter Penhall, Suzanne Brown, Marie Bedggood 27 May 1996 - David Brown Farewell, Keith Boast, Educational Services, Wally Gradkowski, Dzintra Crocker, World Wide Web, Ann McCaffrey 17 June 1996 - Lifelong Learning Through Vocational Education and Training, Lyndal Cooper, Engineering Studies, David Manterfield, Rod MacKinney 19 August 1996 - SMB Strategic Plan 1997-2001, Ian Harris, Ararat Prison Education, Moongate 06 September 1996 - Tom Johnson, Bill Gribble, Ron Wild, INternational Projects Report, Cas Anderson, Court House Theatre, Former Court House, The Moongate 11 November 1996 - Brewery Complex Opening by Prime Minister John Howard on 09 December 1996, Human Resources, Marie Kerr, Fran Kisler, Karen Neale, Trudy Horwoood, Graham Hankin, Engineering Studies, David Manerfied, Sheilagh Kentish, Goroke College 12 May 1997 - Ballarat Group Training, Ballarat Aboriginal Co-operative, SMB Flexible Learning Centre, E.J. Tippett Library, Changing Role of the TAFE Teacher, Maree Greig, Colin Prowse, Performing Arts, Dave Knowles, Karyn Kilroy 20 August 1997 - Amalgamation Update, Graham Paynter, Heather MacLeod, Performing Arts 05 September 1997 - From TAFE to VET, Leoda Atkinson, Daniel James, Ararat campus, Mark Bevelander, computers, Craftsmanship Awards, Koorie Programs Unit, Deanne Jakiel, Stephen Burns, Women's Access Program, Internet 20 October 1997 - amalgamation update, Flexible Learning Centre, Andrea Bateman, Val D'Angri, Leoda Atkinson, Paul Mason, Andrea Bateman 10 November 1997 - Ballarat School of Mines/University of Ballarat Amalgamation, Shenzhen Polytechnic China, Videoconferencing, John Ferrier (Science), Performing Arts 08 December 1997 - Last Edition of Miners' Write Ron Wild, Brian McLennan, Max Palmer, Jeanetter John, Farewell to SMB, Time Capsuleminers write, ballarat school of mines, ron wild -
 Federation University Historical Collection
Document - Documents, Ballarat School of Mines Correspondence Relating to the Ballarat Technical Art School, 1907-1914, 24/12/1907 - 28/08/1914
The dates 1907-1914 cover the first eight years of the Ballarat Technical Art School No. 15, a division of the Ballarat School of Mines. This covers that time before the custom built Ballarat Technical Art School opened in 1915.48 pieces of hand and type written correspondence relating to the Ballarat Technical Art School, covering its first eight years. .1) Transferal of money from the Ballarat Fine Art Public Gallery Association to the Ballarat School of Mines for credit to the Ballarat Technical Art School No 15. .3) Letter from Herbert H. Smith reporting on the appointment of Thomas Trengove to the position of Art Director at the Stawell School of Mines, and the appointment of Arthur Lilburne and Pridgeon as student assistants. .5) Application from Arthur M. Lilburne for a position at the Ballarat Technical Art School. .7) Resignation of Thomas Trengrove from the Ballarat Technical Art School so he could take up a position at the Stawell School of Mines, 1908. .9) Correspondence from H.H. Smith concerning expectations. 1908 .10) Report from Herbert H. Smith on the number of Art enrolments at the Ballarat West Art School, the Ballarat East Art School and the Drawing Centre. .8) Correspondence from Henry H. Hall regarding his teaching appointment, 1908 .11) A Report on architectural studies at the Ballarat Technical Art School on Clegg and Miller letterhead. .12) Report from M.C. Young. .13) Report from Arthur Lilburne .14) Reorrt from J.A. Wright, 1908 .15) Report on student numbers from Edith M. Cornell, 1908 .16) Report on classes in Freehand Geometry and Perspective by Fred Foster, 1908 .16b) Report by Decorating and Signwriting teacher John Barber, 1908 .17) Report from Esther and Lily Green from the East Public Library, 1908 .18) Report from Percy Isaac of the Ballarat East Public Library re manual training and Sloyd classes. .19) Report on the progress of the Ballarat Technical Art School by Principal Herbert H. Smith, 1908 .20) Report from Arthur M. Lilburn on the Elementary Evening Classes and the State School Teachers Saturday class, 1908 .21) Report by M.C. Young on drawing classes at the Ballarat Technical Art School, 1908 ,22) Report by Fred Foster on Freehand Geometry of Perspective classes at the Ballarat Technical Art School, 1908 .24) Report by E. and L. Green on classes at the Ballarat Technical Art School, 1908 .25) Report by Miss Wright on Dresscutting classes at the Ballarat Technical Art School, 1908 .26) Report by John Barber on Signs and Decorating classes at the Ballarat Technical Art School, 1908 .27) Report by Edith Cornell on Millinery classes at the Ballarat Technical Art School, 1908 .28) Report by Percy R. Green on Manual Training ad Carpentry classes at the Ballarat Technical Art School, 1908 .29) Correspondence from Posenby Carew-Smyth and Melbourne Education Department letterhead, 1908, .30) Report on the need for instruction in Decorative Needlework at the Ballarat Technical Art School by Principal Herbert H. Smith. Ida Johnston undertook classes from Miss Macgeorge in Melbourne at the suggestion of Posonby Carew-Smyth, and H.H. Smith suggested she be appointed to teach the class, 1910 .31) Report on the Junior Technical School, 1915 .32) Quarterly Report on the Ballarat Technical Art School by Principal Herbert H. Smith, 1911 .34) Report on the progress of the Ballarat Technical Art School by Principal Herbert H. Smith, 1914 .34b) Invoice from James Ingram and Son, Booksellers and School Stationers, 1908 .35) Report on the progress of the Ballarat Technical Art School by Principal Herbert H. Smith, 1914 .36) Correspondence from F.N. King seeking employment at the Ballarat Junior Technical Scool due to the resignation of A.W. Steane, 1914 .37) Correspondence regarding the qualifications of F.N. King, including Sloyd at NAAS, Sweden, 1914 Reference from F.V. Burridge of the London County Council Central School of Arts and Crafts (incorporating The Royal Female School of Art), Southamoton Row, London, regarding Francis N. King, 1913 .40) Correspondence on Ballarat Junior Technical School letterhead when it was located at 104 Doveton Street, Ballarat (Dana Street Primary School) from Albert W. Steane. The report mentioned to appointment of R.W. Richards commencing duties as a science ad mathematics master and Francis N. King as Woodwork and Modeling instructor, 1914 .41) Report on the progress of the Ballarat Technical Art School by Principal Herbert H. Smith, 1914 .42) Correspondence on Stanley Mullen Company letterhead requesting a junior (lady) to help in designing and drawing from Needlework, 1914 .43) Report on the progress of the Ballarat Technical Art School by Principal Herbert H. Smith, 1914 .44) Report on the progress of the Ballarat Technical Art School by Principal Herbert H. Smith, 1914. The report includes the resignation of Donadl Johnston to take up the position of assistant to Posonby Carew-Smyth. Harold Herbert to travel to England, and Edwin Cannon to to apply his art knowledge commercially. H.H. Smith suggested they be replaced with Ken Moss and Harold Brown .45) Report on the progress of the Ballarat Technical Art School by Principal Herbert H. Smith .46) Hours and duties of the caretaker and attendant at the Ballarat Technical Art School .47) Letter from the J.A. Powell, secretary of the Ballarat West Art School to the Ballarat School of Mines. ballarat technical school, henry j. hall, arthur m lilburn, thomas h. trengrove, herbert h. smith, g.w. clegg, m.c. young, j.w. wright, fred foster, j. barber, etsher green, lily green, p. isaac, e.m. cornell, albert steane, f.n. king, letterhead, ballarat fine art public gallery association, richard maddern, j. powell, j.a. powell, frederick martell, ponsonby carew-smyth, stawell school of mines, lilburne, pridgeon, arthur lilburne, henry hall, edith m. cornell, john barber, east ballarat library, esther green, percy isaac, sloyd, millinery, r.w. richards, frank king, a.w. steane, naas, majorie walker, art needlework, stanley mullen company, donald johnston, ted cannon, edwin cannon, harold brown, harold herbert, art gallery of ballarat -
 Victorian Aboriginal Corporation for Languages
Book, Aldo Massola, Journey to Aboriginal Victoria, 1969
Looks at the Aboriginal community from the time of white contact, across many parts of Victoria. Chap.1; Melbourne - early missions, camp of Native Police, corroboree trees, canoe trees, grave &? headstone of Derrimut; quarries at Keilor, excavation sites at Green Gully &? Keilor; quarry at Mt. William, notes on inheritance of quarries Coranderrk settlement - Barraks grave, notes on his life; Chap.2; Geelong - Yawangi group of the Wothowurong tribe, camping grounds in area quarries; Notes on William Buckley, Gellibrand (a notable Aboriginal), graves in the Western Cemetery; Chap.3; Colac - war between Colac &? Geelong tribes; Mission at Birregurra, reason for failure of Buntingdale Mission; brass plate to Coc-coc-coine; reserve at Elliminyt, native ovens, camp sites, initiation site &? ritual; quarry sites, axegrinding factory, rock pecking &? engraving; dried hand &? 3 Aboriginal skulls found; Chap.4; The south-west coast - middens, camp sites notes on Framlingham Stn., fish traps at Tyrendarra; Chap.5; The far west - massacres of Aborigines near Casterton; camp sites, oven mounds; the first cricket team formed; Aboriginal cemetery; Chap.6; Hamilton - camps; Mount Rouse Station, axegrinding grooves at Nareeb Nareeb, shelters described, fish traps, massacre at Lake Condah; mission; canoes; Chap.7; Camperdown - legend about Lake Bullen Merri; obelisk erected in memory of Aborigines of district especially chief Wombeetch Puyuun; Jarcoort tribe; fish weirs, camps, intertribal fights between Booluc-burrers, Jarcoorts &? Ellengermote groups; bartering place at Mount Noorat; articles traded, legend of Flat-Top Hill; Chap.8; Ballarat - camp at Lake Wendouree; White Stone Lagoon; legends concerning Mt. Buninyong &? waterfalls at Lal-lal; camp sites; pygmy-type implements near Meredith, quarry at Glue Pot Rocks near Durdidwarrah; brass plate of King Billy; Chap.9; Ararat - Tjapwurong territory; camp sites, quarries, shield &? canoe trees; Bunyip belief at Lake Buninjon of Muk-jarawaint &? Pirtkopen-noot tribes, gives legend; stone implements; mill stones; fish weirs; stone arrangement near Lake Wongan; ground drawing of a bunyip, paintings in rock shelter near Mt. Langi Ghiran; Chap.10; Maryborough - camps, oven mounds, rock wells, stone arrangement at Carisbrook; camp sites at Mt. Franklin; Chap.11; Charlton - belief in Mindye (snake); canoe trees, ovens, camp sites, water holes, rock wells, stone implements; method of rainmaking; Chap.12; Horsham-Stawell, The Wimmera - Wotjobaluk land; camps, fish traps at Toolondo; Black Range cave paintings, Flat Rock shelters (detailed account of these paintings); Bunjils Cave; Chap.13; Horsham-Stawell, The Mallee - camp sites, implements; Ebenezer Mission, Willie Wimmera taken to England by Rev. Chase to become a missionary, died in England; Chap.14; The Murray River, Mildura Swan Hill - Battle of the Rufus; ceremonial ground, Lake Gol Gol, canoe &? shield trees; stone implements; camp sites, fire place arrangements; fish traps; oven mounds; Chap.15; The Murray River, Swan Hill-Echuca - legend about Lake Boga; camps, oven mounds, the Cohuna skull, Kow Swamp, method of burial; Chap.16; Shepparton ovens; brass plates of King Paddy of Kotupna &? King Tattambo of Mulka Stn., native well, camps; Chap.17; Wangaratta -camps, quarry, rock holes, the Faithful massacre; grinding rocks at Earlston; Chap.18; The High Plains - Ya-itma-thang; camps, Bogong moth feasts, native paths for trade &? intertribal fights, articles traded; painted shelters; Koetong Ck. Valley, near Mt. Pilot &? near Barwidgee Ck.; Chap.19; Dandenong - water holes, list of 8 holes in Beaumaris - Black Rock area; camps, middens, stone implements (microliths), legend of Angels Cave, stone axes, Native Police Force, Narre Narre Warren Station, legend about rocks on Bald Hill, kangaroo totemic site; Chap.20; Wonthaggi- Yarram - natives visit Phillip Is., murder of William Cook and Yankee by five Tasmanians (listed as Bon Small Boy, Jack Napoleon Timninaparewa, Fanny Waterpoordeyer, Matilda Nattopolenimma and Truganini) near Cape Patterson, men; camp sites, middens, legend of White Rock; Chap.21; Sale - Bairnsdale, The Lakes Country middens, camps; legend at Wulrunjeri; story of a white woman supposedly living with with the Tutangolung tribe, efforts made to prove story; canoe trees; Chap.22; Sale-Bairnsdale, The Inland Braiakolung tribe, camps, implements, canoe &? shield trees; Ramahyuck Mission, grinding rocks, fights with Omeo tribe; native tracks, death through enemy magic - procedure, belief in ghosts; Chap.23; Lakes Entrance and the Country to the east - Kroatungolung people, legend of Kalimna Valley; camps, stones of Nargun, bunyip, devils at Lake Tyers, excavation at Buchan, carbon dates; middens, ochre at Cape Conrad, stone fish-hook file at Thurra River; note on Bidwel tribe; Each chapter gives historical details, early contacts, relationships with settlers; Aboriginal place names and detailed description of sites and geographical features.b&w photographs, b&w illustrations, colour illustrationsgeelong, colac, hamilton, camperdown, ballarat, ararat, maryborough, charlton, horsham, stawell, murray river, shepparton, wangaratta, dandenong, wonthaggi, yarram, sale, bairnsdale, lakes entrance -
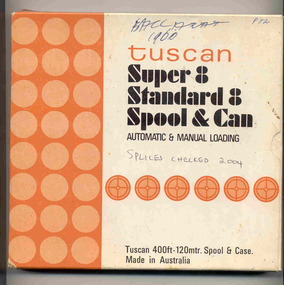 Ballarat Tramway Museum
Film - Movie Film & Box, Kodak, 1960
Yields information in movie film format of Ballarat trams in 1960, how the system operated and was used by people., Yields information in movie film format of Ballarat trams in 1960, how the system operated and was used by people.Movie film - 8mm, approx. 17.5 mins, with leader strip on a plastic reel, within a black and white plastic box, titled "Ballarat No. 1. 1960" contained with a cardboard box, 'Tuscan Super 8 and Standard 8 Spool and Can' . Has been transferred to DVD - see Reg item 4100 as Segment No. 1. Filmed and made by Ben Parle. Also transferred to DVD by Rod Cook Oct. 2015, via Roger Greenwood for use in his DVD, "The City of Ballarat Trams, Gardens & Gold" of 2016. See Reg Item 6883. Synopsis: based on time. 0:00 Starts with bogies cars crossing railway level crossing (34?, 39?) 0:30 SEC Logo 0:45 Ballarat Station sign and intro “Some City Scenes” 0:49 35 turning from Lydiard St Nth to Sturt St towards Grenville St with Commonwealth Bank in view. and then 42 returning 1:19 42 showing Mt Pleasant, turns from Sturt St into Lydiard St Nth 1:53 Tramway road works in Lydiard St Nth, near intersection with Mair St with Jelbart Road roller in use, starts with an SEC roadworks sign. 2:12 39 passing the works out bound to Lydiard St Nth. 2:46 Good view of the roller working before 35 arrives. 3:01 35 passing the works in bound with 3:29 14 crossing Lydiard St in Sturt St, towards Grenville St 3:47 Trams in City Loop 3:55 21 coming up the hill 4:04 31 entering Bridge St from Sturt St with Bucks Head Hotel in the background. 4:27 Overhead work at corner of Sturt and Lydiard, with view of the sign at the City terminus “Trams leave here for Sebastopol, Gardens, View Point.” 4:34 Passengers getting off and then onto 38, ex Lydiard St Nth at city terminus including a young lady wearing gloves and a wheeling a pram hurriedly the photographer. A number of other prams in the view as well as. The Conductor helps to unload the pram. 5:07 41 proceeding up Sturt St, appears to have just rained. 5:26 11 using the Dawson St crossover, with a motor car doing a U turn as well. 6:00 14 descending Sturt St towards the City, filmed at Dawson St. 6:11 Title “The Gardens via Drummond St North Line” 6:16 19 showing Victoria St, turning from Drummond St Nth into Sturt St. 6:28 30 inbound in Drummond St Nth, approach and trailing shots. Trailing shot ahs the hospital in the background. 6:49 31 outbound, Drummond St Nth, approach and trailing shots, trees are in autumn colours. 7:04 12, inbound Drummond St Nth, with Macarthur St in the background, stopping to pick up a lady, approach and trailing shots and then entering the Mill St crossing loop. 7:53 14 outbound in Drummond St Nth, dropping a lady passenger off and then turning into Macarthur St and then tram going away. 8:37 View of overhead junction at View Point Jtn. 8:45 View of “Cars Stop Here” sign and pole sign “To City Only” 8:55 30 inbound in Wendouree Parade, stops to pick up passenger, and then a trailing shot of tram entering Macarthur St loop 9:37 View of “Cars Stop Here”, “End of Section” and timetable boards at Haddon St. 9:50 34, pausing at Haddon St and then proceeding towards depot – approach and trailing shots, with “Warning Oncoming Trams” sign in shot. 10:27 “Warning Oncoming Trams” sign 10:32 34 crossing 12 at the Martin Ave loop 10:48 39? Wendouree Parade, near Barrett Ave, stopping and letting off passengers. 11:24 30 passing depot junction and then trailing shot of it entering Tram Sheds or Depot Loop and then proceeding towards the City. 12:11 Shot of the “Caution Beware of Trams” sign at the depot. 12:14 25 stopping at depot junction and then trailing shot of it going toward Forrest St. 12:47 12 passing Depot Junction, trailing shot. 13:07 Shot of :Electricity Supply Department, Ballarat Branch” sign at depot. 13:13 View of a destination showing “Depot” on a bogie tram 13:15 Title “Some Depot Scenes” 13:19 View of a trolley pole and then 13 leaving the depot through the gates, destination showing “View Point”. 13:54 View of trolley pole and then 32 stopping at the depot gates. 14:08 12 (Sunny view) running out onto Wendouree Parade and then a bogie tram approaching Depot Loop. 14:43 View of 42 running in with a single trucker behind in Wendouree Parade, and another single trucker running out. 15:02 Title “Some Scenes in the Gardens” 15:05 25 running through the Gardens, approach and trailing shots, near our Depot Junction. 15:55 View of “No Parking East of Loop” sign 15:59 View of overhead and then trackwork (with points removed), but overhead still in position at the Old Gardens Loop or Gardens South Loop and then 12 entering the loop from the south and then a trailing shot looking along the Parade. 16:33 View of “Cars Stop Here” and “End of Section” and then timetable boards at Gardens Loop. 16:55 View of 34 leaving the loop 17:14 Title “The End”Written labels giving title information on outside of box.trams, tramways, ballarat, sebastopol, lydiard st north, victoria st, mt pleasant, sturt st west -
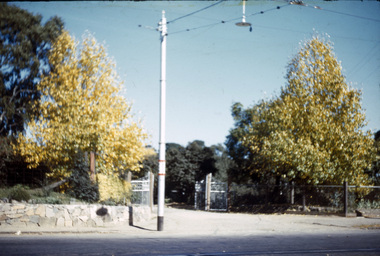 University of Melbourne, Burnley Campus Archives
Album - Black and white and colour slides, Burnley Views, 1947-1955
Contributor: T.H. KneenCardboard box of 108 35mm glass slides in metal frames made by "Gnome." Box labelled "Burnley Gardens Slides." Also 16 unused slides (1) Swan Street entrance c. (2) Orchid? b/w. (3) Nursery b/w. (4) Pasture area with man working b/w. (5) Draught horse working in the Orchard b/w. (6) Crop of corn in the Orchard c. (7) Magnolia c. (Magnolia x soulangeana). (8) Display of orange flowers c. (9) Lemon tree in the Orchard c. (10) Sign advertising 'Fruit Tree Pruning Demonstarion Sat. 2nd July (1949) c. (11) Jersey cow c. (12) Rock Point c. (13) Dahlias in the Orchard c. (14) Foundation Stone '28th August, 1946' c. (15) Felled Cypress tree 1951 b/w. (16) School truck in front of glasshouses and cacti b/w. (17)Administration Building completed but surrounded by rubble C.1949 c. (18) Plant Research Institute c. (19) Inside a glasshouse. c. (20) Administration Building c. (21) Group of female students dressed up for a function c. (22) Solenostemon (Syn. Coleus) in a glasshouse. (23, 24)Stock Matthiola incana. (25) Blossom in the Orchard c. (26) Orchard c. (27) Picking fruit in the Orchard c. (28) 2 female students holdong large bunches of poppies c. (29) Flowers growing in the Orchard c. (30) House - not Burnley c. (31) Students on an excursion c. (32) Staff member with Gladioli c. (33) Garden view - not Burnley? c. (34) Administration Building c. (35) Roses c. (36) Flowers in the Orchard c. (37) Draught horse working in the Orchard c. (38) Staff member amongst flowers in the Orchard c. (39) Garden view c. ((40) Blossom in the Orchard c. (41) Orchard c. (42) Flowers inside glasshouse c. (43) Mesembryanthemums in pots possibly in the nursery c. (44) Tree b/w. (45) Garden bed c. (46) Sign, 'Agrostology Branch, pasture Plant Research Field,' c. (47) Path to Principal's Residence c. (48) Irrigation in the Orchard b/w. (49) Cactus flowers b/w. (50) Garden view with T.H. Kneen children playing c. (51) (52) Cinerarias (now Pericallis x hybrida) in pots c. (53) Temporary building where the Grey Garden is now b/w. (54) Garden view b/w. (55) Unknown building b/w. (56) Person pruning in the Orchard c. (57) Students working in the Orchard c. (58) Swan Street with recently completed rock wall constructed by the Public Works Department b/w. (59) Lagoon paddock b/w. (60,62) Pavilion and new Administration Building before the Pavilion was removed b/w. (61) As (60) but viewed from a different direction c. (63) Plant c. (64) View through a window on the stairs in the Administration Building c. (65) Plant c. (66) Garden view of trees c. (67) Garden View b/w. (68) Blossom tree c. (69 )Garden view along path to Principal's Residence c. (70) Lagoon Paddock c. (71) Lagoon Paddock with cows b/w. (72) Inside a glasshouse b/w. (73) Entrance sign- Department of Agriculture Burnley Gardens, School of Horticulture & Primary Agriculture, Plant Research laboratory, Agrostology Branch, Fruit Preserving Branch c. (74) Plant Research Laboratory b/w. (75) Students on an excursion c. (76) Glasshouses b/w. (77) Garden view b/w. (78) Kniphophia c. (79) Hibiscus c. (80) Garden view c. (81) Dairy, Silo and dog b/w. (82) Irrigation in then Orchard b/w. (83) Garden view with magnolia c. (84) Flower plots in the Orchard c. (85) Pruning demonstration b/w. (86) Administration Building under construction c. (87) Rock Point c. (88) Mrs Kneen and Magnolia c. (89) Glasshouses c. (90) Sequoia sempervirens b/w. (91) Inside Administration Building c. (92) Luffmann Ponds b/w. (93) Sequoia sempervirend, Mrs Kneen and child c. (94) Garden bed in front of Sequoian sempervirens c. (95) Principals Residence b/w. (96) Poultry pens b/w. 1947 (97) Principals Residence b/w. (98) Student picking fruit from netted tree b/w. (99) Rock Point and Long Border c. (100) Administration Building under construction c. (101) Greenhouse b/w. (102) Rock Point c. (103) Flowers in the Orchard c. (104) Waterlilies in the Pond c. (105) Blossom tree c. (106) Hilda Kirkhope Rockery c. (107) Long Border c. (108) Plant Research Institute with flower border along drive c.burnley gardens, flower, nursery, pasture, draught horse, orchard, crops, magnolia, chicken coops, egg laying competition -
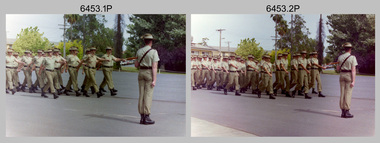 Bendigo Military Museum
Photograph - Officer Commissioning and CO’s Handover Parade, Army Survey Regiment, Fortuna Villa, Bendigo, 1992
This is a set of 28 photographs taken at a CO’s Parade at the Army Survey Regiment, Fortuna, Bendigo in 1992. On this parade WO1 Bill Jones received his commission and by promotion to Captain from CO LTCOL Rene van den Tol. Command of the unit was handed over to LTCOL Rob McHenry. It is probable the commissioning and handover ceremonies occurred on the CO’s Parade. LTCOL Rene van den Tol was CO from 1989 to 1992 and LTCOL Rob McHenry was CO from 1992 to 1993.This is a set of 28 photographs taken at a CO’s Parade at the Army Survey Regiment, Fortuna, Bendigo in 1992. The colour photographs are on 35mm negative film and scanned at 96 dpi. They are part of the Army Survey Regiment’s Collection. .1) - Photo, colour, 1992. Headquarters Squadron marches past RSM WO1 Graham Ragless. .2) - Photo, colour, 1992. Cartographic Squadron marches past RSM WO1 Graham Ragless. L to R: unidentified personnel, WO2 Steve Hansen, CPL Roger Pearson, WO1 Gary Warnest, SSGT Dennis Learmonth, SSGT Greg Else, CPL Ian Bowes, SGT Stuart Symonds. .3) - Photo, colour, 1992. Lithographic Squadron marches past RSM WO1 Graham Ragless. L to R: unidentified personnel, WO1 Steve Egan, LCPL John Bragg, unidentified personnel, WO2 Rob Bogumil, unidentified personnel, SPR Corey Hill. .4) - Photo, colour, 1992. Air Survey Squadron marches past RSM WO1 Graham Ragless. L to R: unidentified personnel, WO1 Allan Hancox, SSGT Wolfgang Thun, unidentified personnel, WO2 Neil ‘Ned’ Kelly, unidentified personnel, SGT Dave Longbottom, SGT Brian Johnson. .5) - Photo, colour, 1992. Cartographic Squadron. L to R: unidentified personnel, SGT Stuart Symonds, CPL Col McInnes, CAPT Mary Anne Martinek in foreground, SPR Jodi Seith, unidentified personnel, SPR Avril (Bray) Lloyd. .6) - Photo, colour, 1992. Air Survey Squadron. L to R: unidentified officer, SSGT Bruce Hammond, SPR Tracy Tillman, SPR Rachel (Stanford) Scott, SPR Paula (Golding) Brinsmead, SGT Graeme Reany, unidentified officer in foreground, unidentified personnel, CPL Steve Coulson. .7) - Photo, colour, 1992. Cartographic Squadron inspection. L to R: RSM WO1 Graham Ragless, unidentified, OC MAJ Graeme Wastell, CO LTCOL Rene van den Tol, unidentified personnel, CPL Col McInnes, SPR Jodi Seith, SPR Avril (Bray) Lloyd. CPL Steve Ellis, SPR Ian Brown, SPR Andrew Lazdovskis. .8) - Photo, colour, 1992. Cartographic Squadron inspection. L to R: OC MAJ Graeme Wastell, CO LTCOL Rene van den Tol, SPR Avril (Bray) Lloyd, CPL Steve Ellis, SPR Ian Brown, SPR Andrew Lazdovskis, SPR Adrian Taylor, unidentified, SPR Mick Knight, SPR Dawn Hoadley, CPL Craig Kellet. .8) to .12) - Photo, colour, 1992. Officer Commissioning Ceremony. L to R: CO LTCOL Rene van den Tol, WO1 Bill Jones promoted to Captain. .13) - Photo, colour, 1992. Officer Commissioning Ceremony. L to R: ADJT CAPT Geoff Ford, RSM WO1 Graham Ragless, CO LTCOL Rene van den Tol, WO1 Bill Jones promoted to Captain. .14) - Photo, colour, 1992. Officer Commissioning Ceremony. WO1 Bill Jones promoted to Captain. .15) - Photo, colour, 1992. Commanding Officer Handover. CO LTCOL Rene van den Tol delivers speech. .16) to .17) - Photo, colour, 1992. Commanding Officer Handover. R to L: CO LTCOL Rene van den Tol hands over to incoming CO LTCOL Rob McHenry. .18) - Photo, colour, 1992. Commanding Officer Handover. L to R: RSM WO1 Graham Ragless, ADJT CAPT Geoff Ford, CO LTCOL Rob McHenry. .19) - Photo, colour, 1992. Commanding Officer Handover. L to R: ADJT CAPT Geoff Ford, RSM WO1 Graham Ragless, CO LTCOL Rob McHenry. .20) - Photo, colour, 1992. Cartographic Squadron marches off parade ground. L to R: OC MAJ Graeme Wastell, unidentified officer, CAPT Greg Oaten, LT Matt Jackson, CAPT Mary Anne Martinek, SPR Mick Knight. .21) & .22) - Photo, colour, 1992. Cartographic Squadron marches off parade ground. .23) - Photo, colour, 1992. Lithographic Squadron marches off parade ground. L to R: OC Bob Coote, unidentified officer, SPR Scott Cameron, unidentified officer, SSGT Russ Mollenhauer, SGT Brian Fauth. .24) - Photo, colour, 1992. Lithographic Squadron marches off parade ground. L to R: LCPL Janet Murray, unidentified, SPR Mick Muzeen, Allison (Ottaway) Wooldrage, SGT Keith Quinton, SGT Frank Lenane, SGT Laurie Justin, SGT Dale Hudson, LCPL John Bragg, unidentified, SGT Kim Reynolds, SPR Corey Hill, SPR Andrew Arman, SPR Ross Anza, WO1 Peter Coombes. .25) - Photo, colour, 1992. Parade guests. L to R: unidentified guests, MAJ Peter Jensen. .26) - Photo, colour, 1992. Parade guests. L to R: unidentified guests, CAPT Doug Arman, unidentified guests. .27) - Photo, colour, 1992. Parade personnel march off. L to R: unidentified, WO2 Ted Burgess, WO1 Ken Slater. .28) - Photo, colour, 1992. Parade personnel. L to R: unidentified, SPR Allan Blake..1P to .28P – There are no annotations.royal australian survey corps, rasvy, army survey regiment, army svy regt, fortuna, asr -
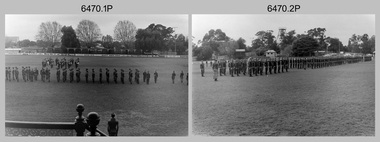 Bendigo Military Museum
Photograph - Army Survey Regiment Freedom of Entry Parade Rehearsal, Bendigo CBD, 1985
This set of 30 black and white photographs were taken at the Army Survey Regiment’s parade rehearsal held at the Queen Elizabeth Oval, Bendigo on the 27th of June 1985. The rehearsal was for the Freedom of Entry parade held 1-2 weeks later in 1985. The exact date for the Freedom of Entry parade is not known. The Freedom of Entry to the City of Bendigo was an honour first conferred by the Bendigo City Council to the Army Survey Regiment in 1970. The Freedom of Entry parade in 1985 was the fourth time the unit exercised its right of freedom of entry. The Regiment also exercised its Freedom of Entry with anniversary parades in 1977, 1980 and 1995. Refer to items 6020.8P, 6021.25P, 6248P, 6266, 6409.2 and 6430.39P for more Army Survey Regiment Freedom of Entry photographs, documents and certificates. See item 6471.2P for photos of Lithographic Squadron taken on the same day of this parade rehearsal.This set of 30 black and white photographs of the Army Survey Regiment (Army Svy Regt) were taken on the 27th of June 1985 at a rehearsal for the Freedom of Entry parade to the City of Bendigo, held 1-2 weeks later in 1985. The photographs are on 35mm negative film and were scanned at 96 dpi. They are part of the Army Survey Regiment’s Collection. .1) - Photo, black & white, 1985. Army Svy Regt .2) - Photo, black & white, 1985. Army Svy Regt right dress drill. .3) - Photo, black & white, 1985. Officers ready to take posts. .4) - Photo, black & white, 1985. Army Svy Regt present arms. SPR Mick Arnott in foreground. .5) - Photo, black & white, 1985. Army Svy Regt presents arms. .6) - Photo, black & white, 1985. Army Svy Regt presents arms. CAPT Neil Taylor in right foreground. .7) - Photo, black & white, 1985. In readiness for arrival of guests of honour. CO LTCOL Jorge Gruszka and CPL Nick Van Dalen in left foreground. .8) - Photo, black & white, 1985. Arrival of guests of honour. CO LTCOL Jorge Gruszka leads the salute. CPL Nick Van Dalen opening the car door. .9) - Photo, black & white, 1985. CO LTCOL Jorge Gruszka formally welcomes the guests of honour, the “Lord Mayor”, acted by SGT John Zuringer. .10) - Photo, black & white, 1985. CO LTCOL Jorge Gruszka escorts “Lord Mayor” (SGT John Zuringer) from the dais to inspect the Army Svy Regt’s squadrons. .11) - Photo, black & white, 1985. Inspection of the Army Svy Regt’s squadrons. .12) - Photo, black & white, 1985. Inspection of the Army Svy Regt’s squadrons. WO1 Dave Thomson on the far right with sword. .13) - Photo, black & white, 1985. Inspection of squadrons. L to R: CAPT Neil Taylor in foreground. 2LT Kathy Ryan, CO LTCOL Jorge Gruszka, WO1 Brian Mead, Lord Mayor” (SGT John Zuringer). Front rank: 2nd right CPL TJ Wicker, SSGT Doug Gay, Centre rank: 2nd right SPR Tracy (Parker) Ash, CPL Mark Lander. .14) - Photo, black & white, 1985. Inspection of squadrons Centre rank: L to R: SPR Robin Marshall, CPL Mark Lander, remainder unidentified. CO LTCOL Jorge Gruszka, WO1 Brian Mead, Lord Mayor” (SGT John Zuringer). Rear rank: 4th right SSGT Greg Buckingham, 3rd right SSGT Ian ‘Rock’ Thistleton, 2nd right SPR Annette Godden, 1st right SSGT Graham Ragless. .15) - Photo, black & white, 1985. L to R: “Lord Mayor” (SGT John Zuringer) and WO1 Brian Mead march past the Army Band. .16) - Photo, black & white, 1985. Army Svy Regt marches past the dias. ‘Eyes right’ salute given by CO LTCOL Jorge Gruszka. .17) - Photo, black & white, 1985. Unidentified squadron marches past the dias. ‘Eyes right’ salute given by MAJ Daryl Hockings CSM. .18) - Photo, black & white, 1985. Unidentified squadron marches past the dias. ‘Eyes right’ salute given by MAJ Rob John. .19) - Photo, black & white, 1985. Lithographic squadron marches past the dias. ‘Eyes right’ salute given by MAJ Peter Raue. .20) - Photo, black & white, 1985. Unidentified squadron marches past the dias. ‘Eyes right’ salute given by by MAJ Terry Edwards. .21) - Photo, black & white, 1985. Army Svy Regt right dress drill. .22) - Photo, black & white, 1985. At attention. Front rank: L to R: SSGT Doug Gay, CPL TJ Wicker, remainder unidentified. Centre rank: L to R: SPR Robin Marshall, remainder unidentified. Rear rank: 4th right SSGT Greg Buckingham, 3rd right SSGT Ian ‘Rock’ Thistleton, 2nd right SPR Annette Godden, 1st right SSGT Graham Ragless, far right super-numery WO1 Doug Arman. .23) - Photo, black & white, 1985. At attention. Centre rank: L to R: SPR Robin Marshall, remainder unidentified. Rear rank: SSGT Graham Ragless. Super-numery rank 2nd right - WO1 Doug Arman, far right - WO2 Pat Lumsden. .24) - Photo, black & white, 1985. Army Svy Regt Advance and Review Order. .25) - Photo, black & white, 1985. Army Svy Regt presents arms. .26) - Photo, black & white, 1985. CO LTCOL Jorge Gruszka leads the Army Svy Regt’s march past the dias. .27) - Photo, black & white, 1985. Army Svy Regt marches past the dias. ‘Eyes right’ salute given by CO LTCOL Jorge Gruszka. .28) - Photo, black & white, 1985. Unidentified squadron marches past the dias. ‘Eyes right’ salute given by MAJ Rob John. .29) - Photo, black & white, 1985. Lithographic squadron marches past the dias. ‘Eyes right’ salute given by MAJ Peter Raue. .30) - Photo, black & white, 1985. Army Svy Regt completes its march past the dias. No personnel are identified. Date and occasion annotated on film negative sleeve.royal australian survey corps, rasvy, army survey regiment, army svy regt, fortuna, asr -
 Bendigo Military Museum
Photograph - 4th Field Survey Squadron ANZAC Day Parade. Adelaide, SA, 1994
This is a set of 32 photographs of 4th Field Survey Squadron personnel parading through the streets of the Adelaide CBD on ANZAC Day, on the 25th of April 1994. The march concluded at the Cross of Sacrifice in Pennington Gardens East followed by the ANZAC Day Service of Remembrance. See items 6566.14P and 6567.11P for more photos taken during ANZAC Day, 1994.This is a set of 32 photographs of 4th Field Survey Squadron personnel parading through the streets of the Adelaide CBD on ANZAC Day, on the 25th of April 1994. The colour photographs are on 35mm negative film and are part of the Army Survey Regiment’s Collection. The photographs were scanned at 96 dpi. .1) - Photo, colour, 1994. Preparation. Bayonets fixed on SLR rifles. .2) - Photo, colour, 1994. Eyes right as unit passes dignitaries on the dais. .3) - Photo, colour, 1994. Eyes right as unit passes dignitaries on the dais. CAPT Rob Gray, centre of photo, OC MAJ Peter Demaine on right. .4) to .7) - Photo, colour, 1994. Eyes right as unit passes dignitaries on the dais. .8) - Photo, colour, 1994. Unit marches along the parade route. .9) to .13) - Photo, colour, 1994. Eyes right as unit passes dignitaries. .14) - Photo, colour, 1994. Unit marches along the parade route. Right file L to R: WO2 Peter Hammer, unidentified, SGT Dave Longbottom, SGT Paul Baker, unidentified. .15) - Photo, colour, 1994. Unit marches along the parade route. Right file L to R: SGT Paul Baker, unidentified (x2), SPR Fran Calvert, SPR Greg Richards, SGT H. Evertz. Centre file: SGT Mark Donnelly, SPR Mark McInerney, unidentified (x2), SPR Matt Arnold. .16) - Photo, colour, 1994. Unit marking time. Right file L to R: SGT Paul Baker, unidentified (x2), SPR Fran Calvert, SPR Greg Richards, SGT H. Evertz, CPL Brett Parkin. Centre file L to R: SPR Matt Arnold, SPR Mark Linwood. Right file L to R: unidentified, SPR Mark Sinderberry. Officers L to R: unidentified (x2), CAPT Rob Gray, CAPT Tony Stephens. .17) - Photo, colour, 1994. Unit marking time. L to R: SGT Paul Baker, unidentified, SSGT John ‘Shep’ Shephard, SGT Dave Longbottom, SPR Daryl Miller, CPL Steve Wegener, unidentified (x2), CPL Jeremy Archer, WO2 Peter Hammer, unidentified Warrant Officers (x2). .18) - Photo, colour, 1994. Unit marking time. L to R: SPR Mark Linwood, SPR Greg Richards, SPR Matt Arnold, SPR Mark Sinderberry, unidentified (x5), SPR Chris Pearse, unidentified, CPL Dick Crawford, unidentified, SSGT John ‘Shep’ Shephard, CPL Steve Wegener, unidentified, CPL Jeremy Archer, unidentified Warrant Officer. .19) - Photo, colour, 1994. Unit marking time. Officers L to R: unidentified (x2), CAPT Tony Stephens. L to R: SPR Mark Linwood, SPR Greg Richards, SPR Matt Arnold, SPR Mark Sinderberry, remainder unidentified. .20) - Photo, colour, 1994. Unit marched along the parade route. L to R: CAPT Rob Gray, unidentified officer. .21) - Photo, colour, 1994. Unit marches along the parade route. OC MAJ Peter Demaine. .22) - Photo, colour, 1994. Unit marches along the parade route. L to R: CAPT Tony Stephens, SPR Mark Linwood, SPR Matt Arnold, SPR Mark Sinderberry, unidentified (x3), SPR Chris Pearse, unidentified, CPL Dick Crawford, unidentified, SGT Dave Longbottom, SSGT John ‘Shep’ Shephard, CPL Steve Wegener, CPL Jeremy Archer, unidentified Warrant Officers (x2). .23) - Photo, colour, 1994. Unit marches along the parade route. L to R: SSGT John ‘Shep’ Shephard, SPR Daryl Miller, CPL Steve Wegener, unidentified, CPL Jeremy Archer, unidentified Warrant Officers (x2). .24) - Photo, colour, 1994. Unit marches along the parade route. L to R: unidentified, CPL Dick Crawford, SGT Dave Longbottom, SSGT John ‘Shep’ Shephard, unidentified, CPL Steve Wegener, WO2 Peter Hammer, CPL Jeremy Archer, unidentified Warrant Officers (x2). .25) - Photo, colour, 1994. Unit marches along the parade route. L to R: unidentified (x3), SPR Fran Calvert, unidentified (x2), SPR Chris Pearse, unidentified, CPL Dick Crawford, SPR Daryl Miller, SSGT John ‘Shep’ Shephard. .26) - Photo, colour, 1994. Unit marches along the parade route. L to R: CAPT Tony Stephens, CPL Brett Parkin, SPR Mark Linwood, SGT H. Evertz, SPR Mark Sinderberry, unidentified (x2). .27) - Photo, colour, 1994. Unit marches along the parade route. L to R: CPL Brett Parkin, CAPT Tony Stephens, SPR Mark Linwood, SPR Greg Richards, SPR Matt Arnold, unidentified, SPR Mark Sinderberry, unidentified (x3), SPR Chris Pearse, unidentified, CPL Dick Crawford, unidentified, SGT SSGT John ‘Shep’ Shephard, CPL Steve Wegener, CPL Jeremy Archer, unidentified Warrant Officer. .28) - Photo, colour, 1994. Unit marches along the parade route. L to R: Officers - OC MAJ Peter Demaine, unidentified (x2), CAPT Rob Gray, CAPT Tony Stephens. L to R: CPL Brett Parkin, SGT H. Evertz, SPR Mark Linwood, SSGT Pat ‘Fuji’ Drover, SPR Mark Sinderberry, unidentified. .29) - Photo, colour, 1994. Unit preparing to halt. .30) to .32) - Photo, colour, 1994. Unit ‘stand easy’..1P to .32P – There are no personnel identified. ‘1994 ANZAC DAY’ annotated on negatives sleeve.royal australian survey corps, rasvy, 4 fd svy sqn -
 Bendigo Military Museum
Photograph - Army Survey Regiment Freedom of Entry March, Bendigo CBD, 1980
The Freedom of Entry to the City was an honour conferred by the Bendigo City Council to the Army Survey Regiment in 1970. 1980 was the third time the unit exercised its freedom of marching into the city with swords drawn, bayonets fixed and drums beating. The honour is usually bestowed upon local regiments, in recognition of their dedicated service, and it is common for military units to periodically exercise their freedom by arranging a parade through the city. Led by the Regiment’s CO – LTCOL Bob Skitch, the unit marched down View St in the CBD, along Pall Mall and up Gaol Rd to the Queen Elizabeth II Oval. The ceremonial parade followed with a march past the guests of honour, Mayor of Bendigo Councillor Paul Tomkinson and military dignitaries. The parade concluded after formal inspections of the troops. The Regiment also exercised its Freedom of Entry with anniversary parades in 1977, 1980, 1985, 1990 and 1995. Some photos in this set were also printed on photo paper and catalogued under item 6021.25P. Photos of the parade are catalogued under item 6490.53P. Photos of the Freedom of Entry parade rehearsal are catalogued under item 6479.38P.This set of 21 black and white photographs of the Army Survey Regiment were taken on the occasion of the Freedom of Entry to the City of Bendigo March in 1980. The majority of photographs are on 35mm negative film and scanned at 96 dpi. Photos 6491.3P and 6491.18P were printed on photographic paper and scanned at 300 dpi. They are part of the Army Survey Regiment’s Collection. .1) - Photo, black & white, 1980. L to R: MAJ Don Swiney MBE, LTCOL Bob Skitch, WO1 Aub Harvey, ADJT CAPT John Harrison, photographer in foreground – SGT Garran Hill .2) to .5) - Photo, black & white, 1980. L to R: MAJ Don Swiney MBE, LTCOL Bob Skitch, WO1 Aub Harvey, ADJT CAPT John Harrison. .6) - Photo, black & white, 1980. Headquarters Squadron marches left wheels into Pall Mall followed by 3rd MD Band. L to R: WO2 Ted Burgess, WO1 Dave Thomson, WO2 George Graham, CPL Andy Wilson, unidentified (x2), SPR Jeff Ruiz, unidentified, SGT Rick Warren, remainder unidentified. .7) - Photo, black & white, 1980. Headquarters Squadron marches down Pall Mall followed by 3rd MD Band. Right file L to R: WO1 Alex Cairney, WO2 Ted Burgess, CPL Andy Wilson, unidentified, SGT Rick Warren, remainder unidentified. Centre file L to R: unidentified (x2), SGT Bruce Hammond, CPL Phil McGuire. .8) - Photo, black & white, 1980. 3rd MD Band marches down Pall Mall. .9) - Photo, black & white, 1980. Dignitaries on dais next to Soldiers Institute Memorial Hall. L to R: Colonel Commandant COL J.L. Stedman (Retd), Commander 3MD BRIG Geoffrey Cohen AM, unidentified aide de camp, Brigadier Lawrence Fitzgerald OBE (Retd), Mayor – Councillor Paul Tomkinson, CAPT Don Maskew. .10) - Photo, black & white, 1980. Lithographic Squadron marches down Pall Mall towards the dais. L to R: CPL Josh Degroot, CPL Rhys De Laine, unidentified, SPR Per Andersen – right marker, MAJ Sam Schwartz US Exchange, CAPT Stan Vote, OC MAJ Robin Blackburn. .11) - Photo, black & white, 1980. Headquarters Squadron salutes on the march past the dais. L to R: CPL Cliff Webb, unidentified officer, SGT Bob Croxton, unidentified, SGT Syd Davis, CAPT Bob Cooper. .12) - Photo, black & white, 1980. 3rd MD Band marches down Pall Mall towards the dais. .13) - Photo, black & white, 1980. 3rd MD Band marches past the dais. L to R: Colonel Commandant COL J.L. Stedman (Retd), Commander 3MD BRIG Geoffrey Cohen AM, unidentified aide de camp, Brigadier Lawrence Fitzgerald OBE (Retd), Mayor – Councillor Paul Tomkinson, CAPT Don Maskew, unidentified officer. .14) - Photo, black & white, 1980. 3rd MD Band salutes on the march past the dais. L to R: unidentified aide de camp, Colonel Commandant COL J.L. Stedman (Retd), Commander 3MD BRIG Geoffrey Cohen AM, CAPT Don Maskew, Brigadier Lawrence Fitzgerald OBE (Retd), Mayor – Councillor Paul Tomkinson, unidentified officer. .15) - Photo, black & white, 1980. 3rd MD Band salutes on the march past the dais. L to R: Colonel Commandant COL J.L. Stedman (Retd), Commander 3MD BRIG Geoffrey Cohen AM, Mayor – Councillor Paul Tomkinson, CAPT Don Maskew. .16) - Photo, black & white, 1980. Squadrons march past the dais. .17) - Photo, black & white, 1980. Female Contingent salutes on the march past the dais. L to R: Colonel Commandant COL J.L. Stedman (Retd), Commander 3MD BRIG Geoffrey Cohen AM, CAPT Don Maskew, Brigadier Lawrence Fitzgerald OBE (Retd), Mayor – Councillor Paul Tomkinson. .18) - Photo, black & white, 1980. Female Contingent salutes on the march past the dais. L to R: SPR Scheryl Delforce, SPR Ilen Isaac, SPR Ginny (Turner) Rowe, SPR Cathy Regan, CPL Marrianne (Van De Zee) De Groot, SPR Gae (Robinson) Amato, SPR Megan (McBurney) Reynolds, SPR Sue (Fryer) Bottomley, SPR Le-anne (Smallshaw) Shirley, SPR Janet (Chopping) Justin, SPR Zoe (Lisiewich) Ames, unidentified saluting officer, L to R: Colonel Commandant COL J.L. Stedman (Retd), Commander 3MD BRIG Geoffrey Cohen AM. .19) - Photo, black & white, 1980. Cartographic Squadron led by CAPT Bob Roche salutes on the march past the dais. L to R: Colonel Commandant COL J.L. Stedman (Retd), Commander 3MD BRIG Geoffrey Cohen AM, CAPT Don Maskew, Brigadier Lawrence Fitzgerald OBE (Retd), Mayor – Councillor Paul Tomkinson. .20) & .21) - Photo, black & white, 1980. Air Survey Squadron salutes on the march past the dais. L to R: Colonel Commandant COL J.L. Stedman (Retd), Commander 3MD BRIG Geoffrey Cohen AM, CAPT Don Maskew, Brigadier Lawrence Fitzgerald OBE (Retd), Mayor – Councillor Paul Tomkinson.There are no personnel identified. royal australian survey corps, rasvy, army survey regiment, army svy regt, fortuna, asr -
 Surrey Hills Historical Society Collection
Archive - Vertical file, Awards
A vertical file containing the following items regarding awards of various nature; all individuals having some local connection: 1. ‘Proudly humble retiree’, re Antonio Trivisonno paper and date unknown (1 page); and ‘OAM for seniors work’ Whitehorse Leader, 2.2.2011 (1 page). 2. ‘Antonio Trivisonno - enthusiasm for life’, SHNN, No. 170, Feb./March 2011 (1 page). 3. ‘Boroondara‘s Queen’s Birthday Honours list’, (re David Bottomley and William Swinson) Progress Leader, 14.6.2016 (1 page). 4. ‘Order of Australia awards’, (re David Kissane and John Payne) SHNN c. Feb. 2018 (1 page). 5. ‘Conservator honoured’, (re John Payne) Age ?, 26.1.2018 (1 page). 6. ‘Making world a better place’, (re David Kissane and others) Whitehorse Leader, 29.1.2018 (1 page). 7. ‘Honours for local people’, re Dr Hari Harayan Sinha and Stanley Bruce McKenzie, SHNN 44, Feb./March 1990 (1 page). 8. ‘Congratulations’, re Martin Culkin, Andrew Wall and Jean Jackson, SHNN No. 185 Aug./Sept. 2013 (1 page). 9. ‘A bloomin’ good life’, re Mr. Vivian Bennett, 1989 (source unknown), (1 page). 10. “Know your plants” medallist advises re Mr. Vivian Bennett, 1979 (source unknown), (1 page). 11. ‘Community contributions recognised’ re Caroline Carroll and Jack Ma, SHNN No. 188, Feb./March 2014 (2 pages). 12. Christopher Thorn, SHNN No. 206, Feb./March 2017 (1 page). 13. ‘Calculation is worth a medal’ re Prof. Kate Smith-Miles, Progress Leader, 23.11.2010 (1 page). 14. ‘Reward for dedicated work a dream once thought impossible for Caroline’, re Caroline Carroll, Progress Leader, 28.1.2014 (1 page). 15. ‘Community service – with a smile’, re Nina Buscombe, SHNN No. 92, Feb./March 1998 (1 page). 16. ‘Local resident awarded OAM’, re Charlie Wei Quan Xu, SHNN 225 April/May 2020 (1 page). 17. ‘David Winter, Whitehorse Citizen of the Year’, SHNN 230, Feb./March 2021 (1 page). 18. Gwen Smith Victorian Senior of the Year 2016, The Senior, November, 2016 (1 page). 19. ‘Local Traders win Oz awards!’ SHNN 142, June/July 2006 (1 page). 20. Centenary Medal Presentation 24.3.2003 at Ashwood Secondary College, 12 page booklet provided by Anna Burke, MP, Federal member for Chisholm. Note Elizabeth Meredith. 21. ‘Father of the Year!’ SHNN 138, October/November 2005 re Robert Moodie (1 page). 22. Burwood Bulletin Inc., Issue 159, Autumn 2021, re David Winter (3 sheets). 23. ‘Mont Albert Resident receives Order of Australia’, SHNN 158 re Dr. Rodney Arambewela (1 page). 24. ‘Citizen of the year 2000’, SHNN 106, June/July 2000 re Gert Rainey (1 page). 25. “’Best Friend’ award for Philip Crohn, SHNN 181, Dec. 2012/Jan./2013 (1 page). 26. ‘Surrey Hills Citizen of the Year 2002’, SHNN 118, June/July 2002 re Suzanna Henman (1 page). 27. ‘Bill Chandler awarded OAM’, SHNN 191, August/September, 2014 (1 page). 28. Kevin Donnelly AM, SHNN 206, February/March, 2017 (1 page). 29. ‘Just her cup of tea’, Progress Press, 1.5.2000. (1 page). 30. ‘Congratulations Greg Buchanan!’, SHNN No. 236, February, 2022 (1 page), and Citizenship Ceremony 26.1.2022. (A4 folded sheet). 31. ‘Meet our 2022 Citizens of the Year’, Boroondara Bulletin, March, 2022: Greg Buchanan, Rhea Werner and Belinda Battey (2 sheets). 32. ‘Order of Australia awards’: John Grace AO; Lesley (Pat) Farrant AM; Helen Buckingham OAM; Margaret Zacharin OAM; SHHN No. 215, August-September 2018 (1 page). 33. ‘It’s an Honour!’ Graeme Davison AM; Graham Bartle OAM; Stephen Dinham OAM; SHHN No. 173 August-September 2011 (1 page). 34. Mrs. Anne Patricia Murphy, awarded OAM, (no date), (1 page). 35. Citizen of the year 2023 Maxine Gross, Boroondara Bulletin, March, 2023 (1 page). 36. ‘Citizen of the year 2000’, Gert Rainey, SHNN No. 106, June/July 2000 (1 page). 37. ‘Arthur Tonkin Surrey Hills Citizen of the year 2001’, SHNN No. 112, June/July 2001 (1 page). 38. ‘Surrey Hills Citizen of the year 2001’, Suzanna Henman, SHNN No. 118, June/July 2002 (1 page). 39. ‘Surrey Hills Citizens of the year 2004’, Sue Barnett and Andrew White, SHNN No. 130, June/July 2004 (1 page). 40. ‘A creative and rich life’, Peter Hardham OAM, SHNN ? , June 2019 (1 page). 41. ‘Australia Day Honours’, Craig Kenny and Jillian Wright both OAM and of Mont Albert, SHNN No. 219, April/May 2019, (1 page). 42. Professor Marilyn Liddell, AM, Progress Press, Feb. 2010 (1 page). antonio trivisonno, david bottomley, william swinson, david kissane, dr hari harayan sinha, stanley bruce mckenzie, andrew wall, martin culkin, jean jackson, vivian bennett, caroline carroll, jack ma, christopher thorn, prof. kate smith-miles, nina buscombe, charlie wei quan xu, gwen smith, david winter, robert moodie, elizabeth meredith, rodney arambewela, philip crohn, suzanna henman, gert rainey, bill chandler, kevin donnelly, greg buchanan, rhea werner, belinda battey, john grace, lesley (pat) farrant, helen buckingham, margaret zacharin, graeme davison, graham bartle, stephen dinham, anne patricia murphy, maxine gross, arthur tonkin, peter hardham, andrew white, craig kenny, sue barnett, jillian wright, marilyn liddell, john payne -
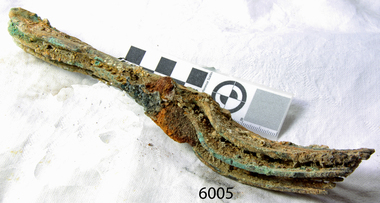 Flagstaff Hill Maritime Museum and Village
Domestic object - Fork, circa 1878
This fork is from the wreck of the Loch Ard, that sailed from Gravesend, London. The manifest listed an array of manufactured goods being exported to the Colony of Victoria. Included in the cargo manifest was a large number of hardware & cutlery items. This fork is representative of similar items of silver electro-plated cutlery salvaged from the Loch Ard wreck site, comprising nickel silver electroplated spoons and forks of various sizes but all sharing the same general shape and design. Some of the pieces display their makers’ mark of William Page & Co Birmingham UK. Within the Flagstaff Hills cutlery collection donated from the Loch Ard, maker’s marks are often obscured by sedimentary accretion or verdigris after a century of submersion in the ocean. However sufficient detail has survived to indicate that the collection of samples of electroplated cutlery probably originated from the same cargo consignment from the Loch Ard and were made by William Page & Co. William Page was born in 1811 and died in 1885. He was active as a manufacturer of cutlery from 1829 with premises at 74 Belmont Rd, Dales End as a "close plater" (someone who works sheet metal), and he began electroplating in 1855. William Page & Co was also active from 1880 at Cranemore St, Cattle’s Grove also 55 Albion St, Birmingham, in 1936 the firm became Ltd. The firm used the trademarks "Asrista, Bolivian Silver, Silverite, Roman Silver, Roumanian Silver and Trevor Plate. In 1938 William Page was a supplier to the British Government, marking it's products with the broad arrow symbol and was also present at Sheffield. History of the Loch Ard: The Loch Ard got its name from ”Loch Ard” a loch which lies to the west of Aberfoyle, and the east of Loch Lomond. It means "high lake" in Scottish Gaelic. The vessel belonged to the famous Loch Line which sailed many vessels from England to Australia. The Loch Ard was built in Glasgow by Barclay, Curdle and Co. in 1873, the vessel was a three-masted square-rigged iron sailing ship that measured 79.87 meters in length, 11.58 m in width, and 7 m in depth with a gross tonnage of 1693 tons with a mainmast that measured a massive 45.7 m in height. Loch Ard made three trips to Australia and one trip to Calcutta before its fateful voyage. Loch Ard left England on March 2, 1878, under the command of 29-year-old Captain Gibbs, who was newly married. The ship was bound for Melbourne with a crew of 37, plus 17 passengers. The general cargo reflected the affluence of Melbourne at the time. Onboard were straw hats, umbrella, perfumes, clay pipes, pianos, clocks, confectionery, linen and candles, as well as a heavier load of railway irons, cement, lead and copper. There were other items included that were intended for display in the Melbourne International Exhibition of 1880. The voyage to Port Phillip was long but uneventful. Then at 3 am on June 1, 1878, Captain Gibbs was expecting to see land. But the Loch Ard was running into a fog which greatly reduced visibility. Captain Gibbs was becoming anxious as there was no sign of land or the Cape Otway lighthouse. At 4 am the fog lifted and a lookout aloft announced that he could see breakers. The sheer cliffs of Victoria's west coast came into view, and Captain Gibbs realised that the ship was much closer to them than expected. He ordered as much sail to be set as time would permit and then attempted to steer the vessel out to sea. On coming head-on into the wind, the ship lost momentum, the sails fell limp and Loch Ard's bow swung back towards land. Gibbs then ordered the anchors to be released in an attempt to hold its position. The anchors sank some 50 fathoms - but did not hold. By this time the ship was among the breakers and the tall cliffs of Mutton Bird Island rose behind. Just half a mile from the coast, the ship's bow was suddenly pulled around by the anchor. The captain tried to tack out to sea, but the ship struck a reef at the base of Mutton Bird Island, near Port Campbell. Waves subsequently broke over the ship and the top deck became loosened from the hull. The masts and rigging came crashing down knocking passengers and crew overboard. When a lifeboat was finally launched, it crashed into the side of Loch Ard and capsized. Tom Pearce, who had launched the boat, managed to cling to its overturned hull and shelter beneath it. He drifted out to sea and then on the flood tide came into what is now known as Loch Ard Gorge. He swam to shore, bruised and dazed, and found a cave in which to shelter. Some of the crew stayed below deck to shelter from the falling rigging but drowned when the ship slipped off the reef into deeper water. Eva Carmichael a passenger had raced onto the deck to find out what was happening only to be confronted by towering cliffs looming above the stricken ship. In all the chaos, Captain Gibbs grabbed Eva and said, "If you are saved Eva, let my dear wife know that I died like a sailor". That was the last Eva Carmichael saw of the captain. She was swept off the ship by a huge wave. Eva saw Tom Pearce on a small rocky beach and yelled to attract his attention. He dived in and swam to the exhausted woman and dragged her to shore. He took her to the cave and broke the open case of brandy which had washed up on the beach. He opened a bottle to revive the unconscious woman. A few hours later Tom scaled a cliff in search of help. He followed hoof prints and came by chance upon two men from nearby Glenample Station three and a half miles away. In a complete state of exhaustion, he told the men of the tragedy. Tom then returned to the gorge while the two men rode back to the station to get help. By the time they reached Loch Ard Gorge, it was cold and dark. The two shipwreck survivors were taken to Glenample Station to recover. Eva stayed at the station for six weeks before returning to Ireland by steamship. In Melbourne, Tom Pearce received a hero's welcome. He was presented with the first gold medal of the Royal Humane Society of Victoria and a £1000 cheque from the Victorian Government. Concerts were performed to honour the young man's bravery and to raise money for those who lost family in the disaster. Of the 54 crew members and passengers on board, only two survived: the apprentice, Tom Pearce and the young woman passenger, Eva Carmichael, who lost her family in the tragedy. Ten days after the Loch Ard tragedy, salvage rights to the wreck were sold at auction for £2,120. Cargo valued at £3,000 was salvaged and placed on the beach, but most washed back into the sea when another storm developed. The wreck of Loch Ard still lies at the base of Mutton Bird Island. Much of the cargo has now been salvaged and some items were washed up into Loch Ard Gorge. Cargo and artefacts have also been illegally salvaged over many years before protective legislation was introduced in March 1982. The shipwreck of the Loch Ard is of significance for Victoria and is registered on the Victorian Heritage Register ( S 417). Flagstaff Hill has a varied collection of artefacts from Loch Ard and its collection is significant for being one of the largest accumulation of artefacts from this notable Victorian shipwreck. The collections object is to also give us a snapshot into history so we can interpret the story of this tragic event. The collection is also archaeologically significant as it represents aspects of Victoria's shipping history that allows us to interpret Victoria's social and historical themes of the time. The collections historically significance is that it is associated unfortunately with the worst and best-known shipwreck in Victoria's history. Large Nickel Silver plated dinner forks, fiddle-back design handle, narrow stem with flared collar and elongated forks three in the group.makers’ mark “W” & “P” placed within a raised diamond outline, which is in turn contained within a sunken crown shape identifying the manufacturer as William Page & Co of Birmingham.flagstaff hill, warrnambool, shipwrecked coast, flagstaff hill maritime museum, maritime museum, shipwreck coast, flagstaff hill maritime village, great ocean road, loch line, loch ard, captain gibbs, eva carmichael, tom pearce, glenample station, mutton bird island, loch ard gorge, electroplated cutlery, fork -
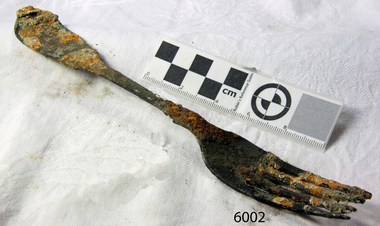 Flagstaff Hill Maritime Museum and Village
Domestic object - Fork, circa 1878
This fork is from the wreck of the Loch Ard, that sailed from Gravesend, London. The manifest listed an array of manufactured goods being exported to the Colony of Victoria. Included in the cargo manifest was a large number of hardware & cutlery items. This fork is representative of similar items of silver electro-plated cutlery salvaged from the Loch Ard wreck site, comprising nickel silver electroplated spoons and forks of various sizes but all sharing the same general shape and design. Some of the pieces display their makers’ mark of William Page & Co Birmingham UK. Within the Flagstaff Hills cutlery collection donated from the Loch Ard, maker’s marks are often obscured by sedimentary accretion or verdigris after a century of submersion in the ocean. However sufficient detail has survived to indicate that the collection of samples of electroplated cutlery probably originated from the same cargo consignment from the Loch Ard and were made by William Page & Co. William Page was born in 1811 and died in 1885. He was active as a manufacturer of cutlery from 1829 with premises at 74 Belmont Rd, Dales End as a "close plater" (someone who works sheet metal), and he began electroplating in 1855. William Page & Co was also active from 1880 at Cranemore St, Cattle’s Grove also 55 Albion St, Birmingham, in 1936 the firm became Ltd. The firm used the trademarks "Asrista, Bolivian Silver, Silverite, Roman Silver, Roumanian Silver and Trevor Plate. In 1938 William Page was a supplier to the British Government, marking it's products with the broad arrow symbol and was also present at Sheffield. History of the Loch Ard: The Loch Ard got its name from ”Loch Ard” a loch which lies to the west of Aberfoyle, and the east of Loch Lomond. It means "high lake" in Scottish Gaelic. The vessel belonged to the famous Loch Line which sailed many vessels from England to Australia. The Loch Ard was built in Glasgow by Barclay, Curdle and Co. in 1873, the vessel was a three-masted square-rigged iron sailing ship that measured 79.87 meters in length, 11.58 m in width, and 7 m in depth with a gross tonnage of 1693 tons with a mainmast that measured a massive 45.7 m in height. Loch Ard made three trips to Australia and one trip to Calcutta before its fateful voyage. Loch Ard left England on March 2, 1878, under the command of 29-year-old Captain Gibbs, who was newly married. The ship was bound for Melbourne with a crew of 37, plus 17 passengers. The general cargo reflected the affluence of Melbourne at the time. Onboard were straw hats, umbrella, perfumes, clay pipes, pianos, clocks, confectionery, linen and candles, as well as a heavier load of railway irons, cement, lead and copper. There were other items included that were intended for display in the Melbourne International Exhibition of 1880. The voyage to Port Phillip was long but uneventful. Then at 3 am on June 1, 1878, Captain Gibbs was expecting to see land. But the Loch Ard was running into a fog which greatly reduced visibility. Captain Gibbs was becoming anxious as there was no sign of land or the Cape Otway lighthouse. At 4 am the fog lifted and a lookout aloft announced that he could see breakers. The sheer cliffs of Victoria's west coast came into view, and Captain Gibbs realised that the ship was much closer to them than expected. He ordered as much sail to be set as time would permit and then attempted to steer the vessel out to sea. On coming head-on into the wind, the ship lost momentum, the sails fell limp and Loch Ard's bow swung back towards land. Gibbs then ordered the anchors to be released in an attempt to hold its position. The anchors sank some 50 fathoms - but did not hold. By this time the ship was among the breakers and the tall cliffs of Mutton Bird Island rose behind. Just half a mile from the coast, the ship's bow was suddenly pulled around by the anchor. The captain tried to tack out to sea, but the ship struck a reef at the base of Mutton Bird Island, near Port Campbell. Waves subsequently broke over the ship and the top deck became loosened from the hull. The masts and rigging came crashing down knocking passengers and crew overboard. When a lifeboat was finally launched, it crashed into the side of Loch Ard and capsized. Tom Pearce, who had launched the boat, managed to cling to its overturned hull and shelter beneath it. He drifted out to sea and then on the flood tide came into what is now known as Loch Ard Gorge. He swam to shore, bruised and dazed, and found a cave in which to shelter. Some of the crew stayed below deck to shelter from the falling rigging but drowned when the ship slipped off the reef into deeper water. Eva Carmichael a passenger had raced onto the deck to find out what was happening only to be confronted by towering cliffs looming above the stricken ship. In all the chaos, Captain Gibbs grabbed Eva and said, "If you are saved Eva, let my dear wife know that I died like a sailor". That was the last Eva Carmichael saw of the captain. She was swept off the ship by a huge wave. Eva saw Tom Pearce on a small rocky beach and yelled to attract his attention. He dived in and swam to the exhausted woman and dragged her to shore. He took her to the cave and broke the open case of brandy which had washed up on the beach. He opened a bottle to revive the unconscious woman. A few hours later Tom scaled a cliff in search of help. He followed hoof prints and came by chance upon two men from nearby Glenample Station three and a half miles away. In a complete state of exhaustion, he told the men of the tragedy. Tom then returned to the gorge while the two men rode back to the station to get help. By the time they reached Loch Ard Gorge, it was cold and dark. The two shipwreck survivors were taken to Glenample Station to recover. Eva stayed at the station for six weeks before returning to Ireland by steamship. In Melbourne, Tom Pearce received a hero's welcome. He was presented with the first gold medal of the Royal Humane Society of Victoria and a £1000 cheque from the Victorian Government. Concerts were performed to honour the young man's bravery and to raise money for those who lost family in the disaster. Of the 54 crew members and passengers on board, only two survived: the apprentice, Tom Pearce and the young woman passenger, Eva Carmichael, who lost her family in the tragedy. Ten days after the Loch Ard tragedy, salvage rights to the wreck were sold at auction for £2,120. Cargo valued at £3,000 was salvaged and placed on the beach, but most washed back into the sea when another storm developed. The wreck of Loch Ard still lies at the base of Mutton Bird Island. Much of the cargo has now been salvaged and some items were washed up into Loch Ard Gorge. Cargo and artefacts have also been illegally salvaged over many years before protective legislation was introduced in March 1982. The shipwreck of the Loch Ard is of significance for Victoria and is registered on the Victorian Heritage Register ( S 417). Flagstaff Hill has a varied collection of artefacts from Loch Ard and its collection is significant for being one of the largest accumulation of artefacts from this notable Victorian shipwreck. The collections object is to also give us a snapshot into history so we can interpret the story of this tragic event. The collection is also archaeologically significant as it represents aspects of Victoria's shipping history that allows us to interpret Victoria's social and historical themes of the time. The collections historically significance is that it is associated unfortunately with the worst and best-known shipwreck in Victoria's history. Large Nickel Silver plated dinner fork, fiddle-back design handle, narrow stem with flared collar and elongated forks.makers’ mark “W” & “P” placed within a raised diamond outline, which is in turn contained within a sunken crown shape identifying the manufacturer as William Page & Co of Birmingham.flagstaff hill, warrnambool, shipwrecked coast, flagstaff hill maritime museum, maritime museum, shipwreck coast, flagstaff hill maritime village, great ocean road, loch line, loch ard, captain gibbs, eva carmichael, tom pearce, glenample station, mutton bird island, loch ard gorge, electroplated cutlery, fork