Showing 173 items
matching golden gully
-
 Eltham District Historical Society Inc
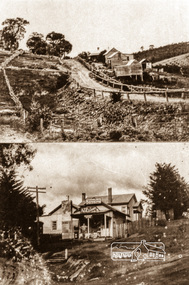
Negative - Photograph, Albert Jones, 'Golden Glen' at Wattle Glen and the Wattle Glen General Store, c.1910
Top photo: The property 'Golden Glen', home of photographer, Albert Jones. At the right of the photo is an apple orchard over the other side of Watery Gully creek. The middle building in the photo is still standing, located on Wattle Glen - Kangaroo Ground Road between Pretty Hill Lane and Millers Road (Melway 271 A6) but on the opposite side of the road. Bottom photo: The Wattle Glen General Store in this photo was located at the same intersection as the present Wattle Glen General Store (cnr of Reynolds Road and Kangaroo Ground Road) but on the diagonally opposite corner. [Comment from Valda via Victorian Collections June 11, 2018] "The addition to the store on the left, and the building at the back, were not part of the store/post office owned by the Keenan's. They were added by Mr and Mrs Alan (Janet) Frencham's in the ?mid-1950s." See also EDHS_03112: See Ref: EDHS_03112 A WINDOW ON THE PAST by Roger Sanders, The Sun, Wednesday, Auguist 11, 1976, pp 38-39 A fascinating window has been opened on the early life of the Eltham district. It is a rare collection of 3,000 perfectly preserved glass plate photograph negatives. The collection is the work of the late Albert Jones, a Diamond Creek orchardist and amateur photographer. About 500 of the negatives have been printed and 100 are on display at Gallery 4, Eltham, as part of the Eltham Festival," which started on Friday. They capture in fine detail rural and village life around Eltham, Hurstbridge, Kangaroo Ground, Yarra Glen and Diamond Valley from 1900 to 1930. While the natural beauty of the district was painted in this period by Arthur Streeton (later Sir Arthur), Tom Roberts and Charles Conder, among others, photography was relatively new. Yet Albert Jones used the new medium to compile a weighty album of pioneers at work, at home, at sport and on holidays. He was at the first Yarra Glen race meeting, early Diamond Valley football matches and photographed soldiers from the district leaving for war. He photographed early gold mines, men with horses laying the Diamond Creek-Hurstbridge rail track and the arrival of the first steam train at Hurstbridge. He took his cameras on holiday around Victoria and the collection includes scenes from St. Kilda and Portsea and many country towns. The Jones collection of negatives was found by Mr A. J. "Ned" Spark, of Balwyn, under a house he bought from Mr Jones' widow. The plates almost went to the tip with a pile of rubbish before Mr Spark realised their potential value. Mr Spark, who is retired, will continue the identification and recording of the photographs when he returns from holidays. The exhibition of the Jones' photographs is open each afternoon until August 21 at Gallery 4, 1016 Main Rd., Eltham. Photographs included in article: • The priceless collection of glass plate negatives were found under this house in Eltham [actually Wattle Glen], home of Albert Jones and his wife. • A quiet country pub - Panton Hills Hotel. • Teams of draught horses were used in the building of the Diamond Creek-Hursbridge railway in 1910. • Chinaman Jimmy using a gold cradle in Wattle Glen Gully. • The photographer and orchardist Albert Jones. His work is on show as part of the Eltham Festival • St Kilda Pier – several of the houses are still standing, but the waterfront has changed dramatically since this was taken before 1920. • A picnic was a dressy affair at the start of the century – the women in this family group are decked in lace and pearls.Roll of 35mm colour negative film, 4 stripsKodak Safety 5035albert jones, golden glen, shops, wattle glen -
 Eltham District Historical Society Inc
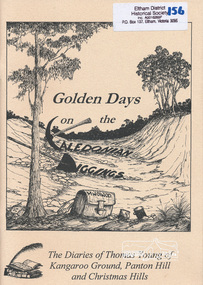
Book, Golden Days on the Caledonian Diggings: the diaries of Thomas Young of Kangaroo Ground, Panton Hill and Christmas Hills, compiled by Mick Woiwod, 2005
The original diaries, (1859-1866,1895-1900) of Thomas Young discovered by a Young descendant have been transcribed with the author adding his own research and historical photographs. The diary sheds light on the lives of prospectors who worked the Caledonian goldfields in the 1860s, including St Andrews and Smiths Gully. Thomas Young, migrated from Scotland and moved to the goldfields in 1858. He carted ore by horse and dray from mines around St Andrews to crushers in Panton Hill and Smiths Gully. He later became a baker. He and his wife Bridget had eleven children. He later settled at Christmas Hills establishing the local store and school. See also: "Old Diary Strikes Old" by Natalie Birch, Diamond Valley Leader August 17 2005The diary provides a rare first-hand account of life on the Caledonian goldfields.v. : ill. 69 p 30 cm[written inside front cover] To my very good friend Harry Gilham - Mick Woiwod 25th August 2005thomas young, caledonian gold fields, kangaroo ground, christmas hills, panton hill, smiths gully, st andrews, diary, gold mining -
 Marysville & District Historical Society
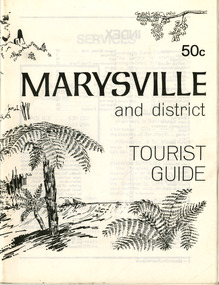
Booklet (Item) - Tourist guide, Ian and Danese Walshe et al, MARYSVILLE and district TOURIST GUIDE, 1982
A tourist guide outlining services, accommodation, activities and places of interest to visit in and around Marysville and the local district.A tourist guide outlining services, accommodation, activities and places of interest to visit in and around Marysville and the local district.marysville, victoria, australia, tourist guide, marysville hotel, castles' store, hawthorne's corner shop, tudor lodge, black spur motel and caravan park, buxton general store, golden fleece roadhouse, marysville garage, burrengeen park, lake mountain, steavenson falls, nanda binya lodge, alpenglow nursery, black spur inn hotel, silver stream trout farm, mccfarlane's grocery, barton's drapery, marysville newsagency, eildon explorer, beauty spot nursery, crossways, pumpernickel, mckenzie's tourist services, blue hills riding school, mountain view horse hire, pitt's garage, maryton park, j l gould sawmill, eildon deer park, eildon weir, maroondah dam, snob's creek, healesville sanctuary, graceburn park, cathedral range, beauty spot walk, tree fern gully walk, michaeldene track, keppel track, woods lookout track, cumberland scenic reserve, cambarville, the big tree, cora-lyn falls, barton's lookout, cumberland falls, sovereign view, wirreanda festival, scenic motel, tower motel, marylands guest house, kooringa guest house, marylyn guest house, mountain lodge, el kanah, marysville hotel motel, buxton hotel motel, black spur inn, buxton caravan park, marysville caravan park, the cumberland, marysville recreation and fun park -
 Marysville & District Historical Society
Document (item) - Gold Mine Prospectus, H.D. McKie, Prospectus of the New Golden Bower & Star Gold M.Co, 1896
A copy of the Prospectus of the New Golden Bower & Star Gold M.Co. near Marysville in Victoria.A copy of the Prospectus of the New Golden Bower & Star Gold M.Co. near Marysville in Victoria. The Golden Bower gold mine was a quartz reef mine. William Edward Chester discovered the Golden Secret gold vein which became part of the Golden Bower Mine at Chesterville near Donovans Creek on the Cumberland goldfield which he mined with George Locke until the late 1930s. new golden bower & star gold m.co., donovan's creek, nuggety gully creek, yarra track, marysville, victoria, share prospectus, upper yarra track, wood's point, victoria mount morgan gold mining co., british mount morgan mine, mr white, reefton turnoff, santa claus reef, bear's creek, mr r ely, bear's creek reef, big river, mr feely, new star reef, golden bower reef, a1 mining co, mr r m lee, locke's no.1 extended gold mining company, mr q dick -
 Federation University Historical Collection
Booklet - Exercise Book, Sebastopol Mines and Socialism
Sebastopol is a suburb of Ballarat..1) Black notebook with red spine .2) hand drawn map showing location of Sebastopol minesHandwritten pageswilliam robertson, new lady don company, kohinor company, leviathon company, newington, copenhagen company, hand in hand company, tannery ground, ballarat freehold company, rough and ready company, park company, inkerman alluvial lead, band & albion consols, gravel pits lead, robert gay, sebastopol mines, ballarat east, alluvial, dalton's flat, canadian gully, red streak, montezuma company, great republic company, golden point, gravel pits, j. hardy, scott's boot shop, lady don company, cgt -
 Federation University Historical Collection
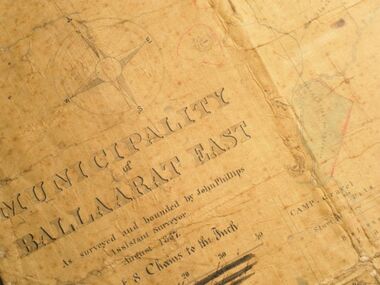
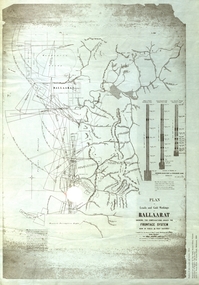
Map, Municipality of Ballarat East, 1857
Gold was discovered in Ballarat in 1851. This plan was created six years later and names some of the great gold locations of Ballarat East. It also shows the locality of the Eureka Stockade (1854) and the walking tracks and roads on the Ballarat East Goldfield.In 2007 this map was listed on the inaugural Ballarat Treasure's Register.Large map backed onto linen. The map has read and blue highlights, and identifies areas such as Mount Pleasant, Golden Point, White Flat, Nightingale, Malekoff, Old Post Office Hill, Red streak, Gumtree Flat, Old Gravelpits, Bakery Hill, Ballaarat Flat, The Camp, Specimen Gully, Pennyweight Hill, Warrenheip Gully, Gays Gully, Pennyweight Flat, Eureka, Black Hill, Pinchgut, Crocodile, Hit or Miss, Little Bendigo, Brown Hill, Mopoke, Cricket Reserve, Canadian Hotel, Ballarat Eastmount pleasant, golden point, white flat, nightingale, malekoff, old post office hill, red streak, gumtree flat, old gravelpits, bakery hill, ballaarat flat, the camp, specimen gully, pennyweight hill, warrenheip gully, gays gully, pennyweight flat, eureka, black hill, pinchgut, crocodile, hit or miss, little bendigo, brown hill, mopoke, cricket reserve, canadian hotel, ballarat eastm phillips, john phillips, field draughtsman, ballarat east, ballarat east map -
 Federation University Historical Collection
Plan, Plan of Leads and Gold Workings at Baallarat Shewing the Complications Under the Frontage System, 1863, 1863
Facsimile of a plan held by the Public Record Office Victoria. Facsimile of a plan of Ballarat showing leads, gold workings an dthe frontage system.ballarat, mining, inkermann lead, golden point lead, robert davidson, terrible lead, white horse lead, frenchman's lead, little magpie lead, milkmaid's lead, woolshed lead, nuggety lead, blackman's lead, canadian lead, sailor's gully lad, nightingale lead, malakoff lead, black hill gully, pennyweight flat, black hill, winter's pre-emptive right, nelson company, great extended, great republic lead, cgt -
 Federation University Historical Collection
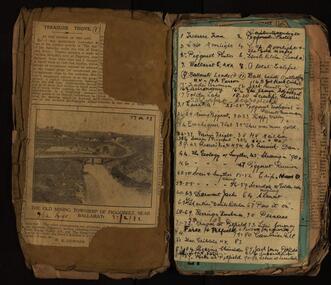
Book - Scrapbook, Mining articles and notices, 1932 - 1936, 1934-1936
Hardcover minute book with charcoal green cover and red spine. Numerous newspaper clipping have been pasted onto the pages, most related to mining. The clippings include: 26 September 1932 - Castlemaine Goldmines - Best Prospects for Years 12 October 1932 - South New Chum Syncline Goldmines NL 30 November 1932 - New Morning Star Co. 19 February 1934 - Berringa Gold Syndicate NL 12 September 1934 - Murchison Goldfield - Triton Gold Mine 1935 - Great Poseidon 1935 1935 - Golden Age Amalgamated 11 February 1935 - Loloma Gold Mines NL 19 May 1936 - Beaconsfield Gold Mine in Tasmania 02 July 1936 - Fletchers Gold Mine 17 August 1936 - Lasseter's Reef. Kalgoorlie 17 November 1836 - Large Scale Operations at Ballarat 16 January 1937 - New Charlton Gold Area 19 January 1937 Golden Jacket Mine 26 January 1937 - Rich Quartz at Avoca April 1934 - Bendigo Mines Limited May 1934 - Church Centenary - St Luke's Campbell Town Interesting History (image) Tasmania 1932 - Evolution of Auto-Car - Cugnot's Steam Trolley (image) 1932 - Evolution of Auto-Car - Push Foot Schemes (image) 1933 - Evolution of Auto-Car - Hancock's Steam Omnibus (image) 1933 - Evolution of Auto-Car - First Petrol Car (image) 1934 - The Gold Standard - How Australia Forsook It August 1934 - Bolwarrah and Gordon's Amalgamated NL 23 August 1934 - Dunolly Gold Mines NL 12 September 1934 - Murchison Goldfield - Triton Gold Mine 08 September, Adelaide Advertiser - Australia's Heritage of Golden Days by Ernestine Hill 28 November 1934 - Chronicles of Early Melbourne by Garyowen 05 May 1936 - Bendigo Mines Director's Policy (image of E.C. Dyason) 30 June 1936 - Lamplough Mine 27 June 1936 - Gold Dredging Company for Newstead 30 May 1935, The Herald - Gordon Battery in Production 19 September 1936 - Wattle Gully reef - Payable Values at 655 Feet 30 June 1936 - Avoca Developments NL 16 July 1934 - Westralia Renown Mines NL Prospectus 07 November 1936 - Ballarat East Gold Field - English Company's Deal (Victoria United, Britania United, First Chance, Last Chance, Llanberris No 1, Llanberris No 2, Sulieman No. 1, Sulieman No. 2, Sulieman No. 4, North Normanby, North Woah Hawp, Woah Hawp Canton, Tinworth's, Prince Regent Consolidated) 07 November 1936 - Large Scale Operations at Ballarat (image of A.E. Llewellyn) * How an Australian Discovered the World's Greatest Goldfield -The Beginning of The Rand. bendigo mines, coolgardie discovery, melbourne - chronicles of early melbourne, ballarat gold field, mining, lasseter's reef, squatter, emperor mine, cassilis gold mining, granite, bendigo mines ltd, campbell town st luke's centenary, car evolution, dartmore, harcourt granite, murchison goldfield, ballarat mines, fanny bay, mail, rand, alex allan, raymond cahalin, mary dyer, robert fordham, a. garsand, augustus f. heseltine, j. owen james, william latham, k palmer, tinworth, theosanous, c. tompkin, castlemaine goldmines, coolgardie -
 Federation University Historical Collection
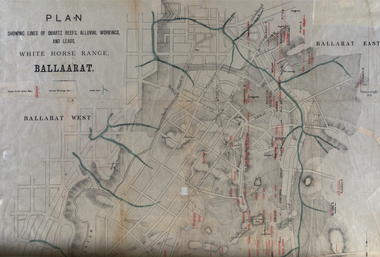
Plan, White Horse Range Ballarat, 1885, 06/1885
Two plans .1) Plan of the Ballarat Goldfields showing leads, rivers, streets and topography. Quartz reefs include: Yorkshire, Try Again, Promised Land, Western Slates, Norwegian, Robert's Lode, Finn's, Band and albion, Rothschild, Old Post Office, Queen Lode. Leads include: Navy jacks, Gays, Canadian, Prince Regent, Sailors Gully, White Horse, Little White Horse, Milkmans, Nightingale, Golden Point, Gravel Pits. Scale is 8 Chains to 1 inch .2) Plan showing lines of quartz reefs, alluvial workings and leads, White Horse Range, Ballarat. Leads include White Horse LEad, Little White Horse Lead, One Eye Gully, Terrible Lead, Sailor's Gully, Canadian Lead, Prince Regent Gully, Canadian Lead, Cavs Lead, Navy jacks Lead, Eureka Lead, Old Gravel Pits Lead, Gravel Pits Lead, Nightingale Lead, Malakoff Lead, Milkmans Lead, Redan Lead, Woolshed Lead, Jacksons Lead, Winters Lead, SCtochman's Lead, Canadian Lead. Reefs include: Promised Land, Daniash, Sir Garnet Wolsley, Norwegian, Rothschile, Band and Albion, Finns, Llanberis, Roberts Lode, Tynworths and Black Hill, Oregan, Yorkshire, Try Again, Yorkshire, Post Office, Clarke's, Western Slates, Black Slate, Danks Slates, Eastern Slates, Queen's Lode, Fire Brigade. Mines include Red Streak, New Chum, Tinworths, Woah Hawp, Normanby, Speedwell, Llanberris Extended, Llanberis, Last Chance, Major, Countess, Pioneer and a number of batteries along Main Road Hills include: Mount Clear, Pennyweight Hill, Sovereign Hillballarat, plan, white horse range, white horse, goldfields, mines, reefs, indicators, leigh river, cgt, tinworth, mining -
 Federation University Historical Collection
Book - Scrapbooks, William RObertson, Newsclips written by William Robertson, c1930-c1948, c1930-c1948
Small brown covered scrapbook with newsclipping written by William Robertson, and his handwritten corrections to the articles. Newsclips include poetry and articles on: Piggoreet, Captain Moonlight, Devil's Kitchen, Ballarat East Australian Natives' Association, A Total Eclipse, Ballarat Leads, Joe Mack Cricket, Trade Unionism, Jack Hewitt of Piggoreet, Astronomy, Golden Lake, Scientific Shearers, Eureka, Piggoreet Geological, Piggoreet Mining, Happy Valley, Exchequer Flat, Fairy's Fright, H.V. Mailboy, Shearers, Creswick, Geology of Smythesdale, Shearing in the 1890s, Piggoreet reunion, Scarsdale and Smythesdale, Scarsdale to Golden Lake, Derwent Jacks, Shanties Devil's Kitchen, Berringa Bushmen, Perseus, Kruger at Pitfield, Fires and Pitfield, Football Memories, Cambrian Hill, Theo Gribble, Jack Jones Pitfield, Risks at Pitfield, Superstition, Scarsdale, death notice for William Robertson's mother.On cover: "Wm Robertson 10 Young Street Ballarat East"andrew christie, mrs nimon, william christie, alec christie, grand trunk, cape clear, donald mclean's, alchemist co, john lynch, golden belt lead, paddy webb, annie rooney, kruger hanging, pitfield, boer war, napoleons, cambran hill, hiscocks, john winter, john jenkins, bonshaw, john bird, nintingbool, moppianum station, w.h. bird, david clarke, william hamilton, john clarke, benjamin j. scott, julius kleberger, m.a. weatherston, j.h. vaughan, a. reid, alfred william crow, p. young, george clarkson, a.w. crowe, william henderson, claud pender, a. garside, mount erip, alec crothers, communism, basalt, italian gully, john roberts, john browne, john crossthwaite, patrick mcgrath, newtown, john boyd, john bruce, william irwin, george hatfield, d. croswaite, grand trunk mine, golden horn, jubilee lode, woady yallock, springdallah, fairy glen lead, linton lead, south berry, banshee, wil-o-the wisps, forest creek, chewton, mount alexander, jim crow ranges, trawalla, j.g. roberts, carngham, german lead, scarsdale railway, great western, beaumont mine, north grenville, shearing, piggoreet reunion, scarsdale and smythesdale, scarsdale to golden lake, derwent jacks, shanties, devil's kitchen, berringa bushmen, perseus, kruger at pitfield, fires and pitfield, football memories, cambrian hill, theo gribble, jack jones pitfield, risks at pitfield, superstition, scarsdale, golden point lead outlet, frenchman's lead, trooper o'brogue, peroni, morelli, lucky woman's gully, william robertson, piggoreet, captain moonlight, devil's kitchen, ballarat east australian natives' association, total eclipse, ballarat leads, joe mack cricket, trade unionism, jack hewitt of piggoreet, astronomy, golden lake, scientific shearers, eureka, piggoreet geological, piggoreet mining, happy valley, exchequer flat, fairy's fright, h.v. mailboy, shearers, creswick, geology of smythesdale -
 Bendigo Historical Society Inc.
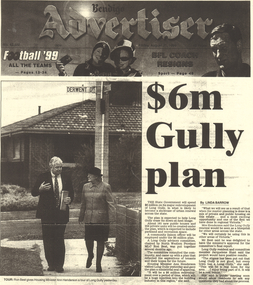
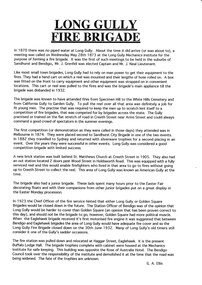
Document - LONG GULLY HISTORY GROUP COLLECTION: $6M GULLY PLAN
Photocopy of the front page of the Bendigo Advertiser Friday August 20, 1999. The article titled $6m Gully plan by Linda Barrow mentions a building plan for the area. It has a photo of Ron Best MLC and Housing Minister Ann Henderson on a tour of Long Gully. There is a small article about Phil White, The Herald Sun/Monash University Teacher of the Year Award.bendigo, history, long gully history group, the long gully history group - $6m gully plan, bendigo advertiser20/8/1999, ron best, ann henderson, jacquelene hunt, phil white, golden square secondary college, herald sun, monash university, graeme fryar, racv, ashmans, linda barrow -
 Running Rabbits Military Museum operated by the Upwey Belgrave RSL Sub Branch
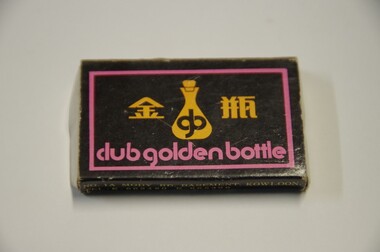
Matches
Matches. Club Golden Bottlemiscellaneous, vietnam -
 Bendigo Historical Society Inc.
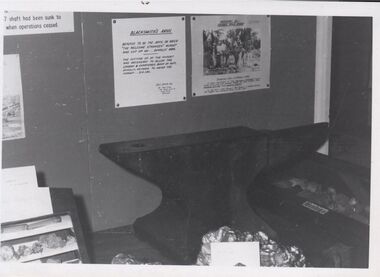
Photograph - GOLDEN DAYS HISTORICAL EXHIBITION COLLECITON: BLACKSMITH'S ANVIL
... , Long Gully, Bgo. Photograph GOLDEN DAYS HISTORICAL EXHIBITION ...Black and white photograph: blacksmith's anvil. Written on back of photo in blue pen 'Golden Days Historical Exhibition' 12 to 17 August, 1960. Reputed to be the anvil on which The Welcome Stranger (210 lbs) nugget was cut up on Dunolly 1869. Present owned (1960) Mr. Noel Gray, Backhaus Street, Long Gully, Bgo.bendigo, history, golden days historical exhibition -
 Bendigo Historical Society Inc.
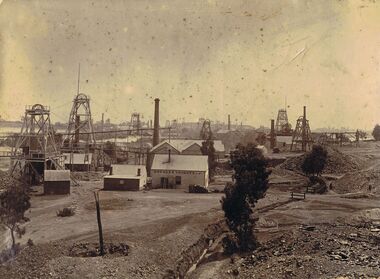
Photograph - MINING LANDSCAPE BENDIGO - CALIFORNIA GULLY AREA
Sepia image: mounted on board, shows mining landscape with numerous poppet heads and mining chimneys visible. In forefront of image: Shed with 'Duchess Tribute' written on front, small cottage alongside, poppet head on LH side and another immediately behind, various sheds. Written on bottom of photo in blue pen: Golden Square. (is not Golden Square view but California Gully on New Chum Line of reef )bendigo, mining, landscape view, sandhurst, bendigo, duches tribute, poppet heads, chimneys -
 Bendigo Historical Society Inc.
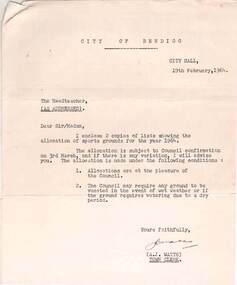
Document - NORMAN OLIVER COLLECTION: ALLOCATION OF SPORTS GROUNDS FOR SCHOOLS 19 FEBRUARY 1964
The Norman Oliver collection. Norman Oliver was three times Mayor of Bendigo - 1950-51, 1964-65, 1970-71. Three typed pages - a covering letter from City Hall dated 19th February 1964, to the Head teacher regarding the allocation of sports grounds for 1964, a weekly timetable for the use of each ground by a particular school, and a list of special allocations. The grounds allocated are : Queen Elizabeth Oval, Showgrounds, Kennington, Golden Square, Ewing Park, Wilkie Park, Centenary Oval, Garden Gully, Garden Gully (new Basketball courts), North Bendigo Recreation Reserve, Allingham St., Quarry Hill, White Hills, Long Gully, and Londonderry. Weeroona Oval and the Olympic Pool are included in the special allocations list for events such as annual sports days, inter-school sports and school swimming carnivals.bendigo, council, norman joseph oliver , councillor norman oliver. mayor of bendigo. school sports. bendigo sports grounds. -
 Bendigo Historical Society Inc.
Document - AUTOBIOGRAPHY OF NELSON JAMES MEAGER, 1980
Autobiography of Nelson James Meager (1925-1998) Born and died in Bendigo: ''Growing up on the Bendigo Goldfields'' - written in the 1980s. 14 page document donated by Edith Lunn.person, individual, nelson james meager, chum street, fogitt & jones abattoirs, kangaroo flat state school, coliban watershed, big hill ranges, mt hetrbert, golden square state school, whip & jesery mine, forbes carshalton mine, 3 bo bendigo, st marks anglican church, rowes hill (allingham street), spring gully reservior, bendigo mines ltd, napoleon mine, mr fisher, st marks, g. j. coles, mr john curtin, raggart's bakery. -
Bendigo Historical Society Inc.
Document - MINING IN BENDIGO COLLECTION: NOTES ON MINES
... South New Moon Mines Dep't Garden Gully United Healthy Golden ...Handwritten notes on Bendigo Mines. Notes include the number of ounces of gold obtained up to 1954 when the mines closed, total dividends paid, average production per ton, number of shafts The Mines Dept, made safe, notes on the South New Moon, Garden Gully United, New Chum Goldfields and the Catherine Reef United.document, gold, mining in bendigo, mining in bendigo, notes on mines, carlisle, central blue, central nell gwynne, fortuna hustlers, garden gully united, lady barkly, new argus, new red white & blue consol, south new moon, mines dep't, garden gully united, healthy golden bendigo, south new moon, roberts & sons, new chum goldfields, catherine reef united -
 Bendigo Historical Society Inc.
Document - KELLY AND ALLSOP COLLECTION: BENDIGO STOCK EXCHANGE PRICE LIST, 04/11/1908
Bendigo Stock Exchange Price List dated 4 Nov? 1908. List has name of stock being bought and sold and most of the prices. Initials MPK and 10.30 under the printing. Names are Confidence, Koch’s, Bendigo, New Shen, Sea GMC, Spring Gully, Specs?ill , Langdon, William, Cornish United and Golden Fleece.business, stockbroker, kelly & allsop, kelly and allsop collection, confidence, kochs, ? bendigo, new shen, sea gmc, spring gully, specs?ill , langdon, william, cornish united, golden fleece -
 Bendigo Historical Society Inc.
Photograph - CORNISH COLLECTION: PHOTOGRAHS OF BENDIGO HOMES WITH CORNISH CONNECTIONS
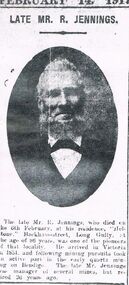
Collection of photographs of Bendigo homes with Cornish connections: a. ''Helston'' - home of Richard Jennsion at Long Gully (with separate Obit. Attached - faded (over-exposed?) photo of front/side of house; b. ''Reawla'' - front of wooden house with very prominent palm trees behind picket fence - annotation in writing: '' named after Cornish village (now gone)'' (meaning??); c. front/side photo of ''Fentongrove'' California Gully - former home of Richard Williams - has separate portrait of bearded gent - no name but presumably Richard Williams? D. front/side photo of former home of John Harvey, Golden Square on un-named street corner (accompanied by copy of head & shoulders portrait of Mr John Harvey (poor quality); e. ''Cambourne'', brick home of Ambrose Dunstan, Long Gully with heavily treed garden. Accompanied by a copy of poor quality (newspaper) photo of ''The late Mr A Dunstan (taken when he was Mayor)''; f. front of brick home ''St Leonards'', Don Street, home of Charles Perry; g. copy of photograph of David Lanyon and wife Augusta in front of their miners cottage, Ophir Street. Some printed detail re the couple attached to photo copy.bendigo, history, historical homes -
 Bendigo Historical Society Inc.
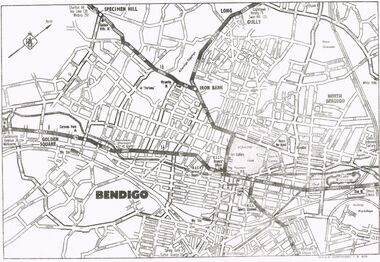
Map - MAP OF CENTRAL BENDIGO
... Bendigo city streets Long Gully North Bendigo Golden Sqyare ...Map of Central Bendigo, RACV Copyright (no date - but RACV Branch Office is shown as being at View Point). Black & White Copy. Showing road and rail system and prominent features of City landscape.RACV Copyright.map, bendigo, city streets, long gully, north bendigo, golden sqyare, specimen hill, iron bark. -
 Bendigo Historical Society Inc.
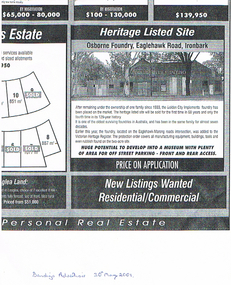
Newspaper - LONG GULLY HISTORY GROUP COLLECTION: OSBORNE FOUNDRY EAGLEHAWK ROAD IRONBARK
Copy of an advertisement from the Bendigo Advertiser 30 May 2001. Advertisement is for the Osborne Foundry, Eaglehawk Road, Ironbark. A photo shows the building with Golden City Implement painted on the front. The foundry had been in the same family for almost seven decades and is now listed for sale. Price on Application. Written underneath is: Bendigo Advertiser 30th May 2001.bendigo, history, long gully history group, the long gully history group - osborne foundry eaglehawk road ironbark, golden city implements, victorian heritage register, bendigo advertiser 30/5/2001 -
 Bendigo Historical Society Inc.
Document - LONG GULLY HISTORY GROUP COLLECTION: LONG GULLY FIRE BRIGADE
... . It was decided to close Long Gully and keep Golden Square Brigade..... It was decided to close Long Gully and keep Golden Square Brigade ...Short history of the Long Gully Fie Brigade by G A Ellis. The brigade started in 1873 and was disbanded in 1932. The brigades's main appliance was a cart or reel pulled by the men. The men used to practice in Creeth Street and later there were competitions with other brigades. A new station was built in 1905. It was decided to close Long Gully and keep Golden Square Brigade.bendigo, history, long gully history group, the long gully history group - long gully fire brigade, long gully mechanics institute, mr j grenfell, mr j neal, white hills cemetery, sandhurst city brigade, st matthews church, american gully, easter fair, buffalo lodge hall, rose of australia hotel, bendigo council, g a ellis -
 Bendigo Historical Society Inc.
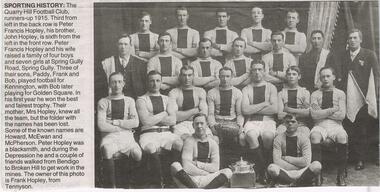
Newspaper - JENNY FOLEY COLLECTION: SPORTING HISTORY
Bendigo Advertiser ''The way we were'' from Monday, December 13, 2004. Sporting history: the Quarry Hill football club, runners-up 1915. Third from left in the back row is Peter Francis Hopley, his brother, John Hopley, is sixth from the left in the front row. Peter Francis Hopley and his wife raised a family of four boys and seven girls at Spring Gully Road, Spring Gully. Three of their sons, Paddy, Frank and Bob, played football for Kennington, with Bob later playing for Golden Square. In the first year he won the best and fairest trophy. Some of the names are: Howard, McEwen and McPherson. Peter Hopley was a blacksmith and during the depression he and a couple of friends walked from Bendigo to Broken Hill to get work in the mines.newspaper, bendigo advertiser, the way we were -
 Bendigo Historical Society Inc.
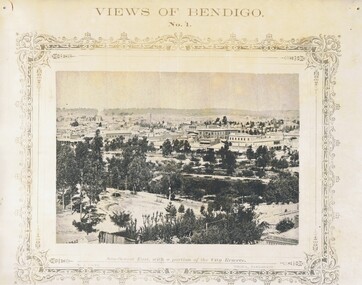
Photograph - VIEWS OF BENDIGO: COPIES OF 52 PHOTOS, 1850 - 1900
Copies of Photographs from - Views of Bendigo by Nicholas Caire Originals in Box 13 No.1 Sandhurst east/ City Reserve x 2 No 2 New Chum Line of Reef No 3 Sandhurst to North from top of Masonic Hall No.4 Hustler's Line of Reef No.5 Battery of stampers for crushing quartz x 2 No.6 View Sandhurst from top of Masonic Hall x 2 No.7 Excavation Quartz Reef, Ironbark Hill. No 8 St. Paul's Church. No.9 View Camp Reserve from Court House. No.10 View of Nth. Old Chum. No.11 View Camp Hill near the Lodge x 2 No.12 Garden Gully. No.13 Shamrock Hotel, Sandhurst. No.14 View from Court House, east end Pall Mall. No.15 Wesleyan Church, Golden Square x 2 No.16 Savings Bank, Sandhurst No.17 Bendigo District Hospital. No.18 Interior Wesleyan Church x 2 No.19 View Golden Square township. No.20 The Town Hall, Sandhurst. No 21 The City Hotel,Sandhurst. No 22 Pall Mall Sandhurst, No 23 Sandhurst City Market No 24 Pall Mall looking west x 2 No 25 Camp Hill x 2 No 26 Charing Cross No 27 View Sandhurst. x 2 No 28 Long Gully. No 29 Railway station and sheds No 30 Cemetery Back Ck. No 31 Kock's Pioneer Quartz Crushing Plant Long Gully. No 32 Masonic Hall. No 33 Bendigo Benevolent Asylum. No 34 Bendigo Flat. No 35 Old Chum Hill x 2 No 36 New Chum Gully No 37 Township of Eaglehawk No 38 From St Paul's tower looking west No 39 Tunnel Big Hill. No 40 From St Paul's tower looking south x 2 No 41 From St Paul's tower looking eastward x 2 No 42 From St Paul's tower looking north west x 2 No 43 Great Extended Hustlers Quartz Mining Claim No 44 Big Hill Rail line x 2 No 45 From St Paul's tower looking westward x 2 No 46 From St Paul's tower looking north west No 47 Big Hill Ranges Buick. x 2 No 48 St.Paul's Tower x 2 No 49 Eaglehawk township. No 50 Mitchell Street No 51 Botanical gardens, White Hills x 2 No 52 View Point, Sandhurst. .N.J. Caire.place, bendigo, bendigo area., views of bendigo. -
 Bendigo Historical Society Inc.
Book - FROM A GOLDEN PAST TO A HEALTH FUTURE, 1985
From a Golden Past to a Healthy Future, a history of the Eaglehawk & Long Gully Community Health Centre, 97 pages with black & white photographs, illustrations and maps. Research paper submitted as part of the requirements for BA degree Humanities. 1885Dianne N Franciseaglehawk, health, community health centre, eaglehawk & long gully community health centre, health, eaglehawk - history. -
Bendigo Historical Society Inc.
Book - VISION SPLENDID BENDIGO, 1986
Vision Splendid Bendigo. Cream coloured paper 56 pages, with line drawings of landmark buildings of Bendigo. Drawings by Jan Neil. Vision Splendid Introduction, Wesleyan Church Golden Square, Sacred Heart Cathedral, Central Deborah Mine, Marlborough House, Fuse factory, Goldmines Hotel, Fortuna Villa, Bon Accord, Heinz Butcher Shop, Long Gully State School, California Gully State School, Stone cottage Harvey Town, Eaglehawk Town Hall, Caradon, Eaglehawk State School, Victoria Hotel, Bendigo Pottery, Eucalyptus Distillery, St Luke’s, Lake Weeroona, Joss House, Benevolent Home, Lansellstowe, Kaithness, Malmo Valentine Street, Dudley House, Rifle Brigade Hotel, Fire Station, Masonic Hall, Temperance Hall, Old Post Office, Wesley Church, St. John’s Church, Alexandra Fountain, Commercial Bank View Point, State Bank, St Paul’s Cathedral Railway Station, National Bank, Town Hall, Post Office, Shamrock Hotel, Camp Hill State School, Police Barracks, Law Courts, Specimen Cottage, Technical College, St. Kilian’s Church, Tram Depot, St. Aidan’s OrphanageJan Neilbendigo, buildings, heritage buildings, heritage, heritage buildings, bendigo. -
 Bendigo Historical Society Inc.
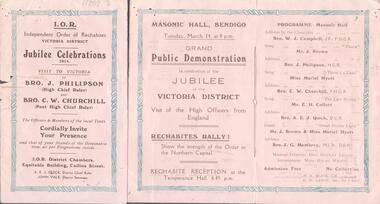
Document - INDEPENDENT ORDER OF RECHABITES: JUBILEE CELEBRATIONS MASONIC HALL BENDIGO
Pink paper, brown text, 4 page folded program for the 'Public Demonstration in celebration of the Jubilee of the Victoria District. Visit of the High Officers from England.' Held at the Masonic Hall Bendigo Tuesday March 14th at 8 p.m., no year given but probably 1911. The Bendigo tents are listed: Star of Bendigo Tent No. 5., meets Temperance Hall Refuge Tent No 14, meets M.U. Hall, Eaglehawk Coben Tent No. 39, Tent Rom, California Gully Olive Branch Tent No. 42, Temperance Hall, kangaroo Flat Laurel Tent No. 137, Methodist School, Golden Square Sutton Tent No. 166, Methodist Hall, McIntyre St Long Gully Pride of the Hills Tent No. 427, Methodist Building, White Hills A program of entertainers is provided: 'Programme Masonic Hall' Bro W.J. Campbell Mr. J. Brown, Bro. J. Philipson Miss Muriel Hyett Bro C.W. Churchill Mr. E.H. Collett Bro. A.E. J. Quick Mr. J. Brown and Miss Muriel Hyett Bro. J.G. Membrey.bendigo, clubs, independent order of rechabites -
 Bendigo Historical Society Inc.
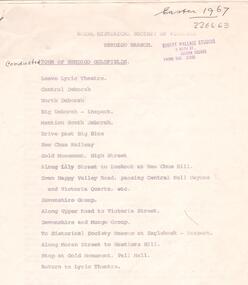
Document - ALBERT RICHARDSON COLLECTION: TOUR OF BENDIGO GOLDFIELD 1967
Seven page printed document. On top 'Royal Historical Society of Victoria, Bendigo Branch. Conducted tour of Bendigo Goldfields.' Easter 1967. Document lists the names and details of mines covered on the tour, including the : Central Deborah, corner Violet and Creek Street North Deborah, Breen Street, Quarry Hill The Deborah, off Adams Street, Quarry Hill The New Chum Railway, Breen Street, Golden Square Eureka Extended South Belle Vue. The Hustlers Hill area history. New Chum Hill history Mines on the New Chum Hill and vicinity: Lansell's 180 New Chum and Victoria The Lazarus New Chum United New Chum consolidated Garibaldi Long Gully mines The Ironbark Carlisle United Hercules Document is signed by A. Richardson.bendigo, mining, mine tour 1967 -
 Bendigo Historical Society Inc.
Photograph - NICHOLAS CAIRE VIEWS OF BENDIGO
Full set (52 photos) of Nicholas Caire ''Views of Bendigo'' photographs. 1) Sandhurst East with a portion of the City Reserve. 2) New Chum line of reef. 3) Sandhurst-North part as seen from the top of the Masonic Hall. 4) The Hustler's line of reef seen from Redan Hill. 5) Battery of stampers for crushing quartz 6) View of Sandhurst as seen from the top of the New Masonic Hall. 7) Excavation of quartz reef near Ironbark Hill. 8) St. Paul's Church, tower and belfry. 9) View of the Camp Reserve as seen from the Court House. 10) View of North Old Chum showing surface excavations. 11) View as seen from the Camp Hill near the lodge. 12) Garden Gully amalgamated claims. 13) Shamrock Hotel, Sandhurst. 14) View as seen from Court House showing the willows & East Pall Mall. 15) Wesleyan Church, Golden Square. 16) Savings bank, Sandhurst. 17) The Bendigo district hospital. 18) Interior of the Wesleyan Church, Golden Square. 19) View of Golden Square township. 20) The Town Hall, City of Sandhurst. 21) The City Hotel, Sandhurst. 22) Pall Mall, Sandhurst. 23) Sandhurst City Market. 24) Pall Mall, Sandhurst looking west. 25) View from Camp Hill looking north - east 26) View of Charing Cross, Sandhurst. 27) View of Sandhurst as seen from Knipe's Castle. 28) Township of Long Gully. 29) View taken from St. Paul's tower. 30) View of the Sandhurst cemetery at back creek. 31) Kock's pioneer quartz crushing plant, Long Gully. 32) The New Masonic Hall, Sandhurst. 33) The Bendigo benevolent asylum and industrial school. 34) Bendigo flat as seen from Wattle Hill. 35) View of Old Chum Hill. 36) New Chum Gully as seen from Specimen Hill. 37) Township of Eaglehawk. 38) View from St. Paul's tower looking south west. 39) View of the railway tunnel through the Big Hill, near Mt. Herbert. 40) View taken from St. Paul's looking south. 41) Scene taken from St. Paul's tower looking eastward. 42) View of Sandhurst from St. Paul's tower looking north-west. 43) The great extended Hustler's co's. quartz mining claim. 44) View from the Big Hill showing the line of railway to Melbourne. 45) View from St. Paul's Church tower looking westward. 46) View from St. Paul's Church tower looking north-west. 47) Scene near the Big Hill ranges taken from Mr. Buick's residence. 48) View from St. Paul's Church tower looking north eastward. 49) Township of Eaglehawk 50) View of Mitchell Street, Sandhurst. 51) Botanical gardens near the White Hills. 52) View Point, Sandhurst.bendigo, streetscape, various views, nicholas cairne -
Bendigo Historical Society Inc.
Photograph - DEBORAH GOLD MINE, GOLDEN SQUARE
Black and white photograph of Deborah Gold Mine, Abel Street, Golden Square. Image shows large mining sheds (engine house, boiler room) with tramway and poppet head at rear. Two ore bins on RH side. Large mullock hills at RH rear of ore bins. Written on back of photo 'Deborah Reef Gold Mines NL 20.3.37' Paper with photo states:' The Deborah Gold Mine, Abel Street. The poppet head was moved from the Windmill Hill mine Long Gully. This photograph was taken in March 1937 after a further 10 heads had been added to the battery'bendigo, mining, deborah gold mines