Showing 101 items
matching ken hand
-
 Ballarat Tramway Museum
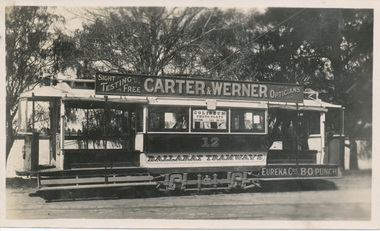
Photograph - ESCo tram - Lydiard St level crossing, Mr Duffy?, c1907
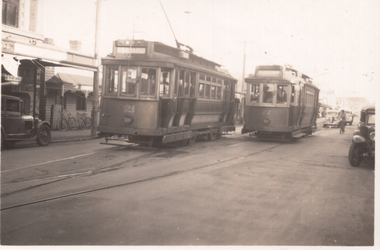
Lydiard St level crossing with an Electric Supply Co. of Victoria tram, northbound to Gregory St in Lydiard St North. The tram has three equal windows and is most likely one of the ex-Sydney electric trams that were sold to Ballarat. A number is not discernable. Note the ladies sitting on the outside seats. Ballarat B signal box with signalman looking out the window overlooks the level crossing with gates. C1907.Yields information about an early ESCo tram in Lydiard St North at the level crossing.Photograph, black and white - plain black with some notes on rear Has Ken Magor stamp, "Mr Duffy" in pencil in top right hand corner, "Ballarat Tramways ? date".tramways, trams, esco, lyiard st north, level crossing, signal box -
 Ballarat Tramway Museum
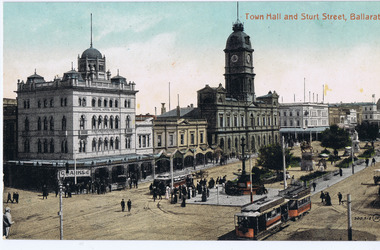
Postcard, Valentine & Sons Publishing Co, "Town Hall and Sturt St Ballarat", c1905
Photo of the scene looking southwest from the Post Office area, with an ESCo tram hauling a trailer and another tram on the opposite side of the roadway. Has the Town Hall, National Mutual Building, C Marks, and Snows in the view. Wal has dated the photo about 1913 on the rear of the postcard and about 1912 in his album notes - considered c1905 as the destinations are hanging from the front of the tram. They were soon after moved to the roof of the tram in a destination box. in the card sent to Ken Magor by Wal Jack, he notes the the Historical Museum has a large photo of this and you can see No. 12 outlined very clearly. See Reg Item 6247 for another version of this photograph/postcard.Yields information about the intersection of Sturt and Lydiard Streets in the early ESCo era and streetscape and the use of the former horse trams as trailers.5128 - Digital image from the Wal Jack Ballarat Album of a coloured postcard - titled "Town Hall and Sturt St Ballarat", has number 300516 and initials JV in the bottom right hand corner. Card printed in Great Britain, produced by Valentines. 5128.1 - Black and white version of the same photo 5128.2 - colour version with a note from Wal Jack to Ken Magor with Ken's stamp on the bottom right hand corner.5128 - On rear in ink "1913" and "Note No. 12 tram on left" 5128.1 - hand written message, undated to May from her brother Claude 5128.2 - see image 5sturt street, ballarat, tramways, esco, town hall, national mutual, trailers, horse trams, tram 12 -
 Ballarat Tramway Museum
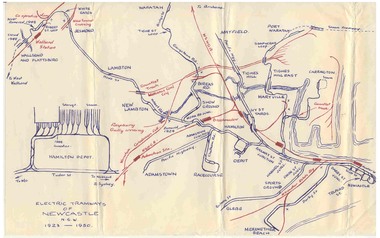
Map, Ken McCarthy, Electric Tramways of Newcastle 1923 - 1950, c1960
Hand drawn red and blue biro map of Newcastle electric tram lines - period 1923 - 1950, showing principal railway lines, tram tracks, crossovers depot layout, level crossings on plain foolscap paper.trams, tramways, newcastle, steam trams, trams, map -
 Ballarat Tramway Museum
Map, Ken McCarthy, Map of Proposed National Park Line - SPER, mid 1950's
Hand drawn plan on plain foolscap paper of proposed tram line from Loftus to View Point within National Park for South Pacific Electric Railways - with notes, proposed destination roll.trams, tramways, sper, national park line, loftus, destination roll -
 Ballarat Tramway Museum
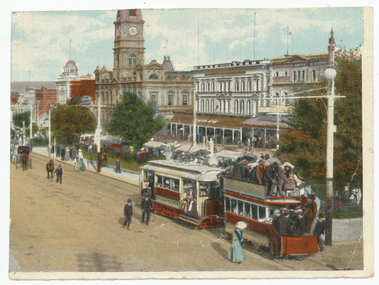
Photograph - Illustration/s, Ballarat Sturt St and crowded trailer
Colour illustration of eastbound Sturt Street tram with Town Hall in the background. ESCo tram towing former horse tram - Taken c1905 as tram does not appear to have a destination box fitted. Wal Jack has provided notes on the rear of the copy sent to Ken Magor, identifying the electric tram as No. 2 and the horse trailer as No. 4, the latter of which can be seen in the image. For a list and description of the same base image see Archives file - "Notes on ESCo Tram towing a heavily loaded trailer".Yields information about the ESCo electric trams towing former horse trams, passenger loading, colours schemes through the use of hand coloured and printed images.Colour illustration printed on plain paper and cut from a magazine or publication. Two copies held.On 2nd copy in pencil "Electric Supply Co of Victoria Ltd, Ballarat Tramways. No. 2 tram hauling No. 4 trailer, ex No 4 horse tram from Gardens in Sturt Street (from Doveton St), about 1912.trams, tramways, sturt st, horse trams, town hall, esco, tram 2, tram 4 -
 Surrey Hills Historical Society Collection
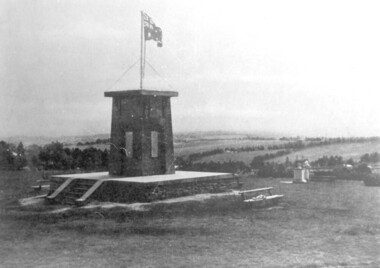
photograph, Ken Hall, Beckett Park Soldiers War Memorial c1932, c1980
Copy negative by Ken Hall from a c1933 City of Camberwell brochure. The original appears to have had a crease mark across it as this is evident on both copies.Black and white photo of the First World War memorial erected on the high point in Beckett Park, Balwyn. Taken with the memorial in the foreground and looking to the south-west. The Australian flag is flying on top of the monument and in the background are rows of trees dividing largely clear land.On the rear: Copy 1: "1153 Repeat of No 164" in top left hand corner in lead pencil in Jocelyn Hall's hand. Copy 2: "1153 Repeat of No 164" in top left hand corner in lead pencil in Jocelyn Hall's hand and "Soldiers War Memorial / Beckett Park / Erected 1918" in blue biro centre right.first world war, war memorial, beckett park -
 Surrey Hills Historical Society Collection
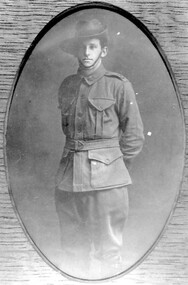
Photograph, George Leslie Rayment of Surrey Hills, AIF serviceman in WW1
George's grandfather was James Rayment Snr (1817-1890). He was born in Essex, England. He arrived in Melbourne aboard the “Bengal” in 1840. He married Jane McKnight on 12 March 1861. She died in 1871. James lived in South Melbourne until he married Elizabeth Brown in 1873. He moved to “Spenceycroft” at 654 Canterbury Road in 1880 - the property had a dairy. He moved to 85 Croydon Road, Surrey Hills (the house still stands) in 1886 but still ran the dairy. He moved back to South Melbourne and died there in 1890. His son James Rayment Jnr (1862-1916) was born in Emerald Hill. He married Harriet Ratten in 1882 and lived at 85-87 Croydon Rd Surrey Hills until 1914. He also owned properties at 70,72,81 and 83 Croydon Road. Harriet died in 1897. He married Victoria Benbow in 1898. In 1912 his occupation was fishmonger. In 1914 he moved to “The Wattles” at 95 Middlesex Road, Surrey Hills. In 1919 his wife Victoria owned lots 45,47,49,51,53,55 Durham Road. Surrey Hills. He died 1916 and Victoria died in 1939. James, the third, lived in Middlesex Road, Surrey Hills where he and his wife had a flower and vegetable farm. His brother was George Leslie Rayment (1894-1976), known as Les, the subject of this photo. He was born in Boroondarra. He lived at 85 Croydon Road, Surrey Hills. In 1914 he enlisted and served in the HQ staff 3rd Light Horse Brigade and was promoted to Staff Sergeant. In 1916 he was discharged for family reasons, those being that his father had died and there was no-one at home to support the family in Middlesex Road. In 1918 he married Grace Lewis at the Highfield Methodist Church. In 1919 they moved into “Clovelly”, 94 Durham Road, Surrey Hills. In 1927 his wife Grace died and in 1933 he married Celia Lewis. In 1936, with the help of his brother James, they built their new house at 14 Benwerrin Road, Surrey Hills. Celia died in 1967 and Les in 1976. Les had 2 children Dr Dulcie Grace Rayment and Norma Lesley Rayment. (Information courtesy of Mel Constable; Mel's wife is a Rayment descendant). Les' brother, James Arthur Rayment, was born in Balwyn in 1889. His A.I.F. record states - he joined on the 14 July 1915 to the 5th Field Company Engineers. His father was living in Middlesex Road, Surrey Hills at the time of his enlistment. He returned to Australia and was discharged on 22/7/1919. His occupation was carpenter; his religion, Methodist. He was 26 years and 2 months at enlistment and left Australia on 23/11/1915. James Arthur Rayment married Lilian Sarah Smith in 1920 (Ref: Victoria 1920/6780). REF: Mrs Dorothy Legg - James Rayment and his wife Elizabeth lived and farmed in Russell Street in the 1860s. The land was a dairy property and may have included some of the land later owned by the Presbyterian Church. Their sons James and Alex walked to the Balwyn State School. James married and lived at 'The Wattles' in Middlesex Road.Black and white photo of George Leslie Rayment in AIF uniform, standing with his hands behind his back. armed forces, world war, 1914 - 1918, clothing and dress, (mr) george leslie rayment, les rayment -
 Surrey Hills Historical Society Collection
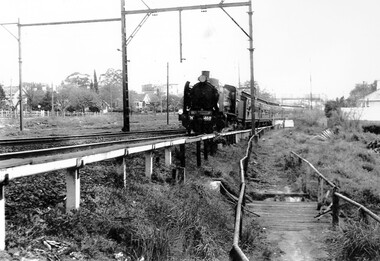
Photograph, Loco N 468 at Surrey Hills on Railfan Tour to Healesville for the Australia Railway Enthusiasts Group, 1 October 1966
We have an original copy donated by Iam Barkla and a larger one copied by Ken Hall. The Barkla original has a sticker with his reference details on the back. The occasion was a Railfan tour to Healesville for the Australian Railway Enthusiasts Group. Photo taken on 1 October 1966. A black and white photo of steam train. Some of the houses in WIndsor Crescent can be seen on the left hand side of the photograph; also some of the Union Road shops and the pedestrian overpass at the Surrey Hills station.surrey hills railway station, 1966, railfan tour, australia railway enthusiasts group, union road shops, windsor crescent -
 Beechworth RSL Sub-Branch
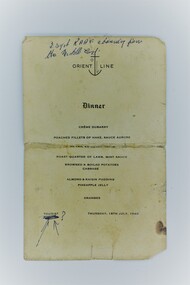
Orient Line Dinner Menu, Orient Line Dinner Menu Thursday, 18th July, 1940, 1940
This menu would have been printed to distribute to guests attending dinner on the Orient Line, which embarked for the Middle East in 1940. The dinner was held on Thursday 18th July of the same year. Signatures on the reverse of this document were signed by Ken Williams, RW Sterrett, MR Campbell, J.H. Christie, JH McKinnon and F Finch. This item relates closely to a photograph of the 3rd Squadron, in RAAF uniform, boarding the Orient Line.This menu is an item of ephemera dating to the World War Two era. Items such as this are ordinarily lost over the passage of time. As the item contains signatures it is possible that further research and interpretation could be done regarding the men it relates to. The item is therefore of historic and social significance and has good interpretive capacity.Card with printed lettering centrally spaced and folded along horizontal centreline. There are hand written inscription on the front and reverse in pen ink.On the front, top: 3 Sqn RAAF boarding for the Middle East. On the front, lower left there are markings under and to the right of the printed word 'tourist'. The is a thick line under the word, two arrows pointing to it from beneath and a question mark to the right. On the reverse, upper left corner: Ken Williams, RW Sterrett MR Campbell JH Christie JH McKinnon F Finchdinner menu, orient line, raaf, royal australian air force, ken williams, r w sterrett, m r campbell, j h mckinnon, f finch, j h christie, 3 squadron -
 Carlton Football Club
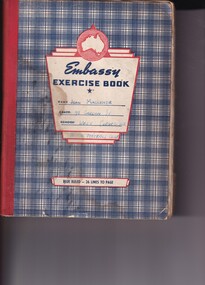
Exercise Book Scrapbook, Carlton Football Club 1958, 1958
... ; 1958 Summary In his final season, Ken Hands stepped down from ...An immaculate collection of newspaper articles & statistics compiled by Joan MacKenzie of the 1958 VFL seasonThe book contains an almost complete record of Carlton FC's 1958 season by Newspaper articles and self penned tables and statistics. The start of the 1958 season was tumultuous with infighting and committee factions. This period is superbly captured by the compiler of the scrap book. The 1958 season was not a successful one for Carlton; 1958 Summary In his final season, Ken Hands stepped down from the captaincy that he had held for the previous 5 and a half years. Unforunately, Carlton carried its losing form of the end of the 1957 season into 1958. The club would win only one of its first seven games, and that was against the previous years wooden spoon winner, Geelong. By the end of round 7, the Blues would sit dead last on the premiership table, and any chance of a finals appearance was gone. The club managed to turn its fortunes around from round 8, though, winning four games in a row and 7 of its last 11 games. This lifted us to seventh place on the ladder with an 8 win, 10 loss record for the year. This improved form would lay the foundation for 1959, Carlton's best year of the 1950's, when the club would win its first eight games, finish second on the ladder, and reach a Preliminary Final. A Lined Blue & Red Embassy Exercise Book. Embassy was Coles's Generic Brand. -
 Carlton Football Club
Event Program, Grand Final Dinner 1962, 1962
... Martin Cross Coach: Ken Hands In: V. Varlamos Out: B. Buckley ...Losing GF 1962Program & Menu for post match dinner 1962 GF, a loss to Essendon Carlton 1.1 7 5.6 36 7.8 50 8.10 58 Essendon 6.5 41 7.7 49 10.10 70 13.12 90 Venue: M.C.G. Date: Saturday September 29, 1962 Result: Loss by 32 points Umpire: Jack Irving Crowd: 98,385 Goalkickers: B.Williams 3, J.Nicholls 2, G.Donaldson, M.Cross, K.Greenwood. Best: S.Silvagni, M.Crowe, J.James, B.Cox, G.Donaldson, B.Williams. Injuries: Nil Game Review It was a tale of contrasting preparation for the Grand Finalists, with the Blues having been involved in three games decided by less than a goal in a row, while Essendon hadn't played for three weeks. Leading up to the match Essendon had injury problems, with Terry Rodgers unable to take the field and ruckman Geoff Leek requiring a pain killing injection to get him up for the game. Leek actually fooled the Essendon match committee by passing his fitness test (during which he was asked to kick a medicine ball) by using his good leg - not the suspect one. When the ball was bounced to start the Grand Final, Essendon straight away looked like the fresher side, and slammed on 6 goals to one to take control. Carlton dug deep in the second term and fought back, kicking 4 majors and closing the gap to only 13 points by the half-time break. The Bombers surged again in the third term, with their forwards looking lively and dangerous. The Blues were just out-gunned, and trailed by 20 points at the last break. The game became spiteful in the first few minutes of the last quarter, as Essendon overwhelmed the Blues defence. They kicked three quick, unanswered goals to establish a 39-point advantage, and from thenh on had the flag in their bag. As the heat went out of the game, Cross scored a consolation goal for Carlton, but it was a case of too little too late. Best players in a well-beaten Carlton side were Serge Silvagni, who continually stood against the tide, John James and Graham Donaldson up forward, Bob Crowe in defence, and Berkley Cox, who controlled the centre. 1962 Grand Final Team B: 8 John Benetti 18 Peter Barry 16 Maurie Sankey HB: 26 Graeme Anderson 20 Wes Lofts 14 Bob Crowe C: 19 Ian Collins 9 Berkley Cox 30 Murray Kick HF: 13 Graham Donaldson (c) 10 John James 12 John Gill F: 5 Ken Greenwood 22 Tom Carroll 36 Peter Falconer Ruck: 2 John Nicholls (vc) 1 Serge Silvagni 7 Bruce Williams Res: 32 Vasil Varlamos 23 Martin Cross Coach: Ken Hands In: V. Varlamos Out: B. BuckleyFour page program -
 Melbourne Legacy
Slide, Operation Firewood, 1960s
Colour slide of three legatees and a map in a forest. The caption identifies Ken Brumbrell and Graham Fogarty. It was during Operation Firewood. Legatees would organise collection of wood from the country and distribute it to widows in metropolitan Melbourne. Other slides show the cutting and loading of wood and delivery to widows in metropolitan Melbourne. Was with many other slides taken in the 1950s and 1960s. The slides have been photographed to make digital images and moved to archive quality sleeves. In many cases the original images were not well focussed and the digital image the best available.A record of Legacy helping widows by sourcing, supplying and delivering firewood. When open fires were the main source of heating, a load of firewood and help moving it, would have been very important to the widows.Colour slide of a view of Legatees during Operation Firewood in brown Anscochrome cardboard mount.Printed on front in red ink 'Anscochrome / View from this side / Made in Australia'. Hand written on front 'The deamon drivers out from Picola / Ken Bumbrell / Graham Fogarty' in blue pen. Printed on reverse in red ink 'Processed by Verycolor photo labs. Melbourne, Victoria'.operation firewood, legatees -
 Melbourne Legacy
Document, Legatee Frank Doolan notes on the Flanders Field poem, 1970s
Photocopy of an article in the 'You asked us' section about 'Flanders Fields, and the man who wrote it' published in The Toronto Star 13 November 1971. The article discusses the controversy surrounding the wording of the first and penultimate lines and claims that poet John McCrae originally originally wrote 'grow' but changed it to 'blow' when asked to by the editors of 'Punch'. The photocopy of the article was supplied by Legatee Ken Rabling. Legatee Frank Doolan signed the note he wrote to accompany the photocopy and dated it 7/8/73. An item from Legatee Frank Doolan, who was on the archive committee and made attempts to collate the history of Legacy. An example of the ongoing controversy surrounding the disputed wording. The poem 'In Flanders Field' was the inspiration for the torch of the Legacy Badge with McCrae's call to the reader to take up The Torch, as the organisation did by looking after the widows and families of fallen soldiers.01302.1 Handwritten signed note in blue ball point, address stamped in black. 01302.2 Photocopy of a page from 'The Star Weekly', Toronto, Canada dated 13 November 1971.01302.1 Top right hand side 'Box 16'poem, history -
 Ballarat Tramway Museum
Photograph - Black & White Photograph/s and Digital Image, Syd Harvey, ESCo No. 12 outside Wendouree Parade depot, c1920
Black and white photo of ESCo No. 12 outside Wendouree Parade depot, post the 1912 installation of Motorman's windscreens. Both blinds rolled up. Has a roof advertisement for "Carter & Werner Opticians" and a step ad for "Eureka Cos. BO Punch". Seat backs face passengers to sit on the outside of the tram., that is have yet to be relocated to face inwards only. See image 757.2 - which shows this. Three copies of the photo - both from a copy neg. Copy 1, circa 1980, Copy 2, by John Phillips, 1993, Copy 3 ex Ken Magor, sent by Wal Jack to Ken. The rear of this print has extensive details on rear. See item 9468 for a glass plate negative.Yields information about the appearance of one of the Museum's tramcars at the time of fitting windscreens and demonstrates the evolution of the ESCo's tramcars, and advertising. Image 757.2, is different to others in that it is fitted with a chain along the sides and a pay as you enter sign at the rear.Series of black and white photographs of ESCo tram 12. 757.2 - on rear in ink "24a)", top left hand corner and along bottom edge "Car 12 at Lake Wendouree near depot Sydney Harvey" and "William F Scott" address label in the bottom left hand corner., See image i4 for details of Wal's notes on back of photo.trams, tramways, esco, windscreens, tramcars, roof ads , tram 12 -
 Ballarat Tramway Museum
Photograph - Black & White Photograph/s - set of 2 - Geelong No. 11, 1916
Photo of Geelong electric tram No. 11 - crossbench tram, taken in the same location as Reg Item 4316, following conversion from a trailer in Corio Terrace, now Brougham St. Has the driver and conductor standing at either end of the tram wearing their uniforms. Has the destination of "Newtown", 4345.1 - Black and White print contained within the Wal Jack Bendigo and Geelong Album, see Reg Item 5003 for more details. Added 7/8/2013. See Destination Eaglehawk for background details. Wal Jack has dated the photo as 1916. Yields information about Geelong tram No. 11Black and white photograph with notes on the rear. Copy 1 and 2 - On rear, stamped in black ink "Photo supplied from P.W. Duckett Collection, All Rights Reserved, 69 Howitt Rd. Nth Caulfield 3161." 4345.1 - Wal Jack stamp with the number T176 written in on the bottom right hand corner. Third copy has extensive notes on rear and Ken Magor stamp - see image i3trams, tramways, geelong, depot, brougham st, cross bench tram, tram 11, uniforms -
 Eltham District Historical Society Inc
Film - Video (VHS), Jenni Mitchell, Demolition of the Shire of Eltham Offices, 1996
Poor video quality (noise and interference), incomplete and unedited raw footage. A video documenting the demolition of the Shire of Eltham offices at 895 Main Road Eltham under the direction of the Commissioners appointed for the new Shire of Nillumbik and some of the communities activities surrounding the event. The building was demolished exactly 25 years after the southern wing housing Engineering and Planning on the upper level and the Eltham Library on the ground level was opened in celebration of the Shire of Eltham's centenary. Video has lots of distortion and noise, and sections of clips dubbed over. Immediate initial footage of Jenni Mitchell talking about asbestos claims in the Shire Offices (Sigmund Jorgensen standing behind her) advising Council did a review of the building several years previously and had been cleared of health problems. Cuts to group of people standing outside front door of offices but possibly voice dub over not related ? Then the date 27 Jul 1996 on a scene flashes on screen immediately followed by an edited clip intro of title and credits with classical music track. It then opens with Jenni Mitchell driving to the Shire Offices on Saturday 27 July 1996 at 11.00am. Footage of Main Road past Pitt Street, Alistair Knox Park then entering Shire Office driveway which is fenced off and contractor signs hanging up. Scenes at rear of building showing some internal demolition has commenced. View of the Administration wing. More clips of road driving, Alistair Knox Park, Eltham Library and visitor car park for Shire Offices. Cuts to a group of people standing in access to visitor carpark with new Eltham Library in background, one being immediate former Shire of Eltham President, John Graves. Scenes of people looking through chain link fence and security guard checking front door. John Graves being filmed that someone informed him the Shire was offering the building to the Community Health Centre for $2.3 million and that if they had been offered a price of $1.1 for what it apparently was sold for they would have snapped it up. View of truck loaded with brick rubble literally struggling to ascend the hill of Library Place to exit into Main Road. Cuts to a scene looking at Eltham War memorial Hall through the Memorial Gate, then the Shillinglaw trees and large banner sign ‘Delta Demolitions’ hanging on office façade. Views of front door, old library and bluestone wall. Scene (31 Jul 1996) filmed at night of several white crosses with “RIP Community” and “RIP Democracy”. Scene (1 August 1996) again driving along Main Road towards the Shire Offices then scenes of the offices showing substantially more demolition to exterior, groups of people standing on footpath outside watching, Delta heavy demolition machines, woman holding sign “Democracy where have you gone …”, the odd person in full protection gear and breathing apparatus hand carrying materials out to place on rubbish pile in front of people standing on footpath watching (with no protection) and then stamping on it to break it creating dust, security person in hard hat (no other protection) wandering around, many groups standing around watching, news film crew, person standing on roadside edge holding signs facing traffic stating “Pirate Planning” and “ Grant us your ears” also sign on back of parked car “Elthams High Jacks”, another sign “Community Democracy”, views of crosses in Main Road median strip “RIP Community”, groups of people on footpaths and reporters conducting interviews, footage of unknown person standing with Jenni Mitchell and Sigmund Jorgensen advising people have the right to protest, Jenni Mitchell urging people to ask questions of local MP and Council and Sigmund Jorgensen referring to the three historic Shillinglaw trees with demolition machinery operating in background, Jenni Mitchell and others installing more crosses in median strip; demolition machines operating inside and outside the building, more views of onlookers including Sigmund Jorgensen then Police approaching on footpath, workers and machinery continuing to operate, views of the old library being demolished, the former Community Services department, security personnel. Scene (2 August 1996) more heavy demolition machinery in operation smashing building up, people standing around southern wing watching, view overlooking Eltham Library of train pulling in to Eltham station. Scene (7 August 1996) more heavy demolition and people wandering around with only hard hat protection, no dust protection, comments from one operator dumping a bin of material stating “wait till there’s a Hungry Jack’s here, you’ll be laughing, fuel, videos, hamburgers. You’ll be up with the rest of the world soon, you’ll have electricity and everything here, ha ha ha ha”, more heavy machinery demolition and breaking up of materials, view of Hitachi train going by and Administration wing, view inside the front door opening of the staircase leading to upper level, person walking around operating heavy machinery with a hose spraying rubble (no protective gear other than hard hat interspersed with edit cuts of meeting of Commissioners and independent observers on panel as well as members of the community in public gallery. Nillumbik Shire CEO Barry Rochford addressing the meeting., Chief Commissioner Don Cordell directly addressing Jenni Mitchell with respect to permission to take photographs, Barry Rochford continues to address the question asked of Council about the valuation of the former Shire of Eltham Office building/site, public gallery calling out asking why was building demolished, what was the urgency. Scene (14 August 1996) views of southern wing, previous single demolition operator again mocking people filming, operators working in and around building, Shillinglaw trees and largely demolished front, heavy demolition equipment at work, piles of building rubble, hose spraying water over rubble, large trucks arriving for rubble removal and loading of truck. Scene (21 August) more of the same, building virtually down, Shillinglaw trees standing tall and alone, water spraying on rubble and wattle in bloom. Cuts to Council meeting with public onlookers. Barry Rochford walks out, Wayne Phillips addresses meeting explaining one or two people shouting, members of the community challenging Council (Commissioners) about why due process appear to have been subverted. Former Shire President Robert Marshall in public audience, cuts back to Shire office carpark entrance site and sign hung on fence in front of library “Think Again!” and people standing around observing awaiting a protest demonstration erecting a large sign on stilts stating “Shell No!”, people singing a revised version of God Save the Queen (God Save Us All), Sigmund Jorgensen in attendance, Jenni Mitchell, Sigmund Jorgenson and others address the protest crowd, followed by people mingling, music being played then people standing around the cleared site circumference all with arms linked (video very broken up with noise) then chants “Save the Gateway” and “No Shell for Eltham” and more music and singing “Put up a parking lot”. The crowd then proceeds to walk along the footpath of Main Road. Scene (15 Sep 1996) meeting at Montsalvat in Great Hall addressed by Sigmund Jorgensen discussing a recently published list of the Commissioner’s to senior Council Officers of banned Nillumbik people, others encouraging people to view proposed plans for the site and lodge objections. Specific issues regarding asbestos claims are also addressed. Harry Gilham addresses the meeting on the subject of the Eltham War Memorial and Memorial Gardens and how Council believe a roundabout in the vicinity is of greater importance. Views of various artworks on display (for auction) and music performance in the Barn Gallery. Meeting addressed by Sigmund Jorgensen discussing an appeal against Council granting a permit to Dallas Howgate to develop the site and that the Minister has called the matter in to be decided by the governing council. This is followed by an auction of paintings. 0.05 - Jenni Mitchel, Sigmund Jorgensen and Peter Doughtery in background. 0.18 - Jock Kyme in front of building – David Essex, Marg Johnson on his left-hand side. 5.34 - John Graves – ex Shire of Eltham Councillor and President. 9.02 - Unknown person being interviewed. 9.30 - Jenni Mitchell, unknown person, Mark Burns, community activist. 10.04 - Sigmund Jorgenson, Jenni Mitchell. 12.04 - Police members 21.33 - Nillumbik Council offices 7 August 1996 Barry Rochford CEO, Vin Heffernan Commissioner, Don Cordell Chief Commissioner, Kevin Abbott Commissioner, unknown person. 28.00 - Barry Rochford CEO 28.05 - Kahn Frankie - in commissioner’s seat after commissioners and council staff have vacated the council chamber. 28.26 - Wayne Phillips, State Liberal member for Eltham, addressing community in response to questions. 28.36 - Mark Burns, community activist addressing gallery. 28.48 - Ken Hines, ex Shire of Eltham Councillor and President. 29.34 - Ken Hines, ex Shire of Eltham Councillor and President standing, Robert Marshall, ex Shire of Eltham Councillor and President seated in front. 29.41 - Karen Gerhards, community activist. 30.06 - Marg Johnson with loud hailer, next to Jock Kyme, community activist. 31.32 - Marg Johnson with possibly Frank Burgoyne?, Sigmund Jorgensen, Jock Kyme. 35.35 - Harry Gilham at meeting at Montsalvat on 15 September 1996. 35.43 - Sigmund Jorgenson at lectern. 36.42 - Marg Jennings. 37.47 - Mark McDonald, Jim Connor, ex Shire of Eltham Councillor in background. 36.28 - John Cohen, ex Shire of Eltham Councillor and President. 38.56 - Ken Hines, ex Shire of Eltham Councillor and President. 41.11 - Harry Gilham, president of the Eltham District Historical Society. 43.55 - Sigmund Jorgensen in Long Gallery at Montsalvat, at start of the art auction to raise funds for community action. 45.50 - Unknown person conducting art auction. VHS Video cassette (poor quality) Converted to MP4 file format 45:01, 535MBvideo recording, 895 main road, alistair knox park, artworks, auction, barn gallery, barry rochford, community health centre, dallas howgate, delta demolitions, demolition, don cordell, eltham, eltham library, eltham shire office, eltham war memorial, eltham war memorial gate, eltham war memorial hall, great hall, harry gilham, jenni mitchell, john graves, library place, main road, memorial gardens, mervyn hannan, montsalvat, pitt street, protest, robert marshall, roundabout, shell oil, shillinglaw trees, sigmund jorgensen, sign, wayne phillips -
 Warrnambool and District Historical Society Inc.
Booklet - Warrnambool Visitor's Handbooks 1979-2024, Collett, Bain and Gaspar, Printers, 1979-2014
This is a collection of eight Warrnambool Visitor handbooks produced between 1979 and 2014 by the City of Warrnambool Tourist Information Centre. They contain maps of Warrnambool, lists of services, accommodation and tourist attractions as well as many advertisements for local businesses.These handbooks give a useful snapshot of businesses and tourist attractions in Warrnambool for each of the years covered. (1979, 1980, 1986, 1990, 1993, 1994, 1995, 2014)[.1a] A 48 page booklet with white pages and blue printing. The front cover has a coloured photograph of Flagstaff Hill with boats on a man made lake in the foreground looking across Lake Pertobe toward South Warrnambool. [.1b] A coloured bifold brochure. The front cover has a fisherman on a cray-boat holding a crayfish in the lower section. The top quarter has a blue back ground with white printing. The rear cover is red and has small photos of the Hopkins River and the Framlingham Forest. [.2] A 48 page booklet with white pages and black printing. The front cover is white with black writing on the left hand side and a colour photograph of the Loch Ard peacock. The Warrnambool Premier Town stylised logo of seven Norfollk pines above blue waves is in the top right hand corner. There is a blank ink Warrnambool Library stamp underneath the logo. The rear cover has photographs of The Twelve Apostles and the Hopkins Falls and the Premier Town Logo [.3] A 40 page booklet with mainly black printing on white paper. There are three fold out maps of Warrnambool and the surrounding district. The glossy cover has a black background with a colour photograph of the Twelve Apostles taken at sunset. The rear cover has three small of Proudfoot's boathouse on the Hopkins River, Flagstaff Hill, and the main beach area. The front cover has black writing inside to peach coloured rectangles. The inside rear cover has a fold out coloured tour map of Western Victoria. [.4] A 40 page booklet printed on glossy white paper with coloured photographs and black and red printing. The front cover has a photograph of The Twelve Apostles surrounded by a white border. There is red writing in the upper border. There is a sandy coloured writing superimposed across the bottom of the photograph and a Victoria's Shipwreck Coast logo in the bottom right hand corner. [.5] A 44 page booklet printed on white paper with black printing. The cream coloured cover has a pale red rectangle with blue writing on the right hand facing edge and includes two stylised Norfolk pines and with waves underneath. There is is an intersecting blue rectangle with cream printing. [.6] A 48 page booklet printed on white paper with black printing. The cover is brown with a cream vertical strip containing black writing on the right hand side. There is a stylised map from Geelong to Mount Gambier showing the Great Ocean Road across the cover. [.7] A 48 page booklet printed on white paper with black print. The glossy colour cover has a photograph of a Southern Right whale fluke. There is white printing on a the blue background of the sky and sea. The bottom left hand side of the front cover has a Tourism Victoria logo made of jigsaw puzzle pieces. The back cover has a stylised coloured map of The Great Ocean Road located in a white rectangle at the top of the page. Within the rectangle is a small map of Australia locating Victoria and the part of Victoria covered by the map. [.8] A 64 page A5 coloured booklet printed on white pages with black print. The white front cover has black and grey print with a colour photograph of two people holding coffee cups watching four race horses being exercised on the beach and in the water of Lady Bay in the early morning. The bottom right hand corner has a Tourism Victoria logo. The rear cover has a mainly blue back ground with a pink orange and green colour splats contains words advertising the 2015 Fun 4 Kids Festival [.1a] Warrnambool The Heart of Victoria's Great Southwest Visitor's Handbook [.1b] Warrnambool City for all seasons; The Heart of Victoria's Great Southwest [.2] Warrnambool visitor's handbook Warrnambool Premier Town 1979-1982 [.3] Warrnambool Handbook Victoria [.4] Warrnambool The Shipwreck Coast [.5] Welcome to Warrnambool Warrnambool Visitors Handbook 1993-1994 [.6] Welcome to Warrnambool Visitors Handbook 1994-95 Rear cover: Warrnambool Centre of Victoria's Shipwreck Coast on Australia's Great Ocean Road [.7] Warrnambool Shipwreck Coast - Great Ocean Road; You'll love every piece of Victoria; Visitors Handbook [.8] Warrnambool Great Ocean Road Official Visitor Guide; It's a wonderful Warrnambool; You'll love every piece of Victoria visitvictoria.com. Rear Cover Live entertainment.Workshops.Creativity.Action 28 June - 5 July 2015 Australia's Best Children's Festival F4K The ultimate winter school holiday adventure Fun 4 kids festival Warrnambool For more information visit Fun4kids.com.au Warrnambool great Ocean Road Victoriawarrnambool, visitor handbooks, tourist information guides, warrnambool maps -
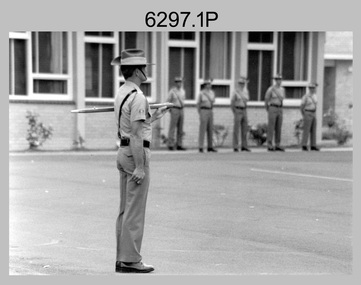 Bendigo Military Museum
Photograph - Army Survey Regiment – RSM Handover at CO's Parade, Fortuna, Bendigo, 1995
These 15 photographs were taken in 1995 during a CO’s Parade at the Army Survey Regiment, Fortuna, Bendigo in 1995. On this occasion outgoing RSM WO1 Phil Meagher handed over to incoming RSM WO1 Ken Johnston OAM MM. WO1 Phillip Nicholas Meagher served in the Australian Regular Army (ARA) from Jan 1971 to Jun 1997. He was RSM of the Army Survey Regiment from 1992 to 1995. He was succeeded by WO1 Ken Johnston OAM MM from the Royal Australian Infantry Corps, who was RSM for the remainder of 1995. WO1 Johnston served in the Citizens’ Military Force and the ARA from Feb 1966 to Mar 2002. A tribute in the Army Newspaper on the 14 May 2014 and discoverable on the Trove website, stated he passed away on 12 May 2014. In this tribute it stated he was a Vietnam War Military Medal recipient, known as a “Digger’s Digger” and for his direct no-nonsense approach. As RSM of the Army Survey Regiment, WO1 Johnston was instrumental in shaping and sharpening the military skills and behaviours of personnel who chose to continue in their reallocation to other corps in the ARA or the 1st Topographic Support Squadron in Enoggera, QLD. His tenure is covered in more detail on page 164 of Valerie Lovejoy’s book 'Mapmakers of Fortuna – A history of the Army Survey Regiment’ ISBN: 0-646-42120-4. On this occasion CO LTCOL Duncan Burns presented MAJ Mick Banham the Defence Force Service Medal for 15 years of efficient remunerated service in the Australian Army. This is a set of 15 photographs taken of a RSM Handover at a CO’s Parade at the Army Survey Regiment, Fortuna, Bendigo, 1995. The photographs were printed on photographic paper and are part of the Army Survey Regiment’s Collection. The photographs were scanned at 300 dpi. .1) - Photo, black & white, 1995. Outgoing RSM WO1 Phil Meagher. .2) - Photo, black & white, 1995. L to R: MAJ Mick Banham, outgoing RSM WO1 Phil Meagher. .3) - Photo, black & white, 1995. L to R: CO LTCOL Duncan Burns, MAJ Mick Banham. .4) - Photo, black & white, 1995. L to R: ADJT CAPT Brenton McDonald, RP SGT Peter Coles, CO LTCOL Duncan Burns, MAJ Mick Banham receiving Defence Force Service Medal. .5) - Photo, black & white, 1995. L to R: ADJT CAPT Brenton McDonald, CO LTCOL Duncan Burns, MAJ Mick Banham (background), outgoing RSM WO1 Phil Meagher, incoming RSM WO1 Ken Johnston OAM MM, CAPT Bin Fashar Sutiman (Indonesian Army). .6) - Photo, black & white, 1995. L to R: SGT Perry Langberg, MAJ Dave Stephenson, SPR Trevor King, SPR Craig Smith, CAPT Colin Davidson, LCPL Mark Fedden, SPR Donna Grayland. .7) - Photo, black & white, 1995. L to R: unidentified (x3), RSM WO1 Phil Meagher, SGT Darren Wilkinson, SSGT Steve Drummond, unidentified, SPR Donna Grayland, SPR Allison Ottaway, unidentified, back of ADJT CAPT Brenton McDonald, unidentified (x4), CPL Darren Maher, SGT Laurie Justin. .8) - Photo, black & white, 1995. Outgoing RSM WO1 Phil Meagher, remainder unidentified. .9) - Photo, black & white, 1995. L to R: WO2 Peter Imeson, CPL Darren Maher, unidentified, SSGT Steve Winner. .10) - Photo, black & white, 1995. L to R: MAJ Mick Banham, ADJT CAPT Brenton McDonald, CAPT Doug Arman, WO1 Phil Meagher, CAPT Bin Fashar Sutiman (Indonesian Army), WO1 Ken Johnston OAM MM, CAPT Bill Griggs, unidentified. .11) - Photo, black & white, 1995. L to R: WO1 Ken Johnston OAM MM, ADJT CAPT Brenton McDonald. .12) - Photo, black & white, 1995. Outgoing RSM WO1 Phil Meagher. .13) - Photo, black & white, 1995. L to R: Outgoing WO1 Phil Meagher, incoming RSM WO1 Ken Johnston OAM MM. .14) - Photo, black & white, 1995. L to R: Incoming RSM WO1 Ken Johnston OAM MM, outgoing WO1 Phil Meagher. .15) - Photo, black & white, 1995. L to R: MAJ Mick Banham, RP SGT Peter Coles, outgoing RSM WO1 Phil Meagher..1P to.15P – There are no annotations.royal australian survey corps, rasvy, army survey regiment, army svy regt, fortuna, asr -
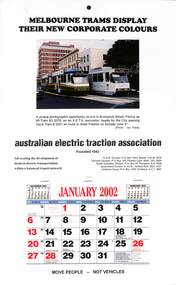 Melbourne Tram Museum
Document - Calendar, AETA 2002 featuring M>Tram and Yarra trams B2 class trams
The AETA published calendars on an annual basis through to 2005, promoting electric transport in Public Transport. The photo shows the two different liveries adopted by the Franchised operators M>Tram and Yarra trams when the system was split into two different companies. Features B2 class trams 2078 and 2021. The hand written note, dated 28-11-2005 by Keith Kings was with the calendar and records that Ken Craven was not able to arrange production for a 2006 calendar. Yields information about the AETA promotional activities.Australian Electric Traction Association (AETA) Calendar for 2002, featuring a photo by Ian Thiele of M>Tram and Yarra Trams B2 class trams passing each other in Brunswick St Fitzroy. Gives contact details for the AETA divisions. Stapled to the sheet is a 12 sheet preprinted calendar for 1985 with various details of holidays etc. Printed on card with a punched hole on the top edge. The photo is glued to the sheet. Hand written note on ruled quarto sheet.calendars, aeta, tramways, b2 class trams, tram 2021, tram 2078, brunswick st, m>tram, yarra trams, franchise, ken craven -
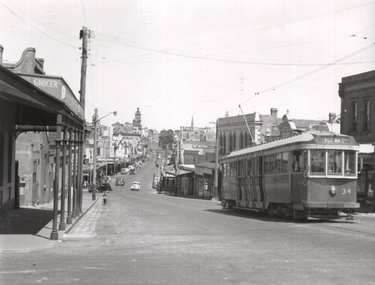
 Ballarat Tramway Museum
Photograph - Geelong 21 and 22 crossing at the Albert St loop in Pakington St, Wal Jack, 23-6-1949
Geelong 21 and 22 crossing at the Albert St loop, the second loop in Pakington St. Tram 21 has the destination of Station, and 22 the destination of West. See item 7815 for negative. Date - 23-6-1949. Refer to "Twenty five years ago, the Closure of the Geelong Tramways", by Ken McCarthy, April 1981 issue of Trolley Wire page 10 for routing information.Yields information about tram operations in Pakington St.Black and white photograph, with hand written details on rear.See rear image. tramways, trams, geelong, tram 21, tram 22, pakington st -
 Ballarat Tramway Museum
Photograph - Tram 34 - Bakery Hill, Ken Winney, 12/1949
Photograph shows SEC Ballarat tram No. 34 climbing Bakery Hill in Victoria St. The photo is taken at Humpffray St looking west. There is a Grocer on the left hand side of the photo. Photo by I K Winney of Sydney, 12/1949.Yields information about the view looking west along Victoria St from Humpffray St during 1949.Black and white photograph with photographers details on rear."Bogie No. 34 (ex MMTB C class) en route to Victoria St. Ballarat city area in background. 12/1949, I K Winneytramcars, tram 34, victoria st, bakery hill -
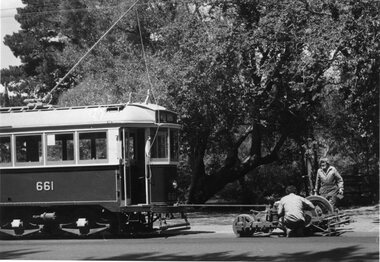 Ballarat Tramway Museum
Photograph - Black & White Photograph/s, Dave Macartney, 21/02/1985 12:00:00 AM
Has a strong association with the people employed by the BTPS in 1985 under the CEP Scheme and the completion of the overhaul of No. 40's trucks.Black and White photograph of No. 661 with one of 40's truck on a bearing testing run at St Aidans Driver 21/2/1985. Photo has Ken Walker and Warren Doubleday looking at the truck. Photographed by Dave Macartney. See April 1985 Trolley WireOn rear in ink "661 with 50's truck on bearing testing run, St Aidans Drive 21-2-85", label "Photo Page 35 bottom Reduced to 5 1/2" x 3 1/8". and in bottom left hand corner "Photo Dave Macartney"tramways, trams, btps, cep, bogies, maximum traction, tram 661 -
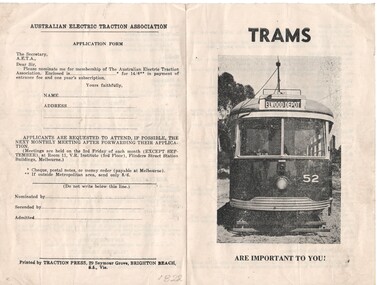 Melbourne Tram Museum
Pamphlet, Australian Electric Traction Association (AETA), "Trams are important to You", early 1950's, mid to late 1960's
... are in dollars hand written. Has Ken Craven as Secretary of the AETA.... Interurban train, mid 1960's? Fees are in dollars hand written. Has ...Pamphlet or membership application form, folded sheet of paper printed on semi gloss paper, titled "Trams are important to You", advertising membership of the AETA, Australian Electric Traction Association with an application form on the last page. Has a photo of VR 52 on the front cover. Inside has list of activities of the AETA, its magazine and branch and meeting details. Membership was 8/6. Printed by Traction Press. .1 - ditto, three fold with a detachable application section, detailing basis of the AETA, with a photo of a trams in Germany, Melbourne, Brisbane Trolley bus and a Sydney Interurban train, mid 1960's? Fees are in dollars hand written. Has Ken Craven as Secretary of the AETA.trams, tramways, aeta, membership, forms -
 Melbourne Tram Museum
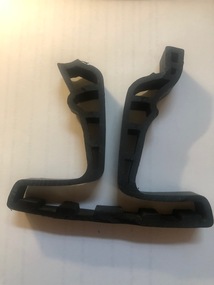
Functional object - Material sample, rubber boot for a rail, 2002
Material sample - rubber boot and associated notes: 1 - rubber extruded section that was secured around the base and sides of the rail and held in position with metal clips. Made for 41 kg/m tramway rail. 2 -Note printed on A4 paper about the section, its use, where and who - John Holland 2002, between Union Road and Box Hill, enables some track resilience and electrical isolation. 3 - Envelope addressed to Keith Kings from Ken Hall of Preston Workshops with a hand written note about the product and its use. Received August 2003trams, tramways, trackwork, box hill, track construction, rails, civil engineering, tram 106 -
 Melbourne Tram Museum
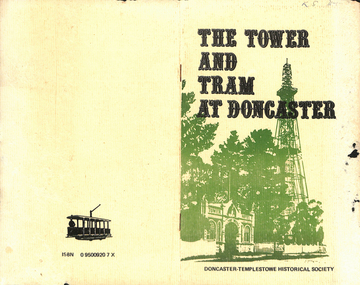
Book, Doncaster - Templestowe Historical Society, "The Tower and Tram at Doncaster", 1980
Book - 2 folded sheets (4 pages) centre stapled within an manila coloured cover, titled "The Tower and Tram at Doncaster", published by the Doncaster - Templestowe Historical Society 1980. Written by Irvine Green and Ken Smith. Gives a brief history of the Tower and Doncaster Tram including a reproduction of the Timetable on the inside of the cover.Has remnants of "K. Stodden" in ink on the top right hand corner of the cover,trams, tramways, doncaster, box hill, tramways -
 Melbourne Tram Museum
Document, Australian Electric Traction Association (AETA), "AETA submission - Victoria Harbour", Jan. 1990
Submission from Australian Electric Traction Association (AETA) dated Jan. 1990 about public transport options to Victoria Harbour, Melbourne docklands. Gives options for extension of Flinders St (tram route 48) or Collins St. Includes notes on La Trobe and Bourke St routes and suggestions re the Webb Dock railway line, ferries, monorails, and car parking. Signed by Ken Craven. Includes two diagrams.Yields information about the AETA's work and a 1990 submission re Victoria Harbour Docklands.Photocopy of a 5 page A4 document, was stapled in top left hand cornertramways, trams, aeta, docklands, new tramways, submissions, victoria harbour -
 Melbourne Tram Museum
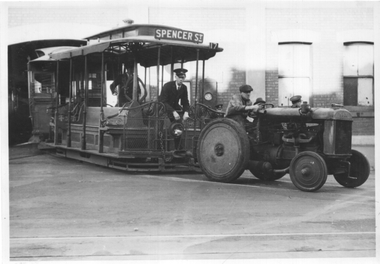
Photograph - Cable tram being towed out of North Fitzroy depot, The Age, late 1930s
The photograph shows a cable tram set being towed out of a car depot or car house by a tractor, North Fitzroy Nicholson St depot. The grip is in the raised position, with the gripman's hands on the brake levers. The conductor is waiting to pull the pin that secures the tow bar. The tram has the destination of Spencer St. Photo late 1930s or 1940. Note the Bundy clock on the depot wall.Yields information about towing a cable tram out of a car house probably shortly before closure of the cable tram system in 1940.Black and White photograph - printed on plain paper.On the rear has the Copyright stamp of The Age and pencil number "KM-M-007", Ken Magor stamp, "tram being towed out of depot" and number 4838.cable trams, tractor, towing cable tram, car house, north fitzroy depot -
 Glenelg Shire Council Cultural Collection
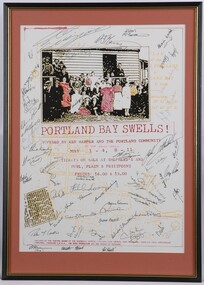
Poster - Poster - Portland Bay Swells, c. 1983
From Portland Town Council Art Programme. Sponsored by PTC's Art Program, the Theatre Board of the Australian Council, Portland 150th Anniversary Committee, Portland CEMA and the Myer Foundation.Poster for theatrical production. The central image is a retouched photograph of a group of people (men and women) outside a building. The building is made of wood. The people are standing in front of the building and on its roofless verandah. They are dressed in clothing of c1910's. The image is black and white with some items of clothing hand coloured in with red, orange and yellow. The entire poster is covered with approximately 61 signatures. On lower left is a reproduced newspaper clipping of paper addressing a welcome home ceremony for Gallipoli soldiers. In pale yellow in background is a map of Portland Bay. In orange mount in black and gold frame. Below image are the words: "Portland Bay Swells! Devised by Ken Harper and the Portland Community." Below this are details of performance times and ticket details. Mounted in peach matt. Black wooden frame with glass.Front: (no inscriptions) Back: (no inscriptions) -
 Melbourne Tram Museum
Letter, Ken Craven, Stamps - "Australia's Historic Tramways, 1989
Set of three items associated with a letter from Ken Craven, Secretary of the AETA to John Belot. .1 - White DL size envelope with the five of the Oct 1989 Historic Tramway Stamps with the tram cancellation stamp dated 11 October 1989. Has the "Australia's Historic Tramways" logo in the lower left hand corner, hand addressed to John Belot and the stamp for the stamp show Melbourne 18-22 October 1989 in the bottom right hand corner. On the rear has details of the stamp issue, W.K. Craven's address stamp, and two cancellation stamps - Blackburn 11 Oct. 1989 and Caulfield Post Office stamp. .2 - Handwritten letter from Ken Craven, Secretary of the AETA to John Belot, noting the exhibition at Box Hill and his forthcoming trip to NZ and the Transport Art ticket enclosed. .3 - Transporting Art tram No. 13 ticket No. 0085, dated 17th July 1989, Jenyns tram (Lorraine and Bob). See also Reg Items 470 to 474 for other examples and associated materials and 510 for a Poster. On the rear are detail of the stamp issue, the designers and cover design.trams, tramways, stamps, australia post, aeta, letters, transporting art -
 Melbourne Tram Museum
Photograph - W2 class tram in Spencer St, 1947
Black and white photograph showing a W2 class tram, climbing the Spencer St hill near Collins St. The tram has a war time white stripe on the rear cabin. Has the Victorian Railways Head Office and the Outward Parcels Office in the background. Also visible is the VR Spencer St yard clock.Yields information about the W2 class trams and Spencer St station buildings in 1947Photograph with hand written notes on rear. Printed on Kodak Velox paper.In pencil "Recent Melbourne about 47 in Mar or April" and the Ken Magor stamp.trams, tramways, w2 class, spencer st