Showing 74 items
matching north road railway crossing
-
 Ballarat Tramway Museum
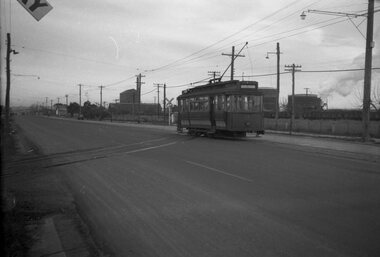
Negative, Wal Jack, late 1940s
Negative and Digital images of the Wal Jack Geelong Negative file of Geelong 17 inbound in Melbourne Road on the North line, near Swinburne St at the level crossing used for goods traffic, opposite North Geelong railway yard. Tram has the destination of Belmont. In the background are various gasholders. Photo late 1940's. trams, tramways, geelong, north, level crossings, tram 17 -
 Kew Historical Society Inc
Photograph - Railway level crossing in Glenferrie Road, Glenferrie, E.J. Dower, c.1912
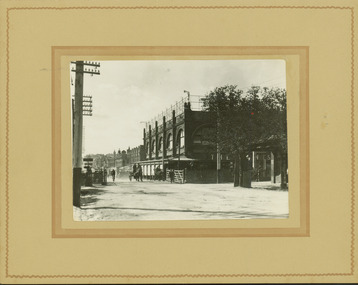
One of a series of photographs, taken by Edgar James Dower in the second decade of the twentieth century. Born and raised in Olinda, his family later moved to Surrey Hills. He worked as an adult as a clerk in the city office of the Metropolitan Gas Company, and in his role as a 'collector', he was able to photograph scenes including the construction of tramlines and associated buildings in Kew, Hawthorn, Camberwell and Surrey Hills. Later he established a real estate agency with his brother - the E.J. Dower Real Estate Agency, Dandenong Office.The image is an historically significant record of the development of transport infrastructure which was used to connect Victorians in the first two decades of the twentieth century. This development resulted from increases in population and the consequent extension of Melbourne's suburbs. The photographs, both individually and collectively, richly detail the labour of workers and the tools and machinery used to create and extend Melbourne's public transport network in the years preceding and during World War 1.Digital copy of an original mounted photograph showing Glenferrie Road Hawthorn, looking north towards the old railway level crossing that existed before the line was elevated on a bridge over Glenferrie Road. "The Don Store" at right is immediately behind the old railway level crossing. The tree and shops at left before the crossing were to be removed / demolished as part of the realignment of the train tracks.Annotated verso: "1914 [deleted]/1913 / Glenferrie Road showing railway gates / Taken just before the commencement of the regrading of railway line to Camberwell".theme --- travelling by tram, theme -- connecting victorians by transport and communications, glenferrie road -- hawthorn (vic.), railways -- hawthorn, the don store -- hawthorn (vic.) -
 Kew Historical Society Inc
Photograph - Railway level crossing in Glenferrie Road, Glenferrie, E.J. Dower, 1912
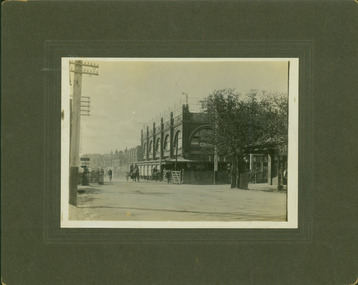
One of a series of photographs, taken by Edgar James Dower in the second decade of the twentieth century. Born and raised in Olinda, his family later moved to Surrey Hills. He worked as an adult as a clerk in the city office of the Metropolitan Gas Company, and in his role as a 'collector', he was able to photograph scenes including the construction of tramlines and associated buildings in Kew, Hawthorn, Camberwell and Surrey Hills. Later he established a real estate agency with his brother - the E.J. Dower Real Estate Agency, Dandenong Office.The image is an historically significant record of the development of transport infrastructure which was used to connect Victorians in the first two decades of the twentieth century. This development resulted from increases in population and the consequent extension of Melbourne's suburbs. The photographs, both individually and collectively, richly detail the labour of workers and the tools and machinery used to create and extend Melbourne's public transport network in the years preceding and during World War 1.Digital copy of an original mounted photograph showing Glenferrie Road Hawthorn, looking north towards the old railway level crossing that existed before the line was elevated on a bridge over Glenferrie Road. "The Don Store" at right is immediately behind the old railway level crossing. The tree and shops at left before the crossing were to be removed / demolished as part of the realignment of the train tracks.Annotated verso: "Glenferrie Road, Glenferrie, showing railway gates and Walker's Store / Taken prior to the construction of electric tramline and the regrading of Camberwell Railway Line / Taken by E.J. Dower about 1912".theme --- travelling by tram, theme -- connecting victorians by transport and communications, glenferrie road -- hawthorn (vic.), railways -- hawthorn, the don store -- hawthorn (vic.) -
 Melton City Libraries
Photograph, 'Melton South Chaff Mill employees, Unknown
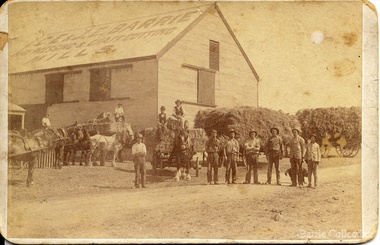
Charles E “Ernie” Barrie started constructing a Chaff mill on the corner of Brooklyn and Station road in 1900. It soon became a thriving business and was ideally located close to the railway line. Ernie and his father William and other Barrie brothers had been operated travelling chaff cutters in the district of Melton and Werribee. Within a short time the mill expanded into two big sheds in partnership with his brother James E known as “Ted”. The eldest brother William was in the Manager living in Melton South. In 1906 Ernie applied for a railway crossing on Brooklyn Road to have direct access for railway trucks to be shunted to the mill to be loaded. The Mill was also had the first phone to be connected, No 1, and No’s 2, 3 were the Golden Fleece and Macs Hotels. In 1906 Ernie married Jessie Lang daughter of the Head Teacher at Melton State School No 430 (1896 –1917). The Barrie house on the north side of the mill was completed in August 1906. It survived for almost 60 years until demolition. Chaff mills were very susceptible to fires and often burnt down and would be rebuilt again ready for the peak of the harvesting season. The final demise of the Mill occurred in a spectacular blaze on the night of Friday 2nd December 1977, just before the earth tremor as reported in the local paper. Brian Dobson the local photographer lived close by and captured the night blaze. A video was also taken of the action by the fire brigade. My parents Bon and Edna Barrie were living at 19 First Avenue, and took colour slides of the smouldering ruins in the half -light. Ironically Bon had spent the first year of his life (born in April 1909 and sister Mary born October 1907) at the house beside the mill. Trethowan’s Chaff mill in Brooklyn road was also destroyed by fire, which stated in the evening on Tuesday April 28th 1987. It was established in 1910 by Dixon Brothers, followed by, Ebbot & Kebby, Robinson, Trethowan and Butler and was with the Trethowan family when it burnt down. Melton South was small a community referred to as Melton Railway Station. Member of the community raised the idea to have a public hall. In 1909 Cr Barrie, Mr Nesbitt and Delany formed a committee to build a community hall. Cr Barrie donated the land and The Exford Hall was completed in September 1910 later to be named Victoria Hall. It was demolished in 1992. Colour slide in Barrie archive. In April 1910 the Ernie sold the Mill to Glover Onians (HSK Ward) family moved away to a property in Trundle NSW. Ernie had acquired 640 acres (a square mile) and leased a further 1920 acres of adjoining land. It was the practise of the farmers in the area at the time to buy up or lease the surrounding land from the 640 acre crown land blocks to make up acerage for a viable wheat farm. His wife Jessie found the climate to be very hot and when the Darlingsford property at Melton was put up for sale in the latter part of 1910 and was passed in at the auction. My grandfather saw this an opportunity to return to Melton. The negotiations to Darlingsford were finalised on May 11th 1911. Barrie bothers with connections to Chaff mills and farming in Melton from the 1900s William Henry, Charles Ernest, James Edwin, Samuel John, Robert, Arthur Roger, Albert Walter. Three grandsons and a great-grandson are in business earthmoving and farming in Melton today. (2013) Memoirs by Wendy BarrieEmployees at Chaff Mill, it was located on the corner of Brooklyn and Station Road, Melton South. local identities, agriculture -
 Wodonga & District Historical Society Inc
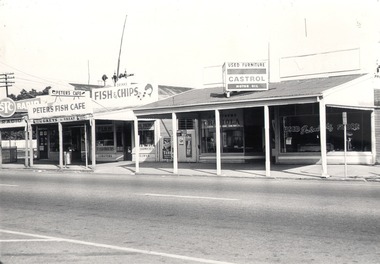
Photograph - Mann Collection Album - High Street West - Vee Jay Radio, Peter’s Fish Café, Jim Matthews Store, C.1970s
Elaine Mann was married to David Mann, a successful Wodonga businessman and community leader who passed away in Wodonga in June 2012. David was a member of the Mann family who began their business in Wodonga in 1920. Elaine was a teacher in Wodonga for many years and an active member of the community.This photo collection is of significance as it documents how the businesses and buildings in Wodonga have evolved and contributed to community throughout the late 20th century.These businesses were located just north of the railway crossing between Melbourne Road and Bond Street. The railway signals can be seen in the background above Peter’s Fish Café. These buildings have all been demolished and the area is now part of Junction place. Jim Matthews was selling Radiola car radios. He also sold used furniture and had a bike repair business at this location, before later expanding his bike business on the south of the railway crossing, Peters Cafe was at 103 High Street. It was operated by the Bouteris family in the early 1970s. It later became the Chao Thai Restaurant. Vee Jay Radio was operated by Mr. Albert Eddie Branwhite. He moved to Wodonga in 1946 and started selling radio repairs door to door. He then set up his store in 105 High Street. This site had previously been a barber’s shop. The business involved electrical repairs and appliance sales. In the late 1950s Mr. Branwhite established the Wodonga Express. He set the type and printed from the back of this shop until relocating to the Lincoln Causeway. He was actively involved in the community, including many years on the Wodonga Hospital Board of Management which was recognised with a life governorship. Mr. Branwhite passed away in 2001, wodonga businesses, high st wodonga, vee jay radio, jim matthews, peter’s fish café, mr. albert eddie branwhite -
 Canterbury History Group
Photograph - J. Weymouth , Ironmonger, c1910
J. Weymouth Ironmonger, north side of Canterbury Road. Unsealed road and gutters, horse and cart in front of shop and closed railway gates black and white photographcanterbury, canterbury road, j. weymouth ironmonger, railway crossings, horse drawn vehicles -
 Melbourne Tram Museum
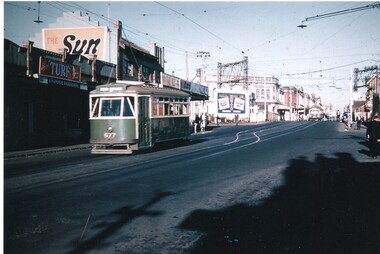
Photograph - Colour Print, Keith Stodden, 1959
Colour print of X1 class tram No. 677 eastbound in Glenhuntly road, just prior to the Elsternwick station level crossing. Shows the railway overhead structures, shops on the north side of the road with signs for Turf tobacco, The Sun, The Age, the Rex?? and an advertisement board for Hoyts. Photo shows the crossover just before the level crossing. From a slide by Keith Stodden. Printed on Fujichrome Crystal Archive paper.On rear in black ink "Elsternwick 1959 from slide by Keith M. Stodden"trams, tramways, elsternwick, glenhuntly rd, x1 class, level crossings, tram 677 -
 Melbourne Tram Museum
Document - Personal Papers, Jack McLean, Keith Kings, "Tramway / Railway level crossings", 1954
Set pf personal papers concerning tramway / railway level crossings in Melbourne. Consist of .1 - letter to Ross dated 19/3/1984, carbon copy from Jack McLean, printed on computer paper perforated computer paper torn into strips - has hand written notes. Three separate sheets. Covers Market St Melbourne (Queensbridge) South Melbourne (City Road) St George Road - North Fitzroy Queens Parade Clifton Hill Epsom Road Showgrounds Glenferrie Road Hawthorn Glenferrie Road Malvern Burke Road Camberwell, Glenferrie Rd Kooyong, Burke Road Gardiner Glenhuntly Road Glenhuntly Glenhuntly Road Elsternwick, Whitehorse Road (Deepdene), Riversdale Road, Riversdale Lygon St North Carlton Nicholson St Footscray Nicholson St North Fitzroy, .2 - six pages - retype of above document on A4 computer printing paper - covers the same material. .3 - Hand drawing of the Melbourne rail system with crossing dates including bridges noted on it for cable and electric tramways. Has initials KK 12/54 in bottom right hand corner. drawn on lined double width foolscap paper.trams, tramways, level crossings, railway squares, tramway square, cable trams -
 Melbourne Tram Museum
Photograph - Black & White Photograph/s, mid 1921
Photograph, Black and White, of the Level Crossing in Lygon St with the inner Circle Railway North Carlton, with Melbourne Brunswick and Coburg Tram No. 19 crossing with the interlocked gates and signal box in the view. Photo mid 1921. The level crossing was electrified on 5-7-1921, but the wires etc would have been positioned earlier. See Weekly Notice Extracts 1894-1994, published 1996.In ink on the rear: "Melbourne - Ex Coburg Trust route / No. 19 in Lygon St at railway crossing North Carlton / (later No. 166) After 10/8/1920. Has KSK stamp and Number LWR-3 and CEE 13 in to right hand corner.trams, tramways, lygon st, north carlton, level crossings, mbctt, tram 19, s class -
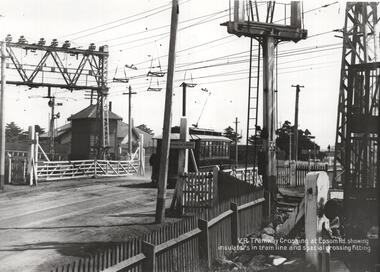 Melbourne Tram Museum
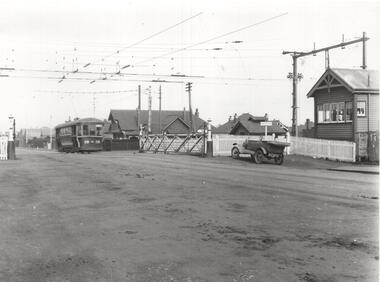
Photograph - Black & White Photograph/s, Victorian Railways, c1919
Photograph, Black and White, of the Level Crossing in Epsom Road, Flemington or Ascot Vale showing the overhead arrangement and structures either side of the road to provide power to either the trams or the trains. The small signal box is in the view as well as the interlocked gates. A NMETL saloon tram is crossing the railway lines. Photo late 1919 or 1920. Has the words "VR Tramway Crossing at Epsom Rd showing insulators in tram line and special crossing fitting." The level crossing was electrified on 18-8-1919 and abolished mid 1925 when the underpass was built. See Weekly Notice Extracts 1894-1994, published 1996.In ink on the rear: "Melbourne - North Melbourne Electric Tramway and Lighting Co. Ltd - No. 4 in Epsom Road on level crossing to Showrooms and Flemington Racecourse. About 1919-1920." Has KSK stamp and Number LWR-4 and CEE 12 in to right hand corner.trams, tramways, level crossings, nmetl, epsom rd, showgrounds, ascot vale, tram 4 -
 Melbourne Tram Museum
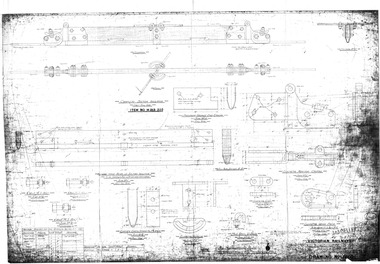
Drawing, Victorian Railways, "Overhead at rail tram crossings", 1920 to 1959
Set of 12 Victorian Railways prints of drawings of overhead arrangements at locations where trams and trains crossed in Melbourne. .1 - L6866 - wood break section insulator for tramway intersections, earthed section - has Merz McLellan stamp, originally prepared by the British Insulated and Helsby Cables - 1920. .2 - L5564 - Tramway intersection wood break section insulator - 5/49 .3 - L687 - Tramway and Railway Intersection fittings details - has reference to original 1920 drawings, Rev C 9/56. .4 - L6514 - Tramway and Railway Intersection Nicholson St North Fitzroy - 5/49 .5 - L652D - Tramway and Railway Intersection fittings details - has reference to original 1920 drawings, Rev D 8/48. .6 - L6656 - Tramway and Railway intersection fittings assembly - 6/56 .7 - L6511 - Tramway and railway intersection fittings assembly - for trams fitted with carbon skids - 4/55 .8 - L7025 - Tramway and railway intersection Glenhuntly Road GA - pencil drawings 6/59 .9 - L8106 - GA for tramway crossing Lygon St originally prepared by the British Insulated and Helsby Cables - 1920. .10 - L1749 -GA for tramway crossing Burke Road, originally prepared by the British Insulated and Helsby Cables - 1920. .11 - L1757 - blue print - fittings for tramway and railway contact wires at level crossings originally prepared by the British Insulated and Helsby Cables - 1920. .12 - L3506 - GA of tramway crossing St Georges Road. 6/30trams, tramways, railways, tramways, overhead, glenhuntly rd -
 Melbourne Tram Museum
Photograph - Digital Image, Kevin O'Reilly, series of three images of the Hawthorn Bridge over the Yarra, c1930, c1930's
Image from CD (Compact Diskette for use in computers) - see Reg Item 135. A series of three images of the Hawthorn Bridge over the Yarra, c1930, during the era with problems with the bridge. See separate article for more details. Richmond 6, Richmond, Richmond 3 on the CD as original files. .1 - Looking from the south west, at the Hawthorn bridge with the temporary wooden bridge being constructed on the south side. Has the cable tram depot in the photo and part of the Burnley racing course. Temporary track on the north side of the steel bridge and crossings can be seen. .2 - Looking along Bridge Road to the east with Hawthorn Bridge in the middle of the photograph. Shows the industrial and residential areas, Hawthorn Railway Station and part of the Burnley Race course, the cable tram depot building. W class tram in Church St Hawthorn and W class tram crossing the bridge on the north side temporary track. Note the cable tram used as a shelter on the north east corner of the bridge. .3 - Looking south along River St towards Bridge Road, with the Yarra River and Hawthorn Bridge on the left side of the photograph. Shows the industry in the area at the time, wool and skin Merchants, north side of the cable depot, housing and the outlook to the river!trams, tramways, hawthorn, yarra river, burnley, richmond, hawthorn bridge -
 Melbourne Tram Museum
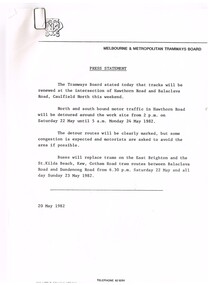
Document - Press Release, Melbourne & Metropolitan Tramways Board (MMTB), "Press Statement", Jun. 1982
Set of four MMTB Press Statements or Press Releases with MMTB letterhead. Photocopied onto A4 paper. 1. Renewal of tracks - Caulfield North - 20/5/1982. 2. Maintenance of railway crossing - Riversdale Road - 15/6/1982. 3. Maintenance of Bridge Rd and Church St Richmond - 1/6/1982 4. Maintenance work in Pascoe Vale Road, Moonee Ponds - 16/6/1982Item 4 has a handwritten note in ink "NB now half a "Grand Union" at Sydney Road & Moreland Rd"trams, tramways, mmtb, trackwork, road works, news broadcasts -
 Whitehorse Historical Society Inc.
Photograph - B/W Photograph, Railway Crossing Mitcham, 1/09/1976 12:00:00 AM
... Black and white photo of Railway Crossing, Mitcham Road... photo of Railway Crossing, Mitcham Road, looking north Railway ...Black and white photo of Railway Crossing, Mitcham Road, looking northmitcham road, mitcham, railway crossings