Showing 173 items matching " tram 69"
-
 Ballarat Tramway Museum
Photograph - Digital image, Wal Jack, 11/12/1943 12:00:00 AM
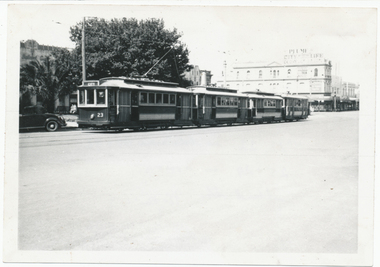
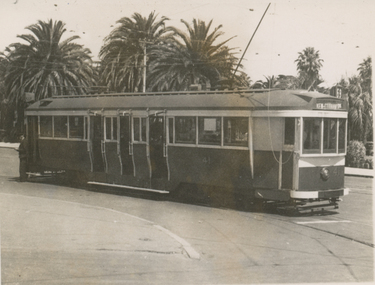
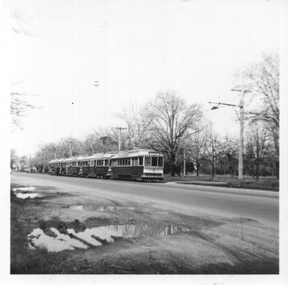
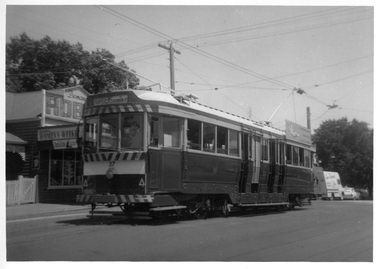
Yields information the appearance of the SEC tram fleet in 1943 when parked in City Loop. None of these trams remain in Ballarat today.Digital image from the Wal Jack Ballarat Album of trams 23, 22, 25 and 29 in Sturt St loop 11-12-1943. In the background is the Ballarat Courier Building and in the background is an advertisement for Plume, and City Mutual Life insurance. See image i2 for rear of photograph. See image i3 for hi res scan of print. See image i4 for hi res scan of negativeon rear of photo in ink, "SEC Ballarat, No. 23, 22 ex Adelaide 69 and 92, 25 and 29 ex MMTB Sturt St 11-12-43" and in top right hand corner Wal Jack copyright stamp with number "T56" written.trams, tramways, sturt st, city loop, grenville st, tram 23, tram 22, tram 25, tram 29 -
 Ballarat Tramway Museum
Photograph - Digital image, Wal Jack, 11/10/1939 12:00:00 AM
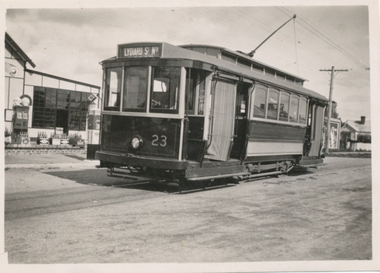
Yields information about SEC No. 23, its repainting and the streetscape at a Service station.Digital image from the Wal Jack Ballarat Album of No. 23 at Rubicon St, Redan, has the destination of Lydiard St North. Has in the background a service station with shell bowsers. Note the oil bottles alongside the bowsers. Note very similar image to Reg Item 4346. See image i2 for rear of photograph. See image i3 for hi res scan of print. See image i4 for hi res scan of negativeon rear of photo in ink, "Ballarat No. 23 ex Adelaide 69 Rubicon St 11-10-39" and in bottom right hand corner "W. Jack T35"trams, tramways, redan, rubicon st, sebastopol, tram 23 -
 Ballarat Tramway Museum
Photograph - Digital image, 11/04/1944 12:00:00 AM
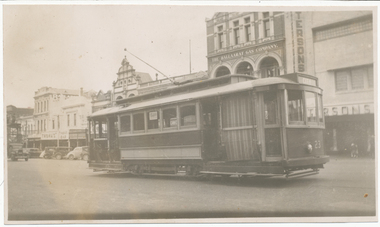
Yields information about Ballarat tram No. 23 in 1944 and the Sturt St east end south side streetscape.Digital image from the Wal Jack Ballarat Album of a photograph of No. 23 in Sturt St parking loop south side east end with the Paterson's store, Ballarat Gas Co and Thomas' Tarax bar in the background. On the left hand edge is the tower truck. Dated 11-4-1944. See image i2 for rear of photograph. On rear of photograph in ink "Ballarat Tramways No. 23 (ex Adelaide "A" 69) on parking loop, Sturt St Ballarat 11-4-44" and "R. Pearson Photo" in bottom right hand corner.trams, tramways, sturt st, city loop, tram 23 -
 Ballarat Tramway Museum
Memorabilia - Scrap book
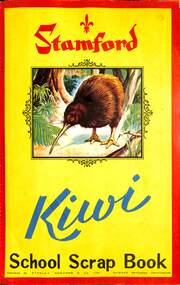
Inside front cover - reproduction of the Ballarat white on black destination roll by the TMSV c1971 page 1 - Newspaper cutting "Tram Era Ends in Ballarat" from The Courier's special supplement. page 2 - ditto page 3 - blank page 4 - Newspaper cutting from a Melbourne paper - "Last tram to Ballarat" Nine small B&W photos taken during the ARHS TMSV Tram tour 21/8/1971 - see btm5989.1 > 5989.7 page 5 - Seven B&W photos ditto - see btm5990.1 > 5990,7 Murray Views postcard No. 51 of Sturt St, taken at Grenville St - see btm5991i page 6 - Letter from The Ballarat Courier, on letterhead to Ellen enclosing photos of the tram 42 being moved to Zion Congregational Church Sebastopol and one photograph - see btm5992i1 page 7 - one large Courier photo tram 42 at the church and four small black and white photos of the tram 42 at the church - see btm5992i2 to 5992i6 five photos of Ballarat bogie trams - see btm5993i1 to 5993i page 8 - six photos of Ballarat c1970 - see btm5994i1 to btm5994i6. Page 9 - Newspaper clipping of Ballarat 36 in Melbourne and black and white photo of 36 and a decorated advertising tram in Swanston St. See also btm3173. page 10 - TMSV produced listing of Ballarat tramcars dated Feb. 1971 and two illustrations - ESCo 8 and SEC 17 at night. page 11 - blank Page 12 to 18 - newspaper clippings from The Courier's supplement. Page 19 - ditto and Nu-color-vue Ballarat Postcard BT 69 - see Reg Item. btm960i Page 20 to 23 - newspaper clippings from The Courier's supplement. Page 24 - ditto and and Nu-color-vue Ballarat Postcard BT 65 - see Reg Item. btm669i Page 25 - Illustration of No. 27 at the depot with the "1,000,000" miles in Ballarat Banner - Courier Photo - see btm 3316i and Notes written by Keith Kings on the history of No. 27 and the TMSV tour - 29/6/1988. Page 26 and 27 - newspaper clippings from The Courier at the time of the re-opening of the Ballarat trams - BTPS 1975. See Reg Item btm5996i1 and i2. Inside rear cover - ARHS / TMSV tour and photo stop notes for the Farewell Ballarat Tram Tour - 21/8/1971. Ellen Butland - a driver at Kew Depot, 1st women driver at Kew and 5th in the MMTB - via Ron Scholten 2/11/13.Has a strong association with a Melbourne tram driver who assembled the scrap book and series of photos of Ballarat trams at the time of closure. Yields information about the tram operations.Stamford Kiwi School Scrap Book - card covers, 23 sheets, spiral bound, titled "Ballarat", prepared by Ellen Butland of Auckland following the closure of the SEC Ballarat Tramway system. Each page has been scanned. Black and white photos have been separately catalogued - as noted below."Ballarat" in top right hand corner in ink.destination roll, closure, arhs, tours, courier, tourism, zion congregational church, trams, tramways, ballarat -
 Ballarat Tramway Museum
Postcard, Nu-color-vue or Nucolorvue Productions, "Looking west up Sturt Street", 1960s
Postcard showing Sturt St from the building on the north east corner of Sturt and Grenville Sts. Shows three trams in the parking loop, the small shelter and a general view looking west along Sturt St. - 1960sYields information about Sturt St looking west from Grenville St.Postcard - colour with serated edges by Nu-color-vue - No. BT 52. Mounted on a dark grey sheet with another postcard - Nu-color-vue No. BT 69, see Reg Item - 960 and 9304 for an unmounted copy.trams, postcard, sturt st, grenville st, shelters -
 Ballarat Tramway Museum
Photograph - Black & White Photograph/s, Wal Jack, 4/01/1943 12:00:00 AM
Black & white photograph of M&MTB 'E' 41 on Balloon loop at St. Kilda 4-1-1943. Tram has painted white strip under drivers windows, above headlight and bumper bars (part) and on edge of footboards. Has Kew-Cotham Road destination. Route 69. See inscription markings for further details. Note: the tram class was originally and E, but maximum traction cars were later classified by the MMTB as "C"; see Destination city p14. Tram was later to become SECV Ballarat No. 38. Hi Res image and of back added 10-12-2013 Reimaged 17/7/2017 both front and back.On rear in ink. 'M&MTB, 'C' class No. 41 (Maximum Traction Trucks) ex Prahran & Malvern TT. car on Balloon Loop, Esplanade St. Kilda, (opp. Luna Park). St. Kilda - Cotham Rd. Kew line - route No. 69. 4-1-43' Has been stamped 'W.Jack, No. T337, copyright'.trams, tramways, mmtb, st kilda , tram 41 -
 Ballarat Tramway Museum
Photograph - SECV tram 30 Wendouree Parade, 10-5-1969
Photograph shows SECV Ballarat tram 30 in Wendouree Parade with the destination of Victoria St. Has Lake Wendouree in the background. Received in an envelope dated 10-5-69, photographer not known.Yields information about tram 30 and Wendouree Parade.Black and white print on plain paper.tramcars, trams, tram 30, secv, wendouree parade -
 Ballarat Tramway Museum
Photograph - Black & White Photograph/s - set of 2 - Geelong No. 11, 1916
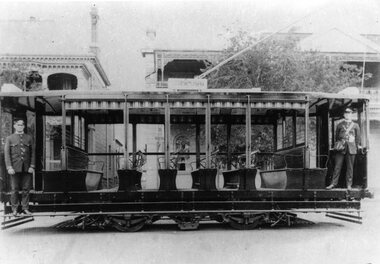
Photo of Geelong electric tram No. 11 - crossbench tram, taken in the same location as Reg Item 4316, following conversion from a trailer in Corio Terrace, now Brougham St. Has the driver and conductor standing at either end of the tram wearing their uniforms. Has the destination of "Newtown", 4345.1 - Black and White print contained within the Wal Jack Bendigo and Geelong Album, see Reg Item 5003 for more details. Added 7/8/2013. See Destination Eaglehawk for background details. Wal Jack has dated the photo as 1916. Yields information about Geelong tram No. 11Black and white photograph with notes on the rear. Copy 1 and 2 - On rear, stamped in black ink "Photo supplied from P.W. Duckett Collection, All Rights Reserved, 69 Howitt Rd. Nth Caulfield 3161." 4345.1 - Wal Jack stamp with the number T176 written in on the bottom right hand corner. Third copy has extensive notes on rear and Ken Magor stamp - see image i3trams, tramways, geelong, depot, brougham st, cross bench tram, tram 11, uniforms -
 Melbourne Tram Museum
Negative, Wal Jack, c1950
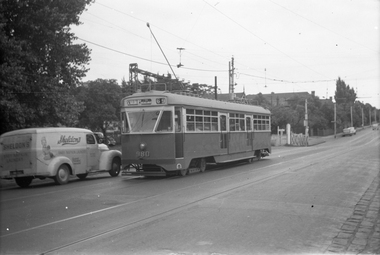
Black and white negative, by Wal Jack, of PCC 980, south bound in Glenferrie Road, about to cross over the Kooyong Station Level crossing while running a route 69, St Kilda Beach. c1950. Alongside is a Sheldon's Baby Napkin Laundry van of Roche Street Hawthorn. trams, tramways, pcc class, glenferrie road, route 69, railway squares, level crossings, kooyong, tram 980 -
 Ballarat Tramway Museum
Photograph - Tram Tour - Sturt St West, 5-10-1969
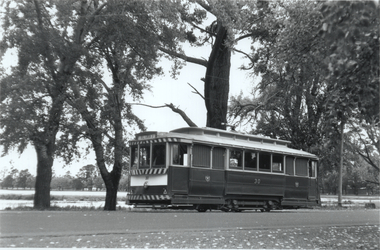
Photograph showing four trams, led by No. 21 and three bogies in Sturt St West on a tram tour of Ballarat. Based on the tours database - see reference - the tour took place on the 5-10-1969, the ARE and SPER in conjunction with the Vintage Train. Trams used were 21, 37, 41 and 35.Yields information about the 1969 Vintage Train, tour in conjunction with SPER and the ARE.Black and white print with photographers notes on the rear in ink.In ink "Tramcade Sturt St en route to Gardens 7/10/69"tramcars, trams, tours, are, sper, vintage train, tram 21 -
 Ballarat Tramway Museum
Album - Postcards & Photographs - Vic Solomons and others - Australian Tramways, Vic Solomons, 2023
Contains 184 images of postcards and photographs collected primarily by Vic Solomons of Sydney, with others from the collection of Wal Jack and Warren Doubleday. Covers almost all of Australia's tramway systems. 1 Post Card Hay St Perth Looking East No 3 Unknown Perth 2 Post Card Cars 30 & 90 both on Route 19 pass in Barrack St looking South Perth WA 1935.02.18 Perth 3 Post Card Hay St Looking East Perth WA Unknown Perth 4 Post Card William St Perth WA Unknown Perth 5 Post Card Perth from Shaftsbury Hotel Unknown Perth 6 Post Card Hay St Perth WA Looking East Unknown Perth 7 Post Card Barrack St Perth Unknown Perth 8 Post Card Murray Views No 3 High St Showing Town Hall Fremantle WA Unknown Fremantle 9 Post Card High St Fremantle WA Unknown Fremantle 10 Post Card View of Bolder City Golden Mile in the Background (Section No 1) 1908.08.20 Kalgoolie 11 Post Card Hannan St Kalgoolie 1900.08.19 Kalgoolie 12 Post Card Hannan St Kalgoolie WA (No 2) Unknown Kalgoolie 13 Post Card Intersection Hannan & Maritana Sts Kalgoolie WA Unknown Kalgoolie 14 Post Card Hannan St Kalgoolie Unknown Kalgoolie 15 Post Card Lane Street Bolder City Unknown Kalgoolie 16 Post Card Hobart Double Deck Tram Unknown Hobart 17 Post Card Macquarie St Hobart Unknown Hobart 18 Photo Liverpool Street Hobart Unknown Hobart 19 Photo Hobart 21 Unknown Hobart 20 Photo Hobart 14 in Elizabeth St Hobart Unknown Hobart 21 Post Card Macquarie St Hobart Unknown Hobart 22 Post Card Macquarie St Hobart Tas Unknown Hobart 23 Photo Double Decker Tram 3 at G.P.O. Hobart Tas No 31 Unknown Hobart 24 Post Card Double Decker Tram 19 Hobart Tas A B Series No 24 Unknown Hobart 25 Photo Hobart Municipal Tramways Tas No 95 Unknown Hobart 26 Post Card Elizabeth St Hobart Unknown Hobart 27 Post Card Elizabeth St Hobart Unknown Hobart 28 Post Card Elizabeth St Hobart Unknown Hobart 29 Post Card Elizabeth St Hobart Tas Unknown Hobart 30 Post Card HMT 21 with crew at Beach Road Terminus Unknown Hobart 31 Post Card HMT 9 & another with crew at Beach Road Terminus. Front cover photo of Destination GPO 1921.01.00 Hobart 32 Post Card Cascade Road and Mount Wellington Hobart Unknown Hobart 33 Post Card Elizabeth St Hobart Unknown Hobart 34 Post Card Elizabeth St Hobart Unknown Hobart 35 Post Card Elizabeth St Hobart 1915.04.07 Hobart 36 Post Card Macquarie St Hobart Tas Unknown Hobart 37 Post Card Macquarie St showing Post Office Hobart 1908.03.12 Hobart 38 Post Card Hobart Municipal Tramways 21 Unknown Hobart 39 Post Card Elizabeth St Hobart Tas Unknown Hobart 40 Post Card Liverpool Street Hobart Unknown Hobart 41 Post Card Electric Tram Launceston Tas 446 W J Little Photo 1919.02.08 Launbceston 42 Post Card Launceston Tram no 3 1911.08.30 Launbceston 43 Post Card Launceston Tram no 3 passes tram No 1 Unknown Launbceston 44 Post Card Tram 6 at Trevallyn a popular suburb Launceston Tasmania Unknown Launbceston 45 Post Card Tram 7 at Trevallyn Road Terminus Launceston Tasmania Unknown Launbceston 46 Post Card Tram 4 in Brisbane St Launceston Unknown Launbceston 47 Post Card Tram 9 in Brisbane St Launceston Tasmania Unknown Launbceston 48 Post Card Camerom Street Launceston Tasmania Unknown Launbceston 49 Post Card Murray Views No 15 Jetty Road Glenelg Terminus 1962-02-08 Adelaide 50 Post Card Bay Tram at Jetty Road Terminus Glenelg SA Unknown Adelaide 51 Post Card Tram 3 in King William Street Adelaide S Aust Unknown Adelaide 52 Post Card Valentine Series No 3065 The Old Horse Tram Victor Harbour Unknown Victor Harbour 53 Post Card Bourke Street Melbourne with Cable Car Looking East 1904.04.25 Melbourne 54 Post Card Opening of New Electric Tramway Elsternwick 1913-11-13 Melbourne 55 Post Card Cable trams in Clarendon St Sth Melb Unknown Melbourne 56 Post Card Pall Mall from Charing Cross Bendigo Unknown Bendigo 57 Post Card Tram 4 & 7 pass at The Fountain and Mitchell Street Bendigo Vic Rose Series P 3198 Unknown Bendigo 58 Post Card M&MTB 133 at Charing Cross bound for Eaglehawk Bendigo Vic Murray Views No 45 Unknown Bendigo 59 Post Card Pall Mall Bendigo Vic Unknown Bendigo 60 Post Card Charing Cross & Mitchell St Bendigo Trams passing 1919.00.00 Bendigo 61 Post Card Pall Mall Looking East Unknown Bendigo 62 Post Card Electric Trams and City Hotel Bendigo Vic Unknown Bendigo 63 Post Card Moorabool Street Geelong V 23 Unknown Geelong 64 Post Card Murray Views No 3 Moorabool Street Geelong Vic Unknown Geelong 65 Post Card The Rose Series P 2487 Ryrie Street Geelong Vic Unknown Geelong 66 Post Card Southern Cross Series 2696 Ryrie Stret Geelong Vic Unknown Geelong 67 Post Card The Rose Series P 1490 Ryrie Street Geelong Vic 1920-03-04 Geelong 68 Post Card Valentine Series No 1568 Lower Sturt Street Ballarat Unknown Ballarat 69 Post Card Rose Series P 1710 Sturt Street Ballarat Victoria Unknown Ballarat 70 Post Card Sturt Street Ballarat Victoria Unknown Ballarat 71 Post Card Horse Tram In Sturt Street Ballarat 1905.11.10 Ballarat 72 Post Card Sturt Street Ballarat Looking North-West Unknown Ballarat 73 Post Card Shoppes Square Sturt Street Ballarat Looking North Unknown Ballarat 74 Post Card Junction Sturt and Lydiard Streets Ballarat 1909-09-01 Ballarat 75 Post Card The Electric Supply Co Souvenir Tram Ticket No 3085of the opening of Electric System August 18 1905 1905.08.18 Ballarat 76 Post Card Sturt Street Ballarat Victoria 1907.11.25 Ballarat 77 Post Card Off to the Gardens Electric Tram Ballarat Unknown Ballarat 78 Post Card Sturt Street Ballarat 1907.04.16 Ballarat 79 Post Card Sturt Street Ballarat Looking East Electric tram with Double Deck Trailer 1911.04.17 Ballarat 80 Post Card Sturt Street Ballarat Looking East Unknown Ballarat 81 Post Card Sturt Street Ballarat Looking West 1911.03.01 Ballarat 82 Post Card Town Hall and Sturt Street Ballarat Unknown Ballarat 83 Post Card Lydiard Street Ballarat 1906.11.23 Ballarat 84 Post Card Looking North along Adelaide Street from George Street Brisbane Sidues Series No 764 Unknown Brisbane 85 Post Card Looking South along Queen Street from the Creek Street Intersection Brisbane Qld Sirues Series No 1379 Unknown Brisbane 86 Post Card George Street from near Supreme Court Brisbane Unknown Brisbane 87 Post Card Queen and Eagle Streets Brisbane 1907.07.04 Brisbane 88 Post Card Queen Street showing His Majesty’s Theatre Brisbane Unknown Brisbane 89 Post Card Queen Street Treasury Building 1908.01.20 Brisbane 90 Post Card G P O and Queen Street Brisbane Unknown Brisbane 91 Post Card Queen Street Brisbane Looking from Wharf Street Unknown Brisbane 92 Post Card Customs House Brisbane 1905.02.16 Brisbane 93 Post Card Queen St Brisbane 1905.09.16 Brisbane 94 Post Card Queen St Brisbane 1907.11.19 Brisbane 95 Post Card Treasury Buildings Brisbane Unknown Brisbane 96 Post Card Queen and Eagle Streets Brisbane Unknown Brisbane 97 Post Card The Valley Corner Brisbane Unknown Brisbane 98 Post Card Brisbane Queen Street opposite General Post Office Unknown Brisbane 99 Post Card North Quay and Milton Beach Brisbane Q Unknown Brisbane 100 Post Card Victoria Bridge Brisbane South Side 1907.08.14 Brisbane 101 Post Card Victoria Bridge Brisbane Unknown Brisbane 102 Post Card Breakfast Creek Bridge Brisbane Q Unknown Brisbane 103 Post Card Melbourne Street Station South Brisbane Queensland Unknown Brisbane 104 Post Card General Post Office Queen Street Brisbane 1955.09.23 Brisbane 105 Post Card Customs House Brisbane 1904.11.04 Brisbane 106 Post Card Queen St Brisbane 1919.11.00 Brisbane 107 Post Card Queen St Brisbane Sidues Series No 627 Unknown Brisbane 108 Post Card Creek Street Brisbane Queensland Unknown Brisbane 109 Post Card Customs House and Garden Reach Brisbane Queensland 1910.00.08 Brisbane 110 Post Card Queen and Creek Streets Brisbane 1909.06.07 Brisbane 111 Post Card Queensland National Bank andd Queen Street Brisbane Queensland Unknown Brisbane 112 Post Card Queen Street and Treasury Buildings Brisbane 0000.09.07 Brisbane 113 Post Card Queen Street showing “Courier” Buildings Brisbane Unknown Brisbane 114 Post Card Intersection George & Roma Streets Brisbane Q 1916.05.11 Brisbane 115 Post Card Adelaide Street Brisbane Q Unknown Brisbane 116 Post Card G P O Queen Street Brisbane Q Unknown Brisbane 117 Post Card Treasury Building Brisbane 1906.03-20 Brisbane 118 Post Card Queen and Eagle Streets Brisbane 1907.02.01 Brisbane 119 Post Card Queen St Brisbane Unknown Brisbane 120 Post Card Queen St Brisbane Q Unknown Brisbane 121 Post Card Victoria Bridge Brisbane 1906.07.30 Brisbane 122 Post Card An Unusual View showing Head of Queen Street Victoria Bridge & South SideSuburbs Brisbane Q Unknown Brisbane 123 Post Card Petries Bight Brisbane Q Unknown Brisbane 124 Post Card South End Victoria Bridge Brisbane Q Unknown Brisbane 125 Post Card Customs House Brisbane Unknown Brisbane 126 Post Card Photo of toastrack car circa 1910 Unknown Brisbane 127 Post Card Treasury Buildings Brisbane Unknown Brisbane 128 Post Card East Street Rockhampton with Steam Tram & trailer Unknown Rockhampton 129 Post Card Post Office Rockhampton with steam tram Unknown Rockhampton 130 Post Card East Street Rockhampton with Steam Trams Rose Series P 7154 Unknown Rockhampton 131 Post Card William Street Rockhampton Rose Series P 7156 Unknown Rockhampton 132 Post Card Central East Street Rockhampton Q with Steam Trams Unknown Rockhampton 133 Photo Sturt St Ballarat Unknown Ballarat 134 Photo Bridge Street Ballarat Unknown Ballarat 135 Post Card George St Sydney Unknown Sydney 136 Post Card Elizabeth St Sydney Unknown Sydney 137 Post Card Railway Square Unknown Sydney 138 Post Card Sydney Harbor Bridge - pending receipt 139 Post Card Kings Cross - Mowbray Series with description on rear from C Roy G Field Unknown Sydney 140 Post Card Kings Cross - Mowbray Series with description on rear from C Roy G Field Unknown Sydney 141 Post Card Central Railway Station Sydney - Rose Series P6033 1954-01-26 Sydney 142 Post card William Street Darlinghurst looking towards City - Rose Series P6602 unknown Sydney 143 Post Card Circular Quay Sydney - Rose Series P6680 Unknown Sydney 144 Post Card View at Manly NSW - Rose Series B1003 Unknown Sydney 145 Post Card Hunter St Newcastle NSW - Rose Series P7843 Unknown Newcastle 146 Post Card Bank Corner Newcastle NSW - Mowbray Series No. 155 Unknown Newcastle 147 Post Card Hunter St Newcastle NSW Unknown Newcastle 148 Post Card Criterion Hotel Hunter St Newcastle NSW Unknown Newcastle 149 Photo Horse tram at Newtown Station 1894 to 1898 - PTC photo c1894 Newtown 150 Photo Steam tram motor No 3 at Railway Square 1879 1879 Sydney 151 Photo Railway steam tram c1900 with a horse drawn double deck bus c1900 Sydney 152 Photo Steam motor 5A and doubled deck bus Unknown Sydney 153 Photo Steam motor 53A with detail notes on rear 1922 Sydney 154 Photo Cable tram set at Milsons Point ferry terminal c1900 Sydney 155 Photo Early Sydney electric car - Ocean St - Rose Bay Unknown Sydney 156 Photo George St looking souoth c1905 c1905 Sydney 157 Photo Tram 165 at Circular Quay Unknown Sydney 158 Photo Tramcar ferry or transporter at The Spit Unknown Sydney 159 Photo tram 882 George St at Marti Place, 1937 1937 Sydney 160 Photo Tram 826 Railway Sq area Unknown Sydney 161 Photo Railway Sq in background, Broadway with double decker bus and toastrack car late 1930s Sydney 162 Photo Coupled St Pitt St? - photo Ben Parle Feb. 1950 Sydney 163 Photo Electric tram No. 2 - North Sydney with side trolley pole running Unknown Sydney 164 Photo George St - Horden's Corner Unknown Sydney 165 Photo George St at Martin Place c1920 Sydney 166 Photo Castlereagh St Sydney c1928 c1928 Sydney 167 Photo Railway Sqare c1920 c1920 Sydney 168 Photo Darling St Countereweight Unknown Sydney 169 Photo Trolley bus depot Unknown Sydney 170 Photo Trolley bus No. 14 Unknown Sydney 171 Photo Newcastle Railway Station with steam tram - Wharf Road?? Unknown Newcastle 172 Photo High St West Maitland - steam tram Unknown Maitland 173 Photo High St West Maitland - steam tram Unknown Maitland 174 Post Card Argent St near tram terminal Broken Hill NSW c1900 Broken Hill 175 postcard Argent St looking south Broken Hill - with Ken Magor's notes on rear Unknown Broken Hill 176 Photo Toronto - steam tram 61A Unknown Toronto 177 Photo 124A trial run 1911? Sutherland - Cronulla line 1911 Sutherland 178 Photo 103A at a tram stop Unknown Sydney 179 Photo Cable tram set at Crows Nest terminus grip car 12, trailer 22 Unknown Sydney 180 Photo Cable tram Queens Square Sydney 1903 Sydney 181 Photo cars 2078 and 2077 Chatswood late 1950s Sydney 182 Photo car 1877 Balmain area late 1950s Sydney 183 Photo Trolley bus - Rockdale destination Late 1950s Sydney 184 Photo Broken Hill steam tram - motor 18A North Tram Unknown Broken Hill 185 Photo Millars Point Sydney NSW - ferry/tram interchange, unknown Sydney All items imaged including the rear or back where there was writing of information. All files stored on the Museum's Photo Collections directory. Demonstrates through the medium of many images, Australian tramway systems and Ballarat's place in them.Album - heavy card covers, plastic lined with postcard or 6x4 photo sleeves.australia, tramways, postcards, photographs, steam trams, horse trams, cable trams, trolley buses -
 Melbourne Tram Museum
Album - Ron Wilson 46 Photographs -1987 to 1999
Photo - see pdf file for further information. Number Brief Description RWC1 SW6 897 in MTA livery on Rt 5 in Swanston St outside Flinders St Station RWC2 WS6 965 as an advertising car for Next Flight on Rt 15 in Swanston St outside Flinders St Station RWC3 W1 427 on tourist Service in Swanston St at the city shunt. Photo taken from the signal box RWC4 SW5 814 as an advertising car for the RVIB in Park St near St Kilda Rd RWC5 PMTT foundation stone for Kew Depot RWC6 SW5 682 as an arts car in Coldblo Rd in Malvern Depot RWC7 SW5 724 as an arts car on Rt 6 in St Kilda Rd at Domain Rd RWC8 SW6 866 on Rt 6 and a Z 107 in MTA livery in Swanston St outside Flinders St Station RWC9 W5 821 with 2 doors in MTA livery in Victoria Prd at Brunswick St RWC10 782 at Bylands RWC11 SW5 847 in MTA livery turns into Preston Workshops during track repairs RWC12 Scrubber 10W in St Kilda Rd outside the arts centre RWC13 W5 685 on the fan of South Melb Depot RWC14 SW6 880 on Rt 8 in St Kilda Rd outside Flinders St Station RWC15 W6 997 on Rt 15 in St Kilda Rd outside Flinders St Station RWC16 W6 971 in Victoria Prd crossing Nicholson St RWC17 SW5 846 on Rt 6 in Swanston St at Flinders St RWC18 SW6 852 on Rt 72 in Swanston St at Flinders St RWC19 Z 217 on Rt 22 as an advertising car for Qantas in Swanston St outside Flinders St Station RWC20 Z 230 on Rt 1 in Swanston St at Little Lonsdale St RWC21 W7 1011 on Rt 8 as an advertising car for St George Bank in St Kilda Rd outside the Arts Centre RWC22 Z 220 as an advertising car foe Telstra in Swanston St at Flinders Lane RWC23 SW6 854 on RT passes 946 in Swanston St outside Flinders St Station RWC24 Z 56 in MTA livery in Swanston St outside Flinders St Station RWC25 SW6 930 in MTA Livery at the end of the siding in the South Melb per way depot RWC26 SW6 954 on Rt 69 at the St Kilda Terminus RWC27 SW6 948 on a semi-trailer in Preston Workshops RWC28 Z 159 in MTA Livery in Elizabeth St at Victoria St RWC29 B2 2003 on Rt 59 in Elizabeth St at Victoria St RWC30 A1 235 at the Batman Ave Terminus RWC31 Z 191 at the Batman Ave Terminus RWC32 SW6 998 on Rt 15 in MTA livery in Swanston St at Collins St RWC33 SW6 925 on Rt 8 in MTA livery in Swanston St at Collins St RWC34 SW6 993 on Rt 67 in MTA livery in Swanston St at Collins St RWC35 SW5 846 on Rt 6 in MTA livery in Swanston St at Collins St RWC36 W2 643 at Bylands RWC37 A1 233 at the Batman Ave Terminus RWC38 SW6 883 on Rt 64 in MTA livery in Swanston St at Collins St RWC39 SW6 939 in MTA Livery running in to South Melb Depot in Swanston St at Collins St RWC40 SW5 844 in M&MTB on Rt 72 in Swanston St at Collins St RWC41 W7 1024 advertising Buy Australian on Rt 5 in Swanston St at Collins ST RWC42 W7 1007 on RT 64 in M&MTB livery in Swanston St at Collins St RWC43 SW6 880 in MTA livery on Rt 69 at the St Kilda Terminus RWC44 SW6 884 on Rt 16 waits as Z 169 shunts in ST Kilda Rd outside the Arts Centre RWC45 SW5 in M&MTB livery on Rt 8 in ST Kilda Rd outside the Arts Centre RWC46 Z 133 in MTA Livery on Rt 50 in Elizabeth St at the Terminus Demonstrates the work of Ron Wilson in photography and collection of prints. Assembled album in a black presentation folder of 46 photographs from the Ron Wilson Collection - 12 A4 sleeves. All photographs have been scanned and placed on the Museum's G drive. A list of all photographs with details has been compiled. melbourne, tramways, trams, flinders st, mta, advertising trams -
 Ballarat Tramway Museum
Photograph - Black & White Photograph/s, Peter Duckett, late 1890's?
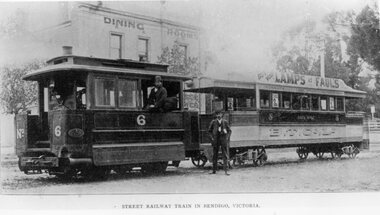
Yields information about the appearance of Bendigo Birney trams during the 1950's, possibly during enthusiast tour.Black and White Photograph of Bendigo steam tram motor No. 2 and bogie trailer No. 5, 1890's?, photographed with a building marked "Dining Rooms" in the background. Has the driver in the steam tram motor and the conductor standing alongside. Trailer marked "B.T.Co. Ltd", possibly around the turn of the century. Earlier photos have the full company name. Trailer has roof advertisement "Buy your Lamps at Faull's" - oil? or electric? Taken from a postcard or a magazine - has the caption "Street Railway Train in Bendigo, Victoria", possibly North American origin given the language. Peter Duckett Collection.On the front, top left hand corner of the print "26" in ink within a circle. On rear, stamped in black ink "Photo supplied from P.W. Duckett Collection, All Rights Reserved, 69 Howitt Rd. Nth Caulfield 3161." On rear in ink "Motor 6 and Trailer 5" and a "William F Scott" address label.trams, tramways, bendigo, steam tram motors, trailers, tram 6, tram 5 -
 Ballarat Tramway Museum
Photograph - Black & White Photograph/s, Peter Duckett, mid 1930's to early 1940's
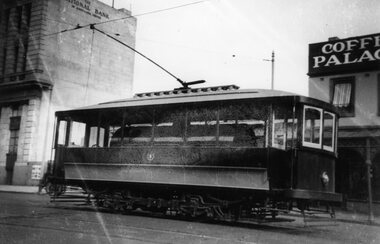
Yields information about the appearance of Geelong's Birney trams during the 1940's.Black and White Photograph of Geelong 's Scrubber or Track cleaning tramcar, in the early SEC colour scheme, either mid 1930's to early 1940's. Has the National Bank in the background and a Coffee Palace alongside. Peter Duckett Collection. Dave O'Neil confirmed June 30/2009, Moorabool St, just past Malop St towards depot.On rear, stamped in black ink "Photo supplied from P.W. Duckett Collection, All Rights Reserved, 69 Howitt Rd. Nth Caulfield 3161."trams, tramways, geelong, scrubber tram, track cleaner, moorabool st, tram track cleaner, tram scrubber -
 Ballarat Tramway Museum
Photograph - Black & White Photograph/s, Peter Duckett, 1940's
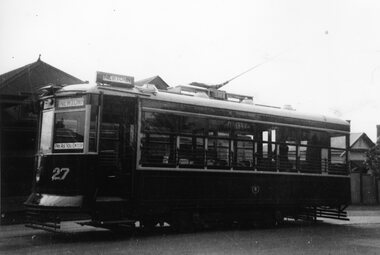
Yields information about the appearance of Bendigo steam tram motors and trailers.Black and White Photograph of Geelong No. 27, Birney tram, showing "Newtown" as the destination and a "Pay as You Enter" sign. Photo taken during the 1940's, before the tram went to Bendigo. Peter Duckett Collection. Dave O'Neil confirmed June 30/2009, photo taken at Aphrasia St, near Pleasant St Loop, the tram travelling to Newtown. The house behind the tram is still there.On rear, stamped in black ink "Photo supplied from P.W. Duckett Collection, All Rights Reserved, 69 Howitt Rd. Nth Caulfield 3161."trams, tramways, geelong, birney, newtown, tram 27 -
 Ballarat Tramway Museum
Photograph - Black & White Photograph/s, Peter Duckett, 1940's
Yields information about the appearance of Geelong's Scrubber / track cleaning tram, c1930, early 1940's.Black and White Photograph of Geelong No. 15, Birney tram, showing "Eastern Beach" as the destination and a "Pay as You Enter" sign. Photo taken during the 1940's, before the tram went to Bendigo. Peter Duckett Collection. Dave O'Neil confirmed June 30/2009, tram is at the Chilwell terminus, the house in the view still remains. SeeOn rear, stamped in black ink "Photo supplied from P.W. Duckett Collection, All Rights Reserved, 69 Howitt Rd. Nth Caulfield 3161."trams, tramways, geelong, birney, chilwell, tram 15 -
 Ballarat Tramway Museum
Photograph - Black & White Photograph/s, Peter Duckett, 1930's
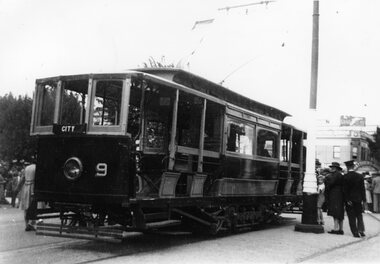
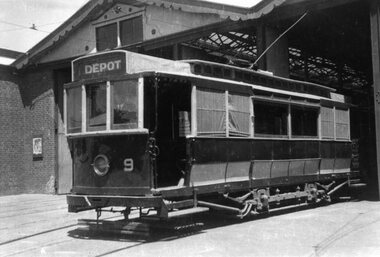
Black and White Photograph of Bendigo ESCo No. 9, at Charing Cross, mid to late 1930's, prior to "modernisation" in 1945. Painted in the 1930's SEC Colour scheme. Tram has the destination of "City". Note the people in the background, indicating a parade or an event. See Reg Item 4342 for a photograph of the same tram following "modernisation". Peter Duckett Collection.On the front, top left hand corner of the print "26" in ink within a circle. On rear, stamped in black ink "Photo supplied from P.W. Duckett Collection, All Rights Reserved, 69 Howitt Rd. Nth Caulfield 3161." In the top left hand corner in ink "1930s Bendigo Tramways (SEC) / Car at Charing Cross" and a "William F Scott" address label in the bottom left hand corner.trams, tramways, bendigo, esco, secv, charing cross, tram 9 -
 Ballarat Tramway Museum
Photograph - Black & White Photograph/s, Peter Duckett, late 1940's or early 1950's
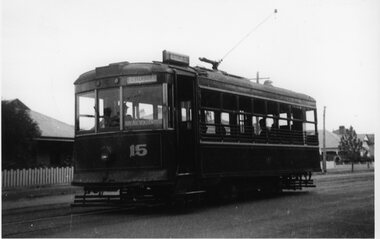
Yields information about the appearance of Bendigo's ESCo trams during the 1940's, prior to "modernisation", see Reg Item 4342.Black and White Photograph of Bendigo Birney tram No. 29 leaving the depot, with the destination of Eaglehawk. Photographed either late 1940's or early 1950's. Could be an enthusiast tour/ or visit, given the people in the background of the photograph. Peter Duckett Collection.On rear, stamped in black ink "Photo supplied from P.W. Duckett Collection, All Rights Reserved, 69 Howitt Rd. Nth Caulfield 3161."trams, tramways, bendigo, depot, birney, tram 29 -
 Ballarat Tramway Museum
Negative - Copy, Peter Duckett
Yields information about the use of a maximum traction tram when no longer required for regular passenger use as a "dog car" for transporting owners and their dogs to the Showgrounds for races.Copy negative of a black and white photograph from Ray Pearson Collection, taken by Dave Macartney in 1975c of Melbourne service tram No. 30 - the Dog Car, or Dog tram Camberwell depot, early 1940's. Copy print from Peter Duckett? Used to transport owners and their dogs to the Showgrounds for races, late 1930's and early 1940's. Refer to page 69 of Destination City 5th Edition for the information on this tram and a similar photograph taken by Peter Duckett. Note: Ray Person notes the tram as "No. 20" Image revised from the scan in the Ray Pearson album 30/5/2020. See Page 69 of Destination City 5th Edition and Page 69 of Destination City 5th Edition. trams, tramways, mmtb, bogie trams, dog car, race traffic -
 Melbourne Tram Museum
Document - Research Notes, Swanston Trams, "Swanston Trams / Malvern Depot", 1998
Four page research report, A4 sheets stapled in the top left hand corner, titled "Swanston Trams / Malvern Depot" giving details of the history of Malvern Depot and its tram routes. Produced in 1988 under the banner of Swanston Trams. Describes routes 5 (Malvern Burke Road), 6 (Glen Iris), 8 (Toorak), 16 ( St Kilda Beach), 69 (Kew Cotham Road), 72 (Camberwell), and the main problems from a safety view for each of the routes. Two copies held.trams, tramways, swanston trams, malvern depot, routes -
 Melbourne Tram Museum
Slide, Keith Kings, 9/03/1969 12:00:00 AM
35mm Kodak white cardboard colour slide by Keith Kings of Alf Twentyman's preserved cable tram set at his Northcote home, grip 436 and trailer 586 9/3/69.Keith Kings stamp and number "47-2", with details of exposure. "MMTB cable grip car 436 and Trailer 586 Alf Twentyman's Northcote. 9/3/1969.trams, tramways, cable trams, preserved trams, northcote, tram 436, tram 586 -
 Melbourne Tram Museum
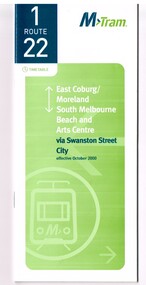
Ephemera - Timetable, M>Tram, Set of 21 M>Tram timetables, Sep. 2002
Set of 21 M>Tram timetables, light green cover with route number on cover, giving details of popular M>Tram destination, check points, map and description of routes, use of Metcards and contact details. .1 - Route 1 / 22 - East Coburg/Moreland to South Melbourne Beach - October 2000 - 36 pages. .2 - Route 3 - East Malvern - Melbourne University - January 2002 - 24 pages. .3 - Route 82 - Moonee Ponds - Footscray - October 2000 - 20 pages. .4 - Route 5 - Malvern (Burke Road) - Melbourne University - August 2003 - 32 pages. .5 - Route 6 - Glen Iris - Melbourne University - January 2002 - 24 pages. .6 - Route 8 - Toorak - Melbourne University - August 2003 - 24 pages. .7 - Route 16 - St Kilda Beach - Melbourne University - January 2002 - 24 pages. .8 - Route 19 - North Coburg - City - October 2000 - 36 Pages .9 - Route 55 - West Coburg - Domain Road Interchange - October 2000 - 28 pages. .10 - Route 57 - West Maribyrnong - City - October 2000 - 28 pages. .11 - Route 64 - East Brighton - Melbourne University - January 2002 - 32 pages. .12 - Route 67 - Carnegie - Melbourne University - January 2002 - 24 pages. .13 - Route 72 - Camberwell - Melbourne University - January 2002 - 24 pages. .14 - Route 78 / 79 - North Richmond - Prahran / St Kilda Beach - January 2003 - 20 pages. Full Image of .8 added 9/4/17 following a query about route 19 timetables - see image i2. .15 - Route 5 - Malvern (Burke Road) - Melbourne University - January 2002 - 32 pages .16 - Route 8 - Toorak - Melbourne University - January 2002 - 24 pages. .17 - Route 69 - Kew Cotham Road - St Kilda Beach - January 2002 - 20 pages .18 - Route 59 - Airport West - City - October 2000 - 32 Pages .19 - Route 78 / 79 - North Richmond - Prahran / St Kilda Beach - January 2002 - 20 pages. .20 - Route 82 - Moonee Ponds - Footscray - October 2000 - 20 pages. .21 - Route 67 - Carnegie - Melbourne University - Augst 2003 - 24 pagestrams, tramways, m>tram, tram services, timetables, route 1, route 22, route 82, route 5, route 6, route 8, route 16, route 19, route 55, route 57, route 64, route 67, route 72, route 78, route 79, route 69, route 59, route 82 -
 Melbourne Tram Museum
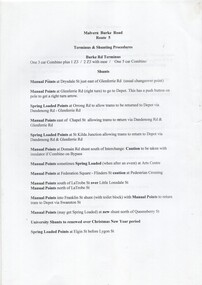
Document - Instruction, M>Tram, "Terminus and Shunting Procedures", early 2000's
Instruction - set of 6 A4 sheets titled "Terminus and Shunting Procedures", giving details of the various terminal and shunting procedures along the route itself, for Malvern routes 5, 6, 8, 16, 69 and 72. Provides information about shunting various classes of cars at the same time, including Combino trams and for various locations whether manual or spring loaded points. Route 69 ceased 10/2004.trams, tramways, malvern depot, drivers, training, operations, terminus, route 5, route 6, route 8, route 16, route 72, route 69, points -
 Melbourne Tram Museum
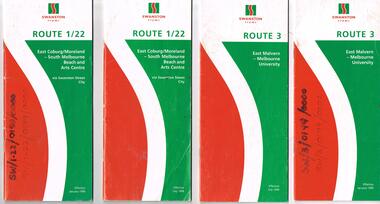
Ephemera - Timetable, Swanston Trams, Set of Swanston Trams timetables, 1999
Set of Swanston Trams timetables, red white green cover with route number on cover, giving details of popular destination, check points, use of Metcards and contact details, tram hire, frequency, a Welcome to Swanston Trams, description of route and route map. Has a fold out with a feed back form. .1 - Route 1/22 - East Coburg / Moreland - South Melbourne Beach and Arts Centre - January 1999 - 40 pages. .2 - ditto - July 1999. .3 - Route 3 - East Malvern - University - July 1999 - 28 pages .4 - ditto - January 1999 .5 - Route 5 - Malvern (Burke Rd) - University - July 1999 - 24 pages .6 - Route 6 - Glen Iris - City - January 1999 - 28 pages .7 - ditto - July 1999. .8 - Route 8 - Toorak - January 1999 - 32 pages .9 - ditto July 1999 .10 - Route 16 - St Kilda Beach - University - January 1999 - 28 pages .11 - ditto July 1999 .12 - Route 19 - North Coburg - City - January 1999 - 48 pages .13 - ditto July 1999 .14 - Route 55 - West Coburg - Domain Interchanges via William St - January 1999 - 32 pages .15 - ditto July 1999 .16 - Route 57 - West Maribyrnong - City - January 1999 .17 - ditto July 1999 .18 - Route 59 - Airport West - City - June 1999 .19 - Route 64 - East Brighton - University - January 1999 - 28 pages .20 - ditto July 1999 .21 - Route 67 - Carnegie - City - January 1999 - 28 pages .22 - ditto July 1999 .23 - Route 69 - Kew Cotham Rd - St Kilda Beach - January 1999 - 28 pages .24 - ditto July 1999 .25 - Route 72 - Camberwell - University - January 1999 - 28 pages .26 - ditto July 1999 .27 - Route 78/79 - North Richmond - Prahran or St Kilda Beach - January 1999 - 28 pages .28 - ditto July 1999 .29 - Route 82 - Moonee Ponds - Footscray - January 1999 - 20 pages .30 - ditto July 1999Some have number notes and notes written inside about changes or errors in ink. See History.trams, tramways, swanston trams, tram services, timetables, route 1, route 22, route 3, route 5, route 6, route 8, route 16, route 19, route 55, route 57, route 59, route 64, route 67, route 69, route 72, route 78, route 79, route 82 -
 Ballarat Tramway Museum
Photograph - ESCo Bendigo tram 9 - set of 2, Peter Duckett, c1945
Photograph of Bendigo ESCo No. 9, at the Depot, during the 1940's following "modernisation" scheme. Tram has the destination of "Depot". See page 28 of Destination Eaglehawk for the same photograph and page 30 for notes regarding the "modernisation", undertaken in 1945, but not liked by the Union and subsequently scrapped in 1947. See Reg Item 4341 and 9110 for photographs of the same tram before modernization Peter Duckett Collection. 4342.1 - Black and White print contained within the Wal Jack Bendigo and Geelong Album, see Reg Item 5003 for more details. Added 2/7/2013. See Destination Eaglehawk.Yields information about the appearance of Bendigo's ESCo bogie trams during the 1940's.Black and White photograph with notes on the rear.On the front, top left hand corner of the print "27" in ink within a circle. On rear, stamped in black ink "Photo supplied from P.W. Duckett Collection, All Rights Reserved, 69 Howitt Rd. Nth Caulfield 3161." In the bottom right hand corner, a "William F Scott" address label in the bottom left hand corner. 4342.1 - Bendigo - No. 9 as rebuilt @ bard. Mr. McNaught (Manager) at Master Controller.trams, tramways, bendigo, depot, secv, unions, esco, tram 9 -
 Ballarat Tramway Museum
Photograph - Black & White Photograph/s, Peter Duckett, 11/10/1939 12:00:00 AM
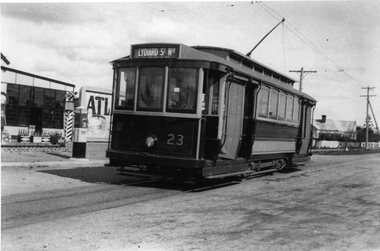
Yields information about the appearance of Ballarat 42 in Albert St Sebastopol prior to the closure of the tramway.Black and White Photograph of Ballarat No. 23, Ex Adelaide tram, in Skipton St, near Rubicon St, inbound with the Destination of Lydiard St Nth. Note the partial use of the weather blinds. Photographed during the 1930's , prior to repainting as the Gold tram. Has Atlantic petrol bowsers in the background and an Atlantic sign. Photo used on page 10 of Destination City. Very similar image to Wal Jack photo - see Reg item 5158 Peter Duckett Collection. See Destination EaglehawkOn rear, stamped in black ink "Photo supplied from P.W. Duckett Collection, All Rights Reserved, 69 Howitt Rd. Nth Caulfield 3161."trams, tramways, ballarat, skipton st, adelaide, rubicon st, tram 23 -
 Ballarat Tramway Museum
Photograph - Black & White Photograph/s, Peter Duckett, 1950's
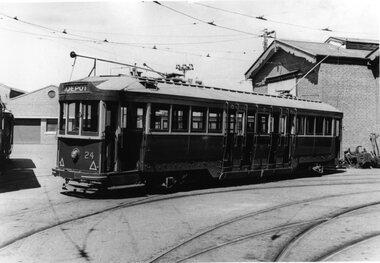
Yields information about the appearance of Bendigo's ESCo bogie trams during the 1950's.Black and White Photograph of Bendigo bogie tram No. 24 at the Bendigo Tram depot during the 1950's. Has the destination of "Depot" Peter Duckett Collection. See Destination EaglehawkOn rear, stamped in black ink "Photo supplied from P.W. Duckett Collection, All Rights Reserved, 69 Howitt Rd. Nth Caulfield 3161." In the bottom right hand corner, in ink "1950's" and "pic 29" in red ink.trams, tramways, bendigo, depot, secv, tram 24 -
 Ballarat Tramway Museum
Photograph - Black & White Photograph/s, Peter Duckett, 1954
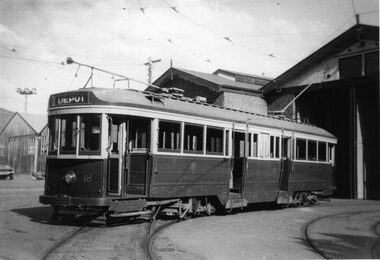
Black and White Photograph of Bendigo bogie tram No. 18 at the Bendigo Tram depot 1954. Has the destination of "Depot". Peter Duckett Collection. Destination EaglehawkOn the front, top left hand corner of the print "29" in ink within a circle - two numbers. On rear, stamped in black ink "Photo supplied from P.W. Duckett Collection, All Rights Reserved, 69 Howitt Rd. Nth Caulfield 3161." In the centre of the photograph "1954" in ink and in the bottom left hand corner, "William F. Scott" address label.trams, tramways, bendigo, depot, secv, tram 18 -
 Ballarat Tramway Museum
Photograph - Black & White Photograph/s, Bob Lilburn, 17/01/1969 12:00:00 AM
Black and white photograph of Ballarat tram No. 37 at the Mt Pleasant terminus. Tram has destination of "Gardens via Drummond Nth.", roof advertisement for the SEC "Everything's under control in my all electric kitchen". Shop on the left hand side of the photo has Robur Tea company, Coca Cola and Women's Weekly advertisements. High Res image added 8/5/2019 from Peter Lambert. 2nd print - dates the photo as 17-1-1969 a photo by Bob Lilburn.On rear of 2nd image - "2nd Ballarat 37, Mt Pleasant, Ex Bendigo 1, Ex Geelong 35" and "ex MMTB 119, 17-1-69"trams, tramways, mt pleasant, barkly st, tram 37 -
 Ballarat Tramway Museum
Photograph - Set of four black and white negatives of Ballarat trams, Warren Doubleday, 20-4-1968
Photos 25-4-69, of: .1 - Ballarat 17 at Stones Corner with Caltex Service Station in the background. Tram leaving Main Road before joining Bridge St. .2 - No. 28 running from Bridge Street into Sturt Street with a "Trotting at Bray Raceway Tonight" Auxillary board. Tram has the destination of Gardens via Sturt St West. In the background are the Big W and the Dickins Store. .3 - Tram 43 on "0" road at the SEC Ballarat Depot. .4 - Tram 13 at the Gardens Loop in Wendouree Parade. Tram has an ANA Hospital and Medical Benefits (Australian Natives Association) Advertising Board.Yields information about the operation of the Ballarat tramway system that was operated by the State Electricity Commission of Victoria.Set of four black and white negatives of Ballarat Tramways, 120 size. ballarat, trams, tramways, sturt street, tram 17, main road, bridge street, tram 28, bray raceway, dickins, big w, tram 13, ana health, wendouree parade, gardens loop, depot, tram 43, stones corner, caltex