Showing 154 items
matching blue bowl
-
 Kiewa Valley Historical Society
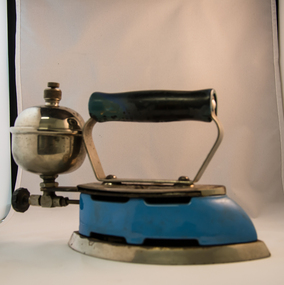
Iron Hand Kerosene, mid to late 1900s
The 1950's saw a revolution in small appliances for use in the average household. This hand held self heating(kerosene) iron was introduced as a time saving and more convenient iron for pressing clothes and other cloth fabrics. It replaced irons needing a separate fire source to heat the ironing plate. These irons continued to be in service, even when electricity was available in cities and larger rural towns (domestic electric steam irons were invented in 1938). This item was used before and during the electricity supplies available from the Kiewa Hydro Electricity Scheme. These irons remained in use within regional rural areas that had limited or unreliable electrical reticulation.In the 1950s and later the Kiewa Valley was still a relatively isolated region which was home to rural properties and small settlements. The availability of electricity and or the financial means to afford new types of electric hand irons ensured that older and sometimes less efficient ironing remained for an extended period covering the 1960s to 1970s. Kerosene products, such as this kerosene iron was a cheaper method for farm based domestic and other rural activities requiring a heat source. The use of kerosene as a heat/light source was able to be supplied in bulk and able to be used when floods severed vital roads into this region. The supply of electricity was in summer time subject to interruption from bush fire damaged wooden poles carrying the electrical cables. Self sufficiency by rural populations was the backbone of survival and the ability to store energy sources "on the farm" was a prerequisite of isolated regions, such as the Kiewa Valley, circa 1950s.This Coleman kerosene iron has a solid steel chrome plated(press) base with a painted (blue) wooden handle. The handle is stud fastened onto an oblong shaped rolled steel handle frame and screwed (two screws) onto the base plate. Both the heating plate and the top securing plate are shaped similar to a river boat. The main housing enclosing the heating element is enamel coated(blue in colour) steel and has a half hole for lighting the kerosene at the rear end. Behind the handle and protruding upwards is a stainless steel fully enclosed container (bowl shaped) for the main supply of kerosene to the burner or generator(enclosed within the main body of the iron. The bowl has an air valve and inlet for pressurised air intake (hand pump) On the bottom rear of the fuel bowl there is a screw regulated fuel pump. The fuel heated base plate provides the heat for this advertised "self heating iron(instant lighting). See KVHS 0347B- Instruction sheet; KVHS 0347C- Wrench; and KVHS 0347D Fuel can.Stamped on the base plate of the handle, front region "COLEMAN LAMP & STOVE CO." below this "WICHITA KAN" below this"TORONTO CAN". In the middle of the handle base and in larger print "COLEMAN Instant-Lite" At the rear location in large print "MODEL 4" in smaller print below "MADE IN U.S.A." below this "PAT#1718473"household appliances, alternative non electrical ironing appliances, domestic appliances, kerosene appliances -
 Ringwood and District Historical Society
Programme, Ringwood and District Horticultural and Garden Club, Ringwood and District Horticultural and Garden Club Schedule for the Annual Autumn Show, 1971, 1971
Ringwood and District Horticultural and Garden Club Schedule for the Annual Autumn Show, 1971.12 page booklet- typed Schedule.Front Page Ringwood and District Horticultural and Garden Club Schedule for the Annual Autumn Show To be held in the Assembly Hall, Ringwood High School, Bedford Road, Ringwood Saturday, March 6, 1971. (Doors Open at 2 p.m.) Entries close: 9 p.m. Thursday March 4th, 1971. Admission: Adults: 30 centsChildren: 5 cents Next Page OFFICE BEARERS LIFE MEMBERS: Mrs.Lord, Mrs.W.McDowell, Mr.B.J.Hubbard, Messrs.W.Gillespie, E.Bennett, G.W.Burns, E.T.Kearsley, Les.Ingram, W.McDowell. PRESIDENT:Mr.J.Roberts 39 Warrandyte Road Ringwood, Telephone: 870-1483 VICE-PRESIDENTS: Mrs.D.Hutchinson Mr.V.H.Wilson MENS' COMMITTEE: Mr.G.W.Burns, Mr.W.McDowell, Mr.E.Frame, Mr.V.H.Wilson, MR.J.Percival LADIES COMMITTEE: Mesdames: W.McDowell, D.Hutchinson, A.Mabu, D.Wilson, Miss Isbester TREASURER: Mr.D.Puckey Summit Crescent Ringwood North SECRETARY: Mrs.V.H.Wilson 38 William Street Ringwood, Telephone: 870-7458 ENTRIES CLOSE ON THRUSDAY MARCH 4TH 1971 AT 9 P.M. NO LATE ENTRIES WILL BE ACCEPTED AT THIS SHOW. PROGRAMME Staging of Exhibits 8.30 a.m. till 12 Noon Judging Commences 12.30 p.m. Show Opens 2.30 p.m. Removal of Exhibits 9.00 p.m. Admission: Adults: 30 centsChildren: 5 cents Page One EXHIBITORS MAY MAIL OR TELEPHONE ENTRIES TO THE UNDERMENTIONED:- MRS.V.H.WILSON,38 William Street, Ringwood870-7458 MRS.D.HUTCHINSON, 48 Caroline Street, RINGWOOD 870-8577 ENTRIES CLOSE THURSDAY MARCH 4TH AT 9 P.M. RULES FOR COMPETITORS All Exhibits must be stages by 12 Noon and must not be removed before 9 p.m. Exhibitors must apply on moring of Show to the Secretary for Cards which must be placed in front of Exhibit in the allotted space. All Exhibits, except Floral Art, must be grown by the Exhibitor. Awards will be made by the Judges whose decision is final. Prize Money available at 8 p.m. and if not claimed within one month will revert to the Society. Exhibits should be names. In a close finish this counts. No Exhibitor allowed in Hall whilst Judging is in progress. Any Protest shall be in writing accompanied with a 50 cent deposit lodged with the Secretary before 7 p.m. on day of Show. Protest must be limited to non-accordance of an Exhibit within the Schedule. The Committee is empowered to determine and protest to be forfeited if it deems such to be frivolous. BOWL:- The width of the vessel must be greater than its height. VASE:- The height of the vessel must be greater than its width. Page Two Continuation of: RULES FOR COMPETITORS... The Rules of the Royal Horticultural Society of Victoria will apply. Dahlias will be judged under the Rules and Standards laid down by the National and Royal Dahlias Society of Victoria. A VASE consists of 3 to 6 stems (in Cut Flowers) unless otherwise stated. AWARDS: Bronze Medal of the National Dahlia Society for Best Dahlia Exhibit. BLUE RIBBONS MAY BE AWARDD FOR:- BEST VASE OF CUT FLOWERS BEST DAHLIA OVER 6 INCHES BEST VASE DAHLIAS UNDER 6 INCHESBST FLORAL ART EXHIBIT BEST SEEDLING DAHLIA CERTIFICATES OF MERIT:- GIANT DAHLIA OVER 8 INCHESBEST SHRUB MINIATURE CACTUS DAHLIA BETWEEN 4 1/2" TO 6" BEST POT PLANT CHARM DECORATIVE BETWEEN 6' AND 8' BEST VEGETABLE BEST SINGLE ROSE UNLESS OTHERWISE STATED ENTRY FEE PER SCHEDULE CLA CLASS - 5 CENTS PER ENTRY. PLEASE NOTE THAT ENTRY FEE FOR ITEMS NO. 1 AND 2 IS 25 CENTS IN EACH SECTION ENTRIES CLOSE: THURSDAY MARCH 4TH, 1971 AT 9 P.M. Page Three VICTORIANCHAMPIONSHIPSECTION 1 SCH.NO: FIRST 1DAHLIAS UNDER 8 INCHES 12 Vases (3 of each) Distinct Varieties TROPHY VALUED AT $5.00 29 Giant Dahlias, Distinct Varieties (SPONSORED BY AMETCO TRAVEL AGENCY, RINGWOOD) To be won Three Times - Trophy valued at $20-00 DAHLIAS OPEN SECTION 2 39 Dahlias 3 Medium Cactus, 3 Miniature Cactus, 3 Charm Cactus, Distinct Varieties, Shown separately $2-00 44 Giant Decorative, Distinct Varieties 50c. 51 Giant Decorative 30c. 63 Giant Cactus, Distinct Varieties 50c. 71 Giant Cactus 30c. 86 Medium Garden Cactus N.N.D. 50c. 93 Medium Garden Cactus, Distinct Varieties 50c. 10 3 Medium Decorative Distinct Varieties 50c. 11 1 Medium Decorative 30c. 12 6 Vases Miniature Cactus, Distinct Varieties - 3 of each - 75c 13 3 Vases Miniature Cactus, Distinct Varieties - 3 of each - 50c 14 3 Vases Miniature Decorative, Distinct Varieties - 3 of each 50c 15 1 Vase Miniature Dahlias - 3 Blooms Distinct Variety 30c 16 3 Vases Charm Cactus, Distinct Varieties - 3 of each - 50c 17 3 Vases Charm Decorative - Distinct Varieties - 3 of each 50c Page Four Continuation of: SECTION 2 - DAHLIAS OPEN. SCH.NO. FIRST 18 1 Vase Charm, 3 Blooms, Distinct Variety30c 19 Seedling Dahlia Over Six Inches30c 20 Seedling Dahlia Under Six Inches 30c 21 3 Vases Pompones, Distinct Varieties, 3 of each50c 22 1 Vase Pompones, N.N.D, 50c 23 3 Exhibition Cactus Distinct Varieties 50c 24 1 Exhibition Cactus30c 25 1 Miniature Dahlia20c 26 1 Charm Dahlia 20c 27 1 Vase Dahlias Under 8 Inches, 10 Stalks, N.N.D. 75c SECTION 3: RINGWOOD AND DISTRICT AMATEUR CHAMPIONSHIP DAHLIAS - AMATEUR 28 6 Giant Dahlias, Distinct Varieties $1.00 29 9 Dahlias Distinct Varieties (Shown Separately) 3 Medium Cactus; 3 Miniature Cactus, 3 Charm Cactus $2.00 30 3 Giant Decorative Distinct Varieties 50c 31 1 Giant Decorative30c 32 3 Giant Cactus, Distinct Varieties 30c 34 3 Medium Decoratve Distinct Varieties 50c 35 1 Medium Decorative 30c 36 3 Medium Cactus Distinct Varieties50c 37 1 Medium Cactus 30c 38 3 Vases Miniature Cactus Distinct Varieties (3 of each) 50c 39 1 Vase Miniature Cactus 3 Blooms N.N.D. 50c 40 1 Vase Miniature Decorative 3 Blooms N.N.D.50c Page Five Continuation of: SECTION 3 - AMATEUR DAHLEA CLASS SCH.NO: FIRST 413 Vases Charm Cactus, Distinct Varieties - 3 of each -50c. 421 Vase Charm Cactus, Distinct Variety - 3 Blooms - 30c 433 Vases Charm Decorative, Distinct Varieties, 3 of each50c 441 Vase Charm Decorative 5 Blooms N.N.D. 30c 451 Vase Miniature, 3 Blooms, N.N.D.20c 461 Charm 471 Vase Pompones 5 Blooms N.N.D.50c 481 Vase Show or Ball Dahlias 3 Blooms N.N.D. 50c. SECTION 4: DAHLIAS - NOVICE 491 Giant Dahlia 30c 501 Medium Dahlia 30c 511 Vase Miniature Dahlias, 3 Blooms, N.N.D.30c 521 Vase Charm Dahlias, 3 Blooms, N.N.D. 30c 531 Miniature Dahlia20c 541 Charm Dahlia 20c SECTION 5:R O S E S-O P E N 55Roses, 3 Blooms in Separate Containers, (Distinct Varieties)40c 56Roses, 3 Blooms, 1 colour shown separately 30c 57Roses, 3 Blooms, Bud to Full Bloom 30 c 58Roses, 3 Vases, Distinct Varieties 75c 59Roses, 1 Vase Full Bloom showing stamens 30c 60Roses, 1 Vase C.V.A. 20c Page Six Continuation of: SECTION 5 - R O S E S-O P E N SCH.NO:FIRST 611 Rose in Bloom20c 62Rose, 1 Vase of Floribunda or Grandiflora 30c SECTION 6 - R O S E S - A M A T E U R 63Rose, 1 Bloom20c 64Rose, 1 Vase, C.V.A. 30c 65Roses, 3 Blooms, Distinct Varieties35c 66Roses, 3 Blooms, Bud to Full Bloom 35c 67Roses, 1 Vase Floribunda or Grandiflora30c SECTION 7C U T F L O W E R S -O P E N 683 Vases Cut Flowers, Distinct Kinds, C.V.A. 50c 691 Vase Cut Flowers, Distinct Variety, C.V.A. 25c 701 Vase Cut Flowers, Red Shades, Distinct Kind 25c 711 Vase Cut Flowers, Pink Shades, Distinct Kind25c 721 Vase Cut Flowers, White Shades, Distinct Kind 25c 731 Vase Cut Flowers, Cream or Yellow Shades25c 741 Vase Cut Flowers, Blue Shades 25c 751 Head Hydrangeas25c 763 Vases Geranium or Pelargonium, N.N.D. 25c 771 Vase Asters, C.V.A.25c 781 Vase Zinnias, Distinct Variety, Dahlia Flowered25c 793 Vases Zinnias, Distinct Colours, Dahlia Flowered 25c 801 Vase Lilliput Zinnias, C.V.A. 25c 811 Vase Marigolds. C.V.A. 25c 821 Vase Cut Flowers, not shown in this Schedule 25c 831 Vase Decorative Chrysanthemum, C.V.A., A.N.S.25c Page Seven Continuation of: SECTION 7:CUT FLOWERS - OPEN - SCH.NO: FIRST: 841 Container phlox, C.V.A.25c SECTION 8C U TF L O W E R S - AMATEUR 853 Vases Cut Flowers, Distinct Kinds, C.V.A. 40c 861 Vase Cut Flowers, Distinct Variety, C.V.A. 25c 871 Vase Cut Flowers, Red Shades, Distinct Kinds25c 881 Vase Cut Flowers, Red Shades, Distinct Kinds 25c 891 Vase Cut Flowers, Blue Shades, Distinct Kinds 25c 901 Vase Cut Flowers, White Shades, Distinct Kinds 25c 913 Vases Fuchsias, C.V.A.25c 923 Vases Geraniums or Pelargoniums (N.N.D.) 25c 931 Vase Aster, C.V.A.25c. 941 Vase African Marigolds, Distinct Variety 25c 951 Vase Zinnias, Dahlia Flowered, C.V.A. 25c. 961 Vase Cut Flowers not stated in Schedule 25c 971 Flower not stated in Schedule 25c 981 Vase Geranium, Distinct Variety25c 991 Container Phlox25c Page Eight SECTION 9 - C U T F L O W E R S - N O V I C E SCH.NO:FIRST: 1001 Vase Asters 25c 1011 Vase Snap Dragons C.V.A.25c 1021 Vase Marigold C.V.A.25c 1031 Vase Zemias, Dahlia Flowered, C.V.A. 25c 1041 Vase Zemias, Lilliput, C.V.A. 25c 1051 Container Phlox 25c SECTION 10 F L O R A L A R T O P E N FIRST SECOND 106Arrangement of Flowers for the Home50c 20c 107Table Centre Piece of Mixed Flowers 50c 20c 108Bowl of Dahlias 50c 20c 109Arrangement of Autumn Tones (Any Foliage Allowed)50c 20c 110 Arrangement of Flowers (Dahlias to predominate - May include any plant material and accessories)$1-00 50c 111Dry Arrangement 50c 20c 112Church Arrangement 50c 20c 113A Basket of Fruit 50c 20c 114Line Arrangement (May include any Plant Material) 50c 20c 115"AS I LIKE IT" (May include any Plant Material and Accessories) 50c 20c 116Arrangement, Tall and Stately 50c 20c 117Bowl of Floating Flowers (FLOWERS MUST FLOAT)35c 15c Page Nine SECTION 11 F L O R A L A R T - A M A T E U R SCH.NO: FIRST:SECOND: 118Arrangement of Dahlias35c 15c 119Miniature Arrangement 50c 15c 120Harvest Arrangement of Flowers and/or Vegetables 40c20c 121Arrangement of Gladioli 35c 15c 122One Flower Spray30c 15c 123Arrangement of Five Dahlias 35c 15c 124Presentation Basket50c 20c 125Arrangement in Pink and Gray on Silver 40c 20c S P E C I A L N O T I C E PLEASE NOTE THAT SCHEDULE NUMBERS 106, 118 AND 120, TO BE EXHIBITED IN 2FT.6IN. NICHE.. SECTION 12 F L O R A L A R T - INTERMEDIATE SCH.NO: FIRST: SECOND: 126A Dry Arrangement 30c15c 127Presentation Basket40c20c 128Tall Arrangement 30c15c 129Line Arrangement Five Flowers40c20c ENTRIES CLOSE THURSDAY MARCH 4TH, 1971 AT 9 P.M. Page Ten SECTION 13 F L O R A L A R T - N O V I C E SCH.NO:FIRST: SECOND: 130"My Choice" 30c 15c 131Dry Arrangement 30c 15c 132One Flower Spray 30c 15c 133Presentation Basket 40c 20c 134Arrangement, "AS I LIKE IT"30c 15c SECTION 14V E G E T A B L E S SCH.NO:FIRST: 135Collection of not more than 8 Vegetables $1.50 136Brace (2) of Apple Cuccumbers25c. 137Brace (2) of Long Cuccumbers 25c 138Plate of 4 Tomatoes, smooth, (eith Stalks) 25c. 139Plate of 4 Onions25c 140One Vegetable Marrow25c 141One Pumpkin 25c 142One Lettuce25c 143Plate of Peas - 12 Pods - 25c 144Plate of Climbing Beans - 12 Beans25c. 145Plate of Dwarf Beans - 12 Beans - 25c 146Bunch of Three Carrots with Tops25c 147Bunch of Three Parsnips 25c 148One Head Silver Beet25c 149Plate of 4 Potatoes25c 150Bunch of 3 Red Beet with Tops 25c 1513 Sticks of Rhubarb with Leaves25c 152Vegetable not otherwise specified 25c 1533 Cobs Sweet Corn25c. Page Eleven SECTION 14 - F R U I T SCH.NO: FIRST: SECOND: 154A Dish of 4 Culinary Apples 25c 155A Dish of 4 Dessert Apples 25c 156A Dish of 4 Lemons 25c 157A Dish of 6 Passion Fruit 25c 158A Fruit not otherwise stated 25c SECTION 15 - FLORAL ART - CHILDREN 11 TO 14 YEARS 159Floral Mat 12 inches by 9 inches 75c25c 160Arrangement of 3 Flowers (Any Foliage) 20c10c 161Decorated Saucer of Flowers20c 10c 162Flower Arrangement in Egg Cup 20c10c 163Novelty of any Horticultural Material20c 10c 164Boquet of Flowers 20c 10c 165Miniature Arrangement not to Exceed Three Inches 20c 10c. 166Arranged Vase of Flowers 20c 10c 167Arranged Vase of 6 Dahlias20c 10c. SECTION 16SPECIAL FUCHSIAS SECTION 168Single, 3 Distinct Variety 169Single, 6 Distinct Variety 170Single, 3 C.V.A. 171Single, 6 C.V.A. 172Double, 3 Distinct Variety 173Double, 6 Distinct Variety 174Double, 3 Distinct Variety 175Double, 6 C.V.A. Page Twelve Fuchsias Florets to be displayed on collar in a container (Small). Containers and Collars will be supplied by the Club, PRIZE-CARDS - FIRST, SECOND, WILL BE AWARDED ALSO MERIT CARD. A TROPHY WILL BE AWARDED TO THE BEST EXHIBIT IN SPECIAL FUCHSIAS SECTION SPECIAL OPEN CLASS - POT PLANTS.... SCH.NO:FIRST: 1761 Pot Plant, Foliage30c 1771 Pot Plant, Orchid In Bloom 30c 1781 Pot Succulents 30c 1791 Pot Geranium in Bloom 30c 1801 Pot Geranium Foliage 30c 1813 Indoor Plants - Different Varieties 30c 1825 Pots, at least 3 in Bloom 30c 183Container of Mixed Plants 30c 1841 Pot Plant in Bloom 30c Back Page G A R D E N C O M P E T I T I O N G A R D E N C O M P E T I T I O N sponsored by RINGWOOD CITY COUNCIL (Entries close Thursday February18th) (JUDGING SATURDAY FEBRUARY 27TH, 1971) ENTRIES MAY BE LEFT WITH: MRS.D.HUTCHINSON MRS.V.H.WILSON 43 Caroline Streetor38 William Street RINGWOOD RINGWOOD 870-8577870-7458 JOIN THESOCIETY Our MONTHLY MEETINGS are held on the THIRD MONDAY at 8 p.m. on each month in the PUBLIC LIBRARY, Warrandyte Road, RINGWOOD. YEARLY SUBSCRIPTION: ONE DOLLAR ($1-00) C H R Y S A N T H E M U M S H O W SATURDAY, MAY 8TH, 1971 WATCH FOR FURTHER DETAILS Sunrise Secretarial Service, 12 Grey Street, Ringwood East Telephone: 870-6871 -
 Orbost & District Historical Society
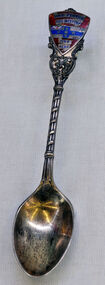
spoon, 1901-1906
A souvenir of Federation Day January 1 1901.The souvenir teaspoon commemorates the federation of the Australian colonies Small silver Federation teaspoon. plain bowl with ornate handle showing the flag and "one people,one destiny, one flag". Top is red, white and blue.On back Rd No 346138 Pictures of crown, lion, anchor and ?souvenir teaspoon federation silver memento -
 Orbost & District Historical Society
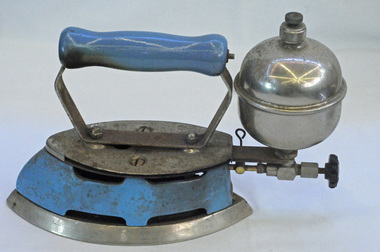
iron, c. 1940s, 50s
Used in the Orbost district prior to electricity being connected (early 1960s). Used for ironing clothes.This is an example of a domestic appliance commonly used before electricity connection was widespread.A metal iron enamelled in blue colour, with a silver coloured fuel reservoir shaped like a bowl. This most likely stored Shellite which was the fuel to heat the iron. The handle is also blue and made of wood. iron shellite-iron clothes-iron -
 The Cyril Kett Optometry Museum
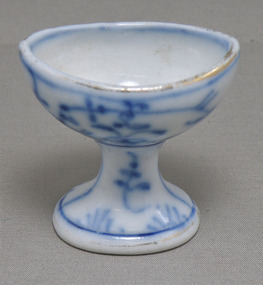
Pedestal porcelain eye bath, Maw & Company, Late 19th Century
Porcelain pedestal eye bath with underglaze blue decoration of straw flower pattern. Lines of gilding around bowl rim and foot.Traces only of gilt letters under foot which include 'M' and 'W'. -
 Orbost & District Historical Society
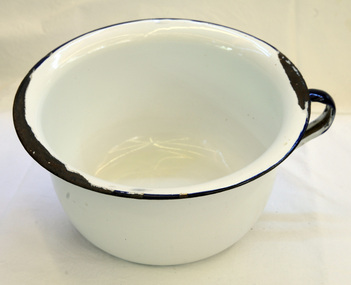
chamber pot, Circa 1920-1940s
This item was used as a portable toilet probably in a bedroom at night. They were commonly used until indoor plumbing was installed.Nowadays commodes have replaced chamber pots and are equally helpful for the sick and disabled persons. However, chamber pots are still used in countries which lack indoor plumbing facilities or during winter. The chamber pot is used in the form of a bedpan in hospitals and homes for very ill patients. The most popular form of the chamber pot is the potties used for children during toilet training. This is an example of an ordinary household item not commonly in use in the 21st century.A white painted enamel bowl-shaped container with a handle. It is blue rimmed with a blue handle.chamber-pot sanitation -
 Flagstaff Hill Maritime Museum and Village
Domestic object - Candle stick holder, Early 20th century
None currently availableItem at this time cannot be associated with an historical event, person or place, provenance is unknown, item assessed as a collection asset.Candle stick holder, enamel corrugated bowl shaped dish with no handleBlue and white abstract mottle patternflagstaff hill, warrnambool, shipwrecked coast, flagstaff hill maritime museum, flagstaff hill maritime village, great ocean road, candle holder, candle stick holder, lighting, enamelled candle holder -
 Flagstaff Hill Maritime Museum and Village
Domestic object - Bowl, Late 19th or early 20th Century
The Process of Making Pottery Decorating, Firing, Glazing, Making, Technical There is a rhythm and flow to clay. It can’t be done all at once! Even the making process! It can take weeks to get everything done, especially if you can only work on your pottery once a week! Even though we have three hour classes, it’s often just not enough time! Here is an overview of some of the processes so you have a bit more grasp on some of the technical stuff! Step One – Design There are SO many ideas out there for making stuff in clay! From delicate porcelain jewellery, through to heavy sculptural work and everything in between. Deciding your direction is sometimes not that easy – when you first start, try everything, you will naturally gravitate to the style that you enjoy! The options and variations are endless and can get a wee bit overwhelming too! Check in with me before you start to ensure your ideas will work, what order you might do things, how you could achieve the look you are seeking and any other technical data required! Step Two – Making Clay is thixotropic. This means that as you work with it, the clay first gets sloppier and wetter, before is begins to dry in the atmosphere. For most things, you simply can’t do all parts of the project at once. An example of work order might look like: Get last weeks work out from the shelves Prepare clay for today’s work – roll your clay, prepare balls for throwing, make the first stage of a pinch pot) Clean up last week’s work and put it on the shelf for bisque firing Check that you have any glazing to do – and do enough of it that you will have time to finish your main project Do the next step of your next project – there might be a further step that can’t be complete immediately, in that case, wrap your work well and put onto the shelves. Letting your work rest for a while can really help keep your work clean and professional looking. Many things require bagging under plastic to keep it ready for work the next week – put your name on the outside of the bag so you can find your work easily. We have stickers and markers. Consider how you want to decorate your work – coloured slip can be applied at a fairly wet stage (remembering that it will make your work even wetter!). Trying to apply slip to dry clay won’t work! If you want to do sgraffito – you will need to keep the work leather hard (a state of dryness where you can still work the clay with a little effort and a little water and care). Step Three – Drying Most of the time your work can go into the rack uncovered to let it dry out for the following week. If you want to continue forming or shaping you will need to double bag your work – put your work on a suitable sized bat and put the bat in a bag so the base of the bag is under the bat, then put another bag over the top of the work and tuck the top of the bag under the bat. If you want to trim (or turn) your thrown work the following week, it should also be double bagged. If your work is large, delicate, or of uneven thicknesses, you should lightly cover your work for drying. When considering the drying process, bare in mind the weather, humidity and wind! The hotter and dryer, the faster things dry and work can dry unevenly in the shelves – this can lead to cracking – another time to lightly cover your work for drying. Step Four – Trimming and Cleaning Up Your work is dry! It is called greenware now and it is at it’s most fragile! Handle everything with two hands. I often refer to soft hands – keep everything gentle and with your fingers spread as much as possible. Try to not pick up things like plates too much, and always with both hands! Before your work can be bisque fired it should be “cleaned up”. You work won’t go into the kiln if it has sharp edges – when glazed, sharp edges turn into razor blades! Use a piece of fly wire to rub the work all over – this will scratch a little so be light handed. Use a knife or metal kidney to scrape any areas that require a bit more dynamic treatment than the fly wire offers! Finally, a very light wipe over with a slightly damp sponge can help soften and soothe all of your edges and dags! Trimming thrown work: If you are planning to trim (or turn) your thrown work (and you should be), make sure you bag it well – your work should be leather hard to almost dry for easiest trimming. Use this step to finish the work completely – use a metal kidney to polish the surface, or a slightly damp sponge to give a freshly thrown look. Wipe the sponge around the rim after trimming, and check the inside of the pot for dags! Trimming slip cast work: Usually I will trim the rims of your work on the wheel the following day to make that stage easier, however you will still need to check your work for lumps and bumps. Last but not least – check that your name is still clearly on the bottom of your work. Step Five – Bisque Firing When the work is completely dry it can go into the bisque kiln. The bisque kiln is fired to 1000°C. This process burns off the water in the clay as well as some of the chemically bound water. The structure of the clay is not altered that much at this temperature. Inside the bisque kiln, the work is stacked a little, small bowl inside a larger bowl and onto a heavy plate. Smaller items like decorations or drink coasters might get stacked several high. Consideration is paid to the weight of the stack and shape of the work. A bisque kiln can fire about one and a half times the amount of work that the glaze kiln can fire. The firing takes about 10 hours to complete the cycle and about two days to cool down. Once it has been emptied the work is placed in the glaze room ready for you to decorate! Step Six – Glazing Decorating your work with colour can be a lot of fun – and time consuming! There are three main options for surface treatment at this stage: Oxide Washes Underglazes Glazes Washes and underglazes do not “glaze” the work – It will still need a layer of glaze to fully seal the clay (washes don’t need glaze on surfaces not designed for food or liquid as they can gloss up a little on their own). Underglazes are stable colourants that turn out pretty much how they look in the jar. They can be mixed with each other to form other colours and can be used like water colours to paint onto your work. Mostly they should have a clear glaze on top to seal them. Oxides are a different species – the pink oxide (cobalt) wash turns out bright blue for instance. They don’t always need a glaze on top, and some glazes can change the colour of the wash! The glazes need no other “glaze” on top! Be careful of unknown glaze interactions – you can put any combination of glaze in a bowl or on a plate, but only a single glaze on the outside of any vertical surface! Glazes are a chemical reaction under heat. We don’t know the exact chemicals in the Mayco glazes we use. I can guess by the way they interact with each other, however, on the whole, you need to test every idea you have, and not run the test on a vertical surface! Simply put, glaze is a layer of glass like substance that bonds with the clay underneath. Clay is made of silica, alumina and water. Glaze is made of mostly silica. Silica has a melting point of 1700°C and we fire to 1240°C. The silica requires a “flux” to help it melt at the lower temperature. Fluxes can be all sorts of chemicals – a common one is calcium – calcium has a melting point of 2500°C, however, together they both melt at a much lower temperature! Colourants are metal oxides like cobalt (blue), chrome (green through black), copper (green, blue, even red!), manganese (black, purple and pink) iron (red brown), etc. Different chemicals in the glaze can have dramatic effects. for example, barium carbonate (which we don’t use) turns manganese bright pink! Other elements can turn manganese dioxide brown, blue, purple and reddish brown. Manganese dioxide is a flux in and of itself as well. So, glazes that get their black and purple colours, often interact with other glazes and RUN! Our mirror black is a good example – it mixes really well with many glazes because it fluxes them – causes them to melt faster. It will also bring out many beautiful colours in the glazes because it’s black colouring most definitely comes from manganese dioxide! Glaze chemistry is a whole subject on it’s own! We use commercial Mayco glazes on purpose – for their huge range of colour possibilities, stability, cool interactions, artistic freedom with the ability to easily brush the glazes on and ease of use. We currently have almost 50 glazes on hand! A major project is to test the interactions of all glazes with each other. That is 2,500 test tiles!!!! I’m going to make the wall behind the wheels the feature wall of pretty colours! Step Seven – Glaze (Gloss or sometimes called “Glost”) Firing Most of the time this is the final stage of making your creation (but not always!) The glaze kiln goes to 1240°C. This is called cone 6, or midrange. It is the low end of stoneware temperatures. Stoneware clays and glazes are typically fired at cone 8 – 10, that is 1260 – 1290°C. The energy requirement to go from 1240°C to 1280°C is almost a 30% more! Our clay is formulated to vitrify (mature, turn “glass-like”) at 1240°, as are our glazes. A glaze kiln take around 12 hours to reach temperature and two to three days to cool down. Sometimes a third firing process is required – this is for decoration that is added to work after the glaze firing. For example – adding precious metals and lustres. this firing temperature is usually around 600 – 800°C depending upon the techniques being used. There are many students interested in gold and silver trims – we will be doing this third type of firing soon! After firing your work will be in the student finished work shelves. Remember to pay for it before you head out the door! There is a small extra charge for using porcelain clay (it’s more than twice the price of regular clay), and for any third firing process! Once your work has been fired it can not turn back into clay for millennia – so don’t fire it if you don’t like it! Put it in the bucket for recycling. https://firebirdstudios.com.au/the-process-of-making-pottery/ The bowl is an example of kitchenware used in the 19th century and still in use today.Bowl white ceramic. Crack on side. Badly stained.Backstamp very faint and unable to be read.flagstaff hill, warrnambool, shipwrecked-coast, flagstaff-hill, flagstaff-hill-maritime-museum, maritime-museum, shipwreck-coast, flagstaff-hill-maritime-village, mixing bowl, food preparation, kitchen equipment, ceramic -
 Flagstaff Hill Maritime Museum and Village
Domestic object - Bowl
The Process of Making Pottery Decorating, Firing, Glazing, Making, Technical There is a rhythm and flow to clay. It can’t be done all at once! Even the making process! It can take weeks to get everything done, especially if you can only work on your pottery once a week! Even though we have three hour classes, it’s often just not enough time! Here is an overview of some of the processes so you have a bit more grasp on some of the technical stuff! Step One – Design There are SO many ideas out there for making stuff in clay! From delicate porcelain jewellery, through to heavy sculptural work and everything in between. Deciding your direction is sometimes not that easy – when you first start, try everything, you will naturally gravitate to the style that you enjoy! The options and variations are endless and can get a wee bit overwhelming too! Check in with me before you start to ensure your ideas will work, what order you might do things, how you could achieve the look you are seeking and any other technical data required! Step Two – Making Clay is thixotropic. This means that as you work with it, the clay first gets sloppier and wetter, before is begins to dry in the atmosphere. For most things, you simply can’t do all parts of the project at once. An example of work order might look like: Get last weeks work out from the shelves Prepare clay for today’s work – roll your clay, prepare balls for throwing, make the first stage of a pinch pot) Clean up last week’s work and put it on the shelf for bisque firing Check that you have any glazing to do – and do enough of it that you will have time to finish your main project Do the next step of your next project – there might be a further step that can’t be complete immediately, in that case, wrap your work well and put onto the shelves. Letting your work rest for a while can really help keep your work clean and professional looking. Many things require bagging under plastic to keep it ready for work the next week – put your name on the outside of the bag so you can find your work easily. We have stickers and markers. Consider how you want to decorate your work – coloured slip can be applied at a fairly wet stage (remembering that it will make your work even wetter!). Trying to apply slip to dry clay won’t work! If you want to do sgraffito – you will need to keep the work leather hard (a state of dryness where you can still work the clay with a little effort and a little water and care). Step Three – Drying Most of the time your work can go into the rack uncovered to let it dry out for the following week. If you want to continue forming or shaping you will need to double bag your work – put your work on a suitable sized bat and put the bat in a bag so the base of the bag is under the bat, then put another bag over the top of the work and tuck the top of the bag under the bat. If you want to trim (or turn) your thrown work the following week, it should also be double bagged. If your work is large, delicate, or of uneven thicknesses, you should lightly cover your work for drying. When considering the drying process, bare in mind the weather, humidity and wind! The hotter and dryer, the faster things dry and work can dry unevenly in the shelves – this can lead to cracking – another time to lightly cover your work for drying. Step Four – Trimming and Cleaning Up Your work is dry! It is called greenware now and it is at it’s most fragile! Handle everything with two hands. I often refer to soft hands – keep everything gentle and with your fingers spread as much as possible. Try to not pick up things like plates too much, and always with both hands! Before your work can be bisque fired it should be “cleaned up”. You work won’t go into the kiln if it has sharp edges – when glazed, sharp edges turn into razor blades! Use a piece of fly wire to rub the work all over – this will scratch a little so be light handed. Use a knife or metal kidney to scrape any areas that require a bit more dynamic treatment than the fly wire offers! Finally, a very light wipe over with a slightly damp sponge can help soften and soothe all of your edges and dags! Trimming thrown work: If you are planning to trim (or turn) your thrown work (and you should be), make sure you bag it well – your work should be leather hard to almost dry for easiest trimming. Use this step to finish the work completely – use a metal kidney to polish the surface, or a slightly damp sponge to give a freshly thrown look. Wipe the sponge around the rim after trimming, and check the inside of the pot for dags! Trimming slip cast work: Usually I will trim the rims of your work on the wheel the following day to make that stage easier, however you will still need to check your work for lumps and bumps. Last but not least – check that your name is still clearly on the bottom of your work. Step Five – Bisque Firing When the work is completely dry it can go into the bisque kiln. The bisque kiln is fired to 1000°C. This process burns off the water in the clay as well as some of the chemically bound water. The structure of the clay is not altered that much at this temperature. Inside the bisque kiln, the work is stacked a little, small bowl inside a larger bowl and onto a heavy plate. Smaller items like decorations or drink coasters might get stacked several high. Consideration is paid to the weight of the stack and shape of the work. A bisque kiln can fire about one and a half times the amount of work that the glaze kiln can fire. The firing takes about 10 hours to complete the cycle and about two days to cool down. Once it has been emptied the work is placed in the glaze room ready for you to decorate! Step Six – Glazing Decorating your work with colour can be a lot of fun – and time consuming! There are three main options for surface treatment at this stage: Oxide Washes Underglazes Glazes Washes and underglazes do not “glaze” the work – It will still need a layer of glaze to fully seal the clay (washes don’t need glaze on surfaces not designed for food or liquid as they can gloss up a little on their own). Underglazes are stable colourants that turn out pretty much how they look in the jar. They can be mixed with each other to form other colours and can be used like water colours to paint onto your work. Mostly they should have a clear glaze on top to seal them. Oxides are a different species – the pink oxide (cobalt) wash turns out bright blue for instance. They don’t always need a glaze on top, and some glazes can change the colour of the wash! The glazes need no other “glaze” on top! Be careful of unknown glaze interactions – you can put any combination of glaze in a bowl or on a plate, but only a single glaze on the outside of any vertical surface! Glazes are a chemical reaction under heat. We don’t know the exact chemicals in the Mayco glazes we use. I can guess by the way they interact with each other, however, on the whole, you need to test every idea you have, and not run the test on a vertical surface! Simply put, glaze is a layer of glass like substance that bonds with the clay underneath. Clay is made of silica, alumina and water. Glaze is made of mostly silica. Silica has a melting point of 1700°C and we fire to 1240°C. The silica requires a “flux” to help it melt at the lower temperature. Fluxes can be all sorts of chemicals – a common one is calcium – calcium has a melting point of 2500°C, however, together they both melt at a much lower temperature! Colourants are metal oxides like cobalt (blue), chrome (green through black), copper (green, blue, even red!), manganese (black, purple and pink) iron (red brown), etc. Different chemicals in the glaze can have dramatic effects. for example, barium carbonate (which we don’t use) turns manganese bright pink! Other elements can turn manganese dioxide brown, blue, purple and reddish brown. Manganese dioxide is a flux in and of itself as well. So, glazes that get their black and purple colours, often interact with other glazes and RUN! Our mirror black is a good example – it mixes really well with many glazes because it fluxes them – causes them to melt faster. It will also bring out many beautiful colours in the glazes because it’s black colouring most definitely comes from manganese dioxide! Glaze chemistry is a whole subject on it’s own! We use commercial Mayco glazes on purpose – for their huge range of colour possibilities, stability, cool interactions, artistic freedom with the ability to easily brush the glazes on and ease of use. We currently have almost 50 glazes on hand! A major project is to test the interactions of all glazes with each other. That is 2,500 test tiles!!!! I’m going to make the wall behind the wheels the feature wall of pretty colours! Step Seven – Glaze (Gloss or sometimes called “Glost”) Firing Most of the time this is the final stage of making your creation (but not always!) The glaze kiln goes to 1240°C. This is called cone 6, or midrange. It is the low end of stoneware temperatures. Stoneware clays and glazes are typically fired at cone 8 – 10, that is 1260 – 1290°C. The energy requirement to go from 1240°C to 1280°C is almost a 30% more! Our clay is formulated to vitrify (mature, turn “glass-like”) at 1240°, as are our glazes. A glaze kiln take around 12 hours to reach temperature and two to three days to cool down. Sometimes a third firing process is required – this is for decoration that is added to work after the glaze firing. For example – adding precious metals and lustres. this firing temperature is usually around 600 – 800°C depending upon the techniques being used. There are many students interested in gold and silver trims – we will be doing this third type of firing soon! After firing your work will be in the student finished work shelves. Remember to pay for it before you head out the door! There is a small extra charge for using porcelain clay (it’s more than twice the price of regular clay), and for any third firing process! Once your work has been fired it can not turn back into clay for millennia – so don’t fire it if you don’t like it! Put it in the bucket for recycling. https://firebirdstudios.com.au/the-process-of-making-pottery/ This bowl is an example of kitchenware used in the 19th century and still in use today.Bowl white ceramic plain that has two sets of edging around lip. Inside bowl has plaster designed to look like cooking mixture.flagstaff hill, warrnambool, shipwrecked-coast, flagstaff-hill, flagstaff-hill-maritime-museum, maritime-museum, shipwreck-coast, flagstaff-hill-maritime-village, kitchen equipment, ceramic -
 Flagstaff Hill Maritime Museum and Village
Domestic object - Bowl, J & G Meakin, Late 19th or early 20th Century
The Process of Making Pottery Decorating, Firing, Glazing, Making, Technical There is a rhythm and flow to clay. It can’t be done all at once! Even the making process! It can take weeks to get everything done, especially if you can only work on your pottery once a week! Even though we have three hour classes, it’s often just not enough time! Here is an overview of some of the processes so you have a bit more grasp on some of the technical stuff! Step One – Design There are SO many ideas out there for making stuff in clay! From delicate porcelain jewellery, through to heavy sculptural work and everything in between. Deciding your direction is sometimes not that easy – when you first start, try everything, you will naturally gravitate to the style that you enjoy! The options and variations are endless and can get a wee bit overwhelming too! Check in with me before you start to ensure your ideas will work, what order you might do things, how you could achieve the look you are seeking and any other technical data required! Step Two – Making Clay is thixotropic. This means that as you work with it, the clay first gets sloppier and wetter, before is begins to dry in the atmosphere. For most things, you simply can’t do all parts of the project at once. An example of work order might look like: Get last weeks work out from the shelves Prepare clay for today’s work – roll your clay, prepare balls for throwing, make the first stage of a pinch pot) Clean up last week’s work and put it on the shelf for bisque firing Check that you have any glazing to do – and do enough of it that you will have time to finish your main project Do the next step of your next project – there might be a further step that can’t be complete immediately, in that case, wrap your work well and put onto the shelves. Letting your work rest for a while can really help keep your work clean and professional looking. Many things require bagging under plastic to keep it ready for work the next week – put your name on the outside of the bag so you can find your work easily. We have stickers and markers. Consider how you want to decorate your work – coloured slip can be applied at a fairly wet stage (remembering that it will make your work even wetter!). Trying to apply slip to dry clay won’t work! If you want to do sgraffito – you will need to keep the work leather hard (a state of dryness where you can still work the clay with a little effort and a little water and care). Step Three – Drying Most of the time your work can go into the rack uncovered to let it dry out for the following week. If you want to continue forming or shaping you will need to double bag your work – put your work on a suitable sized bat and put the bat in a bag so the base of the bag is under the bat, then put another bag over the top of the work and tuck the top of the bag under the bat. If you want to trim (or turn) your thrown work the following week, it should also be double bagged. If your work is large, delicate, or of uneven thicknesses, you should lightly cover your work for drying. When considering the drying process, bare in mind the weather, humidity and wind! The hotter and dryer, the faster things dry and work can dry unevenly in the shelves – this can lead to cracking – another time to lightly cover your work for drying. Step Four – Trimming and Cleaning Up Your work is dry! It is called greenware now and it is at it’s most fragile! Handle everything with two hands. I often refer to soft hands – keep everything gentle and with your fingers spread as much as possible. Try to not pick up things like plates too much, and always with both hands! Before your work can be bisque fired it should be “cleaned up”. You work won’t go into the kiln if it has sharp edges – when glazed, sharp edges turn into razor blades! Use a piece of fly wire to rub the work all over – this will scratch a little so be light handed. Use a knife or metal kidney to scrape any areas that require a bit more dynamic treatment than the fly wire offers! Finally, a very light wipe over with a slightly damp sponge can help soften and soothe all of your edges and dags! Trimming thrown work: If you are planning to trim (or turn) your thrown work (and you should be), make sure you bag it well – your work should be leather hard to almost dry for easiest trimming. Use this step to finish the work completely – use a metal kidney to polish the surface, or a slightly damp sponge to give a freshly thrown look. Wipe the sponge around the rim after trimming, and check the inside of the pot for dags! Trimming slip cast work: Usually I will trim the rims of your work on the wheel the following day to make that stage easier, however you will still need to check your work for lumps and bumps. Last but not least – check that your name is still clearly on the bottom of your work. Step Five – Bisque Firing When the work is completely dry it can go into the bisque kiln. The bisque kiln is fired to 1000°C. This process burns off the water in the clay as well as some of the chemically bound water. The structure of the clay is not altered that much at this temperature. Inside the bisque kiln, the work is stacked a little, small bowl inside a larger bowl and onto a heavy plate. Smaller items like decorations or drink coasters might get stacked several high. Consideration is paid to the weight of the stack and shape of the work. A bisque kiln can fire about one and a half times the amount of work that the glaze kiln can fire. The firing takes about 10 hours to complete the cycle and about two days to cool down. Once it has been emptied the work is placed in the glaze room ready for you to decorate! Step Six – Glazing Decorating your work with colour can be a lot of fun – and time consuming! There are three main options for surface treatment at this stage: Oxide Washes Underglazes Glazes Washes and underglazes do not “glaze” the work – It will still need a layer of glaze to fully seal the clay (washes don’t need glaze on surfaces not designed for food or liquid as they can gloss up a little on their own). Underglazes are stable colourants that turn out pretty much how they look in the jar. They can be mixed with each other to form other colours and can be used like water colours to paint onto your work. Mostly they should have a clear glaze on top to seal them. Oxides are a different species – the pink oxide (cobalt) wash turns out bright blue for instance. They don’t always need a glaze on top, and some glazes can change the colour of the wash! The glazes need no other “glaze” on top! Be careful of unknown glaze interactions – you can put any combination of glaze in a bowl or on a plate, but only a single glaze on the outside of any vertical surface! Glazes are a chemical reaction under heat. We don’t know the exact chemicals in the Mayco glazes we use. I can guess by the way they interact with each other, however, on the whole, you need to test every idea you have, and not run the test on a vertical surface! Simply put, glaze is a layer of glass like substance that bonds with the clay underneath. Clay is made of silica, alumina and water. Glaze is made of mostly silica. Silica has a melting point of 1700°C and we fire to 1240°C. The silica requires a “flux” to help it melt at the lower temperature. Fluxes can be all sorts of chemicals – a common one is calcium – calcium has a melting point of 2500°C, however, together they both melt at a much lower temperature! Colourants are metal oxides like cobalt (blue), chrome (green through black), copper (green, blue, even red!), manganese (black, purple and pink) iron (red brown), etc. Different chemicals in the glaze can have dramatic effects. for example, barium carbonate (which we don’t use) turns manganese bright pink! Other elements can turn manganese dioxide brown, blue, purple and reddish brown. Manganese dioxide is a flux in and of itself as well. So, glazes that get their black and purple colours, often interact with other glazes and RUN! Our mirror black is a good example – it mixes really well with many glazes because it fluxes them – causes them to melt faster. It will also bring out many beautiful colours in the glazes because it’s black colouring most definitely comes from manganese dioxide! Glaze chemistry is a whole subject on it’s own! We use commercial Mayco glazes on purpose – for their huge range of colour possibilities, stability, cool interactions, artistic freedom with the ability to easily brush the glazes on and ease of use. We currently have almost 50 glazes on hand! A major project is to test the interactions of all glazes with each other. That is 2,500 test tiles!!!! I’m going to make the wall behind the wheels the feature wall of pretty colours! Step Seven – Glaze (Gloss or sometimes called “Glost”) Firing Most of the time this is the final stage of making your creation (but not always!) The glaze kiln goes to 1240°C. This is called cone 6, or midrange. It is the low end of stoneware temperatures. Stoneware clays and glazes are typically fired at cone 8 – 10, that is 1260 – 1290°C. The energy requirement to go from 1240°C to 1280°C is almost a 30% more! Our clay is formulated to vitrify (mature, turn “glass-like”) at 1240°, as are our glazes. A glaze kiln take around 12 hours to reach temperature and two to three days to cool down. Sometimes a third firing process is required – this is for decoration that is added to work after the glaze firing. For example – adding precious metals and lustres. this firing temperature is usually around 600 – 800°C depending upon the techniques being used. There are many students interested in gold and silver trims – we will be doing this third type of firing soon! After firing your work will be in the student finished work shelves. Remember to pay for it before you head out the door! There is a small extra charge for using porcelain clay (it’s more than twice the price of regular clay), and for any third firing process! Once your work has been fired it can not turn back into clay for millennia – so don’t fire it if you don’t like it! Put it in the bucket for recycling. https://firebirdstudios.com.au/the-process-of-making-pottery/This bowl was made by renowned pottery company J & G Meakin of England. The firm was established in the mid-1800's. The bowl is an example of kitchenware used in the 19th century and still in use today.Bowl; white ceramic, round and tapering inwards towards base. Made by J and G Meakin England.On base, 'Ironstone China Reg SOL 391413' with symbolflagstaff hill, flagstaff hill maritime museum and village, warrnambool, maritime museum, maritime village, great ocean road, shipwreck coast, mixing bowl, food preparation, j & g meakin, pottery, stoke-on-trent, kitchen equipment, ceramic -
 Flagstaff Hill Maritime Museum and Village
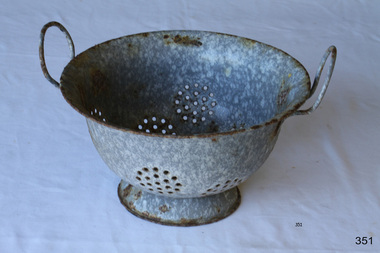
Domestic object - Colander, Late 19th or early 20th Century
The colander is an extremely useful tool in the kitchen, as it allows food to be fully drained of liquids such as water or oil. Enamelware dates back to 1760 in Germany.This object is significant as an example of a type of item in common use in the 19th Century and that is still in use today.Mottled blue enamel colander with draining holes in the base and sides. Two thin handles on lip of bowl.None.flagstaff hill, warrnambool, shipwrecked-coast, flagstaff-hill, flagstaff-hill-maritime-museum, maritime-museum, shipwreck-coast, flagstaff-hill-maritime-village, enamel, colander, food preparation -
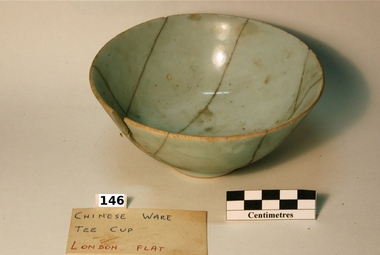
 Bright & District Historical Society operating the Bright Museum
Bowl
... one recording the location where found. chinese bowl porcelain ...Brought to the Ovens Goldfields by Chinese men working in the area in the 19th century. Most likely made in China.Aldo Gios recorded the location of where most pieces in his collection were found. Some maps drawn by Aldo Gios, also give more detail. This detail is rare as most pieces of broken crockery were discarded and complete items were usually collected with no thought to recording the location where they were found. This object is part of one of the largest collections of Chinese ware found in the Upper Ovens area and the only one recording the location where found.Chinese food bowl, porcelain, celadonBlue Chinese writing or maker's stamp on basechinese, bowl, porcelain, celadon -
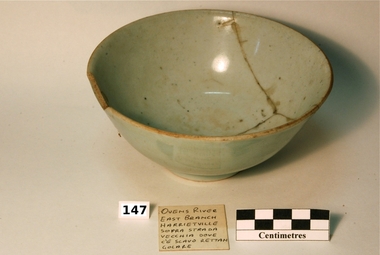
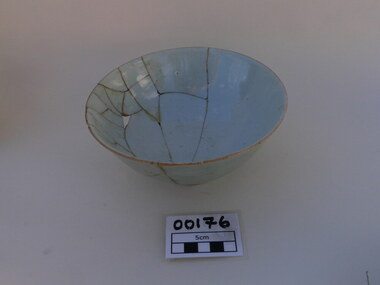
 Bright & District Historical Society operating the Bright Museum
Bowl
... one recording the location where found. chinese bowl tableware ...Brought to the Ovens Goldfields by Chinese men working in the area in the 19th century. Most likely made in China.Aldo Gios recorded the location of where most pieces in his collection were found. Some maps drawn by Aldo Gios, also give more detail. This detail is rare as most pieces of broken crockery were discarded and complete items were usually collected with no thought to recording the location where they were found. This object is part of one of the largest collections of Chinese ware found in the Upper Ovens area and the only one recording the location where found.Chinese porcelain bowl, celadonBlue Chinese writing or maker’s stamp on base.chinese, bowl, tableware, porcelain, celadon -
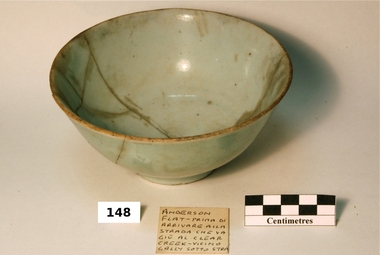
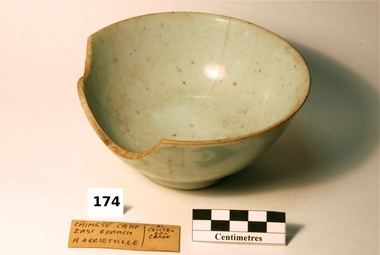
 Bright & District Historical Society operating the Bright Museum
Bowl
Brought to the Ovens Goldfields by Chinese men working in the area in the 19th century. Most likely made in China.Aldo Gios recorded the location of where most pieces in his collection were found. Some maps drawn by Aldo Gios, also give more detail. This detail is rare as most pieces of broken crockery were discarded and complete items were usually collected with no thought to recording the location where they were found. This object is part of one of the largest collections of Chinese ware found in the Upper Ovens area and the only one recording the location where found.Chinese porcelain bowl, celadon.Blue Chinese writing or maker’s stamp on base.chinese, bowl, tableware, porcelain, harrietville, celadon -
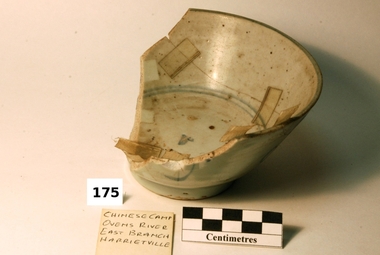
 Bright & District Historical Society operating the Bright Museum
Bowl
Brought to the Ovens Goldfields by Chinese men working in the area in the 19th century. Most likely made in China.Aldo Gios recorded the location of where most pieces in his collection were found. Some maps drawn by Aldo Gios, also give more detail. This detail is rare as most pieces of broken crockery were discarded and complete items were usually collected with no thought to recording the location where they were found. This object is part of one of the largest collections of Chinese ware found in the Upper Ovens area and the only one recording the location where found.Chinese porcelain food bowl, celadon.Blue Chinese writing or maker’s stamp on base.chinese, bowl, tableware, porcelain, buckland, celadon -
 Bright & District Historical Society operating the Bright Museum
Bowl
... Porcelain food bowl, celadon glaze, Chinese. Blue floral... recording the location where found. chinese bowl goldfields gios ...Brought to the Ovens Goldfields by Chinese men working in the area in the 19th century. Most likely made in China.Aldo Gios recorded the location of where most of the pieces in this collection were found. Some maps drawn by Aldo Gios also give more detail. This detail is rare, as most pieces of broken crockery were discarded and complete items were usually collected with no thought to recording the location they came from. Part of one of the largest collections of Chinese ware found in the Upper Ovens area and the only one recording the location where found.Porcelain food bowl, celadon glaze, Chinese. Blue floral design on outer surface, blue lines inside.chinese, bowl, goldfields, gios, tableware, glaze, porcelain, buckland, celadon -
 Bright & District Historical Society operating the Bright Museum
Bowl
... . Bowl base colour is a milky blue. Bowl ...Brought to the Ovens Goldfields by Chinese men working in the area in the 19th century. Most likely made in China.Aldo Gios recorded the location of where most of the pieces in this collection were found. Some maps drawn by Aldo Gios also give more detail. This detail is rare, as most pieces of broken crockery were discarded and complete items were usually collected with no thought to recording the location they came from. Part of one of the largest collections of Chinese ware found in the Upper Ovens area and the only one recording the location where found.Porcelain food bowl, glazed, Chinese. Handpainted swirling pattern with Chinese writing on outer surface. Bowl base colour is a milky blue.Blue Chinese writing or maker’s stamp on base.chinese, bowl, goldfields, gios, tableware, glaze, porcelain, buckland, handpainted -
 Bright & District Historical Society operating the Bright Museum
Bowl
Brought to the Ovens Goldfields by Chinese men working in the area in the 19th century. Most likely made in China.Aldo Gios recorded the location of where most of the pieces in this collection were found. Some maps drawn by Aldo Gios also give more detail. This detail is rare, as most pieces of broken crockery were discarded and complete items were usually collected with no thought to recording the location they came from. Part of one of the largest collections of Chinese ware found in the Upper Ovens area and the only one recording the location where found.Chinese porcelain food bowl, celadon glaze.Blue Chinese writing or maker’s stamp on base.chinese, bowl, goldfields, gios, tableware, glaze, porcelain, harrietville, celadon -
 Bright & District Historical Society operating the Bright Museum
Bowl
... tableware glaze harrietville celadon handpainted porcelain bowl Blue ...Brought to the Ovens Goldfields by Chinese men working in the area in the 19th century. Most likely made in China.Aldo Gios recorded the location of where most of the pieces in this collection were found. Some maps drawn by Aldo Gios also give more detail. This detail is rare, as most pieces of broken crockery were discarded and complete items were usually collected with no thought to recording the location they came from. Part of one of the largest collections of Chinese ware found in the Upper Ovens area and the only one recording the location where found.Chinese porcelain food bowl, celadon glaze. Decorations in blue colour on outer surface. Blue lines circling the inside, handpainted.Blue Chinese writing or maker’s stamp on base.chinese, goldfields, gios, tableware, glaze, harrietville, celadon, handpainted, porcelain bowl -
 Bright & District Historical Society operating the Bright Museum
Bowl
Brought to the Ovens Goldfields by Chinese men working in the area in the 19th century. Most likely made in China.Aldo Gios recorded the location of where most of the pieces in this collection were found. Some maps drawn by Aldo Gios also give more detail. This detail is rare, as most pieces of broken crockery were discarded and complete items were usually collected with no thought to recording the location they came from. Part of one of the largest collections of Chinese ware found in the Upper Ovens area and the only one recording the location where found.Chinese porcelain food bowl, celadon glaze.Blue Chinese writing or maker’s stamp on base. chinese, bowl, goldfields, gios, tableware, glaze, porcelain, harrietville, celadon -
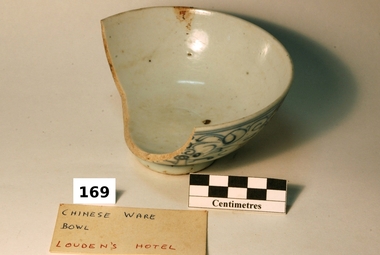
Bright & District Historical Society operating the Bright Museum
Bowl
... Chinese porcelain food bowl, celadon glaze, blue floral... tableware bowl celadon glaze buckland valley goldfields aldo gios ...Chinese porcelain food bowl, celadon glaze, blue floral design on outer surface. Blue lines around inside of bowl. Eight pieces reassembled. Has a base rim."Tick" on bottom of the bowl.porcelain, chinese, tableware, bowl, celadon, glaze, buckland valley, goldfields, aldo gios -
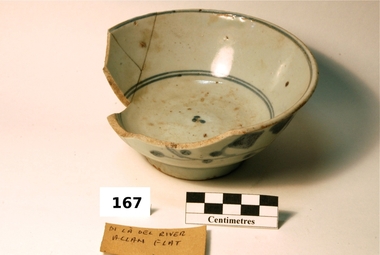
Bright & District Historical Society operating the Bright Museum
Bowl
... Reconstructed, but incomplete, white ceramic bowl... bowl with a blue shell pattern over all surfaces except ...Reconstructed, but incomplete, white ceramic bowl with a blue shell pattern over all surfaces except the base.bowl, ceramic, tableware, aldo gios -
Bright & District Historical Society operating the Bright Museum
Bowl, soup
... Reconstructed, incomplete soup bowl with a blue fern leaf... bowl with a blue fern leaf design. Bowl, soup ...Reconstructed, incomplete soup bowl with a blue fern leaf design.soup bowl, tableware, ceramic, buckland valley, aldo gios -
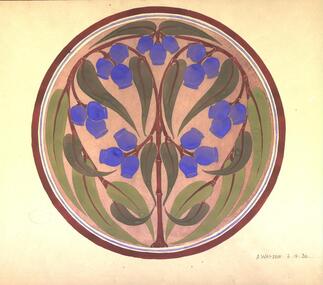 Federation University Historical Collection
Painting - Artwork, Edith Alice Watson, Examples of General Design from folio of artwork undertaken at the Ballarat Technical Art School, 1931,1932
Edith (Alice) WATSON (1914–2010) Murtoa | Australia Alice Watson studied at the Ballarat Technical Art School (at the School of Mines, Ballarat) from 1930 until 1933. Watson sat several departmental exams, including drawing and painting plant forms from nature, lettering, Composition of Form and Colour and advanced General Design, as well as dressmaking and embossed leatherwork. General Design examinations required only designs on paper, and not the full execution of an object (which was the case for Applied Design exams). Watson's folio applies many Australian native floral elements to design. Upon graduating, Watson taught at the Murtoa High School, living with her parents until their deaths in 1972 and 1988 when she was 74 years old. Alice Watson died in Ballarat, aged 95, having conserved her beautiful student folio, which was generously gifted to the Federation University permanent Historical Collection by the Watson family. A folio of thirty three drawings and paintings undertaken by Alice Watson at the Ballarat Technical Art School. The works include including the application of Australian flora to designs, including for pottery, leather and applique. .2) is a design for a table runner to be executed in richelieu work .3) frieze including fish .4) "Design for a border to be executed in stencil". 1932 .12) "Design on the waratah for a bowl to be executed in clay". 1932 .14) "Time test" .12) .17) .15) .18) show the combination of Australian flora with Art Nouveau-inspired designs .9) is a design for a wallet to be executed in raffia showing elevation, side elevation and plan views .11) is a design for a prayer book carrier to be executed in leather work .10) is an example of pencil transfer method of design seen on .11) .18) Design for a fan, image of birds and berries on a blue ground. .25) landscape illustration .27) "development" design based on a correa .29) "Design for a tea cosy based on the Cobia-Scanden to be executed in applique. 1931 (see also .31) .30) "Design for a writing tablet to be executed in embossed leather work and based on the native fuschia" (correa). 1931 .31) a completed doily holder: applique workMost are signed A. Watson 1931 .2) Paper is embossed with stamp of 'Goodall's Bristol Boards' stamp. (Crown depicted in centre) .20 and .22) Paper is embossed with 'Windsor & Newtons Bristol Board' stamp.(Griffin depicted in centre)ballarat technical art school, alice watson, flora, design, artwork, folio, art nouveau, alumni, leather work design, richelieu work, applique, doily holder, doyley holder, general design, edith alice watson -
 Flagstaff Hill Maritime Museum and Village
Bowl
Bowl white enamel small with blue rim around top-in good conditionflagstaff hill, warrnambool, shipwrecked-coast, flagstaff-hill, flagstaff-hill-maritime-museum, maritime-museum, shipwreck-coast, flagstaff-hill-maritime-village -
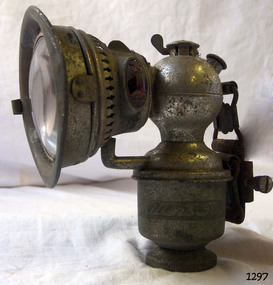 Flagstaff Hill Maritime Museum and Village
Lamp
Carbide Bicycle lamp, with locking fixing attachment, reflector, glass and burner. Has red and blue side light. Printed on carbide bowl "Miller's Regalia British Made" Switch and carbide filler on top.flagstaff hill, warrnambool, shipwrecked-coast, flagstaff-hill, flagstaff-hill-maritime-museum, maritime-museum, shipwreck-coast, flagstaff-hill-maritime-village -
 Flagstaff Hill Maritime Museum and Village
Domestic object - Plate
The Process of Making Pottery Decorating, Firing, Glazing, Making, Technical There is a rhythm and flow to clay. It can’t be done all at once! Even the making process! It can take weeks to get everything done, especially if you can only work on your pottery once a week! Even though we have three hour classes, it’s often just not enough time! Here is an overview of some of the processes so you have a bit more grasp on some of the technical stuff! Step One – Design There are SO many ideas out there for making stuff in clay! From delicate porcelain jewellery, through to heavy sculptural work and everything in between. Deciding your direction is sometimes not that easy – when you first start, try everything, you will naturally gravitate to the style that you enjoy! The options and variations are endless and can get a wee bit overwhelming too! Check in with me before you start to ensure your ideas will work, what order you might do things, how you could achieve the look you are seeking and any other technical data required! Step Two – Making Clay is thixotropic. This means that as you work with it, the clay first gets sloppier and wetter, before is begins to dry in the atmosphere. For most things, you simply can’t do all parts of the project at once. An example of work order might look like: Get last weeks work out from the shelves Prepare clay for today’s work – roll your clay, prepare balls for throwing, make the first stage of a pinch pot) Clean up last week’s work and put it on the shelf for bisque firing Check that you have any glazing to do – and do enough of it that you will have time to finish your main project Do the next step of your next project – there might be a further step that can’t be complete immediately, in that case, wrap your work well and put onto the shelves. Letting your work rest for a while can really help keep your work clean and professional looking. Many things require bagging under plastic to keep it ready for work the next week – put your name on the outside of the bag so you can find your work easily. We have stickers and markers. Consider how you want to decorate your work – coloured slip can be applied at a fairly wet stage (remembering that it will make your work even wetter!). Trying to apply slip to dry clay won’t work! If you want to do sgraffito – you will need to keep the work leather hard (a state of dryness where you can still work the clay with a little effort and a little water and care). Step Three – Drying Most of the time your work can go into the rack uncovered to let it dry out for the following week. If you want to continue forming or shaping you will need to double bag your work – put your work on a suitable sized bat and put the bat in a bag so the base of the bag is under the bat, then put another bag over the top of the work and tuck the top of the bag under the bat. If you want to trim (or turn) your thrown work the following week, it should also be double bagged. If your work is large, delicate, or of uneven thicknesses, you should lightly cover your work for drying. When considering the drying process, bare in mind the weather, humidity and wind! The hotter and dryer, the faster things dry and work can dry unevenly in the shelves – this can lead to cracking – another time to lightly cover your work for drying. Step Four – Trimming and Cleaning Up Your work is dry! It is called greenware now and it is at it’s most fragile! Handle everything with two hands. I often refer to soft hands – keep everything gentle and with your fingers spread as much as possible. Try to not pick up things like plates too much, and always with both hands! Before your work can be bisque fired it should be “cleaned up”. You work won’t go into the kiln if it has sharp edges – when glazed, sharp edges turn into razor blades! Use a piece of fly wire to rub the work all over – this will scratch a little so be light handed. Use a knife or metal kidney to scrape any areas that require a bit more dynamic treatment than the fly wire offers! Finally, a very light wipe over with a slightly damp sponge can help soften and soothe all of your edges and dags! Trimming thrown work: If you are planning to trim (or turn) your thrown work (and you should be), make sure you bag it well – your work should be leather hard to almost dry for easiest trimming. Use this step to finish the work completely – use a metal kidney to polish the surface, or a slightly damp sponge to give a freshly thrown look. Wipe the sponge around the rim after trimming, and check the inside of the pot for dags! Trimming slip cast work: Usually I will trim the rims of your work on the wheel the following day to make that stage easier, however you will still need to check your work for lumps and bumps. Last but not least – check that your name is still clearly on the bottom of your work. Step Five – Bisque Firing When the work is completely dry it can go into the bisque kiln. The bisque kiln is fired to 1000°C. This process burns off the water in the clay as well as some of the chemically bound water. The structure of the clay is not altered that much at this temperature. Inside the bisque kiln, the work is stacked a little, small bowl inside a larger bowl and onto a heavy plate. Smaller items like decorations or drink coasters might get stacked several high. Consideration is paid to the weight of the stack and shape of the work. A bisque kiln can fire about one and a half times the amount of work that the glaze kiln can fire. The firing takes about 10 hours to complete the cycle and about two days to cool down. Once it has been emptied the work is placed in the glaze room ready for you to decorate! Step Six – Glazing Decorating your work with colour can be a lot of fun – and time consuming! There are three main options for surface treatment at this stage: Oxide Washes Underglazes Glazes Washes and underglazes do not “glaze” the work – It will still need a layer of glaze to fully seal the clay (washes don’t need glaze on surfaces not designed for food or liquid as they can gloss up a little on their own). Underglazes are stable colourants that turn out pretty much how they look in the jar. They can be mixed with each other to form other colours and can be used like water colours to paint onto your work. Mostly they should have a clear glaze on top to seal them. Oxides are a different species – the pink oxide (cobalt) wash turns out bright blue for instance. They don’t always need a glaze on top, and some glazes can change the colour of the wash! The glazes need no other “glaze” on top! Be careful of unknown glaze interactions – you can put any combination of glaze in a bowl or on a plate, but only a single glaze on the outside of any vertical surface! Glazes are a chemical reaction under heat. We don’t know the exact chemicals in the Mayco glazes we use. I can guess by the way they interact with each other, however, on the whole, you need to test every idea you have, and not run the test on a vertical surface! Simply put, glaze is a layer of glass like substance that bonds with the clay underneath. Clay is made of silica, alumina and water. Glaze is made of mostly silica. Silica has a melting point of 1700°C and we fire to 1240°C. The silica requires a “flux” to help it melt at the lower temperature. Fluxes can be all sorts of chemicals – a common one is calcium – calcium has a melting point of 2500°C, however, together they both melt at a much lower temperature! Colourants are metal oxides like cobalt (blue), chrome (green through black), copper (green, blue, even red!), manganese (black, purple and pink) iron (red brown), etc. Different chemicals in the glaze can have dramatic effects. for example, barium carbonate (which we don’t use) turns manganese bright pink! Other elements can turn manganese dioxide brown, blue, purple and reddish brown. Manganese dioxide is a flux in and of itself as well. So, glazes that get their black and purple colours, often interact with other glazes and RUN! Our mirror black is a good example – it mixes really well with many glazes because it fluxes them – causes them to melt faster. It will also bring out many beautiful colours in the glazes because it’s black colouring most definitely comes from manganese dioxide! Glaze chemistry is a whole subject on it’s own! We use commercial Mayco glazes on purpose – for their huge range of colour possibilities, stability, cool interactions, artistic freedom with the ability to easily brush the glazes on and ease of use. We currently have almost 50 glazes on hand! A major project is to test the interactions of all glazes with each other. That is 2,500 test tiles!!!! I’m going to make the wall behind the wheels the feature wall of pretty colours! Step Seven – Glaze (Gloss or sometimes called “Glost”) Firing Most of the time this is the final stage of making your creation (but not always!) The glaze kiln goes to 1240°C. This is called cone 6, or midrange. It is the low end of stoneware temperatures. Stoneware clays and glazes are typically fired at cone 8 – 10, that is 1260 – 1290°C. The energy requirement to go from 1240°C to 1280°C is almost a 30% more! Our clay is formulated to vitrify (mature, turn “glass-like”) at 1240°, as are our glazes. A glaze kiln take around 12 hours to reach temperature and two to three days to cool down. Sometimes a third firing process is required – this is for decoration that is added to work after the glaze firing. For example – adding precious metals and lustres. this firing temperature is usually around 600 – 800°C depending upon the techniques being used. There are many students interested in gold and silver trims – we will be doing this third type of firing soon! After firing your work will be in the student finished work shelves. Remember to pay for it before you head out the door! There is a small extra charge for using porcelain clay (it’s more than twice the price of regular clay), and for any third firing process! Once your work has been fired it can not turn back into clay for millennia – so don’t fire it if you don’t like it! Put it in the bucket for recycling. https://firebirdstudios.com.au/the-process-of-making-pottery/Ceramics have evolved over thousands of years.White earthenware dinner plate. Crazing evident all over.Backstamped ‘Made in England S LTD’flagstaff hill, warrnambool, shipwrecked-coast, flagstaff-hill, flagstaff-hill-maritime-museum, maritime-museum, shipwreck-coast, flagstaff-hill-maritime-village, ceramics, tableware -
 Flagstaff Hill Maritime Museum and Village
Domestic object - Plate, Johnson Bros
The Process of Making Pottery Decorating, Firing, Glazing, Making, Technical There is a rhythm and flow to clay. It can’t be done all at once! Even the making process! It can take weeks to get everything done, especially if you can only work on your pottery once a week! Even though we have three hour classes, it’s often just not enough time! Here is an overview of some of the processes so you have a bit more grasp on some of the technical stuff! Step One – Design There are SO many ideas out there for making stuff in clay! From delicate porcelain jewellery, through to heavy sculptural work and everything in between. Deciding your direction is sometimes not that easy – when you first start, try everything, you will naturally gravitate to the style that you enjoy! The options and variations are endless and can get a wee bit overwhelming too! Check in with me before you start to ensure your ideas will work, what order you might do things, how you could achieve the look you are seeking and any other technical data required! Step Two – Making Clay is thixotropic. This means that as you work with it, the clay first gets sloppier and wetter, before is begins to dry in the atmosphere. For most things, you simply can’t do all parts of the project at once. An example of work order might look like: Get last weeks work out from the shelves Prepare clay for today’s work – roll your clay, prepare balls for throwing, make the first stage of a pinch pot) Clean up last week’s work and put it on the shelf for bisque firing Check that you have any glazing to do – and do enough of it that you will have time to finish your main project Do the next step of your next project – there might be a further step that can’t be complete immediately, in that case, wrap your work well and put onto the shelves. Letting your work rest for a while can really help keep your work clean and professional looking. Many things require bagging under plastic to keep it ready for work the next week – put your name on the outside of the bag so you can find your work easily. We have stickers and markers. Consider how you want to decorate your work – coloured slip can be applied at a fairly wet stage (remembering that it will make your work even wetter!). Trying to apply slip to dry clay won’t work! If you want to do sgraffito – you will need to keep the work leather hard (a state of dryness where you can still work the clay with a little effort and a little water and care). Step Three – Drying Most of the time your work can go into the rack uncovered to let it dry out for the following week. If you want to continue forming or shaping you will need to double bag your work – put your work on a suitable sized bat and put the bat in a bag so the base of the bag is under the bat, then put another bag over the top of the work and tuck the top of the bag under the bat. If you want to trim (or turn) your thrown work the following week, it should also be double bagged. If your work is large, delicate, or of uneven thicknesses, you should lightly cover your work for drying. When considering the drying process, bare in mind the weather, humidity and wind! The hotter and dryer, the faster things dry and work can dry unevenly in the shelves – this can lead to cracking – another time to lightly cover your work for drying. Step Four – Trimming and Cleaning Up Your work is dry! It is called greenware now and it is at it’s most fragile! Handle everything with two hands. I often refer to soft hands – keep everything gentle and with your fingers spread as much as possible. Try to not pick up things like plates too much, and always with both hands! Before your work can be bisque fired it should be “cleaned up”. You work won’t go into the kiln if it has sharp edges – when glazed, sharp edges turn into razor blades! Use a piece of fly wire to rub the work all over – this will scratch a little so be light handed. Use a knife or metal kidney to scrape any areas that require a bit more dynamic treatment than the fly wire offers! Finally, a very light wipe over with a slightly damp sponge can help soften and soothe all of your edges and dags! Trimming thrown work: If you are planning to trim (or turn) your thrown work (and you should be), make sure you bag it well – your work should be leather hard to almost dry for easiest trimming. Use this step to finish the work completely – use a metal kidney to polish the surface, or a slightly damp sponge to give a freshly thrown look. Wipe the sponge around the rim after trimming, and check the inside of the pot for dags! Trimming slip cast work: Usually I will trim the rims of your work on the wheel the following day to make that stage easier, however you will still need to check your work for lumps and bumps. Last but not least – check that your name is still clearly on the bottom of your work. Step Five – Bisque Firing When the work is completely dry it can go into the bisque kiln. The bisque kiln is fired to 1000°C. This process burns off the water in the clay as well as some of the chemically bound water. The structure of the clay is not altered that much at this temperature. Inside the bisque kiln, the work is stacked a little, small bowl inside a larger bowl and onto a heavy plate. Smaller items like decorations or drink coasters might get stacked several high. Consideration is paid to the weight of the stack and shape of the work. A bisque kiln can fire about one and a half times the amount of work that the glaze kiln can fire. The firing takes about 10 hours to complete the cycle and about two days to cool down. Once it has been emptied the work is placed in the glaze room ready for you to decorate! Step Six – Glazing Decorating your work with colour can be a lot of fun – and time consuming! There are three main options for surface treatment at this stage: Oxide Washes Underglazes Glazes Washes and underglazes do not “glaze” the work – It will still need a layer of glaze to fully seal the clay (washes don’t need glaze on surfaces not designed for food or liquid as they can gloss up a little on their own). Underglazes are stable colourants that turn out pretty much how they look in the jar. They can be mixed with each other to form other colours and can be used like water colours to paint onto your work. Mostly they should have a clear glaze on top to seal them. Oxides are a different species – the pink oxide (cobalt) wash turns out bright blue for instance. They don’t always need a glaze on top, and some glazes can change the colour of the wash! The glazes need no other “glaze” on top! Be careful of unknown glaze interactions – you can put any combination of glaze in a bowl or on a plate, but only a single glaze on the outside of any vertical surface! Glazes are a chemical reaction under heat. We don’t know the exact chemicals in the Mayco glazes we use. I can guess by the way they interact with each other, however, on the whole, you need to test every idea you have, and not run the test on a vertical surface! Simply put, glaze is a layer of glass like substance that bonds with the clay underneath. Clay is made of silica, alumina and water. Glaze is made of mostly silica. Silica has a melting point of 1700°C and we fire to 1240°C. The silica requires a “flux” to help it melt at the lower temperature. Fluxes can be all sorts of chemicals – a common one is calcium – calcium has a melting point of 2500°C, however, together they both melt at a much lower temperature! Colourants are metal oxides like cobalt (blue), chrome (green through black), copper (green, blue, even red!), manganese (black, purple and pink) iron (red brown), etc. Different chemicals in the glaze can have dramatic effects. for example, barium carbonate (which we don’t use) turns manganese bright pink! Other elements can turn manganese dioxide brown, blue, purple and reddish brown. Manganese dioxide is a flux in and of itself as well. So, glazes that get their black and purple colours, often interact with other glazes and RUN! Our mirror black is a good example – it mixes really well with many glazes because it fluxes them – causes them to melt faster. It will also bring out many beautiful colours in the glazes because it’s black colouring most definitely comes from manganese dioxide! Glaze chemistry is a whole subject on it’s own! We use commercial Mayco glazes on purpose – for their huge range of colour possibilities, stability, cool interactions, artistic freedom with the ability to easily brush the glazes on and ease of use. We currently have almost 50 glazes on hand! A major project is to test the interactions of all glazes with each other. That is 2,500 test tiles!!!! I’m going to make the wall behind the wheels the feature wall of pretty colours! Step Seven – Glaze (Gloss or sometimes called “Glost”) Firing Most of the time this is the final stage of making your creation (but not always!) The glaze kiln goes to 1240°C. This is called cone 6, or midrange. It is the low end of stoneware temperatures. Stoneware clays and glazes are typically fired at cone 8 – 10, that is 1260 – 1290°C. The energy requirement to go from 1240°C to 1280°C is almost a 30% more! Our clay is formulated to vitrify (mature, turn “glass-like”) at 1240°, as are our glazes. A glaze kiln take around 12 hours to reach temperature and two to three days to cool down. Sometimes a third firing process is required – this is for decoration that is added to work after the glaze firing. For example – adding precious metals and lustres. this firing temperature is usually around 600 – 800°C depending upon the techniques being used. There are many students interested in gold and silver trims – we will be doing this third type of firing soon! After firing your work will be in the student finished work shelves. Remember to pay for it before you head out the door! There is a small extra charge for using porcelain clay (it’s more than twice the price of regular clay), and for any third firing process! Once your work has been fired it can not turn back into clay for millennia – so don’t fire it if you don’t like it! Put it in the bucket for recycling. https://firebirdstudios.com.au/the-process-of-making-pottery/Ceramics have evolved over thousands of years.A white earthenware side plate with a gadroon edge. Has water marks and chips on front.‘Johnson Bros England Reg No 15587’flagstaff hill, warrnambool, shipwrecked-coast, flagstaff-hill, flagstaff-hill-maritime-museum, maritime-museum, shipwreck-coast, flagstaff-hill-maritime-village, johnson bros, ceramics, tableware -
 Flagstaff Hill Maritime Museum and Village
Domestic object - Plate, Alfred Meakin
The Process of Making Pottery Decorating, Firing, Glazing, Making, Technical There is a rhythm and flow to clay. It can’t be done all at once! Even the making process! It can take weeks to get everything done, especially if you can only work on your pottery once a week! Even though we have three hour classes, it’s often just not enough time! Here is an overview of some of the processes so you have a bit more grasp on some of the technical stuff! Step One – Design There are SO many ideas out there for making stuff in clay! From delicate porcelain jewellery, through to heavy sculptural work and everything in between. Deciding your direction is sometimes not that easy – when you first start, try everything, you will naturally gravitate to the style that you enjoy! The options and variations are endless and can get a wee bit overwhelming too! Check in with me before you start to ensure your ideas will work, what order you might do things, how you could achieve the look you are seeking and any other technical data required! Step Two – Making Clay is thixotropic. This means that as you work with it, the clay first gets sloppier and wetter, before is begins to dry in the atmosphere. For most things, you simply can’t do all parts of the project at once. An example of work order might look like: Get last weeks work out from the shelves Prepare clay for today’s work – roll your clay, prepare balls for throwing, make the first stage of a pinch pot) Clean up last week’s work and put it on the shelf for bisque firing Check that you have any glazing to do – and do enough of it that you will have time to finish your main project Do the next step of your next project – there might be a further step that can’t be complete immediately, in that case, wrap your work well and put onto the shelves. Letting your work rest for a while can really help keep your work clean and professional looking. Many things require bagging under plastic to keep it ready for work the next week – put your name on the outside of the bag so you can find your work easily. We have stickers and markers. Consider how you want to decorate your work – coloured slip can be applied at a fairly wet stage (remembering that it will make your work even wetter!). Trying to apply slip to dry clay won’t work! If you want to do sgraffito – you will need to keep the work leather hard (a state of dryness where you can still work the clay with a little effort and a little water and care). Step Three – Drying Most of the time your work can go into the rack uncovered to let it dry out for the following week. If you want to continue forming or shaping you will need to double bag your work – put your work on a suitable sized bat and put the bat in a bag so the base of the bag is under the bat, then put another bag over the top of the work and tuck the top of the bag under the bat. If you want to trim (or turn) your thrown work the following week, it should also be double bagged. If your work is large, delicate, or of uneven thicknesses, you should lightly cover your work for drying. When considering the drying process, bare in mind the weather, humidity and wind! The hotter and dryer, the faster things dry and work can dry unevenly in the shelves – this can lead to cracking – another time to lightly cover your work for drying. Step Four – Trimming and Cleaning Up Your work is dry! It is called greenware now and it is at it’s most fragile! Handle everything with two hands. I often refer to soft hands – keep everything gentle and with your fingers spread as much as possible. Try to not pick up things like plates too much, and always with both hands! Before your work can be bisque fired it should be “cleaned up”. You work won’t go into the kiln if it has sharp edges – when glazed, sharp edges turn into razor blades! Use a piece of fly wire to rub the work all over – this will scratch a little so be light handed. Use a knife or metal kidney to scrape any areas that require a bit more dynamic treatment than the fly wire offers! Finally, a very light wipe over with a slightly damp sponge can help soften and soothe all of your edges and dags! Trimming thrown work: If you are planning to trim (or turn) your thrown work (and you should be), make sure you bag it well – your work should be leather hard to almost dry for easiest trimming. Use this step to finish the work completely – use a metal kidney to polish the surface, or a slightly damp sponge to give a freshly thrown look. Wipe the sponge around the rim after trimming, and check the inside of the pot for dags! Trimming slip cast work: Usually I will trim the rims of your work on the wheel the following day to make that stage easier, however you will still need to check your work for lumps and bumps. Last but not least – check that your name is still clearly on the bottom of your work. Step Five – Bisque Firing When the work is completely dry it can go into the bisque kiln. The bisque kiln is fired to 1000°C. This process burns off the water in the clay as well as some of the chemically bound water. The structure of the clay is not altered that much at this temperature. Inside the bisque kiln, the work is stacked a little, small bowl inside a larger bowl and onto a heavy plate. Smaller items like decorations or drink coasters might get stacked several high. Consideration is paid to the weight of the stack and shape of the work. A bisque kiln can fire about one and a half times the amount of work that the glaze kiln can fire. The firing takes about 10 hours to complete the cycle and about two days to cool down. Once it has been emptied the work is placed in the glaze room ready for you to decorate! Step Six – Glazing Decorating your work with colour can be a lot of fun – and time consuming! There are three main options for surface treatment at this stage: Oxide Washes Underglazes Glazes Washes and underglazes do not “glaze” the work – It will still need a layer of glaze to fully seal the clay (washes don’t need glaze on surfaces not designed for food or liquid as they can gloss up a little on their own). Underglazes are stable colourants that turn out pretty much how they look in the jar. They can be mixed with each other to form other colours and can be used like water colours to paint onto your work. Mostly they should have a clear glaze on top to seal them. Oxides are a different species – the pink oxide (cobalt) wash turns out bright blue for instance. They don’t always need a glaze on top, and some glazes can change the colour of the wash! The glazes need no other “glaze” on top! Be careful of unknown glaze interactions – you can put any combination of glaze in a bowl or on a plate, but only a single glaze on the outside of any vertical surface! Glazes are a chemical reaction under heat. We don’t know the exact chemicals in the Mayco glazes we use. I can guess by the way they interact with each other, however, on the whole, you need to test every idea you have, and not run the test on a vertical surface! Simply put, glaze is a layer of glass like substance that bonds with the clay underneath. Clay is made of silica, alumina and water. Glaze is made of mostly silica. Silica has a melting point of 1700°C and we fire to 1240°C. The silica requires a “flux” to help it melt at the lower temperature. Fluxes can be all sorts of chemicals – a common one is calcium – calcium has a melting point of 2500°C, however, together they both melt at a much lower temperature! Colourants are metal oxides like cobalt (blue), chrome (green through black), copper (green, blue, even red!), manganese (black, purple and pink) iron (red brown), etc. Different chemicals in the glaze can have dramatic effects. for example, barium carbonate (which we don’t use) turns manganese bright pink! Other elements can turn manganese dioxide brown, blue, purple and reddish brown. Manganese dioxide is a flux in and of itself as well. So, glazes that get their black and purple colours, often interact with other glazes and RUN! Our mirror black is a good example – it mixes really well with many glazes because it fluxes them – causes them to melt faster. It will also bring out many beautiful colours in the glazes because it’s black colouring most definitely comes from manganese dioxide! Glaze chemistry is a whole subject on it’s own! We use commercial Mayco glazes on purpose – for their huge range of colour possibilities, stability, cool interactions, artistic freedom with the ability to easily brush the glazes on and ease of use. We currently have almost 50 glazes on hand! A major project is to test the interactions of all glazes with each other. That is 2,500 test tiles!!!! I’m going to make the wall behind the wheels the feature wall of pretty colours! Step Seven – Glaze (Gloss or sometimes called “Glost”) Firing Most of the time this is the final stage of making your creation (but not always!) The glaze kiln goes to 1240°C. This is called cone 6, or midrange. It is the low end of stoneware temperatures. Stoneware clays and glazes are typically fired at cone 8 – 10, that is 1260 – 1290°C. The energy requirement to go from 1240°C to 1280°C is almost a 30% more! Our clay is formulated to vitrify (mature, turn “glass-like”) at 1240°, as are our glazes. A glaze kiln take around 12 hours to reach temperature and two to three days to cool down. Sometimes a third firing process is required – this is for decoration that is added to work after the glaze firing. For example – adding precious metals and lustres. this firing temperature is usually around 600 – 800°C depending upon the techniques being used. There are many students interested in gold and silver trims – we will be doing this third type of firing soon! After firing your work will be in the student finished work shelves. Remember to pay for it before you head out the door! There is a small extra charge for using porcelain clay (it’s more than twice the price of regular clay), and for any third firing process! Once your work has been fired it can not turn back into clay for millennia – so don’t fire it if you don’t like it! Put it in the bucket for recycling. https://firebirdstudios.com.au/the-process-of-making-pottery/Ceramics have evolved over thousands of years.Earthenware dessert plate, cream colour. Made by Alfred Meakin, England. Backstamped ‘Alfred Meakin England’. flagstaff hill, warrnambool, shipwrecked-coast, flagstaff-hill, flagstaff-hill-maritime-museum, maritime-museum, shipwreck-coast, flagstaff-hill-maritime-village, alfred meakin, ceramics, earthenware, kitchenware -
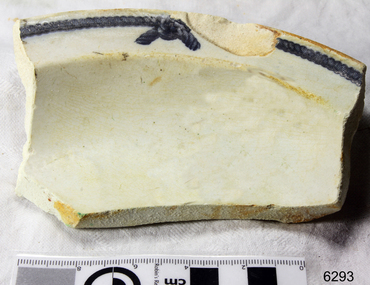 Flagstaff Hill Maritime Museum and Village
Domestic object - China piece, ca 1855
... Piece of China bowl, white with knotted blue rope design... shipwreck SS Queen china bowl bowl fragment blue knotted rope motif ...When the ship Schomberg was launched in 1855, she was considered the most perfect clipper ship ever to be built. James Blaine’s Black Ball Line had commissioned her to be built for their fleet of passenger liners. At a cost of £43,103, the Aberdeen builders designed her to sail faster than the quick clippers designed by North American Donald McKay. She was a three masted wooden clipper ship, built with diagonal planking of British oat with layers of Scottish larch. This luxury vessel was designed to transport emigrants to Melbourne in superior comfort. She had ventilation ducts to provide air to the lower decks and a dining saloon, smoking room, library and bathrooms for the first class passengers. At the launch of Schomberg’s maiden voyage, her master Captain ‘Bully’ Forbes, drunkenly predicted that he would make the journey between Liverpool and Melbourne in 60 days. Schomberg departed Liverpool on 6 October 1855 with 430 passengers and 3000 tons cargo including iron rails and equipment intended the build the Geelong Railway and a bridge over the Yarra from Melbourne to Hawthorn. The winds were poor as Schomberg sailed across the equator, slowing her journey considerably. She was 78 days out of Liverpool when she ran aground on a sand-spit near Peterborough, Victoria, on 27 December; the sand spit and the currents were not marked on Forbes’s map. Overnight, the crew launched a lifeboat to find a safe place to land the ship’s passengers. The scouting party returned to Schomberg and advised Forbes that it was best to wait until morning because the rough seas could easily overturn the small lifeboats. The ship’s Chief Officer spotted SS Queen at dawn and signalled the steamer. The master of the SS Queen approached the stranded vessel and all of Schomberg’s passengers were able to disembark safely. The Black Ball Line’s Melbourne agent sent a steamer to retrieve the passengers’ baggage from the Schomberg. Other steamers helped unload her cargo until the weather changed and prevented the salvage teams from accessing the ship. Local merchants Manifold & Bostock bought the wreck and cargo, but did not attempt to salvage the cargo still on board the ship. They eventually sold it on to a Melbourne businessman and two seafarers. After two of the men drowned when they tried to reach Schomberg, salvage efforts were abandoned.32 In 1975, divers from Flagstaff Hill, including Peter Ronald, found an ornate communion set at the wreck. The set comprised a jug, two chalices, a plate and a lid. The lid did not fit any of the other objects and in 1978 a piece of the lid broke off, revealing a glint of gold. As museum staff carefully examined the lid and removed marine growth, they found a diamond ring, which is currently on display in the Great Circle Gallery.33 Flagstaff Hill also holds ship fittings and equipment, personal effects, a lithograph, tickets and photograph from the Schomberg. Most of the artefacts were salvaged from the wreck by Peter Ronald, former director of Flagstaff Hill. The Schomberg, which is on the Victorian Heritage Register (VHR S612), has great historical significance as a rare example of a large, fast clipper ship on the England to Australia run, carrying emigrants at the time of the Victorian gold rush. She represents the technical advances made to break sailing records between Europe and Australia. Flagstaff Hill’s collection of artefacts from the Schomberg is significant for its association with the shipwreck. The collection is primarily significant because of the relationship between the objects, as together they have a high potential to interpret the story of the Schomberg. It is archaeologically significant as the remains of an international passenger Ship. It is historically significant for representing aspects of Victoria’s shipping history and for its association with the shipwreck and the ship, which was designed to be fastest and most luxurious of its day Piece of China bowl, white with knotted blue rope design around outer rim. . Recovered from the wreck of the Schomberg. Painted [blue knotted rope motif]warrnambool, shipwrecked-coast, flagstaff-hill, flagstaff-hill-maritime-museum, maritime-museum, shipwreck-coast, flagstaff-hill-maritime-village, schomberg, shipwrecked-artefact, clipper ship, black ball line, 1855 shipwreck, aberdeen clipper ship, captain forbes, peterborough shipwreck, ss queen, china bowl, bowl fragment, blue knotted rope motif