Showing 121 items
matching glazed tiles
-
 Whitehorse Historical Society Inc.
Ceramic - Tile
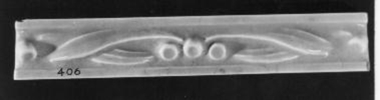
... Pale blue glazed border tile with white edged gumnut... glazed border tile with white edged gumnut and leaf pattern ...See 359Pale blue glazed border tile with white edged gumnut and leaf pattern'1503'ceramics, earthenware -
 Whitehorse Historical Society Inc.
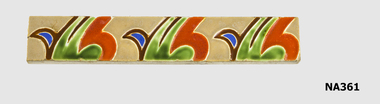
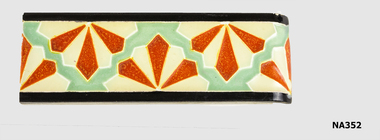
Ceramic - Border Tile, Glazed border tile - fawn background with pattern of orange, green, brown and blue
... Glazed border tile - fawn background with pattern of orange...' Glazed border tile - fawn background with pattern of orange ...See NA359Glazed border tile - fawn background with pattern of orange, green, brown and blue.(on back) '9' '676' '36' (handwritten) 'Jang 71/Blue H825/Fawn M389/Green A627/Brown A430'ceramics, earthenware -
 Whitehorse Historical Society Inc.
Ceramic - Border Tile
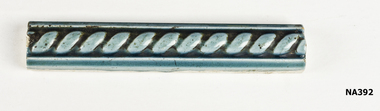
... Glazed border tile - dark blue background with pale blue...See NA359 ceramics earthenware Glazed border tile - dark ...See NA359Glazed border tile - dark blue background with pale blue decoration and edgingceramics, earthenware -
 Whitehorse Historical Society Inc.
Ceramic - Border Tile
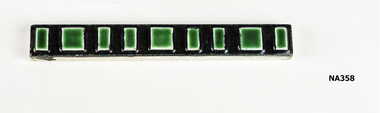
... Glazed border tile - black background with dark green...See NA359 ceramics earthenware Glazed border tile - black ...See NA359Glazed border tile - black background with dark green squares of various sizes.ceramics, earthenware -
 Whitehorse Historical Society Inc.
Ceramic - Border Tile
... Glazed border tile with black edge and pattern of green...See NA359 ceramics earthenware '576' 'E6' (on back) Glazed ...See NA359Glazed border tile with black edge and pattern of green, dark orange and cream.'576' 'E6' (on back)ceramics, earthenware -
 Bendigo Historical Society Inc.
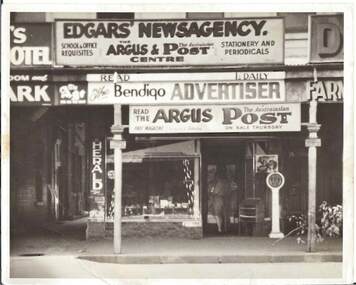
Photograph - EDGAR'S NEWSAGENCY
... various newspaper advertisements, glazed tiles bvelow shop window..., glazed tiles bvelow shop window, two figures standing in doorway ...Black and white photograph of Edgar's Newsagency showing various newspaper advertisements, glazed tiles bvelow shop window, two figures standing in doorway weighing machine, tree branch on footpath, right-of-way at left of shopfront.buildings, commercial, edgar's newsagency -
 Whitehorse Historical Society Inc.
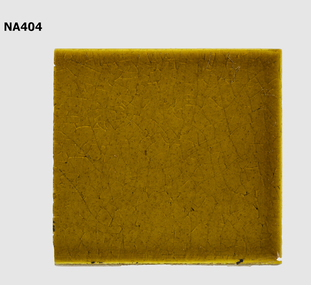
Ceramic - Tile
... Glazed mustard coloured tile with no decoration...see NA359 CERAMICS Earthenware Glazed mustard coloured tile ...see NA359Glazed mustard coloured tile with no decorationceramics, earthenware -
 Whitehorse Historical Society Inc.
Ceramic - Border Tile
... Glazed border tile - cream, green and orange with black...' '36' Glazed border tile - cream, green and orange with black ...See 359Glazed border tile - cream, green and orange with black edging forming geometric pattern(on back) '9' '676' '36'ceramics, earthenware -
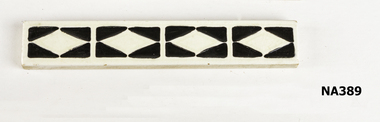 Whitehorse Historical Society Inc.
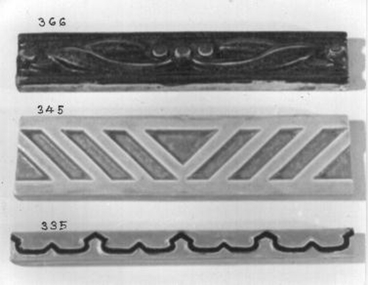
Ceramic - Border tile
... White glazed border tile with black triangles forming...See NA359 ceramics earthenware 'P4' 'P' White glazed border ...See NA359White glazed border tile with black triangles forming squares with white diamonds in centre.'P4' 'P'ceramics, earthenware -
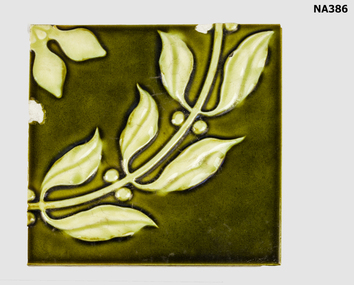 Whitehorse Historical Society Inc.
Ceramic - Tile
... Dark green glazed mosaic tile with a pattern of lighter...See NA359 CERAMICS Earthenware Dark green glazed mosaic ...See NA359Dark green glazed mosaic tile with a pattern of lighter green leaves and buds on a stemceramics, earthenware -
 Whitehorse Historical Society Inc.
Ceramic - Tiles
... Green glazed mosaic tiles (two) with lighter green pattern...See NA359 ceramics earthenware Green glazed mosaic tiles ...See NA359Green glazed mosaic tiles (two) with lighter green pattern and aqua blue inset.ceramics, earthenware -
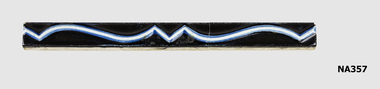 Whitehorse Historical Society Inc.
Ceramic - Border Tile
... Glazed border tile - black background with thin blue...See NA359 ceramics earthenware Glazed border tile - black ...See NA359Glazed border tile - black background with thin blue and white pattern across centre.ceramics, earthenware -
 Whitehorse Historical Society Inc.
Ceramic - Tile
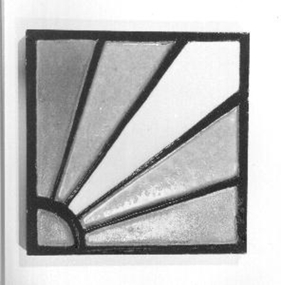
... Glazed mosaic tile with Sunburst design in dark orange... Mitcham melbourne The Australian Tesselated Tile Co. began ...The Australian Tesselated Tile Co. began in Mitcham, south of the Railway Station, in 1886. It almost collapsed after the bursting of the land boom in 1890s, then recovered to become one of the world's greatest tile works. It made a greater range of tiles than any other known tile works, here or overseas.Glazed mosaic tile with Sunburst design in dark orange, light orange and cream. Edged in black(on back) '495' '6'ceramics, earthenware -
 Whitehorse Historical Society Inc.
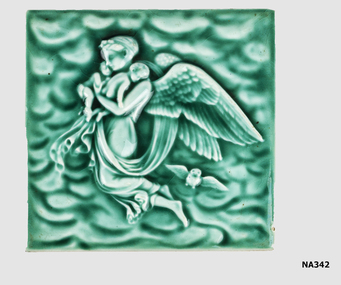
Ceramic - Tile, 1905
... Green glazed mosaic tile depicting Evening Angel with two... ceramics earthenware Green glazed mosaic tile depicting Evening ...Possibly designed by Donor's mother, Mrs. Emma OtterbachGreen glazed mosaic tile depicting Evening Angel with two children asleep in her arms.ceramics, earthenware -
 Whitehorse Historical Society Inc.
Ceramic - Border Tile
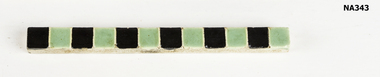
... Border tile glazed with green and black squares...See NA359 ceramics earthenware Border tile glazed ...See NA359Border tile glazed with green and black squaresceramics, earthenware -
 Flagstaff Hill Maritime Museum and Village
Tiles
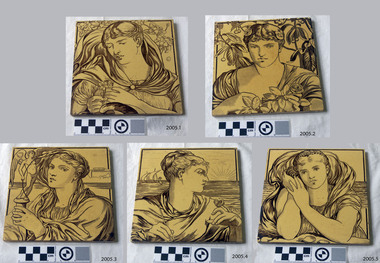
... Tiles ceramic glazed. Each tile has a different scene... ceramic glazed. Each tile has a different scene painted on front ...Tiles ceramic glazed. Each tile has a different scene painted on front in the classical Greek style. All tiles have a cream background with figures drawn in brown. (5)flagstaff hill, warrnambool, shipwrecked-coast, flagstaff-hill, flagstaff-hill-maritime-museum, maritime-museum, shipwreck-coast, flagstaff-hill-maritime-village -
 The Cyril Kett Optometry Museum
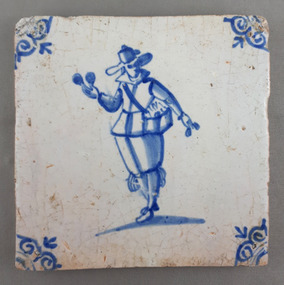
Delft tile of spectacle seller c1650, c1650
... Tin glazed earthenware tile decorated with blue image... of Optometry 374 Cardigan Street Carlton melbourne Tin glazed ...Tin glazed earthenware tile decorated with blue image of a spectacle seller. Corners decorated with ox-head motif. -
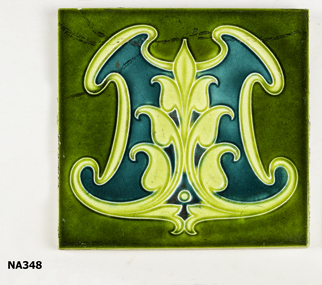
 Whitehorse Historical Society Inc.
Ceramic - Tile
... Glazed mosaic tile - pale blue background with pattern... Mitcham melbourne See 359 ceramics earthenware Glazed mosaic tile ...See 359Glazed mosaic tile - pale blue background with pattern in centre of dark blue and green on white outlined in black.ceramics, earthenware -
 Whitehorse Historical Society Inc.
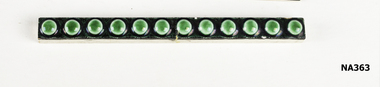
Ceramic - Border Tile
... Glazed border tile - black background with green spots Tile...See NA359 CERAMICS Earthenware Glazed border tile - black ...See NA359Glazed border tile - black background with green spots Tile was broken into two and then repaired. Second piece was NA364.ceramics, earthenware -
 Federation University Historical Collection
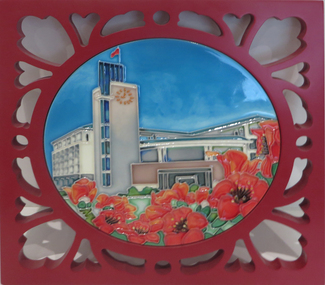
Object - commemorative tile, Commemorative Tile of South China Business College
... Glazed commemorative tile of South China Business College... commemorative tile souvenir Guangdong University of Foreign Studies ...Glazed commemorative tile of South China Business College, Guangdong University of Foreign Studies. Surrounded by red wood with shaped cutouts.Guangdong University of Foreign Studies, South China Business School printed in gold on the back. guangdong university of foreign studies, south china business school, commemorative tile, souvenir -
 Whitehorse Historical Society Inc.
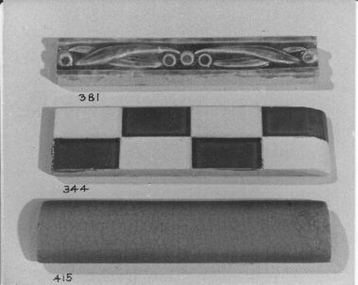
Ceramic - Border Tile
... Border tile glazed with brown and white squares. Rounded... Border tile glazed with brown and white squares. Rounded on one ...See 359Border tile glazed with brown and white squares. Rounded on one end.(on back) 298ceramics, earthenware -
 Whitehorse Historical Society Inc.
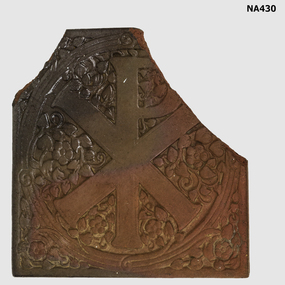
Ceramic - Tile
... Partly glazed terra-cotta tile with Christian Pascal sign... etched on back - chrisma Partly glazed terra-cotta tile ...Probably made for a churchPartly glazed terra-cotta tile with Christian Pascal sign and leavesCrudely hand etched on back - chrismaceramics, terracotta -
 Whitehorse Historical Society Inc.
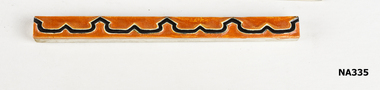
Ceramic - Border Tile
... Thin earthenware tile glazed orange with black pattern... earthenware tile glazed orange with black pattern. Used for border ...see NA359Thin earthenware tile glazed orange with black pattern. Used for border3770 (on back)ceramics, earthenware -
 Whitehorse Historical Society Inc.
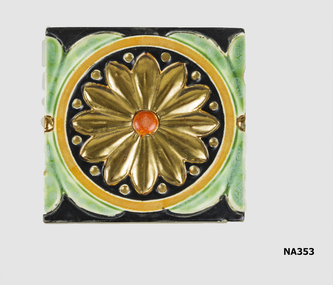
Ceramic - Tile
... Glazed mosaic tile - black edged with green pattern...See 359 ceramics earthenware '676' (on back) Glazed mosaic ...See 359Glazed mosaic tile - black edged with green pattern. Orange circle enclosing large gold petalled design with orange centre on black background.'676' (on back)ceramics, earthenware -
 Buninyong Visitor Information Centre
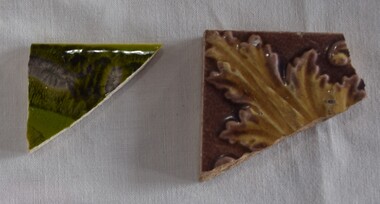
Decorative object - Tile Shards, two sections of broken wall tiles, c. 19th Century
... glazed decoration. 2. Broken glazed wall tile section with Brown... piece of wall tile with green and black glazed decoration. 2 ...Details about these tile sections to be researched. 1. Triangular piece of wall tile with green and black glazed decoration. 2. Broken glazed wall tile section with Brown and tan leaf decoration.decorations, ceramics, buidling materials -
 Whitehorse Historical Society Inc.
Ceramic - Border Tile
... Border tile glazed with light orange and dark orange...) Border tile glazed with light orange and dark orange geometric ...See 359Border tile glazed with light orange and dark orange geometric design cut into surface.676 (on back)ceramics, earthenware -
 Glenelg Shire Council Cultural Collection
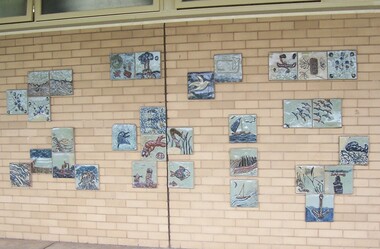
Ceramic - Ceramic Tiles, Grant Finck and Community of Portland, 1983
... 31 glazed ceramic tiles set onto wall at the Civic Hall... for Community Youth Programme. 31 glazed ceramic tiles set onto wall ...Community art project coordinated by Grant Finck - MURAL PROJECT, CITY OF PORTLAND for Community Youth Programme.31 glazed ceramic tiles set onto wall at the Civic Hall, Bentinck Street, with cement in an open arrangement. Each tile depicts scenes of the sea and maritime flora and fauna in blue and grey. -
 Mission to Seafarers Victoria
Plaque - Opus sectile tablet, 1936
... ceramic panel with inscription and decorative glazed detail tiles... ceramic panel with inscription and decorative glazed detail tiles ...The memorial tablet was unveiled in the St Nicholas chapel at the Port Melbourne mission (Beach Cnr Nott St) on Wednesday 24 June 1936. The ceremony was performed by her nephew, Reverend John Smerger Drought - her sister's son. Another plaque was erected the same month in the Williamstown Institute. (Annual Report 1936) Along with the windows in the St Peter chapel in the Central Institute, those were the 3 memorials similar to the ones erected in memory of Miss Tracy. Miss Ethel Godfrey was born in 1861 at sea on the vessel called Copenhagen. Daughter of a pioneer, and settler Frederick Race Godfrey MLA and subsequently Lay Dean at St Paul's. Ethel Studied in Melbourne and abroad at Brussels and became a singing teacher and performer. In 1906 she took on the role of Honorary General Secretary to create and lead the volunteer organisation "The Ladies Harbour Lights Guild" and subsequently helped establish similar groups in Newcastle, Brisbane, Sydney, Hobart, Adelaide and also established the mission in Southampton in the UK. The structure of the LHLG was used as a model framework by similar groups supporting Missions around Australia and the Globe. A key achievement was the fundraising campaign for the memorial chapel in St Peters built in 1917 by Walter R.Butler. She died the 7 July 1935, and is buried in the St Kilda Cemetery.On her retirement in 1930 after some 25 years, Miss Godfrey together with Chaplain Gurney Goldsmith was recognised in the journal The Church and the Sailor, as a key influence and promoter of the formation of Harbour Lights groups across the suburbs of Melbourne, Victoria and Australia, the Ladies Harbour Lights Guild, Melbourne being the first such auxiliary group in the world.Clay base rectangular plaque with inlaid blue ceramic regular tesserae surrounding the ceramic centre rectangular ceramic panel with inscription and decorative glazed detail tiles. Support is a metal frame with inset wood pieces .To the Glory of God and in memory ops/ a much loved leaderAthel Augusta Godfrey, / one of the founders/ of the ladies Harbour Lights Guild/ of which she was honorary general secretary / Until 1930./ This memorial erected in the year of her death."memorial plaque, plaque, lhlg, port melbourne, chapel, brooks robinson and co, reverend john smerger drought, sectile tablet, opus sectile mosaic, mosaic, ethel augusta godfrey 1861-1935 -
 Whitehorse Historical Society Inc.
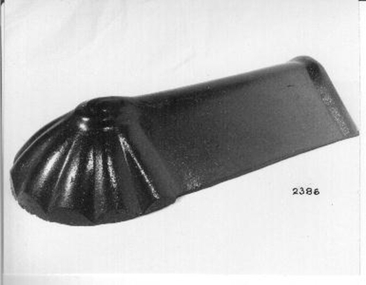
Ceramic - Tile-Ridging
... Brown glazed terracotta roof ridging tile. Fluted at one... Mitcham melbourne ceramics terracotta Brown glazed terracotta roof ...Brown glazed terracotta roof ridging tile. Fluted at one end. Tile curved.ceramics, terracotta -
 Villa Alba Museum
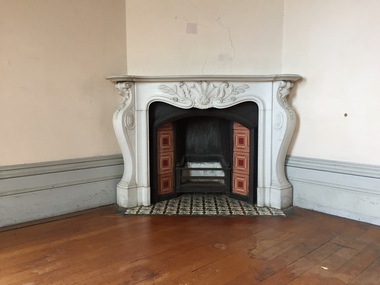
Photograph - Second Bedroom Fireplace, Villa Alba, c.1882
... surround tiles and ornate polychrome glazed tiles in a manner... polychrome glazed tiles in a manner reminiscent of Ottoman Iznik tile ...The Villa Alba Museum is cultural institution committed to the collection, study and display of 19th century interior decorative finishes, and the components of 19th and 20th century interior decoration. Most rooms in this historically and aesthetically significant house have stone (typically marble) fireplaces that are inset with plain and decorative tiles produced by the company of Mintons Ltd.Born digital photograph of the fireplace in the second bedroom of Villa Alba. The original 1880s white marble mantel, obliquely positioned in the northwest corner of the room (one of two examples in the house) is the most ornate mantel in the first floor bedrooms. The central visual element in the mantel is an upturned conch shell surrounded by stylised foliage and flowers. The two upright carved supports of the mantel are sinuously carved in all almost rococo manner. The mantel is inset with monochrome surround tiles and ornate polychrome glazed tiles in a manner reminiscent of Ottoman Iznik tile work. All of the tiles were produced by Mintons Ltd.fireplaces, mintons, mintons - tiles, villa alba -- second bedroom