Showing 112 items
matching hill climb
-
 Eltham District Historical Society Inc
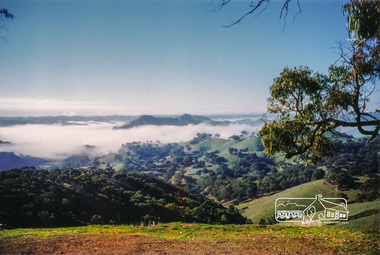
Photograph, Murchison Gap viewed from Strath Creek, Autumn Excursion, Hume and Hovell's 1824 expedition, 26 May 1996, 26/05/1996
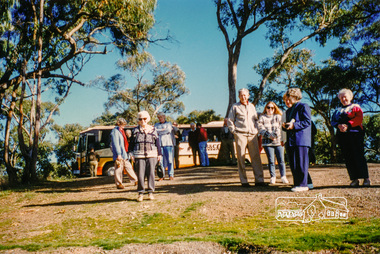
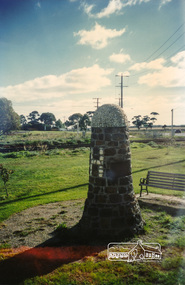
[article by Bettina Woodburn in EDHS Newsletter No. 109, July 1996:] ON THE TRAIL OF HUME AND HOVELL - REPORT ON THE AUTUMN EXCURSION - On a green and fresh morning (Sunday 26th May 1996) the Cobb and Co coach (driven by the most obliging Peter Tampion) set off in a north easterly direction from Eltham to connect with Hume and Hovell's route on their 1824 explorations of central Victoria. The Society would follow a series of monuments erected for the 1924 centenary of the expedition from King Parrot Creek (Tuesday 7th December 1824), through Strath Creek, over Sunday Creek (Sunday 12th December 1824) at Broadford, Tullamarine, St Albans, Deer Park, through Werribee, skirting east of the You Yangs to Lara and Avalon Beach. Because their distance-measuring wheel had broken and a one degree mistake was made in calculations, the two leaders of the original group of six convict-companions arrived at Corio Bay, instead of the expected Western Port, discovered earlier by Flinders. From below Mt. Disappointment (Hume and Hovell's difficulties in "scrambling over brush and rock", "leeches in forest, as well as no water", "cutting grass 4-5 ft. high", dreadful scrub", "devil flies") we took an easier route, saw the Strath Creek memorial in ground fog and a wonderful "field of dreams", the Hume-Hovell privately owned cricket ground with its white picket boundary fence. Now, after a steep climb, in sunshine under gums we stretched and viewed magnificent rolling hills and fog-filled valleys - not "smoke from Aborigines' bush fires". After morning tea at Broadford we followed the Sunday Creek valley beside the Hume Freeway, passed the Wallan Wallan Rest Area (more appropriately Hume and Hovell Rest Area) to tum right at Beveridge. In Gellibrand Hill Park, near the headwaters of the Moonee Ponds Creek, we experienced the landscape the first European settlers saw - huge river red gums and rolling pastures. The gardens and sheltered courtyard of the 1840s, timber, brought from .....[?] prefabricated Woodlands Homestead, provided a pleasant lunch stop. We enjoyed a private tour, panoramic views over Melbourne and surroundings and the excitement of arriving and departing aircraft. Our next river crossing was at Werribee, "in a vast treeless plain", then we drove on by-ways no coach had previously travelled, to find "an immense sheet of water" salty Corio Bay, off-course to the west. In late afternoon of a super, calm, late autumn day we headed homewards. Back at Eltham we were rather surprised to find that we had travelled a total of 347 km. Thanks again to Russell Yeoman for his research and organization. What a wonderful day! Colour photographactivities, hume and hovell, murchison valley, murchison gap, strath creek -
 Eltham District Historical Society Inc
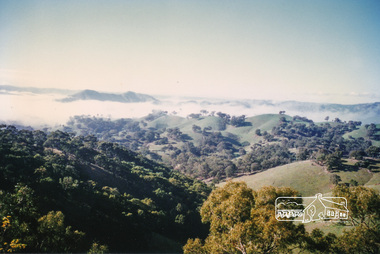
Photograph, Murchison Gap viewed from Strath Creek, Autumn Excursion, Hume and Hovell's 1824 expedition, 26 May 1996, 26/05/1996
[article by Bettina Woodburn in EDHS Newsletter No. 109, July 1996:] ON THE TRAIL OF HUME AND HOVELL - REPORT ON THE AUTUMN EXCURSION - On a green and fresh morning (Sunday 26th May 1996) the Cobb and Co coach (driven by the most obliging Peter Tampion) set off in a north easterly direction from Eltham to connect with Hume and Hovell's route on their 1824 explorations of central Victoria. The Society would follow a series of monuments erected for the 1924 centenary of the expedition from King Parrot Creek (Tuesday 7th December 1824), through Strath Creek, over Sunday Creek (Sunday 12th December 1824) at Broadford, Tullamarine, St Albans, Deer Park, through Werribee, skirting east of the You Yangs to Lara and Avalon Beach. Because their distance-measuring wheel had broken and a one degree mistake was made in calculations, the two leaders of the original group of six convict-companions arrived at Corio Bay, instead of the expected Western Port, discovered earlier by Flinders. From below Mt. Disappointment (Hume and Hovell's difficulties in "scrambling over brush and rock", "leeches in forest, as well as no water", "cutting grass 4-5 ft. high", dreadful scrub", "devil flies") we took an easier route, saw the Strath Creek memorial in ground fog and a wonderful "field of dreams", the Hume-Hovell privately owned cricket ground with its white picket boundary fence. Now, after a steep climb, in sunshine under gums we stretched and viewed magnificent rolling hills and fog-filled valleys - not "smoke from Aborigines' bush fires". After morning tea at Broadford we followed the Sunday Creek valley beside the Hume Freeway, passed the Wallan Wallan Rest Area (more appropriately Hume and Hovell Rest Area) to tum right at Beveridge. In Gellibrand Hill Park, near the headwaters of the Moonee Ponds Creek, we experienced the landscape the first European settlers saw - huge river red gums and rolling pastures. The gardens and sheltered courtyard of the 1840s, timber, brought from .....[?] prefabricated Woodlands Homestead, provided a pleasant lunch stop. We enjoyed a private tour, panoramic views over Melbourne and surroundings and the excitement of arriving and departing aircraft. Our next river crossing was at Werribee, "in a vast treeless plain", then we drove on by-ways no coach had previously travelled, to find "an immense sheet of water" salty Corio Bay, off-course to the west. In late afternoon of a super, calm, late autumn day we headed homewards. Back at Eltham we were rather surprised to find that we had travelled a total of 347 km. Thanks again to Russell Yeoman for his research and organization. What a wonderful day! Colour photographactivities, hume and hovell, murchison valley, murchison gap, strath creek -
 Eltham District Historical Society Inc
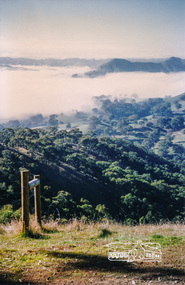
Photograph, Murchison Gap viewed from Strath Creek, Autumn Excursion, Hume and Hovell's 1824 expedition, 26 May 1996, 26/05/1996
[article by Bettina Woodburn in EDHS Newsletter No. 109, July 1996:] ON THE TRAIL OF HUME AND HOVELL - REPORT ON THE AUTUMN EXCURSION - On a green and fresh morning (Sunday 26th May 1996) the Cobb and Co coach (driven by the most obliging Peter Tampion) set off in a north easterly direction from Eltham to connect with Hume and Hovell's route on their 1824 explorations of central Victoria. The Society would follow a series of monuments erected for the 1924 centenary of the expedition from King Parrot Creek (Tuesday 7th December 1824), through Strath Creek, over Sunday Creek (Sunday 12th December 1824) at Broadford, Tullamarine, St Albans, Deer Park, through Werribee, skirting east of the You Yangs to Lara and Avalon Beach. Because their distance-measuring wheel had broken and a one degree mistake was made in calculations, the two leaders of the original group of six convict-companions arrived at Corio Bay, instead of the expected Western Port, discovered earlier by Flinders. From below Mt. Disappointment (Hume and Hovell's difficulties in "scrambling over brush and rock", "leeches in forest, as well as no water", "cutting grass 4-5 ft. high", dreadful scrub", "devil flies") we took an easier route, saw the Strath Creek memorial in ground fog and a wonderful "field of dreams", the Hume-Hovell privately owned cricket ground with its white picket boundary fence. Now, after a steep climb, in sunshine under gums we stretched and viewed magnificent rolling hills and fog-filled valleys - not "smoke from Aborigines' bush fires". After morning tea at Broadford we followed the Sunday Creek valley beside the Hume Freeway, passed the Wallan Wallan Rest Area (more appropriately Hume and Hovell Rest Area) to tum right at Beveridge. In Gellibrand Hill Park, near the headwaters of the Moonee Ponds Creek, we experienced the landscape the first European settlers saw - huge river red gums and rolling pastures. The gardens and sheltered courtyard of the 1840s, timber, brought from .....[?] prefabricated Woodlands Homestead, provided a pleasant lunch stop. We enjoyed a private tour, panoramic views over Melbourne and surroundings and the excitement of arriving and departing aircraft. Our next river crossing was at Werribee, "in a vast treeless plain", then we drove on by-ways no coach had previously travelled, to find "an immense sheet of water" salty Corio Bay, off-course to the west. In late afternoon of a super, calm, late autumn day we headed homewards. Back at Eltham we were rather surprised to find that we had travelled a total of 347 km. Thanks again to Russell Yeoman for his research and organization. What a wonderful day! Colour photographactivities, hume and hovell, murchison valley, murchison gap, strath creek -
 Eltham District Historical Society Inc
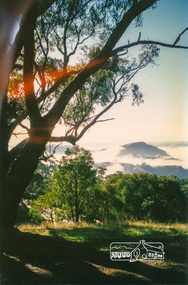
Photograph, Murchison Gap viewed from Strath Creek, Autumn Excursion, Hume and Hovell's 1824 expedition, 26 May 1996, 26/05/1996
[article by Bettina Woodburn in EDHS Newsletter No. 109, July 1996:] ON THE TRAIL OF HUME AND HOVELL - REPORT ON THE AUTUMN EXCURSION - On a green and fresh morning (Sunday 26th May 1996) the Cobb and Co coach (driven by the most obliging Peter Tampion) set off in a north easterly direction from Eltham to connect with Hume and Hovell's route on their 1824 explorations of central Victoria. The Society would follow a series of monuments erected for the 1924 centenary of the expedition from King Parrot Creek (Tuesday 7th December 1824), through Strath Creek, over Sunday Creek (Sunday 12th December 1824) at Broadford, Tullamarine, St Albans, Deer Park, through Werribee, skirting east of the You Yangs to Lara and Avalon Beach. Because their distance-measuring wheel had broken and a one degree mistake was made in calculations, the two leaders of the original group of six convict-companions arrived at Corio Bay, instead of the expected Western Port, discovered earlier by Flinders. From below Mt. Disappointment (Hume and Hovell's difficulties in "scrambling over brush and rock", "leeches in forest, as well as no water", "cutting grass 4-5 ft. high", dreadful scrub", "devil flies") we took an easier route, saw the Strath Creek memorial in ground fog and a wonderful "field of dreams", the Hume-Hovell privately owned cricket ground with its white picket boundary fence. Now, after a steep climb, in sunshine under gums we stretched and viewed magnificent rolling hills and fog-filled valleys - not "smoke from Aborigines' bush fires". After morning tea at Broadford we followed the Sunday Creek valley beside the Hume Freeway, passed the Wallan Wallan Rest Area (more appropriately Hume and Hovell Rest Area) to tum right at Beveridge. In Gellibrand Hill Park, near the headwaters of the Moonee Ponds Creek, we experienced the landscape the first European settlers saw - huge river red gums and rolling pastures. The gardens and sheltered courtyard of the 1840s, timber, brought from .....[?] prefabricated Woodlands Homestead, provided a pleasant lunch stop. We enjoyed a private tour, panoramic views over Melbourne and surroundings and the excitement of arriving and departing aircraft. Our next river crossing was at Werribee, "in a vast treeless plain", then we drove on by-ways no coach had previously travelled, to find "an immense sheet of water" salty Corio Bay, off-course to the west. In late afternoon of a super, calm, late autumn day we headed homewards. Back at Eltham we were rather surprised to find that we had travelled a total of 347 km. Thanks again to Russell Yeoman for his research and organization. What a wonderful day! Colour photographactivities, hume and hovell, murchison valley, murchison gap, strath creek -
 Eltham District Historical Society Inc
Photograph, Autumn Excursion, Hume and Hovell's 1824 expedition, 26 May 1996, 26/05/1996
[article by Bettina Woodburn in EDHS Newsletter No. 109, July 1996:] ON THE TRAIL OF HUME AND HOVELL - REPORT ON THE AUTUMN EXCURSION - On a green and fresh morning (Sunday 26th May 1996) the Cobb and Co coach (driven by the most obliging Peter Tampion) set off in a north easterly direction from Eltham to connect with Hume and Hovell's route on their 1824 explorations of central Victoria. The Society would follow a series of monuments erected for the 1924 centenary of the expedition from King Parrot Creek (Tuesday 7th December 1824), through Strath Creek, over Sunday Creek (Sunday 12th December 1824) at Broadford, Tullamarine, St Albans, Deer Park, through Werribee, skirting east of the You Yangs to Lara and Avalon Beach. Because their distance-measuring wheel had broken and a one degree mistake was made in calculations, the two leaders of the original group of six convict-companions arrived at Corio Bay, instead of the expected Western Port, discovered earlier by Flinders. From below Mt. Disappointment (Hume and Hovell's difficulties in "scrambling over brush and rock", "leeches in forest, as well as no water", "cutting grass 4-5 ft. high", dreadful scrub", "devil flies") we took an easier route, saw the Strath Creek memorial in ground fog and a wonderful "field of dreams", the Hume-Hovell privately owned cricket ground with its white picket boundary fence. Now, after a steep climb, in sunshine under gums we stretched and viewed magnificent rolling hills and fog-filled valleys - not "smoke from Aborigines' bush fires". After morning tea at Broadford we followed the Sunday Creek valley beside the Hume Freeway, passed the Wallan Wallan Rest Area (more appropriately Hume and Hovell Rest Area) to tum right at Beveridge. In Gellibrand Hill Park, near the headwaters of the Moonee Ponds Creek, we experienced the landscape the first European settlers saw - huge river red gums and rolling pastures. The gardens and sheltered courtyard of the 1840s, timber, brought from .....[?] prefabricated Woodlands Homestead, provided a pleasant lunch stop. We enjoyed a private tour, panoramic views over Melbourne and surroundings and the excitement of arriving and departing aircraft. Our next river crossing was at Werribee, "in a vast treeless plain", then we drove on by-ways no coach had previously travelled, to find "an immense sheet of water" salty Corio Bay, off-course to the west. In late afternoon of a super, calm, late autumn day we headed homewards. Back at Eltham we were rather surprised to find that we had travelled a total of 347 km. Thanks again to Russell Yeoman for his research and organization. What a wonderful day! Colour photographactivities, hume and hovell -
 Eltham District Historical Society Inc
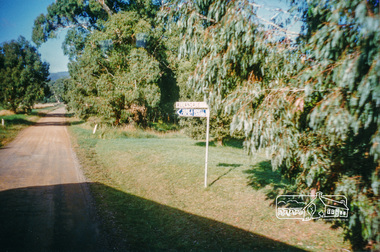
Photograph, Sign to Hume and Hovell Cricket Ground, at Allandale Road, Strath Creek, Autumn Excursion, Hume and Hovell's 1824 expedition, 26 May 1996, 26/05/1996
[article by Bettina Woodburn in EDHS Newsletter No. 109, July 1996:] ON THE TRAIL OF HUME AND HOVELL - REPORT ON THE AUTUMN EXCURSION - On a green and fresh morning (Sunday 26th May 1996) the Cobb and Co coach (driven by the most obliging Peter Tampion) set off in a north easterly direction from Eltham to connect with Hume and Hovell's route on their 1824 explorations of central Victoria. The Society would follow a series of monuments erected for the 1924 centenary of the expedition from King Parrot Creek (Tuesday 7th December 1824), through Strath Creek, over Sunday Creek (Sunday 12th December 1824) at Broadford, Tullamarine, St Albans, Deer Park, through Werribee, skirting east of the You Yangs to Lara and Avalon Beach. Because their distance-measuring wheel had broken and a one degree mistake was made in calculations, the two leaders of the original group of six convict-companions arrived at Corio Bay, instead of the expected Western Port, discovered earlier by Flinders. From below Mt. Disappointment (Hume and Hovell's difficulties in "scrambling over brush and rock", "leeches in forest, as well as no water", "cutting grass 4-5 ft. high", dreadful scrub", "devil flies") we took an easier route, saw the Strath Creek memorial in ground fog and a wonderful "field of dreams", the Hume-Hovell privately owned cricket ground with its white picket boundary fence. Now, after a steep climb, in sunshine under gums we stretched and viewed magnificent rolling hills and fog-filled valleys - not "smoke from Aborigines' bush fires". After morning tea at Broadford we followed the Sunday Creek valley beside the Hume Freeway, passed the Wallan Wallan Rest Area (more appropriately Hume and Hovell Rest Area) to tum right at Beveridge. In Gellibrand Hill Park, near the headwaters of the Moonee Ponds Creek, we experienced the landscape the first European settlers saw - huge river red gums and rolling pastures. The gardens and sheltered courtyard of the 1840s, timber, brought from .....[?] prefabricated Woodlands Homestead, provided a pleasant lunch stop. We enjoyed a private tour, panoramic views over Melbourne and surroundings and the excitement of arriving and departing aircraft. Our next river crossing was at Werribee, "in a vast treeless plain", then we drove on by-ways no coach had previously travelled, to find "an immense sheet of water" salty Corio Bay, off-course to the west. In late afternoon of a super, calm, late autumn day we headed homewards. Back at Eltham we were rather surprised to find that we had travelled a total of 347 km. Thanks again to Russell Yeoman for his research and organization. What a wonderful day! Colour photographactivities, hume and hovell, allandale road, strath creek -
 Eltham District Historical Society Inc
Photograph, Autumn Excursion, Hume and Hovell's 1824 expedition, 26 May 1996, 26/05/1996
[article by Bettina Woodburn in EDHS Newsletter No. 109, July 1996:] ON THE TRAIL OF HUME AND HOVELL - REPORT ON THE AUTUMN EXCURSION - On a green and fresh morning (Sunday 26th May 1996) the Cobb and Co coach (driven by the most obliging Peter Tampion) set off in a north easterly direction from Eltham to connect with Hume and Hovell's route on their 1824 explorations of central Victoria. The Society would follow a series of monuments erected for the 1924 centenary of the expedition from King Parrot Creek (Tuesday 7th December 1824), through Strath Creek, over Sunday Creek (Sunday 12th December 1824) at Broadford, Tullamarine, St Albans, Deer Park, through Werribee, skirting east of the You Yangs to Lara and Avalon Beach. Because their distance-measuring wheel had broken and a one degree mistake was made in calculations, the two leaders of the original group of six convict-companions arrived at Corio Bay, instead of the expected Western Port, discovered earlier by Flinders. From below Mt. Disappointment (Hume and Hovell's difficulties in "scrambling over brush and rock", "leeches in forest, as well as no water", "cutting grass 4-5 ft. high", dreadful scrub", "devil flies") we took an easier route, saw the Strath Creek memorial in ground fog and a wonderful "field of dreams", the Hume-Hovell privately owned cricket ground with its white picket boundary fence. Now, after a steep climb, in sunshine under gums we stretched and viewed magnificent rolling hills and fog-filled valleys - not "smoke from Aborigines' bush fires". After morning tea at Broadford we followed the Sunday Creek valley beside the Hume Freeway, passed the Wallan Wallan Rest Area (more appropriately Hume and Hovell Rest Area) to tum right at Beveridge. In Gellibrand Hill Park, near the headwaters of the Moonee Ponds Creek, we experienced the landscape the first European settlers saw - huge river red gums and rolling pastures. The gardens and sheltered courtyard of the 1840s, timber, brought from .....[?] prefabricated Woodlands Homestead, provided a pleasant lunch stop. We enjoyed a private tour, panoramic views over Melbourne and surroundings and the excitement of arriving and departing aircraft. Our next river crossing was at Werribee, "in a vast treeless plain", then we drove on by-ways no coach had previously travelled, to find "an immense sheet of water" salty Corio Bay, off-course to the west. In late afternoon of a super, calm, late autumn day we headed homewards. Back at Eltham we were rather surprised to find that we had travelled a total of 347 km. Thanks again to Russell Yeoman for his research and organization. What a wonderful day! Colour photographactivities, hume and hovell -
 Eltham District Historical Society Inc
Photograph, Autumn Excursion, Hume and Hovell's 1824 expedition, 26 May 1996, 26/05/1996
[article by Bettina Woodburn in EDHS Newsletter No. 109, July 1996:] ON THE TRAIL OF HUME AND HOVELL - REPORT ON THE AUTUMN EXCURSION - On a green and fresh morning (Sunday 26th May 1996) the Cobb and Co coach (driven by the most obliging Peter Tampion) set off in a north easterly direction from Eltham to connect with Hume and Hovell's route on their 1824 explorations of central Victoria. The Society would follow a series of monuments erected for the 1924 centenary of the expedition from King Parrot Creek (Tuesday 7th December 1824), through Strath Creek, over Sunday Creek (Sunday 12th December 1824) at Broadford, Tullamarine, St Albans, Deer Park, through Werribee, skirting east of the You Yangs to Lara and Avalon Beach. Because their distance-measuring wheel had broken and a one degree mistake was made in calculations, the two leaders of the original group of six convict-companions arrived at Corio Bay, instead of the expected Western Port, discovered earlier by Flinders. From below Mt. Disappointment (Hume and Hovell's difficulties in "scrambling over brush and rock", "leeches in forest, as well as no water", "cutting grass 4-5 ft. high", dreadful scrub", "devil flies") we took an easier route, saw the Strath Creek memorial in ground fog and a wonderful "field of dreams", the Hume-Hovell privately owned cricket ground with its white picket boundary fence. Now, after a steep climb, in sunshine under gums we stretched and viewed magnificent rolling hills and fog-filled valleys - not "smoke from Aborigines' bush fires". After morning tea at Broadford we followed the Sunday Creek valley beside the Hume Freeway, passed the Wallan Wallan Rest Area (more appropriately Hume and Hovell Rest Area) to tum right at Beveridge. In Gellibrand Hill Park, near the headwaters of the Moonee Ponds Creek, we experienced the landscape the first European settlers saw - huge river red gums and rolling pastures. The gardens and sheltered courtyard of the 1840s, timber, brought from .....[?] prefabricated Woodlands Homestead, provided a pleasant lunch stop. We enjoyed a private tour, panoramic views over Melbourne and surroundings and the excitement of arriving and departing aircraft. Our next river crossing was at Werribee, "in a vast treeless plain", then we drove on by-ways no coach had previously travelled, to find "an immense sheet of water" salty Corio Bay, off-course to the west. In late afternoon of a super, calm, late autumn day we headed homewards. Back at Eltham we were rather surprised to find that we had travelled a total of 347 km. Thanks again to Russell Yeoman for his research and organization. What a wonderful day! Colour photographactivities, hume and hovell -
 Flagstaff Hill Maritime Museum and Village
Equipment - Rigging
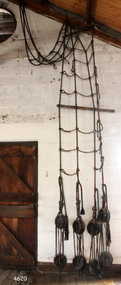
The shrouds or fore-rigging are a part of the standing rigging on a sailing ship. They are used in pairs on each side of a ship to help hold the masts in place and to aid the sailors who climb the rigging. They are part of the basic framework for the sails. Larger vessels may have two or three pairs, and some ships may have upper and lower shrouds. The upper shrouds would be fixed to a protruding structure on the top of the masts so that they hung from the right angle. The ropework skills of the sailmaker would be used to create the shrouds, choosing fibres with properties suitable for the job at hand and creating the triangular shape carefully. Deadeyes and ropes were then used to attach the shrouds to the ship's structure.This shroud is an example of a part of the standing rigging of a sailing ship. Shrouds were used in pairs on larger sailing vessels to help hold the masts in place and give access to adjustable rigging such as sails.Fore Rigging or Shrouds, made from rope fibres. This shroud includes the upper and lower wooden deadeyes. They are part of a ship's rigging. flagstaff hill, warrnambool, maritime museum, maritime village, great ocean road, shipwreck coast, shroud, fore-rigging, ropework, sailing ship rigging, standing rigging, natural fibres, sailmakers, handmade, deadeye, knot making -
 Flagstaff Hill Maritime Museum and Village
Equipment - Rigging
The shrouds or fore-rigging are a part of the standing rigging on a sailing ship. They are used in pairs on each side of a ship to help hold the masts in place and to aid the sailors who climb the rigging. They are part of the basic framework for the sails. Larger vessels may have two or three pairs, and some ships may have upper and lower shrouds. The upper shrouds would be fixed to a protruding structure on the top of the masts so that they hung from the right angle. The ropework skills of the sailmaker would be used to create the shrouds, choosing fibres with properties suitable for the job at hand and creating the triangular shape carefully. Deadeyes and ropes were then used to attach the shrouds to the ship's structure.This shroud is an example of a part of the standing rigging of a sailing ship. Shrouds were used in pairs on larger sailing vessels to help hold the masts in place and give access to adjustable rigging such as sails.Fore Rigging or Shrouds, made from rope fibres. This shroud includes the upper and lower wooden deadeyes. They are part of a ship's rigging.flagstaff hill, warrnambool, maritime museum, maritime village, great ocean road, shipwreck coast, shroud, fore-rigging, ropework, knot making, sailing ship rigging, standing rigging, natural fibres, sailmakers, handmade, deadeye -
 Bendigo Historical Society Inc.
Slide - DIGGERS & MINING. DIGGERS AND MINERS, 1850s
Diggers & Mining. Diggers and Miners. A sports oval, which was made on the top of the nearby hill, was reached only after a very stiff climb. Picture shows the very steep track which you would have to walk to reach the oval. Markings: 51 994.5 WAL. Used as a teaching aid.hanimounteducation, tertiary, goldfields -
 Bendigo Historical Society Inc.
Postcard - POSTCARD. BENDIGO SEWERAGE AUTHORITY. 14TH OCTOBER. 1922, 14/10/1922
Postcard. Sepia photograph of on the front it is stamped Bendigo Sewerage Authority, 14th October 1922. Photograph of a car, 4 men, a tower you could climb and a round brick tank, with a ladder leaning against it. Written on the back 'One Tree Hill', with compliments Gordon Nivine, Engineer-in-chief. 14/10/22.postcard, photograph, one tree hill., postcard. photograph. one tree hill. 14th oct. 1922. bendigo sewerage authority. -
Bendigo Historical Society Inc.
Photograph - PORTRAIT FAMILY
Black & White photograph, a family of 2 adults, 2 children, male wearing a turban and a button up suit type uniform. Female wearing wide brimed helmet looking hat,over the shoulder sash over blouse, the tallest(eldest) child, a boy in bare feet, similar hat to woman, short type jump suit, the girl wearing a white dress, black shoes and socks, black and white bonnet. All 4 standing outside a white 2 storey house, pillars on ground floor, a flowering climbing plant close to family. On back of photo, can partially read, 'This is just a snapshot taken (blank) our house in May 1918 (blank line). Up in the hills the men wear (blank) instead of Dhoti because of the (that’s all).photograph, portrait, family, photograph, portrait, family of 2 adults, 2 children, male wearing turbin. -
Whitehorse Historical Society Inc.
Article, Bigger Anzac turnout|Across the years|Ranks thin as crowds still climb, 2003
Articles re Anzac Day ceremonies ast Mitcham R.S.L. and Box Hill.Articles re Anzac Day ceremonies ast Mitcham R.S.L. and Box Hill.Articles re Anzac Day ceremonies ast Mitcham R.S.L. and Box Hill.anzac day, mitcham returned servicemens league, mcphee, peter, richardson, keith, abdur, rahman -
 Ballarat Heritage Services
Photograph, Camberville Tree Stump with Axeman's Footholes, 2014, 04/11/2014
Colour photograph of a tree stump at Camberville, showing the foot holes created for the axemen to climb the tree.tree stump, foot holes, axeman, camberville -
 Southern Sherbrooke Historical Society Inc.
Photograph - Hay being stacked at Glen Park Farm, Selby
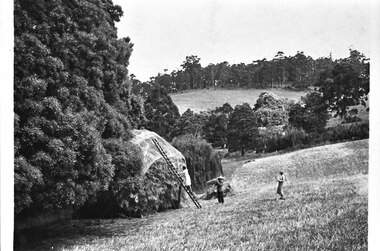
B&W photo showing hay being stacked at Glen Park Farm, Selby. The photo shows two women and a man in a sloping paddock. On the left is a woman in a pale, knee-length dress, climbing a ladder propped up against a tall haystack. The haystack has a covering with a repeated logo on it. A man stands near the bottom of the ladder, holding a sheaf of hay on his right shoulder. He is wearing a hat, light jacket and dark trousers. A woman stands uphill of the others. She has a light blouse and slightly darker calf-length skirt. The haystack is set between trees on the downhill side. In the distance Black Hill can be seen. -
 Ballarat Tramway Museum
Photograph - Digital image Set of 10, George Coop, 1968 - 1970
... and Pleasant Streets. .1 - Tram 26 climbing the Sturt St hill... and Pleasant Streets. .1 - Tram 26 climbing the Sturt St hill ...Yields information about the tram operations and the landscape views of the Sturt St median strip.Ten (10) Digital images taken by George Coop during the period 1968 - 1970, of SEC trams in Sturt St, between the City and Pleasant Streets. .1 - Tram 26 climbing the Sturt St hill to Lydiard St, with the Cook's Private Hotel, the Commonwealth Bank and the National Mutual Life building in the background. Photo taken from the Titanic Bandstand. .2 - Tram 40 Sturt St, enough to Lydiard St North just before Raglan St. Has a lady passenger by the tram stop. .3 - Tram 30 - Sturt St north side, near Armstrong St, - has a blue framing line around the photograph. .4 - Tram 39, Sturt St, near Doveton St, shows the rotunda in the median strip. .5 - Tram 18, with median step in view. .6 - Tram 31, with two Johnnie Walker whiskey roof adverts, outside the National Mutual Life building with the Alan Bros Jewellers and Golden Star Chinese Cafe in the view. .7 - Tram 31, Sturt St south side with Town Hall and the Golden City Hotel in the view. Tram has destination of Gardens via Drummond North. .8 - Tram 41 - ditto - going to Sebastopol. .9 - Tram 13, south side, Gardens via Sturt West, about , near Ripon St, with the Ampol service station in the background and about to pick up a lady passenger .10 - Tram 17, near Doveton St. Has a Twin Lakes sign and a Wilkinson Sword Razor Bladese roof advert. trams, tramways, sturt st, raglan st, passengers, doveton st, tram 26, tram 40, tram 30, tram 39, tram 18, tram 31, tram 41, tram 13, tram 17 -
 Ballarat Tramway Museum
Slide - 35mm slide/s, Noel Simons, 21/11/1962 12:00:00 AM
... at Alexandra Fountain, Charing Cross Bendigo" 1188.3 - "No. 4 climbing... Fountain, Charing Cross Bendigo" 1188.3 - "No. 4 climbing the View ...Set of 17 transparencies taken on 21/11/1962 on Kodak mounts. 1188.1 - Bendigo No. 11 at Depot Junction McCrae and Arnold St. with driver/conductor changing points. 1188.2 - Bendigo No. 4 at Charing Cross, side on photo, with City Club Hotel and Alexandra Fountain in the background. Tram has Castrol and SEC 'Electric Cooking' ads. 1188.3 - Bendigo No. 4 climbing View St. after tram has passed photographer. Tram has Streets Ice Cream and Cohns Soft Drinks ad on rear dash panel. In the background are the buildings in View St., including the Princess Theatre. Tram has destination of Eaglehawk. 1188.4 - Trams 2 and 4 crossing at the California Gully or Thorpe St Loop. 1188.5 - Bendigo 4 in Mt Korong Road. Tram inbound with destination of Quarry Hill, just leaving Garden Gully Loop. 1188.6 - Bendigo 4 and 17 crossing at the Hayes St. or Iron Bark Gully Loop. No. 17 bound for Eaglehawk, No. 4, Quarry Hill. 17 has two SEC roof ads and a white horse whiskey ad. 1188.7 - No. 17 bound for Eaglehawk, soon after leaving California Gully. Has large mullock heap in background. 1188.8 - Bendigo 2 and 17 crossing at the Thorpe St. or California Gully Loop. Has butchers shop in background. 1188.9 - Bendigo 17 at the Eaglehawk terminus. Has destination of Quarry Hill. In background is the hotel and shops at the terminus, showing ads for "Melbourne Bitter". Tram has two SEC 'Electric Cooking' ads. Driver and conductor about to assist two lady passengers with a pram and baby. 1188.10 - No. 17 at Eaglehawk terminus, awaiting departure. Has Eaglehawk Town Hall and Post Office in background. Tram has a Whitehorse Whiskey ad on the front dash panel. 1188.11 - No. 3 in High St. Eaglehawk, with destination of Eaglehawk. Has the shops on the south side of High St. in the background, including the Eaglehawk fish shop. Tram has two roof ads, one an SEC roof ad, and Cohns Drinks and Streets Ice cream ads on front dash panel. 1188.12 - as above, but after tram has passed photographer. Note the centre of the road poles. 1188.13 - No. 2 outbound for Eaglehawk at the intersection of Mt. Korong Road and the Calder Highway. Photo taken after the tram has passed the photographer. Has an Ampol service station in the background. 1188.14 - No. 11 leaving the Bendigo depot, crossing the bridge, with the Scrubber car in the background. 1188.15 - No. 21 at the North Bendigo terminus. Tram has destination of Golden Square and Cohns drink ad on front dash and two roof ads on side. 1188.16 - No. 11 on Golden Square route, in High St. at intersection with Old High St. 1188.17 - No. 11 at the Golden Square terminus, conductor turning the pole. Hotel on the left side of the photo. Note the road works barrier and red flag behind the tram. Slide has an end of roll mark on the right hand side of the image.Information written on in black ink and date stamped on purple ink. 1188.1 - "Birney car No. 11 in McCrae St. at Cnr of Arnold about to run into depot, Bendigo" 1188.2 - "No. 4 at Alexandra Fountain, Charing Cross Bendigo" 1188.3 - "No. 4 climbing the View St. Hill from Charing Cross, Bendigo (Eaglehawk Route)" 1188.4 - "No. 4 and 2 at Thorpe St. Loop, California Gully" 1188.5 - "No. 4 in Mt Korong Rd., Long Gully, Near Havilah Rd. (Bendigo) (Eaglehawk Route)" 1188.6 - "Nos. 17 and 4 crossing on Hayes St. Loop, Ironbark, Bendigo" 1188.7 - "No. 17 soon after leaving California Gully (Eaglehawk Route)" 1188.8 - "No.2 and 17 crossing on Thorpe St. Loop, California Gully (Eaglehawk Route)" 1188.9 - "No. 17 at Eaglehawk terminus" 1188.10 - "No. 17 at Eaglehawk terminus" 1188.11 - "No. 3 in High St. Eaglehawk" 1188.12 - "No. 3 nearing Eaglehawk terminus" 1188.13 - "No. 2 in Mt. Korong Rd., Ironbark. Calder highway on left (Eaglehawk route) 1188.14 - "Birney car No. 11 leaving Bendigo depot. Scrubber car at rear" 1188.15 - "No. 21 at North Bendigo Terminus" 1188.16 - "Birney car No. 11 in High St. Bendigo at intersection with Old High Street (Golden Square Route)" 1188.17 - "Birney Car No. 11 at Golden Square terminus, High St., Bendigo". tramways, trams, bendigo, depot junction, charing cross, view st., eaglehawk, north bendigo, golden square, tram 2, tram 3, tram 4, tram 11, tram 17, tram 21, tram scrubber -
 Ballarat Tramway Museum
Slide - 35mm slide/s - set of 20, Noel Simons, 21/05/1971 12:00:00 AM
... , but after crossing bridge, now ascending a hill. Photo taken after.... 1197.6 - No. 26 climbing High St. hill Eaglehawk, nearing end ...Set of 20 transparencies taken on 21/5/1971 on Kodak mounts. 1197.1 - Bendigo No. 5 en route to Eaglehawk at Creeth St Long Gully. Tram has a SEC roof ad and Cinzano roof ad. 1197.2 - No 5 approaching Needle Loop between Long Gully and California Gully. On left hand side is the City of Bendigo sign, indicating city boundary. 1197.3 - As for 1197.2 but actually entering loop. Photo taken after tram has passed photographer. 1197.4 - No. 26 bound for Eaglehawk descending the railway bridge near Eaglehawk, at Jobs Gully. 1197.5 - as for 1197.4, but after crossing bridge, now ascending a hill. Photo taken after tram has passed photographer. 1197.6 - No. 26 climbing High St. hill Eaglehawk, nearing end of Double track, bound for Quarry Hill. Shows centre of the road poles. 1197.7 - As for 1197.6, with tram entering single track section. Photo taken after tram has passed photographer. Has a BP service station in the background. 1197.8 - No. 26 (bound for Quarry Hill) crossing No. 17 (Eaglehawk) at Job's Gully Loop. 1197.9 - No. 17 climbing railway bridge at Job's Gully, en route to Eaglehawk. Photo taken after tram has passed photographer. 1197.10 - No.26 bound for Quarry Hill, leaving Long Gully Loop? Has the Creeth St. church in l197.l in the far background. Photo taken after tram has passed photographer. 1197.11 - Tramway Point work at the northern end of Long Gully Loop. 1197.12 - No. 17 en route for Quarry Hill turning into View St. from Bamard St. Tram has SEC roof ads "Everything fine in my all electric Kitchen' and 'Electric Cooking is Matchless'. 1197.13 - as for 1197.12, but tram has turned into View St and about to enter the double line track. Photo taken after tram has passed photographer. 1197.14 - No. 21 enters Nolan St after turning from MacRae St. en route to Bendigo. Note sign on its own post noting tram turns "Beware Tram Turns" and stop sign on adjacent pole "Trams stop on Request". No. 21 has two SEC roof ads. 1197.15 - No. 21 in Nolan St. after turning from Bridge St. (White Hills Road). Note signal light for Bridge St. loop on pole corner of street. Photo taken after tram has passed photographer. 1197.16 - No. 2 bound for Eaglehawk at unknown location. 1197.17 - Tram stop sign on a pole "CARS STOP BY REQUEST" 1197.18 - No. 5 in Carpenter St.? en route to Quarry Hill. 1197.19 - No. 28 has just arrive at Golden Square terminus, passengers are disembarking and the trolley pole is being turned. Golden Square Hotel in the background. 1197.20 - No. 28 at Golden Square terminus. Has a "Nothing beats Briquettes for hear roof ad. Information written on in black ink and date stamped on purple ink. 1197.1 - "No. 5 at Creeth St. Long Gully" 1197.2 - "No. 5 approaching Needle Loop between Long Gully and California Gully" 1197.3 - "No. 5 at Needle Loop between Long Gully and California Gully" 1197.4 - "No. 26 crossing railway bridge at Job's Gully near Eaglehawk" 1197.5 - "No. 26 just after crossing railway bridge at Job's Gully near Eaglehawk/ 1197.6 - "No. 26 in High St. Eaglehawk" 1197.7 - "No. 26 at end of double track in High St. Eaglehawk" 1197.8 - "Nos. 26 and 17 crossing at Job's Gully Loop" 1197.9 - "No. 17 crossing railway bridge at Job's Gully near Eaglehawk". 1197.10 - "No. 26 at Long Gully" 1197.11 - 'Northern end of points at Long Gully Loop". 1197.12 - "No. 17 turning into View St. from Bamard St. Bendigo". 1197.13 -'No. 17 at beginning of double track in View St. after leaving Bamard St. Bendigo. 1197.14 - "No. 21 enters Nolan St. from MacRae St. Bendigo." 1197.15 - "No. 21 in Nolan St. Bendigo just after leaving White Hills Road." 1197.16 - "No. 2" 1197.18 - "No. 5" 1197.19 - "Birney car No. 28 at Golden Square Terminus" 1197.20 "Birney car No. 28 at Golden Square Terminus" tramways, trams, bendigo, long gully, railway bridge, jobs gully, trackwork, nolan st, quarry hill, tram stops, golden square, tram 2, tram 5, tram 17, tram 21, tram 26, tram 28 -
 Ballarat Tramway Museum
Slide - 35mm slide/s - set of 32, Noel Simons, 25/02/1971 12:00:00 AM
Set of 31 transparencies taken on 25/2/1972 on Kodak mounts. 1201.1 - Bendigo No. 26 in Bond St. just after leaving Long Gully en route for Quarry Hill. Has Norris Supermarket in background. Has two SEC roof ads. 1201.2 - No. 26 climbing View St. from Charing Cross en route to Eaglehawk. Has ANZ bank and AMOCO service station in background. 1201.3 - as for 1201.3, but after tram has passed photographer. Has buildings west of Mackenzie St. in photograph. 1201.4 - Tram stop and centre of the road pole with two "CARS STOP BY REQUEST" signs mounted on pole at the corner of Mackenzie St. 1201.5 - same position as for 1201.3, but with No. 5 descending the street. 1201.6 - same position as for 1201.2, but with No. 5 descending the street. Photo taken after tram has passed photographer. 1201.7 - No. 7 in Nolan St. from across the park at Lake Weeroona. 1201.8 - No. 7 entering McCrae St from Nolan St. - distant view. Note "TRAM "sign on left hand side under tree and overhead in McCrae St. from former track that once was in this street. 1201.9 - No. 7 in High St. with Cathedral in background. Tram en route to North Bendigo. Note scaffolding around Cathedral main spire area. 1201.10 - No. 7 crossing Bendigo Creek bridge in High St. near Golden Square. Has a Caltex Service station in the background. 1201.11 - No. 7 at Golden Square terminus with Sunburst Fruit Juices and a Peters Ice cream delivery vans alongside. 1201.12 - as for 1201.11 but photo taken from behind tram, with the end of the rails in the photograph. 1201.13 - No. 7 and 21 in Pall Mall at Charing Cross with No. 5 in the background. Taken some distance away from the location. 1201.14 - No. 7 at Golden Square terminus, taken a short distance from the tram terminus. Shows Milk Bar on right hand side and the hotel on the left hand side. Taken from the south side of the roadway. 1201.15 - as from 1201.14 but taken from the north side of the roadway. 1201.16 - No 5 waiting at California Gully loop. Distant photo showing surrounds 1201.17 - No. 5 en route for Quarry Hill crossing No. 26 at California Gully. 1201.18 - No. 26 at Eaglehawk terminus with Eaglehawk Town Hall and Post Office in background. 1201.19 - No. 21 arriving at Charing Cross en route to North Bendigo. Has Alexandra Fountain in the background, ANZ bank RACV building, and other buildings on the north side of Pall Mall or Nolan St. 1201.20 - No. 26 en route for Quarry Hill at Charing Cross, with crew standing by front door. Has Colonial Mutual life building, Armstrong Tyre Service (Firestone) and a sign for Cohns Drinks in the background. 1201.21 - as for 1201.20 but with No. 5 en route to Eaglehawk now in photograph. 1201.22 - No. 26 at Quarry Hill terminus. 1201.23 - No. 26 at Quarry Hill terminus, view of front portion of tram only from a gate at the Bendigo cemetery. 1201.24 - Track at the end of the Quarry Hill line showing the point blades of the former "Y" terminus and the overhead for this. 1201.25 - No. 2 at the Quarry Hill terminus, looking along the former Trackwork. 1201.26 - as for 1201.25 1201.27 - number not used. 1201.28 - Golden Square terminus from some distance from the actual terminus, showing the Warning sign "TRAM" for motorists from the south. No. 7 at the terminus. 1201.29 - No. 7 passing through the Golden Square shopping centre. Numerous cars and pedestrians. Tram en route for North Bendigo. 1201.30 - No. 7 in High St. Golden Square, en route for North Bendigo. Photo taken after tram has passed photographer. 1201.31 - No. 7 in High St. just past Wattle St. with the Cathedral in the background. Tram has two SEC roof ads good side on photo, 'Everything's fine in my all electric kitchen' and 'Electrical cooking - clean, quick, economical'. 1201.32 - No. 7 in High St. nearing Wattle St. Has Cathedral in the background. Photo taken after tram has passed photographer.Information written on in black ink and date stamped on purple ink. 1201.1 - "No. 26 in Bond St just after leaving Long Gully" 1201.2 - "No. 26 climbing View St. from Charing Cross" 1201.3 - "No. 26 ascending View St. from Charing Cross (At Mackenzie St.)" 1201.4 - "View St. & Mackenzie St." 1201.5 - "No. 5 in View St. near Mackenzie St." 1201.6 - "No. 5 in View St. nearing Charing Cross." 1201.7 - "No. 7 in Nolan St. seen from Lake Weeroona Park." 1201.8 - "No. 7 entering McRae St. from Nolan St. Note "TRAM" warning sign on left. 1201.9 - "No. 7 in High St. passing Short St." 1201.10 - "No. 7 crossing Bendigo Creek bridge in High St. near Golden Square." 1201.11 - "No. 7 at Golden Square terminus" 1201.12 - "No. 7 at Golden Square terminus" 1201.13 - "No 7, 21 and 5 at Charing Cross" 1201.14 - "No. 7 at Golden Square terminus" 1201.15 - "No. 7 at Golden Square terminus" 1201.16 - "No 5 waiting at California Gully loop." 1201.17 - "Nos. 5 and 26 crossing at California Gully loop" 1201.18 - "No. 26 at Eaglehawk terminus" 1201.19 - "No. 21 arriving at Charing Cross from Golden Square" 1201.20 - "No. 26 at Charing Cross" 1201.21 - "Nos. 5 and 26 at Charing Cross." 1201.22 - "No. 26 at Quarry Hill terminus" 1201.23 - "No. 26 at Quarry Hill terminus seen through the gates of the Bendigo Cemetery." 1201.24 - "Quarry Hill terminus showing remains for former double track layout abandoned before 1964." 1201.25 - "No. 2 at Quarry Hill terminus" 1201.26 - "No. 2 at Quarry Hill terminus" 1201.28 - "The Southern approach to Golden Square with No. 7 standing at the terminus, "TRAM" warning sign on the left. 1201.29 - "No. 7 passing through Golden Square Shopping Centre" 1201.30 - "No. 7 in High St. Golden Square" 1201.31 - "No. 7 in High St. passing Wattle St." 1201.32 - "No. 7 in High St. nearing Wattle St."tramways, trams, bendigo, bond st., view st., nolan st., high st., eaglehawk, california gully, charing cross, quarry hill, trackwork, tram 2, tram 5, tram 7, tram 21, tram 26 -
 Ballarat Tramway Museum
Slide - 35mm slide/s - set of 19, Noel Simons, 26/02/1972 12:00:00 AM
... traffic works. 1203.2 - No. 5 climbing the High St. hill... traffic works. 1203.2 - No. 5 climbing the High St. hill ...Set of 18 transparencies taken on 26/2/1972 on Kodak mounts. 1203.1 - Bendigo 5 at Eaglehawk terminus - with new traffic works. 1203.2 - No. 5 climbing the High St. hill Eaglehawk with the buildings on the east side in the photo. 1203.3 - No 2 descending the road over rail bridge at Job's Gully, heading for Quarry Hill. 1203.4 - as for 1202.3, but more side on. Tram has two SEC roof ads. 1203.5 - as for 1202.4 1203.6 - No. 26 entering Garden Gully Loop, Mt. Korong Road, Ironbark. Tram en route to Eaglehawk. Water column on right hand side of photograph. 1203.7 - No. 2 on the Eaglehawk route, Iron Bark area?, bound for Quarry Hill. 1203.8 - as for 1202.7, but photo taken after tram has past photographer. 1203.9 - No. 5 at Eaglehawk terminus, night photo. Tram has arrived at terminus, showing Quarry Hill, pole turned, but the tram lights have yet to be turned around. 1203.10 - as for 1202.9, but lights have been turned around. 1203.11 - No. 26 climbing the View St. Hill near the Commodore Hotel. Has Campbells Electrical Services building in the background. Photo taken after the tram has passed the photographer. 1203.12 - No. 7 end on photograph, at Golden Square, destination showing Golden Square - night photo. 1203.13 - number not used. 1203.14 - as for 1202.12, but partially side on, has a passenger looking out the tram. 1203.15 - as for 1202.12, but with hotel in the background. 1203.16 - No. 26 and 2 at Charing Cross, night photo. Tram 26 en route to Quarry Hill, 2 to Eaglehawk. 1203.17 - Interior photo of No. 26, at night. 1203.18 - No. 26 at the Quarry Hill terminus as night. 1203.19 - as for 1202.18, but central portion of the tramcar.Information written on in blue ink and date stamped on purple ink. 1203.1 - "No. 5 at Eaglehawk terminus" 1203.1 - "No. 5 in High St. Eaglehawk" 1203.3 - "No. 2" 1203.4 - "No. 2" 1203.5 - "No. 2" 1203.6 - "No. 26 at Garden Gully Loop Mt Korong Rd., Ironbark" 1203.7 - "No. 2" 1203.8 - "No. 2" 1203.9 - "No. 5 at Eaglehawk terminus" 1203.10 - "No. 5 at Eaglehawk terminus" 1203.11 - "No. 26 in View St. Near the Commodore Motel" 1203.12 - "No. 7 at Golden Square Terminus" 1203.14 - "No. 7 at Golden Square Terminus" 1203.15 - "No. 7 at Golden Square Terminus" 1203.16 - "Nos. 26 and 2 at Charing Cross" 1203.17 - "Interior of No. 26" 1203.18 - "No. 26 at the Quarry Hill terminus" 1203.19 - "No. 26 at the Quarry Hill terminus "tramways, trams, bendigo, eaglehawk, bridges, iron bark gully, night photo, quarry hill, golden square, tram 2, tram 5, tram 7, tram 26 -
 Ballarat Tramway Museum
Slide - 35mm slide/s - set of 25, Noel Simons, 26/02/1972 12:00:00 AM
... passing William St, en route to Quarry Hill. Photo taken after... William St., Long Gully. No. 5 cresting hill in distance." 1204.8 ...Set of 25 transparencies taken on 26/2/1972 on Kodak mounts. 1204.1 - Bendigo No. 5 - just arrived at Manchester Loop near Havilah Road, Long Gully. Photo taken after tram has passed photographer. 1204.2 - No. 26 in Backhaus St. Long Gully passing William St, en route to Quarry Hill. Photo taken after tram has passed photographer. 1204.3 - No. 5 climbing the High St. Hill Eaglehawk, heading for Quarry Hill with the buildings on the West side of High St. in the background, including the Eaglehawk Town Hall. 1204.4 - as for 1204.3, but tram close up. 1204.5 - as for 1204.3, but after tram has passed photographer. 1204.6 - No. 5 at intersection of Mt Korong Road Ironbark and Calder Highway, with the AMPOL service 'station in the background. Photo taken after tram has passed photographer. 1204.7 - No. 26 en route to Quarry Hill shortly after leaving Needle Loop, passing William St., Long Gully. 1204.8 - No. 5 at California Gully Loop, picking up a passenger, with the shops at Long Gully in the background. Photo taken after tram has passed photographer. 1204.9 - No. 5 in Long Gully, en route to Quarry Hill. Photo taken after tram has passed photographer. 1204.10 - No. 2 at Eaglehawk terminus with the Eaglehawk Town Hall and Post Office in the background. Tram has two SEC roof ads. 1204.11 - No. 2 at Eaglehawk terminus, close up. 1204.12 - as for 1204.11, but through the park gates. 1204.13 - as for 1204.11, but with tram stop shelters in the foreground and buildings on the West side of High St in the background. 1204.14 - No. 2 in Mt. Korong Rd, midway between California Gully Loop and Needle Loop. Photo taken after tram has passed photographer. 1204.15 - No. 5 in Long Gully, en route to Quarry Hill. 1204.16 - as for 1204.15, but with trams departed loop. Has an ESSO service station in the background. 1204.17 - No. 26 leaves Charing Cross up View St.. Photo taken after tram has passed photographer. Has Armstrong Tyre Service, Cohns Drinks ad on a building and the T&G building in the background. Also Firestone ads on the tyre service building. 1204.18 - No. 5 waits at Charing Cross with the Alexandra Fountain in the background. Tram has two SEC roof ads, 'Everything s fine in my all electric kitchen' and 'Electricity Best for Cooking'. Has RACV, Colonial Mutual Life buildings in the background and the planting areas around Charing Cross gardens in the foreground. 1204.19 - No. 21 en route to North Bendigo arrives at Charing Cross, with passengers waiting to board. No. 5 in the background. In the background is the Fountain Gate Plaza building and the City Family Hotel. 1204.20 - as for 1204.19, but with No. 7 en route to Golden Square. 1204.21 - as for 1204.19, but closer up. 1204.22 - as for 1204.18 1204.23 - No. 25 in Nolan St. near the crossing of Bendigo Creek, running a special tram tour. 1204.24 - No. 25 on a special charter, in Weeroona Ave. at Cnr of Caledonia St. passing the Gas works. 1204.25 - Nos. 25 (showing Golden Square), 7 and 26 at Charing Cross. Has fountain in the background.Information written on in blue ink and date stamped on purple ink. 1204.1 - "No. 5 at Manchester Loop, near Havilah Rd. Long Gully." 1204.2 - "No. 26 in Backhaus St. Long Gully passing William St." 1204.3 - "No. 5 in High St. Eaglehawk." 1204.4 - "No. 5 in High St. Eaglehawk." 1204.5 - "No. 5 in High St. Eaglehawk." 1204.6 - "No. 5 in Mt. Korong Rd., Ironbark, passing Calder Highway Junctn." 1204.7 - "No. 26 shortly after leaving Needle Loop, passing William St., Long Gully. No. 5 cresting hill in distance." 1204.8 - "No. 5 at California Gully Loop." 1204.9 - "No. 5 in Long Gully" 1204.10 - "No. 2 at Eaglehawk terminus." 1204.11 - "No. 2 at Eaglehawk terminus." 1204.12 - "No. 2 at Eaglehawk terminus." 1204.13 - "No. 2 at Eaglehawk terminus." 1204.14 - "No. 2 in Mt. Korong Rd, midway between California Gully Loop and Needle Loop. 1204.15 - "Nos. 2 and 26 crossing at Long Gully." 1204.16 - "No. 26 leaves Long Gully loop for Eaglehawk as No. 2 pulls out of the far end towards Bendigo" 1204.17 - "No. 26 beginning the climb up View St. from Charing Cross." 1204.18 - "No. 5 at Charing Cross." 1204.19 - "No 21 arrives at Charing Cross from Golden Square while No. 5 awaits departure time for Eaglehawk." 1204.20 - "Nos. 7, 21, and 2 (behind which is No. 5) at Charing Cross." 1204.21 - "Nos. 7, 21, and 2 at Charing Cross." 1204.22 - "No. 5 at Charing Cross." 1204.23 - "No. 25 in Nolan St. near Bendigo creek crossing" 1204.24 - "No. 25 in Weeroona Ave. at cnr of Caledonia St." 1204.25 - "Nos. 25, 7, 26 and 2 (behind 26) at Charing Cross."tramways, trams, bendigo, eaglehawk, long gully, california gully, charing cross, north bendigo, tram 2, tram 5, tram 7, tram 21, tram 25, tram 26 -
 Ballarat Tramway Museum
Slide - 35mm slide/s set of 7, Noel Simons, 29 Feb. 1972
Set of 7 transparencies taken on 29/2/1972 on Kodak mounts. 1208.1 - Bendigo 18 (en route to Quarry Hill) and 2 (Eaglehawk) in the early morning at Charing cross with the Alexandra fountain and the Fountain Plaza building in the background. 1208.2 - No. 2 descending View St. Photo taken after tram has passed the photographer. 1208.3 - as for 1208.2 at Mackenzie St. intersection 1208.4 - No. 26 ascending View St. with the ANZ bank, T& G in the background. 1208.5 - as for 1208.4, but at Mackenzie St. intersection. Photo taken after tram has passed the photographer. 1208.6 - No. 18 in View St. seen from the lookout tower in Rosalind Park. 1208.7 - No. 7 en route to North Bendigo in Nolan St. Photographed across the Centenary Oval.Information written on in blue ink and date stamped on purple ink. 1208.1 - "Nos. 18 and 2 in the early morning sun at Charing Cross." 1208.2 - "No. 2 descending View St. towards Charing Cross." 1208.3 - "No. 2 in View St. passing Mackenzie St." 1208.4 - "No. 26 in View St. just after leaving Charing Cross." 1208.5 - "No. 26 climbing View St. past Mackenzie St." 1208.6 - "No. 18 climbing View St. seen from lookout tower in Rosalind Park." 1208.7 - "No. 7 in Nolan St. heading towards North Bendigo. / Last picture of a Bendigo tram."tramways, trams, bendigo, charing cross, view st., nolan st., tram 2, tram 7, tram 18, tram 26 -
 Ballarat Tramway Museum
Film - Movie Film & Box, Kodak, 1960
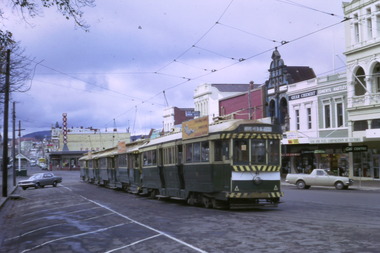
Yields information in movie film format of Ballarat trams in 1960, how the system operated and was used by people., Yields information in movie film format of Ballarat trams in 1960, how the system operated and was used by people.Movie film - 8mm, approx. 30mins, with leader strip on a plastic reel, within a black and white plastic box, titled "Ballarat No. 1. 1960". Has been transferred to DVD - see Reg item 4100 as Segment No. 2. Made by Ben Parle. Also transferred to DVD by Rod Cook Oct. 2015, via Roger Greenwood for use in his DVD, "The City of Ballarat Trams, Gardens & Gold" of 2016. See Reg Item 6883. Synopsis: based on time. 0:00 View of typed introduction, noting that this is a pictorial record of Ballarat. 0:10 Title “The Tramways of Ballarat 1960, Part 1” 0:16 13, showing “View Point” at Stones Corner, Bridge St, east end, with trolley pole being turned, while another single trucker heads out towards Mt Pleasant. 0:25 13 leaving Stones Corner, short approach and then longer trailing shot of the tram going towards the City in Bridge St. 0:44 View out of front of tram in Bridge St heading towards the City, with cars in the photo, then passing through city Loop, no trams in the loop and running up to Lydiard St Nth and crossing the road. 1:22 Running up Sturt St from Armstrong St, passes over Dawson St X-over and up to the next intersection, Lyons St. 1:54 Title “The View Point Line” 1:59 19 inbound, in Ripon St, from crossing Mair St, towards camera and then passing away and turning into Sturt St. 2:49 View of a “Warning Oncoming Trams” sign 2:52 19 in Ripon St, going to View Point, crossing Webster St towards camera, then going away through the disconnected Victoria Ave loop, pass the “Warning Oncoming Trams” sign. Note very windy scene with people running across roads. 3:17 19 in Wendouree Parade, in bound, though showing destination View Point, going away from the camera, past the View Point Hotel. 3:39 19 coming towards camera near Excerpt or Devon St and then going away towards the terminus. 4:04 19 at the terminus, stationary, with a single trucker 3?, passing from Macarthur St into Wendouree Parade, behind 19. 4:20 33 coming towards camera in Wendouree Parade from St Aidans Drive, stopping to pick up passenger at Forest St and then going away towards the City, photographed from near the depot, on a wet and windy day. 4:54 35 in Wendouree Parade, coming towards the Camera from St Aidans Drive and then going away with the Gardens Loop area in the background. Tram stops at stop to let a passenger off. 5:28 21 leaving Gardens Loop for the City via the Depot, green light in signal can be seen. 5:43 28?, closely followed by 26 turn from Drummond St South into Sturt St. 6:18 Scene opens with shot of “Sebastopol” destination on a bogie tram. 6:21 Title “The Sebastopol Line” 6:24 21 turning from Sturt St into Drummond St Sth with destination of Bell St and then going away from the camera. 6:55 38 in Drummond St Sth, coming towards the camera and then passing the camera with Sturt St just in the view. 7:10 21, showing Gregory St, in Drummond St Sth, approaching and then going away, entering the Urquhart St Loop, 7:39 34 in Drummond St Sth (location check required (Latrobe?)), approaches camera, picks up passengers and the goes away. 8:09 39 at ? Street, turns from Drummond St Sth into Skipton St, after picking up and setting down passengers, bound for Sebastopol 8:55 35 inbound in Skipton St passes through the Bell Street Loop, and then goes away from the camera. 9:33 42 outbound in Skipton St, approaches the camera, passes and then crosses over the half the road into Albert St. 10:00 39 inbound in Albert St – location? 10:31 34 outbound for Sebastopol, approaches camera and just starts to pass by. 10:36 34 in Grey St crossing loop, crosses 42 inbound. 10:59 39 outbound in Albert St, with shopping centre in bound, approaches camera, passes and then crosses over Albert St. Mid morning scene. 11:39 39 inbound, Albert St south, approaches camera and then passes and the crosses over Albert St. 12:16 41 outbound in Albert St passes the camera, and pulls into the terminus with the conductor getting out on the back bumper to pull the pole down as the tram stops and a passenger walks into the Royal Hotel. 12:39 Title “The Lydiard Street North Line” 12:44 Filmed from the Hotel balcony, 21 inbound in Lydiard St Nth passes over Mair St, stops while 33 passes in the other direction. 13:18 With the red light showing on the Seymour St loop signal, 33 inbound for Sebastopol stops and picks up many passengers, passes the camera and runs past the VRI building in the background and through the loop. Possibly filmed on a Sunday given the ladies dresses and quieter streets. 14:01 30 outbound, passes the camera and stops at Macarthur St. Filmed alongside the brick wall of the cutting. 14:28 30 inbound arrives, passes through the Gregory St loop and then proceeds past the camera, making a stop to pick up passengers. 15:14 28 in Lydiard St Nth – location?, approaches and goes away from the camera, north of Gregory St. 15:34 28 ditto location? 15:53 21 arrives at the terminus with passengers getting on and off. 16:11 View of the a vertical positioned “End of Section” sign on a pole at the terminus and then lifting the camera to see the timetable board and the stop sign. 16:33 31 in Bridge St passing Morseheads and then turning into Sturt St, stops at the Grenville St stop, while another single trucker comes down to the stop from the City. 16:58 31 outbound in Bridge St, with destination of Victoria St. 17:14 Title “The Victoria Street Line” 17:18 31 outbound to Victoria St from Stones Corner. Starts with an overhead shot, shows clock at the Caltex service station,. 17:37 31 inbound approaching Bakery Hill and then descending to the junction after it passes camera. 18:09 25 climbing outbound in Victoria St, passing the camera, to then pass through the King St loop. 18:47 25 inbound in Victoria St, passing the camera, then pass through the King St loop, with St Alypius Church in the background. 19:36 14 approaching the rail bridge in Victoria St and stopping at the 2nd last stop to left of passengers. 20:01 14 leaving the terminus and approaching the camera and the a short sequence going away, to the next stop to pick up quite a few passengers. 20:14 “Trams Stop Here” sign, metal wrap around on a steel pole. 20:16 Title “The Mount Pleasant Line” 20:21 11 inbound in Main St, with a passenger leaping off the tramcar and another getting off just before the junction. 20:45 11 passes the junction and then proceeds away from the camera in Bridge St. 21:04 30 outbound in Main St, then turns into Barkly St, a bus (Eclipse Motors) passes in Main St just before the sequence ends. 21:31 30 inbound near Steinfield St. (exact location?) 21:49 25 approaches the camera, then proceeds away and passes through the Grant St. loop. 22:29 25 inbound, windy day, between Grant and Cobden, (exact location?), with a horse drawn bread van in the view and the breadman walking behind the tram as it passes. 23:02 11 outbound in Barkly St, (exact location?) 23:37 11 inbound in Barkly St (exact location?) 23:44 Mt Pleasant terminus signage 23:50 30 approaches the terminus and then stops with the conductor alighting turning the pole, passengers getting on and off and the driver appearing at the other end. 24:32 Title “The Gardens Via Sturt St. West Line” 24:35 21 outbound in Sturt St near Raglan St, approaches and passes the Camera. 25:09 12, showing City Oval, approaches and passes the camera, outbound near Windermere St. 25:33 13 showing View Point, goes away from the camera – location? 25:44 12 comes from St. West, inbound passes the camera and then stop as the next stop next Talbot St? 26:21 Short sequence of a “Warning Oncoming Trams” sign 26:28 42 inbound in Sturt St West, just before Ripon St, view coming towards camera and then going away to cross Ripon St. 27:10 34 passes through the Parker St loop 27:25 35 or 39 inbound past the college in Sturt St West 28:04 41 outbound at the Russell St curve, passes away from the camera. 28:11 35? inbound passes away from the camera through the Victoria Park or Morrison St loop, swinging out into the roadway. 28:29 View of timetable sign at Hamilton Ave. 28:37 35 turning from Sturt St West into Hamilton Ave, can see the conductor changing over the barrier rails. 29:11 42 inbound, crosses another bogie tram (35?) at Carlton St loop then passes the camera and goes past the Olympic rings monument. 29:42 12 approaches the Carlton St gates. 30:07 12 outbound, crosses a bogie tram in the loop with both trams then leaving the loop. 30:20 Title “End of Part One” Written labels giving title information on outside of box.trams, tramways, ballarat, sebastopol, lydiard st north, victoria st, mt pleasant, sturt st west -
 Ballarat Tramway Museum
Film - Movie Film & Box, Kodak, 1960s
... climbing Sturt St hill towards Lydiard St Nth. 3:17 No. 21 turning... climbing Sturt St hill towards Lydiard St Nth. 3:17 No. 21 turning ...Yields information in movie film format of Ballarat trams in 1971 at the time of one of the closure tours and, a enthusiast tour, how the system operated and was used by people., Yields information in movie film format of Ballarat trams in 1971 at the time of one of the closure tours and, a enthusiast tour, how the system operated and was used by people.Movie film - 8mm, approx. 4.14 mins, with white leader strip on a plastic reel, within a Kodak movie yellow plastic container. Has been transferred to DVD - see Reg item 4100 as Segment No. 4. Filmed and made by an unknown person. Synopsis: based on time - Colour film Title "Ballarat trams specials" 0:00 No. 41 and two other bogie trams loading passengers outside the Ballarat railway station. 0:12 Image of R class loco and K class as 2nd loco at the station and train 0:18 Inside a bogie tram looking through saloon door showing the HTT logo. 0:23 From the front of a tram, or 39 turning from Lydiard St Nth into Sturt St and then proceeding along Sturt St. 0:31 Short sequence inside the tram with some passengers in the view 0:39 No. 21, showing Special in Sturt St West and then the two bogie trams following. 1:08 21 turning from Sturt St West into Hamilton Ave, followed by 41, 35 and 37 and then loading photographers. 1:58 As above north of Gardens Loop in Wendouree Parade. 2:07 Interior view of tram moving at speed, then Forest St corner showing church, and Wendouree Parade. 2:24 Drummond St Sth, crossing two trams at Bell St loop 2:29 Sebastopol line, from the window, heading towards the terminus. 2:44 No. 32 at Sebastopol terminus with the pole being turned. 3:01 Single trucker climbing Sturt St hill towards Lydiard St Nth. 3:17 No. 21 turning from Lydiard St Nth into Sturt St 3:31 Bogie tram climbing Sturt St hill towards Lydiard St Nth 3:55 Crossing the railway level crossing in Lydiard St Nth from the window of the tram. 4:02 Train departing from station – very poor sequence – appears to be a K class locomotive. 4:15 end Placed in a blue cardboard box specially made for the item 30/08/2010.trams, tramways, ballarat, vintage train, bell st, level crossings, lydiard st nth, sturt st west, tram 41, tram 39, tram 21, tram 35, tram 37, tram 32 -
 Ballarat Tramway Museum
Photograph - Black & White Photograph/s, Herald Sun, 16/04/1972 12:00:00 AM
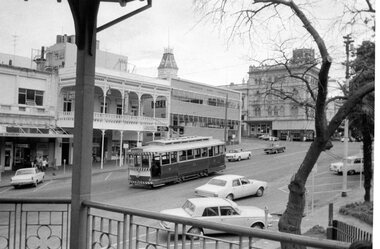
Yields information the operation of Bendigo trams in View St Bendigo, on the Eaglehawk route, and the delivery of the tram to Eaglehawk following closure.Black and White photograph of Bendigo No. 26 climbing View St, Bendigo with the destination of Eaglehawk and a "Borough of Eaglehawk sign" on the front dash panel. Photo taken with a large telephoto lens to show up the hill. Has Mitchell St in the background and a number of cars in the foreground. Photo taken on the last day of operation - used in Keith Dunstan's "A Place in the Sun" 17/4/1972. Herald Sun newspaper photograph. Printed on Agfa paper. For a copy of the newspaper article see Reg. Item 2229. See A Place in the Sun 17/4/1972.On rear in ink "ED15/215" and "17/4/72" in ink and a "Herald Sun Newspaper copyright" stamp - very faint green ink.tramways, trams, bendigo, eaglehawk, closure, view st, tram 26 -
 Ballarat Tramway Museum
Photograph - Digital Image, Black & White Photograph/s, Marc Dahlstrom, c1971
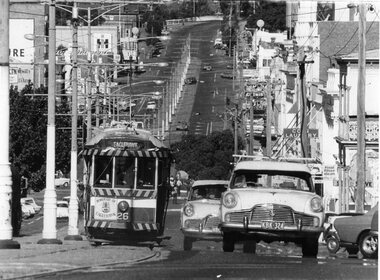
... running a "Special" climbing the Sturt St hill up to Lydiard St..." climbing the Sturt St hill up to Lydiard St, shows the steep hill ...Digital image from a black and white print of tram 42 running a "Special" climbing the Sturt St hill up to Lydiard St, shows the steep hill. In the background is Cooks Private Hotel, Ballarat Travel Centre, Commonwealth Bank, National Mutual Building and Alan Bros. Photo by Marc Dahlstrom c1971. 5056.1 - physical print of the same image, with the Marc Dahlstrom stamp on the rear - added 8-5-2016.On rear is the Marc Dahlstrom stamp.trams, tramways, sturt st, lydiard st, tram 42 -
 Ballarat Tramway Museum
Photograph - Digital image Set of 10, Tony Smith, 1971
... Victoria St destination. .10 - 37 - climbing the Lydiard St hill... Victoria St destination. .10 - 37 - climbing the Lydiard St hill ...Yields information about Ballarat Tramways and trams prior to the closure of the tramway system.Set of 10 digital images of Ballarat trams prior to closure, scanned from original slides by Tony Smith, 1971 prior to closure of the system. .1 - 41 and four other single truckers in the City Loop - Sturt St - has Dickins, Gear Chemist, Egments - Hartleys in the background. .2 - 33 northbound in Drummond St North with a large semi trailer behind it. .3 - Scrubber tram on 0 road at the depot. .4 - 43 in Lydiard St North .5 - 37? at Sebastopol terminus with the Royal Hotel in the Background. .6 - 37, Albert St, south of Ophir St crossover, northbound - photo not in focus. .7 - 37 at the Grey St loop, northbound. .8 - 37 and 34? - Urquhart St loop? - not in focus. .9 - 11 - Sturt St, showing Victoria St destination. .10 - 37 - climbing the Lydiard St hill, tram showing Sebastopol.trams, tramways, city loop, sturt st, lydiard st north, drummond st nth, depot, grey st loop, albert st, urquhart st, tram 41, tram 33, tram scrubber, tram 43, tram 37, tram 34, tram 11 -
 Ballarat Tramway Museum
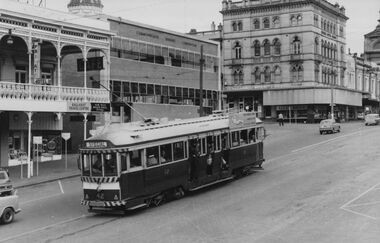
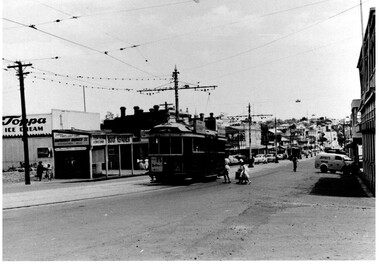
Photograph - Black & White, Bendigo 3 climbing Mitchell St, late 1950's
Black and White photograph, of Bendigo 3 climbing Mitchell St, near the Railway Station with the Destination of Quarry Hill. Has a Hutton's Ham ad on the front drivers panel and two rood ads. In the background are Sandhurst Dairies shop advertising Toppa Ice Cream, a boot repairer and a van marked Jeffreys Bread parked on the north side of Mitchell St. Nearing the point where the double track became single - see the signal wire insulators in the overhead. Printed on Fujichrome paper. Two copies held."TMSV Sales" stamp on rear. On rear of in ink 'HTT16 = MM N 102 = Geel 32 = BED 3"trams, tramways, bendigo, mitchell st, quarry hill, overhead, tram 3