Showing 270 items matching "railway signals"
-
 Ballarat Tramway Museum
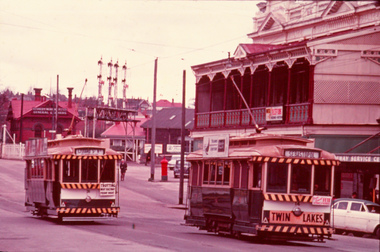
Slide - 35mm slide/s, Max Michell, No. 14 southbound in Lydiard St North, Sep. 1971
... . In the background is the railway level crossing signal gantry and Reid's..., from the Association of Railway Enthusiast's film strip titled ...Yields information the operation of trams prior to the closure of the SEC system near the Railway Station. Has a strong association with the work of the Association of Railway Enthusiasts.AGFA blue and white plastic mount, 35mm slide, from the Association of Railway Enthusiast's film strip titled "Provincial Tramway Film Strip" of No. 14 southbound in Lydiard St North with a Twin Lakes and an auxiliary board advertising a Fete. No. 31 is northbound to Lydiard St North with an auxiliary board "Trotting Bray Raceway Friday Night". Photo taken Sept. 1971. In the background is the railway level crossing signal gantry and Reid's Coffee Palace. Note the letter box at the railway station yard. The film strip notes (Reg. Item 2560), provided the following caption details: "No. 31 and 14 cross at the end of the double track outside the Ballarat Coffee Palance - Oct. '68" Photo Max Michell Slide No. 7 Various notations by John as to the slide number and the trams in pencil and ink.tramways, trams, are, film strip, level crossings, lydiard st north, bray raceway, tram 31, tram 14 -
 Ballarat Tramway Museum
Photograph - Colour Photograph/s - set of 15', Austin Brehaut, 1/04/2000 12:00:00 AM
... Grenville St - 6/4/2000 .13 - Railway Station from Signal box - 27... - Railway Station from Signal box - 27/4/2000 .14 - Lower Sturt St ...Yields information about various locations in Ballarat in March 2000 for comparison with previous photographs.Set of 15 colour photographs taken by Austin Brehaut in April 2000 showing various locations that Ballarat trams once ran in, for use in a BTM presentation, named "Ballarat Past and Present" at the COTMA 2000 Ballarat Conference. All on Fujicolour Crystal Archive Paper. On rear in blue ink is the date, location and where relevant a reference number to photo locations that the author of the presentation had requested. Letter from Austin, filed with this worksheet. 1772.1 - Sebastopol terminus, 4/4/2000 .2 - Albert St. Sebastopol near "crossover" - 4/4/2000 .3 - Old depot site, 5/4/2000 .4 - From depot site at Depot junction - 5/4/2000 .5 - Albert St. Sebastopol, looking south above loop site - 5/4/2000 .6 - Mt. Pleasant line, in Barkly St. towards terminus - 5/4/2000 .7 - Mt. Pleasant terminus, Cobden Cnr. - 5/4/2000 .8 - Wendouree Parade at Macarthur St. - 5/4/2000 .9 - Site of old Power Station Cnr Ripon St. Wendouree Parade .10 - Sturt St. at Dawson St (site of crossover) towards former Golden City Hotel - 6/4/2000 .11 - From Grenville St - up Sturt St. hill - 6/4/2000 .12 - Lower Sturt St. toward Grenville St - 6/4/2000 .13 - Railway Station from Signal box - 27/4/2000 .14 - Lower Sturt St. toward Grenville St - 6/4/2000 .15 - Railway Station from Signal box - 27/4/2000 For 2010 comparisons see 4645 and 4646. See Aboveballarat, sebastopol, albert st, sec depot, railway station, mt pleasant, dawson st, sturt st -
 Ballarat Tramway Museum
Photograph - Digital image Set of 9, Tony Smith, 19/09/1971 12:00:00 AM
... the railway - taken from the signal box (B) with Reids Palace... the railway - taken from the signal box (B) with Reids Palace ...Yields information about Ballarat Tramways and trams prior to the closure of the tramway system.Set of 9 digital images of Ballarat trams prior to closure, scanned from original slides by Tony Smith, 1971 prior to closure of the system. This set of slides appears to be the last day of operations - 19/9/1971 .1 - 40 south bound in Lydiard St Nth, at the Gregory St Loop. .2 - 40 after passing through the loop .3 - 42, north bound in Lydiard St. North at Macarthur St. .4 - 42 southbound at the Railway station level crossing with the Kennedy Murray Pty Ltd General Carriers building at the station yard in the background. .5 - 42 southbound in Lydiard St North after crossing the railway - taken from the signal box (B) with Reids Palace in the background and the Provincial Hotel. .6 - 35 northbound after passing through the level crossing. .7 - bogie tram crossing the tracks with Ballarat Railway Station in the background. .8 - bogie tram entering the double track section in Lydiard St with Reids Palace in the background. Note the new bus stop bay. .9 - 35 and another bogie in Sturt St, with the Town Hall, Golden Star Chinese Cafe and Georges Fish & Chip shop in the background.trams, tramways, lydiard st nth, gregory st, level crossings, ballarat railway station, sturt st, closure, tram 40, tram 42, tram 35 -
 Bendigo Historical Society Inc.
Negative - Photos of Bendigo - Glass Plate Negatives, Early 1900s
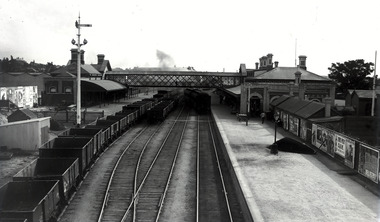
... Collection. Content railway station, locomotives and signal box... Collection. Content railway station, locomotives and signal box ...Three Boxes of Glass Plate Negatives and six black and white photos. 1. Box 1 Eight whole plate negatives of Pall Mall, Bendigo. Copies from original photos, or negatives made by the Army Survey Regiment stationed at Fortuna Villa. The original photos were taken by Alan Fox in 1857 and are in the State library of Victoria - currently being scanned. 2. Box 2 Fourteen half plate glass negatives collected from Bartlett's (Vincent Kelly) studio, Pall Mall, Bendigo by donor. Many other negatives went to the State Library of Victoria - currently being scanned. 11072.1k Group of men and Children, and dog at a cricket match at the side of a sports pavilion. Group of men, maybe a team of runners. Child in clothing with Kentish Flour sew-ons and hat with wheat on the top. Miss Cohn, 6/7/1911 Mr A Robinson, 31/3/1904 Mr Ah Hoy, 19/4/1903 Mr Ah Gay, 19/11/1903 Mr Ah Gay and one other, 19/1/1903 Mr Ah Hoy, 22/12/1902 Mr Ah Hoy, 22/12/1902 Mr Kim Ah Hoy, 22/12/1902 Mr Kim Ah Hoy, 22/12/1904 Mr Deravin, 5/6/1902 3. Box 3 Bendigo Railway Station and Encroachments - Nine Quarter glass lead Plates in a box labelled "Kahland Collection. Content railway station, locomotives and signal box, Bendigo Railway Station. 11072a Bendigo Railway Station from the Mitchell Street Bridge 4. Six black and white photos printed taken by Allan Doney - currently being scanned. 11072.1af Bendigo Arcade Pall Mall next to Myers. 11072.1ag Easter 1955 Junior Fire Brigade pulling fire cart with portrait of Queen Elizabeth 2 on the corner of Park Road and Bridge Street. 11072.1ah School of Mines Float Easter procession 1954. 11072.1ai Hustlers Terrace Bendigo 11072.1aj Limerick Castle Hotel Williamson St Bendigo 11072.1ak Christian Science Society 15 MacKenzie St., Bendigo, on the left at 11 MacKenzie St., formerly "Legacy House", now the Bendigo Historical Society. On the extreme left is the rear of the Princess theatre in View St. photos, bendigo, bendigo railway yards, mike butcher collection -
 Ballarat Tramway Museum
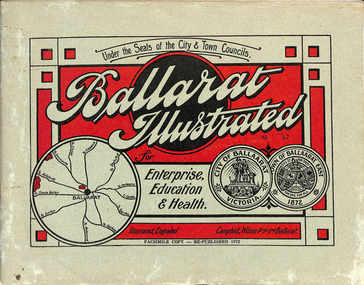
Book, "Ballarat Illustrated", 1972
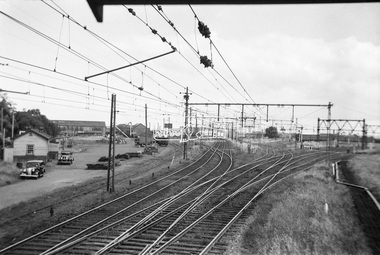
... station and railway gates with signal gantry and horse drawn... left hand photo, shows Railway station and railway gates ...Original c 1914 (see below), facsimile copy - re-published 1972. Original features photos of Ballarat City and Town, its buildings, parks and the various industries and organisations that were in Ballarat at the time of publication, including ESCo. Many photos features ESCo trams. Photos sepia toned. Has some red colour block printing on the front cover and rear, for Star Oil Engines. On inside back cover is a map with the places of interest and tram route map, marked in red. Pages are un-numbered. Original published by Ballarat East Town Council and Ballaarat City Council. On cover has number stamped in black in, "No. 87" (assume facsimile copy No.). Photos with publication show tram No. 21, built 1913 and ESCo photo page shows Mr. Pringle as Manager. Mr Pringle became manager in January 1911, As there is no photos of the "Avenue of Honour", or other mention of the first world war, assume original published about 1913 or 1914. Original shows Engravings and printing by "Campbell Wilson Prop Ltd, Ballarat". See Other Information as well for more listing details. High Resolution image added 31/8/2012 of i2 of ESCo page and i3 for Ballarat identies and sheet i4 extracted for Mr Pringle. PDF scan of full document added 21/5/2019 - see images btm633-1i.pdf and btm633-2i.pdf Notes on "Ballarat Illustrated" Reg. Item No. 733 From notes made by Neville Gower 12/1/1997 Cover: Inside front cover: Last paragraph, "Facilities for Travelling" - Electric trams serve all parts of Ballarat. Page 3: Street Scene, Municipal Town Hall, showing tram wiring Page 7: Street Scene, Lydiard St. North, intersection and tramway centre, with ESCo tram No. 21 in the bottom photo. Other photos features trams as well in Sturt St and Lydiard St. North. Page 9: Street Scene, Top photo of Sturt St. from Lydiard St. looking east, shows piles on right-hand side of road. Car parked by Post Office has a car registration number "9007". Bottom photo, an tram climbing hill, shows double trolley in the street, with early English type of pull offs. Page 13: Street Scenes and Historic Buildings: One of five photos, shows Victoria St. looking East, with tram track prominent in photo and how stone work was set up about the rails and overhead poles. Page 23: Street scene, Gardens North Entrance gates, shows details of gates near St. Aidans Drive. Note double trolley wire on poles, and style of insulators. No trams in photo, three ladies walking down the track. Page 37: Street Scene; Lydiard St views, top left hand photo, shows Railway station and railway gates with signal gantry and horse drawn vehicles. Tram tracks apparent. Bottom left hand photo shows Lydiard St. North, near Post Office, double track with centre poles - Single wire per track. Top right hand photo, showing Cemetery gates in background. Bottom right hand photo - from north end of Lydiard St. South, looking north, with an ESCo tram in background. Also has a parked car on left hand side. Page 45: Street Scenes - Bridge St; top photo at west end of Bridge St. with ESCo No. 11 with possibly double trolley wire in photo. Bottom photo at east end of Bridge St. with tram in background, shows junction. Double trolley heading out to Mt. Pleasant, single trolley for Victoria St. Page 45: Street Scenes - Bridge St; top photo at west end of Bridge St. with ESCo No. 11 with possibly double trolley wire in photo. Bottom photo at east end of Bridge St. with tram in background, shows junction. Double trolley heading out to Mt. Pleasant, single trolley for Victoria St. Page 61: Street Scenes and Historic Buildings - Public Institutions Ballarat - top left hand photo of the Hospital shows some tram track in foreground, with double trolley wire. Top right photo is of the Orphanage, the name of the tram terminus for many years. Page 68: Electric Supply Co. of Victoria's pages - top photo showing powerhouse in background, across the lake, can hardly see anything for the trees, except for the chimney. Bottom photos of the steam Turbo Generators and the switchboard. Gives Mr. P.J. Pringle as Chief Engineer and General Manager. He took over in Jan. 1911. Page 69: Ballarat East Views - features photo of Black Hill open cut, Ballarat East Railway Station, Ballarat Fire Station and "Victoria St. looking East", repeat of photo printed on page 12, but slightly darker. Image on system includes fire station and railway station, - Ballarat East. Page 78: Series of photos of various Ballarat VIP's of the era, fourth one in on top line features "P.J.Pringle, Electric Supply Co." Inside Back cover - map of Ballarat including tram lines and places of interest marked in red. Gives a detailed photographic presentation of Ballarat in 1914.80 page book with, in addition, light green card covers, titled "Ballarat Illustrated". Loose copy of page 9 and 10 held.trams, tramways, ballarat, local history, heritage buildings, esco -
 Flagstaff Hill Maritime Museum and Village
Equipment - Ships' Telegraph section, Milne Brothers, Copper and Brass Works, Early-to mid-20th century
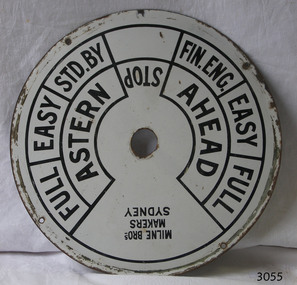
This Engine Room section of a ship's telegraph system was part of the equipment of the Ports and Harbour ship the SS Rip. The vessel serviced and maintained the lights and buoys at Port Phillip Bay and Queenscliffe. The SS Rip was possibly the former gunboat "Albert". The ship’s communication system that was used from the late 19th century to early-to-mid-20th-century is called an Engine Order Telegraph (E.O.T.) or ship’s telegraph. The system has two parts, the Bridge Section and the Engine Room Section. The Bridge Section is usually mounted on top of a pedestal, and the Engine Room Section is often attached to a vertical surface. The standard commands printed or stamped onto the dial are the directions of AHEAD and ASTERN, and the speeds of STOP, FULL, EASY, STD. BY. and FIN. ENG. The ship’s pilot on the Bridge of a vessel sends his Orders for speed and direction to the to the Engine Room with the E.O.T. He moves the lever or levers, depending on the number of engines the ship has, to change the indicator on the Bridge Section’s dial to point in the new direction and speed of travel. This change causes the Orders to be duplicated on the Engine Room Section’s dial and a bell to signal the change simultaneously. The engineer then adjusts the ship’s engines and steering equipment to follow the pilot’s Order. The manufacturer, Mulne Bros., was a copper and brass works at 166 Sussex Street Sydney, in December 1892, and previously from 1870 at 128 to 130 Sussex Street. The company made and sold a wide range of equipment including machinery and gauges for the Railways.The Engine Room section is significant for being part of the communications system on the ship SS Rip, owned by Melbourne's Ports & Harbours department and used to service and maintain the navigation signals of Port Phillip Bay and at Queenscliffe in the mid-20th century. The dial is an example of marine equipment made in Australia and used for the safety of Victorian vessels. It is also significant for being made by an early Australian manufacturer, Milne Brothers of Sydney.Engine Room Section of a ship’s telegraph or Engine Order Telegraph (E.O.T.). The round metal dial has inscriptions stamped around the edges. The inscriptions are nautical terms for direction and speed and include the maker’s details. The dial was made by Milne Bros. of Sydney. It was part of the equipment on the "SS Rip" in Victoria.Black paint around dial: "MILNE BROS. / MAKERS / SYDNEY" "FULL EASY STD. BY " "FIN ENG. EASY FULL" ""ASTERN" "STOP" "AHEAD"flagstaff hill, warrnambool, maritime museum, maritime village, great ocean road, shipwreck coast, marine technology, marine communications, engine order telegraph, e.o.t., ship’s telegraph, bridge section, engine room section, ship’s engine telegraph section, marine telegraph, milne bros., milne brothers, sydney, copper and brass works, ports & harbours ship, ss rip, gunboat albert, service ship, maintenance ship -
 Orbost & District Historical Society
black and white photographs, August 21 1987
These photographs are of the final train to leave Orbost railway Station on August 21 1987 signalling the closure of the line. 3105.12 shows Locomotive T408 and on the side is written "LAST TRAIN EX ORBOST 24.8.87". These photographs are associated with the history of the Orbost-Bairnsdale railway line and therefore reflects the role that the rail line played in the social and economic history of Orbost. The closure of the line was a significant event in Orbost's history.Fifteen black / white photographs of the last train to leave Orbost Railway station.3105.1 - on back - "Last Train leaving Orbost Railway Station on Friday August 21. 1987. SRM August 26 1987 Last train from Orbost, Friday last saw the end of an era when the last freight train to pull out of Orbost Station at about 4.co pm. A symbolic wave from engineer, Bill Buckley, was the only ceremony to mark the passing of rail transport for East Gippsland." 3105.2 - on back - " Last train prepares to leave from Orbost on August 21, 1987." 3105.3 - on back - " The Orbost railhead following the departure of the last train on Friday August 21, 1987. Shows spectators who farewelled the last train." 3105.4 - on back - "From Grandview, Newmerella, shows the last train from Orbost crossing the timber Trestle (sic) viaduct across the Snowy River flats on Friday August 21, 1987" 3105.5 - on back - " A pair of Series 3 "T" Class Diesel Electric locomotives which were used to haul the final train from the Orbost Rail Head on Friday, August 21, 1987. Goods shed on right" 3105.6 - on back - " VFTY Timber Wagons at the Orbost Railway Station. 30 of these large wagons were built for the timber traffic between Orbost and Melbourne. Part of last train to leave Orbost on August 1, 1987." 3105.7 - on back - "The Fordson powered Rail Tractor which was used during shunting at the Orbost railway station, hooked up behind the second locomotive for its final journal from Orbost on Friday August 21, 1987." 3105.8 - on back - "Two Series 3 "T" Class Locomotives (Diesel Electric) were used to haul the final train from Orbost - T408 and T347, T408 was the leading locomotive. Orbost Goods Shed is on the left. Last train left on Friday August 27, 1987." 3105.9 - on back - " 3 "T" Class Diesel Electric locomotives often used in pairs to haul the timber trains out of Orbost. This locomotive was used to lead (haul) the final train from Orbost on Friday August 21, 1987" 3105.10 - on back - "The Gantry at the Orbost Railway Yards - capacity 10 tons. The last wagons before being hooked up to the locos for their last trip out of Orbost on Friday August 21, 1987" 3105.11 - on back - " Station Masters Office and Goods Shed at Orbost Railway Station. The two Series 3 "T" Class Diesel Electric locomotives waiting to haul the final train from Orbost on Friday 21 1987" otrbost-bairnsdale-railway east-gippsland-railway orbosr-railway-closure -
 Ringwood and District Historical Society
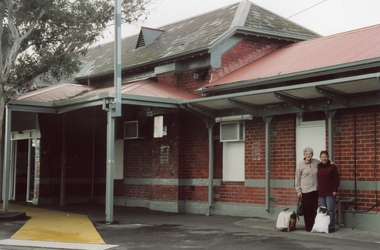
Photograph, Ringwood Railway Station before development- circa 2000
Coloured photograph"Written on back of photograph" Ringwood station before development. Signal box -
 Warrnambool and District Historical Society Inc.
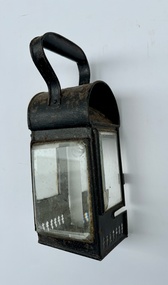
Functional object - Lantern with handle, c. 1900
This is a vintage item dating from the early 20th century. It is a hand-held lantern that could also have been hung from a ledge or wall. Lanterns of this type were often used by railway employees or ship's crew for signalling. The lighting was probably obtained by a candle as there is no evidence of an oil mechanism.This item is of interest because of its age and its possible use locally over a hundred years ago.This is a metal lantern painted black on the outside and silver-frosted inside. It has a rectangular-shaped body with bevelled glass, a semi-circular metal top and a metal handle. The hinged glass door on the side is missing.vintage lighting, hand-held metal lanterns -
 Glen Eira Historical Society
Article - Attwood Family
... Elsternwick Railway stations Signal Boxes Beena Avenue Murrumbeena ...Two items about the Attwood Family: A seventeen page computer typed copy of the memories of John Attwood, compiled by Colin Smith in January 2002. Includes memories of his childhood, contact and impressions of local identities including Merric Boyd and others; the retailers and business owners in the Murrumbeena area, the trains and railway stations, picture theatres and other businesses. A photocopy of an article taken from the Herald Sun newspaper 06/11/2007. Myra Attwood, wife of John, local business person in Murrumbeena Newsagency; includes brief local history of family and Myra’s personal hobbies, till the time of her death. Also a newspaper clipping of her death notice, unknown source and date.emily street, murrumbeena, elsternwick, railway stations, signal boxes, beena avenue, murrumbeena state school, primary schools, attwood john, attwood myra, attwood rhonda, attwood colin, attwood warren, attwood murray, attwood janine, attwood susan, attwood michael, attwood greg, attwood gerard, black bridge, outer circle railway, murrumbeena newsagency, newsagents, murrumbeena railway station, railway stations, book binders, stevens alf, sykes harold, attwood motors, neerim road, boyd merric, boyd mrs., timber houses, outbuildings, artists, trains, car parks, christie’s woodyard, ferguson cam, railway accidents, ardyne street, north road, dalny road, brett street, barnes family, newspapers, roads and streets, soils, flower growing, market gardens, world war 1939-1945, land subdivisions, air raid precautions, bicycles, drawing, springthorpe park, mass media, murrumbeena shopping centre, butcher shops, grocer shops, green grocers, shoe shops, confectionary shops, barber shops, beck george, bowyer ralph, rennie bill, bookmakers, presbyterian church, methodist church, hanna’s milk bar, sunday school, woodland bill, ssw grocery chain, drays, woodland alec, lee ron, jewellers, bakeries, fish shops, dressmakers, delicatessens, east bentleigh, selkrigs family, pottery, heads’ garage, head lindsay, head doug, head clarry, head ron, murrumbeena road, car retailers, petrol pumps, motor vehicle repair shops, billy one motors, bird mr., real estate agents, w.b. tonks and company, sparrow mr., pidgeon mr., hardware stores, florist shops, murrumbeena post office, tile shops, gardens, murrumbeena chamber of commerce, kiosks, gardeners, carnegie citizens band, spurway nursing home, argosy theatre, cinemas, dance halls, the capri, theatre groups, caulfield council, the blowfly train service, billiard rooms, printers, hammond olsen and company, l.j. miles and company, moody’s real estate agency, paddocks, flats, es&a bank murrumbeena, esanda bank murrumbeena, state savings bank murrumbeena, commonwealth bank murrumbeena, fuel merchants, hobart road, golden fleece service station, quince’s buses, bus services, ardyne street, timber yard, gow mr., railway parade, shell service station, pharmecies, house miss, bicycle shops, barnhill les mr., fliner mr., boot makers, widdop peter, moran and cato’s, grocers, pizza shop, car yards, classic caravan, o’brien kevin, wrought iron work, williams mr., candle making factory, lights, power tom, gates, fences, whitelaw monier tiles, whitelaw bill, hanna rex, dandenong road, cumloden grammar school, independent schools, emmaus rest house, oakdene, house names, taranto bob, hanson cab service, billy one motors, grey mr., horse troughs, horse drawn vehicle, taxis, board roy, buick cars, charleston’s bakery, carnegie, rosstown hotel, corum’s dairy, kangaroo road, reids dairy, dalny road, reid shaver, racehorses, cove’s dairy, wilson street, police, murrumbeena police station, dunoon street, murrumbeena park, footballers, gangs, liberal party, labour party, united australian party, uap, woodland alec, liquor shops, johnson suzanne, singers, taylor squizzy, boyd family, artists, criminals, skase christopher, skase charles, sunaria competition, herald and weekly times, ralph j.w., j.h. ralph butchers, butcher shops, pennington gardens, home units, flats, schrape frank, builder, smith colin, mansions, death registers, hockley myra, esperanto, book keepers, accountants, solicitors -
 Eltham District Historical Society Inc
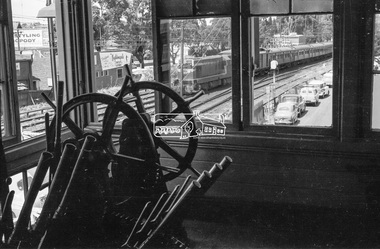
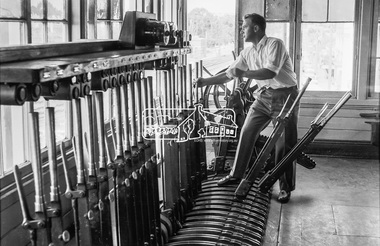
Photograph, George Coop, Box Hill Signal Box, c.Feb. 1964
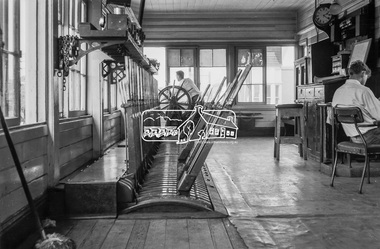
... Box Hill Railway Signal Box... Coop Collection Box Hill Railway Signal Box box hill railway ...A T-class diesel-electric locomotive can bee seen through the window hauling a Tait train. Also advertising on the buildings facing passing train passengers including 'Dialyn's Theatre Shoppe for Nightingale Tightlets & Leotards'. This is not a conventional suburban Tait ‘Red Rattler’ service. It may have come from Lilydale where trains from both Warburton and Healsville were combined to continue the run into Melbourne, a normal service for them at the time. It is unusual as the train is hauled by a diesel which also suggests it may have been a special excursion train from either of those two towns. Normally these combined trains would be hauled by two swing door ‘Red Rattlers’ motor coaches from Lilydale, the start/end of electric service. Digital TIFF file Scan of 35mm Ilford FP3 black and white transparencygeorge coop collection, box hill railway signal box, box hill railway station, signal box -
 Eltham District Historical Society Inc
Photograph, George Coop, Box Hill Signal Box, c.Feb. 1964
... Box Hill Railway Signal Box... melbourne George Coop Collection Box Hill Railway Signal Box box ...Digital TIFF file Scan of 35mm Ilford FP3 black and white transparencygeorge coop collection, box hill railway signal box, box hill railway station, signal box -
 Eltham District Historical Society Inc
Photograph, George Coop, Newport Signal Box, Newport Railway Station, c.1951
... Newport Signal Box, Newport Railway Station... melbourne Now demolished. Newport Railway station, visible through ...Now demolished. Newport Railway station, visible through the windows was situated on the opposite side of the Melbourne Road level crossing. All of this infrastructure has since been replaced by a large overpass, the level crossing now the location of a pedestrain underpass. One of several photos at Newport taken the same day in the early 1950s when George Coop was a secondary school student.Digital TIFF file Scan of Kopdak 620 black and white negative transparencygeorge coop collection, newport railway station, level crossing, melbourne road, newport signal box -
 Eltham District Historical Society Inc
Photograph, George Coop, View looking south from the Newport Signal Box, Newport Railway Station, c.1951
... View looking south from the Newport Signal Box, Newport.... George Coop Collection Newport Railway Station Newport Signal Box ...The pair of lines running to trhe left head to Williamstown. the central pair of lines are heading into the Newport Workshops and various stored trains are visible in the background and the pair of lines diverging to the right are heading to Geelong. One of several photos at Newport taken the same day in the early 1950s when George Coop was a secondary school student.Digital TIFF file Scan of Kopdak 620 black and white negative transparencygeorge coop collection, newport railway station, newport signal box -
 Eltham District Historical Society Inc
Photograph, George Coop, A Harris (Blue) electric train at the Station Street crossing, Box Hill, c.Feb. 1964
Viewed from Box Hill Signal Box Waiting at the level crossing is a Ford Zephyr MKII, registation GWH838 manufactured by Ford Australia in Geelong, (1956-1962) Cross Ref EDHS_04674-10 taken within minutes of this image. Digital TIFF file Scan of 35mm Kodachrome positive transparencygeorge coop collection, 515m, box hill, electric train, ford zephyr, gwh838, harris (blue) train, railway crossing, station street, level crossing -
 Eltham District Historical Society Inc
Folder, The Age et al, Centenary of the Eltham to Hurstbridge Railway extension, 2012
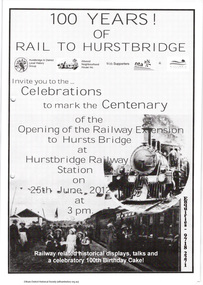
In 2012 local community groups acknowledged the centenary of the extension of the Railway line from Eltham to Hurstbridge which took place in 1912. Newspaper article: Automatic system signals the end of the station's tradition, The Age 20 June 2012. Material produced by Nillumbik Historical Society advertising centenary celebrations and providing history with photographs of the Eltham to Hurstbridge extension. The Heidelberg Historian newsletter of the Heidelberg Historical Society No 279, December 2013 (14 pages) including an article by David Watson "Prince's Bridge to Hurst's Bridge".29 pages, newspaper articleharry gilham collection, hurstbridge railway line, centenary celebrations, eltham railway station -
 Eltham District Historical Society Inc
Photograph, Steam locomotive D3-640 at Bendigo Railway Station, c November 1962
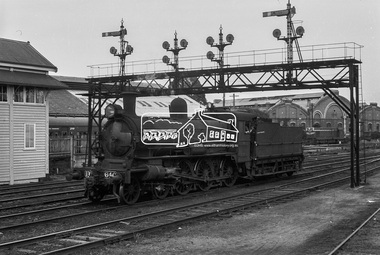
"Bendigo pilot D 640 ambles beneath the signal gantry and past B Box at Bendigo Station. The two depot sheds can be seen in the background" - Newsrail October 2020.Digital TIFF file Scan of 35mm Ilford FP3 black and white negative transparencybendigo, bendigo railway station, d3-640, d3-class steam locomotive, george coop collection -
 Eltham District Historical Society Inc
Photograph, George Coop, Box Hill Signal Box, c.Feb. 1964
... melbourne Box Hill Railway Station Box Hill Signal Box Digital TIFF ...Digital TIFF file Scan of 35mm Ilford FP3 black and white transparencybox hill railway station, box hill signal box -
 Eltham District Historical Society Inc
Photograph, George Coop, Box Hill Signal Box, c.Feb.1964
... melbourne Box Hill Railway Station Box Hill Signal Box Digital TIFF ...Digital TIFF file Scan of 35mm Ilford FP3 black and white transparencybox hill railway station, box hill signal box -
 Bendigo Military Museum
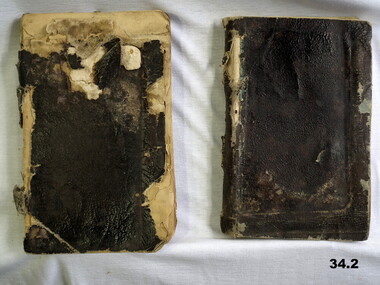
Book - DIARIES, c.WWI
The diaries belonged to Horace S. GIBSON, clerk with the Victorian Railways, Camberwell, No. 1817, 4th Div. Signal Coy. He enlisted on 6.7.1915 in the 12th reinforcements 1st Div Signal Coy. Embarked for Egypt 9.11.1915. Transferred to 4th Div Signal Coy 9.3.16. Embarked for France 2.6.1916. KIA Zonnebeke Belgium 23.9.1917. Horace Gibson was born in Bendigo. Diaries Volume 1 and Volume 2 are written in pen & ink, also contains sketches, names & addresses. Detailed account by day of the weather & what was eaten for each meal, as well as training, the war up to the morning he is killed in action.Inside cover of Volume 1: Horace Stanley Gibson, Clerk, Camberwell Victorian Railways Australia. Private address, c/o Mrs S E Gibson Barrell Street Eaglehawk, Victoria Australia. documents, diaries, personal notes, records, military history -
 Orbost & District Historical Society
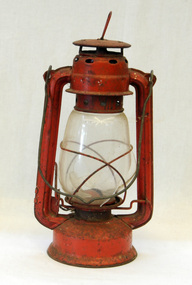
lantern, World Light MFY LTD, 1920's-1940's
This lantern could have been used for railway lighting. Railway lighting illuminated not only stations but also yards, engines, rolling stock, signals, signal-boxes and crossings. There were a number of different types of lamps used for a variety of railway purposes. This is a hand-held light.Railway lamps of this kind were significant railway items in their period of use as essential tools to the safe-working operations of the railway. Used domestically these lanterns were common in the period before the widespread connection of electricity. A painted red metal "hurricane" lamp which has a glass shade. This is a portable oil lantern which has an oil tank on the bottom that forms the base of the lamp. The tank has a door for filling and it also houses the wick and knob that increases or decreases the length of the wick.On base : No. 707 Globe Brand (globe of world) World Light MFY LTDlantern lighting hurricane-lamp -
 Ringwood and District Historical Society
Photographs, Ringwood Railway Station buildings circa 2000
... (No 2 Platform); 3. Ringwood signal box Ringwood Railway Station ...Collection of three Ringwood photographs:; 1. Ringwood Station (No 1 Platform); 2. Ringwood Station (No 2 Platform); 3. Ringwood signal box -
 Flagstaff Hill Maritime Museum and Village
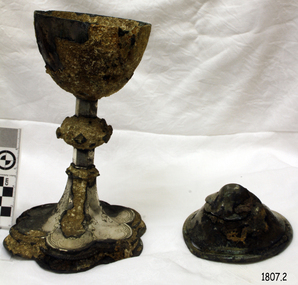
Ceremonial object - Ciborium and Lid, Before 1855
Ciborium is the ancient Greek word for the cup-shaped seed vessel of the Egyptian water lily "nelumbium speciosum" and came to describe a drinking cup made from that seed casing. These vessels were particularly common in ancient Egypt and the Greek East. The word "'ciborium'" was also used in classical Latin to describe such cups. In medieval Latin, and in English, "Ciborium" more commonly refers to a covered container used in Roman Catholic, Anglican, Lutheran and related churches to store the consecrated hosts of the sacrament of Holy Communion. It resembles the shape of a chalice but its bowl is more round than conical and takes its name from its cover, surmounted by a cross or other sacred design. This ciborium is part of a Communion Set that was recovered from the wreck of the Schomberg in 1975 after 120 years in the sea. Five years later during the cleaning of the ciborium, a diamond ring was found secreted in the underside of the ciborium's lid. This ring has since come to be called the Schomberg Diamond and is also on display as part of the Flagstaff Hill Museums Schomberg collection. In 1975, divers from Flagstaff Hill (Peter Ronald, former Director of Flagstaff Hill, Colin Goodall and Gary Hayden), found an ornate communion set at the Schomberg wreck site. The set comprised a jug, the ciborium, a chalice and a plate. The ciborium remained untouched for a number of years before restoration began and the marine growth was removed. In 1980 a piece of the lid broke off, revealing a glint of gold. As museum staff carefully examined the lid and removed marine growth, they found a diamond ring, which is currently on display in the Great Circle Gallery at Flagstaff Hill. The collection also holds ship fittings and equipment, personal effects, a lithograph, tickets as well as photographs from the Schomberg. ABOUT THE SCHOMBERG (October 6 to December 27, 1855)- When the ship Schomberg was launched in 1855, she was considered the most perfect clipper ship ever to be built. James Baine’s Black Ball Line had commissioned her for their fleet of passenger liners. The Aberdeen builders designed her to sail faster than the clippers designed the three-masted wooden clipper ship to be fast. The timber used for the diagonal planking was British oak with layers of Scottish larch. This luxury emigrant vessel was designed for superior comfort. She had ventilation ducts to provide air to the lower decks and a dining saloon, smoking room, library and bathrooms for the first-class passengers. The master for Schomberg’s maiden voyage was Captain ‘Bully’ Forbes. He drunkenly predicted at her launch that he would make the journey between Liverpool and Melbourne in 60 days. Schomberg departed Liverpool on 6 October 1855 with 430 passengers and 3000 tons of cargo including iron rails and equipment intended the build the Geelong Railway and a bridge over the Yarra from Melbourne to Hawthorn. The poor winds slowed Schomberg’s sail across the equator. She was 78 days out of Liverpool when she ran aground on a sand spit near Peterborough, Victoria, on 27 December; the sand spit and currents were not marked on Forbes’s map. The ship’s Chief Officer spotted the coastal steamer SS Queen at dawn and sent a signal. The master of the SS Queen approached the stranded vessel and all of Schomberg’s passengers safely disembarked.This ciborium is significant as an example of an item in common use in the mid-19th century that is still in use today. It is also important for it relationship with the famous Schomberg Diamond that was discovered by accident, hidden inside it. The ciborium is particularly significant in that along with other items from the wreck helped in part to have the legislation changed to protect shipwrecks, with far tighter controls being employed to oversee the salvaging of wreck sites around our coast. This salvaged item forms part of the Schomberg collection at Flagstaff Hill maritime museum. The collection as a whole is of historical and archaeological significance at a State level. Flagstaff Hill’s collection of artefacts from the Schomberg is also significant for its association with the Victorian Heritage Registered Schomberg shipwreck (VHR S 612). The collection is of additional significance because of the relationship between the objects salvaged, as together they help us to interpret the story of the Schomberg. The collection as a whole is historically significant for representing aspects of Victoria's maritime history and its potential to interpret social and historical themes from society at the time of the wreck.Silver engraved Ciborium or chalice with lid, part of the five-piece Communion Set. The chalice is a round cup with a long stem and a floral-shaped base with embossed decoration. It has a matching round lid that comes to a rounded apex on top. Engravings on chalice feature flowers and a Fleur-de-lis pattern.flagstaff hill, flagstaff hill maritime museum and village, warrnambool, maritime museum, maritime village, great ocean road, shipwreck coast, schomberg, 1855, clipper ship, james baines & co, black ball line, luxury ship, emigrant ship, captain forbes, bully forbes, ss queen, peterborough shipwreck, communion set, religious service, communion service, ceremonial service, mass, ciborium, chalice, schomberg diamond -
 Flagstaff Hill Maritime Museum and Village
Decorative object - Buggy Fitting, Circa 1855
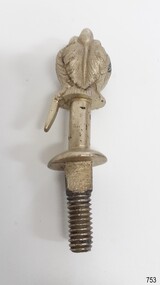
This ornate fitting for a horse-drawn vehicle was amongst the items recovered from the Schomberg over one hundred years after it was wrecked. ABOUT THE SCHOMBERG (October 6 to December 27, 1855)- When the ship Schomberg was launched in 1855, she was considered the most perfect clipper ship ever to be built. James Baine’s Black Ball Line had commissioned her for their fleet of passenger liners. The Aberdeen builders designed her to sail faster than the clippers designed the three-masted wooden clipper ship to be fast. The timber used for the diagonal planking was British oak with layers of Scottish larch. This luxury emigrant vessel was designed for superior comfort. She had ventilation ducts to provide air to the lower decks and a dining saloon, smoking room, library and bathrooms for the first-class passengers. The master for Schomberg’s maiden voyage was Captain ‘Bully’ Forbes. He drunkenly predicted at her launch that he would make the journey between Liverpool and Melbourne in 60 days. Schomberg departed Liverpool on 6 October 1855 with 430 passengers and 3000 tons of cargo including iron rails and equipment intended the build the Geelong Railway and a bridge over the Yarra from Melbourne to Hawthorn. The poor winds slowed Schomberg’s sail across the equator. She was 78 days out of Liverpool when she ran aground on a sand spit near Peterborough, Victoria, on 27 December; the sand spit and currents were not marked on Forbes’s map. The ship’s Chief Officer spotted the coastal steamer SS Queen at dawn and sent a signal. The master of the SS Queen approached the stranded vessel and all of Schomberg’s passengers safely disembarked. In 1975, 120 years after the Schomberg was wrecked, divers from Flagstaff Hill found an ornate communion set at the wreck site along with many other artefacts. In 1978 a diamond ring was discovered under the concretion in the lid of the communion set, which is currently on display. Former Director of Flagstaff Hill, Peter Ronald, had salvaged most of the artefacts from the wreck. The Schomberg has historical significance as one of the first luxurious ships built to bring emigrants to Australia to cash in on the gold rush era. And is included on the Victorian Heritage Register (VHR S612). The collection of Schomberg artefacts held at Flagstaff Hill Museum is primarily significant because of the relationship between these recovered items having a high potential to interpret the story of the Schomberg and its foundering during a storm. The shipwreck is of additional historically significance for representing aspects of Victoria’s shipping history and for its association with the first passenger ship, which was designed not only to be the fastest and most luxurious of its day but foundered on its maiden voyage to Australia.Ornate buggy or coach fitting with feather plumes on top, and a screw thread on the bottom. Silver plated,.warrnambool, flagstaff-hill, flagstaff-hill-maritime-museum, shipwreck-coast, flagstaff-hill-maritime-village, schomberg, shipwrecked-artefact, clipper ship, black ball line, 1855 shipwreck, aberdeen clipper ship, captain forbes, peterborough shipwreck, ss queen, artifact, ornate fitting, buggy fitting -
 Flagstaff Hill Maritime Museum and Village
Plant specimen - Wood Sample, Alexander Hall and Son, ca. 1855
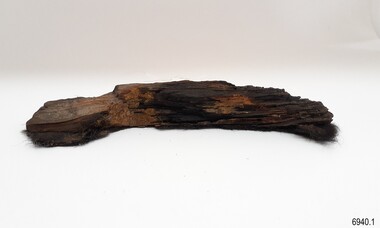
The wood sample is one of two pieces in the Collection from the wreck of the sailing ship Schomberg that were carried on the tides and discovered on a New Zealand beach along the coast. The samples have been positively identified scientifically as part of the timber from the Schomberg. ABOUT THE SCHOMBERG (October 6 to December 27, 1855)- When the ship Schomberg was launched in 1855, she was considered the most perfect clipper ship ever to be built. James Baines Black Ball Line had commissioned her for their fleet of passenger liners. The Aberdeen builders designed her to sail faster than the clippers designed the three-masted wooden clipper ship to be fast. The timber used for the diagonal planking was British oak with layers of Scottish larch. This luxury emigrant vessel was designed for superior comfort. She had ventilation ducts to provide air to the lower decks and a dining saloon, smoking room, library and bathrooms for the first-class passengers. The master for Schomberg’s maiden voyage was Captain ‘Bully’ Forbes. He drunkenly predicted at her launch that he would make the journey between Liverpool and Melbourne in 60 days. Schomberg departed Liverpool on 6 October 1855 with 430 passengers and 3000 tons of cargo including iron rails and equipment intended the build the Geelong Railway and a bridge over the Yarra from Melbourne to Hawthorn. The poor winds slowed Schomberg’s sail across the equator. She was 78 days out of Liverpool when she ran aground on a sand spit near Peterborough, Victoria, on 27 December; the sand spit and currents were not marked on Forbes’s map. The ship’s Chief Officer spotted the coastal steamer SS Queen at dawn and sent a signal. The master of the SS Queen approached the stranded vessel and all of Schomberg’s passengers safely disembarked. In 1975, 120 years after the Schomberg was wrecked, divers from Flagstaff Hill found an ornate communion set at the wreck site along with many other artefacts. In 1978 a diamond ring was discovered under the concretion in the lid of the communion set, which is currently on display. Former Director of Flagstaff Hill, Peter Ronald, had salvaged most of the artefacts from the wreck. This wood sample is significant for its connection with the wreck of the Schomberg, as part of the vessel's structure. It is scientifically important as evidence that shipwreck relics can move a long way for the site of the wreck. The Schomberg collection as a whole is of historical and archaeological significance at a State level. Flagstaff Hill’s collection of artefacts from the Schomberg is also significant for its association with the Victorian Heritage Registered shipwreck (VHR S 612). The collection is of prime significance because of the relationship between the objects salvaged, as together they help us to interpret the story of the Schomberg. The collection as a whole is historically significant for representing aspects of Victoria's maritime history and its potential to interpret social and historical themes.Wood sample with layers of different coloured timber. The sample has holes along a portion of the edge and a fur-like appearance along one side. In places it has the appearance of charcoal. The sample is a piece of the hull from the wreck of the Schomberg. The sample was washed up on a beach on the coast of New Zealand. flagstaff hill, flagstaff hill maritime museum and village, warrnambool, maritime museum, maritime village, great ocean road, shipwreck coast, schomberg, 1855, clipper ship, black ball line, luxury ship, emigrant ship, captain forbes, bully forbes, ss queen, wood sample, new zealand, james baines & co -
 Flagstaff Hill Maritime Museum and Village
Plant specimen - Wood Sample, Alexander Hall and Son, ca. 1855
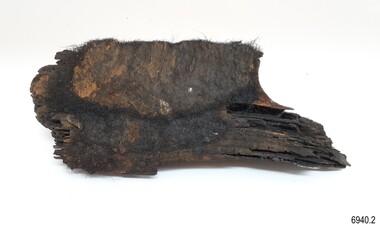
The wood sample is one of two pieces in the Collection from the wreck of the sailing ship Schomberg that were carried on the tides and discovered on a New Zealand beach along the coast. The samples have been positively identified scientifically as part of the timber from the Schomberg. ABOUT THE SCHOMBERG (October 6 to December 27, 1855)- When the ship Schomberg was launched in 1855, she was considered the most perfect clipper ship ever to be built. James Baines Black Ball Line had commissioned her for their fleet of passenger liners. The Aberdeen builders designed her to sail faster than the clippers designed the three-masted wooden clipper ship to be fast. The timber used for the diagonal planking was British oak with layers of Scottish larch. This luxury emigrant vessel was designed for superior comfort. She had ventilation ducts to provide air to the lower decks and a dining saloon, smoking room, library and bathrooms for the first-class passengers. The master for Schomberg’s maiden voyage was Captain ‘Bully’ Forbes. He drunkenly predicted at her launch that he would make the journey between Liverpool and Melbourne in 60 days. Schomberg departed Liverpool on 6 October 1855 with 430 passengers and 3000 tons of cargo including iron rails and equipment intended the build the Geelong Railway and a bridge over the Yarra from Melbourne to Hawthorn. The poor winds slowed Schomberg’s sail across the equator. She was 78 days out of Liverpool when she ran aground on a sand spit near Peterborough, Victoria, on 27 December; the sand spit and currents were not marked on Forbes’s map. The ship’s Chief Officer spotted the coastal steamer SS Queen at dawn and sent a signal. The master of the SS Queen approached the stranded vessel and all of Schomberg’s passengers safely disembarked. In 1975, 120 years after the Schomberg was wrecked, divers from Flagstaff Hill found an ornate communion set at the wreck site along with many other artefacts. In 1978 a diamond ring was discovered under the concretion in the lid of the communion set, which is currently on display. Former Director of Flagstaff Hill, Peter Ronald, had salvaged most of the artefacts from the wreck. This wood sample is significant for its connection with the wreck of the Schomberg, as part of the vessel's structure. It is scientifically important as evidence that shipwreck relics can move a long way for the site of the wreck. The Schomberg collection as a whole is of historical and archaeological significance at a State level. Flagstaff Hill’s collection of artefacts from the Schomberg is also significant for its association with the Victorian Heritage Registered shipwreck (VHR S 612). The collection is of prime significance because of the relationship between the objects salvaged, as together they help us to interpret the story of the Schomberg. The collection as a whole is historically significant for representing aspects of Victoria's maritime history and its potential to interpret social and historical themes.Wood sample with layers of different coloured timber. The sample has holes along a portion of the edge and a fur-like appearance along one side. In places it has the appearance of charcoal. The sample is a piece of the hull from the wreck of the Schomberg. The sample was washed up on a beach on the coast of New Zealand. flagstaff hill, flagstaff hill maritime museum and village, warrnambool, maritime museum, maritime village, great ocean road, shipwreck coast, schomberg, 1855, clipper ship, black ball line, luxury ship, emigrant ship, captain forbes, bully forbes, ss queen, wood sample, new zealand, james baines & co -
 Flagstaff Hill Maritime Museum and Village
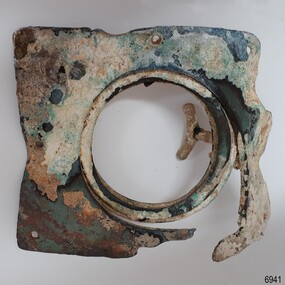
Functional object - Porthole Frame, Alexander Hall and Son, ca. 1855
The porthole was recovered from the wreck of the clipper ship Schomberg. ABOUT THE SCHOMBERG (October 6 to December 27, 1855)- When the ship Schomberg was launched in 1855, she was considered the most perfect clipper ship ever to be built. James Baines Black Ball Line had commissioned her for their fleet of passenger liners. The Aberdeen builders designed her to sail faster than the clippers designed the three-masted wooden clipper ship to be fast. The timber used for the diagonal planking was British oak with layers of Scottish larch. This luxury emigrant vessel was designed for superior comfort. She had ventilation ducts to provide air to the lower decks and a dining saloon, smoking room, library and bathrooms for the first-class passengers. The master for Schomberg’s maiden voyage was Captain ‘Bully’ Forbes. He drunkenly predicted at her launch that he would make the journey between Liverpool and Melbourne in 60 days. Schomberg departed Liverpool on 6 October 1855 with 430 passengers and 3000 tons of cargo including iron rails and equipment intended the build the Geelong Railway and a bridge over the Yarra from Melbourne to Hawthorn. The poor winds slowed Schomberg’s sail across the equator. She was 78 days out of Liverpool when she ran aground on a sand spit near Peterborough, Victoria, on 27 December; the sand spit and currents were not marked on Forbes’s map. The ship’s Chief Officer spotted the coastal steamer SS Queen at dawn and sent a signal. The master of the SS Queen approached the stranded vessel and all of Schomberg’s passengers safely disembarked. In 1975, 120 years after the Schomberg was wrecked, divers from Flagstaff Hill found an ornate communion set at the wreck site along with many other artefacts. In 1978 a diamond ring was discovered under the concretion in the lid of the communion set, which is currently on display. Former Director of Flagstaff Hill, Peter Ronald, had salvaged most of the artefacts from the wreck. This porthole is significant as an example of an ship's fitting in common use in the mid-19th century. The Schomberg collection as a whole is of historical and archaeological significance at a State level. Flagstaff Hill’s collection of artefacts from the Schomberg is also significant for its association with the Victorian Heritage Registered shipwreck (VHR S 612). The collection is of prime significance because of the relationship between the objects salvaged, as together they help us to interpret the story of the Schomberg. The collection as a whole is historically significant for representing aspects of Victoria's maritime history and its potential to interpret social and historical themes.Porthole frame. Square thick metal plate with formed holes for fixing. Central round opening in the plate is fitted with a hinged round frame with a handle opposite the hinge. Bolts are embedded in the inner frame. The surface is encrusted and the plate is broken near one corner. The frame was recovered from the wreck of the Schomberg.flagstaff hill, flagstaff hill maritime museum and village, warrnambool, maritime museum, maritime village, great ocean road, shipwreck coast, schomberg, 1855, clipper ship, black ball line, luxury ship, emigrant ship, captain forbes, bully forbes, ss queen, james baines & co, porthole frame -
 Flagstaff Hill Maritime Museum and Village
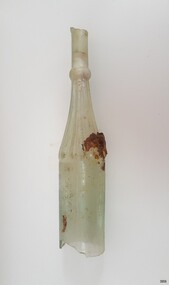
Container - Bottle, Ca. 1855
The slim, green-tinged clear glass condiment bottle was possibly used for storing and serving sauce or salad oil. The handmade bottle would have had an applied lip. It has hand blown into a two-piece mould that finished just below the neck ring, with the rest of the neck and mouth hand blown. It was recovered from the wreck of the Schomberg. ABOUT THE SCHOMBERG (October 6 to December 27, 1855)- When the ship Schomberg was launched in 1855, she was considered the most perfect clipper ship ever to be built. James Baine’s Black Ball Line had commissioned her for their fleet of passenger liners. The Aberdeen builders designed her to sail faster than the clippers designed the three-masted wooden clipper ship to be fast. The timber used for the diagonal planking was British oak with layers of Scottish larch. This luxury emigrant vessel was designed for superior comfort. She had ventilation ducts to provide air to the lower decks and a dining saloon, smoking room, library and bathrooms for the first-class passengers. The master for Schomberg’s maiden voyage was Captain ‘Bully’ Forbes. He drunkenly predicted at her launch that he would make the journey between Liverpool and Melbourne in 60 days. Schomberg departed Liverpool on 6 October 1855 with 430 passengers and 3000 tons of cargo including iron rails and equipment intended the build the Geelong Railway and a bridge over the Yarra from Melbourne to Hawthorn. The poor winds slowed Schomberg’s sail across the equator. She was 78 days out of Liverpool when she ran aground on a sand spit near Peterborough, Victoria, on 27 December; the sand spit and currents were not marked on Forbes’s map. The ship’s Chief Officer spotted the coastal steamer SS Queen at dawn and sent a signal. The master of the SS Queen approached the stranded vessel and all of Schomberg’s passengers safely disembarked. In 1975, 120 years after the Schomberg was wrecked, divers from Flagstaff Hill found an ornate communion set at the wreck site along with many other artefacts. In 1978 a diamond ring was discovered under the concretion in the lid of the communion set, which is currently on display. Former Director of Flagstaff Hill, Peter Ronald, had salvaged most of the artefacts from the wreck. This bottle is significant as an example of an item in common use in the mid-19th century. The Schomberg collection as a whole is of historical and archaeological significance at a State level. Flagstaff Hill’s collection of artefacts from the Schomberg is also significant for its association with the Victorian Heritage Registered shipwreck (VHR S 612). The collection is of prime significance because of the relationship between the objects salvaged, as together they help us to interpret the story of the Schomberg. The collection as a whole is historically significant for representing aspects of Victoria's maritime history and its potential to interpret social and historical themes.Bottle; slim, round, clear, slightly green-tinged, glass condiment bottle, possibly for salad oil or sauce. Handmade bottle with a broken and missing lip and base. The neck is straight and plain down to a high horizontal neck ring. The neck then flares outward towards the shoulder with a vertical ribbed design, finished with a scalloped border on the top of the body. The body has straight sides. Side seams run from below the neck ring to the heel. The glass has imperfections, bubbles and an uneven surface. There is brown sediment on its shoulder. A long white plug is in the narrow part of the neck. The bottle was recovered from the wreck of the Schomberg.flagstaff hill, warrnambool, flagstaff hill maritime museum, maritime museum, shipwreck coast, flagstaff hill maritime village, great ocean road, shipwreck artefact, john chance, glass bottle, antique bottle, handmade, mouth blown, blown bottle, 19th century bottle, collectable, bottle, two piece mould, food bottle, oil bottle, salad oil bottle, sauce bottle, condiments bottle, neck ring, ribbed sides -
 Flagstaff Hill Maritime Museum and Village
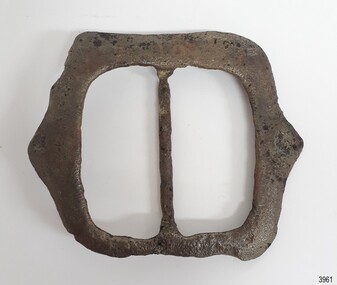
Equipment - Harness Buckle, Ca. 1855
Harness fittings like this buckle were amongst the cargo on the sailing ship Schomberg. ABOUT THE SCHOMBERG (October 6 to December 27, 1855)- When the ship Schomberg was launched in 1855, she was considered the most perfect clipper ship ever to be built. James Baine’s Black Ball Line had commissioned her for their fleet of passenger liners. The Aberdeen builders designed her to sail faster than the clippers designed the three-masted wooden clipper ship to be fast. The timber used for the diagonal planking was British oak with layers of Scottish larch. This luxury emigrant vessel was designed for superior comfort. She had ventilation ducts to provide air to the lower decks and a dining saloon, smoking room, library and bathrooms for the first-class passengers. The master for Schomberg’s maiden voyage was Captain ‘Bully’ Forbes. He drunkenly predicted at her launch that he would make the journey between Liverpool and Melbourne in 60 days. Schomberg departed Liverpool on 6 October 1855 with 430 passengers and 3000 tons of cargo including iron rails and equipment intended the build the Geelong Railway and a bridge over the Yarra from Melbourne to Hawthorn. The poor winds slowed Schomberg’s sail across the equator. She was 78 days out of Liverpool when she ran aground on a sand spit near Peterborough, Victoria, on 27 December; the sand spit and currents were not marked on Forbes’s map. The ship’s Chief Officer spotted the coastal steamer SS Queen at dawn and sent a signal. The master of the SS Queen approached the stranded vessel and all of Schomberg’s passengers safely disembarked. In 1975, 120 years after the Schomberg was wrecked, divers from Flagstaff Hill found an ornate communion set at the wreck site along with many other artefacts. In 1978 a diamond ring was discovered under the concretion in the lid of the communion set, which is currently on display. Former Director of Flagstaff Hill, Peter Ronald, had salvaged most of the artefacts from the wreck.This object is significant as an example of an item in common use in the mid-19th century. The Schomberg collection as a whole is of historical and archaeological significance at a State level. Flagstaff Hill’s collection of artefacts from the Schomberg is also significant for its association with the Victorian Heritage Registered shipwreck (VHR S 612). The collection is of prime significance because of the relationship between the objects salvaged, as together they help us to interpret the story of the Schomberg. The collection as a whole is historically significant for representing aspects of Victoria's maritime history and its potential to interpret social and historical themes.Buckle, square, large, for a horse harness. The silver-plated surface has damage from exposure to the sea. It has been lacquered since its recovery from the wreck of the Schomberg.flagstaff hill, flagstaff hill maritime museum and village, warrnambool, maritime museum, maritime village, great ocean road, shipwreck coast, schomberg, 1855, clipper ship, james baines & co, black ball line, luxury ship, emigrant ship, captain forbes, bully forbes, ss queen, peterborough shipwreck, harnes fitting, horse brass, buckle, horse harness, horse harness buckle -
 Flagstaff Hill Maritime Museum and Village
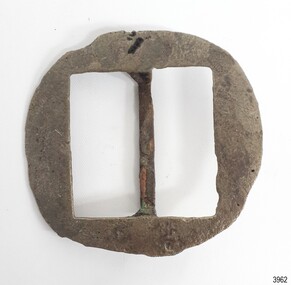
Equipment - Harness Buckle, Ca. 1855
Harness fittings like this buckle were amongst the cargo on the sailing ship Schomberg. ABOUT THE SCHOMBERG (October 6 to December 27, 1855)- When the ship Schomberg was launched in 1855, she was considered the most perfect clipper ship ever to be built. James Baine’s Black Ball Line had commissioned her for their fleet of passenger liners. The Aberdeen builders designed her to sail faster than the clippers designed the three-masted wooden clipper ship to be fast. The timber used for the diagonal planking was British oak with layers of Scottish larch. This luxury emigrant vessel was designed for superior comfort. She had ventilation ducts to provide air to the lower decks and a dining saloon, smoking room, library and bathrooms for the first-class passengers. The master for Schomberg’s maiden voyage was Captain ‘Bully’ Forbes. He drunkenly predicted at her launch that he would make the journey between Liverpool and Melbourne in 60 days. Schomberg departed Liverpool on 6 October 1855 with 430 passengers and 3000 tons of cargo including iron rails and equipment intended the build the Geelong Railway and a bridge over the Yarra from Melbourne to Hawthorn. The poor winds slowed Schomberg’s sail across the equator. She was 78 days out of Liverpool when she ran aground on a sand spit near Peterborough, Victoria, on 27 December; the sand spit and currents were not marked on Forbes’s map. The ship’s Chief Officer spotted the coastal steamer SS Queen at dawn and sent a signal. The master of the SS Queen approached the stranded vessel and all of Schomberg’s passengers safely disembarked. In 1975, 120 years after the Schomberg was wrecked, divers from Flagstaff Hill found an ornate communion set at the wreck site along with many other artefacts. In 1978 a diamond ring was discovered under the concretion in the lid of the communion set, which is currently on display. Former Director of Flagstaff Hill, Peter Ronald, had salvaged most of the artefacts from the wreck.This object is significant as an example of an item in common use in the mid-19th century. The Schomberg collection as a whole is of historical and archaeological significance at a State level. Flagstaff Hill’s collection of artefacts from the Schomberg is also significant for its association with the Victorian Heritage Registered shipwreck (VHR S 612). The collection is of prime significance because of the relationship between the objects salvaged, as together they help us to interpret the story of the Schomberg. The collection as a whole is historically significant for representing aspects of Victoria's maritime history and its potential to interpret social and historical themes.Buckle for a horse harness. The silver-plated surface has been damaged from exposure to the sea. It has been lacquered since its recovery from the wreck of the Schomberg.flagstaff hill, flagstaff hill maritime museum and village, warrnambool, maritime museum, maritime village, great ocean road, shipwreck coast, schomberg, 1855, clipper ship, james baines & co, black ball line, luxury ship, emigrant ship, captain forbes, bully forbes, ss queen, peterborough shipwreck, harnes fitting, horse brass, buckle, horse harness, horse harness buckle