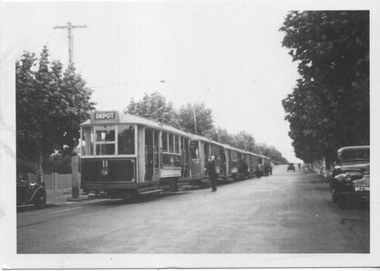
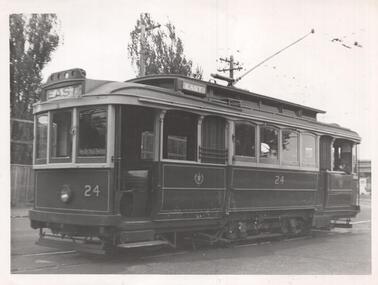
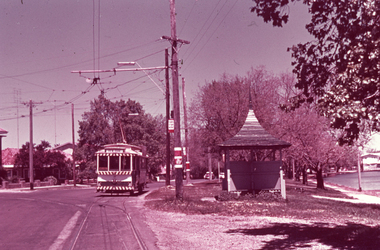
Showing 232 items
matching railway terminus
-
 Nillumbik Shire Council
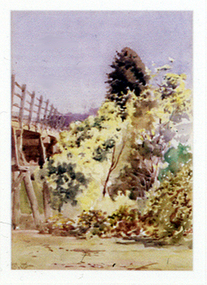
Painting: Walter WITHERS (b.1854 Warwickshire, UK — d.1914 Eltham, Aus), Trestle Bridge, Eltham, c.1903-10
Walter Withers was a significant Australian landscape artist and a member of the Heidelberg School of Australian Impressionists. In 1903 Withers bought 'Southernwood', a house on 2½ acres (1 ha) at Eltham, to which he added a studio. Because of ill health, he lived during the week at his studio in Oxford Chambers, Melbourne, and on weekends and holidays with his family at Eltham until his death in 1914. The Eltham rail bridge is a unique and valuable historic relic of an earlier steam locomotive transport era in the Diamond Creek Valley and has long formed an important part of a magnificent Eltham landscape. When built in 1902 it was close to the terminus point of the Heidelberg-Eltham rail extension, on the route of the proposed Diamond Valley Railway that was then planned to continue much further up the valley towards Kinglake. This bridge is situated in attractive river-valley parkland amidst the tall and spreading manna gums and candlebarks of the Diamond Creek Valley. The Alistair Knox Park river-valley landscape, of which the timber trestle bridge is an important visual component, has been classified by the National Trust. Large manna gum and candlebark trees adorn the adjacent creek banks, and historic Shillinglaw Cottage is also part of this much-prized Eltham landscape. Eltham is home to a historic wooden railway trestle bridge. Mainly of timber-pier and timber-beam construction, but varied by a few longer steel-joists spans on timber piers at the main stream channel, this substantial bridge has almost two hundred metres of timber deck. Built in 1902, it is the only railway bridge of predominantly timber construction that is still in regular use as an integral part of Melbourne's metropolitan electric railway network and one of extremely few timber rail bridges in the State that still carry trains. Apart from its important continuing social function as a carrier of rail transport for the Hurstbridge line, this impressive bridge and its beautiful parkland environs contribute much to the character of Eltham township and that town's special reputation as an historic centre of environmental and conservation concerns. This section of the Diamond Creek Valley was the subject of a Walter Withers painting in the earliest years of the twentieth century and has strong historic links with our Heidelberg School of painters. Watercolour painting on paper of Eltham's Trestle Bridge in the middle of the day. A small section of the wooden bridge is located to the left of the painting. The focus is predominately on the wattle, manna gum and candlebark trees that is to the right of the bridge. The golden hues typically represent the australian sunlight and landscape. "W.W" in gothic script on the lower right side of the painting. Not dated. withers, eltham, trestle bridge, railway, watercolour -
 Whitehorse Historical Society Inc.
Photograph - Coloured photograph, Blackburn Railway Station, 2/08/1979 12:00:00 AM
Coloured photo of Blackburn Railway Station. A third track is being laid to cope with the station being used as a terminus while reconstruction work is carried out at Box Hill railway station. Photo looking east.blackburn railway station, blackburn -
 Whitehorse Historical Society Inc.
Photograph - Coloured photograph, Blackburn Railway Station Car Park, 2/08/1979
... Coloured photo of Blackburn Railway Station area. New... and platform being added for a terminus while Box Hill Railway station ...Coloured photo of Blackburn Railway Station area. New third track and platform being added for a terminus while Box Hill Railway station alterations are made.blackburn railway station, car park -
 Ballarat Tramway Museum
Postcard - Set of 6 and background card, Ken Flood, "Launceston Municipal Tramways"
The Postcards show trams of Launceston which operated from 1911 to 1952, published by International Railway Postcards of Launceston. The background card gives a short history of Launceston trams and the reproduction of two tickets. 1 - Postcard 1 - No. 11 leads a line up of cars in Elphin Road - Ken Flood 6-3-1948 2 - No 27, Mumford St loop - Ken Flood - 9-10-1948 3 - No. 24 Wellington St, photo Ken Flood, 26-2-1949 4 - No. 9 turns from George St into Cameron St - 25-9-1948 - Photo Ken Flood 5 - No. 26 - Talbot Road terminus - 1-11-1948 - Ken Flood 6 - No. 9 Elphin Road, 13-10-1948 - Ken Flood Yields information about Launceston trams, the Museum having No 14 on display, No. 14 from 2022.Set of 6 black and white postcards and a story card. Each have a caption on the rear and a place for a stamp and address.launceston, tramways, tramcars -
 Ballarat Tramway Museum
Photograph - Black & White Photograph/s, CLC, 1950
Yields information about Geelong trams in the late 1940's on the Chilwell - East - West lines.Black and White photograph of Geelong No. 24 at the West terminus. Tram has the destination of East. About 1954. Photo by CLC - General Manager of the Wombat Hill Railway,On the rear in pencil "With compliments by General Manager of the Wombat Hill Railway, Printed by the Public Relations Publicity Dept Wombat Hill railway, Geelong No. 24 West terminus about 1950." Has the Keith Kings number "CLC-8" in top right hand corner.trams, tramways, geelong, east, west, tram 24 -
 Ballarat Tramway Museum
Slide - 35mm slide/s - set of 2, Noel Simons, Nov. 1970
Set of 2 Kodak Ready-mount with slides made from the Association of Railway Enthusiast Provincial Tramways film strip. 1166.1 - No. 31 at the View Point terminus, corner of Wendouree Parade and Macarthur St., shows tram and section arrangements on poles. Also has SEC tramway shelter alongside stop. Tram has destination of "View Point" 1166.2 - No. 38 crossing Albert St. en route to Sebastopol.1166.1 - "No. 21 at View Point terminus. Line of left is that for cars on "Gardens via Drummond St. Nth" route." 1166.2 - "No. 38 crossing Albert St. near Sebastopol terminus" All have date stamp of "Nov. 1970" in blue ink. Writing in blue ink.tramways, trams, view point, wendouree parade, albert st, sebastopol, tram 21, tram 38 -
 Ballarat Tramway Museum
Slide - 35mm slide/s - set of 9, Noel Simons, Sept. 1971
Set of 9 Kodak Ready-mount with slides made from the Association of Railway Enthusiast Provincial Tramways film strip. Reference Item 2560 details the ARE Film Strip, and provide references to other slides. See also Reg. item 1164. 1174.9 on plain white mount. 1174.1 - Tram 40 North bound for Lydiard St. North at the Railway Gates, with the gates closed. Tram carrying a heavy load of passengers. Railway station building and car park in background. Taken from the signal box. 1174.2 - Tram 12 bound for Gardens, photographed across the median strip plantation near Dawson St. Image i2a - adjusted 9/2021 to remove colour cast. 1174.3 - Tram 43 in bound along Wendouree Parade near Barrett Ave, passing a former tram stop and with "Warning Oncoming Trams" sign mounted on an adjacent pole. See also Reg. item 1172.1 for a photo taken in May 1971. This photo taken after the closure of the Victoria St. line, as the tram stop has been painted out. 1174.4 - Looking along the track to Sebastopol terminus on the west side of Albert St. - telephoto shot showing bogie tram in the far distance. Shows the nature of the track, poles, tram stop frequency and in the fare distance the terminus. Also show the trees that used to be along this section of the track. 1174.5 - No. 42 showing "Special" in Macarthur St. approaching Drummond St. north. Photo taken from under the verandah of a shop on the south side of the street that were many years later to become the Tramcar Restaurant. Note metal fence to cemetery. 1174.6 - Nos. 21 (Sebastopol) crossing 14 (Lydiard St. Nth) at the loop between Sayle and Grey St. Photo taken looking south. 1174.7 - No. 12 bound for Mt Pleasant, in Bridge St. about to stop at the junction for the two routes. Telephoto photo looking west along Bridge St. with many cars in the photo. Very few people on the street itself. 1174.8 - No. 30 and 17 at the City Terminus, on the north side of Sturt St. Taken from the Post Office corner with the Town Hall in the background. 1174.9 - No. 39 inbound along Sturt St. West. with many cars on the road. Bus stop on a pole on the other side of the road.1174.1 - "No. 40 on Lydiard St. North service waits at the level crossing at Ballarat Railway Station." 1174.2 - "No. 12 bound for 'Gardens' seen across the centre plantation in Sturt St." 1174.3 - "Barrett Ave." 1174.4 - "The Sebastopol route near the terminus" 1174.6 - "Nos. 21 and 14 crossing at Sayle St. Loop on Sebastopol route" 1174.7 - "No. 12 at Eastern end of Bridge St." 1174.8 - "Nos. 30 and 17 in Sturt St. at Cnr of Lydiard St." 1174.9 - "No. 39 City bound from 'Gardens" in Sturt St. West" All have date stamp of "Sep 1971" in black ink. Writing in blue ink.tramways, trams, lydiard st. nth, railway crossing, sturt st, wendouree parade, sebastopol, macarthur st., bridge st., sturt st. west, tram 12, tram 14, tram 17, tram 21, tram 30, tram 39, tram 40, tram 42, tram 43 -
 Ballarat Tramway Museum
Slide - 35mm slide/s, Noel Simons, 21/11/1962 12:00:00 AM
Set of 6 transparencies taken on 21/11/1962 on Kodak mounts. 1189.1 - Bendigo No.11 at Quarry Hill terminus. Photo taken looking in along the route. Tram has destination of North Bendigo. 1189.2 - No. 21 in Pall Mall bound for North Bendigo. Tram has roof ads for Mamouney's furniture and SEC. In the background are the National Bank building, Dad and Dave's Cafe and the Beehive Buildings and the London Pharmacy. 1189.3 - No. 2 in Mitchell St, just after crossing over railway bridge. Photo taken after tram has passed photographer. Has what appears to be an SEC road works crew in the background. Has destination of Quarry Hill. 1189.4 - No. 17 climbing Mitchell St. on the start of the single track section, just before crossing the railway bridge. Has destination of Quarry Hill and the large Maples building sign in the background. 1189.5 - as for 1189.4 but after tram has passed photographer. Has an Ilford film roof ad and an SEC roof ad. Railway bridge in the background. 1189.6 - No. 21 at Charing Cross with passengers boarding. Tram has destination of North Bendigo and roof ads for SEC 'Electric Cooking' and Sandhurst Milk. In background are the buildings on the south side of High St. Also has a SEC worker in white overalls sweeping the track.Information written on in black ink and date stamped on purple ink. 1189.1 - "Birney car No. 11 in High St. Bendigo at Golden Square terminus" 1189.2 - "No. 21 in Pall Mall Bendigo near Charing Cross" 1189.3 - "No. 2 in Mitchell St. Bendigo, just after crossing bridge over railway line (Quarry Hill route)" 1189.4 - "No. 17 in Mitchell St. Bendigo, climbing the hill the bridge over the railway line. (Quarry Hill route)" 1189.5 - "No. 17 in Mitchell St., Bendigo approaching bridge over Railway line (Quarry Hill route)" 1189.6 - "No. 21 at Charing Cross, Bendigo"tramways, trams, bendigo, golden square, pall mall, mitchell st., quarry hill, tram 2, tram 11, tram 17, tram 21 -
 Ballarat Tramway Museum
Slide - 35mm slide/s, Noel Simons, Dec. 1971
One slide on a Kodak Ready Mount made from the Association of Railway Enthusiast Provincial Tramways film strip, during December 1971 of Bendigo No. 3 at Eaglehawk terminus with its reflection in a shop window looking through a multi post verandah. Has the Eaglehawk Town Hall in the background."No. 3 and its reflection at Eaglehawk terminus" and "Dec 1971" in purple ink using a hand stamp.tramways, trams, eaglehawk, bendigo, tram 3 -
 Ballarat Tramway Museum
Slide - 35mm slide/s - set of 20, Noel Simons, 21/05/1971 12:00:00 AM
Set of 20 transparencies taken on 21/5/1971 on Kodak mounts. 1197.1 - Bendigo No. 5 en route to Eaglehawk at Creeth St Long Gully. Tram has a SEC roof ad and Cinzano roof ad. 1197.2 - No 5 approaching Needle Loop between Long Gully and California Gully. On left hand side is the City of Bendigo sign, indicating city boundary. 1197.3 - As for 1197.2 but actually entering loop. Photo taken after tram has passed photographer. 1197.4 - No. 26 bound for Eaglehawk descending the railway bridge near Eaglehawk, at Jobs Gully. 1197.5 - as for 1197.4, but after crossing bridge, now ascending a hill. Photo taken after tram has passed photographer. 1197.6 - No. 26 climbing High St. hill Eaglehawk, nearing end of Double track, bound for Quarry Hill. Shows centre of the road poles. 1197.7 - As for 1197.6, with tram entering single track section. Photo taken after tram has passed photographer. Has a BP service station in the background. 1197.8 - No. 26 (bound for Quarry Hill) crossing No. 17 (Eaglehawk) at Job's Gully Loop. 1197.9 - No. 17 climbing railway bridge at Job's Gully, en route to Eaglehawk. Photo taken after tram has passed photographer. 1197.10 - No.26 bound for Quarry Hill, leaving Long Gully Loop? Has the Creeth St. church in l197.l in the far background. Photo taken after tram has passed photographer. 1197.11 - Tramway Point work at the northern end of Long Gully Loop. 1197.12 - No. 17 en route for Quarry Hill turning into View St. from Bamard St. Tram has SEC roof ads "Everything fine in my all electric Kitchen' and 'Electric Cooking is Matchless'. 1197.13 - as for 1197.12, but tram has turned into View St and about to enter the double line track. Photo taken after tram has passed photographer. 1197.14 - No. 21 enters Nolan St after turning from MacRae St. en route to Bendigo. Note sign on its own post noting tram turns "Beware Tram Turns" and stop sign on adjacent pole "Trams stop on Request". No. 21 has two SEC roof ads. 1197.15 - No. 21 in Nolan St. after turning from Bridge St. (White Hills Road). Note signal light for Bridge St. loop on pole corner of street. Photo taken after tram has passed photographer. 1197.16 - No. 2 bound for Eaglehawk at unknown location. 1197.17 - Tram stop sign on a pole "CARS STOP BY REQUEST" 1197.18 - No. 5 in Carpenter St.? en route to Quarry Hill. 1197.19 - No. 28 has just arrive at Golden Square terminus, passengers are disembarking and the trolley pole is being turned. Golden Square Hotel in the background. 1197.20 - No. 28 at Golden Square terminus. Has a "Nothing beats Briquettes for hear roof ad. Information written on in black ink and date stamped on purple ink. 1197.1 - "No. 5 at Creeth St. Long Gully" 1197.2 - "No. 5 approaching Needle Loop between Long Gully and California Gully" 1197.3 - "No. 5 at Needle Loop between Long Gully and California Gully" 1197.4 - "No. 26 crossing railway bridge at Job's Gully near Eaglehawk" 1197.5 - "No. 26 just after crossing railway bridge at Job's Gully near Eaglehawk/ 1197.6 - "No. 26 in High St. Eaglehawk" 1197.7 - "No. 26 at end of double track in High St. Eaglehawk" 1197.8 - "Nos. 26 and 17 crossing at Job's Gully Loop" 1197.9 - "No. 17 crossing railway bridge at Job's Gully near Eaglehawk". 1197.10 - "No. 26 at Long Gully" 1197.11 - 'Northern end of points at Long Gully Loop". 1197.12 - "No. 17 turning into View St. from Bamard St. Bendigo". 1197.13 -'No. 17 at beginning of double track in View St. after leaving Bamard St. Bendigo. 1197.14 - "No. 21 enters Nolan St. from MacRae St. Bendigo." 1197.15 - "No. 21 in Nolan St. Bendigo just after leaving White Hills Road." 1197.16 - "No. 2" 1197.18 - "No. 5" 1197.19 - "Birney car No. 28 at Golden Square Terminus" 1197.20 "Birney car No. 28 at Golden Square Terminus" tramways, trams, bendigo, long gully, railway bridge, jobs gully, trackwork, nolan st, quarry hill, tram stops, golden square, tram 2, tram 5, tram 17, tram 21, tram 26, tram 28 -
 Ballarat Tramway Museum
Slide - 35mm slide/s - set of 4, Noel Simons, Apr. 1972
Set of 4 transparencies - copy slides - possibly ARE film strip dated March 1972. 1209.2 and 1209.4 on Kodak Readymount mounts. 1209.1 - Bendigo 5, 6 and 28 on a special tram service in bound to the City on a tour in Caledonia St. about to enter Lucan St, or White Hills Road or Weeroona Ave. (mis match in names in various maps). Gas works in the background. No. 5 has a white disk on the rear of the tram. 1209.2 - Nos 2 and 26 at Charing Cross with the Fountain Plaza in the background. Both trams have the destination of Quarry Hill, though 26 is on the Eaglehawk bound track. 1209.3 - No. 19 at the Golden Square terminus, with the conductor or driver swinging the pole and Billy Rodda's Golden Square hotel in the background. 1209.4 - No. 7 at Fire Station loop, en route to North Bendigo, picking up a passenger with a pram. Part of a set of 20 slides made by the Association of Railway Enthusiast Provincial Tramways film strip. Reference Item 2560 details the ARE Film Strip and provide references to other slides.Information written on in blue ink and date stamped on purple ink. 1209.1 - "Nos 5, 6 and 28 in Caledonia St. about to enter Weeroona Ave." 1209.2 - "Nos 2 and 26 at Charing Cross." 1209.3 - "Swinging the pole on No. 19 at Golden Square Terminus." 1209.4 - "No. 7 inward bound from Golden Square stops at Fire Station Loop."tramways, trams, bendigo, charing cross, golden square, gas works, special trams, tram 2, tram 5, tram 6, tram 7, tram 19, tram 28 -
 Ballarat Tramway Museum
Photograph - Colour Photograph/s - set of 15', Austin Brehaut, 1/04/2000 12:00:00 AM
Yields information about various locations in Ballarat in March 2000 for comparison with previous photographs.Set of 15 colour photographs taken by Austin Brehaut in April 2000 showing various locations that Ballarat trams once ran in, for use in a BTM presentation, named "Ballarat Past and Present" at the COTMA 2000 Ballarat Conference. All on Fujicolour Crystal Archive Paper. On rear in blue ink is the date, location and where relevant a reference number to photo locations that the author of the presentation had requested. Letter from Austin, filed with this worksheet. 1772.1 - Sebastopol terminus, 4/4/2000 .2 - Albert St. Sebastopol near "crossover" - 4/4/2000 .3 - Old depot site, 5/4/2000 .4 - From depot site at Depot junction - 5/4/2000 .5 - Albert St. Sebastopol, looking south above loop site - 5/4/2000 .6 - Mt. Pleasant line, in Barkly St. towards terminus - 5/4/2000 .7 - Mt. Pleasant terminus, Cobden Cnr. - 5/4/2000 .8 - Wendouree Parade at Macarthur St. - 5/4/2000 .9 - Site of old Power Station Cnr Ripon St. Wendouree Parade .10 - Sturt St. at Dawson St (site of crossover) towards former Golden City Hotel - 6/4/2000 .11 - From Grenville St - up Sturt St. hill - 6/4/2000 .12 - Lower Sturt St. toward Grenville St - 6/4/2000 .13 - Railway Station from Signal box - 27/4/2000 .14 - Lower Sturt St. toward Grenville St - 6/4/2000 .15 - Railway Station from Signal box - 27/4/2000 For 2010 comparisons see 4645 and 4646. See Aboveballarat, sebastopol, albert st, sec depot, railway station, mt pleasant, dawson st, sturt st -
 Ballarat Tramway Museum
Photograph - Colour Photograph/s - set of 25, Austin Brehaut, 7/04/2000 12:00:00 AM
Yields information about various locations in Ballarat in March 2000 for comparison with previous photographs.Set of 25 colour photographs taken by Austin Brehaut on 7 April 2000 showing various locations that Ballarat trams once ran in, for use in a BTM presentation, named "Ballarat Past and Present" at the COTMA 2000 Ballarat Conference. All on Fujicolour Crystal Archive Paper. On rear in blue ink is the date, location and where relevant a reference number to photo locations that the author of the presentation had requested. Letter from Austin, filed with the worksheet for Reg. Item 1772. 1773.1 - Base Hospital, Cnr Drummond St. North and Mair St. .2 - Hospital Corner - Base Hospital Along Drummond St. North .3 - St John of God Hospital, cnr Mair and Drummond St. Nth. .4 - Hospital Corner, looking South East from Base Hospital .5 - Gardens at Loop (Wendouree Parade) .6 - Gardens Loop and Shelter .7 - Shelter at Gardens Loop .8 - Bridge Mall looking west .9 - Lower Victoria St. along Bridge St .10 - Railway crossing, Ballarat Station, with gates open .11 - Victoria St. hill facing west .12 - Railway crossing, Lydiard St. North .13 - Railway crossing, Ballarat Station, with gates closed .14 - Lydiard St. North terminus from cemetery .15 - Lydiard St. North at Macarthur St. .16 - Lydiard St. North at Sturt St facing South East - Post Office on left .17 - Looking north along Lydiard St at Sturt St .18 - Sturt and Lydiard Sts corner from Post Office .19 - Centre plantation Sturt St. looking east .20 - Sturt St. West near Ballarat and Clarendon College .21 - Sturt St. West facing west at Russell St. .22 - Victoria St. terminus .23 - Victoria St. terminus .24 - St Alipius Church, Victoria St. .25 - Junction of tramline and Phoenix foundry railway in Sturt St. at Armstrong St. (transferred from roadway) See Reg item 4645 and 4646 for the 2010 comparisons.See Aboveballarat, hospital corner, gardens loop, railway crossing, lydiard st. north, sturt st, phoenix foundry, armstrong st., victoria st., sturt st. west -
 Ballarat Tramway Museum
Photograph - B&W print of donated negative, Ron E. Fluck, 7/04/1950 12:00:00 AM
Black and white print of a donated negative. Print made 8/1998. Photo of Victorian Railway tram No.34 at the Brighton Beach terminus. Tram has the destination of "St Kilda Rly Stn". In the overhead can be seen the pan for assisting the driver to put the rear pole onto the wire. Also in the background of the photo is a stone wall of the railway tunnel under the road that served the Brighton Beach Pier. Photo taken 7-4-1950. See Victorian Railways to '62, pages 47 and 49 re railway tunnel.tramways, trams, brighton beach, vr, railway tunnel, tram 34 -
 Ballarat Tramway Museum
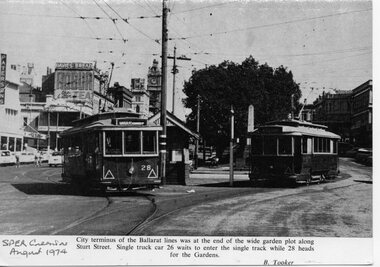
Photograph - Illustration/s, Grenville St. and Sturt St. Ballarat
Black and white illustration from the South Pacific Electric Railway Co-op (Sydney Tramway Museum) - Aug. 1974 calendar of Ballarat trams 26 and 28 at the intersection of Grenville St. and Sturt St. Tram 28 proceeding to the Gardens via Drummond St., while 26 waits for 28 to clear and proceed to what appears on the destination to be Mt. Pleasant. Photo undated, but prior to the fitting of marker lights on the drivers canopy window sills - during the 1950's. Photo caption mentions that this was the City terminus of the system - incorrect during the SEC operational days. Photo by B. Tooker. Has buildings on either side of Sturt St. in background.On bottom right hand corner "SPER Calendar Aug. 1974"trams, tramways, ballarat, sturt st., grenville st. -
 Ballarat Tramway Museum
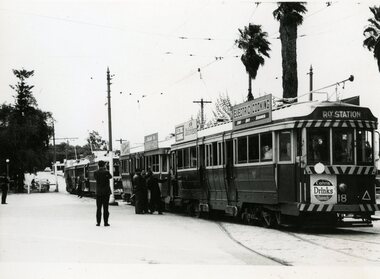
Photograph - Black & White Photograph/s, early 1960's
Black and White print of Bendigo SECV Bendigo tram 18 and four other trams (two bogies and two Birneys) at Eaglehawk tram terminus on a tour. Tram has dash canopy lights, but no large white strip under the drivers windows. Photo not dated but appears to be during early 1960's. Tram 18 has destination of "Railway Station", also has a white disk indicating a tram in a convoy. Also has a good photo of the "Cohn's Drinks Quench" advertisement on the front dash panel, as well as two SEC roof ads.trams, tramways, eaglehawk, bendigo, tram tours, high st, specials, tram 18 -
 Ballarat Tramway Museum
Slide - 35mm slide/s, Aug. 1984
Colour slide - white / yellow cardboard mount, Kodacolor (Kodachrome) slide, of Z3's 208 (Route 95, showing Exhibition) and 225 showing (Route 96, East Brunswick), at the Bourke St. terminus with the Spencer St. Railway station building in the background and the Greyhound building on the right side. 225 has been painted green, while 208 is in the original orange colour scheme. Date on cardboard mount by Kodak is August 1984. Has an Australia Post van by the side of 225.tramways, trams, bourke st, melbourne, spencer st., tram 225, tram 208 -
 Ballarat Tramway Museum
Magazine, Association of Railway Enthusiasts (ARE), "Australian Railway Enthusiast - Vol 9, No. 4, December 1971", Dec. 1971
Copy of the Australian Railway Enthusiast - Vol 9, No. 4, December 1971, which contains seven photographs of the closure of the Ballarat Tramway System on 19/9/1971 by Greg Triplett. Item 579 refers for centre page photograph. Magazine has articles on the Beech Forest Narrow Gauge, The Atjeh Tram (Indonesia), cable cars preserved in Melbourne and a derailment at Yering Vic. in 1900. Ballarat Photos 1 - 40 in Lydiard St. 2 - Bogie car in Wendouree Parade from the wheat silos 3 - Intersection of Sturt and Lydiard Street from the Town Hall 4 - Tram at City Centre with Boer War (?) statue in front of the tram - night photo 5 - 35 at Sebastopol Terminus - night photo 6 - 42 at the Lydiard Street terminus - night photo 7 - 40 leaving Sebastopol as the last tram - night photo (see item 579) Second copy added 31-8-2017. Second copy has a "Technical Book & Mag. Co." yellow label on the front cover.trams, tramways, ballarat, closure, lydiard st, sturt st, sebastopol -
 Ballarat Tramway Museum
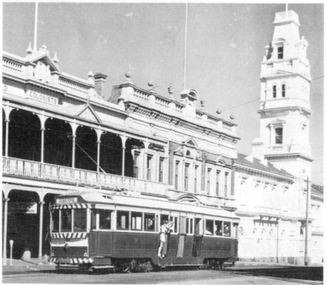
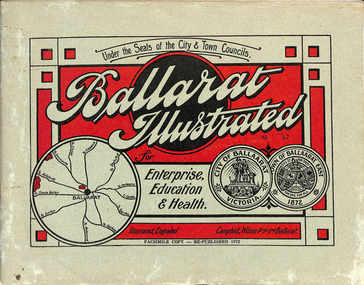
Book, "Ballarat Illustrated", 1972
Original c 1914 (see below), facsimile copy - re-published 1972. Original features photos of Ballarat City and Town, its buildings, parks and the various industries and organisations that were in Ballarat at the time of publication, including ESCo. Many photos features ESCo trams. Photos sepia toned. Has some red colour block printing on the front cover and rear, for Star Oil Engines. On inside back cover is a map with the places of interest and tram route map, marked in red. Pages are un-numbered. Original published by Ballarat East Town Council and Ballaarat City Council. On cover has number stamped in black in, "No. 87" (assume facsimile copy No.). Photos with publication show tram No. 21, built 1913 and ESCo photo page shows Mr. Pringle as Manager. Mr Pringle became manager in January 1911, As there is no photos of the "Avenue of Honour", or other mention of the first world war, assume original published about 1913 or 1914. Original shows Engravings and printing by "Campbell Wilson Prop Ltd, Ballarat". See Other Information as well for more listing details. High Resolution image added 31/8/2012 of i2 of ESCo page and i3 for Ballarat identies and sheet i4 extracted for Mr Pringle. PDF scan of full document added 21/5/2019 - see images btm633-1i.pdf and btm633-2i.pdf Notes on "Ballarat Illustrated" Reg. Item No. 733 From notes made by Neville Gower 12/1/1997 Cover: Inside front cover: Last paragraph, "Facilities for Travelling" - Electric trams serve all parts of Ballarat. Page 3: Street Scene, Municipal Town Hall, showing tram wiring Page 7: Street Scene, Lydiard St. North, intersection and tramway centre, with ESCo tram No. 21 in the bottom photo. Other photos features trams as well in Sturt St and Lydiard St. North. Page 9: Street Scene, Top photo of Sturt St. from Lydiard St. looking east, shows piles on right-hand side of road. Car parked by Post Office has a car registration number "9007". Bottom photo, an tram climbing hill, shows double trolley in the street, with early English type of pull offs. Page 13: Street Scenes and Historic Buildings: One of five photos, shows Victoria St. looking East, with tram track prominent in photo and how stone work was set up about the rails and overhead poles. Page 23: Street scene, Gardens North Entrance gates, shows details of gates near St. Aidans Drive. Note double trolley wire on poles, and style of insulators. No trams in photo, three ladies walking down the track. Page 37: Street Scene; Lydiard St views, top left hand photo, shows Railway station and railway gates with signal gantry and horse drawn vehicles. Tram tracks apparent. Bottom left hand photo shows Lydiard St. North, near Post Office, double track with centre poles - Single wire per track. Top right hand photo, showing Cemetery gates in background. Bottom right hand photo - from north end of Lydiard St. South, looking north, with an ESCo tram in background. Also has a parked car on left hand side. Page 45: Street Scenes - Bridge St; top photo at west end of Bridge St. with ESCo No. 11 with possibly double trolley wire in photo. Bottom photo at east end of Bridge St. with tram in background, shows junction. Double trolley heading out to Mt. Pleasant, single trolley for Victoria St. Page 45: Street Scenes - Bridge St; top photo at west end of Bridge St. with ESCo No. 11 with possibly double trolley wire in photo. Bottom photo at east end of Bridge St. with tram in background, shows junction. Double trolley heading out to Mt. Pleasant, single trolley for Victoria St. Page 61: Street Scenes and Historic Buildings - Public Institutions Ballarat - top left hand photo of the Hospital shows some tram track in foreground, with double trolley wire. Top right photo is of the Orphanage, the name of the tram terminus for many years. Page 68: Electric Supply Co. of Victoria's pages - top photo showing powerhouse in background, across the lake, can hardly see anything for the trees, except for the chimney. Bottom photos of the steam Turbo Generators and the switchboard. Gives Mr. P.J. Pringle as Chief Engineer and General Manager. He took over in Jan. 1911. Page 69: Ballarat East Views - features photo of Black Hill open cut, Ballarat East Railway Station, Ballarat Fire Station and "Victoria St. looking East", repeat of photo printed on page 12, but slightly darker. Image on system includes fire station and railway station, - Ballarat East. Page 78: Series of photos of various Ballarat VIP's of the era, fourth one in on top line features "P.J.Pringle, Electric Supply Co." Inside Back cover - map of Ballarat including tram lines and places of interest marked in red. Gives a detailed photographic presentation of Ballarat in 1914.80 page book with, in addition, light green card covers, titled "Ballarat Illustrated". Loose copy of page 9 and 10 held.trams, tramways, ballarat, local history, heritage buildings, esco -
 Ballarat Tramway Museum
Photograph - Black & White Photograph/s, 31/10/1965 12:00:00 AM
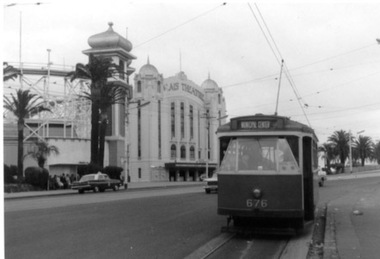
Set of three Black and white photographs on Kodak paper of an Association of Railway Enthusiasts tram tour with X2 676. The tour featured the use of a Washington DC destination roll. Date of Tour 31/10/1965. 1422.1 - X2 at the terminus of route 69/79 routes at the Esplanade, St Kilda. Note the track is alongside the north side kerb. Has Palais Theatre in the background and Luna Park. Tram showing destination of "Municipal Center" 1422.2 - Hawthorn Road, just north of Balaclava road, looking south. SW6 869 alongside. 676 on temporary track - during the reconstruction of Hawthorn Road - permanent track has been completed alongside. Tram showing destination of "Racecourse" 1422.3 - X2 676 on "Bang Road" Coldblo Road at Malvern depot entry looking east. Tram showing destination of "Friendship Hts". See P.Winspur notes, data sheet for Reg. Item 1418 and Dave Macartneytrams, tramways, tram tours, are, trackwork, mmtb, tram 676, tram 869 -
 Ballarat Tramway Museum
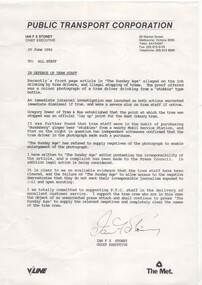
Document - Letter/s, Public Transport Corporation (PTC), 25/06/1992 12:00:00 AM
Copy of printed or photocopied letter sent to all Public Transport Corporation (V/Line - railway and The Met - Tramways and bus) dated 25/6/1992 signed by the Chief Executive Office, Ian F.X. Stoney. Letter concerns the "alleged" drinking of tramway staff and illegal stoppage of trams, as published in the Sunday Age. Investigations determined the photo was the Coburg Tram terminus and the crew member was drinking a "Bundaberg Ginger Beer" stubbie. Letter written in support of staff and to criticize the AGE newspaper who refused to supply a negative.trams, tramways, ptc, i. stoney, sunday age, tram crews -
 Ballarat Tramway Museum
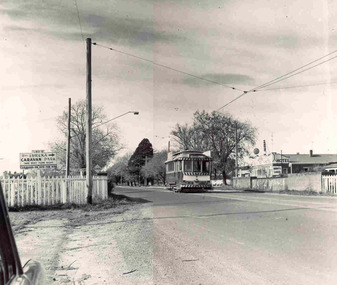
Photograph - Black and White photograph/s - mounted set of 2', John Phillips, late 1960's or early 1970's
Yields information about the vicinity of the Victoria St terminus and the bridge over the Buninyong Railway line.Black and White photograph mounted on heavy cardboard backing. Photo of Ballarat No. 31, just after leaving Victoria St. terminus, late 1960's or early 1970s crossing over the Eureka siding railway bridge. Taken by John Phillips. Tram has destination of Gardens via Sturt St. West, Twin Lakes advertisement on the front. In the background is Meagher's Hotel with Abbots Lager and Victoria Bitter sign. On the bridge is graffiti "Smash US Imperialism". On the Ballarat side of the bridge is a sign directing travellers to the "Eureka Caravan Park". Has 6 Velcro dots on rear and marks where mounting devices have been removed on the rear. Note image scanned in two runs through a scanner, resulting in the shading in the image file. .1 - Second copy with 4 black Velcro squares and 4 dots on rear - wider view on the right hand side with an additional pole - not scanned.trams, tramways, victoria st, eureka, twin lakes, tram 31 -
 Ballarat Tramway Museum
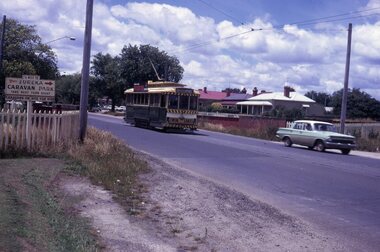
Slide - 35mm slide/s, Peter Moses, Jan. 1966
Photo of SEC Ballarat Tram No. 11, west bound after leaving Victoria St. terminus crossing the Buninyong or Eureka Siding railway Bridge. Tram fitted with a "Twin Lakes" and SEC Briquettes roof advertisement and has destination of "Gardens via Sturt St. West". On the left side of the photograph is a roadside advertisement for the "Eureka Caravan Park". Note scanning error in the photograph. Kodak cardboard mount slide, taken by Peter Moses January 1966. Actual slide does not give the year, but slide fitted in with numbering sequence for 1966.On back of slide in blue ink in bottom right hand corner "P. Moses".tramways, trams, victoria st, railway bridge, tram 11 -
 Ballarat Tramway Museum
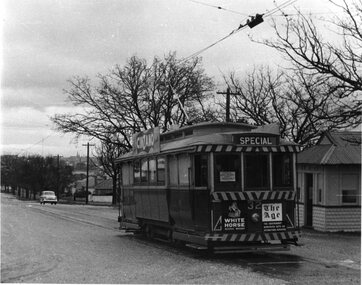
Photograph - Black & White Photograph/s, Dave Macartney, 25/07/1961 12:00:00 AM
Black and white photograph of Ballarat No. 32 soon after arrival at the Lydiard St. terminus on 23/7/1961. Tram showing SPECIAL on a Victorian School Railway Clubs Association Tour (VSRCA). Photo taken by Dave Macartney. Date was shown as 25/7, but later corrected - 12/2006 Tram has Cinzano roof advertisements and advertisements for White Horse Whiskey and The Age newspaper on the front dash panel. In the background is the shelter at the terminus. Photo also shows the trolley pole pan placed at a terminus to assist with the location of the trolley pole at night. See Reg Item 7092 for a report and 6668 for the tour booking form.tramways, trams, lydiard st north, vsrca, trolley poles, tram 32 -
 Ballarat Tramway Museum
Photograph - Black & White Photograph/s - Last tram from Sebastopol, Greg Triplett, Sep. 1971
Black and white reproduction of photographs used to illustrate the closure of the SEC Ballarat System, published in Association of Railway Enthusiast's (ARE) Dec 1971 issue of their magazine. Centre page photo shows tram 40 at Hospital corner, prior to running into the depot, while on rear pages are night photos of tram 35 at Sebastopol terminus (Royal Mail Hotel in background) and No. 41? at the Lydiard St. north terminus. trams, tramways, ballarat, closure, last tram , tram 40, 35 and 41? -
 Ballarat Tramway Museum
Document - Photocopy, Neville Gower and Neville Hesketh, "Mayor's Report 1967-1968", Jul. 1997
Photocopy of part of City of Ballarat's Mayor's Report for 1967 - 1968. Originals held in the Ballarat Library. Three pages covering trams, railways, item on Country Roads Board (CRB) and traffic issues in Ballarat and small photos of trams at City terminus. Page headed "City Traffic" added 19/12/2009 - and imaged along with following page which has the photo of the city tram at the terminus added. Looks at the introduction of traffic lights into the City and traffic problems and parking meters.trams, tramways, city of ballaarat, trams, railways, civic history, traffic lights -
 Ballarat Tramway Museum
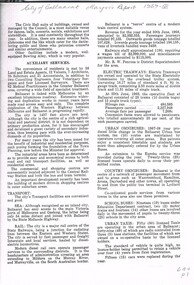
Slide - 35mm slide/s, Nov. 1970
Agfa plastic mount (blue base, white cover) of a photograph of No. 21 at View point terminus. Note tram stop arrangements, shelter and the Lake in the Background. Photo taken 11/1970. One of a set of 20 slides made by the Association of Railway Enthusiast Provincial Tramways film strip. Reference Item 2560 details the ARE Film Strip and provide references to other slides. Slide rescanned at 3200 dpi 25-10-2020, jpg replaced, tiff file retained. This file was scanned in 2003 and may show colour changes."BAS 64" in pencil.tramways, trams, wendouree parade, view point, tram 21 -
 Ballarat Tramway Museum
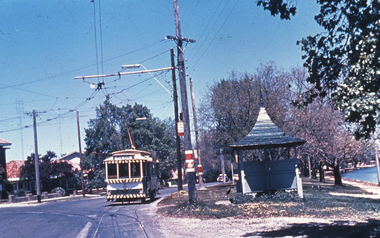
Slide - 35mm slide/s, Graham Evans, Sep. 1971
Agfa plastic mount (blue base, white cover) of a photograph of a bogie tram on the reserved track between Ophir St and the terminus - telephoto lens. Note tram stop signs, aerial phone lines, the condition of the track and the gravel crossings. Photo taken 9/1971. See also M. Plummer slides Reg. Item 2160 for similar photograph with No. 17. One of a set of 20 slides made by the Association of Railway Enthusiast Provincial Tramways film strip. Reference Item 2560 details the ARE Film Strip and provide references to other slides. Slide rescanned at 3200 dpi 25-10-2020, jpg replaced, tiff file retained. This file was scanned in 2003 and may show colour changes."BAS 70" in pencil.tramways, trams, albert st., sebastopol, ophir st -
 Ballarat Tramway Museum
Slide - 35mm slide/s, Glen Mills, Nov. 1970
White cardboard mount, 35mm slide, from the Association of Railway Enthusiast's film strip titled "Provincial Tramway Film Strip" of No. 21 or could be 27 taken from the Ballarat (Ballarat East) Fire Station tower. Photo taken Nov. 1970. Has the sign of the AMPOL service station in the foreground. Has destination of Special. Tram at the intersection of Main and Barkly Streets. The film strip notes (Reg. Item 2560), provided the following caption details: "Another 1/2 mile or so saw the "Mt PLEASANT" line turn sharply from the Midland Highway and head towards its terminus in the southern suburbs. - Nov. '70 (Glen Mills)" See image btm2564p.tif for high level scan of image. Stamped on base of slide "11772" and written in ink on top edge "12 Mt Pleasant Line Ballarat"tramways, trams, are, film strip, mt pleasant, barkly st -
 Ballarat Tramway Museum
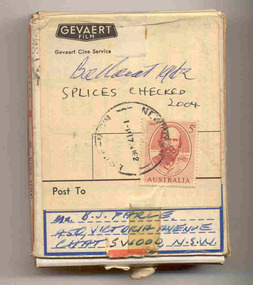
Film - Movie Film & Box, Gevaert, 1962
Yields information in movie film format of Ballarat trams in 1962, a enthusiast tour, how the system operated and was used by people., Yields information in movie film format of Ballarat trams in 1962, a enthusiast tour, how the system operated and was used by people.Movie film - 8mm, approx. 4.15mins, with green leader strip on a plastic reel, within a Gevaert film cardboard box, with a Harvin Film Laboratory r, Marrickville NSW label and address to B.J. Parle, Chatswood and a 5d stamp. Titled "Ballarat 1962". Has been transferred to DVD - see Reg item 4100 as Segment No. 6. Filmed and made by Ben Parle. Also transferred to DVD by Rod Cook Oct. 2015, via Roger Greenwood for use in his DVD, "The City of Ballarat Trams, Gardens & Gold" of 2016. See Reg Item 6883. Synopsis: based on time - Black and White film Title "Ballarat 1962" 0:00 37 departing City Centre in Sturt St, east bound, followed by 18 0:23 18 and 37 arriving into City Loop from Bridge St. 0:40 18 and 37 passing through the Gregory St Loop 0:54 18 and 37 arriving and at Lydiard St Nth terminus 1:15 18 and 37 in Lydiard St Nth 1:22 18 and 37 at Railway St gates, with gates closed with B class hauled passenger train, wooden and air-conditioned carriages departing. 1:51 Interior view of passengers in 18 2:10 View from a side window of 18 turning from Lydiard St Nth into Sturt St, heading east, with an inspector getting off No. 18 2:23 View from front window in Victoria St and entering King St loop to cross No. 14. 2:55 18 and 37 departing King St loop, in bound. 3:10 18 in Barkly St, outbound 3:38 42 in bound Drummond St Nth and turning into Sturt St at Hospital corner. 4:16 End Written labels giving title information on outside of box.trams, tramways, ballarat, gardens, victoria st, bridge st, sturt st, tram 18, tram 37, tram 42