Showing 334 items matching "route 9"
-
 Melbourne Tram Museum
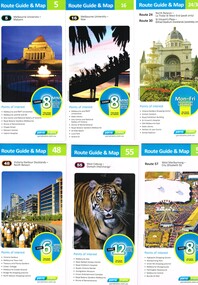
Ephemera - Tram Route Guides, Public Transport Victoria (PTV), "Tram Route Guide", Oct. 2011 to Oct 2012
... - Vermont South .9 - Route 78 and 79 - North Richmond - Prahran... South .9 - Route 78 and 79 - North Richmond - Prahran or St ...Set of 23 Tram Route Guides, published during 2011 or 2012. Each comprises a vertical DL folded sheet, full colour for the nominated routes, with Yarra Trams, Myki and TramTracker logos, listing the stops, interchanges with bus and other tram services, ticketing zones, estimated frequencies with adverts for Night tram services, TramTracker and Myki tickets. .1 - Route 5 - Melbourne University to Malvern .2 - Route 16 - Melbourne University to Kew .3 - Route 24 and 30 - North Balwyn - Latrobe St and St Vincent's Plaza - Etihad Stadium .4 - Route 48 - North Balwyn - Victoria Harbour Docklands .5 - Route 55 - West Coburg - Domain Interchange .6 - Route 57 - West Maribyrnong to Flinders St Station .7 - Route 59 - Airport West - City .8 - Route 75 - City - Vermont South .9 - Route 78 and 79 - North Richmond - Prahran or St Kilda Beach .10 - Route 82 - Footscray to Moonee Ponds .11 - Route 96 - East Brunswick - St Kilda Beach .12 - ditto .13 - Route 112/11 - West Preston - St Kilda, West Preston - Victoria Harbour Docklands .14 - Route 70 - Wattle Park - Waterfront City Docklands .15 - Route 86/95 - Bundoora - Waterfront City Docklands and Melbourne Museum - City .16 - Route 1 - East Coburg - South Melbourne Beach .17 - Route 3/3a - Melbourne University to East Malvern .18 - Route 6 - Melbourne University to - Glen Iris .19 - Route 8 - Moreland to Toorak .20 - Route 64 - Melbourne University to East Brighton .21 - Route 67 - Melbourne University to Carnegie .22 - Route 72 - Melbourne University to Camberwell .23 - Route 109 - Box Hill - Port Melbourne and Route 31 - Hoddle St - Victoria Harbour - Docklands .24 - Route 75 - Vermont South - dated 10/2011 See Reg Item 2278 for 2016 versionstrams, tramways, timetables, maps, route 1, route 3/3a, route 5, route 6, route 8, route 11, route 16, route 24, route 30, route 31, route 48, route 55, route 57, route 59, route 64, route 67, route 70, route 72, route 75, route 78, route 79, route 82, route 86, route 95, route 96, route 109, route 112, east coburg, south melbourne, malvern, west maribyrnong, airport west, docklands, north balwyn, west coburg, domain interchange, north richmond, prahran, east brunswick, st kilda, vermont south, footscray, moonee ponds, kew, st vincent's plaza, preston, wattle park, bundoora, museum, south melbourne beach, east coburg, east malvern, glen iris, toorak, moreland, east brighton, carnegie, camberwell, box hill, port melbourne -
 Melbourne Tram Museum
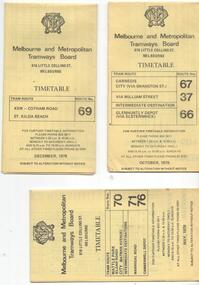
Ephemera - Timetable/s, Melbourne & Metropolitan Tramways Board (MMTB), "MMTB Tram Timetables", 1977 to 1978
... - Weekends, July 1978, printed on green paper. .9 - Bus routes 284... - Weekends, July 1978, printed on green paper. .9 - Bus routes 284 ...Set of 6 MMTB Tram timetables, folded sheets, 8 sections, providing timetables for specific routes, day of week giving information on tram times at specific time points, route map, sections and fares and organisation address - 616 Little Collins St. Melbourne. All printed on yellow paper. 1. - Route 67, 37 and 66 - Carnegie - City via Swanston St (67), via William St (37) and Glenhuntly Depot (66) - dated Oct. 1978. .2 - Route 69 - Kew Cotham Road - St Kilda Beach dated Dec. 1978 .3 - Route 70, 71 and 76 - Wattle Park - Batman Ave, Arraign Road (Route 71) and Camberwell Depot (Route 76), dated May 1978 .4 - Route 72, 32 and 73 - Camberwell City via Swanston St (72), via William St (32) and Camberwell Junction (73) dated Sept, 1978. .5 - Route 82 - Moonee Ponds - Footscray - Highpoint West - dated Sept. 1977 .6 - Route 88, 14, 89 and 90, 96, 95 and 97 - East Preston via Bourke St (88), via Latrobe St (14), East Preston Bell St (89) and Northcote Dundas St (90) to the city and East Brunswick (96), Exhibition (95) and North Fitzroy (Park St), dated May 1978. .7 - Routes 48, 24, 40, 41, 29, 74, 76. 28 - July 1978 .8 - ditto - Weekends, July 1978, printed on green paper. .9 - Bus routes 284 (East Kew - Doncaster North) and 270 (East Kew - Shoppingtown) - dated August 1978trams, tramways, mmtb, timetables, melbourne, fares, route 14, route 32, route 37, route 66, route 67, route 69, route 70, route 71, route 72, route 73, route 76, route 82, route 88, route 89, route 90, route 95, route 96, route 97, route 48, route 24, route 40, route 41, route 29, route 74, route 76, route 28, route 284, route 270 -
 Melbourne Tram Museum
Ephemera - Timetable, Public Transport Corporation (PTC), Set of 24 The Met tram timetables, 1995
... - City - April 1995 .9 - Route 16 - St Kilda Beach - City - April... Melbourne Beach and St Kilda Beach - City - April 1995 .9 - Route 16 ...Set of 24 The Met Public Timetables.Demonstrates tram timetables published by The Met during 1995..1 - Printed 20 page book stapled timetable for East Coburg / Moreland Sth Melbourne Arts centre tram service, Route 1 and 22, dated April 1995. The "The Met" logo, was published by the Public Transport Corporation. Provides a map, description of route, time points, timetable, ticketing information, some ticketing information, introduction by the relevant Depot, including a photo - and an image of a tram available for hire as a party tram. .2 - Route 3 - East Malvern - City - April 1995 .3 - Route 5 - Malvern (Burke Road - City - April 1995 .4 - Route 6 - Glen Iris - City - April 1995 .5 - Route 8 - City - April 1995 .6 - Route 11 - City - April 1995 .7 - Route 11 - City - Nov. 1995 .8 - Route 12 - Sth Melbourne Beach and St Kilda Beach - City - April 1995 .9 - Route 16 - St Kilda Beach - City - April 1995 .10 - Route 19 - North Coburg - City - Nov 1994, revised 8/1995 .11 - Route 48 - North Balwyn - City - 30/4/1995, revised 9/1995 .12 - Route 64 - East Brighton - City - April 1995 .13 - Route 64 - East Brighton - City - Nov. 1995 .14 - Route 67 - Carnegie - City - April 1995 .15 - Route 67 - Carnegie - City - August 1995 .16 - Route 69 - Kew Cotham Road - St Kilda Beach - April 1995 .17 - Route 70 - Wattle Park - City - April 1995 .18 - Route 72 - Camberwell - City - April 1995 .19 - Route 75 - East Burwood - City - April 1995, revised 8/1995 .20 - Route 78/79 - North Richmond - St Kilda Beach or Prahran - April 1995 .21 - Route 86 - Bundoora - City - Oct 1995. .22 - Route 109 - Port Melbourne - Mont Albert April 1995 .23 - Route 109 - Port Melbourne - Mont Albert August 1995 .24 - La Trobe St Service - City - East Melbourne April 1995trams, tramways, tickets, the met, tram services, timetables, route 69, route 1, route 22, route 3, route 5, route 6, route 8, route 11, route 12, route 16, route 19, route 48, route 64, route 72, route 75, route 78, route 79, route 86, la trobe st - east melbourne, route 67, route 70, route 109 -
 Melbourne Tram Museum
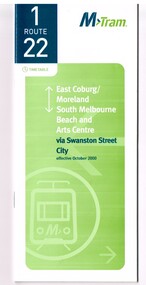
Ephemera - Timetable, M>Tram, Set of 21 M>Tram timetables, Sep. 2002
... - 36 Pages .9 - Route 55 - West Coburg - Domain Road... - October 2000 - 36 Pages .9 - Route 55 - West Coburg - Domain Road ...Set of 21 M>Tram timetables, light green cover with route number on cover, giving details of popular M>Tram destination, check points, map and description of routes, use of Metcards and contact details. .1 - Route 1 / 22 - East Coburg/Moreland to South Melbourne Beach - October 2000 - 36 pages. .2 - Route 3 - East Malvern - Melbourne University - January 2002 - 24 pages. .3 - Route 82 - Moonee Ponds - Footscray - October 2000 - 20 pages. .4 - Route 5 - Malvern (Burke Road) - Melbourne University - August 2003 - 32 pages. .5 - Route 6 - Glen Iris - Melbourne University - January 2002 - 24 pages. .6 - Route 8 - Toorak - Melbourne University - August 2003 - 24 pages. .7 - Route 16 - St Kilda Beach - Melbourne University - January 2002 - 24 pages. .8 - Route 19 - North Coburg - City - October 2000 - 36 Pages .9 - Route 55 - West Coburg - Domain Road Interchange - October 2000 - 28 pages. .10 - Route 57 - West Maribyrnong - City - October 2000 - 28 pages. .11 - Route 64 - East Brighton - Melbourne University - January 2002 - 32 pages. .12 - Route 67 - Carnegie - Melbourne University - January 2002 - 24 pages. .13 - Route 72 - Camberwell - Melbourne University - January 2002 - 24 pages. .14 - Route 78 / 79 - North Richmond - Prahran / St Kilda Beach - January 2003 - 20 pages. Full Image of .8 added 9/4/17 following a query about route 19 timetables - see image i2. .15 - Route 5 - Malvern (Burke Road) - Melbourne University - January 2002 - 32 pages .16 - Route 8 - Toorak - Melbourne University - January 2002 - 24 pages. .17 - Route 69 - Kew Cotham Road - St Kilda Beach - January 2002 - 20 pages .18 - Route 59 - Airport West - City - October 2000 - 32 Pages .19 - Route 78 / 79 - North Richmond - Prahran / St Kilda Beach - January 2002 - 20 pages. .20 - Route 82 - Moonee Ponds - Footscray - October 2000 - 20 pages. .21 - Route 67 - Carnegie - Melbourne University - Augst 2003 - 24 pagestrams, tramways, m>tram, tram services, timetables, route 1, route 22, route 82, route 5, route 6, route 8, route 16, route 19, route 55, route 57, route 64, route 67, route 72, route 78, route 79, route 69, route 59, route 82 -
 Melbourne Tram Museum
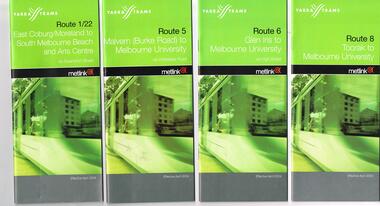
Ephemera - Timetable, Yarra Trams, Set of 22 Yarra Trams timetables, 2003 and 2004
... - Route 59 - Airport West - City - April 2004 - 32 pages. .9... pages. .9 - Route 64 - East Brighton - University - April 2004 ...Set of 22 Yarra Trams timetables, green grey cover with route number on cover, giving details of popular destination, check points, use of Metcards and contact details, tram hire, frequency, a Welcome to Swanston Trams, description of route and route map. .1 - Route 1/22 - East Coburg / Moreland - South Melbourne Beach and Arts Centre - April 2004 - 36 pages. .2 - Route 5 - Malvern (Burke Rd) - University - April 2004 - 32 pages. .3 - Route 6 - Glen Iris - City - April 2004 - 20 pages. .4 - Route 8 - Toorak - April 2004 - 20 pages. .5 - Route 16 - St Kilda Beach - University - April 2004 - 24 pages. .6 - Route 48 - North Balwyn to Docklands - May 2003 - 28 pages .7 - Route 57 - West Maribyrnong - City - April 2004 - 28 pages. .8 - Route 59 - Airport West - City - April 2004 - 32 pages. .9 - Route 64 - East Brighton - University - April 2004 - 28 pages. .10 - Route 67 - Carnegie - City - April 2004 - 20 pages. .11 - Route 70 - Wattle Park - City - May 2003 - 24 pages .12 - Route 72 - Camberwell - University - April 2004 - 28 pages. .13 - Route 78/79 - North Richmond - Prahran or St Kilda Beach - April 2004 - 20 pages .14 - Route 82 - Moonee Pond - Footscray - April 2004 - 20 pages. .15 - Route 109 - Port Melbourne to Box Hill - May 2003 - 28 pages. .16 - Route 112 - Sth Melbourne/St Kilda Beach to West Preston - May 2003 - 44 pages. .17 - Route 3 - East Malvern to Melbourne University - April 2004 - 20 pages .18 - Route 16 - Melbourne University to Kew - Oct. 2004 - 40 pages with fold out map .19 - Route 24 - North Balwyn to LaTrobe St and Route 30 - St Vincent's Plaza to Flinders St via Docklands - 8 pages. .20 - Route 69 - Kew (Cotham Road) to St Kilda Beach - April 2004 .21 - Route 86 - Bundoora to Central Pier - May 2003 .22 - Route 96 - St Kilda Beach to East Brunswick - Sept 2002Some have number notes and notes written inside about changes or errors in ink. See History.trams, tramways, yarra trams, tram services, timetables, route 1, route 3, route 22, route 5, route 6, route 8, route 16, route 24, route 30, route 48, route 57, route 59, route 64, route 67, route 69, route 70, route 72, route 78, route 79, route 86, route 96, route 109, route 112 -
 Eltham District Historical Society Inc
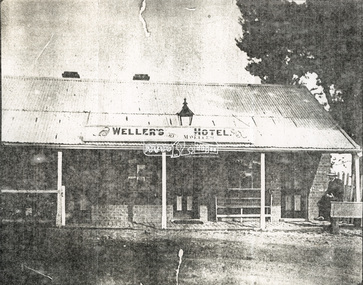
Document - Folder, Wellers of Kangaroo Ground, 1984-2017
... 1973, p11, "Eltham on old coach route" 9. Information about... 1973, p11, "Eltham on old coach route" 9. Information about ...Wellers of Kangaroo Ground Vertical File Contents: 1. Article: History of Wellers Restaurant by Sandra Cahir, revised 2017. 7 pages 2. Article: Weller’s Hotel of Kangaroo Ground (final draft) by Jim Allan, 1 June 2017, including feedback email from Sandra Cahir (7 May 2017). 3. Printout of online image - Kangaroo Ground landholders from 1841, Kangaroo Ground Presbyterian Church. (2022, June 29). Retrieved from https://kgpc.pcvic.org.au/images/history_images/Kangaroo-Ground-landholders.jpg 4. Folder of printouts of historical newspaper articles referencing the hotel 1866-1911 https://trove.nla.gov.au/list/163201 5. Printouts (various versions) from Victorian Heritage Database (National Trust and Nillumbik Shire) https://vhd.heritagecouncil.vic.gov.au/ 6. Collection of research notes, copies of records from various publications including EDHS Chronology of Events and Kangaroo Ground: The Highland Taken by Mick Woiwod, pp90, 180-181 (EDHS_01618). 7. Report: Request for ministerial amendment to use the property as a restaurant, includes existing conditions and plan for development, 1 November 1984 8. Papers donated by Diana and Peter Bassett-Smith including: a. Photocopy of Weller’s Hotel, Licensee M. Weller b. Letter: Shire of Eltham to Office of the Secretary for Planning and Environment, 23 Feb 1984 - Information regarding inclusion of Wellers Hotel into the Historic Buildings Register c. Letter: Historic Buildings Council letter to Peter Bassett-Smith seeking historical information on Wellers Hotel, 10 Jan 1985 d. Memo: Peter Bassett-Smith to Robert N. Hendrey on history of Wellers Hotel, 28 Jan 1985 - Includes extract of information about Mary Weller, Dept. of Crown Lands and Survey Map NILLUMBIK showing properties of John Weller and E. Weller and a Diamond Valley News article from 10 April 1973, p11, "Eltham on old coach route" 9. Information about the Weller family including family trees from various sources a. Edward Weller, Pioneer Families in Victoria, http://mepnab.netau.net/w/w09.html, 1 Jan 2017 (link broken) b. The WELLER family tree. (2017, January 1), 2 pages. Retrieved from https://www.weller.org.uk/cgi-bin/FamilyTree/ShowFamily.pl? and 27 pages Retrieved from https://www.weller.org.uk/cgi-bin/FamilyTree/ShowFamily.pl?ListAllPeople=A c. Edward WELLER on the WELLER family tree. (2017, January 1), 1 page. Retrieved from https://www.weller.org.uk/cgi-bin/FamilyTree/ShowFamily.pl?PersonID=516 d. Photograph (print copy), believed to be Edward Weller, 1836-1883 e. Photograph (print copy), Gravestone of Weller family at Kangaroo Cemetery f. Wellers of Kangaroo Ground, 1 page, possibly from History, http://www.wellers.com.au (broken) c.2016 g. Edward and Mary Weller miscellaneous biographical research notes (by Jim Allen?) including from Ancestry.com, and extracts from Chappel file (EDHS_04448) with relevant names highlighted h. Information about the Vernon Pitman family from Ancestry.com 10. Newspaper articles: a. Cobb & Co called here by Marguerite Marshall; Diamond Valley News, May 4, 1982, p2 b. Rich is history, 30 August 1983 (very similar to previous article) c. Weller’s Pub - restaurant, craft store or art gallery? Diamond Valley News, October 22, 1985, p3 d. Despite years of neglect a magical charm lies waiting, Diamond Valley News, October 29, 1985 e. Old pub fate still in doubt, Diamond Valley News, (?) 29 October 1985 f. Renovated Weller’s Pub to begin its new stage of life, DVN 26 January 1988 g. Wellers Restaurant, Lynne Hillier, Network, October 1988, p14 h. Revolution at Wellers, Nillumbik Mail, December 20, 2000 i. Wellers brings on good times, Valley Weekly, June 22, 2005 j. Dine in with ideal outlook, Valley News, 10 August 2005 k. Advertisement: Wellers of Kangaroo Ground, Enjoy lunch, afternoon tea and dinner at Wellers from Tuesday to Sunday, Valley Weekly, Wednesday, August 31, 2005 l. Advertisement: Wellers of Kangaroo Ground, Appearing live; Normie Rowe Fri 24 Feb, Diamond Valley Leader February 22, 2006, p11 m. Advertisement: Wellers of Kangaroo Ground, Lunch Special, Diamond Valley Leader March 27, 2010 n. Braithwaite abounds to Kangaroo Ground, Gig Guide, The Age, Friday, October 8, 2010, p14 o. History up for grabs, Diamond Valley Leader, March 28, 2012 p. Advertisement: Wellers Restaurant, Freehold only for sale, Morrison Kleeman, Diamond Valley Leader, March 28, 2012 q. Restaurant’s crash course, Megan Bailey, Diamond Valley Leader, January 1, 2014, p3. Also accessible online - Staff praised after car crashes through Kangaroo Ground eatery. (2022, June 29). Retrieved from https://www.heraldsun.com.au/leader/north/staff-praised-after-car-crashes-through-kangaroo-ground-eatery/news-story/021c896a1ab6d76bd6b73f2e57dc1854 r. Eatery set for revival, Brittany Shanahan, Diamond Valley Leader 15 February 2017; Also, online as Much-loved Wellers of Kangaroo Ground to be relaunched as Italian restaurant Fondata 1872. (2022, June 29). Retrieved from https://www.heraldsun.com.au/leader/north/muchloved-wellers-in-kangaroo-ground-to-be-relaunched-as-italian-restaurant-fondata-1872/news-story/665777fb347584ef483867ae2b536a8f s. Fondata 1872 proves a big hit with food, Diamond Valley Leader 3 May 2017, p3 11. Wellers of Kangaroo Restaurant Bar Entertainment Functions, tri-fold brochure promotional brochure 12. Website Printout: Wellers Restaurant, Live Guide, (2017, January 5). Retrieved from http://www.liveguide.com.au/Restaurants_Bars/VIC/Kangaroo_Ground/Food_Styles/3... 13. Website Printout: Wellers of Kangaroo Ground, Only Melbourne (2017, January 30). Retrieved from http://www.onlymelbourne.com.au/wellers-of-kangaroo-ground 14. Printouts from Fondata 1872 website and Facebook page including colour photograph of sign in front and business card (2017). Related EDHS Collection items • Wellers Hotel of Kangaroo Ground by Jim Allen, Part 1, Newsletter No. 235, Eltham District Historical Society, August 2017. Retrieved from https://elthamhistory.files.wordpress.com/2017/08/edhs-nl-235-aug-2017.pdf • Wellers Hotel of Kangaroo Ground by Jim Allen, Part 2, Newsletter No. 236, Eltham District Historical Society, October 2017. Retrieved from https://elthamhistory.files.wordpress.com/2017/10/edhs-nl-236-oct-2017.pdf • EDHS_03997 - Slide, Wellers Hotel, Pitmans Corner, Eltham-Yarra Glen Road, Kangaroo Ground, c.1975 https://victoriancollections.net.au/items/5e59e36221ea671798ac40eb • EDHS_03998 - Slide, Wellers Hotel, Pitmans Corner, Eltham-Yarra Glen Road, Kangaroo Ground, c.1975 https://victoriancollections.net.au/items/5e59e39e21ea671798ac9c27 • EDHS_03999 - Slide, Wellers Hotel, Pitmans Corner, Eltham-Yarra Glen Road, Kangaroo Ground, c.1975 https://victoriancollections.net.au/items/5e59e3c721ea671798acd2ef • EDHS_04000 - Slide, Wellers Hotel, Pitmans Corner, Eltham-Yarra Glen Road, Kangaroo Ground, c.1975 https://victoriancollections.net.au/items/5e59e3e021ea671798acfd68 • EDHS_04066-18 - Photograph, Wellers Restaurant, Eltham-Yarra Glen Road, Kangaroo Ground, c.Mar. 1989 https://victoriancollections.net.au/items/610f4dafa346aadcee7ac79c • EDHS_04041-26 - Photograph, Wellers Restaurant, 150 Eltham-Yarra Glen Road, Kangaroo Ground, c.May 1988 https://victoriancollections.net.au/items/610e2f4a7d65e7c945a35e69 • EDHS_04437 – Newsclipping, Renovated Weller's Pub to begin its new stage of life by Linley Hartley, Diamond Valley News, 26 January 1988 https://victoriancollections.net.au/items/5de4913921ea6710a46a85c7 • EDHS_04438 - Newsclipping, Wellers Restaurant by Lynne Hillier, Network, October 1988, p14 https://victoriancollections.net.au/items/5de4916f21ea6710a46aea0f • ArtStreams magazine (from Volume 9, 2004) ‘partnered' with Wellers in promoting and supporting the arts and culture. Various advertisements throughout, particular with live performance acts. Numerous references throughout to art and music performances on site. • Stephen Cummings and Joe Camilleri at Wellers Kangaroo Ground, ArtStreams, Vol. 9, No. 4, Sep/Oct 2004, p17 EDHS_04406 - Journal, ArtStreams: Whittlesea, Banyule, Darebin, Manningham, Nillumbik, Yarra; Vol. 9, No. 4, Sep-Oct 2004 https://victoriancollections.net.au/items/5bcc086021ea6804a82a92a9 • Daryl Braithwaite rocks up at Wellers, Fiona Sievers, ArtStreams, Vol.10 No.2, 2005, pp6-7 EDHS_04409 - Journal, ArtStreams: Vol. 10, No. 2, 2005 https://victoriancollections.net.au/items/60f5416ab06f0c13a9419541 • Ephemeral Sculpture by Peter Dougherty, ArtStreams, Vol.10 No.3, 2005, pp7-9. About sculptures created in or on the grounds of culinary establishments throughout the Shire. - Denise Keele-Bedford constructed ‘Ou Well’ at Wellers Restaurant and Vicky Shukuroglou, also at Wellers set up cotton banners printed and painted with natural dyes from onion skins, spinach, radish beetroot, turmeric and charcoal. EDHS_04410 - Journal, ArtStreams: Vol. 10, No. 3, 2005 https://victoriancollections.net.au/items/60f5436db06f0c13a941ae19 • Music at Wellers Restaurant, ArtStreams, Vol.10 No.4, 2005, p23 EDHS_04411 - Journal, ArtStreams: Vol. 10, No. 4, 2005 https://victoriancollections.net.au/items/60f543e4b06f0c13a941b059 • Weller’s Pub, Diamond Valley sketchbook / text by Brian McKinlay ; drawings by Graham Hawley, 1973, pp42-43 EDHS_00856 - https://victoriancollections.net.au/items/590852edd0ce7b14e8177da3 • Gold Field Coaches Stopped Here, Nillumbik now and then / Marguerite Marshall; photographs Alan King with Marguerite Marshall, 2008, pp86-87 EDHS_00977 - https://victoriancollections.net.au/items/5935f315d0cdd42c80f9cc52 External Links: • Historic Kangaroo Ground venue comes up for rare sale. (2022, June 29). Retrieved from https://www.smh.com.au/business/companies/historic-kangaroo-ground-venue-comes-up-for-rare-sale-20120325-1vshw.html • Wellers, Kangaroo Ground property sold with leaseback. (2022, June 29). Retrieved from https://www.urban.com.au/expert-insights/investing/37735-wellers-kangaroo-ground-property-sold-with-leaseback • Wellers, Kangaroo Ground | With Mark Seymour, at one of his …. (2022, June 29). Retrieved from https://www.flickr.com/photos/robertmilesdesign/4564390893/ • 2016 Notice of proposed deregistration - WELLERS OF KANGAROO GROUND PTY LTD 124 435 409. (2022, June 29). Retrieved from https://publishednotices.asic.gov.au/browsesearch-notices/notice-details/WELLERS-OF-KANGAROO-GROUND-PTY-LTD-124435409/35d43b89-159a-4435-963f-daec688a61ca • Search results for: Websites (archived). (2022, June 29). Retrieved from https://trove.nla.gov.au/search/category/websites?keyword=%22wellers%20restaurant%22 29 June 2022 edward weller, wellers of kangaroo ground, wellers hotel, wellers restaurant, mary weller, pittmans corner, fondata 1812 at wellers, historic buildings register, hotels, john weller, kangaroo ground, pitman's corner, bassett-smith collection -
 Melbourne Tram Museum
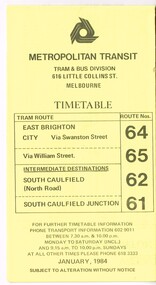
Ephemera - Timetable, Metropolitan Transit Authority (MTA), "Metropolitan Transit Timetables", Jan. 1984
... , July 1983 .9 - Route 15, 16 and 55 - St Kilda Beach to City..., July 1983 .9 - Route 15, 16 and 55 - St Kilda Beach to City ...Set of 13 Metropolitan Transit Tram timetables, folded sheets, 8 to 10 sections, providing timetables for specific routes, day of week giving information on tram times at specific time points, route map, sections and fares and Transport Information Centre telephone number. All printed on yellow paper. .1 - Route 64 (65 via William St), 62 and 61 - dated January 1984. .2 - Route 3 (Darling Road via Swanston St) with route 377 bus on Sundays via Batman Ave. - July 1984 .3 - Route 5 - Malvern Burke Road - City - July 1984. Cover was printed showing route 35 via William St, but has been crossed out in pencil. .4 - Route 6 (Glen Iris - City) and Route 7 (Malvern Town Hall) - July 1984. Cover was printed showing route 36 via William St, but has been crossed out in pencil. .5 - Route 8 - Toorak - City - June 1984. Cover was printed showing route 38 via William St, but has been crossed out in pencil. .6 - Route 10 and 11 West Preston via Collins St and Route 13 via Latrobe St - March 1985. .7 - Route 10 and 12 - South Melbourne and St Kilda Beach - City (Brunswick St) via Collins St and route 17 - Park and Clarendon Sts. - Sept 1984 .8 - Route 15 and 22 - Moreland to City, July 1983 .9 - Route 15, 16 and 55 - St Kilda Beach to City via Swanston St - July 1983. Cover was printed showing route 53 via William St, but has been crossed out in pencil. .10 - Route 19 (Coburg), 18 (Brunswick) and 20 (Bell St) - City - August 1984 .11 - Routes 59 (Airport West), 49 (Niddrie), 52 (Bulla Road), 51 (Essendon Station) and 81 (Essendon Depot) - April 1985. .12 - Route 69 - Kew Cotham Road to St Kilda Beach - Sept. 1984 .13 - Route 72 (Camberwell - City), 32 via William St and route 73 (Camberwell Junction) - August 1984. .14 - Route 1 and 21 - East Coburg - City - August 1983. Full Image of .10 added 9/4/17 following a query about route 19 timetables - see image i6trams, tramways, the met, timetables, melbourne, latrobe st, la trobe st, mta, buses, route 64, route 65, route 3, route 5, route 6, route 8, route 10, route 11, route 12, route 13, route 17, route 15, route 22, route 16, route 55, route 19, route 18, route 20, route 59, route 49, route 52, route 51, route 81, route 69, route 72, route 32, route 73, route 1, route 21 -
 Melbourne Tram Museum
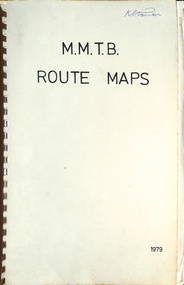
Map, Melbourne & Metropolitan Tramways Board (MMTB), MMTB Route Maps, 1979
... where the various routes branch off St Kilda Road 9 - Batman... where the various routes branch off St Kilda Road 9 - Batman Ave ...Series of colour maps for various tram and bus routes, dated 1979. Also contained, not scanned are letters, reports, and specifications for printing these maps for use in shelters etc. Some have the Transport Information Centre telephone printed on them. Some are finished with a plastic laminate finish on either one or both sides. Show the major cross streets, parks, schools, other tram routes, major stop numbers, and railway lines. See also item 3909 for another example of these. Trams 1 - City route guide - R9/77 - showing all route numbers and destinations that passed through the CBD. 2 - Bourke St tram routes - R4/77 - East Brunswick Blyth St and East Preston Tyler St and intermediate routes, routes 95, 96, 97, 90, 89 and 88. 3 - Malvern, East Malvern, Carnegie, and East Brighton Tram Routes (from St Kilda Junction) - R1/79 - shows routes 5, 3, 67, 66, 61, 62, and 64. 4 - Elizabeth St tram routes - R12/77 - Essendon Airport, West Maribyrnong, North Coburg lines, routes 50, 58, 60, 54, 57, 52. 49, 59, 18, 20 and 19 5 - Flinders St tram routes - R5/78 - North Balwyn, East Burwood, routes 48, 40, 41, Hartwell, 28, 74 and 75 6 - Kew - St Kilda Beach - R1/79 - Route 69. 7 - Mont - Albert City - R11/77, shows routes 43. 47. 45. 44 8 - St Kilda Rd Tram Routes R12/77 - details South Melbourne Beach, route 1 and route 2 and St Kilda Beach routes 15, 16, and 55 otherwise shows where the various routes branch off St Kilda Road 9 - Batman Ave tram routes - R9/77 - Wattle Park, North Richmond and Prahran - routes 70, 71, 78 and 79. 10 - Footscray - Moonee Ponds - R3/81 - Route 82 11 - Swanston St tram guide - R1/79 - lists all routes and route numbers that branch or cross Swanston St between Grattan St and St Kilda Junction. 12 - Toorak Camberwell and Glen Iris tram route with Camberwell Junction and Malvern Town Hall, R1/79, routes 8, 7, 6, 72, and 73 shown. 13 - West Preston - Beach tram routes - R12/77 - routes 10, 11, 9 and 12, 14 - William St tram routes - R12/77 - Route 55, 56, and 63 - South Melbourne Depot and Domain. Buses 1 - Footscray, Sunshine, Deer Park, Nth Altona & Fishermans Bend - R2/79 2 - Box Hill bus routes to Templestowe, Heidelberg & East Kew - R6/78 - notes superseded by R3/82 3 - Plan of Russell St Melbourne bus departure bays. 4 - Box Hill, Mitcham & Ringwood bus routes to East Doncaster & Warrandyte - R3/82 5 - City - Warrandyte & East Doncaster bus routes - R3/82 & R6/78 6 - Bulleen - City - Port Melbourne - Garden City Bus route - R6/78 7 - North Altona - City bus route - 11/78 8 - Clifton Hill - Elsternwick - R2/79 9 - La Trobe - Northland - West Heidelberg - City Bus Service via East Freeway - 11/79 and R3/81 10 - Box Hill, Mitcham & Ringwood Bus Routes to East Doncaster & Warrandyte - R10/84 - with the Metropolitan Transit logo.Yields information about tram and bus routes in late 1970s early 1980s.Book - brown comb binding, card and clear plastic covers containing both bound and unbound maps and documents.K C Painter on front cover in ink.tramways, mmtb, tram routes, maps, bus routes, route numbers, routes, route guide -
 Melbourne Tram Museum
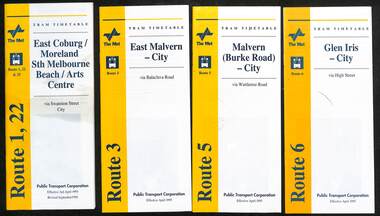
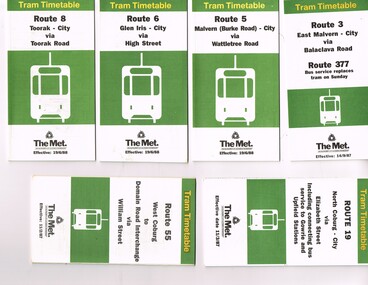
Ephemera - Timetable, The Met, Set of 18 Tram Timetables, produced by The Met, 1986 - 1988
... - dated 14/9/1987 .2 - Route 5 - Malvern Burke Road - City via... - replaced by bus 377 on Sundays - dated 14/9/1987 .2 - Route 5 ...Set of 18 Tram Timetables, produced by The Met for various routes, white cover with two green, multi fold horizontal sheet, giving a route map, description, notes, time points, information contact details and types of tickets (Neighbourhood and Travelcards) and where they could be purchased. .1 - Route 3 - East Malvern - City via Balaclava Road - replaced by bus 377 on Sundays - dated 14/9/1987 .2 - Route 5 - Malvern Burke Road - City via Wattletree Road - 19/6/1988 .3 - Route 6 - Glen Iris - City via High St - 19/6/1988 .4 - Route 8 - Toorak - City via Toorak Road - 19/6/1988 .5 - Route 19 - North Coburg - City via Elizabeth St including connecting bus service to Gowrie and Upfield stations - 11/3/1987 .6 - Route 55 - West Coburg - Domain Interchange via William St - 11/2/1987 .7 - Route 57 - West Maribyrnong - City via North Melbourne - Route 357 bus replaces tram on Sunday - 1/12/1986 .8 - Route 59 - Airport West - City via Essendon -1/12/1986 .9 - Route 64 - East Brighton - City via Hawthorn Road - 14/9/1987 .10 - Route 67 - Carnegie - City via Glenhuntly Road - 14/9/1987 .11 - Route 69 - Kew (Cotham Road) - St Kilda Beach via Glenferrie Road - 19/6/1988 .12- Route 72 - Camberwell - City via Malvern Road - 19/6/1988 .13 - Route 75 - East Burwood - City via Flinders St - 15/2/1988 .14 - Route 78, Route 79, North Richmond - Prahran via Chapel St and North Richmond - St Kilda Beach via Chapel St - 13/7/1987 .15 - Route 82 - Footscray Moonee Ponds via Highpoint City and Route 223 bus replacement for Saturday afternoon and all day Sunday. 3/8/1987 .16 - Route 88 - Bundoora - City via Preston .17 - Route 96 - East Brunswick - St Kilda Beach via Bourke St City - 22/11/1987 .18 - Route 111 - Royal Exhibition Buildings - Port Melbourne via Bourke St City - 20/12/1987. (2nd copy added 1/4/20201( .19 - Route 600 - St Kilda - Middle Brighton via Elwood - 1/12/1986 Full Image of .5 added 9/4/17 following a query about route 19 timetables - see image i6.trams, tramways, timetables, tickets, tram services, route 3, route 5, route 6, route 19, route 55, route 57, route 59, route 64, route 8, route 67, route 69, route 72, route 75, route 78, route 78, route 79, route 82, route 88, route 86, route 111, route 600 -
 Flagstaff Hill Maritime Museum and Village
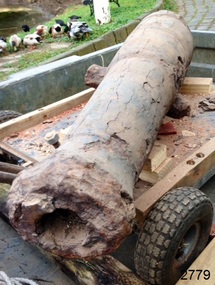
Weapon - Cannon, circa 1825
HISTORICAL INFORMATION In an article dated 26 March 1963, the Warrnambool Standard reported: “A cannon which has lain on the ocean floor since the barque, Children, was wrecked at Childer’s Cove on January 15, 1839, was raised by three Warrnambool skindivers at the week-end…The cannon, weighing about 750 lb. and 4-ft. 6-in. in length…is in excellent order considering the length of time it has remained under-water”. No conservation measures were taken at that time, other than chipping off the marine growth with hammers and cold chisels. The minutes for the 4 February 1974 meeting of the Flagstaff Hill Planning Board recorded that “a cannon recovered some time ago was lying in the garden of [one of the three original divers] and that it could be picked up at any time”. Peter Ronald, past Manager and Diver for Flagstaff Hill, notes that the CHILDREN cannon would have been recovered by the other divers around 1964. When the cannon came into care of Flagstaff Hill it was given basic conservation relevant to the time. (At the same meeting the Board was advised of the recovery of an anchor from the wreck of the CHILDREN by Flagstaff Hill divers (Peter Ronald, Colin Goodall and Gary Hayden, and Hank Howey and Andrew Coffee), and its interim relocation in the sea at the end of the Warrnambool Breakwater while awaiting conservation). The CHILDREN was owned by the pioneering Henty family of Portland. She was en route from Launceston to Adelaide, when she foundered in rough conditions at Childers Cove on 14 January 1839. The CHILDREN was a small three-masted barque, only 29 metres long and 254 tons weight, with 14 crew members and 24 passengers (including 9 children) on board. The ship was also carrying an awkwardly ballasted cargo of 1500 sheep, 8 bullocks, 7 horses, 5000 London house bricks, 6 whaling boats, and general trade goods. When the CHILDREN was driven into the limestone stack at the entrance to the cove, the seas smashed her into pieces within half an hour, and 16 lives were lost. The CHILDREN was an all-wooden ship, built in 1825 at Liverpool, and her shipwreck in 1839 is one of colonial Victoria’s earliest and most significant maritime disasters. There is little left to mark the tragedy on the seabed now, apart from some of the house bricks intended for the Henty’s Portland Bay settlement. Despite its poor condition, the CHILDREN’s signal cannon remains an important and interpretable record of her demise, (along with her anchor, the bottom half of her ship’s bell, and portions of a brass porthole - artefacts that are also in the Flagstaff Hill collection). In 2015 the CHILDREN cannon will undergo further conservation. (Conservation Management Plan for Victorian Guns and Cannon, South Western Victoria, May 2008, ref W/F/06) The shipwreck of the CHILDREN is of state significance — Victorian Heritage Register No. S116.A 1.3 metre iron 6pdr cannon recovered from the wreck of the CHILDREN. The shape of the cannon tapers from a thick round breech to a flared muzzle, with an 8 centimetre bore, and two side trunnions for pivoting on a wooden gun carriage. It was recovered from the shipwreck site of the CHILDREN by local divers in 1963. This small muzzle-loading signal cannon is in poor and unrestored condition. The cannon’s upper profile of smooth grey metal casing has corroded off, leaving an extensively oxidised rough red surface of crumbling iron. The bottom half of the cannon remains intact although the outer smooth casing also appears to be separating from the iron core of the barrel. Original grey casting is also missing from the breech and muzzle ends of the cannon. Corrosion and spalling of the upper surface layer of the cannon has removed the maker’s marks and specificationsflagstaff hill, warrnambool, shipwrecked coast, flagstaff hill maritime museum, maritime museum, shipwreck coast, flagstaff hill maritime village, great ocean road, the children, ship’s cannon, signal cannon, childers cove, 1839 shipwreck, conservation of marine artefactsm, shipwreck-coast, flagstaff-hill-maritime-village, cannon, 6pdr small bore cannon, children cannon, defence, children, shipwreck, 1839 -
 Bendigo Military Museum
Photograph - Johnson Ground Elevation Meter (JGEM) Survey Vehicle - Army Survey Regiment, Fortuna, Bendigo, c1960s
This is a set of 16 photograph of the Royal Australian Survey Corps’ Johnson Ground Elevation Meter (JGEM) Survey Vehicle taken at the Army Survey Regiment, Fortuna, Bendigo. The JGEM vehicle was extensively used by RA Svy within Australia from the late 1960s. A limited number of Ground Elevation Meter (GEM) station wagon type vehicles were manufactured by General Motors Corporation (GMC) in the USA for the United States Geological Survey, Canada’s mapping agencies, RA Svy and National Mapping (Natmap). The GEM was a four-wheel drive, four-wheel steer vehicle. Four-wheel steering was necessary to avoid systematic errors caused by non-tracking of front and rear wheels on conventionally steered vehicles. The manufacturer substituted the rear axle with a front axle and connected them to form the four-wheel steering mechanism. The two Australian GEM vehicles, referred to as Johnson GEMs (JGEMs) were converted into right-hand drive. After delivery in 1964, acceptance Natmap and RA Svy testing and operator training was undertaken at the Army's School of Military Survey located at Balcombe, Victoria. A small fifth wheel was mounted on a cantilever arm suspension midway between the front and rear wheels on the right side of the vehicle. It was lowered to and raised from its operating position by use of a constant pressure air cylinder. A telescopic bar, suspended between the front and rear axles, provided the reference datum for the angle measurement. The wheel provided the velocity or distance signal through a pulse generator system. A sensitive pendulum mounted on this bar provided the angle measurement for each minute distance traversed. The JGEM contained electromechanical instruments used to determine relative elevations, by trigonometric principles, along a traversed path. These relative elevations were obtained through apparatus which measures the instantaneous angle of inclination of the road and the instantaneous velocity of the meter along such a path. Road routes over which the JGEM operated were planned so that each started and ended as near as practicable to an existing point of known elevation (formally referred to as a level traverse bench mark). The difference in height from the bench mark and the road surface alongside the JGEM’s fifth wheel was measured with a level and staff. Along each route, mapping control photo reference points where new elevation values were required were identified on aerial photographs. Under favourable conditions it was possible to survey as much as 160km in an ordinary working day. The first of RA Svy’s JGEM operations was undertaken in 1:250,000 scale map areas of Queensland. CPL John Hook was the JGEM’s main operator in the early 1970s undertaking operations covering 1:250,000 scale map blocks over northern Victoria and central NSW, each requiring 36 points (9 runs of photography and 4 points across. SPR Lyn Thompson and SPR Bob McDonagh teamed with CPL Hook on some of these JGEM operations. When RA Svy was integrated into the Royal Australian Engineers in 1996, the JGEM vehicle with the Survey Corps collection was donated to its museum. It is believed to be the last of the original manufactured fleet in existence. The JGEM has undergone extensive refurbishment to achieve roadworthiness and is currently housed at The Australian Army Museum of Military Engineering, Hoslworthy Barracks, NSW. It can be viewed by making an appointment with the museum’s curator.This is a set of 16 photograph of the Royal Australian Survey Corps’ Johnson Ground Elevation Meter (JGEM) Survey Vehicle taken at the Army Survey Regiment, Fortuna, Bendigo. The photographs were on 35mm slide film and were scanned at 96 dpi. They are part of the Army Survey Regiment’s Collection. .1) - Photo, colour, c1960s, Johnson Ground Elevation Meter (JGEM) Survey Vehicle .2) - Photo, colour, c1960s, JGEM instrumentation, on-board computer. .3) - Photo, colour, c1960s, JGEM instrumentation. .4) - Photo, colour, c1960s, JGEM instrumentation, on-board computer. .5) - Photo, colour, c1960s, JGEM tyre pressure controller .6) - Photo, colour, c1960s, JGEM rear doors, SGT Geoff Briggs. .7) - Photo, colour, c1960s, JGEM 5th wheel distance/angle measurement device in lowered position, SGT Geoff Briggs. .8) - Photo, colour, c1960s, JGEM 5th wheel distance/angle measurement device in lowered position. .9) & .10) - Photo, colour, c1960s, JGEM tyre pressure system, SGT Geoff Briggs. .11) - Photo, colour, c1960s, JGEM tyre pressure system. SGT Geoff Briggs. .12) - Photo, colour, c1960s, JGEM levelling scope, levelling staff, unidentified technicians. .13) & .14) - Photo, colour, c1960s, JGEM levelling scope, unidentified technician. .15) & .16) - Photo, colour, c1960s, probably survey operation adjusted height plotted on block base sheet. .1P to .16P - Some of the equipment is annotated on the frame of the 35mm slides.royal australian survey corps, rasvy, army survey regiment, army svy regt, fortuna, asr, surveying -
 Eltham District Historical Society Inc
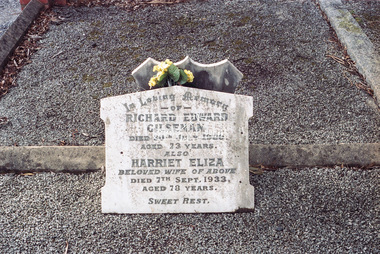
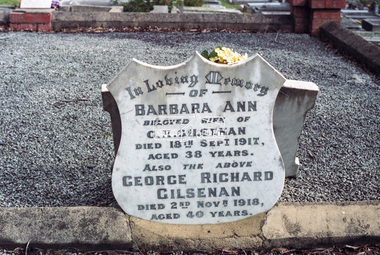
Negative - Photograph, Harry Gilham, Grave of Richard Edward Gilsenan and his wife, Harriet Eliza, Eltham Cemetery, Victoria, 1 Aug 2007
Richard Gilsenan was a retired schoolteacher living at “Rosebank” in Eltham, now the site of the Living and Learning Centre. In 1906, Eltham Primary School’s headmaster John Brown died, and Richard was brought out of retirement (briefly) to be acting headmaster. His son Harold was a junior teacher there at the time. Thereafter, Richard was Secretary of the Eltham Progress League and more importantly was a magistrate at the Eltham Court of Petty Sessions. Cases commonly brought before him included not sending a child to school (typical fine 5/- or eight hours in the lock-up), not having a child vaccinated (fixed fine 40/-), stealing fruit from an orchard, selling liquor out of hours, and offensive language and behaviour. Other miscellaneous cases were allowing cattle to wander, selling cigarettes to a minor, carelessly burning off rubbish on a hot windy day, dumping a dead horse in the Diamond Creek, and youths throwing ripe fruit at passers-by. Richard died in 1920 and is buried in Eltham Cemetery with his wife Harriet Eliza. In mourning his passing, his peers noted that his decisions had been given in a very fair way. Incidentally, his son Harold (the teacher) died in 1921 after being trampled by a horse while en route from Eltham to Cathkin (his then school). In Loving Memory Of Richard Edward Gilsenan Died 30th July 1920 Aged 73 years Also Harriet Eliza Beloved wife of above Died 7th Sept. 1933 Aged 78 years Sweet Rest And In Loving Memory Of Barbara Ann Beloved wide of G. R. Gilsenan Died 18th Sept. 1917 Aged 38 years Also the above George Richard Gilsenan Died 2nd Nov. 1918 Aged 40 yearseltham cemetery, gravestones, memorials, barbara ann gilsenan, george richard gilsenan, harriet eliza gilsenan, richard edward gilsenan -
 Eltham District Historical Society Inc
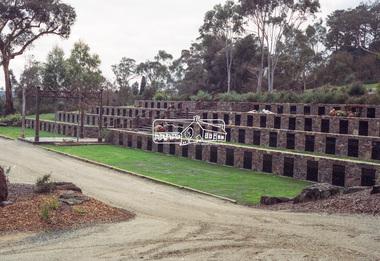
Negative - Photograph, Harry Gilham, Terrace Wall Section, Eltham Cemetery, Mount Pleasant Road, Eltham, 1 Aug 2007
Richard Gilsenan was a retired schoolteacher living at “Rosebank” in Eltham, now the site of the Living and Learning Centre. In 1906, Eltham Primary School’s headmaster John Brown died, and Richard was brought out of retirement (briefly) to be acting headmaster. His son Harold was a junior teacher there at the time. Thereafter, Richard was Secretary of the Eltham Progress League and more importantly was a magistrate at the Eltham Court of Petty Sessions. Cases commonly brought before him included not sending a child to school (typical fine 5/- or eight hours in the lock-up), not having a child vaccinated (fixed fine 40/-), stealing fruit from an orchard, selling liquor out of hours, and offensive language and behaviour. Other miscellaneous cases were allowing cattle to wander, selling cigarettes to a minor, carelessly burning off rubbish on a hot windy day, dumping a dead horse in the Diamond Creek, and youths throwing ripe fruit at passers-by. Richard died in 1920 and is buried in Eltham Cemetery with his wife Harriet Eliza. In mourning his passing, his peers noted that his decisions had been given in a very fair way. Incidentally, his son Harold (the teacher) died in 1921 after being trampled by a horse while en route from Eltham to Cathkin (his then school). In Loving Memory Of Richard Edward Gilsenan Died 30th July 1920 Aged 73 years Also Harriet Eliza Beloved wife of above Died 7th Sept. 1933 Aged 78 years Sweet Rest And In Loving Memory Of Barbara Ann Beloved wide of G. R. Gilsenan Died 18th Sept. 1917 Aged 38 years Also the above George Richard Gilsenan Died 2nd Nov. 1918 Aged 40 yearseltham cemetery, gravestones, memorials -
 Eltham District Historical Society Inc
Folder, Pioneers & Painters; Shire of Eltham Historical Society research notes, background information, etc, 1969-1986, 1969-1986
Material pertaining to the production of a history of the Shire of Eltham, "Pioneers & Painters: One Hundred Years of Eltham and its Shire" in recognition of the shire's centenary in 1971 Item Title Caption 04768-1 Newspaper clipping - The Eltham of 1905; Gellibrand our first white visitor? Diamond Valley News, 24 June 1969, p5 04768-2 Newspaper clipping - The Eltham of 1905; Gellibrand our first white visitor? Heidelberger, 25 June 1969 04768-3 Notes on Eltham District Road Board Members 1866-1871 04768-4 Notes on Eltham District Road Board Members 1866-1871 04768-5 Map showing Gellibrand's likely route through district 12-13 February 1836 and Hoddles's route of Febrary 1838 04768-6 Notes by Shire Secretary, M.B. Watson regarding meeting with Reverend Longfield regarding history of St Margaret's Church 04768-7 Alan Marshall's notes from discussion with Mr. F. Barrett regarding SEPP images 611, 635 and 636 SEPP_0611 SEPP_0635 SEPP_0636 04768-8 Transcripts of letter from local residents to Charles Joseph Latrobe requesting a bridge over the Plenty River dated 10 April 1849 and his reply dated 5 May 1849; from Latrobe Library Archives - Land Branch Records 04768-9 Notes on history of Eltham Shire, Centenary events and publication of Pioneers & Painters for release in conjunction of opening of new Library 04768-10 Newspaper clipping - Glossy record of shire's romantic past and the people who made it by Fab Calafuri, Diamond Valley News, Tuesday, December 16, 1986, p18 SEPP_0755-3 Letter: Acknowledgement from Colin J. Bock, Eltham Shire Secretary to A.R. Thomas of Bendigo for copy of 1913 photograph of Shire of Eltham Councilors, 21 May 1973 A.R. Thomas' father Mr. A.G. Thomas, C.E., was the Shire Secretary at the time in 1913. Cross Ref: SEPP_0755 The idea to develop a book on the history of the Shire of Eltham to be edited by noted author, Alan Marshall in celebration of the shire's centenary was initiated in 1969. The Shire of Eltham Historical Society undertook significant research in conjunction with Alan Marshall locating material at various institutions and other societies; interviewing longer term residents and a public campaign through the local press to acquire photographic material for duplication and use in the book. The public campaign received generous response and the material collected became the genesis for the Shire of Eltham Pioneers Photograph collection now held in partnership between Eltham District Historical Society and Yarra Plenty Regional Library (Eltham Library).Paper documents of various sizes and newspaper clippingsa.g. thomas, a.r. thomas, alan marshall, bridge road, charles joseph latrobe, council members, d.w. lachlan, eltham district road board, eltham shire council, ernie orford, f. barrett, francis rogerson, g. bransprone, james donaldson, james johnston, john bell, john thomson, joseph tice gellibrand, lower plenty bridge, m.b. watson, main road, map, patrick turnbull, peter morris, pioneers and painters, post office, rev. longfield, sepp, shire of eltham pioneers photograph collection, shire secretary, st margaret's church, thomas armstrong, thomas bell, thomas sweeney, william bell (1796-1870), centenary celebrations, christmas hills, clifton pugh, david newbury, dudley street, eltham, gareth jones roberts, hurstbridge, john perceval, joy peck, kangaroo ground, kinglake, lower plenty, luther haley general store, montmorency, neil douglas, panton hill, peter glass, research (vic.), sheila ferguson, shire of eltham, st andrews, yarra glen -
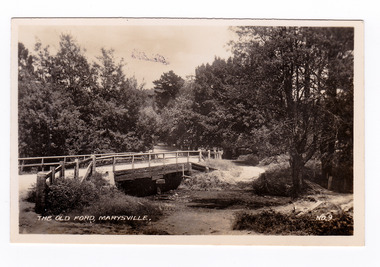
 Marysville & District Historical Society
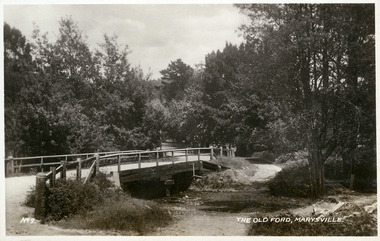
Postcard (item) - Black and white postcard, Valentine Publishing Co. Pty. Ltd, The Old Ford, Marysville No.9, 1923-1963
An early black and white photograph of the old ford in Marysville, Victoria.An early photograph of the bridge at the end of the main street in Marysville which is near the Buxton-Marysville Road and the Marysville-Wood's Point Road intersection. The Marysville-Buxton Road joins the Maroondah Highway which leads to Alexandra. The Marysville-Woods Point Road was originally part of the Yarra Track, constructed in the early 1860s to provide access between Healesville and the Woods Point Goldfields. Despite the steep terrain and engineering difficulties, the Yarra Track soon became a busy route used by pack horses, horse-drawn drays, and wagons. Today this sealed mountain road is a popular scenic drive between Marysville and Warburton. This photograph was published by the Valentine Publishing Co Pty. Ltd as a souvenir of Marysville.marysville, victoria, valentine publishing co, souvenir, buxton-marysville road, marysville-wood's point road, maroondah highway, alexandra, yarra track, mining -
 Bendigo Military Museum
Photograph - PHOTOGRAPHS WW1, Originals: 1915
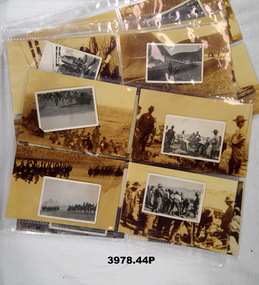
The photos in the collection relate to Thomas Robert JONES No 1982 AIF. Refer Reg No 1377 for his service details..1) - .22) Photos, black / white, showing men, training, the desert, Dardanelles, Turkish prisoners, leaving Egypt. .23) - .44) Enlargement copies of photos .1) - .22), sepia.Hand written on the rear in pen: .1) Housing parade on the desert Egypt, bugler band 6th Battalion. .2) Australian Field Artillery exercising horses near the pyramids. .3) Some of the buglers of the 6th Battalion with their identification disks as eyeglasses. .4) Serving out rations. .5) 6th Battalion having a short halt during a route march on the desert. .6) 18 Pounder Field Gun Australian Artillery. .7) 'Come to the Cook House Door' 6th Battalion AIF. .8) Lieut WATSON - Machine Gun being vaccinated by Lieut BALFE A Coy. Both these Officers are amongst the fallen. .9) 6th Battalion AIF preparing to leave Mena Camp for the Dardanelles. .10) A Turk captured on the morning of 25th April 1915 on board the troop ship Galeka. .11) Wounded alongside of hospital ship Galeka. .12) HMS Vengeance at the Dardanelles. .13) Hospital ship Sudan off Gaba Tepe. .14) Observation balloon off Cape Helles. .15) British Destroyer off Cape Helles. .16) Cape Helles, Dandanelles. .17) Turkish prisoners captured at the Suez _ _ _ Barracks, Cairo. .18) Turkish prisoners. .19) <> Guides near pyramids Mena. .20) Method of irrigation on the Nile, Egypt. .21) Going on leave into Cairo. .22) View of Cairo mosques in foreground taken from the Citadel. .23) - .44) On rear in stamp form: Dennis Major, 7 Bancroft St Bendigo Vic 3550. Tel & fax 03 544 2445 photography, military, ww1 -
 Eltham District Historical Society Inc
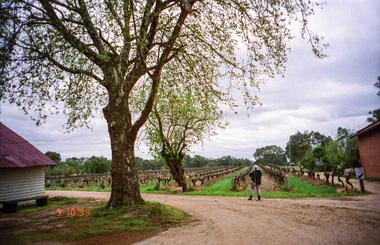
Photograph, Chateau Tahbilk Winery; 9 Oct 1994, 20/11/1994
Brief visit of the Major Mitchell Trail. This car based trail follows the route of the famous explorer right across Victoria. It crosses the Goulbum River near Chateau Tahbilk and Mitchelton Wineries and passes through Nagambie.Record of the Society's history of activities - Spring 1994 excursionRoll of 35mm colour negative film, 4 stripsKodak Gold 100-4shire of eltham historical society, activities, chateau tahbilk winery, major mitchell trail -
 Eltham District Historical Society Inc
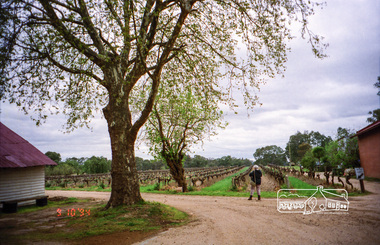
Photograph, Chateau Tahbilk Winery; 9 Oct 1994, 20/11/1994
Brief visit of the Major Mitchell Trail. This car based trail follows the route of the famous explorer right across Victoria. It crosses the Goulbum River near Chateau Tahbilk and Mitchelton Wineries and passes through Nagambie.Record of the Society's history of activities - Spring 1994 excursionRoll of 35mm colour negative film, 4 stripsKodak Gold 100-4shire of eltham historical society, activities, chateau tahbilk winery, major mitchell trail -
 Eltham District Historical Society Inc
Photograph, Chateau Tahbilk Winery; 9 Oct 1994, 20/11/1994
Brief visit of the Major Mitchell Trail. This car based trail follows the route of the famous explorer right across Victoria. It crosses the Goulbum River near Chateau Tahbilk and Mitchelton Wineries and passes through Nagambie.Record of the Society's history of activities - Spring 1994 excursionRoll of 35mm colour negative film, 4 stripsKodak Gold 100-4shire of eltham historical society, activities, chateau tahbilk winery, major mitchell trail -
 RSL Victoria - Anzac House Reference Library and Memorabilia Collection
Diary of Herbert Newton Lowe, Herbert Newton Lowe, March 1917 to February 1918
Diary covers the period from 9 March 1917 to 10 February 1918 on the Western Front. Lowe was later (Aug 1918) to be awarded the Military Medal for his actions on the Somme. Military Medal 'On the 11th/12th August, 1918, during operations on the SOMME, near PROYART, this man, just previous to the attack showed great devotion to duty in laying and maintaining alternative routes up to the front line, and after the attack had commenced he acted as linesmen, and throughout the operation, during which the lines were cut on several occasions, he went out under heavy shell and machine gun fire and repair the lines thereby enabling communication to be maintained and valuable information reaching Headquarters without delay. His splendid example inspired his comrades to volunteer to continue this most important work should he become a casualty.' Source: 'Commonwealth Gazette' No. 61 Date: 23 May 1919Black, softcovered notebook. WW1 diary of Herbert Lowe (3rd Divisional Signal Company, Reinforcement 1 Wireless Section).ww1, western front, diaries, herbert newton lowe, 3 divisional signal company -
 Eltham District Historical Society Inc
Negative - Photograph, Mail coach en route to Hurstbridge, c.1922
Coach with flaps takes aboard passengers. It travelled between Kinglake and Hurstbridge. The vehicle has advertising on the side indicating: W. BODY. HURSTBRIDGE bread and pastry. The Advertiser on 15 Sep 1922 has a display advertisement on page 2 indicating that Hurstbridge bakery 'W. Body wishes to notify the Public of Hurstbridge and surrounding district that he has purchased Mr Oliver's business'. The Advertiser, Friday 10 November 1922, page 2: Mr J. D. Chalmers, who runs the motor service from Hurstbridge to Kinglake, has just had a large, body built on a two-ton motor, which will be serviceable for either 25 passengers or general goods. The work was entrusted to Mr. D.G. Graham, motor and coach builder, Hurstbridge, who completed it within a month, the finish, painting, etc.. being quite up to the standard of a city shop. The mail coach operated the route between Kinglake and Hurstbridge motor route, on which Mr. Sharpe had pioneered and run a motor mail route with a bus which carried 20 passengers, for many years but Sharpe's license for his motor bus was refused by the Country Roads Board mid 1930 as his bus was considered too large . In February 1935, Mr Sharpe was granted a license to carry passengers between Hurstbridge and Kinglake and Mr Kell between Kinglake and Hurstbridge. In 1936 the mail contract from Heidelberg to Knglake was via car and members of the community were concerned that there was no further any conveyance of passengers from Hurstbridge to Kinglake.This photo forms part of a collection of photographs gathered by the Shire of Eltham for their centenary project book,"Pioneers and Painters: 100 years of the Shire of Eltham" by Alan Marshall (1971). The collection of over 500 images is held in partnership between Eltham District Historical Society and Yarra Plenty Regional Library (Eltham Library) and is now formally known as 'The Shire of Eltham Pioneers Photograph Collection.' It is significant in being the first community sourced collection representing the places and people of the Shire's first one hundred years.Digital image 4 x 5 inch B&W Neg 9 x 12.5 cm B&W printsepp, shire of eltham pioneers photograph collection, kinglake, mail coach, w. body, public transport, bus, bus travel, hurstbridge, pioneers and painters -
 Marysville & District Historical Society
Photograph (item) - Black and white photograph, Valentine Publishing Co. Pty. Ltd, The Old Ford, Marysville No.9, 1923-1963
An early black and white photograph of the old ford in Marysville, Victoria.An early photograph of the bridge at the end of the main street in Marysville which is near the Buxton-Marysville Road and the Marysville-Wood's Point Road intersection. The Marysville-Buxton Road joins the Maroondah Highway which leads to Alexandra. The Marysville-Woods Point Road was originally part of the Yarra Track, constructed in the early 1860s to provide access between Healesville and the Woods Point Goldfields. Despite the steep terrain and engineering difficulties, the Yarra Track soon became a busy route used by pack horses, horse-drawn drays, and wagons. Today this sealed mountain road is a popular scenic drive between Marysville and Warburton. This photograph was published by the Valentine Publishing Co Pty. Ltd as a souvenir of Marysville.marysville, victoria, valentine publishing co, souvenir, buxton-marysville road, marysville-wood's point road, maroondah highway, alexandra, yarra track, mining -
 Marysville & District Historical Society
Photograph (item) - Colour tinted photograph, Valentine Publishing Co. Pty. Ltd, The Old Ford, Marysville No.9, 1923-1963
An early colour tinted photograph of the old ford in Marysville, Victoria. This photograph was published by the Valentine Publishing Co Pty. Ltd. as a souvenir of Marysville.An early photograph of the bridge at the end of the main street in Marysville which is near the Buxton-Marysville Road and the Marysville-Wood's Point Road intersection. The Marysville-Buxton Road joins the Maroondah Highway which leads to Alexandra. The Marysville-Woods Point Road was originally part of the Yarra Track, constructed in the early 1860s to provide access between Healesville and the Woods Point Goldfields. Despite the steep terrain and engineering difficulties, the Yarra Track soon became a busy route used by pack horses, horse-drawn drays, and wagons. Today this sealed mountain road is a popular scenic drive between Marysville and Warburton. This photograph was published by the Valentine Publishing Co Pty. Ltd as a souvenir of Marysville.marysville, victoria, valentine publishing co, souvenir, buxton-marysville road, marysville-wood's point road, maroondah highway, alexandra, yarra track, mining -
 Glen Eira Historical Society
Article - TRAMWAYS IN GLEN EIRA
Contains 9 items: 1/Typed statements from Keith Stodden, dated 03/09/2004, contributing his list of tram routes in Glen Eira from 1920-1970 and 1970-2004. 2/’Trams in Glen Eira (Caulfield) – A Time Line History’, by Keith Stodden, dated 03/09/2004, listing opening and conversion dates and a detailed time-line from 1888 through 1995, of tram lines in Glen Eira (7 typed pages). Included is Mr Stodden’s handwritten draft of this time-line (13+2 pages). 3/’Trams in Glen Eira, notes prepared by Keith Stodden’, dated 27/05/2004, briefly describing tram routes in Glen Eira (2 pages). 4/Page from unnamed Melbourne newspaper (dated December 1895 in pen) with advertisement for tendering for lease of property for Caulfield Tramway. 5/’Our Tramways’, photocopy of cutting from unnamed newspaper, hand dated 1913, about recent developments on Melbourne tramways. 6/’Melbourne and Metropolitan Tramways Board, location of cars at end of 28 day period, 16 June 1928’, listing by tram depot (2 pages); ‘Melbourne and Metropolitan Tramways Board, location of cars at end of 28 day period, 9 June 1934’, listing by tram depot (2 pages); ‘Melbourne and Metropolitan Tramways Board, location of cards at end of financial year, 30 June 1938’, listing by depot (2 pages). 7/’Glenhuntly Road’, cutting from Southern Cross newspaper, dated 14/05 but without the year (perhaps 1980), with brief history of Glenhuntly Road and photograph of first electric tram there, April 1913. 8/Flyer (2 pages) for ‘The Tramway Society of Victoria Ltd’, about the history of the Society (undated). 9/’Caulfield Conservation Study-Tramways Reservation-Dandenong Road’, photocopied description (5 pages) of reservations in the centre of Dandenong Road, with photographs. Assessment and one photograph dated March 1994.tram services, tram depots, trams, glen eira, caulfield, transport, glen huntly road, leslie street, elsternwick, hawthorn road, grange road, dandenong road, derby road, carnegie, balaclava road, stodden keith, glen huntly depot, caulfield tramway, elsternwick, watts thomas, elstercreek, architectural features, flannagan leonard j., ward andrew, tram companies, land transport, tram shelter -
 Bendigo Historical Society Inc.
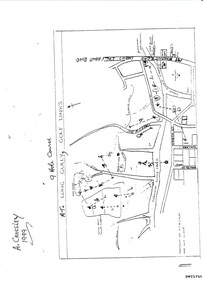
Document - LONG GULLY HISTORY GROUP COLLECTION: THE LONG GULLY GOLF LINKS
Some history of the Long Gully Golf Links, a 9 Hole Course, by John Harvey. First page has a map of the area showing where the holes are and different features. There is a description of the tees and the route taken around the course.Dates when the Eaglehawk, Neangar park, Kangaroo Flat Golf Clubs and the Long Gully Playground were opened.bendigo, history, long gully history group, the long gully history group - the long gully golf links, a crossley, john harvey, long gully rec, dai gum san reservation, quarry hill golf club, bendigo golf club, marong gulf club, miss colgan, sacred heart cathedral choir, mechanics institute, rose of australia hotel, north hercules and energetic mine site, les thomas, tom austen, pearl south mullock heap, doc catford, clubs wearne, pearl mining co's diggings, pearl south, pearl east, bill and faye osterfield, ellen lee osterfield, eaglehawk gold club, neangar park golf club, f m fitzpatrick, kangaroo flat golf club, long gully playground, pearl sands, ennor brothers, birchmore brothers, shirley harvey, belvoir park, harold ennor, george ennor -
 Bendigo Historical Society Inc.
Document - BASIL MILLER COLLECTION: TRAMS - 'RUNNING JOURNAL'
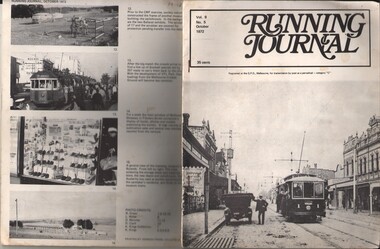
Journal of the Tramway Museum Society of Victoria Ltd. Volume 9, No.5, 35 cents, October 1972. 16 pages. Front cover picture (right) shows car no. 1 of Prahran and Malvern Tramways Trust fleet in High Street Malvern. The P&M T T commenced in 1910 with some four and a half route miles along High Street, Glenferrie Road and Wattletree Road. When absorbed by the M&M T B in 1920 its routes totalled over 35 miles.person, individual, basil miller -
 Victorian Aboriginal Corporation for Languages
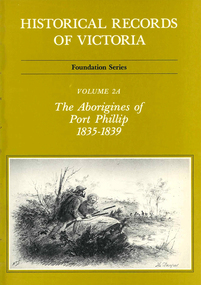
Book, Ian Macfarlane, Historical records of Victoria : foundation series : volume 2A : the Aborigines of Port Phillip 1835-1839, 1982
Reproductions of various transactions and reports dealing with Aboriginal people in Port Phillip in the period 1835-39, beginning with some of the earliest reports and tracing the evolution of government interaction and policy towards Aborigines in the 19th century. Covers mission work, government reports, the native police, conflicts with squatters, with numerous illustrations and original reports. Contents: Part I, Evolution of British policy Ch. 1. Proposals to appoint protectors of aborigines Ch. 2. Racial conflict in the year of official settlement at Port Phillip Ch. 3. House of Commons Select Committee on Aborigines Part II, The Wesleyan Mission at Buntingdale Ch. 4. Establishment and early operations of the Wesleyan mission Part III, The Government acts Ch. 5. Establishing the first government mission 1835-7 Ch. 6. Food and clothing for the Aborigines Ch. 7. Punishment of Aborigines found drunk, 1836-8 Ch. 8. Operations of the government mission, November 1837 to March 1839 Ch. 9. First attempt to form a native police corps Part IV, Growing conflict with squatters, 1837-8 Ch. 10. The disappearance of Gellibrand and Hesse Ch. 11. Attacks in the Western District Ch. 12. Attacks on the overland routes to Port Phillip Ch. 13. Evolution of policy in Sydney, 1838.b&w illustrations, b&w photographs, tables, document reproductionsvictorian history, colonisation, justice system -
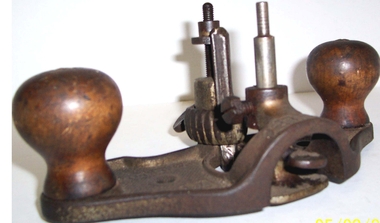 Whitehorse Historical Society Inc.
Tool - Router, c1907
From the estate of Werner Weiss of 13 Lionel Street East DoncasterSteel Stanley brand two handed wooden steel router - Stanley 71 - grooving bit fitted is 1.2cm wide. Different size bits can be installed. Height of bit can be adjusted as can the depth to which groove can be used.Stanley No.71. Patent 10-29-01 Pat 9-10-07trades, carpentry