Showing 165 items matching "single track"
-
 Ballarat Tramway Museum
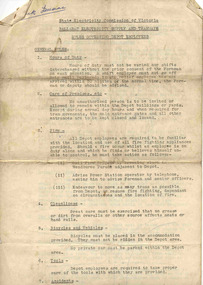
Document - Instruction, State Electricity Commission of Victoria (SECV), SEC "Rules Governing Depot Employees" and "Rules Governing Track Repair Employees", 1958
... Governing Depot Employees' consisting of three pages and a single... Governing Depot Employees' consisting of three pages and a single ...Gestetner reproduced 'State Electricity Commission of Victoria / Ballarat Electricity Supply and Tramways / Rules Governing Depot Employees' consisting of three pages and a single page "Rules Governing Track Repair Employees", with welding repair notes on the rear in pencil and ink showing location and where welds done and some dates (1958). Document details General rules such as hours of duty, fire, accidents behaviour; Depot Operation - Safety Rules detailing many procedural rules about work safety on trams. The 4th page details rules governing track repair employees, such as safety, breaking of rail circuits and use of bitumen boilers. See Also Reg Item 2440 and 2441 for copies of later versions. Was originally located with item 3692 - 1958 Trackwork diary.Yields information about the procedures, instructions and rules that tramway (depot and track) worked under in Ballarat.Four page duplicated foolscap document stapled in the top left hand corner.trams, tramways, sec, safety, depot, rules, instructions, welding -
 Eltham District Historical Society Inc
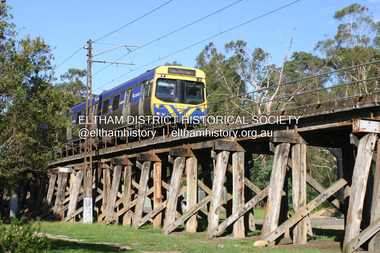
Photograph - Digital Photograph, Alan King, Eltham Railway Trestle Bridge, 28 December 2007
... . The 38 span single-track railway bridge over creek and road has.... The 38 span single-track railway bridge over creek and road has ...Covered under National Trust of Australia (Victoria) State Significance and Heritage Overlay, Nillumbik Planning Scheme. Published: Nillumbik Now and Then / Marguerite Marshall 2008; photographs Alan King with Marguerite Marshall.; p103 The Eltham railway trestle bridge is the only one of its kind still regularly used in Melbourne’s metropolitan railway network. Opened in 1902, it is also one of Victoria’s very few timber rail bridges that still carries trains.1 The bridge is part of the railway line extension from Heidelberg - extended to Hurstbridge in 1912. This extension resulted in one of the greatest social changes experienced in Eltham Shire, as it considerably lessened its isolation attracting tourists, artists and suburban commuters particularly after World War Two.2 The bridge has been classified by the National Trust as historically, scientifically, aesthetically and socially significant at state level. But this has not always been recognised, and in 1977, locals fought to save it from destruction. The Victorian Railways proposed to replace the bridge with an earth embankment and large culverts to avoid maintenance problems and fire. This was rejected by the Eltham Council who protested that the bridge helped maintain the area’s rural character, historic link and beauty, as well as avoiding possible serious flooding on the flood plain if a culvert was blocked. The bridge stands as part of a National Trust classified landscape which includes the Alistair Knox Park, named after the local conservationist and architect who helped to make Eltham famous for its mud-brick houses. The landscape includes tall and spreading manna gums and candlebarks, and the historic Shillinglaw Cottage. Artist Walter Withers, one of the Heidelberg School of painters, painted the bridge early in the 20th century. The 38 span single-track railway bridge over creek and road has 34 timber-beam spans and four steel-joist spans, supported by four-pile timber piers and timber abutments. It has almost 200m of timber deck. All of the timbers have been replaced over the years, but the only change to the bridge’s character was the addition of pylons and wiring for electric trains in 1923. A petition for a railway to the shire was first made in 1883. A large deputation of local citizens to the Commissioner of Railways proposed a route passing through Alphington to midway between Greensborough and Eltham up the Diamond Creek valley towards Queenstown and Kinglake. As a result the Princes Bridge-Heidelberg Railway was opened in 1888. From 1888 locals demanded a railway extension. Kangaroo Ground farmers in particular, led by Shire Councillor and Member for Evelyn, Ewen Cameron, said it would assist local farmers and orchardists send their produce to the Melbourne market. In 1890, before the severe economic Depression, an extension of the line to Hurst’s Bridge (now Hurstbridge) was included in a new Railways Bill. The parliamentary delegations were regaled with a banquet at Hurst’s barn and entertained by the Diamond Creek Brass Band, but the extension was abandoned when the Depression struck in 1892-1893. The extension of the railway to Eltham, completed in 1902, was one of the few built in those hard times. That is why the Eltham timber-trestle railway bridge is a rare example of a broad-gauge rail bridge constructed between 1893 and 1910. At the opening, despite persistent drizzle, 300 children waving flags and banners were among the large crowd welcoming the first train, carrying official dignitaries, to Eltham. It had taken 24 years to bring the railway to Eltham. From then Eltham became a popular destination for outings. Mr Orford of Eltham recalled that after the railway came to Eltham ‘the craze for picnics on weekends and holidays began…. During the wattle season, wattle trains came to Eltham frequently. The visitors roamed the creek pulling great armfuls of wattle blossom to take back with them to Melbourne’.3 In 1926 the railway line was electrified as part of the metropolitan rail network. But the Victorian Railways decided not to complete the formerly planned Diamond Valley Railway to Queenstown (now St Andrews) and Kinglake.This collection of almost 130 photos about places and people within the Shire of Nillumbik, an urban and rural municipality in Melbourne's north, contributes to an understanding of the history of the Shire. Published in 2008 immediately prior to the Black Saturday bushfires of February 7, 2009, it documents sites that were impacted, and in some cases destroyed by the fires. It includes photographs taken especially for the publication, creating a unique time capsule representing the Shire in the early 21st century. It remains the most recent comprehenesive publication devoted to the Shire's history connecting local residents to the past. nillumbik now and then (marshall-king) collection, eltham railway trestle bridge, eltham trestle bridge -
 Ballarat Tramway Museum
Slide - 35mm slide/s - set of 20, Noel Simons, 21/05/1971 12:00:00 AM
... , with tram entering single track section. Photo taken after tram has... poles. 1197.7 - As for 1197.6, with tram entering single track ...Set of 20 transparencies taken on 21/5/1971 on Kodak mounts. 1197.1 - Bendigo No. 5 en route to Eaglehawk at Creeth St Long Gully. Tram has a SEC roof ad and Cinzano roof ad. 1197.2 - No 5 approaching Needle Loop between Long Gully and California Gully. On left hand side is the City of Bendigo sign, indicating city boundary. 1197.3 - As for 1197.2 but actually entering loop. Photo taken after tram has passed photographer. 1197.4 - No. 26 bound for Eaglehawk descending the railway bridge near Eaglehawk, at Jobs Gully. 1197.5 - as for 1197.4, but after crossing bridge, now ascending a hill. Photo taken after tram has passed photographer. 1197.6 - No. 26 climbing High St. hill Eaglehawk, nearing end of Double track, bound for Quarry Hill. Shows centre of the road poles. 1197.7 - As for 1197.6, with tram entering single track section. Photo taken after tram has passed photographer. Has a BP service station in the background. 1197.8 - No. 26 (bound for Quarry Hill) crossing No. 17 (Eaglehawk) at Job's Gully Loop. 1197.9 - No. 17 climbing railway bridge at Job's Gully, en route to Eaglehawk. Photo taken after tram has passed photographer. 1197.10 - No.26 bound for Quarry Hill, leaving Long Gully Loop? Has the Creeth St. church in l197.l in the far background. Photo taken after tram has passed photographer. 1197.11 - Tramway Point work at the northern end of Long Gully Loop. 1197.12 - No. 17 en route for Quarry Hill turning into View St. from Bamard St. Tram has SEC roof ads "Everything fine in my all electric Kitchen' and 'Electric Cooking is Matchless'. 1197.13 - as for 1197.12, but tram has turned into View St and about to enter the double line track. Photo taken after tram has passed photographer. 1197.14 - No. 21 enters Nolan St after turning from MacRae St. en route to Bendigo. Note sign on its own post noting tram turns "Beware Tram Turns" and stop sign on adjacent pole "Trams stop on Request". No. 21 has two SEC roof ads. 1197.15 - No. 21 in Nolan St. after turning from Bridge St. (White Hills Road). Note signal light for Bridge St. loop on pole corner of street. Photo taken after tram has passed photographer. 1197.16 - No. 2 bound for Eaglehawk at unknown location. 1197.17 - Tram stop sign on a pole "CARS STOP BY REQUEST" 1197.18 - No. 5 in Carpenter St.? en route to Quarry Hill. 1197.19 - No. 28 has just arrive at Golden Square terminus, passengers are disembarking and the trolley pole is being turned. Golden Square Hotel in the background. 1197.20 - No. 28 at Golden Square terminus. Has a "Nothing beats Briquettes for hear roof ad. Information written on in black ink and date stamped on purple ink. 1197.1 - "No. 5 at Creeth St. Long Gully" 1197.2 - "No. 5 approaching Needle Loop between Long Gully and California Gully" 1197.3 - "No. 5 at Needle Loop between Long Gully and California Gully" 1197.4 - "No. 26 crossing railway bridge at Job's Gully near Eaglehawk" 1197.5 - "No. 26 just after crossing railway bridge at Job's Gully near Eaglehawk/ 1197.6 - "No. 26 in High St. Eaglehawk" 1197.7 - "No. 26 at end of double track in High St. Eaglehawk" 1197.8 - "Nos. 26 and 17 crossing at Job's Gully Loop" 1197.9 - "No. 17 crossing railway bridge at Job's Gully near Eaglehawk". 1197.10 - "No. 26 at Long Gully" 1197.11 - 'Northern end of points at Long Gully Loop". 1197.12 - "No. 17 turning into View St. from Bamard St. Bendigo". 1197.13 -'No. 17 at beginning of double track in View St. after leaving Bamard St. Bendigo. 1197.14 - "No. 21 enters Nolan St. from MacRae St. Bendigo." 1197.15 - "No. 21 in Nolan St. Bendigo just after leaving White Hills Road." 1197.16 - "No. 2" 1197.18 - "No. 5" 1197.19 - "Birney car No. 28 at Golden Square Terminus" 1197.20 "Birney car No. 28 at Golden Square Terminus" tramways, trams, bendigo, long gully, railway bridge, jobs gully, trackwork, nolan st, quarry hill, tram stops, golden square, tram 2, tram 5, tram 17, tram 21, tram 26, tram 28 -
 Flagstaff Hill Maritime Museum and Village
Photograph - Photograph and Negative, 1952
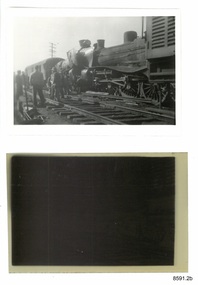
... to allow the Melbourne-bound train to pass it on the single track... to allow the Melbourne-bound train to pass it on the single track ...'Moriac, 1952 On 13 April 1952, a woman was killed and seven people were seriously injured when two passenger trains collided. A Melbourne-bound train collided with a Warrnambool-bound train, which was still shunting into siding at the station to allow the Melbourne-bound train to pass it on the single track. Both engines were derailed. The victim was in the first carriage of the Melbourne-bound train, which was telescoped after being forced into the tender of the locomotive. https://en.wikipedia.org/wiki/Railway_accidents_in_Victoria' 'April 12th 1952 7.52 p.m. Two passenger trains collided head on, on Warrnambool line near Moriac just out of Geelong. One killed four injured.' https://trove.nla.gov.au/newspaper/article/244373869?searchTerm=1952%20rail%20accident%20warrnambool ONE DEAD, MANY INJURED IN VIC. RAIL CRASH MELBOURNE, Saturday. — A woman was killed and seven persons were seriously injured when two passenger trains collided head-on at Moriac (59 miles south of Melbourne), near Geelong, at 8.15 tonight. Both engines were derailed, and the first carriage of the Geelong-bound train was telescoped by the coal tender. The dead woman was in this carriage. The trains involved were the 3.25 p.m. passenger train from Port Fairy to Geelong, and the 5.50 p.m. train from Melbourne to Warrnambool, which passed through Geelong at 7.05 p.m. ONE SHUNTING The Warrnambool-bound train had stopped at Moriac and was shunting into a siding to allow the other train to pass along the single track when the crash occurred. The impact hurled the Warrnambool-bound train backwards and the two engines, badly wrecked, came to rest 30ft apart. One engine hung at an acute angle on its side and the crew« were badly scalded by escaping steam. The crash was heard several miles away and hundreds of people rushed to the scene. Two ambulances were called from Geelong, and ambulance men joined railwaymen and volunteers in freeing the injured from badly damaged carriages. MANY SHOCKED Many other passengers were slightly hurt or badly affected by shock. They were treated on the spot. Mr. T. Mather, newsagent and postmaster at Moriac, said the noise of the crash startled him and he was on the scene in a matter of minutes. "There was great confusion," he said. "People on the trains were calling out for help. Many feared a fire would break out. However, we soon got relief gangs together and set to work to free those trapped in the wrecked carriage. One woman was dead, and a man seemed to be dead or dying." Special buses were chartered by the Railway Department to convey the passengers to their destinations. The line was blocked, but repair gangs were soon at work clearing the debris. https://trove.nla.gov.au/newspaper/article/18490332# This photograph and negative belonged to Dr. William Roy Angus. It was donated to Flagstaff Hill Maritime Village by his daughter, Bernice McDade. It is part of the “W.R. Angus Collection” includes historical medical equipment, surgical instruments and material once belonging to Dr Edward Ryan and Dr Thomas Francis Ryan, (both of Nhill, Victoria) as well as Dr Angus’ own belongings. The Collection’s history spans the medical practices of the two Doctors Ryan, from 1885-1926 plus that of Dr Angus, up until 1969. ABOUT THE “W.R.ANGUS COLLECTION” Doctor William Roy Angus M.B., B.S., Adel., 1923, F.R.C.S. Edin.,1928 (also known as Dr Roy Angus) was born in Murrumbeena, Victoria in 1901 and lived until 1970. He qualified as a doctor in 1923 at University of Adelaide, was Resident Medical Officer at the Royal Adelaide Hospital in 1924 and for a period was house surgeon to Sir (then Mr.) Henry Simpson Newland. Dr Angus was briefly an Assistant to Dr Riddell of Kapunda, then commenced private practice at Curramulka, Yorke Peninsula, SA, where he was physician, surgeon and chemist. In 1926, he was appointed as new Medical Assistant to Dr Thomas Francis Ryan (T.F. Ryan, or Tom), in Nhill, Victoria, where his experiences included radiology and pharmacy. In 1927 he was Acting House Surgeon in Dr Tom Ryan’s absence. Dr Angus had become engaged to Gladys Forsyth and they decided he further his studies overseas in the UK in 1927. He studied at London University College Hospital and at Edinburgh Royal Infirmary and in 1928, was awarded FRCS (Fellow from the Royal College of Surgeons), Edinburgh. He worked his passage back to Australia as a Ship’s Surgeon on the on the Australian Commonwealth Line’s T.S.S. Largs Bay. Dr Angus married Gladys in 1929, in Ballarat. (They went on to have one son (Graham 1932, born in SA) and two daughters (Helen (died 12/07/1996) and Berenice (Berry), both born at Mira, Nhill ) According to Berry, her mother Gladys made a lot of their clothes. She was very talented and did some lovely embroidery including lingerie for her trousseau and beautifully handmade baby clothes. Dr Angus was a ‘flying doctor’ for the A.I.M. (Australian Inland Ministry) Aerial Medical Service in 1928 . Its first station was in the remote town of Oodnadatta, where Dr Angus was stationed. He was locum tenens there on North-South Railway at 21 Mile Camp. He took up this ‘flying doctor’ position in response to a call from Dr John Flynn; the organisation was later known as the Flying Doctor Service, then the Royal Flying Doctor Service. A lot of his work during this time involved dental surgery also. Between 1928-1932 he was surgeon at the Curramulka Hospital, Yorke Peninsula, South Australia. In 1933 Dr Angus returned to Nhill and purchased a share of the Nelson Street practice and Mira hospital (a 2 bed ward at the Nelson Street Practice) from Dr Les Middleton one of the Middleton Brothers, the current owners of what previously once Dr Tom Ryan’s practice. Dr Tom and his brother had worked as surgeons included eye surgery. Dr Tom Ryan performed many of his operations in the Mira private hospital on his premises. He had been House Surgeon at the Nhill Hospital 1902-1926. Dr Tom Ryan had one of the only two pieces of radiology equipment in Victoria during his practicing years – The Royal Melbourne Hospital had the other one. Over the years Dr Tom Ryan had gradually set up what was effectively a training school for country general-practitioner-surgeons. Each patient was carefully examined, including using the X-ray machine, and any surgery was discussed and planned with Dr Ryan’s assistants several days in advance. Dr Angus gained experience in using the X-ray machine there during his time as assistant to Dr Ryan. When Dr Angus bought into the Nelson Street premises in Nhill he was also appointed as the Nhill Hospital’s Honorary House Surgeon 1933-1938. His practitioner’s plate from his Nhill surgery is now mounted on the doorway to the Port Medical Office at Flagstaff Hill Maritime Village, Warrnambool. When Dr Angus took up practice in the Dr Edward and Dr Tom Ryan’s old premises he obtained their extensive collection of historical medical equipment and materials spanning 1884-1926. A large part of this collection is now on display at the Port Medical Office at Flagstaff Hill Maritime Village in Warrnambool. In 1939 Dr Angus and his family moved to Warrnambool where he purchased “Birchwood,” the 1852 home and medical practice of Dr John Hunter Henderson, at 214 Koroit Street. (This property was sold in1965 to the State Government and is now the site of the Warrnambool Police Station. and an ALDI sore is on the land that was once their tennis court). The Angus family was able to afford gardeners, cooks and maids; their home was a popular place for visiting dignitaries to stay whilst visiting Warrnambool. Dr Angus had his own silk worm farm at home in a Mulberry tree. His young daughter used his centrifuge for spinning the silk. Dr Angus was appointed on a part-time basis as Port Medical Officer (Health Officer) in Warrnambool and held this position until the 1940’s when the government no longer required the service of a Port Medical Officer in Warrnambool; he was thus Warrnambool’s last serving Port Medical Officer. (Masters of immigrant ships arriving in port reported incidents of diseases, illness and death and the Port Medical Officer made a decision on whether the ship required Quarantine and for how long, in this way preventing contagious illness from spreading from new immigrants to the residents already in the colony.) Dr Angus was a member of the Australian Medical Association, for 35 years and surgeon at the Warrnambool Base Hospital 1939-1942, He served as a Surgeon Captain during WWII1942-45, in Ballarat, Victoria, and in Bonegilla, N.S.W., completing his service just before the end of the war due to suffering from a heart attack. During his convalescence he carved an intricate and ‘most artistic’ chess set from the material that dentures were made from. He then studied ophthalmology at the Royal Melbourne Eye and Ear Hospital and created cosmetically superior artificial eyes by pioneering using the intrascleral cartilage. Angus received accolades from the Ophthalmological Society of Australasia for this work. He returned to Warrnambool to commence practice as an ophthalmologist, pioneering in artificial eye improvements. He was Honorary Consultant Ophthalmologist to Warrnambool Base Hospital for 31 years. He made monthly visits to Portland as a visiting surgeon, to perform eye surgery. He represented the Victorian South-West subdivision of the Australian Medical Association as its secretary between 1949 and 1956 and as chairman from 1956 to 1958. In 1968 Dr Angus was elected member of Spain’s Barraquer Institute of Barcelona after his research work in Intrasclearal cartilage grafting, becoming one of the few Australian ophthalmologists to receive this honour, and in the following year presented his final paper on Living Intrasclearal Cartilage Implants at the Inaugural Meeting of the Australian College of Ophthalmologists in Melbourne In his personal life Dr Angus was a Presbyterian and treated Sunday as a Sabbath, a day of rest. He would visit 3 or 4 country patients on a Sunday, taking his children along ‘for the ride’ and to visit with him. Sunday evenings he would play the pianola and sing Scottish songs to his family. One of Dr Angus’ patients was Margaret MacKenzie, author of a book on local shipwrecks that she’d seen as an eye witness from the late 1880’s in Peterborough, Victoria. In the early 1950’s Dr Angus, painted a picture of a shipwreck for the cover jacket of Margaret’s book, Shipwrecks and More Shipwrecks. She was blind in later life and her daughter wrote the actual book for her. Dr Angus and his wife Gladys were very involved in Warrnambool’s society with a strong interest in civic affairs. He had an interest in people and the community They were both involved in the creation of Flagstaff Hill, including the layout of the gardens. After his death (28th March 1970) his family requested his practitioner’s plate, medical instruments and some personal belongings be displayed in the Port Medical Office surgery at Flagstaff Hill Maritime Village, and be called the “W. R. Angus Collection”. All rail accidents are serious, especially those involving fatalities.Photograph and negative showing two steam locomotives that appear to have collided head on. Also a newspaper article about the collision. From the W.R. Angus Collection.1139 on the back of the photograph together with multiple 'Ilford' brand marks.flagstaff hill maritime museum and village, great ocean road, shipwreck coast, rail accident, moriac, 1952, fatality, dr w r angus -
 Ballarat Tramway Museum
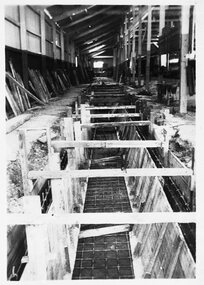
Photograph - B&W print of donated negative - set of 2, State Electricity Commission of Victoria (SECV), c1936
... . No. 12 at the front of the depot and two other single truckers... other single truckers on adjacent tracks. 2nd copy held ...Yields information about the installation of the service pits in the depot during 1935/1936 and the methods usedSet of 2 Black and white photo prints from collected negatives of the construction of service pits and the pit for the wheel grinder at the SEC Ballarat depot building, during refurbishment by the SEC during the 1935/ 1936. 1352.1 - Formwork being set up for the service pit in No. 1 road at the SEC depot. 1352.2 - finished concrete walls for pit and wheel grinder on No. 4 road at the SEC depot, but not yet fully backfilled. No. 12 at the front of the depot and two other single truckers on adjacent tracks. 2nd copy held of 1352.2 ex moveable display boards. Colour photocopies laminated of these photographs on display 6/2000 at 02-02-06. 3rd copy of 1352.2 added 14-08-2006. See Reg Item 3806 for a photograph of the grinder in use. Copy 4 - of both photos - large format prints (203H x 253W) - added 28/7/2007, ex Alan Bradley holding of prints, received 5/2007. See also Reg Item 3901 for a mounted set of these photographs along with those of Reg Item. 1351, Neg rescanned 14/5/2020 at 3200dpi, images replaced. tramways, trams, wendouree parade, sec depot, rehabilitation, service pits, wheel grinder, tram 12 -
 Eltham District Historical Society Inc
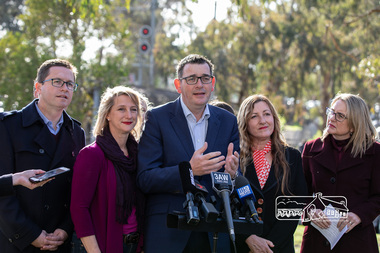
Photograph, Peter Pidgeon, Victorian Labor Government Press Release announcing planned upgrades to Hurstbridge line rail services and protection of historic Railway Trestle Bridge, Panther Place, Eltham, 1 August 2018, 1 Aug 2018
... Government promised new train lines but didn’t deliver a single... Government promised new train lines but didn’t deliver a single ...Announcement by Premier Daniel Andrews, Minister for Public Transport, Jacinta Allan and Member for Eltham, Vicki Ward mad alongside the Eltham Railway Trestle Bridge. MEDIA RELEASE "More Trains And Fewer Delays On The Hurstbridge Line" https://www.premier.vic.gov.au/wp-content/uploads/2018/08/180801-More-Trains-And-Fewer-Delays-On-The-Hurstbridge-Line-1.pdf Commuters on the Hurstbridge line will have more trains, more seats and fewer delays with a re-elected Andrews Labor Government to continue its massive upgrade of the Hurstbridge line. The Andrews Labor Government said it would deliver locals in Melbourne’s north-east more peak hour train services and less time stuck at boom gates, and we have. The first stage of the Hurstbridge Line Upgrade has been delivered – six months early and on budget. This includes the new Rosanna Station, duplicated track between Heidelberg and Rosanna and the removal of the dangerous level crossings at Alphington and Rosanna. There’s more to do and only Labor will deliver the next stage of the Hurstbridge Line Upgrade to give local commuters more train services and a more comfortable commute. The $530 million project will include a brand new train station at Greensborough and the duplication of three kilometres of track between Greensborough and Montmorency, and 1.5 kilometres of track between Diamond Creek and Wattle Glen to allow more train services during the morning peak. This will allow trains to run every six and a half minutes at Greensborough, every 10 minutes at Eltham and Montmorency, and every 20 minutes at Hurstbridge, Diamond Creek and Wattle Glen – as well as two extra Hurstbridge express services. Locals on the Labor Government’s new Mernda line will also get five extra train services during the morning peak, with a major upgrade of the Clifton Hill junction where the Mernda and Hurstbridge lines connect. Labor will also protect the Eltham Trestle Bridge – the last remaining timber bridge on Melbourne’s electric train network – which has local heritage protection and is an important part of the area’s character. The Liberals will leave this bridge to rot and demolish the nearby childcare centre and football club with their under-cooked and under-costed promise to upgrade the Hurstbridge line. Only Labor will protect this important piece of Melbourne’s history with planning work to be carried out for a long-term solution as part of the project. Stage two of the Hurstbridge Line Upgrade will create more than 950 jobs, with construction to start in 2020 and finish by 2022. Quotes attributable to Premier Daniel Andrews “We said we’d upgrade the Hurstbridge line and remove dangerous and congested level crossings at Rosanna and Alphington and we did – but there’s more to do.” “Only Labor will deliver the next stage of the Hurstbridge Line Upgrade with a new Greensborough Station and more trains, more often.” Quote attributable to Minister for Public Transport Jacinta Allan “The former Liberal Government promised new train lines but didn’t deliver a single kilometre of track – now they’re promising a half-baked upgrade of the Hurstbridge line with rubbery figures that don’t add up.” Quote attributable to Member for Eltham Vicki Ward “As a fifteen year old hopping on Red Rattlers at Eltham I wanted to do something to make the Hurstbridge line better. It’s taken me a few decades but finally our line will offer the frequency of services that are expected and needed in a 21st century city.”Born digital image (qty 27)jacinta allan, minister for public transport, panther place, premier daniel andrews, press announcement, railway line construction, trestle bridge, vicki ward mp for eltham, victorian parliament -
 Melbourne Tram Museum
Album - Charles Craig - part 1 of 2, 1950s to 1970s
... beams and old track CC39 Looking down showing temporary single... beams and old track CC39 Looking down showing temporary single ...Photo - see pdf file for further information. Number Brief Description CC1 S178 at Elsternwick level crossing track works CC2 Building East Preston Depot 1955 CC3 Camberwell depot – post WW2 – lots of trams and a black cat CC4 W2 584 and SW6 958 northbound – Chapel St and Brighton Road CC5 W2 357 – southbound, Chapel St Brighton Road CC6 Pascoe Vale Road, Raceday working – note the signal CC7 The Preston Workshops - The Argus, post WW2, 223, 647 et al CC8 923 or is it 922 being built at Preston – The Argus photo - CC8A 832 being positioned onto trucks at Preston after an overhaul – Argus Photo – see also CC306 CC9 Footscray depot` CC10 W5 797 in St Kilda Road during track works – 1950s CC11 W2 457 at Kew Post Office CC12 Wellington Parade – W2 432, 492 and 337 – special event CC13 Swan St line up of trams – football? Or other special event – Sinclair’s bus on the right side. CC14 W2 630 being washed at a depot – The Argus photo CC15 Royal Park line at Flemington Road – W2 355 and W5 786 CC16 Nicholson St track construction from a tram cab CC17 T181 on tour at Gordon St CC18 T181 on Maribyrnong Bridge CC19 Ditto at River St just off bridge CC20 As for CC18 CC21 At Raleigh Rd CC22 T181 at Footscray depot CC23 Track construction, Nicholson, just north of Gertrude CC24 Commissioning overhead Bourke St tram 988 CC25 Queens Parade – 997 and 994 CC26 Swapping trolley wheel to skid – commissioning CC27 Track construction in Gertrude St CC28 985 in Queens Parade running special CC29 997 in Queens Parade CC30 1033 at North Fitzroy – AETA Special CC31 Bourke St at Elizabeth St – has passengers on board CC32 W6 985, 996 Queens Parade, Mk 3 bus 333 CC33 As above CC34 Showing construction at Nicholson & Gertrude – Bourke St CC35 W2 223 on Burnley temporary bridge – VR track expansion CC36 W5 823 – ditto CC37 Tram on old bridge prior to removal CC38 W2 433 on temporary bridge with new bridge beams and old track CC39 Looking down showing temporary single track – Swan St CC40 Tait train passing under tram bridge CC41 SW6 on single line – off loading CC42 W2 547 at City Road Junction CC43 City Road Jtn – 1969 – 596 and 771 CC44 City Road Jtn – 1969 – 596 and 771 (same as CC45 438 in Flinders St CC46 355 somewhere CC47 552 somewhere CC47A 364 at Preston Workshops? CC48 W2 334 on Traverser – Preston Workshops CC49 Wellington pade – large line up of trams, c1950 925, and 611 CC50 W2 493 Franklin st – advertising for Savings Certificates CC51 Possibly 551 with advertising for fund raising for Blind institute CC52 249 at Hawthorn – Riversdale Junction – with a Tally Ho and Village Fair Aux. board CC53 MMTB Postcard of 511 CC54 Wattle Park terminus with Single line warning sign CC55 Wattle Park Duplication CC56 36 at Domain Junction – 833 CC57 36 at Domain Junction CC58 36 at Domain Junction with 810 and 833 CC59 36 in Swanston by Flinders St Station CC60 36 in Spencer St at A’Beckett CC61 36 crossing Collins St CC62 36 crossing Collins St CC63 36 northbound in St Kilda Road with Shrine in background CC64 36 northbound in Swanston St at Flinders St CC65 Postcard – Ballarat 36 in Domain Road CC66 Postcard - Stampshow – Hawthorn Horse tram CC67 Postcard - Stampshow – Peace cable tram CC68 Postcard - 1041 and cable car set 1 at Preston CC69 Postcard - Colins & Elizabeth – greetings from old Melbourne CC70 Postcard - Cable car set at Preston CC71 Postcard - Twentyman’s cable cars CC72 Postcard - Nu-color-vue – horse tram 256 CC73 Cable car set – Market & Flinders CC74 Cable trams at Twentymans’ in their shed CC75 Cable tram track at Bourke & Spencer prior to removal CC76 Cable tram bogie at Preston Workshops – used as a dolly CC77 Cable trams at Twentymans’ CC78 Postcard - Valentines – Bourke looking west from Swanston CC79 Postcard - Rose 3938 – Bourke at Swanston – the Leviathan building CC80 Postcard - Valentines – Elizabeth St looking south from Collins – No. 19 CC81 Postcard - Rose P4765 – Bourke St Melbourne CC82 Postcard - Rose 4090 – cable tram passing Parliament house CC83 Postcard - Valentines – GPO Elizabeth St CC84 Interior of cable trailer with clothing on a set CC85 Elizabeth St looking north CC86 Cigarette card - Collins St No. 41- WD HO Wills CC87 Postcard - Rialto building with cable set CC88 Postcard - Valentines - Swanston at Flinders looking north CC89 CC90 Q 150 Hanna St – dated on rear CC91 176 turning – photo ex Alan Jungworth CC92 161 on Princes Bridge – minimum fare 4d sign and Inspector CC93 459 at Point Ormond CC94 158 at Gordon St – side on view CC95 X 217 in Swanston St CC96 X 217 in Swanston St with an East Brighton destination CC97 T177 CC98 T177 Peel St – no destination roll – being transferred? CC99 X1 462 in Glenhuntly Road to Point Ormond CC100 X1 462 in Glenhuntly Road to Elsternwick Rly Station CC101 X1 462 in Glenhuntly Road to Point Ormond CC102 Q 150 Hanna St CC103 190 at Camberwell Depot CC104 T182 at Footscray CC105 X1 466 and W2 at Footscray CC106 190 at Camberwell Depot CC107 X1 467 Barkly St Footscray CC108 X2 679 turning into William St from La Trobe St CC109 X2 677 Glenhuntly Road with Point Ormond Destination CC110 Postcard T180 CC111 Postcard format – X1 467 on a truck – see also CC178 CC112 Postcard format – X1 467 at Wantirna South CC113 Q200 and SW6 896 at Thornbury – has labels on rear CC114 T177, Ballarat Road – has labels on rear CC115 T178 at Point Ormond CC116 Postcard X1 465 and 466 CC117 Postcard – X2 676 CC118 Postcard – TMSV X2 217 CC119 810 on temporary bridging – 24-12-67 CC120 W2 575 – Queens Parade junction in, still temporary bridging, substation under construction CC121 Forming Queens Parade Junction base slab CC122 W2 596 prior to tramway works – all tracks still in position CC123 It’s a mass of reinforcing – bridging being formed CC124 Looking north with substation being built CC125 Looking east with some rather tight curves, Wellington St still in use CC126 SW6 958 ex Wellington St with all tracks and signal box and buildings. CC127 Victoria Pde at Gisborne looking east – at least 4 cars CC128 SW6 893? With dash canopy lights and SW6 862 and a man with a newspaper CC129 SW6 894 on the S curves, with tram in Wellington St CC130 Similar photo CC131 W2 564 turning into Wellington St – the concrete tracks are not that old CC132 W2 552 running out of Wellington St CC133 W5 732 from Fitzroy St into St Kilda Road with next iteration in position – very wonky CC134 W5 764 turning into Fitzroy St CC135 SW6 947 turning from Wellington St CC136 W2 586 running out of High St CC137 W2 500 turning into Wellington St CC138 W2 543 in Wellington St inbound CC139 L103 with St Kilda Junction destination, and a tower truck on right CC140 Workmen – new track in Queensway in use CC141 Ditto CC142 L103 in Queensway, and another car in bound CC143 Looking east along Wellington St which has been taken out of use. Also a MMTB Roller CC144 W5 824 and a W2 and all types of wobbly temporary track CC145 W2 354 to High St CC146 Sw6 947 on the S bends CC147 W2 500 looking north – tram on the S bends CC148 SW6 896 leaving the S bend CC149 W2 357 and a MMTB City bus with trees/gardens on the side CC150 W5 817 Elliot Ave – see also CC302 CC151 W2 552 – note the large trolley bridge CC152 W2 550 at depot or workshops CC153 1B truck CC154 SW2 432 CC155 W2 155 at Glenhuntly CC156 SW6 937 on AETA tour? CC157 X2 677 on Footscray service – Ballarat Rd? CC158 W2 641 – High St Kew? CC159 SW6 847 – Power St Hawthorn CC160 Simpson St – big line up CC161 W2 546 truck No. 1? CC162 W2s at Glenhuntly depot CC163 No. 15 truck under 899 CC164 206 and other junk at Preston Workshops CC165 W in Swanston St Melbourne – Rose series card CC166 Y1 613 Batman Ave?? or William St at Collins CC167 Tram plans CC168 X 217 Swanston St – see also 95 and 96 CC169 217 in Swanston St – same as 95 CC169A 192 in St Kilda Road at Princes bridge CC170 192 in St Kilda Road at Princes bridge CC171 Bendigo 3 arriving Malvern depot – being unloaded CC172 Ditto CC173 T180 at a depot CC174 X1 463 wheel set CC175 C30 – dog car side view – close up CC176 C30 dog car CC177 206 and 30 at Preston Workshops CC178 X1 467 on a truck – see CC111 also CC179 42 CC180 42 at a depot, no destination box CC181 W2 556 1A type truck CC182 Flinders St Station – Rose Series CC183 W7 1035 Spring – Nicholson St CC184 W7 1022 MMTB Post Card CC185 Adelaide 178 – has on rear – R. Lilburn 4/82 CC186 Adelaide 175 – has on rear – R. Lilburn 4/82 CC187 Y1 610 on AETA tour CC188 Y1 610 on AETA tour with large group – Point Ormond CC189 AETA display – has GH55-32 in pencil on rear CC190 AETA display – has GH55-29 in pencil on rear CC191 Y1 610 on AETA tour with large group – Point Ormond CC192 VR 53 at Footscray CC193 VR cars 40 and 34 at Elwood wash dock CC194 W7 1024 as the 1970 Christmas tram CC195 Geelong – loading a set of 22E trucks CC196 Geelong 10 and 23 running an AETA special CC197 Geelong – AETA special CC198 Geelong 7 at Junction CC199 Geelong 10, in the city CC200 Geelong 33 with Belmont destination CC201 Geelong 15 Eastern Park destination 29-3-1948 CC202 Geelong 23 at Railway Station – 29-3-1948 CC203 Geelong 23 at Railway Station – 29-3-1948 CC204 Geelong – loading a bogie tram CC205 Geelong – loading a bogie tram CC206 Geelong 40 – loaded on truck CC207 Geelong 40 – on jacks CC208 Geelong 40 on jacks – 19 behind CC209 Geelong 38 with two workers on either side CC210 – 214 Australian Historic Tramways stamp folder and set CC215 Bendigo 17 at depot – has dup JBS on rear CC216 Bendigo 20, 29 bogie and straight sill car at Charing Cross CC217 Bendigo one man bogie Pall Mall CC218 Bendigo – Bogie 23, other cars and welding truck at depot CC219 Bendigo 7 with Quarry Hill destination CC220 Bendigo 21 with Lake Weerona destination CC221 ESCo 18 Ballarat CC222 Ballarat bogie 22 on AETA special CC223 Ditto CC224 Ballarat 34 at Stones Corner – R Lilburn CC225 Ballarat 15 in Bridge St – R Lilburn CC226 Ballarat 40 at Gardens – R Lilburn CC227 Ballarat 37 running out of depot – R Lilburn CC228 Postcard – Valentines – Sturt St with loaded horse tram trailer CC229 AETA Geelong tram tour ticket – 29-3-1948 CC230 Postcard – Geelong – Valentine 2114 – T&G building CC231 Postcard – PMTT ! – High St Malvern CC232 Postcard – Empire – Glenferrie Road, Malvern at Wattletree Rd CC233 Postcard Y469, MMTB CC234 Postcard Z2 Spring St CC235 Postcard – Z1 MMTB CC236 Postcard – Stamp Show W1 431 CC237 Postcard – Stamp show B2005 CC238 Postcard – Stamp show W6 982 CC239 Postcard – Valentines 1264 – Johnstone Park with tram in distance CC240 Postcard – Rose 10711 – Swanston and Lonsdale – Hospital and W232 CC241 Postcard – Rose 4827 – Fitzroy St St Kilda W2 362 and 548 CC242 Postcard – Valentines – 939 – St Kilda War Memorial, W and a R? CC243 Postcard – Valentines – 572 – St Kilda War Memorial, W 413 and 140? CC244 Postcard – Valentines – 938 – Uper and Lower Esplanade – L 104 CC245 Postcard – St Kilda Rd at Princes Bridge Y1 and W CC246 Postcard – Biscay BG82 – W5 814 - CC247 Postcard – Biscay 796112 – Bourke St looking west CC248 Postcard – Biscay 796109 – Bourke St looking east CC249 Postcard – Biscay 2AUS58 – Z5 Bourke St CC250 Postcard – Biscay BG 249 – Swanston St CC251 Postcard – National View – St Kilda Rd – shrine and Prince Henrys W2 405 CC252 Postcard – Nu color vue – 11 ML 156 – St Kilda Rd CC253 Postcard – Nu color vue – 11 ML 153 – Swanston St CC254 Postcard – Nu Color vue – Collins St 442 CC255 Postcard – Pitt card – Adelaide – H 364 at Victoria St CC256 Postcard – SPER L/P 154 CC257 Postcard – BTMS – 550 CC258 Postcard – SPER – Brisbane 295 CC259 Adelaide 131 at Burnside – has R Lilburn on card, c1911 CC260 Adelaide 194 CC261 Adelaide 235, with two crew, The News photo CC262 Rockhampton, outside post office – has source of photo details CC263 Sydney – 2086 and 2062 arriving Circular Quay CC264 Sydney – P class – Pitt St? CC265 Sydney – 1610 at Circular Quay CC266 Brisbane 99 and 468 CC267 Sydney with bridge behind CC268 Steam tram Paramatta Park – 103 CC269 Sydney – Museum Station =- Elizabeth St CC270 Sydney – weed burner 137S at a loop Demonstrates the work of Charles Craig in photography and collection of prints.Assembled album in a black presentation folder of 270 photographs from the Charles Craig Collection - 86 sleeves - part 1 of 2. All photographs have been scanned and placed on the Museum's G drive. A list of all photographs with details where possible has been compiled. Victorian Provincial, Launceston, Hobart and Sydney tram photos have been transferred to other Museums, image files retained.melbourne, tramways, tramcars, trams, charles craig, st kilda junction, trackworks -
 Ballarat Tramway Museum
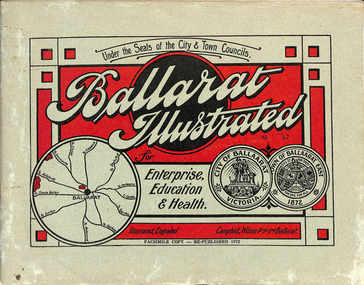
Book, "Ballarat Illustrated", 1972
... poles - Single wire per track. Top right hand photo, showing..., double track with centre poles - Single wire per track. Top right ...Original c 1914 (see below), facsimile copy - re-published 1972. Original features photos of Ballarat City and Town, its buildings, parks and the various industries and organisations that were in Ballarat at the time of publication, including ESCo. Many photos features ESCo trams. Photos sepia toned. Has some red colour block printing on the front cover and rear, for Star Oil Engines. On inside back cover is a map with the places of interest and tram route map, marked in red. Pages are un-numbered. Original published by Ballarat East Town Council and Ballaarat City Council. On cover has number stamped in black in, "No. 87" (assume facsimile copy No.). Photos with publication show tram No. 21, built 1913 and ESCo photo page shows Mr. Pringle as Manager. Mr Pringle became manager in January 1911, As there is no photos of the "Avenue of Honour", or other mention of the first world war, assume original published about 1913 or 1914. Original shows Engravings and printing by "Campbell Wilson Prop Ltd, Ballarat". See Other Information as well for more listing details. High Resolution image added 31/8/2012 of i2 of ESCo page and i3 for Ballarat identies and sheet i4 extracted for Mr Pringle. PDF scan of full document added 21/5/2019 - see images btm633-1i.pdf and btm633-2i.pdf Notes on "Ballarat Illustrated" Reg. Item No. 733 From notes made by Neville Gower 12/1/1997 Cover: Inside front cover: Last paragraph, "Facilities for Travelling" - Electric trams serve all parts of Ballarat. Page 3: Street Scene, Municipal Town Hall, showing tram wiring Page 7: Street Scene, Lydiard St. North, intersection and tramway centre, with ESCo tram No. 21 in the bottom photo. Other photos features trams as well in Sturt St and Lydiard St. North. Page 9: Street Scene, Top photo of Sturt St. from Lydiard St. looking east, shows piles on right-hand side of road. Car parked by Post Office has a car registration number "9007". Bottom photo, an tram climbing hill, shows double trolley in the street, with early English type of pull offs. Page 13: Street Scenes and Historic Buildings: One of five photos, shows Victoria St. looking East, with tram track prominent in photo and how stone work was set up about the rails and overhead poles. Page 23: Street scene, Gardens North Entrance gates, shows details of gates near St. Aidans Drive. Note double trolley wire on poles, and style of insulators. No trams in photo, three ladies walking down the track. Page 37: Street Scene; Lydiard St views, top left hand photo, shows Railway station and railway gates with signal gantry and horse drawn vehicles. Tram tracks apparent. Bottom left hand photo shows Lydiard St. North, near Post Office, double track with centre poles - Single wire per track. Top right hand photo, showing Cemetery gates in background. Bottom right hand photo - from north end of Lydiard St. South, looking north, with an ESCo tram in background. Also has a parked car on left hand side. Page 45: Street Scenes - Bridge St; top photo at west end of Bridge St. with ESCo No. 11 with possibly double trolley wire in photo. Bottom photo at east end of Bridge St. with tram in background, shows junction. Double trolley heading out to Mt. Pleasant, single trolley for Victoria St. Page 45: Street Scenes - Bridge St; top photo at west end of Bridge St. with ESCo No. 11 with possibly double trolley wire in photo. Bottom photo at east end of Bridge St. with tram in background, shows junction. Double trolley heading out to Mt. Pleasant, single trolley for Victoria St. Page 61: Street Scenes and Historic Buildings - Public Institutions Ballarat - top left hand photo of the Hospital shows some tram track in foreground, with double trolley wire. Top right photo is of the Orphanage, the name of the tram terminus for many years. Page 68: Electric Supply Co. of Victoria's pages - top photo showing powerhouse in background, across the lake, can hardly see anything for the trees, except for the chimney. Bottom photos of the steam Turbo Generators and the switchboard. Gives Mr. P.J. Pringle as Chief Engineer and General Manager. He took over in Jan. 1911. Page 69: Ballarat East Views - features photo of Black Hill open cut, Ballarat East Railway Station, Ballarat Fire Station and "Victoria St. looking East", repeat of photo printed on page 12, but slightly darker. Image on system includes fire station and railway station, - Ballarat East. Page 78: Series of photos of various Ballarat VIP's of the era, fourth one in on top line features "P.J.Pringle, Electric Supply Co." Inside Back cover - map of Ballarat including tram lines and places of interest marked in red. Gives a detailed photographic presentation of Ballarat in 1914.80 page book with, in addition, light green card covers, titled "Ballarat Illustrated". Loose copy of page 9 and 10 held.trams, tramways, ballarat, local history, heritage buildings, esco -
 Kiewa Valley Historical Society
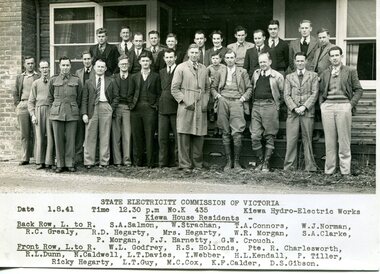
Photographs – Set of 10 black and white photographs and photocopies of original photographs documenting early residents of Bogong Village
Bogong Village, which was known as “The Junction”, is well recorded. The first tent camp was at the junction of Pretty Valley and Rocky Valley streams in the early 40’s. Further downstream were the sawmill, stables and blacksmith’s forge. Horses were the main mode of transport in the early days. The road to Bogong had reached the lookout spur just beyond Roper’s Spur track just before the 1939 fires. The early forties saw rapid growth of the village, with single and married men’s quarters, workshops, mess huts and administrative offices. The facilities necessary for communal living were quickly in place- a post office, police station, co-op store, medical centre, community hall/theatre, tennis courts and school. Much of the temporary accommodation that housed groups such as the Albion Quarrying Company were in the area now under water.This group of photographs are a pictorial record of the early history of the Kiewa Hydro Scheme, the people who worked in the background supplying administrative support and the workers and their families. It also shows a glimpse into how a large group of people from very diverse backgrounds came together to enjoy social activities and share each others companyGroup of 10 black and white photographs and photocopies of original photographs of varying sizes (some official SECV photos) Some Photos are labelled with the date and the names of SECV staff members. Depicting early life at Bogong Village 1. Group photo – Kiewa House Residents 1.8.41 (SECV official photo) 2. Female staff residents 3. Female office staff 4. Kitchen staff – Junction Mess (SECV official photo) 5. Male administration staff Bogong 6. Bogong Social Club fancy dress ball, 1940 7. Wives and children of SECV workers 8. Children in fancy dress 9. Opening of Volunteer Air Observers post 1943 10. Flag raising at opening of Volunteer Air Observers post 1. Printed under photo: STATE ELECTRICITY COMMISSION OF VICTORIA Date: 1.8.41 Time: 12.30pm No:K 435 Kiewa Hydro-Electric Works. Kiewa House Residents Back Row L to R: S.A. Salmon, W. Strachn, T.A Connors, W.J Norman, R.C Grealey, R.D Hegarty, Mrs Hegarty, W.R Morgan, S.A Clarke, P. Morgan, P.J. Harnetty, G.W Crouch. Front Row L to R: W.L Godfrey, R.S Hollands, Pte. R Charlesworth, R.L Dunn, N Caldwell, L.T Davies, I Webber, H.L Kendall, P Tiller, Ricky Hegarty, L.T Guy, M.C Cox, K.F Calder, D.S Gibson 2. Printed on bottom: Staff who lived at Kiewa House and worked in the Administration Office c 1943 Handwritten at bottom Priscilla Johnson (nee Reid) At top of page A GOOD LIFE: WOMEN’S RECOLLECTIONS OF LIFE IN THE UPPER KIEWA VALLEY 3. Printed under photo- Office Staff – Bogong 4. Printed under photo: STATE ELECTRICITY COMMISSION OF VICTORIA Date: 18.5.40 Time: 11.05am No:K 103. Kiewa Hydro-Electric Works. Kitchen Staff- Junction Mess. Opening night of the new staff mess Bogong. 5. Printed under photo -Administration staff Bogong 6. Printed under photo- The social club raised money for patriotic fund from fancy dress nights. (1st Fancy Dress Ball, Bogong 1940) 7. Printed above photo: ---- and family life begins (1942 Bogong) 8. Printed under photo: A favourite photograph 9. Printed under photo: STATE ELECTRICITY COMMISSION OF VICTORIA Date: 24.5.43 Time: 2.8pm No:K 1151 Kiewa Hydro-Electric Works. Bogong- Squadron Leader Leggett speaking at opening of Air Observer’s Post 10. Printed under photo: Raising the flag at the opening of the Volunteer Air Observer’s Post at Bogong - 1943 bogong village; kiewa hydro electric scheme; social activities; community clubs -
 Kiewa Valley Historical Society
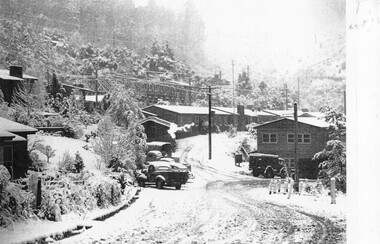
Photographs – Set of 9 black and white photographs and photocopies of original photographs depicting the early days of Bogong Village during the 1940’s, circa 1940's
Bogong Village, which was known as “The Junction”, is well recorded. The first tent camp was at the junction of Pretty Valley and Rocky Valley streams in the early 40’s. Further downstream were the sawmill, stables and blacksmith’s forge. Horses were the main mode of transport in the early days. The road to Bogong had reached the lookout spur just beyond Roper’s Spur track just before the 1939 fires. The early forties saw rapid growth of the village, with single and married men’s quarters, workshops, mess huts and administrative offices. The facilities necessary for communal living were quickly in place- a post office, police station, co-op store, medical centre, community hall/theatre, tennis courts and school. Much of the temporary accommodation that housed groups such as the Albion Quarrying Company were in the area now under water.Pictorial history of the early years of Bogong Village including one photo taken following the devastating fires of 1939. Photos show the terrain in which Bogong Village was built, the early construction used for the temporary buildings and the housing and the amount of infrastructure required to accommodate the needs of the residents of the area including workers, their families and other support staff. Set of 9 black and white photographs and photocopies of photographs depicting early buildings at Bogong Village . Photos show very early construction buildings as well as the village in various weather conditions, including snowing and after bush fires. (some official SECV photographs) 1. Bogong Village in heavy snow 2. Bogong Township during heavy snow (SECV Official Photo) 3. VIP Lodge at Bogong in the snow 4. Bogong Village - circa 1940’s 5. Bogong Village under street lights 6. Lewis Construction Camp (SECV Official Photo) 7. Albion Quarrying Co. Camp (SECV Official Photo) 8. Tent camp and early buildings following 1939 fires 9. Typical house – Bogong Village 1. Handwritten under photo – August 1948 2. Printed under photo: STATE ELECTRICITY COMMISSION OF VICTORIA Date: 25.8.48 Time: 9am No:K 4680 Kiewa Hydro-Electric Works. Bogong Township 3. Handwritten on back of photo- V.I.P. Lodge, Bogong 4 – 5. No markings 6. Printed under photo: STATE ELECTRICITY COMMISSION OF VICTORIA Date: 28.11.40 Time: 1.40pm No:K284 Kiewa Hydro-Electric Works. Lewis Construction Camp 7. Printed under photo: STATE ELECTRICITY COMMISSION OF VICTORIA Date: 11.1.41 Time: 10.40am No:K294 Kiewa Hydro-Electric Works. Albion Quarrying Co. Camp – Bogong. Handwritten on back of photo: On the floor of the present dam 8. No markings 9. Printed under photo: STATE ELECTRICITY COMMISSION OF VICTORIA Date: 11.1.46 Time: 1.23pm No:K2181 Kiewa Hydro-Electric Works. Bogong – Typical House bogong village; 1939 fires; kiewa hydro electric scheme; -
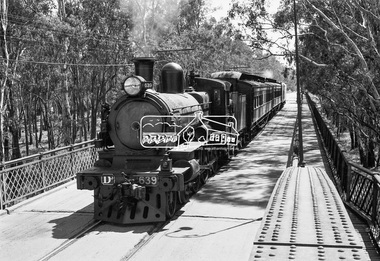 Eltham District Historical Society Inc
Photograph, VR Commissioner's Special train, steam locomotive D3-639 crossing the Echuca-Moama Road Rail Bridge over the Murray River from Moama, NSW to Echuca, Victoria, 1962
VR Commissioner's Special train, steam locomotive D3-639 crossing the Echuca-Moama Road Rail Bridge over the Murray River from Moama, NSW to Echuca, Victoria. Commissioner Edgar Henry Brownbill on footplate, 1962. Commissioner Edgar Henry Brownbill was in office 1957 to 1967. George Coop advises - "The train on the Eltham/Moama bridge is actually the Commissioner’s Special on one of its inspection tours of the VR rail system. This was a very grand special train with accommodation for the Commissioner and staff in carriages also used once for the Royal Train and other State purposes. You can just see the Commissioner of the day, dressed in his suit and wearing engine drivers gloves, standing in the loco cab doorway. A good ‘hands on’ impression is created amongst local staff if can be seen that the boss is no ‘desk jockjey’. The observation car on the back was originally made for the ’Spirit of Progress’. I climbed up onto the bridge iron plate work to get this view. It was safe enough as the cantilevered pedestrian walkway was still on the east side at the time." "I was resident in Echuca from Jan. ’59 to approx. May ’64. At that time the single Echuca/Moama bridge was a combined road/rail bridge. The rail gauge was 5’3” and still is, I believe, on the new bridge that sits just upstream of the old one. This rail line into NSW has always been 5’3" gauge because it has no connection with any NSW tracks. The old Echuca/Moama bridge, locally called the ‘Iron Bridge’ has, over years, undergone some structural changes. The two lattice iron hoops arcing over the roadway have been raised and lowered and changed design. Presently a pedestrian walkway is cantilevered off the west (or downstream) side of the bridge. It used to be on the eastern side. Guess changes went in when new rail bridge only was built on the eastern side as well." Image dated as c.1963 based on same image in Port of Echuca collection (possibly frame 32 of film) (print 19.5 x 24.5cm) On reverse in pencil: "Brown card" in black pen: "Commissioners special. F. Brown on Footplate. George C.L. Coop c1963". https://victoriancollections.net.au/items/59d575b921ea6e1278d78042 However based on frame no. 10, date set as 1962Digital TIFF file Scan of 35mm Ilford FP3 black and white negative transparencyd3-639, d3-class steam locomotive, echuca-moama road rail bridge, edgar henry brownbill, george coop collection, murray river, vr commissioner's special train -
 Eltham District Historical Society Inc
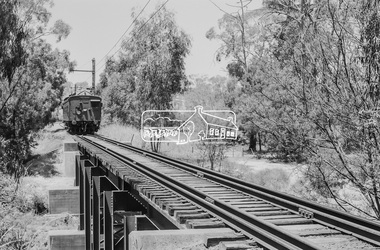
Photograph, George Coop, Single Motor Carriage (Red Rattler) Tait train, possibly 471M, heading for Eltham near Allendale Road, Diamond Creek, c.December 1980, 1980
View is looking northwest from the hillside just north of Allendale Road. The long rectangular house in the upper left is No. 22 Challenger Street, Diamond Creek, right at the sharp turn into Price Court. On the track in the straight section heading northwest are two small bridges where the track crosses the Diamond Creek, each fitted with derailment guard rails to prevent severe derailments should a train come off the tracks whilst crossing the culverts. Digital TIFF file Scan of 35mm Ilford FP4 black and white transparency471m, allendale road, challenger street, derailment guard rail, diamond creek, hurstbridge line, price court, red rattler, red rattler single carriage, single motor carriage, tait train -
 Eltham District Historical Society Inc
Photograph, George Coop, Single Motor Carriage (Red Rattler) Tait train heading for Hurstbridge about to cross over the Diamond Creek just north of Allendale Road, c.December 1980, 1980
The derailment guard rail is intended to prevent severe derailment and to keep errant trains in line with track when going over culverts or similar should they become derailed.Digital TIFF file Scan of 35mm Ilford FP4 black and white transparency471m, allendale road, derailment guard rail, diamond creek, hurstbridge line, railway bridge, red rattler, red rattler single carriage, single motor carriage, tait train -
 Lara RSL Sub Branch
Framed collection of the Kokoda Trail, The Kodoka Trail, Circa 2018
The Kokoda Track (or Trail) is a single-file thoroughfare that runs 96 kilometres (60ml) overland) - 60 kilometres (37ml) in a straight line - through the Owen Stanley Range in Papua New Guinea (PNG).The trail was First used by Europeans in the 1890s by miners struggling northwards to the Yodda Kokoda goldfields. During the Pacific War of World War 2 a series of battles were fought from July 1942 to January 1943 between Japanese and Australian forces.One of the bloodiest campaigns of World War 2,which has forever sealed the relation ship between Australia and Papua New Guinea began 61 years ago. This Photographic Memorial is dedicated to those Australian and Papua New Guinea forces who fought against the Japanese with courage and fortitude on the Kokoda Trail.Rectangular shaped glass covered picture frame showing a collection of photos,two flags and a Rising sun badge. The Kododa Trail.kokoda track, world war 2, papua new guinea, australian forces, lara r.s.l. -
 Flagstaff Hill Maritime Museum and Village
Tool - Sash Window Template, Late 19th to first quarter of the 20th century
A window sash is a type of moveable window frame that can slide, usually vertically. Unlike a window frame built into the wall, a sash allows glass window panes to slide up and down. The sashes fit inside a track that runs along another window frame attached to the house. Lead weights traditionally counterbalanced sashes, but today they are counterbalanced by springs. The traditional sash window is double-hung; this means it has two sashes that can both slide along a vertical track. However, some sash windows have a single moveable sash, and sashes may slide horizontally. A sash usually contains panels of glass, called lights. The lights are traditionally held together by a grid of bars. The sash window was developed in 17th century England and allowed for greater airflow. The sash window has had a significant impact on western architecture, used in nearly every style of English domestic architecture since the late 17th century. The subject item is a template used by the carpenter to mark or scribe the vertical track in which to window will slide up and down.An item used when sash windows were made by hand from the 17th to the early 20th century. The template allowed the carpenter to mark accurately a channel that was then planed and the Mitre to join the bars.Wooden Ovalo sash template with two screws each side. It has slot along length and has 45 degree bevelled edge each end.Noneflagstaff hill, warrnambool, shipwrecked-coast, flagstaff-hill, flagstaff-hill-maritime-museum, maritime-museum, shipwreck-coast, flagstaff-hill-maritime-village, wooden ovalo sash template, ovalo sash template, template, sash template, sash templet, window sash, tool -
 City of Moorabbin Historical Society (Operating the Box Cottage Museum)
Manufactured Objects, bottle opener 'Lukey Mufflers', mid 20thC
Len Lukey was a Victorian Racing Car Driver in the 1950s & 1960s and established his Car Exhaust Muffler business in his backyard in Highett c 1970. In 1964 he purchased the site and then developed and operated the Phillip Island Car Racing Track until his death 1978. He designed the Lukey Racing Car Museum and Gardens at that site. The 1959 Australian Drivers Championship was a CAMS sanctioned motor racing title for drivers of Formula Libre cars. The championship winner was awarded the 1959 CAMS Gold Star. The series was won by Victorian racer Len Lukey driving his Cooper T45 Climax and in the opening round of the series his own much modified Cooper T23 which was known as the Lukey-Bristol. Lukey was one of only a few drivers who attempted to complete the gruelling twelve race schedule, the longest in ADC history. Lukey finished just two points ahead of his season long rival, Alec Mildren from the ACT [1] (Cooper-Climax). Stan Jones, the father of F1 World Champion Alan Jones, was third in the championship, using four different cars over the course of the series. Race victories were shared around with Mildren taking three wins. Lukey, Jones and Bill Patterson each took two wins, with single victories going to Jack Brabham, Bib Stillwell and New Zealand Maserati 250F racer Ross Jensen. Jack Brabham later became F1 World Champion 3 times. A steel bottle opener with engraved advertising for Lukey Mufflers Pty Ltd HighettAlong Shaft : LUKEY MUFFLERS / HIGHETT VICTORIA / XL 3641car part manufacturers, lukey mufflers pty ltd, highett, moorabbin, bentleigh, cheltenham, early settlers, bottle openers, steel manufacturer, brabham jack, formula one grand prix champions, jones alan, phillip island car racing track. -
 Bendigo Historical Society Inc.
Document - BASIL MILLER COLLECTION: TRAMS - HISTORY DETAILS
Typed single sided foolscap page headed '3', details history of trams and extension to track post 1934 when State Electricity commission of Victoria had control of Bendigo Trams. Has been folded across the middle.person, individual, basil miller -
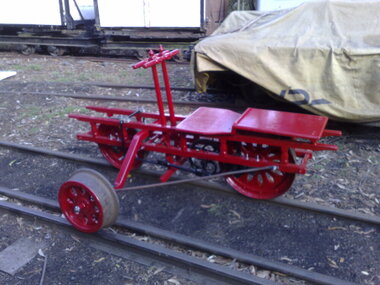 Puffing Billy Railway
Hand Tricycle Number 386, Commonwealth Railways 3'6" Gauge Hand Tricycle
The trolley entered service for the Commonwealth Railways (later Australian National Railways) as trolley number "386" and was originally built to the gauge of 3"6.Historic - Commonwealth Railways - Narrow Gauge Railway - Track vehicleThe tricycle is red and has three wheels, two large on one side with a single offset wheel on the other. Timber and steel constructionhand tricycle, commonwealth railways, australian national railways, trolley, puffing billy -
 Puffing Billy Railway
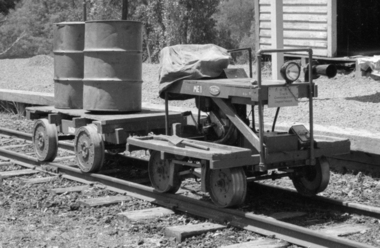
ME1, Victorian Railways 2'6" Gauge Trolly, 1958
It was constructed on a former Victorian Railways NKS type underframe and powered by a single cylinder, 500 cc B.S.A. side valve motorcycle engine to drive axle by roller chains through an 'Ariel Square Four' gearbox and has traveled on all four 2'6" narrow gauge lines that operated in the state of Victoria.Historic - Narrow Gauge Railway - Track Patrol Vehicle used by Puffing Billy Preservation Society and made from parts of a Victorian Railways track patrol vehicleMotorised small rectangular trolly made of wood and wrought iron ME1 P.B.P.S Track Construction Departmentme 1, trolley, victorian railway, 2'6" gauge, puffing billy, trolly -
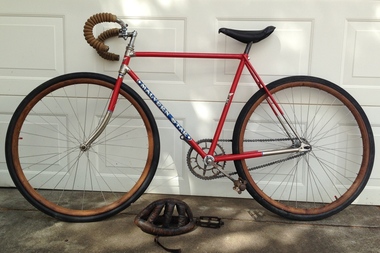 Geelong Cycling Club
Road Bike, 1929
Track cycle won by Jack Phillips 1929 in the Melbourne - Ballarat - Geelong - Melbourne Road Race. This was the first open road race won by a Geelong Amateur Cyclist. The Amateur Cycling Club was formed in 1929. This bike was restored by Ken Dickie who did his apprenticeship in fine line restorations and the painting was by Fred Cook. Hand grips by Harry Clarke. They used photographs from Jack Phillips of the original bike to restore the bike to its original colours and appearance.Track cycle one by Jack Phillips - the first of the big open road races won by an amateur.Restored Malvern Start Road Bike from 1929. Painted in red with the words Malvern Star highlighted in white on a blue background on the frame. The stem features two silver stars on a blue background. Single speed with wooden wheel rims. It has a leather saddle and rubber hand grips (formerly used as gas masks in WWI)"Malvern Star"jack phillips; geelong amateur cycling club; malvern star; geelong cycling club; 1929; -
 Ballarat Tramway Museum
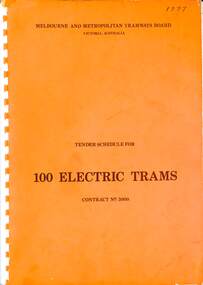
Document, Melbourne and Metropolitan Tramways Board (MMTB), "Tender Schedule for 100 Electric Trams Contract No. 3000", 1977
Compiled and published by the Melbourne and Metropolitan Tramways Board, closing Monday 10 May 1977. Details the conditions of tender, conditions of contract, notes, specifications, gives background information about Melbourne, dimensions, performance, drivers and conductors, trucks, wheels, brakes, electrical equipment, control panels and drawings. The drawings give a map of the system, typical city route, Glenferrie Road route (grade diagram), concrete track construction, min. radius curves, loading gauge, all-electric tram and mounting details for the trolley base, schedule of prices, tender form, form of contract, and schedule of information to be provided by the tenderer. Includes an Alphabetical Index. Includes a drawing for a single-ended version of the tramcar. Became the Z3 class following the addition of a rear or 3rd door. Yields information about the 1977 tender for 100 electric tramcars that became the Melbourne Z3 class tram.Comb bound (white plastic) specification or tender document, approx 180 pages, with glossy card orange covers, titled "Tender Schedule for Electric Trams" and "Contract 3000". "1977" on front cover in ink.tramways, tramcars, z3 class, specification, tenders, mmtb, melbourne, single ended tramcars -
 Ballarat Tramway Museum
Photograph - Digital image Set of 6, W. J. Llewelyn, c1970
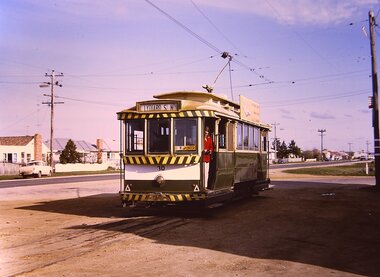
Set of six Digital images of All by Chris Phillips. c1970 .1 - No. 30 at Sebastopol terminus showing Lydiard St Nth destination with a lady standing in the front door. Has a Pay as you enter sign. Shows the houses behind the tram in Albert St. .2 - No. 30 leaving the terminus with the hotel and house in the background. .3 - view from inside the tram, looking back along the track towards the terminus. Shows the nature of the Albert St at the time. .4 - No. 30 with Chris Phillips boarding the tram. .5 and .6 - single trucker at dusk with all the lights on.trams, tramways, sebastopol, albert st, night photo, tram 30 -
 Ballarat Tramway Museum
Photograph - Digital image Set of 8, George Coop, 1968 - 1970
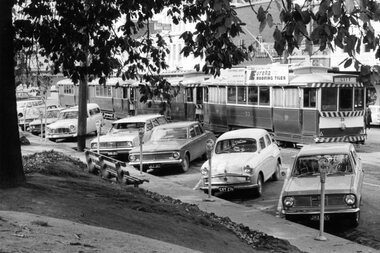
Yields information about the City Loop area and its operation. Eight (8) Digital images taken by George Coop during the period 1968 - 1970, of trams at the City Loop. .1 - 33, 17 and two other single truckers parked in the loop with motor vehicles and parking meters. No. 33 has an Eureka Roofing Tile Advert. .2 - 28? passing two track workers cleaning the west end points with a bogie car and three single truckers in the loop. In the background are Patersons and Dickins Food Store. .3 - No. 12 parked at the east end of the loop, hard up against the tram in front. Shows the Section Insulator. .4 - As for .1, front on photo with the destination of City and a "Pay as You Enter". The Dickins sign can be seen. .5 - as for .2, No. 35 leads the queue. Has the Woolworths Big W store in the background. .6 - view from the rear (12, 30, 17) with No. 33 being driven out of the loop. .7 - View from the rear, 33 has moved out of view. Has the T&G (Temperance and General) building in the view. .8 - No. 31 moves over the points at the west end of the loop. The tram has the Destination of Gardens via Drummond North, a Twin Lakes advert and a SEC Electric Cooking Advert.trams, tramways, city loop, sturt st, trackwork, overhead, tram 33, tram 17, tram 26, tram 12, tram 35, tram 31 -
 Ballarat Tramway Museum
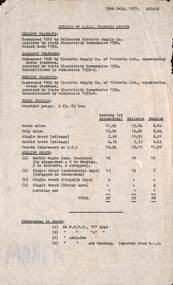
Document - Report, State Electricity Commission of Victoria (SECV), "Details of SEC Tramways System", 15/07/1971 12:00:00 AM
... Ballarat Bendigo Track Tram Tracks Rolling Stock Report - single ...Yields information about the three Provincial systems on a short report - track, rolling stock and a short history.Report - single foolscap sheet, typed, titled "Details of SEC Tramways System", prepared by Les Denmead, 15/7/1971m listing the three Provincial tramways, track details, size, rolling stock and notes including miles of tracks. Gives some details of the then current fleet.trams, tramways, reports, geelong, ballarat, bendigo, track, tram tracks, rolling stock -
 Ballarat Tramway Museum
Photograph - Colour print of donated negatives - set of 8, Ron E. Fluck, 27/01/1979 12:00:00 AM
Set of 8 colour laser printed copies of colour 35mm negatives featuring photographs of trams taken by Ron Fluck in Melbourne on 27/1/1979 and 28/1/1979 (1758.6 and 1758.7). 1758.1 - (Negative No. 251) - W2 340 at Airport West terminus. Sleepered track section on inbound track - must have been running single line at the time, following changeover to new terminus from Essendon Airport to Airport west. 1758.2 - NN253 - Z16 at Wattle Park terminus. 1758.3 - NN252 - VR 700 at Footscray terminus. 1758.4 - NN250 - W2 340 enroute to the Airport West terminus. New freeway arrangement being constructed on the left hand side of the tramway. 1758.5 - NN254 - Z1 11 at East Burwood Terminus 1758.6 - NN255 - W2 234 at Batman Ave terminus - one of the trams painted in "Transporting Art Program" 1758.7 - NN256 - W2 234 and SW6 912 at Batman Ave terminus. 1758.8 - NN257 - Z1 88 and W5 726 at corner of Bourke and Spencer St. Melbourne, with the Mail Exchange in the background. See Destination City 5th Editionmelbourne, essendon airport, princes bridge, footscray, east burwood, wattle park, transporting art, tram 11, tram 234, tram 340, tram 700, tram 16, tram 726, tram 88, tram 912 -
 Ballarat Tramway Museum
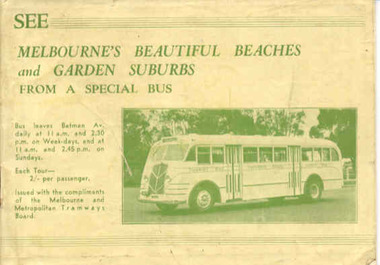
Book, Melbourne and Metropolitan Tramways Board (MMTB), "See Melbourne's Beautiful Beaches and Garden Suburbs from a Special Bus", 1939
Thirty two page landscape booklet on semi gloss white paper with off white cover and single supplementary white sheet tipped onto the inside of the front cover titled "See Melbourne's Beautiful Beaches and Garden Suburbs from a Special Bus". Saddle stapled, printed letterpress. Text printed in black and green ink. Cover green ink only. The book advertising MMTB's Special tourist bus, giving overall tour details on page 1, including fares, time of departures and reservations. Each tour has a map showing the route, details of the tour route with notes and photographs. Page 14 shows a maximum traction tram on the reserved track in Dandenong road and page 30, W2 488 outbound in Victoria Parade. Page 32 has an advertisement for the Round Trip by Tram 1/-. Front cover has details of the departure times and fares and a photo of the Tourist Bus. The supplementary sheet has been prepared for the tours that operated daily from Sun Sept. 17 to Friday May 31, except Anzac Day. Melbourne Tram Museum has a similar book - different bus - Reg Item 99 - 1938-39 version..trams, tramways, mmtb, bus tours, melbourne, sightseeing -
 Ballarat Tramway Museum
Photograph - Miscellaneous Images, Set of 15 (Only three photos in archive, .5, .6 and .7. Location of remaining 12 photos under investigation), 1960s
Set of 15 items personally collected or given to Les Denmead by visiting Tramway enthusiasts or other interested people to Ballarat. Retained as a sample of images or other mementoes given by people though not directly of Ballarat. The following items are a summary only: 1901.1 - Postcard from South Pacific Electric Railway of L/P class tram No. 154 on SPER track , SPER-1 - Nucolorvue. 1901.2 - Photograph of Brisbane FM 440? and drop centre behind - CBD area Brisbane. Has 'Brisbane' written on back. 1901.3 - Photograph of Brisbane FM 473, showing Grange, as for 1901.2. 1901.4 - Photograph of Brisbane FM 422, showing Chermside, Brisbane CBD area, has "Brisbane May 1955' written on front of photo. 1901.5 - Illustration of Christchurch Horse Tram, Tramway Historical Society / Shell Oil company produced card, full details on rear. 1901.6 - Illustration of Wellington 'Fiducia' tram No. 238, operating on Wellington Tramway Museum track. Produced by Museum, with full details on rear. 1901.7 - Colour illustration of Wellington tram No. 257, central or downtown Wellington, outside the Parliament grounds. Full details on rear of card - produced by Shell Oil Company? 1901.8 - Photo of four H class trams at Victoria Sq. Adelaide, 25/3/1967. Taken by Douglas A. Colquhoun. On left hand side is a single car 378 and on the other track a three car set 366, 367 and 368. 1901.9 - Photo of Adelaide E1 111, crossing the Holland St. Bridge, 24.10.1953. Photo by Douglas A. Colquhoun. 1901.10 - Photo of Adelaide A 82, Wayville Junction, Feb. 1952. Photo by Douglas A. Colquhoun. 1901.11 - Photo of Adelaide A 10, later SEC Ballarat 21, in Adelaide CBD, with Ferors Gresham Hotel alongside. Has written note on background re tram. 1901.12 - Two prints of the front vestibule of a Toronto PCC tram, with operator (driver) seated. 1901.13 - Two prints of Toronto PCC 4400 and 4404, coupled together, 9/8/1949 with a depot? or carbarn building in the background. Has caption on the base of the photograph - copy photograph. 1901.14 - Two prints of a close up photograph of the coupling between the two cars in 1901.13. 1901.15 - Photograph of a Fare Box on a Toronto Streetcar. (1901.13 to .14) have "Canada" written on the back. 1trams, tramways, sydney, brisbane, adelaide, wellington, christchurch, toronto, pcc, victoria sq., tram 21 -
 Ballarat Tramway Museum
Photograph - Black & White Photograph/s, Keith Kings, 14/03/1949 12:00:00 AM
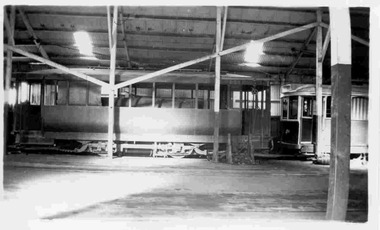
Black and White photograph contained with Reg. Item 1902 - Photo Album from Keith Kings to Les Denmead 1970. Photograph of SEC Ballarat Scrubber or track cleaning car inside depot, taken 14/3/1949. Has a single truck tram car on the right side of the scrubber car and an armature and other parts on the floor of the depot. Also shows cross bracing structure of the depot. Keith Kings No. B(w)(6) Scanning: i - image file, p - presentation file, b - back of photograph.Stamp in top left hand corner and handwritten number with "K.S. Kings No. B(w)(6) Copyright reserved". In blue ink "Ballarat / Track cleaning car / Depot / 14/3/49"trams, tramways, ballarat, depot, track cleaner, scrubber tram, tram scrubber -
 Ballarat Tramway Museum
Administrative record - Memorandum, Hal Cain, moving of trams to the new depo, Dec. 1971
Copies of reports and notes prepared by Hal Cain on the moving of trams to the new depot, depot access track construction and the construction of the depot. All on foolscap sheets, toner photocopies, with punched holes on the left hand edge. 914.1 - copy of a memo on the method of moving tramcars from the old SEC Depot to the Society's new building. Written on BTPS letterhead (see item 913) over two sheets of paper. Photocopied onto a single foolscap sheet of paper. In top right hand corner has notation "written by HAL 22/12/71". Last point - number 9 did not copy well and has lost most of last line - see 914.2 (Note by WAD - basis of method used for the movement of the first tram, but found to be very difficult and likely to damage the tramcars. Led to the laying of a temporary access track to the edge of the Wendouree Parade, which was used for the movement of the following five tramcars.) 914.2 - as for 914.1 but includes good text of point 9. 914.3 - copy of a report written by Hal Cain about the "Construction of connecting track in South Gardens Reserve from the Society's Depot to Wendouree Parade". On foolscap paper, with two punch holes in the left hand edge. In top right hand corner has notation "written by HAL 22/12/71". (two copies held) 914.4 - copy of a report written by Hal Cain on the: a - quotation received by the Society for the erection of the its Tram Depot b - Formation of the BTPS Cooperative c - Progress of the Preservation Society to date. On foolscap paper, with two punch holes in the left hand edge. In top right hand corner has notation "written by HAL 22/12/71". (two copies held) trams, tramways, btps, btps depot, track construction, btps co-operative -
 Ballarat Tramway Museum
Photograph - Black & White Photograph/s set of 19, Mar. 1972
... access track with a single truck car in background. 981.18... access track with a single truck car in background. 981.18 ...Set of 19 black and white prints, all 89mm square of Bendigo trams, date machine printed on print is "Mar 1972". 981.1 - Tram 21 at North Bendigo terminus, with level crossing in background. Has destination "Golden Square" and two SEC roof ads. 981.2 - tram 2? at Eaglehawk, with destination "Depot", two SEC roof ads and "Leo A. Hughes Photographer" on side of building in background. 981.3 - tram 2? at Eaglehawk, side on view. 981.4 - tram 26 at Quarry Hill terminus looking back into city. 981.5 - tram 7 en route to North Bendigo at the site of the Bridge St. loop. Has a Peters Ice Cream truck and Sandhurst Fruit Juices truck on right side of photograph. 981.6 - tram 2 at Quarry Hill terminus. 981.7 - tram 2? at one of the loops on the Eaglehawk line, inbound? 981.8 - bogie tram at Charing Cross with fountain in background. Side on view looking south. 981.9 -trams 7 and 21 on Golden Square/North Bendigo line with bogie tram in background, at Charing Cross. Same as item 972. 981.10 - bogie tram at Charing Cross - has buildings in south west corner in background, including Colonial Mutual Life and an advertisement for the Herald newspaper. 981.11 - trams 25, 7 and two other trams at Charing Cross. 981.12 - trams 2 and 26 and three others at Charing Cross. 981.13 - tram 25 at Golden Square terminus, with Rodda's Golden Square Hotel in the background. Tram showing destination of "Nth Bendigo" 981.14 - tram 24, showing "Special" on depot access track. Has two Johnnie Walker roof ads on side. 981.15 - as above, but tram on bridge outside depot. 981.16 - trams 25 and 28 at depot 981.17 - tram 24 showing "Special" on depot access track with a single truck car in background. 981.18 - trams 2 and 26 at Charing Cross. Has advertisements for "Armstrong Tyre Service" and "Cohn's drinks" on buildings in background. 981.19 - Bendigo 2 at location?, about to enter a loop or double track section. Has hotel in background. On rear of each photo in the top left hand corner is a print number 1 to 19 in ink and location notes, generally "Bendigo"trams, tramways, charing cross, bendigo, golden square, quarry hill, tram 2, tram 21, tram 7, tram 24, tram 26