Showing 95 items matching "stability"
-
 The Beechworth Burke Museum
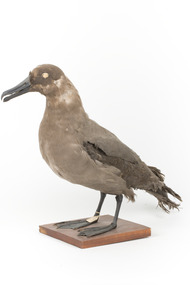
Animal specimen - Sooty Albatross, Trustees of the Australian Museum, 1860-1880
The Sooty Albatross can be located on islands in the southern Atlantic Ocean and the Indian Ocean. It is a colonial bird with colonies consisting of 50 to 60 pairs of birds. These birds will build nests on cliffs and steep slopes. The diet of the Sooty Albatross includes squid, crustaceans, cephalopods, fish and carrion. They are considered an endangered species by the IUCN with a population shrinkage of over 75% over the last 90 years. In the 21st century, the population of this Albatross has seen stability on Gough Island. Interestingly, this species have several features which make them unique. They have nasal passages attached to their upper bill called naricorns and can produce a stomach oil which is stored by the bird and used against predators as well as being food for their chicks. These birds also have a salt gland which helps desalinate their bodies after residing in salt water. This specimen is part of a collection of almost 200 animal specimens that were originally acquired as skins from various institutions across Australia, including the Australian Museum in Sydney and the National Museum of Victoria (known as Museums Victoria since 1983), as well as individuals such as amateur anthropologist Reynell Eveleigh Johns between 1860-1880. These skins were then mounted by members of the Burke Museum Committee and put-on display in the formal space of the Museum’s original exhibition hall where they continue to be on display. This display of taxidermy mounts initially served to instruct visitors to the Burke Museum of the natural world around them, today it serves as an insight into the collecting habits of the 19th century.This specimen is part of a significant and rare taxidermy mount collection in the Burke Museum. This collection is scientifically and culturally important for reminding us of how science continues to shape our understanding of the modern world. They demonstrate a capacity to hold evidence of how Australia’s fauna history existed in the past and are potentially important for future environmental research. This collection continues to be on display in the Museum and has become a key part to interpreting the collecting habits of the 19th century.This Sooty Albatross specimen is of medium size and mainly a sooty-brown plumage. The colouring around the sides of the head and the base of the tail is dark. It has a dark bill which is medium in size and has been stylized with glass eyes by the taxidermist. The tail is a wide diamond-shape and the feet are webbed. This specimen has been placed on a wooden mount and has a small paper identification tag tied to its right leg.Sooty Albatross / 13D / Catalogue Page 49 /taxidermy mount, taxidermy, animalia, burke museum, beechworth, australian museum, skin, reynell eveleigh johns, bird, hawk-owl, europe, atlantic ocean, indian ocean, albatross, sooty albatross, endangered species -
 Bendigo Military Museum
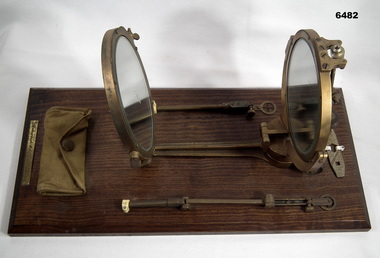
Instrument - Heliograph Mk V Training Aid - circa 1912, 1912
The Heliograph MkV is a fascinating piece of historical surveying and communications equipment. It was primarily used for visual signaling by reflecting sunlight with a mirror to send coded messages over long distances. This method was primarily useful in remote areas where other forms of communication were not available. The MkV model, specifically, was widely used by the British Army and other military forces from around 1906 until the mid 1960s. It remained in use with the Australian Army Survey Corps until the mid 1980s. The device typically included a 5 - inch mirror and was often mounted on a tripod for stability. Initially the instrument was used to communicate between survey stations using Morse code to coordinate their activities. Later when better forms of communication were available they were used for precise angle alignment where the sunlight reflection from the mirror was targeted between the survey stations to give very accurate results. The MkV was relatively light weight and portable, making it ideal for use in the field. It could be setup and adjusted quickly. The heliograph had an adjustable mirror that could be tilted to reflect sunlight towards a distant receiver. Surveyors could align the mirror using a sighting device. Whilst it was primarily used by the Military it was also used in civil surveying particularly in the remote areas of Australia. This instrument was used as a training aid to help teach surveyors at the Royal Australian Survey Corps School of Military Survey. Catalog item No 2009 is a tripod that was used to mount the Heliograph whilst being used for surveying.A Heliograph containing two mirrors with brass surrounds mounted on a wooden board as a Training Aid. Item has additional parts attached to the base board."Heliograph Mk V Training Aid"royal australian survey corps, rasvy, fortuna, army survey regiment, army svy regt, asr -
 Ballarat Heritage Services
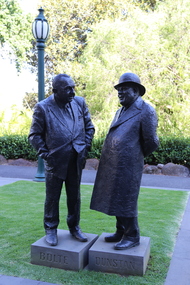
Photograph - Colour, Statue of Sir Rupert James Hamer, AC, KCMG, ED, 2016, 21/02/2016
Sir Albert Arthur Dunstan, KCMG was an Australian politician. A member of the Country Party (now National Party of Australia), Dunstan was the 33rd Premier of Victoria. His term as Premier was the second-longest in the state's history, behind Sir Henry Bolte. Dunstan, who was Premier from 2 April 1935 to 14 September 1943 and again from 18 September 1943 to 2 October 1945, was the first Premier of Victoria to hold that office as a position in its own right, and not just an additional duty taken up by the Treasurer, Attorney General, or Chief Secretary. Sir Henry BoltePrint Page Print this page 15-November-2018[Diane Watson] 15-November-2018[Diane Watson] 15-November-2018[Diane Watson] 21-November-201615-November-2018 [Diane Watson]21-November-201615-November-2018[Diane Watson]15-November-2018[Diane Watson]21-November-2016 Photographs supplied by Sandra Brown / Diane Watson A statue commemorates the former Premier of Victoria, Sir Henry Bolte for his services to Victoria and Ballarat. In the 1955 elections an almost unknown sheep farmer from the bush, Henry Bolte, became premier. His long, uninterrupted Liberal rule was a seminal period in Victoria`s history, not least for the unprecedented development of the hitherto languishing state and the political stability that his election in 1955 delivered. There was a chaotic political culture in Victoria before Bolte was elected. It was effectively a national joke with one minority government in 1943 lasting just five days and another in 1952 lasting only four.Statue of Henry Bolte and Sir Allbert Dunstantreasury gardens, statue, henry bolte, albert dunstan, premier -
 National Wool Museum
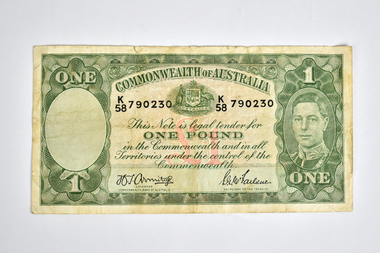
Currency - One Pound Note, John Ash, 1938 - 1948
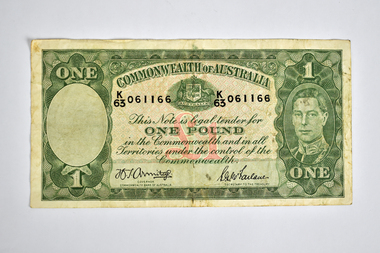
John Ash succeeded Thomas Harrison as the Australian Note Printer in 1927 and oversaw the printing of a new series of banknotes, known as the Ash Series. First issued between 1933 and 1934, the new banknotes sought to improve the currency's resistance to counterfeiting. A special watermark was created to increase the security of the new series. Shaped as a medallion, the watermark showed the profile of Edward, the Prince of Wales. A new portrait of the King was also introduced, depicting him frontally rather than in profile as he had appeared in the prior banknotes of the Harrison Series (1923-1925). The back of each denomination contained an individual vignette that reflected a sector of the country's economy. The wool and agricultural industries were represented, as they had been in the first series of the nation's banknotes (1913-1914), and they were joined by manufacturing and commerce. The prominent British sculptor, Paul Montford, contributed to the design of the new series. Recognised for his sculptural works on the exterior of Melbourne's Shrine of Remembrance, Montford was commissioned to produce relief sculptures that formed the basis of the banknotes' vignettes. His sculptures were translated into wash drawings by Frank Manley, the artist and engraver for the Commonwealth Bank's Note Printing Branch. Manley accentuated the sculpture's three-dimensional qualities with deep shadows and touches of illusionism. A sheep in Montford's pastoral scene, for example, stands forward from the frame as if entering the viewer's space to escape branding and Manley preserves this visual conceit in his drawing. Whereas the printing of the previous series of Australian banknotes had been criticised for its poor definition, the sculptural basis of the Ash Series clarified the banknotes' imagery. During a period of record unemployment, the scenes emphasised the strength of the human figure in gestures of labour, evoking classical, heroic qualities in their poses. The sculptural forms suggested stability in the turbulence of the Great Depression and imparted a sense of solidity to paper currency. - museum.rba.gov.auCommonwealth of Australia paper one pound note in green and white tones depicting graphics and text. The obverse has a framed design with a blank portal to the left and King George VI in the right portal. The centre shows the Australian Coat of Arms, serial number, and detail over one pound symbol on a mosaic background, with signatories below. The reverse features a framed pastoral scene with farmers tending sheep, with a blank portal to the right.Obverse: ONE / 1 / 1 / ONE / COMMONWEALTH OF AUSTRALIA / K / 58 / 790230 / K / 58 / 790230 / This Note is legal tender for / ONE POUND / in the Commonwealth and in all / Territories under the control of the / Commonwealth. / [signature] / GOVERNOR / COMMONWEALTH BANK ON AUSTRALIA / [signature] / SECRETARY TO THE TREASURY Reverse: 1 /1 / 1 / 1 / PASTORALcurrency, money, pound note, pastoral scene, industry, commonwealth of australia, paul montford, king george vi, frank manly, john ash -
 National Wool Museum
Currency - One Pound Note, John Ash, 1938 - 1948
John Ash succeeded Thomas Harrison as the Australian Note Printer in 1927 and oversaw the printing of a new series of banknotes, known as the Ash Series. First issued between 1933 and 1934, the new banknotes sought to improve the currency's resistance to counterfeiting. A special watermark was created to increase the security of the new series. Shaped as a medallion, the watermark showed the profile of Edward, the Prince of Wales. A new portrait of the King was also introduced, depicting him frontally rather than in profile as he had appeared in the prior banknotes of the Harrison Series (1923-1925). The back of each denomination contained an individual vignette that reflected a sector of the country's economy. The wool and agricultural industries were represented, as they had been in the first series of the nation's banknotes (1913-1914), and they were joined by manufacturing and commerce. The prominent British sculptor, Paul Montford, contributed to the design of the new series. Recognised for his sculptural works on the exterior of Melbourne's Shrine of Remembrance, Montford was commissioned to produce relief sculptures that formed the basis of the banknotes' vignettes. His sculptures were translated into wash drawings by Frank Manley, the artist and engraver for the Commonwealth Bank's Note Printing Branch. Manley accentuated the sculpture's three-dimensional qualities with deep shadows and touches of illusionism. A sheep in Montford's pastoral scene, for example, stands forward from the frame as if entering the viewer's space to escape branding and Manley preserves this visual conceit in his drawing. Whereas the printing of the previous series of Australian banknotes had been criticised for its poor definition, the sculptural basis of the Ash Series clarified the banknotes' imagery. During a period of record unemployment, the scenes emphasised the strength of the human figure in gestures of labour, evoking classical, heroic qualities in their poses. The sculptural forms suggested stability in the turbulence of the Great Depression and imparted a sense of solidity to paper currency. - museum.rba.gov.auCommonwealth of Australia paper one pound note in green and white tones depicting graphics and text. The obverse has a framed design with a blank portal to the left and King George VI in the right portal. The centre shows the Australian Coat of Arms, serial number, and detail over one pound symbol on a mosaic background, with signatories below. The reverse features a framed pastoral scene with farmers tending sheep, with a blank portal to the right.Obverse: ONE / 1 / 1 / ONE / COMMONWEALTH OF AUSTRALIA / K / 58 / 790230 / K / 58 / 790230 / This Note is legal tender for / ONE POUND / in the Commonwealth and in all / Territories under the control of the / Commonwealth. / [signature] / GOVERNOR / COMMONWEALTH BANK ON AUSTRALIA / [signature] / SECRETARY TO THE TREASURY Reverse: 1 /1 / 1 / 1 / PASTORALcurrency, money, pound note, pastoral scene, industry, commonwealth of australia, paul montford, king george vi, frank manly, john ash -
 Puffing Billy Railway
Lister Auto Truck
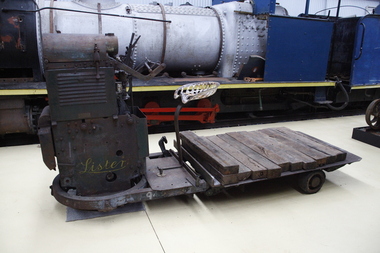
The Lister Auto-Truck was a small monowheel tractor built for moving light loads around factories, railway yards and similar sites. They were built by R A Lister and Company of Dursley, Gloucestershire, well known for their range of small stationary engines The Auto-Truck was one of several monowheel tractors to appear in the 1920s and '30s, with the availability of small, reliable petrol engines, as developed for motorcycles and the stationary engines for which Lister were already known. These were tricycle vehicles, with the single leading wheel used for both drive and steering. Their simple construction carried most of the mechanism on this wheel as a single unit, the chassis with the trailing wheels being little more than a trailer for balance. Simplicity was a key feature. The engines were single-cylinder and air-cooled. Ignition was by magneto, rather than requiring a battery and electrical system. One of these designs was produced in the 1920s by George Grist of the Auto Mower Co., Norton St Philip, Somerset. The engine was a JAP 600 cc four-stroke air-cooled sidevalve, a typical small engine of the time. The Auto Mower Co. were Lister agents and when Lister heard of this 'Auto-Truck' they bought one for use in their own factory. It was used to carry heavy engine castings from the foundry to the machine shop. Lister customers saw them and there was such interest in wanting to buy them that Lister negotiated with Auto Mower to build them under licence. Although Lister were already well known for their small petrol stationary engines, these were heavy cast-iron engines with water hopper cooling and unsuitable for vehicle use. Lister remained with the JAP engine for the Auto-Truck. The Auto-Truck was designed for use in factories or other places with smooth surfaces of concrete or tarmac. This allowed the use of small solid-tyred wheels with only simple suspension, making the vehicle simple, cheap and lightweight. They had little ability on soft surfaces though and could even topple over if driven carelessly across slopes. Their design was a compromise between the top-heavy nature of the tall engine grouping above its wheel and a well thought-out chassis for stability. The bearing between them was a large diameter ring roller bearing, mounted at the lowest part of the chassis. This gave rigidity and stability, even after long wear. A ring of rolled channel girder was attached to the engine group and rollers on the chassis carried the load upon this. On early Auto-Trucks this bearing is set very low, in line with the chassis members, and is covered by thin steel plates. The front panel of the engine cover is distinctive with large ventilation holes and a Lister signature cut through it. Strangely this panel is made of thick cast iron, providing substantial weight high on the engine and only adding to its top heaviness. To improve visibility of moving vehicles in noisy factories, this panel was often painted white, the rest of the vehicle being Lister's usual brunswick green. The driver was seated on a Brooks bicycle saddle, which in recognition of the lack of vehicle suspension, was carried on the end of a cantilevered bar that acted as a leaf spring. A wide handlebar on the engine group was used for steering. A squeeze bar the width of this handlebar engaged the clutch. Controls included a hand throttle, a gear lever with two forward and one reverse gears, and a large handbrake lever. The engine unit rotated freely for a full 360° rotation. When used in reverse, the Auto-Truck could either be driven from the saddle, looking backwards over the driver's shoulder; or they could dismount, swivel the engine unit around and control it as a pedestrian-controlled truck from behind. Under the engine cover were two equal diameter tanks, a fuel tank for petrol and a shorter oil tank. Engine and chain-drive lubrication used a total-loss oil system, controlled by a small pump and needle valve. Info Ref: Lister Auto-Truck - Wikipedia https://en.wikipedia.org/wiki/Lister_Auto-TruckHistoric - Industrial monowheel tractor for moving light loads around factories, railway yards and similar sites.The Lister Auto-Truck - small monowheel tractor Made of steel with three wheels. Powered by a J.A.P single cylinder petrol motor which is Hand Cranked to start.Lister puffing billy, lister, lister auto truck, monowheel tractor -
 Clunes Museum
Sign - DISPLAY PANEL, 2000
COPIES OF DISPLAY PANELS DONATED TO THE PEOPLE OF CLUNES BY THE HUGH WILLIAMSON FOUNDATION.INTERPRETIVE DISPLAY PANEL DEPICTING HISTORY OF SCHOOL DAYS IN CLUNES. WOODEN DISPLAY PANEL AND LAMINATED COPY.SCHOOL DAYS CHILDREN OF EARLY GOLDFIELD TOWNS WERE TAUGHT IN TENT SCHOOLS.THESE SCHOOLS WERE EASILY MOVED TO THE SITE OF THE LATEST GOLDRUSH. WITH GREATER COMMUNITY STABILITY PERMANENT SCHOOLS WERE ESTABLISHED. CLUNES STATE SCHOOL NO. 1552 WAS OPENED IN JULY 1875 ON LAND DONATED BY RIVETT H. BLAND, MANAGER OF THE PORT PHILIP GOLD MINING CO. SHORTLY BEFORE WORLD WAR ONE, THIS SCHOOL BECAME VICTORIA,S THIRD HIGHER ELEMENTARY SCHOOL. TODAY IT IS STILL USED TO EDUCATE THE CHILDREN OF CLUNES STATE SCHOOL NO. 136 WAS BUILT IN 1881 ON THE SITE OF AN EARLIER TEMPORARY SCHOOL THAT WAS BUILT IN 1857. THE DESIGN WAS FIRST USED AT HORSHAM. AND INCLUDES AN EARLY EXAMPLE OF A LARGE SCHOOL VERANDAH. IN 1892 THIS SCHOOL AMALGAMATED WITH STATE SCHOOL NO. 1552 AND WAS USED AS THE INFANT SCHOOL. IT CLOSED ITS DOORS IN 1922 AND WAS LATER USED AS A MILL FOR THE CLUNES KNITTING AND MAUFACTURING CO. LTD. IT NOW HOUSES THE CLUNES BOTTLE MUSEUM THE CLUNES CATHOLIC SCHOOL OPENED IN 1875 AND CLOSED IN 1926 THE LATEST EDUCATIONAL ASSET AT CLUNES IS A CAMPUS OF WESLEY COLLEGE. BLENDINGHISTORIC BUILDINGS AND MODERN ARCHITECTURE THE CAMPUS IS SITUATED IN SERVICE STREETlocal history, civic momentoes, presentations, williamson, hugh foundation -
 The Beechworth Burke Museum
Photograph
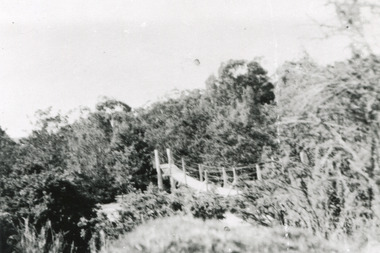
This rectangle black and white photograph shows a bush scene with part of a suspension rope and wooden plank bridge visible in the middle of the image. It is likely this suspension bridge was used by the Tannery workers to move between the town and the Ovens Tannery located South-West of Beechworth due to its secluded bush location, the bridge likely spanned the gorge across Spring creek. The tannery itself was located alongside Gimlet Creek, about three kilometres from town, down what is now known as Malakoff and Old Tannery Road but which at the time was remote and accessed through bushland. The Ovens tannery was stablished in 1858 by Matthew Dodd and Hallahan and later Matthew and his brother Thomas Dodd in 1866 who developed it over the years. According to Doyle, 'we have little information about its early operations except the tannery itself comprised four small buildings' by 1870 ‘a small village with gardens of vines and fruit trees surrounded the tannery’ (Woods, 121), and by 1887 the Tannery employed fifteen men. The Ovens tannery was among several new businesses establishing themselves such as a foundry that brought industrial manufacturing alongside the developing township and which strengthened the economic stability of Beechworth after the receding mining surge. According to Woods (p. 121) in the 1860’s the government spent considerable sums to establish several public buildings such as the Benevolent Asylum, the Hospital and Insane Asylum to support those in need of care in the area directly after the Indigo gold rush which had left Beechworth, a fairly remote regional and newly formed township (Gold was first discovered in Beechworth in 1852) with a number of infirm and destitute people in its wake and which due to the support and establishment of these facilities ‘made Beechworth a significant social welfare centre in Victoria’ (Woods, p. 121). The tannery provided employment and connected the regional centre with other parts of Victoria and the wider colonial outposts and would have been a welcome opportunity for those seeking work after gold was no longer a source of income.A good example of the ingenuity of regional settlers to achieve what would have been a difficult and remote construction of a bridge as a means of access. This bridge is evidence of planning and forethought and shows dedication to establishing a life in a remote landscape.Black and white rectangular photograph printed on paperreverse: / 2983 / / BMM2983 /black and white photograph, bush, suspension bridge, rope bridge, tannery, spring creek, ovens tannery, bushland, gimlet creek, matthew dodd, beechworth -
 Bendigo Military Museum
Instrument - Duplex Heliograph Mk V - 1940 with Tripod, LUCO Art Metal Coy Ltd, London, 1940
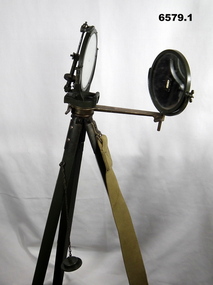
The Heliograph MkV is a fascinating piece of historical surveying and communications equipment. It was primarily used for visual signaling by reflecting sunlight with a mirror to send coded messages over long distances. This method was primarily useful in remote areas where other forms of communication were not available. The MkV model, specifically, was widely used by the British Army and other military forces from around 1906 until the mid 1960s. It remained in use with the Australian Army Survey Corps until the mid 1980s. The device typically included a 5 - inch mirror and was often mounted on a tripod for stability. Initially the instrument was used to communicate between survey stations using Morse code to coordinate their activities. Later when better forms of communication were available, they were used for precise angle alignment where the sunlight reflection from the mirror was targeted between the survey stations to give very accurate results. The MkV was relatively light weight and portable, making it ideal for use in the field. It could be setup and adjusted quickly. The heliograph had an adjustable mirror that could be tilted to reflect sunlight towards a distant receiver. Surveyors could align the mirror using a sighting device. Whilst it was primarily used by the Military it was also used in civil surveying particularly in the remote areas of Australia. The British Army Mark V version uses a flat round mirror with a small unsilvered spot in the centre. The sender aligned the heliograph to the target by looking at the reflected target in the mirror and moving their head until the target was hidden by the unsilvered spot. Keeping their head still, they then adjusted the aiming rod so its cross wires bisected the target, they then turned up the sighting vane, which covered the cross wires with a diagram of a cross, and aligned the mirror with the tangent and elevation screws, so the small shadow that was a reflection of the unsilvered spot hole was on the cross target. This indicated that the sunbeam was pointing at the target. If the sun was in front of the sender, its rays were reflected directly from this mirror to the receiving station. If the sun was behind the sender, the sighting rod was replaced by a second mirror, to capture the sunlight and direct it onto the main mirror to reflect it to the receiving station.. 1 Brish Army "Mance" Mk V A253 Heliograph has two 125mm diameter mirrors on a brass arm with targeting attachments. The Instrument is mounted on a three-legged tripod of brass and mahogany with spiked feet, approximately 1.2 metres high. The instrument was made by LUCO Art Metal Co Ltd, London in 1940. .2 A military green metal carrying safety storage case with khaki shoulder strap.A253 stamped on instrumentroyal australian survey corps, rasvy, fortuna, army survey regiment, army svy regt, asr -
 Dandenong/Cranbourne RSL Sub Branch
Memorabilia - Pack Saddle
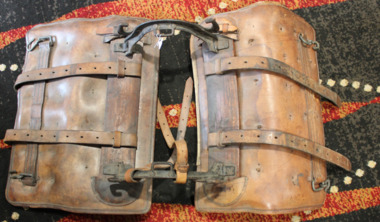
Believed to have been made 1939/43. In 1904 the British Army adopted a new General Service (GS) pack saddle with an adjustable tree, known as the Mark V pack saddle. The main innovation was the adjustable tree created by having the front and back steel arches jointed to the wooden sidebars, which allowed them to turn to adjust to the size of the back of whatever animal carried the saddle, from the largest horse to the smallest donkey, and eliminated the need to manufacture saddles in different sizes. The saddle could be adapted, by the addition of hanging bars, or universal slats, to carry a wide variety of stores, tools and equipment, and also wounded men. The GS pack saddle was used in both world wars by both the British and Australian armies. The use of pack saddles was especially important in the campaign in Palestine during the First World War where wheeled transport was often not an option. Each machine gun carried by light horse units was transported on a pack saddle, and was accompanied by a second pack animal carrying spare ammunition. During the Second World War pack animals were routinely used by patrols, and larger units such as Norforce, in remote areas of northern Australia. The saddle shown here has two separate girths, which crossed under the animal's belly. Most later versions of the saddle used a shorter single girth buckled to a 'V' attachment, which was in turn buckled to the sidebars. Use of the 'V' attachment gave greater strength and stability to the saddle, and decreased 'rocking' of the load. -
 Melbourne Tram Museum
Document - Folder with papers, Yarra Trams, "M>Tram Q&A pack", Feb. 2004
Set of seven press releases and other information documents contained within a white card board folder marked ""M>Tram Q&A pack" issued at the time Yarra Trams entered into the new partnership arrangement to merge M>Tram operations into Yarra and operate a single tram network. Has a M>Tram logo on the front cover. All dated 19/2/2004 unless otherwise noted and all A4 size on white paper. .1 - folder with following papers: .2 - Single page letter from Des Davies Manager Human Resources Yarra Trams to all M>Tram staff. .3 - single page letter from Colin Nicol and Peter Anderson Receivers of M>Tram at KPMG to all M>Tram, M>Train and Bayside Maintenance staff. .4 - Media Release from Connex group, 2 pages, "Connex Awarded Melbourne Train Franchise" with Veolia and Connex logos. .5 - Media release from Yarra Trams, 4 sheets, 7 pages, from Yarra Trams "Yarra Trams services to expand across the entire Melbourne Tram network" .6 - Media release from the Premier of Victoria - 5 sheets including two fact sheets - "Stability returns to State's tram and train system" .7 - M>Tram "Staff Update - Refranchising Announcement" - two pages - signed by Bernie Carolan .8 - DL size three fold pamphlet, "New Public Transport Partnerships" published by Victorian Government Dept. of Infrastructure, with message from Peter Batchelor, Minister for Transport.trams, tramways, yarra trams, m>tram, victorian government, transport, press release, media release, connex -
Bendigo Historical Society Inc.
Document - ROYAL PRINCESS THEATRE COLLECTION: VICTORIAN SYMPHONY ORCHESTRA, 15 July
Victorian Symphony Orchestra, Royal Princess Theatre, Bendigo. Conducted by Juan Jose Castro. Soloist: Isador Goodman (pianist). This series of concerts is arranged by the Australian Broadcasting Commission in conjunction with the Government of Victoria. Royal Princess Theatre, Bendigo. Thur., 1st May. Star Theatre, Shepparton, Friday, 2nd May at 8pm. Direction: Australian Broadcasting Commission. Juan Jose Castro (write up on the life of). Harmony and Home. Linking 'Home and Family Week' with this Visit. Bendigo faces the challenge brought through the medium of 'Home and Family Week.' Issues arising out of the relationship of Marriage, Parenthood and the family have been discussed by possible solution. Rather than compete with the Concert, negotiations were effected with the A.B.C., resulting in the acknowledgement of this function as part of our week, and the reciprocal arrangement of space in this booklet. Music, as truly as Education and other Culture, influences the outlook and the stability of the home. Ancient Jewish history gave common paternity . . . Programme. Programme notes. Page 6: photo of Isador Goodman. Page 7: photo of John Brownlee. Associate Artist: Raymond Lambert (pianist). Conductor: Juan Jose Castro. First violins: Jorgensen B, Hutchins H, Schieblich F, Deerson N, O'Brien P, Glassford W, Michael R, Burlakov A. Second violins: Lenzer H, Badley R, Pattison B, Whitelaw M, Pietruschka I, Braithwaite N. Violas: Kerr C, Kogan M, Roberts W. 'Cellos: Howley D, Touzeau H, Awburn V, Neri E. Basses: Howley T, Shiffron S, Morton W. Flutes: Chugg R, Barklamb L. Oboes: Richmond E, Woolley D. Clarinets: White T, Crowley C. Bassoons: Wightman T, Hunt. Horns: White R, Miller G, Grieve G, Bickford G. Trumpets: Simpson M, Roberts S. Trombones: Code S, McGlade J, Willis H. Tuba: Coram C. Tympani: Craig G. Percussion: Crawford B, McManamny T. Harp: Bendall A. Musical Autobiographies The London Daily Graphic's record critic praised Eugene Goossen's musical autobiography, Overture and Beginners, as excellent Story . . . Photographs of Elena Nikolaidi and Michael Rabin along with a write up on each. Advertisements: Georges, Melbourne. Railway.program, theatre, concert, victorian symphony orchestra, royal princess theatre, bendigo. conducted by juan jose castro. soloist: isador goodman (pianist). this series of concerts is arranged by the australian broadcasting commission in conjunction with the government of victoria. royal princess theatre, bendigo. thur., 1st may. star theatre, shepparton. juan jose castro harmony and home. linking 'home and family. family week.' issues arising out of the relationship of marriage, a.b.c., resulting in the acknowledgement of this function as part of our week, and the reciprocal arrangement of space in this booklet. music, as truly as education and other culture. ancient jewish history gave common paternity. programme notes. page 6: photo of isador goodman. page 7: photo of john brownlee. associate artist: raymond lambert (pianist). first violins: jorgensen b, hutchins h, schieblich f, deerson n, o'brien p, glassford w, michael r, burlakov a. second violins: lenzer h, badley r, pattison b, whitelaw m, pietruschka i, braithwaite n. violas: kerr c, kogan m, roberts w. 'cellos: howley d, touzeau h, awburn v, neri e. basses: howley t, shiffron s, morton w. flutes: chugg r, barklamb l. oboes: richmond e, woolley d. clarinets: white t, crowley c. bassoons: wightman t, hunt. horns: white r, miller g, grieve g, bickford g. trumpets: simpson m, roberts s. trombones: code s, mcglade j, willis h. tuba: coram c. tympani: craig g. percussion: crawford b, mcmanamny t. harp: bendall a. musical autobiographies the london daily, eugene goossen's, photographs of elena nikolaidi and michael rabin along with a write. advertisements: georges, melbourne. railway. -
 Upper Yarra Museum
Razor, Cut throat
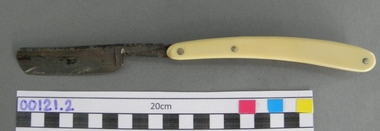
Sharped Edged instrument used for cleaning hair from the skin. http://en.wikipedia.org/wiki/Straight_razor A straight razor is a razor with a blade that can fold into its handle.[1] They are also called open razors and cut-throat razors. HISTORY The first modern straight razor complete with decorated handles and hollow ground blades was constructed in Sheffield, England, by Benjamin Huntsman in 1740. Huntsman's process was adopted by the French sometime later. The English manufacturers were even more reluctant than the French to adopt the process and only did so after they saw its success in France.[5] Straight razors were the most common form of shaving before the 20th century and remained that common in many countries until the 1950s. TODAY Straight razors are still manufactured. DOVO, of Solingen, Germany, and Thiers Issard of France are two of the most well-known European manufacturers. Feather Safety Razor Co. Ltd. of Osaka, Japan makes a razor with the same form as a traditional straight, but featuring a disposable blade that can be installed through an injector-type system. Modern straight razor users are known to favor them for a variety of reasons. Some are attracted to the nostalgia of using old and traditional methods of shaving. It is a masculine ritual comparable to pipe smoking. Others profess an interest in reducing the waste of disposable blades.[11][22] Still others agree that straight razors provide a superior shave through a larger blade and greater control of the blade including the blade angle. Straight razors cover a much greater area per shaving stroke because their cutting edge is much longer than any of the multiblade razors. Ivory cut throat razor, with cream case 00121.3.Known as a straight razor.Razor with square point, full hollow ground 5/8” blade and double transverse stabiliser. The centre pin adds stability and rigidity to the handle---I think this is it ROM Parts The narrow end of the blade pivots on a pin, between 2 pieces of ivory forms the handle. LONG EXTRACT FROM WIKI _ SHORTEN to describe 00121 The parts of a straight razor and their function are described as follows: The narrow end of the blade rotates on a pin called the pivot, between two protective pieces called the scales or handle. The upward curved metal end of the narrow part of the blade beyond the pivot is called the tang and acts as a lever to help raise the blade from the handle. One or two fingers resting on the tang also help stabilize the blade while shaving. The narrow support piece between the tang and the main blade is called the shank, but this reference is often avoided because it can be confusing. The shank sometimes features decorations and the stamp of the country of origin. The top side and the underside of the shank can sometimes exhibit indentations known as fluting, or jimps for a more secure grip.[8] The curved lower part of the main blade from the shank to the cutting edge is called the shoulder.[9] The point where the shoulder joins the cutting edge is called the heel. A thick strip of metal running transversely at the junction where the main blade attaches to the shank is called the stabiliser. The stabiliser can be double,[10] single or can be absent in some razor models. The first stabiliser is usually very narrow and thicker and runs at the shank to blade junction, covering the shank and just spilling over to the shoulder. The second stabiliser can be distinguished since it is considerably wider and narrower, appearing after the first stabiliser and running lower into the shoulder. The non-cutting top of the blade is called the back or the spine while the cutting part of the blade opposite the back is called the cutting edge.[11] Finally the other free end of the blade, at the opposite end of the tang, is called the point and, sometimes, the head or the nose.[9][12] There are two to three pins in any handle. The middle pin, if present, is plastic coated and is called the plug.[13] Its function is to stabilise the sides of the handle so that they cannot be squeezed in the middle. When folded into the scales, the blade is protected from accidental damage, and the user is protected from accidental injury. During folding, the back of the blade, being thick and normally with a curved cross-section, acts as a natural stopper and prevents further rotation of the blade out of the handle from the other side shaving, lever, handle, blade, pivot, razor, tang -
 Flagstaff Hill Maritime Museum and Village
Print - Portrait of Queen Victoria, Hoy Art Picture Framing, Original probably painted in 1887 or 1897 to commemorate 50 or 60 years on the throne
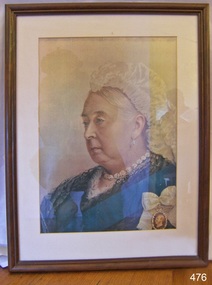
Queen Victoria was born at Kensington Palace, London, on 24 May 1819. She was the only daughter of Edward, Duke of Kent, the fourth son of George III. Her father died shortly after her birth and she became heir to the throne because the three uncles who were ahead of her in the succession - George IV, Frederick Duke of York, and William IV - had no legitimate children who survived. Warmhearted and lively, Victoria had a gift for drawing and painting; educated by a governess at home, she was a natural diarist and kept a regular journal throughout her life. On William IV's death in 1837, she became Queen at the age of 18. Queen Victoria is associated with Britain's great age of industrial expansion, economic progress and, especially, empire. At her death, it was said, Britain had a worldwide empire on which the sun never set. In the early part of her reign, she was influenced by two men: her first Prime Minister, Lord Melbourne, and then her husband, Prince Albert, whom she married in 1840. Both men taught her much about how to be a ruler in a 'constitutional monarchy, in which the monarch had very few powers but could use much influence. Albert took an active interest in the arts, science, trade and industry; the project for which he is best remembered was the Great Exhibition of 1851, the profits from which helped to establish the South Kensington museums complex in London. Her marriage to Prince Albert produced nine children between 1840 and 1857. Most of her children married into other Royal families in Europe. Edward VII (born 1841), married Alexandra, daughter of Christian IX of Denmark. Alfred, Duke of Edinburgh and of Saxe-Coburg and Gotha (born 1844) married Marie of Russia. Arthur, Duke of Connaught (born 1850) married Louise Margaret of Prussia. Leopold, Duke of Albany (born 1853) married Helen of Waldeck-Pyrmont. Victoria, Princess Royal (born 1840) married Friedrich III, German Emperor. Alice (born 1843) married Ludwig IV, Grand Duke of Hesse and by Rhine. Helena (born 1846) married Christian of Schleswig-Holstein. Louise (born 1848) married John Campbell, 9th Duke of Argyll. Beatrice (born 1857) married Henry of Battenberg. Victoria bought Osborne House (later presented to the nation by Edward VII) on the Isle of Wight as a family home in 1845, and Albert bought Balmoral in 1852. Victoria was deeply attached to her husband and she sank into depression after he died, aged 42, in 1861. She had lost a devoted husband and her principal trusted adviser in affairs of state. For the rest of her reign she wore black. Until the late 1860s she rarely appeared in public; although she never neglected her official Correspondence, and continued to give audiences to her ministers and official visitors, she was reluctant to resume a full public life. She was persuaded to open Parliament in person in 1866 and 1867, but she was widely criticised for living in seclusion and quite a strong republican movement developed. Seven attempts were made on Victoria's life, between 1840 and 1882 - her courageous attitude towards these attacks greatly strengthened her popularity. With time, the private urgings of her family and the flattering attention of Benjamin Disraeli, Prime Minister in 1868 and from 1874 to 1880, the Queen gradually resumed her public duties. In foreign policy, the Queen's influence during the middle years of her reign was generally used to support peace and reconciliation. In 1864, Victoria pressed her ministers not to intervene in the Prussia-Denmark war, and her letter to the German Emperor (whose son had married her daughter) in 1875 helped to avert a second Franco-German war. On the Eastern Question in the 1870s - the issue of Britain's policy towards the declining Turkish Empire in Europe - Victoria (unlike Gladstone) believed that Britain, while pressing for necessary reforms, ought to uphold Turkish hegemony as a bulwark of stability against Russia, and maintain bi-partisanship at a time when Britain could be involved in war. Victoria's popularity grew with the increasing imperial sentiment from the 1870s onwards. After the Indian Mutiny of 1857, the government of India was transferred from the East India Company to the Crown, with the position of Governor-General upgraded to Viceroy, and in 1877 Victoria became Empress of India under the Royal Titles Act passed by Disraeli's government. During Victoria's long reign, direct political power moved away from the sovereign. A series of Acts broadened the social and economic base of the electorate. These acts included the Second Reform Act of 1867; the introduction of the secret ballot in 1872, which made it impossible to pressurise voters by bribery or intimidation; and the Representation of the Peoples Act of 1884 - all householders and lodgers in accommodation worth at least £10 a year, and occupiers of land worth £10 a year, were entitled to vote. Despite this decline in the Sovereign's power, Victoria showed that a monarch who had a high level of prestige and who was prepared to master the details of political life could exert an important influence. This was demonstrated by her mediation between the Commons and the Lords, during the acrimonious passing of the Irish Church Disestablishment Act of 1869 and the 1884 Reform Act. It was during Victoria's reign that the modern idea of the constitutional monarch, whose role was to remain above political parties, began to evolve. But Victoria herself was not always non-partisan and she took the opportunity to give her opinions, sometimes very forcefully, in private. After the Second Reform Act of 1867, and the growth of the two-party (Liberal and Conservative) system, the Queen's room for manoeuvre decreased. Her freedom to choose which individual should occupy the premiership was increasingly restricted. In 1880, she tried, unsuccessfully, to stop William Gladstone - whom she disliked as much as she admired Disraeli and whose policies she distrusted - from becoming Prime Minister. She much preferred the Marquess of Hartington, another statesman from the Liberal party which had just won the general election. She did not get her way. She was a very strong supporter of the Empire, which brought her closer both to Disraeli and to the Marquess of Salisbury, her last Prime Minister. Although conservative in some respects - like many at the time she opposed giving women the vote - on social issues, she tended to favour measures to improve the lot of the poor, such as the Royal Commission on housing. She also supported many charities involved in education, hospitals and other areas. Victoria and her family travelled and were seen on an unprecedented scale, thanks to transport improvements and other technical changes such as the spread of newspapers and the invention of photography. Victoria was the first reigning monarch to use trains - she made her first train journey in 1842. In her later years, she became the symbol of the British Empire. Both the Golden (1887) and the Diamond (1897) Jubilees, held to celebrate the 50th and 60th anniversaries of the Queen's accession, were marked with great displays and public ceremonies. On both occasions, Colonial Conferences attended by the Prime Ministers of the self-governing colonies were held. Despite her advanced age, Victoria continued her duties to the end - including an official visit to Dublin in 1900. The Boer War in South Africa overshadowed the end of her reign. As in the Crimean War nearly half a century earlier, Victoria reviewed her troops and visited hospitals; she remained undaunted by British reverses during the campaign: 'We are not interested in the possibilities of defeat; they do not exist.' Victoria died at Osborne House on the Isle of Wight, on 22 January 1901 after a reign which lasted almost 64 years, then the longest in British history. Her son, Edward VII succeeded her. She was buried at Windsor beside Prince Albert, in the Frogmore Royal Mausoleum, which she had built for their final resting place. Above the Mausoleum door are inscribed Victoria's words: "Farewell best beloved, here, at last, I shall rest with thee, with thee in Christ I shall rise again." Source: https://www.royal.uk/queen-victoria This picture captures Queen Victoria in her later years. It may well have been painted to commemorate her Golden Anniversary in 1887, or her Diamond Anniversary in 1897.Picture, print, reproduction of a drawing or photograph of Queen Victoria. She is wearing a dark-coloured dress, white headdress and a diamond necklace and earrings. On her left shoulder is the Royal Order of Victoria and Albert, awarded to female members of the British Royal Family and female courtiers. There are four grades or classes of this Royal Order as well as the Sovereign's Badge, which is exclusive to her. Also across her left shoulder, is a blue riband representing the Order of the Garter. The picture is in a medium-coloured timber frame with a white string across the width at the rear. The label says it was framed by Hoy Art, Warrnambool. The signature of the Queen is on the picture but is not obvious since the picture has been re-framed."HOY ART / PICTURE FRAMING / 48 Kepler St, Warrnambool 3280 / Phone (055) 62 8022" Signature (hidden by new framing) "Victoria H.R.S."flagstaff hill, warrnambool, shipwrecked-coast, flagstaff-hill, flagstaff-hill-maritime-museum, maritime-museum, shipwreck-coast, flagstaff-hill-maritime-village, picture of queen victoria, queen victoria, the royal order of victoria and albert, the order of the garter, hoy art -
 Flagstaff Hill Maritime Museum and Village
Domestic object - Bowl, Late 19th or early 20th Century
The Process of Making Pottery Decorating, Firing, Glazing, Making, Technical There is a rhythm and flow to clay. It can’t be done all at once! Even the making process! It can take weeks to get everything done, especially if you can only work on your pottery once a week! Even though we have three hour classes, it’s often just not enough time! Here is an overview of some of the processes so you have a bit more grasp on some of the technical stuff! Step One – Design There are SO many ideas out there for making stuff in clay! From delicate porcelain jewellery, through to heavy sculptural work and everything in between. Deciding your direction is sometimes not that easy – when you first start, try everything, you will naturally gravitate to the style that you enjoy! The options and variations are endless and can get a wee bit overwhelming too! Check in with me before you start to ensure your ideas will work, what order you might do things, how you could achieve the look you are seeking and any other technical data required! Step Two – Making Clay is thixotropic. This means that as you work with it, the clay first gets sloppier and wetter, before is begins to dry in the atmosphere. For most things, you simply can’t do all parts of the project at once. An example of work order might look like: Get last weeks work out from the shelves Prepare clay for today’s work – roll your clay, prepare balls for throwing, make the first stage of a pinch pot) Clean up last week’s work and put it on the shelf for bisque firing Check that you have any glazing to do – and do enough of it that you will have time to finish your main project Do the next step of your next project – there might be a further step that can’t be complete immediately, in that case, wrap your work well and put onto the shelves. Letting your work rest for a while can really help keep your work clean and professional looking. Many things require bagging under plastic to keep it ready for work the next week – put your name on the outside of the bag so you can find your work easily. We have stickers and markers. Consider how you want to decorate your work – coloured slip can be applied at a fairly wet stage (remembering that it will make your work even wetter!). Trying to apply slip to dry clay won’t work! If you want to do sgraffito – you will need to keep the work leather hard (a state of dryness where you can still work the clay with a little effort and a little water and care). Step Three – Drying Most of the time your work can go into the rack uncovered to let it dry out for the following week. If you want to continue forming or shaping you will need to double bag your work – put your work on a suitable sized bat and put the bat in a bag so the base of the bag is under the bat, then put another bag over the top of the work and tuck the top of the bag under the bat. If you want to trim (or turn) your thrown work the following week, it should also be double bagged. If your work is large, delicate, or of uneven thicknesses, you should lightly cover your work for drying. When considering the drying process, bare in mind the weather, humidity and wind! The hotter and dryer, the faster things dry and work can dry unevenly in the shelves – this can lead to cracking – another time to lightly cover your work for drying. Step Four – Trimming and Cleaning Up Your work is dry! It is called greenware now and it is at it’s most fragile! Handle everything with two hands. I often refer to soft hands – keep everything gentle and with your fingers spread as much as possible. Try to not pick up things like plates too much, and always with both hands! Before your work can be bisque fired it should be “cleaned up”. You work won’t go into the kiln if it has sharp edges – when glazed, sharp edges turn into razor blades! Use a piece of fly wire to rub the work all over – this will scratch a little so be light handed. Use a knife or metal kidney to scrape any areas that require a bit more dynamic treatment than the fly wire offers! Finally, a very light wipe over with a slightly damp sponge can help soften and soothe all of your edges and dags! Trimming thrown work: If you are planning to trim (or turn) your thrown work (and you should be), make sure you bag it well – your work should be leather hard to almost dry for easiest trimming. Use this step to finish the work completely – use a metal kidney to polish the surface, or a slightly damp sponge to give a freshly thrown look. Wipe the sponge around the rim after trimming, and check the inside of the pot for dags! Trimming slip cast work: Usually I will trim the rims of your work on the wheel the following day to make that stage easier, however you will still need to check your work for lumps and bumps. Last but not least – check that your name is still clearly on the bottom of your work. Step Five – Bisque Firing When the work is completely dry it can go into the bisque kiln. The bisque kiln is fired to 1000°C. This process burns off the water in the clay as well as some of the chemically bound water. The structure of the clay is not altered that much at this temperature. Inside the bisque kiln, the work is stacked a little, small bowl inside a larger bowl and onto a heavy plate. Smaller items like decorations or drink coasters might get stacked several high. Consideration is paid to the weight of the stack and shape of the work. A bisque kiln can fire about one and a half times the amount of work that the glaze kiln can fire. The firing takes about 10 hours to complete the cycle and about two days to cool down. Once it has been emptied the work is placed in the glaze room ready for you to decorate! Step Six – Glazing Decorating your work with colour can be a lot of fun – and time consuming! There are three main options for surface treatment at this stage: Oxide Washes Underglazes Glazes Washes and underglazes do not “glaze” the work – It will still need a layer of glaze to fully seal the clay (washes don’t need glaze on surfaces not designed for food or liquid as they can gloss up a little on their own). Underglazes are stable colourants that turn out pretty much how they look in the jar. They can be mixed with each other to form other colours and can be used like water colours to paint onto your work. Mostly they should have a clear glaze on top to seal them. Oxides are a different species – the pink oxide (cobalt) wash turns out bright blue for instance. They don’t always need a glaze on top, and some glazes can change the colour of the wash! The glazes need no other “glaze” on top! Be careful of unknown glaze interactions – you can put any combination of glaze in a bowl or on a plate, but only a single glaze on the outside of any vertical surface! Glazes are a chemical reaction under heat. We don’t know the exact chemicals in the Mayco glazes we use. I can guess by the way they interact with each other, however, on the whole, you need to test every idea you have, and not run the test on a vertical surface! Simply put, glaze is a layer of glass like substance that bonds with the clay underneath. Clay is made of silica, alumina and water. Glaze is made of mostly silica. Silica has a melting point of 1700°C and we fire to 1240°C. The silica requires a “flux” to help it melt at the lower temperature. Fluxes can be all sorts of chemicals – a common one is calcium – calcium has a melting point of 2500°C, however, together they both melt at a much lower temperature! Colourants are metal oxides like cobalt (blue), chrome (green through black), copper (green, blue, even red!), manganese (black, purple and pink) iron (red brown), etc. Different chemicals in the glaze can have dramatic effects. for example, barium carbonate (which we don’t use) turns manganese bright pink! Other elements can turn manganese dioxide brown, blue, purple and reddish brown. Manganese dioxide is a flux in and of itself as well. So, glazes that get their black and purple colours, often interact with other glazes and RUN! Our mirror black is a good example – it mixes really well with many glazes because it fluxes them – causes them to melt faster. It will also bring out many beautiful colours in the glazes because it’s black colouring most definitely comes from manganese dioxide! Glaze chemistry is a whole subject on it’s own! We use commercial Mayco glazes on purpose – for their huge range of colour possibilities, stability, cool interactions, artistic freedom with the ability to easily brush the glazes on and ease of use. We currently have almost 50 glazes on hand! A major project is to test the interactions of all glazes with each other. That is 2,500 test tiles!!!! I’m going to make the wall behind the wheels the feature wall of pretty colours! Step Seven – Glaze (Gloss or sometimes called “Glost”) Firing Most of the time this is the final stage of making your creation (but not always!) The glaze kiln goes to 1240°C. This is called cone 6, or midrange. It is the low end of stoneware temperatures. Stoneware clays and glazes are typically fired at cone 8 – 10, that is 1260 – 1290°C. The energy requirement to go from 1240°C to 1280°C is almost a 30% more! Our clay is formulated to vitrify (mature, turn “glass-like”) at 1240°, as are our glazes. A glaze kiln take around 12 hours to reach temperature and two to three days to cool down. Sometimes a third firing process is required – this is for decoration that is added to work after the glaze firing. For example – adding precious metals and lustres. this firing temperature is usually around 600 – 800°C depending upon the techniques being used. There are many students interested in gold and silver trims – we will be doing this third type of firing soon! After firing your work will be in the student finished work shelves. Remember to pay for it before you head out the door! There is a small extra charge for using porcelain clay (it’s more than twice the price of regular clay), and for any third firing process! Once your work has been fired it can not turn back into clay for millennia – so don’t fire it if you don’t like it! Put it in the bucket for recycling. https://firebirdstudios.com.au/the-process-of-making-pottery/ The bowl is an example of kitchenware used in the 19th century and still in use today.Bowl white ceramic. Crack on side. Badly stained.Backstamp very faint and unable to be read.flagstaff hill, warrnambool, shipwrecked-coast, flagstaff-hill, flagstaff-hill-maritime-museum, maritime-museum, shipwreck-coast, flagstaff-hill-maritime-village, mixing bowl, food preparation, kitchen equipment, ceramic -
 Flagstaff Hill Maritime Museum and Village
Domestic object - Bowl
The Process of Making Pottery Decorating, Firing, Glazing, Making, Technical There is a rhythm and flow to clay. It can’t be done all at once! Even the making process! It can take weeks to get everything done, especially if you can only work on your pottery once a week! Even though we have three hour classes, it’s often just not enough time! Here is an overview of some of the processes so you have a bit more grasp on some of the technical stuff! Step One – Design There are SO many ideas out there for making stuff in clay! From delicate porcelain jewellery, through to heavy sculptural work and everything in between. Deciding your direction is sometimes not that easy – when you first start, try everything, you will naturally gravitate to the style that you enjoy! The options and variations are endless and can get a wee bit overwhelming too! Check in with me before you start to ensure your ideas will work, what order you might do things, how you could achieve the look you are seeking and any other technical data required! Step Two – Making Clay is thixotropic. This means that as you work with it, the clay first gets sloppier and wetter, before is begins to dry in the atmosphere. For most things, you simply can’t do all parts of the project at once. An example of work order might look like: Get last weeks work out from the shelves Prepare clay for today’s work – roll your clay, prepare balls for throwing, make the first stage of a pinch pot) Clean up last week’s work and put it on the shelf for bisque firing Check that you have any glazing to do – and do enough of it that you will have time to finish your main project Do the next step of your next project – there might be a further step that can’t be complete immediately, in that case, wrap your work well and put onto the shelves. Letting your work rest for a while can really help keep your work clean and professional looking. Many things require bagging under plastic to keep it ready for work the next week – put your name on the outside of the bag so you can find your work easily. We have stickers and markers. Consider how you want to decorate your work – coloured slip can be applied at a fairly wet stage (remembering that it will make your work even wetter!). Trying to apply slip to dry clay won’t work! If you want to do sgraffito – you will need to keep the work leather hard (a state of dryness where you can still work the clay with a little effort and a little water and care). Step Three – Drying Most of the time your work can go into the rack uncovered to let it dry out for the following week. If you want to continue forming or shaping you will need to double bag your work – put your work on a suitable sized bat and put the bat in a bag so the base of the bag is under the bat, then put another bag over the top of the work and tuck the top of the bag under the bat. If you want to trim (or turn) your thrown work the following week, it should also be double bagged. If your work is large, delicate, or of uneven thicknesses, you should lightly cover your work for drying. When considering the drying process, bare in mind the weather, humidity and wind! The hotter and dryer, the faster things dry and work can dry unevenly in the shelves – this can lead to cracking – another time to lightly cover your work for drying. Step Four – Trimming and Cleaning Up Your work is dry! It is called greenware now and it is at it’s most fragile! Handle everything with two hands. I often refer to soft hands – keep everything gentle and with your fingers spread as much as possible. Try to not pick up things like plates too much, and always with both hands! Before your work can be bisque fired it should be “cleaned up”. You work won’t go into the kiln if it has sharp edges – when glazed, sharp edges turn into razor blades! Use a piece of fly wire to rub the work all over – this will scratch a little so be light handed. Use a knife or metal kidney to scrape any areas that require a bit more dynamic treatment than the fly wire offers! Finally, a very light wipe over with a slightly damp sponge can help soften and soothe all of your edges and dags! Trimming thrown work: If you are planning to trim (or turn) your thrown work (and you should be), make sure you bag it well – your work should be leather hard to almost dry for easiest trimming. Use this step to finish the work completely – use a metal kidney to polish the surface, or a slightly damp sponge to give a freshly thrown look. Wipe the sponge around the rim after trimming, and check the inside of the pot for dags! Trimming slip cast work: Usually I will trim the rims of your work on the wheel the following day to make that stage easier, however you will still need to check your work for lumps and bumps. Last but not least – check that your name is still clearly on the bottom of your work. Step Five – Bisque Firing When the work is completely dry it can go into the bisque kiln. The bisque kiln is fired to 1000°C. This process burns off the water in the clay as well as some of the chemically bound water. The structure of the clay is not altered that much at this temperature. Inside the bisque kiln, the work is stacked a little, small bowl inside a larger bowl and onto a heavy plate. Smaller items like decorations or drink coasters might get stacked several high. Consideration is paid to the weight of the stack and shape of the work. A bisque kiln can fire about one and a half times the amount of work that the glaze kiln can fire. The firing takes about 10 hours to complete the cycle and about two days to cool down. Once it has been emptied the work is placed in the glaze room ready for you to decorate! Step Six – Glazing Decorating your work with colour can be a lot of fun – and time consuming! There are three main options for surface treatment at this stage: Oxide Washes Underglazes Glazes Washes and underglazes do not “glaze” the work – It will still need a layer of glaze to fully seal the clay (washes don’t need glaze on surfaces not designed for food or liquid as they can gloss up a little on their own). Underglazes are stable colourants that turn out pretty much how they look in the jar. They can be mixed with each other to form other colours and can be used like water colours to paint onto your work. Mostly they should have a clear glaze on top to seal them. Oxides are a different species – the pink oxide (cobalt) wash turns out bright blue for instance. They don’t always need a glaze on top, and some glazes can change the colour of the wash! The glazes need no other “glaze” on top! Be careful of unknown glaze interactions – you can put any combination of glaze in a bowl or on a plate, but only a single glaze on the outside of any vertical surface! Glazes are a chemical reaction under heat. We don’t know the exact chemicals in the Mayco glazes we use. I can guess by the way they interact with each other, however, on the whole, you need to test every idea you have, and not run the test on a vertical surface! Simply put, glaze is a layer of glass like substance that bonds with the clay underneath. Clay is made of silica, alumina and water. Glaze is made of mostly silica. Silica has a melting point of 1700°C and we fire to 1240°C. The silica requires a “flux” to help it melt at the lower temperature. Fluxes can be all sorts of chemicals – a common one is calcium – calcium has a melting point of 2500°C, however, together they both melt at a much lower temperature! Colourants are metal oxides like cobalt (blue), chrome (green through black), copper (green, blue, even red!), manganese (black, purple and pink) iron (red brown), etc. Different chemicals in the glaze can have dramatic effects. for example, barium carbonate (which we don’t use) turns manganese bright pink! Other elements can turn manganese dioxide brown, blue, purple and reddish brown. Manganese dioxide is a flux in and of itself as well. So, glazes that get their black and purple colours, often interact with other glazes and RUN! Our mirror black is a good example – it mixes really well with many glazes because it fluxes them – causes them to melt faster. It will also bring out many beautiful colours in the glazes because it’s black colouring most definitely comes from manganese dioxide! Glaze chemistry is a whole subject on it’s own! We use commercial Mayco glazes on purpose – for their huge range of colour possibilities, stability, cool interactions, artistic freedom with the ability to easily brush the glazes on and ease of use. We currently have almost 50 glazes on hand! A major project is to test the interactions of all glazes with each other. That is 2,500 test tiles!!!! I’m going to make the wall behind the wheels the feature wall of pretty colours! Step Seven – Glaze (Gloss or sometimes called “Glost”) Firing Most of the time this is the final stage of making your creation (but not always!) The glaze kiln goes to 1240°C. This is called cone 6, or midrange. It is the low end of stoneware temperatures. Stoneware clays and glazes are typically fired at cone 8 – 10, that is 1260 – 1290°C. The energy requirement to go from 1240°C to 1280°C is almost a 30% more! Our clay is formulated to vitrify (mature, turn “glass-like”) at 1240°, as are our glazes. A glaze kiln take around 12 hours to reach temperature and two to three days to cool down. Sometimes a third firing process is required – this is for decoration that is added to work after the glaze firing. For example – adding precious metals and lustres. this firing temperature is usually around 600 – 800°C depending upon the techniques being used. There are many students interested in gold and silver trims – we will be doing this third type of firing soon! After firing your work will be in the student finished work shelves. Remember to pay for it before you head out the door! There is a small extra charge for using porcelain clay (it’s more than twice the price of regular clay), and for any third firing process! Once your work has been fired it can not turn back into clay for millennia – so don’t fire it if you don’t like it! Put it in the bucket for recycling. https://firebirdstudios.com.au/the-process-of-making-pottery/ This bowl is an example of kitchenware used in the 19th century and still in use today.Bowl white ceramic plain that has two sets of edging around lip. Inside bowl has plaster designed to look like cooking mixture.flagstaff hill, warrnambool, shipwrecked-coast, flagstaff-hill, flagstaff-hill-maritime-museum, maritime-museum, shipwreck-coast, flagstaff-hill-maritime-village, kitchen equipment, ceramic -
 Flagstaff Hill Maritime Museum and Village
Domestic object - Bowl, J & G Meakin, Late 19th or early 20th Century
The Process of Making Pottery Decorating, Firing, Glazing, Making, Technical There is a rhythm and flow to clay. It can’t be done all at once! Even the making process! It can take weeks to get everything done, especially if you can only work on your pottery once a week! Even though we have three hour classes, it’s often just not enough time! Here is an overview of some of the processes so you have a bit more grasp on some of the technical stuff! Step One – Design There are SO many ideas out there for making stuff in clay! From delicate porcelain jewellery, through to heavy sculptural work and everything in between. Deciding your direction is sometimes not that easy – when you first start, try everything, you will naturally gravitate to the style that you enjoy! The options and variations are endless and can get a wee bit overwhelming too! Check in with me before you start to ensure your ideas will work, what order you might do things, how you could achieve the look you are seeking and any other technical data required! Step Two – Making Clay is thixotropic. This means that as you work with it, the clay first gets sloppier and wetter, before is begins to dry in the atmosphere. For most things, you simply can’t do all parts of the project at once. An example of work order might look like: Get last weeks work out from the shelves Prepare clay for today’s work – roll your clay, prepare balls for throwing, make the first stage of a pinch pot) Clean up last week’s work and put it on the shelf for bisque firing Check that you have any glazing to do – and do enough of it that you will have time to finish your main project Do the next step of your next project – there might be a further step that can’t be complete immediately, in that case, wrap your work well and put onto the shelves. Letting your work rest for a while can really help keep your work clean and professional looking. Many things require bagging under plastic to keep it ready for work the next week – put your name on the outside of the bag so you can find your work easily. We have stickers and markers. Consider how you want to decorate your work – coloured slip can be applied at a fairly wet stage (remembering that it will make your work even wetter!). Trying to apply slip to dry clay won’t work! If you want to do sgraffito – you will need to keep the work leather hard (a state of dryness where you can still work the clay with a little effort and a little water and care). Step Three – Drying Most of the time your work can go into the rack uncovered to let it dry out for the following week. If you want to continue forming or shaping you will need to double bag your work – put your work on a suitable sized bat and put the bat in a bag so the base of the bag is under the bat, then put another bag over the top of the work and tuck the top of the bag under the bat. If you want to trim (or turn) your thrown work the following week, it should also be double bagged. If your work is large, delicate, or of uneven thicknesses, you should lightly cover your work for drying. When considering the drying process, bare in mind the weather, humidity and wind! The hotter and dryer, the faster things dry and work can dry unevenly in the shelves – this can lead to cracking – another time to lightly cover your work for drying. Step Four – Trimming and Cleaning Up Your work is dry! It is called greenware now and it is at it’s most fragile! Handle everything with two hands. I often refer to soft hands – keep everything gentle and with your fingers spread as much as possible. Try to not pick up things like plates too much, and always with both hands! Before your work can be bisque fired it should be “cleaned up”. You work won’t go into the kiln if it has sharp edges – when glazed, sharp edges turn into razor blades! Use a piece of fly wire to rub the work all over – this will scratch a little so be light handed. Use a knife or metal kidney to scrape any areas that require a bit more dynamic treatment than the fly wire offers! Finally, a very light wipe over with a slightly damp sponge can help soften and soothe all of your edges and dags! Trimming thrown work: If you are planning to trim (or turn) your thrown work (and you should be), make sure you bag it well – your work should be leather hard to almost dry for easiest trimming. Use this step to finish the work completely – use a metal kidney to polish the surface, or a slightly damp sponge to give a freshly thrown look. Wipe the sponge around the rim after trimming, and check the inside of the pot for dags! Trimming slip cast work: Usually I will trim the rims of your work on the wheel the following day to make that stage easier, however you will still need to check your work for lumps and bumps. Last but not least – check that your name is still clearly on the bottom of your work. Step Five – Bisque Firing When the work is completely dry it can go into the bisque kiln. The bisque kiln is fired to 1000°C. This process burns off the water in the clay as well as some of the chemically bound water. The structure of the clay is not altered that much at this temperature. Inside the bisque kiln, the work is stacked a little, small bowl inside a larger bowl and onto a heavy plate. Smaller items like decorations or drink coasters might get stacked several high. Consideration is paid to the weight of the stack and shape of the work. A bisque kiln can fire about one and a half times the amount of work that the glaze kiln can fire. The firing takes about 10 hours to complete the cycle and about two days to cool down. Once it has been emptied the work is placed in the glaze room ready for you to decorate! Step Six – Glazing Decorating your work with colour can be a lot of fun – and time consuming! There are three main options for surface treatment at this stage: Oxide Washes Underglazes Glazes Washes and underglazes do not “glaze” the work – It will still need a layer of glaze to fully seal the clay (washes don’t need glaze on surfaces not designed for food or liquid as they can gloss up a little on their own). Underglazes are stable colourants that turn out pretty much how they look in the jar. They can be mixed with each other to form other colours and can be used like water colours to paint onto your work. Mostly they should have a clear glaze on top to seal them. Oxides are a different species – the pink oxide (cobalt) wash turns out bright blue for instance. They don’t always need a glaze on top, and some glazes can change the colour of the wash! The glazes need no other “glaze” on top! Be careful of unknown glaze interactions – you can put any combination of glaze in a bowl or on a plate, but only a single glaze on the outside of any vertical surface! Glazes are a chemical reaction under heat. We don’t know the exact chemicals in the Mayco glazes we use. I can guess by the way they interact with each other, however, on the whole, you need to test every idea you have, and not run the test on a vertical surface! Simply put, glaze is a layer of glass like substance that bonds with the clay underneath. Clay is made of silica, alumina and water. Glaze is made of mostly silica. Silica has a melting point of 1700°C and we fire to 1240°C. The silica requires a “flux” to help it melt at the lower temperature. Fluxes can be all sorts of chemicals – a common one is calcium – calcium has a melting point of 2500°C, however, together they both melt at a much lower temperature! Colourants are metal oxides like cobalt (blue), chrome (green through black), copper (green, blue, even red!), manganese (black, purple and pink) iron (red brown), etc. Different chemicals in the glaze can have dramatic effects. for example, barium carbonate (which we don’t use) turns manganese bright pink! Other elements can turn manganese dioxide brown, blue, purple and reddish brown. Manganese dioxide is a flux in and of itself as well. So, glazes that get their black and purple colours, often interact with other glazes and RUN! Our mirror black is a good example – it mixes really well with many glazes because it fluxes them – causes them to melt faster. It will also bring out many beautiful colours in the glazes because it’s black colouring most definitely comes from manganese dioxide! Glaze chemistry is a whole subject on it’s own! We use commercial Mayco glazes on purpose – for their huge range of colour possibilities, stability, cool interactions, artistic freedom with the ability to easily brush the glazes on and ease of use. We currently have almost 50 glazes on hand! A major project is to test the interactions of all glazes with each other. That is 2,500 test tiles!!!! I’m going to make the wall behind the wheels the feature wall of pretty colours! Step Seven – Glaze (Gloss or sometimes called “Glost”) Firing Most of the time this is the final stage of making your creation (but not always!) The glaze kiln goes to 1240°C. This is called cone 6, or midrange. It is the low end of stoneware temperatures. Stoneware clays and glazes are typically fired at cone 8 – 10, that is 1260 – 1290°C. The energy requirement to go from 1240°C to 1280°C is almost a 30% more! Our clay is formulated to vitrify (mature, turn “glass-like”) at 1240°, as are our glazes. A glaze kiln take around 12 hours to reach temperature and two to three days to cool down. Sometimes a third firing process is required – this is for decoration that is added to work after the glaze firing. For example – adding precious metals and lustres. this firing temperature is usually around 600 – 800°C depending upon the techniques being used. There are many students interested in gold and silver trims – we will be doing this third type of firing soon! After firing your work will be in the student finished work shelves. Remember to pay for it before you head out the door! There is a small extra charge for using porcelain clay (it’s more than twice the price of regular clay), and for any third firing process! Once your work has been fired it can not turn back into clay for millennia – so don’t fire it if you don’t like it! Put it in the bucket for recycling. https://firebirdstudios.com.au/the-process-of-making-pottery/This bowl was made by renowned pottery company J & G Meakin of England. The firm was established in the mid-1800's. The bowl is an example of kitchenware used in the 19th century and still in use today.Bowl; white ceramic, round and tapering inwards towards base. Made by J and G Meakin England.On base, 'Ironstone China Reg SOL 391413' with symbolflagstaff hill, flagstaff hill maritime museum and village, warrnambool, maritime museum, maritime village, great ocean road, shipwreck coast, mixing bowl, food preparation, j & g meakin, pottery, stoke-on-trent, kitchen equipment, ceramic -
 Flagstaff Hill Maritime Museum and Village
Domestic object - Plate
The Process of Making Pottery Decorating, Firing, Glazing, Making, Technical There is a rhythm and flow to clay. It can’t be done all at once! Even the making process! It can take weeks to get everything done, especially if you can only work on your pottery once a week! Even though we have three hour classes, it’s often just not enough time! Here is an overview of some of the processes so you have a bit more grasp on some of the technical stuff! Step One – Design There are SO many ideas out there for making stuff in clay! From delicate porcelain jewellery, through to heavy sculptural work and everything in between. Deciding your direction is sometimes not that easy – when you first start, try everything, you will naturally gravitate to the style that you enjoy! The options and variations are endless and can get a wee bit overwhelming too! Check in with me before you start to ensure your ideas will work, what order you might do things, how you could achieve the look you are seeking and any other technical data required! Step Two – Making Clay is thixotropic. This means that as you work with it, the clay first gets sloppier and wetter, before is begins to dry in the atmosphere. For most things, you simply can’t do all parts of the project at once. An example of work order might look like: Get last weeks work out from the shelves Prepare clay for today’s work – roll your clay, prepare balls for throwing, make the first stage of a pinch pot) Clean up last week’s work and put it on the shelf for bisque firing Check that you have any glazing to do – and do enough of it that you will have time to finish your main project Do the next step of your next project – there might be a further step that can’t be complete immediately, in that case, wrap your work well and put onto the shelves. Letting your work rest for a while can really help keep your work clean and professional looking. Many things require bagging under plastic to keep it ready for work the next week – put your name on the outside of the bag so you can find your work easily. We have stickers and markers. Consider how you want to decorate your work – coloured slip can be applied at a fairly wet stage (remembering that it will make your work even wetter!). Trying to apply slip to dry clay won’t work! If you want to do sgraffito – you will need to keep the work leather hard (a state of dryness where you can still work the clay with a little effort and a little water and care). Step Three – Drying Most of the time your work can go into the rack uncovered to let it dry out for the following week. If you want to continue forming or shaping you will need to double bag your work – put your work on a suitable sized bat and put the bat in a bag so the base of the bag is under the bat, then put another bag over the top of the work and tuck the top of the bag under the bat. If you want to trim (or turn) your thrown work the following week, it should also be double bagged. If your work is large, delicate, or of uneven thicknesses, you should lightly cover your work for drying. When considering the drying process, bare in mind the weather, humidity and wind! The hotter and dryer, the faster things dry and work can dry unevenly in the shelves – this can lead to cracking – another time to lightly cover your work for drying. Step Four – Trimming and Cleaning Up Your work is dry! It is called greenware now and it is at it’s most fragile! Handle everything with two hands. I often refer to soft hands – keep everything gentle and with your fingers spread as much as possible. Try to not pick up things like plates too much, and always with both hands! Before your work can be bisque fired it should be “cleaned up”. You work won’t go into the kiln if it has sharp edges – when glazed, sharp edges turn into razor blades! Use a piece of fly wire to rub the work all over – this will scratch a little so be light handed. Use a knife or metal kidney to scrape any areas that require a bit more dynamic treatment than the fly wire offers! Finally, a very light wipe over with a slightly damp sponge can help soften and soothe all of your edges and dags! Trimming thrown work: If you are planning to trim (or turn) your thrown work (and you should be), make sure you bag it well – your work should be leather hard to almost dry for easiest trimming. Use this step to finish the work completely – use a metal kidney to polish the surface, or a slightly damp sponge to give a freshly thrown look. Wipe the sponge around the rim after trimming, and check the inside of the pot for dags! Trimming slip cast work: Usually I will trim the rims of your work on the wheel the following day to make that stage easier, however you will still need to check your work for lumps and bumps. Last but not least – check that your name is still clearly on the bottom of your work. Step Five – Bisque Firing When the work is completely dry it can go into the bisque kiln. The bisque kiln is fired to 1000°C. This process burns off the water in the clay as well as some of the chemically bound water. The structure of the clay is not altered that much at this temperature. Inside the bisque kiln, the work is stacked a little, small bowl inside a larger bowl and onto a heavy plate. Smaller items like decorations or drink coasters might get stacked several high. Consideration is paid to the weight of the stack and shape of the work. A bisque kiln can fire about one and a half times the amount of work that the glaze kiln can fire. The firing takes about 10 hours to complete the cycle and about two days to cool down. Once it has been emptied the work is placed in the glaze room ready for you to decorate! Step Six – Glazing Decorating your work with colour can be a lot of fun – and time consuming! There are three main options for surface treatment at this stage: Oxide Washes Underglazes Glazes Washes and underglazes do not “glaze” the work – It will still need a layer of glaze to fully seal the clay (washes don’t need glaze on surfaces not designed for food or liquid as they can gloss up a little on their own). Underglazes are stable colourants that turn out pretty much how they look in the jar. They can be mixed with each other to form other colours and can be used like water colours to paint onto your work. Mostly they should have a clear glaze on top to seal them. Oxides are a different species – the pink oxide (cobalt) wash turns out bright blue for instance. They don’t always need a glaze on top, and some glazes can change the colour of the wash! The glazes need no other “glaze” on top! Be careful of unknown glaze interactions – you can put any combination of glaze in a bowl or on a plate, but only a single glaze on the outside of any vertical surface! Glazes are a chemical reaction under heat. We don’t know the exact chemicals in the Mayco glazes we use. I can guess by the way they interact with each other, however, on the whole, you need to test every idea you have, and not run the test on a vertical surface! Simply put, glaze is a layer of glass like substance that bonds with the clay underneath. Clay is made of silica, alumina and water. Glaze is made of mostly silica. Silica has a melting point of 1700°C and we fire to 1240°C. The silica requires a “flux” to help it melt at the lower temperature. Fluxes can be all sorts of chemicals – a common one is calcium – calcium has a melting point of 2500°C, however, together they both melt at a much lower temperature! Colourants are metal oxides like cobalt (blue), chrome (green through black), copper (green, blue, even red!), manganese (black, purple and pink) iron (red brown), etc. Different chemicals in the glaze can have dramatic effects. for example, barium carbonate (which we don’t use) turns manganese bright pink! Other elements can turn manganese dioxide brown, blue, purple and reddish brown. Manganese dioxide is a flux in and of itself as well. So, glazes that get their black and purple colours, often interact with other glazes and RUN! Our mirror black is a good example – it mixes really well with many glazes because it fluxes them – causes them to melt faster. It will also bring out many beautiful colours in the glazes because it’s black colouring most definitely comes from manganese dioxide! Glaze chemistry is a whole subject on it’s own! We use commercial Mayco glazes on purpose – for their huge range of colour possibilities, stability, cool interactions, artistic freedom with the ability to easily brush the glazes on and ease of use. We currently have almost 50 glazes on hand! A major project is to test the interactions of all glazes with each other. That is 2,500 test tiles!!!! I’m going to make the wall behind the wheels the feature wall of pretty colours! Step Seven – Glaze (Gloss or sometimes called “Glost”) Firing Most of the time this is the final stage of making your creation (but not always!) The glaze kiln goes to 1240°C. This is called cone 6, or midrange. It is the low end of stoneware temperatures. Stoneware clays and glazes are typically fired at cone 8 – 10, that is 1260 – 1290°C. The energy requirement to go from 1240°C to 1280°C is almost a 30% more! Our clay is formulated to vitrify (mature, turn “glass-like”) at 1240°, as are our glazes. A glaze kiln take around 12 hours to reach temperature and two to three days to cool down. Sometimes a third firing process is required – this is for decoration that is added to work after the glaze firing. For example – adding precious metals and lustres. this firing temperature is usually around 600 – 800°C depending upon the techniques being used. There are many students interested in gold and silver trims – we will be doing this third type of firing soon! After firing your work will be in the student finished work shelves. Remember to pay for it before you head out the door! There is a small extra charge for using porcelain clay (it’s more than twice the price of regular clay), and for any third firing process! Once your work has been fired it can not turn back into clay for millennia – so don’t fire it if you don’t like it! Put it in the bucket for recycling. https://firebirdstudios.com.au/the-process-of-making-pottery/Ceramics have evolved over thousands of years.White earthenware dinner plate. Crazing evident all over.Backstamped ‘Made in England S LTD’flagstaff hill, warrnambool, shipwrecked-coast, flagstaff-hill, flagstaff-hill-maritime-museum, maritime-museum, shipwreck-coast, flagstaff-hill-maritime-village, ceramics, tableware -
 Flagstaff Hill Maritime Museum and Village
Domestic object - Plate, Johnson Bros
The Process of Making Pottery Decorating, Firing, Glazing, Making, Technical There is a rhythm and flow to clay. It can’t be done all at once! Even the making process! It can take weeks to get everything done, especially if you can only work on your pottery once a week! Even though we have three hour classes, it’s often just not enough time! Here is an overview of some of the processes so you have a bit more grasp on some of the technical stuff! Step One – Design There are SO many ideas out there for making stuff in clay! From delicate porcelain jewellery, through to heavy sculptural work and everything in between. Deciding your direction is sometimes not that easy – when you first start, try everything, you will naturally gravitate to the style that you enjoy! The options and variations are endless and can get a wee bit overwhelming too! Check in with me before you start to ensure your ideas will work, what order you might do things, how you could achieve the look you are seeking and any other technical data required! Step Two – Making Clay is thixotropic. This means that as you work with it, the clay first gets sloppier and wetter, before is begins to dry in the atmosphere. For most things, you simply can’t do all parts of the project at once. An example of work order might look like: Get last weeks work out from the shelves Prepare clay for today’s work – roll your clay, prepare balls for throwing, make the first stage of a pinch pot) Clean up last week’s work and put it on the shelf for bisque firing Check that you have any glazing to do – and do enough of it that you will have time to finish your main project Do the next step of your next project – there might be a further step that can’t be complete immediately, in that case, wrap your work well and put onto the shelves. Letting your work rest for a while can really help keep your work clean and professional looking. Many things require bagging under plastic to keep it ready for work the next week – put your name on the outside of the bag so you can find your work easily. We have stickers and markers. Consider how you want to decorate your work – coloured slip can be applied at a fairly wet stage (remembering that it will make your work even wetter!). Trying to apply slip to dry clay won’t work! If you want to do sgraffito – you will need to keep the work leather hard (a state of dryness where you can still work the clay with a little effort and a little water and care). Step Three – Drying Most of the time your work can go into the rack uncovered to let it dry out for the following week. If you want to continue forming or shaping you will need to double bag your work – put your work on a suitable sized bat and put the bat in a bag so the base of the bag is under the bat, then put another bag over the top of the work and tuck the top of the bag under the bat. If you want to trim (or turn) your thrown work the following week, it should also be double bagged. If your work is large, delicate, or of uneven thicknesses, you should lightly cover your work for drying. When considering the drying process, bare in mind the weather, humidity and wind! The hotter and dryer, the faster things dry and work can dry unevenly in the shelves – this can lead to cracking – another time to lightly cover your work for drying. Step Four – Trimming and Cleaning Up Your work is dry! It is called greenware now and it is at it’s most fragile! Handle everything with two hands. I often refer to soft hands – keep everything gentle and with your fingers spread as much as possible. Try to not pick up things like plates too much, and always with both hands! Before your work can be bisque fired it should be “cleaned up”. You work won’t go into the kiln if it has sharp edges – when glazed, sharp edges turn into razor blades! Use a piece of fly wire to rub the work all over – this will scratch a little so be light handed. Use a knife or metal kidney to scrape any areas that require a bit more dynamic treatment than the fly wire offers! Finally, a very light wipe over with a slightly damp sponge can help soften and soothe all of your edges and dags! Trimming thrown work: If you are planning to trim (or turn) your thrown work (and you should be), make sure you bag it well – your work should be leather hard to almost dry for easiest trimming. Use this step to finish the work completely – use a metal kidney to polish the surface, or a slightly damp sponge to give a freshly thrown look. Wipe the sponge around the rim after trimming, and check the inside of the pot for dags! Trimming slip cast work: Usually I will trim the rims of your work on the wheel the following day to make that stage easier, however you will still need to check your work for lumps and bumps. Last but not least – check that your name is still clearly on the bottom of your work. Step Five – Bisque Firing When the work is completely dry it can go into the bisque kiln. The bisque kiln is fired to 1000°C. This process burns off the water in the clay as well as some of the chemically bound water. The structure of the clay is not altered that much at this temperature. Inside the bisque kiln, the work is stacked a little, small bowl inside a larger bowl and onto a heavy plate. Smaller items like decorations or drink coasters might get stacked several high. Consideration is paid to the weight of the stack and shape of the work. A bisque kiln can fire about one and a half times the amount of work that the glaze kiln can fire. The firing takes about 10 hours to complete the cycle and about two days to cool down. Once it has been emptied the work is placed in the glaze room ready for you to decorate! Step Six – Glazing Decorating your work with colour can be a lot of fun – and time consuming! There are three main options for surface treatment at this stage: Oxide Washes Underglazes Glazes Washes and underglazes do not “glaze” the work – It will still need a layer of glaze to fully seal the clay (washes don’t need glaze on surfaces not designed for food or liquid as they can gloss up a little on their own). Underglazes are stable colourants that turn out pretty much how they look in the jar. They can be mixed with each other to form other colours and can be used like water colours to paint onto your work. Mostly they should have a clear glaze on top to seal them. Oxides are a different species – the pink oxide (cobalt) wash turns out bright blue for instance. They don’t always need a glaze on top, and some glazes can change the colour of the wash! The glazes need no other “glaze” on top! Be careful of unknown glaze interactions – you can put any combination of glaze in a bowl or on a plate, but only a single glaze on the outside of any vertical surface! Glazes are a chemical reaction under heat. We don’t know the exact chemicals in the Mayco glazes we use. I can guess by the way they interact with each other, however, on the whole, you need to test every idea you have, and not run the test on a vertical surface! Simply put, glaze is a layer of glass like substance that bonds with the clay underneath. Clay is made of silica, alumina and water. Glaze is made of mostly silica. Silica has a melting point of 1700°C and we fire to 1240°C. The silica requires a “flux” to help it melt at the lower temperature. Fluxes can be all sorts of chemicals – a common one is calcium – calcium has a melting point of 2500°C, however, together they both melt at a much lower temperature! Colourants are metal oxides like cobalt (blue), chrome (green through black), copper (green, blue, even red!), manganese (black, purple and pink) iron (red brown), etc. Different chemicals in the glaze can have dramatic effects. for example, barium carbonate (which we don’t use) turns manganese bright pink! Other elements can turn manganese dioxide brown, blue, purple and reddish brown. Manganese dioxide is a flux in and of itself as well. So, glazes that get their black and purple colours, often interact with other glazes and RUN! Our mirror black is a good example – it mixes really well with many glazes because it fluxes them – causes them to melt faster. It will also bring out many beautiful colours in the glazes because it’s black colouring most definitely comes from manganese dioxide! Glaze chemistry is a whole subject on it’s own! We use commercial Mayco glazes on purpose – for their huge range of colour possibilities, stability, cool interactions, artistic freedom with the ability to easily brush the glazes on and ease of use. We currently have almost 50 glazes on hand! A major project is to test the interactions of all glazes with each other. That is 2,500 test tiles!!!! I’m going to make the wall behind the wheels the feature wall of pretty colours! Step Seven – Glaze (Gloss or sometimes called “Glost”) Firing Most of the time this is the final stage of making your creation (but not always!) The glaze kiln goes to 1240°C. This is called cone 6, or midrange. It is the low end of stoneware temperatures. Stoneware clays and glazes are typically fired at cone 8 – 10, that is 1260 – 1290°C. The energy requirement to go from 1240°C to 1280°C is almost a 30% more! Our clay is formulated to vitrify (mature, turn “glass-like”) at 1240°, as are our glazes. A glaze kiln take around 12 hours to reach temperature and two to three days to cool down. Sometimes a third firing process is required – this is for decoration that is added to work after the glaze firing. For example – adding precious metals and lustres. this firing temperature is usually around 600 – 800°C depending upon the techniques being used. There are many students interested in gold and silver trims – we will be doing this third type of firing soon! After firing your work will be in the student finished work shelves. Remember to pay for it before you head out the door! There is a small extra charge for using porcelain clay (it’s more than twice the price of regular clay), and for any third firing process! Once your work has been fired it can not turn back into clay for millennia – so don’t fire it if you don’t like it! Put it in the bucket for recycling. https://firebirdstudios.com.au/the-process-of-making-pottery/Ceramics have evolved over thousands of years.A white earthenware side plate with a gadroon edge. Has water marks and chips on front.‘Johnson Bros England Reg No 15587’flagstaff hill, warrnambool, shipwrecked-coast, flagstaff-hill, flagstaff-hill-maritime-museum, maritime-museum, shipwreck-coast, flagstaff-hill-maritime-village, johnson bros, ceramics, tableware -
 Flagstaff Hill Maritime Museum and Village
Domestic object - Plate, Alfred Meakin
The Process of Making Pottery Decorating, Firing, Glazing, Making, Technical There is a rhythm and flow to clay. It can’t be done all at once! Even the making process! It can take weeks to get everything done, especially if you can only work on your pottery once a week! Even though we have three hour classes, it’s often just not enough time! Here is an overview of some of the processes so you have a bit more grasp on some of the technical stuff! Step One – Design There are SO many ideas out there for making stuff in clay! From delicate porcelain jewellery, through to heavy sculptural work and everything in between. Deciding your direction is sometimes not that easy – when you first start, try everything, you will naturally gravitate to the style that you enjoy! The options and variations are endless and can get a wee bit overwhelming too! Check in with me before you start to ensure your ideas will work, what order you might do things, how you could achieve the look you are seeking and any other technical data required! Step Two – Making Clay is thixotropic. This means that as you work with it, the clay first gets sloppier and wetter, before is begins to dry in the atmosphere. For most things, you simply can’t do all parts of the project at once. An example of work order might look like: Get last weeks work out from the shelves Prepare clay for today’s work – roll your clay, prepare balls for throwing, make the first stage of a pinch pot) Clean up last week’s work and put it on the shelf for bisque firing Check that you have any glazing to do – and do enough of it that you will have time to finish your main project Do the next step of your next project – there might be a further step that can’t be complete immediately, in that case, wrap your work well and put onto the shelves. Letting your work rest for a while can really help keep your work clean and professional looking. Many things require bagging under plastic to keep it ready for work the next week – put your name on the outside of the bag so you can find your work easily. We have stickers and markers. Consider how you want to decorate your work – coloured slip can be applied at a fairly wet stage (remembering that it will make your work even wetter!). Trying to apply slip to dry clay won’t work! If you want to do sgraffito – you will need to keep the work leather hard (a state of dryness where you can still work the clay with a little effort and a little water and care). Step Three – Drying Most of the time your work can go into the rack uncovered to let it dry out for the following week. If you want to continue forming or shaping you will need to double bag your work – put your work on a suitable sized bat and put the bat in a bag so the base of the bag is under the bat, then put another bag over the top of the work and tuck the top of the bag under the bat. If you want to trim (or turn) your thrown work the following week, it should also be double bagged. If your work is large, delicate, or of uneven thicknesses, you should lightly cover your work for drying. When considering the drying process, bare in mind the weather, humidity and wind! The hotter and dryer, the faster things dry and work can dry unevenly in the shelves – this can lead to cracking – another time to lightly cover your work for drying. Step Four – Trimming and Cleaning Up Your work is dry! It is called greenware now and it is at it’s most fragile! Handle everything with two hands. I often refer to soft hands – keep everything gentle and with your fingers spread as much as possible. Try to not pick up things like plates too much, and always with both hands! Before your work can be bisque fired it should be “cleaned up”. You work won’t go into the kiln if it has sharp edges – when glazed, sharp edges turn into razor blades! Use a piece of fly wire to rub the work all over – this will scratch a little so be light handed. Use a knife or metal kidney to scrape any areas that require a bit more dynamic treatment than the fly wire offers! Finally, a very light wipe over with a slightly damp sponge can help soften and soothe all of your edges and dags! Trimming thrown work: If you are planning to trim (or turn) your thrown work (and you should be), make sure you bag it well – your work should be leather hard to almost dry for easiest trimming. Use this step to finish the work completely – use a metal kidney to polish the surface, or a slightly damp sponge to give a freshly thrown look. Wipe the sponge around the rim after trimming, and check the inside of the pot for dags! Trimming slip cast work: Usually I will trim the rims of your work on the wheel the following day to make that stage easier, however you will still need to check your work for lumps and bumps. Last but not least – check that your name is still clearly on the bottom of your work. Step Five – Bisque Firing When the work is completely dry it can go into the bisque kiln. The bisque kiln is fired to 1000°C. This process burns off the water in the clay as well as some of the chemically bound water. The structure of the clay is not altered that much at this temperature. Inside the bisque kiln, the work is stacked a little, small bowl inside a larger bowl and onto a heavy plate. Smaller items like decorations or drink coasters might get stacked several high. Consideration is paid to the weight of the stack and shape of the work. A bisque kiln can fire about one and a half times the amount of work that the glaze kiln can fire. The firing takes about 10 hours to complete the cycle and about two days to cool down. Once it has been emptied the work is placed in the glaze room ready for you to decorate! Step Six – Glazing Decorating your work with colour can be a lot of fun – and time consuming! There are three main options for surface treatment at this stage: Oxide Washes Underglazes Glazes Washes and underglazes do not “glaze” the work – It will still need a layer of glaze to fully seal the clay (washes don’t need glaze on surfaces not designed for food or liquid as they can gloss up a little on their own). Underglazes are stable colourants that turn out pretty much how they look in the jar. They can be mixed with each other to form other colours and can be used like water colours to paint onto your work. Mostly they should have a clear glaze on top to seal them. Oxides are a different species – the pink oxide (cobalt) wash turns out bright blue for instance. They don’t always need a glaze on top, and some glazes can change the colour of the wash! The glazes need no other “glaze” on top! Be careful of unknown glaze interactions – you can put any combination of glaze in a bowl or on a plate, but only a single glaze on the outside of any vertical surface! Glazes are a chemical reaction under heat. We don’t know the exact chemicals in the Mayco glazes we use. I can guess by the way they interact with each other, however, on the whole, you need to test every idea you have, and not run the test on a vertical surface! Simply put, glaze is a layer of glass like substance that bonds with the clay underneath. Clay is made of silica, alumina and water. Glaze is made of mostly silica. Silica has a melting point of 1700°C and we fire to 1240°C. The silica requires a “flux” to help it melt at the lower temperature. Fluxes can be all sorts of chemicals – a common one is calcium – calcium has a melting point of 2500°C, however, together they both melt at a much lower temperature! Colourants are metal oxides like cobalt (blue), chrome (green through black), copper (green, blue, even red!), manganese (black, purple and pink) iron (red brown), etc. Different chemicals in the glaze can have dramatic effects. for example, barium carbonate (which we don’t use) turns manganese bright pink! Other elements can turn manganese dioxide brown, blue, purple and reddish brown. Manganese dioxide is a flux in and of itself as well. So, glazes that get their black and purple colours, often interact with other glazes and RUN! Our mirror black is a good example – it mixes really well with many glazes because it fluxes them – causes them to melt faster. It will also bring out many beautiful colours in the glazes because it’s black colouring most definitely comes from manganese dioxide! Glaze chemistry is a whole subject on it’s own! We use commercial Mayco glazes on purpose – for their huge range of colour possibilities, stability, cool interactions, artistic freedom with the ability to easily brush the glazes on and ease of use. We currently have almost 50 glazes on hand! A major project is to test the interactions of all glazes with each other. That is 2,500 test tiles!!!! I’m going to make the wall behind the wheels the feature wall of pretty colours! Step Seven – Glaze (Gloss or sometimes called “Glost”) Firing Most of the time this is the final stage of making your creation (but not always!) The glaze kiln goes to 1240°C. This is called cone 6, or midrange. It is the low end of stoneware temperatures. Stoneware clays and glazes are typically fired at cone 8 – 10, that is 1260 – 1290°C. The energy requirement to go from 1240°C to 1280°C is almost a 30% more! Our clay is formulated to vitrify (mature, turn “glass-like”) at 1240°, as are our glazes. A glaze kiln take around 12 hours to reach temperature and two to three days to cool down. Sometimes a third firing process is required – this is for decoration that is added to work after the glaze firing. For example – adding precious metals and lustres. this firing temperature is usually around 600 – 800°C depending upon the techniques being used. There are many students interested in gold and silver trims – we will be doing this third type of firing soon! After firing your work will be in the student finished work shelves. Remember to pay for it before you head out the door! There is a small extra charge for using porcelain clay (it’s more than twice the price of regular clay), and for any third firing process! Once your work has been fired it can not turn back into clay for millennia – so don’t fire it if you don’t like it! Put it in the bucket for recycling. https://firebirdstudios.com.au/the-process-of-making-pottery/Ceramics have evolved over thousands of years.Earthenware dessert plate, cream colour. Made by Alfred Meakin, England. Backstamped ‘Alfred Meakin England’. flagstaff hill, warrnambool, shipwrecked-coast, flagstaff-hill, flagstaff-hill-maritime-museum, maritime-museum, shipwreck-coast, flagstaff-hill-maritime-village, alfred meakin, ceramics, earthenware, kitchenware -
 Flagstaff Hill Maritime Museum and Village
Domestic object - Jug
The Process of Making Pottery Decorating, Firing, Glazing, Making, Technical There is a rhythm and flow to clay. It can’t be done all at once! Even the making process! It can take weeks to get everything done, especially if you can only work on your pottery once a week! Even though we have three hour classes, it’s often just not enough time! Here is an overview of some of the processes so you have a bit more grasp on some of the technical stuff! Step One – Design There are SO many ideas out there for making stuff in clay! From delicate porcelain jewellery, through to heavy sculptural work and everything in between. Deciding your direction is sometimes not that easy – when you first start, try everything, you will naturally gravitate to the style that you enjoy! The options and variations are endless and can get a wee bit overwhelming too! Check in with me before you start to ensure your ideas will work, what order you might do things, how you could achieve the look you are seeking and any other technical data required! Step Two – Making Clay is thixotropic. This means that as you work with it, the clay first gets sloppier and wetter, before is begins to dry in the atmosphere. For most things, you simply can’t do all parts of the project at once. An example of work order might look like: Get last weeks work out from the shelves Prepare clay for today’s work – roll your clay, prepare balls for throwing, make the first stage of a pinch pot) Clean up last week’s work and put it on the shelf for bisque firing Check that you have any glazing to do – and do enough of it that you will have time to finish your main project Do the next step of your next project – there might be a further step that can’t be complete immediately, in that case, wrap your work well and put onto the shelves. Letting your work rest for a while can really help keep your work clean and professional looking. Many things require bagging under plastic to keep it ready for work the next week – put your name on the outside of the bag so you can find your work easily. We have stickers and markers. Consider how you want to decorate your work – coloured slip can be applied at a fairly wet stage (remembering that it will make your work even wetter!). Trying to apply slip to dry clay won’t work! If you want to do sgraffito – you will need to keep the work leather hard (a state of dryness where you can still work the clay with a little effort and a little water and care). Step Three – Drying Most of the time your work can go into the rack uncovered to let it dry out for the following week. If you want to continue forming or shaping you will need to double bag your work – put your work on a suitable sized bat and put the bat in a bag so the base of the bag is under the bat, then put another bag over the top of the work and tuck the top of the bag under the bat. If you want to trim (or turn) your thrown work the following week, it should also be double bagged. If your work is large, delicate, or of uneven thicknesses, you should lightly cover your work for drying. When considering the drying process, bare in mind the weather, humidity and wind! The hotter and dryer, the faster things dry and work can dry unevenly in the shelves – this can lead to cracking – another time to lightly cover your work for drying. Step Four – Trimming and Cleaning Up Your work is dry! It is called greenware now and it is at it’s most fragile! Handle everything with two hands. I often refer to soft hands – keep everything gentle and with your fingers spread as much as possible. Try to not pick up things like plates too much, and always with both hands! Before your work can be bisque fired it should be “cleaned up”. You work won’t go into the kiln if it has sharp edges – when glazed, sharp edges turn into razor blades! Use a piece of fly wire to rub the work all over – this will scratch a little so be light handed. Use a knife or metal kidney to scrape any areas that require a bit more dynamic treatment than the fly wire offers! Finally, a very light wipe over with a slightly damp sponge can help soften and soothe all of your edges and dags! Trimming thrown work: If you are planning to trim (or turn) your thrown work (and you should be), make sure you bag it well – your work should be leather hard to almost dry for easiest trimming. Use this step to finish the work completely – use a metal kidney to polish the surface, or a slightly damp sponge to give a freshly thrown look. Wipe the sponge around the rim after trimming, and check the inside of the pot for dags! Trimming slip cast work: Usually I will trim the rims of your work on the wheel the following day to make that stage easier, however you will still need to check your work for lumps and bumps. Last but not least – check that your name is still clearly on the bottom of your work. Step Five – Bisque Firing When the work is completely dry it can go into the bisque kiln. The bisque kiln is fired to 1000°C. This process burns off the water in the clay as well as some of the chemically bound water. The structure of the clay is not altered that much at this temperature. Inside the bisque kiln, the work is stacked a little, small bowl inside a larger bowl and onto a heavy plate. Smaller items like decorations or drink coasters might get stacked several high. Consideration is paid to the weight of the stack and shape of the work. A bisque kiln can fire about one and a half times the amount of work that the glaze kiln can fire. The firing takes about 10 hours to complete the cycle and about two days to cool down. Once it has been emptied the work is placed in the glaze room ready for you to decorate! Step Six – Glazing Decorating your work with colour can be a lot of fun – and time consuming! There are three main options for surface treatment at this stage: Oxide Washes Underglazes Glazes Washes and underglazes do not “glaze” the work – It will still need a layer of glaze to fully seal the clay (washes don’t need glaze on surfaces not designed for food or liquid as they can gloss up a little on their own). Underglazes are stable colourants that turn out pretty much how they look in the jar. They can be mixed with each other to form other colours and can be used like water colours to paint onto your work. Mostly they should have a clear glaze on top to seal them. Oxides are a different species – the pink oxide (cobalt) wash turns out bright blue for instance. They don’t always need a glaze on top, and some glazes can change the colour of the wash! The glazes need no other “glaze” on top! Be careful of unknown glaze interactions – you can put any combination of glaze in a bowl or on a plate, but only a single glaze on the outside of any vertical surface! Glazes are a chemical reaction under heat. We don’t know the exact chemicals in the Mayco glazes we use. I can guess by the way they interact with each other, however, on the whole, you need to test every idea you have, and not run the test on a vertical surface! Simply put, glaze is a layer of glass like substance that bonds with the clay underneath. Clay is made of silica, alumina and water. Glaze is made of mostly silica. Silica has a melting point of 1700°C and we fire to 1240°C. The silica requires a “flux” to help it melt at the lower temperature. Fluxes can be all sorts of chemicals – a common one is calcium – calcium has a melting point of 2500°C, however, together they both melt at a much lower temperature! Colourants are metal oxides like cobalt (blue), chrome (green through black), copper (green, blue, even red!), manganese (black, purple and pink) iron (red brown), etc. Different chemicals in the glaze can have dramatic effects. for example, barium carbonate (which we don’t use) turns manganese bright pink! Other elements can turn manganese dioxide brown, blue, purple and reddish brown. Manganese dioxide is a flux in and of itself as well. So, glazes that get their black and purple colours, often interact with other glazes and RUN! Our mirror black is a good example – it mixes really well with many glazes because it fluxes them – causes them to melt faster. It will also bring out many beautiful colours in the glazes because it’s black colouring most definitely comes from manganese dioxide! Glaze chemistry is a whole subject on it’s own! We use commercial Mayco glazes on purpose – for their huge range of colour possibilities, stability, cool interactions, artistic freedom with the ability to easily brush the glazes on and ease of use. We currently have almost 50 glazes on hand! A major project is to test the interactions of all glazes with each other. That is 2,500 test tiles!!!! I’m going to make the wall behind the wheels the feature wall of pretty colours! Step Seven – Glaze (Gloss or sometimes called “Glost”) Firing Most of the time this is the final stage of making your creation (but not always!) The glaze kiln goes to 1240°C. This is called cone 6, or midrange. It is the low end of stoneware temperatures. Stoneware clays and glazes are typically fired at cone 8 – 10, that is 1260 – 1290°C. The energy requirement to go from 1240°C to 1280°C is almost a 30% more! Our clay is formulated to vitrify (mature, turn “glass-like”) at 1240°, as are our glazes. A glaze kiln take around 12 hours to reach temperature and two to three days to cool down. Sometimes a third firing process is required – this is for decoration that is added to work after the glaze firing. For example – adding precious metals and lustres. this firing temperature is usually around 600 – 800°C depending upon the techniques being used. There are many students interested in gold and silver trims – we will be doing this third type of firing soon! After firing your work will be in the student finished work shelves. Remember to pay for it before you head out the door! There is a small extra charge for using porcelain clay (it’s more than twice the price of regular clay), and for any third firing process! Once your work has been fired it can not turn back into clay for millennia – so don’t fire it if you don’t like it! Put it in the bucket for recycling. https://firebirdstudios.com.au/the-process-of-making-pottery/The form of the jug has been in use for many centuries.Stoneware jug. Two tone brown glaze with pierced lip behind spout. Spout chipped.None.flagstaff hill, warrnambool, shipwrecked-coast, flagstaff-hill, flagstaff-hill-maritime-museum, maritime-museum, shipwreck-coast, flagstaff-hill-maritime-village, jug, ceramic jug -
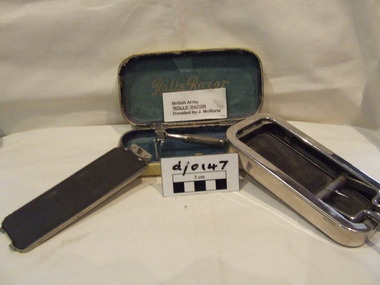 Waverley RSL Sub Branch
Razor
Used by J McRorie during WWII Assumed to be a "Going away gift" The factory address was 255 Cricklewood Broadway, London, N.W. 2, with showrooms located at 197a, Regent St., London, W.1. A U.S. importer was Lee & Schiffer, East 44th St., New York City. By 1937 the U.S. distributor was Rolls Razor, Inc., 305 East 45th St., New York. The eponymous product was a sophisticated safety-razor which promoted with the slogan "The razor that is stropped and honed in its case" the claimed first use was 1922. The U.S. patent for the method of attaching the blade to the handle was filed in 1925 and issued in 1930. The name "Rolls Razor (1927) Ltd." was used in advertising. The razor was still manufactured and sold until 1958 when the company was purchased by entrepreneur/corporate raider John Bloom who decided to focus on washing machines rather than the razor. Rolls Razor open case. The blade handle on the left is attached to the honing mechanism lever via a spring-loaded bearing. The nickel plated blade on the right side is attached to the honing bar that slides on the red leather strop. The grey honing stone is part of the closing lid. The leather strop and the hone lids are not interchangeable as the blade needs to push against the hone but pull against the strop. The blade has a safety guard with pivot action that allows it to vary the shaving angle while providing safe operation. The head of the blade handle locks perpendicular to the blade using a slide type of action with the spring-loaded bearing providing additional stabilityRolls razor in a plush lined leather covered metal case containing Razor, leather strop with automated blade sharpening mechanism and a changeable carbide plate fitter inside a silver inner caseRolls Razorrazor -
 Kiewa Valley Historical Society
Tester Direct Current, mid 1900's
This tester was used between 1950 and 1980's. As part of the Occupation, Health and Safety requirements, equipment used to monitor the performance of electricity producing generators, regularly, hand held testers were used to check the insulation and the "earth" pin were up the the required operational levels. As the generators and their ancillary monitoring equipment was spread over a large area and cumbersome to service small hand held devices were required. These had to always be safe for the user to operate. A selected range of high quality meters were recalibrated every two years in the Meter and Calibration Laboratory at Yarraville(near Melbourne) This meter is very significant to The Kiewa Hydro Electricity Scheme because it was an integral part of maintaining the electricity producing water driven generators of the power stations. The reason why this meter was so essential is that provided the safety check on equipment used to monitor each Hydro Generator that they were complying within the grid network parameters. Grid parameters are set so that if there is an electrical fault on the system, that fault can be attended to with a very small change in the output stability of each generator. It is essential that the voltage of the network remain within the set limits. Generators are at Dartmouth, Mackay, Clover, West Kiewa, Yarrawonga, Cain Curran and three Power Stations in the Thornton area.This hand driven current generator produces 500 volts by winding the handle(on funnel curved side) to keep the voltage constant(one minute per test). The whole body is made from caste aluminium. One of the functions of this meter is to test the isolation resistance of any equipment being tested. This is to see if that equipment is safe to handle(no electrical shocks). The second function is to test the earth pin of any portable electrical equipment. The turn key on one side can direct which function is required(marked insulation or continuity). On the top side(enclosed in a glass fronted marked scale) is a continuity scale(top) and an insulation scale(bottom). This is covered , when not in use by "flip up" lid with manufacturer's details and name of the instrument. Opposite the winder are two screw tight knobs. One marked earth(left side) and one marked line(right side). On the top and next to the glass windowed scales in a post manufacture SEC Vic equipment equipment ID number. For carrying purposes there is chromed steel (fold together) handle.The bottom of the unit has two metal "feet" 150mm long by 114mm wideManufacturer's details on top side "MEG" underneath "INSULATION AND CONTINUITY TESTER" below this "constant 500 VOLT pressure" below this "REGISTERED MEG MEGGER TRADE MARK" below this "REG DESIGN NO. 690326" below this "UNITED KINGDOM PATENT Nos. 193746, 197178, 198182, 202062, 202398, 204649, 350715" below this "SUPPLIED BY THE GENERAL ELECTRIC Co. Ltd OF ENGLAND" below this "MAGNET HOUSE, KINGSWAY LONDON W.C.2" 'sec vic kiewa hydro scheme, alternate energy supplies, alpine feasibility studies temperature, rainfall -
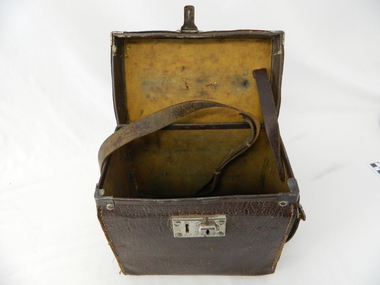 Kiewa Valley Historical Society
Case leather
This case was used between 1950 and 1980's. As part of the Occupation, Health and Safety requirements, equipment used to monitor the performance of electricity producing generators, regularly, hand held testers were used to check the insulation and the "earth" pin were up the the required operational levels. As the generators and their ancillary monitoring equipment was spread over a large area and cumbersome to service small hand held devices were required. These had to always be safe for the user to operate. A selected range of high quality meters were recalibrated every two years in the Meter and Calibration Laboratory at Yarraville(near Melbourne)This leather case contains a meter which is very significant to The Kiewa Hydro Electricity Scheme because it was an integral part of maintaining the electricity producing water driven generators of the power stations. The reason why this meter was so essential is that provided the safety check on equipment used to monitor each Hydro Generator that they were complying within the grid network parameters. Grid parameters are set so that if there is an electrical fault on the system, that fault can be attended to with a very small change in the output stability of each generator. It is essential that the voltage of the network remain within the set limits. Generators are at Dartmouth, Mackay, Clover, West Kiewa, Yarrawonga, Cain Curran and three Power Stations in the Thornton area.This carry case is made from leather hide and cloth covered cardboard insert. The front side has a lockable English made suitcase fitting. It has a broken carry strap (leather) travelling from top and through leather strap holders both sides and on the bottom of the case. A State Electricity Commission of Victoria identification tag riveted onto the top lid "ELECTRICAL ENGINEERING SECTION No. 1483"sec vic kiewa hydro scheme, alternate energy supplies, alpine located electricity generators, mobile measuring equipment -
 Kiewa Valley Historical Society
Book - Phasmatid Insect Plague Control in the Kiewa Hydro-Electric Works Catchment, Victoria, Australia. 1964, by R. L. Newman, B.Sc. (For.), Works Forestry Officer - Kiewa Territory
The Phasmatid Didymuria Violescens have been increasing and causing defoliation in south eastern Australia.The author R.L.Newman is the 'Works Forestry Officer - Kiewa Territory reported for the SECV'Fears have been held for the survival of stands of certain eucalypt species the destruction of which might have affected the stability of the Kiewa catchment. Spraying was carried out by the SECV in 1961 and 1963. This was found to be successful indicating that there will be no need for further spraying in the treated areas at least for some years.'Yellow book with 74 pages. Cover has the SECV emblem at the top centre. Print with black and white pictures / illustrations.In Pen - J. Watson on the cover.phasmatid insect plague, r.l.newman, forestry officer kiewa territory -
Moorabbin Air Museum
Document (Item) - Aero 1673 notes on a visit to southern Germany to interrogate German technical staff on stability and control matters with respect to flight testing, Royal aircraft establishment Farnborough Hants
-
 Moorabbin Air Museum
Document (item) - CAC History North American Aviation Diectional Stability Tests P-51D-5-NA
-
 Moorabbin Air Museum
Document (item) - CAC History P-51D-5-NA Stability and flight tests of mods
-
Moorabbin Air Museum
Book - Aircraft design, Aeroplane Design
Fundamental principles of aircraft design, circa 1938non-fictionFundamental principles of aircraft design, circa 1938structure of airplane, mechanics of flight, stability & control, materials & their strength, heat treatment, lugs & bearings -
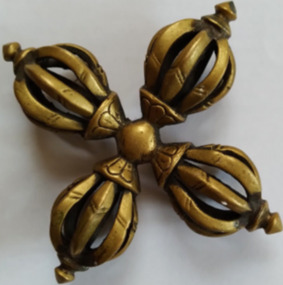 Great Stupa of Universal Compassion
Ceremonial object - Double dorje
In Tibetan Buddhism a "dorje" (also known as "vajra" in Sanskrit) symbolizes the indestructible nature of reality, spiritual power, and enlightenment, often depicted as a thunderbolt or diamond scepter, representing the ability to cut through illusion and achieve ultimate wisdom; it is a key ritual object in the Vajrayana school of Tibetan Buddhism, signifying the union of compassion and wisdom through its male principle association when used with a bell (female principle). The Double Dorje (Vishvavajra), is a powerful Buddhist symbol. It consists of two crossed vajras (dorjes) and represents the foundation of the physical world. The Double Dorje is often associated with stability and protection, symbolizing the indestructible nature of the universe. This double dorje is a cross of two dorjes, which look like a small scepter with multiple prongs at each end.tibetan buddhism, holy objects, worship devices