Showing 683 items matching "stored trams"
-
 Ballarat Tramway Museum
Photograph - Digital image, 1970s
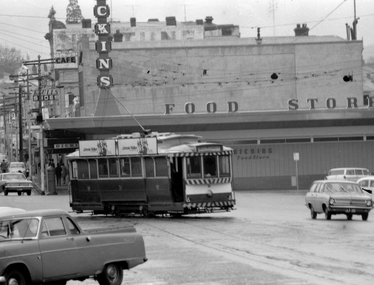
... St from Bridge St, with S E Dickins Food store... the Sturt St and Grenville St intersection. Trams tramways Sturt St ...Yields information about the Sturt St and Grenville St intersection.Digital image, black and white, of No. 31 entering Sturt St from Bridge St, with S E Dickins Food store in the background. Tram has two Johnnie Walker Whiskey roof advertisements. Photo taken by Peter Bruce 1970's and 1971, prior to the closure of the Ballarat tramway system. Peter's Title of image: "No. 31 Dickins"trams, tramways, sturt st, bridge st, tram 31 -
 Ballarat Tramway Museum
Photograph - Digital image, The Courier Ballarat, 1/10/1949 12:00:00 AM
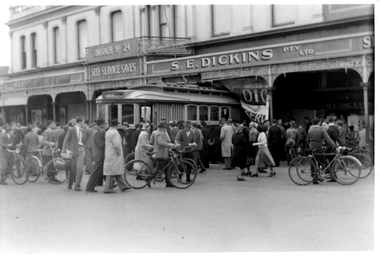
... in the front of S.E. Dickins Pty Ltd. (Grocers) store c1949. The tram... and S.E. Dickins Store, Bridge St Ballarat. Trams tramways ...Yields information about Ballarat 17 in an accident with a bus used a doughnut kitchen and S.E. Dickins Store, Bridge St Ballarat.Set of four images of photographs (two each same, different exposure) of Black and white photographs of SEC Tram 17 and a former bus used a food vendors stand, that have finished up in the front of S.E. Dickins Pty Ltd. (Grocers) store c1949. The tram derailed at the intersection of Sturt and Grenville St. collided with the bus and pushed it into the front of the store. Many people standing around the incident, including two trammies in front of the tram. See Reg Item 5587 for newspaper reports and 1020 for other photographs.trams, tramways, grenville st, accidents, s.e. dickins, tram 17 -
 Ballarat Tramway Museum
Negative, Geoff Grant, 25/06/1955 12:00:00 AM
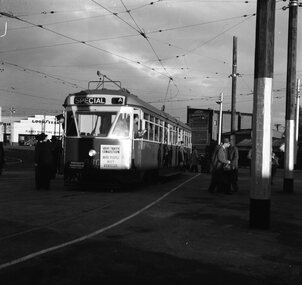
... printer (stored in folder ) of tram 980 on AETA tour (Australian... and white print made by a laser printer (stored in folder ) of tram ...Negative No. N350 and black and white print made by a laser printer (stored in folder ) of tram 980 on AETA tour (Australian Electric Traction Association) on 25/6/1955 entering shed roads at the then new East Preston depot. Tram has AETA tour signs and the slogan "Save traffic congestion, Move People not vehicles". In route number box is letter "A". Negative scanned hi res and imaged updated 22/5/2020.trams, tramways, melbourne, preston depot, aeta tour, tram 980 -
 Ballarat Tramway Museum
Photograph - Black & White Photograph/s, early 1960's
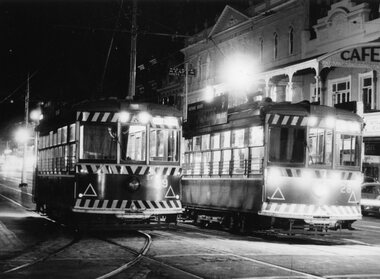
... Chemist" store in the background. Tram 28 has a SECV briquette..." and "W.I. Jones Chemist" store in the background. Tram 28 has ...Black and White print of Bendigo SECV Bendigo trams 29 and 28 (Birney's) at night at the Charing Cross terminus for the Golden Square - North Bendigo route. Trams have dash canopy lights, but no large white strip under the drivers windows. Photo not dated but appears to be at during early 1960's. Has the Beehive Stores building, "Dad and Dave Cafe" and "W.I. Jones Chemist" store in the background. Tram 28 has a SECV briquette ad on the roof.trams, tramways, pall mall, bendigo, charing cross, tram 28, tram 29 -
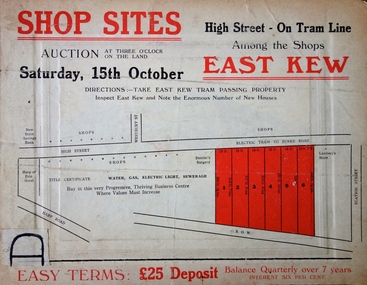 Kew Historical Society Inc
Plan - Subdivision Plan, Shop Sites, East Kew, c.1927
... and Lambert’s Store. The High Street Tram was to reach Burke Road... and Lambert’s Store. The High Street Tram was to reach Burke Road ...Subdivision plans are historically important documents used as evidence of the growth of suburbs in Australia. They frequently provide information about when the land was sold on which a built structure was subsequently constructed as well as evidence relating to surveyors and real estate and financial agents. The numerous subdivision plans in the Kew Historical Society's collection represent working documents, ranging from the initial sketches made in planning a subdivision to printed plans on which auctioneers or agents listed the prices for which individual lots were sold. In a number of cases, the reverse of a subdivision plan in the collection includes a photograph of a house that was also for sale by the agent. These photographs provide significant heritage information relating house design and decoration, fencing and household gardens.This is one of a small number of subdivision plans for commercial property in the collection. The subdivision proposed to create six shop sites in High Street between the Harp of Erin and Station Street. The plan shows this stretch of High Street, East Kew already lined with shops that include the hotel on the corner, the new State Savings Bank, a dentist’s surgery and Lambert’s Store. The High Street Tram was to reach Burke Road in 1925, so the proposed subdivision must postdate that event, and the opening of the Bank in 1926.subdivision plans - east kew, high street - east kew -
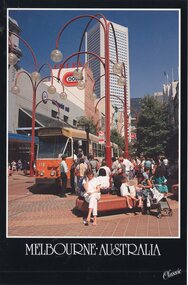 Melbourne Tram Museum
Postcard, Nu-color-Vue, Z110 in the Bourke St Mall, late 1980's
... St tram stop, late 1980s. Has the Coles store... stop, late 1980s. Has the Coles store in the background. Tram ...Colour postcard divided back, black border, - Nu-Color-Vue, The Classic Collection of Z110 in the Bourke St Mall, at the Swanston St tram stop, late 1980s. Has the Coles store in the background. Tram has the destination of Route 87, LaTrobe University. Back has space for name and address, stamp and a message and details of the postcard. Produced by Nu-Color-Vue, number 140 117, NCV 6340. Has "Melbourne Australia" along the bottom edge.trams, tramways, bourke st, route 87, mall, z class, tram 110 -
 Ballarat Tramway Museum
Negative, Geoff Grant, 25/06/1955 12:00:00 AM
... printer (stored in folder ) of tram W7 1001 on AETA tour... and white print made by a laser printer (stored in folder ) of tram ...Negative No. N351 and black and white print made by a laser printer (stored in folder ) of tram W7 1001 on AETA tour (Australian Electric Traction Association) on 25/6/1955 entering shed roads at the then new East Preston depot. Tram has AETA tour signs and the slogan "Electric Transport a Necessity - Protects your investment, builds your city, creates business". In route number box is letter "B". Negative scanned hi res and imaged updated 22/5/2020. trams, tramways, melbourne, preston depot, aeta tour, tram w7 1001 -
 Ballarat Tramway Museum
Negative - Set of 2, Geoff Grant, 25/06/1955 12:00:00 AM
... by a laser printer (stored in folder ) of tram SW6's 888 and 887... by a laser printer (stored in folder ) of tram SW6's 888 and 887 ...Negatives No. N354 and N355 and black and white prints made by a laser printer (stored in folder ) of tram SW6's 888 and 887 at Malvern Depot in Coldblo Road prior to travelling to Preston Depot on AETA tour (Australian Electric Traction Association) on 25/6/1955. 1616.1 - In route number box of 888 is letter "B". 1616.2 - 887 - with letter "A" in route number box and sign with slogan "Save traffic congestion, move people, not vehicles." Negative scanned hi res and imaged updated 22/5/2020.trams, tramways, melbourne, malvern depot, coldblo road, aeta tour, tram sw6 888 tram sw6 887 -
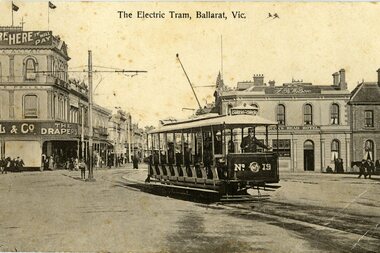 Ballarat Tramway Museum
Postcard, V.S.M. Melbourne, ESCo crossbench car No. 19, c1906
... in the background and Cowdell Tonner and Ellis drapers store on the corner... of the Electric Supply Co of Victoria tram's in Ballarat, the use of cross ...Demonstrates the early days of the Electric Supply Co of Victoria tram's in Ballarat, the use of cross bench or toast rack trams and the intersection of Grenville, Bridge and Sturt Sts Ballarat.Sepia toned photograph of ESCo crossbench car No. 19, at Sturt and Grenville Sts. with the Bucks Head Hotel in the background and Cowdell Tonner and Ellis drapers store on the corner of Bridge and Grenville St. The tram has the destination of Convent/Gardens. See Reg item 3885 for a photo of the store and a Toastrack tram. On the rear, divided areas for a message and address, place for a stamp and two 1d Australian postage stamps in the bottom right hand corner. In the stamp area, has the words "printed in Prussia" in very small type. On rear of card in top left hand corner "28)", along top edge "9383H $25" and in bottom right hand corner a "William F Scott" address label and "WFS Collection"trams, tramways, esco, toastrack tram, grenville st, bridge st, sturt st, tram 470 -
 Ballarat Tramway Museum
Negative - Set of 2, Geoff Grant, 25/06/1955 12:00:00 AM
... by a laser printer (stored in folder ) of tram SW6's 888 travelling... printer (stored in folder ) of tram SW6's 888 travelling ...Negatives No. N352 and N353 and black and white prints made by a laser printer (stored in folder ) of tram SW6's 888 travelling to Preston Depot on AETA tour (Australian Electric Traction Association) on 25/6/1955. Tram has AETA tour signs and the slogan "Electric Transport a Necessity - Protects your investment, builds your city, creates business". In route number box is letter "B". Geoff Grant's envelope notes the photos as being taken from the cabin of SW6 887. 1615.1 - In Victoria Parade - note hedges 1615.2 - in Victoria St., North Richmond, just to the west of the railway overbridge. Negative scanned hi res and imaged updated 22/5/2020.trams, tramways, melbourne, victoria st, victoria parade, aeta tour, tram sw6 888 -
 Ballarat Tramway Museum
Negative - Set of 2, Geoff Grant, 25/06/1955 12:00:00 AM
... by a laser printer (stored in folder ) of tram SW6's 888 and 887... (stored in folder ) of tram SW6's 888 and 887 at the Victoria ...Negatives No. N356 and N357and black and white prints made by a laser printer (stored in folder ) of tram SW6's 888 and 887 at the Victoria Parade crossover, near Nicholson St, reversing as part of journey travelling to Preston Depot on AETA tour (Australian Electric Traction Association) on 25/6/1955. 1617.1 - 887 closest to camera, 888 in distance. 1617.2 - crew standing in front of 887. Dave Macartney advised 12/1/2001 that the crew member on the left is Sam Serman, who was senior inspector at the time and drove special trams. Also advised that the tram was fitted with a wheel at one end and a skid at the other to handle the different types of overhead. hi res scan made and image updated 23/5/2020.trams, tramways, melbourne, victoria parade, aeta tour, tram sw6 888 tram sw6 887 -
 Ballarat Tramway Museum
Photograph - Digital image Set of 5, George Coop, 1968 - 1970
... , with the Dickins store in the background. Tram has a "Make Bliss not Love..., with the Dickins store in the background. Tram has a "Make Bliss not Love ...Yields information about the tram operations at the intersection of Bridge and Grenville St and Sturt St.Five (5) Digital images taken by George Coop during the period 1968 - 1970, of SEC trams in the Grenville St area. .1 - Tram 31 crossing Grenville St to pick up passengers in Sturt St - the shelter in the foreground and the Woolworth's Big W store in the background. .2 - Tram 17 picking up a passenger at the Shelter, with the Dickins store in the background. Tram has a "Make Bliss not Love" roof advert and has a destination of Gardens via Sturt St West. .3 - Tram 13 - as for .1 .4 - ditto with 12 in the City Loop - in the background are the Magnet Bakery, Begonia City Butch and Gilbert and Jury shop. .5 - Tram 26, in Bridge St, with the points at Grenville St in the foreground. Tram has the destination of Gardens via Sturt St West. In the background are the shops for Faull's shoes and Suttons HMV. trams, tramways, grenville st, shelters, bridge st, sturt st, city loop, passengers, tram 31, tram 17, tram 13, tram 12, tram 26 -
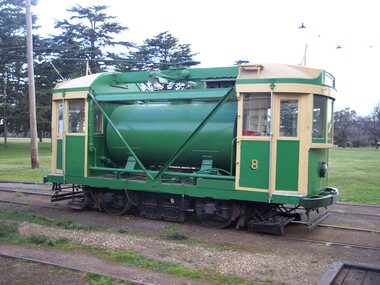 Ballarat Tramway Museum
Functional Object - Tramcar, Melbourne and Metropolitan Tramways Board (MMTB), Scrubber Tram No. 8, 1934
... . The tram was stored at Malvern depot for many years before being... of the rails was no longer. The tram was stored at Malvern depot ...One of a few service vehicles built from almost new by the MMTB rather than being a converted vehicle. Donated to the BTM in 1999 and has been an operational tram 2001.Single truck (4 wheels), special purpose tram fitted with two cabs, control equipment, air brakes, track scrubber or cleaning equipment, pump, water and air lines to clean track. Carries approx. 4 cubic metres of water. The tram was built by the Melbourne and Metropolitan Tramways Board in 1934 using the cabs from a C class tram (No. 32). It was transported to the isolated Footscray system a number of times to clean the rails there. In 1961 it received additional body bracing and repainted in the diagonal black and string (light cream) stripes. The tram became 8W during 1975 as the then new Z class trams came into service. By the early 1990's the need for the tram and the other similar cars used to "scrub" the surface of the rails was no longer. The tram was stored at Malvern depot for many years before being donated to the Ballarat Tramway Museum by the Public Transport Commission in September 1999. It has been scrubbing the rails in Ballarat since March 2001. For a detailed article see April 2008 issue of Fares Please. Photo Warren Doubleday 20/9/2008 after painting completed See Destination CityMMTBtrams, scrubber tram -
 Ballarat Tramway Museum
Functional Object - Tramcar, Melbourne and Metropolitan Tramways Board (MMTB), Tramcar 504, 1928
... side." The tram was retained by the State and stored until 2015... side." The tram was retained by the State and stored until 2015 ...A four motor bogie drop centre combination tram of the Melbourne W2 class. Body built by the James Moore and Co. of South Melbourne as a W2 class tram. Delivered to the MMTB Preston Workshops where the electrical and mechanical equipment was fitted. Issued to traffic 18/4/1928. Allocated to Essendon Depot. The tram was part of the Transporting Art project suggested by the artist Clifton Pugh (1924-1990) in Jan. 1978 to the Lord Mayor of Melbourne Cr. Irvin Rockman. The concept was enthusiastically supported by Victorian Premier Rupert Hamer. Clifton Pugh's tram was the second tram to appear. Described by the artist as "The apostle birds in flight, as if the tram has run into a group of them and they're flying along the sides. Then I found the route was to be through Collingwood and Hawthorn football territory and one cannot be one-eyed in that worlds, there are a magpie and a hawk on each side." The tram was retained by the State and stored until 2015 when it was transported to the Museum's Offsite store. Formal ownership was transferred to the Museum during 2019. Conservation planning for the tram's return to service and the restoration of the artwork is underway. 1986 - withdrawn from service following a minor accident and stored. In 2015 tram relocated to the Museum's offsite store and during 2019 transferred to ownership of the Museum. See btm.org.au/trams/504.html for further detail. Photos - i1 - Ray Marsh 1978 i2 - Alastair Reither - 3/6/2015 showing the damaged side. i3 - Clifton Pugh on board his tram. Photo from the Diners Club Signature Magazine April/May 1982, from an article titled Moving Masterpieces. Photo courtesy of the Melbourne Tram Museum. See Destination Citytrams, w2 class, transporting art, tram 504 -
 Ballarat Tramway Museum
Photograph - Digital image Set of 10, Tony Smith, 5/09/1971 12:00:00 AM
... Armstrong St with the Crockers store in the background. Tram... - both trams for Mt Pleasant. Has the Patersons furniture store ...Yields information about Ballarat Tramways and trams prior to the closure of the tramway system.Set of 10 digital images of Ballarat trams prior to closure, scanned from original slides by Tony Smith, 1971 prior to closure of the system. This set of slides, possibly on the last weekend of Mt Pleasant services - closure took place on 5/9/1971. . .1 - 30 rounding the curve from Lydiard St Nth to Sturt St. Tram has destination of Sebastopol. IN the background is the Commonwealth bank and the SEC cabinet switch isolator on the corner. .2 - 13 and another single trucker at the City terminus, north side with Racey's store and the SEC offices in the background. 13 has a Twin Lakes sign and the destination of Victoria St. .3 - 26 (Mt Pleasant) and 27 at the city terminus, with many passengers. Has the town hall in the background. .4 - 14 turning from Sturt St into Lydiard St (destination does not appear to be Lydiard St nth - City Oval?) with the ANZ bank in the background. A number of passengers waiting at the tram stop. .5 - 14 in Sturt St west near Pleasant St, at City Oval, with the pole being reversed by a "Bounds". Tram has the destination of City Oval. .6 - 13 west bound (showing Mt Pleasant) at Pleasant and Sturt St, with the VicRoads (CRB) offices and St Peters Anglican church in the background. .7 - 13 and 14 in Sturt St west, opposite City Oval (see .5 and .6) - trams reversing. .8 - 13 and 14 at Grenville St, about to cross into Bridge St from Sturt St. .9 - 14 at ditto - both trams for Mt Pleasant. Has the Patersons furniture store in the background. .10 - 30 eastbound in Sturt St, near Armstrong St with the Crockers store in the background. Tram showing "Special"trams, tramways, sturt st, electrical switching, city oval, lydiard st, pleasant st, grenville st, tram 30, tram 13, tram 26, tram 14 -
 Eltham District Historical Society Inc
Photograph - Postcard, Postcard: No. 32. Peak Tram, Hongkong, c.1910s - c.1920s
Specially Made for: The Graeco Egyptian Tobacco Store. Hongkong.This item, a souvenir from Hongkong from between the wars (circa 1923) was brought home to Research, Victoria by Bill Teagle who was serving in the Royal Australian Navy (1919-1945). According to Bill's neice Valerie Waller (nee Feldbauer, daughter of Violet and Theodore 'Curly' Feldbauer), her Uncle Bill would always bring some sort of souvenir home from his travels for family members. The item ( along with a series of postcards from Japan of the Great Kanto Earthquake of 1 September 1923) was possibly given by Bill Teagle to his sister Margaret Rose (formerly Ingram) who later married Richard Edward (Eddie) Fielding in early 1948. (Eddie had been engaged to someone else before he went to war, but his fiancée broke it off before his return to Australia.) It was cared for by the Teagle/Fielding family for approximately one hundred years. It is of particular significance given the family's connection to the Eltham War Memorial through 'Curly' Feldbauer and the significance of that memorial to the local community and represents that despite the horrors of war, former friends then foes can become friends again.tom fielding collection, postcard, hongkong, a. h. & co. hongkong, the graeco egyptian tobacco store -
 Glen Eira Historical Society
Document - Reeves, Walter
2 items, which may be related, about old Elsternwick: 1/A roneod copy of Recollections of Walter Reeves: gives notes on local identities, their business’, Caulfield State School, places of interest and events that took place in the area; undated and apparently summarised by an un-named other person from Mr Reeves' recollections. 2/A hand written list taken from Rate Books 1864 of areas in dispute, including nine names of residents, between Caulfield and St Kilda, date and author unknown. No direct connection to Walter Reeves apparent but they are taped together.automobile, hebenstreit mr, shoobra road, butcher, glenhuntly road, henderson h mr, davis charles, hardware store, beddoe frank, horne street, shops, renown theatre, phoebe theatre, theatres, lepage phoebe, lepage jack, taylor ‘squizzie’, echuca terrace, edward street, hawthorn road, revees walter, dunn bros, cycle shop, cox bros, supermarkets, apps (undertakers), elsternwick men’s club, elsternwick trades club, johnston t., hayter george (painter and decorator), sargood frederick, cabmen, cabs, ‘ripponlea’, wilson dick, blacksmiths, orrong road, moran and cato, repco, downshire road, bullock (grocer), grocers, taylor’s liquor and wine saloon, bottleshops, biddle misses, schools, bliss mr, station master, elsternwick, bensonino mr, newsagents, caulfield, gas supply, point nepean road, rowney dick, trams, riddell’s paddock, football golf links, riddell john carre, rowan road, sports grounds, melville’s supermarket -
 Eltham District Historical Society Inc
Document, Rodda recollections by Joan Gay
Joan Gay (nee Ramsdale) was the daughter of Charles and Vera Ramsdale who owned the Research General Store.Digital file only - A4 photocopy of page on loan for scanning by EDHSbranton, brinkotter poultry farm, bus services, charles ramsdale, collingwood football club, ingrams road, ivy reynolds, joan gay (nee ramsdale), jupps piggery, linden strike drive, lyon bros, milk bar, mrs hill, neil mann, research (vic.), research cricket club, research hall, research primary school, research tennis club, reynolds road, rodda, tram, vera ramsdale, wests bakery, reminscences -
Glen Eira Historical Society
Document - GLEN HUNTLY (HISTORY OF)
This file contains one item: 1/A loose-leaf, 23-page document titled ‘The History of Glen Huntly’, by Alfred R. Jones, dated 20/06/1991, describing the history of the suburb. The author has drawn heavily from the 4 sources noted in the bibliography. Subjects covered include the ship the suburb is named after, the suburb’s State School, the suburb’s churches, the Rosstown Railway and Sugar Mill, the origin of the name of Carnegie, the suburb’s aerodrome, and the beautification of the Glen Huntly Shopping Centre. The final 12 pages consist of 9 appendices relating to the aforementioned subjects. Appendix A is a typewritten letter from Ron McLeod, secretary of the Place Names Committee, to Mr. D. R. Aylen, CEO of the City of Caulfield, notifying the latter of the alteration of the name ‘Glenhuntly’ to ‘Glen Huntly’. Appendix B is a list of the ministers of St. David’s Uniting Church from its formation in 1916 to the present. Appendix C identifies the persons portrayed in St. David’s stained glass windows. Appendix D is a poster announcing the auction of 41 blocks of land between Hawthorn and Bambra Road formerly owned by William Ross, plus a map identifying said land blocks and anither fir locality. Appendix E is an A4 plan of the Rosstown Railway. Appendix F is a drawing of the Rosstown Sugar Mill. Appendix G is a poem titled ‘The Swagman’s Retreat’, by Herb Arnott, about the failure of the Mill. Appendix H is a map of Caulfield’s horse tramways plus a list of opening and closing dates. Appendix J is a list of streets explaining the meanings of their names.glen huntly, glenhuntly, local history, ‘glen huntly’ (ship), ‘glen huntlely’ (ship), quarantine stations, glen huntly road, lake street, mernda avenue, glen huntly state school no. 3703, ormond francis, ormond, garden avenue, grange road, churches, congregational church, glen huntly presbyterian church, st. david’s, st. david’s uniting church, anglican church, jenkin william ‘boss’, methodist church, wattle avenue, smith a. w. mr., glen huntly post office, glen huntly road, king f. l. mr., uniting church, child care centre, presbyterian church of eastern australia, glen huntly methodist church, sun aria, miller mary, stained glass, phrenologists, trinity congregational church, primitive methodists, ‘the victorian independent’, mercy mr., greek orthodox original old calendar church, wanalta road, salvation army, halls, myrtle street, catholic church, st. anthony’s roman catholic church, foundation stones, neerim road, mannix archbishop, st. agnes’ anglican church, booran road, sunday schools, clergy residences, ‘see’ anglican news magazine, lees archbishop, booth archbishop, glen huntly presbyterian church, el nido grove, tennis courts, bollard v. w. right rev., waratah avenue, royal avenue, munster avenue, james street, rothschild street, peace memorial organ, singers, bremner marie, scotland betty, carden joan, rosstown railway, south caulfield, plants, marata road, curraweena road, bambra road, ross william murray, ross leila, ross constance, vautin constance, ‘the grange’, north road, leila road, wild cherry road, caulfield roads board, elsternwick, land sales, sugar mills, koornang road, woornack road, elsternwick railway station, riddell parade, clarence street, dover street, oakleigh road, murrumbeena crescent, carlisle crescent, railways, trains, parks and reserves, caulfield council, sussex street, caulfield city council, swamps, rosstown sugar mill, rosstown estate, ‘the swagman’s retreat’, arnott herb, rosstown, carnegie, ‘ross’s folly’, carnegie andrew, rosstown hotel, dandenong road, rosstown road, rosstown plate horse race, caulfield racecourses, ames avenue, rosstown court, hostels, murrumbeena, cinemas, innovations (cabinetry film), films, music, pianos, manchester grove, safeway store, squash courts, airports, lord reserve, aeroplanes, air navigation act 1921, neville street, larkin sopwith aviation company of australasia, lyons street, morgan street, bookmakers, nightsoil, poultry, weatherboard buildings, glen huntly railway station, rosedale avenue, rifle clubs, scout groups, 1st glen huntly troop, ana, dowding jack mr., glen huntly infant welfare and family planning clinic, vermador private hospital, watson grove, rowlands (drapers), bones plant nursery, caulfield railway station, bridges, trams, horse tramways, glen eira road, elsternwick railway station, kooyong road, aboriginal peoples, truganini road, hannan lyn mrs. (urban planning officer), glen huntly shopping centre, sculptures, street beautification scheme, “flying the yellow flag”, moore olive, “return to rosstown”, jowett d. f., weickhardt i. s., “from sand swamp and health”, murray peter r., wells john c., caulfield historical society, newsletters, place names committee, mcleod ron, aylen d. r. mr., jones hugh rev., king joseph, scarfe james, vertigan sidney, vertigan earle, rance victor, flavell cameron, denholm robin, moorhead ken, taliai siupeli, eccles james leslie, little agnes, hutchins william r., dickie may a., gordon ivey agnes, theobald a. a. mrs., brownbill lloyd norman, ash georgette, land sales, auctions, messrs. crews & arkle, street names -
Glen Eira Historical Society
Letter - HUNT, WILLIAM HOGARTH
Two sets of this man's handwritten memories: 1/Five pages of handwritten personal memories, written by William Hogarth Hunt 13/07/1977. He outlines his family, their travels and settlement in 1908 at Glenhuntly: a detailed account of residents, shop owners, land sales and identities, Murray Ross, Mr Burr of Burr’s Gun Oil and Mr Zarman. Also details Glenhuntly Methodist Church, football, athletics, Glenhuntly Aerodrome and an extensive list of local residents and their stories. 2/Two pages of handwritten personal memories, written by William Hogarth Hunt 02/09/1977. A detailed account of residents, shop owners, identities, athletes, local policemen and their stories in the Glen Huntly area.personal memories, hunt william hogarth, glenhuntly, grange road, trams, plumber, stone mary ann, neerim road, wanalta road, schurme mrs, private hospital, hospitals, watson grove, hunt jessie, hunt alfred, hunt charles, smith mr, fisher mr, smith mrs, jockeys, dore george, ‘willis’, builders, house names, mernda, roseberry grove, el nido, neerim road, glenhuntly post office, mrs fielder’s sweetshop, mrs beer’s sweet shop, paddocks, confectionery, fielder fred, maroona road, murrumbeena, grocers, callister dave, carnegie state school, hay and corn store, james street, woodyard, hillards chemist, hughes body works, chemists, davidson’s, glenhuntly printing, hay and corn stores, railway gates, anz bank, fox mr, martin jack, fox mrs, clothing stores, steam rollers, radio and tv shop, beasley j, delicatessen/ham and beef shop, butchers, schurme’s private hospital, gellatley george, tailors, commonwealth banks, watson grove, banks, preston peter, e.j. & h. amos, hardware stores, estate agents, glenhuntly picture theatre, whittle mr, theatres, newsagency, cooper and cooke, station street, f.j. long and co, jennings a.v, timber yards, builders, ‘the estate’, hillcrest estate, grange road, marara road, rosedale avenue, hobart jack, mackie road, confectionery stores, ross murray, glenhuntly athletic club, godfrey evelyn, athletics clubs, railways, glenhuntly junior football club, elsternwick, princess park, carnegie oval, booran road, koornang park, ormond oval – ee. gunn reserve, glenhuntly oval, oakleigh road, victorian amateur turf club, koornang road, glenhuntly aerodrome, neville street, glenhuntly state school, rosslyn street, geary mr, lauriston tennis courts, bakers, carnegie r.s.l., east bentleigh, bowling clubs, tucker road, tennis clubs, centre road, murrumbeena road, larman mr, hollway street, nurseries, parker street, lyle marshall, burr mr, solicitors, builders, bones nursery, ‘burr’s gunoil’, glenhuntly methodist church, carnegie, smith alf, ezard family, clemens family, noy family, noy clarrie, dickie family, storey family, storey george, davis family, joss house, chinese community, wattle avenue, grange road, glenhuntly amateur football club, football clubs, glenhuntly athletic club, athletic clubs, glen huntly junior football club, carnegie oval, koornang park, glenhuntly oval, victorian amateur turf club, glenhuntly aerodome, glenhuntly state school, geary mr., bakers, east bentleigh, tucker road, centre road, larman mr, nurseries, lyle marshall, solicitors, bones nursery, carnegie, "the estate", royal avenue, mckay avenue, dumsday bertha miss, love family, gilmour family, waratah ave, sinclair mr, tuckpointers, bricks, donegan mr, plumbers, frazer mr, frazer and jenkinson printers, frazer arthur, ezard manufacturing, jewellers, private hospital, maroona road, o'carroll mr, beattie mr, horse trainer, morton tom, lord harry, estate agents, ormond, councillors, taylor mr, builders, gibson family, westley alf, o'carroll j (jack) d, glenhuntly athletics club, athletes, jack page's bakery and cake shop, nay clarrie, hunt william h., hunt alf, page jack, armstrong jack, manchester grove, morgan advertising, cusdin sid, farrier, glenhuntly cricket club, caulfield racecourse, neerim road, hoffman's plumbing, emma street, st. agnes school, st. agnes church hall, jenkin 'boss' mr, teachers, hawthorn miss, quinn miss, chitty charlie, chitty's timber, crystal palace picture theatre, theatres, marsh bill, hardware shops, watson arthur w, j.s. kidd and company, marshes hardware, kidd's hardware, bruce ivy, 'belgrave', house names, belgrave road, dandenong road, hunter 'pud', police officers, hunt jess, kangaroo road, murrumbeena, glen huntly -
 Bendigo Historical Society Inc.
Document - DIGGING UP THE PAST
... Hotel Benola Red Lion Mitta Cook Warrens Grocery Store Tram de ...Typed notes on the past, Garden Gully area. Mentioned is the Wattle and Barnard Street area. There were three hotels on the intersection: The Belvedere, Danaher's Hotel and the Red Lion. There was also Warrens Grocery Store. There were mullock heaps and wood stacks. The manager of the Garden Gully Mine was also held up and robbed when his horse was shot at and wounded. There was also the Garden Gully Ghost.document, digging up the past, c r b, belvedere, bob matchett, danaher's hotel, benola, red lion, mitta cook, warrens grocery store, tram de-railments, road metal, garden gully mine and battery, c b v homes, the union bank, national hotel, garden gully ghost, knipe's castle, g c h a jess's paint shop -
 Bendigo Historical Society Inc.
Document - LONG GULLY HISTORY GROUP COLLECTION: TRAMS INFORMATION
Information on O Class Trams, First introduced, Last Withdrawn, Electrics, Size and Seating, W2 with a small photo, where they can be found, some went to the USA, W5 with a small photo, W6 and the Bendigo Toastrack Tram with Nos, Introduced, Withdrawn, Electrics, Size and Seating/Crush Load. Also listed is where other trams can be seen. Also mentioned some early history of Bendigo, The Heritage Walk, The Central Deborah, Sandhurst Town, the early route from Melbourne to Bendigo, Creswick, Castlemaine and the Old Market. (7 pages).bendigo, history, long gully history group, the long gully history group - trams information, prahan and malvern tramway trust, hawthorn tramway trust, melbourne and metropolitan tramways board, australian electric transport museum, david hoadley, tramway musuem of victoria, hawthorn tram depot, david bromage, sydney tramway museum, bendigo tramways, museum of transport and technology nz, whiteman park tramway museum, haddon tramway museum, the old canberra tram company, ballarat vintage tramway, bendigo toastrack tram, kilmore cable tramway, railway museum, scienceworks, tasmanian transport museum, launceston tramway museum society, ballarat vintage tramway, central deborah gold mine, chinese joss house, castleton, sandhurst, shamrock hotels, dai gum san wax museum, post office, law courts, alexandra fountain, beehive store, fortuna villa, sandhurst town -
 Bendigo Historical Society Inc.
Photograph - TRAM, PALL MALL
Black and white photograph, (not mounted), of Pall Mall with Myer store, Allan's Walk. Former Colonial Bank, former National Bank. Then Beehive Building, Tram No. 6. Tram - single truck, dropend saloon car No. 6. Built for Melbourne metropolitan Tramways Board. Converted for one person operation in Ballarat before coming to Bendigo. James Lerk 17/12/1999.place, streetscape, pall mall -
 Bendigo Historical Society Inc.
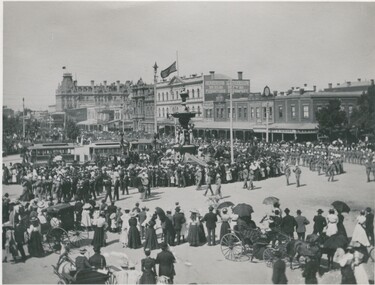
Photograph - QUEEN VICTORIA MEMORIAL PROCESSION BENDIGO, 1901 ?
Black and white photograph: Queen Victoria memorial procession, Alexandra Fountain, Pall Mall. Parade of military and band personnel. Large crowds watching. Flags on Beehive building and Shamrock Hotel at half mast. 3 trams next to Fountain. 3 horse drawn vehicles in foreground with occupants watching parade. In image on windows ' Abbot's ' ' Henderson & Goodison/Beehive/Furniture & Drapery' ' ? Hill/Tailor/Outfitter' ' No7/Co-operative/… ? ' Yankee Doodle/…' K.W. Van Damme/Havelock' ' Melbourne Cash Store ' Clock shows '2.50 ' ' J./.Ree…..' ' Emery & Gibson' On back top right corner, 'MP 255' Pre. Acc no. MP 255. Card index ' Queen Victoria, Memorial Procession Bendigo.'bendigo, streetscape, pall mall -
 Bendigo Historical Society Inc.
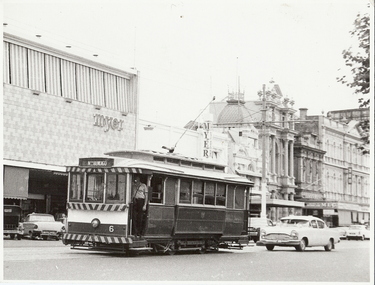
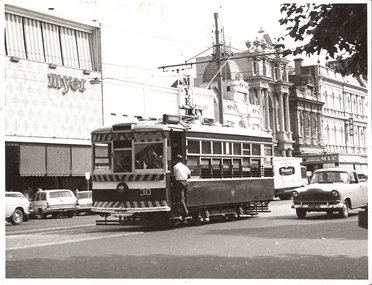
Photograph - PALL MALL, LOOKING SSW, c1969
Black and white photograph. View of Pall Mall looking SSW. Myer store Bendigo Arcade, National Bank, MLC Buildings, Beehive Stores and 3BO. Motor vehicles, Birney Tram No. 30, Peter's Ice Cream truck and Holden utility. Inscriptions:place, streetscape, pall mall -
 Bendigo Historical Society Inc.
Photograph - STEAM TRAM AT ALEXANDRA FOUNTAIN, approx 1901
black and white photograph of steam trams and trailers at the Alexandra Fountain, Charing Cross C 1900. Beehive store in background. 'Henderson and Goodison, Beehive - furniture and drapery' J.T. Hill Tailor ' 'Confidence - Curls Tobacco' sign visible on top of trams.place, streetscape, alexandra fountain -
 Bendigo Historical Society Inc.
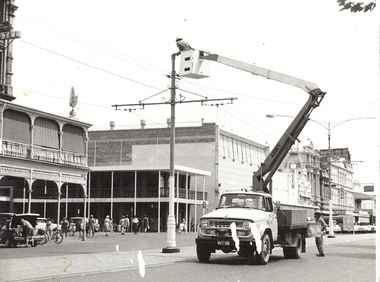
Photograph - PALL MALL
black and white photograph at corner of Pall Mall & Williamson St., Bendigo. Showing portion of Shamrock Hotel, ANZ Bank, Myer store . Truck mounted cherry picker. Workmen working on overhead cable -poles.Alan Doneyplace, streetscape, tram -
 Bendigo Historical Society Inc.
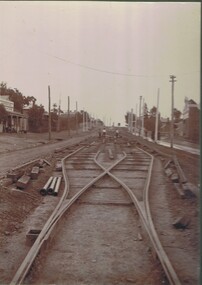
Photograph - UNKNOWN FAMILY COLLECTION: PHOTOGRAPH
Photograph - black and white. Tram tracks being laid, could be Eaglehawk Road. Shop on left says ANDERSON CASH STORE. Written on back, Peter Brisbane, Room 4, 18 Churchill Avenue, Bendigo.W.H. Robinson, Mundy Street, Bendigo.place, transport, tram, tram track being laid. anderson cash store. -
 Bendigo Historical Society Inc.
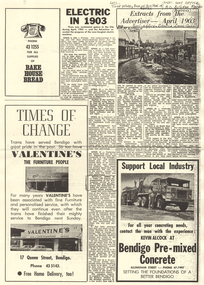
Newspaper - LONG GULLY HISTORY GROUP COLLECTION: ELECTRIC IN 1903
Copy of an article from the Bendigo Advertiser titled Extracts from the Advertiser - April 1903. An article mentioning the progress of the electric trams in Bendigo in 1903 and some disruption it caused to the telephone service and fire alarms. There is a photo of men working on the tram line near the Rose of Australia Hotel and the Post Office. The are also ads on the page for Bake House Bread, Valentine's Furniture and Bendigo Pre-mixed Concrete.bendigo, history, long gully history group, the long gully history group - electric in 1903, bendigo advertiser april 1903, the electric supply company of victoria, mr h w jenvey, rose of australia hotel, co-op store, post office long gully, bowdens butcher shop, bake house bread, valentine's furniture, bendigo pre-mixed concrete -
 Whitehorse Historical Society Inc.
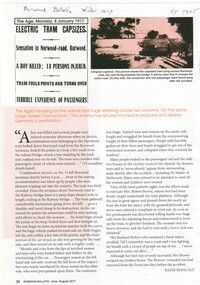
Article, Electric Tram Capsizes, 1917
In 1917, a tram capsized in Norwood (Toorak Road) after gathering too much speed which resulted in the death of a boy and injuries to 18 passengers.norwood road, burwood, toorak road, camberwell, tram services, trams